Dexcom G5 mobile User Manual
Continuous glucose monitoring system
Hide thumbs
Also See for G5 mobile:
- User manual (411 pages) ,
- Quick start manual (72 pages) ,
- Getting started manual (68 pages)
Table of Contents
Advertisement
Advertisement
Table of Contents
Troubleshooting

Subscribe to Our Youtube Channel
Related Manuals for Dexcom G5 mobile


Summary of Contents for Dexcom G5 mobile
- Page 1 CONTINUOUS GLUCOSE MONITORING SYSTEM User Guide...
- Page 2 IMPORTANT USER INFORMATION Failure to use the Dexcom G5 Mobile CGM System and its components according to the instructions for use and all indications, contraindications, warnings, precautions, and cautions may result in you missing a severe hypoglycemia (low blood glucose) or hyperglycemia (high blood glucose) occurrence and/or making a treatment decision that may result in injury.
-
Page 3: Table Of Contents
8.4 Error Messages ......127 4.3 Dexcom G5 Mobile App ....36 4.4 Dexcom G5 Mobile Receiver .... . 47... -
Page 4: Table Of Contents
Glossary 11.3 Changing Receiver Alarm and Alerts .. 181 Index Chapter 12 - Using Dexcom G5 Mobile CGM System for Treatment Decisions 12.1 Introduction ......189 12.2 Importance of Dexcom G5 Mobile CGM System Information for Treatment Decisions .. -
Page 5: Getting Started
GETTING STARTED • Beginning Your Dexcom G5 Mobile Journey • Indications for Use and Safety Statement... - Page 6 Page intentionally left blank...
-
Page 7: Cgm) System Journey
(CGM) device, the Dexcom G5 Mobile CGM System allows you to break free from constant fingersticks. But how do you use the Dexcom G5 Mobile CGM System? What are its features? Do you need to avoid anything? Can you dose off of... -
Page 8: Self-Paced Resources
The following is a list of tutorials and how to access them. First Steps with Your Dexcom CGM Designed for those who have never used a Dexcom CGM. This tutorial covers what to expect in your first week and includes links to step-by-step videos on how to insert your sensor, calibrations, ending a sensor session, etc. - Page 9 Accessing the QSG: • Receiver package ○ Booklet Both the tutorials and the QSG give you brief look at the Dexcom G5 Mobile CGM System. But what if you want more detailed information? User Guide Your Dexcom G5 Mobile CGM System reference book! This user guide gives you the most extensive overview of the system detailing features, important safety information and so much more.
- Page 10 At the end, there is a recap of what was covered and what to expect in the next chapter. Dexcom G5 Mobile System User’s Guide Beginning Your Dexcom G5 Mobile Continuous Glucose Monitoring (CGM) System Journey...
-
Page 11: Statement
Please review the instructions for each part of the system in this user guide before using any of the Dexcom G5 Mobile CGM System. This chapter is important to read. It helps you use the Dexcom G5 Mobile CGM System safely and covers: •... -
Page 12: Indications For Use
Statements are meant to keep you and the system safe while using the Dexcom G5 Mobile CGM System: 1) Indications How, for what purposes, and under what circumstances you should use the Dexcom G5 Mobile CGM System. Indications let you know who should use the Dexcom G5 Mobile CGM System and when. - Page 13 Magnetic Resonance Imaging (MRI), Computed Tomography (CT) scan, or high-frequency electrical heat (diathermy) treatment. The Dexcom G5 Mobile CGM System has not been tested during MRI or CT scans or with diathermy treatment. The magnetic fields and heat could damage the components of the Dexcom G5 Mobile CGM System, which may cause it to display inaccurate blood glucose readings or may prevent alerts.
- Page 14 Diabetes Treatment Decisions If your Dexcom G5 Mobile CGM System does not display a sensor glucose reading or if you are getting inconsistent readings, use a fingerstick blood glucose value from your blood glucose meter to make diabetes treatment decisions.
- Page 15 Placement Do not insert the sensor component of the Dexcom G5 Mobile CGM System in a site other than the belly/abdomen (ages 2 years and older) or the upper buttocks (ages 2 to 17 years). The placement and insertion of the sensor component of the Dexcom G5 Mobile CGM System is not approved for other sites.
- Page 16 Your smart device’s internal settings override any Dexcom G5 Mobile App setting. To receive Alarm or Alerts you must: • Make sure the notifications for the G5 Mobile App are turned on in the setting’s menu of your smart device •...
- Page 17 Alarm or Alert from the Dexcom G5 Mobile CGM System. Precautions Sensor Package Do not use the G5 Mobile Sensor if its sterile package has been damaged or opened. Using a non-sterile sensor might cause infection. Clean and Dry Before Using Do not open the sensor package until you have washed your hands with soap and water, and let them dry.
- Page 18 Dexcom G5 Mobile CGM System. Expiration Date Do not use Dexcom G5 Mobile CGM Sensors that are beyond their expiration date. Before inserting a sensor, confirm the expiration date listed on the package label in the following format: YYYY-MM-DD.
- Page 19 Setting Alarm/Alert Notifications When using both a receiver and a smart device with your Dexcom G5 Mobile CGM System, you must set your settings separately in each. If you set up one device and then use another, you might not get an Alarm or Alert.
- Page 20 ○ Describe what a precaution is • Provide an overview of Safety Statements What Is Next? In our next chapter, gives you a high overview of the Dexcom’s G5 Mobile CGM System. Dexcom G5 Mobile System User Guide Indications for Use and Safety Statement...
- Page 21 LET US G5! THE BASICS • Introduction to the Dexcom G5 Mobile CGM System • Initial Set-Up • Starting a Sensor Session: Inserting the Sensor & Transmitter • Calibration • Ending a Sensor Session...
- Page 22 Page intentionally left blank...
-
Page 23: Chapter 3 - What Is The Dexcom G5 Mobile Cgm System
What Is the Dexcom G5 Mobile CGM System? 3.1 System Description Now it is time to get an overview of the Dexcom’s G5 Mobile CGM System. After this chapter, you will be able to: • Explain the Dexcom G5 Mobile CGM System •... - Page 24 For a list of current devices and operating systems go to: dexcom.com/g5mobile/compatibility Chapter 4 covers how to set up your smart device with the Dexcom G5 Mobile App. The primary difference between the Dexcom G5 Receiver and Dexcom G5 App is not the information they give you, but how that information is presented.
-
Page 25: Cgm System
™ Treatment Decisions New to the Dexcom G5 Mobile CGM System is the ability to use the sensor glucose readings to make treatment decisions, including insulin doses. To make a treatment decision, you need to know what your glucose readings are now, where they are heading, along with what you have eaten, your stress levels, when you last exercised, etc. -
Page 26: System Information
As an example, the calibration chapter will review all calibration messages you may see. Now you know what the Dexcom G5 Mobile CGM System does and what is new, let us open your Dexcom G5 Mobile CGM System packages, see what is inside, and review each item. - Page 27 NB: Als u számára fontos egyéb információkat. Megjegyzés: Ha a nog een exemplaar van de gebruikershandleiding wenst, kunt u dit downloaden op www.dexcom.com of kunt u használati útmutató egy másik példányára lenne szüksége, contact opnemen met de lokale distributeur.
- Page 28 (Continued from previous page) Receiver Receiver package Chargeable Receiver Receiver’s USB charging and download cable AC power wall charger Adapters for wall outlet (Continued on next page) Dexcom G5 Mobile System User Guide What is the Dexcom G5 Mobile CGM System?
- Page 29 This section is meant as a quick overview of each part, specifics for each are found in following chapters. For detailed product specifications and technical information, please go to Chapter 15. The Dexcom G5 Mobile CGM System is comprised of three key parts: 1. Single use sensor 2. Reusable transmitter 3.
-
Page 30: Sensor Overview
Applicator Barrel (contains small introducer needle Collar and sensor) Transmitter Latch Sensor Pod Release Tab Adhesive Patch Figure 1. Dexcom G5 Mobile Sensor Applicator and Pod Dexcom G5 Mobile System User Guide What is the Dexcom G5 Mobile CGM System? - Page 31 Keeps sensor pod attached to your skin. Wire measures glucose levels in fluid in between your cells. Sensor Wire Attached to sensor pod. Discarded with pod after session. Dexcom G5 Mobile System User Guide What is the Dexcom G5 Mobile CGM System?
- Page 32 Receiver or smart device prompts you when battery is running low. 5. Serial number on back More transmitter features and insertion information is in Chapter 4 and 5. Now you are familiar with sensor and transmitter, let us review the Dexcom G5 Mobile Receiver. Dexcom G5 Mobile Receiver...
-
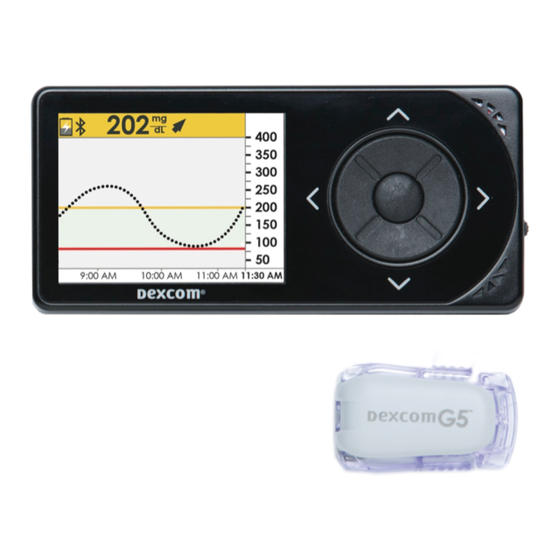
Page 33: Receiver Overview
Plugs into receiver and wall charger to charge battery Micro USB Cable See Chapter 13 for instructions on how to charge your receiver’s battery. (Continued on next page) Dexcom G5 Mobile System User Guide What is the Dexcom G5 Mobile CGM System? - Page 34 Arrows and button to help you Navigation Wheel navigate through the receiver’s menu options and choose features. Press to select menu option. Select Button (Continued on next page) Dexcom G5 Mobile System User Guide What is the Dexcom G5 Mobile CGM System?
-
Page 35: Smart Device Overview
1-6-12-24 views. 3.6 Smart Device Overview The Dexcom G5 Mobile App was created to work with your smart device, giving you even more options in monitoring your glucose trends and patterns. The app is similar to all other apps. - Page 36 Next Steps Your next step in getting started with the Dexcom G5 Mobile CGM System is selecting how to continuously receive your sensor glucose readings: Dexcom G5 Mobile App, the Dexcom G5 Mobile Receiver or a combination. Our next chapter helps you set up both!
-
Page 37: Chapter 4 - Set Up Your Display Devices
Set up Your Display Devices 4.1 Introduction In the previous chapter, you received a high level overview of the Dexcom G5 Mobile CGM System and learned you can monitor your glucose levels with different display devices. Now it is time to set up your Dexcom G5 Mobile App and your receiver. -
Page 38: Dexcom G5 Mobile App
If your smart device is broken or lost, use receiver until it is fixed or replaced. Dexcom G5 Mobile App Installation Installing the app is easy! Simply download the Dexcom G5 Mobile App from your smart device’s store. However, if your smart device has been jailbroken, do not install the app. - Page 39 Initial Dexcom G5 Mobile App Setup Setting up your app is easy! You will need your Dexcom account username and password , along with your transmitter box. Once inside, simply follow the set up wizard instructions. The set up wizard walks you through safety information, recommended settings, entering transmitter SN, setting your high/low glucose levels, and receiving CGM notifications.
- Page 40 Swipe through introductory screens or tap Log In . Enter existing username and password Need a Dexcom username and password? Tap Sign Up . Complete Username/Password fields. Tap Login once. (Continued on next page) Dexcom G5 Mobile System User Guide Set up Your Display Devices...
- Page 41 Once each screen is read, tap the appropriate answer to move forward. Tap Full Safety Statement or I don’t understand to get more information. (Continued on next page) Dexcom G5 Mobile System User Guide Set up Your Display Devices...
- Page 42 Scroll to select another amount. Tap Save to move forward. Once set, you will receive an Alert notification if your glucose rises above your set amount. (Continued on next page) Dexcom G5 Mobile System User Guide Set up Your Display Devices...
- Page 43 Setting up Your App Alarm/Alerts and Basic Settings Make sure you get your Alarm/Alerts notifications. Tap the appropriate response to move forward and set your notifications. Tap OK to receive Alarm/Alerts notifications. (Continued on next page) Dexcom G5 Mobile System User Guide Set up Your Display Devices...
- Page 44 The next screens provide suggestions for device volume, Do Not Disturb , and other basic settings. Tap appropriate answer to move forward. Connecting/Pairing Transmitter With App Tap Next . (Continued on next page) Dexcom G5 Mobile System User Guide Set up Your Display Devices...
- Page 45 Connecting/Pairing Transmitter With App Verify Bluetooth is on. The app will check to see if Bluetooth is turned “on.” Get your Transmitter box. Tap Take Photo . (Continued on next page) Dexcom G5 Mobile System User Guide Set up Your Display Devices...
- Page 46 Center longest barcode within green brackets. NOTE: Picture is representational and may not reflect exactly the back of transmitter box. Check mark confirms successful transmitter SN scan. (Continued on next page) Dexcom G5 Mobile System User Guide Set up Your Display Devices...
- Page 47 If unable to use app’s scanning device: Tap Enter transmitter SN by hand . Use keyboard to enter transmitter SN. Confirm correct SN. Tap Save . (Continued on next page) Dexcom G5 Mobile System User Guide Set up Your Display Devices...
- Page 48 Insert sensor and attach transmitter following video’s instructions. See Chapter 5 for more information. Wait up to 30 minutes for smart device and transmitter to connect. (Continued on next page) Dexcom G5 Mobile System User Guide Set up Your Display Devices...
-
Page 49: Dexcom G5 Mobile Receiver
When you see the sensor warmup timer, your initial set up is complete. Congratulations! If you have any issues setting up the Dexcom G5 Mobile App, contact your local Dexcom representative. If you are having problems with your smart device, contact your smart device’s support line. - Page 50 ○ Go back to last item or screen • Right ○ Go to next item or screen Initial Setup of the Dexcom G5 Mobile Receiver Press Select to turn receiver on. The first screen you see is the startup screen with ascending green bars. Once complete, a set up wizard guides you through the initial set ups steps.
- Page 51 Time formats available are 24 Hour or AM/PM (12-hour). Press Up/Down Arrow to choose desired time format. Press Select button to confirm changes to time format. (Continued on next page) Dexcom G5 Mobile System User Guide Set up Your Display Devices...
- Page 52 SN may be placed in a different location. If transmitter package is not available: • SN is on transmitter’s back NOTE: Picture is representational only, your transmitter may look different (Continued on next page) Dexcom G5 Mobile System User Guide Set up Your Display Devices...
- Page 53 System default is at 11.1 mmol/L. Press Select to save at present levels and close. To change value: Press Up/Down Arrows to change value at 0.1 mmol/L increments. Press Select to save and close. Dexcom G5 Mobile System User Guide Set up Your Display Devices...
- Page 54 • Download the Dexcom G5 Mobile App • Set app up with the recommended settings • Successfully set up your Dexcom G5 Mobile Receiver What Is Next? Now you have completed setting up your app and/or the receiver, your next step is starting a sensor session.
-
Page 55: Inserting Sensor, Transmitter, And Starting Your Session
Now that your display devices are set up, you are ready to begin a sensor session. If this is your first time inserting a sensor, you may want to watch the Dexcom G5 Mobile sensor insertion video to get a better understanding of the process. -
Page 56: Prepping For Sensor Insertion
5.2 Prepping for Sensor Insertion Before inserting a sensor, make sure you have everything you need. Some items are included in the Dexcom G5 Mobile CGM System’s packages, others are not. Items Included in Your Dexcom G5 Mobile Packages For sensor insertion, you need the sensor and transmitter. - Page 57 8. Transmitter Latch 7. Sensor Pod 9. Release Tab 2. Adhesive Patch Figure 3. Dexcom G5 Mobile Sensor Applicator and Pod The following table reviews the sensor applicator components in order of use. Order of Use Name What it does Sterilized for your protection.
- Page 58 Before starting, check your blood glucose meter; make sure it is in good working order following manufacturer’s directions and the meter’s date and time match your display device’s date and time. Make sure test strips have not expired and work with your meter. Dexcom G5 Mobile System User Guide Starting a Sensor Session...
-
Page 59: Choosing Your Insertion Site
• Remove the sensor and applicator from its sterile package only at time of use • Place at least 8 cm from your insulin pump infusion set or injection site Dexcom G5 Mobile System User Guide Starting a Sensor Session... -
Page 60: Inserting Your Sensor
See Step 3 in the next table for directions. NOTE: Contact your healthcare professional for specific questions regarding the use of medical tape, barrier wipes and/or other adhesives as it relates to your use of Dexcom CGM. 5.4 Inserting Your Sensor You have collected all of the needed items to begin a sensor session, viewed the tutorials, reviewed the sensor applicator and prepped the sensor pod site. - Page 61 • If yes, do not use Remove sensor applicator from sterile pouch. Closely inspect sensor , check it has not been damaged. Keep sensor packaging until sensor session is complete. (Continued on next page) Dexcom G5 Mobile System User Guide Starting a Sensor Session...
- Page 62 Pull safety lock out. Place fingers of one hand on edges of adhesive patch . Pinch up your skin at the tips of the white adhesive . (Continued on next page) Dexcom G5 Mobile System User Guide Starting a Sensor Session...
- Page 63 NOTE: Finger placement is important for correct needle removal. Hold transmitter latch down against your body. Squeeze ribbed release tabs on the sides of sensor pod. (Continued on next page) Dexcom G5 Mobile System User Guide Starting a Sensor Session...
-
Page 64: Attaching Your Transmitter
Chapter 7 reviews when and how to remove your transmitter. Before inserting your transmitter, check you entered the correct transmitter SN into your display device. Chapter 4 covers entering transmitter’s SN number. Dexcom G5 Mobile System User Guide Starting a Sensor Session... - Page 65 Keep finger on transmitter holding it in place. Push transmitter latch up and forward over the transmitter’s wide end with your other hand. You should hear 2 clicks. (Continued on next page) Dexcom G5 Mobile System User Guide Starting a Sensor Session...
-
Page 66: Loose Sensor Pod
• Do not tape over the transmitter or any the sensor pod’s plastic parts • Do not tape under sensor pod • Do not leave any substance on the skin where you insert the sensor Dexcom G5 Mobile System User Guide Starting a Sensor Session... -
Page 67: Starting Your Sensor Session
We will first review starting the sensor session for the app. Dexcom App: Starting a Session Step What you see What you do Wait for Successful Pairing notification. Tap green checkmark in black square. (Continued on next page) Dexcom G5 Mobile System User Guide Starting a Sensor Session... - Page 68 Keep smart device within six meters of transmitter during the sensor warmup period. Locked screen Initial calibration prompt tells you when warmup is complete. Chapter 6 covers calibrating. (Continued on next page) Dexcom G5 Mobile System User Guide Starting a Sensor Session...
-
Page 69: Receiver: Starting A Session
Receiver: Starting a Session Step What you see What you do Press Select to turn on receiver. From Trend Graph. Press Select to go to Main Menu . (Continued on next page) Dexcom G5 Mobile System User Guide Starting a Sensor Session... - Page 70 Bluetooth icon. • Solid: Connected • Blinking: Searching for connection • No Bluetooth Icon: No connection Wait. Screen provides countdown of the two hour sensor warmup. (Continued on next page) Dexcom G5 Mobile System User Guide Starting a Sensor Session...
-
Page 71: Receiver Bluetooth ® Tips
Check correct transmitter SN is in receiver. • SN is on the label on bottom of transmitter box Press Select to go to Main Menu . (Continued on next page) Dexcom G5 Mobile System User Guide Starting a Sensor Session... - Page 72 Check correct transmitter SN is in receiver. • SN is on the label on bottom of transmitter box Compare SN in receiver to SN on transmitter box. If correct, contact your local Dexcom representative. Press Select to exit screen. If Wrong SN Entered Press Left Arrow twice to go to Main Menu .
- Page 73 Wait for sensor session to end. From Main Menu : Press Down Arrow to Settings . Press Select . Press Down Arrow to Transmitter . Press Select . (Continued on next page) Dexcom G5 Mobile System User Guide Starting a Sensor Session...
-
Page 74: Sensor Session Warmup
The sensor takes about two hours to adjust to your body. While you are in the sensor warmup period, you can customize your settings. Chapter 11, steps you through how to personalize your Dexcom G5 Mobile CGM System’s display devices. Once the sensor warmup is complete, you are ready to enter your initial calibrations! The next chapter shows you how. - Page 75 • Prepare transmitter for placement • Properly attach transmitter to sensor • Outline sensor warmup • Identify countdown icon What Is Next? The next chapter guides you through the calibration steps. Dexcom G5 Mobile System User Guide Starting a Sensor Session...
- Page 76 Page intentionally left blank Dexcom G5 Mobile System User Guide Starting a Sensor Session...
-
Page 77: Chapter 6 - Calibration
○ Determine if you need to calibrate outside of the normal calibration requirements • Initiate startup calibration • Perform update calibrations • Correctly enter your fingerstick measurement ○ Dexcom G5 Mobile App ○ Dexcom G5 Mobile Receiver • Identify calibration errors Dexcom G5 Mobile System User Guide Calibration... -
Page 78: Calibration Overview
Calibrations are a must to make sure the CGM system is performing at its best. By calibrating when the system notifies you that a calibration is due, the Dexcom G5 Mobile CGM System uses your meter’s BG value to make sure the sensor glucose readings remain accurate throughout your session. -
Page 79: When To Calibrate
3. First maintenance calibration is 12 hours after your second initial calibration. Update Calibration 1. Enter one fingerstick measurement every 12 hours. 2. Display devices provides calibration prompts. 3. You may be prompted to enter additional fingerstick measurements as needed. Dexcom G5 Mobile System User Guide Calibration... -
Page 80: Calibration Prompts
BG values, your sensor glucose readings begin. If you do not enter your BG values right away, the system reminds you every 15 minutes. Remember, only use your BG meter for calibrations, and never enter values from your CGM. Dexcom G5 Mobile System User Guide Calibration... - Page 81 Lock Screen Sensor warmup is Smart Device: Follow steps in complete. In App Section 6.5 and 6.6. Ready for first Immediately prepare of two initial for next calibration. calibrations. Receiver (Continued on next page) Dexcom G5 Mobile System User Guide Calibration...
- Page 82 BG meter value. 12 hours. Receiver Your sensor glucose readings begin in approximately five minutes once the device(s) accepts your calibrations. Update Calibration Prompts Once your start-up calibration is done, your update calibration schedule begins. Dexcom G5 Mobile System User Guide Calibration...
- Page 83 For more information on setting your sound/vibration prompts and how to clear them, please see Chapter 10. Smart Device Calibration prompts will alert you with a triple beep if your smart device is not on Silent or Do Not Disturb . Dexcom G5 Mobile System User Guide Calibration...
-
Page 84: Preparing For Calibration
Be safe—if blood glucose is low, first treat low blood sugar, and then calibrate. 6.6 Ready? Set? Calibrate! You have followed the eight steps, have a valid BG value from your meter, and your display device keeps alerting you: Calibrate! Calibrate! Calibrate! Dexcom G5 Mobile System User Guide Calibration... - Page 85 Next are steps to enter your calibrations using the app, followed by the steps for entering your calibrations into the receiver. Calibrate With Your Dexcom G5 Mobile App Step What you see What you do...
- Page 86 Verify value is correct. Double check your Tap Save . numbers. If not correct: Entering wrong BG values can affect the Tap Cancel . sensor’s accuracy. Reenter correct value. (Continued on next page) Dexcom G5 Mobile System User Guide Calibration...
- Page 87 Additional Info Tap circle to enter your second BG value. Follow steps 2-3 and enter second reading. Meter icon has no Your calibration was calibration prompt. successful. Calibration accepted. (Continued on next page) Dexcom G5 Mobile System User Guide Calibration...
- Page 88 Additional Info Default Home Trend Wait for next calibration screen. prompt in 12 hours. Calibration accepted. Calibrate With Your Dexcom G5 Mobile Receiver Step What you see What you do Additional Info Press Select to turn on You will not see receiver.
- Page 89 Verify BG value is Cancel and re-enter BG correct. value. If incorrect: Fingerstick Press Right Arrow to measurement must Cancel. be within five minute Press Select . window. Reenter BG value. (Continued on next page) Dexcom G5 Mobile System User Guide Calibration...
-
Page 90: Calibration Errors
Calibration(s) accepted. 6.7 Calibration Errors Before or during your calibration process, your display device may show error prompts. If the prompts do not go away after 15 minutes, refer to Chapter 15, Troubleshooting. Dexcom G5 Mobile System User Guide Calibration... - Page 91 Fingerstick measurements entered into one device will be available in the other approximately ten minutes after entering data. Dexcom G5 Mobile System User Guide Calibration...
- Page 92 In the next chapter, you will learn how to end a typical seven day sensor session, what to do if you need to end your sensor session early, along with removing the transmitter and determining if you need to replace it. Dexcom G5 Mobile System User Guide Calibration...
-
Page 93: Transmitter Session
Session 7.1 Introduction Dexcom G5 Mobile Sensor Sessions last seven days. This chapter reviews what you should expect when your session is about to expire, removing the sensor and transmitter. It also covers how to determine if you need to end your session early. - Page 94 Ending Your Seven Day Sensor Session Just like other prompts, your sensor session ending prompts need clearing: • App ○ Tap screen • Receiver ○ Press Select Dexcom G5 Mobile System User Guide Ending Your Sensor Session and Transmitter Session...
- Page 95 Prompts begin when sensor session has only six hours left. Smart Device: Clock will countdown until session has In App ended. Continue to get sensor glucose readings. Receiver (Continued on next page) Dexcom G5 Mobile System User Guide Ending Your Sensor Session and Transmitter Session...
- Page 96 Smart Device: Lock Screen Two hours remain on your current sensor session. Smart Device: In App Continue to get sensor glucose readings. Receiver (Continued on next page) Dexcom G5 Mobile System User Guide Ending Your Sensor Session and Transmitter Session...
- Page 97 What it means At Thirty Minutes Smart Device: Lock Screen Thirty minutes remain. Smart Device: Continue to get sensor glucose readings. In App Receiver (Continued on next page) Dexcom G5 Mobile System User Guide Ending Your Sensor Session and Transmitter Session...
- Page 98 Smart Device: Tap screen’s “?” for steps to: In App • Remove sensor • Insert new sensor Receiver Press Select to clear. Receiver (Continued on next page) Dexcom G5 Mobile System User Guide Ending Your Sensor Session and Transmitter Session...
- Page 99 Quick Start Guide, tutorials, or go to Chapter 5 in this User Guide. Dexcom G5 Mobile System User Guide Ending Your Sensor Session and Transmitter Session...
- Page 100 You will receive error prompts leading to a new sensor session. If you see error prompts, always your local Dexcom representative. When your display device has system errors, you may not receive any sensor glucose readings and you should not calibrate. Dexcom G5 Mobile System User Guide Ending Your Sensor Session and Transmitter Session...
- Page 101 Smart Device: Lock Screen Sensor issues detected. Smart Device: Session ends automatically. In App • Sensor Glucose Readings • Alarm/Alerts Replace sensor. Receiver (Continued on next page) Dexcom G5 Mobile System User Guide Ending Your Sensor Session and Transmitter Session...
- Page 102 Smart Device: into sensor pod? In App Make sure you have not taken acetaminophen. If not corrected after three hours: • Contact your local Dexcom Receiver representative Dexcom G5 Mobile System User Guide Ending Your Sensor Session and Transmitter Session...
- Page 103 The Dexcom G5 Mobile CGM System knows when a typical seven day sensor session is over, automatically ending the session in each display device. However, if you need to end the session early, you need to let the system know by manually stopping the sensor session.
- Page 104 Receiver: Ending a Sensor Session Early Step What you see What it means What you do Go to Main Menu. Press Select . (Continued on next page) Dexcom G5 Mobile System User Guide Ending Your Sensor Session and Transmitter Session...
- Page 105 Shutting down the receiver does not extend your sensor session past the seven days; it only stops the receiver from communicating with the transmitter. Your sensor session will stop seven days after you started the session. Dexcom G5 Mobile System User Guide Ending Your Sensor Session and Transmitter Session...
- Page 106 4. Nothing is rubbing against sensor pod (for example, seat belts). 5. You selected a good insertion site (see Chapter 5). 6. Insertion site is clean and dry before sensor insertion. Dexcom G5 Mobile System User Guide Ending Your Sensor Session and Transmitter Session...
-
Page 107: Remove Sensor Pod And Transmitter
What you do Grasp end of adhesive patch . Peel adhesive patch up and away from your body to remove sensor pod and transmitter . (Continued on next page) Dexcom G5 Mobile System User Guide Ending Your Sensor Session and Transmitter Session... - Page 108 Remember: 1. Never use same spot repeatedly for sensor insertion. 2. Never use same site for 2 sensor sessions in a row. Dexcom G5 Mobile System User Guide Ending Your Sensor Session and Transmitter Session...
-
Page 109: End Of Transmitter Battery
If the transmitter battery has seven days or less remaining, you will not be able to start a new session. Dexcom G5 Mobile System User Guide Ending Your Sensor Session and Transmitter Session... - Page 110 Transmitter Battery Messages Device What you see What it means Smart Device: Lock Screen Smart Device: In App Battery will expire in three weeks. Receiver (Continued on next page) Dexcom G5 Mobile System User Guide Ending Your Sensor Session and Transmitter Session...
- Page 111 What you see What it means Smart Device: Lock Screen Smart Device: In App Battery will expire in two weeks. Order a new transmitter. Receiver (Continued on next page) Dexcom G5 Mobile System User Guide Ending Your Sensor Session and Transmitter Session...
- Page 112 Receiver To make sure you have a transmitter that is ready for a new sensor session, you may want to reorder a new one by contacting your local Dexcom representative at your first low battery prompt. Sound/Vibration Prompts In case you cannot look at your screen, both the smart device and receiver provide beep/vibration prompts to tell you your transmitters battery is low or the transmitter failed.
- Page 113 But the Dexcom G5 Mobile CGM System can do much more. In the next part, Part 3: Next Steps, you will learn how to get the most out of your Dexcom G5 Mobile CGM System.
- Page 114 Page intentionally left blank Dexcom G5 Mobile System User Guide Ending Your Sensor Session and Transmitter Session...
- Page 115 NEXT STEPS - GETTING THE MOST OUT OF YOUR DEXCOM CGM • Reading Trend Graph Screens and Recognizing Trends • Events • Alarm and Alerts • Sounds for Alarm, Alerts and System Messages...
- Page 116 Page intentionally left blank...
-
Page 117: Arrows, And Errors
CGM system status. While the screen does look different between the receiver and smart devices, their information and color coding are the same. Dexcom G5 Mobile System User Guide Home Screen, Rate of Change Arrows, and Errors... - Page 118 No matter how you hold it the receiver’s view does not change; the Dexcom G5 Mobile App has two ways to view data based on how you hold your smart device: 1. Vertically in portrait: 3-hour trend information with task bar.
- Page 119 BG red circle and Calibration Prompt. value (see Chapter number BG Meter No need to without red Do nothing. calibrate. circle (Continued on next page) Dexcom G5 Mobile System User Guide Home Screen, Rate of Change Arrows, and Errors...
- Page 120 Share is not active. instructions. Do nothing. Once activated, Dexcom Share Dexcom Share icon Tap icon to access is colored. Dexcom Share. Dexcom G5 Mobile System User Guide Home Screen, Rate of Change Arrows, and Errors...
- Page 121 Shown in milligrams per deciliter (mmol/L). 1. Yellow: At or above target 2. Gray: Within range 3. Red: At or below target (Continued on next page) Dexcom G5 Mobile System User Guide Home Screen, Rate of Change Arrows, and Errors...
- Page 122 Each dot represents a sensor reading taken every five minutes. Rate of Change Arrow Direction and number of arrows show sensor glucose change rate. (Continued on next page) Dexcom G5 Mobile System User Guide Home Screen, Rate of Change Arrows, and Errors...
- Page 123 Range and Alert Levels 1. Yellow Bar: High Alert level 2. Gray Background: Within range (Portrait only) 3. Red Bar: Low Alert level (Continued on next page) Dexcom G5 Mobile System User Guide Home Screen, Rate of Change Arrows, and Errors...
- Page 124 This section will get you familiar with the receiver’s home screen. In other chapters, you will see how to use the navigation wheel to enter data or make system changes. Dexcom G5 Mobile System User Guide Home Screen, Rate of Change Arrows, and Errors...
-
Page 125: Status Bar
Plug USB into level. the adapter and then into electrical outlet. Do nothing. Shows Bluetooth Receiver’s Bluetooth connection Bluetooth is is working. always on. (Continued on next page) Dexcom G5 Mobile System User Guide Home Screen, Rate of Change Arrows, and Errors... - Page 126 Review and take and speed Trend Arrow appropriate action your glucose is (see Chapter 12). changing. Far right. Take appropriate Error icons Status Area action. and calibration prompts. Dexcom G5 Mobile System User Guide Home Screen, Rate of Change Arrows, and Errors...
- Page 127 Press Up/Down Arrows to access 1, 3, 6, 12, or 24 hour trend views. Rate of Change Arrow Direction and speed of your glucose changes. Sensor Glucose Reading Range Shows between 2.2-22.2 mmol/L. (Continued on next page) Dexcom G5 Mobile System User Guide Home Screen, Rate of Change Arrows, and Errors...
-
Page 128: Rate Of Change Arrows
0.8 mmol/L in 15 minutes. Glucose slowly rising 0.5-0.1 mmol/L each minute or up to 1.7 mmol/L in 15 minutes. (Continued on next page) Dexcom G5 Mobile System User Guide Home Screen, Rate of Change Arrows, and Errors... -
Page 129: Error Messages
CGM if your Bluetooth is off or if you have signal loss. Before the system can move forward, you need to address the error. Dexcom G5 Mobile System User Guide Home Screen, Rate of Change Arrows, and Errors... - Page 130 In App and your display device. Move within six meters of display device. Wait up to 30 minutes while transmitter restores communication. Receiver (Continued on next page) Dexcom G5 Mobile System User Guide Home Screen, Rate of Change Arrows, and Errors...
- Page 131 • Within six meters of your display device? • In your two hour warmup period? • Outside of your calibration schedule? Receiver • In a sensor session? (Continued on next page) Dexcom G5 Mobile System User Guide Home Screen, Rate of Change Arrows, and Errors...
- Page 132 If not corrected: • Contact your local Dexcom representative • Remove sensor Receiver • Insert new sensor (Continued on next page) Dexcom G5 Mobile System User Guide Home Screen, Rate of Change Arrows, and Errors...
- Page 133 Enter another BG meter value. Receiver Calibration Error Smart Device: Lock Screen Smart Device: In App Wait 15 minutes. Enter a BG meter value. Receiver (Continued on next page) Dexcom G5 Mobile System User Guide Home Screen, Rate of Change Arrows, and Errors...
- Page 134 In the next chapter, you will learn how to enter Events in the Dexcom G5 Mobile CGM System. Dexcom G5 Mobile System User Guide...
-
Page 135: Chapter 9 - Daily Events Affect Your Glucose Trends And Patterns
These are all Events that can raise or lower your blood sugars. An Event is an action or situation affecting your glucose levels. With the Dexcom G5 Mobile CGM System, you have the ability to enter your daily Events, helping you track their effect on your glucose trends. - Page 136 The fourth category, Health, has more options: • Illness • Stress • Feel High • Feel Low • Cycle • Alcohol The following table provides more detail on each type of Event. Dexcom G5 Mobile System User Guide Daily Events Affect your Glucose Trends and Patterns...
- Page 137 Enter Carb grams per snack or meal, Receiver’s screen up to 250 grams. reflects last number entered. Receiver (Continued on next page) Dexcom G5 Mobile System User Guide Daily Events Affect your Glucose Trends and Patterns...
- Page 138 Enter insulin units for each dose, up to Receiver’s screen 250 units. reflects last number entered. Cannot enter type of insulin, only dosage. Receiver (Continued on next page) Dexcom G5 Mobile System User Guide Daily Events Affect your Glucose Trends and Patterns...
- Page 139 In App exercise’s intensity level and duration. Defaulted at 30 Enter intensity and minutes. duration. Type of exercise is not an option. Receiver (Continued on next page) Dexcom G5 Mobile System User Guide Daily Events Affect your Glucose Trends and Patterns...
- Page 140 What you do Health Smart Device: In App Enter different health Events (see General well being. following Health Events Menu table). Receiver (Continued on next page) Dexcom G5 Mobile System User Guide Daily Events Affect your Glucose Trends and Patterns...
- Page 141 BG symptoms, etc. You select the Event: no amounts are entered, just date and time. Dexcom G5 Mobile System User Guide Daily Events Affect your Glucose Trends and Patterns...
- Page 142 Device What you see What it means Health Main Menu Smart Device: In App Use Health Main Menu to access selections. Receiver (Continued on next page) Dexcom G5 Mobile System User Guide Daily Events Affect your Glucose Trends and Patterns...
- Page 143 As an example, you are running late because of traffic (Stress) and quickly swing by a restaurant to get lunch (carbs of 85 grams) before meeting some friends. Dexcom G5 Mobile System User Guide Daily Events Affect your Glucose Trends and Patterns...
-
Page 144: Entering Events
Enter Events: Smart Device In the Dexcom G5 Mobile App, Events are just a tap away! The Event icon, a running man, is on the app’s home screen’s task bar in portrait mode (remember, you do not have the task bar in landscape). - Page 145 (Continued from previous page) Enter Carb Event Tap Carbs . Add up all carb grams from lunch. Enter “85” using keypad. Tap Done . (Continued on next page) Dexcom G5 Mobile System User Guide Daily Events Affect your Glucose Trends and Patterns...
- Page 146 (Continued from previous page) Enter Carb Event Tap Event Time . Scroll and select date and time. Tap Done . (Continued on next page) Dexcom G5 Mobile System User Guide Daily Events Affect your Glucose Trends and Patterns...
- Page 147 (Continued from previous page) Enter Carb Event Tap Save or Cancel . Enter Stress Event Tap Running Man . Tap Health . (Continued on next page) Dexcom G5 Mobile System User Guide Daily Events Affect your Glucose Trends and Patterns...
- Page 148 (Continued from previous page) Enter Stress Event Tap Stress . Tap Done . Tap Event Time . (Continued on next page) Dexcom G5 Mobile System User Guide Daily Events Affect your Glucose Trends and Patterns...
- Page 149 (Continued from previous page) Enter Stress Event Scroll and select date and time. Tap Done . Tap Save or Cancel . (Continued on next page) Dexcom G5 Mobile System User Guide Daily Events Affect your Glucose Trends and Patterns...
- Page 150 Turn to landscape. The receiver and app do not talk to one another. If you enter an Event only into the receiver, while the information will appear on Dexcom reports, you will not get an Event marker on your app’s Trend screen.
- Page 151 Press Left/ Right Arrows to change time and date. • Left: Backwards • Right: Forward Press Select . Confirmation screen. Press Select . (Continued on next page) Dexcom G5 Mobile System User Guide Daily Events Affect your Glucose Trends and Patterns...
-
Page 152: Viewing Events
Press Select to save. 9.4 Viewing Events Events entered into your receiver can only be viewed on a Dexcom report; there are no markers on your receiver’s screen. On your smart device, turn to landscape to view your Event markers. A single small square marks all Events. - Page 153 ○ Dexcom G5 Mobile App ○ Dexcom G5 Mobile Receiver • Recognize Event Markers on the Dexcom G5 Mobile App ○ Describe how Event Markers are different in portrait and landscape view • Describe how to view Events entered via your receiver What Is Next? In the next chapter, you will learn about your trend’s Alarm and Alerts helping you monitor...
- Page 154 Page intentionally left blank Page intentionally left blank Dexcom G5 Mobile System User Guide Daily Events Affect your Glucose Trends and Patterns...
-
Page 155: Alerts
Dexcom’s G5 Mobile CGM System understands there are times when you cannot look at your receiver or smart device; however you still need to know of actionable glucose trends or if you are not getting your sensor glucose readings. -
Page 156: What Are Alarm And Alerts
The following are the defaults. Default Alerts Low/High Alerts Your Low/High Alerts have the same color coding as your Trend Graph screen: Dexcom G5 Mobile System User Guide Sensor Glucose Alarm and Alerts... -
Page 157: Reading Alarm And Alerts
The default setting for Signal Loss is On. Now you have the basics for Dexcom’s G5 Mobile’s Alarm/Alerts feature. Next, you will learn about each Alarm/Alert in more detail. - Page 158 What it means Smart Device: Lock Screen Smart Device: Sensor glucose reading at or below 3.1 In App mmol/L. Shows last glucose value. Arrows reflect rate of change. Receiver Dexcom G5 Mobile System User Guide Sensor Glucose Alarm and Alerts...
- Page 159 Shows most current sensor glucose In App reading. Arrows reflect rate of change. Can be set to repeat between 15 minutes to 4 hours. Receiver (Continued on next page) Dexcom G5 Mobile System User Guide Sensor Glucose Alarm and Alerts...
- Page 160 Alert level. Smart Device: Shows most current sensor glucose In App reading. Arrows reflect rate of change. Can be set to repeat between 15 minutes to 4 hours. Receiver Dexcom G5 Mobile System User Guide Sensor Glucose Alarm and Alerts...
- Page 161 Number of arrows show Smart Device: how fast it is rising: In App • One arrow: 0.11 mmol/L/min • Two arrows: 0.2+ mmol/L/min Receiver (Continued on next page) Dexcom G5 Mobile System User Guide Sensor Glucose Alarm and Alerts...
- Page 162 Sensor glucose reading falling quickly. Number of arrows show Smart Device: how fast it is falling: In App • One arrow: 0.11 mmol/L/min • Two arrows: 0.2+ mmol/L/min Receiver Dexcom G5 Mobile System User Guide Sensor Glucose Alarm and Alerts...
-
Page 163: App: Alarm/Alert Recommended Settings
• When your smart device is in Do Not Disturb mode, you will not receive any Alarm/Alerts. The Dexcom G5 Mobile App cannot override the Do Not Disturb setting • If you do not enable your Dexcom G5 Mobile push Notifications settings during setup, you will not get any Alarm/Alerts •... -
Page 164: Receiver: Default Beeps And Vibrations
10.5 Receiver: Default Beeps and Vibrations The Dexcom G5 Mobile Receiver’s Alarm/Alerts are vibrations and a beep, or a series of beeps, based on the Alarm or Alert. Beeps and vibrations are preprogrammed into the receiver, and unlike the smart device, the volume cannot be changed. - Page 165 Vibrates 2 times. After 5 Minutes: Vibrates/beeps 2 times every 5 minutes until cleared. Trend screen will continue to reflect Alert until sensor glucose readings go below Alert level. Dexcom G5 Mobile System User Guide Sensor Glucose Alarm and Alerts...
- Page 166 Initial Default Alert: None/Off. After Setting Change: Vibrates 3 times. After 5 Minutes: Vibrates/beeps 3 times every 5 minutes until cleared or sensor glucose reading drops below Alert level. Dexcom G5 Mobile System User Guide Sensor Glucose Alarm and Alerts...
- Page 167 Vibrates 1 time. After 5 Minutes: Vibrates/beeps 1 time every 5 minutes for a total of 6 times if not cleared. After 6 times it will not alert again. Dexcom G5 Mobile System User Guide Sensor Glucose Alarm and Alerts...
-
Page 168: Clearing Alarm/Alerts
Device What you see What you do Smart Device: Slide Alarm or Alert to access app. Lock Screen Smart Device: Tap OK to accept Alarm or Alert. In App Dexcom G5 Mobile System User Guide Sensor Glucose Alarm and Alerts... -
Page 169: Your Alarm/Alerts
High Alert glucose level threshold, or you want to continue getting a Low Alert notification if your glucose levels do not improve, even though you cleared the message? How do you make your Alarm/Alerts fit your needs? Dexcom G5 Mobile System User Guide Sensor Glucose Alarm and Alerts... - Page 170 Page intentionally left blank Page intentionally left blank Dexcom G5 Mobile System User Guide Sensor Glucose Alarm and Alerts...
-
Page 171: Introduction
First, let us take a look at personalizing your app Alarm and Alerts, and then we will review the same process for the receiver. Dexcom G5 Mobile System User Guide On the Go With G5: Customizing Your Alarm and Alerts... -
Page 172: Changing App Alarm And Alerts
What you do What it means Tap Main Menu icon. Access Main Menu. Access Alerts Main Tap Alerts . Menu. (Continued on next page) Dexcom G5 Mobile System User Guide On the Go With G5: Customizing Your Alarm and Alerts... - Page 173 • Notify me options • Sound options “?” explains: • Each Alarm/Alert Tap “?” for Alarm/Alert • Message options information. • Recommended settings (Continued on next page) Dexcom G5 Mobile System User Guide On the Go With G5: Customizing Your Alarm and Alerts...
- Page 174 Change the amount of time you want between your High/Low Alerts if your sensor glucose readings continue to be low or high. i. Scroll selection wheel, find your desired Alert level. Dexcom G5 Mobile System User Guide On the Go With G5: Customizing Your Alarm and Alerts...
- Page 175 What it means Access Alerts’ Main Menu Tap Main Menu icon. Access Main Menu. Access Alerts Main Tap Alerts . Menu. (Continued on next page) Dexcom G5 Mobile System User Guide On the Go With G5: Customizing Your Alarm and Alerts...
- Page 176 Tap High mmol/L . settings (mmol/L). Check High Alerts is On. Shows High Alert options and current • On-Orange settings. • Off-Gray (Continued on next page) Dexcom G5 Mobile System User Guide On the Go With G5: Customizing Your Alarm and Alerts...
- Page 177 Slide to On. Will not get Alerts if Off. • On-Orange • Off-Gray Change High Alert Tap Notify Me Above . (mmol/L). (Continued on next page) Dexcom G5 Mobile System User Guide On the Go With G5: Customizing Your Alarm and Alerts...
- Page 178 (mmol/L). Returns to High Glucose Tap Save . Alert screen options. Notify Me Above set at 10.5 mmol/L. (Continued on next page) Dexcom G5 Mobile System User Guide On the Go With G5: Customizing Your Alarm and Alerts...
- Page 179 Changing the current repeat setting. Scroll selection wheel. Can select in five Stop at 1 hour. minute steps (range 15 minutes-4 hours). (Continued on next page) Dexcom G5 Mobile System User Guide On the Go With G5: Customizing Your Alarm and Alerts...
- Page 180 Tap Save . Alert screen options. Repeat shows how often you will get notified. Tap Sound . Customize Alert sound. (Continued on next page) Dexcom G5 Mobile System User Guide On the Go With G5: Customizing Your Alarm and Alerts...
- Page 181 NOTE: Sounds shown sound. are representational Return to High Glucose only, your smart device Alert Menu. options may be different. (Continued on next page) Dexcom G5 Mobile System User Guide On the Go With G5: Customizing Your Alarm and Alerts...
- Page 182 (Continued from previous page) Return to Trend Screen Tap “X” . Return to Main Menu. Tap Menu icon Return to trend screen. Swipe right. Dexcom G5 Mobile System User Guide On the Go With G5: Customizing Your Alarm and Alerts...
-
Page 183: Changing Receiver Alarm And Alerts
5 seconds until your sensor glucose value rises above 3.1 mmol/L or you confirm by pressing the Select button. The next table lists the different sound Profiles, starting with the quietest, working its way up to the loudest. Dexcom G5 Mobile System User Guide On the Go With G5: Customizing Your Alarm and Alerts... - Page 184 In a meeting? Select Vibrate . Going to a ball game after work? Select Attentive . The next table shows how to change a sound Profile, then sample how it sounds. Dexcom G5 Mobile System User Guide On the Go With G5: Customizing Your Alarm and Alerts...
- Page 185 Alarm/Alerts. Press Select . Press Up/Down Arrow . Stop at desired Profile . Choose sound Profile . Press Select . (Continued on next page) Dexcom G5 Mobile System User Guide On the Go With G5: Customizing Your Alarm and Alerts...
- Page 186 Repeat option. Rise/Fall Rate Your trend screen provides visual cues letting you know your sensor glucose readings are falling or rising rapidly. Dexcom G5 Mobile System User Guide On the Go With G5: Customizing Your Alarm and Alerts...
-
Page 187: Signal Loss
Step What you see What you do What it means Change High Alert Level Press Select . Go to Main Menu. (Continued on next page) Dexcom G5 Mobile System User Guide On the Go With G5: Customizing Your Alarm and Alerts... - Page 188 Current setting Press Down Arrow . Use Up/Down arrows to Stop at 10.6 mmol/L. change your High Alert level (mmol/L). (Continued on next page) Dexcom G5 Mobile System User Guide On the Go With G5: Customizing Your Alarm and Alerts...
- Page 189 Press Up / Down Arrow . current repeat minutes. Stop at 60 minutes. Change time frame in 5 Press Select . minute increments. (Continued on next page) Dexcom G5 Mobile System User Guide On the Go With G5: Customizing Your Alarm and Alerts...
- Page 190 ○ Signal Loss What Is Next? Believe it or not, you are becoming a pro at using your Dexcom G5 Mobile CGM System! You have set up the app and receiver, started a session, calibrated, followed your glucose trends, paid attention to your Alarm/Alerts, prompts, and ended a session!
-
Page 191: System For Treatment Decisions
How would you determine your treatment? Could you use your Dexcom G5 Mobile CGM System sensor glucose readings to make a treatment decision? Prior to the Dexcom G5 Mobile CGM System, you had to take a fingerstick with your BG meter before making any treatment decisions. -
Page 192: Decisions
• Recall key points in developing your diabetes management plan when talking with your healthcare professional • Recite the “Do’s and Do Not’s” of treatment decisions based on Dexcom G5 Mobile CGM System 12.2 Importance of Dexcom G5 Mobile CGM System Information for Treatment Decisions A BG meter value is only a number. - Page 193 3.0 mmol/L or less in only 30 minutes? A single number is not enough. Your Dexcom G5 Mobile CGM System helps you make treatment decisions based on your glucose trends, including its speed and direction of change. You can proactively decide what to do, or what not to do, helping prevent low and high glucose levels.
-
Page 194: Making Treatment Decisions
BG meter, not your Dexcom G5 Mobile CGM System to make your treatment decisions. When using your Dexcom G5 Mobile CGM System, there are four CGM keys in the treatment decision process. If you do not use all four, you will not have all the needed information, causing you to make an incorrect treatment decision. - Page 195 System Keys Smart Device: In App, Landscape 1) Sensor Glucose Reading Smart Device: Most recent sensor glucose In App, reading. Portrait Receiver (Continued on next page) Dexcom G5 Mobile System User Guide Using Dexcom G5 Mobile CGM System for Treatment Decisions...
- Page 196 System Keys Smart Device: In App, Landscape 2) Trend Graph Smart Device: Shows your past sensor glucose In App, readings. Portrait Receiver (Continued on next page) Dexcom G5 Mobile System User Guide Using Dexcom G5 Mobile CGM System for Treatment Decisions...
- Page 197 In App, Landscape Smart Device: In App, 3) Change Arrows Portrait Current sensor glucose speed and direction of change arrows. Receiver (Continued on next page) Dexcom G5 Mobile System User Guide Using Dexcom G5 Mobile CGM System for Treatment Decisions...
-
Page 198: Sensor Glucose Readings
Portrait Receiver Sensor Glucose Readings Make sure you have at least three consecutive readings within the last 15 minutes prior to making a treatment decision. Dexcom G5 Mobile System User Guide Using Dexcom G5 Mobile CGM System for Treatment Decisions... - Page 199 Earlier in Chapter 8 you learned each dot on your home screen represents a single sensor glucose reading reported once every five minutes. Do not make any decisions based on your Dexcom G5 Mobile CGM System if there is a gap between the last three dots or you do not have any trend arrows.
- Page 200 No trend arrow? That means you are not getting sensor BG readings. Check your trend graph screen before making a treatment Dexcom G5 Mobile System User Guide Using Dexcom G5 Mobile CGM System for Treatment Decisions...
- Page 201 Dexcom G5 Mobile CGM System information. The next table gives you a general overview on how you can use Dexcom G5 Mobile CGM System trend arrows in treatment decisions. Your healthcare professional can help you develop a treatment plan based on your trend arrows.
- Page 202 Do not take multiple close together in insulin doses too time. close together in Think about your time. trend graph and recent Alarm/Alerts. (Continued on next page) Dexcom G5 Mobile System User Guide Using Dexcom G5 Mobile CGM System for Treatment Decisions...
- Page 203 Think about your trend graph and recent Alarm/Alerts. (Continued on next page) Dexcom G5 Mobile System User Guide Using Dexcom G5 Mobile CGM System for Treatment Decisions...
- Page 204 With previous Dexcom CGM generations, an Alarm or Alert prompt typically meant you had to take a fingerstick measurement to determine what action to take. With the Dexcom G5 Mobile CGM System, by paying attention to your sensor glucose readings, trend graph, trend...
-
Page 205: Creating Personal Guidelines
Your healthcare professional can assist you with determining your personal glucose target ranges, how to reach them, help you set your Low/High Alert levels, any additional Alerts to use, and how to best use the Dexcom G5 Mobile CGM System in your daily diabetes management. - Page 206 Your healthcare professional can guide you in correctly using your Dexcom G5 Mobile CGM System information when making treatment decisions. • Make sure you are getting the full picture. Never use your Dexcom G5 Mobile CGM System for treatment decisions if in the last 15 minutes you do not have three consecutive sensor glucose readings on the trend graph, or you are missing a trend arrow.
- Page 207 • Knowing your plan may reduce the risk of a rebounding high after a low Prevent and Treat Highs Your healthcare professional can help you use your Dexcom G5 Mobile CGM System trends information to prevent or treat high glucose levels. Talk with them to learn how to improve your meal insulin dosing decisions and timing of insulin dose.
-
Page 208: Do's And Do Not's Of Cgm Treatment Decisions
• Do not dose off of Dexcom G5 Mobile CGM System if you took paracetamol/acetaminophen • Do not make a Dexcom G5 Mobile CGM System based treatment decision if there are no trend arrows Dexcom G5 Mobile System User Guide... -
Page 209: You Decide
At this point, you should know when you can and when you cannot make a treatment decision based on your Dexcom G5 Mobile CGM sensor glucose readings. Now let us go back to the questions at the beginning of the chapter and see what you would do! 12.6 You Decide! - Page 210 11.5 mmol/L with a single arrow going up. Not only is your glucose high, it is also rising at around 0.5-0.1 mmol/L each minute or up 1.7 mmol/L in 15 minutes. Dexcom G5 Mobile System User Guide Using Dexcom G5 Mobile CGM System for Treatment Decisions...
- Page 211 “A” does not consider how long it takes insulin to work. The insulin you took before your meal may continue to work for 3-4 hours. So, taking a “full” extra dose of insulin, a short Dexcom G5 Mobile System User Guide Using Dexcom G5 Mobile CGM System for Treatment Decisions...
- Page 212 Keep notes and share them with your healthcare professional. Now You Can: • List the four keys needed to make a treatment decision using your Dexcom G5 Mobile CGM System • Recognize how many sensor glucose readings you need in making a treatment decision •...
-
Page 213: Part 4: Everything Else G5
CGM System • Recognize key points to talk with your healthcare professional when developing your diabetes management plan • Recite the “Do’s and Do Not’s” of treatment decisions based on Dexcom G5 Mobile CGM System What Is Next? The next chapters begin our fourth part of the user guide: information you need to know, but unlike the previous chapters, typically not part of your day-to-day Dexcom G5 Mobile CGM System experience. - Page 214 Page intentionally left blank Page intentionally left blank Dexcom G5 Mobile System User Guide Using Dexcom G5 Mobile CGM System for Treatment Decisions...
- Page 215 EVERYTHING ELSE G5 • Warranty • Maintenance • Technical Information • Troubleshooting • Package Symbols...
- Page 216 Page intentionally left blank...
-
Page 217: Chapter 13 - Warranty: The Fine Print
Dexcom, Inc. (“Dexcom”) provides a limited warranty to the original purchaser that the Dexcom G5 Mobile Receiver is free from defects in material and workmanship under normal use (“Limited Warranty”) for the period commencing upon the date of shipment and continuing for the following specified period of time after that date (“Warranty Period”):... - Page 218 DAMAGES, HOWEVER CAUSED AND ON ANY THEORY OF LIABILITY, ARISING IN ANY WAY OUT OF THE SALE, USE, MISUSE OR INABILITY TO USE ANY DEXCOM G5 MOBILE SYSTEM. THIS LIMITATION SHALL APPLY EVEN IF DEXCOM OR ITS AGENT HAS BEEN ADVISED OF SUCH DAMAGES AND NOTWITHSTANDING ANY FAILURE OF ESSENTIAL PURPOSE OF THIS LIMITED REMEDY.
-
Page 219: Transmitter Warranty Information
(h) water damage to the transmitter beyond the specifications listed in the Dexcom G5 Mobile System User Guide, a copy of which was included with your Dexcom G5 Mobile CGM System and may be found at dexcom.com. - Page 220 HOWEVER CAUSED AND ON ANY THEORY OF LIABILITY, ARISING IN ANY WAY OUT OF THE SALE, USE, MISUSE OR INABILITY TO USE ANY DEXCOM G5 MOBILE CGM SYSTEM. THIS LIMITATION SHALL APPLY EVEN IF DEXCOM OR ITS AGENT HAS BEEN ADVISED OF SUCH DAMAGES AND NOTWITHSTANDING ANY FAILURE OF ESSENTIAL PURPOSE OF THIS LIMITED REMEDY.
-
Page 221: Chapter 14 - Taking Care Of Your Dexcom G5 Mobile Cgm System
System 14.1 Introduction There are not a lot of moving parts in the Dexcom G5 Mobile CGM System, so maintenance is relatively simple: keep it clean, keep display device(s) dry and protected, use accessory parts, like the USB cable, etc., given to you with the system and store according to each piece’s labeling instructions. -
Page 222: Basic Maintenance
While the receiver is being charged, you will continue to get your sensor glucose readings if the transmitter and receiver are within six meters of each other. Dexcom G5 Mobile System User Guide How to Take Care of Your Dexcom G5 Mobile CGM System... - Page 223 Low Battery Charge your battery. Open USB port door . Micro USB Port Plug USB cable into port for recharging. (Continued on next page) Dexcom G5 Mobile System User Guide How to Take Care of Your Dexcom G5 Mobile CGM System...
- Page 224 AC Power Adapter the bottom of the plug and push up until the plug pops out of the adapter. (Continued on next page) Dexcom G5 Mobile System User Guide How to Take Care of Your Dexcom G5 Mobile CGM System...
- Page 225 Do not block access to the charger. Keep charging until Battery Charging icons are solid. (Continued on next page) Dexcom G5 Mobile System User Guide How to Take Care of Your Dexcom G5 Mobile CGM System...
-
Page 226: Cleaning And Disinfecting The System
3. Look at cables for signs of wear and tear. Do not use if worn or damaged. There is no repair service available for any Dexcom G5 Mobile CGM System parts. If you experience problems, contact your local Dexcom representative. - Page 227 • Thoroughly wet the surface of the device with a second disinfectant wipe to wipe the front, back and all four sides of the device Dexcom G5 Mobile System User Guide How to Take Care of Your Dexcom G5 Mobile CGM System...
-
Page 228: Storage
• Remove gloves and dispose of gloves as biohazard waste • Wash hands thoroughly 14.4 Storage Storing your Dexcom G5 Mobile CGM System correctly helps prevents system failures. Sensor 1. Keep the sensor in its sterile packaging until you are ready to use it. -
Page 229: Checking App And Receiver Information
• Insertion Time • Last Calibration • Transmitter Battery • Transmitter SN • Serial Number • Part Number • Part Revision • Software Number Dexcom G5 Mobile System User Guide How to Take Care of Your Dexcom G5 Mobile CGM System... -
Page 230: System Disposal
(receiver and transmitter) and parts that have come in contact with blood or other bodily fluids (sensor). Consult your area’s local waste management authorities for proper disposal instructions. Dexcom G5 Mobile System User Guide How to Take Care of Your Dexcom G5 Mobile CGM System... -
Page 231: Technical Information
For more information on the clinical study results, see website at: dexcom.com/global 15.2 Product Specifications The Dexcom G5 Mobile CGM System is intended for use by patients at home and in healthcare facilities. Use of accessories, transducers and cables other than those specified or provided by the manufacturer of this equipment could result in increased electromagnetic emissions or decreased electromagnetic immunity of this equipment and result in improper operation. - Page 232 Limited Warranty 3 months IP28: Protection against insertion of large objects and immersion in water up to Moisture Protection 2.4 meters for 24 hours Protection against submersion in water (Continued on next page) Dexcom G5 Mobile System User Guide Technical Information...
- Page 233 Power frequency magnetic Power Frequency fields should be at levels (50/60 Hz) Magnetic 30 A/m 30 A/m characteristic of a typical location Field in a typical commercial or hospital IEC 61000-4-8 environment. Dexcom G5 Mobile System User Guide Technical Information...
- Page 234 There are no risks to connecting any part of the system to an MSO (Multiple Socket Outlet) Temperature: 0° C - 40° C Storage/Operating Conditions Humidity: 10% - 95% RH Operating Altitude -396.24 to 4,206 meters (Continued on next page) Dexcom G5 Mobile System User Guide Technical Information...
- Page 235 ± 1 kV line(s) to line(s) ± 1 kV line(s) to line(s) of a typical commercial or hospital ± 2 kV line(s) to earth Not applicable IEC 61000-4-5 environment. (Continued on next page) Dexcom G5 Mobile System User Guide Technical Information...
- Page 236 The Dexcom G5 Mobile CGM System is intended for use in the electromagnetic environment specified in the next table. The customer or the user of the Dexcom G5 Mobile CGM System should ensure that it is used in such an environment.
- Page 237 RF transmitters, an electromagnetic site survey should be considered. If the measured field strength in the location in which the Dexcom G5 Mobile CGM System is used exceeds the applicable RF compliance level in the table, the Dexcom G5 Mobile CGM System should be observed to verify normal operation.
-
Page 238: Electromagnetic Emissions
The Dexcom G5 Mobile CGM System is intended for use in the electromagnetic environment specified in the next table. The customer or the user of the Dexcom G5 Mobile CGM System should ensure that it is used in such an environment. - Page 239 AC power outlet. Misuse of the USB cable can present a strangulation risk. Isolation of system is by unplugging charger from wall. Power Supply/Charger Specifications MT21255 Part Number Class Input AC Input 100-240 Vac, 50/60Hz, 0.2A, 0.2A rms at 100 Vac DC Output 5V DC, 1A (5.0 Watts) Dexcom G5 Mobile System User Guide Technical Information...
- Page 240 Page intentionally left blank Dexcom G5 Mobile System User Guide Technical Information...
-
Page 241: Troubleshooting
If your problem is not found here, follow the steps listed on your app screen, or contact your local Dexcom representative. Please contact your local Dexcom representative if any of these errors continue and the instructions do not resolve the issue. -
Page 242: Troubleshooting
What you see Problem What you do Smart Device: Check Alarm/Alerts , In App sound and/or vibrations for notifications are on. Not receiving Alerts Check your smart device is not on mute (if applicable). Receiver Dexcom G5 Mobile System User Guide Troubleshooting... - Page 243 Example: a 11.3 mmol/L Receiver receiver reading and a 9.4 mmol/L glucose meter value = a 17% difference (this is still considered accurate) Outside of these guidelines: Calibrate again. (Continued on next page) Dexcom G5 Mobile System User Guide Troubleshooting...
- Page 244 In App System will often resolve itself. Not getting If this continues for sensor glucose an extended period of readings time, contact your local Dexcom representative Receiver to report error. (Continued on next page) Dexcom G5 Mobile System User Guide Troubleshooting...
- Page 245 2. Tap Bluetooth . 3. Turn Bluetooth Off and On . Smart Device: In App Wait up to 2 hours. No sensor System is counting glucose readings down to when you do your initial calibration. Receiver Dexcom G5 Mobile System User Guide Troubleshooting...
- Page 246 Sensor Pod Adhesive Picture Problem What you do Put medical tape over sensor pod’s white Sensor pod will adhesive patch (e.g., Blenderm). not stick Do not place tape over the transmitter. Dexcom G5 Mobile System User Guide Troubleshooting...
- Page 247 Receiver Low Receiver Charge receiver . Battery Do nothing. Receiver is able to continue System Receiver to work and recover from an Recovery error. App: Tap OK to clear Alert. (Continued on next page) Dexcom G5 Mobile System User Guide Troubleshooting...
- Page 248 Contact your local Dexcom No sensor representative to report Receiver glucose readings error. will be displayed App: until error is resolved Follow same instructions. Tap question mark to get more information. (Continued on next page) Dexcom G5 Mobile System User Guide Troubleshooting...
- Page 249 System did not value. accept recent Wait 15 minutes. calibration If no sensor glucose readings appear on the display, the sensor needs to be replaced. Contact your local Dexcom representative. Receiver (Continued on next page) Dexcom G5 Mobile System User Guide Troubleshooting...
- Page 250 Stop sensor session . Re-Enter correct transmitter App: Pairing Failed Menu > Trans SN> Enter correct SN Receiver: Receiver Settings >Trans SN >Enter correct SN If correct: Contact your local Dexcom representative. (Continued on next page) Dexcom G5 Mobile System User Guide Troubleshooting...
- Page 251 What you see Problem What you do Smart App: Device: Tap OK to clear In App Receiver: Transmitter Low Press Select to clear. Battery Will not re-alert once cleared. Order new transmitter. Receiver Dexcom G5 Mobile System User Guide Troubleshooting...
- Page 252 Page intentionally left blank Dexcom G5 Mobile System User Guide Troubleshooting...
-
Page 253: Chapter 19 - Package Label Symbols
The following symbols may be found on the sensor, transmitter, and receiver package labels. These symbols tell you about the proper and safe use of the Dexcom G5 Mobile System. Some of these symbols may not have meaning in your region, and are listed for informational purposes only. - Page 254 93/42/EEC European Union WEEE Do Not Use if Package is Directive 2012/19/EU Damaged Electrical Equipment Designed Ship By Date Primarily for Indoor Use Bluetooth Input Refer to Instruction Keep Dry Manual/Booklet Dexcom G5 Mobile System User Guide Package Label Symbols...
- Page 255 • Glossary • Index...
- Page 256 Page intentionally left blank...
-
Page 257: Glossary
A self-contained program or piece of software designed to fulfill a particular purpose; an application, especially as downloaded by a user to a smart or mobile device. The Dexcom G5 Mobile App was developed as a display for continuous glucose monitoring. Blood Glucose (BG) BG is an abbreviation of blood glucose. - Page 258 A transmitter sends sensor glucose readings to a display device. Contraindication A safety statement outlining specific situations where the Dexcom G5 Mobile should not be used because it may be harmful to you. The risk of use clearly outweighs any possible benefit. Hyperglycemia High blood glucose.
- Page 259 The removal poses a security risk and data may become vulnerable. Do not use, install or run the Dexcom G5 Mobile App on a jailbroken smart device. The app may not work correctly on a jailbroken smart device.
- Page 260 A safety statement letting you know the following feature has important hazard information. Describes serious and life threatening circumstances of using the Dexcom G5 Mobile CGM System, their consequences, and how to avoid the hazard. Dexcom G5 Mobile System User Guide...
-
Page 261: Index
Why is Calibrating important 76 Choosing site 57 CGM System Preventing Sensor Failures 104 Basic Maintenance 220 Sensor Session Different Monitoring Methods 35 App 65 Disposal 228 Attaching Transmitter 62 Overview 27 Definition 258 Storage 226 Dexcom G5 Mobile System User Guide Index... -
Page 262: Table Of Contents
Attaching 62 Battery Messages 108 Connecting/Pairing Transmitter With App 37 Connecting/Pairing with Receiver 47 End of Transmitter Battery 107 Overview 30 Remove from Sensor Pod 105 Safety Statements 10 Troubleshooting 240 Warranty 215 Dexcom G5 Mobile System User Guide Index... - Page 263 Dexcom, Dexcom Follow, Dexcom G4, Dexcom G4 PLATINUM, Dexcom G5, Dexcom G5 Mobile, Dexcom Share, and G5 are either registered trademarks or trademarks of Dexcom, Inc. in the United States and/or other countries. The Bluetooth word and logos are registered trademarks owned by Bluetooth SIG, Inc.
- Page 264 Dexcom, Inc. 6340 Sequence Drive San Diego, CA 92121 USA +1.858.200.0200 dexcom.com Outside US: Contact your local Dexcom representative EC REP MediTech Strategic Consultants B.V. Maastrichterlaan 127-129 NL - 6291 EN Vaals Tel. +31.43.306.3320 Fax. +31.43.306.3338 LBL013137 Rev 004 MT23201...
Need help?
Do you have a question about the G5 mobile and is the answer not in the manual?
Questions and answers