NEC UX5000 Manual
Ux mail
Hide thumbs
Also See for UX5000:
- Hardware manual (370 pages) ,
- Manual (328 pages) ,
- Resource manual (220 pages)
Table of Contents
Advertisement
Quick Links
• Turn the page for a complete list of part numbers.
• If you are not familiar with the voice mail features, read the
Default Mailbox Number Assignments
Mailbox Type
ACD Announcement
Announcement
Call Routing
Directory Dialing
Distribution
Future Delivery
Guest
Hospitality
Interactive
Message Center
Network
Subscriber
Trunk
Undefined
Total
1
Capacities (Maximum)
Answering Tables . . . . . . . . . . . . . . . . . . 100
Caller ID Numbers. . . . . . . . . . . . . . . . 25,000
Dial Action Tables . . . . . . . . . . . . . . . . . . 500
Distribution Lists . . . . . . . . . . . . . . . . . . . 100
1
See
D
UX M
C
EFAULT
AIL
ONFIGURATION
TCPIP Ports
UX Mail Administrator . . . . . . . . 100 (fixed)
For additional resources, visit UX5000 on the web at
Important Notes
F
EATURE
UX Mail Specifications
Mailbox Numbers
810-814, 821-824, 831-834, 841-844
819, 820, 829, 830, 839, 840, 849, 850
815-818, 825-828, 835-838, 845-848
Voice Prompt Languages . . . . . . . . . . . . .7 [4]
Unified Messaging Seats . . . . . . . . . .200 [10]
Voice Mail Ports . . . . . . . . . . . . . . . . . .16 [4]
Voice Storage Hours . . . . . . . . . . . 125 or 550
(
7)
for more. [ ] is the default capacity.
PAGE
Empowered by Innovation
.
G
(
30)
LOSSARY
PAGE
None
800-809
None
851-860
861
None
None
None
301-499
001-072
1669
2,000
http://www.necux5000.com
1. Installation
2. Features
3. Programming
4. Voice Prompts
UX Mail Manual
P/N O913250
Rev 2, May 20, 2008
Printed in U.S.A
.
V4.15
.
Advertisement
Table of Contents

Related Manuals for NEC UX5000


Summary of Contents for NEC UX5000
- Page 1 PAGE TCPIP Ports UX Mail Administrator ..100 (fixed) UX Mail Manual P/N O913250 Rev 2, May 20, 2008 Printed in U.S.A V4.15 For additional resources, visit UX5000 on the web at http://www.necux5000.com...
- Page 2 Voice storage capacity is with the default 4 languages installed. This manual has been developed by NEC Unified Solutions, Inc. It is intended for the use of its customers and service personnel, and should be read in its entirety before attempting to install or program the system. Any comments or suggestions for improving this manual would be appreciated.
-
Page 3: Table Of Contents
Table of Contents Table of Contents Chapter 1: UX Mail Installation ..........1 UX Mail Installation . - Page 4 UX5000 Programming ........
- Page 5 Table of Contents Directory Dialing Using a Call Routing Mailbox....... . . 121 Directory Dialing Using a Directory Dialing Mailbox .
- Page 6 Table of Contents Message Listen Mode ............198 Message Notification .
- Page 7 Table of Contents Single Digit Dialing ............277 Subscriber Mailbox .
- Page 8 Table of Contents Customize ............322 Answering Tables .
- Page 9 Table of Contents MTRF Action – Monitored (Ring No Answer) Transfer ....340 Number ............341 Distribution Lists .
- Page 10 Table of Contents [General] Department..........357 [General] Tenant .
- Page 11 Table of Contents Message Notification Tab..........373 [Message Notification] Message Notification .
- Page 12 Table of Contents [General] Type ..........389 [General] Security Code.
- Page 13 Table of Contents [General] Bilingual Mode ........411 Mailbox Options: Network: [Network] .
- Page 14 Table of Contents [Lamp/Logon/Transfer] Message Waiting Lamp ..... .433 [Lamp/Logon/Transfer] Lamp Off String......433 [Lamp/Logon/Transfer] Lamp Off String.
- Page 15 Table of Contents Extension............452 Tenant .
- Page 16 Table of Contents [Dial Strings] Off Hook Call Announce......470 [Dial Strings] Conference .........470 System Options: [Timer] .
- Page 17 Table of Contents Mailbox Access Count Report..........501 Mailbox Call Flags Report .
- Page 18 Table of Contents xvi ◆ Table of Contents UX Mail Manual...
-
Page 19: Ux Mail Installation
Before Installing The installation guidelines in this manual are a supplement to the detailed instructions provided in your UX5000 Hardware Manual. Review your system hardware manual thoroughly before using these guidelines to install UX5000 UX Mail. When you are done with the initial installation: ●... -
Page 20: Powering Down The System (Optional)
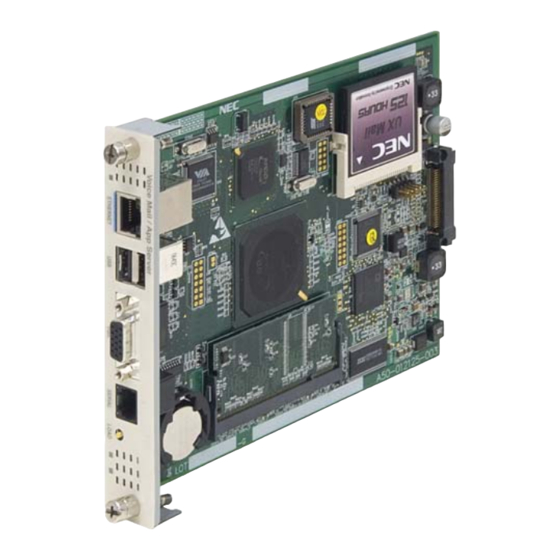
UX Mail Installation Powering Down the System (Optional) Skip this step if you have chosen to insert the UX Mail blade “hot” (with power applied). • Go right to instead. UX M NSTALLING THE LADE PAGE Checking the CPU LEDs and Powering Down Before powering down, you must check the CCPU blade LEDs. -
Page 21: Installing The Ux Mail Blade
To install the UX Mail Blade: Take adequate anti-static precautions. You should always wear a grounded wrist strap when installing or removing UX5000 blades. Be sure the wrist strap is attached to a known electrical service ground (such as the earth ground lug on the UX5000 chassis). -
Page 22: Powering Up The System And Checking The Cpu Leds
UX Mail Installation Powering Up The System and Checking the CPU LEDs Skip step 1 below if you inserted the UX Mail “hot” (with power applied). To power up the system: Turn the power switch to On ( 1 ). The blue LED adjacent to the power switch goes on. -
Page 23: Checking The Ux Mail Leds
UX Mail Installation Checking the UX Mail LEDs The boot time for UX Mail is about 3 minutes, depending on the tasks the UX Mail has to perform during startup. To check the UX Mail LEDs: After the UX Mail boots, verify the UX Mail front panel LEDs using the following table and the illustra- tion below. -
Page 24: Connecting Ux Mail To A Lan
UX Mail Installation Connecting UX Mail to a LAN You can use the UX Mail LAN (Local Area Network) connection for local and remote programming. The embedded UX Mail Administrator program can use this connection for programming the voice mail applica- tion on the blade. -
Page 25: Default Ux Mail Configuration
• After adding a license, you must reset the UX Mail blade for the license to take effect. • See the UX5000 Parts List available in the Dealer Area for more on the available www.necux5000.com... -
Page 26: Programming
Programming Programming UX Mail Programming Basic Setup Assign the UX Mail extension numbers to a unique Department Group. 16-02-01: D EPARTMENT ROUP SSIGNMENT FOR XTENSIONS Assign the UX Mail extensions to a unique Department Group (e.g., 2 ). - These are the extensions automatically assigned by the system to the UX Mail blade. The extensions should be consecutive. -
Page 27: Having Ux Mail Answer Trunk Calls
- This enables the NSL call status messages that are required for Make Call and Message Noti- fication callouts. ✔ By default, this option is 0 (disabled). See the UX5000 Software Manual for additional voice mail programming. Installation ◆ 9 UX Mail Manual... -
Page 28: Setting Tcp/Ip, Gateway, And Dns Addresses
Setting TCP/IP, Gateway, and DNS Addresses Setting TCP/IP, Gateway, and DNS Addresses Assigning the UX Mail TCPIP Address, Subnet Mask, and Gateway Address The UX Mail Administrator program uses TCP/IP protocol to communicate with the voice mail application over the LAN. For UX Mail to communicate over the LAN, you must set the IP address and subnet mask before using the UX Mail Administrator. -
Page 29: Programming The Ux Mail Tcp/Ip Address, Subnet Mask, And Gateway Address
Setting TCP/IP, Gateway, and DNS Addresses Programming the UX Mail TCP/IP Address, Subnet Mask, and Gateway Address Assign the TCP/IP address. 10-55-01: IP A DDRESS Select the slot into which the UX Mail blade is inserted and assign the IP Address. ✔... -
Page 30: Setting The Domain Name Server
Setting TCP/IP, Gateway, and DNS Addresses Setting the Domain Name Server The Domain Name Server (DNS or name server) is the computer connected to the internet that converts a domain name (such as necux5000.com) to a specific IP address for routing on the internet. If you want to use domain names to identify your SMTP and IMAP4 servers when setting up Desktop Messaging, you must make an entry for this option. -
Page 31: Ux Mail Administrator Program
UX Mail Administrator Program UX Mail Administrator Program UX Mail Administrator PC Requirements ● Operating System Use one of the following or higher: - Windows 98 (Service Pack 2) - Windows NT 4.0 - Windows 2000 - Windows XP ● Processor Pentium 400 MHZ or higher, mouse required ●... -
Page 32: Starting The Ux Mail Administrator Program
UX Mail Administrator Program Starting the UX Mail Administrator Program The UX Mail Administrator program for UX Mail uses your web browser installed on your PC and the built- in web server on the UX Mail blade. To start the UX Mail Administrator program: Set the UX Mail IP and gateway addresses. -
Page 33: Accessing The Ux Mail Options
UX Mail Administrator Program Accessing the UX Mail Options Administrator Log On If you log on as an administrator, you can access and customize all the options available through the UX Mail Administrator program. To log on as an Administrator: Click . -
Page 34: User Log On (User Programming - User Level)
UX Mail Administrator Program User Log On (User Programming - User Level) Any user that knows the IP address of the UX Mail can program a limited set of options for their Subscriber Mailbox. The user must have a Security Code enabled for their mailbox. To log on as a user: Click . - Page 35 UX Mail Administrator Program Click the User Mailbox Options link. You see the User Programming options screen. Installation ◆ 17 UX Mail Manual...
-
Page 36: Ux Mail Administrator User Options (User Programming - Admin Level)
UX Mail Administrator Program UX Mail Administrator User Options (User Programming - Admin Level) You can customize the following options from the UX Mail Administrator user options screen: Admin User Options Menu Item Mailbox Option Feature Mailbox Options Tab OP + S Security Code 273) ECURITY... -
Page 37: Log Out
UX Mail Administrator Program Log Out When you are done using the UX Mail Administrator program, you should log out of programming. This prevents unauthorized personnel from using your UX Mail Administrator program session to make unautho- rized changes to the system. To log out of UX Mail Administrator programming: Click Navigating the UX Mail Administrator program... -
Page 38: Resetting The Ux Mail Blade
UX Mail Administrator Program Resetting the UX Mail Blade You should reset the UX Mail blade after changing the TCP/IP address, gateway address, or DNS address. You may also need to reset the blade for maintenance purposes. Resetting the blade will also restart the asso- ciated voice mail application program. -
Page 39: Some Common Ux Mail Applications
Some Common UX Mail Applications Some Common UX Mail Applications About the Common Applications This section provides an overview of the following common UX Mail applications. These applications are a handy quick reference during initial UX Mail setup. ● 1: H PPLICATION AVING THE UTOMATED... -
Page 40: Application 1: Having The Automated Attendant Answer Outside Calls
Some Common UX Mail Applications Application 1: Having the Automated Attendant Answer Outside Calls Default Setup Outside calls are not answered by the Automated Attendant. • There are no Direct Inward Lines (DILs) routing to the UX Mail master extension number. Application Summary 1. -
Page 41: Application 2: Set Up Separate Day And Night Greetings
Some Common UX Mail Applications Application 2: Set Up Separate Day and Night Greetings Default Setup All trunks answered by the Automated Attendant route to Answer Table 1 • Answering Table 1 has four schedules (1-4). - Schedule 1 runs Monday-Friday from 8:30AM to 12:00PM and uses Call Routing Mailbox 811. - Schedule 2 runs Monday-Friday from 12:00PM to 5:00PM and uses Call Routing Mailbox 812. -
Page 42: Recording The Instruction Menu Messages
Some Common UX Mail Applications Recording the Instruction Menu Messages Record the weekday morning, weekday afternoon, weekday evening, and weekend Instruction Menu Messages. To record the Instruction Menu Messages. At extension 301, press your voice mail key. Dial SA (72) + I (4). Dial the number of Call Routing Mailbox whose Instruction Menu Message you want to record. -
Page 43: Application 3: Provide Unique Day And Night Dialing Options For Callers
Some Common UX Mail Applications Application 3: Provide Unique Day and Night Dialing Options for Callers Default Setup Call Routing Mailboxes 811 and 812 use Dial Action Table 1 Call Routing Mailboxes 813 and 814 use Dial Action Table 2 Dial Action Tables 1 and 2 provide the following dial options: •... -
Page 44: Application 4: Manual Night Mode Control Of The Automated Attendant
ANUAL IGHT WITCHING Enter 1 to enable night mode switching in the extension’s Class of Service. - See the UX5000 Software Manual for more on this option. ✔ By default, this capability is disabled. 20-06-01: C LASS OF ERVICE FOR XTENSIONS Assign the extension’s Class of Service. - Page 45 - When the UX Mail Automated Attendant is set up to answer calls normally (and follow the Answer Schedules), this entry should be 700. - See the UX5000 Software Manual for more on this option. ✔ By default, there are no DIL assignments set up.
- Page 46 Some Common UX Mail Applications 28 ◆ Installation UX Mail Manual...
-
Page 47: Features
Introduction to Voice Mail Features Chapter 2: Features Introduction to Voice Mail Features Introduction to Voice Mail Features If you are not familiar with the voice mail features, review the Feature Glossary on page 30. This chapter provides detailed information on the voice mail features. The features in this chapter are in alphabetical order, like a dictionary. -
Page 48: Feature Glossary
The message that the System Administrator records for a Automated Attendant specific Announcement Mailbox. ■ for more. NNOUNCEMENT ESSAGE PAGE Answering Machine Emulation A keyset on the UX5000 can work like a home answering Voice Mail machine. for more. ■ NSWERING ACHINE MULATION PAGE... - Page 49 Feature Glossary Name Description Usage Auto Forward Messages left in an extension user’s mailbox can automat- Voice Mail ically forward to a co-worker’s mailbox. for more. ■ ORWARD PAGE Auto Help An extension user can enable a full or abbreviated set of Voice Mail voice prompts that guide them while using their mailbox.
- Page 50 PAGE ■ Also see in this glossary. UEUING Caller ID A telco service that provides a caller’s number and System optional name. UX5000 can pass this information to voice mail to enable ID A ALLER UTOMATIC RANSFER ALLER WITH ETURN ■...
- Page 51 Feature Glossary Name Description Usage Confidential Message An extension user can leave a Confidential Message for a Voice Mail co-worker that cannot be forwarded to another user. for more. ■ 106) ONFIDENTIAL ESSAGE PAGE Conversation Record Allows an extension user to record their active call as a mes- Voice Mail sage in their mailbox.
- Page 52 Automated Attendant callers. ■ for more. 143) LEXIBLE OUTING PAGE Flexible Mailbox Numbering Plan If the UX5000 extension numbers are customized, the System voice mail mailbox numbers can be customized to match. ■ 144) LEXIBLE AILBOX UMBERING PAGE more.
- Page 53 Feature Glossary Name Description Usage Future Delivery Message An extension user can record a voice message for a co- Voice Mail worker and have voice mail deliver it at a specified time in the future. ■ for more. 147) UTURE ELIVERY ESSAGE PAGE...
- Page 54 Feature Glossary Name Description Usage Leaving a Message An extension user can leave a voice message in a Voice Mail co-worker’s mailbox if that extension is busy, unan- swered, or in Do Not Disturb. ■ for more. 172) EAVING A ESSAGE PAGE Leaving a Message at a Busy/...
- Page 55 Feature Glossary Name Description Usage Make Call to Sender in this glossary. Voice Mail ■ Message Center Mailbox A shared mailbox for a group of co-worker’s. Can also be Voice Mail the routing destination for rotary dial Automated Atten- dant callers. ■...
- Page 56 Feature Glossary Name Description Usage Message Reply An extension user can reply to a message in their mailbox Voice Mail by dialing a simple code, without knowing the caller’s extension number. ■ for more. 223) ESSAGE EPLY PAGE Message Retention Voice mail will save a mailbox’s new, held, or saved Voice Mail messages for the Message Retention interval, and then...
- Page 57 Feature Glossary Name Description Usage Networking (AMIS) Allows voice mail to exchange voice messages with any System other voice mail system that provides AMIS networking. for more. ■ (AMIS) ( 236) ETWORKING PAGE Next Call Routing Mailbox Provides callers with additional dialing options after they Voice Mail leave a message in an extension’s mailbox (depending on the setting of the Next Call Routing Mailbox Dial Mode).
- Page 58 Feature Glossary Name Description Usage Programmable Voice Prompts ■ in this glossary. System OICE ROMPTS Programmer In this manual, the technician that uses a PC and the UX Maintenance Mail Administrator to customize the voice mail program- mable options. ■ Also see in this glossary.
- Page 59 OUTING FOR OTARY ALLERS glossary. Screened Transfer Similar to UX5000 screened transfers in which the trans- Automated Attendant ferring party controls the transfer. After an Automated Attendant caller dials an extension, voice mail calls (screens) the destination extension to see if the transfer can go through.
- Page 60 ■ for more. 277) INGLE IGIT IALING PAGE Subscriber Mailbox The mailbox type normally used for UX5000 extensions. Voice Mail ■ for more. 279) UBSCRIBER AILBOX PAGE System Administrator The extension user that has voice mail system administra- Maintenance tion capabilities.
- Page 61 After an Automated Attendant caller dials an extension, voice mail immediately transfers the call to the destination and hangs up. Any recalls or additional routing are han- dled by the UX5000 – just as with any other unscreened transfer. ■...
- Page 62 Description Usage Voice Mail Overflow The connected UX5000 can reroute outside calls when all System voice mail ports are busy. In addition, the UX5000 can automatically reroute unanswered outside calls to the voice mail Automated Attendant. for more. ■ 305)
-
Page 63: Acd Announcement Mailbox
(without saying “Goodbye”). The ACD Announcement Mailbox message is recorded by the System Administrator, the same as for normal Announcement Mailboxes. This allows the UX5000 ACD to have customized announcements for callers waiting in queue for an agent to become free. - Page 64 ACD Announcement Mailbox Operation Recording an ACD Announcement Mailbox Message (If you don’t see a Soft Key, press More> until it appears.) Log onto System Administrator’s mailbox (301). [Admin] Access the System Administrator options. • Alternately dial (72). [Annc] Select the Announcement Message options. •...
- Page 65 ACD Announcement Mailbox Recording an ACD Announcement Mailbox Message (If you don’t see a Soft Key, press More> until it appears.) [Play] Backup to beginning. • Dial (22). • You can append the message after the playback completes. [Cncl] Cancel the recording and erase the current Announce- ment Mailbox message.
-
Page 66: Announcement Mailbox
Announcement Mailbox Announcement Mailbox Description An Announcement Mailbox plays a pre-recorded announcement to callers. The Announcement Mailbox is typically set up to provide information to callers (such as company directions) and then route the caller back to the Automated Attendant. For example: ■... - Page 67 Announcement Mailbox Programming Step 1 Set up the Announcement Mailbox. 353). USTOMIZE AILBOX PTIONS NNOUNCEMENT PAGE - Select Announcement. ✔ By default, 800-809 are the Announcement Mailboxes. Step 2 To record the Announcement Message: PERATION BELOW ✔ By default, a message is not recorded. Step 3 To have voice mail hang up after playing the Announcement Mailbox message (without providing additional dialing options):...
- Page 68 Announcement Mailbox - Interactive Prompts (prompts recorded for an Interactive Mailbox). ✔ By default, the maximum Subscriber Message Length is 120 seconds. Step 7 To enter a Department Name for an Announcement Mailbox: 354). USTOMIZE AILBOX PTIONS NNOUNCEMENT EPARTMENT PAGE - Enter the Department Name.
- Page 69 Announcement Mailbox Operation Recording an Announcement Mailbox Message (If you don’t see a Soft Key, press More> until it appears.) Log onto System Administrator’s mailbox (301). [Admin] Access the System Administrator options. • Alternately dial (72). [Annc] Select the Announcement Message options. •...
- Page 70 Announcement Mailbox Recording an Announcement Mailbox Message (If you don’t see a Soft Key, press More> until it appears.) [Play] Backup to beginning. • Dial (22). • You can append the message after the playback completes. [Cncl] Cancel the recording and erase the current Announce- ment Mailbox message.
-
Page 71: Announcement Message
Announcement Message Announcement Message Description The Announcement Message is the voice message that the System Administrator records for a specific Announcement or ACD Announcement Mailbox. See for more. NNOUNCEMENT AILBOX PAGE Related Features NNOUNCEMENT AILBOX PAGE Programming NNOUNCEMENT AILBOX PAGE Operation NNOUNCEMENT AILBOX... -
Page 72: Answering Table
Answering Table Answering Table Description The Answering Table determines how the Automated Attendant answers outside calls on each voice mail port, according to the time of the day and day of the week that the call is ringing. The Answering Table is an integral part of the Automated Attendant. - Page 73 Answering Table Related Features Automated Attendant (page 68) The Answering Table determines how the Automated Attendant answers calls. Call Routing Mailbox (page 88) The Call Routing Mailbox provides the dialing instructions (Dial Action Table) and announcements to Automated Attendant Callers. Dial Action Table (page 116) The Dial Action Table defines the dialing options for the Call Routing Mailbox chosen by the Answering Table, which in turn provides those options to Automated Attendant callers.
-
Page 74: Answering Machine Emulation
Answering Machine Emulation Description A keyset on the UX5000 can work like a home answering machine. This lets voice mail screen their calls, just like their answering machine at home. If activated, the extension’s incoming calls route to the user’s Subscriber Mailbox. - Page 75 Answering Machine Emulation Operation Personal Answering Machine Emulation (AME) To activate or cancel Personal Answering Machine Emulation: Select the Call Forwarding options. [Prog + Cfwd + Sta] Alternately do one of the following: [Prog + Cfwd + Sta] • Press CALL1 and dial *2 . •...
-
Page 76: Answer Schedule Override
Answer Schedule Override Answer Schedule Override Description Answer Schedule Override provides alternate answering for Automated Attendant calls. When enabled, Answer Schedule Override sends calls to the specified Override Mailbox. The Override Mailbox can be an Announcement or Call Routing Mailbox. You can use Answer Schedule Override to provide holiday and bad weather closing enactments, for example. - Page 77 Answer Schedule Override Operation Using Answering Schedule Override (If you don’t see a Soft Key, press More> until it appears.) Log onto System Administrator’s mailbox (301) • To log into the System Administrator’s Mailbox remotely, after the Automated Attendant answers dial # and the Sys- tem Administrator’s Mailbox number.
-
Page 78: Auto Attendant Do Not Disturb
Auto Attendant Do Not Disturb Auto Attendant Do Not Disturb Description If a Subscriber Mailbox user has a mailbox greeting recorded, they can enable Auto Attendant Do Not Dis- turb to send Automated Attendant calls directly to their mailbox. Their extension will not ring for calls from the Automated Attendant. - Page 79 Auto Attendant Do Not Disturb Operation Setting Up Auto Attendant Do Not Disturb (If you don’t see a Soft Key, press More> until it appears.) Log onto Subscriber Mailbox [Greet] Access the Mailbox Greeting options • Alternately dial (4). Voice mail plays a summary of your current settings •...
- Page 80 Auto Attendant Do Not Disturb Setting Up Auto Attendant Do Not Disturb (If you don’t see a Soft Key, press More> until it appears.) Backup a few seconds. • Dial (2). [Play] Backup to beginning. • Dial (22). • You can append the message after the playback completes. [Erase] Erase the recording.
-
Page 81: Auto Erase Or Save
Auto Erase or Save Auto Erase or Save Description When a mailbox user completely listens to a new message and then exits their mailbox, voice mail will either automatically save or erase the message. The setting of this option depends on how the subscriber would prefer their mailbox to operate. -
Page 82: Auto Forward
Auto Forward Auto Forward Description Messages left in a Subscriber, Guest, Network, or Message Center Mailbox can automatically forward to a co-worker’s mailbox. This can help employees that work closely together cover each other’s messages. For example, if an executive has to be out of the office for an extended length of time they can Auto Forward their mailbox to their secretary. - Page 83 Auto Forward - To have the forwarded message be deleted from the recipient mailbox, select Forward and Erase ✔ The default setting is Forward and Save . Step 4 To set up the Auto Forward mode for a Subscriber Mailbox: : [M 431).
-
Page 84: Auto Help
Auto Help Auto Help Description A Subscriber, Guest, Message Center, or Network Mailbox user can enable a full or abbreviated set of voice prompts to guide them while using their mailbox. An inexperienced voice mail user may want to leave Auto Help enabled. -
Page 85: Auto Time Stamp
After a Subscriber, Guest, or Message Center Mailbox user listens to a message, voice mail can optionally announce the time and date the message was left. If the UX5000 provides Caller ID to the voice mail, Auto Time Stamp can also announce the caller’s number. Auto Time Stamp could be helpful in a legal office, for example, when it is essential to keep track of the date and time each message was left. -
Page 86: Automated Attendant
Automated Attendant Automated Attendant Description The Automated Attendant can automatically answer incoming calls, play an announcement, and provide dialing options to callers. There are 3 major Automated Attendant components: ■ Answering Table (page 54) The Answering Table determines how the Automated Attendant answers outside calls on each voice mail port, according to the time of the day and day of the week that the call is ringing. - Page 87 Automated Attendant Related Features Answering Table (page 54) Determines how the Automated Attendant answers outside calls on each voice mail port. Call Routing Mailbox (page 88) The mailbox associated with an Answering Table that specifies which dialing options (Dial Action Table) and announcements are available to Automated Attendant callers.
- Page 88 Automated Attendant Step 4 Set the maximum message length for Automated Attendant callers leaving a message in a mailbox. : [T 472) USTOMIZE YSTEM PTIONS IMERS UBSCRIBER ESSAGE ENGTH PAGE - Set the maximum length ( 1-9999 seconds) of recorded messages for: - Subscriber or Guest Mailbox users dialing RS to record and send a message.
-
Page 89: Automated Attendant Transfer
Automated Attendant Transfer Automated Attendant Transfer Description An extension user can transfer their trunk call to the Automated Attendant so the outside caller can use the Automated Attendant dialing options. This helps an outside caller, for example, that wants to return to the Automated Attendant so they can dial another co-worker or use a different Automated Attendant option. -
Page 90: Automatic Routing For Rotary Dial Callers
Automatic Routing for Rotary Dial Callers Automatic Routing for Rotary Dial Callers Description If an Automated Attendant caller doesn’t dial any digits, voice mail will automatically route them to a spec- ified option (such as the operator or a mailbox). The destination the caller reaches is set by the TIMEOUT action in the Dial Action Table associated with the Call Routing Mailbox that initially answered the call. -
Page 91: Bilingual Voice Prompts
Bilingual Voice Prompts Bilingual Voice Prompts Description Voice mail provides voice prompts in 2 languages. These 2 languages are available to Automated Attendant callers, specific trunks, or specific mailboxes. In addition, Automated Attendant callers may be able to select the language of their choice. There are four languages stored on the hard disk: Stored Language Assignments Language... - Page 92 Bilingual Voice Prompts ✔ By default, Guest Mailboxes uses English mnemonic. : [G ESSAGE ENTER AILBOX USTOMIZE AILBOX PTIONS ESSAGE ENTER ENERAL ILINGUAL 394). PAGE - Select the language the caller hears when they log onto the Message Center Mailbox. - The setting for this option overrides the default system language selection.
-
Page 93: Broadcast Message
Broadcast Message Broadcast Message Description A prerecorded Broadcast Message automatically plays to each Subscriber, Guest, Message Center, or Net- work Mailbox user when they log into their mailbox. It also plays to a user that calls a Future Delivery Mail- box to listen to any undelivered messages. - Page 94 Broadcast Message Operation Recording a Broadcast Message (If you don’t see a Soft Key, press More> until it appears.) Log onto System Administrator’s mailbox (301). [Admin] Access the System Administrator options. • Alternately dial (72). [Bdcast] Select the Broadcast Message options. •...
- Page 95 Broadcast Message Recording a Broadcast Message (If you don’t see a Soft Key, press More> until it appears.) [Play] Backup to beginning. • Dial (22). • You can append the message after the playback completes. [Cncl] Cancel the recording and erase the current Broadcast Message. [Erase] Erase the currently recorded message.
-
Page 96: Call Announcing
Call Announcing Call Announcing Description When an Automated Attendant caller dials a subscriber’s extension, Call Announcing can broadcast their name to the extension user (who can then either accept or reject the call). Call Announcing is only available to Subscriber Mailboxes, and only when the outside caller is routed from the Automated Attendant by a Screened Transfer (TRF) action or by Directory Dialing. - Page 97 Call Announcing Step 2 Turn Call Announcing On for the Subscriber Mailbox. PERATION BELOW Step 3 Check the Off Hook Call Announce string. : [D 470). USTOMIZE YSTEM PTIONS TRINGS NNOUNCE PAGE - This string is automatically set during installation at 6P@A. Do not change this string from its default setting.
- Page 98 Call Announcing Operation Turning Call Announcing On or Off (If you don’t see a Soft Key, press More> until it appears.) Log onto Subscriber Mailbox. [Optns] Access the Mailbox Options Menu. • Alternately dial (67). [CallAn] Access Call Announcing. • Alternately dial (22).
-
Page 99: Call Blocking
Call Blocking Call Blocking Description Call Blocking prevents Automated Attendant callers from reaching a subscriber’s extension and sends them back to the Automated Attendant. If a Subscriber Mailbox has Call Blocking enabled, the mailbox will block calls routed to the subscriber’s extension from the following: ■... -
Page 100: Call Forward To A Mailbox
Call Forward to a Mailbox Call Forward to a Mailbox Description A subscriber can easily forward calls to their Subscriber Mailbox. Instead of dialing an extension as the for- warding destination, the user dials the voice mail master number instead. With Call Forward to a Mailbox, the subscriber is assured that their calls don’t get forgotten when they are busy or unavailable. - Page 101 Call Forward to a Mailbox Activating or Canceling Call Forward to your Mailbox [Int] Select to forward Intercom calls only. [Int] • Alternately dial 4 . Option will not forward voice-announced Intercom calls. Chapter 2: Features ◆ 83 UX Mail Manual...
-
Page 102: Call Queuing
Call Queuing Call Queuing Description Automated Attendant callers can wait in line (without hanging up) for a busy extension to become free. Voice mail tells the caller their place in queue while they wait. While the caller is in queue, voice mail plays a Music on Hold program and periodically announces their position in line. - Page 103 Call Queuing Programming Step 1 Enable Call Queuing for the Subscriber Mailbox. : [S 440). USTOMIZE AILBOX PTIONS UBSCRIBER UBSCRIBER UEUING PAGE - Enable (check) or disable (uncheck) Call Queuing for the Subscriber Mailbox. ✔ By default, Call Queuing is disabled (No). Step 2 Adjust the Call Queuing Hold timer.
- Page 104 Call Queuing Operation Recording Music On Hold (If you don’t see a Soft Key, press More> until it appears.) Log onto System Administrator’s mailbox (301). • Optionally connect a customer-provided handset recording device to the administrator’s terminal. [Admin] Access the System Administrator options. •...
- Page 105 Call Queuing Recording Music On Hold (If you don’t see a Soft Key, press More> until it appears.) [Play] Backup to beginning. • Dial (22). • You can append the recording after the playback completes. [Cncl] Cancel the recording and erase the current Music On Hold recording. [Erase] Erase the current Music On Hold recording.
-
Page 106: Call Routing Mailbox
Call Routing Mailbox Call Routing Mailbox Description The Call Routing Mailbox, associated with an Answering Table, specifies which dialing options (Dial Action Table) and announcements are available to Automated Attendant callers. The Call Routing Mailbox is an integral part of the Automated Attendant. The Automated Attendant can automatically answer incom- ing calls, play an announcement, and provide dialing options to callers. - Page 107 Call Routing Mailbox Related Features Answering Table (page 54), The Call Routing Mailbox associates a specific set of dialing options (Dial Action Table) with an Answering Table. Automated Attendant (page 68) The Automated Attendant can automatically answer incoming calls, play an announcement, and pro- vide dialing options to callers.
- Page 108 Call Routing Mailbox ✔ See the following chart for default settings. Dial Action Table Default Assignments Mailbox Number Dial Action Table 811, 812, 821, 822, 831, 832, 841, 842 813, 814, 823, 824, 833, 834, 843, 844 Step 5 To change how long an Automated Attendant screened transfer (TRF) will ring an extension: : [C 359).
- Page 109 Call Routing Mailbox - Reports: 499) AILBOX IRECTORY EPORT PAGE - Reports: 500) AILBOX UMERIC EPORT PAGE - Reports: 501) AILBOX CCESS OUNT EPORT PAGE Operation Recording a Welcome Message for a Call Routing Mailbox (If you don’t see a Soft Key, press More> until it appears.) Log onto System Administrator’s mailbox (301).
- Page 110 Call Routing Mailbox Recording a Welcome Message for a Call Routing Mailbox (If you don’t see a Soft Key, press More> until it appears.) Backup a few seconds. • Dial (2). [Play] Backup to beginning. • Dial (22). • You can append the message after the playback completes.
- Page 111 Call Routing Mailbox Recording an Instruction Menu Message for a Call Routing Mailbox (If you don’t see a Soft Key, press More> until it appears.) Log onto System Administrator’s mailbox (301). [Admin] Access the System Administrator options. • Alternately dial (72).
- Page 112 Call Routing Mailbox Recording an Instruction Menu Message for a Call Routing Mailbox (If you don’t see a Soft Key, press More> until it appears.) [Cncl] Cancel the recording and erase the current Instruction Menu Message. [Erase] Erase the currently recorded message. •...
-
Page 113: Call Waiting
Call Waiting Call Waiting Description Automated Attendant callers can wait in line (without hanging up) for a busy extension to become free. Voice mail sends a beep to the busy extension letting them know a call is waiting. Call Waiting is only avail- able to Subscriber Mailboxes, and only when the outside caller is routed from the Automated Attendant by a Screened Transfer (TRF) action or by Directory Dialing. - Page 114 Call Waiting Programming Compatibility Guidelines: ■ When using the UX Mail Administrator to enter dial strings, take care not to enter illegal characters (such as dashes). Enter only those characters allowed by the option you are programming. Step 1 Check the Call Waiting string. : [S 438).
-
Page 115: Caller Id
Caller ID Caller ID Description Caller ID is a telco service that provides a caller’s number and optional name. The UX5000 can pass this infor- mation to voice mail to enable features. ID A 186) ALLER UTOMATIC RANSFER PAGE PAGE... -
Page 116: Caller Id Automatic Transfer
Related Features Caller ID (page 97) Caller ID Automatic Transfer is available only if the telco provides Caller ID to the UX5000 and the UX5000 passes that Caller ID data to the voice mail ports. Make Call (page 186) An extension user can listen to a voice message and dial a code to return the call without knowing the caller’s number. -
Page 117: Caller Id With Return Call
Caller ID with Return Call Caller ID with Return Call Description 186) PAGE Chapter 2: Features ◆ 99 UX Mail Manual... -
Page 118: Calling The Automated Attendant
Calling the Automated Attendant Calling the Automated Attendant Description Automated Attendant callers can use various voice mail features and then return to the Automated Attendant for additional dialing options. This lets the caller dial other extensions, leave messages for co-workers, or use other Automated Attendant features. -
Page 119: Centralized Voice Mail
The networking provides a seamless connection of multiple systems. Networking can allow many compa- nies to connect their UX5000 systems so they appear as one. This provides the ability to have only one oper- ator to manage the system and share one voice mail within the network. An extension user in the network can easily dial another extension or transfer a call within the Networking System. - Page 120 Centralized Voice Mail Operation Centralized Voice Mail operation is automatic once programmed. 102 ◆ Chapter 2: Features UX Mail Manual...
-
Page 121: Centrex Transfer
Attendant answers an outside call and then transfers the caller back to the telco using the same trunk on which the call initially rang. Centrex Transfer is only available if the UX5000 connects to Centrex trunks that provide the features required to complete the transfer (see Programming below). Centrex Transfer allows the voice mail to maximize the capabilities of any connected Centrex trunks. - Page 122 Centrex Transfer - For the selected mailbox, enter xxxxPPP. - The digits xxxx represent the Centrex extension you want to dial. - The entire string must not exceed 15 characters. - The three pauses (PPP) at the end of the string give the outgoing call time to ring. ✔...
-
Page 123: Checking/Deleting A Message
Checking/Deleting a Message Checking/Deleting a Message Description A Subscriber, Guest, or Message Center Mailbox user can check if a voice mail message they left for a co- worker has been listened to by the co-worker. If not, they can delete it. The mailbox user can check on mes- sages they sent using either the Message Record ( RS ) or Message Forward ( MF ) method. -
Page 124: Confidential Message
Confidential Message Confidential Message Description A subscriber user can leave a Confidential Message for a co-worker that cannot be forwarded to another user. The subscriber can tag a message as confidential after using Message Record ( RS ), Message Forward ( MF ), or Future Delivery ( FD ) to record the message. - Page 125 Confidential Message Operation Tagging a Message as Confidential (If you don’t see a Soft Key, press More> until it appears.) To record a message, then tag it as confidential: Log onto Subscriber Mailbox. [Rec] Record the message + + Dial mailbox number to receive message. [Done] •...
-
Page 126: Conversation Record
Related Features Subscriber Mailbox (page 279) Conversation Record is only available to subscriber extensions. Programming Step 1 In UX5000 programming, assign a Conversation Record key. , assign a keyset programmable key as a record key. 15-07-01: P ROGRAMMING UNCTION - The voice mail Record Key is code 78. - Page 127 Conversation Record Operation Conversation Record To record your active call in your mailbox: Press your voice mail Record key. • You hear 2 beeps and your Record key flashes. The beeps periodically repeat to remind you that you are recording. You and your caller hear the voice prompt “Recording.”...
-
Page 128: Desktop Messaging / Email Integration
Desktop Messaging / Email Integration Desktop Messaging / Email Integration Description Compatibility Guidelines: • When using Microsoft Exchange Server, the software version must be Exchange 2000 or higher. UX Mail provides Desktop Mes- saging between a subscriber’s voice mailbox and their email inbox. - Page 129 Desktop Messaging / Email Integration Programming The programming below is required to enable Desktop Messaging for a Subscriber Mailbox. • For Exchange Server accounts, ask the server administrator for the account setup information. • In Outlook Express, make sure the following Tools: Options: options are enabled: - Empty messages from the ‘Deleted Items’...
- Page 130 Desktop Messaging / Email Integration Step 2 Configure the SMTP settings for the subscriber’s email account. : [E 442). USTOMIZE AILBOX PTIONS UBSCRIBER MAIL ERVER PAGE - Enter the name of the SMTP server that handles the subscriber’s outgoing email messages (such as smtp.emailserver.com).
- Page 131 Desktop Messaging / Email Integration - Enter the type of IMAP4 Authentication required by the subscriber’s email provider. The options are Login, DRAM MD5, and Plain. ✔ By default, this option is Plain. : [E 444). USTOMIZE AILBOX PTIONS UBSCRIBER MAIL EARCH PAGE...
-
Page 132: Diagnostics
Diagnostics Diagnostics Description Diagnostics help you troubleshoot your voice mail and keep it operating at peak performance. The following diagnostics are available (see Programming below): Remove Voice Mail Ports from Service ● ● Port Self Test Diagnostics In addition, the System Administrator can log onto their mailbox and obtain the system version number. Related Features Real Trace (page 264) The Real Trace is a troubleshooting report that displays voice mail events as they occur, in real time. -
Page 133: Using The Port Self Test Diagnostic
Diagnostics Using the Port Self Test Diagnostic Step 1 Assign an extension to the voice mail port. 454). USTOMIZE PTIONS XTENSION PAGE - Optionally enable (Yes) or disable (No) this option. This enables the second portion of the Port Self Test Diagnostic. This entry is arbitrary. It is only used for testing. ✔... -
Page 134: Dial Action Table
Dial Action Table Dial Action Table Description The Dial Action Table defines the dialing options for the Call Routing Mailbox chosen by the active Answering Table, which in turn provides those dialing options to Automated Attendant callers. There are 500 Dial Action Tables. The Dial Action Table is an integral part of the Automated Attendant. The Auto- mated Attendant can automatically answer incoming calls, play an announcement, and provide dialing options to callers. -
Page 135: Dial Action Table Options
Dial Action Table Dial Action Table Options The following table summarizes the Dial Action Table dial (key) actions and their associated features. Dial Action Table Key Action Summary Action Description Feature Reference For more, see: Directory Dialing by First Name Directory Dialing (page 120) Page 339 DIRF... - Page 136 Dial Action Table Dial Action Table Key Action Summary Action Description Feature Reference For more, see: Quick Confidential Message without Greeting Quick Message (page 261) Page 338 Allows an Automated Attendant caller to leave REC2C a Quick Confidential Message at an extension. The caller will not hear the extension’s per- sonal greeting.
- Page 137 Dial Action Table Step 2 Customize the Dial Action Table options. 333) URN TO USTOMIZE CTION ABLES PAGE FOR A DESCRIPTION OF ALL THE CTION ABLE OPTIONS AND THE FEATURES TO WHICH THEY APPLY ✔ The default Dial Action Table dialing options are: Dial Action Table Default Settings Dial Action Tables 1-3 Dial Action Tables 4-100...
-
Page 138: Directory Dialing
Directory Dialing Directory Dialing Description Directory Dialing allows an Automated Attendant caller to reach an extension by dialing the first few letters in the extension user’s name. With Directory Dialing, the caller does not have to remember the extension number of the person they wish to reach — just their name. Here’s how Directory Dialing works. When the Automated Attendant answers: It routes the call automatically to a Directory Dialing Mailbox. -
Page 139: Directory Dialing Using A Call Routing Mailbox
Directory Dialing Networking (AMIS) (page 236) Directory Dialing can allow callers to leave a message in a Network Alias Mailbox. Directory Dialing is not available with Network Remote Mailboxes. System Administrator (page 283) The System Administrator can record the Directory Dialing Message. Tenant Service (page 287) Tenant Service may limit access to a Directory Dialing Mailbox. - Page 140 Directory Dialing Step 4 Record a name for each mailbox to which you want to Directory Dial. From a System Administrator’s mailbox (301), - Press + Mailbox number + [Admin] [Subs] [Name] [Rec] [Done] - This will help resolve routing conflicts (for example, between two co-workers with the same first name).
- Page 141 Directory Dialing To have Directory Dialing Log directly into a mailbox: 5.3.1 : LOGON A – L 339) USTOMIZE CTION ABLES CTION OICE PAGE - In the Dial Action Table, for the range’s leading digit program Action = Logon and Number = XXX.
-
Page 142: Directory Dialing Using A Directory Dialing Mailbox
Directory Dialing Directory Dialing Using a Directory Dialing Mailbox Step 1 Set up the Directory Dialing Mailbox. : [G 361). USTOMIZE AILBOX PTIONS IRECTORY IALING ENERAL PAGE - Select Dir. Dialing. ✔ Be default, there are no Directory Dialing mailboxes assigned. Step 2 Route outside calls to the Directory Dialing Mailbox. - Page 143 Directory Dialing Customize: Dial Action Tables: 5.2.1 UTRF A – U 336) CTION NSCREENED RANSFER PAGE - In the Dial Action Table, for the range’s leading digit program Action = UTRF and Number = XXX. - For example, to have Directory Dialing Unscreened Transfer to extensions in the 300-399 range, for digit 3 be sure Action = UTRF and Number = XXX.
- Page 144 Directory Dialing - The name entry syntax is last name, followed by a space, followed by the first name. For example: SMART MIKE - Normally, the name should be at least 4 letters long. ✔ By default, there are no names entered. Repeat this step for all mailboxes of all types to which you want to Directory Dial.
- Page 145 Directory Dialing Operation Recording a Directory Dialing Message for a Directory Dialing Mailbox (If you don’t see a Soft Key, press More> until it appears.) Log onto System Administrator’s mailbox (301). [Admin] Access the System Administrator options. • Alternately dial (72).
- Page 146 Directory Dialing Recording a Directory Dialing Message for a Directory Dialing Mailbox (If you don’t see a Soft Key, press More> until it appears.) [Play] Backup to beginning. • Dial (22). • You can append the message after the playback completes.
-
Page 147: Directory Dialing Mailbox
Directory Dialing Mailbox Directory Dialing Mailbox Description A Directory Dialing Mailbox lets you set up a type of Directory Dialing that bypasses the Automated Atten- dant. The Directory Dialing Mailbox can answer outside calls, play a unique message, and let callers imme- diately dial by name. -
Page 148: Directory Dialing Message
Directory Dialing Message Directory Dialing Message Description The Directory Dialing Message is the announcement the Directory Dialing Mailbox provides to incoming callers. This announcement tells the callers how to use the Directory Dialing feature. See IRECTORY IALING for more. 124) SING A IRECTORY IALING... -
Page 149: Distribution List
Distribution List Distribution List Description The Distribution List is the list of extensions that will receive a message sent to the associated Distribution Mailbox. Once you associate a Distribution List with a Distribution Mailbox, any message left in the Distri- bution Mailbox will automatically be sent to all the mailboxes in the list. - Page 150 Distribution List Programming Step 1 Set up the Distribution Mailbox. 365). USTOMIZE AILBOX PTIONS ISTRIBUTION PAGE - Select Distribution. ✔ By default, 851-860 are Distribution Mailboxes. Step 2 Assign the Distribution Mailbox to a Distribution List. 366). USTOMIZE AILBOX PTIONS ISTRIBUTION ISTRIBUTION PAGE...
- Page 151 Distribution List Operation Recording a Distribution List Message (If you don’t see a Soft Key, press More> until it appears.) Log onto your mailbox. [Rec] Access Record and Send a Message. • Alternately dial (77). Record Message + [Done] • Alternately dial # . •...
-
Page 152: Distribution Mailbox
Distribution Mailbox Distribution Mailbox Description Use a Distribution Mailbox when setting up a Distribution List. When you record a message and send it to the Distribution Mailbox, voice mail automatically sends the message to everyone on the predefined Dis- tribution List. See for more. -
Page 153: Erasing All Messages
Erasing All Messages Erasing All Messages Description The System Administrator can delete all messages in a Subscriber, Guest, or Message Center Mailbox. The System Administrator can also delete all messages waiting to be delivered in a Network Mailbox. Erasing All Messages is an administrator’s maintenance tool. The administrator may need to use this tool if an employee has left the company or has an excessive number of messages stored in their mailbox. -
Page 154: Exiting A Mailbox
Exiting a Mailbox Exiting a Mailbox Description A Subscriber, Guest, Message Center, or Future Delivery Mailbox user can exit their mailbox by dialing a code or by hanging up. After exiting, the mailbox user can use their extension for normal call processing. Note: If you receive new messages while using your mailbox, you will hear, “You have received new mes- sages”... -
Page 155: External Extension
External Extension External Extension Description An extension can have Screened Transfer (TRF) calls from the Automated Attendant automatically route on another trunk to an outside number. To set this up, enable External Extension for the extension’s Subscriber Mailbox and enter an External Extension callout number. When the Automated Attendant answers and the outside caller dials the extension, voice mail automatically routes the incoming call to the programmed External Extension callout number. - Page 156 - This string should be F. ✔ By default, this option is N (no entry). Step 6 In UX5000 programming, set up the trunks voice mail will use for External Extension as Tandem Trunks (i.e., Unsupervised Conference). UX5000 EFER TO THE...
-
Page 157: First Time Tutorial
First Time Tutorial First Time Tutorial Description Voice mail can play a brief tutorial to mailbox users when they log onto their mailbox for the first time. First Time Tutorial is available to Subscriber and Guest Mailboxes. The tutorial will ask the mailbox user if they want to record their Greeting, Mailbox Name, and Security Code. -
Page 158: First Time Tutorial For Subscriber Mailboxes
First Time Tutorial First Time Tutorial for Subscriber Mailboxes Step 1 Enable First Time Tutorial for the Subscriber Mailbox. : [L USTOMIZE AILBOX PTIONS UBSCRIBER OGON RANSFER IRST OGIN PTION 434). PAGE - Select Option 1 to have First Time Tutorial play the Announcement Message from the Announcement Mailbox specified in step 2. - Page 159 First Time Tutorial Operation Using the First Time Tutorial (If you don’t see a Soft Key, press More> until it appears.) Log onto your Subscriber Mailbox for the first time. • You hear the prerecorded First Time Tutorial message. If your mailbox has First Time Tutorial Option 2, also do the following. [Greet] Select to record a Greeting for your mailbox.
-
Page 160: Flexible Answering Schedules
Flexible Answering Schedules Flexible Answering Schedules Description The Automated Attendant can answer outside calls with different announcements and dialing options, depending on the time of day and day of week. For example, a company can set up separate schedules for weekdays, evenings, weekends, and specific holidays. -
Page 161: Flexible Call Routing
Flexible Call Routing Flexible Call Routing Description The Automated Attendant can provide outside callers with a wide variety of dialing (routing) options. You can customize the announcements and routing options to exactly meet the site requirements. Use Flexible Call Routing to eliminate or minimize the need for an operator or receptionist to handle outside calls. There are 3 components to Flexible Call Routing. -
Page 162: Flexible Mailbox Numbering Plan
If the UX5000 extension numbers are customized, you can customize the voice mail mailbox numbers to match. For example, if you change your UX5000 extension numbers to two digits, you will also have to cre- ate corresponding mailboxes to match (see the example under Programming below). -
Page 163: Forced Unscreened Transfer
Forced Unscreened Transfer Forced Unscreened Transfer Description A Subscriber Mailbox can optionally convert Automated Attendant Screened Transfers to Unscreened Transfers. Enable this option for a mailbox if the subscriber prefers to receive all calls sent by the Automated Attendant as Unscreened Transfers. With Unscreened Transfers: ●... -
Page 164: Future Delivery Mailbox
Future Delivery Mailbox Future Delivery Mailbox Description The Future Delivery Mailbox is the type of mailbox that allows users to leave Future Delivery Messages. Voice mail allows a single Future Delivery Mailbox. See for more. 147) UTURE ELIVERY ESSAGE PAGE Related Features Future Delivery Message (page 147) Use the Future Delivery Mailbox to enable Future Delivery Messages. -
Page 165: Future Delivery Message
Future Delivery Message Future Delivery Message Description An extension user can record a voice message for a co-worker and have voice mail deliver it at a future time. If a co-worker is on vacation, for example, you can record a Future Delivery Message and have voice mail deliver it to them when they return. - Page 166 Future Delivery Message Step 4 To have the Future Delivery Department name appear on the Distribution List and Mailbox Options reports: 368). USTOMIZE AILBOX PTIONS UTURE ELIVERY EPARTMENT PAGE - This information appears on the Distribution List (page 495) and Mailbox Options (page 497) reports.
- Page 167 Future Delivery Message Recording a Future Delivery Message (If you don’t see a Soft Key, press More> until it appears.) [Back] Back up to the Main Menu without sending the message. [Erase] • Alternately dial ** . Enter the time for the message to be delivered. Entries are HHMM (2 digits for the hour and 2 digits for the minute) followed by A (for AM) or P (for PM).
-
Page 168: Getting Recorded Help
Getting Recorded Help Getting Recorded Help Description If a Subscriber, Guest, Message Center, Network, or Future Delivery Mailbox user dials an incorrect code or forgets what to dial while in their mailbox, they can request help from the voice mail voice prompts. Recorded Help provides the user with a built-in, interactive user’s guide. -
Page 169: Go To A Mailbox
Go To A Mailbox Go To A Mailbox Description An Automated Attendant caller can dial a digit to route to a Call Routing or Announcement Mailbox. This is called the Go To (GOTO) action. The GOTO action can route directly to a specific Call Routing or Announcement Mailbox, or allow the Automated Attendant caller to go to a mailbox of their own choosing. - Page 170 Go To A Mailbox Related Features Automated Attendant (page 68) The Automated Attendant can automatically answer incoming calls, play an announcement, and provide dialing options to callers. Dial Action Table (page 116) The GOTO action is a Dial Action Table option. Instruction Menu (page 162) Be sure the Instruction Menu for the active Call Routing Mailbox describes how to use the GOTO action.
-
Page 171: Greeting
Greeting Greeting Description A Subscriber or Guest Mailbox user can record up to 3 personalized greetings for their mailbox. One of the 3 greetings can be active, while the other 2 are stored. Caller’s to the user’s mailbox hear the active person- alized greeting rather than a default message. - Page 172 Greeting Programming Step 1 Set the maximum length of Subscriber and Guest Mailbox greetings. : [T 472). USTOMIZE YSTEM PTIONS IMERS UBSCRIBER ESSAGE ENGTH PAGE - Set the maximum length ( 1-9999 seconds) of recorded messages for: - Subscriber or Guest Mailbox users dialing RS to record and send a message. - Extension users leaving a message in a Subscriber, Guest, or Message Center Mailbox.
- Page 173 Greeting Operation Recording a Greeting (If you don’t see a Soft Key, press More> until it appears.) Log onto Subscriber Mailbox [Greet] Access the Mailbox Greeting options • Alternately dial (4). Voice mail plays a summary of your current settings •...
- Page 174 Greeting Recording a Greeting (If you don’t see a Soft Key, press More> until it appears.) Backup a few seconds. • Dial (2). [Play] Backup to beginning. • Dial (22). • You can append the message after the playback completes. [Erase] Erase the recording.
-
Page 175: Guest Mailbox
Guest Mailbox Guest Mailbox Description An outside party can have their own Guest Mailbox for receiving and sending messages. A Guest Mailbox is similar in many respects to a Subscriber Mailbox, but normally does not have an extension associated with it. - Page 176 Guest Mailbox Message Retention (page 224) Set how long a Guest Mailbox will retain held and saved messages. Message Playback Direction (page 218) Set the Guest Mailbox message playback order. Message Storage Limit (page 227) Set the maximum number of messages that can be left in the mailbox. Next Call Routing Mailbox (page 247) The Next Call Routing Mailbox provides additional dialing options after a caller leaves a message in a Guest Mailbox.
- Page 177 Guest Mailbox Step 5 Set the maximum length of recorded Quick Messages left in the Guest Mailbox. : [T 473). USTOMIZE YSTEM PTIONS IMERS ONSUBSCRIBER ESSAGE ENGTH PAGE - This option sets the maximum length (1-9999 seconds) of recorded messages for: - Automated Attendant callers leaving a message or Quick Message in Guest, Message Cen- ter, and Subscriber Mailboxes.
-
Page 178: Hang Up
Hang Up Hang Up Description Hang Up (HUP) is an Automated Attendant option that immediately hangs up the outside call. When setting up a Dial Action Table, you may want to use Hang Up for unused actions (rather than the caller hearing the standard error message). -
Page 179: Hotel/Motel Services
Hotel/Motel Services Hotel/Motel Services Description Related Features Programming Operation Chapter 2: Features ◆ 161 UX Mail Manual... -
Page 180: Instruction Menu
Instruction Menu Instruction Menu Description The Instruction Menu is the second announcement that plays to Automated Attendant callers, right after the Welcome Message. Normally, the Instruction Menu provides callers with the Automated Attendant dialing options. The Instruction Menu is associated with the active Call Routing Mailbox. Normally, you should have the System Administrator customize (rerecord) the Instruction Menu to match the dialing options enabled in the active Dial Action Table. - Page 181 Instruction Menu Programming Step 1 To turn off the default Instruction Menu (and Welcome Message): : [C USTOMIZE AILBOX PTIONS OUTING ANDLING EFAULT ESSAGES 360). PAGE - Use this option to enable (Yes) or disable (No) the default Instruction Menu and Welcome Message for a Call Routing Mailbox.
- Page 182 Instruction Menu Recording an Instruction Menu Message for a Call Routing Mailbox (If you don’t see a Soft Key, press More> until it appears.) [Rec] Record a new Instruction Menu Message. • Alternately dial (7). Record message. [Pause] Pause recording. •...
-
Page 183: Interactive Mailbox
Interactive Mailbox Interactive Mailbox Description The Interactive Mailbox is a “question and answer” mailbox that provides callers with the ability to record answers to a sequence of pre-recorded Interactive Prompts. Voice mail saves the answers as new messages in the Subscriber, Guest, or Message Center Mailbox assigned to store the responses. See NTERACTIVE ESSAGING for more. -
Page 184: Interactive Messaging
Interactive Messaging Interactive Messaging Description Compatibility Guidelines: • Interactive Messaging provides the capability of 1600 Interactive Prompts maximum. Interactive Messaging provides callers with a “question and answer” order taker. It uses an Interactive Mail- box to give callers the ability to record answers to a sequence of pre-recorded Interactive Prompts. Voice mail saves the answers as new messages in the Subscriber, Guest, or Message Center Mailbox assigned to store the responses. - Page 185 Interactive Messaging Programming Step 1 Set up the Interactive Mailbox. : [G 383). USTOMIZE AILBOX PTIONS NTERACTIVE ENERAL PAGE - Select Interactive. ✔ By default, there are no Interactive Mailboxes assigned. Step 2 Optionally assign a department name to an Interactive Mailbox. : [G 384).
- Page 186 Interactive Messaging Step 8 Enable or disable the reference number for each interactive caller. : [I USTOMIZE AILBOX PTIONS NTERACTIVE NTERACTIVE EFERENCE UMBER FOR 388). PAGE - If enabled, voice mail will play a reference number to the caller after they have recorded their answers.
- Page 187 Interactive Messaging Operation Recording Interactive Prompts Log onto System Administrator’s mailbox (301) (72) Access System Administrator options (47) Select Interactive Prompts Enter the Interactive Mailbox Number (If there are no Interactive Prompts recorded) Access the record menu for prompt 1 Record prompt Backup (22)
- Page 188 Interactive Messaging Recording Interactive Prompts Erase recording Exit recording mode Add a new prompt at the end of the list Record new prompt + # Backup (22) Backup to beginning Pause or restart recording Erase recording Exit recording mode Erase a prompt Enter prompt number to erase + #, or # to exit Review all prompts Go to another Interactive mailbox...
-
Page 189: Interactive Prompts
Interactive Prompts Interactive Prompts Description The Interactive Prompts are the Interactive Messaging pre-recorded prompts. When a caller logs into an Interactive Mailbox, they hear the Interactive prompts and can record responses to these prompts. See NTER for more. 166) ACTIVE ESSAGING PAGE Related Features... -
Page 190: Leaving A Message
Leaving a Message Leaving a Message Description An extension user can leave a voice message in a co-worker’s mailbox if that extension is busy, unanswered, or in Do Not Disturb. Leaving a voice message is a handy and efficient way to communicate with co-work- ers that avoids post-it notes, message pads, and unnecessary email. -
Page 191: Listening To Messages
Listening to Messages Listening to Messages Description While or after listening to a message, a Subscriber, Guest, Message Center, or Network Mailbox user has many message handling options from which to choose. The listening options let you quickly and efficiently manage your voice mail messages, respond to the message sender, or forward the message to a co-worker for additional handling. - Page 192 Listening to Messages Related Features Message Record (page 220) While recording a message, an Subscriber or Guest Mailbox user has many recording options from which to choose. Programming Step 1 Set the Message Backup/Go Ahead Time. : [T 474). USTOMIZE YSTEM PTIONS IMERS...
-
Page 193: Local Backup, Restore, And Archive
Local Backup, Restore, and Archive Local Backup, Restore, and Archive Description Compatibility Guidelines: ■ Local Backup, Restore, and Archive may cause interruption of normal voice mail operations. The Local Backup, Local Restore, and Backup Archives options provide a method for backing up the voice mail database, storing the database on your PC, and restoring the saved data back into the system. - Page 194 Local Backup, Restore, and Archive Programming Step 1 To start the Local Backup, Restore, and Archive: 515). OOLS OCAL ACKUP OCAL ESTORE OCAL RCHIVE PAGE Operation 515) OCAL ACKUP OCAL ESTORE OCAL RCHIVE PAGE 176 ◆ Chapter 2: Features UX Mail Manual...
-
Page 195: Log Onto Voice Mail
Log Onto Voice Mail Log Onto Voice Mail Description A subscriber can log onto their mailbox using a method that best suits their needs and location. While at their own extension, the subscriber just presses a single key to log onto their mailbox. To use their mailbox while at a co-worker’s extension, the subscriber dials the voice mail master number, followed by their mail- box number (which is normally the same as their extension number). - Page 196 Log Onto Voice Mail Guest Mailbox (page 157) A guest can log onto their mailbox through the Automated Attendant or by dialing the voice mail master number. Interactive Messaging (page 166) A caller remotely logging onto an Interactive Mailbox can listen and respond to the Interactive Prompts. Message Center Mailbox (page 190) A Message Center Mailbox user can log onto their mailbox through the Automated Attendant or by dial- ing the voice mail master number.
- Page 197 Log Onto Voice Mail Operation Logging Onto Your Mailbox To log onto your Subscriber Mailbox: Press your Voice Mail key. From an on-premise single line set, lift handset and dial *8. ■ To log onto your Guest or Message Center Mailbox, or your Subscriber Mailbox from a co-worker’s extension: Press an idle CALL key.
-
Page 198: Mailbox Name
Mailbox Name Mailbox Name Description When a Greeting is not recorded, a caller leaving a message in a Subscriber, Guest, Message Center, or Net- work Alias Mailbox can hear the mailbox’s prerecorded name instead of the mailbox number. The prere- corded Mailbox Name gives the mailbox that personal touch. - Page 199 Mailbox Name Operation Recording Your Mailbox Name Log onto Subscriber, Guest, or Message Center Mailbox (76) Access the Mailbox Name Menu Listen to the currently recorded name (if any) Backup (22) Backup to beginning Go forward Pause or restart listening (88) Turn volume up (83)
- Page 200 Mailbox Name Recording Co-worker’s Names from a System Administrator’s Mailbox Log onto System Administrator’s Mailbox (301) (72) Access the System Administrator options Access the Mailbox Name menu Enter the number of the mailbox whose name you want to record Listen to the currently recorded name (if any) Backup (22) Backup to beginning...
-
Page 201: Mailbox Security Code Delete
Mailbox Security Code Delete Mailbox Security Code Delete Description The System Administrator can delete the security code for any Announcement, Future Delivery, Guest, Mes- sage Center, Network, or Subscriber Mailbox. This effectively unlocks the mailbox. If mailbox security is not necessary, deleting a mailbox’s security code speeds up mailbox logon. Without a security code, the user just presses their Voice Mail key to immediately log onto their mailbox. -
Page 202: Main Menu
Main Menu Main Menu Description After a Subscriber, Guest, Message Center, or Network Mailbox user logs into their mailbox, voice mail pro- vides them with the Main Menu of options. The Main Menu provides quick access to the most commonly used mailbox features in a central location. - Page 203 Main Menu Related Features See the Mailbox Main Menu chart on the previous page. Programming No additional programming required. Operation Accessing the Mailbox Main Menu Log onto Subscriber, Guest, or Message Center Mailbox You automatically go to the mailbox Main Menu. ■...
-
Page 204: Make Call
Make Call is available for messages received from outside callers if the UX5000 has Caller ID enabled, Caller ID is provided by the connected telco, and the UX5000 is set up to pass the Caller ID infor- mation to the voice mail. -
Page 205: Caller Id Programming
Step 1 Be sure the telco provides Caller ID to the UX5000. Step 2 Check your UX5000 programming to be sure the UX5000 is set up to receive the Caller ID and pass it to the voice mail ports. Step 3 Determine if voice mail should add a leading 1 to the number it dials when placing a Make Call. -
Page 206: Ask Caller's Name Programming
Make Call - Customize: Mailbox Options Edit: Subscriber: ESSAGE OTIFICATION OCAL ALLOUTS 426) PAGE - Customize: Mailbox Options Edit: Subscriber: ESSAGE OTIFICATION ISTANCE 426) OUTS PAGE Ask Caller’s Name Programming Step 1 Optionally have a Guest Mailbox request that the caller enter their number. : [M ’... - Page 207 Make Call Operation Using Make Call from your Mailbox Log onto Subscriber, Guest, or Message Center Mailbox Listen to the message for which you want to make a return call (62) Dial this code while listening to the message you want to return ■...
-
Page 208: Message Center Mailbox
Message Center Mailbox Message Center Mailbox Description A Message Center Mailbox is a unique mailbox type used to “collect” messages not intended for a specific mailbox. For example, a Technical Services group could have a Message Center Mailbox for storing shared messages. - Page 209 Message Center Mailbox Next Call Routing Mailbox (page 247) The Next Call Routing Mailbox provides additional dialing options to callers that leave a message in a Message Center Mailbox. Tenant Service (page 287) Tenant Groups may limit access to a Message Center Mailbox. Welcome Message (page 308) You can record a Welcome Message for a Message Center Mailbox.
- Page 210 Message Center Mailbox Operation Logging Onto a Message Center Mailbox To log onto a Message Center Mailbox: Press an idle CALL key + dial the voice mail master number (e.g., 700). When voice mail answers, dial the Message Center Mailbox number. Logging Onto a Message Center Mailbox from the Automated Attendant To log onto a Message Center Mailbox from the Automated Attendant: After the Automated Attendant answers, dial # + the Message Center Mailbox number.
-
Page 211: Message Count Display
Message Count Display Message Count Display Description If you press CHECK and dial *0 at an idle keyset, the display will show the number of new messages wait- ing in the mailbox. Message Check Display One message waiting in the Subscriber Mailbox When you log onto your mailbox, your display shows the active Message List (New, Saved, Held, or All) and the number of messages in the active list. -
Page 212: Message Delete
Message Delete Message Delete Description A Subscriber, Guest, Message Center, or Network Mailbox user can delete any messages left in their mail- box. In addition, a user can log onto a Future Delivery Mailbox and delete any undelivered messages in the Future Delivery Mailbox. -
Page 213: Message Forward
Message Forward Message Forward Description A Subscriber or Message Center Mailbox user can forward a message in their mailbox to up to 10 co-work- ers. Forwarding is helpful when a user receives a message with which a co-worker can assist them. Rather than sending a new message, the user can just forward the message with which they need help. - Page 214 Message Forward Forwarding a Message Log onto Subscriber or Message Center Mailbox Access the Message Listen mode (to listen to the message that you want to forward) (63) Access the Message Forward Menu Record a comment that will precede the forwarded message + # , OR Dial # to forward without a comment When recording a comment for your forwarded message Backup...
-
Page 215: Message Length
Message Length Message Length Description You can set the maximum length of a message that can be left in a user’s mailbox. When a caller tries to leave a message that exceeds the limit, they hear, “You have reached the recording limit. To listen to the mes- sage you recorded, press L . -
Page 216: Message Listen Mode
Message Listen Mode Message Listen Mode Description Message Listen Mode determines the type of messages a Subscriber, Guest, Message Center, or Network Mailbox user will hear when they dial L (5) after logging into their mailbox. The can hear all their messages, just their new messages, just their saved messages, or just their held messages. -
Page 217: Message Notification
Message Notification Message Notification Description Once activated by the Subscriber, Guest, or Message Center mailbox user, Message Notification dials up to 3 numbers to let the user know when there are new messages in their mailbox. Notification can call exten- sions, local numbers, long distance numbers and pagers. -
Page 218: Message Notification To Normal Numbers
ALLOUTS PAGE ✔ By default, port 4 is enabled for callouts. Enter the access digits the UX5000 should dial to get an outside line when placing a local or long dis- ● tance Message Notification callout. - For local numbers, see Customize: Tenant Options:... -
Page 219: Message Notification To Radio Pagers
✔ By default, port 4 is enabled for callouts. ● Enter the access digits the UX5000 should dial to get an outside line when placing a local or long dis- tance Message Notification callout. - For local numbers, see Customize: Tenant Options:... -
Page 220: Message Notification To Digital Pagers
ALLOUTS PAGE ✔ By default, port 4 is enabled for callouts. Enter the access digits the UX5000 should dial to get an outside line when placing a local or long dis- ● tance Message Notification callout. - For local numbers, see Customize: Tenant Options:... - Page 221 Message Notification Program the information that should appear in the pager’s display when it receives a Message Notification call. ● Enter the dial string that determines what shows on the pager’s display. - See Customize: Tenant Options: 479) ENERAL IGITAL AGER ALLBACK UMBER...
-
Page 222: Message Notification To Message Delivery
ALLOUTS PAGE ✔ By default, port 4 is enabled for callouts. Enter the access digits the UX5000 should dial to get an outside line when placing a local or long dis- ● tance Message Notification callout. - For local numbers, see Customize: Tenant Options:... -
Page 223: Cascading Message Notification
Message Notification Cascading Message Notification The voice mail system automatically provides Cascading Message Notification. This means that if a user sets up and enables all three Message Notification groups, the voice mail will cycle (cascade) through the groups in order when the mailbox receives a new message. Cascading will continue until Message Notifica- tion is acknowledged or until it cancels. - Page 224 Message Notification Programming Compatibility Guidelines: ■ When using the UX Mail Administrator to enter dial strings, take care not to enter illegal characters (such as dashes). Enter only those characters allowed by the option you are programming. Step 1 Determine which ports voice mail can use for Message Notification callouts. 456).
- Page 225 - Your pager service may be able to help you determine the best value for this option (0-99 seconds). ✔ By default, this option is 18 seconds. Step 4 Make sure the UX5000 programming does not restrict Message Notification callouts. Step 5 Optionally review the following report. - Report:...
-
Page 226: Message Notification For Guest Mailboxes
Message Notification Message Notification For Guest Mailboxes Step 1 Enable Message Notification for the Guest Mailbox. : [M 373). USTOMIZE AILBOX PTIONS UEST ESSAGE OTIFICATION ESSAGE OTIFICATION PAGE - Once you enable Message Notification in this option, the Guest Mailbox user must log onto their mailbox and use the OP + N options to activate Message Notification. - Page 227 Message Notification Step 7 Specify the notification mode for the call. : [M 376). USTOMIZE AILBOX PTIONS UEST ESSAGE OTIFICATION PAGE - The choices are Normal, Radio Pager, Digital Pager, and Message Delivery. ✔ By default, the setting for this option is Normal. Step 8 If the Message Notification recipient should be required to enter the Guest Mailbox Security Code prior to listening to the message:...
-
Page 228: Message Notification For Message Center Mailboxes
Message Notification Message Notification For Message Center Mailboxes Step 1 Enable Message Notification for the Message Center Mailbox. : [M USTOMIZE AILBOX PTIONS ESSAGE ENTER ESSAGE OTIFICATION ESSAGE OTIFICATION 395). PAGE - Once you enable Message Notification in this option, the user must log onto their mailbox and use the OP + N options to activate Message Notification. - Page 229 Message Notification Step 7 Specify the notification mode for the call. : [M 398). USTOMIZE AILBOX PTIONS ESSAGE ENTER ESSAGE OTIFICATION PAGE - The choices are Normal, Radio Pager, Digital Pager, and Message Delivery. ✔ By default, the setting for this option is Normal. Step 8 If the Message Notification recipient should be required to enter the Guest Mailbox Security Code prior to listening to the message:...
-
Page 230: Message Notification For Subscriber Mailboxes
Message Notification Message Notification For Subscriber Mailboxes Step 1 Enable Message Notification for the Subscriber Mailbox. : [M USTOMIZE AILBOX PTIONS UBSCRIBER ESSAGE OTIFICATION ESSAGE OTIFICATION 425). PAGE - Once you enable Message Notification in this option, the subscriber must log onto their mailbox and use the OP + N options to activate Message Notification. - Page 231 Message Notification Step 7 Specify the notification mode for the call. : [M 428). USTOMIZE AILBOX PTIONS UBSCRIBER ESSAGE OTIFICATION PAGE - The choices are Normal, Radio Pager, Digital Pager, and Message Delivery. ✔ By default, the setting for this option is Normal. Step 8 If the Message Notification recipient should be required to enter the Guest Mailbox Security Code prior to listening to the message:...
- Page 232 Message Notification Operation Setting Up Message Notification (Page 1 of 3) Log onto Subscriber, Guest, or Message Center Mailbox. (67) Access the Mailbox Options menu Access the Message Notification Options Menu Hear a summary of your Message Notification Group settings Select which Message Notification Groups should be active (33) Enable first Message Notification Group (if disabled)
- Page 233 Message Notification Setting Up Message Notification (Page 2 of 3) To be notified only for new messages from a specific mail- Enter the specific mailbox num- To be notified only for urgent messages skip to next option Go back and select another group to modify Select the type of device you will use to receive your Message Notification...
- Page 234 Message Notification Setting Up Message Notification (Page 3 of 3) Go back to Message Notifica- tion Options Menu without changing the priority order Plays Help message at any menu level. Entering Special Dial Codes Function Description Dial Code (Wait for sound) Wait 2 seconds for any constant sound (*4) (such as non-standard dial tone), then...
-
Page 235: Message Notification For Urgent Messages
Message Notification for Urgent Messages Message Notification for Urgent Messages Description A Subscriber, Guest, or Message Center Mailbox user can set up Message Notification to provide unique handling for urgent messages. A user can be notified of just urgent messages, or be notified of all messages but have urgent messages given priority and special handling. -
Page 236: Message Playback Direction
Message Playback Direction Message Playback Direction Description When a user dials L (5) after logging into their mailbox, voice mail will play their messages in either LIFO (last-in-first-out) or FIFO (first-in-first-out) order. In addition, the user can dial RL (75) to reverse the listening order temporarily while listening to their messages. - Page 237 Message Playback Direction Operation Message Playback Direction Log onto Subscriber, Guest, or Message Center Mailbox Listen to your messages (75) While listening to your messages, this reverses the message playback order Plays Help message at any level Chapter 2: Features ◆ 219 UX Mail Manual...
-
Page 238: Message Record
Message Record Message Record Description A Subscriber or Guest Mailbox user can record and send a message to up to 10 Subscriber, Guest, Message Center, Network, or Future Delivery Mailboxes. Additionally, a Guest Mailbox user may be restricted to recording a Message Reply only, rather than an entire new message. Message Record is the heart of the voice messaging system. - Page 239 Message Record Related Features Guest Mailbox (page 157) A Guest Mailbox user may be restricted to recording a Message Reply only. Listening to Messages (page 173) While or after listening to a message, an extension user has many message handling options from which to choose.
- Page 240 Message Record Message Record Log onto Subscriber, Guest, or Message Center Mailbox (77) Record and send a message Record at the tone and press # when you are done. Options available while recording Backup (22) Backup to beginning Pause or restart recording Erase recording (84) Hear the time and date you recorded the comment...
-
Page 241: Message Reply
A Guest Mailbox user may be restricted to recording a Message Reply only. Make Call (page 186) Message Reply does not apply to outside calls. If the UX5000 provides Caller ID information to voice mail, a subscriber or guest may be able to use Make Call (MC) to call the person back. -
Page 242: Message Retention
Message Retention Message Retention Description Voice mail will save a Subscriber, Guest, Network, or Message Center Mailbox’s new, held, or saved mes- sages for the Message Retention interval, and then delete them. You’ll find Message Retention an invaluable tool for managing voice mail message storage space. If users are letting old, unwanted messages build up in their mailboxes, shorten the Message Retention time. - Page 243 Message Retention Chapter 2: Features ◆ 225 UX Mail Manual...
-
Page 244: Message Status Report
Message Status Report Message Status Report Description The Message Status Report shows the number and type of messages stored in each mailbox, as well as other important mailbox attributes. For a complete explanation of how to use the Message Status Report, turn to page 320. -
Page 245: Message Storage Limit
Message Storage Limit Message Storage Limit Description Message Storage Limit sets how many messages can be left in a Subscriber, Guest, Message Center, or Net- work Mailbox. It also sets the maximum number of undelivered messages that a Future Delivery Mailbox can store. - Page 246 Message Storage Limit Step 5 Set the maximum number of messages that can be left in a Subscriber Mailbox. : [G 424). USTOMIZE AILBOX PTIONS UBSCRIBER ENERAL UMBER OF ESSAGES PAGE - If a caller tries to leave a message once the maximum is reached, they hear, “That mailbox is full.”...
-
Page 247: Message Waiting Lamp
Message Waiting Lamp Message Waiting Lamp Description An extension’s Message Waiting lamp flashes to indicate that the user has new messages waiting in their mailbox. Once voice mail is properly installed and programmed, Message Waiting Lamp operation is auto- matic. The Voice Mail key flashes green when there are new messages in the extension user’s mailbox. The Message Waiting Lamp is a visual reminder of new messages. -
Page 248: Monitored Transfer
-Plays greeting. -Prompts caller to start recording. With Active Greeting Option not available. Not Recorded Custom UX5000 programming may redirect the unanswered call (for example, to a hunt group or another extension). 230 ◆ Chapter 2: Features UX Mail Manual... - Page 249 Unscreened Transfer (page 299) After an Automated Attendant caller dials an extension, voice mail immediately transfers the call to the destination and hangs up. Any recalls or additional routing are handled by the UX5000 – just as with any other unscreened transfer...
-
Page 250: Multiple Company Greetings
Multiple Company Greetings Multiple Company Greetings Description The Automated Attendant can answer each individual trunk (outside line) with a unique greeting and unique set of dialing options. This allows several companies to share a single voice mail. Callers to each company hear that company’s greeting (Welcome Message and Instruction Menu) and can dial options that may be available to that specific company. -
Page 251: Music On Hold
Music on Hold feature of telecommunications systems. NEC Unified Solutions, Inc. hereby dis- claims any liability arising out of the failure to obtain such a license. - Page 252 Music On Hold Operation Recording Music On Hold Log onto System Administrator’s mailbox (301) ■ Optionally connect a customer-provided handset recording device to the administrator’s terminal. (72) Access System Administrator options (64) Select the Music On Hold options Listen to current Music on Hold recording Backup (22) Backup to beginning...
-
Page 253: Network Mailbox
Network Mailbox Network Mailbox Description Compatibility Guidelines: • AMIS Networking is an optional standard feature in UX Mail. It requires the purchase and installation of an AMIS Networking license after the 30-day demo period expires. A Network Mailbox is a unique type of mailbox required by the Networking (AMIS) feature. AMIS Net- working allows the system to exchange voice mail messages with virtually any other voice mail system world wide that supports the analog Audio Messaging Interchange Specification (AMIS) standard. -
Page 254: Networking (Amis)
Audio Messaging Interchange Specification (AMIS) standard. AMIS Networking uses the UX5000 trunks to send and receive messages and does not require dedicated resources or the UX5000s to be permanently networked together. With AMIS Networking, for example, an office in North America could exchange voice mail messages with an Asian affiliate without the expense and overhead of a permanent managed network. -
Page 255: Network Remote Mailbox
Networking (AMIS) Network Remote Mailbox A Network Remote Mailbox is a mailbox that allows a user in the local (sending) system to send a mes- sage to any mailbox in the remote (receiving) system. After a user records and sends a message to the Net- work Alias Mailbox, voice mail prompts them to enter the specific mailbox in the remote system to which the message should be delivered. - Page 256 Networking (AMIS) Broadcast Message (page 75) A Broadcast Message can play to a user when they log into a Network Mailbox. Checking/Deleting a Message (page 105) Since a message left in a Network Mailbox is erased after it is delivered, this feature does not apply. Confidential Message (page 106) Networking does not support the Confidential Message feature.
-
Page 257: Basic Programming At The Sending System
Networking (AMIS) Message Playback Direction (page 218) When a user logs onto a Network Mailbox, they hear any undelivered messages in FIFO (first-in-first- out) order. Message Record (page 220) A user logged onto a Network Mailbox cannot record and send a message. Message Reply (page 223) A user can reply to a network message. - Page 258 Networking (AMIS) Step 3 Enter the access digits for network callouts. : [A OR LOCAL NETWORK CALLOUTS USTOMIZE ENANT PTIONS CCESS IGITS ETWORK OCAL 481). ALLOUT PAGE : [A OR LONG DISTANCE NETWORK CALLOUTS USTOMIZE ENANT PTIONS CCESS IGITS EFORE 482).
- Page 259 Networking (AMIS) - An internal number could be, for example, the extension number of an OPX circuit or tie line connected to the remote system. - This number is not preceded by an access code. ✔ By default, this option is Internal . : [N 415).
-
Page 260: Basic Programming At The Receiving System
Networking (AMIS) Basic Programming at the Receiving System Step 1 Allow the receiving system to accept incoming network calls. : [G 1]: I 459). USTOMIZE YSTEM PTIONS ENERAL NCOMING ETWORK PAGE - Select All to allow the receiving system to accept all network calls. - To set up the receiving system to accept network calls only from specific sites, see Setting Up Network Site Restriction below. -
Page 261: Setting Up Networking Site Restriction
Networking (AMIS) Setting Up Networking Site Restriction Step 1 In the sending system, enter the site’s number (using # delimiters). : [G ’ 477) USTOMIZE ENANT PTIONS ENERAL ETWORK ELEPHONE UMBER PAGE FOR MORE - Enter the number exactly as it should be dialed to reach the sending system, excluding the leading 1 (if required) and trunk access codes. - Page 262 Networking (AMIS) The following illustration provides an example of the related options in both the sending and receiving sys- tems for a typical system installed in North America. 244 ◆ Chapter 2: Features UX Mail Manual...
- Page 263 Networking (AMIS) Operation Message Record to a Network Mailbox Log onto Subscriber, Guest, or Message Center Mailbox (77) Record and send a message Record at the tone and press # when you are done. Options available while recording Backup (22) Backup to beginning Pause or restart recording Erase recording...
- Page 264 Networking (AMIS) Message Record to a Network Mailbox (*7) Networking does not support this option. Send the message (*6) Specify recipients by name (see above for the *N options) Cancel the previous mailbox entry Erase the message and back up to main menu Erase the message and go back to the Main Menu Plays Help message at any level 246 ◆...
-
Page 265: Next Call Routing Mailbox
Next Call Routing Mailbox Next Call Routing Mailbox Description The Next Call Routing Mailbox provides callers with additional dialing options after they leave a message in a mailbox (depending on the setting of the Next Call Routing Mailbox Dial Mode). Next Call Routing Mail- box lets the caller choose how voice mail should handle their call. - Page 266 Next Call Routing Mailbox work: . See the following 3 tables for an 406) ENERAL OUTING AILBOX PAGE explanation of these options: N (N 407) ETWORK LIAS AILBOX PTION NABLES CTION PAGE 1 (E 0-9) ( 408) ETWORK LIAS AILBOX PTION NABLES CTIONS...
-
Page 267: Paging Message
Paging Message Paging Message Description The Paging Message is the prerecorded announcement used for Park and Page. When the Paging Message is recorded and turned on, voice mail can Park an Automated Attendant call at the extension and automatically page with the prerecorded message. The Paging Message typically says something like, “Mike Smart, you have a call.”... - Page 268 Paging Message Recording the Paging Message Log onto Subscriber Mailbox (74) Access Paging Message options ■ If your Paging Message is recorded, voice mail tells you if it is on (active) or off (inactive) Listen to the Paging Message Options available while listening Back up a few seconds.
-
Page 269: Park And Page
Park and Page Park and Page Description Voice mail can Park an Automated Attendant Screened Transfer at an extension and automatically Page with a prerecorded Paging Message announcing the parked call. The Paging Message typically says something like, “Mike Smart, you have a call.” With Park and Page, voice mail automatically tries to locate the sub- scriber instead of just sending the call to the mailbox. - Page 270 Be sure Park and Page is enabled. 45-01-04: P ARK AND - Enter 1 to enable this option. ✔ By default, this option is enabled (Yes). Step 4 Set the UX5000 orbit recall time. 24-02-04: T DJUST RANSFER ECALL IME AS REQUIRED 252 ◆...
- Page 271 Voice mail parks the call at the subscriber’s extension and pages them with the Paging Message. ■ The call will remain parked for the UX5000 Park Recall time. To pick up the call: - Subscriber presses idle CALL key + ** + Their extension number.
-
Page 272: Port Activity
The Port Activity diagnostic shows in real time what is happening at each voice mail port. You may find this diagnostic helpful when troubleshooting your voice mail system. NEC Unified Solutions Technical Service personnel can help you interpret this diagnostic. For more on the Port Activity, turn to page 318. -
Page 273: Port Self Test
Port Self Test Port Self Test Description The Port Self Test is a diagnostic that tests each voice mail port to be sure it is functioning properly. The Self Test is in 2 parts: Dial Tone Test The voice mail port goes off hook and waits for dial tone. If dial tone is detected, the test is successful. If dial tone is not successful, the test fails and voice mail takes the port out of service. -
Page 274: Ports In/Out Of Service
Ports In/Out of Service Ports In/Out of Service Description The Ports In/Out of Service diagnostic allows you to remove a port from service, or put in back in service if it has been removed. An out of service port can no longer answer calls. You would typically remove a port from service if it was not operating correctly, and then return it to service once you have corrected the problem. -
Page 275: Pre-Greeting Announcement Mailbox
Pre-Greeting Announcement Mailbox Pre-Greeting Announcement Mailbox Description When you specify a Pre-Greeting Announcement Mailbox for a Subscriber Mailbox, callers leaving a message in the Subscriber Mailbox hear the Announcement Message recorded for the Pre-Greeting Announcement Mailbox prior to the Subscriber Mailbox’s Greeting. The announcement can contain important legal information, a product advisory, or just general information about the company. - Page 276 Pre-Greeting Announcement Mailbox Operation Recording an Announcement Mailbox Message Log onto System Administrator’s mailbox (301) (72) Access System Administrator options (26) Select Prompt Customization Enter the Announcement Mailbox number Listen to current Announcement Mailbox message Backup (22) Backup to beginning Go forward Pause or restart listening (88)
-
Page 277: Programming Voice Mail
Programming Voice Mail Programming Voice Mail Description You program (customize) voice mail by using your PC browser to connected to the administrator program running on the embedded UX Mail web server. This program, called the UX Mail Administrator, allows you to program all the UX Mail options. -
Page 278: Property Management System Integration (Pmsi)
Property Management System Integration (PMSI) Property Management System Integration (PMSI) Description Related Features Programming Operation 260 ◆ Chapter 2: Features UX Mail Manual... -
Page 279: Quick Message
Quick Message Quick Message Description Quick Message is a Dial Action Table action that allows Automated Attendant callers to dial a digit (nor- mally *) followed by a mailbox number to leave a message in a Subscriber, Guest, or Network Mailbox. Since Quick Message is enabled by default, it is an efficient way for experienced Automated Attendant call- ers to leave messages. - Page 280 Quick Message Programming Step 1 Set up the Answering Table and associated Call Routing Mailbox to access the Dial Action Table you want to customize. 322) USTOMIZE NSWERING ABLES PAGE FOR MORE ON SETTING UP YOUR NSWERING ABLES : [G 356) USTOMIZE AILBOX...
- Page 281 Quick Message Step 6 Optionally set up a Confidential Quick Message without Greeting (REC2C) Action. : REC2C A – Q USTOMIZE CTION ABLES CTION UICK ONFIDENTIAL ESSAGE WITHOUT REETING 338). PAGE - To have the caller leave a quick message at a specific mailbox, the corresponding Number option should be the mailbox number.
-
Page 282: Real Trace
Real Trace Description The Real Trace diagnostic shows (in real time) the voice mail events as they occur. NEC Unified Solutions Technical Service personnel may request that you run this diagnostic. They will also help you interpret the results. Unlike the , the Real Trace does not store data in the events database. -
Page 283: Recording Silence Elimination
Recording Silence Elimination Recording Silence Elimination Description Compatibility Guidelines: ■ Enabling this feature may cause stored messages to sound choppy and/or unnatural. Voice mail can automatically remove quiet (silent) periods from recorded messages to conserve message space. There are two ways you can do this: ■... -
Page 284: Remote Diagnostics And Programming
Remote Diagnostics and Programming Remote Diagnostics and Programming Description The UX Mail Administrator in UX Mail runs on an embedded web server which communicates with your PC browser. While you’re on-site using the company LAN or directly connected, running the UX Mail Administrator is as simple as typing the UX Mail IP Address into your browser’s address line. -
Page 285: Reports
Reports Reports Description The UX Mail Administrator provides a comprehensive set of reports for monitoring system performance and usage. The following table summarizes each of these reports. Reports Report Description For more, see: Auto Attendant, Port Shows how voice mail answers outside Reports: TTENDANT calls at each voice mail port. - Page 286 Reports Reports Report Description For more, see: System Options Lists all the Customize: System Options Reports: 515) OOLS PAGE programming. Message Status Shows information about the messages View: 320) ESSAGE TATUS PAGE stored in a mailbox. Related Features Diagnostics (page 114) Diagnostics help you troubleshoot your voice mail and keep it operating at peak performance.
-
Page 287: Return Receipt
Return Receipt Return Receipt Description After recording and sending a message to a co-worker, a Subscriber or Guest Mailbox user can request a Return Receipt which notifies them when their co-worker has listened to the message. By requesting a Return Receipt, the user will know when the recipient has reviewed the message without having to call them back. -
Page 288: Screened Transfer
Screened Transfer allows the Automated Attendant to transfer outside calls to the system extensions without the need for a live receptionist or operator. Screened Transfer is similar to UX5000 screened transfers in which the transferring party controls the transfer. After an Automated Attendant caller dials an extension, voice mail calls (screens) the destination extension to see if the transfer can go through. - Page 289 Screened Transfer With Active Greeting Puts call on Hold. Puts call on Hold. Puts call on Hold. Not Recorded Tries extension (i.e., tests Tries extension (i.e., tests Tries extension (i.e., tests for status). for status). for status). Rings extension. Sends call to mailbox: Sends call to mailbox: -If answered, transfers -Plays name (if recorded)
- Page 290 Screened Transfer Programming Step 1 Assign the TRF action to a key on the active Dial Action Table. : TRF A – S 336). USTOMIZE CTION ABLES CTION CREENED RANSFER PAGE - Normally, to reach extensions that have mailboxes, the corresponding Number option should be XXX.
-
Page 291: Security Code
Security Code Security Code Description A mailbox can have a security code to protect it from unauthorized access. A Security Code can be six digits maximum, using 0-9. If a subscriber wants to keep their mailbox private, they can enter a Security Code. No one else can use the subscriber’s mailbox unless they know the code. - Page 292 Security Code Step 8 To automatically enable a Security Code for new mailboxes created after the initial installation: : [G 1] M 458). USTOMIZE YSTEM PTIONS ENERAL AILBOX EFAULT ECURITY PAGE - This only affects new mailboxes created after the initial installation. ✔...
- Page 293 Security Code Deleting a Security Code (From your System Administrator’s Mailbox) Log onto System Administrator’s Mailbox (301) (72) Access the System Administrator Menu (37) Access the Delete Security Code options Enter the number of the mailbox whose Security Code you want to delete Delete the Security Code for selected mailbox and go back to Sys- tem Administrator Menu Go back to System Administrator Menu without deleting the Secu-...
-
Page 294: Shutting Down The System
UX5000 or removing the voice mail blade from the chassis. Shutting down the voice mail ensures that the blade will restart with all the programmed options intact. You should not turn off the UX5000 or remove the voice mail blade without first shutting down the voice mail. -
Page 295: Single Digit Dialing
Single Digit Dialing Single Digit Dialing Description An Automated Attendant caller can press a single key to route to an extension, route to another destination, or use a voice mail feature. Single Digit Dialing simplifies the Automated Attendant since the caller just dials a single digit to reach an extension or use an option. - Page 296 Single Digit Dialing Dial Action Table Key Action Summary Action Description Feature Reference For more, see: Quick Urgent Message with Greeting Quick Message (page 261) Page 338 Allows an Automated Attendant caller to leave a REC1U Quick Urgent Message at an extension. The caller will hear the extension’s personal greeting.
-
Page 297: Subscriber Mailbox
Subscriber Mailbox Description A Subscriber Mailbox is the type of mailbox assigned to a UX5000 extension. The terminal assigned to the Subscriber Mailbox is called the subscriber’s extension. When an extension user accesses their voice mail, they are using their Subscriber Mailbox. It provides voice messaging services. - Page 298 Subscriber Mailbox Make Call (page 186) To simplify returning outside calls, voice mail can ask the caller leaving a message to enter their number prior to leaving the message. The subscriber can then dial MC to call the person back. Mailbox Name (page 180) The Subscriber Mailbox name facilitates Directory Dialing.
- Page 299 Subscriber Mailbox Programming Step 1 Set up a Subscriber Mailbox. : [G 418). USTOMIZE AILBOX PTIONS UBSCRIBER ENERAL PAGE - Select Subscriber. ✔ Mailboxes 300-499 are Subscriber Mailboxes. Step 2 Optionally assign a department name to a Subscriber Mailbox. : [G 419).
- Page 300 Subscriber Mailbox - Outside callers transferred by an extension user to a Message Center Mailbox. ✔ By default, these types of messages 120 seconds long maximum. Step 8 Optionally review the following reports. - Reports: 497) AILBOX PTIONS EPORT PAGE - Reports: 499) AILBOX...
-
Page 301: System Administrator
114) IAGNOSTICS PAGE (73) Shut down voice mail prior to turning off 276) HUTTING OWN THE YSTEM PAGE the UX5000 power. (36) Erase all messages in a mailbox. 135) RASING ESSAGES PAGE (37) Delete a mailbox security code. 183) AILBOX... - Page 302 System Administrator Related Features Bilingual Voice Prompts (page 73) The system administrator can assign one of the four stored languages to either active language (Lan- guage 1 or Language 2). Subscriber Mailbox (page 279) Only a Subscriber Mailbox can be a System Administrator. Tenant Service (page 287) A Subscriber Mailbox can be System Administrator for an individual Tenant Group or all Tenant Groups.
-
Page 303: System Administrator Mailbox
System Administrator Mailbox System Administrator Mailbox Description A System Administrator Mailbox is a Subscriber Mailbox in which you have enabled the System Adminis- trator option. This provides the subscriber with system administration capabilities. Voice mail can have mul- tiple System Administrator Mailboxes. Turn to for more. -
Page 304: System Re-Initialization
System Re-initialization System Re-initialization Description Compatibility Guidelines: ■ Re-initializing the system returns all programmed options to their factory set (default) values. Any site specific programming you have done will be erased following re-initialization. You can re-initialize the voice mail database. You may want to do this if the site requirements significantly change and it is easier to start over from default that remove all your custom programming. -
Page 305: Tenant Service
Tenant Service Tenant Service Description Tenant Service enhances the way multiple businesses in the same building can share a single voice mail sys- tem. For example, Tenant Service can: ■ Allow or prevent inter-tenant messaging. If prevented, a Subscriber, Guest, or Network Mailbox user can only record and send a message to another mailbox in their same Tenant Group. - Page 306 Tenant Service : [G 393). USTOMIZE AILBOX PTIONS ESSAGE ENTER ENERAL ENANT PAGE - Voice mail provides from 1-4 Tenant Groups. ✔ By default, all Message Center Mailboxes are in Tenant Group 1. : [G 410). USTOMIZE AILBOX PTIONS ETWORK ENERAL ENANT PAGE...
-
Page 307: Time And Date
Description Compatibility Guidelines: • UX Mail will automatically obtain the Time and Date from the UX5000 clock. A Subscriber, Guest, or Message Center Mailbox user can hear the time and date when they call their mailbox. This is frequently a convenient way to hear the time and date since the top line of the terminal display (which normally shows the time and date) changes when the user logs into their mailbox. -
Page 308: Time And Date Stamp
Mailbox. Programming To get Time and Date Stamp with Caller ID, be sure Caller ID is properly installed and programmed in the connected UX5000. Operation Hearing the Time and Date a Message was Left Log onto Subscriber, Guest, or Message Center Mailbox... -
Page 309: Trace Viewer
Trace Viewer Description The Trace Viewer diagnostic allows you to view the events stored in the trace database. NEC Unified Solu- tions Technical Service personnel may request that you to run this diagnostic. They will also help you interpret the results. Following is a sample of the Trace Viewer diagnostic. -
Page 310: Transfer Only Mailbox
Transfer Only Mailbox Transfer Only Mailbox Description If a subscriber has a Transfer Only Mailbox, Automated Attendant callers can ring their extension but cannot leave messages in their Subscriber Mailbox. A Transfer Only Mailbox would be helpful at a courtesy exten- sion, for example, since there is no need to leave messages at that type of extension. -
Page 311: Transfer To A Mailbox
It saves the caller time and cuts down on unnec- essary UX5000 call processing. Transfer to a Mailbox is frequently used by attendants and receptionists as well as other co-workers. -
Page 312: Transfer To An Acd Group
Transfer to an ACD Group Description The Automated Attendant can transfer outside callers to ACD Group master numbers. This lets the UX5000 handle the call routing. Set this up by assigning TRF, UTRF, or MTRF actions in the active Dial Action Table to route to the ACD Group master number. - Page 313 Transfer to an ACD Group Operation Chapter 2: Features ◆ 295 UX Mail Manual...
-
Page 314: Trunk Mailbox
Trunk Mailbox Description A Trunk Mailbox allows a specific UX5000 trunk to have its own Answering Table. This is an essential part of setting up Multiple Company Greetings and other types of flexible answering. A Trunk Mailbox permits the voice mail Automated Attendant to provide a unique Welcome Message, Instruction Menu, and dialing options for each trunk. - Page 315 Trunk Mailbox - Reports: 499) AILBOX IRECTORY EPORT PAGE - Reports: 500) AILBOX UMERIC EPORT PAGE - Reports: 501) AILBOX CCESS OUNT EPORT PAGE Operation Chapter 2: Features ◆ 297 UX Mail Manual...
-
Page 316: Undefined Routing
Undefined Routing Undefined Routing Description An Automated Attendant Undefined Routing is a Dial Action Table key assignment for which there is no routing defined. When an Automated Attendant caller dials a digit for which there is no routing assigned, Voice mail plays, “That is an invalid entry. Please try again.” Voice mail then repeats the dialing options (Instruction Menu) to the caller. -
Page 317: Unscreened Transfer
Unscreened Transfer allows the Automated Attendant to transfer outside calls to system extensions without the need for a live receptionist or operator. It is similar to UX5000 unscreened transfers in which the trans- ferring party immediately extends the call. After an Automated Attendant caller dials an extension, voice mail transfers the call to the destination and hangs up. - Page 318 With Active Greeting Option not available. Not Recorded Custom UX5000 programming may redirect the unanswered call (for example, to a hunt group or another extension). Related Features Answering Table (page 54) Determines how the Automated Attendant answers outside calls on each voice mail port.
- Page 319 Unscreened Transfer Programming Step 1 Assign the UTRF action to a key on the active Dial Action Table. : UTRF A – U 336). USTOMIZE CTION ABLES CTION NSCREENED RANSFER PAGE - Normally, to reach extensions that have mailboxes, the corresponding Number option should be XXX.
-
Page 320: Urgent Message
Urgent Message Urgent Message Description A Subscriber or Guest Mailbox user can leave an Urgent Message for a co-worker for priority handling. When the Urgent Message recipient logs onto their mailbox, they hear, “You have an Urgent Message.” If they dial L (5) to listen to the message, they hear, “This is an Urgent Message.” An urgent message automat- ically goes to the top of the recipient’s new message list, assuring that it will be the first message the recipi- ent listens to when they log onto their mailbox. - Page 321 Urgent Message Operation Urgent Message Log onto Subscriber, Guest, or Message Center Mailbox (77) Record and send a message Record at the tone and press # when you are done. ■ For other recording options, see 220) ESSAGE ECORD PAGE Enter the mailbox number(s) to receive the message (up to 10).
-
Page 322: Voice Compression Rate
Voice Compression Rate Voice Compression Rate Description The Voice Compression Rate determines the compression method voice mail uses to store voice messages. There are two rates available: ● 32 kbits/sec - which maximizes the quality of the stored messages. 24 kbits/sec - which conserves storage space but sacrifices message quality. ●... -
Page 323: Voice Mail Overflow
Voice Mail Overflow Description The UX5000 can reroute outside calls when all voice mail ports are busy. This assures an alternate answer- ing point for calls if voice mail can’t answer. In addition, the UX5000 can automatically reroute unanswered outside calls to the voice mail Automated Attendant. This type of overflow ensures that voice mail will pick up calls that don’t go through, allowing callers to leave a message rather than having to call back later. -
Page 324: Voice Prompts
Voice Prompts Voice Prompts Description Voice Prompts provide real-time instructions on how to use the voice mail features. The Voice Prompts are provided by default, but can be rerecorded as required by the System Administrator. For a list of all the pre- recorded Voice Prompts, see Chapter 4: 533) OICE... -
Page 325: Volume Control
Volume Control Volume Control Description A Subscriber, Guest, or Message Center Mailbox user can use Volume Control to turn the volume up or down while listening to a message, greeting, or prerecorded voice prompt. Volume Control lets the user interactively adjust the loudness of the messages and prompts to a comfortable level. Volume Control is also available to a Future Delivery Mailbox caller while listening to undelivered Future Delivery messages. -
Page 326: Welcome Message
Welcome Message Welcome Message Description The Welcome Message is the first announcement that plays to Automated Attendant callers, just before the Instruction Menu. Normally, the Welcome Message provides the company greeting. The Welcome Message is associated with the active Call Routing Mailbox, and can be customized (rerecorded) by the System Administrator. - Page 327 Welcome Message Programming Step 1 To turn off the default Welcome Message (and Instruction Menu): : [C USTOMIZE AILBOX PTIONS OUTING ANDLING EFAULT ESSAGES 360). PAGE - Use this option to enable (Yes) or disable (No) the default Instruction Menu and Welcome Message for a Call Routing Mailbox.
- Page 328 Welcome Message 310 ◆ Chapter 2: Features UX Mail Manual...
-
Page 329: Programming
Use these reports to optimize voice mail operation and as troubleshooting aids. Tools and Diagnostics ● Use the tools to maintain your system. Be aware that some of the diagnostics require the assistance of NEC Unified Solutions Technical Service personnel. Chapter 3: Programming ◆ 311 UX Mail Manual... -
Page 330: Ux Mail Administrator Main Screen
UX Mail Administrator Main Screen Overview UX Mail Administrator Main Screen Overview Description The UX Mail Administrator Main Menu is the voice mail programming interface. The Main Menu provides menu items for: ● Installation (Installation options) ● View (To view Diagnostics and Reports) ●... -
Page 331: Installation
Use this option to select basic configuration options for your voice mail. To access the Install Options: From the Main Menu, click Install Options. You see: Phone System This option is assigned to NEC UX5000. You cannot change it. Ports To change the number of voice mail ports installed: ●... -
Page 332: Default Security
Installation Install Options Default Security To change the default mailbox security code: From the Main Menu, click Install Options. For Default Security, enter the default Subscriber Mailbox security code (if any). This default entry will initially apply to each extension user’s mailbox. ●... -
Page 333: Numbering Plan
View Install Options Numbering Plan To set up the extension and trunk numbering: From the Main Menu, click Install Options. Click the Numbering Plan link. For Number of Extensions, enter the total number of Subscriber or Trunk Mailboxes in your system (depending on what you are programming). -
Page 334: Real Trace
View Real Trace Real Trace Description Use this option to display the Real Trace report. This report is a troubleshooting tool that shows voice mail events (activity) as they occur. Following are sample Real Trace reports. The Real Trace report provides the following options. Pause ●... -
Page 335: Trace Viewer (Trace File)
View Trace Viewer (Trace File) Trace Viewer (Trace File) Description The Trace Viewer report provides a history of system events stored in the voice mail trace database. While voice mail is running, it is constantly storing a history of what it is doing in this database. Use the Trace Viewer to look at the data in this database. -
Page 336: Port Activity
Use the Port Activity report to show the activity at each voice mail port. This diagnostic shows in real time what it happening at each voice mail port. NEC Unified Solutions Technical Service personnel can help you interpret this diagnostic. Following is an example of the Port Activity diagnostic, followed by an explanation of the report fields. - Page 337 View Port Activity Port Activity Fields Field Field Definition Options Option Definition The voice mail port number. None None Port Type of call the port is handling. Not Inst Not installed. Start Initializing. On Hook On-hook (idle). Lamp Processing a Message Waiting lamp update.
-
Page 338: Message Status
View Message Status Message Status Description This option shows the number and type of messages stored in each mailbox and some other important mail- box attributes. To run the report: Click on Message Status . You see: Click Move to : You see: Enter the mailbox you want to view + OK . -
Page 339: Misc Options
View Misc Options Misc Options Description Misc Options shows the voice mail version number. To see the Misc Options: From the Main Menu, click View: Misc Options. You see: Chapter 3: Programming ◆ 321 UX Mail Manual... -
Page 340: Customize
Customize Answering Tables Customize Answering Tables Description Use this option to determine how the Automated Attendant answers outside calls, according to the time of the day and the day of the week that the call is ringing. There are 100 Answering Tables. The block diagram below shows how this works by default. -
Page 341: Day(S) Or Date
Customize Answering Tables Programming Day(s) or Date For each Schedule, use this option you to specify the days of the week on which the Schedule should start. For the currently selected Schedule, click in the field and enter the days of the week that the schedule should start. -
Page 342: Mailbox Number
Customize Answering Tables ● N (None). Default ✔ Schedule 1 = 08:00 Schedule 1 starts at 8:00AM. ✔ Schedule 2 = 12:00 Schedule 2 starts at 12:00PM (noon). ✔ Schedule 3 = 17:00 Schedule 3 starts at 5:00PM. ✔ Schedule 4 = 17:00 Schedule 1 starts at 5:00PM. -
Page 343: Caller I.d. Options
Customize Caller I.D. Options Caller I.D. Options Description Use the Caller I.D. Tables to set up Caller ID Automatic Transfer. To use the tables, enter a 10-digit number in the Caller I.D Number field. Then, specify the routing you want voice mail to automatically execute in the Caller I.D Action field when the number entered in the Caller I.D Number field is received. - Page 344 Customize Caller I.D. Options Options ● Extension number - Enter the extension number to which voice mail should automatically send the call (UTRF) when a match occurs. ● Mailbox number - Enter the mailbox number to which voice mail should automatically send the call when a match occurs.
-
Page 345: Callout Options: [General]
Customize Callout Options: [General] Callout Options: [General] Description Use Callout Options to set various options for outgoing calls placed by voice mail for the Caller ID, Hotel/ Motel, Message Notification, and Networking features. These outgoing calls are termed “callouts.” Voice mail uses the entries you make in Callout Options when placing calls for these features. -
Page 346: [General] Wait Between Non-Pager Busy Callouts
Customize Callout Options: [General] ● Also see below for how voice mail determines that a [General] W RNA C AIT BETWEEN PAGER ALLOUTS call is Ring No Answer. Options ● Time in minutes (1-999). Default ✔ 30 minutes. Wait between Non-Pager Busy Callouts [General] Once a non-pager notification cycle begins, voice mail will wait this interval before retrying a callout that was busy at the called party. -
Page 347: [General] Callout Report
Customize Callout Options: [General] Options ● ● Default ✔ No. Callout Report [General] When this option is enabled, voice mail will collect Message Notification callout data for the Callout Log Report (see page 492). When this option is disabled, voice mail will not collect Message Notification callout data for the Callout Log Report. -
Page 348: Callout Options: [Optional]
Customize Callout Options: [Optional] Callout Options: [Optional] Optional Tab Wait between Network Callouts [Optional] If a network callout to deliver a network message can’t go through (i.e., if the remote site is busy or doesn’t answer), use this option to set how long the system should wait before retrying the callout. ●... -
Page 349: [Optional] Hotel/Motel Snooze Alarm Timer (Minutes)
Customize Callout Options: [Optional] Hotel/Motel Snooze Alarm Timer (Minutes) [Optional] After an extension user activates the Snooze Alarm, UX Mail will wait this interval before recalling the extension. for more. ● 161) OTEL OTEL ERVICES PAGE Options Time in minutes (1-999). ●... -
Page 350: [Optional] Caller Id Make Call Suffix Digits
Customize Callout Options: [Optional] Caller ID Make Call Suffix Digits [Optional] Use this option to add digits and commands to the end of the number dialed by a Caller ID callback. This is a system-wide feature that globally affects all Caller ID Return Calls. ●... -
Page 351: Dial Action Tables
Customize Dial Action Tables Dial Action Tables Description The Dial Action Table defines the options that an Automated Attendant caller can dial. A Dial Action Table is associated with a Call Routing Mailbox, which in turn is associated with an Answering Table. When an Answering Table is active, its associated Call Routing Mailbox selects the Dial Action Table which provides the dialing options to callers. - Page 352 Customize Dial Action Tables Default The following table shows the default settings for the Dial Action Tables. Dial Action Table Default Settings Dial Action Tables 1-3 Dial Action Tables 4 and above UTRF to 0 UTRF to 0 (Unscreened Transfer to operator) (Unscreened Transfer to operator) (Undefined) (Undefined)
-
Page 353: Setting Up Dial Action Tables
Customize Dial Action Tables Setting Up Dial Action Tables Compatibility Guidelines: ■ When using the UX Mail Administrator to enter dial strings, take care not to enter illegal characters (such as dashes). Enter only those characters allowed by the option you are programming. Key Column This option designates the key action you are programming (0-9, #, *, and timeout). -
Page 354: Goto Action - Go To Mailbox
This is similar to UX5000 unscreened transfers in which the transferring party immediately extends the call. After an Automated Attendant caller dials an extension, voice mail transfers the call to the destination and hangs up. Any recalls or additional routing are handled by the UX5000 – just as with any other unscreened transfer. -
Page 355: Hup Action - Hang Up
Customize Dial Action Tables Additional Information ● See the detailed Unscreened Transfer Operation call routing chart on page 299. ● Also see 270) 230) CREENED RANSFER PAGE ONITORED RANSFER PAGE NSCREENED RANSFER 299) PAGE HUP Action – Hang Up When an Automated Attendant caller presses a key assigned to this action, UX Mail says “Goodbye” and immediately hangs up. -
Page 356: Rec1U Action - Quick Urgent Message With Greeting
Customize Dial Action Tables Additional Information ● for more. 261) UICK ESSAGE PAGE REC1U Action – Quick Urgent Message with Greeting Use this key action to allow an Automated Attendant caller to leave a Quick Urgent Message at an exten- sion. -
Page 357: Dirf Action - Directory Dial By First Name
Customize Dial Action Tables DIRF Action – Directory Dial by First Name Use this key action to allow an Automated Attendant caller to use Directory Dialing by first name first. Number Option ● There is no entry required in the corresponding Number option. Additional Information ●... -
Page 358: Fax1
Customize Dial Action Tables FAX1 Not used. FAX2 Not used. FAX1C Not used. FAX1U Not used. FAX2C Not used. FAX2U Not used. MTRF Action – Monitored (Ring No Answer) Transfer Use this key action to allow an Automated Attendant caller to place a Monitored Transfer to an extension. With Monitored Transfer, after an Automated Attendant caller dials an extension voice mail checks the sta- tus of the called extension. -
Page 359: Number
Customize Dial Action Tables Number The Number field can contain up to 30 characters. Following are the available commands. Digits (0-9, # and *) ● N (None) ● ● [ ] (Entry enclosed in square brackets] Not used. ● { } (Entry enclosed in brackets). Use this command with the MTRF, TRF, and UTRF actions to reach extensions that do not have mail- boxes (e.g., {XXX} or {V}). -
Page 360: Distribution Lists
Customize Distribution Lists Distribution Lists Description Use this option to set up your Distribution Lists. Once you associate a Distribution List with a Distribution Mailbox, any message left in the Distribution Mailbox will automatically be sent to all the mailboxes in the list. -
Page 361: Remove
Customize Distribution Lists Remove List Chapter 3: Programming ◆ 343 UX Mail Manual... -
Page 362: Mailbox Options: Add
Customize Mailbox Options: Add Mailbox Options: Add Description Compatibility Guidelines: When adding a Subscriber Mailbox, do one of the following to enable the keyset’s soft keys: ■ Create the Subscriber Mailbox before plugging in the keyset for the first time. ■... -
Page 363: Mailbox Options: Edit
Customize Mailbox Options: Edit Mailbox Options: Edit Description allows you to select a mailbox for editing. AILBOX PTIONS Editing Mailboxes The default mailbox range is 001-855. Turn to NDERSTANDING THE OMMAND for more on this option. 347) PAGE Click to go to the Click to jump to Click to go to the previous mailbox. -
Page 364: Filter
Customize Mailbox Options: Edit Filter Click to select the type of mailbox you want to view. Option Tabs Click a tab to access the options under that tab. Apply Changes Before leaving a screen, always click Apply Changes . 346 ◆ Chapter 3: Programming UX Mail Manual... -
Page 365: Understanding The Copy Command
Customize Mailbox Options: Edit Understanding the Copy Command Read these Guidelines Before Using the Copy Command The Copy Command will only copy from the currently selected mailbox to the next mailbox or a range beginning with the next mailbox. The Copy Command cannot: •... -
Page 366: Using The Ux Mail Copy Command
Customize Mailbox Options: Edit Using the UX Mail Copy Command To use the Copy Command: From the options, select the item from which you want to copy: USTOMIZE ● Answering Table ● Caller ID Options Table ● Dial Action Table ●... - Page 367 Customize Mailbox Options: Edit Click OK . You see: Shows the range to be copied. Select the options you want to copy. Do one of the following. Click Apply changes to copy the selected options to the specified range. ● Select additional options on other tabs, then click Apply changes (on any tab for this mailbox) to ●...
-
Page 368: Mailbox Options: Delete
Customize Mailbox Options: Delete Mailbox Options: Delete Description allows you to delete individual or a range of mailboxes. You may find you need to AILBOX PTIONS ELETE delete unused mailboxes of a certain type to make room for new mailboxes you require. In this option, you will choose: The individual or range of mailboxes you want to delete. -
Page 369: Mailbox Options: Acd Announcement
Mailbox Options: ACD Announcement Description The ACD Announcement Mailbox can provide the announcements for the UX5000’s Automatic Call Distri- bution. It is a simple, announcement-only mailbox. The ACD Announcement Mailbox message is recorded by the System Administrator, the same as for normal Announcement Mailboxes. -
Page 370: Department
Customize Mailbox Options: ACD Announcement Department Use this option to assign a department name to the ACD Announcement Mailbox. This information appears on the (page 495) and (page 497) reports. ISTRIBUTION AILBOX PTIONS Options Characters (10 characters maximum, using any keyboard characters). ●... -
Page 371: Mailbox Options: Announcement
Customize Mailbox Options: Announcement Mailbox Options: Announcement Description An Announcement Mailbox plays a pre-recorded greeting to mailbox callers. Callers can directly dial the Announcement Mailbox or be routed to it through the Automated Attendant. for more. ● NNOUNCEMENT AILBOX PAGE Announcement Mailbox Options Type Use this option to select the mailbox type. -
Page 372: Name
Customize Mailbox Options: Announcement Name You can program a name for an Announcement Mailbox. Voice mail can use this name for Directory Dial- ing. This name also appears on system reports. To allow Automated Attendant callers to Directory Dial an Announcement Mailbox, be sure to define the Announcement Mailbox leading digit in your Dial Action Tables. -
Page 373: Directory List
Customize Mailbox Options: Announcement Directory List Use this option to specify to which Directory List the Announcement Mailbox belongs. This entry is associ- ated with the Directory List to Use option in Call Routing and Directory Dialing mailboxes. To allow Automated Attendant callers to Directory Dial an Announcement Mailbox, be sure to define ●... -
Page 374: Mailbox Options: Call Routing: [General]
Customize Mailbox Options: Call Routing: [General] Mailbox Options: Call Routing: [General] Description A Call Routing Mailbox is the mailbox associated with an Answering Table that specifies which dialing options (Dial Action Table) and announcements are available to Automated Attendant Callers. The block diagram below shows how this works by default. -
Page 375: General Tab
Customize Mailbox Options: Call Routing: [General] General Tab Type [General] Use this option to select the mailbox type. Options Select Call Routing. ● Default ✔ By default, mailboxes are predefined as Call Routing Mailboxes. 810-818 and 831-838 Name [General] You can program a name for a Call Routing Mailbox. Voice mail can use this name for Directory Dialing. This name also appears on system reports. -
Page 376: [General] Tenant
Customize Mailbox Options: Call Routing: [General] Tenant [General] Use this option to specify to which Tenant Group the Call Routing Mailbox belongs. If Tenant Groups are not set up in , voice mail provides a sin- : [G 1] N 460) USTOMIZE YSTEM... -
Page 377: Mailbox Options: Call Routing: [Call Handling]
Customize Mailbox Options: Call Routing: [Call Handling] Mailbox Options: Call Routing: [Call Handling] Call Handling Tab Dial Action Table [Call Handling] Use this option to assign the Dial Action Table to the Call Routing Mailbox. The Dial Action Table defines the dialing options for the Call Routing Mailbox. -
Page 378: [Call Handling] Directory List To Use
Customize Mailbox Options: Call Routing: [Call Handling] Directory List To Use [Call Handling] If the Dial Action Table assigned to this Call Routing Mailbox has a Directory Dialing (DIRF or DIRL) action programmed: This option determines which Directory List is used when an Automated Attendant caller uses Directory Dialing. If the Dial Action Table assigned to this Call Routing Mailbox does not have a Directory Dialing (DIRF or DIRL) action programmed: This option is not used. -
Page 379: Mailbox Options: Directory Dialing: [General]
Customize Mailbox Options: Directory Dialing: [General] Mailbox Options: Directory Dialing: [General] Description A Directory Dialing mailbox lets you set up a type of Directory Dialing that bypasses the Automated Atten- dant. The Directory Dialing mailbox can answer outside calls, play a unique message, and let callers imme- diately dial by name. -
Page 380: [General] Department
Customize Mailbox Options: Directory Dialing: [General] Department [General] Use this option to assign a department name to the Directory Dialing Mailbox. This information appears on the Distribution List (page 495) and Mailbox Options (page 497) reports. Options Characters (10 characters maximum, using any keyboard characters). ●... -
Page 381: Mailbox Options: Directory Dialing: [Call Handling]
Customize Mailbox Options: Directory Dialing: [Call Handling] Mailbox Options: Directory Dialing: [Call Handling] Call Handling Tab Dial Action Table [Call Handling] Use this option to assign the Dial Action Table to the Directory Dialing Mailbox. The Dial Action Table defines the dialing options for the Directory Dialing Mailbox. ●... -
Page 382: [Call Handling] Directory List To Use
Customize Mailbox Options: Directory Dialing: [Call Handling] Directory List To Use [Call Handling] This option determines which Directory List is used by this Directory Dialing Mailbox. for more. ● 120) IRECTORY IALING PAGE Options 1-100 ● - Mailbox uses Directory List 1-100. A (All) ●... -
Page 383: Mailbox Options: Distribution
Customize Mailbox Options: Distribution Mailbox Options: Distribution Description Use a Distribution Mailbox when setting up a Distribution List. When you record a message and send it to the Distribution Mailbox, voice mail automatically sends the message to everyone on the predefined Dis- tribution List. -
Page 384: Department
Customize Mailbox Options: Distribution Department Use this option to assign a department name to the Distribution Mailbox. This information appears on the Distribution List (page 495) and Mailbox Options (page 497) reports. Options Characters (10 characters maximum, using any keyboard characters). ●... -
Page 385: Mailbox Options: Future Delivery
Customize Mailbox Options: Future Delivery Mailbox Options: Future Delivery Description A Future Delivery Mailbox is the type of mailbox that allows extension users to leave Future Delivery Messages. for more. ● 146) UTURE ELIVERY AILBOX PAGE Future Delivery Mailbox Options Mailbox Type Use this option to select the mailbox type. -
Page 386: Name
Customize Mailbox Options: Future Delivery Name You can program a name for the Future Delivery Mailbox. This name appears on system reports. You cannot use the Future Delivery Mailbox name for Directory Dialing. The Directory Dialing fea- ● ture is not available to Future Delivery Mailboxes. ●... -
Page 387: Mailbox Options: Guest: [General]
Customize Mailbox Options: Guest: [General] Mailbox Options: Guest: [General] Description An outside party can have a Guest Mailbox for receiving and sending messages. A Guest Mailbox is similar to a Subscriber Mailbox, except that it doesn’t have an associated extension. for more. -
Page 388: [General] Name
Customize Mailbox Options: Guest: [General] Name [General] You can program a name for a Guest Mailbox. Voice mail can use this name for Directory Dialing. This name also appears on system reports. ● To allow Automated Attendant callers to Directory Dial a Guest Mailbox, be sure to define the Guest Mailbox leading digit in your Dial Action Tables. -
Page 389: [General] Next Call Routing Mailbox
Customize Mailbox Options: Guest: [General] Next Call Routing Mailbox [General] Use this option to assign a Next Call Routing Mailbox to the Guest Mailbox. This provides callers with addi- tional dialing options after they leave a message in the Guest Mailbox. The following table shows these options (which are equivalent to Next Call Routing Mailbox Dial Mode setting of None for Subscriber Mailboxes. -
Page 390: [General] Directory List
Customize Mailbox Options: Guest: [General] Directory List [General] Use this option to specify to which Directory List the Guest Mailbox belongs. This entry is associated with the Directory List to Use option in Call Routing and Directory Dialing mailboxes that you’ll use to name dial this Guest Mailbox (if any). -
Page 391: Mailbox Options: Guest: [Message Notification]
Customize Mailbox Options: Guest: [Message Notification] Mailbox Options: Guest: [Message Notification] Message Notification Tab Compatibility Guidelines: ■ When using the UX Mail Administrator to enter dial strings, take care not to enter illegal characters (such as dashes). Enter only those characters allowed by the option you are programming. The following Message Notification options do not affect voice mail’s ability to light message waiting lamps. -
Page 392: [Message Notification] Local Callouts
Customize Mailbox Options: Guest: [Message Notification] Local Callouts [Message Notification] Use this option to enable or disable the ability of the Guest Mailbox user to enter local numbers for their Message Notification callout numbers. Voice mail defines local numbers as 5-8 digits long. ●... -
Page 393: [Message Notification] Notification Phone Number
Guest Mailbox user enter the numbers from their extension. The callout numbers you enter in this option override the mailbox user entries and visa versa. Keep the following in mind when entering numbers: Internal (extension numbers) are 3 or 4 digits long, depending on UX5000 programming. ●... -
Page 394: [Message Notification] Call Type
Customize Mailbox Options: Guest: [Message Notification] ● W (Wait for dial tone) This command waits for CO dial tone, and then continues. Default ✔ Indexes 2-3 entries are N (None). Call Type [Message Notification] For each Notification Number you enter, use this option to specify the type of call the number represents (Internal, Local, or Long Distance). -
Page 395: [Message Notification] Security Required
Customize Mailbox Options: Guest: [Message Notification] Security Required [Message Notification] Use this option to require the Message Notification recipient to enter the Guest Mailbox’s security code before they can listen to the messages from that mailbox. This option applies to Normal Notification Mode only. -
Page 396: Mailbox Options: Guest: [Messaging]
Customize Mailbox Options: Guest: [Messaging] Mailbox Options: Guest: [Messaging] Messaging Tab Message Playback [Messaging] Use this option to set the Guest Mailbox message playback order. When the guest listens to their messages, voice mail can play the newest messages first (first-in-first-out, or FIFO), or the oldest messages first (last- in-first-out, or LIFO). -
Page 397: [Messaging] Auto Forwarding
Customize Mailbox Options: Guest: [Messaging] Auto Forwarding [Messaging] Use this option to set how Auto Forward operates at the Guest Mailbox. The options are: Disabled ● The Guest Mailbox user cannot set up Auto Forwarding using the OP + AF options. ●... -
Page 398: [Messaging] Urgent Message Return Time
Caller ID is not available or installed. ● This option is not required for Make Call to work to UX5000 extensions. It is only required to enable Make Call for outside (Automated Attendant) callers. Make Call follows the same programming and restrictions as Message Notification. -
Page 399: Mailbox Options: Guest: [Lamp/Logon/Transfer]
Customize Mailbox Options: Guest: [Lamp/Logon/Transfer] Mailbox Options: Guest: [Lamp/Logon/Transfer] Lamp/Logon/Transfer Tab Compatibility Guidelines: ■ When using the UX Mail Administrator to enter dial strings, take care not to enter illegal characters (such as dashes). Enter only those characters allowed by the option you are programming. Lamp: Message Waiting Lamp [Lamp/Logon/Transfer] Do not use this option. -
Page 400: [Lamp/Logon/Transfer] First Login Option
Customize Mailbox Options: Guest: [Lamp/Logon/Transfer] First Login Option [Lamp/Logon/Transfer] Use this option to set up the First Time Tutorial options for the Guest Mailbox. The First Time Tutorial will occur only when the guest logs into their mailbox for the first time. ●... -
Page 401: Mailbox Options: Interactive: [General]
Customize Mailbox Options: Interactive: [General] Mailbox Options: Interactive: [General] Description The Interactive Mailbox provides callers with the ability to record answers to a sequence of pre-recorded Interactive Prompts. Voice mail saves the answers as new messages in the Subscriber, Guest, or Message Center Mailbox assigned to store the responses. -
Page 402: [General] Department
Customize Mailbox Options: Interactive: [General] Department [General] Use this option to assign a department name to the Interactive Mailbox. This information appears on the Dis- tribution List (page 495) and Mailbox Options (page 497) reports. Options Characters (10 characters maximum, using any keyboard characters). ●... -
Page 403: [General] Tenant
Customize Mailbox Options: Interactive: [General] Tenant [General] Use this option to specify to which Tenant Group the Interactive Mailbox belongs. If Tenant Groups are not set up in Customize: System Options: , voice mail provides a single tenant. 1] N 460) ENERAL UMBER OF... -
Page 404: Call Handling Tab
Customize Mailbox Options: Interactive: [General] Call Handling Tab Time Limit for Dialing Commands [Call Handling] ■ This option is normally not used. You should leave it at its default setting (5 seconds). This timer sets how long voice mail allows the Interactive Mailbox caller to wait before dialing commands (i.e., digits). -
Page 405: Mailbox Options: Interactive: [Interactive]
Customize Mailbox Options: Interactive: [Interactive] Mailbox Options: Interactive: [Interactive] Interactive Tab Silence Limit [Interactive] This timer sets how long voice mail will wait when the Interactive Mailbox caller is silent (i.e., stops record- ing). This is helpful to rotary dial callers that cannot dial digits to confirm that they have completed leaving a message. -
Page 406: [Interactive] Review Mode
Customize Mailbox Options: Interactive: [Interactive] Review Mode [Interactive] This option sets the Interactive Prompt review mode for each caller to the Interactive Mailbox. If the option is set to None, the caller has no opportunity to review and correct their responses. If set to After each, the caller can review and optionally correct their answers after each response. -
Page 407: Mailbox Options: Message Center: [General]
Customize Mailbox Options: Message Center: [General] Mailbox Options: Message Center: [General] Description A Message Center Mailbox is a unique mailbox type used to “collect” messages not intended for a specific mailbox. Although similar in many respects to a Subscriber Mailbox, it lacks the following features. ( RS ) LOCKING ESSAGE... -
Page 408: [General] Security Code
Customize Mailbox Options: Message Center: [General] Security Code [General] Since Message Center Mailboxes are normally used to “collect” general messages, you should leave this option at its default setting (None). Use this option to enter the Security Code for the Message Center Mailbox. The Security Code protects the mailbox from unauthorized access. -
Page 409: [General] Next Call Routing Mailbox
Customize Mailbox Options: Message Center: [General] Next Call Routing Mailbox [General] Use this option to assign a Next Call Routing Mailbox to the Message Center Mailbox. This provides callers with additional dialing options after they leave a message in the Message Center Mailbox (depending on the setting of Next Call Routing Mailbox Dial Mode below). - Page 410 Customize Mailbox Options: Message Center: [General] If the call is routed from a Call Routing Mailbox (e.g., the Automated Attendant), dialing # routes the call back to that Call Routing Mailbox (the previous Call Routing Mailbox) and plays its Instruction Menu. With this option set to N and no Next Call Routing Mailbox is entered: ●...
-
Page 411: [General] Tenant
Customize Mailbox Options: Message Center: [General] Option 2 (Enables Actions 0-9, #, *, and Timeout) Since you cannot record a greeting for a Message Center Mailbox, Option 2 functions identically to Option 1. This option is not used. Options ● N (None). -
Page 412: [General] Bilingual Mode
Customize Mailbox Options: Message Center: [General] Bilingual Mode [General] Use this option to set the mailbox language. Your choices are English (1) (English mnemonic) and English (2) (English numeric), unless the System Administrator has substituted French or Spanish for one (or both) of these default languages. -
Page 413: Mailbox Options: Message Center: [Message Notification]
Customize Mailbox Options: Message Center: [Message Notification] Mailbox Options: Message Center: [Message Notification] Message Notification Tab Compatibility Guidelines: ■ When using the UX Mail Administrator to enter dial strings, take care not to enter illegal characters (such as dashes). Enter only those characters allowed by the option you are programming. The following Message Notification options are for off-site Message Notification only. -
Page 414: [Message Notification] Local Callouts
Customize Mailbox Options: Message Center: [Message Notification] Local Callouts [Message Notification] Use this option to enable or disable the ability of the Message Center Mailbox user to enter local numbers for their Message Notification callout numbers. Voice mail defines local numbers as 5-8 digits long. ●... -
Page 415: [Message Notification] Phone Number
Keep the following in mind when entering num- bers: ● Internal (extension numbers) are 3 or 4 digits long, depending on UX5000 programming. ● Local numbers are 5-8 digits long. -
Page 416: [Message Notification] Call Type
Customize Mailbox Options: Message Center: [Message Notification] ● S (Wait for sound) This command waits 2 seconds for any constant sound (such as non-standard dial tone), and continues if sound is detected. ● W (Wait for dial tone) This command waits for CO dial tone, and then continues. Default ✔... -
Page 417: [Message Notification] Security Required
Customize Mailbox Options: Message Center: [Message Notification] Security Required [Message Notification] Use this option to require the Message Notification recipient to enter the Message Center Mailbox’s security code before they can listen to the messages from that mailbox. This option applies to Normal Notification Mode only. -
Page 418: Mailbox Options: Message Center: [Messaging]
Customize Mailbox Options: Message Center: [Messaging] Mailbox Options: Message Center: [Messaging] Messaging Tab Message Playback [Messaging] Use this option to set the Message Center Mailbox message playback order. When someone listens to the messages in the Message Center Mailbox, voice mail can play the newest messages first (first-in-first-out, or FIFO), or the oldest messages first (last-in-first-out, or LIFO). -
Page 419: [Messaging] Auto Forwarding
Customize Mailbox Options: Message Center: [Messaging] Auto Forwarding [Messaging] Use this option to set how Auto Forward operates at the Message Center Mailbox. The options are: Disabled ● The Message Center Mailbox user cannot set up Auto Forwarding using the OP + AF options. ●... -
Page 420: [Messaging] Urgent Message Return Time
Caller ID is not available or installed. ● This option is not required for Make Call to work to UX5000 extensions. It is only required to enable Make Call for outside (Automated Attendant) callers. -
Page 421: Mailbox Options: Message Center: [Lamp/Logon/Transfer]
Customize Mailbox Options: Message Center: [Lamp/Logon/Transfer] Mailbox Options: Message Center: [Lamp/Logon/Transfer] Lamp/Logon/Transfer Compatibility Guidelines: ■ When using the UX Mail Administrator to enter dial strings, take care not to enter illegal characters (such as dashes). Enter only those characters allowed by the option you are programming. Message Waiting Lamp [Lamp/Logon/Transfer] Do not use this option. -
Page 422: [Lamp/Logon/Transfer] External Extension
Customize Mailbox Options: Message Center: [Lamp/Logon/Transfer] External Extension [Lamp/Logon/Transfer] Do not use this option. Since Message Center Mailboxes do not have extensions associated with them, the setting of this option should not affect mailbox operation. External Extension Number [Lamp/Logon/Transfer] Do not use this option. Since Message Center Mailboxes do not have extensions associated with them, the setting of this option should not affect mailbox operation. -
Page 423: Mailbox Options: Network: [General]
Customize Mailbox Options: Network: [General] Mailbox Options: Network: [General] Description Compatibility Guidelines: ■ AMIS Networking is an optional feature and requires that you purchase and install an AMIS Net- working license. Network Mailboxes are required for AMIS voice mail networking and are only available if the networking option is licensed in your system. -
Page 424: [General] Name
Customize Mailbox Options: Network: [General] Name [General] You can program a name for a Network Alias Mailbox. Voice mail can use this name for Directory Dialing. This name also appears on system reports. Directory Dialing is not available with Network Remote Mailboxes. ●... -
Page 425: [General] Next Crmb Dial Mode
Customize Mailbox Options: Network: [General] Next CRMB Dial Mode [General] Use this option to determine how the Next Call Routing Mailbox option functions for the Network Alias Mailbox. There are 3 choices for this option: N, 1, and 2 (see below). Also see for more. - Page 426 Customize Mailbox Options: Network: [General] Option 1 (Enables Actions 0-9) This option provides mailbox callers leaving a message the ability to record a message as well as use the 0-9 options from the Dial Action Table associated with the Next Call Routing Mailbox. The mailbox user should record a greeting that defines these options (similar to a Call Routing Mailbox Instruction Menu).
- Page 427 Customize Mailbox Options: Network: [General] Option 2 (Enables Actions 0-9, #, *, and Timeout) By default, enabling Option 2 disables the ability of a caller to leave a message in the called Network Alias Mailbox. See below for more. This option turns the Subscriber Mailbox into a type of Call Routing Mailbox by providing the caller with all the key actions from the Dial Action Table associated with the Next Call Routing Mailbox.
-
Page 428: [General] Tenant
Customize Mailbox Options: Network: [General] Network Alias Mailbox Option 2 (Enables Actions 0-9, #, *, and Timeout) with Personal Greeting While Action While listening to greeting: While recording is paused: recording: Executes 0 action from Next Call Routing Mailbox. Plays recording options help message. Executes 1 action from Next Call Routing Mailbox. -
Page 429: [General] Directory List
Customize Mailbox Options: Network: [General] Directory List [General] Use this option to specify to which Directory List the Network Alias Mailbox belongs. This entry is associated with the Directory List to Use option in Call Routing and Directory Dialing mailboxes that you’ll use to name dial this Network Mailbox (if any). -
Page 430: Mailbox Options: Network: [Network]
Customize Mailbox Options: Network: [Network] Mailbox Options: Network: [Network] Network Tab Type [Network] Use this option to select the Network Mailbox type. There are two options: Alias and Remote. ● Network Alias Mailbox An Alias mailbox corresponds to a specific mailbox in the remote system. If a user leaves a message in a Network Alias Mailbox (and all other programming is correct), the local voice mail delivers the message directly to the specified mailbox in the remote system. -
Page 431: [Network] Network Call Type
Customize Mailbox Options: Network: [Network] Network Call Type [Network] Use this option to select the type of network callout used by the Network Mailbox. When a message is left in the Network Mailbox, voice mail will use the type of callout specified in this option when delivering the message to the remote system. -
Page 432: [Network] Networking Site Restriction Options
Customize Mailbox Options: Network: [Network] Networking Site Restriction Options [Network] Use the Prefix Number, Country Code, Area Code, and Phone Number options for entering the number of the remote site to which messages left in the Network Mailbox will be delivered, as well as for setting up Net- working Site Restriction (page 237). -
Page 433: [Network] Network Prefix Number
Customize Mailbox Options: Network: [Network] Network Prefix Number [Network] If the system to which network messages will be delivered for this mailbox is located in another country, use this option to enter the International Dialing Prefix (e.g., 011). If the remote system is installed in North America, this entry should be None ( N ). -
Page 434: [Network] Network Phone Number
Customize Mailbox Options: Network: [Network] Network Phone Number [Network] Use this option to enter the number for the system to which network messages from this mailbox will be deliv- ered. For example, if the remote system is located at 203-926-5400, enter 9265400 for this option. ●... -
Page 435: [Network] Auto Forwarding
Customize Mailbox Options: Network: [Network] Auto Forwarding [Network] Use this option to set how Auto Forward operates at the Network Mailbox. The options are: Disabled ● An extension user logging onto the Network Mailbox user cannot set up Auto Forwarding using the + AF options. -
Page 436: Mailbox Options: Subscriber: [General]
Customize Mailbox Options: Subscriber: [General] Mailbox Options: Subscriber: [General] Description A Subscriber Mailbox is the type of mailbox assigned to a UX5000 extension. The terminal assigned to the Subscriber Mailbox is called the subscriber’s extension. for more. ● 279) UBSCRIBER... -
Page 437: [General] Name
Customize Mailbox Options: Subscriber: [General] Name [General] You can program a name for a Subscriber Mailbox. Voice mail can use this name for Directory Dialing. This name also appears on system reports. To allow Automated Attendant callers to Directory Dial a Subscriber Mailbox, be sure to define the ●... -
Page 438: [General] Next Crmb Dial Mode
Customize Mailbox Options: Subscriber: [General] Next CRMB Dial Mode [General] Use this option to determine how the Next Call Routing Mailbox option functions for the Subscriber Mail- box. There are 3 choices for this option: N, 1, and 2 (see below). ●... - Page 439 Customize Mailbox Options: Subscriber: [General] Option 1 (Enables Actions 0-9) This option provides mailbox callers leaving a message the ability to record a message as well as use the 0-9 options from the Dial Action Table associated with the Next Call Routing Mailbox. The mailbox user should record a greeting that defines these options (similar to a Call Routing Mailbox Instruction Menu).
- Page 440 Customize Mailbox Options: Subscriber: [General] Option 2 (Enables Actions 0-9, #, *, and Timeout) By default, enabling Option 2 disables the ability of a caller to leave a message in the called Subscriber Mailbox. See below for more. This option turns the Subscriber Mailbox into a type of Call Routing Mailbox by providing the caller with all the key actions from the Dial Action Table associated with the Next Call Routing Mailbox.
-
Page 441: [General] Tenant
Customize Mailbox Options: Subscriber: [General] Subscriber Mailbox Option 2 (Enables Actions 0-9, #, *, and Timeout) with Personal Greeting While Action While listening to greeting: While recording is paused: recording: Executes 0 action from Next Call Routing Mailbox. Plays recording options help message. Executes 1 action from Next Call Routing Mailbox. -
Page 442: [General] Directory List
Customize Mailbox Options: Subscriber: [General] Directory List [General] Use this option to specify to which Directory List the Subscriber Mailbox belongs. This entry is associated with the Directory List to Use option in Call Routing and Directory Dialing mailboxes that you’ll use to name dial this Subscriber Mailbox (if any). -
Page 443: Mailbox Options: Subscriber: [Message Notification]
Customize Mailbox Options: Subscriber: [Message Notification] Mailbox Options: Subscriber: [Message Notification] Message Notification Tab Compatibility Guidelines: ■ When using the UX Mail Administrator to enter dial strings, take care not to enter illegal characters (such as dashes). Enter only those characters allowed by the option you are programming. The following Message Notification options do not affect voice mail’s ability to light message waiting lamps. -
Page 444: [Message Notification] Local Callouts
Customize Mailbox Options: Subscriber: [Message Notification] Local Callouts [Message Notification] Use this option to enable or disable the ability of the Subscriber Mailbox user to enter local numbers for their Message Notification callout numbers. Voice mail defines local numbers as 5-8 digits long. ●... -
Page 445: [Message Notification] Phone Number
Keep the following in mind when enter- ing numbers: ● Internal (extension numbers) are 3 or 4 digits long, depending on UX5000 programming. ● Local numbers are 5-8 digits long. -
Page 446: [Message Notification] Call Type
Customize Mailbox Options: Subscriber: [Message Notification] ● W (Wait for dial tone) This command waits for CO dial tone, and then continues. Default ✔ Indexes 1-3 entries are N (None). Call Type [Message Notification] For each Notification Number you enter, use this option to specify the type of call the number represents (Internal, Local, or Long Distance). -
Page 447: [Message Notification] Security Required
Customize Mailbox Options: Subscriber: [Message Notification] Security Required [Message Notification] Use this option to require the Message Notification recipient to enter the Subscriber Mailbox’s security code before they can listen to the messages from that mailbox. This option applies to Normal Notification Mode only. -
Page 448: Mailbox Options: Subscriber: [Messaging]
Customize Mailbox Options: Subscriber: [Messaging] Mailbox Options: Subscriber: [Messaging] Messaging Tab Message Playback [Messaging] Use this option to set the Subscriber Mailbox message playback order. When a subscriber listens to their messages, voice mail can play the oldest messages first (first-in-first-out, or FIFO), or the newest messages first (last-in-first-out, or LIFO). -
Page 449: [Messaging] Auto Forwarding
Customize Mailbox Options: Subscriber: [Messaging] Auto Forwarding [Messaging] Use this option to set how Auto Forward operates at the Subscriber Mailbox. The options are: Disabled ● The Subscriber Mailbox user cannot set up Auto Forwarding using the OP + AF options. ●... -
Page 450: [Messaging] Urgent Message Return Time
Caller ID is not available or installed. ● This option is not required for Make Call to work to UX5000 extensions. It is only required to enable Make Call for outside (Automated Attendant) callers. -
Page 451: Mailbox Options: Subscriber: [Lamp/Logon/Transfer]
Customize Mailbox Options: Subscriber: [Lamp/Logon/Transfer] Mailbox Options: Subscriber: [Lamp/Logon/Transfer] Lamp/Logon/Transfer Tab Compatibility Guidelines: ■ When using the UX Mail Administrator to enter dial strings, take care not to enter illegal characters (such as dashes). Enter only those characters allowed by the option you are programming. Message Waiting Lamp [Lamp/Logon/Transfer] Use this option to enable or disable Message Waiting lamping at the extension associated with the Sub-... -
Page 452: [Lamp/Logon/Transfer] Transfer-Only Mailbox
Customize Mailbox Options: Subscriber: [Lamp/Logon/Transfer] Transfer-Only Mailbox [Lamp/Logon/Transfer] To enable Transfer-Only Mailbox: The Subscriber Mailbox must not have a Personal Greeting recorded. ■ The call can only be routed to the extension from the Automated Attendant (Call Routing ■ Mailbox) TRF option, or via Directory Dialing. Use this option to designate the Subscriber Mailbox as a Transfer-Only Mailbox. -
Page 453: [Lamp/Logon/Transfer] Login Announcement Mailbox
Customize Mailbox Options: Subscriber: [Lamp/Logon/Transfer] Login Announcement Mailbox [Lamp/Logon/Transfer] Use this option to specify the Announcement Mailbox used for the First Time Tutorial. When you make an entry in this option, be sure you have also enabled either Option 1 or Option 2 in First Log In Option above. The First Time Tutorial will occur only when the subscriber logs into their mailbox for the first time. -
Page 454: [Lamp/Logon/Transfer] External Extension
Customize Mailbox Options: Subscriber: [Lamp/Logon/Transfer] External Extension [Lamp/Logon/Transfer] Use this option to enable or disable External Extension for the Subscriber Mailbox. If enabled (and other External Extension programming is complete), Automated Attendant (TRF and UTRF) callers to the sub- scriber’s extension will route to the outside number entered in External Extension: Number below. If dis- abled, Automated Attendant calls will be handled normally. -
Page 455: Mailbox Options: Subscriber: [Subscriber]
Customize Mailbox Options: Subscriber: [Subscriber] Mailbox Options: Subscriber: [Subscriber] Subscriber Tab Compatibility Guidelines: ■ When using the UX Mail Administrator to enter dial strings, take care not to enter illegal characters (such as dashes). Enter only those characters allowed by the option you are programming. Park/Paging String [Subscriber] The Park/Paging string is automatically set up during voice mail installation. -
Page 456: [Subscriber] Call Waiting String
Customize Mailbox Options: Subscriber: [Subscriber] ● P (Pause) This command waits for 2 seconds and then continues. You can enter a pause command anywhere in the dial string. ● S (Wait for sound) This command waits 2 seconds for any constant sound (such as non-standard dial tone), and continues if sound is detected. -
Page 457: [Subscriber] Call Announcing
Customize Mailbox Options: Subscriber: [Subscriber] Call Announcing [Subscriber] Use this option to enable or disable Call Announcing for the Subscriber Mailbox. Call Announcing lets the subscriber know who is calling before they answer an Automated Attendant call. To use Call Announcing, the Subscriber Mailbox must have Call Announcing turned on. From the ●... -
Page 458: [Subscriber] Pre-Greeting/Closing Announcement Mailbox
Customize Mailbox Options: Subscriber: [Subscriber] Pre-Greeting/Closing Announcement Mailbox [Subscriber] Use this option to set up the Pre-Greeting Announcement Mailbox feature for the Subscriber Mailbox. If enabled, callers leaving a message in the Subscriber Mailbox hear the Announcement Message recorded for the specified Pre-Greeting Announcement Mailbox prior to hearing the mailbox’s Personal Greeting. -
Page 459: Mailbox Options: Subscriber: [Email]
Customize Mailbox Options: Subscriber: [Email] Mailbox Options: Subscriber: [Email] Email Tab The programming below is required to enable Desktop Messaging for a Subscriber Mailbox. For Exchange Server accounts, ask the server administrator for the account setup information. ■ In Outlook Express, make sure the following Tools: Options: options are enabled: ■... -
Page 460: [Email] Smtp Server
Customize Mailbox Options: Subscriber: [Email] Smtp Server [Email] Use this option to specify the name of the SMTP (Simple Mail Transfer Protocol) server that handles outgo- ing messages for the subscriber’s email account. The SMTP server name is typically similar to smtp.emailserver.com. -
Page 461: [Email] Smtp Account
Customize Mailbox Options: Subscriber: [Email] Smtp Account [Email] Enter the subscriber’s complete email address in this option (e.g., yourname@emailserver.com). Options ● Up to 80 alphanumeric characters. Default ✔ No entry. Smtp Password [Email] Use this option to the SMTP Password for the subscriber’s email account. This is the password the sub- scriber enters in their email client to log onto their account. -
Page 462: [Email] Imap4 Password
Customize Mailbox Options: Subscriber: [Email] Imap4 Password [Email] Use this option to the IMAP4 Password for the subscriber’s email account. This is the password the sub- scriber enters in their email client to log onto their account. Options Up to 80 alphanumeric characters. ●... -
Page 463: Desktop Messaging Applications
Customize Mailbox Options: Subscriber: [Email] Desktop Messaging Applications Setting Up Subscribed Folders with Exchange Server Accounts The following procedure shows how to set up IMAP4 subscribed folders for Exchange Server accounts using the Outlook email client. It is in three parts: Part 1: Set Up an IMAP4 Account ●... - Page 464 Customize Mailbox Options: Subscriber: [Email] Enter the following information, clicking Next after you complete each screen: Outlook 2000 Option Typical Entry Your Name Display Name Enter your name Internet E-mail Address E-Mail Address yourname@emailserver.com E-mail Server Names My incoming mail server is a Select IMAP Incoming mail server imap.emailserver.com...
-
Page 465: Desktop Messaging Message Handling
Customize Mailbox Options: Subscriber: [Email] Desktop Messaging Message Handling How UX Mail Desktop Messaging Manages Messages User Action Voice Mail Message Status Email Account Message Status From Email Client New voice mail message arrives. ■ Message received. ■ Email received as unread. ■... -
Page 466: Setting Up The Vm Folder Only Option On An Exchange Account With Outlook
Customize Mailbox Options: Subscriber: [Email] Setting up the VM Folder Only Option on an Exchange Account with Outlook 2003 Part 1: Set up an IMAP Account in Outlook 2003 To set up an IMAP account: Move all your voice mail messages from your inbox to another folder. ●... -
Page 467: Setting Up The Vm Folder Only Option On An Exchange Account With Outlook
Customize Mailbox Options: Subscriber: [Email] When you see the Rules and Alerts screen, click OK to exit. From any extension, leave a test message in the mailbox. Outlook will receive the message and automatically move it to the Voice Mail Messages folder. ●... - Page 468 Customize Mailbox Options: Subscriber: [Email] Part 3: Subscribe to the Voice Mail Messages Folder To subscribe to the Voice Mail Messages folder: In Outlook, right click on your email (IMAP) server and click IMAP Folders . In the IMAP Folders screen, click Query . In the list of displayed folders, select the Voice Mail Messages folder and click Subscribe .
-
Page 469: Mailbox Options: Trunk
Customize Mailbox Options: Trunk Mailbox Options: Trunk Description A Trunk Mailbox allows a specific trunk to have its own Answering Table. This permits the voice mail Automated Attendant to provide a unique Welcome Message, Instruction Menu, and dialing options for each trunk. -
Page 470: Extension
Customize Mailbox Options: Trunk Extension Use this option to assign the Trunk Mailbox to a trunk. The options programmed for the Trunk Mailbox apply to each call answered on the specified trunk. Normally, this option is the same as the Trunk Mailbox number. -
Page 471: Answering Schedule Table
Customize Mailbox Options: Trunk Answering Schedule Table Use this option to specify which Answering Table will answer the trunk specified in the Extension option for this Trunk Mailbox. The selection you make in this option overrides the setting of USTOMIZE PTIONS on page 454. -
Page 472: Port Options
Customize Port Options Port Options Description Use Port Options to set miscellaneous options for each voice mail port. For a summary of how each port is programmed, see Reports: and Reports: 504) 505) PTIONS EPORT PAGE SAGE EPORT PAGE Port Options Tenant Use this option to specify to which Tenant Group the voice mail port belongs. -
Page 473: Answering Table
Customize Port Options Answering Table Use this option to specify the Answering Table voice mail assigns to the voice mail port when it answers an outside (trunk) call. The selection you make in this option is overridden by the setting of USTOMIZE AILBOX 453) -
Page 474: Allow Lamp Callouts
Customize Port Options Allow Lamp Callouts Be sure at least one voice mail port has this option enabled. Use this option to enable or disable message waiting lamp updates for this port. Options Yes or No. ● Default ✔ No for ports 1-3. ✔... -
Page 475: Clear Port's Failure
Customize Port Options Clear Port’s Failure If the Self Test diagnostic reports a failure, and you correct the cause of the failure, use this option to put the port back in service and clear the failure from the Port Activity log. See Self Test above for more on the Self Test diagnostic. -
Page 476: System Options: [General 1]
Customize System Options: [General 1] System Options: [General 1] Description Use System Options to customize various system-wide settings. For a summary of the system options, see Reports: 515) OOLS PAGE General 1 Tab : System Password [General 1] Use this option to set the password you must enter when starting the UX Mail Administrator. If you don’t enter the correct password, you can’t launch the program. -
Page 477: [General 1]: Incoming Network Call Mode
Customize System Options: [General 1] : Incoming Network Call Mode [General 1] Use this option when setting up Networking Site Restriction (page 237). The illustration below shows an example of the related options in both the sending and receiving systems for a typical system installed in North America. -
Page 478: [General 1] Default Bilingual Mode
Customize System Options: [General 1] ● (All incoming network calls are accepted). ● Selected (Network Site Restriction is enabled — only some calls are allowed. See above.) Default ✔ None (Incoming network calls are not accepted). Default Bilingual Mode [General 1] Use this option to set the system voice prompt language. -
Page 479: [General 1] Eliminate Recording Silence
Customize System Options: [General 1] Eliminate Recording Silence [General 1] Enabling this option may cause stored messages to sound choppy and/or unnatural. Use this option to enable or disable Recording Silence Elimination. If enabled, voice mail will automatically remove quiet (silent) periods from recorded messages to conserve message space. If disabled, voice mail will record most short periods of silence. -
Page 480: System Options: [General 2]
Customize System Options: [General 2] System Options: [General 2] General 2 Tab Mailbox Logon Time Limit [General 2] When voice mail requests the caller to enter their mailbox number or security code, this timer determines how long voice mail will wait before repeating the request. ●... -
Page 481: [General 2] Dialing Commands Time Limit
Customize System Options: [General 2] Dialing Commands Time Limit [General 2] When voice mail requests the caller to dial a command, this timer determines how long voice mail will wait before repeating the request. The Dialing Commands: Attempt Limit option below sets how may times (total) voice mail will make ●... -
Page 482: [General 2] Call Queuing Hold Timer
Customize System Options: [General 2] Call Queuing Hold Timer [General 2] Not used. Call Queuing Number of Idle Ports [General 2] Not used. Port Self Test Timer [General 2] If a voice mail port has the automatic Port Self Test Diagnostic enabled, this timer sets the interval between diagnostic attempts. -
Page 483: System Options: [Dial Strings]
Customize System Options: [Dial Strings] System Options: [Dial Strings] Dial Strings Tab Compatibility Guidelines: ■ When using the UX Mail Administrator to enter dial strings, take care not to enter illegal characters (such as dashes). Enter only those characters allowed by the option you are programming. RNA Hold Retrieval [Dial Strings] This dial string is automatically set during installation. -
Page 484: [Dial Strings] Busy Hold Retrieval
Customize System Options: [Dial Strings] ● $ - Not used. Default ✔ F*7 (Flash then dial *7) Busy Hold Retrieval [Dial Strings] This option is not used. External RNA Hold Retrieval [Dial Strings] Use this option to set up the RNA External Hold Retrieval String for the External Extension feature. If voice mail routes an External Extension transfer and the called destination is unanswered, it dials this string to retrieve the call. -
Page 485: [Dial Strings] Transfer Internal
Customize System Options: [Dial Strings] ● W (Wait for dial tone) This command waits for CO dial tone, and then continues. ● $ - Not used. Default ✔ None Transfer Internal [Dial Strings] This dial string is automatically set during installation. You should not change this entry from its default setting. -
Page 486: [Dial Strings] Lamp On
Customize System Options: [Dial Strings] ● W (Wait for dial tone) This command waits for CO dial tone, and then continues. ● $ - Not used. Default ✔ N (None) Lamp On [Dial Strings] This dial string is automatically set during installation. You should not change this entry from its default setting. -
Page 487: [Dial Strings] Hang Up
This dial string is automatically set during installation. You should not change this entry from its default setting. Use this option to set up the string voice mail uses for Directed Call Pickup. This string is the same as the UX5000 Directed Call Pickup string. Options ●... -
Page 488: [Dial Strings] Ringdown
Use this option to set up the Ringdown string. When voice mail sets up Call Announcing or Call Waiting, it dials this string to tell the UX5000 not to connect the outside call when the extension use lifts the handset. - Page 489 Customize System Options: [Dial Strings] ● S (Wait for sound) This command waits 2 seconds for any constant sound (such as non-standard dial tone), and continues if sound is detected. ● X (Extension number) Voice mail automatically replaces the X command with the number of the extension to receive the lamp update.
-
Page 490: System Options: [Timer]
Customize System Options: [Timer] System Options: [Timer] Timers Tab Subscriber Message Length [Timers] Use this option to set the maximum length of recorded messages for: Subscriber or Guest Mailbox users dialing RS to record and send a message. ● ● Extension users leaving a message in a Subscriber, Guest, or Message Center Mailbox. -
Page 491: [Timers] Nonsubscriber Message Length
This timer is automatically set during installation. You should not change this entry from its default setting. After a voice mail port receives the initial protocol digit from the UX5000, this option determines how long voice mail will wait between each of the subsequent digits. -
Page 492: [Timers] After Last Protocol Digit
After a voice mail port receives an entire protocol string from the UX5000, this option determines how long voice mail will wait between the last digit of the string and the receipt of the hangup string. -
Page 493: [Timers] Hang Up Timer
Customize System Options: [Timer] Hang Up Timer [Timers] Use this timer to set the duration of the voice mail port hang up (on hook) that occurs when a dial string or options contains a Hang Up (H) command. You should only change this option if the Hang Up command does not consistently hang up (disconnect) the voice mail port. -
Page 494: Tenant Options: [General]
Customize Tenant Options: [General] Tenant Options: [General] Description Use Tenant Options to customize various options for each tenant group. If the system has only one tenant group, the settings you make for this option affect the entire system. General Tab Compatibility Guidelines: ■... -
Page 495: [General] Site's Network Telephone Number
Customize Tenant Options: [General] Site’s Network Telephone Number [General] Use this option when setting up Networking Site Restriction (page 237). The illustration below shows an example of the related options in both the sending and receiving systems for a typical system installed in North America. -
Page 496: [General] Fax Detect Dial
Customize Tenant Options: [General] The Site’s Network Telephone Number data is also required for the MC (Make Call), RE (Message Reply), and TI (Time and Date Stamp) features. For example, when a network message recipient listens to a mes- sage, they can dial TI to hear: ●... -
Page 497: [General] Digital Pager Callback Number
Customize Tenant Options: [General] Digital Pager Callback Number [General] Use this option to set the Digital Pager Callback Number portion of the Message Notification callout num- ber for a digital pager. This is the portion of the callout number that is appended to the pager service number. Normally, this option should be X*M#, where: - X the number of the extension that generated the notification. -
Page 498: Tenant Options: [Access Digits]
Customize Tenant Options: [Access Digits] Tenant Options: [Access Digits] Access Digits Tab Compatibility Guidelines: ■ When using the UX Mail Administrator to enter dial strings, take care not to enter illegal characters (such as dashes). Enter only those characters allowed by the option you are programming. Before Local Callout [Access Digits] Use this option to enter the dialing prefix that enables voice mail to seize an outside line to place a local... -
Page 499: [Access Digits] Before Long Distance Callout
Customize Tenant Options: [Access Digits] ● S (Wait for sound) This command waits 2 seconds for any constant sound (such as non-standard dial tone), and continues if sound is detected. ● W (Wait for dial tone) This command waits for CO dial tone, and then continues. ●... -
Page 500: [Access Digits] Before Network Long Distance Callout
Customize Tenant Options: [Access Digits] ● F (Flash) This command hook flashes the voice mail port, which places it on Hold. - To set the duration of the Flash, go to 474) IMERS LASH IMER PAGE ● M (Monitored pause) This command waits for 2 seconds, and then continues if busy tone or reorder tone are not detected. -
Page 501: Tenant Options: [Fax On-Demand Cover Page]
Customize Tenant Options: [Fax On-Demand Cover Page] Tenant Options: [Fax On-Demand Cover Page] Fax On-Demand Cover Page Tab Not used. Chapter 3: Programming ◆ 483 UX Mail Manual... -
Page 502: Fax Distribution
Customize Fax Distribution Fax Distribution Fax Distribution Options Not used. 484 ◆ Chapter 3: Programming UX Mail Manual... -
Page 503: Fax Documents
Customize Fax Documents Fax Documents Fax Document Options Not used. Chapter 3: Programming ◆ 485 UX Mail Manual... -
Page 504: Fax Port Options
Customize Fax Port Options Fax Port Options Fax Port Options Not used. 486 ◆ Chapter 3: Programming UX Mail Manual... -
Page 505: Reports
Reports All Reports Reports All Reports Description All Reports provides a list of all the reports you have run and are currently stored on your system. Clicking on any report displays the Report Handling Screen. This screen provides the following options: ●... -
Page 506: Answering Tables Report
Reports Answering Tables Report Answering Tables Report Description Use this report option to show the configuration of each Answering Table. The details of this report include: For each of the 20 schedules within each Answering Table, ● - The schedule in force for each time of the day and day of the week. - The Call Routing Mailbox assigned to each schedule. -
Page 507: Caller I.d Options Report
Reports Caller I.D Options Report Caller I.D Options Report Description Use this report option to show the contents of the Caller ID Tables. the details of this report include: The Match options and associated Action options for each table. ● To run the report: From the Main Menu, click on Caller I.D. -
Page 508: Callout Options Report
Reports Callout Options Report Callout Options Report Description Use this report option to display the settings of Customize: Callout Options (page 327) and Customize: Ten- ant Options (page 476). for more. ● 199) 287) ESSAGE OTIFICATION PAGE ENANT ERVICE PAGE To run the report: From the Main Menu, click on Callout Options Report. - Page 509 Reports Callout Options Report 04/05/05 12:49:36 Page 1 CALLOUT OPTIONS Tenant 1 Digital pager callback number ..X*M# Delay in dialing pager callback number . . . 13 sec Delay before pager announcement ..18 sec Acc.
-
Page 510: Callout Log Report
Reports Callout Log Report Callout Log Report Description Use this report to show the Caller ID and Message Notification callout history. The details of this report include: The mailbox that placed the callout. ● The voice mail port used for the callout. ●... -
Page 511: Dial Action Tables Report
Reports Dial Action Tables Report Dial Action Tables Report Description Use this report option to show the configuration of each Dial Action Table. The details of this report include the Action and Number options for each key entry. for more. ●... - Page 512 Reports Dial Action Tables Report 04/05/05 14:29:08 Page 1 DIAL ACTION TABLE 1 Action Number U-Transfer Undefined None Undefined None Transfer Transfer Undefined None Undefined None Undefined None Undefined None Hang up None Record 1 Logon None U-Transfer DIAL ACTION TABLE 2 Action Number U-Transfer...
-
Page 513: Distribution Lists Report
Reports Distribution Lists Report Distribution Lists Report Description Use this report option to display the configuration of each Distribution List. The details of this report include: The number, name, and department of the Distribution Mailbox assigned to each list. ● The number, name, department, and mailbox type of each mailbox assigned to each list. - Page 514 Reports Distribution Lists Report 04/05/05 14:46:28 Page 1 DISTRIBUTION LIST 1 Distribution List 1 is used in Distribution mailbox (es): Mailbox Name Dept ----------|--------------------------|----------- Distribution Mailbox 1 Distribution List 1 contains the following mailbox (es): Mailbox Name Dept Type ----------|--------------------------|------------|---------- Operator Subscriber Subscriber...
-
Page 515: Mailbox Options Report
Reports Mailbox Options Report Mailbox Options Report Description Use this report option to show the programming for each mailbox. All programming from USTOMIZE (page 353) for each mailbox type can be included in the report. PTIONS To run the report: From the Main Menu, click on Mailbox Options Report. - Page 516 Reports Mailbox Options Report Subscriber Mailbox 498 ◆ Chapter 3: Programming UX Mail Manual...
-
Page 517: Mailbox Directory Report
Reports Mailbox Directory Report Mailbox Directory Report Description Use this report option to show a list of all mailboxes categorized by type, and subcategorized numerically within each type. For each mailbox listed, this report option shows the mailbox number, extension number, name, and Directory List to which the mailbox is assigned. -
Page 518: Mailbox Numeric List Report
Reports Mailbox Numeric List Report Mailbox Numeric List Report Description Use this report option to show a numeric list of all mailboxes. For each mailbox listed, this report option shows the mailbox number, extension number, the mailbox type, the mailbox name, and the Directory List to which the mailbox is assigned. -
Page 519: Mailbox Access Count Report
Reports Mailbox Access Count Report Mailbox Access Count Report Description Use this report option to show how many times each mailbox has been accessed. For each mailbox listed, this report option shows the mailbox number, extension number, the mailbox type, the mailbox name, and access count. - Page 520 Reports Mailbox Access Count Report MAILBOX ACCESS REPORT from 03/30/05 18:05 Mailbox Extension Type Name Access count --------|----------|-------------------|-------------------------|--------- Trunk Trunk Trunk Trunk Trunk Trunk Trunk Trunk Trunk Trunk Trunk Trunk Trunk Trunk Trunk Trunk Trunk Trunk Trunk Trunk Trunk Trunk Trunk Trunk Trunk...
-
Page 521: Mailbox Call Flags Report
Reports Mailbox Call Flags Report Mailbox Call Flags Report Description Use this report option to show the status of various user-enabled features at a mailbox. For each mailbox listed, this report option shows the mailbox number and type, followed by the status of the following user-enabled features: Mailbox Greeting (page 153) and Auto Attendant Do Not Disturb (page 60). -
Page 522: Port Options Report
Reports Port Options Report Port Options Report Description Use this report option to show the programming for each voice mail port. All programming from Customize: Port Options (page 504) is included in the report. To run the report: From the Main Menu, click on Port Options Report. Enter the starting ( Minimum ) and ending ( Maximum ) ports to include in the report. -
Page 523: Port Usage Report
The Tenant Group to which the port belongs. ● How many times the port has called out to update Message Waiting lamps in the UX5000. ● The number of incoming calls answered by the port, and the total time accumulated for those calls. -
Page 524: System Options Report
Reports System Options Report System Options Report Description Use this report option to show the System Options programming. All programming from Customize: System Options (page 515) is included in the report. The report also includes the Site ID for each tenant (page 476). To run the report: From the Main Menu, click on System Options Report. - Page 525 Reports System Options Report 04/06/05 09:34:30 Page 1 SYSTEM OPTIONS Tenant 1 Site ID ....Tenant 2 Site ID ....Tenant 3 Site ID .
-
Page 526: Auto Attendant Port Report
Reports Auto Attendant Port Report Auto Attendant Port Report Description Use this report option to show how voice mail answers outside calls on each voice mail port. The details of this report include: The Answering Table assigned to each port. ●... -
Page 527: Auto Attendant Trunk Report
Reports Auto Attendant Trunk Report Auto Attendant Trunk Report Description If you have set up Trunk Mailboxes to answer outside calls, use this report option to show how the Trunk Mailboxes handle incoming calls. The details of this report include: The Answering Table assigned to each Trunk Mailbox. - Page 528 Reports Auto Attendant Trunk Report 510 ◆ Chapter 3: Programming UX Mail Manual...
-
Page 529: Message Usage Report
Reports Message Usage Report Message Usage Report Description Use this report option to show details of the message storage in each mailbox. These details include: The mailbox number and name. ● The total number of messages stored in the mailbox. ●... -
Page 530: Fax Distribution Report
Reports Fax Distribution Report Fax Distribution Report Description Not used. 512 ◆ Chapter 3: Programming UX Mail Manual... -
Page 531: Fax Documents Report
Reports Fax Documents Report Fax Documents Report Description Not used. Chapter 3: Programming ◆ 513 UX Mail Manual... -
Page 532: Fax Port Options Report
Reports Fax Port Options Report Fax Port Options Report Description Not used. 514 ◆ Chapter 3: Programming UX Mail Manual... -
Page 533: Tools
Tools Local Backup, Local Restore, and Local Archive Tools Local Backup, Local Restore, and Local Archive Description Compatibility Guidelines: ■ Local Backup, Restore, and Archive may cause interruption of normal voice mail operations. The Local Backup, Local Restore, and Local Archives options provide a method for backing up the voice mail database, storing the database on your PC, and restoring the saved data back into the system. -
Page 534: Local Restore Options
Tools Local Backup, Local Restore, and Local Archive - Back up all held messages in the selected mailboxes. - The options are Yes or No . ● Saved Voice Mail Messages - Back up all saved messages in the selected mailboxes. - The options are Yes or No . -
Page 535: Local Archives Options
Tools Local Backup, Local Restore, and Local Archive Local Archives Options The Local Archives is a multi-purpose screen that allows you to: Convert a backup file to an archive file. ● ( Part 2 of the Backup, Restore, and Archive Procedure starting on page 518). ●... -
Page 536: Local Backup, Restore, And Archive Procedure
Tools Local Backup, Local Restore, and Local Archive Local Backup, Restore, and Archive Procedure Part 1: Create the Local Backup Use this procedure to create a backup file on the UX Mail CompactFlash card. You can convert this file to a compressed archive (see Part 2) or restore it to the system (see Part 6). - Page 537 Tools Local Backup, Local Restore, and Local Archive Part 2: Convert the Local Backup to an Archive Use this procedure to convert a backup file to a compressed archive file and automatically delete the backup file. You can then save this archive file to your PC hard disk (see Part 3). You can upload the saved archive from your PC to UX Mail (Part 4), convert the archive back into a backup file (Part 5), and load the backup into the system (Part 6).
- Page 538 Tools Local Backup, Local Restore, and Local Archive Part 3: Save the Archive to your PC Hard Disk This procedure shows you how to save an archive to your PC hard disk. Use Part 4 to upload the archive back to UX Mail, Part 5 to convert the archive into a backup file, and Part 6 to load the backup back into the system.
- Page 539 Tools Local Backup, Local Restore, and Local Archive Part 4: Upload an Archive File from your PC Hard Disk to the UX Mail CompactFlash Follow this procedure to upload an archive file you saved to your PC hard disk in Part 3 back to the UX Mail CompactFlash card.
- Page 540 Tools Local Backup, Local Restore, and Local Archive Part 5: Convert an Archive File into a Backup File that can be Restored to the System In order to load the data stored in an archive file back into the UX Mail, you must first use this procedure to convert the file into a backup file.
- Page 541 Tools Local Backup, Local Restore, and Local Archive Part 6: Restore a Backup file to the system. You can restore your current backup file back into the UX Mail CompactFlash. You can restore the entire backup, the system files without voice messages, or just voice messages. Additionally, you can restore voice messages for all mailboxes, selected mailboxes, or a single mailbox.
-
Page 542: Updates
Tools Updates Updates Description Not used. 524 ◆ Chapter 3: Programming UX Mail Manual... -
Page 543: Update Check
Tools Update Check Update Check Description Not used. Chapter 3: Programming ◆ 525 UX Mail Manual... -
Page 544: Debug Files
Debug Files Description Debug Files provides a list of system files that may be useful to NEC Unified Solutions Technical Services personnel in troubleshooting your system. Clicking on any file displays the Report Handling Screen. This screen provides the following options: Download ●... -
Page 545: Imap4 Debug Files
IMAP4 Debug Files Description IMAP4 Debug Files provides a list of system files that may be useful to NEC Unified Solutions Technical Services personnel in troubleshooting Desktop Messaging. Clicking on any file displays the Report Han- dling Screen. This screen provides the following options: Download ●... -
Page 546: Misc. Setup
Tools Misc. Setup Misc. Setup Description This option is intended for NEC Unified Solutions Technical Services personnel only. To see the Misc. Setup screen: From the Main Menu, click Tools: Misc. Setup. You see: 528 ◆ Chapter 3: Programming UX Mail Manual... -
Page 547: Technical Note On Desktop Messaging Performance
Tools Misc. Setup Technical Note on Desktop Messaging Performance UX Mail has four threads that handle IMAP4 email synchronization. ● Thread 1 - Mailbox Status Change ● Threads 2 and 3 - IMAP4 Synchronization ● Thread 4 - SMTP Delivery Thread 1 - Mailbox Status Change When a subscriber receives a new message in their mailbox, UX Mail immediately updates the email server with the new message status. - Page 548 Tools Misc. Setup Effects of Slow Synchronization The effects of slow email server synchronization can cause huge sync delays for all email-enabled Sub- scriber Mailboxes. For example: A Subscriber Mailbox receives a new voice message and the extension’s message waiting LED flashes. The subscriber listens to the new message and saves it.
-
Page 549: Networking
The on-screen message shows the site’s open and closed ports. To display important information about your UX Mail network settings: Click Info . ● NEC Unified Solutions Technical Services personnel may request this information when trouble- shooting your system. Chapter 3: Programming ◆ 531 UX Mail Manual... -
Page 550: Dial Plan
Tools Dial Plan Dial Plan Description This option is not used. 532 ◆ Chapter 3: Programming UX Mail Manual... -
Page 551: Voice Prompts
Voice Prompts Chapter 4: Voice Prompts Voice Prompts Voice Prompts Customizing (Rerecording) the Voice Prompts Log onto System Administrator’s mailbox (301) (72) Access the System Administrator options (72) Select Prompt Customization Select language 1 Select language 2 Enter prompt number + # to select a prompt Hear current prompt number Listen to default prompt Record a new prompt... - Page 552 Voice Prompts Table of Voice Prompts Thank you for calling. Please hold a moment. Please enter the mailbox number associated with the name. Extension _______. 0 (trailing digit) 1(trailing digit) 2 (trailing digit) 3 (trailing digit) 4 (trailing digit) 5 (trailing digit) 6 (trailing digit) 7 (trailing digit) 8 (trailing digit)
- Page 553 Voice Prompts Table of Voice Prompts Mailbox _______. You have reached the recording limit. Start recording at the tone. When you are done, press the pound key or hang up. There is a problem with the system disk. Please notify the system administrator. There is a problem with the system line card.
- Page 554 Voice Prompts Table of Voice Prompts Welcome to the System Administrator Menu. For the broadcast message, press B R. For welcome messages, press W. For instruction menu messages, press I. For directory dialing messages, press D D. For announcement messages, press A N. For mailbox names, press N.
- Page 555 Voice Prompts Table of Voice Prompts Recording Hello. I have a call for _______. Welcome to the Main Menu of features. To listen to your messages, press L. To record and send a message, press R S. To check on a message you sent, press C M. To record a greeting for your mailbox, press G.
- Page 556 Voice Prompts Table of Voice Prompts 103. To accept this call, press 1. Otherwise, hang up. 104. The message has been erased. 105. Listening has been paused. To continue listening, press the star key. 106. Please enter the mailbox numbers to receive this message, up to ten. To use mailbox NAMES to specify the recipients, press star N.
- Page 557 Voice Prompts Table of Voice Prompts 124. These are the options you have while listening to a recording: To backup, then continue listening, press B. To backup to the beginning and listen, press B B. To go forward, then continue listening, press G. To pause while listening, press the star key.
- Page 558 Voice Prompts Table of Voice Prompts 132. To listen to the broadcast message, press L. To record a new broadcast message, press R. To erase the broadcast message, press E. To exit this feature, press the pound key. 133. There is no broadcast message. To record a broadcast message, press R.
- Page 559 Voice Prompts Table of Voice Prompts 149. That number is restricted. 150. Enter the mailbox number of the message recipient you wish to check on. 151. All of your messages have been listened to. 152. _______ messages have not been listened to. 153.
- Page 560 Voice Prompts Table of Voice Prompts 174. To be notified of all new messages, press A. To be notified only when a message is sent to you from a specific person's mailbox, press S. To be notified only if a message is urgent, press U. To skip to the next setting, press the star key.
- Page 561 Voice Prompts Table of Voice Prompts 188. These are the options you have while listening to a message: To record a reply, press R E. To have the message forwarded, press M F. To make a call to the sender of the message, press M C. To exit the listen mode, press the pound key.
- Page 562 Voice Prompts Table of Voice Prompts 194. Welcome to the Main Menu of features. To listen to your messages, press L. To record and send a message, press R S. To check on a message you sent, press C M. To record a greeting for your mailbox, press G.
- Page 563 Voice Prompts Table of Voice Prompts 216. Recording has been paused. To continue recording, press the star key. To end recording, press the pound key. For a complete list of recording options, press 0. 217. _______ callers waiting ahead of you. 218.
- Page 564 Voice Prompts Table of Voice Prompts 229. The message has been saved. To erase the message, press E. To listen to the next message, press L. To exit the listen mode, press the pound key. For a complete list of listening options, press 0. 230.
- Page 565 Voice Prompts Table of Voice Prompts 257. 27 258. 28 259. 29 260. 30 261. 31 262. 32 263. 33 264. 34 265. 35 266. 36 267. 37 268. 38 269. 39 270. This callback indicator arrived on _______ . 271.
- Page 566 Voice Prompts Table of Voice Prompts 284. The paging message is off. 285. The message has not been recorded because it is too short. 286. You have not entered enough letters. 287. Single-beep tone. 288. Press _______. 289. For _______. 290.
- Page 567 Voice Prompts Table of Voice Prompts 305. Please enter the mailbox number for the interactive prompts. 306. To select a programmable prompt, enter the number of the prompt, then press the pound key. To go to the first programmable prompt, press the star key. To exit, press only the pound key.
- Page 568 Voice Prompts Table of Voice Prompts 323. Interactive prompt _______. 324. _______ is still busy. 325. You may continue to wait or: To leave a message, press 1. For other options, press 2. 326. Welcome to the Mailbox Options Menu. To change your security code, press S.
- Page 569 Voice Prompts Table of Voice Prompts 337. Please enter the mailbox number for the directory dialing message. 338. Please enter the mailbox number of the directory dialing message you wish to copy. 339. Again, please note. The reference number for your call is ______. 340.
- Page 570 Voice Prompts Table of Voice Prompts 360. Enter the extension or telephone number, then press the pound key. To enter special dialing codes, press the star key followed by the desired code letter. For example, pressing star-P will enter a non-monitored pause into the dial string. Similarly, you may press star- star or star-pound to enter the star or pound keys into the string.
- Page 571 Voice Prompts Table of Voice Prompts 383. _____ the Thirteenth _____ 384. _____ the Fourteenth _____ 385. _____ the Fifteenth _____ 386. _____ the Sixteenth _____ 387. _____ the Seventeenth _____ 388. _____ the Eighteenth _____ 389. _____ the Nineteenth _____ 390.
- Page 572 Voice Prompts Table of Voice Prompts 419. _____ nine _____ 420. _____ ten _____ 421. _____ eleven _____ 422. _____ twelve _____ 423. _____ one _____ 424. _____ two _______ 425. _____ three _____ 426. _____ four _____ 427. _____ five _____ 428.
- Page 573 Voice Prompts Table of Voice Prompts 452. I’m sorry. You did not enter a complete extension number. 453. You entered extension number _____. 454. Your FAX order will be sent shortly. Thank you for calling. 455. To receive the documents you have requested, press the start key on your FAX machine when you hear the tone. 456.
- Page 574 Voice Prompts Table of Voice Prompts 473. You may enter the names of up to ten mailboxes to receive this message. To enter a mailbox name, press N. To specify recipients by their mailbox numbers, press star N. To erase the message, press the star key twice. 474.
- Page 575 Voice Prompts Table of Voice Prompts 493. When enabled, the Second notification group will be active from _____. 494. When enabled, the Third notification group will be active from _____. 495. None 496. Selecting the HELD message list. Only messages that have been partially heard, but were not SAVED during a previous mailbox session, will be in this list.
- Page 576 Voice Prompts Table of Voice Prompts 524. _____ held messages _____. 525. _____ one held message _____ . 526. _____ and one saved message. 527. _____ and one held message. 528. To listen to your new messages, press L. To record and send a message, press R S. For the complete Main Menu of features, press 0.
- Page 577 Voice Prompts Table of Voice Prompts 539. ________ the network call could not be completed. 540. Forty 541. Forty-one 542. Forty-two 543. Forty-three 544. Forty-four 545. Forty-five 546. Forty-six 547. Forty-seven 548. Forty-eight 549. Forty-nine 550. Fifty 551. Fifty-one 552. Fifty-two 553.
- Page 578 Voice Prompts Table of Voice Prompts 577. Seventy-seven 578. Seventy-eight 579. Seventy-nine 580. Eighty 581. Eighty-one 582. Eighty-two 583. Eighty-three 584. Eighty-four 585. Eighty-five 586. Eighty-six 587. Eighty-seven 588. Eighty-eight 589. Eighty-nine 590. Ninety 591. Ninety-one 592. Ninety-two 593. Ninety-three 594.
- Page 579 Voice Prompts Table of Voice Prompts 608. So that I may determine the type of telephone you are using, please listen for two beeps, wait two seconds, and then dial 0. 609. To accept this call, press 0, otherwise, hang up and I will call again later. 610.
- Page 580 Voice Prompts Table of Voice Prompts 619. These are the options you have while listening to a message. To record a reply, press RE. To have the message forwarded, press MF. To make a call to the sender of the message, press MC. To exit the listen mode, press the pound key.
- Page 581 Voice Prompts Table of Voice Prompts 625. The following Return Receipt arrived on _____. 626. To listen to the first message you sent, press L. To erase the first message, press E. To exit this feature, press the pound key. 627.
- Page 582 Voice Prompts Table of Voice Prompts 648. Please enter your telephone number and press the pound key when you are done, otherwise, just press the pound key. 649. Welcome to the System Administrator menu. For the Broadcast messages, press BR. For Welcome messages, press W.
- Page 583 Voice Prompts Table of Voice Prompts 663. Welcome to the Hotel Guest Management menu: For Hotel Guest check in, press CI For Hotel Guest check out, press CO For post check out message checking, press MC To move a Hotel Guest, press MG For wake up call set up, press WC For programming hotel list mailboxes, press GL To exit this feature press the pound key.
- Page 584 Voice Prompts Table of Voice Prompts 671. Welcome to the System Administrator menu. For Broadcast messages, press BR. For Welcome messages, press W. For Instruction menu messages, press I. For Directory Dialing messages, press DD. For Announcement messages, press AN. For Mailbox Names, press N.
- Page 585 Voice Prompts Table of Voice Prompts 691. For the First notification group, press F. For the Second notification group, press S. For the Third notification group, press T. For none, press the star key. Or, to exit without changing the original order, press the pound key. 692.
- Page 586 Voice Prompts Table of Voice Prompts 703. There is no Trunk Access Dial String for local notification calls. Enter a string of up to 30 digits, then press the pound key. To enter special dialing codes, press the star key followed by the desired code letter. For example, pressing star P will enter a non monitored pause into the dial string.
- Page 587 NEC Unified Solutions, Inc. 4 Forest Parkway Shelton, CT 06484 www.necux5000.com Important Numbers Sales Support and General Information 800-365-1928 ....Technical Service...
- Page 588 NEC Unified Solutions, Inc. 4 Forest Parkway Shelton, CT 06484 www.necux5000.com (See inside back cover for contact information.) (0913250) Printed in U.S.A. May 20, 2008, Rev 2...
Need help?
Do you have a question about the UX5000 and is the answer not in the manual?
Questions and answers