Table of Contents
Advertisement
Advertisement
Table of Contents

Summary of Contents for PrimeLab 1.0 MULTITEST
- Page 2 Thank you Dear PrimeLab user, We are pleased that you have decided to purchase a PrimeLab 1.0 Multitest kit to analyse your water. With this kit you have acquired a device “Made in Germany”; developed by Water-i.d. GmbH in collaboration with JENCOLOR.
-
Page 3: Table Of Contents
Table of Contents Parts list / Accessories The PrimeLab Front and Back Replacing Batteries Display symbols Operating PrimeLab Menu: SET (Setup) Set device language SET 1 ® Activate / deactivate Bluetooth SET 1 Set date / time SET 2 Set ideal ranges (parameters) - Page 4 Preparation / Installation ® Install Bluetooth USB dongle PDA 1 First connection of PrimeLab with PC (pairing) PDA 2-3 Installing the “PrimeLab Desktop Assistant“ PDA 4-5 Main screen & screen symbols Menu Item Accounts...
-
Page 5: Parts List / Accessories
The quantities of some parts depend on the version (e.g. which reagents) you have purchased. If anything is missing from your kit as pictured below as “In every kit” please immediately notify the vendor from whom you have purchased your PrimeLab! In every kit Light shield... -
Page 6: The Primelab
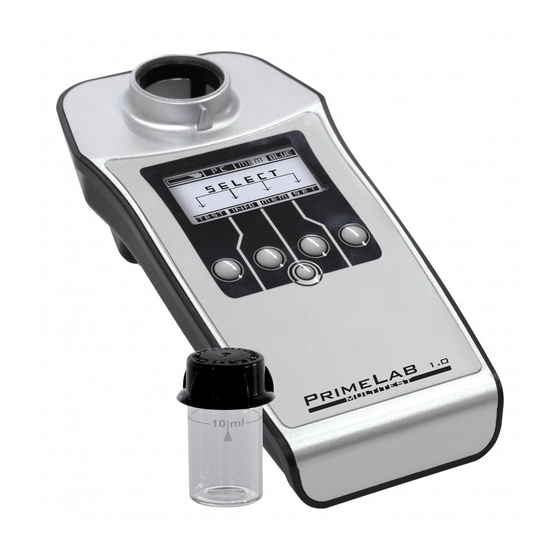
The PrimeLab / front and back The PrimeLab / replacing batteries Chamber for the16mm and for the MERCK cuvettes PrimeLab display Chamber for the 24mm cuvette (see next page) Buttons 1 to 4. Function according to display On / Off button. -
Page 7: Display Symbols
The PrimeLab / Display symbols 100% PrimeLab memory usage ® Bluetooth -transmitter activated 100% deactivated Battery state display Other button assignments: Scroll down or decrease value Assign of Scroll up or increase value buttons 1 - 4 Confirm input / output... -
Page 8: Menu: Set (Setup)
Menu: SET (Setup) Menu: SET (Setup) Set device language SET 1 ® Activate / deactivate Bluetooth SET 1 Set date / time SET 2 Set ideal ranges (parameters) SET 3 Calibration SET 4 - 6 Set display contrast SET 7 Set Auto-Off time SET 7... -
Page 9: Set Device Language
Use button 1 to return to the main menu ® Activate / deactive Bluetooth transmitter A connection with the PC and the PrimeLab Desktop Assistant is only ® possible if the Bluetooth transmitter in your PrimeLab is activated In the start menu press button 4 to access the SETUP menu. -
Page 10: Set Date / Time
Setting the correct date and time is important because each measurement value is saved with a date and time stamp. The time can also be very easily set via the “PrimeLab Desktop Assistant”. In the start menu press button 4 to access the SETUP menu. -
Page 11: Set Ideal Ranges (Parameters)
“OK”, “Low” or “High”. The “PrimeLab Desktop Assistant” will also calculate the dosage recommendation on the basis of the minimum and maximum range limits set by you for the ideal range! In the start menu press button 4 to access the SETUP menu. -
Page 12: Calibration
Menu: SET (Setup) Calibration Because of the innovative PrimeLab technology, especially in conjunction with the JENCOLOR MultiColour sensor, it is no longer necessary to return the photometer for calibration. The precision of the sensor is so good that the strength of the light source (LED) is measured and the system is calibrated on basis of the calculated value. - Page 13 You first have to perform a „PrimeLab calibration“ !!! See page „SET 4" Calibration steps, as shown below, will be displayd on the PrimeLab as well. Please make sure the standard vials (0.5/10/1000 NTU) are free from fingerprints and dirt.
-
Page 14: Error Messages
Select a 24mm glass vial for future PTSA and Fluorescein tests. Fill vial with 10ml of distilled water. USE PIPETTE TO ENSURE 10ml! Place vial into the PrimeLab. Do not close it! Place PTSA-/Fluorescein-adapter on top of the open cuvette. -
Page 15: Set Display Contrast
Menu: SET (Setup) Set display contrast Please ensure that you have removed the protective foil from the display so the display quality is best. In the start menu press button 4 to access the SETUP menu. In the setup list scroll up with button 2 and down with button 3 until the entry “Display”... -
Page 16: Menu: Mem (Memory)
If you attempt to save more than 100 results the respective oldest data set is overwritten. We recommend the regular synchronizing of the test data with the “PrimeLab Desktop Assistant” to be able to view, edit and evaluate the data more easily and better. - Page 17 Menu: MEM (Memory) Browse test results Press button 3 in the start menu to access the MEMORY menu. First you will see how many data sets are saved in memory. “Used: 28/100” signifies, for example, that 28 saved data sets are stored in a maximum of 100 memory spaces available.
- Page 18 Menu: MEM (Memory) View test results Continued... Selection b) You selected “View all data” to see the stored test results for the respective address data set with all parameters. Use buttons 2 and 3 to scroll through the saved test results. These will be shown chronologically.
- Page 19 Menu: MEM (Memory) Clear test results Press button 3 on the start menu to access the MEMORY menu, First you will see how many data sets are saved in memory. “Used: 28/100” signifies, for example, that 28 saved data sets are stored in a maximum of 100 memory spaces available.
- Page 20 Menu: MEM (Memory) Delete test results Continued... Confirm your entry by pressing button 4. Press button 3 to select the option “Clear result”. Confirm your selection by pressing button 4. Just to make sure you are asked if you really want to delete this parameter ID of which you want to delete test results If you are sure please confirm by pressing button 4.
- Page 21 Menu: MEM (Memory) left open for technical reasons MEM 5 MEM 5...
- Page 22 Bluetooth address and the serial number. In addition there is information regarding where you can obtain support for your device; further information is available through the software “PrimeLab Desktop Assistant”. In the start menu, press button 2 to access the INFO menu.
- Page 23 Menu: INFO left open for technical reasons INFO 2 INFO 2...
- Page 24 Because PrimeLab can, through the use of the JENCOLOR sensor, measure all parameters developing a colour in the visible spectral range or clouding after addition of a reagent, the list of PrimeLab test procedures is extended all the time. Visit us on www.primelab.org or start your PrimeLab Desktop Assistant to find out about new test procedures of interest to you.
- Page 25 Menu: TEST / Parameters list / test procedures group/method parameter ID range unit switch reagent page Active Oxygen 01-Act-oxi-MPS-tab Active oxygen (MPS) 0 - 40 mg/l tablet Alkalinity 05-Alkalinit-M-tab Alkalinity-M 5 - 200 mg/l °dH/°eH/ tablet °fH/mmol/ mval/K S4.3 121-Alka-M-HR-tab Alkalinity-M HR 121 5 - 200 mg/l HCO-3/°dH/ tablet...
-
Page 26: Dissolved Oxygen
Menu: TEST / Parameters list / test procedures group/method parameter ID range unit switch reagent page Chlorine Dioxide 16-Chlorin-Dio-tab Chlorine Dioxide 16 0 - 15.0 mg/l tablet 64-Chlorin-Dio-liq Chlorine Dioxide 64 0 - 15.0 mg/l liquid 130-Chl-Diox-pp Chlorine Dioxide 130 0.00 - 5.00 mg/l liquid+pow. - Page 27 Menu: TEST / Parameters list / test procedures group/method parameter ID range unit switch reagent page Hydrazine 23-Hydrazine-liq Hydrazine 23 5 - 600 µg/l liquid Hydrocarbons 160-Hydrocarbons Hydrocarbons 160 0 - 1 NTU YES / NO Hydrogen Peroxide 24-Hydr-Per-LR-tab Hyd. Peroxide (LR) 24 0 - 3.8 mg/l tablet...
- Page 28 Menu: TEST / Parameters list / test procedures group/method parameter ID range unit switch reagent page Nitrite 97-Nitrite-HR-tab Nitrite (HR) 97 0 - 1500 mg/l N/NO tablet 101-Nitrite-HR-liq Nitrite (HR) 101 0 - 3000 mg/l N/NO liquid Nitrogen 151-NitroTotLR-pre Nitrogen-Total (LR) 151 0.5 - 25 mg/l NH , NH pre.
- Page 29 Menu: TEST / Parameters list / test procedures group/method parameter ID range unit switch reagent page PTSA 111-PTSA-Ad PTSA 111 0 - 1000 µg/l 83-QAC-tab 83 25 - 150 mg/l tablet Silica 49-Silica-LR-liq Silica (LR) 49 0 - 5 mg/l Si liquid/ powder 50-Silica-HR-pow...
- Page 30 4. The test results will then be All further steps are saved in this account. described in the Use the PrimeLab software instructions to the (Desktop Assistant) to store individual test procedures. up to 20 accounts on the PrimeLab.
- Page 31 Some reagents are classified as hazardous materials. These are identified as such on the packaging. In addition you can download safety specifications for the reagents offered by PrimeLab from the website www.primelab.org. Always adhere to the safety instructions on the packaging and in the safety specifications to prevent damages to yourself, the PrimeLab device and the environment.
- Page 32 The sampling chamber must be free from water or humidity, otherwise there will be the risk of damage to the electronics inside the device. Please calibrate your PrimeLab on a regular basis (at least 2 weekly) as described in SET-4 of these instructions to obtain the best possible measurement results.
- Page 33 left open for technical reasons...
- Page 34 ZERO value is used with the same cuvette and the same water sample for the test! 2) Replace the screw lid on the cuvette and insert it into the PrimeLab sampling chamber. Align the arrow on the front of the cuvette. Press ZERO.
- Page 35 0.00 - 40.00 mg/l (O ) Tablet Active Oxygen (01) Name on device: 01-Act-oxi-MPS-tab Continued... Note(s) -> The chemical to be identified with this test procedure is potassium mono- persulfate (MPS). -> When preparing the measurement it is important to avoid any active oxygen escaping.
- Page 36 ZERO value is used with the same cuvette and the same water sample for the test! 2) Replace the screw lid on the cuvette and insert it into the PrimeLab sampling chamber. Align the arrow on the front of the cuvette. Press ZERO.
- Page 37 ZERO value is used with the same cuvette and the same water sample for the test! 2) Replace the screw lid on the cuvette and insert it into the PrimeLab sampling chamber. Align the arrow on the front of the cuvette. Press ZERO.
- Page 38 0 - 500 mg/l (CaCO ) Tablet Alkalinity-M HR (121) Name on device: 121-Alka-M-HR-tab Continued... Note(s) -> (*) Conversion to HCO-3, °dH, °eH, °fH, mmol (KS4.3), mval -> In order to obtain as precise a result as possible it is essential that the water sample has a volume of exactly 10ml.
- Page 39 ZERO value is used with the same cuvette and the same water sample for the test! 2) Replace the screw lid on the cuvette and insert it into the PrimeLab sampling chamber. Align the arrow on the front of the cuvette. Press ZERO.
- Page 40 5 - 300 mg/l (CaCO ) Tablet Alkalinity-P (06) Name on device: 06-Alkalinit-P-tab Continued... Note(s) -> (*) Conversion to °dH, °eH, °fH, mmol (KS4.3), mval -> In order to obtain as precise a result as possible it is essential that the water sample has a volume of exactly 10ml.
- Page 41 ZERO value is used with the same cuvette and the same water sample for the test! 2) Replace the screw lid on the cuvette and insert it into the PrimeLab sampling chamber. Align the arrow on the front of the cuvette. Press ZERO.
- Page 42 0 - 0.3 mg/l (Al) Tablet Aluminium (04) Name on device: 04-Aluminium-tab Continued... Possible messages in the line below the measurement value: "low! / high! / good!": Assessment of the measurement value relative to the ideal range defined by you. "Overrange! / underrange!": Measurement value for this parameter is outside the value range of this method.
- Page 43 ZERO value is used with the same cuvette and the same water sample for the test! 2) Replace the screw lid on the cuvette and insert it into the PrimeLab sampling chamber. Align the arrow on the front of the cuvette. Press ZERO.
- Page 44 0 - 1.00 mg/l Tablet Ammonia LR (02) Name on device: 02-Ammonia-LR-Tab Continued... Possible messages in the line below the measurement value: "low! / high! / good!": Assessment of the measurement value relative to the ideal range defined by you. "Overrange! / underrange!": Measurement value for this parameter is outside the value range of this method.
- Page 45 Ammonia (HR) 0.00 - 50.00 mg/l 16mm vial (155) Name on device: 155-AmmoniaHR-pre Ammonia HR vial Ammonia Salicylate F5 Powder Pack Ammonia Cynurate F5 Powder Pack Measurement procedure: The steps up to the selection of the parameter value to be determined are the same for all procedures and described on page "TEST-5".
- Page 46 ZERO value is used with the same cuvette and the same water sample for the test! 2) Replace the screw lid on the cuvette and insert it into the PrimeLab sampling chamber. Align the arrow on the front of the cuvette. Press ZERO.
- Page 47 ZERO value is used with the same cuvette and the same water sample for the test! 2) Replace the screw lid on the cuvette and insert it into the PrimeLab sampling chamber. Align the arrow on the front of the cuvette. Press ZERO.
- Page 48 ZERO value is used with the same cuvette and the same water sample for the test! 2) Replace the screw lid on the cuvette and insert it into the PrimeLab sampling chamber. Align the arrow on the front of the cuvette. Press ZERO.
- Page 49 ZERO value is used with the same cuvette and the same water sample for the test! 2) Replace the screw lid on the cuvette and insert it into the PrimeLab sampling chamber. Align the arrow on the front of the cuvette. Press ZERO.
- Page 50 ZERO value is used with the same cuvette and the same water sample for the test! 2) Replace the screw lid on the cuvette and insert it into the PrimeLab sampling chamber. Align the arrow on the front of the cuvette. Press ZERO.
- Page 51 ZERO value is used with the same cuvette and the same water sample for the test! 2) Replace the screw lid on the cuvette and insert it into the PrimeLab sampling chamber. Align the arrow on the front of the cuvette. Press ZERO.
- Page 52 ZERO value is used with the same cuvette and the same water sample for the test! 2) Replace the screw lid on the cuvette and insert it into the PrimeLab sampling chamber. Align the arrow on the front of the cuvette. Press ZERO.
- Page 53 ZERO value is used with the same cuvette and the same water sample for the test! 2) Replace the screw lid on the cuvette and insert it into the PrimeLab sampling chamber. Align the arrow on the front of the cuvette. Press ZERO.
- Page 54 ZERO value is used with the same cuvette and the same water sample for the test! 2) Replace the screw lid on the cuvette and insert it into the PrimeLab sampling chamber. Align the arrow on the front of the cuvette. Press ZERO.
- Page 55 0 - 2 mg/l Tablet Boron (07) Name on device: 07-Boron-tab Continued... Possible messages in the line below the measurement value: "low! / high! / good!": Assessment of the measurement value relative to the ideal range defined by you. "Overrange! / underrange!": Measurement value for this parameter is outside the value range of this method.
- Page 56 ZERO value is used with the same cuvette and the same water sample for the test! 2) Replace the screw lid on the cuvette and insert it into the PrimeLab sampling chamber. Align the arrow on the front of the cuvette. Press ZERO.
- Page 57 0 - 18 mg/l (Br ) Tablet Bromine (08) Name on device: 08-Bromine-tab Continued... Note(s) -> If the water sample contains chlorine and bromine both will be detected by the DPD reagent and shown in the test result. If this is not required, the measurement procedure must be amended as follows: After step 3 add a "DPD Glycine"...
- Page 58 ZERO value is used with the same cuvette and the same water sample for the test! 2) Replace the screw lid on the cuvette and insert it into the PrimeLab sampling chamber. Align the arrow on the front of the cuvette. Press ZERO.
- Page 59 15) Replace the lid on the cuvette, swirl it carefully and insert it into the sampling chamber of the PrimeLab. Align the arrow on the front of the cuvette. Press TEST. 16) The total result is displayed immediately, divided in "aBr"...
- Page 60 0 - 18 mg/l (Br ) Liquid Bromine (63) Name on device: 63-Bromine-liq +powder Continued... Note(s) -> DPD 1 A and DPD 1 B reagent MUST be added to the vial BEFORE water sample is added to avoid mis-readings! -> If the water sample contains chlorine as well as bromine, this will be detected by the DPD reagent and displayed in the result.
- Page 61 ZERO value is used with the same cuvette and the same water sample for the test! 2) Replace the screw lid on the cuvette and insert it into the PrimeLab sampling chamber. Align the arrow on the front of the cuvette. Press ZERO.
- Page 62 Powder 0.0 - 4.5 mg/l (Br ) Bromine (128) Name on device: 128-Bromine-pp Continued... Note(s) -> Alkalinity of more than 250 mg/l CaCO affect the measurement and the color development. Neutralize to pH 6-7 with 1 N Hydrochloric Acid before performing the test.
- Page 63 ZERO value is used with the same cuvette and the same water sample for the test! 2) Replace the screw lid on the cuvette and insert it into the PrimeLab sampling chamber. Align the arrow on the front of the cuvette. Press ZERO.
- Page 64 ZERO value is used with the same cuvette and the same water sample for the test! 2) Replace the screw lid on the cuvette and insert it into the PrimeLab sampling chamber. Align the arrow on the front of the cuvette. Press ZERO.
- Page 65 9) Crush the tablet with a clean stirrer until it is completely dissolved. 10) Replace the lid on the cuvette, swivel it carefully and insert it in the sampling chamber of the PrimeLab. Align the arrow on the front of the cuvette. Press TEST.
- Page 66 ZERO value is used with the same cuvette and the same water sample for the test! 2) Replace the screw lid on the cuvette and insert it into the PrimeLab sampling chamber. Align the arrow on the front of the cuvette. Press ZERO.
- Page 67 0.5 - 25 mg/l (Cl ) Tablet Chloride (10) Name on device: 10-Chloride-tab Continued... 10) Press button 4 to save the result together with date and time in the device. Possible messages in the line below the measurement value: "low! / high! / good!": Assessment of the measurement value relative to the ideal range defined by you.
- Page 68 ZERO value is used with the same cuvette and the same water sample for the test! 2) Replace the screw lid on the cuvette and insert it into the PrimeLab sampling chamber. Align the arrow on the front of the cuvette. Press ZERO.
- Page 69 ZERO value is used with the same cuvette and the same water sample for the test! 2) Replace the screw lid on the cuvette and insert it into the PrimeLab sampling chamber. Align the arrow on the front of the cuvette. Press ZERO.
- Page 70 9) Crush the tablet with a clean stirrer until it has completely dissolved. 10) Replace the lid on the cuvette, swirl it carefully and insert it into the sampling chamber of the PrimeLab. Align the arrow on the front of the cuvette.
- Page 71 0.00 - 8.00 mg/l (Cl ) Tablet Chlorine (11) (free/combined/total) Name on device: 11-Chlorine-tab Continued... Note(s) -> Sample water with a high calcium content or high conductivity will cloud the sample and deteriorate the measurement precision. In this case use the DPD N°...
- Page 72 ZERO value is used with the same cuvette and the same water sample for the test! 2) Replace the screw lid on the cuvette and insert it into the PrimeLab sampling chamber. Align the arrow on the front of the cuvette. Press ZERO.
- Page 73 11) Replace the lid on the cuvette, swirl it carefully and insert it into the sampling chamber of the PrimeLab. Align the arrow on the front of the cuvette. Press TEST. 12) After the lapse of a 2 minute countdown the total result is displayed, divided in "fCl"...
- Page 74 ZERO value is used with the same cuvette and the same water sample for the test! 2) Replace the screw lid on the cuvette and insert it into the PrimeLab sampling chamber. Align the arrow on the front of the cuvette. Press ZERO.
- Page 75 Powder 0.00 - 2.00 mg/l (fCl ) Chlorine free (129) Name on device: 129-Chlorine-pp Continued... Note(s) -> Alkalinity of more than 250 mg/l CaCO affect the measurement and the color development. Neutralize to pH 6-7 with 1 N Sodium Hydroxide before performing the test.
- Page 76 ZERO value is used with the same cuvette and the same water sample for the test! 2) Replace the screw lid on the cuvette and insert it into the PrimeLab sampling chamber. Align the arrow on the front of the cuvette. Press ZERO.
- Page 77 5 - 200 mg/l (Cl ) Tablet Chlorine (KI) HR (14) Name on device: 14-Chlorine-HR-tab Continued... Note(s) -> In this procedure all oxidizing substances contained in the test liquid will be detected.
- Page 78 ZERO value is used with the same cuvette and the same water sample for the test! 2) Replace the screw lid on the cuvette and insert it into the PrimeLab sampling chamber. Align the arrow on the front of the cuvette. Press ZERO.
- Page 79 ZERO value is used with the same cuvette and the same water sample for the test! 2) Replace the screw lid on the cuvette and insert it into the PrimeLab sampling chamber. Align the arrow on the front of the cuvette. Press ZERO.
- Page 80 9) Crush the tablet with a clean stirrer until it has completely dissolved. 10) Replace the lid on the cuvette, swirl it carefully and insert it into the sampling chamber of the PrimeLab. Align the arrow on the front of the cuvette.
- Page 81 0.00 - 10.00 mg/l (Cl ) Tablet Chlorine MR (122) (free/combined/total) Name on device: 122-ChlorineMR-tab Continued... Note(s) -> Water samples with Chlorine level > 20 mg/l lead to incorrect results because the counter bleaches. -> If the measuring water contains further reducing chemicals (e.g. active oxygen, bromine etc.) this will also be detected and is part of the result.
- Page 82 ZERO value is used with the same cuvette and the same water sample for the test! 2) Replace the screw lid on the cuvette and insert it into the PrimeLab sampling chamber. Align the arrow on the front of the cuvette. Press ZERO.
- Page 83 ZERO value is used with the same cuvette and the same water sample for the test! 2) Replace the screw lid on the cuvette and insert it into the PrimeLab sampling chamber. Align the arrow on the front of the cuvette. Press ZERO.
- Page 84 0 - 15 mg/l (ClO ) Tablet Chlorine Dioxide (16) Name on device: 16-Chlorin-Dio-tab Continued... 7) After the lapse of a 10 second countdown the determined result is displayed. Press button 4 to save the test result together with date and time on the device.
- Page 85 ZERO value is used with the same cuvette and the same water sample for the test! 2) Replace the screw lid on the cuvette and insert it into the PrimeLab sampling chamber. Align the arrow on the front of the cuvette. Press ZERO.
- Page 86 ZERO value is used with the same cuvette and the same water sample for the test! 2) Replace the screw lid on the cuvette and insert it into the PrimeLab sampling chamber. Align the arrow on the front of the cuvette. Press ZERO.
- Page 87 0 - 15 mg/l (ClO ) Liquid Chlorine Dioxide (64) Name on device: 64-Chlorin-Dio-liq Continued... Note(s) -> DPD 1 A and DPD 1 B reagent MUST be added to the vial BEFORE water sample is added to avoid mis-readings! -> Observe the notes as under ID11 (chlorine tablet).
- Page 88 ZERO value is used with the same cuvette and the same water sample for the test! 2) Replace the screw lid on the cuvette and insert it into the PrimeLab sampling chamber. Align the arrow on the front of the cuvette. Press ZERO.
- Page 89 0.00 - 5.00 mg/l (ClO ) Liquid Chlorine Dioxide (130) Name on device: 130-Chl-Diox-pp +Powder Continued... Note(s) -> Alkalinity of more than 250 mg/l CaCO affect the measurement and the color development. Neutralize to pH 6-7 with 1 N Hydrochloric Acid before performing the test.
- Page 90 PrimeLab. Align the arrow on the front of the cuvette. Press TEST. 9) Remove the vial from the PrimeLab and set it aside. It is not required for this test. 10) Add 3 drops of "PL DPD 1 A" and 3 drops of "PL DPD 1 B" into a second empty and clean cuvette.
- Page 91 13) Replace the lid on the cuvette, swivel it carefully and insert it in the sampling chamber of the PrimeLab. Align the arrow on the front of the cuvette. Press TEST. 14) Wait for the lapse of a 2 minute countdown.
- Page 92 ZERO value is used with the same cuvette and the same water sample for the test! 2) Replace the screw lid on the cuvette and insert it into the PrimeLab sampling chamber. Align the arrow on the front of the cuvette. Press ZERO.
- Page 93 ZERO value is used with the same cuvette and the same water sample for the test! 2) Replace the screw lid on the cuvette and insert it into the PrimeLab sampling chamber. Align the arrow on the front of the cuvette. Press ZERO.
- Page 94 0 - 150 mg/l (O ) COD LR 16 mm cuvette (79) Name on device: 79-COD-LR-pre COD-79-LR Measurement procedure: The steps up to the selection of the parameter value to be determined are the same for all procedures and described on page "TEST-5". Please observe the important notes for accurate measurements on pages "TEST-8"...
- Page 95 Suspended particles in the zero cell and / or the sample cell lead to wrong test results. Make sure that any existing suspended solids have settled to the bottom of the cell and are not disturbed by the insertion into the PrimeLab. ->...
- Page 96 0 - 1500 mg/l (O ) COD MR 16 mm cuvette (80) Name on device: 80-COD-MR-pre COD-80-MR Measurement procedure: The steps up to the selection of the parameter value to be determined are the same for all procedures and described on page "TEST-5". Please observe the important notes for accurate measurements on pages "TEST-8"...
- Page 97 Suspended particles in the zero cell and / or the sample cell lead to wrong test results. Make sure that any existing suspended solids have settled to the bottom of the cell and are not disturbed by the insertion into the PrimeLab. ->...
- Page 98 0 - 15000 mg/l (O ) COD HR 16 mm cuvette (17) Name on device: 17-COD-HR-pre COD-17-HR Measurement procedure: The steps up to the selection of the parameter value to be determined are the same for all procedures and described on page "TEST-5". Please observe the important notes for accurate measurements on pages "TEST-8"...
- Page 99 Suspended particles in the zero cell and / or the sample cell lead to wrong test results. Make sure that any existing suspended solids have settled to the bottom of the cell and are not disturbed by the insertion into the PrimeLab. ->...
- Page 100 0 - 500 mg/l (Pt-Co) Colour (107) Name on device: 107-Colour 10 ml 24 mm Syringe Filter paper Filter adapter Measurement procedure: The steps up to the selection of the parameter value to be determined are the same for all procedures and described on page "TEST-5".
- Page 101 0 - 500 mg/l (Pt-Co) Colour (107) Name on device: 107-Colour Continued... 12.) Fill a clean luer-lock syringe (20 ml) with deionised water. 13.) Connect the syringe to the filter holder and discharge the syringe to waste. 14.) Disconnect the syringe from the filter holder and refill syringe with destilled water.
- Page 102 0 - 500 mg/l (Pt-Co) Colour (107) Name on device: 107-Colour Continued... Possible messages in the line below the measurement value: "low! / high! / good!": Assessment of the measurement value relative to the ideal range defined by you. "Overrange! / underrange!": Measurement value for this parameter is outside the value range of this method.
- Page 103 0 - 500 mg/l (Pt-Co) Colour (107) Name on device: 107-Colour Continued... Note(s) -> (*) Special accessories required / not included as standard equipment! -> The sample water needs to have a yelowish to yellowish-brown coloration to be tested with this method which is based on the "Hazan Standard", developed by A.
- Page 104 ZERO value is used with the same cuvette and the same water sample for the test! 2) Replace the screw lid on the cuvette and insert it into the PrimeLab sampling chamber. Align the arrow on the front of the cuvette. Press ZERO.
- Page 105 9) Crush the tablet with a clean stirrer until it has completely dissolved. 10) Replace the lid on the cuvette, swirl it carefully and insert it into the sampling chamber of the PrimeLab. Align the arrow on the front of the cuvette.
- Page 106 0.05 - 5 mg/l (Cu) Tablet Copper (18) (free/combined/total) Name on device: 18-Copper-tab Continued... Note(s) -> For the analysis of total copper the following procedure is necessary: - Add concentrated sulfuric acid to the test sample (1 ml per 100 ml of test sample).
- Page 107 ZERO value is used with the same cuvette and the same water sample for the test! 2) Replace the screw lid on the cuvette and insert it into the PrimeLab sampling chamber. Align the arrow on the front of the cuvette. Press ZERO.
- Page 108 Powder 0 - 5 mg/l (Cu) Copper (19) Name on device: 19-Copper-pow 10 ml 24 mm PL Copper 1 (PLpow20Cu1) Continued... Note(s) -> For the analysis of total copper the following procedure is necessary: - Add concentrated sulfuric acid to the test sample (1 ml per 100 ml of test sample).
- Page 109 Powder 0.01 - 0.50 mg/l Cyanide (158) Name on device: 158-Cyanide-pow +Liquid PL Cyanide-11 PL Cyanide-12 10 ml PL Cyanide-13 24 mm (all included in PL158-kit) Measurement procedure: The steps up to the selection of the parameter value to be determined are the same for all procedures and described on page "TEST-5".
- Page 110 Powder 0.01 - 0.50 mg/l Cyanide (158) Name on device: 158-Cyanide-pow +Liquid Continued... Note(s) -> Reagents to be stored at temperatures of +15°C to 25°C -> This method only detects free Cyanide and Cyanides which can be destroyed by Chlorine ->...
- Page 111 ZERO value is used with the same cuvette and the same water sample for the test! 2) Replace the screw lid on the cuvette and insert it into the PrimeLab sampling chamber. Align the arrow on the front of the cuvette. Press ZERO.
- Page 112 ZERO value is used with the same cuvette and the same water sample for the test! 2) Replace the screw lid on the cuvette and insert it into the PrimeLab sampling chamber. Align the arrow on the front of the cuvette. Press ZERO.
- Page 113 0 - 13 mg/l Liquid DBNPA (65) Name on device: 65-DBNPA-liq Continued... Note(s) -> DPD 1 A and DPD 1 B reagent MUST be added to the vial BEFORE water sample is added to avoid mis-readings!
- Page 114 ZERO value is used with the same cuvette and the same water sample for the test! 2) Replace the screw lid on the cuvette and insert it into the PrimeLab sampling chamber. Align the arrow on the front of the cuvette. Press ZERO.
- Page 115 ZERO value is used with the same cuvette and the same water sample for the test! 2) Replace the screw lid on the cuvette and insert it into the PrimeLab sampling chamber. Align the arrow on the front of the cuvette. Press ZERO.
- Page 116 20 - 1000 µg/l Liquid DEHA (21) Name on device: 21-DEHA-liq Continued... Note(s) -> Ferrous Iron will interfere with this test and can influence the readings. To determine the Ferrous Iron concentration for correction purposes repeat the test without adding PL Oxygen Scavenger 1. If the result is above 0.05mg/l subtract this value from the DEHA result.
- Page 117 ZERO value is used with the same cuvette and the same water sample for the test! 2) Replace the screw lid on the cuvette and insert it into the PrimeLab sampling chamber. Align the arrow on the front of the cuvette. Press ZERO.
- Page 118 ZERO value is used with the same cuvette and the same water sample for the test! 2) Replace the screw lid on the cuvette and insert it into the PrimeLab sampling chamber. Align the arrow on the front of the cuvette. Press ZERO.
- Page 119 0 - 10 mg/l (O ) Liquid Dissolved Oxygen (163) Name on device: 163-DissOxyg-liq PL DissOx 1 (PL30DO1) 10 ml PL DissOx 2 (PL30DO2) 24 mm PL DissOx 3 (PL30DO3) Measurement procedure: The steps up to the selection of the parameter value to be determined are the same for all procedures and described on page "TEST-5".
- Page 120 0 - 10 mg/l (O ) Liquid Dissolved Oxygen (163) Name on device: 163-DissOxyg-liq Continued... 14.) Apply the stopper. 15.) Gently shake glass bottle for 01:00 minute. 16.) Press TEST to start 01:00 minute countdown. 17.) Remove the stopper. 18.) Add 10 drops “PL DissOx 3" into the glass bottle. 19.) Apply the stopper.
- Page 121 ZERO value is used with the same cuvette and the same water sample for the test! 2) Replace the screw lid on the cuvette and insert it into the PrimeLab sampling chamber. Align the arrow on the front of the cuvette. Press ZERO.
- Page 122 Use 10ml Pipette to always properly dose exactly 10ml! 1) Fill sample water into the same cuvette up to the 10ml level. 2) Insert the cuvette WITHOUT LID into the PrimeLab sampling chamber. Align the arrow on the front of the cuvette.
-
Page 123: Calibration Set
• Adapter might not stay straight on PrimeLab • Cuvette-hole (PrimeLab) might be dirty (check the two windows) • Water sample might be too dark / not enough light can pass water sample to reach the sensor... - Page 124 ZERO value is used with the same cuvette and the same water sample for the test! 2) Replace the screw lid on the cuvette and insert it into the PrimeLab sampling chamber. Align the arrow on the front of the cuvette. Press ZERO.
- Page 125 ZERO value is used with the same cuvette and the same water sample for the test! 2) Replace the screw lid on the cuvette and insert it into the PrimeLab sampling chamber. Align the arrow on the front of the cuvette. Press ZERO.
- Page 126 ZERO value is used with the same cuvette and the same water sample for the test! 2) Replace the screw lid on the cuvette and insert it into the PrimeLab sampling chamber. Align the arrow on the front of the cuvette. Press ZERO.
- Page 127 Hardness-Calcium 0 - 500 mg/l (CaCO ) Tablet (78) Name on device: 78-Hard-Cal-tab Continued... 10) Press button 4 to save the result together with date and time in the device. Possible messages in the line below the measurement value: "low! / high! / good!": Assessment of the measurement value relative to the ideal range defined by you.
- Page 128 2) Add one "Calcium Hardness Photometer" tablet to the same cuvette. 3) Crush the tablet with a clean stirrer until it has completely dissolved. 4) Replace the screw lid on the cuvette and insert it into the PrimeLab sampling chamber. Align the arrow on the front of the cuvette. Press ZERO.
- Page 129 Hardness-Calcium HR 50 - 1000 mg/l (CaCO ) Tablet Name on device: 09-Hard-Cal-HR-tab Continued... Note(s) -> (*) Conversion to °dH, °eH and °fH -> If your reading is towards the upper limit of the test a dilution is recommnded. -> Steps 2 and 4 need to be performed quickly.
- Page 130 ZERO value is used with the same cuvette and the same water sample for the test! 2) Close the lid, place the cell into the PrimeLab and press ZERO. 3) Remove the cell and open the lid.
- Page 131 0 - 500 mg/l (CaCO ) Liquid Hardness-Calcium (166) Name on device: 166-Hard-Cal-liq Continued... Note(s) -> (*) Conversion to °dH, °eH and °fH -> If your reading is towards the upper limit of the test a dilution is recommnded. -> If your sample water is very alkaline or acidic it should be brought within the pH range between 4 and 10 by adding 1 mol/l acetic acid or resp.
- Page 132 ZERO value is used with the same cuvette and the same water sample for the test! 2) Replace the screw lid on the cuvette and insert it into the PrimeLab sampling chamber. Align the arrow on the front of the cuvette. Press ZERO.
- Page 133 2 - 50 mg/l (CaCO ) Tablet Hardness-total (LR) (56) Name on device: 56-Hard-tot-LT-tab Continued... Note(s) -> (*) Conversion to °dH, °eH, °fH and Ca -> If your sample water is very alkaline or acidic it should be brought to a pH value range between 4 and 10 by adding 1 mol/l acetic acid or resp.
- Page 134 ZERO value is used with the same cuvette and the same water sample for the test! 3) Replace the screw lid on the cuvette and insert it into the PrimeLab sampling chamber. Align the arrow on the front of the cuvette. Press ZERO.
- Page 135 20 - 500 mg/l (CaCO ) Tablet Hardness-total (HR) (57) Name on device: 57-Hard-tot-HR-tab Continued... Possible messages in the line below the measurement value: "low! / high! / good!": Assessment of the measurement value relative to the ideal range defined by you. „Overrange! / underrange!": Measurement value for this parameter is outside the value range of this method.
- Page 136 0 - 500 mg/l (CaCO ) Liquid Hardness-total (HR) (148) Name on device: 148-Hard-tot-liq 10 ml 10 ml PL Total Hardness 1 24 mm 24 mm PL Total Hardness Measurement procedure: The steps up to the selection of the parameter value to be determined are the same for all procedures and described on page "TEST-5".
- Page 137 0 - 500 mg/l (CaCO ) Liquid Hardness-total (HR) (148) Name on device: 148-Hard-tot-liq Continued... Possible messages in the line below the measurement value: "low! / high! / good!": Assessment of the measurement value relative to the ideal range defined by you. „Overrange! / underrange!": Measurement value for this parameter is outside the value range of this method.
- Page 138 ZERO value is used with the same cuvette and the same water sample for the test! 2) Replace the screw lid on the cuvette and insert it into the PrimeLab sampling chamber. Align the arrow on the front of the cuvette. Press ZERO.
- Page 139 5 - 600 µg/l (N H ) Liquid Hydrazine (23) Name on device: 23-Hydrazine-liq Continued... Note(s) -> mg/l (mg/l) deviated by 1000 results in µg/l (µg/l). Example: 0.01 mg/l (mg/l) = 10 µg/l (µg/l). -> The temperature of the water sample should be between 17°C and 25°C.
- Page 140 2) Close the lid. Shake the cell gently to mix the liquid. 3) Open the lid. 4.) Place the cell into the PrimeLab (use caution to the arrow on the cell). Do NOT close the lid. 5.) Place TURBIDITY-ADAPTER on top of the open cuvette.
- Page 141 ZERO value is used with the same cuvette and the same water sample for the test! 2) Replace the screw lid on the cuvette and insert it into the PrimeLab sampling chamber. Align the arrow on the front of the cuvette. Press ZERO.
- Page 142 0 - 3.8 mg/l (H O ) Tablet Hydrogen Peroxide (LR) (24) Name on device: 24-Hydr-Per-LR-tab Continued... Note(s) -> If the measuring water contains further reducing chemicals (e.g. chlorine, active oxygen, bromine etc.) this will also be detected and is part of the result.
- Page 143 ZERO value is used with the same cuvette and the same water sample for the test! 2) Replace the screw lid on the cuvette and insert it into the PrimeLab sampling chamber. Align the arrow on the front of the cuvette. Press ZERO.
- Page 144 0 - 3.8 mg/l (H O ) Liquid Hydrogen Peroxide (LR) (66) Name on device: 66-Hydr-Per-LR-liq Continued... Note(s) -> DPD 1 A and DPD 1 B reagent MUST be added to the vial BEFORE water sample is added to avoid mis-readings! ->...
- Page 145 0 - 200 mg/l (H O ) Tablet Hydrogen Peroxide (HR) (162) Name on device: 24-Hydr-Per-LR-tab 10 ml Acidifying PT Photometer (TbsHAPP...) 24 mm Hyd. Peroxide HR Photometer (TbsPHPHR...) Measurement procedure: The steps up to the selection of the parameter value to be determined are the same for all procedures and described on page "TEST-5".
- Page 146 0 - 3.8 mg/l (H O ) Tablet Hydrogen Peroxide (LR) (24) Name on device: 24-Hydr-Per-LR-tab Continued... 9.) Place the cell into the device. Again, please use caution to the arrow on the cell. Than press TEST. 10.) Time left: 00:15 minutes.
- Page 147 ZERO value is used with the same cuvette and the same water sample for the test! 2) Replace the screw lid on the cuvette and insert it into the PrimeLab sampling chamber. Align the arrow on the front of the cuvette. Press ZERO.
- Page 148 ZERO value is used with the same cuvette and the same water sample for the test! 2) Replace the screw lid on the cuvette and insert it into the PrimeLab sampling chamber. Align the arrow on the front of the cuvette. Press ZERO.
- Page 149 ZERO value is used with the same cuvette and the same water sample for the test! 2) Replace the screw lid on the cuvette and insert it into the PrimeLab sampling chamber. Align the arrow on the front of the cuvette. Press ZERO.
- Page 150 0.05 - 28 mg/l Tablet Iodine (27) Name on device: 27-Iodine-tab Continued... Note(s) -> All oxidizing substances in the water sample, such as chlorine, active oxygen, bromine.. will also be detected and contained in the result.
- Page 151 ZERO value is used with the same cuvette and the same water sample for the test! 2) Replace the screw lid on the cuvette and insert it into the PrimeLab sampling chamber. Align the arrow on the front of the cuvette. Press ZERO.
- Page 152 0.05 - 28 mg/l Liquid Iodine (67) Name on device: 67-Iodine-liq Continued... Note(s) -> DPD 1 A and DPD 1 B reagent MUST be added to the vial BEFORE water sample is added to avoid mis-readings! -> All oxidizing substances in the water sample, such as chlorine, active oxygen, bromine..
- Page 153 ZERO value is used with the same cuvette and the same water sample for the test! 2) Replace the screw lid on the cuvette and insert it into the PrimeLab sampling chamber. Align the arrow on the front of the cuvette. Press ZERO.
- Page 154 2+/3+ 0 - 1 mg/l Tablet Iron (LR) (28) Name on device: 28-Iron-LR-tab Continued... Note(s) -> If the sample needs to be filtered (dissolved iron) it must be ensured that after filtration there are no more undissolved iron parts in the sample. If you are unsure, please repeat the filtration.
- Page 155 ZERO value is used with the same cuvette and the same water sample for the test! 6) Replace the screw lid on the cuvette and insert it into the PrimeLab sampling chamber. Align the arrow on the front of the cuvette. Press ZERO.
- Page 156 ZERO value is used with the same cuvette and the same water sample for the test! 2) Replace the screw lid on the cuvette and insert it into the PrimeLab sampling chamber. Align the arrow on the front of the cuvette. Press ZERO.
- Page 157 2+/3+ Powder 0 - 10 mg/l Iron (MR) (29) Name on device: 29-Iron-MR-pow Continued... Possible messages in the line below the measurement value: "low! / high! / good!": Assessment of the measurement value relative to the ideal range defined by you. "Overrange! / underrange!": Measurement value for this parameter is outside the value range of this method.
- Page 158 ZERO value is used with the same cuvette and the same water sample for the test! 2) Replace the screw lid on the cuvette and insert it into the PrimeLab sampling chamber. Align the arrow on the front of the cuvette. Press ZERO.
- Page 159 ZERO value is used with the same cuvette and the same water sample for the test! 6) Replace the screw lid on the cuvette and insert it into the PrimeLab sampling chamber. Align the arrow on the front of the cuvette. Press ZERO.
- Page 160 ZERO value is used with the same cuvette and the same water sample for the test! 2) Replace the screw lid on the cuvette and insert it into the PrimeLab sampling chamber. Align the arrow on the front of the cuvette. Press ZERO.
- Page 161 9) Replace the lid on the cuvette, swirl it carefully and insert it into the sampling chamber of the PrimeLab. Align the arrow on the front of the cuvette. Press TEST. 10) After the lapse of a 5 minute countdown the determined result is displayed.
- Page 162 ZERO value is used with the same cuvette and the same water sample for the test! 2) Replace the screw lid on the cuvette and insert it into the PrimeLab sampling chamber. Align the arrow on the front of the cuvette. Press ZERO.
- Page 163 Powder 0.00 - 3.00 mg/l (Fe) Iron total (LR) (132) Name on device: 132-Iron-tot-LR-pp Continued... Notes -> If your sample contains rust, extend countdown to 05:00 minutes manually by waiting 02:00 minutes before pressing TEST. -> Dilute samples with high Iron concentration as high iron samples inhibit colour development.
- Page 164 4) Add 5ml of TM-reagent-I into the beaker. 5) Close the lid of the beaker and shake/swirl beaker until reagents are mixed homogenously. 6) Place 3ml-vial-adapter into the PrimeLab. 7) Fill a clean luer-lock syringe with exactly 3ml of the water-part of your sample.
- Page 165 50 - 500 mg/l (Fe ) Liquid Iron in Oil (149) Name on device: 149-Iron-Oil-liq 13) Add precisely 0.3ml of Oil-sample to the beaker. 14) Add 3ml of TM-reagent-S into the beaker. 15) Add 3ml of TM-reagent-E into the beaker. 16) Add 1ml of TM-reagent-C into the beaker.
- Page 166 ZERO value is used with the same cuvette and the same water sample for the test! 2) Replace the screw lid on the cuvette and insert it into the PrimeLab sampling chamber. Align the arrow on the front of the cuvette. Press ZERO.
- Page 167 0 - 10 mg/l (C H NOS) Liquid Isothiazolinone (88) Name on device: 88-Isothiazol-liq Continued... 14) Place the cell into the device. Again, please use caution to the arrow on the cell. Than press TEST. 15) Add 5 drops "PL Isothiazolinone 5" to your sample. 16) Close the lid.
- Page 168 60 - 1000000 cfu/test Liquid Legionella (147) Name on device: 147-Legionella-liq Legipid-Kit (LGP-10/LGP-40/LGP-100) 2 x cuvettes for magnetic holder (LG-MCHB) Magnetic holder 10 ml (LG-MP2) Plastic adapter for 1ml vials (PLSp-LegiAD-1) 24 mm Filter-kit (manual/professional) (LP-Fil-man/LP-Fil-Prof) Measurement procedure: The steps up to the selection of the parameter value to be determined are the same for all procedures and described on page "TEST-5".
- Page 169 60 - 1000000 cfu/test Liquid Legionella (147) Name on device: 147-Legionella-liq Continued... 13) Shake both cuvettes (LG-MHCB1 and LG-MHCB2), still placed in the magnetic holder and with magnet pulled away from the cuvettes, gently by inverting 3 times every 3 minutes for 15 minutes. 14) Press OK to start 15:00 minutes countdown.
- Page 170 60 - 1000000 cfu/test Liquid Legionella (147) Name on device: 147-Legionella-liq Continued... 29) Push magnet towards/against cuvettes LG-MHCB1 and LG-MHCB2. 30) Press OK to start 03:00 minutes countdown. 31) Empty LG-MHCB1 and LG-MHCB2 (still in magnetic holder LG-MH) to the BACK whilst keeping magnet in place by pushing towards cuvettes with your thumb.
- Page 171 USE A CLEAN PIPETTE. 60) Place the black plastic "Legionella adapter" (PLSp-LegiAD-1) properly into the PrimeLab measuring chamber. Make sure it fits properly. 61) Place filled 1ml LG-CB vial into the adapter. Place the light shield (PLSp-LS-1) on top and press ZERO.
- Page 172 60 - 1000000 cfu/test Liquid Legionella (147) Name on device: 147-Legionella-liq Continued... 63) Transfer 1ml from LG-MHCB2 (right) to a new, clean small vial „LG-CB". USE A CLEAN PIPETTE. 64) Place filled 1ml LG-CB vial into the adapter. Place the light shield (PLSp-LS-1) on top and press TEST.
- Page 173 60 - 1000000 cfu/test Liquid Legionella (147) Name on device: 147-Legionella-liq Continued... 15) The determined result is immediately displayed. Press the "OK" button to save the result together with date and time. Possible messages in the line below the measurement value: "low! / high! / good!": Assessment of the measurement value relative to the ideal range defined by you.
- Page 174 60 - 1000000 cfu/test Liquid Legionella (147) Name on device: 147-Legionella-liq Continued... Note(s) -> Result is displayed as “cfu/l” which is related to filtration of 1 liter of your sample. -> If less than 1 liter is filtered, e.g. only 500ml, results needs to be read as “cfu/..” (e.g. cfu/500ml). ->...
- Page 175 2) Add precisely 1ml sample water to the same cuvette. 3) Replace the screw lid on the cuvette and insert it into the PrimeLab sampling chamber. Align the arrow on the front of the cuvette. Press ZERO.
- Page 176 0 - 100 mg/l Tablet Magnesium (Mg) (93) Name on device: 93-Magnesium-tab Continued... Possible messages in the line below the measurement value: "low! / high! / good!": Assessment of the measurement value relative to the ideal range defined by you. "Overrange! / underrange!": Measurement value for this parameter is outside the value range of this method.
- Page 177 ZERO value is used with the same cuvette and the same water sample for the test! 2) Replace the screw lid on the cuvette and insert it into the PrimeLab sampling chamber. Align the arrow on the front of the cuvette. Press ZERO.
- Page 178 0.2 - 5 mg/l (Mn) Tablet Manganese (31) Name on device: 31-Manganes-LR-tab Continued... 10) Press button 4 to save the result together with date and time in the device. Possible messages in the line below the measurement value: "low! / high! / good!": Assessment of the measurement value relative to the ideal range defined by you.
- Page 179 0 - 0.030 mg/l (Mn) Tablet Manganese VLR (161) Name on device: 161-Manganes-VLR-tab 10 ml Manganese VLR N°1 (TbsHMGNS1VLR...) Manganese VLR N°2 (TbsPMGNS2VLR...) 24 mm Measurement procedure: The steps up to the selection of the parameter value to be determined are the same for all procedures and described on page "TEST-5".
- Page 180 0 - 0.030 mg/l (Mn) Tablet Manganese VLR (161) Name on device: 161-Manganes-VLR-tab Continued... Possible messages in the line below the measurement value: "low! / high! / good!": Assessment of the measurement value relative to the ideal range defined by you. "Overrange! / underrange!": Measurement value for this parameter is outside the value range of this method.
- Page 181 ZERO value is used with the same cuvette and the same water sample for the test! 2) Replace the screw lid on the cuvette and insert it into the PrimeLab sampling chamber. Align the arrow on the front of the cuvette. Press ZERO.
- Page 182 ZERO value is used with the same cuvette and the same water sample for the test! 2) Replace the screw lid on the cuvette and insert it into the PrimeLab sampling chamber. Align the arrow on the front of the cuvette. Press ZERO.
- Page 183 0 - 15 mg/l Tablet Molybdat (LR) (MoO ) (96) Name on device: 96-Molybd-LR-tab Continued... Possible messages in the line below the measurement value: "low! / high! / good!": Assessment of the measurement value relative to the ideal range defined by you. "Overrange! / underrange!": Measurement value for this parameter is outside the value range of this method.
- Page 184 ZERO value is used with the same cuvette and the same water sample for the test! 2) Replace the screw lid on the cuvette and insert it into the PrimeLab sampling chamber. Align the arrow on the front of the cuvette. Press ZERO.
- Page 185 1 - 100 mg/l (MoO ) Tablet Molybdate (32) Name on device: 32-Molybdat-HR-tab Continued... Possible messages in the line below the measurement value: "low! / high! / good!": Assessment of the measurement value relative to the ideal range defined by you. "Overrange! / underrange!": Measurement value for this parameter is outside the value range of this method.
- Page 186 ZERO value is used with the same cuvette and the same water sample for the test! 2) Replace the screw lid on the cuvette and insert it into the PrimeLab sampling chamber. Align the arrow on the front of the cuvette. Press ZERO.
- Page 187 5 - 200 mg/l (MoO ) Liquid Molybdate (HR) (33) Name on device: 33-Molybdat-HR-liq Continued... Note(s) -> (*) Conversion of the measurement result to Mo and Na MoO -> Extend the listed measurement range from 5 - 200 mg/l, to 10 - 400 mg/l by diluting your water sample as follows: add 5 ml of sample water plus 5 ml of Molybdate free water and continue with the test procedure.
- Page 188 ZERO value is used with the same cuvette and the same water sample for the test! 2) Replace the screw lid on the cuvette and insert it into the PrimeLab sampling chamber. Align the arrow on the front of the cuvette. Press ZERO.
- Page 189 Powder 0 - 40 mg/l (MoO ) Molybdate HR (134) Name on device: 134-Molybd-HR-pp Continued... Note(s) -> The following substances interfere with the measurement: Aluminium (> 50 mg/l), Chromium (> 1000 mg/l), Iron (> 50 mg/l), Nickel (> 50 mg/l), Nitrite (>2000 as NO2;...
- Page 190 ZERO value is used with the same cuvette and the same water sample for the test! 2) Replace the screw lid on the cuvette and insert it into the PrimeLab sampling chamber. Align the arrow on the front of the cuvette. Press ZERO.
- Page 191 0 - 7 mg/l Tablet Nickel (HR) (Ni) (90) Name on device: 90-Nickel-HR-tab Continued... Possible messages in the line below the measurement value: "low! / high! / good!": Assessment of the measurement value relative to the ideal range defined by you. "Overrange! / underrange!": Measurement value for this parameter is outside the value range of this method.
- Page 192 ZERO value is used with the same cuvette and the same water sample for the test! 2) Replace the screw lid on the cuvette and insert it into the PrimeLab sampling chamber. Align the arrow on the front of the cuvette. Press ZERO.
- Page 193 11) Replace the lid on the cuvette, swivel it carefully and insert it in the sampling chamber of the PrimeLab. Align the arrow on the front of the cuvette. Press TEST. 12) After the lapse of a 15 minute countdown the determined result is displayed.
- Page 194 ZERO value is used with the same cuvette and the same water sample for the test! 2) Replace the screw lid on the cuvette and insert it into the PrimeLab sampling chamber. Align the arrow on the front of the cuvette. Press ZERO.
- Page 195 0.0 - 11.0 mg/l Liquid Nitrate (34) Name on device: 34-Nitrate-pow +Powder Continued... Possible messages in the line below the measurement value: "low! / high! / good!": Assessment of the measurement value relative to the ideal range defined by you. "Overrange! / underrange!": Measurement value for this parameter is outside the value range of this method.
- Page 196 ZERO value is used with the same cuvette and the same water sample for the test! 2) Replace the screw lid on the cuvette and insert it into the PrimeLab sampling chamber. Align the arrow on the front of the cuvette. Press ZERO.
- Page 197 0 - 0.5 mg/l Tablet Nitrite (LR) (35) Name on device: 35-Nitrite-LR-tab Continued... Note(s) -> (*) Conversion of the measurement result to NaNO , NO .
- Page 198 ZERO value is used with the same cuvette and the same water sample for the test! 2) Replace the screw lid on the cuvette and insert it into the PrimeLab sampling chamber. Align the arrow on the front of the cuvette. Press ZERO.
- Page 199 Powder 5 - 200 mg/l (NaNO ) Nitrite (HR) (36) Name on device: 36-Nitrite-HR-pow Continued... Note(s) -> (*) Conversion of the measurement result to N, No . -> Range 10 - 400 mg/l 5 ml sample water plus 5 ml Nitrite free water The result displayed on the screen needs to be multiplied by 2 ->...
- Page 200 2) Add precisely 1ml sample water to the same cuvette. 3) Replace the screw lid on the cuvette and insert it into the PrimeLab sampling chamber. Align the arrow on the front of the cuvette. Press ZERO.
- Page 201 The test needs to be performed without a delay. Place the vial into the PrimeLab right after reagents have dissolved and lid is closed. Immediately press TEST. It is essential for the accuracy of this test to keep the countdown of 02:00 minutes right after dissolving the tablets/closing the lid/placing the vial into the PrimeLab.
- Page 202 2) Add precisely 1 ml sample water to the same cuvette. 3) Replace the screw lid on the cuvette and insert it into the PrimeLab sampling chamber. Align the arrow on the front of the cuvette. Press ZERO.
- Page 203 0.5 - 25 mg/l 16mm vial Nitrogen-Total (LR) (151) Name on device: 151-NitroTotLR-pre Hydrox. LR vial Persulfate powder packs Reagent A powder packs Reagent B powder packs Acid LR/HR vial DI-Water Measurement procedure: The steps up to the selection of the parameter value to be determined are the same for all procedures and described on page "TEST-5".
- Page 204 0.5 - 25 mg/l 16mm vial Nitrogen-Total (LR) (151) Name on device: 151-NitroTotLR-pre Continued... 18) Proceed to next step to intitiate next countdown. 19) Reagents need to react press TEST to start 02:00 minutes countdown. 20) Open 1 Acid LR/HR vial(s) and add 2ml from ZERO vial to one. This is your new ZERO vial.
- Page 205 0.5 - 25 mg/l 16mm vial Nitrogen-Total (LR) (151) Name on device: 151-NitroTotLR-pre Continued... Possible messages in the line below the measurement value: "low! / high! / good!": Assessment of the measurement value relative to the ideal range defined by you. "Overrange! / underrange!": Measurement value for this parameter is outside the value range of this method.
- Page 206 5 - 150 mg/l 16mm vial Nitrogen-Total (HR) (152) Name on device: 152-NitroTotHR-pre Hydrox. LR vial Persulfate powder packs Reagent A powder packs Reagent B powder packs Acid LR/HR vial DI-Water Measurement procedure: The steps up to the selection of the parameter value to be determined are the same for all procedures and described on page "TEST-5".
- Page 207 5 - 150 mg/l 16mm vial Nitrogen-Total (HR) (152) Name on device: 152-NitroTotHR-pre Continued... 18) Proceed to next step to intitiate next countdown. 19) Reagents need to react press TEST to start 02:00 minutes countdown. 20) Open 1 Acid LR/HR vial(s) and add 2ml from ZERO vial to one. This is your new ZERO vial.
- Page 208 5 - 150 mg/l 16mm vial Nitrogen-Total (HR) (152) Name on device: 152-NitroTotHR-pre Continued... Possible messages in the line below the measurement value: "low! / high! / good!": Assessment of the measurement value relative to the ideal range defined by you. "Overrange! / underrange!": Measurement value for this parameter is outside the value range of this method.
- Page 209 ZERO value is used with the same cuvette and the same water sample for the test! 2) Replace the screw lid on the cuvette and insert it into the PrimeLab sampling chamber. Align the arrow on the front of the cuvette. Press ZERO.
- Page 210 17) Fill in the prepared water from the first cuvette. 18) Replace the lid on the cuvette, swirl it carefully and insert it into the sampling chamber of the PrimeLab. Align the arrow on the front of the cuvette. Press TEST.
- Page 211 ZERO value is used with the same cuvette and the same water sample for the test! 2) Replace the screw lid on the cuvette and insert it into the PrimeLab sampling chamber. Align the arrow on the front of the cuvette. Press ZERO.
- Page 212 0 - 5.4 mg/l (O ) Tablet Ozone (37) Name on device: 37-Ozone-tab Continued... Note(s) -> If the sample water contains further reducing chemicals (e.g. chlorine, activated oxygen, bromine etc.) this will also be detected and is included in the test results. ->...
- Page 213 ZERO value is used with the same cuvette and the same water sample for the test! 2) Replace the screw lid on the cuvette and insert it into the PrimeLab sampling chamber. Align the arrow on the front of the cuvette. Press ZERO.
- Page 214 B) Measurement procedure for “Ozone without chlorine” 1) Fill 10ml of the sample water into a clean 24mm cuvette. 2) Replace the screw lid on the cuvette and insert it into the PrimeLab sampling chamber. Align the arrow on the front of the cuvette. Press ZERO.
- Page 215 6) Fill sample water into the same cuvette up to the 10ml level. 7) Replace the lid on the cuvette, swivel it carefully and insert it in the sampling chamber of the PrimeLab. Align the arrow on the front of the cuvette. Press TEST.
- Page 216 0 - 10 mg/l (PAA) Tablet Peracetic Acid LR (164) Name on device: 164-PeracA-LR-tab 10 ml DPD N°4 (TbsD4...) Measurement procedure: The steps up to the selection of the parameter value to be determined are the same for all procedures and described on page "TEST-5". Please observe the important notes for accurate measurements on pages "TEST-8"...
- Page 217 0 - 10 mg/l (PAA) Tablet Peracetic Acid LR (164) Name on device: 164-PeracA-LR-tab Continued... Notes: -> Please use caution to not extend the countdown time. -> Using the repeat button to repeat the test with the same sample will bring different results as the reagents will keep reacting.
- Page 218 0 - 300 mg/l (PAA) Tablet Peracetic Acid HR (165) Name on device: 165-PeracA-HR-tab 10 ml Chlorine HR (KI) Photometer (TbsD4...) Acidifying GP (TbsPCLHR...) Measurement procedure: The steps up to the selection of the parameter value to be determined are the same for all procedures and described on page "TEST-5".
- Page 219 0 - 300 mg/l (PAA) Tablet Peracetic Acid HR (165) Name on device: 165-PeracA-HR-tab Continued... Notes: -> Please use caution to not extend the countdown time. -> Using the repeat button to repeat the test with the same sample will bring different results as the reagents will keep reacting.
- Page 220 5.) Place the sealed "Methanol Zero" vial into the PrimeLab and press ZERO. 6.) Remove the the cell from the PrimeLab and set it aside. It is not longer required for this test. 7.) Remove the cell from the fridge.
- Page 221 Permanganate Time Test 0 - 100 %A Tablet (159) (Absorption) Name on device: 159-PTT-tab Continued... test number result action Abort test. Tank is still highly contaminated. <29% PTT No further testing Replace vial in the fridge and Result: 1st test / after 10 minutes repeat test after 10 minutes 18% (PTT)
- Page 222 ZERO value is used with the same cuvette and the same water sample for the test! 2) Replace the screw lid on the cuvette and insert it into the PrimeLab sampling chamber. Align the arrow on the front of the cuvette. Press ZERO.
- Page 223 0 - 5 mg/l Tablet Phenol (C H OH) (98) Name on device: 98-Phenol-tab Continued... Possible messages in the line below the measurement value: "low! / high! / good!": Assessment of the measurement value relative to the ideal range defined by you. "Overrange! / underrange!": Measurement value for this parameter is outside the value range of this method.
- Page 224 ZERO value is used with the same cuvette and the same water sample for the test! 2) Replace the screw lid on the cuvette and insert it into the PrimeLab sampling chamber. Align the arrow on the front of the cuvette. Press ZERO.
- Page 225 5.2 - 6.8 (pH) Tablet pH-value (LR) (40) Name on device: 40-pH-LR-tab Continued... Note(s) -> Use of this test procedure and reagent on water samples with pH value outside of the 5.2 - 6.8 range can lead to incorrect test results. If you are not sure we recommend a control measurement using e.g.
- Page 226 ZERO value is used with the same cuvette and the same water sample for the test! 2) Replace the screw lid on the cuvette and insert it into the PrimeLab sampling chamber. Align the arrow on the front of the cuvette. Press ZERO.
- Page 227 6.5 - 8.4 (pH) Tablet pH-value (MR) (38) Name on device: 38-pH-MR-tab Continued... Note(s) -> Use of this test procedure and reagent on water samples with pH value outside of the 6.5 - 8.4 range can lead to incorrect test results. If you are not sure we recommend a control measurement using e.g.
- Page 228 ZERO value is used with the same cuvette and the same water sample for the test! 2) Replace the screw lid on the cuvette and insert it into the PrimeLab sampling chamber. Align the arrow on the front of the cuvette. Press ZERO.
- Page 229 6.5 - 8.4 (pH) Liquid pH-value (MR) (39) Name on device: 39-pH-MR-liq Continued... Note(s) -> Use of this test procedure and reagent on water samples with pH value outside of the 6.5 - 8.4 range can lead to incorrect test results. If you are not sure we recommend a control measurement using e.g.
- Page 230 ZERO value is used with the same cuvette and the same water sample for the test! 2) Replace the screw lid on the cuvette and insert it into the PrimeLab sampling chamber. Align the arrow on the front of the cuvette. Press ZERO.
- Page 231 5 - 11 (pH) Tablet pH-Universal (41) Name on device: 41-pH-univ-tab Note(s) -> Use of this test procedure and reagent on water samples with pH value outside of the 5-11 range can lead to incorrect test results. If you are not sure we recommend a control measurement using e.g.
- Page 232 ZERO value is used with the same cuvette and the same water sample for the test! 2) Replace the screw lid on the cuvette and insert it into the PrimeLab sampling chamber. Align the arrow on the front of the cuvette. Press ZERO.
- Page 233 4 - 11 (pH) Liquid pH-Universal (42) Name on device: 42-pH-univ-liq Continued... Note(s) -> Use of this test procedure and reagent on water samples with pH value outside of the 4-11 range can lead to incorrect test results. If you are not sure we recommend a control measurement using e.g.
- Page 234 ZERO value is used with the same cuvette and the same water sample for the test! 2) Replace the screw lid on the cuvette and insert it into the PrimeLab sampling chamber. Align the arrow on the front of the cuvette. Press ZERO.
- Page 235 2 - 60 mg/l Tablet PHMB (43) Name on device: 43-PHMB-tab Continued... Note(s) -> It is important that all equipment coming in contact with sample water containing a reagent (cuvette, lid, stirrer) is cleaned using a brush, clear water and then distilled water, as otherwise the test kit will discolour over time.
- Page 236 ZERO value is used with the same cuvette and the same water sample for the test! 2) Replace the screw lid on the cuvette and insert it into the PrimeLab sampling chamber. Align the arrow on the front of the cuvette. Press ZERO.
- Page 237 Phosphate -ortho- (LR) 0 - 4 mg/l (PO ) Tablet (44) Name on device: 44-Phosphat-LR-tab Continued... 10) Press button 4 to save the result together with date and time in the device. Possible messages in the line below the measurement value: "low! / high! / good!": Assessment of the measurement value relative to the ideal range defined by you.
- Page 238 ZERO value is used with the same cuvette and the same water sample for the test! 2) Replace the screw lid on the cuvette and insert it into the PrimeLab sampling chamber. Align the arrow on the front of the cuvette. Press ZERO.
- Page 239 0 - 4 mg/l (PO ) Liquid Phosphate -ortho- (LR) (45) Name on device: 45-Phosphat-LR-liq +Powder Continued... Possible messages in the line below the measurement value: "low! / high! / good!": Assessment of the measurement value relative to the ideal range defined by you. "Overrange! / underrange!": Measurement value for this parameter is outside the value range of this method.
- Page 240 ZERO value is used with the same cuvette and the same water sample for the test! 6) Replace the screw lid on the cuvette and insert it into the PrimeLab sampling chamber. Align the arrow on the front of the cuvette. Press ZERO.
- Page 241 11) Crush the tablet with a clean stirrer until this is completely dissolved. 12) Replace the lid on the cuvette, swirl it carefully and insert it into the sampling chamber of the PrimeLab. Align the arrow on the front of the cuvette. Press TEST.
- Page 242 ZERO value is used with the same cuvette and the same water sample for the test! 6) Replace the screw lid on the cuvette and insert it into the PrimeLab sampling chamber. Align the arrow on the front of the cuvette. Press ZERO.
- Page 243 0 - 100 mg/l (PO ) Liquid Phosphate -ortho- (HR) (47) Name on device: 47-Phosphat-HR-liq Continued... 10) After the lapse of a 10 minute countdown the determined result is displayed. Press button 3 to convert this into various measurement units (**). 11) Press button 4 to save the result together with date and time in the device.
- Page 244 3) Replace the lid on the cuvette and swivel this back and forth 5 times. 4) Replace the cuvette in the sampling chamber in the PrimeLab. Make sure the arrow on the front of the cuvette is aligned. Press the ZERO button.
- Page 245 "Overrange! / underrange!": Measurement value for this parameter is outside the value range of this method. 20) Remove the vial from the PrimeLab and set it aside. It is not required for this test. 21) Fill 8 ml distilled water into a clean 24mm cuvette.
- Page 246 . 27) Replace the lid on the cuvette, swivel it carefully and insert it in the sampling chamber of the PrimeLab. Align the arrow on the front of the cuvette. Press TEST. 28) After the lapse of a 10 minute countdown the total result is displayed, divided in: "tPO "...
- Page 247 3) Replace the lid on the cuvette and swivel this back and forth 5 times. 4) Replace the cuvette in the sampling chamber in the PrimeLab. Make sure the arrow on the front of the cuvette is aligned. Press the ZERO button.
- Page 248 20) Crush the tablet with a clean stirrer until it is completely dissolved. 21) Replace the lid on the cuvette, swivel it carefully and insert it in the sampling chamber of the PrimeLab. Align the arrow on the front of the cuvette. Press TEST.
- Page 249 (110) Name on device: 110-Phosphon-tab Continued... 23) Remove the vial from the PrimeLab and set it aside. It is not required for this test. 24) Fill 8ml distilled water into a clean 24mm cuvette. 25) Add precisely 2ml sample water to the same cuvette.
- Page 250 0.00 - 2.60 mg/l 16mm vial Phosphorus-Total (LR) (153) Name on device: 153-PsphrTotLR-tab Phosphorus LR vial PL Phosphorus LR1 PL Phosphorus 2 Phosphate LR 1 Phosphate LR 2 Measurement procedure: The steps up to the selection of the parameter value to be determined are the same for all procedures and described on page "TEST-5".
- Page 251 0.00 - 2.60 mg/l 16mm vial Phosphorus-Total (LR) (153) Name on device: 153-PsphrTotLR-tab Continued... 13) Add 2 Phosphate LR 1 tablets to your sample. 14) Crush the tablet with a clean stirring rod until the tablet has completely dissolved. 15) Add 1 Phosphate LR 2 tablet to your sample. 16) Crush the tablet with a clean stirring rod until the tablet has completely dissolved.
- Page 252 0.0 - 52.0 mg/l 16mm vial Phosphorus-Total (HR) (154) Name on device: 154-PsphrTotHR-tab Phosphorus HR vial PL Phosphorus HR1 PL Phosphorus 2 Phosphate HR 1 Phosphate HR 2 Measurement procedure: The steps up to the selection of the parameter value to be determined are the same for all procedures and described on page "TEST-5".
- Page 253 0.0 - 52.0 mg/l 16mm vial Phosphorus-Total (HR) (154) Name on device: 154-PsphrTotHR-tab Continued... 13) Add 2 Phosphate HR 1 tablets to your sample. 14) Crush the tablet with a clean stirring rod until the tablet has completely dissolved. 15) Add 1 Phosphate HR 2 tablet to your sample. 16) Crush the tablet with a clean stirring rod until the tablet has completely dissolved.
- Page 254 ZERO value is used with the same cuvette and the same water sample for the test! 2) Replace the screw lid on the cuvette and insert it into the PrimeLab sampling chamber. Align the arrow on the front of the cuvette. Press ZERO.
- Page 255 1 - 30 mg/l Liquid Polyacrylate (85) Name on device: 85-Polyacryl-liq Continued... Note(s) -> If the water sample has little or no turbidity after correctly adding the reagents, the water sample must be treated specially. Ask the supplier of this set after a detailed instruction for pretreatment of the sample.
- Page 256 ZERO value is used with the same cuvette and the same water sample for the test! 2) Replace the screw lid on the cuvette and insert it into the PrimeLab sampling chamber. Align the arrow on the front of the cuvette. Press ZERO.
- Page 257 0.7 - 12 mg/l Tablet Potassium (48) Name on device: 48-Potassium-tab Continued... Note(s) -> By adding the "Potassium Photometer" tablet you get a cloudy solution.
- Page 258 Use 10ml Pipette to always properly dose exactly 10ml! 1) Fill sample water into the same cuvette up to the 10ml level. 2) Insert the cuvette WITHOUT LID into the PrimeLab sampling chamber. Align the arrow on the front of the cuvette.
- Page 259 • Adapter might not stay straight on PrimeLab • Cuvette-hole (PrimeLab) might be dirty (check the two windows) • Water sample might be too dark / not enough light can pass water sample to reach the sensor...
- Page 260 ZERO value is used with the same cuvette and the same water sample for the test! 2) Replace the screw lid on the cuvette and insert it into the PrimeLab sampling chamber. Align the arrow on the front of the cuvette. Press ZERO.
- Page 261 ZERO value is used with the same cuvette and the same water sample for the test! 2) Replace the screw lid on the cuvette and insert it into the PrimeLab sampling chamber. Align the arrow on the front of the cuvette. Press ZERO.
- Page 262 0 - 5 mg/l (SiO ) Liquid Silica (LR) (49) Name on device: 49-Silica-LR-liq +Powder Continued... 11) After the lapse of a 10 minute countdown the determined result is displayed. Press button 3 to convert this into various measurement units (*).
- Page 263 ZERO value is used with the same cuvette and the same water sample for the test! 2) Replace the screw lid on the cuvette and insert it into the PrimeLab sampling chamber. Align the arrow on the front of the cuvette. Press ZERO.
- Page 264 Powder 0 - 100 mg/l (SiO ) Silica (HR) (50) Name on device: 50-Silica-HR-pow Continued... 11) After the lapse of a 2 minute countdown the determined result is displayed. Press button 3 to convert this into various measurement units (*). 12) Press button 4 to save the result together with date and time in the device.
- Page 265 ZERO value is used with the same cuvette and the same water sample for the test! 7) Replace the screw lid on the cuvette and insert it into the PrimeLab sampling chamber. Align the arrow on the front of the cuvette. Press ZERO.
- Page 266 12) Crush the tablet with a clean stirrer until this is completely dissolved. 13) Replace the lid on the cuvette, swirl it carefully and insert it into the sampling chamber of the PrimeLab. Align the arrow on the front of the cuvette. Press TEST.
- Page 267 ZERO value is used with the same cuvette and the same water sample for the test! 7) Replace the screw lid on the cuvette and insert it into the PrimeLab sampling chamber. Align the arrow on the front of the cuvette. Press ZERO.
- Page 268 0.2 - 40 % (NaOCl) Liquid Sodium Hypochlorite (68) Name on device: 51-Sodium-Hypo-liq Continued... 11) The determined result is immediately displayed. Press the "OK" button to save the result together with date and time. Possible messages in the line below the measurement value: "low! / high! / good!": Assessment of the measurement value relative to the ideal range defined by you.
- Page 269 ZERO value is used with the same cuvette and the same water sample for the test! 2) Replace the screw lid on the cuvette and insert it into the PrimeLab sampling chamber. Align the arrow on the front of the cuvette. Press ZERO.
- Page 270 Powder 5 - 100 mg/l (SO ) Sulphate (55) Name on device: 55-Sulphate-pow 10 ml 24 mm PL Sulphate 1 (PLpow10SULPHA1) Measurement procedure: The steps up to the selection of the parameter value to be determined are the same for all procedures and described on page "TEST-5".
- Page 271 ZERO value is used with the same cuvette and the same water sample for the test! 2) Replace the screw lid on the cuvette and insert it into the PrimeLab sampling chamber. Align the arrow on the front of the cuvette. Press ZERO.
- Page 272 0.04 - 0.5 mg/l Tablet Sulphide (52) Name on device: 52-Sulphide-tab Continued... 10) Press button 4 to save the result together with date and time in the device. Possible messages in the line below the measurement value: "low! / high! / good!": Assessment of the measurement value relative to the ideal range defined by you.
- Page 273 ZERO value is used with the same cuvette and the same water sample for the test! 2) Replace the screw lid on the cuvette and insert it into the PrimeLab sampling chamber. Align the arrow on the front of the cuvette. Press ZERO.
- Page 274 0 - 0.7 mg/l Liquid Sulphide (140) Name on device: 140-Sulphide-Ha Continued... 11) After the lapse of a 10 minute countdown the determined result is displayed. Press button 3 to convert this into various measurement units (*). 12) Press button 4 to save the result together with date and time in the device.
- Page 275 ZERO value is used with the same cuvette and the same water sample for the test! 2) Replace the screw lid on the cuvette and insert it into the PrimeLab sampling chamber. Align the arrow on the front of the cuvette. Press ZERO.
- Page 276 0 - 5 mg/l (SO ) Tablet Sulphite (LR) (53) Name on device: 53-Sulphite-LR-tab Continued... Note(s) -> (*) Conversion to Na SO...
- Page 277 ZERO value is used with the same cuvette and the same water sample for the test! 2) Replace the screw lid on the cuvette and insert it into the PrimeLab sampling chamber. Align the arrow on the front of the cuvette. Press ZERO.
- Page 278 0 - 300 mg/l Tablet Sulphite (HR) (Na SO ) (105) Name on device: 105-Sulfite-HR-tab Continued... Possible messages in the line below the measurement value: "low! / high! / good!": Assessment of the measurement value relative to the ideal range defined by you. "Overrange! / underrange!": Measurement value for this parameter is outside the value range of this method.
- Page 279 2) Fill 10ml distilled water into a clean 24mm cuvette. 3) Replace the screw lid on the cuvette and insert it into the PrimeLab sampling chamber. Align the arrow on the front of the cuvette. Press ZERO.
- Page 280 0 - 750 mg/l TSS Suspended solids (81) Name on device: 81-Suspended-Sol Continued... Note(s) -> To get a more accurate indication of the measured value, a gravimetrical determination of the water sample is necessary. Here, the water sample is filtered and the residue evaporated at about 100 degrees and weighed to the dried residue.
- Page 281 2) Add precisely 1ml sample water to the same cuvette. 3) Replace the screw lid on the cuvette and insert it into the PrimeLab sampling chamber. Align the arrow on the front of the cuvette. Press ZERO.
- Page 282 ZERO value is used with the same cuvette and the same water sample for the test! 2) Replace the screw lid on the cuvette and insert it into the PrimeLab sampling chamber. Align the arrow on the front of the cuvette. Press ZERO.
- Page 283 14) Replace the lid on the cuvette, swivel it carefully and insert it in the sampling chamber of the PrimeLab. Align the arrow on the front of the cuvette. Press TEST. 15) The determined result is immediately displayed. Press button 3 to convert the result to different units (*).
- Page 284 1) Rinse vial 3 times with your water sample. 2) Fill a cleaned cell (24mm) with 10ml of your sample. 3) Place the cell into the PrimeLab (use caution to the arrow on the cell). Do NOT close the lid.
- Page 285 ZERO value is used with the same cuvette and the same water sample for the test! 2) Replace the screw lid on the cuvette and insert it into the PrimeLab sampling chamber. Align the arrow on the front of the cuvette. Press ZERO.
- Page 286 -> With this method you can create your own parameters , use reagents from other manufacturers and / or perform processes with the PrimeLab that are not shown on the offered ID / parameters. This requires that you familiarize yourself with the colorimetry of the water sample AFTER addition of the reagent that you want to use.
- Page 287 ZERO value is used with the same cuvette and the same water sample for the test! 2) Replace the screw lid on the cuvette and insert it into the PrimeLab sampling chamber. Align the arrow on the front of the cuvette. Press ZERO.
- Page 288 -> With this method you can create your own parameters , use reagents from other manufacturers and / or perform processes with the PrimeLab that are not shown on the offered ID / parameters. This requires that you familiarize yourself with the colorimetry of the water sample AFTER addition of the reagent that you want to use.
- Page 289 ZERO value is used with the same cuvette and the same water sample for the test! 2) Replace the screw lid on the cuvette and insert it into the PrimeLab sampling chamber. Align the arrow on the front of the cuvette. Press ZERO.
- Page 290 -> With this method you can create your own parameters , use reagents from other manufacturers and / or perform processes with the PrimeLab that are not shown on the offered ID / parameters. This requires that you familiarize yourself with the colorimetry of the water sample AFTER addition of the reagent that you want to use.
- Page 291 ZERO value is used with the same cuvette and the same water sample for the test! 2) Replace the screw lid on the cuvette and insert it into the PrimeLab sampling chamber. Align the arrow on the front of the cuvette. Press ZERO.
- Page 292 -> With this method you can create your own parameters , use reagents from other manufacturers and / or perform processes with the PrimeLab that are not shown on the offered ID / parameters. This requires that you familiarize yourself with the colorimetry of the water sample AFTER addition of the reagent that you want to use.
- Page 293 ZERO value is used with the same cuvette and the same water sample for the test! 2) Replace the screw lid on the cuvette and insert it into the PrimeLab sampling chamber. Align the arrow on the front of the cuvette. Press ZERO.
- Page 294 -> With this method you can create your own parameters , use reagents from other manufacturers and / or perform processes with the PrimeLab that are not shown on the offered ID / parameters. This requires that you familiarize yourself with the colorimetry of the water sample AFTER addition of the reagent that you want to use.
- Page 295 ZERO value is used with the same cuvette and the same water sample for the test! 2) Replace the screw lid on the cuvette and insert it into the PrimeLab sampling chamber. Align the arrow on the front of the cuvette. Press ZERO.
- Page 296 -> With this method you can create your own parameters , use reagents from other manufacturers and / or perform processes with the PrimeLab that are not shown on the offered ID / parameters. This requires that you familiarize yourself with the colorimetry of the water sample AFTER addition of the reagent that you want to use.
- Page 297 ZERO value is used with the same cuvette and the same water sample for the test! 2) Replace the screw lid on the cuvette and insert it into the PrimeLab sampling chamber. Align the arrow on the front of the cuvette. Press ZERO.
- Page 298 20 - 1000 FAU Turbidity (59) Name on device: 59-Turbidity Continued... Note(s) -> (*) conversion to FTU (same as FAU) -> FAU stands for Formazin Absorption Units, different from the NTU (nephelometric) method. -> The measurement should be conducted immediately after sampling. ->...
- Page 299 For this, you HAVE TO use the 10ml pipette which came with your Turbidity Kit. 2) Insert the cuvette WITHOUT LID into the PrimeLab sampling chamber. Align the arrow on the front of the cuvette. 3) Place Turbidity-Adapter on top of the open cuvette which already is placed into the PrimeLab measurement chamber.
- Page 300 -> If your PrimeLab was delivered with activated ID 112 (means you have NOT activated it afterwards), the device is already calibrated. You only have to make a new calibration again if you feel that results obtained are inaccurate.
- Page 301 ZERO value is used with the same cuvette and the same water sample for the test! 2) Replace the screw lid on the cuvette and insert it into the PrimeLab sampling chamber. Align the arrow on the front of the cuvette. Press ZERO.
- Page 302 11) Crush the tablet with a clean stirrer until it is completely dissolved. 12) Replace the lid on the cuvette, swivel it carefully and insert it in the sampling chamber of the PrimeLab. Align the arrow on the front of the cuvette. Press TEST.
- Page 303 ZERO value is used with the same cuvette and the same water sample for the test! 3) Replace the screw lid on the cuvette and insert it into the PrimeLab sampling chamber. Align the arrow on the front of the cuvette. Press ZERO.
- Page 304 12) Crush the tablet with a clean stirrer until it is completely dissolved. 13) Replace the lid on the cuvette, swivel it carefully and insert it in the sampling chamber of the PrimeLab. Align the arrow on the front of the cuvette. Press TEST.
- Page 305 1) Rinse vial 3 times with your water sample. 2) Fill a cleaned cell (24mm) with 10ml of your sample. 3) Place the cell into the PrimeLab (use caution to the arrow on the cell). Do NOT close the lid.
- Page 306 0 - 1 mg/l (Zn) Tablet Zinc (62) Name on device: 62-Zinc-tab 10 ml Copper/Zinc LR Photometer (TbsRCZ...) 24 mm EDTA (TbsHED...) Measurement procedure: The steps up to the selection of the parameter value to be determined are the same for all procedures and described on page "TEST-5".
- Page 307 0 - 1 mg/l (Zn) Tablet Zinc (62) Name on device: 62-Zinc-tab Continued... B) "in absence of chlorine“: 17) Fill a cleaned cell (24mm) with 10ml of your sample. 18) Do you want to use the last stored ZERO value? If after switching on the device you have already performed the One-Time-Zero: ZERO (baseline) adjustment for the same type, the following...
- Page 308 Technical details Your PrimeLab is a high-tech photometer of the latest generation. Small and handy, but because of the installed JENCOLOR multi-spectral sensor and the wireless connection to the software package “PrimeLab Desktop Assistant” it is incredibly powerful. Dimensions: 175 x 88 x 59mm...
- Page 309 User guidance is intuitive to prevent mistakes in operation. In exceptional cases, however, the following error messages will be displayed. Please regularly visit www.primelab.org to stay updated on the latest developments. No calibration Your PrimeLab is calibrated on the LED built into the device (brightness and colour).
- Page 310 Do not exert any pressure on the openings and the panes as the panes might be pushed out, which would render the PrimeLab device unusable. Also make sure that the two openings are completely dry after cleaning, without any...
- Page 311 Andreas Hock Dipl. Ec. herewith declares as follows: The product “PrimeLab Multitest 1.0 Multitest” complies with the requirements of the following standards: EN 301 489-1 V1.9.2 Electromagnetic compatibility and Radio spectrum Matters (ERM); Electromagnetic Compatibility (EMC) standard for radio equipment and services;...
- Page 312 Guarantee policy Guarantee policy Guarantee claims in case of defects present in the device. For this product, if bought new from the manufacturer, there is a two year warranty, as required by law, starting from the date of purchase as shown on the purchase receipt This guarantee does not cover any parts installed in the device that were not purchased from the manufacturer of the device.
- Page 313 Disposal (devices and batteries) Disposal (devices and batteries) Disposal instructions according to EU directive by the European Parliament and Council: 2002/96/EC EU directive by the European Parliament and Council: 2006/66/EC Environmental protection information For the manufacture of your devices raw materials have had to be produced and processed.
- Page 314 PrimeLab Desktop Assistant With the “PrimeLab Desktop Assistant” you have acquired a powerful tool for the management and evaluation of your test results, for updating your PrimeLab, for a later installation of additional test procedures and for the development of dosage recommendations.
- Page 315 PrimeLab Desktop Assistant ® Install Bluetooth USB dongle If the computer on which you want to install the “PrimeLab Desktop ® Assistant” is already fitted with Bluetooth connectivity please ® UNDER NO CONDITION insert / install the Bluetooth USB dongle...
- Page 316 First connection of PrimeLab with PC (pairing) ® The advantage of using the Bluetooth connectivity between PrimeLab and your PC is that the two devices only need to “pair” once. This is the same procedure as between your mobile phone and your car.
- Page 317 ® So long as the Bluetooth dongle in your PC is installed (don‘t remove!) and active, from now on your PrimeLab will, when it is switched on, connect automatically and without intervention with your PC when it is switched on! In rare cases Windows will simply cancel the pairing.
- Page 318 Bluetooth connection between your PC and device to download measurement values, write address data on your device, and to remotely control your PrimeLab, load and install the most recent updates for your device and the software automatically from the internet, unlock new test procedures, set ideal value ranges and call support for various topics.
- Page 319 “PrimeLab Desktop Assistant” (Fig. 5) as well as a shortcut on your desktop. Double clicking the icon “PrimeLab” will start the software at any time. Before you do this switch on your PrimeLab so ® that it may establish a Bluetooth connection with your PC.
- Page 320 PrimeLab display. If this is not the case, please follow the instructions on page “SET 1”. 2) Click on the icon “PrimeLab” on your desktop or under START -> All programs -> PrimeLab Desktop Assistant.
- Page 321 “SETUP”. 6) Please note there are two checks that can be done to confirm your PrimeLab photometer and the software package “PrimeLab Desktop Assistant“ are properly connected.
- Page 322 Main screen & screen symbols These menus are explained on the next pages. Next to this symbol They are used for the remote control of your PrimeLab, the remaining memory for the administration of your measurement data, space on the device addresses and water treatment, is indicated in %.
- Page 323 PrimeLab Desktop Assistant left open for technical reasons PDA-9 PDA-9...
- Page 324 PrimeLab Desktop Assistant Menu: Setup Use the setup menu in PrimeLab Desktop Assistant to configure your PrimeLab and for a connection to the internet, to run updates but also to later unlock new test procedures on your device. Here you also have the option to set date and time so that your measurement data is always stored against on the correct date.
- Page 325 If the word ´Inactive´ is displayed , follow the instructions below. So that the PrimeLab Desktop Assistant can provide updates and further test procedures the software needs to be able to connect to the internet through your In most cases this is not a problem. The software uses the standard settings of your web browser (e.g.
- Page 326 PrimeLab Desktop Assistant Menu: Setup / Run update (software / firmware) One great advantage of your PrimeLab lies in the fact that it can always be updated to the newest version and is never out of date! We are developing new features and measurement procedures all the time, so that...
- Page 327 PrimeLab Desktop Assistant Menu: Setup / Assign a name to PrimeLab Especially if you are using several PrimeLab devices (e.g. in a lab) it makes sense to assign a unique name to each PrimeLab device. This can be easily done as...
- Page 328 It is recommended to always keep the date and time settings on your PrimeLab up to date. Date and time settings can either be entered in the device itself (menu SET) or using the software.
- Page 329 Menu: Setup / Import and export accounts In the next chapter (“Account data”) you will learn about the central importance of the “Accounts” established in the software for your work with PrimeLab and the software “PrimeLab Desktop Assistant”. So that you do not have to re-enter address data already stored on your computer the software has an import function you can use, saving time and effort.
- Page 330 The data is now imported and can be viewed and edited under “Accounts”. 2) Exporting “Account data: If you want to backup the accounts saved in the “PrimeLab Desktop Assistant” software (! Not the measurement values!) there is the convenient “Export” function.
- Page 331 PrimeLab Desktop Assistant Menu: Setup / Reset to factory defaults With this option you will reset your PrimeLab back to the original delivery state. The unlocked parameters and test procedures will remain unaffected by this reset to the factory default settings.
- Page 332 Enter water treatment products for dosage recommendations The “PrimeLab Desktop Assistant” can be used make a dosage recommendation on the basis of the measurement results, so that the water on which the measurement is based can be returned to your defined quality range using water treatment products.
- Page 333 PrimeLab Desktop Assistant left open for technical reasons PDA-19 PDA-19...
- Page 334 PrimeLab Desktop Assistant Menu: Account data The menu “Account data” is a central function of the “PrimeLab Desktop Assistant” software, because this is where you find the administration of the sources of the water samples and the measurements conducted with them.
- Page 335 PrimeLab Desktop Assistant Menu: Account data / Add new account Menu: Account data / Edit existing account Menu: Account data / Delete account The software has the function of importing external data, e.g. from your customer database, so that you do not have to re-enter huge amounts of data again.
- Page 336 PrimeLab device itself there is “only” sufficient memory space for 20 accounts and the associated 100 measurement values. With a few clicks you can determine which accounts on the PrimeLab can be saved and selected. Click on the menu “Account data”.
- Page 337 PrimeLab Desktop Assistant Menu: Account data / Manually read test data from the device Whenever the software is started and the connection to PrimeLab is established a window is displayed offering the option to synchronize all data stored on the PrimeLab.
- Page 338 The “PrimeLab Desktop Assistant” has the feature of conducting remotely controlled measurements, for which you prepare the settings and measurement steps on screen and the PrimeLab device itself is “only” used for the actual measurement. The advantage of this procedure is that the individual measurement steps are more...
- Page 339 Menu: Account data / Print test results (report) One of the advantages of the “PrimeLab Desktop Assistant” is the feature that test results can be displayed in any conceivable manner, to provide a most extensive and historic overview of the test results collected.
- Page 340 PrimeLab Desktop Assistant Menu: Account data / Print test results (report) PDA-26 PDA-26...
- Page 341 PrimeLab Desktop Assistant Menu: Account data / Generate dosage recommendations The most powerful feature of “PrimeLab Desktop Assistant” is the possibility to use the measurement results and individually determined ideal value ranges and water treatment products per parameter to have dosage suggestions calculated.
- Page 342 PrimeLab Desktop Assistant Menu: Account data / Generate dosage recommendations PDA-28 PDA-28...
- Page 343 PrimeLab Desktop Assistant Page empty for technical reasons PDA-29 PDA-29...
- Page 344 Menu: Parameters Use the menu “Parameter” to manage the measurement methods available in your PrimeLab and subsequently purchased, unlocked and installed. The measurement methods are each associated with certain parameter groups. There can be more than one method to any parameter group, depending on the various reagent types (liquid, tablet, powder) and / or different measurement ranges.
- Page 345 This also means that the list of water values that can be measured by PrimeLab will continuously grow. So that your PrimeLab is always up-to-date you can acquire codes to unlock further parameters / measurement methods on your device.
- Page 346 The “PrimeLab Desktop Assistant” has the feature of conducting remotely controlled measurements, for which you prepare the settings and measurement steps on screen and the PrimeLab device itself is “only” used for the actual measurement. The advantage of this procedure is that the individual measurement steps are more...
- Page 347 PrimeLab Desktop Assistant Page empty for technical reasons PDA-33 PDA-33...
- Page 348 Menu: Remote control Using the “Remote control” menu all measurements can be conducted conveniently from the PC. In this case PrimeLab works as a pure measurement sensor and no buttons need to be pressed on the device. The menu “Remote control” is also used to define the ideal ranges per measurement method, which is important for the assessment of the test results (low / OK / high) and for the calculation of the dosage recommendations.
- Page 349 The “PrimeLab Desktop Assistant” has the feature of conducting remotely controlled measurements, for which you prepare the settings and measurement steps on screen and the PrimeLab device itself is “only” used for the actual measurement. The advantage of this procedure is that the individual measurement steps are more...
- Page 350 PrimeLab Desktop Assistant Menu: Lexicon The menu “Lexicon” contains valuable information for you, such as a concise water primer, the latest instruction manual, information on reagents and much more. Menu: Lexicon Information and support PDA 37 Device information PDA 37...
- Page 351 On the first tab “FAQ & Support” there are several links to valuable information resources on www.primelab.org. • Water lexicon (info on water parameters that can be measured using PrimeLab) • Operating instructions (download link to the latest operating instructions for the PrimeLab and the “PrimeLab Desktop Assistant”...
- Page 352 ® Bluetooth dongle is in fact defective you can purchase any other Bluetooth dongle to install on your PC. Then re pair the PrimeLab with your PC as described on pages PDA-2 and PDA-3. • Windows lists PrimeLab as a paired device, but cannot establish the connection.
- Page 353 When / where: When attempting to generate a dosage recommendation. Cause / recommendation • The “PrimeLab Desktop Assistant” can only calculate a dosage recommendation if all data required for this are available. These are: -> Measurement value -> Ideal range to be reached after following the dosage recommendation ->...
Need help?
Do you have a question about the 1.0 MULTITEST and is the answer not in the manual?
Questions and answers