Table of Contents
Advertisement
Quick Links
Assembly and operating instructions
DULCOMETER
Multi-parameter Controller diaLog DACb
EN
A2666
Please carefully read these operating instructions before use. · Do not discard.
The operator shall be liable for any damage caused by installation or operating errors.
The latest version of the operating instructions are available on our homepage.
983369
Target group: instructed personnel
Version: BA_DM_239_06/23_EN
Advertisement
Table of Contents

Related Manuals for ProMinent DULCOMETER diaLog DACb


Summary of Contents for ProMinent DULCOMETER diaLog DACb
- Page 1 Assembly and operating instructions DULCOMETER Multi-parameter Controller diaLog DACb A2666 Please carefully read these operating instructions before use. · Do not discard. The operator shall be liable for any damage caused by installation or operating errors. The latest version of the operating instructions are available on our homepage. 983369 Target group: instructed personnel Version: BA_DM_239_06/23_EN...
- Page 2 Supplemental directives General non-discriminatory approach In order to make it easier to read, this document uses the male form in grammatical structures but with an implied neutral sense. The document is always aimed equally at women, men and gender-neutral persons. We kindly ask readers for their under‐ standing in this simplification of the text.
-
Page 3: Table Of Contents
Table of contents Table of contents Operating concept..............7 1.1 Display and keys............7 1.2 Functions of the keys ..........10 1.3 Changes the set operating language......11 1.4 Acknowledge fault or warning message ....11 1.5 Key Lock ..............12 1.6 Measured variables and measuring inputs.... - Page 4 Table of contents Setting measured variables..........64 11.1 Information on the measured variables....65 11.1.1 Measured variable pH [mV]........65 11.1.2 Temperature............66 11.1.3 Measured variable pH [mA]........67 11.1.4 ORP [mV], ORP [mA]..........67 11.1.5 Chlorine, bromine, chlorine dioxide, chlorite, dis‐ solved oxygen and ozone........
- Page 5 Table of contents 13.2 Control parameter [System response]....122 13.3 Control parameter [Setpoint]........123 13.4 Control parameter [xp]..........123 13.5 Control parameter [Ti]..........123 13.6 Control parameter [Td]..........124 13.7 Control parameter [Add. Basic load]....... 124 13.8 Control parameter [Checkout time]......124 13.9 Control parameter [max.
- Page 6 Table of contents 22.4.1 Error messages........... 159 22.4.2 Warning messages..........163 22.5 Help texts..............164 Technical data and measuring ranges......165 23.1 Technical data............165 23.2 Measuring range/Measured value......167 Spare parts and accessories..........168 24.1 Spare parts............. 168 24.2 Replacement of spare parts units......170 24.3 Replacing fan............
-
Page 7: Operating Concept
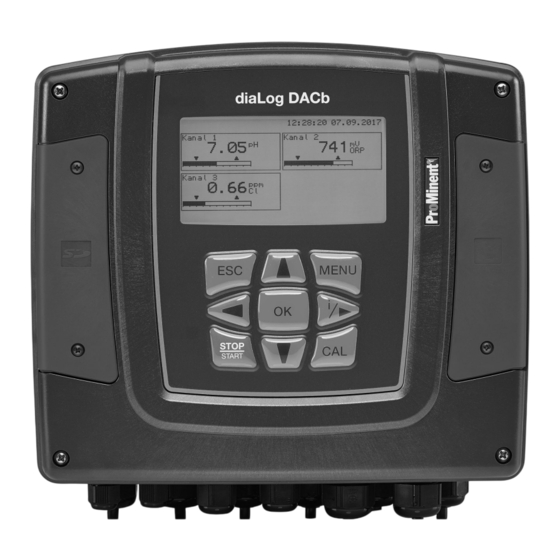
Operating concept Operating concept 1.1 Display and keys A1035 Fig. 1: Operating cross (1) / Active keys are displayed in [black] in the display; inactive keys in [grey]. The following path is shown as an example: Continuous display ➨ ➨ [Calibrate] ➨... - Page 8 Operating concept A2438 Fig. 3: Example of a continuous display when used with one meas‐ uring channel (e.g. pH). 7.55 7.20 0.30 0.50 A2439 Fig. 4: Example of a continuous display when used with two meas‐ uring channels (e.g. pH/chlorine). If you are using 3 measuring channels, select the desired meas‐...
- Page 9 Operating concept Kanal 1 Kanal 2 7.55 0.30 Kanal 3 A2441 Fig. 6: Example of a continuous display when used with 3 meas‐ uring channels (e.g. pH/chlorine/ORP) and the display of all 3 measuring channels Parameters in the adjustable menus Setting of the various parameters in the adjustable menus No time-controlled menu items...
-
Page 10: Functions Of The Keys
Operating concept 1.2 Functions of the keys Tab. 2: Functions of the keys Function Confirmation in the setting menu: Confirms and saves the input values. Confirmation in the continuous display: Displays all information about saved errors and warnings. Back to the continuous display or to the start of the respective setting menu, in which you are currently located. -
Page 11: Changes The Set Operating Language
Operating concept 1.3 Changes the set operating language Simultaneously press the keys ð The controller changes to the menu for setting the oper‐ ating language. Language Language German A1482 Fig. 7: Menu for setting the operating language Now using keys you can set the desired operating language Confirm your selection by pressing the key... -
Page 12: Key Lock
Operating concept Fig. 8: Alarm message, controller stops control 1.5 Key Lock The controller has a key lock. If the key lock is activated, the keys cannot be pressed. The key lock can be activated or deactivated by simultaneously pressing . -
Page 13: Safety And Responsibility
Safety and responsibility Safety and responsibility 2.1 Labelling of Warning Information Introduction These operating instructions provide information on the technical data and functions of the product. These operating instructions pro‐ vide detailed warning information and are provided as clear step- by-step instructions. -
Page 14: General Safety Information
Safety and responsibility Type of information Hints on use and additional information. Source of the information. Additional measures. Denotes hints on use and other useful informa‐ – tion. It does not indicate a hazardous or dam‐ aging situation. 2.2 General safety information WARNING! Danger from hazardous substances! Possible consequence: Fatal or very serious inju‐... -
Page 15: Intended Use
Safety and responsibility 2.3 Intended use INFORMATION: Intended use The device is designed to measure and regulate liquid media. The labelling of the measured variables is indicated in the controller display and is absolutely binding. The protection provided by the device can be impaired if this device is used in a manner not specified in the operating instructions. -
Page 16: User Qualification
Safety and responsibility 2.4 User qualification WARNING! Danger of injury with inadequately qualified per‐ sonnel The operator of the system / equipment is respon‐ sible for ensuring that the qualifications are ful‐ filled. If inadequately qualified personnel work on the unit or loiter in the hazard zone of the unit, this could result in dangers that could cause serious injuries and material damage. -
Page 17: Network Security
Responsibility for network security lies with the operator of the system. ProMinent GmbH in particular is not liable for any con‐ sequences resulting from inadequate security measures and the potential misuse of the user’s authentication features. -
Page 18: Nameplate And Id Code
POWER SUPPLY 100 - 230 VAC 50/60 HZ D - 69123 Heidelberg max. 0,50 A 27 W Tel. 06221/8420 IP66/IP67 Made by ProMinent HEIDELBERG - GERMANY 02/2020 A2940 Fig. 9: Nameplate, CE Device identity code 10 Date of production: Week/year... -
Page 19: Identity Code
Mounting type Mounted on a surface Mounted on a control panel Spare parts assemblies Design with ProMinent logo without ProMinent logo Spare part, processor, complete Spare part, HMI, complete, with PM logo Spare part, HMI, complete, Pool design Operating voltage... -
Page 20: A Complete Measuring Point May Comprise The Following
Nameplate and ID code DAC: DULCOMETER, Multi-parameter Controller diaLog DACb A Modbus RTU, terminal B Profibus DPV1, terminal E LAN with web server, connection via M12 D-coded G PROFINET (2xM12) ® Data logger 0 No data logger 1 With data logger (SD card interface + SD card + card reader) Hardware upgrade 0 none 1 Protective RC circuit (relay) -
Page 21: Storage And Transport
Storage and transport Storage and transport User qualifications, storage and transport: trained personnel Ä Chapter 2.4 ‘User qualification’ on page 16 Ambient conditions for storage and transport: Temperature: - 20 to + 70 °C, Air humidity: < 90 % relative air humidity (non-condensing). Packaging material Dispose of packaging material in an environmen‐... -
Page 22: Functional Description
Functional description Functional description The DULCOMETER Multi-parameter Controller diaLog DACb is a ProMinent controller platform. In the remainder of this document, ‘controller’ is consistently used for the DULCOMETER. the term The controller has been developed for the continuous measure‐ ment and control of liquid analysis parameters. For water treatment processes in environmental technology and industry. - Page 23 Functional description Modbus-RTU. PROFINET ® Visualisation via LAN/Wi-Fi web access.
-
Page 24: Subsequent Extension Of Functions
Subsequent Extension of Functions Subsequent Extension of Functions User qualification, subsequent extension of functions: trained Ä Chapter 2.4 ‘User qualification’ on page 16 user, see Prerequisite: The hardware for channel 3 must be available in the controller. The data logger can be enabled without the need for extension of the hardware. -
Page 25: Functions To Backup The Controller's Setting Data
Functions to Backup the Controller's Setting Data Functions to Backup the Controller's Setting Data User qualification, backup setting data: trained user, see Ä Chapter 2.4 ‘User qualification’ on page 16 The following functions are available: Save unit configuration as a text file. Save unit configuration on an SD card. - Page 26 Functions to Backup the Controller's Setting Data [Upload or save unit configuration] . to select Press to select [Save unit configuration on the SD card] . Press ð The configuration is now saved, which takes approx. 3 minutes. Then press You can now remove the SD card and process the file, if nec‐...
- Page 27 Functions to Backup the Controller's Setting Data Accept with ð The controller then irrevocably accepts the configuration from the SD and deletes the configuration currently on the controller. [Are you sure?] and when you The following prompt appears: press , the configuration is transferred. ð...
-
Page 28: Information On Fieldbus Products
Information on fieldbus products Information on fieldbus products You will find further information on our fieldbus products, including GSD files, operating instructions etc. at: www.prominent.com/fieldbus... -
Page 29: Assembly And Installation
Assembly and installation Assembly and installation 9.1 Requirements User qualification, mechanical installation: trained and qualified personnel Ä Chapter 2.4 ‘User qualifi‐ cation’ on page 16 Ä Chapter 2.4 ‘User qualification’ User qualification, electrical installation: Electrical technician on page 16 WARNING! Installation site and ambient conditions Possible consequence: fatal or very serious inju‐... -
Page 30: Scope Of Delivery
Assembly and installation 9.2 Scope of delivery Tab. 4: The following components are included as standard: Designation Quantity Controller DAC Assembly material, complete, 2P Universal (set) Operating instructions General safety information Surface mount Mounting kit for control panel installation (optional) Cable gland set, DAC, Basic Cable gland set, DAC, functional extension (optional) 9.3 Mechanical installation... - Page 31 Assembly and installation Mounting on a surface Taking surface mount off housing A0490 Fig. 11: Dismantling surface mount Pull the two snap hooks (1) outwards. ð The surface mount snaps slightly downwards. Push the surface mount downwards (2) from the housing and fold (3) it out.
- Page 32 Assembly and installation A0491 Fig. 12: Fitting surface mount Screw the surface mount into position with the washers. A0492 Fig. 13: Mounting surface mount Hook the bottom of the housing (1) into the surface mount. Lightly press the housing at the top (2) against the surface mount.
-
Page 33: Control Panel Installation
Assembly and installation 9.3.2 Control panel installation A1179 Fig. 14: Order number of the DAC control panel mounting kit (optional): 1041095. Control panel 1. Foam rubber caulking strip ∅3 (1x) 2. Galvanised steel retaining brackets (6x) 3. Galvanised PT cutting screws (6x) Punched template Dimensional variations Photocopying the punched template can result in dimensional... - Page 34 Assembly and installation A1170 Fig. 15: The drawing is not true to scale and will not be updated as part of these operating instructions. The drawing is for information only. The circumference of the housing has a 4 mm wide projecting face as a stop for the control panel, with an additional circumferential groove to hold a caulking strip.
-
Page 35: Electrical Installation
Assembly and installation Place the device into the control panel and fix in place at the rear using the retaining brackets and PT cutting screws. ð The device projects approx. 35 mm out of the front of the control panel. 9.4 Electrical installation 9.4.1 Specifications Ä... - Page 36 Assembly and installation Galvanic isolation with the 24 V DC version. Terminals XC1 and XA3 to the mains terminal XP1 are not gal‐ vanically isolated with the 24 V DC version. If there is a potential difference between the supply terminal XP1 and XA3 or XC1 via an external earth loop, then this can lead to a fault in the controller 24 VDC version, supply line...
-
Page 37: Specification Of The Threaded Connectors
Assembly and installation On completion of the electrical installation. On completion of installation, check the PE conductor in accordance with EN 61010 of devices with a protective RC cir‐ cuit. If the mains cable with standard European plug is connected to the device, then the standard European plug must be con‐... - Page 38 Assembly and installation Tab. 5: Set, mounting material, part number 1122825, the “DAC Basic cable gland set” includes the following individual parts Designation Quantity Counter nut, M20x1.5, AF 24, MS nickel-plated Counter nut, M16x1.5, AF 19, MS nickel-plated Counter nut, M12x1.5, AF 15, MS nickel-plated Cable gland, M20x1.5, 9005 V0 Cable gland, M16x1.5, 9005 V0 Cable gland, M20x1.5, 9005 V0...
-
Page 39: Assembly Of The Cable Glands
Assembly and installation 9.4.3 Assembly of the cable glands A3523 Fig. 17: Identification of threaded connectors/number depending on the respective installation The scope of delivery of the device includes a set of cable glands with different sizes of sealing screws, plugs and sealing rings (order number 1122825). -
Page 40: Specification Of The Cables And Terminals
Assembly and installation 9.4.3.1 Installation Ensure that the cables are not under tension. Seals and terminal diagram: Select suitable seals to fit the cable entries of the controller. Close open holes with blanking plugs. This is the only way of ensuring a sufficiently tight seal. - Page 41 Assembly and installation The respective permitted line cross-section can be found in the details below on the respective terminals. 9.4.4.1 Terminal type 1 Tab. 7: Connectible conductor: Component Value Bared length (without cable end sleeve): 10 mm single-wire: min. 0.75 mm², max. 4 mm²; or min.
-
Page 42: Terminal Diagram
Assembly and installation 9.4.4.4 Terminal type 4 (plug-in terminal): Tab. 10: Connectible conductor: Component Value Bared length (without cable end sleeve): 8 mm single-wire: min. 0.2 mm², max. 1.5 mm²; or min. AWG 24, max. AWG 14 fine-wired: min. 0.2 mm², max. 1.5 mm²; or min. - Page 43 Assembly and installation Connection of the chlorine sensor with controllers with two channels Note the following when connecting the sensors when measuring chlorine with pH compensation. The measuring channel must have the measured variable combination VA or AA. Connect the pH sensor to channel 1 and the chlorine sensor to channel 2. VA module: –...
- Page 44 Assembly and installation 9.4.5.2 Terminal layout Klemmenanordnung Ausführung Wandgerät optional: Erweiterungsbaugruppe optional: RC-Schutzbeschaltung Sicherung Basisbaugruppe optional: Kommunikatonsmodul Schirmklemme Anschluss des Koaxialkabels an die Schirmklemme Messeingang Schirmklemme A2464 Fig. 19: Terminal layout 9.4.5.2.1 Terminal diagram for the base module (channel 1/2) with assignment options Base module channel 1 and 2: there can only be one main meas‐...
- Page 45 Assembly and installation Voltage output Digital contact input 1 Digital contact input 2 Digital contact input 3 Digital contact input 4 External, pump 1, raise (potential-free) Mains voltage External, pump 2, lower (potential-free) Standard signal output 1 0/4-20 mA Standard signal output 2 0/4-20 mA Solenoid valve 1 (raise) Mains voltage Solenoid valve 2 (raise)
- Page 46 Assembly and installation 9.4.5.2.2 Terminal diagram for the extension unit (channel 3) with assignment options Normsignal-Ausgang3 0/4-20 mA Digitaler Kontakteingang Digitaler Kontakteingang Digitaler Kontakteingang Temperatur Potenzialausgleich Temperatur Normsignal-Eingang Stromquelle 2-Leiter-Normsignal-Eingang Sensor Externe Pumpe 3, heben (potenzialfrei) Externe Pumpe 4, senken (potenzialfrei) A1174 Fig.
-
Page 47: Mains Voltage
Assembly and installation 9.4.5.2.3 Terminal diagram with protective RC circuit (optional) Protective RC circuit External Mains voltage A1180 Fig. 22: Terminal diagram with protective RC circuit (module D, optional). The RC unit is only permitted in conjunction with the 230 V design. Connectible conductor: Ä... - Page 48 Assembly and installation 9.4.5.2.4 Terminal diagram for the DAC "communication unit" Communication Communication communication Communication Plug M8x1 2 x plugs M8x1 (male) external ext. connector 2x socket M12x1 Female 4-pin external connector (D-coded) Socket M12x1 female 4-pin (D-coded) Switch alternative ext.
- Page 49 2-wire sensor, e.g. for chlorine, bromine or peracetic acid (PES). mA interface: For use with ProMinent 2-wire transmitters and sensors with 2- wire mA interface. Processing of active mA signals, type of connector: current source.
- Page 50 Assembly and installation Ä Chapter 9.4.4.6 ‘Terminal type 5a XE1: see terminal type 5b (single terminal for external conductor as a coaxial cable):’ on page 42 Control line LiYY, 2 x 0.25 mm , Ø 4 mm, part number 725122 mV interface: For the direct connection of pH and ORP sensors Maximum cable length: 10m...
- Page 51 Assembly and installation A module for the direct measurement of two pH values or two redox potentials or pH value and redox potential via a coaxial cable. For the direct connection of pH and ORP sensors. Maximum cable length: 10 m Tab.
- Page 52 Assembly and installation Electrical data Parameter Value Cell constant: 0.005 1/cm ... 15 1/cm Measuring ranges dependent on the sensor type: Specific conductivity: 0.001 µS/cm ... 200 mS/cm Specific electrical resistance: 5 Ωcm ... 1000 MΩcm TOS (total dissolved solids): 0 ...
- Page 53 (PES), and pH and ORP via the pH transmitters, pHV1, part number 809126, and ORP, RHV1, part number 809127. For use with ProMinent 2-wire transmitters and sensors with 2- wire mA interface. Processing of active mA signals (type of connector: current source).
-
Page 54: Switching Of Inductive Loads
Assembly and installation 9.4.6 Switching of inductive loads If you connect an inductive load, i.e. a consumer which uses a coil (e.g. an alpha motorised pump), then you must protect your controller with a protec‐ tive circuit. If in doubt, consult an electrical techni‐ cian for advice. -
Page 55: Connect The Sensors Electrically To The Controller
Assembly and installation A0835 Fig. 30: RC protective circuit for the relay contacts Typical AC current application with an inductive load: 1) Load (e.g. alpha motor-driven pump) 2) RC-protective circuit – Typical RC protective circuit at 230 V AC: [0.22µF/X2] –... - Page 56 Assembly and installation A0948 Fig. 31: Coaxial cable: 1. Protective sleeve 2. Insulation 3. Inner conductor 4. Outer conductor and shielding A0947 Fig. 32: Coaxial cable construction There are two connection types: There is a connection type without potential equalisation (unsym‐ metrical connection type) or a connection type with potential equal‐...
- Page 57 Assembly and installation Please note the following differences: The controller is factory-preset for measurements without potential equalisation (unsymmetrical measurement). To perform a measurement with potential equalisa‐ tion (symmetrical measurement), change the set‐ ting in the [Measurement] menu accordingly. With a symmetrical connection, remove the wire jumper and connect the potential equalisation con‐...
- Page 58 Assembly and installation 9.4.7.2 Connection of amperometric sensors Connect the sensor, as described in the sensor operating instruc‐ tions, to the corresponding terminals of the controller, see Ä Chapter 9.4.5 ‘Terminal diagram’ on page 42 . 9.4.7.3 Connecting the conductive conductivity sensor NOTICE! The sensor must be dry Do not allow the conductivity sensor to come into...
-
Page 59: Priming To Bleeding
Assembly and installation Sensor Connector Cell constant T-correction Max. temp. Measuring Measuring element range κ min. range κ max. Cell constant (°C) (1/cm) (Unit) (Unit) LFTK1FE3m Fixed cable 1.00 Pt1000 0.01 mS/cm 20 mS/cm 0.25 mm m, shielded LFTK1FE5m Fixed cable 1.00 Pt1000 0.01 mS/cm... - Page 60 Assembly and installation Pump 1 Function Decrease value Max. stroke rate Assignment Channel 1 A1068 Fig. 33: [Prime with <OK>] e.g. to bleed a pump [Prime with <OK>] when the pumps are If you select the function connected and operable, the pumps continue to operate at 100% power for as long as you press and hold down the key.
-
Page 61: Commissioning
Commissioning Commissioning Ä Chapter 2.4 ‘User qualifica‐ User qualification: trained user, tion’ on page 16 WARNING! Sensor run in periods This can result in hazardous incorrect metering. Consider the run in period of the sensor when commissioning: – There must be sufficient feed chemical in the sample water for your application (e.g. -
Page 62: Adjusting The Backlight And Contrast Of The Controller Display
Commissioning Wait for the controller's module scan Module scan Base module Softw. version: 01.00.00.00 Expansion module Softw. version: 01.00.00.00 continue with <OK> Auto continue in 10 s A1081 Fig. 34: Module scan ð The controller indicates the controller modules installed and identified. -
Page 63: Calibrating Conductive Conductivity, Sensor Parameter Adjustment
Commissioning Define the following parameters to set up a controller: What type of a process is planned? Which measured variables are there? Is there an in-line, batch or circulation process planned? Should the controller operate as a one-way or two-way control? Which control variables are there? What control parameters are necessary? [HOLD] ? -
Page 64: Setting Measured Variables
Setting measured variables Setting measured variables Ä Chapter 2.4 ‘User qualifica‐ User qualification: trained user tion’ on page 16 [Measurement] ➨ Continuous display ➨ ➨ [Measurement] ➨ [Meas. channel 1] ➨ [Measured variable] Measuring channel settings This descriptions of [Channel 1] apply correspond‐ ingly to the settings in all other measuring chan‐... -
Page 65: Information On The Measured Variables
Setting measured variables Measured variable Meaning Unit [Bromine] [ppm] Bromine [Chlorine] [ppm] Chlorine [Chlorine dioxide] [ppm] Chlorine dioxide [Chlorite] [ppm] Chlorite [Fluoride [mA]] [ppm] Fluoride [Oxygen] [ppm] Oxygen [Ozone] [ppm] Ozone [Peracetic acid] [ppm] Peracetic acid [Hydrogen per.] [PER] [ppm] Hydrogen peroxide with a sensor type [Cond. -
Page 66: Temperature
Setting measured variables Glass break detection [ON] / [OFF] : Switches the pH sensor's glass break detection [ON] [OFF] . The factory setting is [OFF] . The controller displays an [ON] setting. error message if an error is detected in the The internal resistance of the sensor falls significantly in the event of a glass break. -
Page 67: Measured Variable Ph [Ma]
Setting measured variables 11.1.3 Measured variable pH [mA] ‘pH [mA]’ , i.e. pH measurement using a Measured variable pH [mA]: If the measured variable mA signal, is selected, then the possibility of sensor monitoring for cable or glass breaks is no longer available. For a pH measurement using a mA signal, either a DMTa or a pH- V1 measuring transducer is connected to the pH sensor. - Page 68 Setting measured variables Chlorine used in water disinfection comes in various forms, e.g. as liquid sodium hypochlorite, as dissolved calcium hypochlorite, or as chlorine gas. All of these forms can be measured with chlorine sen‐ sors. After adding chlorine to water, the chlorine splits into two frac‐ tions depending on the pH value: 1.
-
Page 69: Measured Variable Fluoride
Setting measured variables Calibration of the chlorine sensor with active pH compensation It is essential that you always calibrate the pH sensor first and only then the chlorine sensor. Whenever the pH sensor is calibrated in future, the chlorine sensor always needs to be calibrated afterwards. -
Page 70: Peracetic Acid
Setting measured variables 11.1.7 Peracetic acid Peracetic acid measured variable Peracetic acid as a measured variable is measured via one of the two mA sensor inputs. Temperature compensation is performed in the sensor. An additionally connected temperature sensor is only used for display and data recording with a data logger and can be issued on a mA-output via field bus or web server. -
Page 71: Conductive [Conductivity]
Setting measured variables [conductivity] 11.1.10 Conductive Temperature compensation and refer‐ ence temperature NOTICE! The sensor must be dry Do not allow the conductivity sensor to come into contact with liquid. Only allow the conductivity sensor to come into contact with liquid once the conductivity sensor has been connected, config‐... - Page 72 Setting measured variables Changing the reference temperature The temperature coefficient must be recalibrated if the reference temperature is changed. Adjustable process for temperature compensation [off] – Temperature compensation is switched off. – It is measured based on the set reference temperature.
-
Page 73: Temperature [Ma] , (As Main Measured Vari- Able)
Setting measured variables [mA] , (as main measured variable) 11.1.11 Temperature ‘Temperature [mA]’ use of a DMTa Measured variable temperature [mA], For the measured variable (as main measured variable): temperature measuring transducer or a Pt100V1 measuring trans‐ ducer is prerequisite. The measuring range is: 0 ... 100 °C. A tem‐ perature sensor cannot be connected directly to the controller. -
Page 74: Calibration
Calibration Calibration Ä Chapter 2.4 ‘User qualifi‐ User qualification: instructed user, cation’ on page 16 Measuring channel settings This descriptions of [Channel 1] apply correspond‐ ingly to the settings in all other measuring chan‐ nels. The procedure for entering the settings for the channel in question is identical, however the parameters to be set may differ. -
Page 75: Calibrating The Ph Sensor
Calibration CAL Cl Last calibration 31.03. 2013 13:11:11 Slope 100 % Zero point 4.00 mA Slope calibration Calibration of zero point A1039 Fig. 38: [Calibration] display with the example of [Chlorine]. Calibration of the measuring channels The calibration processes are identical for all measuring channels. - Page 76 Calibration Selecting the calibration process Select the calibration process prior to initial calibration. This selec‐ tion is saved until you select a new process. 2-point calibration: This is the recommended calibration process because it evaluates the sensor characteristic data: asymmetric potential, slope and response speed. 2 buffer solu‐ tions are needed for 2-point calibration, e.g.
- Page 77 Calibration Buffer temperature dependencies Buffer temperature At temperatures that differ by 25°C in the process, adjust the pH of the buffer solution by entering the reference values printed on the buffer solution bottle into the controller prior to calibration. Buffer temperature dependencies An incorrectly entered buffer temperature can lead to incorrect calibration.
-
Page 78: Selecting The Calibration Process For Ph
Calibration CAL pH Buffer 1: Buffer 2: Calibr.param. for 25 °C Slope % Slope Asymmetry Zero point Accept with <CAL> A1019 Fig. 39: Display of the calibration result CAL pH Sensor quality Asymmetry in mV good acceptable good Slope in mV/pH A1481 Fig. -
Page 79: 2-Point Calibration Of The Ph Sensor (Cal)
Calibration Press CAL pH Calibration process 2 point Buffer detection requirement Buffer manufacturer ProMinent Buffer value 1 pH 7 Buffer value 2 pH 4 Buffer temperature A1025 Fig. 41: Selecting the calibration process ð The menu for selecting the calibration process appears. - Page 80 [Presetting]: select 2 buffers from the 4 possible buffer sets. During calibration, adhere to the selected order e.g. Buffer value 1: pH 7 and Buffer value 2: pH 4: ProMinent (pH 4; 7; 9; 10). (default setting) – ® –...
- Page 81 Calibration CAL pH Last calibration 14:26:07 06/04/2013 Slope 56.64mV/pH Zero point 7,00 pH CAL setup Calibration process 2 point continue with <CAL> A1016 Fig. 43: pH sensor calibration (CAL) Continue with Rinse the sensor thoroughly with water and dry with a cloth (pat dry, don't rub).
- Page 82 Calibration [Buffer detection] e.g. [Manual] : Press and, using the four arrow keys, set the buffer value for buffer 1 to the value of the buffer you are using. Press to confirm input of the value. Remove the sensor from the buffer solution, rinse thoroughly in water and then dry with a cloth (pat dry, don't rub!) Continue with Immerse the sensor in test container 2 which contains the...
-
Page 83: Ph Sensor Calibration (Cal) With An External Sample (1-Point)
Calibration CAL pH Buffer 1: Buffer 2: Calibr.param. for 25 °C Slope % Slope Asymmetry Zero point Accept with <CAL> A1019 Fig. 46: Display of the calibration result Incorrect calibration An error message appears if the result of the calibration lies outside the specified tolerance limits. - Page 84 Calibration NOTICE! Poor sensor operation and fluctuating pH values during the process The calibration method with an external sample has a number of disadvantages compared with the buffer solution calibration method. If the pH value fluctuates significantly during the process, then the pH value may change by a variable amount in the period between sampling, sample measurement and entry of the pH value into the controller.
- Page 85 Calibration CAL pH Last calibration 06/05/2013 14:26:07 Zero point Slope CAL setup Sample (1-point) Calibration process Buffer temperature Manual continue with <CAL> A1023 Fig. 47: pH sensor calibration (CAL) Continue with Take a water sample at the in-line probe housing and, using a suitable method (measuring strips, hand measuring instru‐...
-
Page 86: Calibration Of The Ph Sensor (Cal) By [Data Input]
Calibration [Data Input] 12.1.4 Calibration of the pH Sensor (CAL) by Data input With the [Data input] calibration method, the known data of the sensor is entered in the controller. Cali‐ bration by data input is only as accurate and reli‐ able as the method with which the data was deter‐... - Page 87 Calibration CAL pH Last calibration 06/05/2013 16:47:32 Zero point 7,00 pH Slope 59.16 mV/pH CAL setup Calibration process Data input continue with <CAL> A1024 Fig. 49: pH sensor calibration (CAL) Continue with CAL pH Slope -58.07 mV/pH at 25.0 °C -6.4 mV Asymmetry at 25.0 °C...
-
Page 88: Calibrating The Orp Sensor
Calibration 12.2 Calibrating the ORP Sensor 12.2.1 Selecting the calibration process for ORP Selecting the calibration process There are two calibration processes available for calibrating the controller: 1-point (with buffer solution) Data input Continuous display ➨ CAL ORP Offset 0.0 mV Last calibration 13:26:11 11/04/2013... - Page 89 Calibration ORP sensor calibration The ORP sensor cannot be calibrated. Only an [OFFSET] deviation of magnitude ± 40 mV can be set and thus compensated. If the ORP sensor deviates by more than ± 40 mV from the reference value, then it must be checked in accordance with the requirements of the sensor operating instruc‐...
- Page 90 Calibration CAL ORP Immerse sensor in buffer continue with <CAL> A1028 Fig. 53: 1-point calibration of ORP sensor (CAL) Carry out the instructions and then press [Please wait!] flashes. ð Calibration is running CAL ORP Sensor calibration in buffer Sensor voltage 0.1 mV The stability is: acceptable...
-
Page 91: Calibration Data For Orp Sensor (Cal)
Calibration Press Transfer the result of the calibration into the controller memory by pressing ð The controller operates with the calibration results. 12.2.3 Calibration data for ORP sensor (CAL) Correct sensor operation – Correct measuring and metering is only pos‐ sible if the sensor is working perfectly Refer to the sensor's operating instructions –... -
Page 92: Calibrating The Fluoride Sensor
Calibration Continuous display ➨ CAL ORP 0.0 mV Offset Last calibration 21.05.2013 14:59:56 CAL setup Calibration process Data input offset continue with <CAL> A1032 Fig. 56: Data input, ORP sensor calibration (CAL) Continue with CAL ORP Offset 0.1 mV Accept with <CAL> A1033 Fig. -
Page 93: 2-Point Fluoride Sensor Calibration (Cal)
Calibration Calibration process selection Continuous display ➨ CAL F - 1 ppm = 185.0 mV 16:51:18 11/11/2011 Slope -59.16 mV/dec 11:11:11 100 % 11/11/2011 Single point calibration Two point calibration A1037 Fig. 58: Calibration menu [Fluoride] ð The calibration menu is displayed. Using the arrow keys select the desired menu item. -
Page 94: Two Point Calibration
Calibration Used calibration solution Dispose of the used calibration solution. For more information: see calibration solution safety data sheet. Two test containers with a calibration solution are required for cali‐ bration. The fluoride content of the calibrating solutions should be at least 0.5 ppm F apart from each other. -
Page 95: 1-Point Fluoride Sensor Calibration (Cal)
Calibration CAL F - Two point calibration Immerse sensor in buffer 2 Sensor value 4.88 ppm Sensor voltage 144.2 mV Start with <CAL> A1041 Fig. 61: Fluoride sensor calibration (CAL) Immerse the sensor in test container 2 with calibration solu‐ tion. - Page 96 Calibration Measuring and control behaviour of the controller during calibration During calibration the actuating outputs are deacti‐ vated. Exception: a basic load or a manual control variable has been set. This remains active. The measured value output [standard signal output mA] is frozen, corresponding to its settings in the mA output menu.
-
Page 97: Single Point Calibration
Calibration CAL F - Single point calibration Sensor value 2.50 ppm Change with <OK> continue with <CAL> A1043 Fig. 63: Fluoride sensor calibration (CAL) Then press to change the ppm value or press to con‐ tinue with the calibration Then press Import the result of the calibration into the controller memory by pressing the ð... -
Page 98: Selecting The Calibration Process For Amperometric Measured Variables
Calibration Combined calibration of pH and chlorine It is mandatory that the pH measurement is always calibrated first and then the chlorine measurement. All other calibration of the pH measurement must always be followed by calibration of the chlorine measurement. Otherwise the chlorine measure‐ ment will be inaccurate. -
Page 99: Calibrating The Slope
Calibration 12.4.2 Calibrating the slope CAUTION! Correct sensor operation / Run-in period Damage to the product or its surroundings – Correct measuring and metering is only pos‐ sible if the sensor is working perfectly – Please read the operating manual for the sensor –... - Page 100 Calibration Remove sample water directly at the measuring point and deter‐ [ppm] mine the content of the feed chemical in the sample water in using an appropriate reference method (e.g. DPD, titration etc.). Enter this value into the controller as follows: Press in the continuous display.
-
Page 101: Calibration Of Zero Point
Calibration CAL Cl Calibration successful Slope Zero point continue with <CAL> A1047 Fig. 67: Calibrating the reference value Transfer the result of the calibration into the controller memory by pressing ð The controller displays the continuous display again and operates with the results of the calibration. Incorrect calibration An error message appears if the result of the calibration lies outside the specified... - Page 102 Calibration CAUTION! Correct sensor operation / Run-in period Damage to the product or its surroundings – Correct measuring and metering is only pos‐ sible if the sensor is working perfectly – Please read the operating manual for the sensor – Please also read the operating manuals for the fittings and other components used –...
-
Page 103: Calibrating The Oxygen Sensor
Calibration CAL Cl Zero point Range Accept with <CAL> A1046 Fig. 68: Calibration of zero point Then press CAL Cl Calibration successful Slope Zero point continue with <CAL> A1048 Fig. 69: Calibration of zero point Import the result of the calibration into the controller memory by pressing the ð... -
Page 104: Selection Of The Calibration Process For The Measured Variable O
Calibration If you wish to calibrate a sensor for a special application and/or a special installation location, then you can determine the calibration intervals using the following method. Check the sensor, e.g. one month after its commissioning: Take the sensor out of the medium Clean the outside of the sensor with a damp cloth Then gently dry the sensor diaphragm, e.g. - Page 105 Calibration CAL O2 Last calibration 22.09.2019 14:22:33 Slope 100% (0.80 mA/ppm) Zero point 4.00 mA Calibration of the slope in air Slope calibration by reference measurement in water Calibration of zero point A2851 Fig. 70: Calibration of the slope in air Use OK to select the calibration process: Calibration of the slope in air.
- Page 106 Calibration Wait for the stability of the measured values. The display appears as follows if calibration is successful: CAL O2 Calibration successful Slope Before calibration After calibration Zero point Cancel with <ESC> End with <CAL> A2854 Fig. 73: Successful calibration Use CAL to confirm.
- Page 107 Calibration CAL O2 Last calibration 22.09.2019 14:22:33 Slope 100% (0.80 mA/ppm) Zero point 4.00 mA Calibration of the slope in air Slope calibration using reference measurement in water Calibration of zero point A2856 Fig. 75: Calibrating the slope using a reference measurement in water Use OK to select the calibration process: Calibrate the slope using a reference measurement in water.
-
Page 108: Reference Value
Calibration CAL O2 Determine reference value 07.51 ppm Change with <OK> Continue with <CAL> A2859 Fig. 77: Reference value Use OK and the arrow keys to enter the reference value ð The display appears as follows: CAL O2 Reference value 07.51 ppm Range: 0.00 ... - Page 109 Calibration CAL O2 Calibration not possible Slope Before calibration After calibration Zero point Cancel with <ESC> End with <CAL> A2855 Fig. 80: Unsuccessful calibration Use CAL to end Press ESC to cancel Check the sensor and installation once again and repeat the calibration procedure.
- Page 110 Calibration CAL O2 Zero point 4.05 mA Range 3.95 mA - 4.15 mA Accept with <CAL> A2861 Fig. 82: Zero point Position the sensor in an oxygen-free environment e.g. in water with a slight excess of sodium hydrogen sulfite and wait until the signal is stable Use CAL to accept The display appears as follows if calibration is successful:...
-
Page 111: Measured Value [Ma General] Calibration
Calibration CAL O2 Calibration not possible Slope Before calibration After calibration Zero point Cancel with <ESC> End with <CAL> A2855 Fig. 84: Unsuccessful calibration Use CAL to end Press ESC to cancel Check the sensor and installation once again and repeat the calibration procedure. -
Page 112: Calibrating Conductive Conductivity
Calibration Continue with Then press to adjust the µS/cm value or press to con‐ tinue with calibration. Carry over the result of the calibration into the controller memory by pressing ð The controller shows the continuous display again and operates with the results of the calibration. Incorrect calibration An error message appears if the result of the calibration lies outside the specified... -
Page 113: Calibrating Conductive Conductivity, Cell Constant
Calibration Once you have selected the sensor type, the prompt automatically appears asking whether the sensor parameters (zero point) have to be determined. You can initiate this prompt manually as follows: [Measurement] ➨ Continuous display ➨ Menu ➨ ➨ [Measuring channel X Conductivity] ➨... -
Page 114: Calibrating Conductive Conductivity, Temperature Coefficient
Calibration Apply the result of the calibration into the controller memory by pressing or cancel the process with ESC. ð The controller shows the calibration menu again and operates with the results of the calibration. Incorrect calibration Cell constant, valid range: 0.005 ... 15 1/cm An error message appears if the result of the calibration lies outside the specified... -
Page 115: Calibrating Temperature
Calibration Apply the result of the calibration by pressing ð The controller shows the calibration menu again and operates with the results of the calibration. Incorrect calibration An error message appears if the result of the calibration lies outside the specified tolerance limits. -
Page 116: Setting The [Control]
[Control] Setting the [Control] Setting the Ä Chapter 2.4 ‘User qualifica‐ User qualification: trained user, tion’ on page 16 [Control] ➨ [Control] Continuous display ➨ ➨ Measuring channel settings This descriptions of [Channel 1] apply correspond‐ ingly to the settings in all other measuring chan‐ nels. - Page 117 [Control] Setting the Control Channel 1 parameter set 1 Disturbance variables metering lock Parameter switch A0940 Fig. 85: Continuous display ➨ ➨ [Control] ➨ [Control] pH [mV] 3.1.9 Channel 1 parameter set 1 Type PID control System response normal Setpoint 7.00 pH 1.54 pH Add.
- Page 118 [Control] Setting the Parameter level 1 Function Parameter [Control checkout Checkout time (upper) time] Checkout time ¯ (lower) Control variable threshold [Control variable The adjustable range of the maximum control variable is limit] specified by the device. [Interference variables] Interference vari‐...
- Page 119 [Control] Setting the Effective direction of the [control], You can vary the [control] based on various characteristics. bidirectional or monodirectional [control] operates in two possible direc‐ Function: A bidirectional tions (raise AND lower measured value). Application: Acidic or alkaline waste water is produced alternately in a neutralisation process in an industrial waste water system.
- Page 120 [Control] Setting the Negative Positive Deviation Deviation to the setpoint to the setpoint Upper Setpoint (pH 7.3) Lower Setpoint (pH 6.7) Time Deadzone Positive No control takes‘s place here control output Time Negative control output A1475 Fig. 88: Control type PID bidirectional, with neutral zone...
- Page 121 [Control] Setting the Function: A monodirectional [control] operates in only one of two possible directions (raise OR lower measured value). Application: This affects, for example, a disinfection process, in which chlorine is added to water. The incoming water has a chlorine concentration of 0 ppm and is to be adjusted to 0.5 ppm by the addition of sodium-calcium hypochlorite.
-
Page 122: Control Parameter [Type]
[Control] Setting the Adjustable parameters in the [Control] Make the following selection in the Control menu: menu 13.1 Control parameter [Type] [Type] . You can You set the controller type under the menu option set the [Type] as [1-way] or [2-way] . P, PI, PID controllers are continuous controllers. -
Page 123: Control Parameter [Setpoint]
[Control] Setting the 13.3 Control parameter [Setpoint] The setpoint specifies the target value for control. The controller attempts to maintain the deviation between the setpoint and the ‘0’ as possible. actual value (measured value) as close to 13.4 Control parameter [xp] The xp value is the controller amplification factor. -
Page 124: Control Parameter [Td]
[Control] Setting the 13.6 Control parameter [Td] [Td] is the differentiation time of the D-controller (differen‐ The time tial controller) in seconds. The D-controller reacts to the rate of change of the measured value. 13.7 Control parameter [Add. Basic load] [Add. -
Page 125: Additive And Multiplicative Feed Forward Control
[Control] Setting the 13.10.1 Additive and multiplicative feed forward control Alongside information relating to the actual measured variable, e.g. the chlorine concentration, the interference variable is a further source of information for the controller that makes it easier for the controller to provide stable control during flow processes. -
Page 126: Multiplicative Interference Variable
[Control] Setting the mA input, channel 3: mA interference variable Correction functions included: – pH compensation for chlorine – Additive interference variable for channel 2 – Temperature for pH Applicational example of additive If the addition of a chemical is largely dependent on the flow (pro‐ interference variable portional dependency), then the addition of an additive interference variable proportional to the interference variable (flow), adds a pro‐... -
Page 127: Remote Setpoint Via A 0/4
[Control] Setting the Tab. 22: Interference variable Parameter Default setting Possible values Minimum Maximum Remark value value Function On / Off Switches the interfer‐ ence variable function on or off Signal Frequency DI 2 Frequency DI Specifies the signal source 2 / mA input 2 source from which the interference signal orig‐... -
Page 128: Parameter Switch] Via The Digital Input Or [Timer]
[Control] Setting the Description Factory setting Setting options Area 4…20 mA 0…20mA/4…20mA 4 mA Dependent on the measured Dependent on the measured variable and variable and measuring range measuring range 20 mA Dependent on the measured Dependent on the measured variable and variable and measuring range measuring range Assignment... - Page 129 [Control] Setting the Event controlled Event 3.5.1.1 Function Signal source Digital input 1 Status active opened Switch off delay Assignment Channel 1 A1478 Fig. 93: Event controlled Description Factory setting Adjustment Options Function On/Off Signal source Digital input 2 Digital input 2, digital input 5 Status Active opened Active opened, Active closed...
- Page 130 [Control] Setting the Timer 1 3.5.2.1.1 Function On time 03:00 Off time 03:01 Monday Tuesday Wednesday Thursday Friday Saturday Sunday A1480 Fig. 95: Example: Timer 1...
-
Page 131: Setting The [Limit Values]
[Limit values] Setting the [Limit values] Setting the Ä Chapter 2.4 ‘User quali‐ User qualification: trained user, see fication’ on page 16 [Limit values] ➨ Continuous display ➨ ➨ [Limit values] Measuring channel settings This descriptions of [Channel 1] apply correspond‐ ingly to the settings in all other measuring chan‐... - Page 132 [Limit values] Setting the The controller has the option of defining [Hysteresis limit values] . [Hysteresis] works towards rectifying the limit transgression, i.e. if [Limit 1 upper] of, for example, pH 7.5 has been exceeded by a set hysteresis limit of, for example, pH 0.20, then the criterion for limit transgression is redundant when the value drops below the lower limit of pH 7.3.
-
Page 133: Setting Limit Values Channel 1
[Limit values] Setting the Existing limit value error with alarm You can manually reset an existing limit value error with alarm, for instance to enable a controlled restart of a system to ensure that the limit value situation can be left. [System alerts] menu If an alarm is pending, you can call up the from the continuous display by pressing... -
Page 134: Setting [Limit 2]
[Limit values] Setting the 14.2.2 Setting [Limit 2] [Limit values] ➨ Continuous display ➨ ➨ [Limit values] ➨ [Limit value channel 1] ➨ [Limit value channel 1] ➨ [Limit 2] ➨ [Limit 2] Limit 2 4.1.3.1 High limit Function Value 9.00 pH ON delay OFF delay... -
Page 135: Setting [System Response]
[Limit values] Setting the 14.2.3 Setting [System response] [Limit values] ➨ Continuous display ➨ ➨ [Limit values] ➨ [Limit value channel 1] ➨ [Limit value channel 1] ➨ [System response] ➨ [System response] System response 4.1.5.1 Hysteresis Error messages Message delay Control Stop with fault A1167 Fig. -
Page 136: Digital Input Functions That Can Be Set
Digital input functions that can be set Digital input functions that can be set Digital input Sample water Pause Pause Level in tank Level in Level in fault Hold tank 2 tank 3 1 Basic, module A 2 Basic, module A 3 Basic, module A 4 Basic,... - Page 137 Digital input functions that can be set Level of tank 1 ... 3 If a level switch input is set, then metering of the selected channels is immediately stopped. An alarm is emitted, the display lights up red, an alarm relay is activated, and the alarm relay drops out. ‘active opened’...
-
Page 138: Setting The [Pumps]
[Pumps] Setting the [Pumps] Setting the Ä Chapter 2.4 ‘User quali‐ User qualification: trained user, see fication’ on page 16 [Pumps] ➨ [Pumps] Continuous display ➨ ➨ Measuring channel settings This descriptions of [Channel 1] apply correspond‐ ingly to the settings in all other measuring chan‐ nels. - Page 139 [Pumps] Setting the Maximum pump frequency The pumps are activated according to the control variable up to the pump's respective maximum stroke rate. [Pumps] ➨ [Pumps] ➨ Continuous display ➨ ➨ [Pump 1 channel 1] ➨ Pump 1 Function Decrease value Max.
-
Page 140: Setting The [Relays]
[Relays] Setting the [Relays] Setting the Ä Chapter 2.4 ‘User quali‐ User qualification: trained user, see fication’ on page 16 [Relay] ➨ [Relay] Continuous display ➨ ➨ Measuring channel settings This descriptions of [Channel 1] apply correspond‐ ingly to the settings in all other measuring chan‐ nels. - Page 141 [Relays] Setting the Relay 1 6.1.1 Function Limit 1 Assignment Channel 1 A1070 Fig. 105: Setting Relay 1 Use the key to select the respective menu and con‐ firm with ð The relevant setting menu appears. Tab. 23: Settable parameters of Relay 1 and Relay 2 Parameter Settable function Relay state...
-
Page 142: Function Description [Off]
[Relays] Setting the Changeable scope of the menus The number of adjustable parameters may differ depending on the type and scope of the [Function] selected. The controller provides you with the pos‐ sible adjustable parameters. Use the to select them and confirm with . -
Page 143: Functional Description Of
[Relays] Setting the [Limit value 1/2 (control variable)] 17.1.4 Functional description of [Limit value 1/2 (control variable)] setting, the limit value With the relay reacts to faults and to Pause like an actuator [Cycle] 17.1.5 Function description of [Cycle] setting, the assigned relays are activated cyclically With the independently of the time. -
Page 144: Setting [Digital Inputs]
[digital inputs] Setting [digital inputs] Setting Ä Chapter 2.4 ‘User quali‐ User qualification: trained user, see fication’ on page 16 [Digital inputs] ➨ Continuous display ➨ ➨ [Digital Inputs] Measuring channel settings This descriptions of [Channel 1] apply correspond‐ ingly to the settings in all other measuring chan‐ nels. - Page 145 [digital inputs] Setting Tab. 25: Pause Parameter Adjustment range Function Pause / Off / Pause Hold Status Active open / Active closed Switch off delay 0 ... 1800 s Alarm On/Off Assignment Channel 1, channel 2, channel 1+2 Setting [Digital input 2] Tab.
-
Page 146: Setting The [Ma Outputs]
[mA outputs] Setting the [mA outputs] Setting the Ä Chapter 2.4 ‘User qualifica‐ User qualification: trained user, tion’ on page 16 [mA outputs] ➨ Continuous display ➨ ➨ [mA outputs] [Channel 2] and [Channel 3] Settings for The 2-channel version of the controller has 2 mA outputs, and the 3-channel version has 3 mA outputs. -
Page 147: Setting The [Ma Outputs]
[mA outputs] Setting the [mA outputs] 19.1 Setting the [mA outputs] ➨ Continuous display ➨ ➨ [mA outputs] ➨ [mA output 1] [Function] Set function mA output1 Function Measured value Assignment Channel 1 Output range Current on error Damping high System response with Pause/Pause HOLD Hold Fig. - Page 148 [mA outputs] Setting the [Function ] Adjustable value Adjustable ranges or numerical values [System response with [None] Pause / Pause Hold] The mA output changes with the measured value [Fixed] The mA output is set to a fixed mA output value, which is [Pause Hold] always issued at [Hold]...
-
Page 149: Care And Maintenance
Care and maintenance Care and maintenance Ä Chapter 2.4 ‘User qualifi‐ User qualification: instructed user cation’ on page 16 The device does not require regular care and maintenance. If nec‐ essary, you can wipe down the surface of the device with a damp micro-fibre cloth. -
Page 150: Function: Data Logger
Function: Data logger Function: Data logger Data backup / limited service life There is a possibility of loss of data with all types of data storage. Data loss can be caused by damage to hardware, software, or unauthorised access etc. The operator of the device is responsible for backing up data recorded by the data logger. -
Page 151: Configuring Log Books
Function: Data logger The data log book (optional) The data log book is an optional feature. This option is currently supplied as an industrial 512 MB SD card. The SD card provided has a recording capacity of around 20 years based on a recording interval of 10 seconds. -
Page 152: Using The [Calibration Log Book]
Function: Data logger [calibration log book] 21.2.1 Using the Calibration log book 9.1.1.1 Record Read Clear Fig. 114: Using the [calibration log book] [Record] Use the arrow keys to move the cursor to Press ð The activation symbol (tick) appears in the selection boxes. -
Page 153: Using The [Error Log Book]
Function: Data logger [error log book] 21.2.2 Using the Error log book 9.1.2.1 Record Read Clear Fig. 116: Using the [error log book] [Error log book] Use the arrow keys to select Press [Record] Use the arrow keys to move the cursor to Press ð... -
Page 154: Using The [Data Log Book] (Optional)
Function: Data logger [Data log book] (optional) 21.2.3 Using the The statuses of the digital inputs The [Data log book] saves all measured values, correction variables, control variables and the status of the digital inputs. Data log book 9.1.3.1 Record Read Configure Fig. - Page 155 Function: Data logger [Configuration] of the data log book Configuration 9.1.4.13 Temperature channel 2 Control variable channel 2 Digital inputs One file per day Save interval Fig. 120: [One file per day] checked [One file per day] , then a new input option appears: If you uncheck [File name] .
- Page 156 Function: Data logger The maximum file size is 2 GB The maximum file size is 2 GB. The SD card needs to be the same size. Record 9.1.3.4.1 DATALOG0.CSV Fig. 122: Check the file to write it to an existing file, here [DATALOG0.CSV] If you wish to attached measured data to an existing file, then check this file and the data will be written to this file...
-
Page 157: Diagnostics
[Diagnostics] [Diagnostics] Ä Chapter 2.4 ‘User qualifi‐ User qualification: instructed user cation’ on page 16 [Diagnostics] ➨ Continuous display ➨ ➨ [Diagnostics] It is possible to view log books, perform a simulation of outputs or view device information in this menu. Diagnostics Logbook Simulation... -
Page 158: Reading The [Error Log Book]
[Diagnostics] The following data is stored: Name of the measuring channel Measured variable Time of calibration Zero point Slope Deleting entries in You can also delete entries in the Calibration log book. Deleting [Calibration log book] the entries does not affect the calibrations stored in the controller. [Error Log Book] 22.1.2 Reading the... -
Page 159: Device Info
[Diagnostics] [Simulation] menu item enables you to activate all outputs for test purposes during commissioning. A simulated output remains [Simulation] menu item. It is also pos‐ activated until you quite the [Simulation] sible to prime a peristaltic pump, for example, with mode. - Page 160 [Diagnostics] Error Error message text Cause Remedy pH/ORP sensor is faulty Replace the sensor. The mV input voltage The connected signal Check the origin of the sensor signal. is too high. does not come from a pH Check the raw signal by pressing .
- Page 161 [Diagnostics] Error Error message text Cause Remedy The dosing line is disconnected or the point of injection is blocked. The mA input current is The current is greater Check the origin of the current. too high. than the maximum per‐ Check the raw value in mA in the Informa‐...
- Page 162 [Diagnostics] Error Error message text Cause Remedy The mA input is over‐ The sensor input of Use a multimeter to check the measuring loaded. Channel 1 or 2 is used in signal. If it is an active / driven signal 2-wire connection mode, (voltage is measurable), then the type of but the signal is an active...
-
Page 163: Warning Messages
[Diagnostics] 22.4.2 Warning messages Tab. 31: Warning messages Warning message text Cause Remedy The limit value was The measured value is Check whether the choice of the limit value undershot below the limit value matches the application and adjust if neces‐ sary. -
Page 164: Help Texts
[Diagnostics] Warning message text Cause Remedy The connection to the The connection elements Check the connection, repair it or replace communication have been incorrectly faulty components. module is faulty. installed or are faulty. System warning 1 A system error exists Return the controller to the manufacturer for inspection. -
Page 165: Technical Data And Measuring Ranges
Technical data and measuring ranges Technical data and measuring ranges 23.1 Technical data Tab. 32: Technical data Designation Technical data pH resolution: 0.01 ORP voltage: 1 mV Temperature: 0.1 °C Amperometric analysis (chlorine etc.): 0.001/0.01 ppm, 0.01 vol.%, 0.1 vol.% Precision: 0.3% based on the measuring range end value pH/ORP measuring input:... - Page 166 Technical data and measuring ranges Designation Technical data Maximum operating height: maximum 2000 metres above sea level (m.a.s.l.) Ambient conditions: Use indoors or with protective enclosure Maximum 95% relative air humidity (non-condensing) Ambient temperature: Ambient temperature - 20 … +50 °C Low voltage cables: Copper low voltage cables are needed with a temperature resistance of ≧...
-
Page 167: Measuring Range/Measured Value
Technical data and measuring ranges 23.2 Measuring range/Measured value Tab. 33: Measuring range/Measured value Parameter Measuring range/Measured value Measuring range connector type mV: pH: 0.00 ... 14.00 ORP voltage: -1500 ... +1500 mV Connector type mA (amperometric meas‐ Chlorine ured variables, measuring ranges Chlorine dioxide according to the sensors): Chlorite... -
Page 168: Spare Parts And Accessories
Spare parts and accessories Spare parts and accessories 24.1 Spare parts A1266 Fig. 128: Spare parts Pos. Spare parts Order number Installed by Ä Chapter 2.4 ‘User quali‐ fication’ on page 16 with 230 V device: Micro-fuse 5x20 T 1.6 A 732411 Electrical technician with 24 V device: Micro-fuse 5x20 T 3.15 A... - Page 169 Spare parts and accessories The spare parts units are ordered as identity code features and replaced and configured as described.
-
Page 170: Replacement Of Spare Parts Units
Spare parts and accessories 24.2 Replacement of spare parts units Replacement of the upper part of the User qualification, replacement of the upper part of the housing housing with display Ä Chapter 2.4 ‘User qualifi‐ with display: Electrical technician cation’ on page 16 Adhere to the basic principles of ESD protection whenever working. - Page 171 Spare parts and accessories Place the upper part of the housing back on the controller and secure the 4 screws of the upper part of the housing. Connect the controller to the mains power supply. ð Check all functions of the controller. Replacing the lower part of the housing Back up all parameters...
-
Page 172: Replacing Fan
EN 60900; VDE 0682-201), loosen the electrical plug-in con‐ nector (1). Remove the fan (2). Insert the new fan (2). The ProMinent lettering faces you. ð Make sure that the two fixing hooks slot in properly. Use an appropriate tool to connect the plug-in connector (1). - Page 173 Spare parts and accessories Accessories Order number SN6-socket, retrofit 1036885 Installation kit - DAC - control panel mounting 1041095...
-
Page 174: Disposal Of Used Parts
Refer to the Material Safety Data Sheet for your feed chemical. A current Declaration of Decontamination is available to download on the ProMinent website. Sign indicating EU collection system In accordance with the European Directive 2012/19/EU on waste electrical and electronic equipment, this device features the symbol showing a waste bin with a line through it. -
Page 175: Standards Complied With And Declaration Of Conformity
Standards complied with and Declaration of Conformity Standards complied with and Declaration of Conformity The Declaration of Conformity for the controller is available to download on our homepage. EN 61010-1 Safety requirements for electrical equipment for meas‐ urement, control and laboratory use – Part 1: General requirements EN 61326-1 Electrical equipment for measuring, control and labo‐... -
Page 176: Index
Index Index 1, 2, 3 ... Control outputs ......99 Control panel installation ....33 [Relay timer] . - Page 177 Index Question: How can I bleed the hydraulic installa‐ tion? ........59 Language settings .
- Page 178 Index Question: Where do I find the [Simulation] func‐ Terminal diagrams showing 1:1 assignment ..42 tion? ....... . . 159 Test container 1 with buffer solution .
- Page 180 ProMinent GmbH Im Schuhmachergewann 5 - 11 69123 Heidelberg, Germany Telephone: +49 6221 842-0 Fax: +49 6221 842-419 Email: info@prominent.com Internet: www.prominent.com 983369, 8, en_GB © 2023...
Need help?
Do you have a question about the DULCOMETER diaLog DACb and is the answer not in the manual?
Questions and answers
I need to recalibrate my prominent DiaLog DACb are there written instructions I can use
To recalibrate the ProMinent diaLog DACb, follow these steps:
1. Access the calibration function via the controller menu.
2. Use the arrow keys to navigate through the options.
3. Select the appropriate channel and parameter (e.g., Chlorine).
4. Adjust the slope (e.g., 5.99 mA/ppm) and zero point (e.g., 4.00 mA) as needed.
5. Confirm and save the new calibration values.
Ensure the calibration log book is active to store the changes.
This answer is automatically generated
The dulcometer Dialog- DACb is keep giving signal (Full power) to the dosing pump even if the value cross the set point. it will stop giving signal to the dosing pump only if it reach the upper limit when it starts.