
Related Manuals for Check Point UTM-1 Edge


Summary of Contents for Check Point UTM-1 Edge
- Page 1 Check Point UTM-1 Edge Internet Security Appliance User Guide Version 7.5 Part No: 700800, August 2007...
- Page 2 Check Point, AlertAdvisor, Application Intelligence, Check Point When we speak of free software, we are referring to freedom, not Express, Check Point Express CI, the Check Point logo, Check Point price. Our General Public Licenses are designed to make sure that you...
- Page 3 1. You may copy and distribute verbatim copies of the Program's distributed under the terms of Sections 1 and 2 above on a medium customarily used for software interchange; or, source code as you receive it, in any medium, provided that you conspicuously and appropriately publish on each copy an appropriate b) Accompany it with a written offer, valid for at least copyright notice and disclaimer of warranty;...
- Page 4 Do not use any accessories other than those approved by 10. If you wish to incorporate parts of the Program into other free Check Point. Failure to do so may result in loss of programs whose distribution conditions are different, write to the performance, damage to the product, fire, electric shock or author to ask for permission.
- Page 5 POWER ADAPTER Operate this product only from the type of power source indicated on the product’s marking label. If you are not sure of the type of power supplied to your home, consult your dealer or local power company. Use only the power supply provided with your product. Check whether the device’s set supply voltage is the same as the local supply voltage.
-
Page 7: Table Of Contents
Contents Contents About This Guide ..........................vii Introduction............................1 About Your Check Point UTM-1 Embedded NGX Appliance............1 The UTM-1 Edge X Series and UTM-1 Edge W Series ..............2 Contacting Technical Support......................38 UTM-1 Security...........................39 Introduction to Information Security....................39 The UTM-1 Firewall.........................44 Installing and Setting Up UTM-1 ......................53 Before You Install the UTM-1 Appliance..................53... - Page 8 Configuring High Availability on a Gateway .................246 Sample Implementation on Two Gateways..................250 Using Traffic Shaper.........................255 Overview............................255 Setting Up Traffic Shaper .......................256 Predefined QoS Classes ........................257 Adding and Editing Classes ......................259 Viewing and Deleting Classes......................263 Check Point UTM-1 Edge User Guide...
- Page 9 Contents Restoring Traffic Shaper Defaults....................264 Working with Wireless Networks....................265 Overview............................265 Configuring Wireless Networks......................273 Troubleshooting Wireless Connectivity..................302 Viewing Reports ..........................305 Viewing the Event Log ........................305 Using the Traffic Monitor .......................308 Viewing Computers ........................312 Viewing Connections ........................314 Viewing Wireless Statistics......................316 Viewing ADSL Statistics ........................320 Viewing the Routing Table ......................322 Setting Your Security Policy ......................325 The UTM-1 Firewall Security Policy....................326...
- Page 10 Viewing and Deleting VPN Sites....................523 Enabling/Disabling a VPN Site.......................523 Logging on to a Remote Access VPN Site..................524 Logging off a Remote Access VPN Site ..................527 Installing a Certificate ........................528 Uninstalling a Certificate ........................536 Viewing VPN Tunnels ........................537 Check Point UTM-1 Edge User Guide...
- Page 11 Contents Viewing IKE Traces for VPN Connections ..................540 Viewing VPN Topology .........................541 Managing Users..........................543 Changing Your Login Credentials ....................543 Adding and Editing Users .......................546 Adding Quick Guest HotSpot Users ....................550 Viewing and Deleting Users ......................552 Setting Up Remote VPN Access for Users ..................553 Using RADIUS Authentication.......................553 Configuring RADIUS Attributes ....................560 Using Remote Desktop........................565...
- Page 12 Troubleshooting ..........................653 Connectivity ............................653 Service Center and Upgrades ......................657 Other Problems ..........................658 Specifications .............................659 Technical Specifications .........................659 CE Declaration of Conformity ......................667 Federal Communications Commission Radio Frequency Interference Statement ......674 Glossary of Terms ..........................677 Index..............................683 Check Point UTM-1 Edge User Guide...
-
Page 13: About This Guide
If this icon appears... You can perform the task using these products... All UTM-1 Edge X products, including UTM-1 Edge X Industrial All UTM-1 Edge W products Only UTM-1 products with USB ports Only UTM-1 products with ADSL... -
Page 15: Introduction
This chapter introduces the Check Point UTM-1 appliance and this guide. This chapter includes the following topics: About Your Check Point UTM-1 Embedded NGX Appliance ....1 The UTM-1 Edge X Series and UTM-1 Edge W Series ......2 Contacting Technical Support ..............38 About Your Check Point UTM-1 Embedded NGX... -
Page 16: The Utm-1 Edge X Series And Utm-1 Edge W Series
The UTM-1 Edge X Series and UTM-1 Edge W Series UTM-1 Edge X and UTM-1 Edge W Series Products The UTM-1 Edge X and Edge W product families include various hardware series and models, as described in the following tables. You can upgrade your UTM-1 Edge appliance to a more advanced model within its hardware series, without replacing the hardware. - Page 17 The UTM-1 Edge X Series and UTM-1 Edge W Series Table 2: UTM-1 Edge W Products Hardware Series Models UTM-1 Edge W UTM-1 Edge W8 UTM-1 Edge W16 UTM-1 Edge W32 UTM-1 Edge WU UTM-1 Edge W ADSL UTM-1 Edge W8 ADSL...
- Page 18 The UTM-1 Edge X Series and UTM-1 Edge W Series Concurrent Firewall 8,000 Connections Hardware Features 4-Port LAN Switch 10/100 Mbps WAN Port Ethernet, 10/100 Ethernet, 10/100 ADSL2+ Mbps Mbps ADSL Standards — — ADSL2, ADSL2+, T.1413 G.DMT (G.992.1) G.Lite (G.992.2)
- Page 19 The UTM-1 Edge X Series and UTM-1 Edge W Series Firewall & Security Features Check Point Stateful Inspection Firewall Application Intelligence SmartDefense™ (IPS) Network Address Translation (NAT) Four Preset Security Policies Anti-spoofing Voice over IP (H.323) Support Unlimited INSPECT Policy...
- Page 20 The UTM-1 Edge X Series and UTM-1 Edge W Series Secure HotSpot (Guest Access) Remote Access Users 1/10/15/25 VPN Server with SecuRemote, L2TP OfficeMode and RADIUS Support Site-to-Site VPN Gateway Route-based VPN Backup VPN Gateways Remote Access VPN SecuRemote (Included)
- Page 21 The UTM-1 Edge X Series and UTM-1 Edge W Series Spanning Tree Protocol (STP) Traffic Shaper (QoS) Traffic Monitoring Dead Internet Connection Detection (DCD) WAN Load Balancing Backup Internet Connection DHCP Server, Client, and Relay MAC Cloning Network Address Translation (NAT) Rules...
- Page 22 The UTM-1 Edge X Series and UTM-1 Edge W Series Management Central Management Check Point SmartCenter, Check Point SmartLSM, Check Point SmartUpdate, CheckPoint Provider-1, SofaWare SMP Local Management HTTP / HTTPS / SSH / SNMP / Serial CLI Remote Desktop...
- Page 23 The UTM-1 Edge X Series and UTM-1 Edge W Series UTM-1 Edge W Series Features Table 4: UTM-1 Edge W Series Features Feature UTM-1 Edge W UTM-1 Edge W ADSL SKU Prefix CPUTM-EDGE-WG CPUTM-EDGE-WG-n- ADSL Concurrent Users 8 / 16 / 32 / Unrestricted...
- Page 24 The UTM-1 Edge X Series and UTM-1 Edge W Series Dialup Backup (Req. Ext. Modem) Console Port (Serial) Print Server USB 2.0 Ports Firewall & Security Features Check Point Stateful Inspection Firewall Application Intelligence (IPS) Intrusion Detection and Prevention using Check Point...
- Page 25 The UTM-1 Edge X Series and UTM-1 Edge W Series Port-based, Tag-based, and 32 (WU) / 10 (Other Models) Other VLAN Port-based Security (802.1x) Web Rules Secure HotSpot (Guest Access) Remote Access Users 1/10/15/25 VPN Server with OfficeMode and SecuRemote, L2TP...
- Page 26 The UTM-1 Edge X Series and UTM-1 Edge W Series Networking Supported Internet Connection Static IP, DHCP, PPPoE, Static IP, DHCP, PPPoE, Methods PPTP, Telstra, Cable, Dialup PPTP, Telstra, Cable, Dialup, EoA, PPPoA Transparent Bridge Mode Spanning Tree Protocol (STP)
- Page 27 The UTM-1 Edge X Series and UTM-1 Edge W Series Dynamic Routing Wireless Wireless Protocols 802.11b (11 Mbps), 802.11g (54 Mbps), Super G* (108 Mbps) Wireless Security VPN over Wireless, WEP, WPA2 (802.11i), WPA- Personal, WPA-Enterprise, 802.1x Wireless QoS (WMM)
- Page 28 The UTM-1 Edge X Series and UTM-1 Edge W Series NTP Automatic Time Setting TFTP Rapid Deployment Hardware Specifications Power 100/110/120/210/220/230VAC (Linear Power Adapter) or 100~240VAC (Switched Power Adapter) Mounting Options Desktop, Wall, or Rack Mounting** Warranty 1 Year Hardware * Super G and XR mode are only available with select wireless network adapters.
- Page 29 The UTM-1 Edge X Series and UTM-1 Edge W Series Software Requirements One of the following browsers: • Microsoft Internet Explorer 6.0 or higher • Netscape Navigator 6.0 and higher • Mozilla Firefox Note: For proper operation of the UTM-1 Portal, disable any pop-up blockers for http://my.firewall.
- Page 30 All physical connections (network and power) are made via the rear panel of your UTM-1 appliance. Figure 1: UTM-1 Edge X Appliance Rear Panel The following table lists the UTM-1 Edge X appliance's rear panel elements. Table 5: UTM-1 Edge X Appliance Rear Panel Elements Label Description A power jack used for supplying power to the unit.
- Page 31 The UTM-1 Edge X Series and UTM-1 Edge W Series Label Description RESET A button used for rebooting the UTM-1 appliance or resetting the UTM-1 appliance to its factory defaults. You need to use a pointed object to press this button.
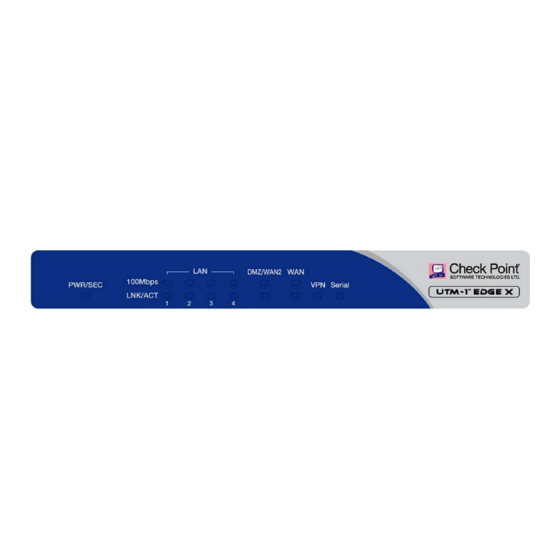
- Page 32 The UTM-1 Edge X Series and UTM-1 Edge W Series Front Panel The UTM-1 Edge X appliance includes several status LEDs that enable you to monitor the appliance’s operation. Figure 2: UTM-1 Edge X Appliance Front Panel For an explanation of the UTM-1 Edge X appliance’s status LEDs, see the table below.
- Page 33 Especially designed for industrial use, the UTM-1 Edge X Industrial appliance brings the proven security benefits of the UTM-1 Edge X appliance to the production floor, protecting machines against all threats.
- Page 34 • A dialup modem with a USB or serial interface Rear Panel Figure 3: UTM-1 Edge X Industrial Appliance Rear Panel The following table lists the UTM-1 Edge X Industrial appliance's rear panel elements. Check Point UTM-1 Edge User Guide...
- Page 35 UTM-1 Edge X Industrial Appliance on a DIN Rail on page 74. Front Panel The UTM-1 Edge X Industrial appliance's front panel includes ports for network and power connections, as well as status LEDs that enable you to monitor the appliance’s operation.
- Page 36 UTM-1 CLI (Command Line Interface), or for connecting an external dialup modem. Two USB 2.0 ports used for connecting USB-based printers or modems Status For an explanation of the UTM-1 Edge X Industrial appliance’s status LEDs, see LEDs the following table. RESET A button used for rebooting the UTM-1 appliance or resetting the UTM-1 appliance to its factory defaults.
- Page 37 The UTM-1 Edge X Series and UTM-1 Edge W Series Table 9: UTM-1 Edge X Appliance Status LEDs State Explanation No VPN activity Flashing (Green) VPN activity On (Green) VPN tunnels established, no activity Serial No Serial port activity Flashing (Green)
- Page 38 The UTM-1 Edge X Series and UTM-1 Edge W Series Getting to Know Your UTM-1 Edge X ADSL Appliance Package Contents The UTM-1 Edge X ADSL package includes the following: • UTM-1 Edge X ADSL Internet Security Appliance • Power supply •...
- Page 39 All physical connections (network and power) are made via the rear panel of your UTM-1 appliance. Figure 5: UTM-1 Edge X ADSL Appliance Rear Panel The following table lists the UTM-1 Edge X ADSL appliance's rear panel elements. Table 10: UTM-1 Edge X ADSL Appliance Rear Panel Elements Label Description A power jack used for supplying power to the unit.
- Page 40 The UTM-1 Edge X Series and UTM-1 Edge W Series Label Description Serial An RJ-45 serial (RS-232) port used for connecting computers in order to access the UTM-1 CLI (Command Line Interface), or for connecting an external dialup modem. An RJ-45 to DB9 converter is supplied for your convenience.
- Page 41 The UTM-1 Edge X Series and UTM-1 Edge W Series Front Panel The UTM-1 Edge X ADSL appliance includes several status LEDs that enable you to monitor the appliance’s operation. Figure 6: UTM-1 Edge X ADSL Appliance Front Panel For an explanation of the UTM-1 Edge X ADSL appliance’s status LEDs, see the following table.
- Page 42 The UTM-1 Edge X Series and UTM-1 Edge W Series State Explanation LNK/ACT Flashing Data is being transmitted/received Link Off Link is down Link Flashing Establishing ADSL connection Link On ADSL connection established DAT Off ADSL line is idle DAT Flashing...
- Page 43 The UTM-1 Edge X Series and UTM-1 Edge W Series Getting to Know Your UTM-1 Edge W Appliance Package Contents The UTM-1 Edge W package includes the following: • UTM-1 Edge W Internet Security Appliance • Power supply • CAT5 Straight-through Ethernet cable •...
- Page 44 All physical connections (network and power) are made via the rear panel of your UTM-1 appliance. Figure 7: UTM-1 Edge W SBXW-166LHGE-5 Appliance Rear Panel Figure 8: UTM-1 Edge W SBXW-166LHGE-6 Appliance Rear Panel The following table lists the UTM-1 Edge W appliance's rear panel elements. Check Point UTM-1 Edge User Guide...
- Page 45 The UTM-1 Edge X Series and UTM-1 Edge W Series Table 12: UTM-1 Edge W Appliance Rear Panel Elements Label Description A power jack used for supplying power to the unit. Connect the supplied power supply to this jack. RESET A button used for rebooting the UTM-1 appliance or resetting the UTM-1 appliance to its factory defaults.
- Page 46 Antenna connectors, used to connect the supplied wireless antennas . ANT 2 Front Panel The UTM-1 Edge W appliance includes several status LEDs that enable you to monitor the appliance’s operation. Figure 9: UTM-1 Edge W Appliance Front Panel For an explanation of the UTM-1 Edge W appliance’s status LEDs, see the table below.
- Page 47 The UTM-1 Edge X Series and UTM-1 Edge W Series State Explanation On (Green) Normal operation On (Red) Error Flashing (Orange) Software update in progress LINK/ACT Off, 100 Off LAN 1-4/ Link is down WAN/ DMZ/WAN2 LINK/ACT On, 100 Off...
- Page 48 The UTM-1 Edge X Series and UTM-1 Edge W Series Getting to Know Your UTM-1 Edge W ADSL Appliance Package Contents The UTM-1 Edge W ADSL package includes the following: • UTM-1 Edge W ADSL Internet Security Appliance • Power supply •...
- Page 49 All physical connections (network and power) are made via the rear panel of your UTM-1 appliance. Figure 10: UTM-1 Edge W ADSL Appliance Rear Panel The following table lists the UTM-1 Edge W ADSL appliance's rear panel elements. Table 14: UTM-1 Edge W ADSL Appliance Rear Panel Elements Label Description A power jack used for supplying power to the unit.
- Page 50 The UTM-1 Edge X Series and UTM-1 Edge W Series Label Description Two USB 2.0 ports used for connecting USB-based printers or modems Serial An RJ-45 serial (RS-232) port used for connecting computers in order to access the UTM-1 CLI (Command Line Interface), or for connecting an external dialup modem.
- Page 51 The UTM-1 Edge X Series and UTM-1 Edge W Series Front Panel The UTM-1 Edge W ADSL appliance includes several status LEDs that enable you to monitor the appliance’s operation. Figure 11: UTM-1 Edge W ADSL Appliance Front Panel For an explanation of the UTM-1 Edge W ADSL appliance’s status LEDs, see the following table.
-
Page 52: Contacting Technical Support
Flashing (Green) WLAN activity Contacting Technical Support If there is a problem with your UTM-1 appliance, see http://www.checkpoint.com/techsupport/. You can also download the latest version of this guide from the Check Point SecureKnowledge Web site. Check Point UTM-1 Edge User Guide... -
Page 53: Utm-1 Security
Introduction to Information Security Chapter 2 UTM-1 Security This chapter explains the basic security concepts on which UTM-1 security is based. This chapter includes the following topics: Introduction to Information Security ............39 The UTM-1 Firewall ..................44 Introduction to Information Security Network security is but a small part of information security, which in turn is only a fraction of general security. - Page 54 Local laws may also enforce the security requirements made in the Health Insurance Portability and Accountability Act of 1996 (HIPAA). • To comply with another organization's security requirements Some organizations require their business partners to comply with international standards of security. Check Point UTM-1 Edge User Guide...
- Page 55 Introduction to Information Security Information Security Challenges The challenges of information security can be divided into the following areas: • Confidentiality and Privacy - Ensuring that only the intended recipients can read certain information • Authentication - Ensuring that information is actually sent by the stated sender •...
- Page 56 For example: • Nowadays, most of an organization's communication and business transactions are conducted via email (regardless of the organization's size). • Online stores process orders and supply products over the Internet. Check Point UTM-1 Edge User Guide...
- Page 57 Introduction to Information Security • Emerging technology today allows an organization's branch offices to communicate, share data, and even establish low-cost VoIP (Voice over IP) communications, rather then using the traditional phone system. • Applications are hosted on a main computer rather than on personal workstations.
-
Page 58: The Utm-1 Firewall
For example, a previously authenticated user would be allowed access through the firewall for authorized services only. • Information manipulation - The ability to perform logical or arithmetic functions on data in any part of the packet. For example, the ability to encrypt packets. Check Point UTM-1 Edge User Guide... - Page 59 Older firewall technologies, such as packet filtering and application-layer gateways, are still in use in some environments. It is important to familiarize yourself with these technologies, so as to better understand the benefits and advantages of the Check Point Stateful Inspection firewall technology.
- Page 60 Poor scalability (breaks the client/server model) Check Point Stateful Inspection Technology Invented by Check Point, Stateful Inspection is the industry standard for network security solutions. A powerful inspection module examines every packet, ensuring that packets do not enter a network unless they comply with the network's security policy.
- Page 61 The UTM-1 Firewall Packet State and Context Information To track and act on both state and context information for an application is to treat that traffic statefully. The following are examples of state and context-related information that a firewall should track and analyze: •...
- Page 62 FTP client with data port server information P > 1023 Data Client initiates data D > FTP server connection to client 1023 server on port P Data Server FTP client acknowledges server data connection Check Point UTM-1 Edge User Guide...
- Page 63 The UTM-1 Firewall The following diagram demonstrates the establishment of a Passive FTP connection through a firewall protecting the FTP server. Figure 12: Establishment of Passive FTP Connection From the FTP server's perspective, the following connections are established: • Command connection from the client on a port greater than 1023, to the server on port 21 •...
- Page 64 HTTP proxy for HTTP session, and so on), and since the application-layer gateway can only support a certain number of proxies, its usefulness and scalability is limited. Finally, this approach exposes the operating system to external threats. Check Point UTM-1 Edge User Guide...
- Page 65 The UTM-1 Firewall Firewall Technology Action Stateful Inspection A Stateful Inspection firewall examines the FTP application-layer Firewall data in an FTP session. When the client initiates a command session, the firewall extracts the port number from the request. The firewall then records both the client and server's IP addresses and port numbers in an FTP-data pending request list.
-
Page 67: Installing And Setting Up Utm-1
This chapter includes the following topics: Before You Install the UTM-1 Appliance ..........53 UTM-1 Edge X and UTM-1 Edge W Installation ........67 Cascading Your Appliance.................82 Connecting the Appliance to Network Printers ..........83 Setting Up the UTM-1 Appliance ..............83... - Page 68 Before You Install the UTM-1 Appliance Windows Vista Checking the TCP/IP Installation Click Start > Control Panel. The Control Panel window appears. Under Network and Internet, click View network status and tasks. Check Point UTM-1 Edge User Guide...
- Page 69 Before You Install the UTM-1 Appliance The Network Sharing Center screen appears. In the Tasks pane, click Manage network connections. Chapter 3: Installing and Setting Up UTM-1...
- Page 70 Before You Install the UTM-1 Appliance The Network Connections screen appears. Double-click the Local Area Connection icon. The Local Area Connection Status window opens. Click Properties. Check Point UTM-1 Edge User Guide...
- Page 71 Before You Install the UTM-1 Appliance The Local Area Connection Properties window opens. Check if Internet Protocol Version 4 (TCP/IPv4) appears in the list box and if it is properly configured with the Ethernet card installed on your computer. TCP/IP Settings In the Local Area Connection Properties window, double-click the Internet Protocol Version 4 (TCP/IPv4) component, or select it and click Properties.
- Page 72 Click OK to save the new settings. Your computer is now ready to access your UTM-1 appliance. Windows 2000/XP Checking the TCP/IP Installation Click Start > Settings > Control Panel. The Control Panel window appears. Check Point UTM-1 Edge User Guide...
- Page 73 Before You Install the UTM-1 Appliance Double-click the Network and Dial-up Connections icon. The Network and Dial-up Connections window appears. icon and select Properties from the pop-up menu that Right-click the opens. Chapter 3: Installing and Setting Up UTM-1...
- Page 74 In the above window, check if TCP/IP appears in the components list and if it is properly configured with the Ethernet card installed on your computer. If TCP/IP does not appear in the Components list, you must install it as described in the next section. Check Point UTM-1 Edge User Guide...
- Page 75 Before You Install the UTM-1 Appliance Installing TCP/IP Protocol In the Local Area Connection Properties window click Install. The Select Network Component Type window appears. Select Protocol and click Add. The Select Network Protocol window appears. Choose Internet Protocol (TCP/IP) and click OK. TCP/IP protocol is installed on your computer.
- Page 76 (Note that 192.168.10 is the default value, and it may vary if you changed it in the Network > My Network page.) Click the Obtain DNS server address automatically radio button. Click OK to save the new settings. Your computer is now ready to access your UTM-1 appliance. Check Point UTM-1 Edge User Guide...
- Page 77 Before You Install the UTM-1 Appliance Mac OS Use the following procedure for setting up the TCP/IP Protocol. Choose Apple Menus -> Control Panels -> TCP/IP. The TCP/IP window appears. Click the Connect via drop-down list, and select Ethernet. Click the Configure drop-down list, and select Using DHCP Server. Close the window and save the setup.
- Page 78 Before You Install the UTM-1 Appliance Mac OS-X Use the following procedure for setting up the TCP/IP Protocol. Choose Apple -> System Preferences. The System Preferences window appears. Click Network. The Network window appears. Check Point UTM-1 Edge User Guide...
- Page 79 Before You Install the UTM-1 Appliance Click Configure. Chapter 3: Installing and Setting Up UTM-1...
- Page 80 Before You Install the UTM-1 Appliance TCP/IP configuration fields appear. Click the Configure IPv4 drop-down list, and select Using DHCP. Click Apply Now. Check Point UTM-1 Edge User Guide...
-
Page 81: Utm-1 Edge X And Utm-1 Edge W Installation
UTM-1 Edge X and UTM-1 Edge W Installation UTM-1 Edge X and UTM-1 Edge W Installation Installing UTM-1 Edge X and Edge W To install the UTM-1 appliance Verify that you have the correct cable type. For information, see Network Requirements on page 30. - Page 82 UTM-1 Edge X and UTM-1 Edge W Installation Figure 13: Typical Connection Diagram Installing UTM-1 Edge X Industrial To install the UTM-1 appliance Verify that you have the correct cable type. For information, see Network Requirements on page 30. Connect the LAN cable: Connect one end of the Ethernet cable to one of the appliance's LAN ports.
- Page 83 UTM-1 Edge X and UTM-1 Edge W Installation Do one of the following: • To use 24V DC input power, see Connecting a 24V Power Supply on page You will need a 24V DC industrial power supply. • To use 5V DC input power: 1) Connect the 5V power supply provided with the UTM-1 appliance to the 5V power socket at the back of the unit.
- Page 84 UTM-1 Edge X and UTM-1 Edge W Installation Connecting a 24V Power Supply Warning: Always turn off the 24V DC industrial power supply before wiring, installing, or removing the UTM-1 Edge X Industrial appliance. Failure to do so may cause faulty operation. To connect 24V power supply Turn off the 24V DC industrial power supply.
- Page 85 UTM-1 Edge X and UTM-1 Edge W Installation Insert the Black (-) wire in the right terminal. Insert the Brown (+) wire in the left terminal. Firmly tighten the plug's screw. Warning: Failure to tighten the DC connector plug's screw sufficiently may result in a fire.
- Page 86 Turn on the 24V DC industrial power supply. Check that the appliance is operating correctly. Installing UTM-1 Edge X ADSL and Edge W ADSL To install the UTM-1 appliance Verify that you have the correct cable type. For information, see Network Requirements on page 30.
- Page 87 UTM-1 Edge X and UTM-1 Edge W Installation Connect the power supply to the appliance's power socket, labeled PWR. Plug the power supply into the wall electrical outlet. Warning: The UTM-1 appliance power supply is compatible with either 100, 120 or 230 VAC input power.
- Page 88 Mounting the UTM-1 Edge X Industrial Appliance on a DIN Rail For your convenience, the UTM-1 Edge X Industrial appliance includes a DIN rail mounting bracket, which enables you to mount your appliance in any DIN Rail cabinet or enclosure:...
- Page 89 UTM-1 Edge X and UTM-1 Edge W Installation You can mount the appliance facing up, down, or outwards. The appliance includes slots and holes on both side panels and on its rear panel, for this purpose: To mount the UTM-1 appliance on a DIN rail Decide on the mounting orientation.
- Page 90 UTM-1 Edge X and UTM-1 Edge W Installation Note: To locate the appliance's right and left side panels, hold the appliance with its front panel facing away from you. The side panel on your left is the appliance left side panel, and the side panel on your right is the appliance's right side panel.
- Page 91 Preparing the Edge Appliance for a Wireless Connection To prepare the UTM-1 Edge W appliance for a wireless connection Connect the antennas that came with your UTM-1 Edge W appliance to the ANT1 and ANT2 antenna connectors in the appliance's rear panel.
- Page 92 UTM-1 Edge X and UTM-1 Edge W Installation Wall Mounting the UTM-1 Edge Appliance For your convenience, the UTM-1 Edge appliance includes a wall mounting kit, which consists of two plastic conical anchors and two cross-head screws. To mount the UTM-1 appliance Edge on the wall Decide where you want to mount your UTM-1 Edge appliance.
- Page 93 If you want to mount the appliance on a plaster wall, you must use anchors that are suitable for plaster walls. Insert the two screws you received with your UTM-1 Edge appliance into the plastic conical anchors, and turn them until they protrude approximately 5 mm from the wall.
- Page 94 Securing the UTM-1 Edge Appliance against Theft The UTM-1 Edge appliance features a security slot to the rear of the right panel, which enables you to secure your appliance against theft, using an anti-theft security device. Note: Anti-theft security devices are available at most computer hardware stores.
- Page 95 Slide the anti-theft device's bolt to the Open position. Insert the bolt into the UTM-1 Edge appliance's security slot, then slide the bolt to the Closed position until the bolts holes are aligned.
-
Page 96: Cascading Your Appliance
The UTM-1 appliance automatically detects cable types, so you can use either a straight-through or crossed Ethernet cable. Connect the other end of the cable to an Ethernet hub or switch. Connect additional computers and network devices to the hub or switch as desired. Check Point UTM-1 Edge User Guide... -
Page 97: Connecting The Appliance To Network Printers
Connecting the Appliance to Network Printers Connecting the Appliance to Network Printers In models with a print server, you can connect network printers. To connect network printers Connect one end of a USB cable to one of the appliance's USB ports. If needed, you can use the provided USB extension cord. - Page 98 Connecting to a Service Center on page 446 You can access the Setup Wizard at any time after initial setup, using the procedure below. To access the Setup Wizard Click Setup in the main menu, and click the Firmware tab. Check Point UTM-1 Edge User Guide...
- Page 99 Setting Up the UTM-1 Appliance The Firmware page appears. Click UTM-1 Setup Wizard. The UTM-1 Setup Wizard opens with the Welcome page displayed. Chapter 3: Installing and Setting Up UTM-1...
-
Page 101: Getting Started
Initial Login to the UTM-1 Portal Chapter 4 Getting Started This chapter contains all the information you need in order to get started using your UTM- 1 appliance. This chapter includes the following topics: Initial Login to the UTM-1 Portal ..............87 Logging on to the UTM-1 Portal..............89 Accessing the UTM-1 Portal Remotely Using HTTPS ......91 Using the UTM-1 Portal................92... -
Page 102: Appliance
Internet Wizard, see Using the Internet Wizard on page 98. After you have completed the Internet Wizard, the Setup Wizard continues to guide you through appliance setup. For more information, see Setting Up the UTM-1 Appliance on page 83. Check Point UTM-1 Edge User Guide... -
Page 103: Logging On To The Utm-1 Portal
Logging on to the UTM-1 Portal • Internet Setup Internet Setup offers advanced setup options, such as configuring two Internet connections. To use Internet Setup, click Cancel and refer to Using Internet Setup on page 113. Logging on to the UTM-1 Portal Note: By default, HTTP and HTTPS access to the UTM-1 Portal is not allowed from the WLAN, unless you do one of the following: •... - Page 104 Logging on to the UTM-1 Portal The login page appears. Type your username and password. Click OK. The Welcome page appears. Check Point UTM-1 Edge User Guide...
-
Page 105: Accessing The Utm-1 Portal Remotely Using Https
Accessing the UTM-1 Portal Remotely Using HTTPS Accessing the UTM-1 Portal Remotely Using HTTPS You can access the UTM-1 Portal remotely (from the Internet) through HTTPS. HTTPS is a protocol for accessing a secure Web server. It is used to transfer confidential user information. -
Page 106: Using The Utm-1 Portal
Used for navigating between the various topics (such as Reports, Security, and Setup). Main frame Displays information and controls related to the selected topic. The main frame may also contain tabs that allow you to view different pages related to the selected topic. Check Point UTM-1 Edge User Guide... - Page 107 Using the UTM-1 Portal Element Description Status bar Shows your Internet connection and managed services status. Figure 19: UTM-1 Portal Chapter 4: Getting Started...
- Page 108 UTM-1 appliance. Users Allows you to manage UTM-1 appliance users. Allows you to manage, configure, and log on to VPN sites. Help Provides context-sensitive help. Logout Allows you to log off of the UTM-1 Portal. Check Point UTM-1 Edge User Guide...
- Page 109 Using the UTM-1 Portal Main Frame The main frame displays the relevant data and controls pertaining to the menu and tab you select. These elements sometimes differ depending on what model you are using. The differences are described throughout this guide. Status Bar The status bar is located at the bottom of each page.
-
Page 110: Logging Off
If you are connected through HTTP, click Logout in the main menu. The Login page appears. • If you are connected through HTTPS, the Logout option does not appear in the main menu. Close the browser window. Check Point UTM-1 Edge User Guide... -
Page 111: Configuring The Internet Connection
Overview Chapter 5 Configuring the Internet Connection This chapter describes how to configure and work with a UTM-1 Internet connection. This chapter includes the following topics: Overview ....................97 Using the Internet Wizard ................98 Using Internet Setup .................113 Setting Up Dialup Modems ..............145 Viewing Internet Connection Information..........152 Enabling/Disabling the Internet Connection..........154 Using Quick Internet Connection/Disconnection ........155... -
Page 112: Using The Internet Wizard
Note: The first time you log on to the UTM-1 Portal, the Internet Wizard starts automatically as part of the Setup Wizard. In this case, you should skip to step 3 in the following procedure. Check Point UTM-1 Edge User Guide... - Page 113 Using the Internet Wizard Configuring an Ethernet-Based Connection on Non- ADSL Models To configure an Ethernet-Based connection Click Network in the main menu, and click the Internet tab. The Internet page appears. Click Internet Wizard. The Internet Wizard opens with the Welcome page displayed. Click Next.
- Page 114 If you chose Cable Modem, continue at Using a Cable Modem Connection on page 104. If you chose Static IP, continue at Using a Static IP Connection on page 105. If you chose DHCP, continue at Using a DHCP Connection on page 106. Check Point UTM-1 Edge User Guide...
- Page 115 Using the Internet Wizard Using a PPPoE Connection If you selected the PPPoE (PPP over Ethernet) connection method, the PPP Configuration dialog box appears. Complete the fields using the information in the following table. Click Next. Chapter 5: Configuring the Internet Connection...
- Page 116 Using the Internet Wizard The Confirmation screen appears. Click Next. The system attempts to connect to the Internet via the specified connection. The Connecting… screen appears. At the end of the connection process the Connected screen appears. Check Point UTM-1 Edge User Guide...
- Page 117 Using the Internet Wizard Click Finish. Table 23: PPPoE Connection Fields In this field… Do this… Username Type your user name. Password Type your password. Confirm password Type your password again. Service Type your service name. This field can be left blank. Using a PPTP Connection If you selected the PPTP connection method, the PPP Configuration dialog box appears.
- Page 118 No further settings are required for a cable modem connection. The Confirmation screen appears. Click Next. The system attempts to connect to the Internet via the specified connection. The Connecting… screen appears. At the end of the connection process the Connected screen appears. Click Finish. Check Point UTM-1 Edge User Guide...
- Page 119 Using the Internet Wizard Using a Static IP Connection If you selected the Static IP connection method, the Static IP Configuration dialog box appears. Complete the fields using the information in the following table. Click Next. The Confirmation screen appears. Click Next.
- Page 120 No further settings are required for a DHCP (Dynamic IP) connection. The Confirmation screen appears. Click Next. The system attempts to connect to the Internet via the specified connection. The Connecting… screen appears. At the end of the connection process the Connected screen appears. Click Finish. Check Point UTM-1 Edge User Guide...
- Page 121 Using the Internet Wizard Configuring an Ethernet-Based Connection on ADSL Models Note: In ADSL models, an Ethernet-based connection is made on the DMZ/WAN2 port. To configure an Ethernet-based connection Click Network in the main menu, and click the Internet tab. The Internet page appears.
- Page 122 If you chose Cable Modem, continue at Using a Cable Modem Connection on page 104. If you chose Static IP, continue at Using a Static IP Connection on page 105. If you chose DHCP, continue at Using a DHCP Connection on page 106. Check Point UTM-1 Edge User Guide...
- Page 123 Using the Internet Wizard Configuring a Direct ADSL Connection To configure a direct ADSL connection Click Network in the main menu, and click the Internet tab. The Internet page appears. Click Internet Wizard. The Internet Wizard opens with the Welcome page displayed. Click Next.
- Page 124 ISP. • To manually fill in the supported ADSL settings for your ISP, complete the fields using the information in the following table. Click Next. The Internet Connection Method dialog box appears. Check Point UTM-1 Edge User Guide...
- Page 125 Using the Internet Wizard Select the Internet connection method you want to use for connecting to the Internet. Click Next. If you chose PPPoE or PPPoA, continue at Using a PPPoE or PPPoA Connection on page 112. If you chose Static IP, continue at Using a Static IP Connection on page 105. If you chose DHCP, continue at Using a DHCP Connection on page 106.
- Page 126 The Confirmation screen appears. Click Next. The system attempts to connect to the Internet via the specified connection. The Connecting… screen appears. At the end of the connection process the Connected screen appears. Click Finish. Check Point UTM-1 Edge User Guide...
-
Page 127: Using Internet Setup
Using Internet Setup Table 27: PPPoE Connection Fields In this field… Do this… Username Type your user name. Password Type your password. Confirm password Type your password again. Using Internet Setup Internet Setup allows you to manually configure your Internet connection. For information on configuring bridged Internet connections, see Adding Internet Connections to Bridges on page 237. - Page 128 Using Internet Setup The Internet page appears. Next to the desired Internet connection, click Edit. Check Point UTM-1 Edge User Guide...
- Page 129 Using Internet Setup The Internet Setup page appears. Do one of the following: • To configure an ADSL connection using the internal ADSL modem, continue at Configuring a Direct ADSL Connection on page 116. This option is available in ADSL models only. •...
- Page 130 For EoA, continue at Using an EoA Connection on page 119. For PPPoE, continue at Using a PPPoE Connection on page 121. For information on configuring bridged connections, see Adding Internet Connections to Bridges on page 237. Check Point UTM-1 Edge User Guide...
- Page 131 Using Internet Setup Using a PPPoA (PPP over ATM) Connection Complete the fields using the relevant information in Internet Setup Fields on page 136. Chapter 5: Configuring the Internet Connection...
- Page 132 The UTM-1 appliance attempts to connect to the Internet, and the Status Bar displays the Internet status “Connecting”. This may take several seconds. Once the connection is made, the Status Bar displays the Internet status “Connected”. Check Point UTM-1 Edge User Guide...
- Page 133 Using Internet Setup Using an EoA (Ethernet over ATM) Connection Complete the fields using the relevant information in Internet Setup Fields on page 136. Chapter 5: Configuring the Internet Connection...
- Page 134 The UTM-1 appliance attempts to connect to the Internet, and the Status Bar displays the Internet status “Connecting”. This may take several seconds. Once the connection is made, the Status Bar displays the Internet status “Connected”. Check Point UTM-1 Edge User Guide...
- Page 135 Using Internet Setup Using a PPPoE (PPP over Ethernet) Connection Complete the fields using the relevant information in Internet Setup Fields on page 136. Chapter 5: Configuring the Internet Connection...
- Page 136 The UTM-1 appliance attempts to connect to the Internet, and the Status Bar displays the Internet status “Connecting”. This may take several seconds. Once the connection is made, the Status Bar displays the Internet status “Connected”. Check Point UTM-1 Edge User Guide...
- Page 137 Using Internet Setup Configuring an Ethernet-Based Connection In the Port drop-down list, do one of the following: • To configure an Ethernet-based connection through the WAN port, select WAN. • To configure an Ethernet-based connection through the DMZ/WAN2 port, select WAN2. This option is available in non-ADSL models only.
- Page 138 Using Internet Setup Using a LAN Connection Complete the fields using the relevant information in Internet Setup Fields on page 136. Check Point UTM-1 Edge User Guide...
- Page 139 Using Internet Setup New fields appear, depending on the check boxes you selected. Click Apply. The UTM-1 appliance attempts to connect to the Internet, and the Status Bar displays the Internet status “Connecting”. This may take several seconds. Once the connection is made, the Status Bar displays the Internet status “Connected”. Chapter 5: Configuring the Internet Connection...
- Page 140 Using Internet Setup Using a Cable Modem Connection Complete the fields using the relevant information in Internet Setup Fields on page 136. Check Point UTM-1 Edge User Guide...
- Page 141 Using Internet Setup New fields appear, depending on the check boxes you selected. Click Apply. The UTM-1 appliance attempts to connect to the Internet, and the Status Bar displays the Internet status “Connecting”. This may take several seconds. Once the connection is made, the Status Bar displays the Internet status “Connected”. Chapter 5: Configuring the Internet Connection...
- Page 142 Using Internet Setup Using a PPPoE Connection Complete the fields using the relevant information in Internet Setup Fields on page 136. Check Point UTM-1 Edge User Guide...
- Page 143 Using Internet Setup New fields appear, depending on the check boxes you selected. Click Apply. The UTM-1 appliance attempts to connect to the Internet, and the Status Bar displays the Internet status “Connecting”. This may take several seconds. Once the connection is made, the Status Bar displays the Internet status “Connected”. Chapter 5: Configuring the Internet Connection...
- Page 144 Using Internet Setup Using a PPTP Connection Complete the fields using the relevant information in Internet Setup Fields on page 136. Check Point UTM-1 Edge User Guide...
- Page 145 Using Internet Setup New fields appear, depending on the check boxes you selected. Click Apply. Chapter 5: Configuring the Internet Connection...
- Page 146 Use this Internet connection type only if you are subscribed to Telstra® BigPond™ Internet. Telstra BigPond is a trademark of Telstra Corporation Limited. Complete the fields using the relevant information in Internet Setup Fields on page 136. Check Point UTM-1 Edge User Guide...
- Page 147 Using Internet Setup New fields appear, depending on the check boxes you selected. Click Apply. The UTM-1 appliance attempts to connect to the Internet, and the Status Bar displays the Internet status “Connecting”. This may take several seconds. Once the connection is made, the Status Bar displays the Internet status “Connected”. Chapter 5: Configuring the Internet Connection...
- Page 148 To configure a Dialup connection on a USB port (using a connected USB modem), select USBModem1. The Connection Type field displays Dialup. Complete the fields using the relevant information in Internet Setup Fields on page 136. Check Point UTM-1 Edge User Guide...
- Page 149 Using Internet Setup New fields appear, depending on the check boxes you selected. Click Apply. The UTM-1 appliance attempts to connect to the Internet, and the Status Bar displays the Internet status “Connecting”. This may take several seconds. Once the connection is made, the Status Bar displays the Internet status “Connected”. Chapter 5: Configuring the Internet Connection...
- Page 150 ISP. Encapsulation Select the encapsulation type to use for the DSL line, as specified by Type your ISP. PPP Settings Username Type your user name. Password Type your password. Confirm password Type your password. Check Point UTM-1 Edge User Guide...
- Page 151 Using Internet Setup In this field… Do this… Service Type your service name. If your ISP has not provided you with a service name, leave this field empty. Server IP If you selected PPTP, type the IP address of the PPTP server as given by your ISP.
- Page 152 Type the static IP address of your UTM-1 appliance. Subnet Mask Select the subnet mask that applies to the static IP address of your UTM- 1 appliance. Default Gateway Type the IP address of your ISP’s default gateway. Check Point UTM-1 Edge User Guide...
- Page 153 Using Internet Setup In this field… Do this… Name Servers Obtain Domain Clear this option if you want the UTM-1 appliance to obtain an IP address Name Servers automatically using DHCP, but not to automatically configure DNS automatically servers. Obtain WINS Clear this option if you want the UTM-1 appliance to obtain an IP address Server automatically using DHCP, but not to automatically configure the WINS...
- Page 154 As a general recommendation you should leave this field empty. If however you wish to modify the default MTU, it is recommended that you consult with your ISP first and use MTU values between 1300 and 1500. Check Point UTM-1 Edge User Guide...
- Page 155 Using Internet Setup In this field… Do this… MAC Cloning A MAC address is a 12-digit identifier assigned to every network device. If your ISP restricts connections to specific, recognized MAC addresses, you must select this option to clone a MAC address. Note: When configuring MAC cloning for the secondary Internet connection, the DMZ/WAN2 port must be configured as WAN2;...
- Page 156 Internet only if it is the Active Gateway in passive state the HA cluster. This is called WAN HA. This field is only enabled if HA is configured. For information on HA, see Configuring High Availability on page 243. Check Point UTM-1 Edge User Guide...
- Page 157 Using Internet Setup In this field… Do this… Dead Connection Detection Probe Next Hop Select this option to automatically detect loss of connectivity to the default gateway. If you selected LAN, this is done by sending ARP requests to the default gateway.
- Page 158 Internet connection is considered to be down. Use this option if you have Check Point VPN gateways, and you want loss of connectivity to these gateways to trigger ISP failover to an Internet connection from which these gateways are reachable.
-
Page 159: Setting Up Dialup Modems
Setting Up Dialup Modems In this field… Do this… If you chose the Ping Addresses connection probing method, type the IP 1, 2, 3 addresses or DNS names of the desired servers. If you chose the Probe VPN Gateway (RDP) connection probing method, type the IP addresses or DNS names of the desired VPN gateways. - Page 160 Connect an RS232 dialup modem to your UTM-1 appliance's serial port. For information on locating the serial port, see Introduction on page 1. Click Network in the main menu, and click the Ports tab. The Ports page appears. Check Point UTM-1 Edge User Guide...
- Page 161 Setting Up Dialup Modems Next to Serial, click Edit. The Port Setup page appears. In the Assign to Network drop-down list, select Dialup. New fields appear. Chapter 5: Configuring the Internet Connection...
- Page 162 Answer incoming Select this option to specify that the modem should answer incoming PPP calls PPP calls. This allows accessing the appliance out of band for maintenance purposes, in case the primary Internet connection fails. Check Point UTM-1 Edge User Guide...
- Page 163 Setting Up Dialup Modems Setting Up a USB Modem Warning: Before attaching a USB modem, ensure that the total power drawn by all connected USB devices does not exceed 2.5W per port (0.5A at 5V). If the total current consumed by a port exceeds 0.5A, a powered USB hub must be used, to avoid damage to the gateway.
- Page 164 To check that that the values you entered are correct, click Test. The page displays a message indicating whether the test succeeded. Configure a Dialup Internet connection on the USB port. See Using Internet Setup on page 113. Check Point UTM-1 Edge User Guide...
- Page 165 Setting Up Dialup Modems Table 30: USB Dialup Fields In this field… Do this… Modem Type Select the modem type. You can select one of the predefined modem types or Custom. If you selected Custom, the Installation String field is enabled. Otherwise, it is filled in with the correct installation string for the modem type.
-
Page 166: Viewing Internet Connection Information
To view activity information for a connection, mouse-over the information icon next to the desired connection. A tooltip displays the number of bytes sent and received bytes through the connection. To refresh the information on this page, click Refresh. Check Point UTM-1 Edge User Guide... - Page 167 Viewing Internet Connection Information Table 31: Internet Page Fields Field Description Status Indicates the connection’s status. Duration Indicates the connection duration, if active. The duration is given in the format hh:mm:ss, where: hh=hours mm=minutes ss=seconds IP Address Your IP address. Enabled Indicates whether or not the connection is enabled.
-
Page 168: Enabling/Disabling The Internet Connection
Next to the Internet connection, do one of the following: • To enable the connection, click The button changes to and the connection is enabled. • To disable the connection, click The button changes to and the connection is disabled. Check Point UTM-1 Edge User Guide... -
Page 169: Using Quick Internet Connection/Disconnection
Using Quick Internet Connection/Disconnection Using Quick Internet Connection/Disconnection By clicking the Connect or Disconnect button (depending on the connection status) on the Internet page, you can establish a quick Internet connection using the currently-selected connection type. In the same manner, you can terminate the active connection. The Internet connection retains its Connected/Not Connected status until the UTM-1 appliance is rebooted. -
Page 170: Configuring Wan Load Balancing
Internet connections, the ratio between the connections' load balancing weights should reflect the ratio between the connections' bandwidths. Note: To ensure continuous Internet connectivity, if one of the Internet connections fails, all traffic will be routed to the other connection. Check Point UTM-1 Edge User Guide... - Page 171 Configuring WAN Load Balancing To configure WAN load balancing Configure the desired load balancing weight for both the primary and secondary Internet connections. For further information, see the Load Balancing Weight field in Using Internet Setup on page 113. Click Network in the main menu, and click the Internet tab. The Internet page appears.
-
Page 173: Managing Your Network
Configuring Network Settings Chapter 6 Managing Your Network This chapter describes how to manage and configure your network connection and settings. This chapter includes the following topics: Configuring Network Settings..............159 Using Network Objects ................188 Configuring Network Service Objects............199 Using Static Routes ..................202 Managing Ports..................209 Configuring Network Settings Note: If you accidentally change the network settings to incorrect values and are... - Page 174 Configuring Network Settings Configuring the LAN Network To configure the LAN network Click Network in the main menu, and click the My Network tab. The My Network page appears. Click Edit in the LAN network’s row. Check Point UTM-1 Edge User Guide...
- Page 175 Configuring Network Settings The Edit Network Settings page for the LAN network appears. In the Mode drop-down list, select Enabled. The fields are enabled. If desired, change your UTM-1 appliance’s internal IP address. See Changing IP Addresses on page 162. If desired, enable or disable Hide NAT.
- Page 176 192.168.100.1 – 192.168.100.254. Click Apply. A warning message appears. Click OK. • The UTM-1 appliance's internal IP address and/or the internal network range are changed. • A success message appears. Do one of the following: Check Point UTM-1 Edge User Guide...
- Page 177 Configuring Network Settings • If your computer is configured to obtain its IP address automatically (using DHCP), and the UTM-1 DHCP server is enabled, restart your computer. Your computer obtains an IP address in the new range. • Otherwise, manually reconfigure your computer to use the new address range using the TCP/IP settings.
- Page 178 Using Network Objects on page 188. Note: The following DHCP server configurations are not available for the OfficeMode network: • Enabling and disabling the UTM-1 DHCP Server • Setting the DHCP range manually • Configuring DHCP relay Check Point UTM-1 Edge User Guide...
- Page 179 Configuring Network Settings Enabling/Disabling the UTM-1 DHCP Server You can enable and disable the UTM-1 DHCP Server for internal networks. To enable/disable the UTM-1 DHCP server Click Network in the main menu, and click the My Network tab. The My Network page appears. In the desired network's row, click Edit.
- Page 180 • To allow the DHCP server to set the IP address range, select the Automatic DHCP range check box. • To set the DHCP range manually: 1) Clear the Automatic DHCP range check box. Check Point UTM-1 Edge User Guide...
- Page 181 Configuring Network Settings The DHCP IP range fields appear. 2) In the DHCP IP range fields, type the desired DHCP range. Click Apply. A warning message appears. Click OK. A success message appears If your computer is configured to obtain its IP address automatically (using DHCP), and either the UTM-1 DHCP server or another DHCP server is enabled, restart your computer.
- Page 182 The My Network page appears. In the desired network's row, click Edit. The Edit Network Settings page appears. In the DHCP Server list, select Relay. The Automatic DHCP range check box is disabled, and new fields appear. Check Point UTM-1 Edge User Guide...
- Page 183 Configuring Network Settings In the Primary DHCP Server IP field, type the IP address of the primary DHCP server. In the Secondary DHCP Server IP field, type the IP address of the DHCP server to use if the primary DHCP server fails. Click Apply.
- Page 184 In the desired network's row, click Edit. The Edit Network Settings page appears. In the DHCP area, click Options. The DHCP Server Options page appears. Complete the fields using the relevant information in the following table. Check Point UTM-1 Edge User Guide...
- Page 185 Configuring Network Settings New fields appear, depending on the check boxes you selected. Click Apply. If your computer is configured to obtain its IP address automatically (using DHCP), restart your computer. Your computer obtains an IP address in the DHCP address range. Chapter 6: Managing Your Network...
- Page 186 (in the Internet Setup page). The WINS Server 1 and WINS Server 2 fields appear. WINS Server 1, 2 Type the IP addresses of the Primary and Secondary WINS servers to use instead of the gateway. Check Point UTM-1 Edge User Guide...
- Page 187 Configuring Network Settings In this field… Do this… Automatically assign Clear this option if you do not want the DHCP server to pass the default gateway current gateway IP address to DHCP clients as the default gateway's IP address. Normally, it is recommended to leave this option selected. The Default Gateway field is enabled.
- Page 188 If you have more than one computer in the DMZ network, connect a hub or switch to the DMZ port, and connect the DMZ computers to the hub. Click Network in the main menu, and click the Ports tab. Check Point UTM-1 Edge User Guide...
- Page 189 Configuring Network Settings The Ports page appears. Next to the DMZ/WAN2 port, click Edit. Chapter 6: Managing Your Network...
- Page 190 In the Mode drop-down list, select Enabled. The fields are enabled. 10. In the IP Address field, type the IP address of the DMZ network's default gateway. Note: The DMZ network must not overlap other networks. Check Point UTM-1 Edge User Guide...
- Page 191 IP address to the VPN client, when the client connects and authenticates. The IP addresses are allocated from a pool called the OfficeMode network. Note: OfficeMode requires either Check Point SecureClient or an L2TP client to be installed on the VPN clients. It is not supported by Check Point SecuRemote.
- Page 192 If desired, enable or disable Hide NAT. See Enabling/Disabling Hide NAT on page 163. If desired, configure DHCP options. See Configuring DHCP Server Options on page 169. Click Apply. A warning message appears. Click OK. A success message appears. Check Point UTM-1 Edge User Guide...
- Page 193 Configuring Network Settings Configuring VLANs Your UTM-1 appliance allows you to partition your network into several virtual LAN networks (VLANs). A VLAN is a logical network behind the UTM-1 appliance. Computers in the same VLAN behave as if they were on the same physical network: traffic flows freely between them, without passing through a firewall.
- Page 194 All outgoing traffic from a tag-based VLAN contains the VLAN's tag in the packet headers. Incoming traffic to the VLAN must contain the VLAN's tag as well, or the packets are dropped. Tagging ensures that traffic is directed to the correct VLAN. Figure 20: Tag-Based VLAN Check Point UTM-1 Edge User Guide...
- Page 195 Configuring Network Settings • Port-based Port-based VLAN allows assigning the appliance's LAN ports to VLANs, effectively transforming the appliance's four-port switch into up to four firewall-isolated security zones. You can assign multiple ports to the same VLAN, or each port to a separate VLAN.
- Page 196 WDS links For information on counting VAPs and WDS links, see Configuring a Wireless Network on page 265. For information on the default security policy for VLANs, see Default Security Policy on page 327. Check Point UTM-1 Edge User Guide...
- Page 197 Configuring Network Settings Adding and Editing VLANs For information on adding and editing port-based VLANs, see Adding and Editing Port- Based VLANs on page 183. For information on adding and editing tag-based VLANs, see Adding and Editing Tag- Based VLANs on page 185. For information on adding and editing VAPs, see Configuring Virtual Access Points on page 294.
- Page 198 In the Subnet Mask field, type the VLAN's internal network range. If desired, enable or disable Hide NAT. See Enabling/Disabling Hide NAT on page 163. If desired, configure a DHCP server. See Configuring a DHCP Server on page 164. Check Point UTM-1 Edge User Guide...
- Page 199 Configuring Network Settings 10. Click Apply. A warning message appears. 11. Click OK. A success message appears. 12. Click Network in the main menu, and click the Ports tab. The Ports page appears. 13. Next to the LAN port you want to assign, click Edit. The Port Setup page appears.
- Page 200 16. Configure a VLAN trunk (802.1Q) port on the VLAN-aware switch, according to the vendor instructions. Define the same VLAN IDs on the switch. 17. Connect the UTM-1 appliance's DMZ/WAN2 port to the VLAN-aware switch's VLAN trunk port. Check Point UTM-1 Edge User Guide...
- Page 201 Configuring Network Settings Deleting VLANs To delete a VLAN If the VLAN is port-based, do the following: Click Network in the main menu, and click the Ports tab. The Ports page appears. Remove all port assignments to the VLAN, by selecting other networks in the drop-down lists.
-
Page 202: Using Network Objects
DHCP server may reassign the IP address to a different computer. If you want to guarantee that a particular computer's IP address remains constant, you can reserve the IP address for use by the computer's MAC address only. This is called Check Point UTM-1 Edge User Guide... - Page 203 Using Network Objects DHCP reservation, and it is useful if you are hosting a public Internet server on your network. • Web Filtering enforcement You can specify whether or not to enforce the Web Filtering service and Web rules for the network object.
- Page 204 The Network Objects page appears with a list of network objects. Do one of the following: • To add a network object, click New. • To edit an existing network object, click Edit next to the desired computer in the list. Check Point UTM-1 Edge User Guide...
- Page 205 Using Network Objects The UTM-1 Network Object Wizard opens, with the Step 1: Network Object Type dialog box displayed. Do one of the following: • To specify that the network object should represent a single computer or device, click Single Computer. •...
- Page 206 Reserve a fixed IP address for this computer option. If you chose Network, the dialog box does not include this option. Complete the fields using the information in the tables below. Click Next. Check Point UTM-1 Edge User Guide...
- Page 207 Using Network Objects The Step 3: Save dialog box appears. Type a name for the network object in the field. Click Finish. Chapter 6: Managing Your Network...
- Page 208 To add a network object, click Add next to the desired computer. • To edit a network object, click Edit next to the desired computer. The UTM-1 Network Object Wizard opens, with the Step 1: Network Object Type dialog box displayed. Check Point UTM-1 Edge User Guide...
- Page 209 Using Network Objects Do one of the following: • To specify that the network object should represent a single computer or device, click Single Computer. • To specify that the network object should represent a network, click Network. Click Next. The Step 2: Computer Details dialog box appears.
- Page 210 My HotSpot page. Furthermore, users on HotSpot networks will be able to access this computer without viewing the My HotSpot page. Exclude this computer Select this option to exclude this computer from the Web Filtering from Web Filtering service and Web rule enforcement. Check Point UTM-1 Edge User Guide...
- Page 211 Using Network Objects Table 35: Network Object Fields for a Network In this field… Do this… IP Range Type the range of local computer IP addresses in the network. Perform Static NAT Select this option to map the network's IP address range to a range of (Network Address Internet IP addresses of the same size.
- Page 212 The Network Objects page appears with a list of network objects. To delete a network object, do the following: In the desired network object's row, click the Erase icon. A confirmation message appears. Click OK. The network object is deleted. Check Point UTM-1 Edge User Guide...
-
Page 213: Configuring Network Service Objects
Configuring Network Service Objects Configuring Network Service Objects You can add custom services as network service objects. This enables you to configure firewall rules, VStream Antivirus rules, custom NAT rules, and static routes for the services represented by the network service objects. Defining network service objects can make your policies easier to understand and maintain. - Page 214 To edit an existing network service object, click Edit next to the desired object in the list. The UTM-1 Network Service Wizard opens, with the Step 1: Network Service Details dialog box displayed. Complete the fields using the information in the table below. Click Next. Check Point UTM-1 Edge User Guide...
- Page 215 Configuring Network Service Objects The Step 2: Network Service Name dialog box appears. Type a name for the network service object in the field. Click Finish. Table 36: Network Service Fields In this field… Do this… Protocol Select the network service's IP protocol. If you select Other, the Protocol Number field appears.
-
Page 216: Using Static Routes
IP address. Note: If the static route's next hop is an Internet connection that is currently unavailable, the UTM-1 appliance sends matching traffic through the static route with the next-lowest metric. Check Point UTM-1 Edge User Guide... - Page 217 Using Static Routes Packets with a source, destination, or network service that do not match any defined static route are routed to the default gateway. To modify the default gateway, see Using a LAN Connection on page 124. When a static route is based on the packet's source, it is called a source route. Source routing can be used, for example, for load balancing between two Internet connections.
- Page 218 The Static Routes page appears, with a list of existing static routes. Do one of the following: • To add a static route, click New Route. • To edit an existing static route, click Edit next to the desired route in the list. Check Point UTM-1 Edge User Guide...
- Page 219 Using Static Routes The Static Route Wizard opens displaying the Step 1: Source and Destination dialog box. Complete the fields using the relevant information in the following table. Click Next. The Step 2: Next Hop and Metric dialog box appears. Complete the fields using the relevant information in the following table.
- Page 220 Specified Network. This route applies to packets sent to a specific network. The Network and Netmask fields appear. Destination - Type the destination network's IP address. Network Destination - Select the destination network's subnet mask. Netmask Check Point UTM-1 Edge User Guide...
- Page 221 Using Static Routes In this field… Do this… Service Specify the service used to send packets (service routing). This can be either of the following: • ANY. This route applies to packets sent using any service. • A specific service. Note: When defining a static route for a specific service, the Source and Destination fields must be set to ANY.
- Page 222 The Static Routes page appears, with a list of existing static routes. To refresh the view, click Refresh. To delete a route, do the following: In the desired route's row, click the Erase icon. A confirmation message appears. Click OK. The route is deleted. Check Point UTM-1 Edge User Guide...
-
Page 223: Managing Ports
Managing Ports Managing Ports The UTM-1 appliance enables you to quickly and easily assign its ports to different uses, as shown in the following table. If desired, you can also disable ports. Table 38: Ports and Assignments You can assign this port... To these uses... - Page 224 Ethernet connection's duplex state. This is useful if you need to check whether the appliance's physical connections are working, and you can’t see the LEDs on front of the appliance. To view port statuses Click Network in the main menu, and click the Ports tab. Check Point UTM-1 Edge User Guide...
- Page 225 Managing Ports The Ports page appears. In non-ADSL models, this page appears as follows: Chapter 6: Managing Your Network...
- Page 226 Managing Ports In ADSL models, this page appears as follows: The page displays the information for each port, as described in the following table. To refresh the display, click Refresh. Check Point UTM-1 Edge User Guide...
- Page 227 Managing Ports Table 39: Ports Fields This field… Displays… Assign To The port's current assignment. For example, if the DMZ/WAN2 port is currently used for the DMZ, the field displays "DMZ". Status The port's current status. This can be any of the following: •...
- Page 228 Table 40: Modifying Port Assignments To assign a port to... See... No network The procedure below. This disables the port. The procedure below Check Point UTM-1 Edge User Guide...
- Page 229 Managing Ports To assign a port to... See... VLAN or Configuring VLANs on page 179 VLAN Trunk A WAN Internet connection The procedure below. Note: When you configure an Ethernet-based Internet connection on a port, the port is automatically assigned to Internet use.
- Page 230 • To disable a network port, select None. • To disable the Serial port, select Disabled. Click Apply. A warning message appears. Click OK. The port is reassigned to the specified network or purpose. Check Point UTM-1 Edge User Guide...
- Page 231 Managing Ports Modifying Link Configurations By default, the UTM-1 appliance automatically detects the link speed and duplex. If desired, you can manually restrict the appliance's ports to a specific link speed and duplex setting. To modify a port's link configuration Click Network in the main menu, and click the Ports tab.
- Page 232 For example, if you were using the DMZ/WAN2 port as WAN2, the port reverts to its DMZ assignment, and the secondary Internet connection moves to the WAN or ADSL port. Check Point UTM-1 Edge User Guide...
- Page 233 Managing Ports Resetting All Ports to Defaults To reset all ports to defaults Click Network in the main menu, and click the Ports tab. The Ports page appears. Click Default. A confirmation message appears. Click OK. All ports are reset to their default assignments and to "Automatic Detection" link configuration.
-
Page 235: Using Bridges
Overview Chapter 7 Using Bridges This chapter describes how to connect multiple network segments at the data-link layer, using a bridge. This chapter includes the following topics: Overview ....................221 Workflow....................227 Adding and Editing Bridges ..............228 Adding Internal Networks to Bridges............232 Adding Internet Connections to Bridges ..........237 Deleting Bridges..................242 Overview... - Page 236 Overview directly, with no firewall filtering the traffic between them. The network interfaces operate as if they were connected by a hub or switch. Figure 22: Bridge with Four VLANs Check Point UTM-1 Edge User Guide...
- Page 237 Overview For example, if you assign the LAN and primary WLAN networks to a bridge and disable the bridge's internal firewall, the two networks will act as a single, seamless network, and only traffic from the LAN and primary WLAN networks to other networks (for example, the Internet) will be inspected by the firewall.
- Page 238 VLAN that belongs to a network segment other than the “Marketing” segment, the connection will be blocked and logged as “Spoofed IP”. Note: The following UTM-1 models do not support using bridge mode with port-based VLAN: • SBX166-LHGE-2 • SBX166-LHGE-3 Check Point UTM-1 Edge User Guide...
- Page 239 Overview How Does Bridge Mode Work? Bridges operate at layer 2 of the OSI model, therefore adding a bridge to an existing network is completely transparent and does not require any changes to the network's structure. Each bridge maintains a forwarding table, which consists of <MAC Address, Port> associations.
- Page 240 STP also uses this information to provide fault tolerance, by re- computing the topology in the event that a bridge or a network link fails. Figure 24: Dual Redundant Bridges with STP Check Point UTM-1 Edge User Guide...
-
Page 241: Workflow
Workflow Figure 25: Link Redundancy with STP Workflow To use a bridge Add a bridge. See Adding and Editing Bridges on page 228. Add the desired internal networks to the bridge. See Adding Internal Networks to Bridges on page 232. Add the desired Internet connections to the bridge. -
Page 242: Adding And Editing Bridges
For information on adding VStream Antivirus rules, see Adding and Editing Vstream Antivirus Rules on page 432. Adding and Editing Bridges To add or edit a bridge Click Network in the main menu, and click the My Network tab. The My Network page appears. Check Point UTM-1 Edge User Guide... - Page 243 Adding and Editing Bridges Do one of the following: • To add a bridge, click Add Bridge. • To edit a bridge, click Edit in the desired bridge's row. The Bridge Configuration page appears. Complete the fields using the following table. Click Apply.
- Page 244 Specify whether to enable STP for this bridge, by selecting one of the following: • Enabled. STP is enabled. • Disabled. STP is disabled. This is the default value. If you selected Enabled, the Bridge Priority field appears. Check Point UTM-1 Edge User Guide...
- Page 245 Adding and Editing Bridges In this field… Do this… Bridge Priority Select this bridge's priority. The bridge's priority is combined with a bridged network's MAC address to create the bridge's ID. The bridge with the lowest ID is elected as the root bridge. The other bridges in the tree calculate the shortest distance to the root bridge, in order to eliminate loops in the topology and provide fault tolerance.
-
Page 246: Adding Internal Networks To Bridges
To add an internal network to a bridge Click Network in the main menu, and click the My Network tab. The My Network page appears. Click Edit in the desired network's row. In the Mode drop-down list, select Bridged. Check Point UTM-1 Edge User Guide... - Page 247 Adding Internal Networks to Bridges New fields appear. Complete these fields as described below. If the assigned bridge uses STP, additional fields appear. Chapter 7: Using Bridges...
- Page 248 Adding Internal Networks to Bridges Click Apply. A warning message appears. Click OK. A success message appears. In the My Network page, the internal network appears indented under the bridge. Check Point UTM-1 Edge User Guide...
- Page 249 Adding Internal Networks to Bridges Table 43: Bridged Network Fields In this field… Do this… Assign to Bridge Select the bridge to which the connection should be assigned. Bridge Anti-Spoofing Select this option to enable anti-spoofing. If anti-spoofing is enabled, only IP addresses within the Allowed IP Range can be source IP addresses for packets on this network.
- Page 250 Note: If you select the same priority for all ports, the root port will be elected based on the port's logical number. The default value is 128. This field only appears if the bridge uses STP. Check Point UTM-1 Edge User Guide...
-
Page 251: Adding Internet Connections To Bridges
Adding Internet Connections to Bridges Adding Internet Connections to Bridges To add an Internet connection to a bridge Click Network in the main menu, and click the Internet tab. The Internet page appears. Next to the desired Internet connection, click Edit. The Internet Setup page appears. - Page 252 Adding Internet Connections to Bridges New fields appear. Complete the fields specified in the table below. Complete the rest of the fields using the relevant information in Internet Setup Fields on page 136. Check Point UTM-1 Edge User Guide...
- Page 253 Adding Internet Connections to Bridges New fields appear, depending on the selected options, and whether the selected bridge uses STP. Click Apply. The UTM-1 appliance attempts to connect to the Internet, and the Status Bar displays the Internet status “Connecting”. This may take several seconds. Once the connection is made, the Status Bar displays the Internet status “Connected”.
- Page 254 All other ports are blocked. It is recommended to set a lower value for faster links. This field only appears if the selected bridge uses STP. It is relevant for regular bridged connections only. Check Point UTM-1 Edge User Guide...
- Page 255 Adding Internet Connections to Bridges In this field… Do this… Spanning Tree Protocol - Port Select the port's priority. Priority The port's priority is combined with the port's logical number to create the port's ID. The port with the lowest ID is elected as the root port, which forwards frames out of the bridge.
-
Page 256: Deleting Bridges
Click Network in the main menu, and click the My Network tab. The My Network page appears. In the desired bridge’s row, click the Erase icon. A confirmation message appears. Click OK. The bridge is deleted. Check Point UTM-1 Edge User Guide... -
Page 257: Configuring High Availability
Overview Chapter 8 Configuring High Availability This chapter describes how to configure High Availability (HA) for two or more UTM-1 appliances. This chapter includes the following topics: Overview ....................243 Configuring High Availability on a Gateway...........246 Sample Implementation on Two Gateways ..........250 Overview You can create a High Availability (HA) cluster consisting of two or more UTM-1 appliances. - Page 258 WAN virtual IP address, in the event that the Active Gateway fails. If desired, you can configure a WAN virtual IP address for the WAN2 interface, as well. Check Point UTM-1 Edge User Guide...
- Page 259 Overview Note: To use a WAN virtual IP address, the Internet connection method must be "Static IP". PPP-based connections and dynamic IP connections are not supported. Before configuring HA, the following requirements must be met: • You must have at least two identical UTM-1 appliances. •...
-
Page 260: Configuring High Availability On A Gateway
Each appliance must have a different internal IP address. See Changing IP Addresses on page 162. Click Setup in the main menu, and click the High Availability tab. The High Availability page appears. Select the Gateway High Availability check box. Check Point UTM-1 Edge User Guide... - Page 261 Configuring High Availability on a Gateway The fields are enabled. Next to each network for which you want to enable HA, select the HA check box. The Internet-Primary field represents the WAN interface, and the Internet-Secondary field represents the WAN2 interface. In the Virtual IP field, type the default gateway IP address.
- Page 262 Using Internet Setup on page 113. 10. If you configured a virtual IP address for the WAN or WAN2 interface, configure the Internet connection to use the "Static IP" connection method. See Using Internet Setup on page 113. Check Point UTM-1 Edge User Guide...
- Page 263 Configuring High Availability on a Gateway Table 45: High Availability Page Fields In this field… Do this… Priority My Priority Type the gateway's priority. This must be an integer between 1 and 255. Internet Connection Tracking Internet - Primary Type the amount to reduce the gateway's priority if the primary Internet connection goes down.
-
Page 264: Sample Implementation On Two Gateways
Gateway A and Gateway B: Table 46: Gateway Details Gateway A Gateway B Internal Networks LAN, DMZ LAN, DMZ Internet Connections Primary and secondary Primary only LAN Network IP Address 192.169.100.1 192.169.100.2 LAN Network 255.255.255.0 255.255.255.0 Subnet Mask Check Point UTM-1 Edge User Guide... - Page 265 Sample Implementation on Two Gateways Gateway A Gateway B DMZ Network IP Address 192.169.101.1 192.169.101.2 DMZ Network 255.255.255.0 255.255.255.0 Subnet Mask The gateways have two internal networks in common, LAN and DMZ. This means that you can configure HA for the LAN network, the DMZ network, or both. You can use either of the networks as the synchronization interface.
- Page 266 The Gateway High Availability area is enabled. The LAN and DMZ networks are listed. Next to LAN, select the HA check box. In the LAN network's Virtual IP field, type the default gateway IP address 192.168.100.3. Next to DMZ, select the HA check box. Check Point UTM-1 Edge User Guide...
- Page 267 Sample Implementation on Two Gateways In the DMZ network's Virtual IP field, type the default gateway IP address 192.168.101.3. Click the Synchronization radio button next to DMZ. In the My Priority field, type "60". The low priority means that Gateway B will be the Passive Gateway. In the Internet - Primary field, type "20".
-
Page 269: Using Traffic Shaper
Overview Chapter 9 Using Traffic Shaper This chapter describes how to use Traffic Shaper to control the flow of communication to and from your network. This chapter includes the following topics: Overview ....................255 Setting Up Traffic Shaper.................256 Predefined QoS Classes................257 Adding and Editing Classes..............259 Viewing and Deleting Classes..............263 Restoring Traffic Shaper Defaults ............264... -
Page 270: Setting Up Traffic Shaper
Use Allow or Allow and Forward rules to assign different types of connections to QoS classes. For example, if Traffic Shaper is enabled for outgoing traffic, and you create an Allow rule associating all outgoing VPN traffic with the Urgent QoS class, then Traffic Check Point UTM-1 Edge User Guide... -
Page 271: Predefined Qos Classes
Predefined QoS Classes Shaper will handle outgoing VPN traffic as specified in the bandwidth policy for the Urgent class. See Adding and Editing Rules on page 338. Note: Traffic Shaper must be enabled for the direction of traffic specified in the rule. Note: If you do not assign a connection type to a class, Traffic Shaper automatically assigns the connection type to the built-in "Default"... - Page 272 “Important” class. Low Priority Traffic that is not sensitive to long delays, and (Bulk Traffic) which does not require a high guaranteed bandwidth. For example, SMTP traffic (outgoing email). Check Point UTM-1 Edge User Guide...
-
Page 273: Adding And Editing Classes
Adding and Editing Classes Adding and Editing Classes To add or edit a QoS class Click Network in the main menu, and click the Traffic Shaper tab. The Quality of Service Classes page appears. Click Add. Chapter 9: Using Traffic Shaper... - Page 274 Complete the fields using the relevant information in the following table. Click Next. The Step 2 of 3: Advanced Options dialog box appears. Complete the fields using the relevant information in the following table. Check Point UTM-1 Edge User Guide...
- Page 275 Adding and Editing Classes Note: Traffic Shaper may not enforce guaranteed rates and relative weights for incoming traffic as accurately as for outgoing traffic. This is because Traffic Shaper cannot control the number or type of packets it receives from the Internet; it can only affect the rate of incoming traffic by dropping received packets.
- Page 276 Then type the maximum rate (in kilobits/second) in the field provided. Incoming Traffic: Select this option to guarantee a minimum bandwidth for incoming traffic Guarantee At belonging to this class. Then type the minimum bandwidth (in Least kilobits/second) in the field provided. Check Point UTM-1 Edge User Guide...
-
Page 277: Viewing And Deleting Classes
Viewing and Deleting Classes In this field… Do this… Incoming Traffic: Select this option to limit the rate of incoming traffic belonging to this Limit rate to class. Then type the maximum rate (in kilobits/second) in the field provided. DiffServ Code Select this option to mark packets belonging to this class with a DiffServ Point Code Point (DSCP), which is an integer between 0 and 63. -
Page 278: Restoring Traffic Shaper Defaults
Rules page. To restore Traffic Shaper defaults Click Network in the main menu, and click the Traffic Shaper tab. The Quality of Service Classes page appears. Click Restore Defaults. A confirmation message appears. Click OK. Check Point UTM-1 Edge User Guide... -
Page 279: Working With Wireless Networks
Overview Chapter 10 Working with Wireless Networks This chapter describes how to configure wireless internal networks. This chapter includes the following topics: Overview ....................265 Configuring Wireless Networks ...............273 Troubleshooting Wireless Connectivity ...........302 Overview Your UTM-1 wireless appliance features a built-in 802.11b/g access point that is tightly integrated with the firewall and VPN. - Page 280 Guest network a low priority, and by enabling Secure HotSpot on this network, you could define terms of use that the guest users must accept before accessing the Internet. In contrast, the Employee VAP would use the more secure WPA2-Enterprise Check Point UTM-1 Edge User Guide...
- Page 281 Overview (802.11i) encryption standard and allow employees to access company resources such as the intranet. You can configure up to three VAPs, in addition to the primary WLAN. For information on configuring VAPs, see Configuring VAPs on page 294. Wireless Distribution System Links The UTM-1 appliance enables you to extend the primary WLAN's coverage area, by creating a Wireless Distribution System (WDS).
- Page 282 When used together with bridge mode and Spanning Tree Protocol (STP), you can use WDS links to create redundant topologies, such as a loop or mesh of linked access points. Figure 27: Two Access Points Linked by a WDS Bridge Check Point UTM-1 Edge User Guide...
- Page 283 Overview Figure 28: Redundant Loop of Access Points Linked by WDS and STP You can configure up to seven WDS links, in addition to the primary WLAN. For information on configuring WDS links, see Configuring WDS Links on page 298. Note: All access points in a WDS must use the same radio channel for the WDS link and for communicating with wireless stations.
- Page 284 No security method is used. This option is not recommended, because it allows unauthorized users to access your wireless network, although you can still limit access from the wireless network by creating firewall rules. This method is suitable for creating public access points. Check Point UTM-1 Edge User Guide...
- Page 285 Overview Security Description Protocol WEP encryption In the WEP (Wired Equivalent Privacy) encryption security method, wireless stations must use a pre-shared key to connect to your network. This method is not recommended, due to known security flaws in the WEP protocol. It is provided for compatibility with existing wireless deployments.
- Page 286 LAN are encrypted and authenticated. For information, see Internal VPN Server on page 475 and Setting Up Your UTM-1 Appliance as a VPN Server on page 476. Check Point UTM-1 Edge User Guide...
-
Page 287: Configuring Wireless Networks
Configuring Wireless Networks Configuring Wireless Networks Note: It is recommended to configure wireless networks via Ethernet and not via a wireless connection, because the wireless connection could be broken after making a change to the configuration. Using the Wireless Configuration Wizard The Wireless Configuration Wizard provides a quick and simple way of setting up your basic primary WLAN parameters for the first time. - Page 288 The Wireless Configuration Wizard opens, with the Wireless Configuration dialog box displayed. Select the Enable wireless networking check box to enable the primary WLAN. The fields are enabled. Complete the fields using the information in Basic WLAN Settings Fields on page 284. Click Next. Check Point UTM-1 Edge User Guide...
- Page 289 Configuring Wireless Networks The Wireless Security dialog box appears. Do one of the following: • Click WPA-Personal to use the WPA-Personal security mode. WPA-Personal (also called WPA-PSK) uses a passphrase for authentication. This method is recommended for small, private wireless networks, which want to authenticate and encrypt wireless data but do not want to install a RADIUS server.
- Page 290 LAN to the WLAN will be allowed. To allow traffic from the WLAN to the LAN, you must create firewall rules. For information, see Using Firewall Rules. 11. Click Next. WPA-Personal If you chose WPA-Personal, the Wireless Configuration-WPA-Personal dialog box appears. Check Point UTM-1 Edge User Guide...
- Page 291 Configuring Wireless Networks Do the following: In the text box, type the passphrase for accessing the network, or click Random to randomly generate a passphrase. This must be between 8 and 63 characters. It can contain spaces and special characters, and is case-sensitive. Click Next.
- Page 292 Configuring Wireless Networks The Wireless Security Complete dialog box appears. Click Finish. The wizard closes. Prepare the wireless stations. Check Point UTM-1 Edge User Guide...
- Page 293 Configuring Wireless Networks If you chose WEP, the Wireless Configuration-WEP dialog box appears. Do the following: Choose a WEP key length. The possible key lengths are: • 64 Bits - The key length is 10 hexadecimal characters. • 128 Bits - The key length is 26 hexadecimal characters. •...
- Page 294 For information on configuring RADIUS servers, see Using RADIUS Authentication on page 553. Click Network in the main menu, and click the My Network tab. The My Network page appears. In the desired wireless network's row, click Edit. Check Point UTM-1 Edge User Guide...
- Page 295 Configuring Wireless Networks The Edit Network Settings page appears. In the Mode drop-down list, select Enabled. The fields are enabled. In the IP Address field, type the IP address of the wireless network network's default gateway. The wireless network must not overlap other networks. In the Subnet Mask field, type the wireless network’s internal network range.
- Page 296 10. Complete the fields using the information in Basic Wireless Settings Fields on page 284. 11. To configure advanced settings, click Show Advanced Settings and complete the fields using the information in Advanced Wireless Settings Fields on page 289. Check Point UTM-1 Edge User Guide...
- Page 297 Configuring Wireless Networks New fields appear. 12. Click Apply. A warning message appears, telling you that you are about to change your network settings. 13. Click OK. A success message appears. Chapter 10: Working with Wireless Networks...
- Page 298 Select the country where you are located. Warning: Choosing an incorrect country may result in the violation of government regulations. This field only appears when configuring the primary WLAN, and it is inherited by all VAPs and WDS links. Check Point UTM-1 Edge User Guide...
- Page 299 Configuring Wireless Networks In this field… Do this… Operation Mode Select an operation mode: • 802.11b (11 Mbps). Operates in the 2.4 GHz range and offers a maximum theoretical rate of 11 Mbps. When using this mode, only 802.11b stations will be able to connect. •...
- Page 300 25 MHz (5 channels) apart. Alternatively, you can reduce the transmission power. This field only appears when configuring the primary WLAN, and it is inherited by all VAPs and WDS links. Check Point UTM-1 Edge User Guide...
- Page 301 Configuring Wireless Networks In this field… Do this… Security Select the security protocol to use. For information on the supported security protocols, see Wireless Security Protocols on page 270. If you select WEP encryption, the WEP Keys area opens. If you select WPA-Enterprise, the Require WPA2 (802.11i) and WPA Encryption fields appear.
- Page 302 128 Bits. The key length is 26 characters. • 152 Bits. The key length is 32 characters. Note: Some wireless card vendors call these lengths 40/104/128, respectively. Note: WEP is generally considered to be insecure, regardless of the selected key length. Check Point UTM-1 Edge User Guide...
- Page 303 Configuring Wireless Networks In this field… Do this… Type the WEP key, or click Random to randomly generate a key matching Key 1, 2, 3, 4 text the selected length. The key is composed of hexadecimal characters 0-9 and A-F, and is not case-sensitive. Table 51: Advanced Wireless Settings Fields In this field…...
- Page 304 Automatic. The UTM-1 appliance automatically selects a rate. This is the default. • A specific rate This field only appears when configuring the primary WLAN, and it is inherited by all VAPs and WDS links. Check Point UTM-1 Edge User Guide...
- Page 305 Configuring Wireless Networks In this field… Do this… Transmitter Power Select the transmitter power. Setting a higher transmitter power increases the access point's range. A lower power reduces interference with other access points in the vicinity. The default value is Full. It is not necessary to change this value, unless there are other access points in the vicinity.
- Page 306 If your network is congested, and the users are distant from one another, set the RTS threshold to a low value (around 500). Setting a value equal to the fragmentation threshold effectively disables RTS. The default value is 2346. Check Point UTM-1 Edge User Guide...
- Page 307 Configuring Wireless Networks In this field… Do this… Extended Range Specify whether to use Extended Range (XR) mode: Mode (XR) • Disabled. XR mode is disabled. • Enabled. XR mode is enabled. XR will be automatically negotiated with XR-enabled wireless stations and used as needed.
- Page 308 For information on configuring the primary WLAN manually, see Manually Configuring a Wireless Network on page 280. For information on using a wizard to configure the primary WLAN, see Using the Wireless Wizard on page 273. Check Point UTM-1 Edge User Guide...
- Page 309 Configuring Wireless Networks If you want to use WPA-Enterprise or 802.1x security mode for the VAP, make sure a RADIUS server is configured. For information on security modes, see Basic Wireless Settings Fields on page 284. For information on configuring RADIUS servers, see Using RADIUS Authentication on page 553.
- Page 310 In the Subnet Mask field, type the VAP's internal network range. 10. If desired, enable or disable Hide NAT. See Enabling/Disabling Hide NAT on page 163. 11. If desired, configure a DHCP server. See Configuring a DHCP Server on page 164. Check Point UTM-1 Edge User Guide...
- Page 311 Configuring Wireless Networks 12. Complete the fields using the information in Basic Wireless Settings Fields on page 284. 13. To configure advanced settings, click Show Advanced Settings and complete the fields using the information in Advanced Wireless Settings Fields on page 289.
- Page 312 WLAN network, all WDS links are automatically disabled. The procedure below explains how to add or edit a WDS link. For information on deleting a WDS link, see Deleting VLANs on page 187. Check Point UTM-1 Edge User Guide...
- Page 313 Configuring Wireless Networks To add or edit a WDS link Configure and enable the primary WLAN. For information on configuring the primary WLAN manually, see Manually Configuring a Wireless Network on page 280. For information on using a wizard to configure the primary WLAN, see Using the Wireless Wizard on page 273.
- Page 314 10. Complete the fields using the relevant information in Basic Wireless Settings Fields on page 284. 11. To configure advanced settings, click Show Advanced Settings and complete the fields using the relevant information in Advanced Wireless Settings Fields on page 289. Check Point UTM-1 Edge User Guide...
- Page 315 Configuring Wireless Networks New fields appear. 12. Click Apply. Note: Both sides of the WDS link must use the same radio channel and security settings. Note: WDS links support using the WEP security mode or no security. However, the access point can use any supported security protocol to communicate with wireless stations, including the WPA/WPA2 protocols.
-
Page 316: Troubleshooting Wireless Connectivity
• On the wireless station, open a command window and type ping my.firewall. If you see a large number of dropped packets, you are experiencing poor reception. Check Point UTM-1 Edge User Guide... - Page 317 Troubleshooting Wireless Connectivity Wireless reception is poor. What should I do? • Adjust the angle of the antennas, until the reception improves. The antennas radiate horizontally in all directions. • If both antennas are connected to the UTM-1 appliance, check that the Antenna Selection parameter in the primary WLAN's advanced settings is set to Automatic (see Manually Configuring a Wireless Network on page 280).
- Page 318 (802.11g or 802.11g Super), and that this standard is enabled in the station software. Transmission speed is determined by the slowest station associated with the access point. For a list of wireless stations that support 802.11g Super, see www.super-ag.com. Check Point UTM-1 Edge User Guide...
-
Page 319: Viewing Reports
Viewing the Event Log Chapter 11 Viewing Reports This chapter describes the UTM-1 Portal reports. This chapter includes the following topics: Viewing the Event Log................305 Using the Traffic Monitor ................308 Viewing Computers..................312 Viewing Connections ................314 Viewing Wireless Statistics ..............316 Viewing ADSL Statistics .................320 Viewing the Routing Table...............322 Viewing the Event Log You can track network activity using the Event Log. - Page 320 (Microsoft Excel) file, and then store it for analysis purposes or send it to technical support. Note: You can configure the UTM-1 appliance to send event logs to a Syslog server. For information, see Configuring Syslog Logging on page 584. Check Point UTM-1 Edge User Guide...
- Page 321 Viewing the Event Log To view the event log Click Reports in the main menu, and click the Event Log tab. The Event Log page appears. If an event is highlighted in red, indicating a blocked attack on your network, you can display the attacker’s details, by clicking on the IP address of the attacking machine.
-
Page 322: Using The Traffic Monitor
All QoS Classes report, the traffic is color-coded by QoS class. Table 53: Traffic Monitor Color Coding for Networks Traffic marked in this color… Indicates… Blue VPN-encrypted traffic Traffic blocked by the firewall Green Traffic accepted by the firewall Check Point UTM-1 Edge User Guide... - Page 323 Using the Traffic Monitor You can export a detailed traffic report for all enabled networks and all defined QoS classes, using the procedure Exporting General Traffic Reports on page 310. Viewing Traffic Reports To view a traffic report Click Reports in the main menu, and click the Traffic tab. The Traffic Monitor page appears.
- Page 324 The Save As dialog box appears. Browse to a destination directory of your choice. Type a name for the configuration file and click Save. A *.csv file is created and saved to the specified directory. Check Point UTM-1 Edge User Guide...
- Page 325 Using the Traffic Monitor Configuring Traffic Monitor Settings You can configure the interval at which the UTM-1 appliance should collect traffic data for network traffic reports. To configure Traffic Monitor settings Click Reports in the main menu, and click the Traffic tab. The Traffic Monitor page appears.
-
Page 326: Viewing Computers
If there are wireless networks, the wireless stations are shown under the network to which they are connected. For information on viewing statistics for these computers, see Viewing Wireless Statistics on page 316. If a wireless station has been blocked Check Point UTM-1 Edge User Guide... - Page 327 Viewing Computers from accessing the Internet through the UTM-1 appliance, the reason why it was blocked is shown in red. If a network is bridged, the bridge's name appears in parentheses next to the network's name. If you are exceeding the maximum number of computers allowed by your license, a warning message appears, and the computers over the node limit are marked in red.
-
Page 328: Viewing Connections
Internet. Note: The report does not display connections between bridged networks, where Firewall Between Members is disabled. To view the active connections Click Reports in the main menu, and click the Connections tab. Check Point UTM-1 Edge User Guide... - Page 329 Viewing Connections The Connections page appears. The page displays the information in the following table. To refresh the display, click Refresh. To view information on the destination machine, click its IP address. The UTM-1 appliance queries the Internet WHOIS server, and a window displays the name of the entity to which the IP address is registered and their contact information.
-
Page 330: Viewing Wireless Statistics
If the primary WLAN is enabled, you can view wireless statistics for the primary WLAN and VAPs, or for individual wireless stations. To view statistics for the primary WLAN and VAPs Click Reports in the main menu, and click the Wireless tab. Check Point UTM-1 Edge User Guide... - Page 331 Viewing Wireless Statistics The Wireless page appears. The page displays the information in the following tables. To refresh the display, click Refresh. Table 55: Wireless Statistics This field… Displays… Status Wireless Mode The operation mode used by the primary WLAN, followed by the transmission rate in Mbps Domain The UTM-1 access point's region...
- Page 332 Discarded Retries The total number of discarded retry packets that were transmitted and received Discarded Misc The total number of transmitted and received packets that were discarded for other reasons Check Point UTM-1 Edge User Guide...
- Page 333 Viewing Wireless Statistics To view statistics for a wireless station Click Reports in the main menu, and click the My Computers tab. The My Computers page appears. The following information appears next to each wireless station: • The signal strength in dB •...
-
Page 334: Viewing Adsl Statistics
If you are using an ADSL model, you can view statistics for the ADSL connection. To view ADSL statistics Click Reports in the main menu, and click the ADSL tab. The ADSL page appears. The page displays the information in the following table. Check Point UTM-1 Edge User Guide... - Page 335 Viewing ADSL Statistics To refresh the display, click Refresh. Table 57: ADSL Statistics This field… Displays… Mode The ADSL connection's type (PPPoE, PPPoA, EoA) Status The ADSL connection's current status (OK, Modem Initializing, No Sync, Establishing Connection, Connected, Disabled) DSL Standard The DSL line's standard ADSL Annex The UTM-1 ADSL model (Annex A, Annex B)
-
Page 336: Viewing The Routing Table
To view the current routing table Click Reports in the main menu, and click the Routing tab. The Routing Table page appears. The page displays the information in the following table. To refresh the display, click Refresh. Check Point UTM-1 Edge User Guide... - Page 337 Viewing the Routing Table Table 58: Routing Table Fields This field… Displays… Source The route's source Destination The route's destination Service The network service for which the route is configured Gateway The gateway's IP address Metric The route's metric Interface The interface for which the route is configured Origin The route's type:...
-
Page 339: Setting Your Security Policy
Viewing the Routing Table Chapter 12 Setting Your Security Policy This chapter describes how to set up your UTM-1 appliance security policy. You can enhance your security policy by subscribing to services such as Web Filtering and Email Filtering. You can also integrate all UTM-1 appliances into an overall enterprise security policy by connecting to SMART management. -
Page 340: The Utm-1 Firewall Security Policy
Each rule specifies the source, destination, service, and action to be taken for each connection. A rule also specifies how a communication is tracked, logged, and displayed. In other words, the rule base is the implementation of the security policy. Check Point UTM-1 Edge User Guide... -
Page 341: Default Security Policy
Default Security Policy Security Policy Enforcement The UTM-1 appliance uses the unique, patented INSPECT engine to enforce the configured security policy and to control traffic between networks. The INSPECT engine examines all communication layers and extracts only the relevant data, enabling highly efficient operation, support for a large number of protocols and applications, and easy extensibility to new applications and services. -
Page 342: Setting The Firewall Security Level
Enforces basic control on All inbound traffic is blocked to the external UTM-1 incoming connections, appliance IP address, except for ICMP echoes while permitting all ("pings"). outgoing connections. All outbound connections are allowed. Check Point UTM-1 Edge User Guide... - Page 343 Setting the Firewall Security Level This Does this… Further Details level… Medium Enforces strict control on All inbound traffic is blocked. all incoming connections, All outbound traffic is allowed to the Internet while permitting safe except for Windows file sharing (NBT ports 137, outgoing connections.
- Page 344 To change the firewall security level Click Security in the main menu, and click the Firewall tab. The Firewall page appears. Drag the security lever to the desired level. The UTM-1 appliance security level changes accordingly. Check Point UTM-1 Edge User Guide...
-
Page 345: Configuring Servers
Configuring Servers Configuring Servers Note: If you do not intend to host any public Internet servers in your network (such as a Web Server, Mail Server, or an exposed host), you can skip this section. The UTM-1 appliance enables you to configure the following types of public Internet servers: •... - Page 346 The Servers page appears, displaying a list of services and a host IP address for each allowed service. Complete the fields using the information in the following table. Click Apply. A success message appears. Check Point UTM-1 Edge User Guide...
- Page 347 Configuring Servers Table 60: Servers Page Fields In this Do this… column… Allow Select the check box next to the public server you want to configure. This can be either of the following: • A specific service or application (rows 1-9) •...
-
Page 348: Using Rules
The UTM-1 appliance processes user-defined rules in the order they appear in the Rules table, so that rule 1 is applied before rule 2, and so on. This enables you to define exceptions to rules, by placing the exceptions higher up in the Rules table. Check Point UTM-1 Edge User Guide... - Page 349 Using Rules For example, if you want to block all outgoing FTP traffic, except traffic from a specific IP address, you can create a rule blocking all outgoing FTP traffic and move the rule down in the Rules table. Then create a rule allowing FTP traffic from the desired IP address and move this rule to a higher location in the Rules table than the first rule.
- Page 350 Urgent class. For information on Traffic Shaper and QoS classes, see Using Traffic Shaper. Note: You must use this type of rule to allow incoming connections if your network uses Hide NAT. Check Point UTM-1 Edge User Guide...
- Page 351 Using Rules Rule Description Allow This rule type enables you to do the following: • Permit outgoing access from your internal network to a specific service on the Internet. Permit incoming access from the Internet to a specific service in your internal network.
- Page 352 Click Security in the main menu, and click the Rules tab. The Rules page appears. Do one of the following: • To add a new rule, click Add Rule. • To edit an existing rule, click the Edit icon next to the desired rule. Check Point UTM-1 Edge User Guide...
- Page 353 Using Rules The UTM-1 Firewall Rule wizard opens, with the Step 1: Rule Type dialog box displayed. Select the type of rule you want to create. Click Next. The Step 2: Service dialog box appears. The example below shows an Allow and Forward rule. Chapter 12: Setting Your Security Policy...
- Page 354 Using Rules Complete the fields using the relevant information in the following table. Click Next. The Step 3: Destination & Source dialog box appears. To configure advanced settings, click Show Advanced Settings. New fields appear. Check Point UTM-1 Edge User Guide...
- Page 355 Using Rules Complete the fields using the relevant information in the following table. Click Next. The Step 4: Rule Options dialog box appears. 10. Complete the fields using the relevant information in the following table. 11. Click Next. Chapter 12: Setting Your Security Policy...
- Page 356 You must then select the desired service or network service object from the drop-down list. Custom Service Click this option to specify that the rule should apply to a specific non- standard service. The Protocol and Port Range fields are enabled. You must fill them in. Check Point UTM-1 Edge User Guide...
- Page 357 Using Rules In this field… Do this… Protocol Select the protocol for which the rule should apply (ESP, GRE, TCP, UDP, ICMP, IGMP, or OSPF). To specify that the rule should apply for any protocol, select ANY. To specify a protocol by number, select Other. The Protocol Number field appears.
- Page 358 For information on Traffic Shaper and QoS classes, see Using Traffic Shaper. This drop-down list only appears when defining an Allow rule or an Allow and Forward rule. Check Point UTM-1 Edge User Guide...
- Page 359 Using Rules In this field… Do this… Redirect to port Select this option to redirect the connections to a specific port. You must then type the desired port in the field provided. This option is called Port Address Translation (PAT), and is only available when defining an Allow and Forward rule.
- Page 360 A tooltip displays the rule's description. To delete a rule, do the following. In the desired rule's row, click the Erase icon. A confirmation message appears. Click OK. The rule is deleted. Check Point UTM-1 Edge User Guide...
-
Page 361: Using Port-Based Security
Using Port-Based Security Using Port-Based Security The UTM-1 appliance supports the IEEE 802.1x standard for secure RADIUS authentication of users and devices that are directly attached to UTM-1 appliance's LAN and DMZ ports, as well as the wireless LAN. When an 802.1x security scheme is implemented for a port, users attempting to connect to that port are required to authenticate using their network user name and password. - Page 362 To configure a Quarantine network other than the LAN or DMZ, add a port- based VLAN network. See Adding and Editing Port-Based VLANs on page 183. Click Network in the main menu, and click the Ports tab. Check Point UTM-1 Edge User Guide...
- Page 363 Using Port-Based Security The Ports page appears. Next to the desired port, click Edit. Chapter 12: Setting Your Security Policy...
- Page 364 In the Port Security drop-down list, select 802.1x. To configure a Quarantine network, in the Quarantine Network drop-down list, select the network that should be the Quarantine network. 10. Click Apply. A warning message appears. 11. Click OK. Check Point UTM-1 Edge User Guide...
-
Page 365: Using Secure Hotspot
Using Secure HotSpot Resetting 802.1x Locking When 802.1x port-based security is configured for a LAN port, the first host that attempts to connect to this port is “locked” to the port. In order to connect a different computer to the port, you must first reset 802.1x locking. To reset 802.1x locking on all ports Click Network in the main menu, and click the Ports tab. - Page 366 My HotSpot page. Furthermore, users will be able to access the excluded network object without viewing the My HotSpot page. For information on excluding network objects from HotSpot enforcement, see Using Network Objects on page 188. Check Point UTM-1 Edge User Guide...
- Page 367 Using Secure HotSpot Important: SecuRemote/SecureClient VPN software users who are authenticated by the Internal VPN Server are automatically exempt from HotSpot enforcement. This allows, for example, authenticated employees to gain full access to the corporate LAN, while guest users are permitted to access the Internet only. Note: HotSpot enforcement can block traffic passing through the firewall;...
- Page 368 • To enable Secure HotSpot for a specific network, select the check box next to the network. • To disable Secure HotSpot for a specific network, clear the check box next to the network. Check Point UTM-1 Edge User Guide...
- Page 369 Using Secure HotSpot Click Apply. Customizing Secure HotSpot To customize Secure HotSpot Click Security in the main menu, and click the HotSpot tab. The My HotSpot page appears. Complete the fields using the information in the following table. Additional fields may appear. Chapter 12: Setting Your Security Policy...
- Page 370 Select this option to allow a single user to log on to My HotSpot from multiple login from more computers at the same time. than one computer at the same time Use HTTPS Select this option to use HTTPS for Secure HotSpot. Check Point UTM-1 Edge User Guide...
-
Page 371: Using Nat Rules
Using NAT Rules In this field… Do this… After login, To redirect users to a specific URL after logging on to My HotSpot, select this redirect to URL option and type the desired URL in the field provided. For example, you can redirect authenticated users to your company’s Web site or a “Welcome”... - Page 372 IP addresses in the larger range to the final IP address in the smaller range. • Service-Based NAT. Translation of a connection's original service to a different service. Check Point UTM-1 Edge User Guide...
- Page 373 Using NAT Rules The UTM-1 appliance also supports implicitly defined NAT rules. Such rules are created automatically upon the following events: • Hide NAT is enabled on an internal network • An Allow and Forward firewall rule is defined • Static NAT is configured for a network object (for information, see Using Network Objects on page 188) •...
- Page 374 Click Security in the main menu, and click the NAT tab. The Address Translation page appears. Do one of the following: • To add a new rule, click New. • To edit an existing rule, click the Edit icon next to the desired rule. Check Point UTM-1 Edge User Guide...
- Page 375 Using NAT Rules The Address Translation wizard opens, with the Step 1 of 3: Original Connection Details dialog box displayed. Complete the fields using the relevant information in the following table. Click Next. The Step 2 of 3: Translations to Perform dialog box appears. Complete the fields using the relevant information in the following table.
- Page 376 To specify an IP address, select Specified IP and type the desired IP address in the field provided. To specify an IP address range, select Specified Range and type the desired IP address range in the fields provided. Check Point UTM-1 Edge User Guide...
- Page 377 Using NAT Rules Field Description And the Select the original destination of the connections you want to translate. destination is To specify an IP address, select Specified IP and type the desired IP address in the text box. To specify an IP address range, select Specified Range and type the desired IP address range in the fields provided.
- Page 378 Implicitly defined NAT rules are marked Automatic Rule in the right-most column. To delete a custom NAT rule, do the following. In the desired rule's row, click the Erase icon. A confirmation message appears. Check Point UTM-1 Edge User Guide...
-
Page 379: Using Web Rules
Using Web Rules Click OK. The rule is deleted. Using Web Rules You can block or allow access to specific Web pages, by defining Web rules. If a user attempts to access a blocked page, the Access Denied page appears. For information on customizing this page, see Customizing the Access Denied Page on page 373. - Page 380 The UTM-1 appliance processes Web rules in the order they appear in the Web Rules table, so that rule 1 is applied before rule 2, and so on. This enables you to define exceptions to rules, by placing the exceptions higher up in the Web Rules table. Check Point UTM-1 Edge User Guide...
- Page 381 Using Web Rules For example, if you want to block all the pages of a particular Web site, except a specific page, you can create a rule blocking access to all of the Web site's pages and move the rule down in the Web Rules table.
- Page 382 The Web Rules page appears. Do one of the following: • To add a new rule, click Add Rule. • To edit an existing rule, click the Edit icon next to the desired rule. Check Point UTM-1 Edge User Guide...
- Page 383 Using Web Rules The UTM-1 Web Rule Wizard opens, with the Step 1: Rule Type dialog box displayed. Select the type of rule you want to create. Click Next. The Step 2: Rule Location dialog box appears. The example below shows a Block rule. Chapter 12: Setting Your Security Policy...
- Page 384 Using Web Rules Complete the fields using the relevant information in the following table. Click Next. The Step 3: Confirm Rule dialog box appears. Click Finish. The new rule appears in the Web Rules page. Check Point UTM-1 Edge User Guide...
- Page 385 Using Web Rules Table 66: Web Rules Fields In this field… Do this… Block/Allow Type the URL or IP address to which the rule should apply. access to the Wildcards (*) are supported. For example, to block all URLs that start with following URL http://www.casino- "http://www.casino-", set this field's value to:...
- Page 386 The Web Rules page appears with a list of existing Web rules. To delete a rule, do the following. In the desired rule's row, click the Erase icon. A confirmation message appears. Click OK. The rule is deleted. Check Point UTM-1 Edge User Guide...
- Page 387 Using Web Rules Customizing the Access Denied Page The Access Denied page appears when a user attempts to access a page that is blocked either by a Web rule or by the Web Filtering service. You can customize this page using the following procedure.
- Page 388 To display the Access Denied page using HTTPS, select the Use HTTPS check box. To preview the Access Denied page, click Preview. A browser window opens displaying the Access Denied page. Click Apply. Your changes are saved. Check Point UTM-1 Edge User Guide...
-
Page 389: Using Smartdefense
SmartDefense Categories .................383 Resetting SmartDefense to its Defaults ............424 Overview The UTM-1 appliance includes Check Point SmartDefense Services, based on Check Point Application Intelligence. SmartDefense provides a combination of attack safeguards and attack-blocking tools that protect your network in the following ways: •... -
Page 390: Configuring Smartdefense
After using the wizard, you can fine tune the policy settings using the SmartDefense tree. See Using the SmartDefense Tree on page 381. To configure the SmartDefense policy using the wizard Click Security in the main menu, and click the SmartDefense tab. Check Point UTM-1 Edge User Guide... - Page 391 Configuring SmartDefense The SmartDefense page appears. Click SmartDefense Wizard. The SmartDefense Wizard opens, with the Step 1: SmartDefense Level dialog box displayed. Chapter 13: Using SmartDefense...
- Page 392 For information on the levels, see the following table. Click Next. The Step 2: Application Intelligence Server Types dialog box appears. Select the check boxes next to the types of public servers that are running on your network. Click Next. Check Point UTM-1 Edge User Guide...
- Page 393 Configuring SmartDefense The Step 3: Application Blocking dialog box appears. Select the check boxes next to the types of applications you want to block from running on your network. Click Next. The Step 4: Confirmation dialog box appears. Click Finish. Chapter 13: Using SmartDefense...
- Page 394 Enables the same protections as High level, as well as the following: Extra Strict • Strict TCP (Log + Block) • Small PMTU (Log + Block) • Max Ping Size (set to 512) • Network Quota Check Point UTM-1 Edge User Guide...
- Page 395 Configuring SmartDefense Using the SmartDefense Tree For convenience, SmartDefense is organized as a tree, in which each branch represents a category of settings. When a category is expanded, the settings it contains appear as nodes. For information on each category and the nodes it contains, see SmartDefense Categories on page 383. Each node represents an attack type, a sanity check, or a protocol or service that is vulnerable to attacks.
- Page 396 To modify the node's current settings, do the following: a) Complete the fields using the relevant information in SmartDefense Categories on page 383. b) Click Apply. To reset the node to its default values: a) Click Default. Check Point UTM-1 Edge User Guide...
-
Page 397: Smartdefense Categories
SmartDefense Categories A confirmation message appears. b) Click OK. The fields are reset to their default values, and your changes are saved. SmartDefense Categories SmartDefense includes the following categories: • Denial of Service on page 383 • FTP on page 410 •... - Page 398 Block. Block the attack. This is the default. • None. No action. Track Specify whether to log Teardrop attacks, by selecting one of the following: • Log. Log the attack. This is the default. • None. Do not log the attack. Check Point UTM-1 Edge User Guide...
- Page 399 SmartDefense Categories Ping of Death In a Ping of Death attack, the attacker sends a fragmented PING request that exceeds the maximum IP packet size (64KB). Some operating systems are unable to handle such requests and crash. You can configure how Ping of Death attacks should be handled. Table 69: Ping of Death Fields In this field…...
- Page 400 Block. Block the attack. This is the default. • None. No action. Track Specify whether to log LAND attacks, by selecting one of the following: • Log. Log the attack. This is the default. • None. Do not log the attack. Check Point UTM-1 Edge User Guide...
- Page 401 SmartDefense Categories Non-TCP Flooding Advanced firewalls maintain state information about connections in a State table. In Non- TCP Flooding attacks, the attacker sends high volumes of non-TCP traffic. Since such traffic is connectionless, the related state information cannot be cleared or reset, and the firewall State table is quickly filled up.
- Page 402 In this field… Do this… Action Specify what action to take when a DDoS attack occurs, by selecting one of the following: • Block. Block the attack. This is the default. • None. No action. Check Point UTM-1 Edge User Guide...
- Page 403 SmartDefense Categories In this field… Do this… Track Specify whether to log DDoS attacks, by selecting one of the following: • Log. Log the attack. This is the default. • None. Do not log the attack. IP and ICMP This category allows you to enable various IP and ICMP protocol tests, and to configure various protections against IP and ICMP-related attacks.
- Page 404 Track Specify whether to issue logs for packets that fail the packet sanity tests, by selecting one of the following: • Log. Issue logs. This is the default. • None. Do not issue logs. Check Point UTM-1 Edge User Guide...
- Page 405 SmartDefense Categories In this field… Do this… Disable relaxed The UDP length verification sanity check measures the UDP header length UDP length and compares it to the UDP header length specified in the UDP header. If verification the two values differ, the packet may be corrupted. However, since different applications may measure UDP header length differently, the UTM-1 appliance relaxes the UDP length verification sanity check by default, performing the check but not dropping offending packets.
- Page 406 Specify whether to log ICMP echo responses that exceed the Max Ping Size Track threshold, by selecting one of the following: • Log. Log the responses. This is the default. • None. Do not log the responses. Check Point UTM-1 Edge User Guide...
- Page 407 SmartDefense Categories In this field… Do this… Max Ping Size Specify the maximum data size for ICMP echo response. The default value is 1500. IP Fragments When an IP packet is too big to be transported by a network link, it is split into several smaller IP packets and transmitted in fragments.
- Page 408 The default value is 10. Track Specify whether to log fragmented packets, by selecting one of the following: • Log. Log all fragmented packets. • None. Do not log the fragmented packets. This is the default. Check Point UTM-1 Edge User Guide...
- Page 409 SmartDefense Categories Network Quota An attacker may try to overload a server in your network by establishing a very large number of connections per second. To protect against Denial Of Service (DoS) attacks, Network Quota enforces a limit upon the number of connections per second that are allowed from the same source IP address.
- Page 410 This flood of pings may disrupt network connectivity. You can configure how the Welchia worm should be handled. Check Point UTM-1 Edge User Guide...
- Page 411 SmartDefense Categories Table 77: Welchia Fields In this field… Do this… Action Specify what action to take when the Welchia worm is detected, by selecting one of the following: • Block. Block the attack. This is the default. • None. No action. Track Specify whether to log Welchia worm attacks, by selecting one of the following:...
- Page 412 IP Mobility - Protocol 55 / • Block. Drop the packet. This is the default. SUN-ND - Protocol 77 / • None. No action. PIM - Protocol 103 Check Point UTM-1 Edge User Guide...
- Page 413 SmartDefense Categories Null Payload Some worms, such as Sasser, use ICMP echo request packets with null payload to detect potentially vulnerable hosts. You can configure how null payload ping packets should be handled. Table 79: Null Payload Fields In this field… Do this…...
- Page 414 None. No action. Track Specify whether to log packets with incorrect checksums, by selecting one of the following: • Log. Log the packets. • None. Do not log the packets. This is the default. Check Point UTM-1 Edge User Guide...
- Page 415 SmartDefense Categories This category allows you to configure various protections related to the TCP protocol. It includes the following: • Flags on page 407 • Sequence Verifier on page 406 • Small PMTU on page 402 • Strict TCP on page 401 •...
- Page 416 Each packet has a large overhead that creates a "bottleneck" on the server. You can protect against this attack by specifying a minimum packet size for data sent over the Internet. Check Point UTM-1 Edge User Guide...
- Page 417 SmartDefense Categories Table 82: Small PMTU Fields In this field… Do this… Specify what action to take when a packet is smaller than the Minimal MTU Action Size threshold, by selecting one of the following: • Block. Block the packet. •...
- Page 418 Specify whether to issue logs for the events specified by the Log Mode Track parameter, by selecting one of the following: • Log. Issue logs. This is the default. • None. Do not issue logs. Check Point UTM-1 Edge User Guide...
- Page 419 SmartDefense Categories In this field… Do this… Log Mode Specify upon which events logs should be issued, by selecting one of the following: • None. Do not issue logs. • Log per attack. Issue logs for each SYN attack. This is the default. •...
- Page 420 None. No action. This is the default. Track Specify whether to log TCP packets with incorrect sequence numbers, by selecting one of the following: • Log. Log the packets. This is the default. • None. Do not log the packets. Check Point UTM-1 Edge User Guide...
- Page 421 SmartDefense Categories Flags The URG flag is used to indicate that there is urgent data in the TCP stream, and that the data should be delivered with high priority. Since handling of the URG flag is inconsistent between different operating systems, an attacker can use the URG flag to conceal certain attacks.
- Page 422 • Sweep Scan. The attacker scans various hosts to determine where a specific port is open. You can configure how the UTM-1 appliance should react when a port scan is detected. Check Point UTM-1 Edge User Guide...
- Page 423 SmartDefense Categories Table 86: Port Scan Fields In this field… Do this… Number of ports SmartDefense detects ports scans by measuring the number of ports accessed accessed over a period of time. The number of ports accessed must exceed the Number of ports accessed value, within the number of seconds specified by the In a period of [seconds] value, in order for SmartDefense to consider the activity a scan.
- Page 424 This category allows you to configure various protections related to the FTP protocol. It includes the following: • Block Known Ports on page 412 • Block Port Overflow on page 413 • Blocked FTP Commands on page 414 • FTP Bounce on page 411 Check Point UTM-1 Edge User Guide...
- Page 425 SmartDefense Categories FTP Bounce When connecting to an FTP server, the client sends a PORT command specifying the IP address and port to which the FTP server should connect and send data. An FTP Bounce attack is when an attacker sends a PORT command specifying the IP address of a third party instead of the attacker's own IP address.
- Page 426 Specify what action to take when the FTP server attempts to connect to a well-known port, by selecting one of the following: • Block. Block the connection. • None. No action. This is the default. Check Point UTM-1 Edge User Guide...
- Page 427 SmartDefense Categories Block Port Overflow FTP clients send PORT commands when connecting to the FTP sever. A PORT command consists of a series of numbers between 0 and 255, separated by commas. To enforce compliance to the FTP standard and prevent potential attacks against the FTP server, you can block PORT commands that contain a number greater than 255.
- Page 428 In the Allowed Commands box, select the desired FTP command. Click Block. The FTP command appears in the Blocked Commands box. Click Apply. When FTP command blocking is enabled, the FTP command will be blocked. Check Point UTM-1 Edge User Guide...
- Page 429 SmartDefense Categories To allow a specific FTP command In the Blocked Commands box, select the desired FTP command. Click Accept. The FTP command appears in the Allowed Commands box. Click Apply. The FTP command will be allowed, regardless of whether FTP command blocking is enabled or disabled.
- Page 430 A worm is a self-replicating malware (malicious software) that propagates by actively sending itself to new machines. Some worms propagate by using security vulnerabilities in the HTTP protocol. You can specify how HTTP-based worm attacks should be handled. Check Point UTM-1 Edge User Guide...
- Page 431 SmartDefense Categories Table 91: Worm Catcher Fields In this field… Do this… Action Specify what action to take when an HTTP-based worm attack is detected, by selecting one of the following: • Block. Block the attack. • None. No action. This is the default. Track Specify whether to log HTTP-based worm attacks, by selecting one of the following:...
- Page 432 Select the worm patterns to detect. CIFS worm patterns Patterns are matched against file names (including file paths but list excluding the disk share name) that the client is trying to read or write from the server. Check Point UTM-1 Edge User Guide...
- Page 433 SmartDefense Categories IGMP This category includes the IGMP protocol. IGMP is used by hosts and routers to dynamically register and discover multicast group membership. Attacks on the IGMP protocol usually target a vulnerability in the multicast routing software/hardware used, by sending specially crafted IGMP packets. You can configure how IGMP attacks should be handled.
- Page 434 This category includes the following nodes: • BitTorrent • eMule • Gnutella • KaZaA • Winny Note: SmartDefense can detect peer-to-peer traffic regardless of the TCP port being used to initiate the session. Check Point UTM-1 Edge User Guide...
- Page 435 SmartDefense Categories In each node, you can configure how peer-to-peer connections of the selected type should be handled, using the following table. Table 94: Peer to Peer Fields In this field… Do this… Action Specify what action to take when a connection is attempted, by selecting one of the following: •...
- Page 436 Instant Messaging Traffic SmartDefense can block instant messaging applications that use VoIP protocols, by identifying the messaging application's fingerprints and HTTP headers. This category includes the following nodes: • • MSN Messenger • Skype • Yahoo Check Point UTM-1 Edge User Guide...
- Page 437 SmartDefense Categories Note: SmartDefense can detect instant messaging traffic regardless of the TCP port being used to initiate the session. Note: Skype versions up to 2.0.0.103 are supported. In each node, you can configure how instant messaging connections of the selected type should be handled, using the following table.
-
Page 438: Resetting Smartdefense To Its Defaults
Click Security in the main menu, and click the SmartDefense tab. The SmartDefense page appears. Click Reset to Defaults. A confirmation message appears. Click OK. The SmartDefense policy is reset to its default settings. Check Point UTM-1 Edge User Guide... -
Page 439: Using Vstream Antivirus
Overview The UTM-1 appliance includes VStream Antivirus, an embedded stream-based antivirus engine based on Check Point Stateful Inspection and Application Intelligence technologies, that performs virus scanning at the kernel level. VStream Antivirus scans files for malicious content on the fly, without downloading the files into intermediate storage. - Page 440 Note: In protocols that are not listed in this table, VStream Antivirus uses a "best effort" approach to detect viruses. In such cases, detection of viruses is not guaranteed and depends on the specific encoding used by the protocol. Check Point UTM-1 Edge User Guide...
- Page 441 Overview If you are subscribed to the VStream Antivirus subscription service, VStream Antivirus virus signatures are automatically updated, so that security is always up-to-date, and your network is always protected. Note: VStream Antivirus differs from the Email Antivirus subscription service (part of the Email Filtering service) in the following ways: •...
-
Page 442: Enabling/Disabling Vstream Antivirus
To enable/disable VStream Antivirus Click Antivirus in the main menu, and click the Antivirus tab. The VStream Antivirus page appears. Drag the On/Off lever upwards or downwards. VStream Antivirus is enabled/disabled for all internal network computers. Check Point UTM-1 Edge User Guide... -
Page 443: Viewing Vstream Antivirus Signature Database Information
Viewing VStream Antivirus Signature Database Information Viewing VStream Antivirus Signature Database Information VStream Antivirus maintains two databases: a daily database and a main database. The daily database is updated frequently with the newest virus signatures. Periodically, the contents of the daily database are moved to the main database, leaving the daily database empty. -
Page 444: Configuring Vstream Antivirus
VStream Antivirus processes policy rules in the order they appear in the Antivirus Policy table, so that rule 1 is applied before rule 2, and so on. This enables you to define exceptions to rules, by placing the exceptions higher up in the Rules table. Check Point UTM-1 Edge User Guide... - Page 445 Configuring VStream Antivirus For example, if you want to scan all outgoing SMTP traffic, except traffic from a specific IP address, you can create a rule scanning all outgoing SMTP traffic and move the rule down in the Antivirus Policy table. Then create a rule passing SMTP traffic from the desired IP address and move this rule to a higher location in the Antivirus Policy table than the first rule.
- Page 446 If a virus is found, it is blocked and logged. Adding and Editing VStream Antivirus Rules To add or edit a VStream Antivirus rule Click Antivirus in the main menu, and click the Policy tab. The Antivirus Policy page appears. Check Point UTM-1 Edge User Guide...
- Page 447 Configuring VStream Antivirus Do one of the following: • To add a new rule, click Add Rule. • To edit an existing rule, click the Edit icon next to the desired rule. The VStream Policy Rule Wizard opens, with the Step 1: Rule Type dialog box displayed.
- Page 448 The example below shows a Scan rule. Complete the fields using the relevant information in the following table. Click Next. The Step 3: Destination & Source dialog box appears. To configure advanced settings, click Show Advanced Settings. Check Point UTM-1 Edge User Guide...
- Page 449 Configuring VStream Antivirus New fields appear. Complete the fields using the relevant information in the following table. Click Next. The Step 4: Done dialog box appears. 10. If desired, type a description of the rule in the field provided. Chapter 14: Using VStream Antivirus...
- Page 450 To specify an IP address, select Specified IP and type the desired IP address source is in the field provided. To specify an IP address range, select Specified Range and type the desired IP address range in the fields provided. Check Point UTM-1 Edge User Guide...
- Page 451 Configuring VStream Antivirus In this field… Do this… And the Select the destination of the connections you want to allow or block. destination is To specify an IP address, select Specified IP and type the desired IP address in the text box. To specify an IP address range, select Specified Range and type the desired IP address range in the fields provided.
- Page 452 Click next to the desired rule, to move the rule up in the table. • Click next to the desired rule, to move the rule down in the table. The rule's priority changes accordingly. Check Point UTM-1 Edge User Guide...
- Page 453 Configuring VStream Antivirus Viewing and Deleting VStream Antivirus Rules To view or delete an existing VStream Antivirus rule Click Antivirus in the main menu, and click the Policy tab. The Antivirus Policy page appears with a list of existing VStream Antivirus rules. To view a rule's description, mouse-over the information icon in the desired rule's row.
- Page 454 To restore the default VStream Antivirus settings, do the following: a) Click Default. A confirmation message appears. b) Click OK. The VStream Antivirus settings are reset to their defaults. For information on the default values, refer to the following table. Check Point UTM-1 Edge User Guide...
- Page 455 Configuring VStream Antivirus Table 100: Advanced Antivirus Settings Fields In this field… Do this… File Types Block potentially unsafe Select this option to block all emails containing potentially unsafe file types in email attachments. messages Unsafe file types are: • DOS/Windows executables, libraries and drivers •...
- Page 456 To view a list of safe file types, click Show next to this option. Selecting this option reduces the load on the gateway by skipping safe file types. This option is selected by default. Check Point UTM-1 Edge User Guide...
- Page 457 Configuring VStream Antivirus In this field… Do this… Archive File Handling Maximum Nesting Level Type the maximum number of nested content levels that VStream Antivirus should scan. Setting a higher number increases security. Setting a lower number prevents attackers from overloading the gateway by sending extremely nested archive files.
-
Page 458: Updating Vstream Antivirus
To update the VStream Antivirus virus signature database Click Antivirus in the main menu, and click the Antivirus tab. The VStream Antivirus page appears. Click Update Now. The VStream Antivirus database is updated with the latest virus signatures. Check Point UTM-1 Edge User Guide... -
Page 459: Smart Management And Subscription Services
The UTM-1 appliance can connect to the following types of Service Centers: • Check Point's Security Management Architecture (SMART) SMART management allows deploying and centrally managing a single security policy on an unlimited number of UTM-1 appliances. Connecting to SMART management is therefore recommended for enterprises. -
Page 460: Connecting To A Service Center
Connecting to a Service Center Connecting to a Service Center To connect to a Service Center Click Services in the main menu, and click the Account tab. The Account page appears. Check Point UTM-1 Edge User Guide... - Page 461 Connecting to a Service Center In the Service Account area, click Connect. The UTM-1 Services Wizard opens, with the Service Center dialog box displayed. Make sure the Connect to a Service Center check box is selected. Do one of the following: •...
- Page 462 If the Service Center requires authentication, the Service Center Login dialog box appears. Enter your gateway ID and registration key in the appropriate fields, as given to you by your service provider, then click Next. • The Connecting screen appears. Check Point UTM-1 Edge User Guide...
- Page 463 Connecting to a Service Center • The Confirmation dialog box appears with a list of services to which you are subscribed. Click Next. The Done screen appears with a success message. Click Finish. The following things happen: Chapter 15: SMART Management and Subscription Services...
- Page 464 The services to which you are subscribed are now available on your UTM-1 appliance and listed as such on the Account page. See Viewing Services Information on page 451 for further information. • The Services submenu includes the services to which you are subscribed. Check Point UTM-1 Edge User Guide...
-
Page 465: Viewing Services Information
Viewing Services Information Viewing Services Information The Account page displays the following information about your subscription. Table 101: Account Page Fields This field… Displays… Service Center The name of the Service Center to which you are connected (if known). Name Gateway ID Your gateway ID. -
Page 466: Refreshing Your Service Center Connection
Click Services in the main menu, and click the Account tab. The Account page appears. In the Service Account area, click Refresh. The UTM-1 appliance reconnects to the Service Center. Your service settings are refreshed. Check Point UTM-1 Edge User Guide... -
Page 467: Configuring Your Account
Configuring Your Account Configuring Your Account This option allows you to access your Service Center's Web site, which may offer additional configuration options for your account. Contact your Service Center for a user ID and password. To configure your account Click Services in the main menu, and click the Account tab. -
Page 468: Web Filtering
For information on configuring network objects, see Using Network Objects on page 188. Note: The Web Filtering service is only available if you are connected to a Service Center and subscribed to this service. Check Point UTM-1 Edge User Guide... - Page 469 Web Filtering Note: The Web Filtering subscription service differs from Web rules in the following ways: • The category-based Web Filtering service is subscription-based and requires a connection to the Service Center, while Web rules are included with the UTM-1 appliance. •...
- Page 470 Web Filtering The Web Filtering page appears. Drag the On/Off lever upwards or downwards. Web Filtering is enabled/disabled. Check Point UTM-1 Edge User Guide...
- Page 471 Web Filtering Selecting Categories for Blocking You can define which types of Web sites should be considered appropriate for your family or office members, by selecting the categories. Categories marked with will remain visible, while categories marked with will be blocked and will require the administrator password for viewing.
- Page 472 To temporarily allow all connections to the Internet, click This ensures continuous access to the Internet. The button changes to When the Service Center is available again, the gateway will enforce the configured Web Filtering policy. Check Point UTM-1 Edge User Guide...
- Page 473 Web Filtering Temporarily Disabling Web Filtering If desired, you can temporarily disable the Web Filtering service. To temporarily disable Web Filtering Click Services in the main menu, and click the Web Filtering tab. The Web Filtering page appears. Click Snooze. •...
- Page 474 The service is re-enabled for all internal network computers. • If you clicked Resume in the Web Filtering page, the button changes to Snooze. • If you clicked Resume in the Web Filtering Off popup window, the popup window closes. Check Point UTM-1 Edge User Guide...
-
Page 475: Email Filtering
Email Filtering Email Filtering There are two Email Filtering services: • Email Antivirus When the Email Antivirus service is enabled, your email is automatically scanned for the detection and elimination of all known viruses and vandals. If a virus is detected, it is removed and replaced with a warning message. - Page 476 To enable/disable Email Filtering Click Services in the main menu, and click the Email Filtering tab. The Email Filtering page appears. Next to Email Antivirus, drag the On/Off lever upwards or downwards. Email Antivirus is enabled/disabled. Check Point UTM-1 Edge User Guide...
- Page 477 Email Filtering Selecting Protocols for Scanning If you are locally managed, you can define which protocols should be scanned for viruses and spam: • Email retrieving (POP3). If enabled, all incoming email in the POP3 protocol will be scanned. • Email sending (SMTP).
- Page 478 This ensures continuous access to email; however, it does not protect against viruses and spam, so use this option cautiously. The button changes to When the Service Center is available again, the gateway will enforce the configured Email Filtering policy. Check Point UTM-1 Edge User Guide...
- Page 479 Email Filtering Temporarily Disabling Email Filtering If you are having problems sending or receiving email you can temporarily disable the Email Filtering services. To temporarily disable Email Filtering Click Services in the main menu, and click the Email Filtering tab. The Email Filtering page appears.
-
Page 480: Automatic And Manual Updates
To configure software updates when locally managed Click Services in the main menu, and click the Software Updates tab. Check Point UTM-1 Edge User Guide... - Page 481 Automatic and Manual Updates The Software Updates page appears. To set the UTM-1 appliance to automatically check for and install new software updates, drag the Automatic/Manual lever upwards. The UTM-1 appliance checks for new updates and installs them according to its schedule.
- Page 482 To manually check for security and software updates Click Services in the main menu, and click the Software Updates tab. The Software Updates page appears. Click Update Now. The system checks for new updates and installs them. Check Point UTM-1 Edge User Guide...
-
Page 483: Working With Vpns
UTM-1 gateways. To connect an appliance to a Check Point SMART management server, you must connect the appliance to the Service Center using the Services page Connect tab. -
Page 484: Overview
• SecuRemote Remote Access VPN Server. Makes a network remotely available to authorized users who connect to the Remote Access VPN Server using the Check Point SecuRemote VPN Client (provided for free with your UTM-1) or another UTM-1. • SecuRemote Internal VPN Server. SecuRemote can also be used from your internal networks, allowing you to secure your wired or wireless network with strong encryption and authentication. - Page 485 Note: A locally managed VPN Server or gateway must have a static IP address. If you need a VPN Server or gateway with a dynamic IP address, you must use either Check Point SMART management or SofaWare Security Management Portal (SMP) management.
- Page 486 The connected networks function as a single network. You can use this type of VPN to mesh office branches into one corporate network. Figure 29: Site-to-Site VPN Check Point UTM-1 Edge User Guide...
- Page 487 Overview To create a Site-to-Site VPN with two VPN sites On the first VPN site’s UTM-1 appliance, do the following: Define the second VPN site as a Site-to-Site VPN Gateway, using the procedure Adding and Editing VPN Sites on page Error! Bookmark not defined..
- Page 488 Remote Access VPN Server with their Remote Access VPN Clients. Figure 30: Remote Access VPN Check Point UTM-1 Edge User Guide...
- Page 489 Overview To create a Remote Access VPN with two VPN sites On the remote user VPN site's UTM-1 appliance, add the office Remote Access VPN Server as a Remote Access VPN site. See Adding and Editing VPN Sites on page Error! Bookmark not defined.. The remote user's UTM-1 appliance will act as a Remote Access VPN Client.
-
Page 490: Setting Up Your Utm-1 Appliance As A Vpn Server
When the SecuRemote Remote Access VPN Server or SecuRemote Internal VPN Server is enabled, users can connect to the server via Check Point SecuRemote/SecureClient or via a UTM-1 appliance in Remote Access VPN mode. When the L2TP (Layer 2 Tunneling Protocol) VPN Server is enabled, users can connect to the server using an L2TP client such as the Microsoft Windows L2TP IPSEC VPN Client. - Page 491 Setting Up Your UTM-1 Appliance as a VPN Server To set up your UTM-1 appliance as a VPN Server Configure the VPN Server in one or more of the following ways: • To accept SecuRemote/SecureClient or UTM-1 remote access connections from the Internet.
- Page 492 To configure the SecuRemote Remote Access VPN Server Click VPN in the main menu, and click the VPN Server tab. The VPN Server page appears. Select the Allow SecuRemote users to connect from the Internet check box. Check Point UTM-1 Edge User Guide...
- Page 493 Setting Up Your UTM-1 Appliance as a VPN Server New check boxes appear. To allow authenticated users connecting from the Internet to bypass NAT when connecting to your internal network, select the Bypass NAT check box. To allow authenticated users connecting from the Internet to bypass the default firewall policy and access your internal network without restriction, select the Bypass default firewall policy check box.
- Page 494 To allow authenticated users connecting from internal networks to bypass the default firewall policy and access your internal network without restriction, select the Bypass default firewall policy check box. User-defined rules will still apply to the authenticated users. Check Point UTM-1 Edge User Guide...
- Page 495 Setting Up Your UTM-1 Appliance as a VPN Server Note: Bypass NAT is always enabled for the internal VPN Server, and cannot be disabled. Click Apply. The internal VPN Server is enabled for the specified connection types. Configuring the L2TP VPN Server To configure the L2TP VPN Server Click VPN in the main menu, and click the VPN Server tab.
- Page 496 Follow the online instructions to complete installation. SecureClient/SecuRemote is installed. For information on using SecureClient/SecuRemote, see the User Help. To access SecureClient/SecuRemote User Help, right-click on the VPN Client icon in the taskbar, select Settings, and then click Help. Check Point UTM-1 Edge User Guide...
- Page 497 Setting Up Your UTM-1 Appliance as a VPN Server Configuring L2TP VPN Clients If you configured the L2TP VPN Server, you must configure the L2TP VPN Client on all computers that should be allowed to remotely access your network via L2TP connections. This procedure is relevant for computers with a Windows XP operating system.
- Page 498 Setting Up Your UTM-1 Appliance as a VPN Server The Network Connection Type dialog box appears. Choose Connect to the network at my workplace. Click Next. The Network Connection dialog box appears. Choose Virtual Private Network connection. Click Next. Check Point UTM-1 Edge User Guide...
- Page 499 Setting Up Your UTM-1 Appliance as a VPN Server The Connection Name dialog box appears. 10. In the Company Name field, type your company's name. 11. Click Next. The Public Network dialog box appears. 12. Choose Do not dial the initial connection. 13.
- Page 500 The Completing the New Connection Wizard screen appears. 15. Click Finish. 16. In the Network and Dial-up Connections window, right-click on the L2TP connection, and click Properties in the popup menu. The connection's Properties dialog box opens. Check Point UTM-1 Edge User Guide...
- Page 501 Setting Up Your UTM-1 Appliance as a VPN Server 17. In the Security tab, choose Advanced (custom settings). 18. Click Settings. The Advanced Security Settings dialog box opens. 19. In the Data encryption drop-down list, select Optional encryption. 20. Choose Allow these protocols. 21.
- Page 502 25. In the Key field, type the preshared secret you configured on the L2TP VPN Server. 26. Click OK. 27. In Properties dialog box, click the Networking tab. 28. In the Type of VPN drop-down list, select L2TP IPSec VPN. 29. Click OK. Check Point UTM-1 Edge User Guide...
-
Page 503: Adding And Editing Vpn Sites
Adding and Editing VPN Sites Adding and Editing VPN Sites To add or edit VPN sites Click VPN in the main menu, and click the VPN Sites tab. The VPN Sites page appears with a list of VPN sites. Do one of the following: •... - Page 504 Select Remote Access VPN to establish remote access from your Remote Access VPN Client to a Remote Access VPN Server. • Select Site-to-Site VPN to create a permanent bi-directional connection to another Site-to-Site VPN Gateway. Click Next. Check Point UTM-1 Edge User Guide...
- Page 505 Adding and Editing VPN Sites Configuring a Remote Access VPN Site If you selected Remote Access VPN, the VPN Gateway Address dialog box appears. Enter the IP address of the Remote Access VPN Server to which you want to connect, as given to you by the network administrator. To allow the VPN site to bypass the default firewall policy and access your internal network without restriction, select the Bypass default firewall policy check box.
- Page 506 Adding and Editing VPN Sites The VPN Network Configuration dialog box appears. Specify how you want to obtain the VPN network configuration. Refer to VPN Network Configuration Fields on page 501. Click Next. Check Point UTM-1 Edge User Guide...
- Page 507 Adding and Editing VPN Sites The following things happen in the order below: • If you chose Specify Configuration, a second VPN Network Configuration dialog box appears. Complete the fields using the information in VPN Network Configuration Fields on page 501 and click Next. Chapter 16: Working with VPNs...
- Page 508 In the Backup Gateway IP field, type the name of the VPN site to use if the primary VPN site fails, and then click Next. • The Authentication Method dialog box appears. Check Point UTM-1 Edge User Guide...
- Page 509 Adding and Editing VPN Sites Complete the fields using the information in Authentication Methods Fields on page 503. Click Next. Username and Password Authentication Method If you selected Username and Password, the VPN Login dialog box appears. Complete the fields using the information in VPN Login Fields on page 504. Click Next.
- Page 510 Warning: If you try to connect to the VPN site before completing the wizard, all existing tunnels to this site will be terminated. 2) Click Next. If you selected Try to Connect to the VPN Gateway, the Connecting… screen appears, and then the Contacting VPN Site screen appears. Check Point UTM-1 Edge User Guide...
- Page 511 Adding and Editing VPN Sites • The Site Name dialog box appears. Enter a name for the VPN site. You may choose any name. Click Next. The VPN Site Created screen appears. Chapter 16: Working with VPNs...
- Page 512 Warning: If you try to connect to the VPN site before completing the wizard, all existing tunnels to this site will be terminated. Click Next. If you selected Try to Connect to the VPN Gateway, the Connecting… screen appears, and then the Contacting VPN Site screen appears. Check Point UTM-1 Edge User Guide...
- Page 513 Adding and Editing VPN Sites The Site Name dialog box appears. Enter a name for the VPN site. You may choose any name. Click Next. The VPN Site Created screen appears. Chapter 16: Working with VPNs...
- Page 514 VPN Sites list. If you edited a VPN site, the modifications are reflected in the VPN Sites list. RSA SecurID Authentication Method If you selected RSA SecurID, the Site Name dialog box appears. Enter a name for the VPN site. You may choose any name. Click Next. Check Point UTM-1 Edge User Guide...
- Page 515 Remote Access VPN Server. Note: Downloading the network configuration is only possible if you are connecting to a Check Point VPN-1 or UTM-1 Site-to-Site VPN Gateway. Specify Click this option to provide the network configuration manually.
- Page 516 OSPF, refer to the Embedded NGX CLI Reference Guide. This option is only available for when configuring a Site-to-Site VPN gateway. Destination network Type up to three destination network addresses at the VPN site to which you want to connect. Check Point UTM-1 Edge User Guide...
- Page 517 Adding and Editing VPN Sites In this field… Do this… Subnet mask Select the subnet masks for the destination network addresses. Note: Obtain the destination networks and subnet masks from the VPN site’s system administrator. Table 103: Authentication Methods Fields In this field…...
- Page 518 Manual Login, see Logging on to a VPN Site on page 524. Username Type the user name to be used for logging on to the VPN site. Password Type the password to be used for logging on to the VPN site. Check Point UTM-1 Edge User Guide...
- Page 519 Adding and Editing VPN Sites Configuring a Site-to-Site VPN Gateway If you selected Site-to-Site VPN, the VPN Gateway Address dialog box appears. Complete the fields using the information in VPN Gateway Address Fields on page 519. Click Next. Chapter 16: Working with VPNs...
- Page 520 Specify how you want to obtain the VPN network configuration. Refer to VPN Network Configuration Fields on page 501. Click Next. • If you chose Specify Configuration, a second VPN Network Configuration dialog box appears. Check Point UTM-1 Edge User Guide...
- Page 521 Adding and Editing VPN Sites Complete the fields using the information in VPN Network Configuration Fields on page 501, and then click Next. • If you chose Specify Configuration or Route All Traffic, the Backup Gateway dialog box appears. In the Backup Gateway IP field, type the name of the VPN site to use if the primary VPN site fails, and then click Next.
- Page 522 Complete the fields using the information in Route Based VPN Fields on page 519, and then click Next. • The Authentication Method dialog box appears. Complete the fields using the information in Authentication Methods Fields on page 520. Check Point UTM-1 Edge User Guide...
- Page 523 Adding and Editing VPN Sites Click Next. Shared Secret Authentication Method If you selected Shared Secret, the Authentication dialog box appears. If you chose Download Configuration, the dialog box contains additional fields. Chapter 16: Working with VPNs...
- Page 524 Complete the fields using the information in VPN Authentication Fields on page 520 and click Next. The Security Methods dialog box appears. To configure advanced security settings, click Show Advanced Settings. New fields appear. Check Point UTM-1 Edge User Guide...
- Page 525 Adding and Editing VPN Sites Complete the fields using the information in Security Methods Fields on page 521 and click Next. The Connect dialog box appears. To try to connect to the Remote Access VPN Server, select the Try to Connect to the VPN Gateway check box.
- Page 526 You may choose any name. To keep the tunnel to the VPN site alive even if there is no network traffic between the UTM-1 appliance and the VPN site, select Keep this site alive. Click Next. Check Point UTM-1 Edge User Guide...
- Page 527 Adding and Editing VPN Sites • If you selected Keep this site alive, and previously you chose Download Configuration, the "Keep Alive" Configuration dialog box appears. Do the following: 1) Type up to three IP addresses which the UTM-1 appliance should ping in order to keep the tunnel to the VPN site alive.
- Page 528 If you selected Certificate, the following things happen: • If you chose Download Configuration, the Authentication dialog box appears. Complete the fields using the information in VPN Authentication Fields on page 520 and click Next. Check Point UTM-1 Edge User Guide...
- Page 529 Adding and Editing VPN Sites • The Security Methods dialog box appears. To configure advanced security settings, click Show Advanced Settings. New fields appear. Complete the fields using the information in Security Methods Fields on page 521 and click Next. Chapter 16: Working with VPNs...
- Page 530 Click Next. • If you selected Try to Connect to the VPN Gateway, the following things happen: The Connecting… screen appears. • The Contacting VPN Site screen appears. Check Point UTM-1 Edge User Guide...
- Page 531 Adding and Editing VPN Sites • The Site Name dialog box appears. Enter a name for the VPN site. You may choose any name. To keep the tunnel to the VPN site alive even if there is no network traffic between the UTM-1 appliance and the VPN site, select Keep this site alive.
- Page 532 The VPN Sites page reappears. If you added a VPN site, the new site appears in the VPN Sites list. If you edited a VPN site, the modifications are reflected in the VPN Sites list. Check Point UTM-1 Edge User Guide...
- Page 533 Adding and Editing VPN Sites Table 105: VPN Gateway Address Fields In this field… Do this… Gateway Address Type the IP address of the Site-to-Site VPN Gateway to which you want to connect, as given to you by the network administrator. Bypass NAT Select this option to allow the VPN site to bypass NAT when connecting to your internal network.
- Page 534 Type the shared secret to use for secure communications with the VPN Secret site. This shared secret is a string used to identify the VPN sites to each other. The secret can contain spaces and special characters. Check Point UTM-1 Edge User Guide...
- Page 535 Adding and Editing VPN Sites Table 109: Security Methods Fields In this field… Do this… Phase 1 Security Methods Select the encryption and integrity algorithm to use for IKE negotiations: • Automatic. The UTM-1 appliance automatically selects the best security methods supported by the site. This is the default. •...
- Page 536 A group with more bits ensures a stronger key but lowers performance. Renegotiate every Type the interval in seconds between IPSec SA key negotiations. This is the IKE Phase-2 SA lifetime. A shorter interval ensures higher security. The default value is 3600 seconds (one hour). Check Point UTM-1 Edge User Guide...
-
Page 537: Viewing And Deleting Vpn Sites
Viewing and Deleting VPN Sites Viewing and Deleting VPN Sites To view or delete a VPN site Click VPN in the main menu, and click the VPN Sites tab. The VPN Sites page appears, with a list of all VPN sites. To delete a VPN site, do the following. -
Page 538: Logging On To A Remote Access Vpn Site
VPN site from those computers, using the same user name and password. Note: You must use a single user name and password for each VPN destination gateway. Check Point UTM-1 Edge User Guide... - Page 539 Logging on to a Remote Access VPN Site Logging on through the UTM-1 Portal Note: You can only log on to sites that are configured for Manual Login. To manually log on to a VPN site through the UTM-1 Portal Click VPN in the main menu, and click the VPN Sites tab.
- Page 540 If the UTM-1 appliance is configured to automatically download the network configuration, the UTM-1 appliance downloads the network configuration. • If when adding the VPN site you specified a network configuration, the UTM- 1 appliance attempts to create a tunnel to the VPN site. Check Point UTM-1 Edge User Guide...
-
Page 541: Logging Off A Remote Access Vpn Site
Logging off a Remote Access VPN Site • The VPN Login Status box appears. The Status field tracks the connection’s progress. • Once the UTM-1 appliance has finished connecting, the Status field changes to “Connected”. • The VPN Login Status box remains open until you manually log off of the VPN site. -
Page 542: Installing A Certificate
Do not use the same certificate for more than one gateway. Note: When the firewall is managed by SmartCenter, it automatically downloads a certificate from SmartCenter, and therefore there is no need to install one. Check Point UTM-1 Edge User Guide... - Page 543 Installing a Certificate Generating a Self-Signed Certificate To generate a self-signed certificate Click VPN in the main menu, and click the Certificate tab. The Certificate page appears. Click Install Certificate. Chapter 16: Working with VPNs...
- Page 544 The UTM-1 Certificate Wizard opens, with the Certificate Wizard dialog box displayed. Click Generate a self-signed security certificate for this gateway. The Create Self-Signed Certificate dialog box appears. Complete the fields using the information in the following table. Click Next. Check Point UTM-1 Edge User Guide...
- Page 545 Installing a Certificate The UTM-1 appliance generates the certificate. This may take a few seconds. The Done dialog box appears, displaying the certificate's details. Click Finish. The UTM-1 appliance installs the certificate. If a certificate is already installed, it is overwritten.
- Page 546 Installing a Certificate • The starting and ending dates between which the gateway's certificate and the CA's certificate are valid Check Point UTM-1 Edge User Guide...
- Page 547 Installing a Certificate Table 110: Certificate Fields In this field… Do this… Country Select your country from the drop-down list. Organization Type the name of your organization. Name Organizational Unit Type the name of your division. Gateway Name Type the gateway's name. This name will appear on the certificate, and will be visible to remote users inspecting the certificate.
- Page 548 Click Browse to open a file browser from which to locate and select the file. The filename that you selected is displayed. Click Next. The Import-Certificate Passphrase dialog box appears. This may take a few moments. Check Point UTM-1 Edge User Guide...
- Page 549 Installing a Certificate Type the pass-phrase you received from the network security administrator. Click Next. The Done dialog box appears, displaying the certificate's details. Click Finish. The UTM-1 appliance installs the certificate. If a certificate is already installed, it is overwritten.
-
Page 550: Uninstalling A Certificate
Click VPN in the main menu, and click the Certificate tab. The Certificate page appears with the name of the currently installed certificate. Click Uninstall. A confirmation message appears. Click OK. The certificate is uninstalled. A success message appears. Click OK. Check Point UTM-1 Edge User Guide... -
Page 551: Viewing Vpn Tunnels
Viewing VPN Tunnels Viewing VPN Tunnels You can view a list of currently established VPN tunnels. VPN tunnels are created and closed as follows: • Remote Access VPN sites configured for Automatic Login and Site-to-Site VPN Gateways A tunnel is created whenever your computer attempts any kind of communication with a computer at the VPN site. - Page 552 The encryption and authentication schemes used for the connection are the strongest of those used at the two sites. Your UTM-1 appliance supports AES, 3DES, and DES encryption schemes, and MD5 and SHA authentication schemes. Check Point UTM-1 Edge User Guide...
- Page 553 Viewing VPN Tunnels This field… Displays… Established The time at which the tunnel was established. This information is presented in the format hh:mm:ss, where: hh=hours mm=minutes ss=seconds Table 112: VPN Tunnels Icons This icon… Represents… This gateway A network for which an IKE Phase-2 tunnel was negotiated A Remote Access VPN Server A Site-to-Site VPN Gateway A remote access VPN user...
-
Page 554: Viewing Ike Traces For Vpn Connections
Click Reports in the main menu, and click the Tunnels tab. The VPN Tunnels page appears with a table of open tunnels to VPN sites. Click Save IKE Trace. A standard File Download dialog box appears. Click Save. Check Point UTM-1 Edge User Guide... -
Page 555: Viewing Vpn Topology
Viewing VPN Topology The Save As dialog box appears. Browse to a destination directory of your choice. Type a name for the *.elg file and click Save. The *.elg file is created and saved to the specified directory. This file contains the IKE traces of all currently-established VPN tunnels. -
Page 557: Managing Users
Changing Your Login Credentials Chapter 17 Managing Users This chapter describes how to manage UTM-1 appliance users. You can define multiple users, set their passwords, and assign them various permissions. This chapter includes the following topics: Changing Your Login Credentials............543 Adding and Editing Users ................546 Adding Quick Guest HotSpot Users............550 Viewing and Deleting Users..............552... - Page 558 Changing Your Login Credentials The Internal Users page appears. In the row of your username, click Edit. The Account Wizard opens displaying the Set User Details dialog box. Edit the Username field. Check Point UTM-1 Edge User Guide...
- Page 559 Changing Your Login Credentials Edit the Password and Confirm password fields. Note: Use 5 to 25 characters (letters or numbers) for the new password. Click Next. The Set User Permissions dialog box appears. Click Finish. Your changes are saved. Chapter 17: Managing Users...
-
Page 560: Adding And Editing Users
To edit an existing user, click Edit next to the desired user. The Account Wizard opens displaying the Set User Details dialog box. Complete the fields using the information in Set User Details Fields on page 547. Click Next. Check Point UTM-1 Edge User Guide... - Page 561 Adding and Editing Users The Set User Permissions dialog box appears. The options that appear on the page are dependant on the software and services you are using. Complete the fields using the information in Set User Permissions Fields on page 548.
- Page 562 HotSpot users. • Read/Write: The user can log on to the UTM-1 Portal and modify system settings. The default level is No Access. The “admin” user’s Administrator Level (Read/Write) cannot be changed. Check Point UTM-1 Edge User Guide...
- Page 563 Adding and Editing Users VPN Remote Select this option to allow the user to connect to this UTM-1 appliance Access using their VPN client. For further information on setting up VPN remote access, see see Setting Up Remote VPN Access for Users on page 553 Web Filtering Select this option to allow the user to override the Web Filtering service Override...
-
Page 564: Adding Quick Guest Hotspot Users
For information on changing the default expiration period, refer to the Embedded NGX CLI Reference Guide. To quickly create a guest user Click Users in the main menu, and click the Internal Users tab. The Internal Users page appears. Click Quick Guest. Check Point UTM-1 Edge User Guide... - Page 565 Adding Quick Guest HotSpot Users The Account Wizard opens displaying the Save Quick Guest dialog box. In the Expires field, click on the arrows to specify the expiration date and time. To print the user details, click Print. Click Finish. The guest user is saved.
-
Page 566: Viewing And Deleting Users
A confirmation message appears. b) Click OK. The user is deleted. To delete all expired users, do the following: a) Click Clear Expired. A confirmation message appears. b) Click OK. The expired users are deleted. Check Point UTM-1 Edge User Guide... -
Page 567: Setting Up Remote Vpn Access For Users
VPN Server, or as an L2TP VPN Server, you can allow users to access it remotely through their Remote Access VPN Clients (a Check Point SecureClient, Check Point SecuRemote, an L2TP VPN Client, or another Embedded NGX appliance). - Page 568 HotSpot session timeout value. When the RADIUS server's Session-Timeout Attribute is configured, HotSpot users will be logged off after the specified session timeout has elapsed. To use RADIUS authentication Click Users in the main menu, and click the RADIUS tab. Check Point UTM-1 Edge User Guide...
- Page 569 Using RADIUS Authentication The RADIUS page appears. Complete the fields using the following table. Click Apply. To restore the default RADIUS settings, do the following: a) Click Default. A confirmation message appears. b) Click OK. The RADIUS settings are reset to their defaults. For information on the default values, refer to the following table.
- Page 570 To clear the text box, click Clear. Port Type the port number on the RADIUS server’s host computer. The default port number is 1812. Shared Secret Type the shared secret to use for secure communication with the RADIUS server. Check Point UTM-1 Edge User Guide...
- Page 571 Using RADIUS Authentication In this field… Do this… Realm If your organization uses RADIUS realms, type the realm to append to RADIUS requests. The realm will be appended to the username as follows: <username>@<realm> For example, if you set the realm to “myrealm”, and the user "JohnS" attempts to log on to the UTM-1 Portal, the UTM-1 appliance will send the RADIUS server an authentication request with the username “JohnS@myrealm”.
- Page 572 Up Remote VPN Access for Users on page 553. Web Filtering Select this option to allow all users authenticated by the RADIUS server Override to override Web Filtering. This option only appears if the Web Filtering service is defined. Check Point UTM-1 Edge User Guide...
- Page 573 Using RADIUS Authentication In this field… Do this… HotSpot Access Select this option to allow all users authenticated by the RADIUS server to access the My HotSpot page. For information on Secure HotSpot, see Configuring Secure HotSpot on page 351. Remote Desktop Select this option to allow all users authenticated by the RADIUS server to log on to the my.firewall portal, view the Active Computers...
-
Page 574: Configuring Radius Attributes
For example, to assign the user VPN access permissions, set attribute number 2 to “true”. Assign the policy to the desired user or user group. For detailed instructions and examples, refer to the "Configuring the RADIUS Vendor- Specific Attribute" white paper. Check Point UTM-1 Edge User Guide... - Page 575 Configuring RADIUS Attributes Table 116: VSA Syntax Permission Description Attribute Attribute Attribute Values Notes Number Format none. The user Admin Indicates the String administrator’s cannot access the level of access to UTM-1 Portal. the UTM-1 Portal readonly. The user can log on to the UTM-1 Portal, but cannot modify system settings.
- Page 576 The user can Indicates whether String This permission is the user can override Web only relevant if override Web Filtering. the Web Filtering Filtering. service is false. The user enabled. cannot override Web Filtering. Check Point UTM-1 Edge User Guide...
- Page 577 Configuring RADIUS Attributes Permission Description Attribute Attribute Attribute Values Notes Number Format true. The user can RemoteDe Indicates whether String This permission is sktop the user can log on to the only relevant if remotely access my.firewall portal, the Remote view the Active computers' Desktop feature is...
-
Page 579: Using Remote Desktop
Overview Chapter 18 Using Remote Desktop This chapter describes how to remotely access the desktop of each of your computers, using the UTM-1 appliance's Remote Desktop feature. This chapter includes the following topics: Overview ....................565 Workflow....................566 Configuring Remote Desktop..............567 Configuring the Host Computer ...............570 Accessing a Remote Computer's Desktop ..........573 Overview Your UTM-1 appliance includes an integrated client for Microsoft Terminal Services,... -
Page 580: Workflow
Grant Remote Desktop Access permissions to users who should be allowed to remotely access desktops. See Adding and Editing Users on page 546. The authorized users can access remote computers' desktops as desired. See Accessing a Remote Computer's Desktop on page 573. Check Point UTM-1 Edge User Guide... -
Page 581: Configuring Remote Desktop
Configuring Remote Desktop Configuring Remote Desktop To configure Remote Desktop Click Setup in the main menu, and click the Remote Desktop tab. The Remote Desktop page appears. Do one of the following: • To enable Remote Desktop, select the Allow remote desktop access check box. - Page 582 Share local printers Select this option to allow the host computer to access printers on the client computer. This enables remote users to access their local printer when logged on to the host computer. Check Point UTM-1 Edge User Guide...
- Page 583 Configuring Remote Desktop In this field… Do this… Share local Select this option to allow the host computer to access smartcards on smartcards the client computer. This enables remote users to access their local smartcards when logged on to the host computer. Share local COM Select this option to allow the host computer to access COM ports on ports...
-
Page 584: Configuring The Host Computer
For information, refer to Microsoft documentation. On the desktop, right-click on My Computer, and select Properties in the pop- up menu that appears. The System Properties dialog box appears displaying the General tab. Click the Remote tab. Check Point UTM-1 Edge User Guide... - Page 585 Configuring the Host Computer The Remote tab appears. Select the Allow users to connect remotely to this computer check box. Click Select Remote Users. The Remote Desktop Users dialog box appears. Do the following for each remote user who should be allowed to access this computer: Click Add.
- Page 586 Type the desired user's username in the text box. The Check Names button is enabled. Click Check Names. Click OK. The Remote Desktop Users dialog box reappears with the desired user's username. Click OK. Click OK. Check Point UTM-1 Edge User Guide...
-
Page 587: Accessing A Remote Computer's Desktop
Accessing a Remote Computer's Desktop Accessing a Remote Computer's Desktop Note: The client computer must meet the following requirements: • Microsoft Internet Explorer 6.0 or later • A working Internet connection To access a remote computer's desktop Click Reports in the main menu, and click the My Computers tab. The My Computers page appears. - Page 588 These are the credentials configured for your user account in Enabling the Remote Desktop Server on page 570. Click OK. The remote computer's desktop appears onscreen. You can use the following keyboard shortcuts during the Remote Desktop session: Check Point UTM-1 Edge User Guide...
- Page 589 Accessing a Remote Computer's Desktop Table 118: Remote Desktop Keyboard Shortcuts This shortcut… Does this… ALT+INSERT Cycles through running programs in the order that they were started Displays the Start menu ALT+HOME CTRL+ALT+BREAK Toggles between displaying the session in a window and on the full screen Opens the Windows Security dialog box CTRL+ALT+END...
-
Page 591: Maintenance
Accessing a Remote Computer's Desktop Chapter 19 Maintenance This chapter describes the tasks required for maintenance and diagnosis of your UTM-1 appliance. This chapter includes the following topics: Viewing Firmware Status .................578 Updating the Firmware................580 Upgrading Your License ................582 Configuring Syslog Logging ..............584 Controlling the Appliance via the Command Line ........586 Configuring HTTPS .................592 Configuring SSH ..................595... -
Page 592: Viewing Firmware Status
You can view your current firmware version and additional details. To view the firmware status • Click Setup in the main menu, and click the Firmware tab. The Firmware page appears. The Firmware page displays the following information: Check Point UTM-1 Edge User Guide... - Page 593 00:80:11:22:33:44 the Internet connection Firmware Version The current version of the firmware Installed Product The licensed software and UTM-1 Edge X (unlimited nodes) the number of allowed nodes Uptime The time that elapsed from 01:21:15 the moment the unit was...
-
Page 594: Updating The Firmware
Connecting to a Service Center on page 446. When connected to SmartCenter, you can also update UTM-1 firmware using SmartCenter's SmartUpdate.component. For information refer to the Check Point SmartUpdate documentation. If you are not subscribed to the Software Updates service, you must update your firmware manually. - Page 595 Updating the Firmware The Firmware Update page appears. Click Browse. A browse window appears. Select the image file and click Open. The Firmware Update page reappears. The path to the firmware update image file appears in the Browse text box. Click Upload.
-
Page 596: Upgrading Your License
UTM-1 appliance you have today. There is no need to replace your hardware. You can also purchase node upgrades, as needed. For example, if you have UTM-1 Edge X16 and you need secure Internet access for more than 16 computers, you can upgrade to UTM-1 Edge X32 without changing your hardware. - Page 597 Upgrading Your License The UTM-1 Licensing Wizard opens, with the Install Product Key dialog box displayed. Click Enter a different Product Key. In the Product Key field, enter the new Product Key. Click Next. The Installed New Product Key dialog box appears. Chapter 19: Maintenance...
-
Page 598: Configuring Syslog Logging
For technical support, contact Kiwi Enterprises. Note: When managed by SmartCenter, the appliance automatically sends logs to the SmartCenter Log Viewer using a secure protocol. You can still configure Syslog logging if desired. Check Point UTM-1 Edge User Guide... - Page 599 Configuring Syslog Logging To configure Syslog logging Click Setup in the main menu, and click the Logging tab. The Logging page appears. Complete the fields using the information in the following table. Click Apply. Table 120: Logging Page Fields In this field… Do this…...
-
Page 600: Controlling The Appliance Via The Command Line
See Using the UTM-1 Portal on page 587. • Using a console connected to the UTM-1 appliance. For information, see Using the Serial Console on page 589. • Using an SSH client. See Configuring SSH on page 595. Check Point UTM-1 Edge User Guide... - Page 601 Controlling the Appliance via the Command Line Using the UTM-1 Portal You can control your appliance via the UTM-1 Portal's command line interface. To control the appliance via the UTM-1 Portal Click Setup in the main menu, and click the Tools tab. The Tools page appears.
- Page 602 In the upper field, type a command. You can view a list of supported commands using the command help. For information on all commands, refer to the Embedded NGX CLI Reference Guide. Click Go. The command is implemented. Check Point UTM-1 Edge User Guide...
- Page 603 Controlling the Appliance via the Command Line Using the Serial Console You can connect a console to the UTM-1 appliance, and use the console to control the appliance via the command line. Note: Your terminal emulation software and your UTM-1 appliance's Serial port must be configured for the same speed.
- Page 604 Controlling the Appliance via the Command Line The Ports page appears. Next to the Serial port, click Edit. Check Point UTM-1 Edge User Guide...
- Page 605 Controlling the Appliance via the Command Line The Port Setup page appears. In the Assign to drop-down list, select Console. In the Port Speed drop-down list, select the Serial port's speed (in bits per second). The Serial port's speed must match that of the attached serial console. The default value is 57600.
-
Page 606: Configuring Https
Click Setup in the main menu, and click the Management tab. The Management page appears. Specify from where HTTPS access to the UTM-1 Portal should be granted. See Access Options on page 594 for information. Check Point UTM-1 Edge User Guide... - Page 607 Configuring HTTPS Warning: If remote HTTPS is enabled, your UTM-1 appliance settings can be changed remotely, so it is especially important to make sure all UTM-1 appliance users’ passwords are difficult to guess. Note: You can use HTTPS to access the UTM-1 Portal from your internal network, by surfing to https://my.firewall.
- Page 608 Additional fields appear, in which you can enter the desired IP address range. Any IP address. Disabled Nowhere. This disables both local and remote access capability. This option is relevant to the SNMP protocol only. Check Point UTM-1 Edge User Guide...
-
Page 609: Configuring Ssh
Configuring SSH Configuring SSH UTM-1 appliance users can control the appliance via the command line, using the SSH (Secure Shell) management protocol. You can enable users to do so via the Internet, by configuring remote SSH access. You can also integrate the UTM-1 appliance with SSH- based management systems. - Page 610 The SSH configuration is saved. If you configured remote SSH access, you can now control the UTM-1 appliance from the Internet, using an SSHv2 client. For information on all supported commands, refer to the Embedded NGX CLI Reference Guide. Check Point UTM-1 Edge User Guide...
-
Page 611: Configuring Snmp
Configuring SNMP Configuring SNMP The UTM-1 appliance users can monitor the UTM-1 appliance, using tools that support SNMP (Simple Network Management Protocol). You can enable users to do so via the Internet, by configuring remote SNMP access. The UTM-1 appliance supports the following SNMP MIBs: •... - Page 612 SNMP clients uses the SNMP community string as a password, when connecting to the UTM-1 appliance. The default value is "public". It is recommended to change this string. To configure advanced SNMP settings, do the following: Click Advanced. Check Point UTM-1 Edge User Guide...
- Page 613 Configuring SNMP The SNMP Configuration page appears. Complete the fields using the following table. Chapter 19: Maintenance...
- Page 614 This information will be visible to SNMP clients, and is useful for administrative purposes. System Contact Type the name of the contact person. This information will be visible to SNMP clients, and is useful for administrative purposes. Check Point UTM-1 Edge User Guide...
- Page 615 Configuring SNMP In this field... Do this… SNMP Port Type the port to use for SNMP. The default port is 161. Send SNMP Traps Select this option to enable sending SNMP traps. An SNMP trap is a notification sent from one application to another. Send Traps On: Indicates that SNMP traps will automatically be sent upon Startup / Shutdown...
-
Page 616: Setting The Time On The Appliance
The Tools page appears. Click Set Time. The UTM-1 Set Time Wizard opens displaying the Set the UTM-1 Time dialog box. Complete the fields using the information in Set Time Wizard Fields on page 604. Click Next. Check Point UTM-1 Edge User Guide... - Page 617 Setting the Time on the Appliance The following things happen in the order below: • If you selected Specify date and time, the Specify Date and Time dialog box appears. Set the date, time, and time zone in the fields provided, then click Next. •...
- Page 618 Keep the current setting Do not change the appliance’s time. The current appliance time is displayed to the right of this option. Use a Time Server Synchronize the appliance time with a Network Time Protocol (NTP) server. Check Point UTM-1 Edge User Guide...
- Page 619 Setting the Time on the Appliance Select this option… To do the following… Specify date and time Set the appliance to a specific date and time. Table 124: Time Servers Fields In this field… Do this… Primary Server Type the IP address of the Primary NTP server. Secondary Server Type the IP address of the Secondary NTP server.
-
Page 620: Using Diagnostic Tools
IP address or DNS name is registered. This information is useful in tracking down hackers. Packet Sniffer Capture network traffic. This information is Using Packet Sniffer on page useful troubleshooting network problems. Check Point UTM-1 Edge User Guide... - Page 621 Using Diagnostic Tools Using IP Tools To use an IP tool Click Setup in the main menu, and click the Tools tab. The Tools page appears. In the Tool drop-down list, select the desired tool. In the Address field, type the IP address or DNS name for which to run the tool.
- Page 622 If you selected WHOIS, the following things happen: The UTM-1 appliance queries the Internet WHOIS server. A window displays the name of the entity to which the IP address or DNS name is registered and their contact information. Check Point UTM-1 Edge User Guide...
- Page 623 Using Diagnostic Tools Using Packet Sniffer The UTM-1 appliance includes the Packet Sniffer tool, which enables you to capture packets from any internal network or UTM-1 port. This is useful for troubleshooting network problems and for collecting data about network behavior. The UTM-1 appliance saves the captured packets to a file on your computer.
- Page 624 Browse to a destination directory of your choice. Type a name for the configuration file and click Save. The *.cap file is created and saved to the specified directory. Click Cancel to close the Packet Sniffer window. Check Point UTM-1 Edge User Guide...
- Page 625 Using Diagnostic Tools Table 126: Packet Sniffer Fields In this field… Do this… Interface Select the interface from which to collect packets. The list includes the primary Internet connection, the UTM-1 appliance ports, and all defined networks. Filter String Type the filter string to use for filtering the captured packets. Only packets that match the filter condition will be saved.
- Page 626 The and element is used to concatenate filter string elements. The filtered packets must match all concatenated filter string elements. YNTAX element and element [and element...] element && element [&& element...] ARAMETERS element String. A filter string element. Check Point UTM-1 Edge User Guide...
- Page 627 Using Diagnostic Tools XAMPLE The following filter string saves packets that both originate from IP address is 192.168.10.1 and are destined for port 80: src 192.168.10.1 and dst port 80 URPOSE The dst element captures all packets with a specific destination. YNTAX dst destination ARAMETERS...
- Page 628 String. The protocol type of the packet. ip, ip6, arp, rarp, This can be the following: atalk, aarp, dec net, sca, lat, mopdl, moprc, iso, stp, ipx, netbeui XAMPLE The following filter string saves ARP packets: ether proto arp Check Point UTM-1 Edge User Guide...
- Page 629 Using Diagnostic Tools host URPOSE The host element captures all incoming and outgoing packets for a specific computer. YNTAX host host ARAMETERS host IP Address or String. The computer to/from which the packet is sent. This can be the following: •...
- Page 630 Note: This element can be prepended by tcp or udp. For information, see tcp on page 618 and udp on page 619. ARAMETERS port Integer. The port from/to which the packet is sent. Check Point UTM-1 Edge User Guide...
- Page 631 Using Diagnostic Tools XAMPLE The following filter string saves all packets that either originated from port 80, or are destined for port 80: port 80 URPOSE The src element captures all packets with a specific source. YNTAX src source ARAMETERS source IP Address or String.
- Page 632 - Capture all TCP packets destined for a specific port. • port - Capture all TCP packets originating from or destined for a specific port. • src port - Capture all TCP packets originating from a specific port. Check Point UTM-1 Edge User Guide...
- Page 633 Using Diagnostic Tools XAMPLE The following filter string captures all TCP packets: XAMPLE The following filter string captures all TCP packets destined for port 80: tcp dst port 80 URPOSE The udp element captures all UDP packets. This element can be prepended to port-related elements.
-
Page 634: Backing Up The Utm-1 Appliance Configuration
To export the UTM-1 appliance configuration to your computer Click Setup in the main menu, and click the Tools tab. The Tools page appears. Click Export. A standard File Download dialog box appears. Click Save. Check Point UTM-1 Edge User Guide... - Page 635 Backing Up the UTM-1 Appliance Configuration The Save As dialog box appears. Browse to a destination directory of your choice. Type a name for the configuration file and click Save. The *.cfg configuration file is created and saved to the specified directory. Click Finish.
- Page 636 In the Import Settings field, type the full path to the configuration file. • Click Browse, and browse to the configuration file. Click Upload. A confirmation message appears. Click OK. The UTM-1 appliance settings are imported. Check Point UTM-1 Edge User Guide...
-
Page 637: Resetting The Utm-1 Appliance To Defaults
Resetting the UTM-1 Appliance to Defaults The Import Settings page displays the configuration file's content and the result of implementing each configuration command. Note: If the appliance's IP address changed as a result of the configuration import, your computer may be disconnected from the network; therefore you may not be able to see the results. - Page 638 Reset button automatically reverts the firmware version. To reset the UTM-1 appliance to factory defaults via the Web interface Click Setup in the main menu, and click the Tools tab. The Tools page appears. Click Factory Settings. Check Point UTM-1 Edge User Guide...
- Page 639 Resetting the UTM-1 Appliance to Defaults A confirmation message appears. To revert to the firmware version that shipped with the appliance, select the check box. Click OK. • The Please Wait screen appears. • The UTM-1 appliance returns to its factory defaults. •...
-
Page 640: Running Diagnostics
The Tools page appears. Click Diagnostics. Technical information about your UTM-1 appliance appears in a new window. To save the displayed information to an *.html file: Click Save. A standard File Download dialog box appears. Check Point UTM-1 Edge User Guide... -
Page 641: Rebooting The Utm-1 Appliance
Rebooting the UTM-1 Appliance Click Save. The Save As dialog box appears. Browse to a destination directory of your choice. Type a name for the configuration file and click Save. The *.html file is created and saved to the specified directory. To refresh the contents of the window, click Refresh. -
Page 643: Using Network Printers
Overview Chapter 20 Using Network Printers This chapter describes how to set up and use network printers. This chapter includes the following topics: Overview ....................629 Setting Up Network Printers..............630 Configuring Computers to Use Network Printers........632 Viewing Network Printers ................649 Changing Network Printer Ports...............650 Resetting Network Printers...............651 Overview Some UTM-1 models include a built-in print server, enabling you to connect USB-based... -
Page 644: Setting Up Network Printers
See Connecting the Appliance to Network Printers on page 83. Turn the printer on. In the UTM-1 Portal, click Network in the main menu, and click the Ports tab. The Ports page appears. Next to USB, click Edit. Check Point UTM-1 Edge User Guide... - Page 645 Setting Up Network Printers The USB Devices page appears. If the UTM-1 appliance detected the printer, the printer is listed on the page. If the printer is not listed, check that you connected the printer correctly, then click Refresh to refresh the page. Next to the printer, click Edit.
-
Page 646: Configuring Computers To Use Network Printers
If the computer for which you want to enable printing is located on the WAN, create an Allow rule for connections from the computer to This Gateway. See Adding and Editing Rules on page 338. Click Start > Control Panel. Check Point UTM-1 Edge User Guide... - Page 647 Configuring Computers to Use Network Printers The Control Panel window opens. Under Hardware and Sound, click Printer. Chapter 20: Using Network Printers...
- Page 648 Configuring Computers to Use Network Printers The Printers screen appears. Click Add a printer. The Add Printer wizard opens displaying the Choose a local or network printer screen. Click Add a local printer. Click Next. Check Point UTM-1 Edge User Guide...
- Page 649 Configuring Computers to Use Network Printers The Choose a printer port dialog box appears. Click Create a new port. In the Type of port drop-down list, select Standard TCP/IP Port. Click Next. The Type a printer hostname or IP address dialog box appears. 10.
- Page 650 13. Select the Query the printer and automatically select the driver to use check box. 14. Click Next. The following things happen: • If Windows cannot identify your printer, the Additional Port Information Required dialog box appears. Do the following: 1) Click Custom. 2) Click Settings. Check Point UTM-1 Edge User Guide...
- Page 651 Configuring Computers to Use Network Printers The Configure Standard TCP/IP Port Monitor dialog box opens. 3) In the Protocol area, make sure that Raw is selected. 4) In the Port Number field, type the printer's port number, as shown in the Printers page.
- Page 652 18. Right-click the printer and click Properties in the popup menu. The printer's Properties dialog box opens. 19. In the Ports tab, in the list box, select the port you added. The port's name is IP_<LAN IP address>. 20. Click OK. Check Point UTM-1 Edge User Guide...
- Page 653 Configuring Computers to Use Network Printers Windows 2000/XP This procedure is relevant for computers with a Windows 2000/XP operating system. To configure a computer to use a network printer If the computer for which you want to enable printing is located on the WAN, create an Allow rule for connections from the computer to This Gateway.
- Page 654 Note: Do not select the Automatically detect and install my Plug and Play printer check box. Click Next. The Select a Printer Port dialog box appears. Click Create a new port. In the Type of port drop-down list, select Standard TCP/IP Port. 10. Click Next. Check Point UTM-1 Edge User Guide...
- Page 655 Configuring Computers to Use Network Printers The Add Standard TCP/IP Port Wizard opens with the Welcome dialog box displayed. 11. Click Next. The Add Port dialog box appears. 12. In the Printer Name or IP Address field, type the UTM-1 appliance's LAN IP address, or "my.firewall".
- Page 656 16. In the Port Number field, type the printer's port number, as shown in the Printers page. 17. In the Protocol area, make sure that Raw is selected. 18. Click OK. The Add Standard TCP/IP Printer Port Wizard reappears. Check Point UTM-1 Edge User Guide...
- Page 657 Configuring Computers to Use Network Printers 19. Click Next. The Completing the Add Standard TCP/IP Printer Port Wizard dialog box appears. 20. Click Finish. The Add Printer Wizard reappears, with the Install Printer Software dialog box displayed. 21. Do one of the following: •...
- Page 658 24. Right-click the printer and click Properties in the popup menu. The printer's Properties dialog box opens. 25. In the Ports tab, in the list box, select the port you added. The port's name is IP_<LAN IP address>. 26. Click OK. Check Point UTM-1 Edge User Guide...
- Page 659 Configuring Computers to Use Network Printers MAC OS-X This procedure is relevant for computers with the latest version of the MAC OS-X operating system. Note: This procedure may not apply to earlier MAC OS-X versions. To configure a computer to use a network printer If the computer for which you want to enable printing is located on the WAN, create an Allow rule for connections from the computer to This Gateway.
- Page 660 Configuring Computers to Use Network Printers The Print & Fax window appears. In the Printing tab, click Set Up Printers. The Printer List window appears. Click Add. Check Point UTM-1 Edge User Guide...
- Page 661 Configuring Computers to Use Network Printers New fields appear. In the first drop-down list, select IP Printing. In the Printer Type drop-down list, select Socket/HP Jet Direct. In the Printer Address field, type the UTM-1 appliance's LAN IP address, or "my.firewall".
- Page 662 12. In the Model Name list, select the desired model. 13. Click Add. The new printer appears in the Printer List window. 14. In the Printer List window, select the newly added printer, and click Make Default. Check Point UTM-1 Edge User Guide...
-
Page 663: Viewing Network Printers
Viewing Network Printers Viewing Network Printers To view network printers Click Network in the main menu, and click the Ports tab. The Ports page appears. Next to USB, click Edit. The USB Devices page appears, displaying a list of connected printers. For each printer, the model, serial number, and status is displayed. -
Page 664: Changing Network Printer Ports
The USB Devices page appears, displaying a list of connected printers. Next to the desired printer, click Edit. The Printer Setup page appears. In the printer's Printer Server TCP Port field, type the desired port number. Click Apply. Check Point UTM-1 Edge User Guide... -
Page 665: Resetting Network Printers
Resetting Network Printers Resetting Network Printers You can cause a network printer to restart the current print job, by resetting the network printer. You may want to do this if the print job has stalled. To reset a network printer Click Network in the main menu, and click the Ports tab. -
Page 667: Troubleshooting
Connectivity Chapter 21 Troubleshooting This chapter provides solutions to common problems you may encounter while using the UTM-1 appliance. Note: For information on troubleshooting wireless connectivity, see Troubleshooting Wireless Connectivity on page 302. This chapter includes the following topics: Connectivity .................... 653 Service Center and Upgrades.............. - Page 668 You can view this setting in the Network > Internet Setup page. • Advanced ADSL configuration fine tuning options are available via the CLI. For information, refer to the Embedded NGX CLI Reference Guide. Check Point UTM-1 Edge User Guide...
- Page 669 Connectivity I cannot access http://my.firewall or http://my.vpn. What should I do? • Verify that the UTM-1 appliance is operating. • Check if the LED for the LAN port used by your computer is green. If not, check if the network cable linking your computer to the UTM-1 appliance is connected properly.
- Page 670 Configuring Servers on page 331. I run a public Web server at home but it cannot be accessed from the Internet. What should I Configure a virtual Web Server. For instructions, see Configuring Servers on page 331. Check Point UTM-1 Edge User Guide...
-
Page 671: Service Center And Upgrades
While trying to connect to a Service Center, I received the message “The Service Center did not respond”. What should I do? • If you are using a Service Center other than the Check Point Service Center, check that the Service Center IP address is typed correctly. •... -
Page 672: Other Problems
When you have finished using the application, make sure to clear the exposed host setting, otherwise your security might be compromised. In the UTM-1 Portal, I do not see the pop-up windows that the guide describes. What should I Disable any pop-up blockers for http://my.firewall. Check Point UTM-1 Edge User Guide... -
Page 673: Specifications
Federal Communications Commission Radio Frequency Interference Statement ....................674 Technical Specifications Check Point is committed to protecting the environment. The latest UTM-1 unified threat management appliance models are compliant with the RoHS Directive, meeting the European Union's strict restrictions on hazardous substances. - Page 674 Technical Specifications UTM-1 Edge X and UTM-1 Edge W Table 127: UTM-1 ADSL Models Attributes Attribute UTM-1 Edge X ADSL UTM-1 Edge W ADSL SBXD-166LHGE-5 SBXWD-166LHGE-5 Physical Attributes Dimensions 200 x 33 x 122 mm 200 x 33 x 130 mm (width x height x depth) (7.87 x 1.3 x 4.8 inches)
- Page 675 RoHS & WEEE ADSL Part 68.CS03 Part 68.CS03 R&TTE .FCC15C, TELCO Table 128: UTM-1 Non-ADSL Models Attributes Attribute UTM-1 Edge X UTM-1 Edge W SBX-166LHGE-5 SBXW-166LHGE-5 Physical Attributes Dimensions 200 x 33 x 122 mm 200 x 33 x 130 mm (width x height x depth) (7.87 x 1.3 x 4.8 inches)
- Page 676 ISO9001, ISO 14001, TL9000 CE . FCC 15B.VCCI CE . FCC 15B.VCCI Reliability EN 300 019 - 1, 2, 3 EN 300 019 - 1, 2, 3 Environment RoHS & WEEE RoHS & WEEE Check Point UTM-1 Edge User Guide...
- Page 677 MTBF (hours) 68,000 hours at 30ºC 68,000 hours at 30ºC R&TTE .FCC15C,TELCO Table 129: UTM-1 Non-ADSL Models Attributes Attribute UTM-1 Edge W SBXW-166LHGE-6 Physical Attributes Dimensions 200 x 32 x 128 mm (width x height x depth) (7.87 x 1.26 x 5.04 inches) Weight 685 g (1.51 lbs)
- Page 678 ISO 9001, 9002, 14001 FCC Part 15 B & C AS/NZS 4268: 2003 A1 Reliability EN 300 019 - 1, 2, 3 Environment RoHS & WEEE MTBF (hours) 68,000 hours at 30ºC R&TTE .FCC15C, TELCO Check Point UTM-1 Edge User Guide...
- Page 679 Technical Specifications Table 130: UTM-1 Edge X Industrial Attributes Attribute UTM-1 Edge X Industrial SBXI-166LHGE-6 Physical Attributes Dimensions 200 x 32 x 128 mm (7.87 x 1.26 x 5.04 inches) (width x height x depth) Weight Without DIN rail adapter: 650 g (1.43 lbs) With DIN rail adapter: 750 g (1.65 lbs)
- Page 680 0ºC ~ 55ºC * Operation Humidity: 10% ~ 95% Storage/Operation (non-condensed) * Extended operating temperature range of -20°C~+55°C was tested (see UTM-1 Edge X Industrial on page 669, “Extended Temperatures Test”) Wireless Attributes Table 131: UTM-1 Wireless Attributes Attribute All Wireless Models Operation Frequency 2.412-2.484 MHz...
-
Page 681: Ce Declaration Of Conformity
CE Declaration of Conformity CE Declaration of Conformity UTM-1 Edge X, Edge X ADSL, Edge W, and Edge W ADSL SofaWare Technologies Ltd., 3 Hilazon St., Ramat-Gan Israel, Hereby declares that this equipment is in conformity with the essential requirements specified in Article 3.1 (a) and 3.1 (b) of:... - Page 682 Directive) and FCC Part 15 Class B. The product has been tested in a typical configuration. For a copy of the Original Signed Declaration (in full conformance with EN45014), please contact SofaWare at the above address. Check Point UTM-1 Edge User Guide...
- Page 683 • Directive 73/23/EEC (Low Voltage Directive – LVD) • Directive 99/05/EEC (Radio Equipment and Telecommunications Terminal Equipment Directive) In accordance with the following standards: Table 133: UTM-1 Edge X Industrial Appliance Standards Standard Description Comments CISPR 22 Radiated and Conducted...
- Page 684 IEC 61000-4-6 Immunity to conducted 0.15-80 MHz, 3 Vrms, 80% AM, 1 kHz disturbances, induced by Performance Criterion A radio-frequency fields IEC 61000-4-8 Power frequency 50 Hz, 1 A/m magnetic field immunity Performance Criterion A Check Point UTM-1 Edge User Guide...
- Page 685 CE Declaration of Conformity IEC 61000-4-11 Voltage dips, short i) >95% reduction -0.5 period, Performance interruptions and voltage Criterion B variations immunity ii) 30% reduction – 25 period, Performance Criterion C Voltage Interruptions: i) >95% reduction – 250 period, Performance Criterion C Safety EN 60950-1...
- Page 686 Humidity Cycling: 40°C, 95%, 2 cycles Water: 0.01m3/minute, 90 Kpa, 15 minutes Random Vibration: 5-20-200Hz/0.01g2/Hz - 3dB, 30 minutes/axis, 1.5 hours Bump: 6ms, 18g, 100 bumps per face Drop: 100 cm, 1 corner, 3 edges and 6 face Check Point UTM-1 Edge User Guide...
- Page 687 CE Declaration of Conformity EN 300 019-2-3 Environment Low Temperature: -5°C, 16 hours (with cold T3.2 (Operational) start test) High Temperature: 55°C, 16 hours (with hot start test) Temperature change: 25°C~+55°C, 3 hours dwell, 5 cycles, 0.5°C/minute, 30 hours Humidity: 30°C, 93%, 96 hours Humidity Cycling: 55°C, 50~95%, 1 cycles Sine Vibration: 5-62-200Hz/5?/s-0.2g, 1 octave/minute, 5 cycles/axis, X, Y, and Z...
-
Page 688: Federal Communications Commission Radio Frequency Interference Statement
Performance, and could result in violation of Part 15 of the FCC Rules. This device complies with Part 15 of the FCC Rules. Operation is subject to the following two conditions: (1) this device may not cause harmful interference, and (2) this device Check Point UTM-1 Edge User Guide... - Page 689 Federal Communications Commission Radio Frequency Interference Statement must accept any interference received, including interference that may cause undesired operation. This Class B digital apparatus complies with Canadian ICES-003. FCC Radiation Exposure Statement for Wireless Models This equipment complies with FCC radiation exposure limits set forth for an uncontrolled environment.
-
Page 691: Glossary Of Terms
Glossary of Terms Glossary of Terms Certificate Authority The Certificate Authority (CA) issues ADSL Modem certificates to entities such as gateways, A device connecting a computer to the users, or computers. The entity later Internet via an existing phone line. uses the certificate to identify itself and ADSL (Asymmetric Digital Subscriber provide verifiable information. - Page 692 "handles", that are translated computer that are designed to watch out into IP addresses. for, seize and then transmit to another computer, specific types of data. An example of a Domain Name is 'www.sofaware.com'. Check Point UTM-1 Edge User Guide...
- Page 693 Glossary of Terms HTTPS IP Spoofing Hypertext Transfer Protocol over Secure A technique where an attacker attempts Socket Layer, or HTTP over SSL. to gain unauthorized access through a false source address to make it appear as A protocol for accessing a secure Web though communications have originated server.
- Page 694 IP address. NAT common customer premises equipment can be used to map several internal IP (e.g. modem). addresses to a single IP address, thereby sharing a single IP address assigned by the ISP among several PCs. Check Point UTM-1 Edge User Guide...
- Page 695 Stateful Inspection was invented by individually to the IP program layer. Check Point to provide the highest level Although each packet has the same of security by examining every layer destination IP address, it may get routed within a packet, unlike other systems of differently through the network.
- Page 696 UDP is often used for applications such as streaming data. A URL (Uniform Resource Locator) is the address of a file (resource) accessible on the Internet. The type of Check Point UTM-1 Edge User Guide...
-
Page 697: Index
Index Index 802.1x deleting, 242 configuring for a wireless network, 270 explained, 221 configuring for ports, 347 multiple, 226 Access Denied page using, 221 customizing, 373 CA, explained, 528, 679 account, configuring, 453 cable modem active computers, viewing, 312 connection, 104, 126 active connections, viewing, 314 explained, 679 ADSL... - Page 698 334 Email Antivirus, see Email Filtering, 461 Email Filtering firmware Email Antispam, 461 explained, 578, 680 Email Antivirus, 461 updating manually, 580 enabling/disabling, 462 viewing status, 578 selecting protocols for, 463 Flags, 407 Check Point UTM-1 Edge User Guide...
- Page 699 Index FTP Bounce, 411 Instant Messengers, 422 gateways internal VPN Server backup, 243 configuring, 480 default, 174, 202, 243 explained, 475 explained, 680 Internet connection ID, 451 configuring, 97 master, 243 configuring backup, 155 Site-to-Site VPN, 470 enabling/disabling, 154 Header Rejection, 415 establishing quick, 154 Hide NAT terminating, 155...
- Page 700 357 Non-TCP Flooding, 387 viewing and deleting, 364 Null Payload, 399 NetBIOS, explained, 682 OfficeMode network about, 177 changing internal range of, 162 configuring, 177 configuring, 159 packet, 152, 202, 606, 681, 682 Check Point UTM-1 Edge User Guide...
- Page 701 Index Packet Sanity, 390 connection, 103, 130 Packet Sniffer explained, 682 filter string syntax, 612 primary WLAN using, 609 configuring, 265 Pass rules, explained, 432 print server, 631 password printers changing, 543 changing ports, 652 setting up, 87 configuring computers to use, 634 Peer to Peer, 420 resetting, 653 Ping, 606...
- Page 702 327 Secure HotSpot setting up, 325 customizing, 355 Sequence Verifier, 406 enabling/disabling, 354 serial console, 16, 30 quick guest users, 550 controlling appliance via, 589 setting up, 353 using, 589 using, 351 servers Check Point UTM-1 Edge User Guide...
- Page 703 Index configuring, 331 checking for manually, 466 explained, 683 explained, 466 Remote Access VPN, 470, 476 source routing, about, 202 Web, 188, 331, 655 Spanning Tree Protocol Service Center explained, 226 connecting to, 446 with WDS, 267 disconnecting from, 453 refreshing a connection to, 452 configuring, 595 service routing, about, 202...
- Page 704 44 traffic reports importing configuration, 623 exporting, 310 viewing, 309 installing, 53 Traffic Shaper maintenance, 577 advanced, 255 mounting, 78 restoring defaults, 264 preparing for a wireless connection, 77 setting up, 256 rebooting, 629 Check Point UTM-1 Edge User Guide...
- Page 705 91 network requirements, 34 using, 92 package contents, 34 Vendor-Specific Attribute rear panel, 35 about, 553 UTM-1 Edge W product family configuring, 430 virtual access points (VAPs) about, 1 about, 179, 265 features, 9 adding and editing, 294...
- Page 706 VStream Antivirus selecting categories for, 457 about, 425 snoozing, 459 configuring, 430 temporarily disabling, 459 configuring advanced settings, 440 Web rules configuring policy, 430 adding and editing, 368 enabling/disabling, 428 changing priority of, 372 Check Point UTM-1 Edge User Guide...
- Page 707 Index customizing the Access Denied page, using, 365 viewing and deleting, 372 Welchia, 396 WEP, 265, 270 WHOIS, 606 wireless networks troubleshooting connectivity, 302 viewing statistics for, 316 wireless protocols, 270 wireless stations viewing, 316 Worm Catcher, 416 WPA2, 270 WPA-Enterprise, 270 WPA-Personal, 265, 270 Index...
Need help?
Do you have a question about the UTM-1 Edge and is the answer not in the manual?
Questions and answers