
Related Manuals for Check Point 730


Summary of Contents for Check Point 730
- Page 1 Check Point 730/750 Appliance Locally Managed Getting Started Guide Models: L-71, L-71W Classification: [Protected] P/N 707409...
- Page 2 Check Point. While every precaution has been taken in the preparation of this book, Check Point assumes no responsibility for errors or omissions. This publication and features described herein are subject to change without notice.
- Page 3 To learn more, visit the Check Point Support Center http://supportcenter.checkpoint.com. Feedback Check Point is engaged in a continuous effort to improve its documentation. Please help us by sending your comments mailto:cp_techpub_feedback@checkpoint.com?subject=Feedba ck on Check Point 730/750 Appliance Locally Managed Getting Started Guide.
-
Page 4: Health And Safety Information
To reduce potential safety issues with the DC power source, only use one of these: • The AC adapter supplied with the appliance. • A replacement AC adapter supplied by Check Point. • An AC adapter purchased as an accessory from Check Point. - Page 5 To prevent damage to any system, it is important to handle all parts with care. These measures are generally sufficient to protect your equipment from static electricity discharge: • Restore the communications appliance system board and peripherals back into the antistatic bag when they are not in use or not installed in the chassis.
- Page 6 For California: Perchlorate Material - special handling may apply. See http://www.dtsc.ca.gov/hazardouswaste/perchlorate The foregoing notice is provided in accordance with California Code of Regulations Title 22, Division 4.5, Chapter 33. Best Management Practices for Perchlorate Materials. This product, part, or both may include a lithium manganese dioxide battery which contains a perchlorate substance.
- Page 7 5 Ha'Solelim Street, Tel Aviv 67897, Israel Declares under our sole responsibility, that the products: Model Number: L-71, L-71W * Product Options: 730, 730 WiFi, 750, 750 Wifi Date First Applied: January 2016 Conform to the following Product Specifications: RF/Wi-Fi (* marked model)
- Page 8 Certification Type CE EMC, European Standard EN 55032 & EN 55024. EN61000-3-2:2014 EN61000-3-3:2013 EN61000-4-2:2009 EN61000-4-3:2006+A1:2008+A2:2010 EN61000-4-4:2012 EN61000-4-5:2014 EN61000-4-6:2014 EN61000-4-11:2004 AS/NZS CISPR 22:2009+A1 2010 Class FCC part 15B , 47 CFR subpart B , Class B ICES-003:2012 Issue 5 Class B ANSI C63.4:2009 VCCI, V-3/2015.4 Class B, V4/2012.04 Draft ETSI EN 301 489-1 V2.2.0...
- Page 9 Certification Type CE LVD: EN 60950-1 Safety UL/c-UL: UL 60950-1 Safety CB IEC 60950-1 Safety AS/NZS 60950-1 Safety ETSI EN 300 328 V2.1.1:2006 RF/Wi-Fi * ETSI EN 300 893 V2.2.2 (2017-05) RF exposure EN62311:2008, EN62479 RF/Wi-Fi * RF exposure IC RSS-102 Issue 5:2015 RF/Wi-Fi * IEEE C95.3-2002 KDB 447498D01...
- Page 10 Certification Type 47 CFR FCC Part 15, Subpart E RF/Wi-Fi * (Section 15.407) ANSI C63.10:2013 AS/NZS 4268 RF/Wi-Fi * JP ARIB STD-T66 (V3.7), MIC notice 88 RF/Wi-Fi * Appendix 43 JP ARIB STD-T71 (V6.1), MIC notice 88 Appendix 45 Date and Place of Issue: January 2016, Tel Aviv, Israel Federal Communications Commission (FCC) Statement: This device complies with Part 15 of the FCC Rules.
- Page 11 turning the equipment off and on, the user is encouraged to try to correct the interference by one of the following measures: • Reorient or relocate the receiving antenna. • Increase the separation between the equipment and receiver. • Connect the equipment into an outlet on a circuit different from that to which the receiver is connected.
- Page 12 Canadian Department Compliance Statement This device complies with Industry Canada license-exempt RSS standard(s). Operation is subject to the following two conditions: 1. This device may not cause interference, and 2. This device must accept any interference, including interference that may cause undesired operation of the device.
- Page 13 La fonction de sélection de l'indicatif du pays est désactivée pour les produits commercialisés aux États-Unis et au Canada. FOR WLAN 5 GHz DEVICE: Caution : 1. The device for operation in the band 5150-5250 MHz is only for indoor use to reduce the potential for harmful interference to co-channel mobile satellite systems;...
- Page 14 2. Le gain maximal d’antenne permis pour les dispositifs utilisant les bandes 5250-5350 MHz et 5470-5725 MHz doit se conformer à la limite de p.i.r.e.; 3. Le gain maximal d’antenne permis (pour les dispositifs utilisant la bande 5725-5825 MHz) doit se conformer à la limite de p.i.r.e.
- Page 15 European Union (EU) Electromagnetic Compatibility Directive This product is herewith confirmed to comply with the requirements set out in the Council Directive on the Approximation of the Laws of the Member States relating to Electromagnetic Compatibility Directive (2014/30/EU). This product is in conformity with Low Voltage Directive 2014/35/EU, and complies with the requirements in the Council Directive 2014/35/EU relating to electrical equipment designed for use within certain voltage limits and the Amendment...
- Page 16 Product Disposal This symbol on the product or on its packaging indicates that this product must not be disposed of with your other household waste. Instead, it is your responsibility to dispose of your waste equipment by handing it over to a designated collection point for the recycling of waste electrical and electronic equipment.
-
Page 17: Informations Relatives À La Santé Et À La Sécurité (Class B)
L'adaptateur secteur fourni avec l'appareil • Un adaptateur secteur de remplacement, fourni par Check Point • Un adaptateur secteur acheté en tant qu'accessoire auprès de Check Point Pour éviter d'endommager tout système, il est important de manipuler les éléments avec soin. Ces mesures sont... - Page 18 généralement suffisantes pour protéger votre équipement contre les décharges d'électricité statique : • Remettez dans leur sachet antistatique la carte système et les périphériques de l'appareil de communications lorsqu'ils ne sont pas utilisés ou installés dans le châssis. Certains circuits sur la carte système peuvent rester fonctionnels lorsque si l'appareil est éteint.
- Page 19 • Ne pas faire fonctionner le processeur sans refroidissement. Le processeur peut être endommagé en quelques secondes. Pour la Californie : Matériau perchloraté : manipulation spéciale potentiellement requise. Voir http://www.dtsc.ca.gov/hazardouswaste/perchlorate L'avis suivant est fourni conformément au California Code of Regulations, titre 22, division 4.5, chapitre 33. Meilleures pratiques de manipulation des matériaux perchloratés.
- Page 20 Déclare sous son entière responsabilité que les produits : Numéro de modèle : L-71, L-71W * Options de produit : 730, 730 Wi-Fi, 750, 750 Wi-Fi Date de demande initiale : Janvier 2016 Sont conformes aux normes produit suivantes :...
- Page 21 Certification Type CE EMC, Norme européenne EN 55032 & EN 55024. EN61000-3-2:2014 EN61000-3-3:2013 EN61000-4-2:2009 EN61000-4-3:2006+A1:2008+A 2:2010 EN61000-4-4:2012 EN61000-4-5:2014 EN61000-4-6:2014 EN61000-4-11:2004 AS/NZS CISPR 22:2009+A1 2010 Classe B FCC partie 15B, 47 CFR sous-partie B, Classe B ICES-003:2012 Édition 5 Classe B ANSI C63.4:2009 VCCI, V-3/2015.4 Classe B, V4/2012.04...
- Page 22 Certification Type Draft ETSI EN 301 489-1 V2.2.0 (2017-03) Draft ETSI EN 310 489-17 V3.2.0 (2017-03) CE LVD : EN 60950-1 Sécurité UL/c-UL : UL 60950-1 Sécurité CB IEC 60950-1 Sécurité AS/NZS 60950-1 Sécurité ETSI EN300 328 V2.1.1:2006 RF/Wi-Fi * ETSI EN 300 893 V2.1.1 (2017-05) Exposition aux fréquences...
- Page 23 Certification Type Canada RSS-247 Édition 1 RF/Wi-Fi * (2015-05) Canada RSS-Gen Édition 4 (2014-11) ANSI C63.10:2013 47 CFR FCC Partie 15, RF/Wi-Fi * Sous-partie C (section 15.247) ANSI C63.10:2013 FCC Partie 2 (Section 2.1091) RF/Wi-Fi * KDB 447498 D01 47 CFR FCC Partie 15, RF/Wi-Fi * Sous-partie E (Section 15.407) ANSI C63.10:2013...
- Page 24 Déclaration à la Federal Communications Commission (FCC) : Ce dispositif est conforme à la section 15 des réglementations de la FCC. Son fonctionnement est soumis aux deux conditions suivantes : (1) Cet appareil ne doit pas causer d'interférence préjudiciable et (2) Cet appareil doit tolérer toute interférence reçue, y compris celles qui pourraient causer un fonctionnement indésirable.
- Page 25 FCC Attention • Tout changement ou modification non expressément approuvé par la partie responsable de la conformité pourrait empêcher l’utilisateur autorisé de faire fonctionner cet appareil. • Cet émetteur ne doit pas être installé ou utilisé en conjonction avec d'autres antennes ou émetteurs. Déclaration à...
- Page 26 Cet appareil numérique de la classe B est conforme à la norme NMB-003 du Canada. Cet appareil et son antenne ne doivent pas être situés ou fonctionner en conjonction avec une autre antenne ou un autre émetteur, exception faites des radios intégrées qui ont été testées.
- Page 27 radars pourraient causer du brouillage et/ou des dommages aux dispositifs LAN-EL. Déclaration de conformité de classe B pour le Japon : Directive de l'Union européenne relative à la compatibilité électromagnétique Ce produit est certifié conforme aux exigences de la directive du Conseil concernant le rapprochement des législations des États membres relatives à...
- Page 28 Mise au rebut du produit Ce symbole apposé sur le produit ou son emballage signifie que le produit ne doit pas être mis au rebut avec les autres déchets ménagers. Il est de votre responsabilité de le porter à un centre de collecte désigné pour le recyclage des équipements électriques et électroniques.
-
Page 29: Table Of Contents
Threat Prevention ..............42 ....................43 Cloud Services .................43 Configuring Check Point 730/750 Appliance Workflow ..................45 Setting up the Check Point 730/750 Appliance ....46 Connecting the Cables ............46 Using the First Time Configuration Wizard Starting the First Time Configuration Wizard ....47 Welcome... - Page 30 Authentication Details ............49 Appliance Date and Time Settings ........50 Appliance Name ..............51 Internet Connection .............. 52 Local Network ................ 55 Wireless Network ..............57 Administrator Access ............58 Appliance Activation .............. 60 Software Blade Activation ........... 63 Summary .................
- Page 31 Blocking Access for Users or Groups ........76 Configuring Threat Prevention Cyber Threats ................77 Enabling/Disabling Threat Prevention Control ....78 IPS Security Levels ..............79 Changing the Anti-Virus, Anti-Bot and Threat Emulation Policy ..................80 Scheduling Blade Updates ...........81 Configuring the Anti-Spam Blade ........82 Configuring the Anti-Spam Policy ........83 Configuring Anti-Spam Exceptions...
- Page 32 Guest Network Configuring a Guest Network ..........99 Monitoring and Reports Viewing Monitoring Reports ..........101 Viewing Security Reports ............102 Viewing System Logs ............103 Getting Support Support ..................105 Where to From Here ............106...
-
Page 33: Introduction
..............................................Cloud Services ......................Thank you for choosing Check Point's Internet Security Product Suite. Check Point products provide your business with the most up to date and secure solutions available today. Check Point also delivers worldwide technical services including educational, professional, and support services... -
Page 34: Before You Get Started
For more information about the Check Point 730/750 Check Point 730/750 Appliance Appliance, see the Administration Guide. For more technical information, go to: http://support.checkpoint.com Before You Get Started Review these documents before doing the procedures in this guide: • Release Notes •... -
Page 35: Shipping Carton Contents
2 standard network cables • 1 serial console cable • 1 mini USB console cable • Wall mount kit (screws and plastic anchors) Check Point 730/750 Appliance Quick Start • Guides Guide Check Point 730/750 Appliance Getting • Started Guide... -
Page 36: Appliance Diagrams And Specifications
Appliance Diagrams and Specifications These are the Check Point 730/750 Appliance models: • Wired • Wireless (WiFi) This section describes the differences in the front and back panels. -
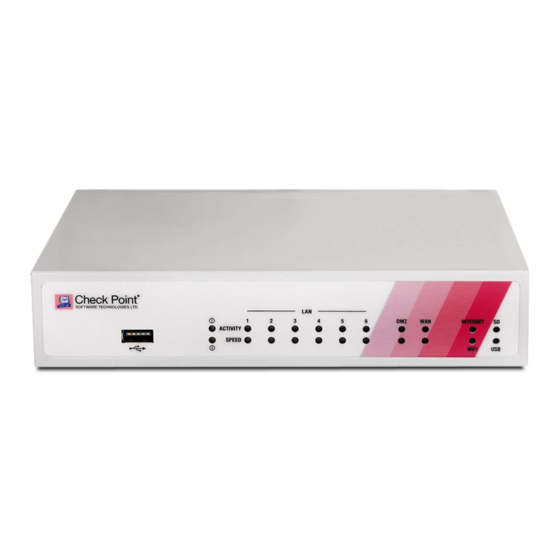
Page 37: Front Panel
Front Panel Wired Model WiFi Model... - Page 38 Item Description • Blinking green during boot. Alert LED • Red when the appliance has a resource problem such as memory shortage. • Green when connected to the Internet. Internet LED • Blinking red when the Internet connection is configured but fails to connect.
-
Page 39: Back Panel
Back Panel Wired Model WiFi Model... - Page 40 Item Description Ground (Earth) Functional grounding. DMZ and WAN Built in Ethernet ports. ports Console port RJ45 or Mini USB Serial connection configured to 115200 bps by default. Note - When both the RJ45 and Mini USB cables are connected, the Mini USB takes precedence.
-
Page 41: Check Point Software Blades Overview
ANT1, ANT2 and Ports for attaching wireless network ANT3 antennas. (Only in WiFi models). Check Point Software Blades Overview The available Check Point Software Blades can be divided into these major groups: • Access Policy • Threat Prevention •... -
Page 42: Access Policy
Access Policy The Access Policy has these features: • Firewall - Makes sure that only allowed traffic enters the company's network. Other traffic is blocked before it enters. • Application Control and URL Filtering - Makes sure that only authorized applications are used on the network and only allowed websites can be accessed. -
Page 43: Vpn
Site-to-Site VPN - Encrypts all communications between multiple sites in your network. Cloud Services Cloud Services lets you connect your Check Point 730/750 Appliance to a Cloud Services Provider that uses a Web-based application to manage, configure, and monitor the appliance. -
Page 45: Configuring Check Point 730/750 Appliance
Workflow This is the recommended workflow for configuring Check Point 730/750 Appliance: 1. Setting up the Check Point 730/750 Appliance (on page 46). 2. Connecting the cables (on page 46). 3. Configuring the appliance with the First Time Configuration Wizard. -
Page 46: Setting Up The Check Point 730/750 Appliance
Setting up the Check Point 730/750 Appliance 1. Remove the Check Point 730/750 Appliance from the shipping carton and place it on a tabletop. 2. Identity the network interface marked as LAN1. This interface is preconfigured with the IP address 192.168.1.1. -
Page 47: Using The First Time Configuration Wizard
Starting the First Time Configuration Wizard To configure the Check Point 730/750 Appliance for the first time after you complete the hardware setup, use the First Time Configuration Wizard. If you do not complete the wizard because of one of these... -
Page 48: Welcome
To open the WebUI, enter one of these addresses in the browser: • http://my.firewall • http://192.168.1.1:4434 If a security warning message shows, confirm it and continue. The First Time Configuration Wizard runs. Welcome The Welcome page introduces the product and shows the name of your appliance. -
Page 49: Authentication Details
Note that only English is allowed as the input language. Authentication Details In the Authentication Details page, enter the required details to log in to the Check Point 730/750 Appliance WebUI application or if the wizard terminates abnormally: • Administrator Name - We recommend that you change the default "admin"... -
Page 50: Appliance Date And Time Settings
Appliance Date and Time Settings In the Appliance Date and Time Settings page, configure the appliance's date, time, and time zone settings manually or use the Network Time Protocol option. When you set the time manually, the host computer's settings are used for the default date and time values. -
Page 51: Appliance Name
When you use the NTP option, there are two default servers you can use. These are ntp.checkpoint.com and ntp2.checkpoint.com. Appliance Name In the Appliance Name page, enter a name to identify the Check Point 730/750 Appliance, and enter a domain name (optional). -
Page 52: Internet Connection
When the gateway performs DNS resolving for a specified object’s name, the domain name is appended to the object name. This lets hosts in the network look up hosts by their internal names. Internet Connection In the Internet Connection page, configure your Internet connectivity details or select Configure Internet connection later. - Page 53 3. Fill in the fields for the selected connection protocol. The information you must enter is different for each protocol. You can get it from your Internet Service Provider (ISP). • Static IP - A fixed (non-dynamic) IP address. DHCP - Dynamic Host Configuration Protocol (DHCP) •...
- Page 54 WebUI application, under Device > DNS. We recommend that you configure the DNS since Check Point 730/750 Appliance needs to perform DNS resolving for different functions. For example, to connect to Check Point User Center during license activation or when Application Control, Web Filtering, Anti-Virus, or Anti-Spam services are enabled.
-
Page 55: Local Network
To test your ISP connection status: Click Connect. The appliance connects to your ISP. Success or failure shows at the bottom of the page. Local Network In the Local Network page, select to enable or disable switch on LAN ports and configure your network settings. By default, they are enabled. - Page 56 range for IP addresses that should not be defined by the DHCP server. The appliance's IP address is automatically excluded from the range. For example, if the appliance IP is 1.1.1.1, the range also starts from 1.1.1.1, but will exclude its own IP address. Important - If you choose to disable the switch on LAN ports (clear the checkbox), make sure your network cable is placed in the LAN1 port.
-
Page 57: Wireless Network
Wireless Network This applies to Wireless Network models only. In the Wireless Network page, configure wireless connectivity details. When you configure a wireless network, you must define a network name (SSID). The SSID (service set identifier) is a unique string that identifies a WLAN network to clients that try to open a wireless connection with it. -
Page 58: Administrator Access
Administrator Access In the Administrator Access page, configure if administrators can use Check Point 730/750 Appliance from a specified IP address or any IP address. To configure administrator access: 1. Select the sources from where administrators are allowed access: LAN - All internal physical ports. - Page 59 Internet - Clear traffic from the Internet (not • recommended). 2. Select the IP address from which the administrator can access Check Point 730/750 Appliance: • Any IP address • Specified IP addresses only •...
-
Page 60: Appliance Activation
Appliance Activation The appliance can connect to the Check Point User Center to pull the license information and activate the appliance. You must register the appliance in your Check Point User Center account. If you don't already have an account, you must create one. - Page 61 License activation is not completed. • The registration information for your MAC address can't be found in the Check Point User Center. To activate your appliance later In the WebUI, go to Home > License > Activate License. To configure a proxy server: 1.
- Page 62 7. You will be notified that you successfully activated the appliance. The next page shows the license status for each blade.
-
Page 63: Software Blade Activation
Software Blade Activation Select the software blades to activate on this Check Point 730/750 Appliance. QoS (bandwidth control) can only be activated from the WebUI after completing the First Time Configuration Wizard. -
Page 64: Summary
Summary The Summary page shows the details of the elements configured with the First Time Configuration Wizard. Click Finish to complete the First Time Configuration Wizard. The WebUI opens on the Home > System page. To back up the system configuration in the WebUI: Go to Device >... -
Page 65: Basic System Configuration
CHAPTER 3 Basic System Configuration In This Section: Threat Prevention Updates ..................Firmware Upgrades ....................Internet Connectivity ....................Licensing ........................Backup and Restore ....................Do these configurations after you complete the First Time Configuration Wizard and log in to the appliance. Threat Prevention Updates Click the status bar at the bottom of the WebUI to see updates. -
Page 66: Firmware Upgrades
3. Select Recurrence: • Daily • Weekly • Monthly 4. Click Apply. Firmware Upgrades To see notifications of available upgrades: 1. Click the status bar. We recommend you configure automatic upgrades. 2. Move the cursor over the notification to show the version number. -
Page 67: Internet Connectivity
If you are not connected, go to Devices > Internet. Licensing You must first register the appliance in your Check Point User Center account. If you do not have a User Center account, you must create one to receive support and updates. -
Page 68: Backup And Restore
MAC address • Registration key 4. Select Hardware Platform. 5. In Hardware Model, select Check Point 730/750 Appliance. 6. Click Activate License. You are notified when you successfully activate the appliance. If changes are made to your license, click Reactivate to get the updated license information. -
Page 69: Configuring Access Policy
Creating a Permanent Access Rule ............... Blocking Access for Users or Groups ..............Configuring Firewall Policy Your Check Point 730/750 Appliance is assigned a Firewall policy. To manually change the policy: 1. Go to Access Policy > Firewall Blade Control. 2. Select an action: •... - Page 70 These are the security levels: • Standard (Default) - Allows outgoing traffic on configured services, and traffic between internal and trusted wireless networks. Blocks incoming unencrypted traffic. • Strict - Blocks all traffic in all directions. Off - Allows all traffic. Manually defined rules are not •...
-
Page 71: Setting Outgoing Services
Setting Outgoing Services To set outgoing services in a Standard policy: Click all services. To allow specified services only: 1. Click Block all outgoing services except the following. 2. Select the services to allow. To allow all services 1. Click Allow all outgoing services. 2. - Page 72 Configure one or more of these options: • Block security risk categories - Lets you block applications and URLs that may be security risks: • Spyware • Phishing • Botnet • Spam • Anonymizer • Hacking This option is selected by default. Block inappropriate content - Lets you block access to •...
-
Page 73: Configuring Access Policy
Configuring Access Policy To configure your access policy using standard categories: 1. Go to Users & Objects > Applications & URLs. 2. Click applications Default Policy or Applications Blade Control page. 3. Select the applications and URLs to block. 4. Click Apply. -
Page 74: Blocking Specific Applications Or Urls
3. Select Custom or New to enter a specified application or URL to block. 4. Click Apply. For more information on application and URL control, see the Check Point 600/700 Appliance Administration Guide or the online help from the top right corner of your WebUI. Creating a Permanent Access Rule A Permanent Access Rule is used to make exceptions to the default category definitions for specified users or groups. - Page 75 To create a permanent access rule: 1. Go to Access Policy > Firewall > Policy. 2. In Outgoing access to the Internet, click New. The Add Rule window opens. 3. In the Add Rule window, click Any in the Source column and then click Users in the new window (Filter: Users).
-
Page 76: Blocking Access For Users Or Groups
Blocking Access for Users or Groups To block internet access for users or groups: 1. Complete steps 1 to 4 in Creating a Permanent Access Rule (on page 74). 2. Make sure Any is selected in the Application column and Block is selected in the Action column. -
Page 77: Configuring Threat Prevention
Examples include worms, blended threats (combinations of malicious code and vulnerabilities for infection and dissemination) and Trojans. To challenge today's malware landscape, Check Point's comprehensive Threat Prevention solution offers a multi-layered, pre- and post-infection defense approach and a consolidated platform that enables enterprise security to deal with modern malware. -
Page 78: Enabling/Disabling Threat Prevention Control
The Intrusion Prevention System (IPS) blocks potentially malicious attempts to exploit known vulnerabilities in files and network protocols. The Anti-Virus engine blocks viruses that pass through web and mail traffic (HTTP and SMTP) as well as through the File Transfer Protocol (FTP). The Anti-Bot engine detects bot-infected machines and blocks bot Command and Control communications. -
Page 79: Ips Security Levels
the next synchronization between the gateway and Cloud Services. IPS Security Levels Select the level of IPS protection you want: • Typical - Most suitable for small or medium sized businesses and provides the best mixture of security and performance. •... -
Page 80: Changing The Anti-Virus, Anti-Bot And Threat Emulation Policy
Changing the Anti-Virus, Anti-Bot and Threat Emulation Policy Anti-Virus, Anti-Bot, and Threat Emulation share the same policy. Your Check Point 730/750 Appliance is configured to manage a standard policy. To manually change the policy: Go to Threat Prevention > Engine Settings. -
Page 81: Scheduling Blade Updates
Scheduling Blade Updates The Blade Control page also shows the update status: • Up to date • Updated service unreachable - Usually caused by a loss in Internet connectivity. Check your Internet connection in the Device > Internet page and contact your ISP if the problem continues. -
Page 82: Configuring The Anti-Spam Blade
3. Select the blades you want to update. 4. Select the recurrence. 5. Click Apply. For more information on Anti-Virus Blade control options, see Check Point 600/700 Appliance Administration Guide or the online help from the top right-hand corner of your WebUI. Configuring the Anti-Spam Blade The Anti-Spam blade lets you block or flag emails that contain spam. -
Page 83: Configuring The Anti-Spam Policy
Configuring the Anti-Spam Policy Your Check Point 730/750 Appliance is configured to manage a typical Anti-Spam Policy. To change this policy, see Configuring Anti-Spam Exceptions (on page 84). The spam filter can identify spam emails by their source address (default), or by email content. -
Page 84: Configuring Anti-Spam Exceptions
Configuring Anti-Spam Exceptions You can configure which senders, domains, or IP addresses are not considered spam. Emails from these senders are not inspected. You can also identify specified senders, domains or IP addresses for the Anti-Spam engine to automatically block. To configure Anti-Spam exceptions: 1. -
Page 85: Configuring Anti-Spam To Detect-Only Mode
For more information on Anti-Spam Blade control options, see Check Point 600/700 Appliance Administration Guide or the online help from the top right-hand corner of your WebUI. Configuring Anti-Spam to Detect-Only Mode To configure the Anti-Spam to work in detect only mode: 1. -
Page 87: Setting Up Users And Administrators
CHAPTER 6 Setting up Users and Administrators In This Section: Configuring Local System Administrators ............Editing Information of Locally Defined Administrators ........Deleting a Locally Defined Administrator ............. Configuring Local Users ................... Granting Remote Access Permissions ..............Editing a Specific User or Group ................ -
Page 88: Configuring Local System Administrators
Configuring Local System Administrators We recommend you configure your system so an administrator can log in from a specific network only. To configure local system Administrators: 1. Go to Device > Administrators. 2. Click New. The Add Administrator window opens. 3. -
Page 89: Editing Information Of Locally Defined Administrators
Editing Information of Locally Defined Administrators To edit information of locally defined administrators: 1. Go to Device > Administrators. 2. Select the administrator and click Edit. 3. Edit the information. 4. Click Apply. Note - Only administrators with full access privileges can edit administrators. -
Page 90: Deleting A Locally Defined Administrator
Deleting a Locally Defined Administrator To delete a locally defined administrator: 1. Go to Device > Administrators. 2. Select the administrator and click Delete. 3. Click Yes in the confirmation window. Note - You cannot delete an administrator who is logged in. Configuring Local Users User profiles define how users can operate within the network: •... - Page 91 8. Click Apply. The user is added to the table in the Users window.
-
Page 92: Granting Remote Access Permissions
Granting Remote Access Permissions To add a new local users group and grant remote access permissions: 1. Go to Users & Objects > Users. 2. Click the arrow on the New button and select Users Group. 3. Enter a group name. 4. -
Page 93: Editing A Specific User Or Group
Editing a Specific User or Group To edit a specific user or group: 1. Go to Users & Objects > Users. 2. Select the user or group from the list. 3. Click Edit. 4. Edit the information. 5. Click Apply. Deleting a User or Group To delete a user or group: 1. -
Page 95: Setting Up Cloud Services
In This Section: Connecting to Cloud Services .................. Cloud Services lets you connect your Check Point 730/750 Appliance to a Cloud Services that uses a Web-based application to manage, configure, and monitor the appliance. This lets your appliance be remotely serviced by your managed services provider. -
Page 96: Connecting To Cloud Services
Connecting to Cloud Services To automatically connect to Cloud Services: 1. In the email that the Security Gateway owner gets from the Cloud Services Provider, click the activation link. After you log in, a window opens and shows the activation details sent in the email. - Page 97 Click Apply to connect. Your appliance will connect to smbmgmt.provisioning.local&Sample-Gateway.domain.Prime (Gateway ID) using the key 6382020 (registration key). Thank you, Service Center security team When connectivity is established, the Cloud Services section at the top of the page shows: • The date of the synchronization •...
-
Page 99: Guest Network
In This Section: Configuring a Guest Network .................. Your Check Point security appliance lets you provide guest Internet access without giving access to your local network. When you configure a guest network with a Hotspot, you can monitor users that connect through your guest network. - Page 100 5. In the Access Policy tab, set the access and log policy options. Note - Do not select the boxes in the Access Policy tab if you do not want guests to access your local network. 6. Enter a password. 7.
-
Page 101: Monitoring And Reports
CHAPTER 9 Monitoring and Reports In This Section: Viewing Monitoring Reports ................... Viewing Security Reports ..................Viewing System Logs ....................Viewing Monitoring Reports The Monitoring page shows statistics for security events and network analysis. When you enter this page, the latest data shows. -
Page 102: Viewing Security Reports
Viewing Security Reports The Reports page shows security reports for the time frame you specify. Security events include: • High Risk Applications - The number of potentially risky applications accessed. Infected Hosts - The number of infected hosts or servers •... -
Page 103: Viewing System Logs
2. Click View Details to get more information on the highlighted log. For more information on Reports, Logs, and Monitoring, see Check Point 600/700 Appliance Administration Guide or the online help from the top right-hand corner of your WebUI. -
Page 105: Getting Support
In This Section: Support ........................Where to From Here ....................Support For technical assistance, contact Check Point 24 hours a day, seven days a week at: • +1 972-444-6600 (Americas) • +972 3-611-5100 (International) When you contact support, you must provide your MAC address. -
Page 106: Where To From Here
Where to From Here You have now learned the basics that are necessary to begin using your Check Point 730/750 Appliance. For more information about the Check Point 730/750 Appliance Check Point 600/700 Appliance Administration and links to the Guide , go to the Check Point Support Center (http://www.checkpoint.com/cp600) where you can find all...
Need help?
Do you have a question about the 730 and is the answer not in the manual?
Questions and answers