Check Point Smart-1 225 Getting Started Manual
Hide thumbs
Also See for Smart-1 225:
- Replacing instructions (5 pages) ,
- Installing and removing (9 pages) ,
- Installing (9 pages)

Related Manuals for Check Point Smart-1 225


Summary of Contents for Check Point Smart-1 225
- Page 1 14 January 2016 Smart-1 225/3050/3150 Appliances Getting Started Guide Classification: [Protected] P/N: 706625 Models: ST-25, ST-50, ST-150...
- Page 2 No part of this product or related documentation may be reproduced in any form or by any means without prior written authorization of Check Point. While every precaution has been taken in the preparation of this book, Check Point assumes no responsibility for errors or omissions.
- Page 3 Rails" on page 21) 15 May 2014 First release of this document Feedback Check Point is engaged in a continuous effort to improve its documentation. Please help us by sending your comments cp_techpub_feedback@checkpoint.com?subject=Feedback on Smart-1 225/3050/3150 Appliances Getting Started Guide.
- Page 4 • Under no circumstances should the lithium battery cell used to power the real-time clock be allowed to short. The battery cell may heat up under these conditions and present a burn hazard. Smart-1 225/3050/3150 Appliances Getting Started Guide...
- Page 5 5. Reliable Earthing - Reliable earthing of rack-mounted equipment should be maintained. Particular attention should be given to supply connections other than direct connections to the branch circuit (e.g. use of power strips). Smart-1 225/3050/3150 Appliances Getting Started Guide...
- Page 6 This equipment generates, uses and can radiate radio frequency energy and, if not installed and used in accordance with the instructions, may cause harmful Smart-1 225/3050/3150 Appliances Getting Started Guide...
- Page 7 A est conforme à la norme NMB-003 du Canada. This Class B digital apparatus complies with Canadian ICES-003. Cet appareil numérique de la classe B est conforme à la norme NMB-003 du Canada. Japan Compliance Statement: Class A Smart-1 225/3050/3150 Appliances Getting Started Guide...
- Page 8 For more information about where you can drop off your waste equipment for recycling, please contact your local city office or your household waste disposal service. Smart-1 225/3050/3150 Appliances Getting Started Guide...
- Page 9 Certains circuits sur la carte système peuvent rester fonctionnels même si l'appareil est éteint. • Il ne faut jamais court-circuiter la pile au lithium qui alimente l'horloge temps-réel. Elle risque de s'échauffer et de causer des brûlures. Smart-1 225/3050/3150 Appliances Getting Started Guide...
- Page 10 5. Mise à la terre: Les équipements montés en rack doivent être en permanence reliés à un terre fiable. Il faut faire particulièrement attention aux branchements qui ne vont pas directement à la source électrique (par exemple des multiprises). Smart-1 225/3050/3150 Appliances Getting Started Guide...
- Page 11 Remarque: Cet équipement a été testé et déclaré conforme aux limites pour appareils numériques de classe B, selon la section 15 des règlements de la FCC. Ces limitations sont conçues pour fournir une protection raisonnable contre les interférences nocives Smart-1 225/3050/3150 Appliances Getting Started Guide...
- Page 12 Ce produit est certifié conforme aux exigences de la directive du Conseil concernant concernant le rapprochement des législations des États membres relatives à la directive sur la compatibilité électromagnétique (2004/108/CE). Pour l'évaluation concernant la compatibilité électromagnétique (2004/108/CE). Smart-1 225/3050/3150 Appliances Getting Started Guide...
- Page 13 Pour obtenir plus d'informations sur les lieux où déposer vos équipements mis au rebut, veuillez contacter votre municipalité ou le service de gestion des déchets. Smart-1 225/3050/3150 Appliances Getting Started Guide...
-
Page 15: Table Of Contents
Advanced Configuration ................24 Connecting to the Smart-1 Appliances CLI ............24 Smart-1 Appliances Hardware ..............25 Smart-1 225 Front Panel ................26 Smart-1 3050 Front Panel ................ 28 Smart-1 3150 Front Panel ................ 30 Front Panel LEDs and Onboard Ports ............32 Front Panel LCD Screen ................ - Page 16 Preparing SmartReporter in the Multi-Domain Server Environment ..48 Enabling Connectivity with the Multi-Domain Server ........49 Creating a Consolidation Session for SmartReporter ......49 RAID on Smart-1 225/3050/3150 ..............51 RAID Levels and Storage Options ............52 RAID Configuration Instructions .............. 52 Monitoring RAID Synchronization ............
- Page 17 Compliance Information ................79 Declaration of Conformity ................ 79 Декларация о соответствии ..............83...
-
Page 19: Introduction
429-4391. For more technical information about Check Point products, consult the Check Point Support Center http://supportcenter.checkpoint.com. Welcome to the Check Point family. We look forward to meeting all of your current and future network, application and management security needs. Smart-1 Appliances Overview... -
Page 20: Shipping Carton Contents
For Hardware Diagnostic Tool: • Copper RJ-45 loopback plug • Fiber optic loopback plug • Documentation Getting Started Guide • Quick Start Guide • Image Management Guide • Installing Telescoping Rails Guide • User license agreement Smart-1 225/3050/3150 Appliances Getting Started Guide... -
Page 21: Mounting The Smart-1 Appliances In A Rack
Installing Telescoping Rails ................Appliance Air Vents ....................Installing Telescoping Rails You can install your Smart-1 appliances with the Telescoping Rails hardware. See the Installing the Telescoping Rails http://downloads.checkpoint.com/dc/download.htm?ID=32424 booklet for illustrated installation procedures. Smart-1 225/3050/3150 Appliances Getting Started Guide... -
Page 22: Appliance Air Vents
The appliance and rack rails have been tested in extreme conditions and do not block air flow to the appliance. These appliances are specifically designed to install with these rails. Smart-1 225/3050/3150 Appliances Getting Started Guide... -
Page 23: Configuring Smart-1 Appliances
Smart-1 Appliances comes with different software images. Select the software image to install on the appliance. It takes a few minutes to install the software image. To see the installation progress, use a serial cable to connect to the Console port. Smart-1 225/3050/3150 Appliances Getting Started Guide... -
Page 24: Initial Configuration
PuTTY (from Windows) or Minicom (from Unix/Linux). Connection parameters for Smart-1 Appliances are: 9600bps, 8 bits, no parity, 1 stop bit (8N1), Flow Control - None. • An SSH connection to the management interface (if SSHD is configured). Smart-1 225/3050/3150 Appliances Getting Started Guide... -
Page 25: Smart-1 Appliances Hardware
Front Panel LEDs and Onboard Ports ..............Front Panel LCD Screen ..................Smart-1 225 Rear Panel ..................Smart-1 3050 Rear Panel ..................Smart-1 3150 Rear Panel ..................Lights Out Management ..................Replacing and Upgrading Components .............. Smart-1 225/3050/3150 Appliances Getting Started Guide... -
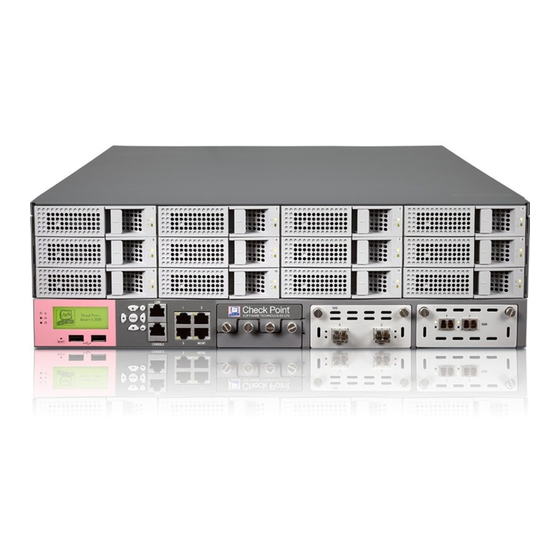
Page 26: Smart-1 225 Front Panel
Item Component Description System LEDs System power, system status, and hard disk activity LCD screen management operations Keypad Perform basic Reset Does a hardware reset. Insert a pin USB ports 2 x USB 2.0 ports Smart-1 225/3050/3150 Appliances Getting Started Guide... - Page 27 WebUI, DiskNumber 0 is the left disk, and DiskNumber 1 is the right disk. The numbers on the stickers on the disks agree with the RAID DiskNumber. Configuring RAID For more about RAID, see Smart-1 225/3050/3150 Appliances Getting Started Guide...
-
Page 28: Smart-1 3050 Front Panel
USB ports 2 x USB 2.0 ports Console port For a serial connection to the appliance using a terminal emulation program such as PuTTY LOM port LOM (Lights Out Management) port for the LOM card Smart-1 225/3050/3150 Appliances Getting Started Guide... - Page 29 The numbers on the stickers on the disks agree with the RAID DiskNumber. Configuring RAID For more about RAID, see Expansion line Expansion slot for optional line cards card SAN Card Expansion slot for optional SAN card Smart-1 225/3050/3150 Appliances Getting Started Guide...
-
Page 30: Smart-1 3150 Front Panel
LOM (Lights Out Management) port for the LOM card Front Panel LEDs and Onboard Ports Onboard network (on page 32) . Use ports these ports to connect • The appliance to the network • To the appliance from the network Smart-1 225/3050/3150 Appliances Getting Started Guide... - Page 31 The numbers on the stickers on the disks agree with the RAID DiskNumber. Configuring RAID For more about RAID, see Expansion line Expansion slot for optional line cards card SAN Card Expansion slot for optional SAN card Slot cover Expansion slot for future use Smart-1 225/3050/3150 Appliances Getting Started Guide...
-
Page 32: Front Panel Leds And Onboard Ports
Smart-1 Appliances Hardware Front Panel LEDs and Onboard Ports Smart-1 225 Front Panel LEDs and Onboard Ports Smart-1 3050 and Smart-1 3150 Front Panel LEDs and Onboard Ports Item Component Description Management port For an Ethernet connection to a computer that does the initial configuration of this appliance. - Page 33 Off - HDD power is off (HDD) power LED • On (Green) - HDD power is on Hard disk drive • Off - No HDD Activity (HDD) activity LED • On (Amber) - HDD Activity Smart-1 225/3050/3150 Appliances Getting Started Guide...
-
Page 34: Front Panel Lcd Screen
Configure the management IP address, netmask, and default gateway of the appliance • Reboot the appliance • Enable DHCP (SecurePlatform only) • Run the Appliance Hardware Diagnostic Tool ("Hardware Diagnostic Tool and Restoring Factory Defaults" on page 55). Smart-1 225/3050/3150 Appliances Getting Started Guide... - Page 35 Select a menu option Change a number Navigate the menu Go back to previous menu (Not used) When Entering an IP Address Press Enter the grub menu Any button Move to the next digit Smart-1 225/3050/3150 Appliances Getting Started Guide...
-
Page 36: Smart-1 225 Rear Panel
1, 2, 3, 4. The one nearest the PSU is 1. The one furthest is 4. Thumb screws for Loosen screws to remove cooling fan unit from the cooling fan unit appliance. Smart-1 225/3050/3150 Appliances Getting Started Guide... - Page 37 ESD grounding plug Connect an ESD strap to this plug when servicing the appliance. Grounding point Use when a DC Power Supply Unit is installed. SAN ports For the optional SAN (Storage Area Network) card. Smart-1 225/3050/3150 Appliances Getting Started Guide...
-
Page 38: Smart-1 3050 Rear Panel
• On (Amber) - Power off • On (Green) - Power on Power supply units 2 redundant, AC power supplies that you can hot swap. Each power supply unit connects to an electric outlet. Smart-1 225/3050/3150 Appliances Getting Started Guide... - Page 39 • Long press to force shut down (when on) ESD grounding plug Connect an ESD strap to this plug when servicing the appliance. Grounding point Use when a DC Power Supply Unit is installed. Smart-1 225/3050/3150 Appliances Getting Started Guide...
-
Page 40: Smart-1 3150 Rear Panel
LED indicator for • Off - Power supply is not connected to an electric each power supply outlet unit • On (Amber) - Power off • On (Green) - Power on Smart-1 225/3050/3150 Appliances Getting Started Guide... - Page 41 • Long press to force shut down (when on) ESD grounding plug Connect an ESD strap to this plug when servicing the appliance. Grounding point Use when a DC Power Supply Unit is installed. Smart-1 225/3050/3150 Appliances Getting Started Guide...
-
Page 42: Lights Out Management
For more information about installing these parts and components, see the Appliances home page http://supportcontent.checkpoint.com/solutions?id=sk98931. Unless directed to do so by Check Point technical support, you are prohibited by warranty and support agreements from replacing any parts. Smart-1 225/3050/3150 Appliances Getting Started Guide... -
Page 43: Configuring Smartevent
2. In SmartDashboard, create a new host for each computer that contains a component of SmartEvent: a) Select Manage > Network Object > New > Check Point > Host b) In the General Properties window, click Communication and enter the activation key. -
Page 44: Preparing Smartevent In The Multi-Domain Server Environment
In SmartDashboard, create a new host for each computer that contains a component of SmartEvent: b) Select Manage > Network Object > New > Check Point > Host. c) In the General Properties window, click Communication and enter the activation key. -
Page 45: Enabling Connectivity With The Multi-Domain Server
Define the Internal Network from these objects. Note - If running SmartEvent Intro in a Security Management Server environment, the internal network will be defined automatically from firewall topology information. You can customize the internal network definition Smart-1 225/3050/3150 Appliances Getting Started Guide... -
Page 46: Defining Correlation Units And Log Servers For Smartevent
At this point, SmartEvent Intro will begin to read logs and detect events. To learn how to manage and fine-tune the system using the SmartEvent Intro Client, SmartEvent Administration Guide see the for your software version on the Check Point Support Center http://supportcenter.checkpoint.com. Smart-1 225/3050/3150 Appliances Getting Started Guide... -
Page 47: Configuring Smartreporter
2. In SmartDashboard, create a new host for each computer that contains a component of SmartReporter: a) Select Manage > Network Object > New > Check Point > Host. b) In the General Properties window, click Communication and enter the activation key. -
Page 48: Preparing Smartreporter In The Multi-Domain Server Environment
2. In Global SmartDashboard, create a new host for each computer that contains a component of SmartReporter: a) Select Manage > Network Object > New > Check Point > Host. b) In the General Properties window, click Communication and enter the activation key. -
Page 49: Enabling Connectivity With The Multi-Domain Server
4. Select the log server from which logs will be collected and will be used to generate reports. 5. Click Next. The New Consolidation Session window appears. 6. Choose whether to use the default source logs and database tables, or select custom source logs and database tables for consolidation. Smart-1 225/3050/3150 Appliances Getting Started Guide... - Page 50 CONNECTIONS. The preselected logs are the sequence of log files that are generated by Check Point products. The preselected logs session will begin at the beginning of the last file in the sequence, or at the point the sequence was stopped.
-
Page 51: Raid On Smart-1 225/3050/3150
• Add HDDs to Smart-1 3150, and configure RAID on the new HDDs. • Monitor RAID synchronization. Note - Only RAID firmware updates provided by Check Point are supported. Related Document: • Smart-1 225/3050/3150 Installing and Removing Hard Disk Drives http://supportcontent.checkpoint.com/documentation_download?ID=32420... -
Page 52: Raid Levels And Storage Options
HDDs without reconfiguring the existing RAID: • 5 or 10 for 4 HDDs • 5 or 6 for 6 HDDs. RAID Configuration Instructions Smart-1 RAID Administration Guide To configure RAID, see the http://supportcontent.checkpoint.com/documentation_download?ID=32479. Smart-1 225/3050/3150 Appliances Getting Started Guide... -
Page 53: Monitoring Raid Synchronization
The numbered labels on the hard disk drawers of the appliance agree with the DiskNumber value in the output of the raid_diagnostic command. This is an example output for Smart-1 225. DiskID 0 is the left hard disk. DiskID 1 is the right hard disk. - Page 54 In the Gaia WebUI, go to the Maintenance > RAID Monitoring page. To monitor the RAID status of the disks - SmartView Monitor: 1. Open SmartView Monitor. 2. Click All Gateways. 3. Select the Smart-1 Gateway. 4. Click System Information. 5. Click RAID Volumes. Smart-1 225/3050/3150 Appliances Getting Started Guide...
- Page 55 CHAPTE R 8 Hardware Diagnostic Tool and Restoring Factory Defaults In This Section: Running the Diagnostic Tool ................Restoring Using the WebUI ................. Restoring Using the Console Boot Menu ............Restoring Using the LCD Panel ................Smart-1 225/3050/3150 Appliances Getting Started Guide...
-
Page 56: Hardware Diagnostic Tool And Restoring Factory Defaults
3. Reboot or turn on the appliance. 4. When this message shows, hit any key to activate the Boot menu. You have about four seconds. Press any key to see the boot menu [Booting in 5 seconds] Smart-1 225/3050/3150 Appliances Getting Started Guide... -
Page 57: Restoring Using The Webui
2. Log in to the WebUI of the appliance using the administrator username and password. 3. In the WebUI, click Maintenance > Factory Defaults. The Factory Defaults window opens. 4. Select the image version that you are restoring. 5. Click Apply. Smart-1 225/3050/3150 Appliances Getting Started Guide... -
Page 58: Secureplatform
In PuTTY select the Serial connection type. 4. Define the serial port settings: 9600 BPS, 8 bits, no parity, 1 stop bit. 5. From the Flow control list, select None. 6. Connect to the appliance. 7. Turn on the appliance. Smart-1 225/3050/3150 Appliances Getting Started Guide... -
Page 59: Restoring Using The Lcd Panel
2. When the countdown begins, press any of the arrow keys. The Boot menu appears. 3. Using the arrow buttons, scroll to the relevant default factory image. 4. Press 5. Confirm the reset by pressing Smart-1 225/3050/3150 Appliances Getting Started Guide... - Page 60 While the appliance is restored to the default image, this message is continuously displayed: Reverting image don't turn off. After the appliance is restored to its default factory configuration, the appliance reboots and the initializing message appears. Smart-1 225/3050/3150 Appliances Getting Started Guide...
-
Page 61: Registration And Support
Check Point software. Check Point documentation is available on the Check Point Support Center http://supportcenter.checkpoint.com. Be sure to also use the online help when you are working with the Check Point SmartConsole clients. Smart-1 225/3050/3150 Appliances Getting Started Guide... - Page 62 Registration and Support Smart-1 225/3050/3150 Appliances Getting Started Guide...
-
Page 63: Установка И Конфигурирование (Ru)
является основанием для отмены гарантийных обязательств. Указания, приведенные ниже, предназначены только для подготовленных специалистов по обслуживанию. Перед установкой или снятием шасси или выполнением работ возле блоков питания следует отключить электропитание и выдернуть вилку из розетки. Smart-1 225/3050/3150 Appliances Getting Started Guide... - Page 64 привести к перегреву батареи и вызвать ожоги при касании. • Не использовать процессор без системы охлаждения. Процессор может выйти из строя в считанные секунды. • Лазерное изделие класса 1. Предупреждение. Полностью закрытая лазерная система с лазером класса 1. Smart-1 225/3050/3150 Appliances Getting Started Guide...
- Page 65 эксплуатацию оборудования. Если инструкция доступна только в электронном виде, например на компьютере или в Интернете, требуемая в этом разделе информация может быть представлена в электронном виде, при условии что пользователь сможет ознакомиться с нею в указанной форме. Smart-1 225/3050/3150 Appliances Getting Started Guide...
- Page 66 отдельно от бытовых отходов поможет сохранить природные ресурсы и переработать отходы безопасным для здоровья и окружающей среды способом. За дополнительной информацией о местах приема отработавшего оборудования для переработки следует обратиться в местную службу по вывозу и утилизации отходов. Smart-1 225/3050/3150 Appliances Getting Started Guide...
-
Page 67: Введение
по телефону: 1 (800) 429-4391. Дополнительную техническую информацию о продукции Check Point см. в Центре поддержки Check Point http://supportcenter.checkpoint.com. Желаем приятной работы с продукцией компании Check Point. Будем рады помочь вам в решении всех текущих и будущих задач по обеспечению безопасности сетей, приложений и управления. -
Page 68: Конфигурация Программного Обеспечения
панели. Устройство включится. 2. В задней части устройства нажмите кнопку Power . 3. После инициализации и начальной загрузки устройства на ЖК-дисплей выводится состояние устройства. Устройство готово к эксплуатации, когда на ЖК-дисплее отображается номер модели. Smart-1 225/3050/3150 Appliances Getting Started Guide... -
Page 69: Начальная Настройка
варианты First Time Configuration Wizard. См. Руководство по установке и обновлению для соответствующей версии программного обеспечения. Примечание. Руководства по установке и обновлению выпускаются только для основных версий. Например, для версии R77.10 выпущено руководство R77. Smart-1 225/3050/3150 Appliances Getting Started Guide... -
Page 70: Аппаратная Часть Smart-1 Appliances
Сброс оборудования. Вставить булавку Порты USB 2 порта USB 2.0 Консольный порт Для последовательного подключения к устройству с помощью программы эмуляции терминала, например PuTTY Порт LOM Порт LOM (Lights Out Management) для платы LOM. Smart-1 225/3050/3150 Appliances Getting Started Guide... - Page 71 При контроле состояния RAID дисков с помощью команды raid_diagnostic или в WebUI DiskNumber 0 — левый диск, а DiskNumber 1 — правый диск. Номера на наклейках на дисках соответствуют RAID DiskNumber. Подробнее о RAID: Настройка RAID. Smart-1 225/3050/3150 Appliances Getting Started Guide...
-
Page 72: Передняя Панель Smart-1 3050
работа жесткого диска ЖК-дисплей Кнопочная Основные операции управления панель Сброс Сброс оборудования. Вставить булавку Порты USB 2 порта USB 2.0 Консольный порт Для последовательного подключения к устройству с помощью программы эмуляции терминала, например PuTTY Smart-1 225/3050/3150 Appliances Getting Started Guide... - Page 73 жесткий диск, а DiskNumber 4 — крайний справа жесткий диск. Номера на наклейках на дисках соответствуют RAID DiskNumber. Подробнее о RAID: Настройка RAID. Линейная плата Гнездо расширения для дополнительных расширения линейных плат Гнездо расширения для дополнительной Плата SAN платы SAN Smart-1 225/3050/3150 Appliances Getting Started Guide...
- Page 74 подключен к сети электропитания, звукового сигнала включается непрерывное звуковое для блоков предупреждение. Звуковой сигнал питания отключается нажатием этой кнопки. Светодиодный • Выключен — питание выключено индикатор для • Включен (зеленый) — питание включено каждого блока питания Smart-1 225/3050/3150 Appliances Getting Started Guide...
- Page 75 Долгое нажатие для принудительного выключения (если включено) Антистатический Подсоединить антистатический браслет к заземляющий этому штекеру при обслуживании штекер устройства. Точка заземления Использовать, если установлен блок питания постоянного тока. Для дополнительной платы сети хранения Порты SAN данных (SAN). Smart-1 225/3050/3150 Appliances Getting Started Guide...
-
Page 76: Задняя Панель Smart-1 3050
Ближайший к PSU: 1. Самый дальний: 3. Винты с Ослабить винты и извлечь вентиляторный накатанной модуль охлаждения из устройства. головкой для вентиляторного модуля охлаждения Винты для Ослабить винты и отсоединить крышку крепления устройства. крышки Smart-1 225/3050/3150 Appliances Getting Started Guide... - Page 77 Краткое нажатие для выключения (если включено) • Долгое нажатие для принудительного выключения (если включено) Антистатический Подсоединить антистатический браслет к заземляющий этому штекеру при обслуживании штекер устройства. Точка заземления Использовать, если установлен блок питания постоянного тока. Smart-1 225/3050/3150 Appliances Getting Started Guide...
- Page 78 Установка и Конфигурирование (RU) Smart-1 225/3050/3150 Appliances Getting Started Guide...
- Page 79 Conforms to the following Product Specifications: FCC, 47 CFR, Part 15 RADIO FREQUENCY DEVICES — Unintentional Subpart B, Class A Radiators VCCI V-3, Class A Information Technology Equipment (ITE) — Limits and methods of measurement Smart-1 225/3050/3150 Appliances Getting Started Guide...
- Page 80 Electromagnetic compatibility (EMC) — Part 4-2 : Testing and measurement techniques — Electrostatic discharge immunity test EN61000-4-3 Electromagnetic compatibility (EMC) — Part 4-3: Testing and measurement techniques — Radiated, radio-frequency, electromagnetic field immunity test Smart-1 225/3050/3150 Appliances Getting Started Guide...
- Page 81 Safety of Information Technology Equipment - 60950-1(ed.2);am1 Global The product herewith complies with the requirements of the EU Directive 2006/95/EC and the EMC Directive 2004/108/EC Date and Place of issue: February, 2014, Tel Aviv, Israel Smart-1 225/3050/3150 Appliances Getting Started Guide...
- Page 82 Caution Any changes or modifications not expressly approved by the grantee of this device could void the user’s authority to operate the equipment. Smart-1 225/3050/3150 Appliances Getting Started Guide...
- Page 83 Ограничения и методы измерений Оборудование информационных технологий ICES-003, класс A (ОИТ). Характеристики радиопомех Оборудование информационных технологий CISPR22 (ОИТ). Характеристики радиопомех. Ограничения и методы измерений Оборудование информационных технологий EN55022, класс A (ОИТ). Характеристики радиопомех. Ограничения и методы измерений Smart-1 225/3050/3150 Appliances Getting Started Guide...
- Page 84 кратковременным выбросам напряжения EN61000-4-5 Электромагнитная совместимость (ЭМС). Часть 4-5. Методы испытаний и измерений. Испытание на устойчивость к выбросам напряжения Электромагнитная совместимость (ЭМС). EN61000-4-6 Часть 4-6. Методы испытаний и измерений. Устойчивость к наведенным помехам, вызванным радиочастотными полями Smart-1 225/3050/3150 Appliances Getting Started Guide...
- Page 85 60950-1:2006/A11:2009 оборудованию Безопасность информационного IEC 60950-1 (ред. 2), оборудования. Международные требования IEC 60950-1(ред.2);am1 Изделие соответствует требованиям директивы ЕС 2006/95/EC и директивы по электромагнитной совместимости 2004/108/EC Дата и место выпуска: Февраль 2014 года, Тель-Авив, Израиль Smart-1 225/3050/3150 Appliances Getting Started Guide...
- Page 86 изделия в жилых районах может вызвать недопустимые помехи. В этом случае пользователь должен будет устранить помехи за свой счет. Предупреждение В случае изменений или модификаций, не одобренных лицензиатом этого устройства, пользователь может лишиться права на эксплуатацию оборудования. Smart-1 225/3050/3150 Appliances Getting Started Guide...
- Page 87 14 de enero de 2016 Smart-1 225/3050/3150 Appliances Guía de Introducción Clasificación: [Protected] P/N: 706625 Models: ST-25, ST-50, ST-150...
- Page 88 Ninguna parte de este producto o de su documentación relacionada puede reproducirse por ningún medio sin autorización previa por escrito de Check Point. Aunque se han tomado todas las precauciones en la preparación de este libro, Check Point no se hace responsable por errores u omisiones. Esta publicación y las características aquí...
- Page 89 (http://supportcontent.checkpoint.com/solutions?id=sk98931). Historial de revisiones Fecha Descripción 14 de enero de 2016 Primera versión de este documento Comentarios Check Point está comprometido en la mejora constante de su documentación. Ayúdenos enviando sus comentarios (mailto:cp_techpub_feedback@checkpoint.com?subject=Feedback on Smart-1 225/3050/3150 Appliances Guía de Introducción).
- Page 90 Restaurar la placa de sistema del aparato de comunicaciones y los periféricos en la bolsa antiestática cuando no están en uso o no está instalado en el chasis. Algunos circuitos de la placa de sistema puede seguir funcionando aun cuando la corriente esté desconectada. Smart-1 225/3050/3150 Appliances Guía de Introducción...
- Page 91 4. Sobrecarga del circuito: debe prestarse atención a la conexión del equipo al circuito de alimentación y a la medida en que la sobrecarga de los circuitos podría influir en la protección contra sobrecorriente y el cableado de alimentación. Al Smart-1 225/3050/3150 Appliances Guía de Introducción...
- Page 92 El funcionamiento de este equipo en una zona residencial Smart-1 225/3050/3150 Appliances Guía de Introducción...
- Page 93 Declaración de cumplimiento del departamento Canadiense: Este aparato digital de clase A cumple con la norma canadiense ICES-003 Cet appareil numérique de la classe A est conforme à la norme NMB-003 du Canada. Smart-1 225/3050/3150 Appliances Guía de Introducción...
- Page 94 Se confirma que este producto se ajusta a los requisitos que se estipulan en la Directiva del Consejo relativa a la aproximación de las legislaciones de los Estados miembros con respecto a la Directiva de Compatibilidad electromagnética (2004/108/EC). Para la evaluación acerca de la Compatibilidad electromagnética (2004/108/EC) Smart-1 225/3050/3150 Appliances Guía de Introducción...
- Page 95 Para obtener más información sobre los lugares de recogida de equipos usados para el reciclaje, póngase en contacto con las autoridades municipales o con el servicio local de recogida de desechos domésticos. Smart-1 225/3050/3150 Appliances Guía de Introducción...
- Page 96 Avisos de seguridad, media ambiente y emisiones electrónicas Smart-1 225/3050/3150 Appliances Guía de Introducción...
- Page 97 Configuración avanzada ............... 21 Conexión a la interfaz de CLI del Smart-1 Appliances ......22 Smart-1 Appliances Hardware ..............23 Panel delantero de Smart-1 225 ............24 Panel delantero de Smart-1 3050 ............26 Panel delantero de Smart-1 3150 ............28 Indicadores LED del panel delantero y puertos incorporados .....
- Page 98 Restauración del uso del panel LCD ............ 51 Inscripción y asistencia técnica ..............53 Inscripción ................... 53 Apoyo ....................53 ¿Hacia dónde vamos desde aquí? ............54 Información de cumplimiento normativo ..........55 Declaración de conformidad ..............55 CAPÍT ULO 1 Smart-1 225/3050/3150 Appliances Guía de Introducción...
-
Page 99: Introducción
Información general de Smart-1 Appliances Smart-1 Appliances ofrece la gestión de seguridad líder en el mercado de Check Point Software Blades en una plataforma de hardware especializada específicamente diseñada para redes de seguridad de empresas medianas y grandes. En función de la arquitectura Software Blade de Check Point, Smart-1 Appliances ofrece una solución... - Page 100 Mantenga la continuidad del negocio con fuentes de alimentación, ventiladores y unidades de disco duro redundantes e intercambiables en caliente. • Simplifique el aprovisionamiento a gran escala de la política de seguridad con Multi-Domain Server. Smart-1 225/3050/3150 Appliances Guía de Introducción...
-
Page 101: Contenido De La Caja De Transporte
Conector de bucle invertido de fibra óptica Documentación • Guía de introducción • Guía de inicio rápido • Guía de gestión de imágenes • Guía para la instalación de rieles telescópicos • Contrato de licencia del usuario CAPÍT ULO 2 Smart-1 225/3050/3150 Appliances Guía de Introducción... - Page 102 Introducción Smart-1 225/3050/3150 Appliances Guía de Introducción...
-
Page 103: Montaje Del Smart-1 Appliances En Un Bastidor
Montaje del Smart-1 Appliances en un bastidor Montaje del Smart-1 Appliances en un bastidor En este capítulo Instalación de rieles telescópicos ................Orificios de ventilación del aparato ................Smart-1 225/3050/3150 Appliances Guía de Introducción... -
Page 104: Instalación De Rieles Telescópicos
El aparato y las guías del bastidor han sido probados en condiciones extremas y no bloquean la circulación de aire hacia el aparato. Estos aparatos están planificados específicamente para ser instalados con estas guías. Smart-1 225/3050/3150 Appliances Guía de Introducción... -
Page 105: Configuración Del Software
Configuración del software CAPÍT ULO 3 Configuración del software En este capítulo Inicio de funcionamiento del aparato ................Configuración inicial ..................... Configuración avanzada ....................Smart-1 225/3050/3150 Appliances Guía de Introducción... -
Page 106: Inicio De Funcionamiento Del Aparato
Se tarda algunos minutos instalar la imagen de software. Para ver el avance de la instalación, utilice un cable serial para conectarse con el puerto de la consola. Para más información sobre las imágenes de software, consulte la página de inicio de Smart-1 Appliances (http://supportcontent.checkpoint.com/solutions?id=sk98931). Smart-1 225/3050/3150 Appliances Guía de Introducción... -
Page 107: Configuración Inicial
La configuración avanzada en SecurePlatform se puede efectuar con el menú sysconfig menu desde la interfaz de línea de comandos (CLI). Nota: El menú sysconfig está disponible solo después de ejecutar el First Time Configuration Wizard en la WebUI. Smart-1 225/3050/3150 Appliances Guía de Introducción... -
Page 108: Conexión A La Interfaz De Cli Del Smart-1 Appliances
Los parámetros de conexión del Smart-1 Appliances son: 9600 bps, sin paridad, 1 bit de parada (8N1), control de flujo: Ninguno. • Una conexión SSH a la interfaz de gestión (si SSHD está configurado). CAPÍT ULO 4 Smart-1 225/3050/3150 Appliances Guía de Introducción... -
Page 109: Smart-1 Appliances Hardware
Pantalla LCD del panel delantero ................Panel trasero de Smart-1 225 ..................Panel trasero de Smart-1 3050 ................... Panel trasero de Smart-1 3150 ................... Lights Out Management ....................Reemplazo y actualización de componentes .............. Smart-1 225/3050/3150 Appliances Guía de Introducción... -
Page 110: Panel Delantero De Smart-1 225
Hace un restablecimiento de hardware. Insertar un alfiler Puertos USB 2 x puertos USB 2.0 Puerto de consola Para una conexión en serie al aparato con un programa de emulación de terminal como PuTTY Smart-1 225/3050/3150 Appliances Guía de Introducción... - Page 111 DiskNumber 0 es el disco izquierdo y DiskNumber 1 es el disco derecho. Los números en las etiquetas sobre los discos concuerdan con el RAID DiskNumber. Para obtener más información sobre RAID, consulte Configuración de RAID Smart-1 225/3050/3150 Appliances Guía de Introducción...
-
Page 112: Panel Delantero De Smart-1 3050
2 x puertos USB 2.0 Puerto de consola Para una conexión en serie al aparato con un programa de emulación de terminal como PuTTY Puerto LOM Puerto LOM (Lights Out Management) para la tarjeta Smart-1 225/3050/3150 Appliances Guía de Introducción... - Page 113 RAID DiskNumber. Para obtener más información sobre RAID, consulte Configuración de RAID Tarjeta de línea de Ranura de expansión para tarjetas de línea opcionales expansión Tarjeta SAN Ranura de expansión para tarjetas SAN opcionales Smart-1 225/3050/3150 Appliances Guía de Introducción...
-
Page 114: Panel Delantero De Smart-1 3150
Indicadores LED del panel delantero y Puertos de red Consulte puertos incorporados incorporados (en la página 30). Utilice estos puertos para conectar • El aparato a la red • Al aparato desde la red Smart-1 225/3050/3150 Appliances Guía de Introducción... - Page 115 Configuración de RAID consulte Tarjeta de línea de Ranura de expansión para tarjetas de línea expansión opcionales Tarjeta SAN Ranura de expansión para tarjetas SAN opcionales Tapa de ranura Ranura de expansión para uso futuro Smart-1 225/3050/3150 Appliances Guía de Introducción...
-
Page 116: Indicadores Led Del Panel Delantero Y Puertos Incorporados
Smart-1 Appliances Hardware Indicadores LED del panel delantero y puertos incorporados Indicadores LED del panel delantero y puertos incorporados de Smart-1 225 Indicadores LED del panel delantero y puertos incorporados de Smart-1 3050 y Smart-1 3150 Smart-1 225/3050/3150 Appliances Guía de Introducción... - Page 117 Encendido (verde) - La alimentación a HDD está unidad de disco encendida duro (HDD) Indicador LED de • Apagado - No hay actividad de HDD actividad de • On (Ámbar) - Actividad de HDD unidad de disco duro (HDD) Smart-1 225/3050/3150 Appliances Guía de Introducción...
-
Page 118: Pantalla Lcd Del Panel Delantero
Apagado - Alimentación el sistema apagada sistema • Encendido (verde) - Alimentación del sistema encendida Estado del sistema • Apagado - Sistema en condiciones correctas • Naranja - Alarma de voltaje, temperatura o ventilador Para uso futuro Smart-1 225/3050/3150 Appliances Guía de Introducción... -
Page 119: Uso Del Panel Lcd
Configurar la dirección IP de la interfaz de gestión. Set Netmask Establecer la interfaz de gestión Netmask. Set Default GW Establecer el valor predeterminado de la interfaz de gestión entrada entrada entrada Sistema Reinicio Reiniciar el aparato. Smart-1 225/3050/3150 Appliances Guía de Introducción... - Page 120 Smart-1 Appliances Hardware Botones del panel de LCD Presione Ingresar al menú principal Cualquier botón Seleccionar una opción del menú Cambiar un número Desplazarse por el menú Volver al menú anterior (no se utiliza) Smart-1 225/3050/3150 Appliances Guía de Introducción...
- Page 121 Cancelar el cambio de IP cuando el cursor se encuentra en el primer dígito Volver al menú anterior cuando el cursor se encuentra en el primer dígito cuando el cursor se encuentra en el último dígito Smart-1 225/3050/3150 Appliances Guía de Introducción...
-
Page 122: Panel Trasero De Smart-1 225
Presione este botón para apagar la unidades de fuente alarma. de alimentación Indicador LED • Apagado - Alimentación apagada para cada unidad • Encendido (verde) - Alimentación encendida de fuente de alimentación Smart-1 225/3050/3150 Appliances Guía de Introducción... - Page 123 Conecte una correa ESD a este enchufe al reparar el conexión a tierra aparato. Punto de conexión Se utiliza cuando se instala una unidad de fuente de a tierra alimentación CC. Puertos SAN Para la tarjeta SAN (Red de área de almacenamiento) opcional. Smart-1 225/3050/3150 Appliances Guía de Introducción...
-
Page 124: Panel Trasero De Smart-1 3050
Si una fuente de alimentación falla o no está (apagado de conectada a la toma de corriente, una alarma suena alarma) para continuamente. Presione este botón para apagar la unidades de fuente alarma. de alimentación Smart-1 225/3050/3150 Appliances Guía de Introducción... - Page 125 (cuando está encendido) Enchufe de Conecte una correa ESD a este enchufe al reparar el conexión a tierra aparato. Punto de conexión Se utiliza cuando se instala una unidad de fuente de a tierra alimentación CC. Smart-1 225/3050/3150 Appliances Guía de Introducción...
-
Page 126: Panel Trasero De Smart-1 3150
Si una fuente de alimentación falla o no está (apagado de conectada a la toma de corriente, una alarma suena alarma) para continuamente. Presione este botón para apagar la unidades de fuente alarma. de alimentación Smart-1 225/3050/3150 Appliances Guía de Introducción... -
Page 127: Lights Out Management
CC. Lights Out Management La tarjeta Check Point Lights Out Management (LOM) le permite utilizar un canal de gestión dedicado para controlar aparatos de Check Point a distancia. Lights Out Management también funciona cuando el aparato está apagado o no responde. -
Page 128: Reemplazo Y Actualización De Componentes
Smart-1 Appliances componentes, consulte la página de inicio de (http://supportcontent.checkpoint.com/solutions?id=sk98931). A menos que se lo indique el soporte técnico de Check Point, los acuerdos de garantía y soporte le prohíben realizar el reemplazo de cualquier pieza. CAPÍT ULO 5 Smart-1 225/3050/3150 Appliances Guía de Introducción... -
Page 129: Raid En Smart-1 225/3050/3150
Añadir HDD a Smart-1 3150 y configurar RAID en las HDD nuevas. • Controlar la sincronización de RAID. Nota: Solamente las actualizaciones de firmware de RAID proporcionadas por Check Point son compatibles. Documento relacionado: Smart-1 225/3050/3150 Instalación y extracción de unidades de disco duro (http://supportcontent.checkpoint.com/documentation_download?ID=32420) Smart-1 225/3050/3150 Appliances Guía de Introducción... -
Page 130: Niveles Raid Y Opciones De Almacenamiento
Puede controlar el estado del RAID de los discos para determinar cuándo se sincronizan los discos duros. Si reinicia el aparato antes de que se sincronicen los discos duros, la sincronización se iniciará de nuevo en el siguiente arranque. Smart-1 225/3050/3150 Appliances Guía de Introducción... - Page 131 Las etiquetas numeradas en los cajones de disco duro del aparato concuerdan con el valor raid_diagnostic en la salida del comando DiskNumber. Este es un ejemplo de salida de Smart-1 225. DiskID 0 es el disco duro de la izquierda. DiskID 1 es el disco duro de la derecha.
- Page 132 Para controlar el estado del RAID de los discos - SmartView Monitor: 1. Abra SmartView Monitor. 2. Haga clic en All Entradas. 3. Seleccione Smart-1 Entrada. 4. Haga clic en System Information. 5. Haga clic en RAID Volumes. Smart-1 225/3050/3150 Appliances Guía de Introducción...
- Page 133 Si es necesario, restablezca el aparato a sus valores predeterminados de fábrica o seleccione otra imagen. Importante: si restablece los valores predeterminados de fábrica o si selecciona otra imagen, toda la información sobre el aparato se borra. Smart-1 225/3050/3150 Appliances Guía de Introducción...
-
Page 134: Ejecución De La Herramienta De Diagnóstico
4. Cuando aparezca este mensaje, presione cualquier tecla para activar el menú Boot . Tiene aproximadamente cuatro segundos. Press any key to see the boot menu [Booting in 5 seconds] 5. En el menú Boot, seleccione HW Diagnostics 6. Presione Enter. Smart-1 225/3050/3150 Appliances Guía de Introducción... -
Page 135: Restauración Mediante La Webui
2. Inicie sesión en la WebUI del aparato mediante el nombre y usuario y la contraseña del administrador 3. administrador 4. administrador. 5. En la WebUI, haga clic Maintenance > Factory Defaults (Mantenimiento > Valores predeterminados de fábrica). Smart-1 225/3050/3150 Appliances Guía de Introducción... -
Page 136: Secureplatform
En la ventana Connect To (Conectar a)de HyperTerminal, seleccione un puerto de la lista Conectar mediante. • En PuTTY, seleccione el tipo de conexión En serie. 4. Defina la configuración del puerto en serie: 9600 bps, 8 bits, sin paridad, 1 bit de parada. Smart-1 225/3050/3150 Appliances Guía de Introducción... -
Page 137: Restauración Del Uso Del Panel Lcd
9. En el menú Arranque, seleccione la imagen Restablecer a valores predeterminados de fábrica (Reset to factory defaults) pertinente. 10. Pulse Entrar. Restauración del uso del panel LCD Para restaurar el aparato con las teclas del panel LCD: 1. Reinicie o encienda el aparato. Smart-1 225/3050/3150 Appliances Guía de Introducción... - Page 138 Do not turn off. Cuando el aparato se restaura a su configuración predeterminada de fábrica, se reinicia. En Gaia se muestra el mensaje Reverting . En SecurePlatform se muestra el mensaje Initializing . CAPÍT ULO 7 Smart-1 225/3050/3150 Appliances Guía de Introducción...
-
Page 139: Inscripción Y Asistencia Técnica
Inscripción El aparato requiere una licencia específica de producto Check Point. Obtenga una licencia e inscríbase en el sitio de Registro de aparatos de Check Point. Conéctese a la interfaz WebUI del aparato para buscar la dirección MAC necesaria para obtener una licencia. -
Page 140: Hacia Dónde Vamos Desde Aquí
Dispone de los fundamentos para empezar. El siguiente paso es obtener un conocimiento más avanzado del software Check Point. La documentación Check Point está a su disposición en el Centro de asistencia técnica de Check Point. Asegúrese de utilizar también la ayuda en línea al trabajar con los clientes de Check Point SmartConsole. -
Page 141: Información De Cumplimiento Normativo
ST-5, ST-10, ST-25, ST-50, ST-150 Opciones del producto: Todas Fecha de primera 2014 solicitud: Cumple con las siguientes especificaciones de producto: FCC, 47 CFR, Parte 15 DISPOSITIVOS EMISORES DE Subparte B, Clase A RADIOFRECUENCIA - Radiadores involuntarios Smart-1 225/3050/3150 Appliances Guía de Introducción... - Page 142 Equipo de tecnología de la información - Características de inmunidad - Límites y métodos de medición EN61000-4-2 Compatibilidad electromagnética (EMC) — Parte 4-2: Técnicas de ensayo y medición - Prueba de inmunidad a descargas electrostáticas Smart-1 225/3050/3150 Appliances Guía de Introducción...
- Page 143 Seguridad de los equipos de tecnología segunda edición informática Seguridad de los equipos de tecnología 60950-1:2006/A11:2009 informática - LVD IEC 60950-1(ed. 2), IEC Seguridad de los equipos de tecnología 60950-1(ed. 2);am1 informática - Global Smart-1 225/3050/3150 Appliances Guía de Introducción...
- Page 144 Precaución Cualquier cambio o modificación no aprobados expresamente por el cesionario de este dispositivo podría anular la autoridad del usuario para operar el equipo. Smart-1 225/3050/3150 Appliances Guía de Introducción...
Need help?
Do you have a question about the Smart-1 225 and is the answer not in the manual?
Questions and answers