Kemper Profiler Main Manual
Hide thumbs
Also See for Profiler:
- The basics & profiling manual (144 pages) ,
- Quick start manual (132 pages) ,
- Main manual (246 pages)
Table of Contents
Advertisement
Quick Links
Advertisement
Table of Contents

Subscribe to Our Youtube Channel
Related Manuals for Kemper Profiler


Summary of Contents for Kemper Profiler
- Page 1 Legal Notice 1 Direm KEMPER PROFILER Main Manual 7.5...
-
Page 2: Legal Notice
The content of this manual is furnished for informational use only, is subject to change without notice and should not be construed as a commitment by Kemper GmbH. Kemper GmbH assumes no responsibility or liability for any errors or inaccuracies that may appear in this book. -
Page 3: Table Of Contents
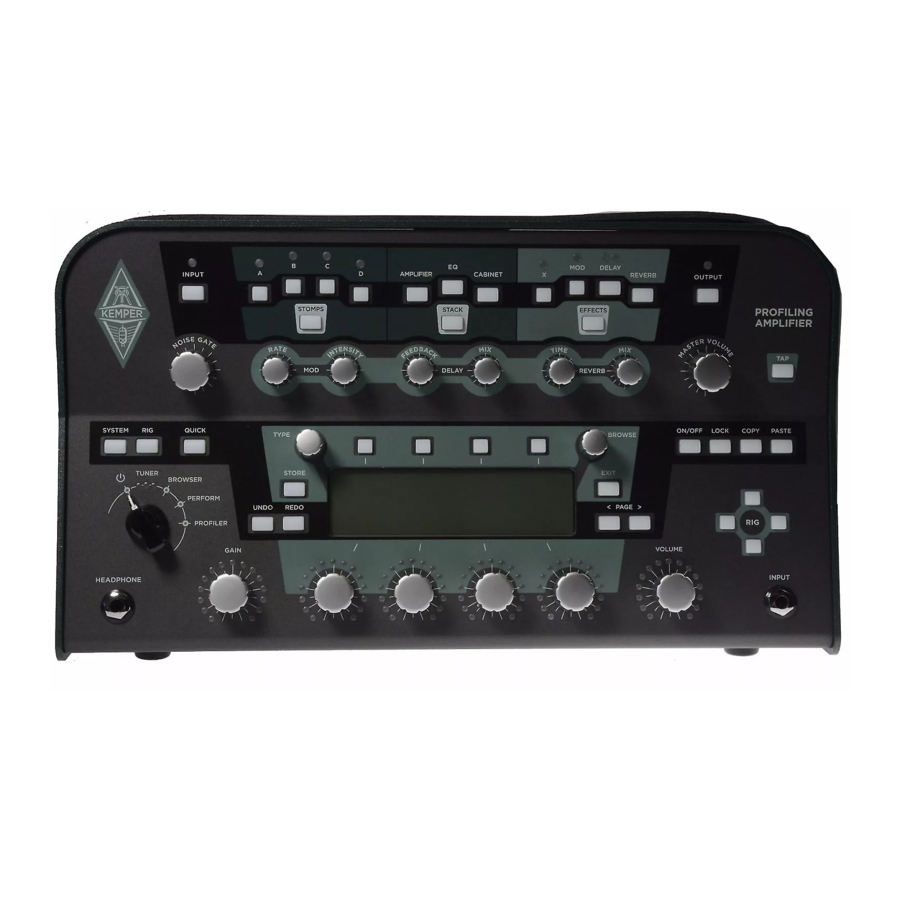
Table of Contents 3 Table of Contents Legal Notice Table of Contents About this Main Manual Rigs and Signal Chain Effect Modules Effect Presets Effect Select Screen Clear Effect Autoload Load Defaults Load Type Auto Type Stack Section Front Panel Controls Head, PowerHead, Rack, and PowerRack Chicken Head Knob (1) INPUT Button (2) INPUT LED (2) - Page 4 Table of Contents 4 NOISE GATE Knob (5) Direct Control Knobs (6) MASTER VOLUME Knob (7) TAP Button (8) SYSTEM Button (9) RIG Button (10) QUICK Button (11) TYPE Knob (12) BROWSE Knob (13) Soft Buttons and Soft Knobs (14) ON/OFF Button (15) LOCK Button (16) COPY and PASTE Buttons (17)
- Page 5 Table of Contents 5 Back Panel Overview Head, PowerHead, Rack, and PowerRack MAIN OUTPUT (1) MONITOR OUTPUT (2) DIRECT OUTPUT/SEND (3) RETURN and ALTERNATIVE INPUT (4) POWER (5) USB (6) NETWORK (7) SWITCH/PEDAL (8) MIDI (9) S/PDIF INPUT and OUTPUT (10) SPEAKER OUTPUT (11) Kensington®...
- Page 6 Table of Contents 6 SYSTEM Button (7) PEDALS Button (8) RIG Button (9) TYPE Knob (10) BROWSE Knob (11) Soft Buttons and Soft Knobs (12) MORPH Button (13) LOCK Button (14) EDIT Button (15) COPY and PASTE Buttons (N/A) STORE Button (16) Button (17) <PAGE>...
- Page 7 Table of Contents 7 RETURN 1-4 (2) SEND 1+2 (3) MAIN OUTPUT (4) MONITOR OUTPUT (5) HEADPHONE Output (6) S/PDIF INPUT and OUTPUT (7) SWITCH/PEDAL (8) MIDI (9) USB (10) Kensington® Lock Connector (11) POWER (12) Basic Setups Using the Tuner Rig Settings Tagging Favorites...
- Page 8 Running a Guitar Speaker Cabinet from a Power Amplifier, “Monitor Cab Off” The Built-in Power Amplifier The Sound of Guitar Cabinets versus Mic'ed Speakers PURE CABINET KEMPER Kone / KEMPER Kabinet Using KEMPER Kone with PROFILER PowerHead or PowerRack KEMPER Kone Wiring...
- Page 9 Instrument Input and Reamping Input Source Select Reamping Alternative Procedure for Input Leveling Expression Pedals and Foot Switches Pedal Controllers Expression Pedal Recommendation Connecting Pedals to PROFILER Remote or PROFILER Stage Four Pedals: Luxury Three Pedals: Comfortable Two Pedals: Mainstream One Pedal: Purist...
- Page 10 Table of Contents 10 Additional Switches Required? Connecting a PROFILER Switch Single and Dual Switches of Other Brands Connecting Pedals and Switches to PROFILER Head, PowerHead, Rack or PowerRack Volume Pedal Function Morphing Monitor Volume Pedal (MIDI Control Change #73)
- Page 11 Table of Contents 11 Studio Equalizer Metal Equalizer Acoustic Simulator Stereo Widener Phase Widener Delay Widener Compressor (Cyan) Auto Swell Noise Gate (Cyan) Noise Gate 2:1 Noise Gate 4:1 Chorus (Blue) Vintage Chorus Hyper Chorus Air Chorus Micro Pitch Vibrato Rotary Speaker Tremolo / Auto Panner Phaser and Flanger (Purple)
- Page 12 Table of Contents 12 Vibe Phaser Flanger Phaser Oneway & Flanger Oneway Pitch Shifter (White) Transpose Pedal Pitch Pedal Vinyl Stop Chromatic Pitch Harmonic Pitch Analog Octaver Delay (Green) Single Delay Two Tap Delay Serial Two Tap Delay Dual Delay Rhythm Delay Quad Delay Legacy Delay...
- Page 13 Table of Contents 13 Crystal Type Crystal Delay Loop Pitch Delay Frequency Shifter Delay Dual Chromatic Delay & Dual Harmonic Delay Dual Crystal Delay Dual Loop Pitch Delay Melody Delay Quad Chromatic Delay & Quad Harmonic Delay Reverb (Green) Spring Reverb Natural Reverb Easy Reverb Echo Reverb...
- Page 14 Device Information Bass Players: Special Hints and Features Performance Mode Setting up Performances Loading Performances Foot Control PROFILER Remote Up/Down Buttons (1) Rig Buttons 1-5 (2) TAP Button (3) TUNER Button (4) Effect Buttons I-IIII (5) Assigning an Effect Module...
- Page 15 Table of Contents 15 Assigning a Second Effect Module More Assignments Toggling Effects Storing Assignments Assignments without Remote Keeping Oversight Action & Freeze Latched / Momentary Locking Effect Buttons LOOPER Button (6) Workflow Advanced Looper Functions Connecting Expression Pedals and External Switches Remote Settings Cabling MIDI...
- Page 16 Transmitting User Interface to MIDI Global Channel NRPN Getting Organized Views Favorite Rigs Erase Non-Favorites KEMPER Rig Manager Updates, Backups and Sharing Sounds Operating System Updates Creating Backups Restoring Backups Importing Rigs, Performances, and Presets Export of Rigs and Presets...
- Page 17 Table of Contents 17 Making Connections Connections for PROFILING a Guitar Amplifier Connections for PROFILING a Combination of Amp and Stomp Box Connections for PROFILING a Computer-Based Guitar Amp Simulation Taking a PROFILE Levels Evaluating the PROFILE Refining the PROFILE The Resulting PROFILE How to PROFILE an Amp without a Cabinet (Direct Amp PROFILEs) How to Create Merged PROFILEs...
- Page 18 Table of Contents 18 Main Manual...
-
Page 19: About This Main Manual
PROFILER. Last, but not least, you... -
Page 20: Rigs And Signal Chain
Input, passes through four effects modules, the stack section, and then followed by another four effects modules. From there, the signal is sent to the outputs. The sequence of the modules and sections from left to right represents the signal flow inside the PROFILER and is reflected by the corresponding controls on the upper row of the front panel. -
Page 21: Effect Modules
RIG navigation cross on the right side of the front panel of all PROFILER variants except PROFILER Stage. Press left/right to advance in single steps, or up/down to jump to the next group. Another way to scroll Rigs is by using the... -
Page 22: Effect Presets
Rig or Performance. Each PROFILER comes with a set of factory presets preinstalled. These can be excellent starting points when you intend to configure a specific effect setting - just find a preset that comes close and then fine-tune its parameters to your needs. -
Page 23: Clear Effect
Preset” whenever you wish to audition one. PROFILER Stage™ users can push the BROWSE knob to load a preset instead. The box to reactivate Autoload is always available on the Effect Select Screen. As soon as the Effect Select Screen is left and the selected effect is in focus use the <PAGE>... -
Page 24: Load Defaults
“Autoload” for the presets. The box to activate “Auto Type” is shown every time you enter the Effect Select Screen. ✓ In addition to the TYPE and BROWSE knobs, PROFILER Head and Rack users can also use the <PAGE> buttons and the... -
Page 25: Stack Section
As with effect presets, the presets in the amplifier, cabinet modules and the stack section are also user data that you can save with a relevant name or delete as you see fit. The PROFILER ships with several examples onboard. If you have a favorite Amplifier PROFILE with settings that you like, and want to reuse later, storing it as a preset could prove very useful. -
Page 26: Front Panel Controls Head, Powerhead, Rack, And Powerrack
Front Panel Controls Head, PowerHead, Rack, and PowerRack 26 Front Panel Controls Head, PowerHead, Rack, and PowerRack PROFILER Head and PowerHead PROFILER Rack and PowerRack... -
Page 27: Chicken Head Knob
Front Panel Controls Head, PowerHead, Rack, and PowerRack 27 Chicken Head Knob (1) Use the chicken head knob to switch the PROFILER on and off. You can select one of the following modes: Tuner Mode Open the tuner to fine-tune your instrument. Please find details in the chapter Using the Tuner. - Page 28 ✓ A tutorial video about the Input Section and how to adjust Clean and Distortion Sens can be found on: www.kemper-amps.com/video The parameters Input Source and Reamp Sense are global and are explained in the Instrument Input and Reamping...
-
Page 29: Input Led
“Monitor Cab Off” By engaging you can run the PROFILER directly to a power amp driving a physical guitar cabinet on stage, while the MAIN OUTPUT still carry the full signal, including the virtual speaker, which would be connected to the front mixing desk. -
Page 30: Output Led
OUTPUT LED (4) The PROFILER performs soft clipping and is very forgiving in terms of amplitude clipping, so here is no need to panic if the OUTPUT LED flashes red occasionally. Typically, you might experience this with clean sounds. In such... -
Page 31: Direct Control Knobs
A tutorial video about the Input Noise Gate can be found on: www.kemper-amps.com/video Direct Control Knobs (6) Direct control knobs provide instant access to specific effects parameters. There are six on the PROFILER Head and PROFILER PowerHead , and four on the PROFILER Rack and PROFILER PowerRack models: •... -
Page 32: Tap Button
As output volumes of linked outputs might vary, Master Volume doesn’t follow a dB scale, but a simple 0-10 scale. TAP Button (8) This button triggers Tempo. The PROFILER Remote™ offers another TAP button for foot control. Hold it down... -
Page 33: Quick Button
Front Panel Controls Head, PowerHead, Rack, and PowerRack 33 QUICK Button (11) This button can be configured to assume different functions, according to your preference. By default, the QUICK button returns to the most recently accessed module or section edit page. You can find more details of what functions are available in the Quick Functions chapter. -
Page 34: Soft Buttons And Soft Knobs
Front Panel Controls Head, PowerHead, Rack, and PowerRack 34 effect types sound with the same settings; browsing effect presets with the BROWSE knob will load all the parameter settings, as well as the respective effect type. Soft Buttons and Soft Knobs (14) There are four soft buttons above the display and four soft knobs below. -
Page 35: Copy And Paste Buttons
In general, you can use common sense to determine whether the PROFILER will let you copy settings from one module to another. For example, you cannot copy the Reverb settings to the amp module. However, it is possible to copy/paste the content between the effect modules A, B, C, D, X, MOD, DLY and REV. -
Page 36: Undo And Redo Buttons
Front Panel Controls Head, PowerHead, Rack, and PowerRack 36 Pressing Store in Browser Mode will offer you three different options via the soft buttons: “Replace” will overwrite the currently selected Rig with the new version while keeping the original name, “Store as” will save the Rig under a new name and won't delete the original Rig. -
Page 37: Rig Navigation Cross
Front Panel Controls Head, PowerHead, Rack, and PowerRack 37 RIG Navigation Cross (22) Use this to navigate through the Rigs. Left and right buttons will switch sequentially, while the up and down buttons will change in larger steps. A newly selected Rig is instantly recalled. HEADPHONE Output (23) Plug in your ¼... -
Page 38: Front Input
Front Panel Controls Head, PowerHead, Rack, and PowerRack 38 Front INPUT (26) This is the default input to plug in your instrument cable. USB (27) Use the USB type A port to connect USB memory sticks for backups and operating system updates. Please consult the chapter Updates, Backups and Sharing Sounds for details. -
Page 39: Back Panel Overview Head, Powerhead, Rack, And Powerrack
Back Panel Overview Head, PowerHead, Rack, and PowerRack 39 Back Panel Overview Head, PowerHead, Rack, and PowerRack PROFILER PowerHead PROFILER PowerRack... -
Page 40: Main Output
Like all inputs and outputs, it offers a ground lift to prevent a loop hum. MONITOR OUTPUT (2) Use this mono output to connect the PROFILER to a stage monitor with its own level controls. This output also has its own ground lift. -
Page 41: Direct Output/Send
DIRECT OUTPUT carries the pure amp sound without effects. There is also a tutorial video specifically about Output and setup for recording available on: www.kemper-amps.com/video RETURN and ALTERNATIVE INPUT (4) The ALTERNATIVE INPUT can be used as a rear-side guitar input, which is especially convenient for the Rack, and “Input Source”... -
Page 42: Power
PowerRack users can find this port on the front panel. See chapter Updates, Backups and Sharing Sounds details. The type B port is used to connect to the KEMPER Rig Manager™ application on your PC or Mac. NETWORK (7) Here, you can plug in a KEMPER PROFILER Remote™. -
Page 43: Midi
S/PDIF INPUT and OUTPUT (10) This is a digital input and output that can be used to connect the PROFILER to other S/PDIF compatible devices, such as certain computers and audio interfaces. Details related to connection and configuration can be found in the chapter Reamping. -
Page 44: Front Panel Controls Stage
Front Panel Controls Stage 44 Front Panel Controls Stage PROFILER Stage... -
Page 45: On/Off Button
Here you can organize your sounds for live performances. A chapter of this manual is dedicated to Performance Mode. PROFILER Mode Hold both buttons to enter PROFILER Mode and create your own PROFILEs. Details can be found in chapter PROFILING an Amp. INPUT Button (3) Press this button to enter the Input Section. - Page 46 Sense is also not a simple booster, as it does not affect the gain of clean sounds. Neither of these parameters colors the sound. ✓ A tutorial video about the Input Section and how to adjust Clean and Distortion Sens can be found on: www.kemper-amps.com/video...
-
Page 47: Input Led
For metal sounds, we recommend adding one of the special noise gate effects, which are explained in the Noise Gate chapter. In PROFILER Mode, the Noise Gate will also work with the connected amplifier, but without influencing the resulting PROFILE. ✓ A tutorial video about the Input Noise Gate can be found on: www.kemper-amps.com/video... -
Page 48: Module And Section Buttons
“Monitor Cab Off” By engaging you can run the PROFILER directly to a power amp driving a physical guitar cabinet on stage, while the MAIN OUTPUT still carry the full signal, including the virtual speaker, which would be connected to the front mixing desk. -
Page 49: Output Led
OUTPUT LED (5) The PROFILER performs soft clipping and is very forgiving in terms of amplitude clipping, so here is no need to panic if the OUTPUT LED flashes red occasionally. Typically, you might experience this with clean sounds. In such... -
Page 50: System Button
Front Panel Controls Stage 50 SYSTEM Button (7) This button opens System Settings which contain multiple pages of global parameters. Global settings are not stored by Rig, so they remain unchanged when you load different Rigs or Performances. PEDALS Button (8) This button opens Pedal Settings with pages related to the global configuration of expression pedals and switches. -
Page 51: Browse Knob
Front Panel Controls Stage 51 BROWSE Knob (11) Use this knob in Browser Mode and Performance Mode to quickly browse the list of Rigs within your current View. Turn the BROWSE knob to display a list of available Rigs — further turns will select one of the listed Rigs. Load the selected Rig by pushing the BROWSE knob or delete it with the soft button labeled “Delete”. -
Page 52: Lock Button
Front Panel Controls Stage 52 LOCK Button (14) Use the lock function to prevent a section or a module from being changed when you switch Rigs. To lock or unlock individual modules, press their respective buttons while holding the LOCK button. Essentially, you can think of a locked module as being "global". -
Page 53: Copy And Paste Buttons (N/A)
Front Panel Controls Stage 53 COPY and PASTE Buttons (N/A) In case you miss the COPY and PASTE buttons that you know from the other PROFILER variants, there is good news: The PROFILER Stage offers a clipboard, too! You can copy and paste any module (A-D, Amplifier, Cabinet, X-REV) as well as the entire stack section. When a module is in focus, hold its button again for two seconds to open the copy/paste screen. -
Page 54: Button
Front Panel Controls Stage 54 Pressing Store in Browser Mode will offer you three different options via the soft buttons: “Replace” will overwrite the currently selected Rig with the new version while keeping the original name, “Store as” will save the Rig under a new name and won't delete the original Rig. -
Page 55: Up/Down Buttons
"Performance Load" in System Settings, the PROFILER will either load Slot 1 or the current Slot of the selected Performance immediately, or wait (“Pending”) until you hit one of the five Buttons. In Browser Mode, you can step or scroll through Rigs in your browse pool according to the selected View and Sorting. -
Page 56: Tuner Button
The Looper is a device for recording up to 60 seconds of stereo audio. It allows for an unlimited number of overdubs. That means you can layer unlimited recordings on top of each other. The functionality of the Looper is identical to the PROFILER Remote. - Page 57 Front Panel Controls Stage 57 ✓ The functionality of all the foot buttons of the Stage is identical to those of the PROFILER Remote. A detailed description can be found in chapter PROFILER Remote.
-
Page 58: Back Panel Overview Stage
Back Panel Overview Stage 58 Back Panel Overview Stage PROFILER Stage INPUT (1) This is the input to plug in your instrument cable. RETURN 1-4 (2) Four balanced RETURN TRS inputs are available. RETURN 1 plays a key role during PROFILING... -
Page 59: Send 1+2
XLR (balanced) or quarter-inch TS-jacks (unbalanced). The XLR outputs are protected against 48V phantom power fed by a mixing desk. However, you should avoid feeding phantom power into the PROFILER if you want the best audio quality. Like all inputs and outputs, it offers a ground lift in the menu of the Output Section prevent a loop hum. -
Page 60: Monitor Output
Back Panel Overview Stage 60 MONITOR OUTPUT (5) Use these outputs to connect the PROFILER to a powered stage monitor for mono, or two powered stage monitors for stereo. These outputs have their own level control and ground lift in the menu of the Output Section. -
Page 61: S/Pdif Input And Output
S/PDIF INPUT and OUTPUT (7) This is a digital input and output that can be used to connect the PROFILER to other S/PDIF compatible devices, such as certain computers and audio interfaces. Details related to connection and configuration can be found in the chapter Reamping. -
Page 62: Usb
PC or Mac. Kensington® Lock Connector (11) Here, you can connect a Kensington® lock to protect your PROFILER against theft. POWER (12) Connect this to your wall outlet using the supplied power cable. The internal, universal power supply accepts 100V -... -
Page 63: Basic Setups
Basic Setups 63 Basic Setups First, let's illustrate a couple of basic environments the PROFILER can be used in. More specialized setups will be covered later, in the context of the specific features they require. This typical home setup includes MP3-player and monitoring via headphones or entertainment-system. - Page 64 Basic Setups 64 This studio setup shows the PROFILER connected to a DAW with studio monitors attached.
-
Page 65: Using The Tuner
LED in the middle is on, and the surrounding green LEDs are both off. If you want a far more advanced tuner, you can use the chicken head knob of PROFILER Head and Rack or TUNER button of PROFILER Stage and Remote to activate Tuner Mode. While Tuner Mode is engaged, a large tuner... - Page 66 Using the Tuner 66 There are multiple ways to engage the Tuner Mode: • turn the chicken head knob of PROFILER Head and Rack to the TUNER position, • press the TUNER button of the PROFILER Stage and Remote, •...
-
Page 67: Rig Settings
Rig Settings 67 Rig Settings RIG button is used to access all Rig-related parameters that are not covered by the knobs on the front panel. These parameters are spread across several pages - use the <PAGE> buttons to navigate between them. Tagging “Rig Tags”... - Page 68 If you hold for about one second, the whole tag is cleared. COPY The COPY button stores up to ten tags in the clipboard. not available at PROFILER Stage PASTE The PASTE button recovers tags from the clipboard, in last in first out order.
-
Page 69: Favorites
Rig Settings 69 Favorites By setting this flag, the current Rig will be designated as one of your favorites. Read more about Views and Favorite Rigs in the chapter Getting Organized. Rig Spillover Off If this option is selected, the effects placed in the DLY and REV modules will not generate spillover, should you switch to another Rig or Slot. -
Page 70: Panorama
This is the individual volume of the Rig. Note that this parameter does not drive the sound into any power amp distortion, so it will only change the volume of the sound, not the character. The setting is stored with the Rig. If you want to modify the overall volume of your PROFILER, use Master Volume... - Page 71 Rig Settings 71 The PROFILER is designed so that every PROFILE, distortion or compression will produce approximately the same loudness, thereby avoiding any extreme volume drops or peaks when you browse through the Rigs. All factory Rigs come with Rig Volume set to the center position, which is the unity or default volume.
-
Page 72: Tempo
The “Tempo Enable” soft button enables or disables the tempo for a Rig. When tempo is disabled, all tempo-related values in the PROFILER revert to the default tempo of 120 bpm and the values are displayed in milliseconds and Hertz. An additional soft button labelled “Use Perf. Tempo” is available in Performance Mode that allows you to set a unique tempo for your current Performance. -
Page 73: Tap Tempo
Tap the beat with your foot while you play. You can also assign a button of a MIDI controller to the Tap function. PROFILER Stage and Remote offer a dedicated TAP button. Learn more... -
Page 74: Beat Scanner
MIDI cable when desired. You can use MIDI clock from any such device to automatically sync your delay and modulation effects to the music, even on stage. The PROFILER will automatically sync to a MIDI clock signal INPUT. Whenever MIDI clock is received, a small “c” will appear on the right side of the home... -
Page 75: Parallel Path
Parallel Path This feature was designed for bass players, but you are free to use it with any other instrument. The PROFILER offers a wide variety of PROFILEs for bass players, as well as numerous effects and distortions that can be used in combination with a bass. - Page 76 Rig Settings 76 The Rig Settings provide a parallel signal path, which feeds directly to the Output Section, bypassing both the stack section and the effect modules X, MOD, DLY, and REV. When “Parallel Path” is activated, module A and B become exclusive to the parallel path, allowing you to add compression and EQ, for example.
-
Page 77: Morph
✓ To learn more about the “Clean Sens” parameter, refer to the respective paragraph or to the tutorial about the Input Section available at: www.kemper-amps.com/video ✓ A tutorial video dedicated to Parallel Path can also be found at: www.kemper-amps.com/video Morph... -
Page 78: Working With Amplifier Profiles, Cabinet Profiles, Power Amps And Guitar Cabinets
PROFILE is taken in one go, it is complete and perfect as it is. While there is no exact information about the separate sound of the amp or cabinet, the PROFILER uses an intelligent algorithm to create the best approximation of a separation line between the Amplifier and Cabinet PROFILEs. -
Page 79: Browsing Amps Or Cabinets
Copy and paste any module or section from another Rig using the COPY and PASTE buttons on PROFILER Head, PowerHead, Rack and PowerRack. PROFILER Stage users should open the module or section they intend to copy first, then hold its button once again until the copy/paste screen opens. •... -
Page 80: Direct Profiles
Direct PROFILEs. Here are some examples: • A Direct Amp PROFILE, tapped at the power amp speaker output, using the PROFILER DI box or another appropriate DI box. A PROFILE such as this represents the whole amp, excluding the guitar cabinet and microphone. - Page 81 Working with Amplifier PROFILEs, Cabinet PROFILEs, Power Amps and Guitar Cabinets 81 • A PROFILE of an acoustic-guitar amp, or an acoustic-amp simulator. This allows you to play an acoustic guitar with piezo pickups, and sound like it was captured by a microphone instead. •...
-
Page 82: Direct Amp Profiles
1) of the PROFILER, rather than capturing the sound by microphone. No further preparation is needed. During the process, the PROFILER will automatically detect the character of a Direct PROFILE and disable the cabinet module accordingly. However, not every DI box is suitable for this job - because the DI box has to be placed between power amplifier and guitar cabinet, it needs to be capable of handling such signal levels. -
Page 83: Cabinet Impulse Responses
(IR). These can be imported into KEMPER Rig Manager™ (version 3 and upwards), available for Mac and PC, and from there into your PROFILER. To find such imported cabinet presets, first press the CABINET button, then use the BROWSE knob. - Page 84 Working with Amplifier PROFILEs, Cabinet PROFILEs, Power Amps and Guitar Cabinets 84 Here's the full procedure for all PROFILER variants other than Stage: • Select the Studio PROFILE in Browser Mode. • Hold the CABINET button for at least one second until it’s in focus.
- Page 85 Working with Amplifier PROFILEs, Cabinet PROFILEs, Power Amps and Guitar Cabinets 85 Direct Amp PROFILE, ready to be fed into a physical guitar cabinet. The original Direct Amp and Studio PROFILEs are now fully contained in the Merged PROFILE, so feel free to delete them now, if you like. A positive side-effect is that the Cabinet of the Merged PROFILE has become an “authentic”...
-
Page 86: Running A Guitar Speaker Cabinet From A Power Amplifier, "Monitor Cab Off
Running a Guitar Speaker Cabinet from a Power Amplifier, “Monitor Cab Off” For the perfect on-stage setup, the PROFILER allows you to run a guitar cabinet through a power amp, and - at the same time - send a complete studio sound (amplifier plus cabinet and microphone) from the... - Page 87 Working with Amplifier PROFILEs, Cabinet PROFILEs, Power Amps and Guitar Cabinets 87 PowerHead with guitar cabinet You can also drive guitar cabinets in stereo via an external solid-state power amp. The PROFILER Stage offers a stereo MONITOR OUTPUT for this purpose.
- Page 88 Working with Amplifier PROFILEs, Cabinet PROFILEs, Power Amps and Guitar Cabinets 88 Stereo setup with external power amp and guitar cabinets A little more explanation might be in order. There is an important difference between tube power amps and solid- state power amps, insofar as solid-state amps try to obtain a linear frequency-response, tube power amps often create an “artistic”, non-linear frequency-response.
-
Page 89: The Built-In Power Amplifier
Working with Amplifier PROFILEs, Cabinet PROFILEs, Power Amps and Guitar Cabinets 89 captured in the PROFILE. In regular Studio PROFILEs, the interaction is simulated. Only a solid-state amp can play back your PROFILE in an authentic way, and imprint the original impedance behavior to your speaker, without adding additional, unpredictable interactions and the colorations of another tube power amp. - Page 90 Working with Amplifier PROFILEs, Cabinet PROFILEs, Power Amps and Guitar Cabinets 90 Volume The Volume parameter mirrors Monitor Output Volume. This is included for your convenience. Wattage Meter The internal power amp is mono, and delivers 600 watts at 8 ohms — however, the wattage will be lowered to 300 watts when used at 16 ohms.
- Page 91 Please refrain from connecting devices with impedances lower than 4 ohms, as the power amp could be damaged. Always ensure adequate ventilation - especially if mounting your PROFILER into a rack. Failure to do so may cause the power amp to shut down to prevent overheating.
-
Page 92: The Sound Of Guitar Cabinets Versus Mic'ed Speakers
The problem here, is that guitar players who don’t play regularly in studios or live venues often tend to struggle when listening to the Studio PROFILEs of the PROFILER through monitor speakers or headphones. Some say the original sound from the guitar cabinet is the “real” amp sound, while mic'ing the cabinet gives it an artificial flavor. Listening... - Page 93 Working with Amplifier PROFILEs, Cabinet PROFILEs, Power Amps and Guitar Cabinets 93 accompanied by a drummer and bass player. Full-range speakers don’t tend to have a membrane area as large as the four speakers of a 4x12 cabinet - as a result, they do not move as much air, and the low-end frequency response is not exaggerated.
-
Page 94: Pure Cabinet
The fundamental character of the sound will still be maintained. All applications that use the mic'ed sound (virtual guitar cabinet) of the PROFILER can benefit from PURE CABINET: recordings, live venues, full-range monitors, in-ear monitors, or just noodling with headphones on. It adapts naturally to the individual sound of each guitar cabinet - the more unbalanced the original guitar cabinet, the more impact it will have. -
Page 95: Kemper Kone / Kemper Kabinet
Bass Boost The KEMPER Kone has been designed to have a perfect tone when the cabinet sits on the floor. Whenever you lift a cabinet into free space, it will lose a certain amount of the bass fundamental, as the mirroring of the floor will attenuate it. - Page 96 KEMPER Kone when you position your ears away from the middle axis of the speaker. To compensate for this, you might like to adjust the color of the KEMPER Kone towards a “creamier”...
- Page 97 • The impedance of the KEMPER Kone is just 4 Ohm, to get optimal efficiency from your power amp. Since 4 Ohm is usually the lowest impedance allowed for power amps, you should avoid undercutting this value by connecting two cabinets, or two speakers in parallel configuration, to the same power amp output.
- Page 98 A signal on the Aux Input fed to the MONITOR OUTPUT by using the “Aux In >Monitor” control will be processed by • the KEMPER Kone intelligence as well. It will always be processed in full-range mode, even if you play your Rigs in Speaker Imprint mode (Monitor Cab Off active).
-
Page 99: Using Kemper Kone With Profiler Powerhead Or Powerrack
• If you are running four KEMPER Kones in a 4x12 cabinet, you can also divide the wattage value by four, thus never exceeding the maximum load. (Explanation: four KEMPER Kones in the typical parallel/serial configuration will not lower the current but distribute the heat among four coils). - Page 100 KEMPER Kone / KEMPER Kabinet 100 • If you are running at high volumes and notice any indications of speaker distress, turn down (Monitor Output) Volume or Power Amp Boost.
-
Page 101: Kemper Kone Wiring
KEMPER Kone / KEMPER Kabinet 101 KEMPER Kone Wiring Here are the wiring schemes for those who intend to equip their own cabinets with KEMPER Kones: Running two KEMPER Kones in series, resulting in 8 ohms Running four KEMPER Kones in parallel/serial configuration, resulting in 4 Ohm... -
Page 102: Output Section
The volume level settings are not stored with the output presets, as switching the presets could result in dangerous volume jumps. ✓ The settings of the Output Section are not stored per Rig but stay as global settings. In PROFILER terminology: they are locked and cannot be unlocked. Output Volumes and Output Volume Link Within the Output Section you can find individual volumes for different physical outputs. - Page 103 ✓ The S/PDIF Clock can be selected on the same page as S/PDIF Volume. The PROFILER can generate a clock of 44.1, 48, 88.2, or 96 kHz. Your audio interface and DAW will be clocked at the selected rate and your DAW project should be set accordingly.
-
Page 104: Output Sources
Useful for reamping or running a second amp in parallel. PROFILER Stage: default and only available for SEND 1 output all other PROFILER variants: default and only available for DIRECT OUTPUT; needs to be used in conjunction with the... - Page 105 REV are sent to the output. If no delay or reverb is active, the output will remain silent. only available for stereo outputs ✓ The SEND 2 output of the PROFILER Stage is reserved for effect loops. Its signal source cannot be select.
- Page 106 It qualifies well for reamping purposes as it provides a GROUND LIFT button, as well as the other analog outputs of PROFILER Head, PowerHead, Rack, and PowerRack. The PROFILER Stage offers ground lift options in the menu of the Output Section. Try different combinations of ground lifts for best hum and noise suppression.
- Page 107 You can exploit this when PROFILING amplifiers: When you set the Output Source of DIRECT OUTPUT or SEND 1 to “Off”, you can mute the reference amplifier by simply switching from PROFILER Mode to Browser Mode. Back in PROFILER Mode, your reference amp will play again.
- Page 108 Output Section 108 method is called the wet/dry/wet setup. Your mixer will love you for that! And, you can still use the MONITOR OUTPUT separately from all of this for your individual stage sound! Wet-dry-wet connections with PowerHead or PowerRack...
- Page 109 Activate “Monitor Stereo” and MONITOR and DIRECT OUTPUT are combined to form a new stereo sum. At the PROFILER Stage the MONITOR OUTPUT is stereo by default. Then select the Output Source “Mod Stereo” for the MONITOR OUTPUT, which contains everything apart from the effects in the DLY and REV modules.
- Page 110 Output Section 110 • Please ensure that the virtual guitar cabinet is not switched off (“Monitor Cab Off” not engaged). • If you want to control the volume of this setup, then link all participating volumes to the MASTER VOLUME knob with the “Link”...
- Page 111 Output Section 111 • Users of PROFILER Head, PowerHead, Rack, and PowerRack can set up a stereo output that is separate from the OUTPUT, and that can be controlled individually: activate “Monitor Stereo” and set MAIN Monitor Output Source to “Master Stereo”.
- Page 112 Output Section 112 One or two passive full range speakers via external power amp ✓ Users of the PROFILER Stage equally set Monitor Output Source to “Master Stereo” and use the stereo MONITOR OUTPUT for this purpose.
-
Page 113: Main Output
Whenever the device (e.g. mixing desk or audio interface) connected to the MAIN OUTPUT XLR or TS jacks indicates too much level coming from the PROFILER, or there is the need to set the Main Output Volume to less than -12 dB, then activate the Main Output Pad to reduce the signal level of the Main Output by 12 dB. This increases the range of the Main Output Volume control and preserves the signal-to-noise ratio of the Main Output. -
Page 114: Output Equalizers
Output Section 114 If you want to establish stereo monitoring with any of the other PROFILER variants, you select the option “Monitor Stereo”, MONITOR OUTPUT and DIRECT OUTPUT become one logical pair of stereo outputs. Functions like Monitor Output Source, Monitor Output Volume, Monitor Volume Pedal, Monitor Output Link, Monitor Cab. Off, Monitor Output EQ and, Aux In >... -
Page 115: Auxiliary Input
Auxiliary Input The Auxiliary Input function allows you to feed a stereo signal, such as an mp3-player, into your PROFILER to play along with it. In the Output Section, the Auxiliary Input function is equipped with three mix controls: one to feed the... - Page 116 Effect Loop active in your Rig, or while you are in PROFILER Mode, as the physical inputs are needed for a different purpose. ✓ To prevent unwanted hum and noise, please remember to turn down the Auxiliary Input Mix when you are not using The Aux In function can also be used to feed in a band monitor mix from a mixing desk, mix it locally with your guitar signal and, monitor the sum for example via in-ear monitors connected to the HEADPHONE output.
- Page 117 Output Section 117 Mixing guitar signal with monitor mix locally; PROFILER Stage: use RETURN 1 and 2 jacks for Aux In ✓ In this case make sure, that the band monitor mix doesn’t include your guitar signal to avoid phasing issues with the guitar signal you mix in locally.
-
Page 118: Constant Latency
Normally, latency is optimized dynamically be as low as possible. However, in some specific configurations e.g. playing through multiple PROFILER units simultaneously and mixing their output signals this dynamic optimization could cause phasing issues. "Constant Latency” avoids such issues by keeping latency at a fixed, defined level. -
Page 119: Instrument Input And Reamping
RETURN The RETURN can be chosen as an analog, studio-level input for reamping purposes. Either (Reamp) the TRS input or the balanced XLR input are available as the RETURN. For PROFILER Stage use balanced TRS RETURN 1 input. Read the next chapter carefully to learn more about the dedicated reamping features. - Page 120 Sens”. They have their dedicated control “Reamp Sens”, as described in the chapter Reamping. ✓ A tutorial video explaining Input Source, as well as how to adjust of Clean Sens Distortion Sens appropriately, can be found at: www.kemper-amps.com/video...
-
Page 121: Reamping
However, you can still use classic reamping hardware and treat the PROFILER like a regular tube amp. Whether you are recording the pure instrument signal, or you are reamping, you are free to use either the analog ins and outs, or the S/PDIF connections. - Page 122 • If your PROFILER unit was built before 2018, you must set your audio interface clock as slave to S/PDIF, since that hardware is capable of running as master only. More recent PROFILER units, including PROFILER Stage, include an option labeled “Auto/Internal”...
- Page 123 PROFILER perfectly. The output assigned to “Git Studio” is perfectly leveled at the same time.
- Page 124 DI signal, play it back now and feed it to the PROFILER. You don’t have to unplug your guitar from the INPUT. It will no longer be routed to the signal flow of the PROFILER, due to the “Reamp” Input Source settings - however, it still feeds the selected DI output and thus the input of your recording device.
-
Page 125: Alternative Procedure For Input Leveling
✓ Two tutorial videos explaining configuration of Output Sources for recording and reamping can be found at: www.kemper-amps.com/video Alternative Procedure for Input Leveling The original "Clean Sens" leveling from step two, and the final leveling of "Reamp Sens" have a kind of opposite relationship that can be used for easier and safer leveling, under two conditions: •... -
Page 126: Expression Pedals And Foot Switches
Expression Pedals and Foot Switches Both PROFILER and PROFILER Remote allow you to connect multiple, independent expression pedals, mono switches or dual switches for different purposes. Each of the PEDAL inputs on the PROFILER Stage (four inputs), all other PROFILER variants... - Page 127 Wah Pedal (MIDI control change #1) Besides the classic wah wah, the PROFILER offers numerous other effects that can be controlled by the Wah Pedal, such as Wah Vowel Filter or Wah Pedal Booster. These are all referred to as “wah” effects and are shown in orange.
-
Page 128: Expression Pedal Recommendation
That’s why it’s the preferred choice of many users for wah applications. The EP-1 KP offers an additional toe switch, which can be connected to PROFILER or Remote, like any other external switch, via an additional TS-cable. This switch can then be used to activate/deactivate wah effects in a similar way to how classical wah pedals work. -
Page 129: Connecting Pedals To Profiler Remote Or Profiler Stage
Expression Pedals and Foot Switches 129 Connecting Pedals to PROFILER Remote or PROFILER Stage Both PROFILER Remote and PROFILER Stage feature four inputs for the direct connection of expression pedals or “Pedal switches. For the Remote, these can be configured in System Settings on the 3-6”... -
Page 130: Four Pedals: Luxury
Expression Pedals and Foot Switches 130 Four Pedals: Luxury Four dedicated pedals connected to PROFILER Remote; for PROFILER Stage use PEDAL 1-4 plugs If you stick to these default assignments, you just need to plug in the TRS-cable, press “Calibrate” and perform a full swell on the pedal to calibrate it. -
Page 131: Three Pedals: Comfortable
Expression Pedals and Foot Switches 131 Three Pedals: Comfortable Two dedicated pedals for volume and Morphing plus one shared pedal for wah and pedal pitch effects; for PROFILER Stage us PEDAL 1-3 jacks Please follow the instructions under Four Pedals: Luxury to connect and calibrate your Volume, Morph and Wah Pedals. -
Page 132: Two Pedals: Mainstream
Expression Pedals and Foot Switches 132 Two Pedals: Mainstream One dedicated pedal for volume and the Morph Pedal to be shared for wah and pedal pitch effects; for PROFILER Stage use PEDAL 1+2 jacks Please follow the above instructions to connect and calibrate your Volume and Morph Pedals. You have neither a dedicated Wah nor dedicated Pitch Pedal. -
Page 133: One Pedal: Purist
The one pedal then needs to be set-up as a wah pedal. The PEDAL 5 input of the Remote, and Pedal 3 input of the PROFILER Stage, are already prepared for it by default. How to connect and calibrate has been already explained in... -
Page 134: Additional Switches Required
A tutorial video demonstrating setting up of expression pedals can be found at: www.kemper-amps.com/video Additional Switches Required? Switches can be connected to both the PROFILER and the PROFILER Remote. Switching functions can be assigned globally. These functions include Rig up/down, activating/deactivating effect modules, triggering Action &... -
Page 135: Connecting A Profiler Switch
Connecting a PROFILER Switch Connect the KEMPER PROFILER Switch using a TRS cable to one of the PEDAL inputs and select the “PROFILER Switch” mode on the corresponding "Pedal" page in “Pedal Settings” of your PROFILER Stage or “System Settings”... -
Page 136: Connecting Pedals And Switches To Profiler Head, Powerhead, Rack Or Powerrack
Connecting Pedals and Switches to PROFILER Head, PowerHead, Rack or PowerRack Connecting pedals and switches to PROFILER directly PROFILER Head, PowerHead, Rack and PowerRack feature two jacks for the direct connection of expression pedals or switches, which can be configured in System Settings on the “Pedal 1-2”... - Page 137 Mode, you can step through Slots and Performances, while disabled Mode, it switches between “KEMPER Amp” and “Reference Amp”. Slots will be skipped automatically. In PROFILER ✓ A tutorial video demonstrating how to set-up switches connected to the PROFILER is available at: www.kemper-amps.com/video...
-
Page 138: Volume Pedal Function
Expression Pedals and Foot Switches 138 Volume Pedal Function In difference to the Pitch Pedal functions, the Volume Pedal function does not have its own effect type, as this would allocate an effect module every time you wanted to use the pedal. Instead, you will find two parameters for the Volume Pedal in Rig Settings. -
Page 139: Morphing
Despite the power of this feature, setting up Morphing is rather simple. If you own a PROFILER Remote or Stage, Morphing is just a few tweaks away. If you don't own a PROFILER Remote or Stage, you can still trigger Morphing... - Page 140 Time to, say, four bars. Now, just hit the Rig Button four bars before your solo starts and enjoy a nice, leisurely stroll to the front of stage while the PROFILER slowly morphs your rhythm sound into a boosted solo sound in the background.
- Page 141 If you are using the Morph button with long values for Rise Time or Fall Time, wait until the transition has finished before editing parameters - the PROFILER will not allow parameter changes at intermediate positions, since it would not be possible to determine whether the edit was intended for the Base or Morph Sound.
- Page 142 A safer way to erase a Morphing is to first activate the Base Sound, and then sweep the base value of any parameter past the morphed value. • If no device is connected to the PROFILER to activate Morphing, all Rigs will load with their Base Sound. • Morph Pedal...
-
Page 143: Monitor Volume Pedal (Midi Control Change #73)
Morphing (this function can also be assigned to the QUICK button; the PROFILER Stage even has its dedicated MORPH button) the parameters “Rise Time” and “Fall Time”, which are applied if Morphing is triggered via Remote’s or Stage’s •... -
Page 144: Stack Section
Stack Section The stack section is the heart of the PROFILER. It represents the raw virtual guitar amplifier and guitar cabinet as defined by the PROFILE. Every PROFILE is represented by the three modules that make up the stack section. - Page 145 The PROFILER masters this technical behavior without degrading or changing the basic character of the amp model whatsoever.
- Page 146 The PROFILER allows for a much wider dynamic range, while preserving the character of the tubes at the same time. Turning down the volume knob on the guitar results in a very natural, clean sound with full dynamics and lots of energy.
- Page 147 Stack Section 147 Clarity “Clarity” changes the sound of the distortion in a new and unique way. Turning the “Clarity” soft knob to the right will bring the clean character of the sound into focus without lowering the amount of distortion. The distortion itself will become less forward in the mid frequencies and sound far more transparent.
- Page 148 Performance Mode. Basically, the equalizer in the PROFILER is a recreation of a generic, passive tone stack, but it is designed to have more impact on the frequency bands. When all soft knobs are in the middle position, it does not change the sound, so what you hear is the unaltered sound of the PROFILE.
-
Page 149: Cabinet
Stack Section 149 Cabinet The CABINET button brings the cabinet module into focus. You can freely combine guitar cabinets and guitar amps from different PROFILEs to create new stacks. The cabinet has four parameters to tweak its character in an artificial way: ... - Page 150 Stack Section 150 Cabinet Imprint Select If Kemper Kone und Monitor Cab. Off are activated globally, this parameter will become available on a second page in the menu. Details can be found in the chapter KEMPER Kone / KEMPER...
-
Page 151: Effects
Effects 151 Effects The four modules named A, B, C and D, placed in the signal flow before the stack, are the ideal place for stomp box type effects - like distortion, for instance. These modules are mono, because the amplifier will only accept a mono signal. - Page 152 Effects 152 Press and hold any effect module button to bring it into focus. If the effect module is active the display will change its color to match the effect. The soft buttons and soft knobs will display the parameters available to edit. Use the <PAGE>...
- Page 153 The “Ducking” control allows you to intensify or suppress (“duck”) an effect just by the dynamics of your playing. You might know this from the “Ducking Delay” that can be found in many effect processors. In the PROFILER, ducking is available for many effect types, both individually and simultaneously.
-
Page 154: Wah Effects (Orange)
Wah Effects (Orange) 154 Wah Effects (Orange) The wah effects are a versatile collection of different effects that can all be controlled by an expression pedal set up Pedal. Alternatively, you can switch to “Pedal Mode” option “Touch”, and control the effect using your picking strength. - Page 155 Wah Effects (Orange) 155 Wah Rate This effect reduces the sampling rate of the audio signal passing through. The sampling frequency is controlled with the “Manual” parameter. Lowering the sample rate results in a Reducer raspy, scratchy quality as well as aliasing. Use the “Peak” parameter to continuously control the quality of the sample rate interpolation, which will alter the harmonic content drastically.
-
Page 156: Wah Parameters
Wah Effects (Orange) 156 Wah Formant The Wah Formant Shifter shifts the harmonic content of the sound. However, in contrast to Shifter the Wah Frequency Shifter, it preserves the dependencies of the harmonics, as well as the fundamental frequency. As a result, you can play single lines in a regular fashion, while the formant shifting affects the character of your instrument. - Page 157 Wah Effects (Orange) 157 Pedal Range This parameter determines the maximum impact of the pedal, as an offset to the value selected for the “Manual” parameter. Negative values of “Pedal Range” will reverse the swell direction of the pedal or touch effect, so the effect will go down when you push the pedal forward.
- Page 158 Wah Effects (Orange) 158 Touch This mode resembles the classic touch wah behavior, where the depth of modulation is controlled by the picking strength and is available for all wah effects. As with the regular wah pedal, the “Range” parameter controls the intensity of the touch effect.
-
Page 159: Distortion (Red)
Distortion (Red) The PROFILER offers a variety of distortion stomps modeled on vintage guitar distortion pedals. Every one of these classic pedals is famous for its distinctive character and has been exploited by some of the greatest guitar heroes of all time. - Page 160 Distortion (Red) 160 Name Description Controls Historical Reference Use the “Tone” control to soften the Green The sound of this one just screams Ibanez® Tube “tubes” - a very special kind of Scream sound with a low pass filter. Screamer TS-808 overdrive which results in a and Overdrive wonderful, smoky tone.
-
Page 161: Booster (Red)
Booster (Red) 161 Booster (Red) Treble Booster A classic sound-shaping stomp pedal that does not feature a built-in distortion. Instead, the Treble Booster is made to shape the high frequencies of your guitar so that they improve the distortion as well as making it more transparent, especially when being used with old amplifier models that were not originally designed for distortion. -
Page 162: Shaper (Red)
Shaper (Red) 162 Shaper (Red) Type Diagram Linear Recti Shaper This is the characteristic curve of the Recti Shaper. Regular distortion This is the characteristic curve of the regular distortion. Soft Shaper This is the characteristic curve of the Soft Shaper. Hard Shaper This is the characteristic curve of the Hard Shaper. -
Page 163: Bit Shaper
Shaper (Red) 163 Bit Shaper The Bit Shaper continuously reduces the bit depth of a signal, with higher “Drive” settings resulting in fewer available bits. The effect can be described as introducing a fizzy distortion, with a choking of the signal at high settings. The signal can even break off completely at the most extreme settings. -
Page 164: Equalizer (Yellow)
Equalizer (Yellow) 164 Equalizer (Yellow) This group of effects offers you a nice selection of high-quality equalizers. They can be placed either before or after stack section, as each configuration has a different impact on the sound. The “Mix” parameter is common to all the equalizers and controls the impact of all the EQ bands combined. Graphic Equalizer, Studio Equalizer, and Metal Equalizer offer “Low Cut”... -
Page 165: Metal Equalizer
— preferably in the X module. You must also switch off the amplifier and cabinet modules to avoid further coloring or distorting your sound. If you are using a KEMPER Kone switching off both amplifier plus cabinet module will automatically switch the Kone into full-range mode even if a speaker imprint has been activated globally. We also suggest starting with no other active effects when exploring the Acoustic Simulator, and remember you’ll also need... - Page 166 Equalizer (Yellow) 166 Body Controls the virtual body-resonance of the acoustic guitar simulation and by that, the amount of bass frequencies. When it comes to adjusting low frequency content of any guitar sound, remember to consider your fellow musicians. The less bass you produce, the more you will cut through the mix.
-
Page 167: Stereo Widener
Equalizer (Yellow) 167 Stereo Widener Not an equalizer in the traditional sense, but it does use equalization to work its magic. By emphasizing certain frequencies on one stereo channel, while attenuating them on the other, it creates a subtle stereo effect. This is done symmetrically, so that when the signal is summed to mono, the effect is completely canceled out with no coloration to the sound. - Page 168 Equalizer (Yellow) 168 ✓ For all Widener effects, it is mandatory to place them after the Stack section, where the effects are processed in stereo. While mono signals will have their stereo width changed by a considerable amount when using these effects, the impact on stereo signals will be considerably less, or even barely noticeable.
-
Page 169: Compressor (Cyan)
Clean sounds benefit from compression, as it helps to lengthen sustain of the strings. Another typical application is to emphasize the attack of the picked strings with the Attack parameter. In the PROFILER, you should use the Pick parameter in the amplifier module to achieve this effect. -
Page 170: Auto Swell
Compressor (Cyan) 170 Squash This gives you control over the dynamic behavior of the compression. At the center position the compressor will work as you expect. When you turn “Squash” towards zero, the compressor will emphasize the first phase of the strings’ decay, resulting in less squash. -
Page 171: Noise Gate (Cyan)
Noise Gate (Cyan) 171 Noise Gate (Cyan) In addition to the noise gate in the Input Section, there are two additional noise gates available as effects, developed specifically with the hi-gain player in mind. Whereas the noise gate in the Input Section is designed to preserve the guitar’s dynamics exactly, the Noise-Gate effects behave like classic downward expanders. -
Page 172: Chorus (Blue)
Chorus (Blue) 172 Chorus (Blue) Vintage Chorus The Vintage Chorus is an emulation of the 70’s chorus technology based on bucket brigades, which can be considered a predecessor of today’s digital sampling technology. The Vintage Chorus not only covers the exact sound of the famous Chorus Ensemble but also many other models of that era which were based on the same basic circuitry. -
Page 173: Hyper Chorus
Chorus (Blue) 173 Depth Use the “Depth” parameter to adjust the intensity of the chorus modulation. ✓ sound leave the “Depth” parameter at exact middle position and use the Tip: for the original Chorus Ensemble “Rate” parameter to create your favorite sound - the original devices did not have a depth control. ... -
Page 174: Air Chorus
Chorus (Blue) 174 Amount If the full sound becomes too complex, you have the option to continuously reduce the amount of delay lines. You can smoothly fade the numbers of delay lines from one to three on each stereo side. So yes, even 1.5 choruses are possible: this simply means one chorus is at full volume, the other is at half. -
Page 175: Micro Pitch
Chorus (Blue) 175 Crossover The “Crossover” parameter enables you to position the bass and middle frequencies of your signal to a stable mono position between your speakers, while the highs still float around. Micro Pitch Micro Pitch is a detune effect, based on pitch shifter technology. The result sounds more stable than a classic chorus, because it avoids the cyclic modulation effect of a low frequency oscillator (LFO). -
Page 176: Vibrato
Chorus (Blue) 176 Vibrato The Vibrato effect modulates the pitch of the sound using a sine modulation. Rate Use the “Rate” parameter to adjust the speed of the modulation. Depth Use the “Depth” parameter to adjust the intensity of the modulation. ... - Page 177 Interestingly, you can take a PROFILE of your own rotary cabinet. If you get the chance to have a real rotary speaker in your studio, as long as you can connect line or guitar signals, you can take a PROFILE of it. Please refer to the for further instructions. Of course, the PROFILER already comes with a Rig “CK Rotary chapter Taking a PROFILE Speaker”...
- Page 178 Chorus (Blue) 178 Use the “Mix” parameter to adjust the balance between the input signal and the output of the Rotary Speaker effect. For an authentic sound, this is best left at “100%”, but it can be very useful if you want to achieve sounds that are less conventional.
-
Page 179: Tremolo / Auto Panner
Chorus (Blue) 179 Tremolo / Auto Panner The Tremolo modulates the level of the signal in a periodic manner. Rate Use the “Rate” soft knob to adjust the speed of Tremolo modulation; this parameter is almost continuously variable but stays in sync to the actual tempo of the Rig. The tempo can be dialed in manually or tapped on the button. -
Page 180: Phaser And Flanger (Purple)
Phaser and Flanger (Purple) 180 Phaser and Flanger (Purple) Phaser The Phaser is a huge filter bank comprising up to 12 filter stages for each stereo side. ✓ There is a similar phaser in the group of Wah Effects that can be controlled by the Pedal. - Page 181 Phaser and Flanger (Purple) 181 Feedback Intensifies the Phaser effect as peaks get higher and notches get lower. Peak Spread You cannot find this parameter in any vintage phaser, because it would have been too expensive to realize in the analog domain.
-
Page 182: Vibe Phaser
Phaser and Flanger (Purple) 182 Vibe Phaser The Vibe Phaser is inspired by the famous Univibe effect. The Univibe is basically a phaser, but with an asymmetrical modulation curve that stays up for quite a while, then bounces down very quickly; apart from that, it is identical to the regular phaser. -
Page 183: Pitch Shifter (White)
Pitch Shifter (White) 183 Pitch Shifter (White) A pitch shifter is an array of alternating delays that first cuts the signal into slices, and then plays them back at a different speed. Any pitch shifter will always introduce a little latency to the signal, simply down to the fact that it uses delays. -
Page 184: Transpose
Pitch Shifter (White) 184 ✓ Check out the tutorial video demo of Formant Shift available at: www.kemper-amps.com/video Pure Tuning When you press “Pure Tuning”, intervals produced by the pitch shifter will be slightly detuned from the standard tempered scale to create a so-called “natural” or “pure” tuning. This will avoid harmonic beating, especially when distorted afterwards. -
Page 185: Pedal Pitch
Pedal Pitch With the Pedal Pitch effect, you can use an expression pedal for the famous Whammy effect, using the KEMPER advanced pitch shifting technology. Set “Heel Pitch” and “Toe Pitch” as the start and end points for your pedal sweep. -
Page 186: Pedal Vinyl Stop
Pitch Shifter (White) 186 Pedal Vinyl Stop Pedal Vinyl Stop is a variation of the Pedal Pitch effect. While Pedal Pitch can create a “dive bomb” effect down to three octaves, Pedal Vinyl Stop will turn the pitch of your instrument down to exactly zero, by swelling up the Pitch Pedal;... - Page 187 Pitch Shifter (White) 187 Detune Similar to the “Detune” in the Micro Pitch effect, this parameter creates a beating between the voices and the direct signal. It will work best if at least two of the three signals run at the same pitch. For example: first, set both voices to “+12”...
-
Page 188: Harmonic Pitch
Pitch Shifter (White) 188 formants are fully compensated, and the timbre of the pitch-shifted voices will be like the original tone. It will sound as though you are hitting the same string on the same instruments, just on a different fret. When you move the “Formant Shift”... - Page 189 Pitch Shifter (White) 189 Voice Balance Use this to balance the two harmony voices. Turn it to either extreme to isolate a voice. Use this to determine the balance between the detuned voices and the direct signal. Stereo The “Stereo”...
- Page 190 Pitch Shifter (White) 190 formants move down for higher-pitched voices, and up for lower-pitched voices. At the extreme left position, the formants are fully compensated, and the timbre of the pitch-shifted voices will be like the original tone. It will sound as though you are hitting the same string on the same instruments, just on a different fret.
- Page 191 The PROFILER Pitch Shifter has the same ability, since it has full control over the relative pitch it creates. Apart from octaves, every interval will be slightly detuned to fit the harmonics of the note you play; this will be most perceivable on thirds and sevenths, which are tuned down by several cents.
-
Page 192: Analog Octaver
Pitch Shifter (White) 192 ✓ Check out the tutorial video demo of Pure Tuning available at: www.kemper-amps.com/video Analog Octaver Originally intended for bass players, the Analog Octaver is a classic effect that can sound great with any instrument. It works by creating two additional signals: one at an octave below the input pitch, and another at two octaves below. - Page 193 Pitch Shifter (White) 193 Low Cut While the octaver can be very pleasant with higher notes, it can soon turn to a deep growl at lower registers. This is because it can produce frequencies well below 20 Hz. “Low Cut” is an additional parameter that is not found in the original effect;...
-
Page 194: Delay (Green)
Without doubt, the delay effect types are some of the most advanced and comprehensive effects collections in the PROFILER. However, the approach we have taken might be a bit different from what you've seen before. You will not find a dedicated reverse delay, tape delay or ducking delay, as we realized there is no sense in splitting such crucial features into separate delay types. - Page 195 Delay (Green) 195 Despite all the flexibility of the new delays, there are good reasons to choose the DLY module for the delay effect: • delay sound (as well as the reverb tail) won’t be cut off when you switch Rigs (“spillover”) if placed in the DLY module •...
- Page 196 Delay (Green) 196 Low Cut & High Cut These two controls determine changes to the frequency response of progressive delay repeats. When Low Cut is set to minimum, and High Cut to maximum, then the delay will not undergo any sound degradation. As you reduce High Cut from its maximum position, the high frequencies will attenuate with every delay repetition, creating a warm, lush sound.
- Page 197 Delay (Green) 197 Delay Time & Delay Ratio If “To Tempo” is not engaged, then Delay Time controls the absolute delay time in milliseconds. The maximum delay time is 2000 ms. As you dial through the delay times, you will notice the change in pitch, typical of tape-speed changes in a tape delay.
- Page 198 In contrast to the Freeze function, Infinity Feedback still lets you add more signal to the delay, creating intermodulation with the repeated signal. ✓ The “Freeze” and “Infinity” soft buttons can both be assigned to one of the Effects Buttons of the PROFILER Remote and Stage. Step and hold the desired Effects Button (I to IIII) while you press the "Freeze"...
- Page 199 Delay (Green) 199 ✓ Both the “Freeze” and “Infinity” soft buttons can also be assigned to a foot switch that you plug into one of the PEDAL inputs of your PROFILER or Remote. Cross Feedback A small number of delay types - namely the...
- Page 200 Stereo This is like the bipolar Stereo parameter included in many effects of the PROFILER. In the delays, this parameter controls the stereo spread of all delay taps. However, it introduces a novel "super-stereo" effect that lets the delay reflections appear well outside the regular stereo image.
- Page 201 Delay (Green) 201 Stereo Modulation Induces a delay time modulation to create a lush and chorus-like sound. The delay taps are modulated in different phases to produce a wide stereo image like the Chorus, even when the delay times are set to equal values. ✓...
-
Page 202: Single Delay
Delay (Green) 202 Single Delay The Single Delay consists of one delay line, with one delay time setting only. This makes the Single Delay ideally suited to the mono effect modules in front of the amp. However, you can still place it after the amp and achieve a decent stereo effect by increasing the Stereo parameter. -
Page 203: Two Tap Delay
Delay (Green) 203 Two Tap Delay The Two Tap Delay is based on a single delay, but with two signal taps for the left and right sides. This allows for dedicated ping-pong delay patterns, that are quite different to those of the Dual Delay, for example. -
Page 204: Serial Two Tap Delay
Delay (Green) 204 Serial Two Tap Delay The Serial Two Tap Delay is a Two Tap Delay with an additional delay placed in front. This additional delay features separate "Mix Serial" and "Feedback Serial" controls, as well as a third delay time setting. The delay time appears as “Note Val. -
Page 205: Dual Delay
Delay (Green) 205 Dual Delay The Dual Delay features two fully independent delays - one for each stereo side - with independent feedback controls. Both feedbacks can be sync'ed with the “Feedback Sync” soft button, so that both are controlled by the Feedback 1 control only. -
Page 206: Rhythm Delay
Delay (Green) 206 Rhythm Delay The Rhythm Delay is quite a beast. It allows you to arrange up to four delay taps to create a rhythmic sequence. Each delay tap can be set individually by time, volume and panorama position. The sound degradation from the high pass and low pass filters increases from tap to tap, giving the delay a natural flavor, even within a pattern. - Page 207 Delay (Green) 207 When you set Feedback to above zero, the whole delay pattern is repeated. The repetition time (and thus pattern length) is defined by the time of the fourth delay tap (Delay 4). For that reason, the fourth delay tap is always the first tap of the next repetition.
-
Page 208: Quad Delay
Delay (Green) 208 Quad Delay The Quad Delay features four delay lines in parallel. The parameter set looks like the Rhythm Delay, but the structure is completely different. The four delays share a common Feedback control, as well as a common Cross Feedback. -
Page 209: Legacy Delay
Legacy Delay The Legacy Delay is based on the first delay algorithm made for the PROFILER. The main purpose is to maintain full backward compatibility to Rigs that have been created before the advent of PROFILER operating system 5.0. The... -
Page 210: Pitch Shifter Delay (Light Green)
Pitch Shifter Delay (Light Green) 210 Pitch Shifter Delay (Light Green) The Pitch Shifter Delays are powerful combinations of the delay types with one of four different pitch shifter types: Chromatic Type The chromatic pitch shifter is positioned at the delay input and can be played polyphonically (chords). The pitch is set in semitones. -
Page 211: Crystal Type
Pitch Shifter Delay (Light Green) 211 Crystal Type Crystal is a reverse delay, in which the pitch is altered by playing back the delayed signal faster or slower. The Crystal is placed in the feedback loop of the delay, creating a pitch helix with every repetition. Setting the pitch to either one octave (+12) or a fifth (+7) will yield the most interesting results. -
Page 212: Loop Pitch Delay
Pitch Shifter Delay (Light Green) 212 Loop Pitch Delay The Loop Pitch Delay is based on the Two Tap Delay as well, with a Chromatic Pitch shifter in the feedback loop. Loop Pitch Delay... -
Page 213: Frequency Shifter Delay
Pitch Shifter Delay (Light Green) 213 Frequency Shifter Delay The Frequency Shifter Delay uses a frequency shifter effect in the feedback loop, instead of a regular pitch shifter. This creates a disharmonious pitch helix. A true lo-fi effect. Frequency Shifter Delay... -
Page 214: Dual Chromatic Delay & Dual Harmonic Delay
Pitch Shifter Delay (Light Green) 214 Dual Chromatic Delay & Dual Harmonic Delay The Dual Chromatic and Harmonic Delays feature the Dual Delay with two pitch-shifters at the input of each delay channel. This allows for creating two pitch-shifted voices that can be delayed, with feedback tweaked to your liking. If you want to go for a single pitch-shifted delay, then set Pitch parameters to identical values. -
Page 215: Dual Crystal Delay
Pitch Shifter Delay (Light Green) 215 Dual Crystal Delay Delay, with two Crystals positioned in each delay’s feedback loop. This The Dual Crystal Delay is based on the Dual allows for two different pitches, while each of their signals can be cross-fed by the “Cross Feedback” control. Dual Crystal Delay... -
Page 216: Dual Loop Pitch Delay
Pitch Shifter Delay (Light Green) 216 Dual Loop Pitch Delay The Dual Loop Pitch Delay works like the Dual Crystal Delay, but with two Chromatic Pitch shifters in the feedback loops. The results are comparable to the Crystal, but more concrete. Dual Loop Pitch Delay... -
Page 217: Melody Delay
Pitch Shifter Delay (Light Green) 217 Melody Delay The Melody Delay is a Rhythm Delay combined with four pitch-shifters that turn the rhythm into a melody. Each note that you play will create an arpeggio of up to four delayed and pitched notes. You will achieve the best results by only playing single notes and letting the Melody Delay play the rest. -
Page 218: Quad Chromatic Delay & Quad Harmonic Delay
Pitch Shifter Delay (Light Green) 218 Quad Chromatic Delay & Quad Harmonic Delay The Quad Chromatic/Harmonic Delays can be considered as a double version of the Dual Chromatic/Harmonic Delays. These feature four pitch-shifters, one on each input of the four delays. This allows for pitched reverberated sounds. -
Page 219: Reverb (Green)
Due to the placement of the reverb tank before the power amp, its output will be distorted along with the dry guitar. To authentically recreate this effect in the PROFILER, you should place the Spring Reverb before the amplifier. - Page 220 Reverb (Green) 220 Dripstone Controls the intensity of the “Dripstone” sound. Distortion (Dwell) The Fender® Reverb Tank, as well as combo amps, utilize a tube amplifier stage to drive a transducer into the spring tank. This tube stage is easily overdriven as it has to create a reasonable signal level, and it creates a distortion that adds some grit to the reverb sound.
-
Page 221: Natural Reverb
Reverb (Green) 221 High Cut High Cut is a static filter that gradually smoothens the high frequency content of the reverb, when turned more to the left. While not implemented in combo amps, this control was available as a “Tone” control on the original Fender® Reverb Tank. - Page 222 The input of the reverb is cut, so no further signal is added to the reverb, allowing you to play along to the pad. The “Freeze” function can be assigned to one of the Effects Buttons of the PROFILER Remote or Stage. Step and hold the desired Effects Button (I to IIII) while you press the "Freeze" soft button.
- Page 223 Tempo, and the onset of the reverb tail can be arranged in musical values — mostly multiples of 1/8 notes. With “To Tempo” a predelay of more than two seconds can be achieved. The tempo can either be tapped with one of the TAP buttons of the PROFILER or PROFILER Remote, or automatically determined using the Beat Scanner when you press and hold one of the TAP buttons.
- Page 224 Reverb (Green) 224 High Cut High Cut is a static 1-pole filter that gradually smooths the high frequency content of the reverb, the further it is turned to the left. High Decay Simulates the high-frequency degradation over time in natural rooms and halls. The further it is turned to the left, the more high frequency content is lost over time.
- Page 225 Reverb (Green) 225 Mid Frequency Offsets the filter frequencies of Low Decay, High Decay and High Cut. Consequently, it also controls the pitch of the resonance frequency created by large settings of Low Decay and High Decay. Low Boost When the Low Boost switch is activated, the Low Damp control below it will change its name to “Low Multiplier”, and invert its behavior, so that instead of damping the low frequencies over time, it will maintain the low frequencies longer than the rest of the reverb tail.
-
Page 226: Easy Reverb
Reverb (Green) 226 Easy Reverb The Easy Reverb is based on the Natural Reverb. In contrast to the latter, the number of parameters is reduced to a minimum, to make the workflow easy and straightforward. Decay Time In the Easy Reverb, the Decay Time also controls the hidden parameters Room Size and Predelay time. This is done in a smart way, automatically creating a natural room sound to match the chosen Decay Time. -
Page 227: Cirrus Reverb
Reverb (Green) 227 There are two alternative ways to create an echo reverb in the PROFILER: • Many Delay Types feature a “Smear” parameter that adds a little reverberation to the delay repeats. While the smearing is much shorter than it is in the Echo Reverb, it builds up with every repetition. -
Page 228: Formant Reverb
Reverb (Green) 228 Formant Reverb This adds formant filters to the Cirrus Reverb to give the reverb tail more color, and a very distinctive, choir-like sound. The main purpose of the Formant Reverb, however, is not to create a realistic choir sound, but to give it a certain character, making it sound more like a synthesizer or Mellotron. -
Page 229: Ionosphere Reverb
Reverb (Green) 229 Ionosphere Reverb The Ionosphere Reverb is based on the Cirrus Reverb Formant Reverb. Featuring the finest pitch and shimmer reverbs, it builds on the concept and takes into brand new territory. Two crystal pitch shifters are embedded into the reverb, allowing you to create effects more akin to orchestral strings and synth-like sounds. -
Page 230: Dly And Rev Modules
Firstly, you can make use of the dedicated control knobs for the Mix and Feedback / Decay Time settings, found on the PROFILER Head and Rack. However, as well as this: • Both modules offer a spillover for delay and reverb tails. That means, the effect tails are not cut when you switch to the next Rig. - Page 231 Reverb (Green) 231 DLY+REV Routing (in Rig Settings) “DLY+REV Routing” is another feature exclusive to the DLY and REV modules. It’s a unique parameter, available in Rig Settings, that allows continuous control over the routing of the effects located in the DLY and REV modules. For the following description, let‘s assume that you have placed a delay in the DLY module and a reverb in the REV module.
- Page 232 Reverb (Green) 232 When you turn “DLY+REV Routing” more to the left, you will notice that the delay reflections will vanish from the reverb - at fully left position, only the dry portion of the delay gets reverberated. Now, the delay and reverb are working in a parallel configuration.
- Page 233 Reverb (Green) 233 As you turn “DLY+REV Routing” more to the right, the opposite happens: the delay reflections keep their reverb tail, but the dry signal loses its reverberation and becomes completely dry. This will emphasize your instrument, as the reverb will not appear until after the first delay reflection.
-
Page 234: Space
Intensity parameter to control the strength of the effect. Legacy Reverb The Legacy Reverb is based on the first reverb algorithm created for the PROFILER. The main purpose of this reverb type is to maintain full backward compatibility with Rigs that have been created before the advent of PROFILER operating system 6.0. -
Page 235: Effect Loop (Pink)
You can apply a hardware effect loop in any of the effect modules. For PROFILER models other than Stage, you cannot use the hardware effects loop in more than one location of the signal flow at the same time. So, if you try to engage the loop at more than one location within one Rig, the first loop in the signal flow will win. - Page 236 However, you can use the “Pre" position to create a spillover effect for your external gear while you switch Rigs on the PROFILER: Load the Rig in which the external effect should be deactivated (but you still want spillover when it's loaded) >...
- Page 237 External gear can be looped in at instrument as well as line level. The following two graphics illustrate the various possibilities to loop in external gear: Looping in a stomp box or pedal ✓ For PROFILER Stage use SEND 2 and RETURN 3 (lower loop) or SEND 1 and RETURN 1 (upper loop).
- Page 238 Effect Loop (Pink) 238 Looping in an effect ✓ For PROFILER Stage use SEND 2 and RETURN 3+4 (lower loop) or SEND 1 and RETURN 1+2 (upper loop). ✓ A tutorial video explaining these effect loops can be found at:...
-
Page 239: System Settings
Global settings do not change when you switch to another Rig. ✓ Users of the PROFILER Stage can access pages related to pedal and external switch configurations via the PEDALS button. LCD / HW Setup / Brightness / User Interface On the LCD / HW Setup page you can control the settings for the display and adjust the “Line Frequency”... - Page 240 The Noise Gate will use this setting to eliminate ground hum, the frequency of which is based on the physical location the PROFILER is being used at. “50 Hz (auto)” and “60 Hz (auto)” will detect the line frequency automatically.
-
Page 241: User Interface 2
View Favorites. Volume LED The MASTER VOLUME knob of the PROFILER Stage offers a LED collar, which reflects the Collar volume of one of the outputs. Select this output with Volume LED Collar. specific to... -
Page 242: Audio Setup
Rig Change Crossfade Time (Rig X-Fade Time) Most digital audio devices create an unpleasant gap in the audio signal when a preset is changed. The PROFILER instead performs a crossfade between the previous and current Rigs, producing a seamless and smooth transition. -
Page 243: Pedal Links
Expression Pedals and Foot Switches. Remote Settings You find global settings for the PROFILER Remote on this page. If no PROFILER Remote is connected, this page is greyed out. All these settings are explained in the chapter PROFILER Remote. This page does not appear on... -
Page 244: Midi Program Change Assignments And Settings
✓ Performance Mode offers powerful possibilities to logically organize Rigs for example by song, loading these via PROFILER Remote MIDI and even simultaneously control external devices via MIDI. Date and Time On this page, you can set the date and time using the soft buttons “Edit Date” and “Edit Time”. Make sure the correct date and time is entered as this will help you to organize your Rigs and PROFILEs. -
Page 245: Device Information
Device Information On this page as well as on page “Details” the operating system version of the PROFILER is displayed. “OS Build Date” is the date this version was released and “DSP Date” is the date the DSP version was released. On “Details”... -
Page 246: Bass Players: Special Hints And Features
Bass Players: Special Hints and Features The PROFILER can be used very effectively with bass guitar. Most of its features apply to bass in the exact same way as they do for other guitars. This chapter summarizes the special features and hints that are specific to bass players. - Page 247 Do not use "Git Analog" in this case. The PROFILER features many stomp and studio effects that are suitable for bass, with some having been specifically tailored for bass players. Below is a brief description of selected features - please refer to the respective chapters for a deeper view.
-
Page 248: Performance Mode
You can navigate through the 125 Performances using the up and down buttons of the RIG navigation cross on the front panel of PROFILER Head, PowerHead, Rack and PowerRack. Use the left and right buttons or the <PAGE> buttons to select a Slot within a Performance. - Page 249 You can also copy and paste Slots from within Performances, and from one Performance to another. Users of the PROFILER Stage initiate copy/paste of a Slot by holding the RIG button for two seconds. Users of any other PROFILER variant should use the dedicated COPY/PASTE buttons.
-
Page 250: Loading Performances
Performance Mode 250 ✓ As soon as you load another Slot from your foot controller, or foot buttons of the PROFILER Remote or Stage, any former modifications within that Performance are interpreted as temporary tweaks during a live performance and will be discarded immediately. -
Page 251: Profiler Remote
PROFILER Remote button functions ✓ The PROFILER Stage offers the same level of functional integration within one housing. It also offers the same foot buttons. The following descriptions of the PROFILER Remote foot buttons also apply to the PROFILER Stage in the... -
Page 252: Up/Down Buttons
"Performance Load" in System Settings, the PROFILER will either load Slot 1 or the current Slot of the selected Performance immediately, or wait (“Pending”) until you hit one of the five Buttons. In Browser Mode, you can step or scroll through Rigs in your browse pool according to the selected View and Sort criteria. -
Page 253: Tuner Button
PROFILER Remote 253 calculates the tempo according to the rhythm and pattern of your playing. You can read more about this function in Tempo chapter. TUNER Button (4) Use this to activate Tuner Mode, instead of moving a volume pedal into heel position. If the option "Mute Signal" is activated, your guitar will be muted while you tune it. -
Page 254: Assigning An Effect Module
Done! It also works the other way around: press and hold the module button on the PROFILER first, then step on the desired Effect Button afterwards. The upper left LED of the Effect Button should now reflect the... -
Page 255: More Assignments
Assignments without Remote If your PROFILER Remote is not connected, or if your stage is so huge that your PROFILER is miles away from the Remote, you will not be able to reach both at the same time. In this case, enter the Remote Effect Buttons page in... -
Page 256: Keeping Oversight
To assign, simply navigate to the respective function within the effect e.g. “Rotary Speed Slow/Fast” within the Rotary Speaker effect. Now press the respective soft button above the display of the PROFILER together with and one of the Remote’s Effect Buttons. Done! Don’t forget to store the Rig to make your assignment permanent. -
Page 257: Looper Button
Rigs and parameters to your liking, while the Looper continues its playback. The audio content of the Looper cannot be stored to permanent memory; it will be lost when you power down the PROFILER. If you are familiar with other looper devices, you’ll find your way around it instantly. - Page 258 PROFILER Remote 258 Here's a brief description of all Looper Buttons: Activates the Looper and toggles the functions of following six buttons between “normal” and LOOPER “Looper”. Record / Playback / Overdub Stop / Erase: press 3 time to erase the current loop...
- Page 259 PROFILER Remote 259 Looper Location Output The Looper is placed right after the last effect - the REV module. It records the fully processed stereo signal. When you change Rigs during the playback of the loop, the playback sound will not change! This allows you to play along, or even overdub, with an unlimited number of different Rigs.
-
Page 260: Workflow
Activate the Looper mode for the six Looper Buttons, by pressing the LOOPER button on the PROFILER Remote. The LOOPER LED lights up. When you press Looper again, the six buttons will revert to their primary function for selecting Rigs. Activating the Looper Mode does not necessarily mean activating the Looper itself. - Page 261 PROFILER Remote 261 Press this button to cancel the last overdub. To redo the last overdub, press Undo again. The undo and redo of an overdub can even be done during playback. However, if you have canceled an overdub, and recorded a new overdub after that, the old overdub recording cannot be recovered.
-
Page 262: Advanced Looper Functions
PROFILER Remote 262 Advanced Looper Functions The Looper offers several expanded functionalities. All these functions are accessible by holding the respective Looper Button, rather than just pressing it shortly. As before, we will explain the advanced functions by following the... -
Page 263: Connecting Expression Pedals And External Switches
Remote Settings You can find a dedicated LCD CONTRAST knob on the rear side of the PROFILER Remote. All other LCD and LED settings are edited on page “Remote Settings” within System Settings of the PROFILER. The physical LCD contrast knob overwrites the corresponding setting in System Settings during startup. -
Page 264: Cabling
PROFILER Remote 264 Cabling The PROFILER and PROFILER Remote communicate with each other via an ethernet cable. The cable included in the PROFILER Remote package with its Neutrik® etherCON® cable connector carrier has been carefully selected and is perfectly suited for this purpose. If you decide to use any 3rd party cable, please make sure it meets our quality standards. - Page 265 A PoE switch will even let you connect multiple Remotes to one PROFILER. Cabling with PoE switch and multiple Remotes PROFILER and Remotes should be connected to those ethernet sockets that provide PoE power. Supported are IEEE standard 802.3af-2003 as well as 802.3at-2009 mode A.
- Page 266 TP-LINK® TL-SG1008P (8 port gigabit switch with 4 port PoE) • Allnet® ALL8085 Switch (8 Port 10/100TX) • Intellinet 8-Port Fast Ethernet POE+ Switch (available with 19’’ rackmount) ✓ If you are using a POE switch, connect the PROFILER to its PoE ethernet sockets, as well as the Remote(s).
-
Page 267: Midi
MIDI IN socket of the PROFILER. Some MIDI controllers support the KEMPER bi-directional MIDI protocol, which requires a second MIDI cable from the MIDI OUT of the PROFILER to the MIDI IN of the MIDI controller. One- and bi-directional MIDI connections There are several kinds of MIDI messages that can be processed, which are outlined in the following sections. -
Page 268: Continuous Controllers
MIDI 268 Continuous Controllers The following MIDI control change numbers can be continuously controlled from a MIDI pedal or sequencer. You will also find the four pedal nodes here for the Morph, Wah, Volume, and Pitch Pedal. The value range is 0-127. Some foot controllers allow you to limit this range by setting a minimum and maximum value. -
Page 269: Effect Switches
MIDI 269 Effect Switches MIDI control change numbers can be used to switch effects on or off. The switch for the Tuner Mode works in a similar way. Non-zero values (1-127) trigger “on”, while zero triggers “off”. Some other switches feature a dedicated hold function, when they are held down: •... - Page 270 MIDI 270 DLY module on/off (with spillover) REV module on/off (without spillover) REV module on/off (with spillover) Tap (values 1-127 activate Beat Scanner, value 0 deactivates Beat Scanner, any value triggers tempo) select (signal muted, if “Mute Signal” is flagged in Tuner Mode) Tuner Mode Rotary Speaker Speed (any value toggles between slow and fast)
-
Page 271: Rig Change In Performance Mode
Load” determines what happens after you have sent control change #48/49 to step or scroll to another Performance. By default, “Performance Load” is set to “Pending” and the PROFILER waits until you send one of the control changes #50-#54; thereby finally selecting your Slot. If “Performance Load” is set to “Slot 1” or “Keep Slot”, the PROFILER will load the corresponding Slot as soon as any Performance is selected. - Page 272 Loads Slot 5 of present Performance and in Browser Mode Rig 5 of current bank. If Rig Button Morph is activated in System Settings, and the PROFILER receives subsequent control changes #50- #54 following the initial Slot load, these will trigger Morphing. So, the same button could be used to first load a Rig, and then act as a Morph Button for that Rig.
- Page 273 MIDI 273 Due to the limit of 128 different program change values you can only address about 25 Performances. If you need more, you must use the MIDI bank select controllers which allow you to address multiple pages of 128 program changes each.
-
Page 274: Rig Change In Browser Mode
Instead of calculating the appropriate MIDI bank select, LSB and program change, you could simply read it from the screen. If no PROFILER Remote is connected, both items are displayed for the current Slot on the left-hand side of the home screen in Performance Mode. -
Page 275: Midi Global Channel
Rigs in Browser Mode. Please refer to the tables in the previous paragraph. MIDI Global Channel By default, the PROFILER receives MIDI commands on all sixteen MIDI channels (“Omni”). However, if you want to on the “MIDI Settings” control multiple devices independently, you can set a specific channel in System Settings page. -
Page 276: Transmitting Midi Commands To Two External Devices In Performance Mode
Slot. Repeat this step for every Slot you intend to send MIDI program changes from. ✓ As soon as you select MIDI THRU to transmit MIDI commands by Slot the PROFILER will stop forwarding incoming MIDI data to the MIDI THRU. -
Page 277: Transmitting User Interface To Midi Global Channel
Settings, nearly all parameter changes within the PROFILER user interface, and the connected PROFILER Remote, will be forwarded through the MIDI OUT. You could, for instance, create a daisy chain of PROFILER units, all following whichever commands you enter on the leading PROFILER, or connected Remote, including any Rig or Slot changes. -
Page 278: Getting Organized
Getting Organized Whether you are using a handful of Rigs, or hundreds, you might be looking for effective ways to organize your browse pool. The PROFILER offers various features to keep an overview, find Rigs quickly, or do some housekeeping. -
Page 279: Favorite Rigs
Favorite Rigs automatically. Should you, by intent or otherwise, change the name of the PROFILER owner in the Startup Dialog, your favorite Rigs will no longer be displayed in the View “Favorites”. But your preference is not lost! You just need to re-enter the original owner name, and your list of Favorite Rigs will reappear. -
Page 280: Erase Non-Favorites
Erase Non-Favorites If you want to clean up your PROFILER, you can use the “Erase Non-Favorites” soft button in System Settings. All Rigs will be erased, except for “Favorites” and “My Rigs”. We recommend that you create a backup before you use this function. -
Page 281: Updates, Backups And Sharing Sounds
Software updates are available on the KEMPER download page and are free of charge to all users. All you need is an active user account, to which a PROFILER is registered with its serial number. As soon as you log into your account, you will have access to any available upgrade packages. - Page 282 • You will need to use an empty USB stick to transfer the files from your Mac or PC to the PROFILER for the first time. The USB stick should be pre-formatted with file system FAT32. When you connect the USB stick for the first time, the PROFILER will format it to ensure maximum reliability.
-
Page 283: Creating Backups
We recommend backing up your Rigs, presets, Performances, and global settings on a regular basis. This can only be done via USB-stick and not via Rig Manager! To do so, please plug the prepared USB stick into your PROFILER, switch into Browse or Performance Mode, hit soft button labeled “USB Stick” and chose the “Backup/Restore” option. -
Page 284: Importing Rigs, Performances, And Presets
USB memory stick. In this case please copy the Rigs to the directory called “Shared” on your USB memory stick. Next, plug the USB stick into the USB slot of your PROFILER and switch to Browser Mode. Then press the soft button “USB Stick”. - Page 285 By using a USB lock, you can prevent anyone else initiating an unauthorized export or backup of your precious Rigs and presets. To avoid mechanical damage of the connector, you might need to disconnect the USB lock before putting your PROFILER Head into a bag or hard case.
-
Page 286: Screen Symbols
Screen Symbols 286 Screen Symbols You might have noticed a few small icons on the screen. Here is a list with their meanings: Rig / Performance edited module / section of signal chain locked favorite Rig parameter enabled for Morphing MIDI program change received MIDI control change or MIDI clock received Bi-directional MIDI protocol activated (supported by specific MIDI foot-controllers) -
Page 287: Profiling An Amp
Now we’re getting to the fun stuff! PROFILING™ your own amp, custom digital simulation, or favorite stomp box, is what sets the KEMPER PROFILER apart from every other digital amplifier out there. We have spent years getting our PROFILING system to deliver the goods in terms of sound quality, playability, and ease of use - all wrapped in a user-friendly interface. -
Page 288: Profiling With Effects In The Recording Chain
Since the PROFILER sends its own test-tones into the reference amp during PROFILING, it should be obvious that the sound of your guitar isn’t part of the result. The PROFILER is designed to react to any guitar in an identical way to the reference amp. -
Page 289: Considerations Regarding Noise And Hum
PROFILING an Amp 289 PROFILER. Keep in mind that this will not change the result of the PROFILING process in any way but will make A/B comparisons between the reference amp and the PROFILER much easier. If you want to make Profiles of computer-based amp simulations, but without using any kind of external mixer for monitoring purposes, you need to be careful not to create a feedback loop. -
Page 290: Making Connections
PROFILER to the guitar input of your reference amplifier. ✓ Connect your microphone, or microphone preamp, to the RETURN of the PROFILER (use either the XLR or quarter- inch input, depending on your microphone or microphone preamp). PROFILER Stage users should connect to its balanced TRS RETURN 1. - Page 291 RETURN 1 of your PROFILER. The reference amp must be connected to the PROFILER in such a way that only the PROFILER will send and receive the signals. This effectively turns the PROFILER into a monitoring device. Avoid any other connections that might lead to confusion and end up corrupting the results. For example, if you want...
- Page 292 Make sure that the signal is only routed to the PROFILER and isn’t duplicated at the main outs of the mixer. Connections with multiple microphones; on PROFILER Stage connect to SEND 1 and RETURN 1...
-
Page 293: Connections For Profiling A Combination Of Amp And Stomp Box
PROFILING an Amp 293 Connections for PROFILING a Combination of Amp and Stomp Box Connections including a stomp box; on PROFILER Stage connect to SEND 1 and RETURN 1 • Connect your guitar to the INPUT of the PROFILER. •... -
Page 294: Connections For Profiling A Computer-Based Guitar Amp Simulation
PROFILING an Amp 294 ✓ The PROFILER can only take an accurate PROFILE of preamp stomp boxes, such as overdrive and distortion pedals, equalizers and filters, tube preamp pedals, and so on. Attempting to PROFILE a delay, reverb or modulation pedal is unlikely to work as expected. -
Page 295: Levels
Press the soft button labeled “Next”. On this page, you can inform the PROFILER whether the sound you want to PROFILE is clean or distorted by pressing the appropriate soft buttons. If your reference amp has a clean sound you can set the PROFILER to... -
Page 296: Evaluating The Profile
PROFILING an Amp 296 “Clean”. In truth, this step isn’t strictly necessary; the PROFILER will detect if the reference amp is clean during the PROFILING process. However, setting the PROFILER to “Clean” before you begin PROFILING will ensure that no extremely loud signals are sent to the reference amp. -
Page 297: Refining The Profile
- you need to play several chords, with attitude! This will generate inter-modulation in the distortion that the PROFILER needs to do its refining. Be sure to strum especially hard so that the PROFILER has a chance to analyze the transients. - Page 298 We assume that the sound of the reference amp is exactly the tone that you want to achieve, hence the equalizer in the PROFILER is set to a neutral state, leaving you free to tweak the sound to your taste.
-
Page 299: How To Profile An Amp Without A Cabinet (Direct Amp Profiles)
DI box for this purpose. A specialized DI box like for example the KEMPER DI box can scale down the voltage to a line level signal, suitable for the PROFILER, on an XLR output jack. - Page 300 PROFILING an Amp 300 Connections PROFILING with DI; on PROFILER Stage connect to SEND 1 and RETURN 1 Why do I need my guitar cabinet when I want to capture a PROFILE without a cabinet? It's true, the sound of the speaker will not be captured in this case, but the complex impedance behavior of the speaker is still needed to create those oft-mentioned interactions between the power tube amp and the connected guitar cabinet.
- Page 301 PROFILE. Besides the DI box, it helps if you own either a PROFILER with built-in power amp, or a separate solid-state power amp, for capturing a Direct Amp PROFILE.
-
Page 302: How To Create Merged Profiles
Put your reference tube amp into standby mode, as it should not run without a speaker connected. • Unplug the speaker cable (the one going to the speaker) and plug it into the SPEAKER OUTPUT of the PROFILER PowerHead or PowerRack. - Page 303 Merged PROFILE, must be based on the same original amp sound. • Connect the microphone (instead of the DI box) to the return of the PROFILER. If you want to disengage the DI box, and connect the guitar cabinet directly, don’t forget to put your reference amp on standby first.
-
Page 304: Profiling A Rotary Speaker Cabinet
PROFILING a Rotary Speaker Cabinet The PROFILER already ships with a Rig named “CK Rotary Speaker”, captured from the real thing, but if you have access to a different brand of rotary speaker, you can take your own PROFILEs, too. -
Page 305: Under The Hood
PROFILING an Amp 305 Under the Hood In case you enjoy reading about technical details, below is a description of what the PROFILER is doing during the PROFILING process: During the first phase, you will hear white noise with a rising amplitude. The PROFILER is now collecting data about the frequency response of the reference amp. -
Page 306: Trouble Shooting
PROFILER doesn’t boot up completely If the PROFILER has not been shut down properly, the result could be that the PROFILER isn’t able to completely restart. In order to rebuild the internal database, please push and hold the RIG button while you switch on with the chicken head knob. - Page 307 If you should hear noise on any outputs, please check the GROUND LIFT buttons on the back panel (or Ground Lift options in the Output Section of the PROFILER Stage). These may only be used selectively and must never be activated all at the same time.
-
Page 308: Customer Support
Any other error states under current operating system should be addressed to Customer Support, either via phone or e-mail. More information about the Kemper hotline, along with an e-mail template, can be found on the web-page www.kemper-amps.com/contact. Please report all relevant information, such as your operating system revision, and... -
Page 309: Technical Specifications
Trouble Shooting 309 Technical Specifications... - Page 310 Width: 42 cm (16.53 inches) Depth: 18 cm (7.09 inches) Weight PROFILER Head: 5.32 kg (11.73 pounds) PROFILER Rack: 5.00 kg (11.02 pounds) PROFILER PowerHead: 6.5 kg (14.33 pounds) PROFILER PowerRack: 6.18 kg (13.62 pounds) PROFILER Stage: 4.6 kg (10.14 pounds)
- Page 311 Technical Specifications 311 Analog Inputs PROFILER Head, PowerHead, Rack, and PowerRack Front INPUT: ¼-inch TS unbalanced, dynamic range >108 dB, impedance 1 megohms ALTERNATIVE INPUT: ¼-inch TRS balanced with ground lift, dynamic range =105 dB, impedance 825 kohms RETURN: XLR balanced, ¼-inch TRS balanced with ground lift, dynamic range =105 dB, impedance 825 kohms ...
- Page 312 USB: USB 2.0 (FS) compatible device, USB-A and USB-B connectors Digital Inputs and Outputs PROFILER Head, PowerHead, Rack, and PowerRack S/PDIF IN/OUT: 44.1/48/88.2/96 kHz (24 bits) with RCA phone connectors for coax cables (units built before 2018 are master only, newer units can be master or slave) ...
- Page 313 Technical Specifications 313 Electrical Requirements Line voltage: Head and Rack: 90-275 V AC max. 0.5 A Stage 100-230 V AC max. 0.5 A PowerHead and PowerRack: 100-125 V or 190-245 V AC max. 10 A Frequency: 50 Hz to 60 Hz, single phase ...
- Page 314 Electrical Approvals FCC verification procedure – 47CFR §15.101 Other class B digital devices and peripherals PROFILER Head/Rack/PowerHead/PowerRack: EN 55022 class B: 2006+A1:2007 EN 61000-3-2: 2006 + A1:2009 + A2:2009 EN 61000-3-3: 2008 EN 55024: 1998 + A1:2001 + A2:2003, 2010...
- Page 315 Technical Specifications 315 KEMPER Kabinet and KEMPER Kone Dimensions KEMPER Kabinet KEMPER Kone Height: 43 cm (16.93 inches) Diameter: 30,5 cm (12 inch) Width: 51.6 cm (20.31 inches) Cutout: 28,3 cm (11.14 inches) Depth: 23.5 cm (9.06 inches) ...
Need help?
Do you have a question about the Profiler and is the answer not in the manual?
Questions and answers