Kemper PROFILER Remote Quick Start Manual
Hide thumbs
Also See for PROFILER Remote:
- Main manual (315 pages) ,
- The basics & profiling manual (144 pages) ,
- Quick start manual (132 pages)
Table of Contents
Advertisement
Available languages
Available languages
Advertisement
Chapters
Table of Contents

Related Manuals for Kemper PROFILER Remote


Summary of Contents for Kemper PROFILER Remote
-
Page 3: Remote Quick Start
REMOTE™ QUICKSTART IN ENGLISH... - Page 4 The content of this manual is furnished for informational use only, is subject to change without notice and should not be construed as a commitment by KEMPER GmbH. KEMPER GmbH assumes no responsibility or liability for any errors or inaccuracies that may appear in this book.
-
Page 5: Table Of Contents
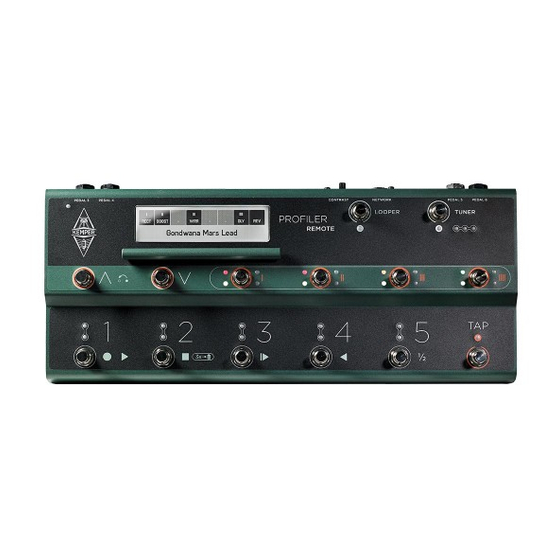
REMOTE QUICK START TABLE OF CONTENT OKAY, SO WHAT DID I JUST BUY? ..................7 GETTING STARTED ......................... 8 Connection OVERVIEW ............................9 Up/Down Buttons (1) Rig Buttons 1-5 (2) TAP Button (3) TUNER Button (4) Effect Buttons I-IIII (5) Assigning an Effect Module Unassigning an Effect Module Assigning a Second Effect Module... - Page 6 6 REMOTE QUICK START...
-
Page 7: Okay, So What Did I Just Buy
OKAY, SO WHAT DID I JUST BUY? First of all, thank you for choosing the KEMPER PROFILER Remote. In doing so, you have chosen the perfect remote controller for your PROFILER™. You can think of it as a complementary control panel, fully integrated with the PROFILER hardware and software. -
Page 8: Getting Started
8 REMOTE QUICK START GETTING STARTED CONNECTION GROUND LIFT / PEDAL NETWORK Please connect your PROFILER™ and Remote via the high quality ethernet cable included in the package. The Neutrik® etherCON® cable connector carrier establishes a robust and lockable connection with the PROFILER Remote. -
Page 9: Overview
REMOTE QUICK START OVERVIEW UP/DOWN BUTTONS (1) In Performance Mode, use these buttons to browse your Performances. A short tap will step up or down to the next Performance. Hold either button to scroll in that direction. Depending on the status of the parameter “Performance Autoload”... -
Page 10: Tap Button
10 REMOTE QUICK START TAP BUTTON (3) This button triggers the Tap Tempo, just like the TAP button on the front panel of the PROFILER. Tap in quarter notes (crotchets) to adjust the tempo of delay, phaser, flanger, and tremolo effects. The LED will blink to indicate the current tempo. -
Page 11: Assigning An Effect Module
Now, you can activate or bypass the selected effect module by stepping on the button on your PROFILER Remote. The lower left white LED indicates the on/off status of this effect module. -
Page 12: Assigning A Second Effect Module
LEDs by the Effect Button indicate both the effect category and on/off state of your second assignment. Now, you can activate or bypass both effects by stepping on the button on your PROFILER Remote. MORE ASSIGNMENTS Even more effect modules can be assigned to the same Effect Button this way. -
Page 13: Assignments Without Remote
ASSIGNMENTS WITHOUT REMOTE If your PROFILER Remote is not connected, or if your stage is so huge that your PROFILER is miles away from the Remote, you will not be able to reach both at the same time. In this case, enter the Remote Effect Buttons page in Rig Settings, hold one of the four soft buttons, and press one or more effect module buttons to complete the assignment. -
Page 14: Locking Effect Buttons
14 REMOTE QUICK START LOCKING EFFECT BUTTONS Effect Buttons are jointly locked/unlocked as soon as the assigned effect module is locked/unlocked. However, this only applies if no more than one effect module is assigned to the same Effect Button. The Remote’s display uses two different icons –... -
Page 15: Looper Button
REMOTE QUICK START LOOPER BUTTON (6) Looper onboard! The following seven buttons are involved: LOOPER Activates the Looper and toggles the following six buttons between their normal function and their Looper functions. Record Playback Overdub Stop Erase: press 3 times to erase the current loop Cancels or reactivates the last overdub Trigger: triggers the loop in Stop mode, retriggers the loop in Play mode Reverse: plays the loop in the reverse... -
Page 16: Connecting Expression Pedals And External Switches
16 REMOTE QUICK START CONNECTING EXPRESSION PEDALS AND EXTERNAL SWITCHES Pedal Pedal Pedal Pedal Pitch Volume Morph Pedal Pedal Pedal Pedal The Remote offers four TRS-sockets named “PEDAL 3” to “Pedal 6” to connect expression pedals. Their functions can be assigned in the System Settings of the PROFILER, as described in the “Expression Pedals and Foot Switches” chapter of the Main Manual and the “Expression Pedals”... - Page 17 You can find the LCD CONTRAST knob on the rear side of the Remote. All other settings are edited and memorized within the System Settings of the PROFILER. Consequently, these are also included in the PROFILER backups. The Main Manual includes a dedicated “PROFILER Remote” chapter, which covers all relevant information. CABLING PROFILER and Remote communicate with each other via an ethernet cable.
- Page 18 18 REMOTE QUICK START...
-
Page 19: Important Safety Instructions
» The apparatus should be connected to a properly grounded (earthed) outlet. Ensure that under any circumstance, the power plug can be easily reached. Kemper GmbH KEMPER PROFILER Tested To Comply with FCC Standards » The apparatus is not for outdoor use. -
Page 20: Compliance Statement
DECLARATION OF CONFORMITY We KEMPER GmbH, Königswall 16-18, 45657 Recklinghausen Germany, Tel: +49 (2361) 9376824, declare under our sole responsibility that the product PROFILER Remote complies with Part 15 of FCC Rules. Operation is subject to the following two conditions: (1) this device may not cause harmful interference. -
Page 21: Warranty Regulations
Warranty coverage is also voided when the device is repaired by unauthorized persons or tampered with in any way. KEMPER reserves the right to refuse warranty claims, if the product was not sold from an authorized base dealer to the respective end-customer. This warranty is limited to replacement or repair of the product. - Page 22 22 REMOTE QUICK START...
- Page 23 REMOTE™ SCHNELLSTART IN DEUTSCH...
- Page 24 Lizenzvertrag. Diese Vertragsbestimmungen wurden bei der Erstellung dieses Handbuchs eingehalten. Der Inhalt dieses Handbuchs ist rein informell und kann zu jeder Zeit, ohne Vorankündigung von der KEMPER GmbH geändert werden. Die KEMPER GmbH haftet nicht für inhaltliche Fehler. Ohne schriftliche Genehmigung der KEMPER GmbH ist es nicht zulässig, diese Publikation oder Teile davon zu reproduzieren und/oder in schriftlicher- und/oder...
- Page 25 PROFILER REMOTE SCHNELLSTART INHALTSVERZEICHNIS WAS IST EIGENTLICH EINE PROFILER REMOTE? ............7 ERSTE SCHRITTE ..........................8 Anschluss ÜBERBLICK ............................9 Auf/Ab-Taster (1) Rig-Taster 1-5 (2) TAP-Taster (3) TUNER-Taster (4) Effekttaster I-IIII (5) Zuweisen eines Effektmoduls Zuweisung eines Effektmoduls löschen Zuweisen eines zweiten Effektmoduls...
- Page 26 26 PROFILER REMOTE SCHNELLSTART...
-
Page 27: Was Ist Eigentlich Eine Profiler Remote
WAS IST EIGENTLICH EINE PROFILER REMOTE? Zunächst einmal vielen Dank dafür, dass sie sich für eine PROFILER Remote™ entschieden haben - die perfekte Fernbedienung für ihren PROFILER™. Sie können sich die PROFILER Remote wie ein zweites Bedienfeld vorstellen, welches hardware- und software-seitig komplett mit dem PROFILER integriert ist. Diese Integration umfasst die Spannungsversorgung, die Anzeige aller wichtigen Informationen über den aktuellen Betriebszustand und... -
Page 28: Erste Schritte
Bitte verbinden sie PROFILER und Remote mittels des mitgelieferten hochwertigen Ethernet-Kabels. Der Neutrik® etherCON® Stecker stellt eine stabile und verschließbare Verbindung mit der PROFILER Remote her. Sobald sie den PROFILER einschalten, starten beide Geräte gemeinsam. Während dieses Startvorgangs wird die... -
Page 29: Überblick
PROFILER REMOTE SCHNELLSTART ÜBERBLICK AUF/AB-TASTER (1) Im Performance-Modus kann man mit diesen Tastern durch die Liste der Performances navigieren. Ein kurzes Antippen blättert jeweils zur nächsten Performance. Bei Halten der Taster wird durch die Performances gescrollt. Der Parameter „Performance Autoload“ im System-Menü bestimmt, ob anschließend sofort automatisch ein Slot (z. -
Page 30: Tap-Taster
30 PROFILER REMOTE SCHNELLSTART TAP-TASTER (3) Dieser Taster steuert das Tap-Tempo vergleichbar mit dem TAP-Taster am PROFILER. Jedes Tippen auf diesen Taster entspricht einer Viertelnote und steuert so das Tempo von Delay-, Phaser-, Flanger- und Tremolo-Effekten. Die LED unterhalb des Tasters blinkt im Takt. Wenn sie diesen Taster halten, wird unser einzigartiger Beat Scanner aktiv, der das Tempo aus dem Rhythmus ihrer Anschläge beim Spielen berechnet. -
Page 31: Zuweisen Eines Effektmoduls
Kategorie des zugewiesenen Effektes anzeigen - z. B. orange für einen Wah-Effekt. Schon können sie mit dem Taster an der PROFILER Remote das zugewiesene Effektmodul an- und abschalten. Die untere linke LED zeigt an, ob das Modul aktiv ist oder nicht. -
Page 32: Zuweisen Eines Zweiten Effektmoduls
32 PROFILER REMOTE SCHNELLSTART ZUWEISEN EINES ZWEITEN EFFEKTMODULS Um demselben Effekttaster eine zweite Zuweisung hinzuzufügen, wiederholen sie dieselben Schritte einfach mit einem anderen Effektmodul. Sie werden feststellen, dass nun die rechten LEDs die Effektkategorie und den Schaltzustand des zweiten Effektmoduls anzeigen. Nun können sie beide Effektmodule mit demselben Effekttaster der Remote an- und abschalten. -
Page 33: Zuweisungen Verwalten Ohne Remote
PROFILER REMOTE SCHNELLSTART ZUWEISUNGEN VERWALTEN OHNE REMOTE Falls ihre Remote gerade nicht angeschlossen ist oder schlicht die Bühne zu groß ist, ist es unmöglich gleichzeitig Taster am PROFILER und der Remote zu betätigen. In diesem Fall können sie das Rig-Menü öffnen und zur Seite „Remote Effect Buttons“... -
Page 34: Sperren Von Effekttastern („Lock")
34 PROFILER REMOTE SCHNELLSTART SPERREN VON EFFEKTTASTERN („LOCK“) Effekttaster werden gemeinsam mit dem Effektmodul, für welches eine Zuweisung besteht, gesperrt bzw. entsperrt. Dies funktioniert allerdings nur, solange demselben Effekttaster nicht mehr als ein Effektmodul zugewiesen sind. Zwei unterschiedliche Symbole zeigen im Display der Remote an, ob nur das Effektmodul selbst gesperrt ist oder ob das Effektmodul mitsamt der Zuweisung eines Effekttasters der Remote gesperrt ist. -
Page 35: Anschluss Von Expression-Pedalen Und Externen Tastern
Pedal Pedal Die PROFILER Remote bietet vier Anschlüsse bezeichnet mit „PEDAL 3“ bis „Pedal 6“ für Expression-Pedale. Deren Funktionen kann man im PROFILER System-Menü festlegen. Dazu gibt es eine Beschreibung im Kapitel „Expression- Pedale und Fußtaster“ in Das Große Handbuch sowie auch ein Video Tutorial. - Page 36 Bildschirms einstellen können. Alle anderen Einstellungen werden im PROFILER System-Menü vorgenommen und auch dort gespeichert. Entsprechend werden diese Einstellungen auch mit jedem Backup des PROFILERs gesichert. Das Kapitel „PROFILER Remote and Looper“ in Das Große Handbuch enthält weitere Hinweise zu den Einstellungsmöglichkeiten.
- Page 37 PROFILER REMOTE SCHNELLSTART VERKABELUNG PROFILER und Remote kommunizieren über ein einzelnes Ethernet-Kabel. Das mitgelieferte Kabel mit dem etherCON®-Stecker von Neutrik® wurde von uns sorgfältig ausgewählt und ist für diesen Zweck perfekt geeignet. Falls sie sich für ein anderes Kabel entscheiden, so stellen sie bitte sicher, dass es denselben Qualitätsstandard erreicht.
-
Page 38: Wichtige Sicherheitshinweise
38 PROFILER REMOTE SCHNELLSTART WICHTIGE SICHERHEITSHINWEISE Bitte lesen Sie die Sicherheitshinweise. Behalten Sie die Sicherheitshinweise auf. Folgen Sie allen Hinweisen; » Verwenden sie dieses Gerät niemals in der Nähe von Wasser. Reinigen sie das Gehäuse nur mit einem trockenen Tuch. -
Page 39: Konformitätserklärung
PROFILER REMOTE SCHNELLSTART KONFORMITÄTSERKLÄRUNG Hiermit erklärt die KEMPER GmbH, Königswall 16-18, 45657 Recklinghausen, Deutschland, Tel: +49 (2361) 9376824, in alleiniger Verantwortung, dass das Produkt PROFILER übereinstimmt mit Teil 15 der amerikanischen FCC- Bestimmungen. Die Bedienung unterliegt folgenden beiden Bedingungen: (1) Dieses Gerät darf keine schädlichen Einstreuungen erzeugen. - Page 40 40 PROFILER REMOTE SCHNELLSTART...
- Page 41 REMOTE™ INICIO RÁPIDO ESPAÑOL...
- Page 42 Kemper GmbH. KEMPER™, PROFILER™, PROFILE™, PROFILING™, PROFILER PowerHead™, PROFILER PowerRack™, PROFILER Remote™, KEMPER Rig Exchange™, KEMPER Rig Manager™...
- Page 43 INICIO RÁPIDO DE REMOTE TABLA DE CONTENIDO MUY BIEN, ¿QUÉ ME ACABO DE COMPRAR? ..............7 PRIMEROS PASOS ........................... 8 Conexión DESCRIPCIÓN GENERAL ......................9 Botones arriba/abajo (1) Rig Botones 1~5 (2) Botón TAP (3) Botón TUNER (4) Botones de efecto I~IIII (5) Asignar un módulo de efectos Desasignar un módulo de efectos Asignar un segundo módulo de efectos...
- Page 44 44 INICIO RÁPIDO DE REMOTE...
-
Page 45: Muy Bien, ¿Qué Me Acabo De Comprar
INICIO RÁPIDO DE REMOTE MUY BIEN, ¿QUÉ ME ACABO DE COMPRAR? En primer lugar, gracias por elegir el KEMPER PROFILER Remote™. Has elegido el controlador remoto perfecto para el PROFILER™. Puedes considerarlo un panel de control complementario, totalmente integrado con el hardware y el software del PROFILER. -
Page 46: Primeros Pasos
Conecta el PROFILER™ y el Remote mediante el cable Ethernet de alta calidad incluido en el paquete. El portador del conector del cable Neutrik® Ethercon® establece una conexión sólida y bloqueable con el PROFILER Remote. Cuando actives el PROFILER, ambas unidades se activarán simultáneamente. Durante la activación, el Remote se... -
Page 47: Descripción General
INICIO RÁPIDO DE REMOTE DESCRIPCIÓN GENERAL BOTONES ARRIBA/ABAJO (1) En el modo Performance, utiliza estos botones para navegar por las Interpretaciones. Un toque breve avanzará o retrocederá hasta la siguiente o la anterior Interpretación. Mantén pulsado cualquiera de los botones para desplazarte en dicha dirección. -
Page 48: Botón Tap
48 INICIO RÁPIDO DE REMOTE BOTÓN TAP (3) Este botón activa el Tap Tempo, igual que el botón TAP del panel frontal del PROFILER. Pulsa notas negras para ajustar el tempo de los efectos de delay, phaser, flanger y tremolo. El LED parpadeará para indicar el tempo actual. Mantén pulsado este botón mientras tocas para activar nuestro fascinante Beat Scanner, que calcula el tempo según el ritmo y el patrón de la interpretación. -
Page 49: Asignar Un Módulo De Efectos
Ahora puedes activar u omitir el módulo de efectos seleccionado pulsando el botón del PROFILER Remote. El LED blanco inferior izquierdo indica el estado de activación/desactivación de este módulo de efectos. -
Page 50: Asignar Un Segundo Módulo De Efectos
Observarás que los LED de la derecha situados, junto al botón de efecto, indican tanto la categoría del efecto como el estado de activación/desactivación de tu segunda asignación. Ahora puedes activar u omitir ambos efectos pulsando el botón del PROFILER Remote. MÁS ASIGNACIONES De esta forma pueden asignarse al mismo botón de efectos incluso más módulos de efectos. -
Page 51: Asignaciones Sin Remote
ASIGNACIONES SIN REMOTE Si el PROFILER Remote no está conectado, o si el escenario es tan enorme que el PROFILER queda a kilómetros del Remote, no podrás utilizarlos al mismo tiempo. En este caso, entra en la página Remote Effect Buttons en Rig Settings, mantén pulsado uno de los cuatro botones programables y pulsa uno o más botones del módulo de efectos... -
Page 52: Bloquear Los Botones De Efectos
52 INICIO RÁPIDO DE REMOTE sueltes este botón de efectos, se volverá inmediatamente al estado inicial. Este comportamiento se aplica tanto a la activación/desactivación como a las funciones “Action & Freeze”. BLOQUEAR LOS BOTONES DE EFECTOS Los botones de efectos se bloquean/desbloquean conjuntamente tan pronto como se bloquea/desbloquea el módulo de efectos asignado. -
Page 53: Botón Looper
INICIO RÁPIDO DE REMOTE BOTÓN LOOPER (6) ¡Looper a bordo! Se utilizan estos siete botones: LOOPER Activa el Looper y hace que estos seis botones alternen entre su función normal y las funciones del Looper. Grabación Reproducción Sobregrabación Stop Borrar: púlsalo 3 veces para borrar el bucle actual Cancela o reactiva la última sobregrabación Trigger: activa el bucle en modo Stop, reactiva el bucle en modo Play Reverse: reproduce el bucle en dirección inversa... -
Page 54: Conectar Pedales De Expresión Yconmutadores Externos
54 INICIO RÁPIDO DE REMOTE CONECTAR PEDALES DE EXPRESIÓN Y CONMUTADORES EXTERNOS Pedal Pedal Pedal Pedal Pedal Pedal Pedal Pedal Pedal Pedal de Pitch Pedal de Volume Morph Pedal Pedal Pedal Pedal Pedal volumen Morph tono El Remote dispone de cuatro zócalos TRS llamados “PEDAL 3” a “Pedal 6” para conectar pedales de expresión. Sus funciones pueden asignarse en los System Settings del PROFILER, tal como se describe en el capítulo “Pedales de expresión y conmutadores de pedal”... - Page 55 El mando LCD CONTRAST se encuentra en la parte posterior del Remote. Todos los demás ajustes se editan y memorizan en los System Settings del PROFILER. En consecuencia, éstos también se incluyen en las copias de seguridad del PROFILER. El Manual Principal incluye un capítulo específico “PROFILER Remote”, donde se explica toda la información importante.
-
Page 56: Instrucciones De Seguridad Importantes
56 INICIO RÁPIDO DE REMOTE INSTRUCCIONES DE SEGURIDAD IMPORTANTES Lee estas instrucciones. Conserva estas instrucciones. Ten en cuenta todas las advertencias. Sigue todas las instrucciones. » No utilices este equipo cerca del agua. Límpialo únicamente con un paño seco. » No bloquees los orificios de ventilación. Instálalo siguiendo las instrucciones del fabricante. No lo instales cerca de fuentes de calor como radiadores, calefactores, estufas ni ningún otro tipo de aparato (incluyendo amplificadores) que genere calor. - Page 57 » El equipo debe conectarse a una toma de corriente debidamente conectada a tierra. Comprueba que, bajo cualquier circunstancia, puedas acceder fácilmente al enchufe de corriente. » El equipo no puede utilizarse al aire libre. Kemper GmbH KEMPER PROFILER Tested To Comply with...
-
Page 58: Declaración De Conformidad
Nosotros, KEMPER GmbH, Königswall 16-18, 45657 Recklinghausen Alemania, Tel.: +49 (2361) 9376824, declaramos bajo nuestra exclusiva responsabilidad que el producto PROFILER Remote cumple con el Apartado 15 de las Reglas de la FCC. El funcionamiento está sujeto a las dos condiciones siguientes: (1) este dispositivo no puede ocasionar interferencias perjudiciales. -
Page 59: Normas De Garantía
NORMAS DE GARANTÍA La garantía de KEMPER GmbH cubre todos los defectos en materiales y mano de obra durante un período de 36 meses a partir de la fecha de la primera compra. Esta garantía no cubre defectos debidos al mal uso, a conexiones defectuosas o a la utilización en condiciones distintas a las especificadas. - Page 60 60 INICIO RÁPIDO DE REMOTE...
- Page 61 REMOTE™ PRISE EN MAIN FRANÇAIS...
- Page 62 KEMPER™, PROFILER™, PROFILE™, PROFILING™, PROFILER PowerHead™, PROFILER PowerRack™, PROFILER Remote™, KEMPER Rig Exchange™, KEMPER Rig Manager™ et KEMPER CabDriver™ sont des marques commerciales de Kemper GmbH. Toutes les fonctions et caractéristiques techniques sont susceptibles d’être modifiées sans préa- vis. © Copyright 2019 Kemper GmbH. Tous droits réservés.
- Page 63 REMOTE – PRISE EN MAIN SOMMAIRE BON, QU’EST-CE QUE JE VIENS D’ACHETER? ..............7 PRISE EN MAIN ..........................8 Connexion PRÉSENTATION ..........................9 Boutons Haut/Bas (1) Boutons Rig 1~5 (2) Bouton TAP (3) Bouton TUNER (4) Boutons d’effet I~IIII (5) Assigner un module d’effet Annuler l’assignation d’un module d’effet Assigner un deuxième module d’effet...
- Page 64 64 REMOTE – PRISE EN MAIN...
-
Page 65: Bon, Qu'est-Ce Que Je Viens D'acheter
REMOTE – PRISE EN MAIN BON, QU’EST-CE QUE JE VIENS D’ACHETER? Avant tout, merci d’avoir choisi le KEMPER PROFILER Remote™. Ce contrôleur est une télécommande idéale pour votre PROFILER™. Il propose des commandes complémentaires et s’intègre parfaitement sur le plan matériel et logiciel avec le PROFILER. -
Page 66: Prise En Main
Branchez le PROFILER™ et le contrôleur Remote avec l’excellent câble Ethernet fourni. La fiche Neutrik® Ethercon® du câble garantit une connexion robuste et verrouillable avec le PROFILER Remote. Quand vous mettez le PROFILER sous tension, le contrôleur démarre simultanément. Durant le démarrage, le Remote... -
Page 67: Présentation
REMOTE – PRISE EN MAIN PRÉSENTATION BOUTONS HAUT/BAS (1) En mode Performance, utilisez ces boutons pour faire défiler vos Performances. Une pression brève sélectionne la Performance suivante ou précédente. Maintenez un des boutons enfoncés pour faire défiler les options dans cette direction. -
Page 68: Bouton Tap
68 REMOTE – PRISE EN MAIN BOUTON TAP (3) Ce bouton déclenche la fonction “Tap Tempo”, comme le bouton TAP en façade du PROFILER. Tapez en suivant un rythme de noires pour régler le tempo des effets delay, phaser, flanger et trémolo. La diode clignote selon le tempo en vigueur. -
Page 69: Assigner Un Module D'effet
(orange pour un effet wah, par exemple). Vous pouvez alors activer ou contourner le module d’effet sélectionné en actionnant le bouton du contrôleur PROFILER Remote. La LED blanche en bas à gauche indique l’état activé/coupé du module d’effet. -
Page 70: Assigner Un Deuxième Module D'effet
Les LED à droite du bouton d’effet indiquent la catégorie de l’effet et l’état activé/coupé de la deuxième assignation. Vous pouvez alors activer ou contourner les deux effets en actionnant le bouton du contrôleur PROFILER Remote. PLUS D’ASSIGNATIONS ENCORE Vous pouvez assigner plus de deux modules d’effet à... -
Page 71: Assignations Sans Remote
ASSIGNATIONS SANS REMOTE Cependant, si votre PROFILER Remote n’est pas branché ou si la scène est grande et si votre PROFILER est très éloigné du contrôleur Remote, il est impossible d’utiliser les deux dispositifs simultanément. Dans ce cas, affichez la page “Remote Effect Buttons”... -
Page 72: Verrouiller Les Boutons D'effet
72 REMOTE – PRISE EN MAIN immédiatement son état initial. Ce comportement s’applique aussi bien à la coupure/activation qu’à des fonctions “Action & Freeze”. VERROUILLER LES BOUTONS D’EFFET Les boutons d’effet sont verrouillés/déverrouillés ensemble dès que le module d’effet assigné est verrouillé/ déverrouillé. -
Page 73: Bouton Looper
REMOTE – PRISE EN MAIN BOUTON LOOPER (6) Looper à bord! Les sept boutons suivants servent à la fonction “Looper” (création de boucles): LOOPER Active le Looper et alterne entre la fonction normale et la fonction Looper des six boutons suivants. Enregistrement Lecture Ajout... -
Page 74: Connexion De Pédales D'expression Et De Commutateurs Externes
74 REMOTE – PRISE EN MAIN CONNEXION DE PÉDALES D’EXPRESSION ET DE COMMUTATEURS EXTERNES Pédale Pedal Pédale Pedal Pédale Pedal Pédale Pedal Pédale Pitch Volume Pédale Morph Pédale Pédale Pitch Pedal Pedal Pedal Pedal Volume Morph Le contrôleur Remote dispose de 4 prises TRS “PEDAL 3”~“Pedal 6” permettant de brancher des pédales d’expression. - Page 75 La commande LCD CONTRAST est située en face arrière du contrôleur Remote. Tous les autres réglages sont modifiés et mémorisés avec les “System Settings” du PROFILER. Ils sont donc inclus dans les archives (backups) du PROFILER. Le manuel principal comprend un chapitre dédié “PROFILER Remote” donnant toutes les informations nécessaires.
-
Page 76: Consignes Importantes De Sécurité
» Cet appareil doit être branché à une prise de courant pourvue d’une borne de terre. Veillez à garder un libre accès à la prise de courant en toutes circonstances. Kemper GmbH KEMPER PROFILER » Cet appareil n’est pas conçu pour un usage à l’extérieur. -
Page 77: Déclaration De Conformité
Nous, KEMPER GmbH, Königswall 16-18, 45657 Recklinghausen, Allemagne, Tél: +49 (2361) 9376824, déclarons sous notre seule responsabilité que le produit PROFILER Remote est conforme à la partie 15 de la réglementation FCC. Le fonctionnement de l’appareil est soumis aux deux conditions suivantes: (1) l’appareil ne peut pas causer d’interférences nocives. -
Page 78: Conditions De Garantie
CONDITIONS DE GARANTIE La garantie KEMPER GmbH couvre tous les défauts du matériel et de fabrication durant une période de 36 mois à partir de la date d’achat originale. Cette garantie ne couvre pas les défauts dus à de mauvais traitements, à... - Page 79 GUIDA VELOCE REMOTE™ ITALIANO...
- Page 80 è soggetto a modifiche senza preavviso e non deve essere considerato vincolante per Kemper GmbH. Kemper GmbH non si assume nessuna responsabilità per la presenza di eventuali errori o imprecisioni in questo manuale. Ad eccezione di quanto consentito da questa licenza, nessuna parte di questa pubblicazione può essere riprodotta, archiviata in un sistema di consultazione elettronica o trasmessa in qualsiasi forma o qualsiasi mezzo, elettronico, meccanico, tramite registrazione o di altro genere senza il consenso scritto di Kemper GmbH.
- Page 81 GUIDA RAPIDA DEL REMOTE INDICE OKAY, MA COSA HO APPENA COMPERATO? ..............7 PER INIZIARE............................. 8 Collegamenti PRESENTAZIONE ..........................9 Pulsanti Su/Giù (1) Pulsanti Rig 1~5 (2) Pulsante TAP (3) Pulsante TUNER (4) Pulsanti Effetti I~IIII (5) Assegnazione di un Modulo Effetti Eliminare l’Assegnazione di un Modulo Effetti Assegnazione di un Secondo Modulo Effetti Più...
- Page 82 82 GUIDA RAPIDA DEL REMOTE...
-
Page 83: Okay, Ma Cosa Ho Appena Comperato
GUIDA RAPIDA DEL REMOTE OKAY, MA COSA HO APPENA COMPERATO? Innanzitutto, grazie per avere scelto il KEMPER PROFILER Remote™. Facendolo, avete scelto il controllo remoto perfetto per il vostro PROFILER™. Potete pensarlo come un pannello di controllo complementare, perfettamente integrato con l’hardware ed il software del PROFILER. Questa integrazione comprende l’alimentazione, uno schermo che riporta le informazioni importanti riguardanti la modalità... -
Page 84: Per Iniziare
Collegate i vostri PROFILER™ e Remote tramite il cavo ethernet di alta qualità fornito nella confezione. Il connettore Neutrik® Ethercon® stabilisce un collegamento stabile e robusto con il PROFILER Remote. Appena accendete il PROFILER, entrambe le unità si accenderanno insieme. Mentre si avviano, il Remote si... -
Page 85: Presentazione
GUIDA RAPIDA DEL REMOTE PRESENTAZIONE PULSANTI SU/GIÙ (1) In Modalità Performance, usate questi pulsanti per scorrere le vostre Performance. Una pressione veloce vi porterà alla Performance precedente o successiva. Tenete premuto un pulsante per scorrere in quella direzione. A seconda dello stato del parametro “Performance Autoload”... -
Page 86: Pulsante Tap
86 GUIDA RAPIDA DEL REMOTE PULSANTE TAP (3) Questo pulsante attiva il Tap Tempo, proprio come il pulsante TAP sul pannello frontale del PROFILER. Battete a tempo di quarti (semiminime) per impostare il tempo degli effetti di delay, phaser, flanger e tremolo. Il LED lampeggerà... -
Page 87: Assegnazione Di Un Modulo Effetti
Ora potete attivare o bypassare il modulo dell’effetto scelto premendo il pulsante sul vostro PROFILER Remote. Il LED bianco in basso a sinistra indica lo stato acceso/spento di quel modulo effetti. -
Page 88: Assegnazione Di Un Secondo Modulo Effetti
Vedrete i LED di destra del Pulsante Effetti indicare sia la categoria che lo stato acceso/spento della vostra seconda assegnazione. Ora potete attivare o bypassare entrambi gli effetti premendo il pulsante sul vostro PROFILER Remote. PIÙ ASSEGNAZIONI In questo modo potete assegnare al Pulsante Effetti anche altri moduli effetti. Comunque, i LED indicheranno solo le prime due assegnazioni. -
Page 89: Assegnazioni Senza Remote
ASSEGNAZIONI SENZA REMOTE Se il vostro PROFILER Remote non è collegato oppure se il vostro palco è così enorme che il vostro PROFILER si trova a chilometri dal Remote, non potrete raggiungere entrambi nello stesso istante. In tal caso, per realizzare l’assegnazione accedete alla pagina Remote Effect Buttons delle Rig Settings, tenete premuto uno dei quattro... -
Page 90: Blocco Pulsanti Effetti
90 GUIDA RAPIDA DEL REMOTE condizione precedente. Questo comportamento varrà sia per la commutazione acceso/spento che per le funzioni “Action & Freeze”. BLOCCO PULSANTI EFFETTI I Pulsanti Effetti sono bloccati/sbloccati di conseguenza del fatto che il modulo effetti assegnato sia bloccato/ sbloccato. -
Page 91: Pulsante Looper
GUIDA RAPIDA DEL REMOTE PULSANTE LOOPER (6) Looper incorporato! Ne fanno parte i seguenti sette pulsanti: LOOPER Attiva il Looper e commuta i sei pulsanti seguenti tra la loro normale funzione e la loro funzione Looper. Registrazione Riproduzione Sovrapposizione Stop Cancellazione: premete 3 volte per cancellare il loop attuale Annulla o riattiva l’ultima sovrapposizione Trigger: fa partire il loop in condizione di Stop, fa ripartire il loop in condizione di Play... -
Page 92: Collegare Pedali Di Espressione Epedali Esterni
92 GUIDA RAPIDA DEL REMOTE COLLEGARE PEDALI DI ESPRESSIONE E PEDALI ESTERNI Pedale Pedal Pedale Pedal Pedale Pedal Pedale Pedal Pedale del Pedale Pitch Volume Morph Pedale Pedale Pitch Pedal Pedal Pedal Pedal Volume Morph Per collegare pedali di espressione, il Remote dispone di quattro connettori TRS denominati da “PEDAL 3” a “Pedal 6”. - Page 93 Nel retro del Remote troverete il controllo LCD CONTRAST. Tutte le altre impostazioni vengono modificate e memorizzate nelle System Settings del PROFILER. E quindi verranno anche comprese nel backup del PROFILER. Il Manuale Principale contiene un capitolo dedicato al “PROFILER Remote”, che contiene tutte le informazioni pertinenti.
-
Page 94: Istruzioni Importanti Per La Sicurezza
» L’apparecchio deve essere collegato ad una presa di corrente correttamente collegata a terra. Assicuratevi che, in qualsiasi circostanza, la presa di alimentazione possa essere raggiunta con facilità. » L’apparecchio non è adatto ad un utilizzo all’esterno. Kemper GmbH KEMPER PROFILER Tested To Comply with... -
Page 95: Dichiarazione Di Conformità
Noi KEMPER GmbH, Königswall 16-18, 45657 Recklinghausen Germania, Tel: +49 (2361) 9376824, dichiariamo sotto la nostra unica responsabilità che il prodotto PROFILER Remote è conforme con la sezione 15 del Regolamento FCC. Il suo funzionamento è soggetto alle due condizioni seguenti: (1) questo dispositivo non deve generare interferenze dannose. -
Page 96: Condizioni Di Garanzia
CONDIZIONI DI GARANZIA La garanzia KEMPER GmbH copre tutti i difetti di materiali e costruzione per un periodo di 36 mesi dalla data di acquisto originale Questa garanzia non copre guasti derivanti da abuso, collegamenti sbagliati o utilizzo in condizioni diverse da quelle specificate.
Need help?
Do you have a question about the PROFILER Remote and is the answer not in the manual?
Questions and answers