Kemper PROFILER The Basics & Profiling Manual
Hide thumbs
Also See for PROFILER:
- Main manual (315 pages) ,
- Quick start manual (132 pages) ,
- Quick start manual (96 pages)
Table of Contents
Advertisement
Available languages
Available languages
Quick Links
Advertisement
Chapters
Table of Contents

Related Manuals for Kemper PROFILER


Summary of Contents for Kemper PROFILER
- Page 1 KEMPER PROFILER The Basics & Profiling Guide 2014...
- Page 2 Kemper GmbH. Kemper GmbH assumes no responsibility or liability for any errors or inaccuracies that may appear in this book. Except as permitted by such license, no part of this publication may be reproduced, stored in a retrieval system, or transmitted in any form or by any means, electronic, mechanical, recording, by smoke signals or otherwise without the prior written permission of Kemper GmbH.
-
Page 3: Table Of Contents
Table Of Contents Okay, so what did I just buy? What is profiling? Getting started More on connecting your gear Choose your rig Stomps Stack Effects Front Panel controls Rig navigation section Type knob Browse knob Page navigation Exit button On/Off button Lock button Copy and paste buttons... - Page 4 KEMPER PROFILER (14) Output/Master button (15) Master volume knob (16) Volume knob (17) Back panel overview Main Output section Monitor Out section Direct Output/Send Return and Alternative Input Power connector Pedals and switches MIDI S/PDIF digital I/O (10) Speaker Output (11) Kensington Lock™...
- Page 5 Performance mode Editing Performances Switching Performances with a MIDI Foot Controller Updates, backup and sharing sounds Updating the operating system Creating and restoring backups Importing rigs, performances and local presets PROFILER and MIDI Profiling Guide 50 Profiling an amp General considerations...
- Page 6 KEMPER PROFILER Making connections Connections for profiling a hardware guitar amp Connections for profiling a combination of amp and stomp box Connections for profiling a computer-based guitar amp simulation Taking a profile Evaluating the Profile Refining the profile The resulting profile...
- Page 7 The Basics...
- Page 8 The PROFILER is the first digital guitar amp that doesn’t simply include digital versions of guitar amps, but lets you make a “profile” of your own guitar amp to use inside the PROFILER — as well as load profiles of other guitarists’ amplifiers into your PROFILER, which gives you not just a simulation, but their exact digital sound! We hope you’ll find operating the PROFILER straightforward, but if you need more information please...
- Page 9 Do you have a favorite setting on a favorite amp that produces your favorite sound? Would you like to be able to get that identical sound from the PROFILER, and not have to bring your amp to the rehearsal, gig or studio? The method by which you can get that favorite sound into the PROFILER is what we call “profil-...
- Page 10 PROFILER offers multiple inputs and outputs in both analog and digital formats, which we’ll describe in more detail down below. We included all this connectivity so you can use the PROFILER as a central hub in your studio to connect your guitar to a variety of other amps, effects and recording gear and use the PRO- FILER to switch among them.
- Page 11 GETTING STARTED You can connect two pedals to control parameters such as volume or individual stomp parameters. Finally, the PROFILER comes with USB connectors so you can connect it to your computer to transfer data and update the firmware. Choose your rig A complete signal chain is called a “rig”.
- Page 12 KEMPER PROFILER Stomps The first section, labeled “STOMPS”, is for your stomp box effects. This section offers four stomp box slots which are represented by the four buttons labeled A, B, C, and D. Here you can place the built-in stomp effects in any order and configuration you’d like.
- Page 13 GETTING STARTED Finally, you can select more stomps and effects in the EFFECTS section, and change the settings of the delay and reverb using their dedicated knobs. Stack In the middle of this signal flow, you’ll find the “stack” section with the buttons for AMPLIFIER, EQ (equal- izer) and CABINET.
-
Page 14: Front Panel Controls
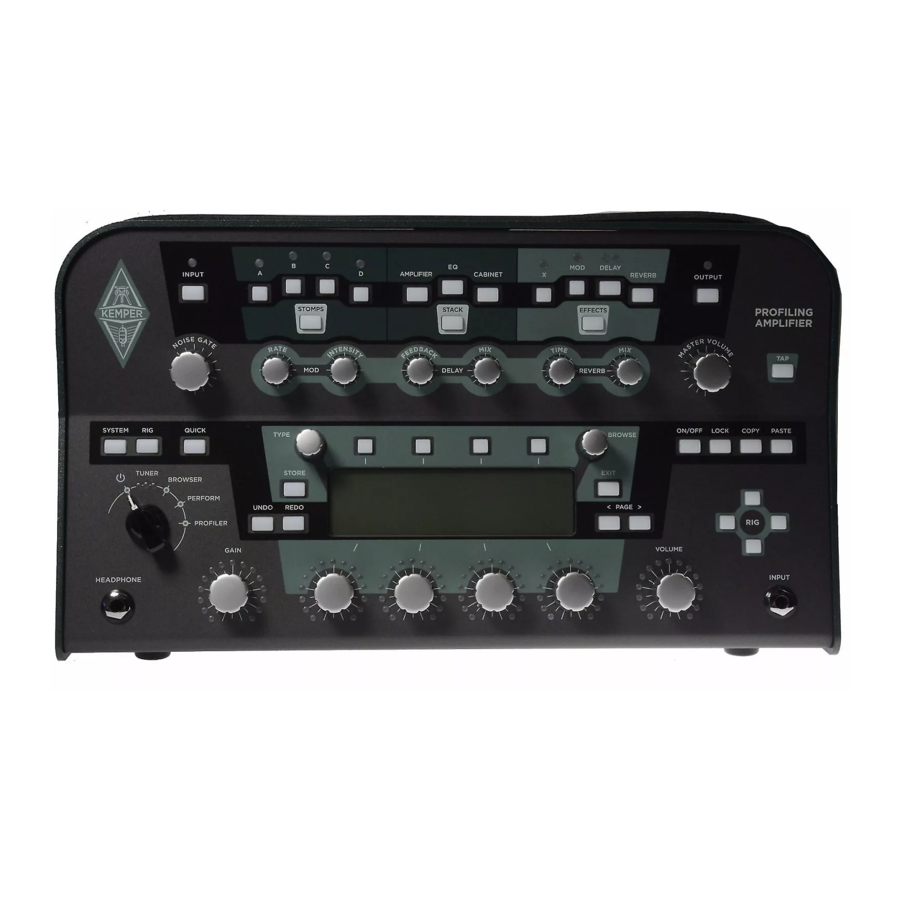
KEMPER PROFILER Front Panel controls Profiler Head: DELAY AMPLIFIER CABINET REVERB MASTER INPUT PROFILING STOMPS STACK EFFECTS AMPLIFIER DELAY REVERB SYSTEM QUICK ON/OFF LOCK COPY PASTE TYPE BROWSE TUNER STORE EXIT BROWSER PERFORM PROFILER HEAD UNDO REDO PAGE PROFILER GAIN... -
Page 15: Rig Navigation Section
FRONT PANEL CONTROLS We already mentioned some of the buttons and knobs in the previous section, when we showed you how to adjust the various effects and settings within the upper half of the front panel. Below is a short explana- tion of what all of the front panel controls do Rig navigation section Here you can navigate through the rigs. -
Page 16: Browse Knob
KEMPER PROFILER Last Imported Only shows the rigs that you have imported recently. My Rigs Only shows the rigs that you have made your own (identified by your author name). Non Favorites Only shows the rigs not marked as favorites Browse knob In Browse mode this knob can be used to quickly browse the list of available rigs. -
Page 17: On/Off Button
FRONT PANEL CONTROLS On/Off button This button switches the currently selected module or section on and off. The light of the module or sec- tion button shows you if a module is active or bypassed. You can also switch a module on and off by press- ing the module button itself. -
Page 18: Copy And Paste Buttons
To do this, select a module and press COPY. Next, select a destination module and press PASTE. Voilà! In general, you can use common sense to determine if the PROFILER will let you copy settings from one module to another. For example, you cannot copy the reverb settings to the amp module. However, it is possible to copy a Stomp to slot X or MOD in the effects section. -
Page 19: Gain Knob
FRONT PANEL CONTROLS Insert Soft Button #1 a space to the left of the selected character. Soft Button #2 Clear the selected space or character. Toggle Soft Knob #1 between upper case and lower case letters. Soft Knob #4 Scroll through the available characters. - Page 20 KEMPER PROFILER torted sounds, you can adjust “Clean Sense” to a level where clean sounds have the same perceived loud- ness as distorted sounds. “Clean Sense” determines the volume of clean sounds, but not the way the amp or the effects are driven. A low level guitar output stays cleaner; a hot guitar will still distort more easily.
- Page 21 You can still use Mono Effect Loops when using the Alternative Input, but avoid using the Stereo Effect Loop; it uses the Alternative Input as the Right return input for the loop, and the Profiler does not auto- matically compensate for this situation.
-
Page 22: Input Led
When the Input Stage is locked, the NOISE GATE is locked as well. With the chicken-head set to Profiler mode, the noise gate will also work with the connected amplifier, but without interfering with the result. -
Page 23: Output/Master Button
“MonitorCabOff”, a global switch to bypass the virtual speaker cabinet individually for the Monitor Output By engaging “MonitorCabOff” you can run the PROFILER directly to a power amp driving a guitar cabinet on stage, while the Main Outputs still carry the full signal, including the virtual speaker, to be connected to the front mixing desk. -
Page 24: Usb
KEMPER PROFILER (17) (Profiler Rack Only). Use the USB host port to connect USB sticks for backups and OS updates. See “Up- dates, backup and sharing sounds” for details. -
Page 25: Back Panel Overview
BACK PANEL OVERVIEW Back panel overview Profiler Head: SPEAKER OUTPUT 8 - 16 Ohm OUTPUT POWER: 8 OHM: 600W RMS / 16 OHM: 300W RMS Dedicated speaker/cabinet output. Do not connect this output to any grounded WARNING: DO NOT OBSTRUCT VENTILATION GRILLS... -
Page 26: Main Output Section
48 V phantom power fed by a mixing desk. However you should avoid to feed phantom power into the PROFILER to get the best audio quality. Like all inputs and outputs it offers a GROUND LIFT to prevent a hum loop. -
Page 27: Return And Alternative Input
You could, for instance, use this feature to mix in music from your MP3-player to the sound of the Profiler to play along. You will find the corresponding mix controls in the Output Stage. Please note that the PROFILER’s XLR input does not provide phantom power. More details about the usage of the RE- TURN, in context of profiling, can be found in our Profiling Guide. -
Page 28: Pedals And Switches
MIDI Input of the PROFILER to switch between rigs, and control changes to switch and control effects. If you send MIDI Clock to the PROFILER, it will instantly sync its tempo, so tempo dependent effects like de- lay or tremolo will adapt their timing. -
Page 29: Power Amplifier
Power Amplifier The optional built-in power amplifier allows you to connect your KEMPER PROFILER to all kinds of 8 or 16 Ohm guitar cabinets, as well as passive linear cabinets. It is internally cabled to the Monitor Output, so you can use all the features of the Monitor Output for the power amplifier as well. - Page 30 Please refrain from connecting devices with impedances lower than 8 Ohms, as the power amp could be damaged. Always ensure adequate ventilation; especially if mounting your PROFILER into a rack. Failure to do so may cause the power amp to shut down in order to prevent overheating.
- Page 31 USING THE TUNER Using the tuner The tuner LEDs above the chicken head knob are always active so you can monitor your tuning while you play. Even when you’re not in tuning mode, the LEDs give you general information whether your guitar is in tune or not.
- Page 32 If you have ever used a digital guitar processor before, you will know that building your own rigs is part of the fun! In the KEMPER PROFILER you will find it surprisingly easy, as well. Simply bring any module or section into focus, activate it, and select from a range of local presets using the BROWSE knob.
- Page 33 BUILDING A RIG Stack section This is your “amplifier stack” consisting of your amplifier profile, speaker cabinet profile, and EQ. Pressing the STACK button and holding it for a short moment will enter the stack edit mode. You can rename the stack using soft button “Rename”...
- Page 34 KEMPER PROFILER Power Sagging ♦ Power sagging models the interaction between the guitar signal and the distortion stage. Often, you hear guitarists talk about how the tubes “breathe” — that’s power sagging. Increase the amount of “Power Sagging” to emphasize the velocity and energy of crunch sounds. The guitar sound gains additional energy and presence, without raising the perceived volume of the distorted signal.
- Page 35 BUILDING A RIG EQ button Holding the EQ button will bring it into focus. The soft knobs underneath the display control the following parameters for the EQ: Soft Knob #1 frequency range. Soft Knob #2 frequency range. Soft Knob #3 Treble frequency range.
- Page 36 KEMPER PROFILER wards the left most position, the sound will resemble that of analog cabinet simulations (which often have a very limited frequency response and little character). Effects section The Effects section is where you can add stereo effects after (post-) the mono stomps section and the amp stack.
- Page 37 BUILDING A RIG The Profiling Amplifier provides three types of delays in the DELAY module on the right. Tap Delay The delay time is linked to the tempo as selected in RIG settings, or by the TAP tempo button. Free Delay Delay time is freely adjustable in milliseconds, and independent from the TAP tempo.
- Page 38 KEMPER PROFILER Tempo A number of time parameters allow their timing to be determined by the tempo of the song you play. These include Delay Time in the Tap Delay, as well as the Rate parameter of the Phaser, Flanger, Tremolo and other modulation effects.
- Page 39 TEMPO highlighted, the present tempo is applied to each of the five slots, to ensure an equal tempo for the setup of a song. The tempo settings of the individual rigs are ignored. Performance Tempo is stored with the Performance. ✔...
- Page 40 MIDI output jack when desired. You can use MIDI Clock from any such device to automat- ically sync your delay and modulation effects to the music, even on stage. The Profiler will automatically sync to a MIDI Clock signal received by its MIDI input.
- Page 41 CONFIGURE YOUR SYSTEM PREFERENCES Configure your system preferences System button Press SYSTEM to access the “global settings” pages. Global settings remain unaffected when you change to another rig. Parameters in the system menu include “Pedal Settings”, “LED Intensities”, “Display Con- trast”, “Time And Date”, among others.
- Page 42 KEMPER PROFILER Using a MIDI pedal to switch rigs You can assign a unique MIDI program change number to each rig, up to a maximum 128 rigs: • Select a rig in Browse mode • Press the SYSTEM button •...
- Page 43 PERFORMANCE MODE Performance mode Performance mode is a powerful tool that allows you to organize rigs in ‘performances’. A total of 125 per- formances are available, each of which can hold up to five rigs in one logical place. You could, for example, use a performance to store the sounds dedicated to the intro, verse, chorus, bridge, and outro of a song, and switch between them using a foot controller.
- Page 44 KEMPER PROFILER Switching Performances with a MIDI Foot Controller Depending on the capabilities of your MIDI foot controller, we have prepared a couple of approaches to select performances and slots via MIDI. You can select any performance and rig directly via MIDI bank select and program change. The bank select and program change numbers associated with any slot are displayed in the dark box, on the left hand side.
- Page 45 You will need to use an empty USB stick in order to transfer the files from your Mac or PC to the PROFIL- ER for the first time. When you connect a USB stick for the first time, the PROFILER will format it to ensure maximum reliability.
- Page 46 In order to transfer these files from your Mac or PC to your PROFILER, please copy them to the directory called “Shared” on your dedicated USB stick. Next, plug the USB stick into the USB slot on the rear panel of your PROFILER and switch to Browse mode.
- Page 47 UPDATES, BACKUP AND SHARING SOUNDS ✔ ✔ Unlike other platforms, you don’t need to unmount the USB stick, you can simply remove it once the task is completed. ✔ ✔ In certain cases you may want to merge a backup with the existing content. To do so, copy the backup in question from the “Backups”...
- Page 48 You can use MIDI to send program changes to switch between rigs. You can send MIDI messages to the PROFILER either using your computer and a MIDI interface, or by using a dedicated MIDI control pedal. For more detailed information please consult the Reference Manual.
- Page 49 Profiling Guide...
- Page 50 Now we’re getting to the fun stuff! Profiling your own amp, custom digital simulation, or favorite stomp box is what sets the KEMPER PROFILER apart from every other digital amplifier out there. We’ve spent years getting our profiling system to deliver the goods in terms of sound quality, playability, and ease of use —...
- Page 51 Since the PROFILER sends its own test-tones into the reference amp during profiling, it should be obvious that the sound of your guitar isn’t part of the result. The PROFILER is designed to react to any guitar in an identical way to the reference amp that was profiled.
- Page 52 PROFILER for both the MAIN OUTPUTS and the RETURN INPUT. If that does not solve the problem, try different combinations using the other GROUND LIFT switches. It is important that at least one of the GROUND LIFT switches is not pressed to make sure that the PROFILER has at least one ground connection.
- Page 53 PROFILING AN AMP sion. For best results it is crucial to do the profiling session in a typical studio setting using linear studio monitors or a PA. ✔ ✔ If your amp provides a spring reverb, remember to turn it off for the profiling process.
- Page 54 Connect the DIRECT OUTPUT/SEND of the PROFILER to the guitar input of your hardware amplifier. • Connect your microphone or microphone preamp to the RETURN INPUT jack of the PROFILER (use either the XLR or quarter-inch input depending on your microphone or microphone preamp).
- Page 55 RETURN INPUT of your PROFILER. The reference amp that you want to profile has to be connected to the PROFILER in such a way that only the PROFILER will send and receive the signals. This effectively turns the PROFILER into a monitoring de- vice.
- Page 56 KEMPER PROFILER It’s a good idea to make the PROFILER the central hub for all your guitar recordings and use it as your main switching device. That way you can use all of your favorite amps alongside the internal effects of the PROFILER.
- Page 57 ✔ ✔ The PROFILER can only accurately profile preamp stomp boxes such as overdrive and distortion pedals, Eqs and filters, tube preamp pedals, and so on. Attempting to profile a delay, reverb or modulation pedal is unlikely to work as expected. In other words: your mileage might vary.
- Page 58 Effects loops are indicated by the LED color white. Using other built-in KEMPER PROFILER effects in the reference rig while you are profiling is not a problem. Those effects you have engaged will still be audible when you switch to your reference amp, so you can configure the PROFILER’s stomp boxes and other effects in the Profiling amp to suit your reference amp...
- Page 59 Press the soft button labeled “Next”. On this page you can inform the PROFILER whether the sound you want to profile is clean or distorted by pressing the appropriate soft buttons. If your reference amp has a clean sound you can set the PROFILER to “Clean”.
- Page 60 PROFILER needs to do its refining. Be sure to strum especially hard so that the PROFILER has a chance to analyze the transients. When you feel that you have refined the profile enough, press the blinking soft button to stop the process. Now make another A/B comparison to check the result.
- Page 61 The resulting profile Once you are happy with the result of the profiling, you can store the sound in the PROFILER as a new rig. We highly recommend that you save the profile before you start modifying its parameters to preserve the original settings.
- Page 62 - one for the bass rotor, and one for the tweeter horn. Connect the microphones to a mixer, create a mono mix of the two, and send this to the PROFILER’s RE- TURN INPUT. The idea is for both microphones to be captured at the same time, resulting in a single pro- file.
- Page 63 In the next phase, slowly pulsating white noise is sent to the reference amp. The volume of the white noise is set to a level at which the reference amp starts to distort. This is how the PROFILER learns about the dynamic distortion curve of the tubes in the reference amplifier.
- Page 64 KEMPER PROFILER...
- Page 65 Legal...
- Page 66 FCC Verification procedure – 47CFR §15.101 Other Class B digital devices and peripherals: EN 55022 Class B: 2006+A1:2007 EN 61000-3-2: 2006 + A1:2009 + A2:2009 EN 61000-3-3: 2008 EN55024:1998 (Profiler Head) + EN55024:2010 (Profiler Rack) + A1:2001 + A2:2003 Radio and Television Interference ♦...
- Page 67 Declaration of conformity We Kemper GmbH, Königswall 16-18, 45657 Recklinghausen Germany, Tel: +49 (2361) 9376824, declare under our sole responsibility that the product PROFILER complies with Part 15 of FCC Rules. Operation is subject to the following two conditions: (1) this device may not cause harmful interference.
- Page 68 KEMPER PROFILER 5) Do not use this apparatus near water. 6) Clean only with dry cloth. 7) Do not block any ventilation openings. Install in accordance with the manufacturer’s instructions. 8) Do not install near any heat sources such as radiators, heat registers, stoves, or other apparatus (includ- ing amplifiers) that produce heat.
- Page 69 COMMUNICATIONS AND SAFETY REGULATION INFORMATION Warranty regulations The Kemper GmbH warranty covers all defects in material and workmanship for a period of 36 months from the date of original purchase. This warranty does not cover defects due to abuse, faulty connections or operation under other than specified conditions.
- Page 70 KEMPER PROFILER...
- Page 73 KEMPER PROFILER Grundlagen und Profiling Anleitung 2014...
- Page 74 Der Inhalt dieses Handbuchs ist rein informell und kann zu jeder Zeit, ohne Voran- kündigung von Kemper GmbH geändert werden. Kemper GmbH haftet weder für inhaltliche- noch für Druckfehler. Ohne schriftliche Genehmigung der Kemper GmbH ist es nicht zulässig, diese Publikation oder Teile davon zu reproduzieren und/oder in schriftlicher- und/oder elektronischer Form zu veröf-...
- Page 75 Inhaltsverzeichnis 80 Was ist eigentlich ein Profiling Amplifier? Was ist Profiling? Erste Schritte Mehr Informationen zum Anschluss von Equipment Wählen sie Ihr Rig Stomps Stack Effects Die Benutzeroberfläche Rig Navigations Taster Type Regler Browse Regler Exit Taster On/Off Taster Lock Taster Copy- und Paste Taster Store Taster (10)
- Page 76 KEMPER PROFILER (15) Master Volume Regler (16) Volume Regler (17) Die Anschlüsse auf der Rückseite Master Out Sektion Monitor Out Sektion Direct Output/Send Return und Alternative Input Netzanschluß Pedale und Schalter MIDI S/PDIF digital I/O (10) Speaker Output (11) Kensington Lock™...
- Page 77 Tempo TAP Tempo Taster Beat Scanner MIDI-Clock 114 Die System Voreinstellungen System Taster Ändern des Modul-Taster Verhaltens Umschalten von Rigs mit einem MIDI Pedal Rig Taster Quick Taster 116 Verwenden des Performance Modus Editieren von Performances Umschalten mit einem MIDI Fußcontroller 118 Updates, Backup und Sound Sharing Updaten des Betriebssystems Erzeugen und Laden von Backups...
- Page 78 KEMPER PROFILER 126 Verkabelung der Komponenten Verkabelung, um das Profil eines Hardware Amps zu erstellen Erstellen eines Profils von einer Kombination aus Amp und Stomp Box Erstellen eines Profils einer computerbasierenden Ampsimulation 130 Der Profiling-Vorgang Refine Profile Das Profiling-Resultat Unter der Haube...
- Page 79 Grundlagen...
- Page 80 Wir sind sicher, dass sie genauso begeistert sein werden wie wir, wenn sie herausgefunden haben, was dieses Gerät leisten kann. Unser Ziel war es, mit dem PROFILER einen Verstärker auf den Markt zu bringen, der sämtliche Bedürfnisse eines Gitarristen befriedigt. Sie können ihn wie einen normalen Ver- stärker auf der Bühne oder im Proberaum verwenden oder ihn als Schaltzentrale und Multi Effekt-Gerät in...
- Page 81 Haben sie eine bevorzugte Einstellung für ihren Lieblingsverstärker, mit der sie ihren ganz persönlichen Sound kreieren? Würden sie gerne exakt diesen Sound mit dem PROFILER erzeugen, so dass sie nicht mehr ihren Verstärker mit in den Proberaum, zum Auftritt oder ins Studio schleppen müssen? Die Methode, mit der sie ihren Lieblingssound in den PROFILER übertragen können, nennen wir „Profiling“.
- Page 82 Namen als Rig Autor gekennzeichnet und datiert wird. Das hilft ihnen später da- bei Rigs in der gewünschten Reihenfolge darzustellen. Das war es schon! Jetzt können sie auf ihrer Gitarre spielen und die mitgelieferten Rigs im Profiler testen. Mehr Informationen zum Anschluss von Equipment Der PROFILER ist mit einer studiotauglichen analogen Eingangsstufe ausgerüstet, deren Signal von einem...
- Page 83 Wählen sie Ihr Rig Die komplette Signalkette im PROFILER bezeichnen wir als „Rig„. Ein Rig besteht aus mehreren Sektio- nen, die im oberen Bereich der Benutzeroberfläche abgebildet sind. Der Signalfluss beginnt an der Input- Sektion, wird von da aus durch die drei Bearbeitungssektionen im oberen Bereich des PROFILER geleitet und gelangt von dort aus in die Output (Master)-Sektion.
- Page 84 KEMPER PROFILER um bis zu 8 Rigs gleichzeitig zu sehen und um durch alle Rigs zu scrollen. Sie können die Darstellungsrei- henfolge der Rigs mit dem Softtaster „Sort by ...“ beeinflussen und die Rigs nach diversen Kriterien wie Autor, Datum, Alphabet etc. sortieren. Verwenden sie den Softtaster „Load“, um ein ausgewähltes Rig in den Speicher zu laden.
- Page 85 ERSTE SCHRITTE Stomp LED Farbkodierung ♦ Sie haben vielleicht schon bemerkt, dass die Stomp-LEDs in verschiedenen Farben leuchten. Das soll Ihnen dabei helfen, die verschiedenen Stomp-Effekte bereits an der Farbe ihrer LEDs zu identifizieren. Die Stomp-Algorithmen haben die folgenden Farben: Orange Distortion Gelb...
- Page 86 KEMPER PROFILER Stack In der Mitte des Signalflusses liegt die Stack-Sektion mit den Tastern für AMPLIFIER, EQ (Equalizer) und CABINET. Die Stack-Sektion repräsentiert den eigentlichen virtuellen Gitarrenverstärker, der durch das Pro- fil bestimmt wird. In der Stack-Sektion können Amps und Cabinets frei kombiniert werden, in dem man die jeweiligen Taster kurz gedrückt hält, um die Module in den Fokus zu bringen um sich darauf mit dem BROWSE-Regler durch...
-
Page 87: Die Benutzeroberfläche
DIE BENUTZEROBERFLÄCHE Die Benutzeroberfläche Profiler Head. DELAY AMPLIFIER CABINET REVERB MASTER INPUT PROFILING STOMPS STACK EFFECTS AMPLIFIER DELAY REVERB SYSTEM QUICK ON/OFF LOCK COPY PASTE TYPE BROWSE TUNER STORE EXIT BROWSER PERFORM PROFILER HEAD UNDO REDO PAGE PROFILER GAIN VOLUME... -
Page 88: Rig Navigations Taster
Song passt, ohne dass sich dabei die Modulationsgeschwindigkeit ändert. Browse Regler Im Browse Modus können sie mit diesem Regler durch alle Rigs im Profiler scrollen. Im Performance Modus können sie damit durch alle Performances scrollen. Drehen sie den BROWSE Regler, um eine Liste aller ver-... -
Page 89: Exit Taster
Im Browse Modus haben sie die Wahl zwischen verschiedenen „Views“. Jede dieser Ansichten filtert die dargestellten Rigs, um ihnen den Überblick zu erleichtern. All Rigs Sämtliche Rigs im Profiler werden angezeigt. Current Author Es werden nur Rigs angezeigt, die den gleichen Autor haben, wie das zuletzt angewählte Rig. -
Page 90: On/Off Taster
KEMPER PROFILER On/Off Taster Dieser Taster aktiviert oder deaktiviert das aktuell angewählte Modul oder die Sektion. Die LED eines Mo- duls oder Sektions-Tasters zeigt an, ob ein Modul aktiv ist oder sich im Bypass-Modus befindet. Sie können ein Modul auch an- und abschalten, in dem sie den Modul-Taster drücken. -
Page 91: Copy- Und Paste Taster
Benutzen sie ihren gesunden Menschenverstand, wenn sie Daten von einem Modul zum anderen kopieren. Der PROFILER lässt es natürlich nicht zu, dass sie z.B. die Reverb-Einstellungen in das Amp Modul kopie- ren. Eine Stomp nach X oder MOD in der Effektsektion zu kopieren, ist dagegen kein Problem. -
Page 92: Gain Regler
KEMPER PROFILER einen aussagekräftigen. Die „Rename“-Option erlaubt es Ihnen, den Namen des aktuellen Rigs zu ändern und es dann durch die neue Version zu ersetzen. Sobald sie sich für eine Option entschieden haben, erscheint die Seite, auf der sie den Namen editieren können. - Page 93 DIE BENUTZEROBERFLÄCHE Clean Sens ♦ Verschiedene Gitarrenmodelle erzeugen verschiedene Ausgangspegel in Abhängigkeit von den verbauten Tonabnehmern und Saitenstärke. Zum Beispiel produzieren Humbucker-Tonabnehmer eine höhere Aus- gangsspannung als Single Coil-Tonabnehmer und Gitarren mit aktiver Elektronik höhere Ausgangsspan- nung als passive Gitarren. Wie bereits erwähnt, können sie die Lautstärkekompensation für ihr Instrument mit „Clean Sens“...
- Page 94 4. SPDIF Input. Der SPDIF Input wird üblicherweise für Reamping in Verbindung mit einem Audio-Inter- face benutzt. SPDIF-Signale sind immer stereophon. Der PROFILER verarbeitet jedoch nur die linke Seite des Signals beim Reamping. Bitte entnehmen Sie dem Reference Manual mehr Details über Reamping.
-
Page 95: Input Led
Rig als auch in einem Input Preset gespeichert. Locking der Input Stage schließt folglich auch die Einstellungen des Noise Gate ein. Im Profiler Modus wirkt das Noise Gate auch mit dem Referenzverstärker. Es verfälscht dabei das resultie- rende Profil nicht. -
Page 96: Master Volume Regler
KEMPER PROFILER Nach der Aktivierung von „MonitorCabOff“ können sie den Profiler direkt mit einer Endstufe und einer re- gulären Gitarrenbox auf der Bühne verwenden, während die Main Outputs weiterhin das Signal inklusive der virtuellen Speakersimulation zum Saal-Mischpult schicken. Sämtliche Output-Einstellungen sind global (oder „locked“) und werden deshalb nicht mit dem Rig abge- speichert. -
Page 97: Die Anschlüsse Auf Der Rückseite
DIE ANSCHLÜSSE AUF DER RÜCKSEITE Die Anschlüsse auf der Rückseite Profiler Head: SPEAKER OUTPUT 8 - 16 Ohm OUTPUT POWER: 8 OHM: 600W RMS / 16 OHM: 300W RMS Dedicated speaker/cabinet output. Do not connect this output to any grounded... -
Page 98: Master Out Sektion
KEMPER PROFILER. Master Out Sektion Das ist der MAIN STEREO-Ausgang. Verwenden sie diesen Ausgang, um den Profiler in einem Studio an ein Mischpult anzuschließen oder in einer Live-Situation mit dem Saal-Mischpult zu verbinden. An diesen Ausgängen liegt das komplette Signal des Rigs an, inklusive Amplifier, Cabinet und allen Effekten. Sie ha- ben die Wahl zwischen symmetrischen XLR- oder unsymmetrischen Klinkenbuchsen. -
Page 99: Return Und Alternative Input
Profiling. Benutzen sie einen der Eingänge, um das Signal des Referenzverstärkers in den PROFILER zu leiten. Ein Line-Pegel Signal aus einem digitalen Amp, einer Speaker Simulation oder der Subgruppe eines Mischpultes leiten sie in den Klinkeneingang, ein Mikrophon verbinden sie mit dem XLR- Eingang. -
Page 100: Netzanschluß
Modus, um den Schaltern bestimmte Funktionen zuzuweisen. MIDI Verwenden sie diese Buchsen, um den Profiler mit MIDI-Equipment zu verbinden. Sie können MIDI Program Changes am MIDI Input des Profiler empfangen, um zwischen Rigs umzuschalten und mit Control Changes Effekte kontrollieren. Wenn sie MIDI Clock zum Profiler schicken, wird die Geschwindigkeit von Effekten... -
Page 101: S/Pdif Digital I/O
LER mit anderen S/PDIF kompatiblen Geräten, wie Computer oder Audio-Interfaces zu verbinden. Speaker Output (10) Nur im PROFILER PowerRack / PowerHead vorhanden. Siehe Power Amplifier. Kensington Lock™ (11) Hier können Sie ein Kensington Schloss, um Ihren PROFILER vor Diebstahl zu schützen. -
Page 102: Power Amplifier
Auf einer speziellen Power Amp-Seite im Master/Output-Menü finden sie weitere Einstellmöglichkeiten:: Power Amp Switch Damit lässt sich die Endstufe unabhängig vom restlichen KEMPER PROFILER an- und abschalten. Es gibt allerdings keinen spezifischen Grund die Endstufe abzuschalten, wenn sie nicht benötigt wird; anders als bei einer Röhrenendstufe besteht für den von uns verbauten Class D Verstärker keine Gefahr, wenn keine... - Page 103 Vermeiden Sie es Lautsprecher mit einer geringeren Impedanz als 8 Ohm anzuschließen, weil da- durch die Endstufe beschädigt werden kann.. Achten Sie unbedingt auf ausreichende Belüftung, insbesondere, wenn Sie den PROFILER in ein Rack einbauen. Andernfalls könnte die eingebaute Endstufe als Schutz vor Überhitzung vorüber-...
- Page 104 Überblick darüber verschaffen, ob Ihre Gitarre richtig gestimmt ist, auch wenn sich der PROFILER gerade nicht im Tuner-Modus befindet. Sollte eine Gitarrensaite extrem verstimmt sein, leuchtet eine der äußeren grünen LEDs. Je genauer die Saite gestimmt ist, desto heller leuchtet die mitt- lere weiße LED.
- Page 105 Erstellen eines Rigs Wenn sie jemals ein Multieffektgerät verwendet haben, wissen sie, dass das Erstellen eigener Rigs Spaß macht. Wie sie sehen werden, ist es im PROFILER darüberhinaus auch noch einfach und übersichtlich ge- löst. Erstellen sie mithilfe des BROWSE-Reglers ihre eigenen Kombinationen aus Modulen und Sektionen, in- dem sie diese aktivieren und aus den vielen lokalen Presets auswählen.
- Page 106 KEMPER PROFILER Stack Sektion Diese Sektion besteht aus dem Amplifier-Profil, dem Speaker Cabinet-Profil und dem Equalizer. Halten sie die STACK-Taster für einen kurzen Moment, um den Stack zu editieren. Mit dem Softtaster „Rename“ kön- nen sie das Stack umbenennen. Verwenden sie den BROWSE-Regler, um durch eine Liste aller verfügbaren lokalen Presets zu blättern.
- Page 107 ERSTELLEN EINES RIGS Power Sagging ♦ Power Sagging modelliert die komplexe Interaktion zwischen Gitarrensignal und Verzerrerstufe. Wenn Gi- tarristen darüber sprechen, wie „Röhren atmen“, dann meinen sie Power Sagging. Erhöhen sie den Wert für „Power Sagging“, um die Ansprache und das Durchsetzungsvermögen von Crunch-Sounds zu erhöhen.
- Page 108 KEMPER PROFILER das Lautstärkepoti an ihrer Gitarre zurückdrehen, wird aus einem angezerrten Sound ein cleaner Sound mit satter Kompression. ✔ ✔ Weitere Informationen zu sämtlichen Amp-Parametern finden sie im Referenz-Handbuch. EQ Modul Halten sie den EQ-Taster, um den Equalizer anzuwählen. Die Softregler unterhalb des Displays kontrollieren...
- Page 109 ERSTELLEN EINES RIGS Character ♦ Verwenden sie diesen Parameter, um den Gesamtcharakter der Lautsprecherbox zu verändern. Wenn sie den Regler nach rechts drehen, verstärken sie die Höhen und Tiefen im Frequenzgang. Das macht den Klang präsenter, kann ihn aber bei zu extremen Einstellungen zu penetrant machen. Drehen sie den Regler nach links, um den Frequenzgang zu glätten und den Einfluß...
- Page 110 Die Delay-LEDs leuchten synchron zum Tempo und zeigen das Rhythmusmuster des Delay-Effektes an. Reverb ♦ Das ist der PROFILER interne Hall-Effekt. Sie haben die Auswahl zwischen verschiedenen Raum- und Hall- Algorithmen. Die TIME- und MIX-Parameter des Reverbs können mit den dedizierten Reglern im oberen rechten Bereich des PROFILER kontrolliert werden.
- Page 111 TEMPO Tempo Einige Effekte bieten die Möglichkeit ihr Timing an das Tempo eines Songs zu koppeln. Dazu gehören De- lay Time im Tap Delay und der Rate-Parameter bei Phaser, Flanger, Tremolo sowie anderen Modulationsef- fekten. Es gibt verschiedene Wege, dieses Tempo zu steuern bzw. zu speichern. Mit folgenden vier Methoden kann man das Tempo setzen oder verändern: •...
- Page 112 KEMPER PROFILER Wenn Sie die Tempo-Seite im Rig-Menü aus dem Performance Mode aufrufen, so werden sie den zusätzli- chen Taster “Use Performance Tempo” vorfinden. Wird dieser Schalter aktiviert, so wird das aktuelle Tem- po für alle Slots der aktuellen Performance genutzt. Damit wird sichergestellt, dass sie bei einem Song un- terschiedliche Sounds mit einheitlichen Tempo nutzen können.
- Page 113 MIDI-Sequencer oder einem Drum-Computer aus ihre Delay- und Modulationseffekte synchro- nisieren. Der PROFILER verarbeitet diese Signale automatisch, sobald sie auf dem passenden MIDI-Kanal an seinen MIDI-Input gesendet werden. Die entsprechenden Werte werden auf der Seite „Tempo“ im Rig-...
- Page 114 KEMPER PROFILER Die System Voreinstellungen System Taster Drücken sie SYSTEM, um die Seiten zu erreichen, auf denen sie Einstellungen vornehmen können, die für alle Rigs und Performances gelten. Parameter im System-Menü sind beispielsweise Pedal-Einstellungen, aber auch „LED-Intensität“, „Display-Kontrast“, „Time und Date“ und andere.
- Page 115 DIE SYSTEM VOREINSTELLUNGEN Umschalten von Rigs mit einem MIDI Pedal Sie können bis zu 128 Rigs eine eigene MIDI Program Change-Nummer zuweisen: • Wählen sie ein Rig im Browse-Modus • Drücken sie den SYSTEM-Taster • Navigieren sie zur “Browse Mode PrgChg” Seite •...
- Page 116 KEMPER PROFILER Verwenden des Performance Modus Der Performance Modus ermöglicht die Organisation von Rigs in sogenannten „Performances“. Insgesamt gibt es 125 Performances, von denen jede bis zu fünf verschiedene Rigs enthalten kann, die in sogenannten “Slots” organisiert sind. Sie können z.B. eine Performance dazu nutzen, die Rigs für das Intro, Vers, Refrain, Bridge und Outro eines Songs zu organisieren und mit einem Fußschalter zwischen ihnen umzuschalten.
- Page 117 VERWENDEN DES PERFORMANCE MODUS Umschalten mit einem MIDI Fußcontroller Abhängig von den Möglichkeiten ihres MIDI Fußcontrollers bieten wir verschiedene Vorgehensweisen, um Performances und Slots über MIDI zu wechseln. Sie können jede Performance und jedes Rig direkt über MIDI Bank Select- und Program Change-Befehle umschalten.
- Page 118 „OS Update“ Ordner auf dem vorformatierten USB-Stick an ihrem Mac oder PC. Melden sie als Nächs- tes den USB-Stick an ihrem Rechner ab und stecken sie ihn in den PROFILER. Befolgen sie die Anweisun- gen, die nach ein paar Sekunden im Display des PROFILER erscheinen.
- Page 119 Die Anzahl der zur Verfügung stehenden Rigs steigt im Laufe der Zeit. Sie können neue Rigs und andere Dateien von unserer Webseite herunterladen: www.kemperamps.com/start/ Um diese Daten von ihrem Mac oder PC zum PROFILER zu übertragen, kopieren sie diese in den Ordner „Shared“ auf dem vorbereiteten USB-Stick. Stecken sie den USB-Stick in die USB-Buchse auf der Rückseite...
- Page 120 KEMPER PROFILER des PROFILER und wechseln sie in den Browse-Modus. Warten sie ein paar Sekunden und drücken sie den Softtaster „External Storage“. Sie haben dann die Möglichkeit, die neuen Daten zu importieren. Bei diesem Vorgang werden die neuen Daten mit den bereits vorhandenen zusammengeführt.
- Page 121 Profiling Leitfaden...
- Page 122 Machen sie sich keine Sorgen, wenn das bereits zu kompliziert klingt. Wichtig zu wissen ist, dass der PRO- FILER die verrückten Messtöne braucht, um herauszufinden, wie der Referenz-Amp seinen Klang dyna- misch im Laufe der Zeit verändert. Dank dieser Informationen ist der PROFILER in der Lage, ein digitales Profil des Referenz-Amps anzulegen.
- Page 123 Da der PROFILER während des Profiling-Vorgangs seine eigenen Testtöne zum Referenz-Amp schickt, hat der Klang der Gitarre keinen Einfluss auf das Ergebnis. Der PROFILER ist so konzipiert, dass er auf jede Gi- tarre exakt so reagiert, wie es der Referenz-Amp auch getan hätte.
- Page 124 ✔ ✔ Stellen sie sicher, dass sie das zuvor selektierte Rig im PROFILER hören, wenn sie beim A/B Vergleich auf Kemper Amp schalten bzw. dass der Referenz-Amp zu hören ist, wenn sie zum Referenz-Amp wechseln. Sollte das nicht der Fall sein, überprüfen sie die Verkabelung zwischen dem Referenz-Amp und dem PRO-...
- Page 125 Die Wiedergabe von Profilen über den MONITOR OUT in Verbindung mit einer Endstufe und einer norma- len Gitarrenbox ist eines der Haupteinsatzgebiete des PROFILER. Während einer Profiling-Session sollten sie aber auf keinen Fall eine Gitarrenbox als Abhöre verwenden, sondern stattdessen, wie in einem typi- schen Studio üblich, auf lineare Studio-Monitore oder eine PA zurückgreifen.
- Page 126 KEMPER PROFILER Verkabelung der Komponenten Verkabelung, um das Profil eines Hardware Amps zu erstellen Hier einige Beispiele, wie sie den KEMPER PROFILER mit ihrem Equipment für das Profiling verbinden müssen: • Verbinden sie ihre Gitarre mit der INPUT-Buchse des PROFILER.
- Page 127 LING INPUT verbunden sein soll. Sie können den EQ und die Phase-Schalter des Mixers verwenden, um das Signal zu optimieren aber stellen sie unbedingt sicher, dass dieses Signal nur zum PROFILER geht und nicht an den Hauptausgängen des Mixers dupliziert wird.
- Page 128 ✔ ✔ Der PROFILER kann nur exakte Profile von Kombinationen aus Stompboxen, wie Overdrive und Distortion, EQs und Filter, Tube Preamp Pedals etc. und dem Referenz-Amp erstellen. Der Versuch, Effekte wie Delay, Reverb oder Modulationseffekte während des Profilings zu verwenden, wird keine brauchbaren Ergebnisse...
- Page 129 • Verbinden sie ihre Gitarre mit dem INPUT des PROFILER. • Verbinden sie den DIRECT OUTPUT/SEND des PROFILER mit dem entsprechenden Eingang des Audio In- terfaces des Computers. • Senden sie das Signal der Guitar Amp Simulations-Software zu einem bestimmten Ausgang des Audio In- terfaces.
- Page 130 Wählen sie als erstes ein Rig im Browse-Modus und stellen sie den Chicken-Head auf den Profiler Modus. Wählen sie am besten ein Rig, dessen Sound dem Charakter des Referenz-Amps ähnelt. Dadurch wird es einfacher, das bereits bestehende Rig mit dem Setup zu vergleichen, von dem sie ein Profil erstellen wol- len.
- Page 131 Verzerrungen auftreten. Drücken sie den Softtaster „Next“. Auf dieser Seite teilen sie dem PROFILER mit, ob der Sound, von dem sie ein Profil erstellen wollen, dis- torted (verzerrt) oder clean (unverzerrt) ist, in dem sie die entsprechenden Softtaster drücken. Sollte der Referenz-Amp einen unverzerrten Sound haben, stellen sie den PROFILER auf „Clean“.
- Page 132 “Tube Shape”-Parameter ungefähr auf einen Wert von 9.0, um das gleiche Verhalten im Profil zu erzeugen. Das Profiling-Resultat Nach dem erfolgreichen Profiling kann das neue Profil in Form eines neuen Rigs im PROFILER gespeichert werden. Wir empfehlen ihnen, das Rig abzuspeichern, bevor sie die Parameter verstellen, um den Original- klang zu bewahren.
- Page 133 Die Klangeinstellung des Equalizers im Referenz-Amp wird zu einem festen Bestandteil des Profils, ohne dass die Stellungen der Equalizerregler im PROFILER dupliziert werden. Wir gehen davon aus, dass sie ex- akt den gewünschten Sound am Referenz-Amp eingestellt hatten. Die Stellungen der Equalizer-Regler im PROFILER sind neutral und sie können den Klang anschließend damit noch weiter bearbeiten.
- Page 134 Für den Fall, dass sie sich für die technischen Details des Profiling-Vorgangs interessieren: In der ersten Phase hören sie ein ansteigendes Rauschen. Damit misst der PROFILER den Frequenzgang des Verstärkers und des Signalwegs. Dieser Frequenzgang ändert sich mit zunehmender Lautstärke und Verzerrung massiv.
- Page 135 DER PROFILING-VORGANG ständigen das charakteristische Interferenzmuster, welches der PROFILER nach Abschluss der Messung perfekt reproduziert.
- Page 136 KEMPER PROFILER...
- Page 137 Rechtliche Dinge...
- Page 138 Kompatibilität: Verfahren für den FCC-Nachweis – 47CFR §15.101 Andere Digital- und Peripheriegeräte der Klasse B: EN 55022 Class B: 2006+A1:2007 EN 61000-3-2: 2006 + A1:2009 + A2:2009 EN 61000-3-3: 2008 EN55024:1998 (Profiler Head) + EN55024:2010 (Profiler Rack) + A1:2001 + A2:2003 Interferenzen von Radio- und Fernsehgeräten...
- Page 139 Konformitätserklärung Hiermit erklärt die Kemper GmbH, Königswall 16-18, 45657 Recklinghausen, Deutschland, Tel: +49 (2361) 9376824, in alleiniger Verantwortung, dass das Produkt PROFILER übereinstimmt mit Part 15 der amerika- nischen FCC-Bestimmungen. Die Bedienung unterliegt folgenden beiden Bedingungen: (1) Dieses Gerät darf keine schädlichen Störeinstreuungen erzeugen.
- Page 140 KEMPER PROFILER 3) Beachten Sie alle Warnungen. 4) Befolgen Sie alle Anweisungen. 5) Verwenden Sie dieses Gerät niemals in der Nähe von Wasser. 6) Reinigen Sie das Gehäuse nur mit einem trockenen Tuch. 7) Versperren Sie niemals die Lüftungsschlitze. Stellen Sie das Gerät immer den Anweisungen des Herstel- lers entsprechend auf.
- Page 141 Verbindungen mit anderen Geräten oder durch nicht bestimmungsgemäße Verwendung des Gerätes ent- stehen. Außerdem erlischt jeder Garantieanspruch bei Fremdeingriffen oder eigenmächtigen Änderungen am Gerät. Kemper behält sich das Recht vor, die Garantieforderungen abzulehnen, wenn das Produkt nicht von einem Autorisierten Stützpunkthändler an den jeweiligen Endkunden verkauft wurde. Die Garantie be- schränkt sich auf den Ersatz oder die Instandsetzung des Produktes.
- Page 142 KEMPER PROFILER...
Need help?
Do you have a question about the PROFILER and is the answer not in the manual?
Questions and answers