
Related Manuals for Waters Xevo TQ-GC


Summary of Contents for Waters Xevo TQ-GC
- Page 1 Waters Xevo TQ-GC Overview and Maintenance Guide 715005564 Copyright © Waters Corporation 2020 Version 01 (previously released as Rev. A) All rights reserved...
-
Page 2: General Information
This document is believed to be complete and accurate at the time of publication. In no event shall Waters Corporation be liable for incidental or consequential damages in connection with, or arising from, its use. For the most recent revision of this document, consult the Waters website (www.waters.com). -
Page 3: Customer Comments
We seriously consider every customer comment we receive. You can reach us at tech_comm@waters.com. Contacting Waters Contact Waters with enhancement requests or technical questions regarding the use, transportation, removal, or disposal of any Waters product. You can reach us via the Internet, telephone, fax, or conventional mail. Waters contact information Contacting medium... -
Page 4: Safety Considerations
Safety considerations Some reagents and samples used with Waters instruments and devices can pose chemical, biological, or radiological hazards (or any combination thereof). You must know the potentially hazardous effects of all substances you work with. Always follow Good Laboratory Practice (GLP), and consult your organization’s standard operating procedures as well as your local... - Page 5 Gas hazard Warning: To avoid serious injury, carefully read and follow all safety warnings and notices in this guide before operating the device. The device uses gasses such as hydrogen, helium, iso- butane, methane, and ammonia that can be flammable, explosive, or toxic, or that can cause asphyxiation.
-
Page 6: Safety Hazard Symbol Notice
Do not dispose of the instrument or return it to Waters for repair until the authority responsible for approving its removal from the premises specifies the extent of decontamination required and the level of residual contamination permissible. -
Page 7: Applicable Symbols
For compliance with the Waste Electrical and Electronic Equipment Directive (WEEE) 2012/19/EU, contact Waters Corporation for the correct disposal and recycling instructions For indoor use only No pushing April 27, 2020, 715005564 Ver. 01 (previously released as Rev. A) -
Page 8: Audience And Purpose
Intended use of the Xevo TQ-GC Waters designed the Xevo TQ-GC as a research tool for authenticated mass measurement; it is not intended for In vitro diagnostic use. It is intended for use only by qualified laboratory personnel. -
Page 9: Fcc Radiation Emissions Notice
FCC radiation emissions notice Changes or modifications not expressly approved by the party responsible for compliance, could void the user's authority to operate the equipment. This device complies with Part 15 of the FCC Rules. Operation is subject to the following two conditions: (1) this device may not cause harmful interference, and (2) this device must accept any interference received, including interference that may cause undesired operation. -
Page 10: Table Of Contents
Equipment misuse notice ....................... vi Safety advisories ..........................vi Operating the device..........................vi Applicable symbols.........................vii Audience and purpose........................viii Intended use of the Xevo TQ-GC ....................viii Calibrating .............................viii Quality control..........................viii EMC considerations..........................viii FCC radiation emissions notice...................... ix Canada spectrum management emissions notice................ix ISM classification: ISM group 1 class A.................. - Page 11 1.4 Xevo TQ-GC operation ......................... 18 1.5 Ionization source ........................... 20 1.5.1 The inner source assembly....................22 1.5.2 The mounting flange ......................25 1.5.3 The outer source assembly ....................25 1.6 Gas requirements.......................... 27 1.7 Sample inlets..........................28 1.7.1 GC interface......................... 28 1.7.2 Reference sample inlet ......................30 1.8 MS operating modes ........................30 1.8.1 MS scanning mode ......................
- Page 12 2.9 Emergency shutdown of the mass spectrometer ................40 3 Changing the mode of operation ................42 3.1 Changing the inner source assembly from EI to CI operation............42 3.2 Changing the inner source assembly from CI to EI operation............46 4 Maintenance procedures ..................51 4.1 Maintenance schedule ........................51 4.2 Spare parts............................
- Page 13 5.4 Contaminated source components ..................... 103 5.5 Air in the CI gas inlet line ......................104 5.6 Repelling magnets on the outer source ..................104 6 Troubleshooting the Xevo TQ-GC .................105 6.1 System troubleshooting....................... 105 6.2 Component hardware troubleshooting ..................105 6.2.1 No ion beam ........................105 6.2.2 Unstable or low-intensity ion beam..................
- Page 14 A.1.1 Specific warnings ......................112 A.2 Notices............................114 A.3 Bottles Prohibited symbol ......................114 A.4 Required protection ........................114 A.5 Warnings that apply to all Waters instruments and devices ............114 A.6 Warnings that address the replacement of fuses................ 119 A.7 Electrical symbols ........................120 A.8 Handling symbols ........................121 B External connections.....................123...
-
Page 15: Waters Xevo Tq-Gc Overview
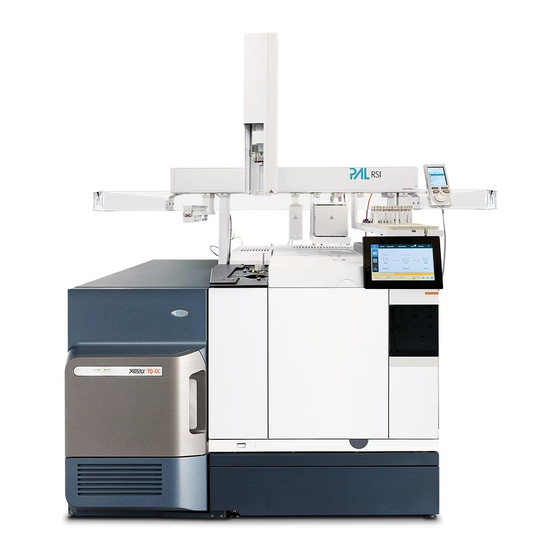
Refer to the appropriate manufacturer’s documentation for additional details. See Waters Xevo TQ-GC Site Preparation Guide (715005566) for mass spectrometer specifications. Figure 1–1: Xevo TQ-GC with the source enclosure door open shown coupled to the GC oven Source enclosure door open April 27, 2020, 715005564 Ver. -
Page 16: Intellistart Technology
Figure 1–2: Xevo TQ-GC with the source enclosure door closed shown coupled to the GC oven Source enclosure door closed 1.1 IntelliStart technology IntelliStart technology monitors instrument performance and indicates when the instrument is ready for use. The software automatically tunes and mass calibrates the instrument, displays performance read- backs, and enables simplified setup of the system for use in routine analytical and open-access applications. -
Page 17: Waters Xevo Tq-Gc
1.2 Waters Xevo TQ-GC Figure 1–3: Xevo TQ-GC with the source enclosure door open shown coupled to the GC oven GC oven Plinth Heated transfer line (HTL) shield Reference sample vial Inner source 1.2.1 Software and data system MassLynx software controls the mass spectrometer and processes data. The MassLynx software enables these major operations: •... -
Page 18: Ionization Techniques
CI-. CI is a softer ionization technique than EI, producing less sample fragmentation and, generally, a stronger molecular ion. 1.4 Xevo TQ-GC operation The mass spectrometer operates as follows: April 27, 2020, 715005564 Ver. 01 (previously released as Rev. A) - Page 19 Samples eluting from the column are introduced into the instrument through a heated transfer line. The sample is ionized by electrons emitted from a filament. The ions are focused into a beam by the source, and then filtered according to their mass- to-charge ratios.
-
Page 20: Ionization Source
Column Heated transfer line (HTL) 1.5 Ionization source The ionization source comprises three assemblies: • Inner source assembly • Mounting flange assembly • Outer source assembly Figure 1–5: Ionization source Inner source assembly Mounting flange assembly Outer source assembly April 27, 2020, 715005564 Ver. 01 (previously released as Rev. A) Page 20... - Page 21 Figure 1–6: Inner source assembly Figure 1–7: Mounting flange assembly Figure 1–8: Outer source assembly The inner source, mounting flange, and outer source assemblies can be removed from the instrument, and the inner and outer source assemblies can be dismantled for cleaning and maintenance.
-
Page 22: The Inner Source Assembly
1.5.1 The inner source assembly The inner source assembly comprises a handle and a shaft, onto which you can attach interchangeable sources by using a bayonet connection. The entire inner source assembly attaches to the outer source assembly by way of the mounting flange assembly on the instrument. - Page 23 Figure 1–10: Inner source assembly components Filament housing assembly Ionization chamber Repeller assembly Inner source guidance rods 1.5.1.1 Inner source configurations There are two interchangeable source configurations: • For EI operation, use the EI ionization chamber and the filament housing assembly prefitted with two yttrium oxide-coated rhenium EI filaments.
- Page 24 Figure 1–11: EI filament housing assembly and ionization chamber EI filament housing assembly fitted with two yttrium oxide-coated rhenium EI filaments EI ionization chamber Figure 1–12: CI filament housing assembly and ionization chamber CI filament housing assembly fitted with one uncoated rhenium CI filament CI ionization chamber Figure 1–13: Inner source assembly fitted with the EI and CI ionization filament assemblies...
-
Page 25: The Mounting Flange
EI Filament 2 CI filament housing assembly fitted with one uncoated rhenium CI filament Before you remove the inner source, you must prepare the instrument so you can work safely on the inner source and the remaining source components (see Preparing the instrument for working on the source Removing and refitting the source... - Page 26 Removing the outer source assembly enables you to: • Remove the PCB holder to access the lenses • Clean the lenses that make up the focusing optics Figure 1–15: The outer source assembly PCB holder PCB holder securing screw 10-pin PCB feed-through connector socket Source block Magnet holder x 2 Magnet holder screw x 2...
-
Page 27: Gas Requirements
Hydrogen gas is explosive. To avoid serious injury or death, the hydrogen gas supply must be connected to the GC oven through Waters hydrogen control box, using the full 10-m length of the 1/8-inch stainless steel capillary tubing from the Xevo TQ-GC installation kit. -
Page 28: Sample Inlets
Table 1–2: Carrier gas (connects to the GC oven) Carrier gas Ionization mode Requirements Regulated pressure setting Helium EI or CI Dry and of high purity 8 bar (116 psi, 800 (99.997%) kPa) Hydrogen 8-10 bar (116-145 psi, 800-1,000 kPa) Nitrogen 8 bar (116 psi, 800 kPa) - Page 29 Figure 1–16: The GC interface Spring-loaded tip (inlet) Heated transfer line Ferrule interface Figure 1–17: The GC interface apertures CI gas aperture Column aperture Reference gas aperture The GC interface can maintain a temperature of 350 °C. A spring-loaded tip maintains contact between the interface and the outer source block for GC operation, while allowing thermal expansion of the inner, reentrant tube.
-
Page 30: Reference Sample Inlet
the column's specifications determined by the manufacturer and set the transfer line (and oven ramp) temperature to operate within the parameters specified. 1.7.2 Reference sample inlet Instrument tuning and calibration uses a reservoir of reference sample. Perfluorotributylamine (PFTBA) is delivered to the source through a solenoid on the front of the instrument. Figure 1–18: Reference sample inlet Reference sample inlet Reference sample ampule... -
Page 31: Sir Mode
1.8.2 SIR mode Use the selected ion recording (SIR) mode for quantitation when you cannot find a suitable fragment ion to perform a more specific multiple reaction monitoring (MRM) analysis (see mode for further details). In SIR and MRM modes, neither quadrupole is scanned, and no spectrum (intensity versus mass) is produced. -
Page 32: Precursor (Parent) Ion Spectrum
Figure 1–19: Product ion spectrum MS1–Static (at precursor mass) Collision cell–Fragment precursor ions and pass all masses MS2–Scanning 1.9.1.1 Typical applications You typically use product ion spectrum for the following applications: • Method development for MRM screening studies: • Identifying product ions for use in MRM transitions. •... -
Page 33: Mrm Mode
1.9.2.1 Typical application You typically use the precursor ion spectrum for structural elucidation—to complement or confirm product scan data—by scanning for all the precursors of a common product ion. 1.9.3 MRM mode MRM mode is the highly selective MS/MS equivalent of SIR. Because both MS1 and MS2 are static, greater dwell time on the ions of interest is possible, so compared with scanning-mode MS/MS, the sensitivity achieved is better. -
Page 34: Vacuum System
1.10 Vacuum system Mass spectrometers use a vacuum to ensure that the ions produced in the source avoid unwanted collisions before they reach the detector. An external roughing pump and an internal split-flow turbomolecular pump combine to create the instrument vacuum. The turbomolecular pump evacuates the analyzer and the source region. Vacuum leaks and electrical or vacuum pump failures cause vacuum loss, which triggers the protective interlocks to switch off the high voltage. - Page 35 Exhaust (not used) Backing pump connector Plinth earthing point Collision cell gas inlet (argon) Turbo vacuum backing line Chemical ionization gas inlet Power April 27, 2020, 715005564 Ver. 01 (previously released as Rev. A) Page 35...
-
Page 36: Preparing The Mass Spectrometer For Operation
For instructions on how to operate and maintain the GC oven, refer to the documentation that accompanied it. Note: The gases you can use on the Xevo TQ-GC and the GC oven have very specific safety requirements. To understand these requirements, see requirements. - Page 37 To start the mass spectrometer: Power-on the workstation and log in. Turn on the gases. Open the source enclosure door and press the power button. Figure 2–1: Switching on the mass spectrometer Power button Wait three minutes for the embedded PC to initialize, as indicated by an audible alert. Tip: The Power and Status LEDs change as follows: •...
-
Page 38: Verifying The Instrument's State Of Readiness
Wait 15-30 minutes for the instrument to fully pump down. Click Operate Result: When the mass spectrometer is in good operating condition, IntelliStart software displays Ready in the Instrument Console. 2.3 Verifying the instrument's state of readiness When the instrument is in good operating condition, the Power and Status LEDs show constant green. -
Page 39: Status Led
2.4.2 Status LED The Status LED, located on the right-hand side of the power LED, indicates the operating condition. See the mass spectrometer’s online Help topic “Monitoring the mass spectrometer LEDs” for details on the Status LED indications. 2.5 Tuning and calibration information You must tune and, if necessary, calibrate the instrument prior to use. -
Page 40: Leaving The Mass Spectrometer Ready For Operation
Figure 2–3: Mass spectrometer reset button Reset button aperture Push the reset button briefly until it clicks, and then remove the rod. Result: The reboot sequence will start immediately. Wait until the reboot sequence completes before you start the mass spectrometer software. Tip: An audible alert sounds when the reboot sequence completes. - Page 41 "Rebooting the mass spectrometer". Note: Where hydrogen is used, the Waters hydrogen control box automatically stops the hydrogen flowing if the instrument suddenly shuts down. See The Waters hydrogen control box To shut down the mass spectrometer in an emergency: Open the source enclosure door.
-
Page 42: Changing The Mode Of Operation
Changing the mode of operation This chapter describes how to prepare the mass spectrometer for the following modes of operation: • EI (electron impact ionization) — use the EI ionization chamber and the filament housing assembly prefitted with two yttrium oxide coated rhenium EI filaments. •... - Page 43 To change from EI to CI operation: Prepare the instrument so you can work safely on the source (see Preparing the instrument for working on the source). Remove the inner source assembly from the instrument (see Removing the inner source assembly from the instrument).
- Page 44 Figure 3–3: Removing the EI filament housing assembly Lift the EI ionization chamber away from the inner source assembly to reveal the repeller assembly. Figure 3–4: Removing the EI ionization chamber Align the CI ionization chamber over the repeller assembly. April 27, 2020, 715005564 Ver.
- Page 45 Figure 3–5: Aligning the CI ionization chamber 10. Lower the ionization chamber onto the repeller assembly. Note: The ionization chamber is asymmetrical and can only be fitted one way. 11. Align the guidance pegs on the CI filament housing assembly with the bayonet mount on the inner source assembly.
-
Page 46: Changing The Inner Source Assembly From Ci To Ei Operation
Note: Ensure that the CI filament housing assembly is fitted the correct way. Figure 3–8: Correctly fitted CI filament housing assembly CI filament housing assembly fitted with one uncoated rhenium CI filament 13. Fit the inner source assembly to the instrument (see Fitting the inner source assembly to instrument). - Page 47 Warning: To avoid burn injuries, take great care when you handle the inner source; this component can be hot. Wait until the inner source has sufficiently cooled before you handle it. Warning: To prevent the inner source from toppling over and causing injury, stand it upright on its handle on a flat bench.
- Page 48 Figure 3–10: Releasing the CI filament housing assembly Lift the CI filament housing assembly away from the inner source assembly. Figure 3–11: Removing the CI filament housing assembly Lift the CI ionization chamber away from the inner source assembly to reveal the repeller assembly.
- Page 49 Figure 3–13: Aligning the EI ionization chamber 10. Lower the ionization chamber onto the repeller assembly. Note: The ionization chamber is asymmetrical and can only be fitted one way. 11. Align the guidance pegs on the EI filament housing assembly with the bayonet mount on the inner source assembly.
- Page 50 Figure 3–15: Securing the EI filament housing assembly 13. Fit the inner source assembly to the instrument (see Fitting the inner source assembly to instrument). 14. Start the instrument (see Preparing to start the mass spectrometer). April 27, 2020, 715005564 Ver. 01 (previously released as Rev. A) Page 50...
-
Page 51: Maintenance Procedures
Maintenance procedures This section provides the maintenance guidelines and procedures necessary to maintain the mass spectrometer's performance. Keep to a maintenance schedule, and perform maintenance as required and described in this section. 4.1 Maintenance schedule The following table lists the periodic maintenance schedules that ensure optimum instrument performance. - Page 52 Table 4–1: Maintenance schedule: (continued) Procedure Frequency For information... Gas-ballasting the roughing Weekly. Gas-ballasting the pump. roughing pump. Replacing the rotary backing Annually. Replacing the roughing pump’s demister element. pump's oil demister element. Note: Applications that contaminate the roughing pump oil reduce this period, which is determined from experience.
-
Page 53: Spare Parts
GC oven. several thousand injections. 4.2 Spare parts To ensure that the Xevo TQ-GC operates as designed, use only Waters Quality Parts. Visit www.waters.com/wqp for information about Waters Quality Parts, including how to order them. 4.3 Safety and handling... -
Page 54: Preparing The Instrument For Working On The Source
Warning: To avoid injury, ensure that the following criteria are met when you perform maintenance inside the source enclosure: • The instrument is in Standby mode. • The filament is turned off. • The instrument has been vented. Warning: To avoid burn injuries, take great care while working with the source enclosure open. -
Page 55: Preparing The Gc Oven For Working On The Capillary Column
To use MassLynx software to prepare the instrument for working on its inner and outer sources: In the MassLynx main window, click MS Tune On the Tune window's Source tab, click Turn Off Filament. In the Tune window, click Operate to put the instrument in Standby mode. -
Page 56: Removing The Inner Source Assembly From The Instrument
The lenses and the spacers are housed in the outer source assembly, and to clean them you must first remove them from the assembly. To access the outer source assembly, you must first remove the inner source and mounting flange assemblies from the instrument. Note: The following procedures apply to both EI and CI source enclosures. - Page 57 Figure 4–1: Releasing the inner source Result: You may hear a small hiss when the source chamber vents. Carefully slide the inner source out from the instrument. Figure 4–2: Removing the inner source Note: If you cannot slide the inner source out of the instrument, you may need to wait for the chamber to fully vent to atmospheric pressure.
-
Page 58: Removing The Mounting Flange Assembly From The Instrument
Figure 4–3: Inner source standing upright See also Cleaning the inner source components Replacing the inner source filament. 4.6.2 Removing the mounting flange assembly from the instrument Required materials: • Chemical-resistant, powder-free gloves • Flat-blade screwdriver To remove the mounting flange assembly: Warning: To avoid personal contamination with biologically hazardous, toxic, or corrosive materials, and to avoid spreading contamination to uncontaminated surfaces, wear clean,... -
Page 59: Removing The Outer Source Assembly From The Instrument
Remove the inner source assembly (see Removing the inner source assembly from the instrument). Loosen the four thumb screws on the mounting flange assembly until they disengage from their threads. Figure 4–4: Loosening the mounting flange assembly's thumb screws Tip: If necessary, use the flat blade driver to loosen the thumb screws. - Page 60 Warning: To avoid burn injuries, take great care when you handle the outer source; this component can be hot. Wait until the outer source has sufficiently cooled before you handle it. Prepare the instrument so you can work safely on the source (see Preparing the instrument for working on the source).
- Page 61 Figure 4–6: Outer source assembly source block screws Source block screw x 3 With the screws loosened, remove the outer source assembly from the instrument. Note: The outer source is still attached to the PCB feed-through cable. Disconnect the 10-pin PCB feed-through connector from the PCB holder on the outer source.
-
Page 62: Fitting The Outer Source Assembly To The Instrument
4.6.4 Fitting the outer source assembly to the instrument Required materials: • Chemical-resistant, powder-free gloves • 2.5-mm hex wrench (supplied with the instrument) To fit the outer source assembly to the instrument: Warning: To avoid personal contamination with biologically hazardous, toxic, or corrosive materials, and to avoid spreading contamination to uncontaminated surfaces, wear clean, chemical-resistant, powder-free gloves when performing this procedure. -
Page 63: Fitting The Mounting Flange Assembly To The Instrument
Facing the instrument directly from the front, hold the outer source assembly with one hand, and then guide it through the aperture into the instrument. Fit the outer source assembly into the instrument. Tip: Ensure that the small guidance hole on the outer source fits over the locating peg on the instrument. -
Page 64: Fitting The Inner Source Assembly To The Instrument
Ensure that the outer source assembly is fitted (see Fitting the outer source assembly to instrument). Align the mounting flange with the aperture on the instrument. Hold the mounting flange against the instrument, and then tighten the four thumb screws. Figure 4–10: Tightening the mounting flange assembly's thumb screws Result: The inner source assembly is ready to be fitted to the instrument. -
Page 65: Cleaning The Inner Source Components
Figure 4–11: Fitting the inner source Slide the inner source into the instrument, and verify that it fits into the outer source. Hold the inner source assembly against the mounting flange, and then turn it approximately 45° in a clockwise direction until it locks. Figure 4–12: Locking the inner source Close the source enclosure door. -
Page 66: Disassembling The Inner Source For Cleaning
Note: To access the ionization chamber and the repeller, you must remove and disassemble the inner source assembly. 4.7.1 Disassembling the inner source for cleaning Required materials: • Chemical-resistant, powder-free gloves To disassemble the inner source assembly: Warning: To avoid personal contamination with biologically hazardous, toxic, or corrosive materials, and to avoid spreading contamination to uncontaminated surfaces, wear clean, chemical-resistant, powder-free gloves when performing this procedure. - Page 67 Figure 4–13: Standing the inner source upright Allow the source to cool. Holding the filament housing assembly, push it down and then rotate it approximately 30° in a counter-clockwise direction. Figure 4–14: Rotating the filament housing assembly Lift the filament housing assembly away from the inner source assembly. Figure 4–15: Removing the filament housing assembly from the inner source assembly April 27, 2020, 715005564 Ver.
- Page 68 Note: To disassemble the filament housing assembly and replace a filament, see Replacing the inner source filament. Lift the ionization chamber and the repeller assembly away from the inner source. Figure 4–16: Removing the ionization chamber and repeller from the inner source Remove the repeller and the repeller rod from the repeller holder.
-
Page 69: Cleaning The Repeller And The Ionization Chamber
4.7.2 Cleaning the repeller and the ionization chamber Required materials: • Chemical-resistant, powder-free gloves • Appropriately sized glass vessels in which to completely immerse components when cleaning. Use only glassware not previously cleaned with surfactants. • Cotton swabs • HPLC-grade (or better) methanol •... -
Page 70: Assembling The Inner Source After Cleaning
Sonicate the component for 15 minutes in each of the following solvents, in order, using a clean beaker for each solvent: • For EI operation: • Methanol – If the methanol is cloudy after the first wash, repeat using a clean beaker of methanol before proceeding •... - Page 71 To assemble the inner source: Warning: To avoid personal contamination with biologically hazardous, toxic, or corrosive materials, and to avoid spreading contamination to uncontaminated surfaces, wear clean, chemical-resistant, powder-free gloves when performing this procedure. Fit the repeller and the repeller rod into the repeller holder. Figure 4–18: Fitting the repeller components together Fit the repeller assembly into the inner source.
- Page 72 Figure 4–20: Fitting the ionization chamber Note: The ionization chamber is asymmetrical and can only be fitted in one way. Fit the filament housing assembly into the inner source: Align the pegs on the filament housing assembly with the bayonet mount on the inner source.
-
Page 73: Replacing The Inner Source Assembly Filament
Figure 4–23: Correctly fitted EI and CI filament housing assemblies EI filament housing assembly fitted with two yttrium oxide-coated rhenium EI filaments EI Filament 1 EI Filament 2 CI filament housing assembly fitted with one uncoated rhenium CI filament Fit the inner source into the instrument (see Fitting the inner source to the instrument). - Page 74 To replace the filament: Warning: To avoid personal contamination with biologically hazardous, toxic, or corrosive materials, and to avoid spreading contamination to uncontaminated surfaces, wear clean, chemical-resistant, powder-free gloves when performing this procedure. Warning: To avoid eye injury, use eye protection when performing this procedure. Warning: To prevent the inner source from toppling over and causing injury, stand it upright on its handle on a flat bench.
- Page 75 Figure 4–25: Releasing the filament housing assembly Lift the filament housing assembly away from the inner source assembly. Figure 4–26: Removing the filament housing assembly Result: The filament housing assembly is ready for dismantling. Figure 4–27: Filament housing assembly Filament securing screw Filament Filament housing Guidance peg...
- Page 76 Note: The filament housing assembly used for EI operation has two filaments, unlike the CI filament housing assembly, which has only one. Figure 4–28: EI and CI filaments EI filament assembly CI filament assembly Replace the damaged filament with the new filament. Important: Use the correct filament.
-
Page 77: Cleaning The Outer Source Assembly's Lenses
Figure 4–30: Securing the filament housing assembly Figure 4–31: Correctly fitted EI and CI filament housing assemblies EI filament housing assembly fitted with two yttrium oxide-coated rhenium EI filaments EI Filament 1 EI Filament 2 CI filament housing assembly fitted with one uncoated rhenium CI filament 11. -
Page 78: Removing The Pcb Holder Assembly From The Lens Holder
Note: To access the lenses you must first remove the PCB holder assembly and its cable from the lens holder, the component that houses the lenses and the PEEK spacers (see Removing the PCB holder assembly from the lens holder). 4.9.1 Removing the PCB holder assembly from the lens holder Required materials: •... - Page 79 Figure 4–33: The outer source assembly — view 2 Cartridge heater securing screw x 2 PCB holder cable grip x 2 Figure 4–34: The outer source assembly — view 3 Source voltage cable securing screw Cartridge heater cables Temperature feedback thermostat Source voltage cable Lenses and spacers securing screw x 2 April 27, 2020, 715005564 Ver.
- Page 80 To remove the PCB holder assembly from the lens holder: Warning: To avoid personal contamination with biologically hazardous, toxic, or corrosive materials, and to avoid spreading contamination to uncontaminated surfaces, wear clean, chemical-resistant, powder-free gloves when performing this procedure. Warning: To avoid burn injuries, take great care while working with the source enclosure open.
-
Page 81: Removing The Lenses And The Spacers From The Lens Holder
4.9.2 Removing the lenses and the spacers from the lens holder Required materials: • Chemical-resistant, powder-free gloves • 2.5-mm hex wrench To remove the lenses and spacers: Warning: To avoid personal contamination with biologically hazardous, toxic, or corrosive materials, and to avoid spreading contamination to uncontaminated surfaces, wear clean, chemical-resistant, powder-free gloves when performing this procedure. - Page 82 Figure 4–36: Removing the source block and ceramic spacer Source block Ceramic spacer Using the wrench, loosen and remove the two screws that secure the magnet holders to the lens holder, and then remove the magnet holders. Figure 4–37: Removing the magnet holders April 27, 2020, 715005564 Ver.
- Page 83 Attention: Do not remove the magnets from the magnet holders. The instrument's performance will deteriorate if the magnets are refitted incorrectly into the magnet holders. Using the wrench, loosen and remove the two screws that secure the lenses and the spacers.
-
Page 84: Cleaning The Lenses
Figure 4–39: Removing the lenses and PEEK spacers Stainless steel lens PEEK spacer Aluminum lens PEEK spacer Magnetic stainless steel lens Clean the lenses (see Cleaning the lenses). Note: You do not need to clean the ceramic or PEEK spacers. 4.9.3 Cleaning the lenses Required materials: •... - Page 85 • HPLC-grade (or better) methanol • HPLC-grade (or better) water • Aluminium oxide powder • HPLC-grade acetone • Dichloromethane (DCM) • 1:1 acetone/dichloromethane (DCM) • Sonicator • Oil-free nitrogen gas To clean the lenses: Warning: To avoid personal contamination with biologically hazardous, toxic, or corrosive materials, and to avoid spreading contamination to uncontaminated surfaces, wear clean, chemical-resistant, powder-free gloves when performing this procedure.
-
Page 86: Fitting The Lenses And The Spacers Into The Lens Holder
Tip: If a component is not reinstalled immediately, store it in a desiccator. Doing so prevents moisture adsorption and reduces equilibration time when the source is installed. Warning: To avoid spreading contamination with biologically hazardous, toxic, and corrosive materials, dispose of all waste materials according to local environmental regulations. - Page 87 Figure 4–40: Sliding the lenses and PEEK spacers into the lens holder Stainless steel lens PEEK spacer Aluminum lens PEEK spacer Magnetic stainless steel lens Locate the screws to secure the lenses and the spacers, and then tighten them using the wrench.
- Page 88 Figure 4–41: Lens securing screws Lens securing screw x2 Locate the magnet holders, and then tighten the screws that secure them using the wrench. Figure 4–42: Securing the magnet holders Important: If the magnets were removed from the magnet holders, refit them so that they attract each other (that is, either north-to-south or south-to-north).
- Page 89 Figure 4–43: Lowering the ceramic spacer and source block onto the lens holder Source block Ceramic spacer Using the wrench, tighten the three screws in the source block. Figure 4–44: Tightening the screws in the source block Source block screw x 3 Fit the PCB holder assembly to the lens holder (see Fitting the PCB holder assembly to the lens...
-
Page 90: Fitting The Pcb Holder Assembly To The Lens Holder
4.9.5 Fitting the PCB holder assembly to the lens holder Required materials: • Chemical-resistant, powder-free gloves • 2.5-mm hex wrench Figure 4–45: The PCB holder assembly Source voltage cable Cartridge heater Temperature feedback thermostat PCB holder 10-pin PCB feed-through connector socket April 27, 2020, 715005564 Ver. - Page 91 Figure 4–46: The outer source assembly reassembled — view 1 PCB holder PCB holder securing screw 10-pin PCB feed-through connector socket Source block Magnet holder x 2 Magnet holder screw x 2 Lens holder PCB cable assembly Figure 4–47: The outer source assembly reassembled — view 2 April 27, 2020, 715005564 Ver.
- Page 92 Cartridge heater securing screw x 2 PCB cable grip x 2 Figure 4–48: The outer source assembly reassembled — view 3 Source voltage cable securing screw Cartridge heater cables Temperature feedback thermostat Source voltage cable Lenses and spacers securing screw x 2 To fit the PCB holder assembly to the lens holder: Warning: To avoid personal contamination with biologically hazardous, toxic, or corrosive...
-
Page 93: Replacing The Reference Gas Ampule
Insert the cartridge heater into the source block, and then, using the wrench, tighten the two screws to secure it. Fit the source voltage cable to its connector, and then, using the wrench, tighten the screw to secure it. Holding the PCB holder assembly, wrap the cable around the lens holder; push the cable into the two cable grips. -
Page 94: Working On The Gc Column
To replace the reference gas ampule: Warning: To avoid personal contamination with biologically hazardous, toxic, and corrosive materials, wear chemical-resistant, powder-free gloves when performing this procedure. Warning: To avoid laceration injuries caused by the shattering of fragile, low-volume, glass vials, take care when installing them and never use force. Warning: To avoid eye injury, use eye protection when performing this procedure. - Page 95 • Changing the GC column • Removing contaminated sections from the ends of the column • Replacing a damaged ferrule to fix an air leak Figure 4–52: The GC oven GC inlet port Capillary column Nut and ferrule Heated transfer line Note: For instructions on how to operate and maintain the GC oven, refer to the documentation that accompanied it.
- Page 96 • Ferrule • Agilent GC user documentation • Eyeglass Warning: To avoid personal contamination with biologically hazardous, toxic, and corrosive materials, wear chemical-resistant, powder-free gloves when performing this procedure. Warning: To avoid spreading contamination with biologically hazardous, toxic, and corrosive materials, dispose of all waste materials according to local environmental regulations.
-
Page 97: Precautions And Recommendations For Working On The Column
Feed the nut and then the replacement ferrule onto the column, ensuring that the tapered end of the ferrule fits into the nut. Feed the column through the HTL until it exits the spring-loaded tip, enabling you to cut it. 10. -
Page 98: Cleaning The Instrument Case
• Replace the injection liner and the septum in the GC injector at regular intervals. Contamination of these components can lead to poor chromatography (tailing peaks) and loss of sensitivity due to adsorption of analyte in the injector. • After you install a new column, ensure that the correct conditioning procedure is completed. •... - Page 99 • The oil in the pump appears darker than new oil, is odorous, or is visibly contaminated. • The oil has been in use for more than one year. Required materials: • Chemical-resistant, powder-free gloves • Tray on which to place the pump •...
- Page 100 Figure 4–53: Backing-pump rear panel Oil level sight glass Oil drain plug Oil inlet Tilt the pump slightly and catch the oil in a suitable container. Dispose of the oil according to local environmental regulations. Refit the oil drain plug into the pump’s rear panel. Remove the oil inlet plug on the top of the pump and pour in 50 mL of fresh oil into the inlet port.
-
Page 101: Gas-Ballasting The Rotary Backing Pump
Note: To prevent pump-start failures, do not power-on the Xevo TQ-GC when the backing pump is in ballast mode. For more information about gas-ballasting the backing pump, see the VACUUBRAND Technology for Vacuum Systems Instructions for use (VACUUBRAND rotary vane pump;... -
Page 102: Best Practices For Efficient Operation
Best practices for efficient operation To ensure that the Xevo TQ-GC and GC oven operate efficiently, observe the following problems and the actions you need to take in order to prevent them: • GC injector and inlet • Air leaks •... -
Page 103: Contaminated Sample Ampule And Reference Gas Line
• Air leaks are often associated with the GC inlet. Ensure that any maintenance performed on the GC is completed before carrying out any maintenance on the instrument. • Ensure that the instrument and GC oven are regularly maintained. • Use Mass Spec Check regularly to ensure the air and water ratios are acceptable. •... -
Page 104: Air In The Ci Gas Inlet Line
• Increased chemical background noise • Poor instrument performance To avoid dirty or contaminated source components, observe the following best practices: • Always wear appropriate gloves when handling the inner and outer source components. • Depending on how the instrument is used, the inner source's ionization chamber and repeller should be cleaned approximately every two weeks. -
Page 105: Troubleshooting The Xevo Tq-Gc
Troubleshooting the Xevo TQ-GC This chapter describes the recommended troubleshooting procedures. 6.1 System troubleshooting A few basic instructions for performing system troubleshooting: • Examine the system, and first consider the most likely causes of the problem. Unresponsive instruments can indicate that power or signal cables are disconnected or improperly connected. -
Page 106: Unstable Or Low-Intensity Ion Beam
Table 6–1: No ion beam Possible causes Corrective action Improperly connected cables. If readbacks for emission current and filament current are 0, ensure that all of the necessary cables are correctly attached to the inner source. Communication failure. Reinitialize the instrument. In the Tune window, click Acquire >... -
Page 107: Poor Sensitivity With Ei Source
Table 6–2: Unstable or low-intensity ion beam (continued) Possible causes Corrective actions Unsuitable lens settings. Verify the lens settings and readbacks. Ensure that all settings affect the beam. Old and inefficient filament. High filament current for a given emission. Replace the filament. Dirty ion repeller or ionization chamber. -
Page 108: Poor Analyzer Vacuum
Check the pump speed on the diagnostics page. If the pump speed is considerably less than 100%, and does not look likely to reach 100%, contact your Waters service representative. April 27, 2020, 715005564 Ver. 01 (previously released as Rev. A) -
Page 109: Poor Source Vacuum
6.2.6 Poor source vacuum Table 6–6: Poor source vacuum Possible causes Corrective actions The inner source and the mounting flange Confirm that the inner source and the mounting assemblies are not fitted correctly. flange assemblies are fitted correctly. The reference gas vial is leaking. Turn off the reference gas and verify that the gas vial is not leaking. -
Page 110: High Noise Levels In Mrm Analyses
(see Cleaning the outer source assembly's lenses spacers). If the peak resolution does not improve, contact Waters. Ion energy set too high, or repeller not Reduce the ion energy, or adjust the source or optimized, giving broad peaks with jagged repeller voltage. -
Page 111: A Safety Advisories
Heed all warnings when you install, repair, or operate any Waters instrument or device. Waters accepts no liability in cases of injury or property damage resulting from the failure of individuals to comply with any safety precaution when installing, repairing, or operating any of its instruments or devices. -
Page 112: Specific Warnings
(Risk of high-pressure gas release.) A.1.1 Specific warnings A.1.1.1 Burst warning This warning applies to Waters instruments and devices fitted with nonmetallic tubing. Warning: To avoid injury from bursting, nonmetallic tubing, heed these precautions when working in the vicinity of such tubing when it is pressurized: •... - Page 113 A.1.1.3 Biohazard warning The following warning applies to Waters instruments and devices that can process biologically hazardous materials. Biologically hazardous materials are substances that contain biological agents capable of producing harmful effects in humans.
-
Page 114: Notices
Use eye protection when performing this procedure. Requirement: Wear clean, chemical-resistant, powder-free gloves when performing this procedure. A.5 Warnings that apply to all Waters instruments and devices When operating this device, follow standard quality-control procedures and the equipment guidelines in this section. - Page 115 Avertissement : Toute modification sur cette unité n’ayant pas été expressément approuvée par l’autorité responsable de la conformité à la réglementation peut annuler le droit de l’utilisateur à exploiter l’équipement. Warnung: Jedwede Änderungen oder Modifikationen an dem Gerät ohne die ausdrückliche Genehmigung der für die ordnungsgemäße Funktionstüchtigkeit verantwortlichen Personen kann zum Entzug der Bedienungsbefugnis des Systems führen.
- Page 116 Avertissement : Manipulez les tubes en polymère sous pression avec precaution: • Portez systématiquement des lunettes de protection lorsque vous vous trouvez à proximité de tubes en polymère pressurisés. • Eteignez toute flamme se trouvant à proximité de l’instrument. • Evitez d'utiliser des tubes sévèrement déformés ou endommagés. •...
- Page 117 Advertencia: se recomienda precaución cuando se trabaje con tubos de polímero sometidos a presión: • El usuario deberá protegerse siempre los ojos cuando trabaje cerca de tubos de polímero sometidos a presión. • Apagar cualquier llama que pudiera haber encendida en las proximidades. •...
- Page 118 • 非金属チューブには、テトラヒドロフラン(THF)や高濃度の硝酸または硫酸などを流さないでくださ い。 • 塩化メチレンやジメチルスルホキシドは、非金属チューブの膨張を引き起こす場合があり、その場 合、チューブは極めて低い圧力で破裂します。 This warning applies to Waters instruments fitted with nonmetallic tubing or operated with flammable solvents. Warning: The user shall be made aware that if the equipment is used in a manner not specified by the manufacturer, the protection provided by the equipment may be impaired.
-
Page 119: Warnings That Address The Replacement Of Fuses
A.6 Warnings that address the replacement of fuses The following warnings pertain to instruments and devices equipped with user-replaceable fuses. Information describing fuse types and ratings sometimes, but not always, appears on the instrument or device. Finding fuse types and ratings when that information appears on the instrument or device: Warning: To protect against fire, replace fuses with those of the type and rating printed... -
Page 120: Electrical Symbols
Avertissement : pour éviter tout risque d'incendie, remplacez toujours les fusibles par d'autres du type et de la puissance indiqués dans la rubrique "Remplacement des fusibles" du chapitre traitant des procédures de maintenance. Warnung: Zum Schutz gegen Feuer die Sicherungen nur mit Sicherungen ersetzen, deren Typ und Nennwert im Abschnitt "Sicherungen ersetzen"... -
Page 121: Handling Symbols
Symbol Description Frame or chassis terminal connection Fuse Functional ground Input Output Indicates that the device or assembly is susceptible to damage from electrostatic discharge (ESD) A.8 Handling symbols The following handling symbols and their associated statements can appear on labels affixed to the packaging in which instruments, devices, and component parts are shipped. - Page 122 Symbol Description Upper limit of temperature Lower limit of temperature Temperature limitation April 27, 2020, 715005564 Ver. 01 (previously released as Rev. A) Page 122...
-
Page 123: B External Connections
Warning: To avoid injury, do not attempt to move the mass spectrometer or the GC oven. Contact Waters Technical Service for instructions. B.1 External wiring and vacuum connections The figure below identifies the rear-panel connections. The connectors and controls not identified are for use by Waters engineers only. -
Page 124: Connecting The Rotary Backing Pump
Serial port Shielded Ethernet Exhaust (not used) Backing pump connector Plinth earthing point Collision cell gas (argon) inlet Turbo vacuum backing line Chemical ionization gas inlet Power B.2 Connecting the rotary backing pump Figure B–2: Connecting the backing pump April 27, 2020, 715005564 Ver. 01 (previously released as Rev. A) Page 124... - Page 125 Vacuum hose assembly Exhaust port Power cable Required materials: • Chemical-resistant, powder-free gloves • 7-mm nut driver • 8-mm hex wrench • Utility knife • NW16 clamp (included in the installation kit) • NW16 O-ring (included in the installation kit) •...
- Page 126 Figure B–3: Backing pump clearance Left-side minimum clearance is 15.24 cm (6 inches) Back-side minimum clearance is 15.24 cm (6 inches) Right-side minimum clearance is 15.24 cm (6 inches) Front-side minimum clearance is 35.56 cm (14 inches) To connect the backing pump: Place a suitable PTFE drip tray on the floor within five feet of the instrument.
-
Page 127: Making The Electrical Connections To The Rotary Backing Pump
Use a hose clamp to connect a length of 19-mm clear PVC exhaust tubing to the pump exhaust port. Route the open end of the exhaust tubing to a suitable exhaust vent. Note: To ensure correct operation of the pump, do not operate it with the oil level at less than 30% of the MAX level. -
Page 128: About The Waters Hydrogen Control Box
When using hydrogen as the carrier gas, the hydrogen gas supply must be connected to the GC oven through the Waters hydrogen control box, which qualified personnel must install. The control box automatically shuts off the flow of hydrogen when any of the following conditions occur in the instrument: •... - Page 129 Warning: To avoid fire or explosion caused by incorrectly fitted gas connections, do not attempt to change or perform any maintenance on the gas lines connected to the instrument or the GC oven. Only qualified personnel should carry out this work, ensuring at all times that the organization's operating procedures are followed.
-
Page 130: Connecting To The Workstation
Autosampler tray and turret Waters Xevo TQ-GC Hydrogen control box Figure B–6: The hydrogen control box Control port Power (24 V, 1 A maximum) Hydrogen inlet (1.0 MPa maximum) Hydrogen outlet B.4 Connecting to the workstation Warning: To avoid injury from electrical shock or fire, and damage to the equipment, follow these guidelines: •... -
Page 131: Connecting The Workstation To The Power Source
Requirement: Use shielded network cables with the instrument to reduce susceptibility to radio and electrical frequency interference. To connect the workstation: Connect the monitor to the workstation PC. Connect one end of the shielded, crossover, network cable to the port labeled instrument LAN on the workstation rear panel. - Page 132 Figure B–7: I/O signal connector I Analog (Out) Analog (Out) Ground Not used Not used Stop flow (Out) Stop flow (Out) Ground Switch 2 (Out) Switch 2 (Out) Figure B–8: I/O signal connector II April 27, 2020, 715005564 Ver. 01 (previously released as Rev. A) Page 132...
-
Page 133: Making I/O Signal Connections
Inject start (In) Inject start (In) Ground Event (In) Event (In) Switch 3 (Out) Switch 3 (Out) Ground Switch 4 (Out) Switch 4 (Out) B.5.1 Making I/O signal connections Table B–1: Instrument analog-out/event-in connections Signal connections Description Analog (Out) Used for analog chart output functionality. The output voltage range is 0 to 1 V. - Page 134 Requirement: To meet the regulatory requirements of immunity from external electrical disturbances, install connection covers over the signal connectors. To make signal connections: Reference the signal connection location from the silk-screened label for inject start or any other input/output connection you plan to use from Connector I or II on the rear panel of each instrument.
- Page 135 Clamp Shield Connection cover Insert the connector with the signal cable into the connection cover, and position the clamp over the cable leads. Tighten the clamp into place with the second self-tapping screw. Figure B–11: Securing the cable leads Clamp Cable leads Place the second connection cover over the first cover, and snap it into place.
-
Page 136: Connecting To The Power Supply
HAR-type (or better) in Europe. The main power cord must be replaced with one of adequate rating. For information regarding what cord to use in other countries, contact your local Waters distributor. Connect the female end of the power cord to the receptacle on the rear panel of the instrument. -
Page 137: C Stopping The Gc Instrument Manually
Stopping the GC instrument manually In some circumstances, you may be unable to stop the GC instrument using software. If this occurs, stop the instrument manually. Tip: If you attempt to stop the GC instrument via software, you may receive a “Server Busy” error message in MassLynx.
Need help?
Do you have a question about the Xevo TQ-GC and is the answer not in the manual?
Questions and answers