Proxim ORiNOCO AP-8000 User Manual
Hide thumbs
Also See for ORiNOCO AP-8000:
- User manual (169 pages) ,
- Installation and management manual (242 pages) ,
- Software management manual (187 pages)
Table of Contents
Advertisement
Quick Links
Advertisement
Table of Contents
Troubleshooting

Subscribe to Our Youtube Channel
Related Manuals for Proxim ORiNOCO AP-8000


Summary of Contents for Proxim ORiNOCO AP-8000
- Page 1 ORiNOCO AP-8000 User Guide...
- Page 2 ("GPL") or GNU Lesser General Public License ("LGPL"). Please see the GPL and LGPL Web sites to view the terms of each license. To access to the GPL Code and LGPL Code used in Proxim AP-8000, extract the source version and explore opensrc directory. The GPL Code and LGPL Code used in AP-8000 are distributed WITHOUT ANY WARRANTY and are subject to the copyrights of one or more authors.
-
Page 3: Table Of Contents
AP-8000 User Guide Contents Introduction ..............8 Products Covered in this User Guide . - Page 4 AP-8000 User Guide Command Line Interface ............. . 28 Simple Network Management Protocol (SNMP) .
- Page 5 AP-8000 User Guide Configuring the Device ..............61 Wireless .
- Page 6 AP-8000 User Guide List Commands ................112 Command Line Completion .
- Page 7 Proxim eService Web site Support ........
-
Page 8: Introduction
AP-8000 User Guide Introduction This chapter contains information on the following: • Products Covered in this User Guide • About AP-8000 Dual Radio Wireless Access Point • Core Features of AP-8000 – Multi-Band MIMO Radios – 802.11n MIMO – Security –... -
Page 9: Products Covered In This User Guide
About AP-8000 Dual Radio Wireless Access Point Proxim’s AP-8000 is 802.11n dual radio wireless Access Point that provides connectivity between wired network and wireless systems and other devices. The AP-8000 wireless Access Point is a Wi-Fi a/b/g/n certified that supports dual radio modes in 2.4 GHz and 5 GHz frequency band. -
Page 10: Quality Of Service (Qos)
Introduction AP-8000 User Guide Quality of Service (QoS) AP-8000 supports Wi-Fi Multimedia (WMM), which is a solution for QoS functionality based on the IEEE 802.11e specification. WMM defines enhancements to the MAC for wireless LAN applications with Quality of Service requirements, which includes transport of voice and video traffic over IEEE 802.11 wireless LANs. -
Page 11: Installation And Initialization
AP-8000 User Guide Installation and Initialization This chapter contains information on the following: • Hardware Overview – LED Indicators – Antennas – Power Socket – Reset – Reload – Ethernet Port – Serial Port • Prerequisites • System Requirements • Product Package •... -
Page 12: Hardware Overview
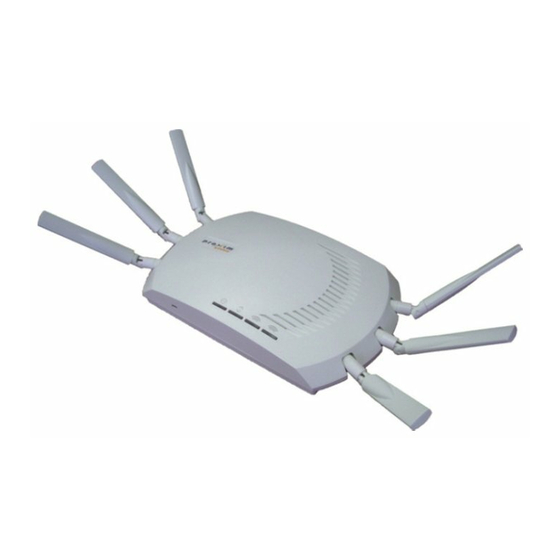
Installation and Initialization AP-8000 User Guide Hardware Overview AP-8000 contains dual 802.11a/b/g/n radios that can operate independently on 2.4 GHz and 5 GHz. It contains 6 antennas, 3 for each radio. The following figure gives you a labelled diagrammatic representation of AP-8000. Figure 2-1 Schematic View of AP-8000 Given below is a detailed description about the various parts of the AP-8000 device. -
Page 13: Power Socket
Installation and Initialization AP-8000 User Guide easily installed. Proxim also provides an optional accessory- Range Extender Antenna (REA), which has standard connectors and can be easily installed. Power Socket This socket connects to the 5 VDC power adapter. Reset Reset button enables a user to powercycle the device. - Page 14 Installation and Initialization AP-8000 User Guide Gateway IP Address and Subnet Determine the gateway IP address and subnet mask of the network environment Mask where the Access Point is deployed.
-
Page 15: System Requirements
Installation and Initialization AP-8000 User Guide System Requirements To use AP-8000, you must have the following minimum system requirements. • Ethernet switch, cross-over or straight Ethernet cable. • IEEE 802.11- compliant devices: An 802.11a/b/g or 802.11n client devices • A computer that is connected to the same IP network as the AP and has one of the following installed: –... -
Page 16: Optional Accessories
Attach the Cables NOTE: Proxim recommends to use CAT6 cable for the length of 100 m or CAT5e cable for lower length. Though AP-8000 can work with CAT5 cable, there is a possibility that you may experience a drop in Ethernet speed from 1000BaseT to 100BaseT or Ethernet interface may show errors. -
Page 17: Using A Console Port
2. Position the antennas as close to the horizontal surface (ceiling or wall), so as to get the maximum signal coverage of the omni-directional antenna. NOTE: Proxim recommends to aim the antenna horizontal, as the wireless coverage angle is wider with the antenna pointing up or down. -
Page 18: Power On The Unit
Installation and Initialization AP-8000 User Guide NOTES: • Note that AP-8000 has been certified under UL Standard 2043 and can be installed in the plenum. In an office building, plenum is the space between the structural ceiling and the tile ceiling that is provided to help air circulate. Many companies also use the plenum to house communication equipment and cables. -
Page 19: Initialization
Installation and Initialization AP-8000 User Guide NOTE: When in operational status, the wireless LEDs will be steady Green. The wireless LEDs would blink Green when the wireless traffic is being transmitted or received. Initialization This section details on how to initialize the AP device using ScanTool. - Page 20 Installation and Initialization AP-8000 User Guide • If the AP device has been assigned an IP address by a DHCP server on the network: a. Select the AP device you want to configure and click Web Config in the Scan List screen. b.
- Page 21 Installation and Initialization AP-8000 User Guide Figure 2-5 Change Screen - Reboot h. You will have to reboot the device to apply changes. When the reboot message appears, click OK to reboot the device and return to the Scan List screen. After allowing sufficient time for the device to reboot, click Rescan in the ScanList screen to verify that your changes have been applied.
-
Page 22: Logging In To The Web Interface
Installation and Initialization AP-8000 User Guide Logging in to the Web Interface Once the AP has a valid IP Address and an Ethernet connection, you can use your Web Browser to configure and monitor the AP. To configure and monitor the AP device using Web Browser, follow the following steps. 1. - Page 23 Installation and Initialization AP-8000 User Guide Figure 2-8 Home Page...
-
Page 24: Upgrade The Software
AP-8000 User Guide Upgrade the Software Proxim periodically releases updated software for the AP on its Web site. Check the Web site for the latest updates after you have installed and initialized the unit. 1. In your web browser, go to http://support.proxim.com. - Page 25 Installation and Initialization AP-8000 User Guide If you do not have a TFTP server installed on your system, install the TFTP server from the installation CD. You can either install the TFTP server from the CD Wizard or run OEM-TFTP-Server.exe found in the CD’s Xtras/SolarWinds sub-directory.
- Page 26 Installation and Initialization AP-8000 User Guide Figure 2-12 Download Page 4. File Download window appears. Click Save button to save the file. Figure 2-13 File Download Page 5. Select an appropriate filename and location, and click Save. Retrieve From Device Using TFTP To upload files from the AP to the TFTP server, navigate to File Management >...
-
Page 27: Install Software Using Tftp Server
Installation and Initialization AP-8000 User Guide Figure 2-14 Retrieve From Device Using TFTP 1. Server IP Address: Enter the TFTP server IP Address. – Double-click the TFTP server icon on your desktop and locate the IP address assigned to the TFTP server. 2. -
Page 28: Management And Monitoring Capabilities
AP-8000 User Guide Management and Monitoring Capabilities There are several management and monitoring interfaces available to the network administrator to configure and manage an AP on the network: • HTTP/HTTPS Interface • Command Line Interface • Simple Network Management Protocol (SNMP) •... -
Page 29: Simple Network Management Protocol (Snmp)
Proxim Enterprise MIB Proxim provides these MIB files on its support site http://support.proxim.com. You need to log on to the support site and use Answer ID: 2813 to locate the MIB. You need to compile one or more of the above MIBs into your SNMP program’s database before you can manage an Access Point using SNMP. -
Page 30: Proximvision Es
ProximVision ES offers you a single intelligent console from which you can manage, monitor, analyze and even configure your AP-8000 device. For more information, see ProximVision ES user guide available at the Proxim’s support site (http://support.proxim.com) with Answer ID: 2845. -
Page 31: Basic Configuration For An Enterprise
AP-8000 User Guide Basic Configuration for an Enterprise This chapter describes the initial configuration of the Access Point using the Web Browser. By default, the pre-configured Access Point can be accessed, but as an enterprise user, you can modify the default settings of the Access Point to provide a secure access for your enterprise. -
Page 32: Finding And Assigning The Access Point's Ip Address
Basic Configuration for an Enterprise AP-8000 User Guide Finding and Assigning the Access Point’s IP Address 1. If your Access Point receives an IP address from the DHCP server on the network, then use the ScanTool to find its IP address. -
Page 33: Configuring The Operational Mode
Click Commit and then Reboot for the changes to take effect. Password Management For security reasons, Proxim recommends you to change the default passwords of the device thus restricting the access to your network to authorized personnel. To change the password, 1. - Page 34 Basic Configuration for an Enterprise AP-8000 User Guide If you want to create a new entry, click Add in the Wireless Security Configuration page. The Wireless Security Add Row page appears. 1. Enter the Profile Name. 2. Authentication Mode: • Authentication Mode: None, then the AP allows access to stations without authentication.
-
Page 35: Access Point Features
AP-8000 User Guide Access Point Features This chapter provides information on the following: • Configuring the Device • Managing the Device • Monitoring the Device... -
Page 36: Configuring The Device
Access Point Features AP-8000 User Guide Configuring the Device The various features available under Device Configuration are as follows: • Wireless 11n Properties • Ethernet • Security • RADIUS • • IP Configuration • VLAN • Filtering Wireless 11n Properties The wireless feature of the Access Point enables you to use the new technology called Multiple Input Multiple Output (MIMO), that uses several antennas to transfer multiple data streams thus enabling more data to be transferred in the same period of time. - Page 37 Access Point Features AP-8000 User Guide • VLAN Priority: This parameter is used to configure the VLAN priority for Wireless VAP. By default the value is set to • QoS Profile Name: This parameter is used to configure the profile name for the Wireless VAP QoS. •...
-
Page 38: Ethernet
Access Point Features AP-8000 User Guide • Guard Interval: Guard Interval ensures that distinct transmissions do not interfere with one another. This feature provides immunity to users. Each user is allotted a time slot to transmit their data and this time slot ends with the guard interval. - Page 39 Access Point Features AP-8000 User Guide Popular EAP types include: • EAP-Message Digest 5 (MD5): Username/Password-based authentication; does not support automatic key distribution • EAP-Transport Layer Security (TLS): Certificate-based authentication (a certificate is required on the server and each client); supports automatic key distribution •...
- Page 40 WEP/WPA-PSK security profile. If you enable RADIUS-MAC, then ensure that RADIUS Authentication server is configured. • WPA2/WPA CAUTION: Proxim recommends not to enable both Local MAC Authentication and RADIUS-MAC Authentication. You also need to ensure that RADIUS MAC Authentication and Access Control are not enabled together.
-
Page 41: Radius
Access Point Features AP-8000 User Guide Configuring Security Profiles Security policies can be configured and applied on the AP as a whole, or on a per SSID basis. You can configure a security profile for each VLAN. The user defines a security policy by specifying one or more values for the following parameters: •... - Page 42 Access Point Features AP-8000 User Guide Session Length Accounting sessions continue when a client reauthenticates to the same AP. Sessions are terminated when: 1. A client disassociates 2. Session-Time-out attributes are configured in the Radius server. If the client roams from one AP to another, one session is terminated and a new session begins. NOTE: This feature requires RADIUS authentication using 802.1x.
-
Page 43: Qos
Access Point Features AP-8000 User Guide • Acct-Input-Packets: This attribute indicates how many packets have been received from the port over the course of this service being provided to a Framed User, and can only be present in Accounting-Request records where the Acct-Status-Type is set to Stop. - Page 44 NOTE: Default recommended values for EDCA parameters have been defined; Proxim recommends not to modify EDCA parameters unless strictly necessary. QoS EDCA Features •...
-
Page 45: Ip Configuration
Access Point Features AP-8000 User Guide • Policy Name: This parameter displays the QoS Policy profile name. • EDCA Profile Name: This parameter displays QoS EDCA profile name. • QoS NoACK Status: This parameter is used to configure the status of the QoS profile ACK status. QoS Policy Features •... - Page 46 Access Point Features AP-8000 User Guide – Clients roam without compromising security VLAN tagged data is collected and distributed through an AP's wireless interface(s) based on Network Name (SSID). An Ethernet port on the Access Point connects a wireless cell or network to a wired backbone. The Access Points communicate across a VLAN-capable switch that analyzes VLAN-tagged packet headers and directs traffic to the appropriate ports.
-
Page 47: Filtering
Access Point Features AP-8000 User Guide Filtering The Access Point’s Packet Filtering features help to control the amount of traffic exchanged between the wired and wireless networks. Intra BSS Filtering The wireless clients that associate with a certain AP form the Basic Service Set (BSS) of a network infrastructure. By default, wireless subscribers in the same BSS can communicate with each other. - Page 48 Access Point Features AP-8000 User Guide For example, if the MAC Address is 00:20:A6:12:54:C3 and the Mask is FF:FF:FF:00:00:00, the AP will examine the source and destination addresses of each packet looking for any MAC address starting with 00:20:A6. If the Mask is FF:FF:FF:FF:FF:FF, the AP will only look for the specific MAC address (in this case, 00:20:A6:12:54:C3).
- Page 49 Access Point Features AP-8000 User Guide Protocol Name Port Number Port Type Filter Entry Status Interface (Enable/Disable) NETBIOS Name Service Ethernet Enable Filtering Features • Global Filter Flag: This parameter is used to enable or disable the filtering tag. If you disable this filtering tag, then the no filtering feature will be applicable.
-
Page 50: Managing The Device
Access Point Features AP-8000 User Guide Managing the Device The various features available under Device Management are as follows: • System Information • Upgrading the Firmware • Password Management • Management Access Control • Reset to Factory System Information System Information feature of the Access Point provides the user with the system specific information such as system name and contact information. -
Page 51: Upgrading The Firmware
Access Point Features AP-8000 User Guide Upgrading the Firmware Using File Management, you can manage your files through HTTP and TFTP. The HTTP Interface (Web browser Interface) provides easy access to configuration settings and network statistics from any computer on the network. You can access the HTTP Interface over your LAN (switch, hub etc) over the Internet, or with a “cross-over”... -
Page 52: Password Management
Access Point Features AP-8000 User Guide Retrieve From Device Using TFTP - Features • Server IP Address: This parameter represents the IP address for the TFTP server. • File Name: This parameter represents the filename to upload or download to the TFTP server. •... -
Page 53: Monitoring The Device
Access Point Features AP-8000 User Guide Monitoring the Device The various features available under Device Monitoring are as follows: • System Log • Event Log • SNTP • Interface Statistics • Bridge • Network Layer • RADIUS System Log The Syslog messaging system enables the AP to transmit event messages to a central server for monitoring and troubleshooting. -
Page 54: Interface Statistics
Access Point Features AP-8000 User Guide • Time Zone: This parameter is used to specify the appropriate time zone. • Day Light Saving Time: This parameter is used to indicate the number of hours to adjust for Daylight Saving Time. Interface Statistics Statistics feature provides information about the various interfaces that are available for the Access Points. -
Page 55: Bridge
Access Point Features AP-8000 User Guide • MTU: Maximum Transfer Unit is the largest size of IP datagram which may be transferred using a specific data link connection. The size of MTU may vary greatly between different links. • Physical Address: The wireless interface address at the protocol layer in the protocol stack. •... -
Page 56: Network Layer
Access Point Features AP-8000 User Guide Network Layer The Network Layer feature provides information on IP ARP and ICMP Statistics. IP ARP Features • Physical Address: Represents the Ethernet address associated with a desired IP address. • Net Address: Represents the IP address corresponding to an Ethernet address. •... -
Page 57: Radius
Access Point Features AP-8000 User Guide RADIUS Authentication Statistics The feature description are: • Round Trip Time: This parameter represents the round-trip time for messages exchanged between radius client and authentication server since client startup. • Stats Requests: This parameter represents the number of RADIUS Access Requests messages transmitted from the client to the server since client startup. -
Page 58: Using Web Interface To Manage The Access Point
AP-8000 User Guide Using Web Interface to Manage the Access Point This chapter contains information on how to configure, manage and monitor the Access Points by using Web Interface. • Web Interface Overview • Configuring the Device • Managing the Device •... -
Page 59: Web Interface Overview
Using Web Interface to Manage the Access Point AP-8000 User Guide Web Interface Overview To configure, manage and monitor the AP device using Web Interface, you must first log on to a Web Browser. See Logging in to the Web Interface. - Page 60 Using Web Interface to Manage the Access Point AP-8000 User Guide Click Ok, to commit the changes. The Commit Status is displayed as shown in the following figure. Figure 6-3 Commit Status 2. Reboot: Reboot operation is required for any change in the key parameters to take effect. For example, a change in the IP Address needs reboot for the changes to take effect.
-
Page 61: Configuring The Device
Using Web Interface to Manage the Access Point AP-8000 User Guide Configuring the Device Using the Web Interface, you can configure the following AP device features. • Wireless • Ethernet • Security • • IP Configuration • VLAN • Filtering To access Configuration features, 1. -
Page 62: Wireless
Using Web Interface to Manage the Access Point AP-8000 User Guide Wireless The various Wireless Interface features supported by AP are described in the following sections: • • Properties • 11n Properties Interface 1 You can view and configure the following parameters for Interface 1. NOTE: By default both the Interfaces (Interface1 and Interface2) are active. - Page 63 Using Web Interface to Manage the Access Point AP-8000 User Guide Figure 6-8 Wireless VAP Parameters - Edit 4. Configure the following parameters: • Type: Select the VAP Type. By default, the VAP Type is AP. NOTE: You can configure up to 4 VAP. •...
- Page 64 Using Web Interface to Manage the Access Point AP-8000 User Guide Figure 6-9 Auto Rate - Disabled • Retries: Enter a value for Retries. The value ranges from 1 to 10. • Legacy Rate: Select Legacy Rate from the drop-down box. •...
- Page 65 Using Web Interface to Manage the Access Point AP-8000 User Guide NOTE: If you have enabled Local MAC Authentication, then do not enable Radius MAC Authentication. • Radius Accounting: Select the Radius Accounting status. • Entry Status: Enable the Entry Status for the radio. If you disable the radio, then you cannot configure the Wireless VAP for the disabled radio.
- Page 66 Current Operating Channel: If Auto Channel Selection option is enabled, then this parameter will show the current operating channel of the device and also lists out the other channels that are available. NOTE: Proxim recommends professional installation and configuration of channels. •...
-
Page 67: Ethernet
Using Web Interface to Manage the Access Point AP-8000 User Guide Figure 6-11 11n Properties Page 2. Configure the following parameters: • 11n AMPDU Status: Set this to “Enable”. • AMPDU Max Num Frames: Enter a value. It represents the maximum number of AMPDU frames that can be transmitted. -
Page 68: Security
Using Web Interface to Manage the Access Point AP-8000 User Guide Figure 6-12 Ethernet Page 2. Configure the following parameters. • MAC Address: Represents the MAC address of the device. • Speed: Represents the speed of the Ethernet interface. • Transmit Mode: Represents the Transmit Mode as either Half Duplex or Full Duplex. - Page 69 Using Web Interface to Manage the Access Point AP-8000 User Guide Figure 6-14 Wireless Security Edit Row Page 3. Modify the required parameters and click ok If you want to create a new entry, click Add in the Wireless Security Configuration page. The Wireless Security Add Row page appears.
- Page 70 Using Web Interface to Manage the Access Point AP-8000 User Guide • For 64-bit encryption, an encryption key is 10 hexadecimal characters (0-9 and A-F) or 5 ASCII characters. ASCII Character Chart). • For 128-bit encryption, an encryption key is 26 hexadecimal characters or 13 ASCII characters. •...
- Page 71 Using Web Interface to Manage the Access Point AP-8000 User Guide — Rekeying Interval: Enter a value for the rekeying interval. — Entry Status: Enable the Entry Status by selecting “Enable” from the drop-down box. NOTE: If an 802.1x client has made authenticated attempts to switch to WEP, or if a WEP client has made authenticated attempts to switch to 802.1x, then the AP will not allow the client to switch immediately.
-
Page 72: Qos
Using Web Interface to Manage the Access Point AP-8000 User Guide • Server Port: Enter the port number which the AP and the server will use to communicate. By default, RADIUS Authentication/Accounting servers communicate on ports 1812/1813. • Shared Secret: Enter the password shared by the RADIUS server and the AP. The password can be a maximum of 65 characters. - Page 73 Using Web Interface to Manage the Access Point AP-8000 User Guide • 802.1D to 802.1p Map Table • QoS Profile • QoS Policy EDCA To configure EDCA table, 1. Navigate to Configuration > QoS > EDCA. The QoS EDCA page appears. Figure 6-22 QoS EDCA Tables 2.
- Page 74 Using Web Interface to Manage the Access Point AP-8000 User Guide • CWMin: Minimum Contention Window. — Configurable range for Station is from 0 to 32767 — Configurable range for AP is from 0 to 32767 • CWMax: Maximum Contention Window. —...
- Page 75 Using Web Interface to Manage the Access Point AP-8000 User Guide 802.1D to 802.1p Map Table To configure QoS 802.1D to 802.1p priority mapping (for layer 2 policies), 1. Navigate to Configuration > QoS > 802.1D to 802.1p Map Tbl. The 802.1D to 802.1p Mapping Table page appears.
-
Page 76: Ip Configuration
Using Web Interface to Manage the Access Point AP-8000 User Guide • EDCA Profile Name: Enter the EDCA Profile Name that you have defined in the EDCA Table. • QoS NO ACK Status: Select the QoS acknowledgement status for the QoS Profile table. 3. -
Page 77: Vlan
Using Web Interface to Manage the Access Point AP-8000 User Guide Figure 6-27 Network IP Config 2. Address Type: Select the Address Type as either Static or Dynamic. – If you select the Address Type as Static, then you need to configure the following parameters and click OK: —... -
Page 78: Filtering
Using Web Interface to Manage the Access Point AP-8000 User Guide 2. Configure the following parameters. • VLAN Status: Select VLAN Status. This will enable the VLAN feature for the device. NOTE: To Disable VLAN, uncheck the Status box and click COMMIT button to update the changes.Once you Commit, Reboot the AP device. - Page 79 Using Web Interface to Manage the Access Point AP-8000 User Guide 2. Configure the following parameters. • Global Filter Flag: Select the status of the Global Filter Flag from the drop-down box. You need to enable its status for Filtering. WARNING: If the Global Flag for Filtering is not enabled on the device, then none of the filtering configuration can be applied.
- Page 80 Using Web Interface to Manage the Access Point AP-8000 User Guide 2. Filtering Control: Select the interface or interfaces that will implement the filter from the Filtering Control drop-down box. The various interfaces available are: • Ethernet: Packets are examined at the Ethernet interface. •...
- Page 81 Using Web Interface to Manage the Access Point AP-8000 User Guide Figure 6-32 Static MAC Address Filter Page 2. To add an entry, click Add. The Static MAC Address Filter Add Row page appears. Figure 6-33 Static MAC Address Filter - Add Entries 3.
- Page 82 Using Web Interface to Manage the Access Point AP-8000 User Guide Configure the following settings to prevent Wireless Clients 1 and 2 from communicating with the Wired Interface: • Wired MAC Address: 00:40:F4:1C:DB:6A • Wired Mask: FF:FF:FF:FF:FF:FF • Wireless MAC Address: 00:02:2D:51:94:E4 •...
- Page 83 Using Web Interface to Manage the Access Point AP-8000 User Guide • Deny IPX RIP • Deny IPX SAP • Deny IPX LSP • Deny IP Broadcasts • Deny IP Multicasts NOTE: The AP can filter these protocols in the wireless-to-Ethernet direction, the Ethernet-to-wireless direction, or in both directions.
- Page 84 Using Web Interface to Manage the Access Point AP-8000 User Guide Figure 6-36 TCP/UDP Port Filter Page 2. Enable the filter control by selecting Enable from the Filter Control drop-down box and click Ok. 3. To add new entries, click Add under the TCP/UDP Filter table. The TCP/UDP Port Filter Add Row page appears. Figure 6-37 TCP/UDP Port Filter Table - Add Entries 4.
-
Page 85: Managing The Device
Using Web Interface to Manage the Access Point AP-8000 User Guide Managing the Device Using the Web Interface, you can manage the following features of the device: • System • Upgrading the Firmware • Password Management • Management Access Control •... -
Page 86: System
Using Web Interface to Manage the Access Point AP-8000 User Guide System The various System features supported by AP are described in the following sections: • System Information • System Inventory Management System Information To configure System specific Information, 1. Navigate to Management > System > Information. The System Information page appears. Figure 6-39 System Information Page 2. -
Page 87: Upgrading The Firmware
Using Web Interface to Manage the Access Point AP-8000 User Guide NOTES: • You must reboot the AP, for country selection to take effect. • Country selection is available only on APs with model numbers ending in -WD. If country selection is available, it must be set before any interface parameters can be configured. - Page 88 Using Web Interface to Manage the Access Point AP-8000 User Guide Figure 6-41 Update Device using the HTTP 2. In the HTTP Update page, provide the following details: • File Type: Select the File Type that needs to be updated from the drop-down box. Choices include: —...
- Page 89 Using Web Interface to Manage the Access Point AP-8000 User Guide — Copy the file to the TFTP server’s root folder. • File Type: Select the proper file type. Choices include: — Config: Configuration information, such as System name, contact name, and so on. —...
-
Page 90: Password Management
Using Web Interface to Manage the Access Point AP-8000 User Guide Figure 6-45 File Download Page • Select an appropriate filename and location, and click Save. Retrieve from Device Using TFTP To upload files from the AP to the TFTP server, the TFTP server must be running and configured to point to the directory to which you want to copy the uploaded file. -
Page 91: Management Access Control
Trap Host IP Address: Enter the IP Address for which the traps needs to be delivered. d. Click Ok. After configuring the password page, click REBOOT to update the changes. NOTE: For security reasons, Proxim recommends you to change the default passwords of the device thus restricting the access to your network to authorized personnel. -
Page 92: Reset To Factory
Using Web Interface to Manage the Access Point AP-8000 User Guide Figure 6-48 Management Access Control Page 2. Select the Access Table Status checkbox. This will enable the Management Access Control. NOTE: The Add button is displayed, only when the Access Table Status is enabled. 3. -
Page 93: Monitoring The Device
Using Web Interface to Manage the Access Point AP-8000 User Guide Monitoring the Device Using the Web Interface you can monitor the following features: • System Log • Event Log • SNTP • Interface Statistics • Bridge • Network Layer •... -
Page 94: System Log
Using Web Interface to Manage the Access Point AP-8000 User Guide System Log To configure System Log settings, 1. Navigate to Monitor > System Log. The System Log page appears. Figure 6-52 System Log Page 2. In the System Log page, do the following: •... -
Page 95: Event Log
Using Web Interface to Manage the Access Point AP-8000 User Guide System Log Host To configure System Log Host Event Notifications, 1. Navigate to Monitor > System Log >System Log Host. The System Log Host Table page appears. Figure 6-54 System Log Host Table Page 2. -
Page 96: Sntp
Using Web Interface to Manage the Access Point AP-8000 User Guide Figure 6-56 Event Log Page 2. In the Event Log page, do the following: • Log Priority: Select Log Priority from the drop-down box. • Click Show Event Log to display the Event Logs for a selected Log Priority. Figure 6-57 Event Log Details 3. -
Page 97: Interface Statistics
Using Web Interface to Manage the Access Point AP-8000 User Guide Figure 6-58 SNTP Configuration 2. In the SNTP page, do the following: • Enable SNTP Status: Select Enable SNTP status checkbox to enable SNTP functionality. The following parameters are configurable only when SNTP is enabled. •... - Page 98 Using Web Interface to Manage the Access Point AP-8000 User Guide Figure 6-60 Ethernet Statistics Page Click Refresh, to view the latest information. For more information on Ethernet Statistics, see Ethernet Statistics. Wireless Station Statistics To view Station Statistics, 1. Navigate to Monitor > Interface Statistics > Wireless > Station Statistics. This Station Statistics page appears. Figure 6-61 Station Statistics Page Click Disassociate, to disassociate a particular client from the AP.
- Page 99 Using Web Interface to Manage the Access Point AP-8000 User Guide Interface1 To view Wireless Interface statistics, 1. Navigate to Monitor > Interface Statistics > Wireless > Interface 1. The Wireless Interface-1 Statistics page appears. Figure 6-62 Wireless Interface Page 2.
-
Page 100: Bridge
Using Web Interface to Manage the Access Point AP-8000 User Guide Bridge The various Bridge features supported by AP are detailed in the following sections. • Bridge Statistics • Learn Table Bridge Statistics To view Bridge Statistics, 1. Navigate to Monitor > Bridge > Bridge Statistics. The Bridge Statistics page appears. Figure 6-64 Bridge Statistics Click Refresh, to view the latest information. -
Page 101: Network Layer
Using Web Interface to Manage the Access Point AP-8000 User Guide Figure 6-65 Learn Table Network Layer The various Network Layer features supported by AP are detailed in the following sections. • IP ARP • ICMP Statistics IP ARP To view IP Address Resolution Protocol (ARP) statistics, 1. -
Page 102: Radius
Using Web Interface to Manage the Access Point AP-8000 User Guide Figure 6-67 ICMP Statistics Page RADIUS The various RADIUS features supported by AP are detailed in the following sections. • Authentication Statistics • Accounting Statistics Authentication Statistics Authentication Statistics provides information on RADIUS Authentication for both the Primary and backup servers for each RADIUS server profile. - Page 103 Using Web Interface to Manage the Access Point AP-8000 User Guide Figure 6-68 Radius Client Authentication Statistics Click Refresh, to view the latest information. For more information on Radius Authentication, see Authentication Statistics Accounting Statistics Account Statistics provides information on RADIUS Accounting for both the Primary and backup servers for each RADIUS server profile.
- Page 104 Using Web Interface to Manage the Access Point AP-8000 User Guide NOTE: When you try to configure a non-configurable parameter the following error occurs. This error message alerts the user to verify the configurable data and reconfigure. Figure 6-70 Error in Configuring Parameters...
-
Page 105: Using Snmp Interface To Manage The Access
AP-8000 User Guide Using SNMP Interface to Manage the Access This chapter provides information on the following: • Pre-requisites • Viewing the MIB Objects • Configuring the MIB Objects – To Configure the Scalar Objects – To Configure the Tabular Objects –... -
Page 106: Pre-Requisites
Listed below are the pre-requisites before configuring the AP device using MIB browser. • Ensure that you have configured the IP address of the AP device in the MIB browser. Proxim provides the MIB along with the CD. NOTE: Proxim recommends to use Proxim Vision ES (PVES) to make configuration changes. If you want to browse the MIB, then Proxim recommends to use NuDesign. -
Page 107: To Apply The Changes To The Flash Memory
Using SNMP Interface to Manage the Access AP-8000 User Guide NOTE: You can configure table by configuring each entry that is available for the table or update the entire table as a single entry. 3. Select the table, right-click, and click Set. 4. -
Page 108: Using Cli To Manage The Access Point
AP-8000 User Guide Using CLI to Manage the Access Point This chapter contains information on the following: • Introduction • Accessing the Command Line Interface • Using CLI to Manage the Device • General Notes on CLI – Prerequisite Skills and Knowledge –... - Page 109 Using CLI to Manage the Access Point AP-8000 User Guide – Country Code Configuration – Inventory Management • Monitoring the Device Using CLI Commands – Event Log Configuration – SNTP Configuration – System Log and System Log Host Configuration – View Interface Statistics –...
-
Page 110: Introduction
Using CLI to Manage the Access Point AP-8000 User Guide Introduction The Command Line Interface (CLI) is a text-based configuration utility that supports a set of keyboard commands and parameters to configure and manage a AP-8000 unit. You can enter command statements, composed of CLI commands and their associated parameters. -
Page 111: Error Messages
Using CLI to Manage the Access Point AP-8000 User Guide Ctrl-F Moves forward along the command line Ctrl-A Moves to the beginning of the command line Ctrl-E Moves to the end of the command line Ctrl-C Exits from one level Attempts command completion Provides command listing exit... -
Page 112: List Commands
Using CLI to Manage the Access Point AP-8000 User Guide NOTES: • For Dynamic row creation, you have to set the Entry Status/Row Status at the beginning and end of your command, and then provide other elements. • To create a new Dynamic row, always set the Index value to 0. Modify a Table Entry To modify a table entry, you have to mention the Index Number. -
Page 113: Command Line Interface Modes Overview
Using CLI to Manage the Access Point AP-8000 User Guide Command Line Interface Modes Overview The Command Line Interface (CLI) is divided into different command modes. Each command mode has its own set of commands that manage the network operations. The commands that are available depends on the mode that you are in. CLI operates in two main modes: •... -
Page 114: Accessing The Cli Of An Access Point
Access Point will default to an IP address of 169.254.128.132. 2. At the DOS command prompt, type telnet <IP Address of the unit>. 3. Enter the CLI’s default username (admin) and password (public). NOTE: Proxim recommends to change the default passwords immediately. -
Page 115: Configuring The Device Using Cli Commands
Using CLI to Manage the Access Point AP-8000 User Guide Configuring the Device Using CLI Commands The Command Line Interface (CLI) is divided into different command modes. Each command mode has its own set of commands that manage the network operations. The commands that you use also depends on the mode that you are in. User Name and Password Command When you start a session, you are in User Exec mode with limited access to commands. -
Page 116: Commit
Using CLI to Manage the Access Point AP-8000 User Guide ---vap-table ---network ---security ? --mac-acl --wireless-config-table --radius-server-profiletable --radius-supported-table ---qos ? --l2l3qos ? --dot1d-to-dot1p-mapping-table --dot1d-to-ipdscp-mapping-table --policy-table --profile-table --wireless-qos-edca ---vlan Show Command - Tree Structure for Device Management #Show ? ---management ? --access-control --snmp ? --trap-host-table... -
Page 117: Device Configuration
Using CLI to Manage the Access Point AP-8000 User Guide Device Configuration To configure the device parameters in Global Configuration Mode, type “?” to list the available commands. >enable #configure (config)#? commit System Management Config Commit dev-configure Device Configuration dev-management Device Management Configuration dev-monitor Device Monitor Configuration... - Page 118 Using CLI to Manage the Access Point AP-8000 User Guide vap-rts-threshold: 2346 vap-beacon-interval: 100 transmit-power-control: 0 cellsize: large dtim: 3 Ack Time out:25 radio 2 { radio-status: enable operational-mode: DOT11NG supported-operational-mode: DOT11NG,DOT11NA current-channel-bandwidth: 40 supported-channel-bandwidth: 20,40 auto-channel-selection: disable current-operating-channel: 1 supportedchannel: 1,2,3,4,5,6,7 auto-rate-selection: enable supported-rate: 1,2,5,6,9,11,12,18,24,36,48,54...
- Page 119 Using CLI to Manage the Access Point AP-8000 User Guide ampdu-max-numberframes: 64 ampdu-max-frame-size: 65535 amsdu-status: disable amsdu-max-frame-size: 4096 frequency-extension: upperExtensionChannel guard-interval: enable-400nSec tx-antennas: seven rx-antennas: seven VAP Configuration To configure Wireless VAP parameters in Interface 1 and Interface 2, use the following commands. Interface 1 (config-dev<config>)# interface (config-dev<config>-if)# wireless...
- Page 120 Using CLI to Manage the Access Point AP-8000 User Guide supported-legacy-rate:12,18,24,36,48,72,96,108 current-HT-rate:27 supported-HT-rate:27,54,81,108,162,216,243,270,324,432,486,540,600 multicast-legacy-rate:18 supported-multicast-legacy-rate:12,18,24,36,48,72,96,108 auto-rateselection:enable retry-count:5 index 1.2 { vaptype: ap vapssid: My Wireless Network 1_2 vapbssid: broadcast-ssid: enable fragmentation-threshold: 2346 vlan-id: -1 vlan-priority: 0 qos-profile-name: Default macacl-status: disable radius-macacl-status: disable radius-accounting-status: disable status: disable...
- Page 121 Using CLI to Manage the Access Point AP-8000 User Guide vapbssid: broadcast-ssid: enable fragmentation-threshold: 2346 vlan-id: -1 vlan-priority: 0 qos-profile-name: Default macacl-status: disable radius-macacl-status: disable radius-accounting-status: disable status: disable security-profile-index:1 radius-profile-index:1 current-legacy-rate:108 supported-legacy-rate:12,18,24,36,48,72,96,108 current-HT-rate:270 supported-HT-rate:27,54,81,108,162,216,243,270,324,432,486,540,600 multicast-legacy-rate:18 supported-multicast-legacy-rate:12,18,24,36,48,72,96,108 auto-rateselection:enable retry-count:3 index 2.1 { vaptype: ap vapssid: My Wireless Network 2_1 vapbssid:...
- Page 122 Using CLI to Manage the Access Point AP-8000 User Guide radius-profile-index:1 current-legacy-rate:108 supported-legacy-rate:2,4,11,22,12,18,24,36,48,72,96,108 current-HT-rate:270 supported-HT-rate:27,54,81,108,162,216,243,270,324,432,486,540,600 multicast-legacy-rate:18 supported-multicast-legacy-rate:2,4,11,22,12,18,24,36,48,72,96,108 auto-rateselection:enable retry-count:3 index 2.3 { vaptype: ap vapssid: My Wireless Network 2_3 vapbssid: broadcast-ssid: enable fragmentation-threshold: 2346 vlan-id: -1 vlan-priority: 0 qos-profile-name: Default macacl-status: disable radius-macacl-status: disable radius-accounting-status: disable...
- Page 123 Using CLI to Manage the Access Point AP-8000 User Guide QoS Configuration Dot1p Configuration To configure Dot1p parameters in QoS, use the following commands. (config)# dev-configure (config-dev<config>)# qos (config-dev<config>-qos)# l2l3qos (config-dev<config>-qos-l2l3qos)# dot1p-table (config-dev<config>-qos-l2l3qos-dot1dtodot1p)# index 1 dot1d-priority 0 dot1p-priority 1 Show command: System Name# show configure qos l2l3qos dot1d-to-dot1p-mapping-table // RUNNING-CONFIGURATION // // L2 &...
- Page 124 Using CLI to Manage the Access Point AP-8000 User Guide Show Command: System Name # show configure qos l2l3qos dot1d-to-ipdscp-mapping-table // RUNNING-CONFIGURATION // // L2 & L3 QoS - Dot1d to IP dscp Mapping Table // index 1 { ipdscp: 0 dscp-lower-limit: 23 dscp-upper-limit: 23 index 1 {...
- Page 125 Using CLI to Manage the Access Point AP-8000 User Guide (config-dev<config>-qos-edca<tbl>)# index 1 secondary-index 1 ap-txop 0.0000 (config-dev<config>-qos-edca<tbl>)# index 1 secondary-index 1 profile-name default (config-dev<config>-qos-edca<tbl>)# index 1 secondary-index 1 sta-cwmin 123 (config-dev<config>-qos-edca<tbl>)# index 1 secondary-index 1 sta-cwmax 123 (config-dev<config>-qos-edca<tbl>)# index 1 secondary-index 1 sta-aifsn 7 (config-dev<config>-qos-edca<tbl>)# index 1 secondary-index 1 sta-txop 0.0000 (config-dev<config>-qos-edca<tbl>)# index 1 secondary-index 1 sta-acm disable Show Command:...
- Page 126 Using CLI to Manage the Access Point AP-8000 User Guide sta-txop: 1.5040 sta-acm: disable ap-cwmin: 3 ap-cwmax: 7 ap-aifsn: 1 aptxop: 1.5040 ap-acm: disable QoS Profile Configuration To configure QoS Profile parameters, use the following commands. (config-dev<config>)# qos (config-dev<config>-qos)# profile-table (config-dev<config>-qos-profile<tbl>)# index 1 profile-name default (config-dev<config>-qos-profile<tbl>)# index 1 nack-status disable Show Command:...
- Page 127 Using CLI to Manage the Access Point AP-8000 User Guide marking-status: enable entry-status: notInService index 1.3 { policy-name: Default policy-type: outboundLayer2 priority-mapping: 1 marking-status: enable entry-status: notInService index 1.4 { policy-name: Default policy-type: outboundLayer3 priority-mapping: 1 marking-status: enable entry-status: notInService MAC ACL Configuration Profile Configuration To configure the Profile parameters, use the following commands.
- Page 128 Using CLI to Manage the Access Point AP-8000 User Guide // RUNNING-CONFIGURATION // // MAC ACL Address Table // index 1 { mac-address:00:11:22:33:44:55 comment: firstrow status: active Security Configuration Radius Server Profile Configuration To configure RADIUS Server Profile entries, use the following commands. (config)# dev-configure (config-dev<config>)# security (config-dev<config>-security)# radius...
- Page 129 Using CLI to Manage the Access Point AP-8000 User Guide Radius Supported Profile Configuration To configure RADIUS Supported Profile Table Entries, use the following commands. (config-dev<config>-security-rad)# supported-profile-tbl (config-dev<config>-security-rad-supported<tbl>)#index 1 max-retransmissions 3 (config-dev<config>-security-rad-supported<tbl>)#index 1 messages-response-time 3 (config-dev<config>-security-rad-supported<tbl>)#index 1 profile-name Default-Radius (config-dev<config>-security-rad-supported<tbl>)#index 1 re-authentication-period 900 Show command: System Name# show configure security radius-supported-table // RUNNING-CONFIGURATION //...
- Page 130 Using CLI to Manage the Access Point AP-8000 User Guide encryption-type: wpa-tkip psk: ****** rekeyinterval: 900 entry-status: active index 2 { profile-name: WEP authentication-mode: wep wep-key-index: 0 wepkey: ****** wepkeylength: wep64 encryption-type: wep psk: ****** rekeyinterval: 900 entry-status: active index 3 { profile-name: PSK authentication-mode: psk wep-key-index: 0...
- Page 131 Using CLI to Manage the Access Point AP-8000 User Guide protocol-name: Deny IPX LSP direction: both row-status: notInService index 4 { protocol-name: Deny IP Broadcasts direction: both row-status: notInService index 5 { protocol-name: Deny IP Multicasts direction: both row-status: notInService Global Filter Flag configuration To enable Global Filter Flag, use the following commands.
- Page 132 Using CLI to Manage the Access Point AP-8000 User Guide (config-dev<config>-filter-protocol)# filter-type passthru (config-dev<config>-filter-protocol)# filter-control ethernet (config-dev<config>-filter-protocol)#protocol-table (config-dev<config>-filter-protocol-table)# index 0 row-status 4 (config-dev<config>-filter-protocol-table)# index 0 protocol-name string (config-dev<config>-filter-protocol-table)# index 0 protocol-number aa:bb (config-dev<config>-filter-protocol-table)# index 0 filter-status 1 (config-dev<config>-filter-protocol-table)# index 0 row-status 4 Show command: System Name# show configure filtering protocol-filter filter-type // RUNNING-CONFIGURATION //...
- Page 133 Using CLI to Manage the Access Point AP-8000 User Guide index 6 { protocol-name: Decnet Phase IV protocol-number: 60:03 filter-status: block row-status: notInService index 7 { protocol-name: DEC Diagnostic protocol-number: 60:05 filter-status: block row-status: notInService index 8 { protocol-name: DEC LAT protocol-number: 60:04 filter-status: block row-status: notInService...
- Page 134 Using CLI to Manage the Access Point AP-8000 User Guide row-status: notInService index 16 { protocol-name: RARP Reverse ARP protocol-number: 80:35 filter-status: block row-status: notInService index 17 { protocol-name: SNMP Over Ethernet protocol-number: 81:4c filter-status: block row-status: notInService index 18 { protocol-name: Xyplex protocol-number: 08:88 filter-status: block...
- Page 135 Using CLI to Manage the Access Point AP-8000 User Guide Show command: System Name# show configure filtering static-mac-addr-filter // RUNNING-CONFIGURATION // // Static MAC Address Filter Table // index 1 { wired-mac-address 00:a6:33:44:23:34 wired-mac-mask FF:FF:FF:FF:FF:FF wireless-mac-address 00:c3:d3:23:44:23 wireless-mac-mask:FF:FF:FF:FF:FF:FF filter-comment:test row-status:active TCP/UDP Port Filter Configuration To configure TCP/UDP Port Filter, use the following commands.
- Page 136 Using CLI to Manage the Access Point AP-8000 User Guide tcp-udp-port-filter { port-filter-control: enable; System Name# show configure filtering tcp-udp-filter table // RUNNING-CONFIGURATION // // TCP UDP Port Filter Table // index 1 { protocol-name: NetBios Name Service port-number: 137 port-type: both interface: allInterfaces row-status: notInService...
- Page 137 Using CLI to Manage the Access Point AP-8000 User Guide protocol-name: Test port-number: 33 port-type: both interface: allInterfaces row-status: active Ethernet Configuration To configure Ethernet parameters, use the following commands. (config)# dev-configure (config-dev<config>)# ethernet (config-dev<config>-ethernet)# index 1 txmodeandspeed 1 Show command: System Name# show configure interface ethernet // RUNNING-CONFIGURATION // // Ethernet Interface //...
- Page 138 Using CLI to Manage the Access Point AP-8000 User Guide (config-dev<config>net)#index 1 address-type static Changes in IP Configuration requires Reboot... Show command: System Name# show configure network // RUNNING-CONFIGURATION // // Network Configuration // network ipaddress: 169.254.128.133 mask: 255.255.255.0 gateway: 169.254.128.133 address-type: static...
-
Page 139: Managing The Device Using Cli Commands
Using CLI to Manage the Access Point AP-8000 User Guide Managing the Device Using CLI Commands Access Control Configuration To configure Access Control parameters, use the following commands. System Name(config-mgmt)# access-ctrl System Name(config-mgmt-access<ctrl>)#access-status enable System Name(config-mgmt-access<ctrl>)#http-access-ctl enable System Name(config-mgmt-access<ctrl>)#https-access-ctrl enable System Name(config-mgmt-access<ctrl>)#ssh-access-ctrl enable System Name(config-mgmt-access<ctrl>)#telnet-access-ctrl enable System Name(config-mgmt-access<ctrl>)# snmp-access-ctrl enable... -
Page 140: Snmp Read, Read-Write Password And Trap Host Table Configuration
Using CLI to Manage the Access Point AP-8000 User Guide (config-mgmt-tftp)#exit (config-mgmt)#exit (config)#exit Show command: Given below are the default TFTP configuration. System Name# show management tftp // RUNNING-CONFIGURATION // // TFTP Configuration // tftp { server-ip: 169.254.128.133 file-name: image.bin file-type: image operation-type: none operational-status: idle... -
Page 141: System Management Configuration
Contact Phone Number location-name: System Location gps-longitude: -121.8893 gps-latitude: 37.3321 gps-altitude: 10 productdescr: ORiNOCO AP-8000 @ WD v1.0.0 SN-08UT41110039 v2.0.0(303290) System Management Configuration To configure System Management parameters, use the following commands. (config-mgmt)#system (config-mgmt-sys)# management (config-mgmt-sys-sysmgmt)# ? Possible completions:... -
Page 142: Country Code Configuration
System Location gps-longitude: -121.8893 gps-latitude: 37.3321 gps-altitude: 10 productdescr: ORiNOCO AP-8000 @ WD v1.0.0 SN-08UT41110039 v2.0.0(303290) Inventory Management The commands for Inventory Management are read-only and hence there is no configuration required. Show command: System Name# show management system inventory-mgmt... - Page 143 Using CLI to Manage the Access Point AP-8000 User Guide index 1 { serial-number: BUILD-360 name: Wireless Card 1 -NIC (0x60) component-id: 2300 component-variant: 1 release-version: 7 major-version: 0 minor-version: 0 index 2 { serial-number: BUILD-360 name: Wireless Card 2 -NIC (0x60) component-id: 2300 component-variant: 1 release-version: 7...
- Page 144 Using CLI to Manage the Access Point AP-8000 User Guide release-version: 0 major-version: 0 minor-version: 0 index 8 { serial-number: -NA- name: License File component-id: 0 component-variant: 0 release-version: 0 major-version: 0 minor-version: 0...
-
Page 145: Monitoring The Device Using Cli Commands
Using CLI to Manage the Access Point AP-8000 User Guide Monitoring the Device Using CLI Commands Event Log Configuration To view and configure Event Logs, use the following commands. (config-monitor-eventlog)# priority warning (config-monitor-eventlog)# reset yes Show command: System Name# show monitor event-log // RUNNING-CONFIGURATION // // EventLog Configuration // eventlog {... -
Page 146: View Interface Statistics
Using CLI to Manage the Access Point AP-8000 User Guide (config-monitor-syslog-host<tbl>)# index 0 row-status createAndGo Show Command: System Name# show monitor syslog // RUNNING-CONFIGURATION // // SysLog Configuration // syslog { status: enable priority: critical reset: 0 // Host Table Configuration // index 1 { ip-address: 10.0.0.1 port: 80... - Page 147 Using CLI to Manage the Access Point AP-8000 User Guide index 2 { descripton: lo type: softwareLoopback mtu: 16436 speed: 0 physical-address: admin-status: up operational-status: up last change: 0-02:11:52.00 in-octets: 62046 in-unicast: 158 in-non-unicast: 0 in-discards: 0 in-errors: 0 in-unknown-protos: 62046 out-octets: 62046 out-unicast-packets: 158 out-non-unicast-packets: 0...
- Page 148 Using CLI to Manage the Access Point AP-8000 User Guide in-discards: 0 in-errors: 0 in-unknown-protos: 0 out-octets: 0 out-unicast-packets: 0 out-non-unicast-packets: 0 out-discards: 0 out-errors: 5980 outqlen: 0 specific: 0.0 index 5 { descripton: wifi1 type: ethernet-csmacd mtu: 1500 speed: 100000000 physical-address: admin-status: up operational-status: up...
-
Page 149: Wireless Station Statistics Configuration
Using CLI to Manage the Access Point AP-8000 User Guide type: ethernet-csmacd mtu: 1500 speed: 100000000 physical-address: 00:21:86:51:e4:d3 admin-status: up operational-status: up last change: 0-02:11:52.00 in-octets: 0 in-unicast: 0 in-non-unicast: 0 in-discards: 0 in-errors: 0 in-unknown-protos: 531926 out-octets: 531926 out-unicast-packets: 1345 out-non-unicast-packets: 0 out-discards: 0 out-errors: 0... -
Page 150: View Ip Arp Statistics
Using CLI to Manage the Access Point AP-8000 User Guide icmpintimeexcds: 4 icmpinparm-probs: 0 icmpin-srcquenchs: 0 icmpinredirects: 0 icmpin-echos: 0 icmp-inechoreps: 0 icmpintimestamps: 0 icmpintimestamreps: 0 icmp-inaddrmasks: 0 icmpinaddrmaskreps: 0 icmpOutMsgs: 4 icmpOutErrors: 0 icmpOutDestUnreachs: 4 icmpOutTimeExcds: 0 icmpOutParmProbs: 0 icmpOutSrcQuenchs: 0 icmpOutRedirects: 0 icmpOutEchos: 0... -
Page 151: View Radius Client Access Statistics
Using CLI to Manage the Access Point AP-8000 User Guide View Radius Client Access Statistics To view Radius Client Access Statistics, use the following commands. System Name#show monitor radius radius-accounting-stats //radius client access statistics// index 0.1{ roundtriptime:0-00:00:00.00 requests:1 re-transmissions:4 responses:0 timeouts:4 unknowntypes:0 packetdropped:0... -
Page 152: Troubleshooting
This chapter helps you isolate and solve problems while using AP device. If this chapter does not provide a solution, or the solution does not solve your problem, contact the Proxim Customer Support. Before starting troubleshooting, it is important to check the details in the product documentation. For details about RADIUS, TFTP, Serial Communication Programs (such as HyperTerminal), Telnet Applications, or Web Browsers, refer to the appropriate documentation. -
Page 153: Troubleshooting
Troubleshooting AP-8000 User Guide Troubleshooting Common Issues Listed below are the common issues encountered while using the AP device: • IP Addressing - The most common installation problems relate to IP addressing. For example, without the TFTP server IP Address, you will not be able to download a new AP Image to the AP. Since IP Address management is fundamental, we suggest you to create a chart to document and validate the IP addresses for your system. -
Page 154: Basic Software Setup And Configuration Problems
Troubleshooting AP-8000 User Guide 2. By default, the Access Point will attempt to automatically detect the Ethernet settings. However, if you are having problems with the Ethernet link, manually configure the Access Point’s Ethernet settings. For example, if your switch operates at 100 Mbits/sec/Full Duplex, manually configure the Access Point to use these settings. -
Page 155: Client Connection Issues
Client PC Card Does Not Work 1. Make sure you are using the latest PC Card driver software. 2. Download and install the latest client software from http://support.proxim.com. Intermittent Loss of Connection 1. Make sure you are within the range of an active AP. -
Page 156: Gigabit Ethernet Poe
Troubleshooting AP-8000 User Guide wireless clients and viewed on one of the backbones should contain IEEE 802.1Q compliant VLAN headers or tags. The VLAN ID in the headers should correspond to one of the VLAN User IDs configured for the AP. VLAN Workgroups The correct VLAN assignment can be verified by pinging the AP to ensure connectivity, by pinging the switch to ensure VLAN properties, and by pinging hosts past the switch to confirm the switch is functional. -
Page 157: Recovery Procedures
Download a New Image Using ScanTool – Download a New Image Using the Bootloader CLI Because the CLI option requires a physical connection to the unit’s serial port, Proxim recommends the ScanTool option. Download a New Image Using ScanTool To download the AP Image, you will need an Ethernet connection to the computer on which the TFTP server resides and to a computer that is running ScanTool (this is either two separate computers connected to the same network or a single computer running both programs). - Page 158 Download Procedure Follow these steps to use ScanTool to download a software image to an Access Point: 1. Download the latest software from http://support.proxim.com. 2. Copy the latest software updates to your TFTP server. 3. Launch ScanTool. 4. Highlight the entry for the AP that you want to update and click Change.
-
Page 159: Setting Ip Address Using Serial Port
Troubleshooting AP-8000 User Guide • Data Bits: 8 • Stop Bits: 1 • Flow Control: None • Parity: None 5. Under File > Properties > Settings > ASCII Setup, enable the Send line ends with line feeds option. HyperTerminal sends a line return at the end of each line of code. 6. - Page 160 Troubleshooting AP-8000 User Guide Initializing the IP Address using CLI After installing the serial port cable, you may use the CLI to communicate with the AP. CLI supports most-generic terminal emulation programs, such as HyperTerminal (which is included with the Windows operating systems). In addition, many web sites offer shareware or commercial terminal programs that you can download.
- Page 161 Troubleshooting AP-8000 User Guide System Name(config-mgmt-sys-sysmgmt)# reboot 1 6. After the AP reboots, verify the new IP address by reconnecting to the CLI and enter a show configure network command. Alternatively, you can ping the AP from a network computer to confirm that the new IP address has taken effect.
-
Page 162: Application Specific Troubleshooting
Troubleshooting AP-8000 User Guide Application Specific Troubleshooting RADIUS Authentication Server If you have enabled RADIUS Authentication on the AP, make sure that your network’s RADIUS servers are operational. Otherwise, clients will not be able to log in. There are several reasons for the authentication server services to be unavailable. To make it available, •... -
Page 163: A Ascii Character Chart
AP-8000 User Guide ASCII Character Chart You can configure WEP Encryption Keys in either Hexadecimal or ASCII format. Each ASCII character corresponds to two hexadecimal digits. The WEP Encryption Keys include ASCII characters consisting of 0-9, A-F, a-f (case sensitive), and punctuation marks as given in the below table. -
Page 164: B Bootloader Cli
AP-8000 User Guide Bootloader CLI The Bootloader CLI is a minimal subset of the normal CLI used to perform initial configuration of the unit. The Boot Loader CLI is available when the unit’s embedded software is not running. This interface is only accessible through the serial interface, if: •... - Page 165 A device in Bootloader can be recognized by looking at the system description. If the system description does not contain any build number in braces, conclude that the device is in Bootloader mode. For example: ORiNOCO AP-8000 : is the name of the board : is the Regulatory Domain V1.0.0...
-
Page 166: C Specifications
AP-8000 User Guide Specifications This chapter provides information on the following: • Software Specifications • Hardware Specifications • Available Channels Software Specifications Following are the software features available in AP-8000. • Number of Stations per BSS • Management Functions • Advanced Bridging Functions •... -
Page 167: Advanced Bridging Functions
Specifications AP-8000 User Guide Advanced Bridging Functions Feature Supported by AP-8000 (Y/N) IEEE 802.1d Bridging Roaming Protocol Filtering Multicast/Broadcast Storm Filtering TCP/UDP Port Filtering Blocking Intra BSS Clients Packet Forwarding Medium Access Control (MAC) Functions Feature Supported by AP-8000 (Y/N) Automatic Channel Selection (ACS) Dynamic Frequency Selection (DFS)/Radar Detection (RD)*... -
Page 168: Network Features
Specifications AP-8000 User Guide Network Features Feature Supported by AP-8000 (Y/N) System Logging (Syslog) RADIUS Accounting Support DHCP Client TCP/IP Protocol Support Hardware Specifications Category Specification Radio • Dual Radio Access Point with integrated radios: 802.11a/b/g/n + 802.11a/b/g/n • 3x3 MIMO per radio Wireless Protocol •... -
Page 169: Available Channels
Specifications AP-8000 User Guide Easy Troubleshooting • Alarms • SNMP Traps • Bridge Statistics • Wireless Statistics • Wi-Fi station Statistics per client per SSID • Learn table Statistics • ICMP Statistics • IP ARP Statistics • Radius Statistics • Interface Statistics LEDs Four indicators on the top panel indicate power, wireless traffic, Ethernet traffic, and... - Page 170 Specifications AP-8000 User Guide Bulgaria 1(2.412), 2 (2.417), 3(2.422), 4(2.427), 36(5.18), 40(5.2), 44(5.22), 48(5.24), 5(2.432), 6(2.437), 7(2.442), 8(2.447), 52(5.26), 56(5.28), 100(5.5), 9(2.452), 10(2.457), 11(2.462), 12(2.467), 104(5.52), 108(5.54), 112 (5.56), 13 (2.472) 116(5.58), 120(5.6), 124(5.62), 128(5.64), 132(5.66), 136 (5.68), 140(5.7) Canada 1(2.412), 2(2.417), 3(2.422), 4(2.427), 36(5.18), 40(5.2), 44(5.22), 48(5.24), 5(2.432), 6(2.437), 7(2.442), 8(2.447),...
- Page 171 Specifications AP-8000 User Guide Italy 1(2.412), 2(2.417), 3(2.422), 4(2.427), 36(5.18), 40(5.2), 44(5.22), 48(5.24), 5(2.432), 6(2.437); 7(2.442), 8(2.447); 52(5.26), 56(5.28), 60(5.3), 64(5.32) 9(2.452); 10(2.457); 11(2.462), 12(2.467), 13(2.472) Japan 1(2.412), 2(2.417), 3(2.422), 4(2.427), 36(5.18), 40(5.2), 44(5.22), 48(5.24), 5(2.432), 6(2.437); 7(2.442), 8(2.447); 52(5.26), 56(5.28), 60(5.3), 64(5.32), 9(2.452);...
- Page 172 Specifications AP-8000 User Guide Russia 1(2.412), 2(2.417), 3(2.422), 4(2.427), 30 (5.15), 31 (5.155), 32 (5.160), 33 5(2.432), 6(2.437); 7(2.442), 8(2.447); (5.165), 34 (5.170), 35 (5.175), 36 9(2.452); 10(2.457); 11(2.462), 12(2.467), (5.180), 37 (5.185), 38 (5.190), 39 13(2.472) (5.195), 40 (5.200), 41 (5.205), 42 (5.210), 43 (5.215), 44 (5.220), 45 (5.225), 46 (5.230), 47 (5.235), 48 (5.240), 49 (5.245), 50 (5.250), 51...
- Page 173 Specifications AP-8000 User Guide 177 (5.885), 178 (5.890), 179 (5.895), 180 (5.900), 181 (5.905), 182 (5.910), 183 (5.915), 184 (5.920), 185 (5.925), 186 (5.930), 187 (5.935), 188 (5.940), 189 (5.945), 190 (5.950), 191 (5.955), 192 (5.960), 193 (5.965), 194 (5.970), 195 (5.975), 196 (5.980), 197 (5.855), 198 (5.990), 199(5.995), 200 (6.000), 201 (6.005), 202 (6.010), 203 (6.015),...
-
Page 174: D Technical Services And Support
Obtaining Technical Service and Support If you are having trouble using the Proxim product, please read this manual and the additional documentation provided with your product. If you require additional support to resolve your issue, please be ready to provide the following information before you contact Proxim’s Technical Services:... -
Page 175: Telephone Support
Extended Warranty: Extend the life of your networking investment by adding 1, 2, or 3 years to your products standard warranty. This service coverage provides unlimited repair of your Proxim hardware for the life of the service contract. The cost of an extended warranty is far less than the cost of a repair providing a sensible return on your investment. - Page 176 AP-8000 User Guide To purchase ServPak support services, please contact your authorized Proxim distributor. To receive more information or for questions on any of the available ServPak support options, call Proxim Support at 408-383-7700 or send an email to servpak@proxim.com.
-
Page 177: E Statement Of Warranty
The express warranties set forth in this Agreement will not apply to defects in a Product caused; (i) through no fault of Proxim Wireless during shipment to or from Buyer, (ii) by the use of software other than that provided with or installed in... -
Page 178: Other Information
In the event the Customer Service Center determines that the problem can be corrected with a software update, Buyer might be instructed to download the update from Proxim Wireless’s web site or, if that’s not possible, the update will be sent to Buyer.
Need help?
Do you have a question about the ORiNOCO AP-8000 and is the answer not in the manual?
Questions and answers