
Related Manuals for Extron electronics VNM EC 200


Summary of Contents for Extron electronics VNM EC 200
- Page 1 User Guide Streaming AV Products VNM Enterprise Controller VN-Matrix ® Enterprise Controller 200 68-2660-01 Rev. C 01 19...
- Page 2 Safety Instructions Safety Instructions • English Istruzioni di sicurezza • Italiano WARNING: This symbol, , when used on the product, is intended to AVVERTENZA: Il simbolo, , se usato sul prodotto, serve ad avvertire alert the user of the presence of uninsulated dangerous voltage within the l’utente della presenza di tensione non isolata pericolosa all’interno del product’s enclosure that may present a risk of electric shock.
- Page 3 ついては、 エクス トロンのウェブサイ ト より 『Extron Safety www.extron.com and Regulatory Compliance Guide』 (P/N 68-290-01) をご覧ください。 Copyright © 2016-2019 Extron Electronics. All rights reserved. Trademarks All trademarks mentioned in this guide are the properties of their respective owners. ® The following registered trademarks(...
- Page 4 FCC Class A Notice This equipment has been tested and found to comply with the limits for a Class A digital device, pursuant to part 15 of the FCC rules. The Class A limits provide reasonable protection against harmful interference when the equipment is operated in a commercial environment.
- Page 5 Conventions Used in this Guide Notifications The following notifications are used in this guide: CAUTION: Risk of minor personal injury. ATTENTION : Risque de blessure mineure. ATTENTION: • Risk of property damage. • Risque de dommages matériels. NOTE: A note draws attention to important information. TIP: A tip provides a suggestion to make working with the application easier.
-
Page 7: Table Of Contents
Contents Advanced Controller Configuration Introduction ..... 19 ............ 1 Network Page ..........20 About this Guide ..........1 About the VNM EC 200 ........2 Password Page ..........21 Role Page ............22 About the Web-based User Interface ....2 About Dual (Redundant) VNM EC 200s ....3 Time Page ............ - Page 8 Group Menu ..........66 Player File Management ......115 VNM 250 Configuration ........67 Creating Presets ..........116 Info Menu (VNM 250) ........67 Create a New Preset ........116 Configure Menu ..........68 Saving Presets ..........119 Connections Menu ........69 Using the VNS 104 in a Preset ....
- Page 9 Configuring the Secondary EC 200 Desk Mounting ........... 192 Time Settings ..........167 HLI Command Overview ......... 193 Configuring Dual EC 200s as the HLI Command Examples ........ 194 System Controller .......... 168 General Commands ........195 Setting the Cluster IP Address ....168 analogOutputEnable ........
- Page 10 presetplayerpause ........222 presetplayerstart ......... 222 presetplayerstop ......... 223 presetrecstart ..........223 presetrecstop ..........223 presetrename ..........223 presetset ............ 224 presetstep ..........224 presetseek ..........225 presetunlaunch ........... 225 Remote Communication and Control Using SIS Commands ..........226 Front Panel Configuration Port ....226 Verbose Mode ..........
-
Page 11: Introduction
Introduction This section gives an overview of the user guide and describes the Extron VNM EC 200 and its features. Topics that are covered include: • About this Guide • About the VNM EC 200 About the Web‑based User Interface • • About Dual (Redundant) VNM EC 200s Transport Protocols Used for Streaming •... -
Page 12: About The Vnm Ec 200
Figure 1 shows a simple application. TouchLink ™ Touchpanel Browser Based User External User Control Control Network Multicast Enabled CONFIG Network VNM EC 200 Screen 1 Screen 2 VNM ENTERPRISE CONTROLLER VNM Enterprise Controller 200 Screen 3 Screen 4 VNS 104 Multi-stream LAN-1 LAN-2 STATUS... -
Page 13: About Dual (Redundant) Vnm Ec 200S
Touchpanel External User Control VNM Enterprise Controller 200 (Primary) LAN-1 LAN-2 STATUS VN-MATRIX 225 SERIES RGB/DVI OVER IP CONFIG VNM EC 200 VNM ENTERPRISE CONTROLLER LAN B (eth1) LAN A (eth0) Physical Port LAN-1 LAN-2 (VN-Matrix Network) STATUS Cluster Port... -
Page 14: Transport Protocols Used For Streaming
Transport Protocols Used for Streaming The source data from a VN-Matrix encoder can be distributed to multiple displays/decoders (one-to-many) or to a single display/decoder (point-to-point). A previously recorded stream can be distributed in the same way and may be thought of as an encoder in this context. A stream can be transported from the source (encoder, recorded stream) to the display (decoder) using one of three methods: •... -
Page 15: Unicast Rtp - An Overview
Unicast RTP — An Overview Similar to multicast RTP, this method uses a real-time variation of UDP, called unicast RTP. Unicast RTP is used where the network infrastructure does not support multicast traffic. Typically, this protocol is used for point-to-point configuration (single source to single display), but can be configured to stream to a maximum of four displays. -
Page 16: Definitions
Definitions PURE3 — PURE3 is specifically designed for network transmission of real time media ® (such as video or graphics, audio, data, and whiteboard elements). It features both spatial and temporal image compression, which allows for efficient bandwidth usage and eliminates the need for forward error correction. -
Page 17: Panels And Cabling
• Veuillez ne pas retirer le lecteur SSD lorsque le VNM EC 200 est en marche. Le contrôleur doit être éteint (voir la procédure de mise hors tension page 12) avant de pouvoir retirer le lecteur. -
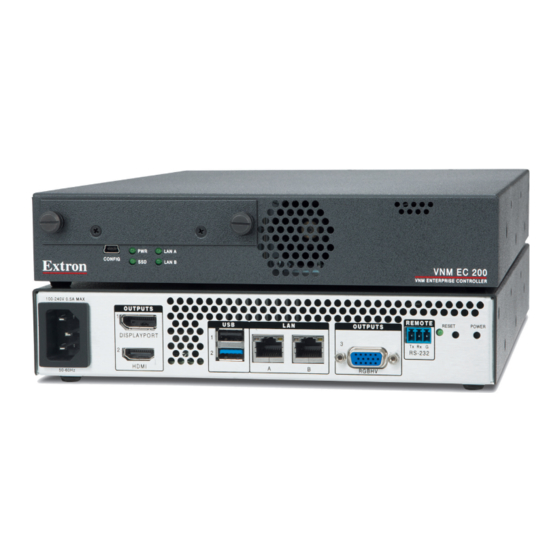
Page 18: Rear Panel Features
Rear Panel Features NOTES: Items are required for normal operation. The other items are used during shutdown, configuration and when upgrading the VNM EC 200. The rear panel of the VNM EC 200 is shown in figure 7 below. H I J 100 - 240V 0.5A MAX OUTPUTS REMOTE... -
Page 19: Ec 200 Rear Panel Reset
Rear Panel Features on page 8). Power on all devices. Connect a control PC to the VNM EC 200 and configure the controller (see Accessing the Web‑based User Interface on page 11). Use the VNM EC 200 and the Web-based User Interface to configure all connected devices. -
Page 20: Controller Configuration And Operation
Controller Configuration and Operation This section provides information on: Power Up Procedure • • Web‑based User Interface Overview Accessing the Web‑based User Interface • • Power Down Procedure Power Up Procedure NOTE: Before applying power to the VNM EC 200, ensure that all necessary devices are powered on and connected properly. -
Page 21: Accessing The Web-Based User Interface
Changing the login password on page 21. Guest — This profile hides the Configuration and Format Editor tabs prohibiting system changes to the VNM EC 200. Guest username — Default: user • Guest password — By default, no password is required. -
Page 22: Power Down Procedure
Click Login or press <Enter>. The Devices page opens (see figure 10). The VNM EC 200 is now ready for configuration and operation. NOTE: The Devices page displays only devices properly configured to operate with the VNM EC 200 (see the user guides for individual devices for more information). -
Page 23: Single Ec 200 Configuration
Single EC 200 Configuration This section details basic information needed to configure the settings of a single VNM EC 200. For information on how to set up redundant VNM EC 200s, see Dual (Redundant) Controller Configuration on page 161. This section provides information on: • Setup Overview •... -
Page 24: Configuring The Network Settings
Configuring the Network Settings The VNM EC 200 is pre-configured with the following network settings. IP address: 192.168.254.254 Subnet mask: 255.255.255.0 Gateway: 192.168.254.1 MTU: 1500 NOTE: With these settings, the units connected to the VN-Matrix network must use IP addresses within the range of 192.168.254.2 through 192.168.254.253 and use the same subnet mask. -
Page 25: Setting The Role
Configure the IP address of the control PC so that it is within the address range of the VNM EC 200. NOTE: Complete this step only if the IP address of the VNM EC 200 is using a network prefix other than 192.168.254.xxx or subnet mask other than 255.255.255.0. -
Page 26: Configuring The Transport Protocol
Configuring the Transport Protocol Use the following procedure to configure the transport protocol that will be used throughout the VN-Matrix system (see Accessing the Web‑based User Interface on page 11 for information on how to log in). Click the Configuration tab. The Configuration page opens (see figure 13, Figure 13. -
Page 27: Configuring A Single Ec 200 As The System Controller
Configuring a Single EC 200 as the System Controller This section details how to assign a single VNM EC 200 as the system controller. Before proceeding, make sure the procedures detailed in Single VNM EC 200 Configuration page 13 are completed first. NOTE: For information on how to configure dual VNM EC 200s as system controllers, Configuring Dual EC 200s as the System Controller on page 168. -
Page 28: Configuring The Vn-Matrix Devices
Configuring the VN-Matrix Devices For the VNM EC 200 to function properly with connected devices: Update each VN-Matrix device with the IP address of the VNM EC 200 and configure each device to operate on the same network as the VNM EC 200. Access the VNM EC 200 Web-based user interface by entering the IP address of the VNM EC 200 into the address bar of a Web browser. -
Page 29: Advanced Controller Configuration
Advanced Controller Configuration The Configuration page contains eight additional pages to configure the general settings of the VNM EC 200. This section presents a detailed overview of each page. The following configuration pages are available: • Network Page • Password Page • Role Page Time Page •... -
Page 30: Network Page
Network Page The Network page (see figure 15) configures the primary physical (LAN A [eth0]) IP address of the VNM EC 200. Figure 15. Network Page The following fields are available for configuration. IP Address — Enter a valid IP address into this field. Netmask —... -
Page 31: Password Page
Password Page The Password page is used to set the passwords for the administrator and user profiles. Figure 16. Password Page Changing the login password From the User drop-down list, select one of the following account names. Select user to change the user password. •... -
Page 32: Role Page
Role Page The Role page is used to set the mode of the VNM EC 200. Figure 17. Role Page To set the role, from the Device Mode drop-down list (see figure 17, ) select: • singleton — Select this option when a single VNM EC 200 is the system controller. redundant_primary —... -
Page 33: Time Page
Time Page The Time page on the Configuration tab is used to manage the clock-related functions available on the VNM EC 200. Figure 18. Time Page Reported Time Panel This panel (see figure 18, ) contains a read-only field that displays the current system time of the controller that is logged in to. -
Page 34: Clock Synchronization Panel
Clock Synchronization Panel figure This panel (see on the previous page) is used to determine the master clock source for the controller. NOTE: If there is only one VNM EC 200 in the system, it is not necessary to configure clock synchronization. All devices in a VN-Matrix system (controllers, encoders, decoders, and recorders) reference a master system clock, sourced from the controller. -
Page 35: Clock Settings Panel
Removing controllers from the Sources list To remove a controller from the list, select a controller from the Sources list (see figure on page 23). Click the button ( in step 1 on the previous page) located below the Sources list to remove the selected IP address. -
Page 36: Time Zone Panel
Setting the time and date NOTES: • Set the time zone before manually setting the time and date (see Setting the time zone, below). • Do not alter these fields if logged into the cluster IP address. Make sure Enable Clock Synchronization is not selected (unchecked). NOTE: If Enable Clock Synchronization is checked, the Set time and Set date fields are dimmed. -
Page 37: Upgrade Page
Upgrade Page The Upgrade page is used to update the firmware of the VNM EC 200. For information on updating the firmware of a single VNM EC 200, see Updating the • Firmware of a Single EC 200 on page 184. • For information on updating the firmware of dual (redundant) VNM EC 200s, see Updating the Firmware of Dual (Redundant) EC 200s on page 184. -
Page 38: System Config Page
System Config Page The System Config page (see figure 20) is used to configure the following sets of control options. • Transport protocol (multicast RTP, unicast TCP, unicast RTP) • Multicast addressing schemes • Clean switch • Secure mode Controller listing and licensing •... - Page 39 Three multicast address schemes are available. default — This setting assumes that VN-Matrix devices on the system use • About Class C (255.255.255.0) subnet addresses. This is the default setting (see the Default Multicast Address on page 34). octet‑0‑1‑3 — This is specific to systems that have special addressing schemes. •...
-
Page 40: Certificates Page
The SSL Certificate is used to validate a secure connection between the Web Server of the VNM EC 200 and the Web browser. When the VNM EC 200 is configured in secure mode the Web browser must connect using Secure Socket Layer (SSL) which is denoted by the browser showing the "https://"... - Page 41 If the system is in secure mode and a new certificate is generated and saved, the Web browser returns the user to the login screen. The user must login and manually accept the security warning. When the system is running in secure mode it is possible to save the current certificate details.
- Page 42 Figure 23. File Upload Dialog Navigate to the folder where the new certificate resides and select the desired file ( Click Open ( ). The certificate is prepared for upload to the EC 200. When the upload is complete, the Upload Certificate dialog opens with the new certificate file (see figure 24).
-
Page 43: System Info Page
System Info Page This page is accessed by selecting the System Info tab (see figure 26). ¢ ¢ £ £ Figure 26. System Info Page The System Info page displays general information about the VNM EC 200. If the VN-Matrix system contains multiple controllers, they are displayed on this page by IP address using individual columns. -
Page 44: About The Default Multicast Address
About the Default Multicast Address When multicast is chosen as the transport protocol, the VNM EC 200 assigns multicast IP addresses automatically. Four schemes are available. Each scheme is designed to calculate and assign a multicast address based on the IP address of an encoder device. This section details how the default multicast address scheme operates. - Page 45 An example of how video multicast addresses are created is shown in the table below. Video Multicast Address Example for IP Address 192.168.0.102 Item Value Binary Comments Default Value for the First Two Octets First octet All multicast addresses in this scheme use Second octet these values.
- Page 46 For each of the multicast group addresses, the VNM EC 200 creates two port numbers. The table below details how port numbers are derived. Default Multicast Address Port Numbers Port Type Port Format Description and Comments Base port number 9004 Derived port x represents the channel number 9004 + xxxyyzzzzzzzzE number (even)
- Page 47 An example of how port numbers are created is shown in the table below. Video Port Number Example for IP Address 192.168.0.102 Item Value Binary Comments Base port number All multicast port 9004 numbers in this scheme start from this value.
-
Page 48: Vn-Matrix Device Configuration And Control
VN-Matrix Device Configuration and Control The VN-Matrix EC 200 is the center of an audio and video streaming network that connects and controls VN-Matrix hardware encoders, decoders, recorders, and software decoders. The EC 200 can control all VN-Matrix devices residing on the same network. Each matrix device must have its system controller IP address set to the IP address of the EC 200. -
Page 49: Devices Page Overview
Devices Page Overview The VN-Matrix EC 200 is the center of an audio and video streaming network that connects and controls VN-Matrix hardware encoders, decoders, recorders, and software decoders. The controller provides support for third party system control using the HLI protocol. The following VN-Matrix devices are discussed in this section: Device Description... - Page 50 When a VN-Matrix device is detected and listed on the Devices page, an entry is always displayed even if the device is subsequently disconnected. All valid devices are listed by device name, followed by their current IP address. NOTE: Some listed devices will not show an IP address. These devices are inactive. A device is considered inactive if it is disconnected from the network or powered down.
-
Page 51: Sorting Devices By Column
IP Address — The IP address of the device is shown in this column. NOTE: The IP address of a device is shown only if the device is currently present on the network and configured to use the VNM EC 200. Controller — This column shows the IP address of the device acting as the system controller. -
Page 52: Sorting Devices By Group
Sorting Devices by Group Devices can be sorted in groups using the Group By menu (see figure 30, 192.168.0.32 192.168.254.254 192.168.0.38 192.168.254.254 192.168.0.39 192.168.254.254 192.168.0.30 192.168.254.254 192.168.0.31 192.168.254.254 192.168.0.35 192.168.254.254 192.168.0.37 192.168.254.254 192.168.0.33 192.168.254.254 Figure 30. Grouping Devices The following group options are available: NOTES: •... -
Page 53: Actions Menu Bar Overview
Actions Menu Bar Overview The Actions menu bar, located at the bottom of the Devices page when a device is selected, is used to check information, configure, license, and upgrade controlled devices. Actions menu items change with the selected device (see figure 31). Encoder Actions: Info... -
Page 54: Actions Menu Bar Features
Actions Menu Bar Features The Actions menu bar buttons perform similar functions regardless of the device selected (see figure 31 on the previous page). The following is an overview of each button and the devices they are associated with. • Info (all devices) —... -
Page 55: Device Configuration
Device Configuration The next section describes the general configuration of VN-Matrix devices and applies to VN-Matrix hardware encoders, decoders, and codecs. For details on the configuration of the VNM-250 see VNM 250 Configuration on page 67; for VN-Matrix recorders Recorder Configuration on page 82;... -
Page 56: Connections Menu
Connections Menu When devices are part of an active (launched) preset, the columns populate with the connection details of the selected VN-Matrix device (see figure 34). Click Connections (see figure 31 on page 43) to open the Connections dialog box. VNM 200/225 VNM 300/325 Figure 34. -
Page 57: Configure Menu
Configure Menu To set global parameters specific to the VN-Matrix 200/225 and 3 devices (see figure 35), click Configure (see figure 31 on page 43). Encoder Decoder Figure 35. Configure Device Settings Device Setup panel Device Name — Enter a name for the device in this field. This name appears in the device list and can be comprised of letters, numbers, and the underscore character. -
Page 58: Format Menu (Encoders)
Format Menu (Encoders) figure 31 Click Format (see on page 43) to open the Source Format dialog box (see figure 36) used to view information about the incoming source. It is also used to make adjustments to the signal and toset the EDID options). The menu differs between the VN- Matrix 200/225 and VN-Matrix 3 series. - Page 59 Measured Video Properties panel This panel provides information about currently connected sources (see figure 36 page 48). The following fields are read-only (cannot be edited). Current Mode — This field details the current video resolution of the connected source. A complete list of supported resolutions is available in the VN‑Matrix 200, VN‑Matrix 225, VN‑Matrix 250, VN‑Matrix 300, and VN‑Matrix 325 User Guides.
- Page 60 Color Space — This drop-down list selects between RGB and YPbPr video source ¨ types (see figure 36 on page 48) NOTES: • When auto is selected from the Mode drop-down list, the color space cannot be determined. • Component sources are detected as an RGsB video type. Macrovision Defeat —...
- Page 61 Ancillary Audio Panel (VN-Matrix 3xx Only) The VN-Matrix 3 models replace the Input, Blanking, and EDID panels with an Ancillary Audio panel for audio configuration (see figure 37). Configuration options change depending upon the model and the transport mode selection. The differences are noted in the following descriptions.
- Page 62 Pack 16: Same as Pack 24 except the least significant 8 bits of audio data are • removed and set to zero. The bit rate is 1.54 Mbps. Decimate 2: Same as Pack 16 except the sample rate is reduced to half. The bit •...
-
Page 63: Format Menu (Decoders)
Format Menu (Decoders) figure 31 When a decoder device is selected, click Format (see on page 43) to open dialog box used to configure the output format of a decoder (see Display Format figure 38). The menu differs slightly depending on the selected VN-Matrix device. NOTES: •... -
Page 64: Compression Menu (Encoders Only)
Sync on Green (SoG) (VN‑Matrix 200/225 only) — When selected, this check box (see figure 38 on page 53) enables Sync on Green on the output analog waveform. When SoG is enabled, separate horizontal and vertical syncs are present on the analog output. - Page 65 The configuration options have a direct effect on the network bandwidth required for the encoded stream. • Increasing compression decreases the network bandwidth requirements for the stream. • Decreasing compression increases the network bandwidth requirements for the stream. Alternatively, the desired bandwidth can be set using the Bitrate panel (see page 57) and the VN-Matrix adjusts compression and frame rate to meet the specified bandwidth...
- Page 66 Chroma Threshold — This check box (see figure 40 on page 54) controls whether the temporal algorithm should consider changes in the color (chrominance) of the image. Selecting this check box provides better results when using digital simulation type sources. However, this can increase the transmit bandwidth by up to 200%, so it should be disabled on bandwidth sensitive systems.
- Page 67 Bitrate panel The Bitrate panel (see figure 40 on page 54) sets a specific bandwidth limit for the encoded stream. Limit Mode — This drop-down list contains management modes that limit the £ instantaneous traffic on the network and drops traffic when the bandwidth rate is exceeded.
-
Page 68: Peripherals Menu
Peripherals Menu Click Peripherals (see figure 31 on page 43) to open the Peripherals Settings dialog box to manage remote keyboard and mouse communications on a VN-Matrix 200/225 (see figure 41). NOTE: Mouse and keyboard functions are supported by VN-Matrix 2 series devices only. - Page 69 A server can accept multiple client connections. Under these conditions the data input by the server serial port is duplicated to all connected clients. The data received from the clients is multiplexed (in order of arrival) and output through the server serial port. •...
-
Page 70: License Menu
License Menu figure 31 Click License (see on page 43) to open the Device License Management dialog box. This dialog displays the enabled features on the selected unit and also enables optional features (see figure 42). ¢ ¢ £ £ VN-Matrix 200/225 VN-Matrix 3xx Figure 42. - Page 71 Change Device Structure panel NOTE: See Update a device license below for information on updating the structure key and checksum. ATTENTION: • DO NOT place information for a VNM EC 200 license into this menu. Doing so causes the device to stop responding. •...
-
Page 72: Upgrade Menu (2Xx And 3Xx Devices)
Upgrade Menu (2xx and 3xx Devices) figure 31 Click Upgrade (see on page 43) to open the Upgrade Device Firmware dialog box used to upgrade the firmware of one or more VN-Matrix devices (see figure 43). ATTENTION: • Ensure that compatible firmware is used to upgrade the selected VN-Matrix devices. -
Page 73: Mode Menu (Vnc Devices Only)
After the proper firmware is uploaded, select the version from the Select a Version drop-down list (see figure 43 on page 62, ) and click Upgrade ( NOTES: • If a VN-Matrix device selected for upgrade already contains the latest version of firmware, the upgrade status displays "Wait". -
Page 74: Misc Menu
Misc Menu This menu contains five selections (see figure 45). • Real‑time Bandwidth Monitor • Delete Device Multiple Device Licensing • • OSD Identifier Editor • Send HLI command Figure 45. Misc Menu Click Misc (see figure 45, ) to open the list. Real-time Bandwidth Monitor Select the real-time bandwidth monitor to open a new dialog box that monitors the bandwidth (measured in Mbps) used by the selected device or devices (see figure 46). - Page 75 OSD Identifier Editor (Encoders and Decoders) Select this option to customize the appearance of the on‑screen display for the selected device or devices (see figure 47). VNM 200/225/300/325 VNE 250, VND250, VNS 104 Figure 47. OSD Identifier Editor Foreground Color — This drop-down list selects the color of the text box font. Background Color —...
-
Page 76: Group Menu
Send HLI Command Selecting this option opens a dialog box for sending High Level Interface (HLI) command strings to VN-Matrix devices (see figure 48). Send HLI Command to selected devices - $id will be replaced with the device id (enter command line) (response) Figure 48. -
Page 77: Vnm 250 Configuration
VNM 250 Configuration The VND 250 and VNE 250 add HDMI input and output capability to the VN-Matrix system. Several configuration items are added to the normal encoder and decoder configuration pages for HDMI and HDCP compatibility. Info Menu (VNM 250) The Info action bar dialog adds two LAN port connection entries for separate control and streaming connections. -
Page 78: Configure Menu
Configure Menu Click Configure to open the dialog box and set global Configure Device Settings parameters specific to the VNM 250 devices (see figure 50). Encoder Decoder Figure 50. VNM 250 Configure Device Settings Device Setup panel Device Name — Enter a name for the device. Mode —... -
Page 79: Connections Menu
Connections Menu When devices are part of an active (launched) preset, the columns in the Connections menu populate with the connection details of the selected VN-Matrix device (see Connections Menu on page 46). The Connections dialog adds the location of the return audio path to the columns. - Page 80 Program Audio Figure 52. Program Audio, Analog Audio Input and Return Audio Panels Input Select: Selects the input audio source. HDMI audio is not supported if RGB (2) input video is selected. HDMI (1): Selects the embedded HDMI audio. • Analog (2): Selects the rear panel analog audio input. •...
-
Page 81: Format Menu (Vnd 250)
Format Menu (VND 250) The VND 250 Display Format dialog shares two configuration options with the VN-Matrix 200/225: • Current Format (see figure 53, Output Format ( • These two configuration options function identically to those on the VN-Matrix 200/225 (see Format Menu (Decoders) on page 53). - Page 82 HDCP Mode — The HDCP mode control (see figure 53 on the previous page) sets the encryption negotiation method between the decoder and an HDCP compliant display. Auto: HDCP negotiation occurs each time a new stream is decoded. Encryption is •...
- Page 83 Videowall panel (not available when output format is set to Auto) The Video Wall configuration settings (see figure 53 on page 71) allow a video stream from a single source to split over several decoders, each attached to one monitor of a videowall layout.
-
Page 84: Compression Menu (Vne 250 Only)
Program Audio Output panel (see figure 53 on page 71) Output Select— Select HDMI audio, analog audio, both, or none. § Analog Audio Output Level (dBu)— Sets the analog output level from a range of -26 ¨ to +12 dBu. Decode Buffer Settings Channel Delay(s) — Configured the same as the video ©... - Page 85 Video Compression panel (see on the previous page) figure 54 Transform — Two transform types are supported. graphics — Optimizes the video to support text and sharp lines, such as are • present on most computer screens. video — Optimizes the video to support smooth tone changes, such as are •...
- Page 86 Audio Compression panel (see on page 74) figure 54 Compression — VN-Matrix devices support limited compression of audio sources. The ¢ S/PDIF digital data bus can carry two types of data: 2-channel uncompressed audio and encoded digital data, the latter often in AC-3 (Dolby Digital) format. If the source is HDMI AC-3, run length encoding (RLE) is applied that results in an output bandwidth of about 430 kbps.
-
Page 87: Peripherals Menu
Target Rate (Mbps) — This field is used in all bandwidth management modes (except ¤ Manual Frame Drop) to specify the network bandwidth used by the source. This value is specified in Megabits per second (Mbps) (see figure 54 on page 74). Frame Drop (%) —... - Page 88 A server can accept multiple client connections. Under these conditions the data input by the server serial port is duplicated to all connected clients. The data received from the clients is multiplexed (in order of arrival) and output through the server serial port. through RS‑232 Settings: Basic configuration of the serial port includes baud rate, data bits, stop bits, parity, and handshake.
-
Page 89: License Menu
License Menu Click License to open the Device License Management dialog box. This dialog displays enabled features for the selected unit and enables optional features (see figure 56). Figure 56. VND 250 (Left) and VNE 250 (Right) License Menu NOTE: The Licensed Features panel and Current Structure panel fields are read-only (cannot be edited). -
Page 90: Misc Menu
Misc Menu This menu contains four selections for the VND 250 and three for the VNE 250 (see figure 57). • Real‑time Bandwidth Monitor (VND 250) Delete Device • • OSD Identifier Editor • Send HLI Command Figure 57. VNM 250 Misc Menu Real-time Bandwidth Monitor (VND 250) Select the real-time bandwidth monitor (see figure 57, ) to open a new dialog box that monitors the bandwidth (measured in Mbps) used by the selected device or devices (see... - Page 91 OSD Identifier Editor Select this option (see figure on the previous page) to customize the appearance of the on‑screen display for the selected device or devices (see figure 59). Figure 59. VNM 250 OSD Identifier Editor Foreground Color — This drop-down list selects the color of the text box font. Background Color —...
-
Page 92: Recorder Configuration
Recorder Configuration This section details options available in the Actions menu bar located at the bottom of the Encoder devices page. The options associated with recorders are listed below (see figure 61). The Actions: Info Connections Configure Format Compression Peripherals License Upgrade Mode Misc... -
Page 93: Recorder Menu
Recorder Menu figure 61 Click Recorder (see on the previous page) to open the Recording Browser dialog box (see figure 63). This dialog displays recorded files for the selected recorder and recorder sub-channels. Figure 63. VN‑Matrix Recorders, Recording Browser The user can select a recording from the default location or navigate to another location on the hard drive. -
Page 94: Configure Menu
Configure Menu Click Configure (see figure 61 on page 82) to open the Configure Device Settings dialog box (see figure 64) used to change the device name or to configure up to three user parameters for the recorder. The dialog box is the same for the VNM Recorder and the VNR 100. -
Page 95: License Menu
License Menu figure 61 Click License (see on page 82) to open the Device License Management dialog box (see figure 65). This dialog provides information about the recorder features licensed for use on the VN-Matrix system. The information is read-only, shown for reference. Figure 65. -
Page 96: Vns 104 Software Decoder Configuration
VNS 104 Software Decoder Configuration The VNS 104 Multi-stream Decoding Software decodes up to four video streams and one stereo audio stream from VNE 225/250 real-time encoders and VN-Matrix Recorder playback channels. It operates on a Windows PC and is managed from the VN-Matrix EC 200. - Page 97 Info Menu Click Info (see figure 67 on the previous page) to open the Device Information dialog box (see figure 68). There are no configuration settings, only information about the connected VNS 104 device. Device Information (21212121) 212121 Device Id: Device Name: Licensed Desktop 192.168.3.51 IP Address:...
- Page 98 For each connection, the Connections dialog box includes: Description – Displays the name of the stream source device. ID – Displays the device ID of the stream source device. Source – For unicast transports, displays the IP address and port number of the stream source device.
- Page 99 Test – Disables decoding and displays a splash screen (if enabled), or a black • screen. Enable Splash Screen: – Enables the display of a splash screen when the display device detects a break in the input data stream or a source stream is not assigned. When this check box is not selected, a black screen is displayed when a source stream is not present or when the display device detects a break in the input data stream.
- Page 100 VNS 104 Misc Menu The miscellaneous menu (Misc) (see figure 67 on page 86) provides the following selections: Figure 72. Actions Bar ‑ VNS 104 Root, Misc VNS 104 Misc Main Delete Device: – Deletes the VNS 104 device from the EC 200 Devices list. NOTES: •...
-
Page 101: Vns 104 Decode Windows
Actions: Info Connections Configure Format Peripherals License Upgrade Mode Misc Group VN-Matrix Recorder Actions: Info Recorder Configure License Upgrade Misc Group VN-Matrix Recorder Sub-channel VNS 104 Decode Windows Actions: Info Recorder License Misc Group When the streams for each of the four displays are assigned using the Preset Manager (see VNS 104 Preset Manager Page on page 96), select an individual stream to view information... -
Page 102: Switcher Page
Switcher Page The Switcher page assigns encoders (sources) to decoders (displays). This allows the user to control streaming throughout the entire system using a single page. Use the following procedure to configure the Switcher page. Click switcher (see figure 76, ) to open the Switcher page (see Accessing the Web‑based User Interface... - Page 103 In the Sources column, click an encoder (sources) (see figure 78, The selected box darkens. In the Displays column, click a decoder (displays) ( The selected box darkens. Click Take ( A connection is created between the selected encoder (source) and decoder (display). Figure 78 shows that the JMP9600 Source is streaming media to •...
-
Page 104: Hidden Devices
Hidden Devices When there are too many devices on the screen, management becomes difficult. The switcher provides a way to hide unused or rarely used devices. There are two ways to set and recover hidden devices: Click the drop-down button on any source or display device and select Hide Device ( To display the Edit hidden devices menu: Click the drop-down button from a source or display device and choose... -
Page 105: Preset Manager
Preset Manager This section provides instructions to connect, disconnect, and operate VN-Matrix Devices using the Preset Manager. Sections include: • Presets Overview Preset Manager Page • • Preset List Matrix Devices List • • Preset Design Panel • Device Attributes Recorder Directory and File Management •... -
Page 106: Preset Manager Page
Preset Manager Page The Preset Manager page enables connection of system devices from the device list for use in the VN-Matrix system. It allows users to create, save, and recall simple and complex system configurations using drag and drop rules under the following guidelines: •... -
Page 107: Preset List
Preset List The Preset List panel (see figure on the previous page) provides management and control of the system presets from the preset list toolbar and provides a way to quickly reconfigure devices. System presets configure and connect groups of VN-Matrix devices for a specific task. They are built using devices in the Matrix Devices list ( ). - Page 108 Copy Click Copy to copy a previously defined preset and save it as another name. To copy a preset: In the Preset List, select the desired Copy Selected Preset preset. Enter a name for the preset copy Click Copy. The Copy Selected Preset dialog box opens.
-
Page 109: Matrix Devices List
Matrix Devices List The available VN-Matrix devices are displayed on the Preset Manager page as a list in the Matrix Devices panel (right). • Matrix devices are listed alphabetically by device name. It is not possible to device11212054 sort or group them. device11212060 •... -
Page 110: Preset Design Panel
Preset Design Panel The workspace in the Preset: design panel is where new system presets are created and details of a selected preset are viewed. Whether creating a new or modifiying a current • preset, devices are dragged from the devices list into the design area to create a preset (see Creating Presets on page 116). -
Page 111: Device Attributes
Device Attributes When a device is placed in the Preset Design workspace, the Device Attributes panel (see figure 80) provides access to preset-specific device settings available to the preset manager. When the device is selected, an appropriate set of attributes for that device populates the device attributes panel. - Page 112 Video Input — A drop-down list to select the input video source. Choices are: Auto — This option automatically selects the HDMI input when a digital source is • detected. HDMI — Selects the HDMI input. • RGB — Selects the RGB input. •...
-
Page 113: Device Attributes - Decoders
Device Attributes – Decoders Decoder device attributes differ depending on the selected device (see figure 82). Selected Device 200/225 Series 3xx Series Figure 82. Device Attributes Panel, Decoders Name — Read-only field for the device name taken from the device list. Stream settings —... -
Page 114: Device Attributes - Vnd 250 Decoder
Device Attributes – VND 250 Decoder The VND 250 decoder has an extended set of device attributes. ¢ ¢ £ £ ¤ ¤ ¥ ¥ Figure 83. Device Attributes Panel, VND 250 Name — Read-only field for the device name, taken from the device list. Output Format —... - Page 115 RS‑232 Mode — Drop-down list to select the RS-232 channel mode. None — The RS-232 pass-through port is disabled. • Pass through Server — Configures the device as a server. • Pass through Client — Configures the device as a client. •...
-
Page 116: Device Attributes - Vn-Matrix Recorder: Play Mode
Device Attributes – VN-Matrix Recorder: Play Mode The 5-channel VN-Matrix Recorder in player mode operates with Ch1 set as the master for all channels (see figure 84, left). Figure 84. Device Attributes, 5‑channel Player The player device attributes for a 5-channel device provide the following functions: NOTE: The attributes for individual channels 2, 3, 4, and 5 (shown in figure 84, right) are a reduced set of the attributes for Ch1. -
Page 117: Device Attributes - Vn-Matrix Recorder: Record Mode
Device Attributes – VN-Matrix Recorder: Record Mode The 5-channel VN-Matrix Recorder in recorder mode operates with Ch1 set as the master for all other channels on that device. VN-Matrix Recorder Figure 85. Device Attributes, 5‑channel Recorder The recorder device attributes for a 5-channel device provide the following functions: Name —... -
Page 118: Device Attributes - Vnr 100 Player
Device Attributes – VNR 100 Player The VNR 100 player Device Attributes panel provides the following functionality: Device Attributes Name VNR100:p Directory /GFChaseTest/ File TEST Launch Status Play Time Sync Start O set 00:00:00 Stop O set 00:00:00 File Length 00:00:02 Figure 86. Device Attributes, VNR 100 Player The function of each attribute is the same as the 5-channel player (see... -
Page 119: Device Attributes - Vns 104 Software Decoder: Decode Window
Device Attributes – VNS 104 Software Decoder: Decode Window Device Attributes Name VNS104:1 Audio Mute Audio Audio Volume Screen Mode Fill Screen Layout QuadSplit Figure 88. Device Attributes, VNS 104 Each VNS 104 decode window has the following attributes (see figure 88): Name — Read-only field for the device name. Audio —... -
Page 120: Recorder Directory And File Management
Recorder Directory and File Management VN-Matrix recorders can be used as a source (player) or display (recorder). The following section describes the recorder directory and file structure and rules to assist in their management. Directory Management Overview A recording can be made on single or multiple devices (recorders). A recording contains all files required to recreate the original stream from an encoder in a set. - Page 121 Enter the directory name ( Recording Browser (VNR100:r) GFChaseTst Create Folder Rec-2013-02-20-12-11-43 Rec-2013-03-01-15-52-44 Enter the folder name Rec_2013-30-18-10-36-50 New_Directory lost+found Cancel Open Close Figure 91. Create Directory, Enter Name Click OK ( NOTE: Using this method, the directory is created and displayed in the directory list immediately.
- Page 122 Create Directory – Direct entry method (advanced) To create a directory using direct entry: Create a preset with an encoder and recorder (see Recorder Presets on page 122). Select a recorder (channel) in the Preset Design workspace. In the Device Attribute panel, click in the Directory row (see figure 94, ) and enter the new directory name in the field.
- Page 123 Duplicate Directory Naming If a recorder preset is built (or copied) using an existing directory name, or if the same preset is launched more than once without changing the name of the directory, a new directory name is automatically created. The first time a recording is launched, the previously entered directory name is created (see figure 95).
-
Page 124: File Management Overview
File Management Overview The recorder allows creation of both directories and files while the player can only select directories and files after they are created by the recorder. Filename By default, the name of the encoding device is used as the name of the recorder file. The default name is changed by entering a new name in the Device Attributes File field. -
Page 125: Completed Directory Structure
Completed Directory Structure A recording directory contains one set of files for each recorder (channel) in the preset. A file set can contain audio, whiteboard, and other data streams associated with the video file. Figure 100. Recording Browser, One File per Channel Deleting a File Delete a file by highlighting it in the browser, <right-click>, then select Delete File. -
Page 126: Creating Presets
Creating Presets Presets are created that configure devices to operate as a system. Once created, presets can be launched with a single button click. The EC 200 then reconfigures and connects the devices in the preset to create the system. The three preset types are: •... - Page 127 Add an encoder to the Preset panel. Click and hold the encoding device (see figure 103, Encode1 Encode1 Encode1 Figure 103. Preset Workspace, Place a Device Drag the device to the upper left corner of the Preset panel ( Drop the device ( NOTE: Devices drag and dropped into the Preset Design workspace are positioned on the left side in the first open space vertically, and in the order they are placed.
- Page 128 Add a decoder to the Preset panel. Click on and hold the desired decoder (see figure 104, Figure 104. Preset Workspace, Add a Decoder Drag the device to the upper left corner of the preset panel ( While holding the decoder, place it on top of the previously placed Encoder1, then release ( The preset completes after a moment.
-
Page 129: Saving Presets
Saving Presets Encode1 Figure 105. Save a Preset Before saving the preset, configure the decoder using the Device Attributes panel (the encoder has no attributes available). Click on the decoder device in the Preset panel (see figure 105, ) to populate the device attributes ( Configure the attributes of the decoder ( ) as needed (see... -
Page 130: Using The Vns 104 In A Preset
Using the VNS 104 in a Preset The VNS 104 is identified in the Device List as a four channel decoder with four possible connections. In the Preset Design panel, each channel can be connected to the same or to a different encoder or player channel. Select New at the base of the Preset List panel to create a blank preset (see figure 106, Figure 106. - Page 131 Drag one of the four software decoder channels from the Device List (see figure 108, ) and drop it onto the source device in the Preset panel ( VNE200_1 VNS104:1 VNE200_1 VNS104:1 Figure 108. Presets, Drag and Drop the VNS 104 NOTE: Output devices are positioned below and to the right of the source device they are connected to.
-
Page 132: Recorder Presets
Recorder Presets Recorder presets are created similar to switching presets. Place an encoder device into the Preset panel first, followed by a recorder channel or channels. Use the Device Attributes panel of a recorder to create or select a file directory, and select the channels to record. -
Page 133: Player Presets
Player Presets Player presets are created similar to switching presets. A player channel is placed into the Preset panel first, followed by a decoder or decoders. The player channel attributes include the playback directory, the playback file, set the start and end offset time and synchronization, and select the playback channels. -
Page 134: Launch Behavior
Launch Behavior Preset List Controls Click Launch (see on page 97) to activate a previously saved preset. Launching a preset causes the configuration of the devices to change according to the device attributes and connections specified in the preset. Until launched, the Preset List defaults each preset to Stop. - Page 135 Transport Dialog Box – Recorder When a recorder preset is launched (see Preset List Controls on page 97), a transport dialog box displays the recording status and provides control of the recording. Only the most recent preset launch is displayed (see figure 112). Figure 112.
- Page 136 Transport Dialog Box – Player When the launch status in Device Attributes is configured to Play, playback begins immediately and the transport dialog box monitors playback. If the launch status is set to Provision, manual control of the playback start and stop is available. The Player panel (see figure 113) also provides the following functionality: Figure 113.
-
Page 137: Selecting A File For Playback
Selecting a File for Playback To select a file for playback (single or five channel recorder): Create a preset with a player and decoder or display (see Creating Presets page 116). Select the player channel in the Preset workspace. The Device Attributes panel populates with the appropriate options. - Page 138 A dialog box opens (see figure 116). Select Yes ( ) to automatically assign the video files to corresponding player channels. If the directory contains five files recorded on a 5-channel recorder, it loads the corresponding files into slots 1 through 5 of the device. It also populates multiple player devices within the preset if they are all part of the same original recording group.
- Page 139 The recorder is ready to play the selected file (see figure 119). Figure 119. Device Attributes, Playback File Selected The remaining device attributes provide several options for playback of the selected file. Launch Status The launch status (see figure 119, ) options are: •...
-
Page 140: Transport Bar Shortcut
Transport Bar Shortcut The transport bar can also be launched by <right-clicking> the preset in the Preset List, then choosing Transport Controls (see figure 120, Figure 120. Right‑click Access to Transport Controls VNM EC 200 • Preset Manager... -
Page 141: Chase-Play Feature (Vnr 100 Only)
Chase-Play Feature (VNR 100 Only) The chase-play feature allows a user to view a live recording while the recording is in progress. The live file can be played, paused, or searched from any point in the file as the recording progresses. Configuration A recording preset is built and configured in the normal way (see Recorder Presets... - Page 142 Features available for playback of live content (chase-play) are the same as those supported for normal playback (see Launch Behavior on page 124). Transport Control Behavior – Live Play Player Control Function Comments Play Starts playing the active recording from The location where replay starts can be any point (time).
-
Page 143: Format Editor Page
Format Editor Page This section provides information about: Custom Source and Display Formats Overview • • Creating a New Source Format (Input Mode) • Creating a New Display Format (Output Mode) Deleting Formats • • Source Format Editor Display Format Editor •... -
Page 144: Custom Source And Display Formats Overview
LAN-2 LAN-2 STATUS STATUS VN-MATRIX 225 SERIES VN-MATRIX 225 SERIES RGB/DVI OVER IP RGB/DVI OVER IP VN-Matrix Decoder VN-Matrix Encoder VNM EC 200 Figure 125. Recommended Setup for Creating Custom Input and Output Modes VNM EC 200 • Format Editor Page... -
Page 145: Creating A New Source Format (Input Mode)
Creating a New Source Format (Input Mode) There can be instances when a VN-Matrix device configured as an encoder cannot detect an input source. This can happen when: • An unrecognized input source connected to the encoder is not defined in the format menu (see Measured Video Properties panel on page 49). - Page 146 On the left tab (see figure 127, ) the Devices page opens ( Choose the encoder connected to the VN-Matrix network in step 3 ( 192.168.0.30 192.168.254.254 192.168.0.33 192.168.254.254 192.168.0.32 192.168.254.254 192.168.0.45 192.168.254.254 192.168.0.39 192.168.254.254 192.168.0.49 192.168.254.254 192.168.0.47 192.168.254.254 192.168.0.35 192.168.254.254 192.168.0.38...
- Page 147 Select manual from the Blanking drop-down list (see Figure 128, on the previous page). Enter 0 in the Pixels field ( Enter 0 in the Lines field ( Leave the Source Format window open. Using the right tab (see figure 129, ), select the Format Editor page ( Select an input mode from the list of source formats ( NOTE: If the frame rate or the resolution of the source is already known, select a...
- Page 148 The name of the new source is listed above the source format properties (see figure 131, Figure 131. New Source Format Saved Return to the left tab (see figure 132, ) where the Source Format dialog box is open. Note the values in the Line Count ( ) and Line Period (ms) ( ) fields.
- Page 149 On the right tab (see figure 133, ) and the format editor ( ), make sure the new source is selected from the Source Formats list ( ) panel and enter the values from step 20 into the Line Count ( ) and Line Period (ms) ( ) fields on the right panel (Source Format - 1280 x 600 60p Test) (...
- Page 150 Select auto from the Mode drop-down list to force a resync of the source. (see figure 135, Figure 135. Force a Resync of the Source The name of the new source created in step 18 is now visible in the Current Mode field (see figure 135, ).
- Page 151 The Measured Video Properties panel (see figure 136, ) now displays information about the new source. NOTE: The loop-through display now shows an image. The edges of the image can be missing since the image is not properly adjusted at this point. Note the values in the First Pixel ( ) and First Line fields ( Figure 136.
- Page 152 Using the right tab (see figure 137, ), on the Format Editor page ( ), enter the values noted in step 27 into the First Pixel ( ) and First Line ( ) fields. Figure 137. Enter Values Into the Source Format Editor Page Click Save (see figure 137, ), located at the lower right corner of the page, to save the resolution.
- Page 153 Return to the left tab (Source Format menu) (see figure 138, ) and select auto from the Mode drop-down list ( ) to force a resync of the source. NOTE: Although the overall image can still look incorrect, the loop-through display now has its top left corner correctly positioned and there should be no cropping on this edge of the image.
- Page 154 Click the right device tab (see figure 139, Select the Format Editor ( In the Source Format panel, adjust the Pixels Per Line field ( ) to size the image correctly. Be sure to click the Save button each time the line is adjusted ( NOTE: The pixels per line may or may not be close to the required value depending on the mode chosen as the starting point in step 16.
- Page 155 Return to the left tab (Source Format menu) (see figure 140, ) and select auto from the Mode drop-down list ( ) to force a resync of the source. Check the display for banding. Figure 140. Force a Resync of the Source Repeat steps 33 and 34.
- Page 156 Using the left tab (Source Format menu), note the value of the First Pixel field (see figure 141, 1280 x 600 60p Test Analog 26.805 1308 Figure 141. Note Source Format Menu Value Click the right tab (Source Format Editor page), (see figure 142, ) and enter the value from step 36 into the First Pixel field ( Figure 142.
- Page 157 Click the left tab (Source Format menu), (see figure 143, ) and select auto from the Mode drop-down list to force a resync of the source ( NOTE: The loop-through display now displays the left side of the image correctly. 1280 x 600 60p Test Analog 26.805...
- Page 158 Click the left tab (Source Format menu), (see figure 145, ) and force a resync of the source by reselecting auto from the Mode drop-down list ( Figure 145. Force a Resync of the Source NOTES: • Check the positioning of the image and adjust if necessary (First Pixel and First Line fields on the Source Format Editor page).
-
Page 159: Creating A New Display Format (Output Mode)
Creating a New Display Format (Output Mode) One issue encountered when using graphic sources with VN-Matrix encoders and decoders is that the encoder often produces a loop-through image stating it has detected a valid input mode, but the decoder displays a splash screen stating "No Matching Output Mode." Use the following procedure to create a custom display format (output mode) that is automatically selected by the decoder when it sees a corresponding input mode. - Page 160 Click the right tab, (see figure 148, ) and select the Format Editor page ( Select an output mode from the display formats panel ( NOTE: Select a display format from the list that closely matches the properties of the new custom display format that is being created. Figure 148.
- Page 161 In the Save Display Format As dialog box, enter a name for the new display format and click OK (see figure 150). NOTES: • Resolutions must be saved using the following format at the beginning of the filename: < Hres> x <Vres> <Frame_Rate><Format>. •...
-
Page 162: Deleting Formats
Deleting Formats NOTES: • The default resolutions provided with the VNM EC 200 cannot be deleted. • Custom resolutions that are in use by any active VN-Matrix device cannot be deleted. To delete a custom resolution format, select a resolution and click Delete located at the lower right corner of the Format Editor page (see figure 152, below). -
Page 163: Display Format Editor
Interlaced — Check this box to use interlaced video. • • Fixed Geometry — This function is currently not implemented. figure 152, Click SaveAs in the lower right corner (see on page 152), to save the resolution to the list with a new name. For additional information on creating source formats, Creating a New Source Format (Input Mode) on page 135. - Page 164 Horizontal Left Border — Specify the horizontal size of the left outer border on the • display. Vertical Top Border — Specify the vertical size of the top outer border on the display. • • Horizontal Right Border — Specify the horizontal size of the right outer border on the display.
- Page 165 Click SaveAs (see figure 153, on page 153) to save the resolution to the Display Formats list. For additional information on creating display formats, see Creating a New Display Format (Output Mode) on page 149. NOTES: • Resolutions must be saved using the following format at the beginning of the filename: <...
-
Page 166: Alarms
Alarms This section provides information on: Alarms Overview • • Alarms Page • Alarm Type Reference Tables Alarms Overview The VN-Matrix system is configured to generate alarms for error conditions. A list of these error conditions and their meanings are presented on the following pages. Alarms can be monitored using the Alarms page. -
Page 167: Sorting Alarms By Column
Sorting Alarms by Column Columns can be sorted by clicking directly on any of the column names. Clicking on a column name sorts the list in ascending or descending order. Figure 155 shows the alarms sorted by raised time ( ). -
Page 168: Alarm Type Reference Tables
Alarm Type Reference Tables Encoders CLI Alarm Alarm Description Fault Description Alarm Type No Source No input source is connected. Critical, Reporting NOSRC Bad Source Syncs An input source is connected Critical, Reporting BADSRCSYN but the sync timing is not recognized (unable to input source due to bad sync... -
Page 169: Decoders
Decoders CLI Alarm Alarm Description Fault description Alarm type No Decoder Video A stream is assigned but the Warning, Reporting NOVIDEO Data decoder is not receiving video data. No Decoder Mode A video stream is assigned Warning, Reporting NOMATCH but the decoder does not recognize the format. -
Page 170: Encoder/Decoder
Encoder/Decoder Alarm Description Fault Description Alarm Type Audio Input Overrange The analog input level is too Warning, Reporting AUDIOOVERRANGE high for the current range setting. Bad Audio Hardware The audio hardware has failed Critical, reporting BADAUDIOHW Reporting or is not present. System Controller Alarm Description... -
Page 171: Dual (Redundant) Controller Configuration
Except for the IP Address, configure each VNM EC 200 identically. Setup Overview Connect one VNM EC 200 to the control PC and change the default IP address (see Configuring the Network Settings (Eth0) on page 162). Use a network switch to connect the primary VN-Matrix network to the rear panel Rear Panel Features LAN A Ethernet connector (eth0) of each VNM EC 200 (see... -
Page 172: Configuring Dual Vnm Ec 200S
IP addresses within the range of 192.168.254.2 through 192.168.254.253 and use the same subnet mask. • Each VNM EC 200 has a default IP address of 192.168.254.254. This IP must be changed on one of the EC 200s before configuration for dual operation. In the following examples: •... - Page 173 This will become the redundant secondary controller. Note the new IP address. Connect the second VNM EC 200 to the network. NOTE: If you changed the IP address of the first EC 200 from the default 192.168.254.254, there is no need to disconnect it from the network.
-
Page 174: Setting The Role Of The Primary Ec 200
Setting the Role of the Primary EC 200 Use the following procedure to set the role of the redundant primary VNM EC 200 (see Accessing the Web‑based User Interface on page 11). Log into the redundant primary VNM EC 200 using the designated IP address and click the Configuration tab. -
Page 175: Setting The Role Of The Secondary Ec 200
Setting the Role of the Secondary EC 200 Use the following procedure to set the role of the redundant secondary VNM EC 200 (see Accessing the Web‑based User Interface on page 11 for information on how to log in). Log into the redundant secondary VNM EC 200 using the designated IP address and click the Configuration tab. -
Page 176: Configuring The Primary Ec 200 Time Settings
Configuring the Primary EC 200 Time Settings Use the following procedure to configure the time settings of the redundant primary VNM EC 200. See Accessing the Web‑based User Interface on page 11 for information on how to log in. Log in to the redundant primary VNM EC 200 and click the Configuration tab. The Configuration page opens (see figure 159, Figure 159. -
Page 177: Configuring The Secondary Ec 200 Time Settings
Configuring the Secondary EC 200 Time Settings Use the following procedure to configure the time settings of the redundant secondary VNM EC 200. Log in to the redundant secondary VNM EC 200 (see Accessing the Web‑based User Interface on page 11) and click the Configuration tab. The Configuration page opens (see figure 160, Figure 160. -
Page 178: Configuring Dual Ec 200S As The System Controller
Configuring Dual EC 200s as the System Controller This section details how to assign the dual VNM EC 200s as the system controller. Before proceeding, make sure the procedures detailed in Configuring Dual VNM EC 200s page 162 are complete. NOTE: For information on how to configure a single VNM EC 200 as the system controller, see Single VNM EC 200 Configuration on page 13. -
Page 179: Adding The Vnm Ec 200S To The Controller List
Adding the VNM EC 200s to the Controller List Accessing Use the following procedure to add the VNM EC 200s to the controller list (see the Web‑based User Interface on page 11). Log in to the redundant primary VNM EC 200 and click the Configuration tab. The Configuration page opens (see figure 162, Figure 162. -
Page 180: Configuring The Transport Protocol
Configuring the Transport Protocol Use the following procedure to configure the transport protocol that will be used throughout the VN-Matrix system (see Accessing the Web‑based User Interface on page 11 for information on how to log in). Log into the redundant primary VNM EC 200 and click the Configuration tab. The Configuration page opens (see figure 163, Figure 163. -
Page 181: Setting The Crossover Subnet Ip Address (Eth1)
Setting the Crossover Subnet IP Address (Eth1) A crossover cable is connected between the LAN B (eth1) ports of a VNM EC 200 pair. By default, the crossover subnet IP address for this port is 192.168.253.0. In most cases, this is acceptable and does not need altered. NOTES: •... -
Page 182: Node Test Page
Node Test Page This page is used to test the VNM EC 200 pair by determining which controller, primary or secondary, has the best communication with the devices in the VN-Matrix system at power up (see figure 165). The VNM EC 200 that communicates best with these devices becomes the Master and the other unit becomes the Slave. - Page 183 Deleting nodes Using a Web browser, navigate to the Web-based user interface by entering the physical LAN A (eth0) IP address of the redundant primary VNM EC 200. Select the Configuration page (see figure 165, on the previous page). Click on the Node test link ( In the Sources list, select the node to delete.
-
Page 184: Pairing The Vnm Ec 200S
Pairing the VNM EC 200s NOTE: Before pairing the VNM EC 200s, the cluster IP address must be set (see Setting the Cluster IP Address on page 168). Use the following procedure to pair the VNM EC 200s (see Accessing the Web‑based User Interface on page 11 for information on how to log in). Using a Web browser, navigate to the Web-based user interface by entering the physical LAN A (eth0) IP address of the redundant primary VNM EC 200. -
Page 185: Cluster Properties Pages
Cluster Properties Pages This section details the control options available using the Cluster and Node Test pages. Procedures relevant to these pages are also detailed in this section. Cluster Page The Cluster page is used to view and manage the pairing status of the controller (see figure 167). - Page 186 Configuration panel ( Use this panel (see figure 167, on page 175) to configure the following options. NOTES: • The Cluster IP Address, Test Switch on Powerup, and Switch IP Address fields can be configured using any VNM EC 200 within the cluster. •...
- Page 187 Other cluster control functions Two buttons at the bottom of the Cluster page manage the state of the controller pair (see figure 167, on page 175). The functions that are available are Migrate, Pair, and Unpair. Pair and Unpair share a single button. •...
-
Page 188: System Control
The VNM EC 200 also uses Extron Simple Instruction Set (SIS) commands from the front panel config connector to perform various reset functions. -
Page 189: Hli Features
SSH via a TCP connection to the IP address of the VNM EC 200 on port number 22. NOTES: • If the IP address has not changed, the factory default IP address of a VNM EC 200 is 192.168.254.254 • Ensure an application that supports SSH is installed •... -
Page 190: Using The Vnm Ec 200 User Interface
Using the VNM EC 200 User Interface To enter HLI commands using the VNM EC 200 Web-based user interface: Access the Web-based user interface (see Accessing the Web‑based User Interface on page 11). From the Devices page, select a device. If necessary, multiple devices can be selected by clicking the check boxes located on the left side of the Devices page (see Devices Page Overview... -
Page 191: Hli Command Tables
HLI Command Tables HLI commands are listed in the reference section (see HLI Command Overview page 193). HLI general commands are used to: • Control a specific function of a single device • Build a connection between devices • Modify the mode of a device Retrieve system information and monitor system status •... -
Page 192: Controller Firmware And License Updates
Controller Firmware and License Updates This section provides information about: Updating the VNM EC 200 License • • Updating the Firmware of a Single EC 200 Updating the Firmware of Dual (Redundant) EC 200s • Updating the VNM EC 200 License The VNM EC 200 includes a basic license when purchased. Updating the license of the VNM EC 200 enables the VN-Matrix system to operate with the VNM Software Decoder and the VNS 104 Multi-stream Software Decoder. - Page 193 To update the VNM EC 200 license: Click the Configuration tab to open the page (see figure 170, Accessing the Web‑based User Interface If login information is required, see page 11. Figure 170. Configuration Page — Updating the Controller License Click the Certificates link ( From the Controllers field in the Configuration panel, select the IP address of the controller that requires a new license ( Click License (see figure 170,...
-
Page 194: Updating The Firmware Of A Single Ec 200
Updating the Firmware of a Single EC 200 Before starting, go to www.extron.com/download and download the latest VNM EC 200 firmware. Then use the following procedure to update the firmware of a single VNM EC 200. Click the Configuration tab (see figure 172, The Configuration page opens. Figure 172. -
Page 195: Download The Firmware Update File
Download the Firmware Update File www.extron.com/download Before starting this procedure, go to and download the latest version of the VNM EC 200 firmware to a folder on the local PC. Backup the Device and Preset Configuration Save the current device and configuration files. Figure 173. -
Page 196: Unpair The Controller Cluster
Browse to the folder where the backup file is to be saved (see figure 176, Figure 176. Save Backup File Dialog Click Save ( Unpair the Controller Cluster Before starting this procedure, go to www.extron.com/download and download the latest version of the VNM EC 200 firmware. Note the file location you store it to. The examples for this update procedure for the dual (redundant) VNM EC 200s use the following IP addresses: Primary Redundant:... -
Page 197: Update The Redundant Secondary Controller
Update the Redundant Secondary Controller When Unpair is complete, use a new browser window or tab to log on to the redundant secondary controller, in this example 192.168.254.253. Select the Configuration tab (see figure 178, Figure 178. Configuration Page — Redundant Secondary Controller Click the Upgrade link ( Click Browse ( ). -
Page 198: Pair The Controllers
Click the Upgrade link in the left panel (see figure 179, on the previous page). Click Browse ( ), and use the file browser to navigate to the firmware file location. Select the file and click Open. Click Upgrade, ( Pair the Controllers When the primary controller upgrade completes the upgrade, click the Configuration tab (if the tab is not open). - Page 199 The following dialog opens: Figure 182. Restore Data Dialog Select Browse (see figure 182, The Choose File to Upload dialog opens. Figure 183. Restore Data Dialog Navigate to, then click to highlight the previously stored backup file (see figure 183, ecbackup.tar.gz in the example.
-
Page 200: Reference Information
Reference Information This section provides information about: Default Factory Settings • • VN‑Matrix System Port Usage Mounting • • HLI Command Overview • HLI Command Examples General Commands • • Preset Commands • Remote Communication and Control Using SIS Commands Host‑to‑device Communications •... - Page 201 Port Transport Usage HLI server port when running in secure mode. To access this port the user needs to enter login credentials. Telnet (can be disabled). TFTP Server, for firmware upgrades. Secure HTTP data communication between the Web browser and the EC 200.
-
Page 202: Mounting
Mounting Rack Installation This section provides information on installing the controller into a rack cabinet. Rack installation requires the use of the optional rack mount kit. The unit can be rack mounted, using the RSU129 and RSB129 rack mount trays. Units can be rack mounted in a single or side by side configuration. -
Page 203: Hli Command Overview
HLI Command Overview The format of an HLI command is shown below. Command Structure command argument1 argument2 [optional argument1] [optional argument2]... NOTE: The number of arguments, both required and optional, depends on the command. Each command has a defined structure. The HLI command must begin the string but additional commands can follow that include arguments, parameters, and other variables. -
Page 204: Hli Command Examples
HLI Command Examples The HLI command examples that follow refer to a VN-Matrix system consisting of the devices in figure 184. The devices are connected to the network with corresponding device ID, IP address, and device names. Browser Based Control PC LAN-1 LAN-2 STATUS... -
Page 205: General Commands
General Commands General commands are structured using both fixed commands and variables. In the following pages, fixed commands are in command fonts that identify the HLI commands. Variables that represent the device identifier, argument, or parameter values are in italic fonts analogOutputEnable... -
Page 206: Analogoutputsetlevel
analogOutputSetLevel The analogueOutputSetLevel command sets the level of the audio channel on VNS 104 devices. The command is sent to window 4, the VNS 104 audio channel. NOTE: This command uses zero-based window numbering. Channel numbers to refer to the top-left, top-right, bottom-left and bottom-right positions respectively. Channel number 4 selects the audio channel. - Page 207 Additional optional parameters and arguments for this command are: Parameter Arguments Description source 50001:1 The serial number (ID) of the source device followed by the channel number (if applicable) The IP address of the source device followed 192.168.0.51:1 by the channel number (if applicable) The user-defined name of the source device VN_Recorder:1 followed by the channel number (if applicable)
- Page 208 VNM 200/225 Device Examples For the VNM 200/225 device examples: 2xx Device1: Name = 200_Device1, ID = 20001, IP = 192.168.0.21 Name = 200_Device2, ID = 20002, IP = 192.168.0.22 2xx Device2: Example 1 - Connect Device1 to Device2 using the device IDs. connect 20001 20002 Example 2 - Connect Device1 to Device2 using the device names.
- Page 209 Example 7 - Connect Encoder1 to Decoder1 with breakaway audio from Encoder2. connect 25001 25003 streams=v,a program_audio_source=25002 Example 8 - Connect Encoder1 to Decoder1 with program and return audio (Decoder1 back to Encoder1). connect 25001 25003 streams=v,a2 Example 9 - Break connections to Encoder1. connect 25001 none Example 10 - Break connections to Decoder1.
- Page 210 Example 3 - Connect VNM 2xx to VNS 104 top left quadrant using IP addresses. connect 192.168.0.21 192.168.0.41:0 Example 4 - Connect VNM 2xx to VNS 104 using a combination of device ID and IP address. connect 20001 192.168.0.41:0 Example 5 - Connect VNM 2xx to VNS 104 bottom right quadrant. connect 20001 40001:3 Example 6 - Connect VNM 2xx video and audio only to VNS 104 bottom right quadrant.
- Page 211 VNM Recorder (5 Channel) Devices For the VNM Recorder device examples: VNM Recorder: Name = 5ch_Device1, ID = 50001, IP = 192.168.0.51 Name = 200_Device1, ID = 20001, IP = 192.168.0.21 VNM 2xx: VNR 100: Name = 100_Device1, ID = 10001, IP = 192.168.0.11 Example 1 - Connect VNM 2xx (source) to VNM Recorder channel 2 specifying a recording directory "dir1".
-
Page 212: Createdisplay
createdisplay The createdisplay command sets a VN-Matrix Codec device to display mode (decoder). It disconnects existing connections before changing the device mode. Command line structure createdisplay device Device name, device ID, or IP address. device: For the following examples: VNM 2xx: Name = 200_Device1, ID = 20001, IP = 192.168.0.21 VNM 3xx: Name = 300_Device2, ID = 30001, IP = 192.168.0.31 Example 1 - Set a VNM 2xx device to display mode using the IP address. -
Page 213: Currenttime
currentTime The currentTime command returns the current system time of the VN-Matrix controller. It can be obtained from any active VN-Matrix device on the system excluding the VN-Matrix EC 200. The currentTime value is the reference point when setting future event start times (see play). -
Page 214: Getalarmlogs
getalarmlogs The getalarmlogs command returns a list and details of alarms present on the VN-Matrix system. Command line structure getalarmlogs Returned attributes for this command are: Attribute Value Description A summary of the severity of the alarm. severity critical, warning, none The associated ID number of the alarm. -
Page 215: Getdevices
getdevices The getdevices command returns attributes and values for all devices connected to the VN-Matrix System Controller. Optional parameters can limit the attributes that are returned or can filter which devices return attributes. Command line structure getdevices keys where order_by Available parameters and arguments for this command: Parameter Argument... - Page 216 IP address of Ethernet port 0 on the device. localIp0 nnn.nnn.nnn.nnn Example: 192.168.0.51 mode enable/disable/standby The current operating mode of the device. Example: enable The user-defined name of the device name Name: channel followed by the channel number if Example: 5ch_Device1:2 applicable (VNM Recorder and VNS104).
-
Page 217: Getdevicelayout (Vns 104 Only)
Example 3 - List by name all VNM 200 devices that are provisioned as displays. getdevices keys=name where="device_type='VNC 200 DVI-AD' and type='display'" Returns: ["200_Device3","200_Device4"] getDeviceLayout (VNS 104 Only) The getDeviceLayout command determines whether video streams are currently displayed in quad-split mode or single window full screen mode on a specific device. Command line structure getDeviceLayout device Device name, device ID, or IP address... -
Page 218: Getfoldertree
getFolderTree The getFolderTree command returns a formatted list of folders in a specified recorder path. Command line structure getFolderTree device path levels Available parameters and arguments for this command are: Parameter Argument Description The device ID of the recorder. device 50001 The IP address of the recorder. -
Page 219: Mkdir
For the following example: VNR 100: Name = 100_Device1, ID = 10001, IP = 192.168.0.11 Example 1 - Return the attributes of the recording ' from folder Test_file_1.rec' on a VNR 100. /tstfolder1 'Test_file_1.rec'/ stat 10001 tstfolder1 Returns: {"startTimeUs":626652,"lengthUs":406367, "isdst":0,"tag":"","length":238,"prefix": "device2000715.videoPort0.2000715.0.0", "ftype":"recording","startTime":55040,"date":"06-09-13", "path":"/Tstfolder1/Test_file_1.rec"} mkdir... -
Page 220: Play (Vnm Recorder And Vnr 100 Devices Only)
play (VNM Recorder and VNR 100 devices only) The play command starts playback of the specified player and channel number. All associated streams (video, audio, data, whiteboard) start when the command is issued. A playat time can be included to start playback at a pre-defined system time in the future, enabling the synchronization of multiple channels. -
Page 221: Record (Vnm Recorder And Vnr 100 Devices Only)
record (VNM Recorder and VNR 100 devices only) The record command starts recording on the specified recorder and channel number. Command line structure record source:n Device name, device ID, or IP address of the VNM Recorder or VNR 100. source: Channel number (defaults to channel 1 if not specified). For the following examples: VNR 100: Name = 100_Device1, ID = 10001, IP = 192.168.0.11... -
Page 222: Scalemode
Available parameters and arguments for this command are: Parameter Argument Description The serial number (ID), IP address, or device device:n 40001:1 name of the VNS 104 device followed by the decode window number, 1-4 192.168.0.41:1 104_Device1:1 Quad split layout layout QuadSplit Full screen layout Fullscreen... -
Page 223: Stop (Vnm Recorder And Vnr 100 Devices Only)
stop (VNM Recorder and VNR 100 devices only) command stops playback of a file on the specified player and channel number. All stop associated streams are also stopped when the command is issued. Command line structure stop source:n Device name, device ID, or IP address of the VNM Recorder or VNR 100. source: Channel number (defaults to channel 1 if not specified). -
Page 224: Walk
walk command returns a formatted list of folders and files in a specified recorder path. walk Command line structure (required parameters in bold): walk device path type levels Available parameters and arguments for this command are: Parameter Argument Description The serial number (ID) of the recorder. device 50001 192.168.0.51... -
Page 225: Delete (Vnm Recorder And Vnr 100 Devices Only)
delete (VNM Recorder and VNR 100 devices only) command deletes recordings on a recodring device. delete Available parameters and arguments for this command are: Parameter Argument Description device 50001 The serial number (ID) of the recorder. The IP address of the recorder. 192.168.0.51 The user-defined name of the recorder. -
Page 226: Preset Commands
Preset Commands Preset commands are structured using both fixed commands and variables. In the following pages, fixed commands are in that identify the HLI commands, and command fonts variables that represent the device, argument, or parameter value are in slanted fonts presetadvance command advances or reverses the player in a preset by a single presetadvance... -
Page 227: Presetdelete
presetdelete command deletes the specified preset from memory. presetdelete Command line structure presetdelete name Name of the stored preset. name: Example 1 - Delete a preset named preset1 presetdelete preset1 presetget command returns the connection status of all devices within a specified presetget preset. -
Page 228: Presetgetlist
presetgetlist command returns a list of all currently stored presets on a system. presetgetlist Command line structure presetgetlist Example 1 - Return a list of all the presets on a system. presetgetlist Returns: ["Preset1","Preset2","Preset3","Preset4"] presetgetplayerstatus (VNM Recorder and VNR 100 only) command returns a list of playback status properties presetgetplayerstatus associated with a specified preset. -
Page 229: Presetgetrecorderstatus (Vnm Recorder And Vnr 100 Only)
Example 1 - Return the playback properties of all player devices within a preset named "preset1" presetgetplayerstatus preset1 Returns: [{"playstate":"PLAY","position_timecode":"01:23:22:00", "filename":"File1_20001.0.0_r0_ s0.rec","directory":"/dir1", "duration_timecode":"02:23:22:00","duration":8602, "position":5002,"speed":2.3,"device_id":"100_Device1"}, {"playstate":"PLAY","position_timecode" :"01:23:22:00", "filename":"File2_20002.0.0_r0_s0.rec","directory" :"/dir2","duration_timecode":"02:23:22:00","duration":8602, "position":5002,"speed":2.3,"device_id":"100_Device2"}, {"ts_playstate":"PLAY","ts_duration_timecode":"02:23:22:00", "ts_speed":2.3,"ts_ position":5002,"ts_position_ timecode":"01:23:22:00","device_id":"preset","ts_ duration":8602}] Example 2 - Return the playback properties of device ID within a preset named 10002 "preset1"... -
Page 230: Presetlaunch
Example 1 - Return the recording properties of all recorder devices in "preset1" presetgetrecorderstatus preset1 Returns: [{"Mbytes":"1564","filename":"File1_20001.0.0_r0_ s0.rec","directory":"/dir1","duration":"8602","recordstate": "disable","device_id":"10001:1"},{"Mbytes":"1564","filename": "File2_20002.0.0_r0_s0.rec","directory":"/dir2","duration": "8602","recordstate":"disable","device_id":"10002:1"}] Example 2 - Return the recording properties of device ID within a preset named 10002 "preset1" presetgetplayerstatus preset1 device=10002 Returns: [{"Mbytes":"1564","filename": "File2_20002.0.0_r0_s0.rec","directory":... -
Page 231: Presetload
presetload command calls a previously stored preset and creates all of the associated presetload connections between source and sink devices. If the preset includes recorder devices (VNM Recorder or VNR 100), directories and filenames are created (if they do not already exist). If the preset includes player devices (VNM Recorder or VNR 100), associated folders, files and offset times are provisioned ready for playback. -
Page 232: Presetplay
presetplay command controls the playback speed of all currently playing player presetplay devices (VNM Recorder and VNR 100) within a preset. If is called while the presetplay players in a preset are paused, playback is resumed at the specified speed. NOTE: cannot be used to start players currently stopped. The presetplay command is used in this instance. -
Page 233: Presetplayerstop
Example 1 - Start all players in "preset1" presetplayerstart preset1 Example 2 - Start all players in while maintaining all offsets. "preset1" presetplayerstart preset1 keepoffset=yes presetplayerstop command stops playback on all active players in a specified presetplayerstop preset. Command line structure presetplayerstop name Name of the stored preset. -
Page 234: Presetset
presetset The presetset command creates and stores a new preset with a specified name and attributes using a JSON string (see HLI Responses on page 181). Command line structure presetset name '{JSON}' The name of the preset (A-Z, a-z, 0-9, dash [-], and underscore [ _ ]). name: The JSON string containing details of sources, displays, and attributes. -
Page 235: Presetseek
presetseek The presetseek command allows the user to seek a specific point in the files of the currently playing recorders in a preset. NOTE: Playback automatically continues from the specified time. No additional play commands are required to continue the playback. Command line structure presetseek name time Name of the stored preset. -
Page 236: Remote Communication And Control Using Sis Commands
The VNM EC 200 can be remotely connected via a host computer or other device (such as a control system) to the front panel USB Config port. That allows the VNM EC 200 to be reset and provides limited configuration using Simple Instruction Set (SIS) commands. -
Page 237: Verbose Mode
EC 200-initiated Messages The EC 200 initiates messages under specific conditions. No response is required from the host. The EC 200-initiated messages are listed here (underlined). © Copyright 2015, Extron Electronics, Enterprise Controller 200, Vn.nn, 60– xxxx-01 Day, DD MMM YYYY HH:MM:SS is the firmware version number. -
Page 238: Error Responses
Error Responses When the EC 200 is unable to execute the command, it returns an error response to the host. The error response is E10 to indicate an unrecognized command. Using the Command and Response Tables Command and Response Tables begin on page 229. Symbols used in the table represent variables in the command and response fields. -
Page 239: Command And Response Tables
Symbol definitions = CR/LF (carriage return/line feed) or ¦ = Carriage return (no line feed, hex 0D) • = Space = Escape Command and Response Tables SIS Command Response Additional Description Command Function (Host to Device) (Device to Host) Information requests Dotted decimal notation xxx.xxx.xxx.xxx Read IP Address... -
Page 240: Dataviewer
DataViewer DataViewer is an enhanced terminal emulation program that facilitates analysis of RS-232, USB, and TCP/IP communication with Extron devices. The software allows users to send commands to a device and view the responses in ASCII or hexadecimal format. Command and response logs can be saved in text or HTML format. - Page 241 The main DataViewer dialog opens and the EC 200 responds with a copyright statement containing the model number, part number, and current firmware version of the connected EC 200, along with the date (see figure 189, (c) Copyright 2015, Extron Electronics, Enterprise Controller 200, V1.03, 60-9999-02 Thu, 24 Sep 2015 13:51:37 192.168.254.254 Figure 189.
-
Page 242: Extron Warranty
Extron Electronics makes no further warranties either expressed or implied with respect to the product and its quality, performance, merchantability, or fitness for any particular use. In no event will Extron Electronics be liable for direct, indirect, or consequential damages resulting from any defect in this product even if Extron Electronics has been advised of such damage.
Need help?
Do you have a question about the VNM EC 200 and is the answer not in the manual?
Questions and answers