
Related Manuals for Extron electronics TLP Pro 720C


Summary of Contents for Extron electronics TLP Pro 720C
- Page 1 User Guide TouchLink ® TLP Pro 720C TouchLink Pro Touchpanel Control Systems 68-2406-01 Rev. B 01 21...
- Page 2 Safety Instructions Safety Instructions • English Instructions de sécurité • Français AVERTISSEMENT : Ce pictogramme, , lorsqu’il est utilisé sur le WARNING: This symbol, , when used on the product, is intended to produit, signale à l’utilisateur la présence à l’intérieur du boîtier du alert the user of the presence of uninsulated dangerous voltage within produit d’une tension électrique dangereuse susceptible de provoquer the product’s enclosure that may present a risk of electric shock.
- Page 3 安全说明 • 简体中文 警告: 产品上的这个标志意在警告用户, 该产品机壳内有暴露的危险 电压, 有触电危险。 注意: 产品上的这个标志意在提示用户, 设备随附的用户手册中有重 要的操作和维护(维修)说明。 关于我们产品的安全指南、遵循的规范、EMI/EMF 的兼容性、无障碍使 用的特性等相关内容, 敬请访问 Extron 网站 , www.extron.com,参见 Extron 安全规范指南,产品编号 。 68-290-01 安全記事 • 繁體中文 안전 지침 • 한국어 경고: 이 기호 가 제품에 사용될 경우, 제품의 인클로저 내에 있는 警告: 若產品上使用此符號,...
- Page 4 FCC Class A Notice This equipment has been tested and found to comply with the limits for a Class A digital device, pursuant to part 15 of the FCC rules. The Class A limits provide reasonable protection against harmful interference when the equipment is operated in a commercial environment. This equipment generates, uses, and can radiate radio frequency energy and, if not installed and used in accordance with the instruction manual, may cause harmful interference to radio communications.
- Page 5 Conventions Used in this Guide Notifications In this user guide, the following are used: WARNING: Potential risk of severe injury or death. AVERTISSEMENT : Risque potentiel de blessure grave ou de mort. CAUTION: Risk of minor personal injury. ATTENTION : Risque de blessure mineure. ATTENTION: Risk of property damage.
-
Page 7: Table Of Contents
Reset Modes ............ 35 Inserting the AAP Assemblies ....... 14 Use Factory Firmware ........35 Mounting the TLP Pro 720C Enclosure ..... 15 Reset All IP Settings ........35 Reset to Factory Defaults ......36 Enable or Disable the DHCP Client ....36 Panel Features ............ - Page 8 TLP Pro 720C • Contents viii...
-
Page 9: Introduction
TouchLink Pro Touchpanel. Unless otherwise stated, the terms TLP Pro and touchpanel refer to the TLP Pro 720C. The TLP Pro 720C is ideal for any AV application requiring a full-size, Cable Cubby touchpanel with a customizable interface. This section provides an overview of these products: About the TLP Pro 720C •... -
Page 10: Application Diagram
Highly reliable, energy-efficient external universal power supply optional — Provides worldwide power compatibility, with high demonstrated reliability and low power consumption for reduced operating costs. Application Diagram This diagram shows a typical application for the TLP Pro 720C touchpanel. RS-232 RS-232 Extron... -
Page 11: Requirements
An Extron IP Link Pro control interface must also be connected to the same network domain as the TLP Pro TouchLink panel. See www.extron.com for a list of suitable controller processor. NOTE: These touchpanels are not compatible with Extron IP Link (non-Pro) control processors. TLP Pro 720C • Introduction... -
Page 12: Installation Overview
Plan where you are going to install the Cable Cubby and how you are going to cut the … hole. Ensure the TLP Pro 720C is oriented correctly and that there is adequate room for … cables and cable retractors (optional). - Page 13 Put together and install the AAP assembly (see … Assemblies on page 13). Mount the Cable Cubby (see Mounting the TLP Pro 720C Enclosure … page 15. Connect the power supply or Power over Ethernet power injector. … TLP Pro 720C • Installation Overview...
- Page 14 Frequently touched devices, such as touchscreens, require regular cleaning to ensure their surfaces remain sanitary. Plastic surfaces and cosmetic finishes can be damaged by long term exposure to chemicals. For Best Practices for Cleaning Your Extron Products, see page 34. TLP Pro 720C • Installation Overview...
-
Page 15: Mounting The Tlp Pro 720C
Mounting the TLP Pro 720C This section describes how to mount the TLP Pro 720C Cable Cubby. It covers: Planning • Tools Required for Installation • Included Parts • Ensure Adequate Under-table Clearance for Retractors • Cutting the Table • Running Cables •... -
Page 16: Tools Required For Installation
1-position Bracket Kit 2-position Bracket Kit 3-position Bracket Kit NOTES: Inside the US, the TLP Pro 720C can be purchased with or without an AC power module. Outside the US, see to find a power www.extron.com module that is suitable for your location. -
Page 17: Ensure Adequate Under-Table Clearance For Retractors
Ensure Adequate Under-table Clearance for Retractors Retractors are optional accessories for handling cables with the TLP Pro 720C. If you are using retractors, ensure that there is sufficient room beneath the table to accommodate them. Horizontal mounting provides maximum legroom and protects the retractors from accidental damage. -
Page 18: Cutting The Surface
TLP Pro 720C: 8.90 +0.00/-0.02 inches W x 7.1 +0.00/-0.02 inches D 226.11 +0.0/-0.5 mm W x 180.3 +0.0/-0.5 mm D NOTE: The width dimension (underlined) refers to the side with AAP access. TLP Pro 720C • Mounting the TLP Pro 720C... -
Page 19: Running Cables
To mount the retractors horizontally and for further information and installation instructions, see the Retractors User Guide, which is available at www.extron.com. The guide also provides information about mounting the retractors at a 30° angle to satisfy ADA compliance requirements. TLP Pro 720C • Mounting the TLP Pro 720C... -
Page 20: Installing Power Modules (Optional)
Installing Power Modules in the TLP Pro 720C Run the cable or conduit to a convenient junction box. Extron recommends the circuit be attached to a junction box that is directly wired to the main circuit. TLP Pro 720C • Mounting the TLP Pro 720C... -
Page 21: Preparing And Installing The Aap Assemblies
Active, passive and pass-through AAPs can be mixed. • Cables can be attached to the active or passive AAPs after assembly. • Insert cables into each pass-through AAP before the next AAP is added. • TLP Pro 720C • Mounting the TLP Pro 720C... -
Page 22: Inserting The Aap Assemblies
NOTE: At this time, captive washer nuts should be hand tightened; otherwise it is difficult to attach the brackets to the frame of the TLP Pro 720C (see “Inserting the AAP Assemblies” below). When using pass-through AAPs, ensure they are in the correct orientation with the opening in the grommets that are facing forward (see figure 8). -
Page 23: Mounting The Tlp Pro 720C Enclosure
Remove the edge grommet protecting the edges of the trim ring ( ) and the plastic film on the finished surfaces. If necessary, remove the table clamps from the sides of the TLP Pro 720C enclosure. 5 5 5 4 4 4... -
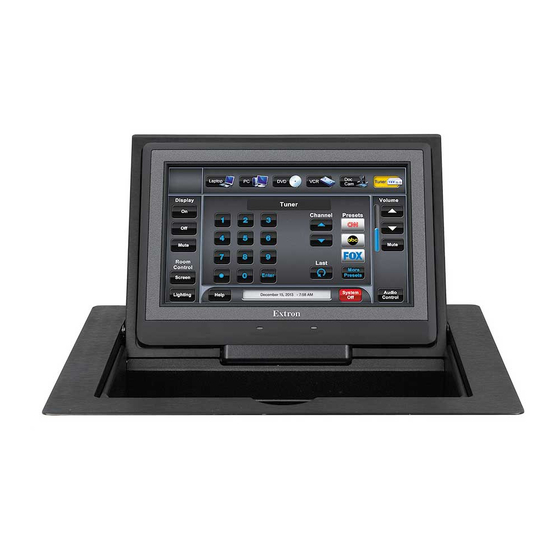
Page 24: Panel Features
Lorsque vous faites glisser l’outil d’extraction entre l’écran et le châssis, faites • attention à éviter d’endommager la nappe de raccordement se trouvant à proximité du bord du châssis. TLP Pro 720C • Panel Features... - Page 25 Display Screen (see page 25). Bezel attachment point — the TLP Pro 720C has eight attachment points (two on each side, two on the top edge, and two on the bottom edge). LCD screen — the TLP Pro 720C has a 7-inch screen with a 800x480 resolution.
-
Page 26: Connectors
Connectors The cable connections are located in a panel on the bottom of the TLP Pro 720C: A A A B B B Power Connector Network and Power over Ethernet Connector Figure 13. Cable Connectors for TLP Pro 720C ATTENTION: Do not power on the touchpanels or control processors until you have read the •... - Page 27 Ne pas étamer les conducteurs avant de les insérer dans le connecteur. Les • câbles étamés ne sont pas aussi bien fixés dans le connecteur et pourraient être retirés. TLP Pro 720C • Panel Features...
-
Page 28: Network And Power Over Ethernet Connector
Network and Power over Ethernet Connector The TLP Pro 720C can be powered by a 12 VDC power supply or Power over Ethernet. ATTENTION: Do not power on the touchpanels or control processors until you have read the • Attention notice on... - Page 29 The power supply shall not be permanently fixed to building structure or similar • structure. La source d’alimentation ne devra pas être fixée de façon permanente à une • structure de bâtiment ou à une structure similaire. TLP Pro 720C • Panel Features...
-
Page 30: On-Screen Menus
When a control processor is connected, a green bubble is shown in the panel. When there is no control processor Advanced connected, there is a red square. TLP Pro 720C • On-screen Menus... -
Page 31: Network Screen
The dialog Host Name Host Name box opens: Figure 18. Host Name Dialog Box Use the keypad to enter a new name, which appears in the text box. Host Name TLP Pro 720C • On-screen Menus... - Page 32 0.0.0.10 without saving the changes. The button Saved returns to gray. Figure 20. IP Address, unsaved (top) If you have not made any changes, the and saved (bottom). buttons are grayed Apply Revert out. TLP Pro 720C • On-screen Menus...
-
Page 33: Display Screen
• If Auto Brightness is off, the screen brightness is not affected by changes in the ambient light. LCD Brightness — Allows you to adjust the screen brightness, using the slider control. • TLP Pro 720C • On-screen Menus... -
Page 34: Audio Screen
Sound sets the volume of audio from any audio file playback. • Click on the Speaker icon at the bottom of each panel to toggle between audio on and audio mute. The audio is muted in figure 22, above. Sound TLP Pro 720C • On-screen Menus... -
Page 35: Advanced Screen
PIN entered on the first occasion, the PIN is set and the dialog closes. Communication LED The Communication LED (see figure , on page 17) can be enabled or disabled by pressing the Enable Disable button. TLP Pro 720C • On-screen Menus... -
Page 36: Calibration Screen
Follow the on-screen instructions until all five sets of cross hairs have been calibrated (one in each corner and a fifth in the center of the screen). The touchpanel exits the calibration screen once the calibration process is completed. Reattach the bezel. TLP Pro 720C • On-screen Menus... -
Page 37: Configuration Software
Installing Software The TLP Pro 720C is compatible with GUI Designer, Global Configurator Plus and Professional, Global Scripter, and Toolbelt. All four software products can be downloaded from www.extron.com. -
Page 38: Using The Software
After assigning the control functions, the project is rebuilt and uploaded to the control processor and touchpanel. Alternatively, instead of using Global Configurator Plus and Professional, use Global Scripter to program control functions for the text and graphic items of the interface. TLP Pro 720C • Configuration Software... -
Page 39: Tlp Pro 720C Web Page
Passwords can be changed during configuration. Passwords are case sensitive. NOTE: If the device is reset to default settings, the passwords are reset to the default password, which is (for either extron admin user TLP Pro 720C • Configuration Software... - Page 40 TLP Pro 720C Web Page There is a single page, most of which is read-only, providing general and network information about the unit. Use the Setup Menu (see page 22) or Toolbelt to configure the touchpanel network settings. TLP Pro 720C • Configuration Software...
-
Page 41: Updating The Firmware
Updating the Firmware Firmware for the TLP Pro 720C can be upgraded using Toolbelt. Before starting, consult your IT team and ensure that the touchpanel has a unique IP address. Downloading Firmware Power on a computer that is connected to the same network as the touchpanel. -
Page 42: Reference Material
Touchpanels For information about network port requirements and licensed third-party software for the TLP Pro 720C, please refer to the Pro Series Control Product Network Ports and Licenses Guide, which is available at www.extron.com. TLP Pro 720C • Reference Material... -
Page 43: Reset Modes
Reset Modes The TLP Pro 720C has the following four reset modes. Use Factory Firmware • Reset All IP Settings • Reset to Factory Defaults • Enable or Disable the DHCP Client • The reset modes are initiated by pressing the... -
Page 44: Reset To Factory Defaults
LED blinks six times. • Reset NOTES: By default DHCP is off and the unit uses a static IP address. • When you disable DHCP, the unit reverts to using the previously-set static IP address. • TLP Pro 720C • Reference Material... -
Page 45: Secure Sockets Layer (Ssl) Certificates
The 802.1X Primer white paper, also available from www.extron.com, provides a general • overview of the protocol and its use within a control system. NOTES: You must run Toolbelt as an administrator. • Machine certificates require a private key file, which can be encrypted. • TLP Pro 720C • Reference Material... -
Page 46: Certificate File Requirements
) characters • Some special characters (colon [ ], underscore [ ], and hyphen [ It has a file extension that is • .key .pem It can have optional encryption (via password or passphrase). • TLP Pro 720C • Reference Material... - Page 47 Extron Warranty Extron warrants this product against defects in materials and workmanship for a period of three years from the date of purchase. In the event of malfunction during the warranty period attributable directly to faulty workmanship and/ or materials, Extron will, at its option, repair or replace said products or components, to whatever extent it shall deem necessary to restore said product to proper operating condition, provided that it is returned within the warranty period, with proof of purchase and description of malfunction to: USA, Canada, South America,...
Need help?
Do you have a question about the TLP Pro 720C and is the answer not in the manual?
Questions and answers