Table of Contents
Advertisement
Quick Links
Download this manual
See also:
User Manual
Advertisement
Table of Contents

Subscribe to Our Youtube Channel
Related Manuals for Extron electronics RAC 104


Summary of Contents for Extron electronics RAC 104
- Page 1 User Guide Audio Products RAC 104 Remote Volume and Tone Controller 68-782-01 Rev. D 10 18...
- Page 2 Safety Instructions Safety Instructions • English Istruzioni di sicurezza • Italiano AVVERTENZA: Il simbolo, , se usato sul prodotto, serve ad WARNING: This symbol, ,when used on the product, is avvertire l’utente della presenza di tensione non isolata pericolosa intended to alert the user of the presence of uninsulated dangerous all’interno del contenitore del prodotto che può...
- Page 3 より 『Extron Safety www.extron.com and Regulatory Compliance Guide』 (P/N 68-290-01) をご覧ください。 Copyright www.extron.com © 2008-2018 Extron Electronics. All rights reserved. Trademarks All trademarks mentioned in this guide are the properties of their respective owners. The following registered trademarks ( ®...
- Page 4 FCC Class A Notice This equipment has been tested and found to comply with the limits for a Class A digital device, pursuant to part 15 of the FCC rules. The Class A limits provide reasonable protection against harmful interference when the equipment is operated in a commercial environment.
- Page 5 Conventions Used in this Guide Notifications The following notifications are used in this guide: CAUTION: Risk of minor personal injury. ATTENTION : Risque de blessure mineure. ATTENTION: • Risk of property damage. • Risque de dommages matériels. NOTE: A note draws attention to important information. Software Commands Commands are written in the fonts shown here: ^AR Merge Scene,,0p1 scene 1,1 ^B 51 ^W^C.0...
-
Page 7: Table Of Contents
Rear Panel Features and Cabling ......4 Presets ............... 20 Front Panel Controls ..........7 Mute ..............20 Channel Ties ............. 8 Resetting the RAC 104 ........9 Reference Information ........ 21 Locking the Front Panel ........9 Mounting the RAC 104 ........21 Tabletop use ........... - Page 8 viii Technical Publications Standards and Styles • Contents...
-
Page 9: Introduction
Inputs: Captive screw connectors • Outputs: Captive screw connectors Volume, bass, and treble controls — Adjust these three settings using the RAC 104 • front panel controls or an RS-232 device. Set upper and lower limits for volume and tone using an RS-232 device. -
Page 10: Application Diagram
AUDI POWE 70V Audio PROT CLIP NORM RS-23 SIGN T PANE FRON LOCK Amplifier AMPL IFIER AUDI Program Audio Amplifier PROT CLIP NORM RS-23 SIGN FRON T PANE Speakers LOCK Figure 1. Typical RAC 104 Application RAC 104 • Introduction... -
Page 11: Installation And Operation
To install and set up the RAC 104 , follow these steps: Turn off all equipment and disconnect it from the power source. Mount the RAC 104 (if applicable) or affix the rubber feet to the bottom of the unit for tabletop use (see Mounting the RAC 104... -
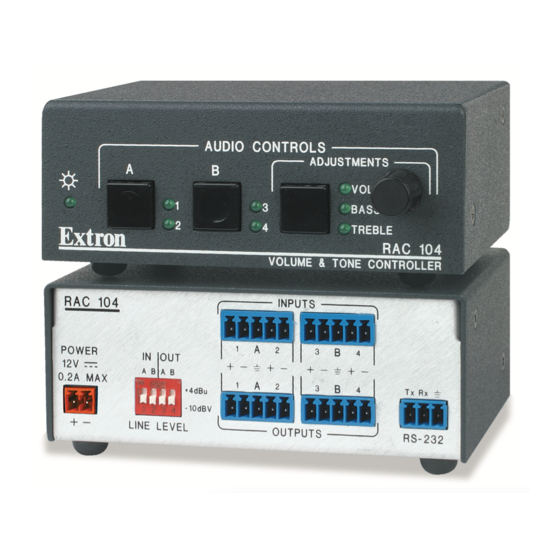
Page 12: Rear Panel Features And Cabling
Line level selector DIP switches — Set these switches to -10 dBV A B A B (unbalanced, consumer line level) or +4 dBu (balanced, professional +4 dBu line level). There are four switches, one for each input group and output -10 dBV group. LINE LEVEL RAC 104 • Installation and Operation... - Page 13 Code américain de l’électricité (National Electrical Code) ANSI/NFPA 70, article 725, et du Code canadien de l’électricité, partie 1, section 16. La source d’alimentation ne devra pas être fixée de façon permanente à une structure de bâtiment ou à une structure similaire. RAC 104 • Installation and Operation...
- Page 14 Un réseau utilisant une alimentation à distance ne peut pas être routé en extérieur. NOTE: After making any adjustments to the RAC 104, either via the front panel controls, SIS commands, or the Extron Audio Products Control Program, wait at least 10 seconds after making those changes before disconnecting power to the RAC 104.
-
Page 15: Front Panel Controls
Power LED — Lights to indicate that the RAC 104 is on. Channel selector buttons and LEDs — The RAC 104 has two channel selector buttons, one for channel group A (channels 1 and 2) and one for channel group B (channels 3 and 4). -
Page 16: Channel Ties
Press the adjustment selector button to select either volume, bass, or treble and turn the adjustment knob in either direction. The RAC 104 automatically sets both channels to the same volume or tone level using the following criteria: For volume — The unit changes the volume setting for the channel with the •... -
Page 17: Resetting The Rac 104
Resetting the RAC 104 To return the RAC 104 to its default settings, press and hold the adjustment selector button for 10 seconds. All the LEDs will light and then turn off. The default settings are: • Volume — 70 (-30 dB) Gain —... -
Page 18: Remote Control
The RAC 104 can be controlled remotely via the RS-232 port using the Extron Simple Instruction Set (SIS). The RS-232 port on the RAC 104 is a 3-pole captive screw connector, with one pole for transmitting data, one for receiving data, and one for the ground. -
Page 19: Error Messages
Error Messages When the RAC 104 receives an SIS command and determines that it is valid, it performs the command and sends a response to the host device. If the controller is unable to perform the command because the command is invalid or contains invalid parameters, the contoller returns an error response to the host. -
Page 20: Timeout
Off = dBV (unbalanced, consumer level) On = dBu (balanced, pro level) Timeout Pauses of 10 seconds or longer between command ASCII characters result in a timeout. The command operation is aborted with no other indication. RAC 104 • Remote Control... -
Page 21: Command And Response Table For Sis Commands
4, channel numbers = group A, channel 1, 2 = group A, channel 2, 3 = group B, channel 4 = group B, channel 4 = on = 0 or 1 0 = off, 1 RAC 104 • Remote Control... - Page 22 = group A, channel 1, 2 = group A, channel 2, 3 = group B, channel 4 = group B, channel 4 = 0 or 1 0 = off, 1 = on = Preset number 1 through 3 RAC 104 • Remote Control...
- Page 23 Commands can be made back-to-back with no spaces. = 0 or 1 0 = off, 1 = on KEY: = A or B, group number Group A = channels 1 and 2, Group B = channels 3 and 4 RAC 104 • Remote Control...
- Page 24 = [bass number minus 7] times 2; default = 7 [0 dB]). = 0 through 14, treble adjustment range (+/-14 dB; 2 dB increment/decrement, treble in dB = [treble number minus 7] times 2; default = 7 [0 dB]). RAC 104 • Remote Control...
-
Page 25: Setup And Control Software
Updates to this program can be downloaded from the Extron website. RS-232 Links The RAC 104 can be controlled remotely via the rear panel 3-pole, 3.5 mm RS-232 port (see figure 2 on page 4) connected to the RS-232 serial port output of a host device, such as a computer running the DataViewer utility, a control system, or the Extron Windows- based control program. -
Page 26: Using The Software
Extron Electronics Audio Products Control Program program group. Figure 10. Windows-based Control Program Main Window Click the comm port that is connected to the RAC 104 remote connector. Click . The main window displays the current Audio Products Control Program volume, tone, and gain/attenuation settings for each channel and allows the user to adjust them. -
Page 27: Using The Help System
. The Open Firmware Loader loads the update. The RAC 104 front panel LEDs flash intermittently during the loading process. Once loading is complete, all the LEDs flash simultaneously for 10 seconds and then return to their default settings. NOTE: The firmware update file must have an .s19 extension. If it does not have that extension it will not work properly. -
Page 28: Front Panel Security Lockout (Executive Modes)
When two channels are tied together, selecting mute or unmute for one channel will mute or unmute both. • When the user ties a muted channel to a channel that is not muted, the RAC 104 unmutes the muted channel automatically. RAC 104 • Setup and Control Software... -
Page 29: Reference Information
Pay particular attention to supply connections other than direct connections to the branch circuit (fr example, use of power strips). For rack mounting, do not install the rubber feet. Mount the RAC 104 on an optional Extron 1U rack shelf (see... -
Page 30: Furniture Mounting
Insert #8 wood screws into the four pilot holes. Tighten each screw into the mounting surface until just less than 1/4 inch of the screw protrudes. Align the mounting screws with the slots in the brackets and place the RAC 104 against the surface, with the screws through the bracket slots (see figure 17 on the next page). -
Page 31: Projector Mounting
Projector mounting Projector mount the RAC 104 using the optional pole mount kit as follows: Remove rubber feet if they were previously installed on the bottom of the RAC 104. RAC 104 Mounting Options.eps Attach the projector mounting bracket to the RAC 104 with the machine screws provided. - Page 32 Extron Electronics makes no further warranties either expressed or implied with respect to the product and its quality, performance, merchantability, or fitness for any particular use. In no event will Extron Electronics be liable for direct, indirect, or consequential damages resulting from any defect in this product even if Extron Electronics has been advised of such damage.
Need help?
Do you have a question about the RAC 104 and is the answer not in the manual?
Questions and answers