Dräger Infinity Acute Care System M540 Instructions For Use Manual
Patient monitor
Hide thumbs
Also See for Infinity Acute Care System M540:
- Instructions for use manual (610 pages) ,
- Quick reference manual (24 pages) ,
- Quick reference manual (24 pages)

Related Manuals for Dräger Infinity Acute Care System M540


Summary of Contents for Dräger Infinity Acute Care System M540
- Page 1 Instructions for use Infinity Acute Care System Infinity M540 patient monitor WARNING To properly use this medical device, Software VG4.n read and comply with these instruc- tions for use.
-
Page 2: Patient Preparation For Spo
Typographical conventions 1 Consecutive numbers indicate steps of action, with the numbering restarting with "1" for each new sequence of actions. Bullet points indicate individual actions or differ- ent options for action. – Dashes indicate the listing of data, options, or objects. - Page 3 Trademarks ® – Acute Care System – Durasensor ® ® – DrägerService – Nellcor ® ® – Infinity – OxiMax ® ® – Hemo4 – OxiCliq ® – Hemo2 – OxiBand ® ® – Innovian – SoftCare ® ® – MCable –...
- Page 4 Safety information definitions WARNING CAUTION A WARNING statement provides important in- A CAUTION statement provides important infor- formation about a potentially hazardous mation about a potentially hazardous situation situation which, if not avoided, could result in which, if not avoided, may result in minor or mod- death or serious injury.
-
Page 5: Table Of Contents
For your safety and that of your patients For your safety and that of your patients Strictly follow these instructions for use ..Storing the instructions for use ... . . Training. -
Page 6: Strictly Follow These Instructions For Use
For your safety and that of your patients Strictly follow these instructions for use Storing the instructions for use NOTE WARNING The Infinity Acute Care System provides the fol- Risk of incorrect use lowing additional instructions for use: Instructions for use must be kept accessible –... -
Page 7: Safety Checks
For your safety and that of your patients Safety checks Restrictions for use CAUTION The medical device must be subject to regular Device for use in health care environments only safety inspections. See chapter "Maintenance". and exclusively by persons as defined in the tar- get groups (see "Maintenance"... -
Page 8: Device Combinations
For your safety and that of your patients Second edition WARNING – IEC 60601-1, second edition (general require- Connecting devices to a multiple socket-out- ments for safety) let (power strip) can result in increased elec- tric leakage current and expose the user to –... -
Page 9: Connection To Hospital Network
For your safety and that of your patients Connection to hospital network CAUTION Risk of patient injury Many medical devices manufactured by Dräger use Do not make therapeutic decisions based solely networks to transmit patient data in real-time and to on individual measured values and monitoring notify clinical users of alarm conditions. - Page 10 For your safety and that of your patients WARNING WARNING To avoid electric shock, inspect all cables be- Dräger recommends using the Infinity Acute fore use. Never use cables that appear Care System or the M540 for primary diagno- cracked, worn, or damaged in any way (doing sis and the ICS (Infinity CentralStation) for pa- so may compromise performance or put the tient viewing only.
-
Page 11: Not For Use In Areas Of Explosion Hazard
For your safety and that of your patients Not for use in areas of explosion hazard Site of operation Only use devices (monitor, MPod, MCable, and ac- WARNING cessories) in areas that meet the environmental re- Risk of fire quirements outlined in the technical data section. his medical device is neither approved nor certified for use in areas where oxygen con- WARNING... -
Page 12: Defibrillator Precautions
For your safety and that of your patients CAUTION CAUTION To avoid short-circuiting and otherwise damaging To prevent burns and electric shock due to the re- the device, Dräger recommends that no fluids routing of electrical current through electrodes, do come in contact with the IACS devices when they not position the defibrillator pads near any elec- are connected to a power socket. -
Page 13: Contents
Contents Contents For your safety and that of your patients. . . Connecting the system cables in an IACS configuration ......73 General safety information . - Page 14 Contents Connecting the lead wires for neonatal and Pulse CO-Ox monitoring with respiration monitoring....119 Masimo SET MCable ....161 Patient preparation for respiration monitoring .
- Page 15 Contents Invasive blood pressure (IBP) ... . 205 Options ......258 Overview of invasive blood pressure Troubleshooting .
- Page 16 Contents Disposal ......301 EU Directive 2002/96/EC (WEEE) ..301 Technical data.
-
Page 17: Application
Application Application Intended use ......18 Indications for use ..... 19 Functional safety . -
Page 18: Intended Use
Application Intended use The Infinity M540 (M540) is intended for the moni- The M540 and any connected hardware are not in- toring of multi-parameter, physiologic patient infor- tended for use in the following hospital environ- mation obtained from connected hardware in envi- ments: ronments where patient care is provided by trained –... -
Page 19: Indications For Use
Application Indications for use The M540 is capable of monitoring the following pa- – Temperature rameters: – Cardiac output – only available when the M540 – Heart rate is docked in an IACS configuration (adult and pediatric patients only) – Arrhythmia (adult and pediatric patients only) –... - Page 20 This page has been left blank intentionally. Instructions for use Infinity Acute Care System – Infinity M540 SW VG4.n...
-
Page 21: Overview
Overview Overview Overview ......22 M540 front panel......23 M540 back panel . -
Page 22: Overview
Overview Overview These instructions for use describe the M540 pa- The M540 docked on an M500 can be set up as a tient monitor. This monitor is a rugged, light-weight, stand-alone configuration to charge the battery handheld, transportable patient monitor with a when the M540 is not part of an IACS configuration. -
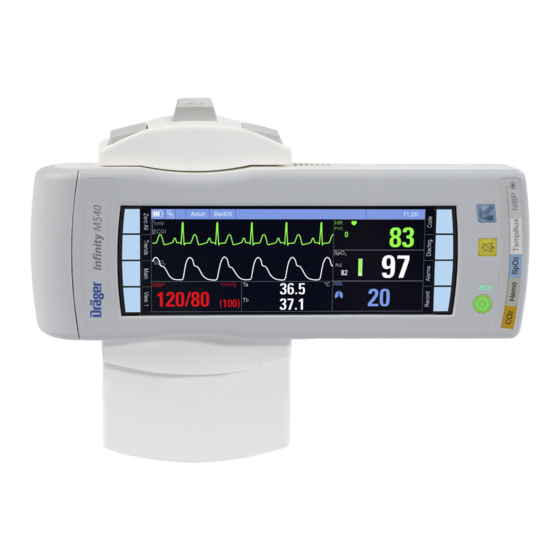
Page 23: M540 Front Panel
Overview M540 front panel M540 fixed keys The M540 has the following fixed keys: The following illustration shows the elements of the front panel. Key/LED Function On/off fixed key Turns the M540 on or off. The button LED flashes when the M540 is undocked;... -
Page 24: M540 Back Panel
Overview M540 back panel M540 side panel A Charging contact points B Labels A Non-invasive blood pressure connector C Optical ethernet links B Temp (2) / Aux connector CAUTION C SpO connector Do not affix any labels inside the shaded areas of D Hemo connector the M540. -
Page 25: M500 Docking Station
Overview M500 docking station M500 back panel The M500 is the device that mechanically secures and powers the M540. The M500 also charges the battery of the M540. If the M540 is part of an IACS configuration, the M500 controls the communica- tion between the M540 and the Cockpit through an optical Ethernet link. -
Page 26: Additional Hardware
Overview M540 docked in the M500 The following diagram shows the M540 when it is A M540 patient monitor docked in the M500 docking station. B M500 docking station Additional hardware The following table lists the additional devices that can be connected to the M540. Device Description Connection... - Page 27 Overview Device Description Connection Infinity MCable – Nellcor OxiMax Measures the percentage of Connects directly to the SpO functional hemoglobin saturated connector of the M540 (see with oxygen (%SpO ) and the page 167 and page 182). pulse rate (PLS). Hemo4 pod Measures up to four pressures, Connects directly to the Hemo...
-
Page 28: Symbols
Overview Symbols Warning! Strictly follow these instructions Alarm monitoring deactivated temporarily for use Consult instructions for use Caution! Observe the accompanying doc- umentation! ESD warning Alarm monitoring deactivated permanently Battery status (when the battery is fully Acoustic alarm signal tone paused tempo- charged, all segments in the symbol are rarily filled in) - Page 29 Overview Upper alarm limits Device part number and revision Autoset alarm limits Device serial number Battery charging LED Adult patient category The speaker is deactivated Pediatric patient category The M540 is docked and connected to the Neonatal patient category network Federal communications commission Japanese radio wave law certification declaration of conformity number...
-
Page 30: Wireless Symbols
Overview Wireless symbols The following symbols appear in the header bar of the M540 only when it is on wireless transport. White wireless symbol indicating the White wireless symbol indicating the M540 M540 has optimum association with a has good association with a wireless access wireless access point. -
Page 31: Abbreviations
Overview Abbreviations The following table lists the abbreviations in these Abbrevia- Description instructions for use and those abbreviations that tion are displayed on the M540. GP1 D to General pressure 1 to 4, diastolic GP4 D value Abbrevia- Description tion GP1 M to General pressure 1 to 4, mean val- GP4 M... - Page 32 Overview Abbrevia- Description Abbrevia- Description tion tion PA D Pulmonary arterial pressur, diastol- STI, STII, ST deviation leads ic value STIII, STV, STV1 to PA M Pulmonary arterial pressur, mean STV6 value STVM ST vector magnitude PA S Pulmonary arterial pressur, systolic value Supraventricular tachycardia Perfusion index (SpO...
-
Page 33: Operating Concept
Operating concept Operating concept Overview ......34 Power-saving mode ....50 M540 in standalone / wireless mode. -
Page 34: Overview
Operating concept Overview The M540 is a portable patient monitor that accom- An M540 standalone configuration consists of the panies the patient from the bedside to anywhere in following components: the hospital. This small, lightweight, splash-resis- – M540 monitor tant monitor makes transporting less disruptive to the patient, reducing the risks of undetected events, –... -
Page 35: Configuration Changes While On Wireless
Operating concept For detailed information on configuring the wireless For information how the M540 behaves in an IACS option (for example, setting up IP addresses, acti- configuration, see page 37. vating and deactivating wireless mode), see page 246. Configuration changes while on wireless transport Any changes to the M540 profile settings while on –... -
Page 36: Bed Label Setting
Operating concept Bed label setting Network status symbol If the Keep bed label setting on the M540 is set to The following table lists the symbols that appear on Yes, the M540 adopts the bed label that was con- the M540 header bar to indicate whether the M540 figured on the previous device (IACS or M500). -
Page 37: M540 In An Iacs Configuration
Operating concept M540 in an IACS configuration In addition to operating as a standalone device, the Once redocked on the M500, the M540 transmits M540 can also function as the signal acquisition the data that was collected during patient transport component for an IACS configuration. -
Page 38: Ics (Infinity Centralstation) Communication
Operating concept Loss of connection to the network When the M540 loses its connection to the Infinity – The message Offline appears on cyan back- network and the feature Offline detection is acti- ground in the network message area until the vated at the Cockpit, the following happens: connection to the network is restored. - Page 39 Operating concept – No waveform and no parameter box are repeat- If you dock a different M540 on an M500, the data ed more than once. Therefore, the next unique of the original wireless M540 continues to be dis- waveform becomes channel 2 on the ICS Bed- played in the same ICS viewport.
-
Page 40: Audio Pause Feature
Operating concept Audio pause feature WARNING Interruptions to network communication can The Infinity network supports an audio pause of limit parameter information and alarm annun- alarm tones from the ICS (see page 95 for more in- ciation to the bedside. Respond to network formation). -
Page 41: Remote View And Remote Control
Operating concept After a successful transfer the M540 returns to the CAUTION last monitoring screen before the transfer started. A Do not touch the screen or undock the M540 dur- message appears at the Cockpit to confirm that the ing the data transfer . Doing so can cause a net- transfer is complete. - Page 42 Operating concept Remote function Remote control Remote control from the ICS? from other bed- side monitors? Activate/deactivate the alarm Archive function. The following hap- pens for each setting of the Archive function: – If the M540 is in an IACS configuration and on wireless trans- port and a parameter whose Archive function is set to Str/Rec or Store goes into alarm, that event is stored at the M540 and in the Event Disclosure database of the ICS.
-
Page 43: Function Keys
Operating concept Function keys A total of eight function keys are located on the front Function Function panel of the M540 (4 on the right and 4 on the left side). Menu Opens the Main dialog win- (function dow. It also closes any open The function keys in positions 2, 3, 4 and 7 are per- key) dialog and returns you to the... -
Page 44: Monitoring Area
Operating concept Alternate function key assignments To program a function key 1 Touch the Menu function key. Function 2 Touch the Screen setup tab > Function keys Privacy Places the M540 into privacy tab. mode (see page 66). This mode is 3 Touch one of the programmable setup keys only available when the patient is (Setup key 1, Setup key 2, Setup key 3, or... -
Page 45: The Alarm Banner Field
Operating concept The alarm banner field The following are some examples of alarm-related symbols and messages that can appear in the alarm banner field. Symbol Description Audio paused This symbol plus a count-down timer appears when you press the yellow fixed key on the front panel of the M540. -
Page 46: Parameter Boxes
Operating concept Parameter boxes Each parameter box contains real-time values of a – Special source labels (for example, PLS for parameter and a combination of the following infor- heart rate signal source for pulse oximetry) mation: When a parameter is in alarm, the parameter box –... -
Page 47: Dialog Windows
Operating concept Dialog windows The following diagram shows how the monitoring To access dialog windows, touch the function keys area appears when accessing a dialog window. on the front of the M540. To access parameter-spe- The left side is reserved for the dialog window while cific setup pages directly, touch the corresponding the right side displays the parameter boxes. -
Page 48: Adjusting The Display
Operating concept Adjusting the display If the orientation of the device changes during pa- To flip the screen manually tient transport, the Auto flip function allows the 1 Touch the Menu function key. screen to flip by 180°. This feature can be turned on or off. -
Page 49: Battery Power
Operating concept Battery power Battery operating times The M540 automatically switches to battery power for up to 3 hours when it is undocked or if there is a loss of power to the M500. The M540 displays low The following table lists the operating times of a ful- battery messages as applicable and then performs ly charged internal battery powering an M540 that a safe shutdown that preserves the integrity of the... -
Page 50: Power-Saving Mode
Operating concept Power-saving mode When the M540 is not docked, the power save To activate/deactivate power save mode mode conserves battery power while continuing to 1 Touch the Menu function key. monitor a patient. 2 Touch the Screen setup tab > Settings tab. When power save mode is activated, the display of the M540 is turned off. -
Page 51: Profiles
Operating concept To select a view To assign a pre-configured view to a view key Touch the currently selected function key sever- 1 Touch the Menu function key. al times (for example, View 5) to scroll through 2 Touch the Screen setup tab > Screen views the available view labels. -
Page 52: Settings Included In A Profile
Operating concept Settings included in a profile The following table illustrates which settings are in- cluded in a profile. The table also identifies which settings are patient defaults and which are user de- faults. Setting Patient default User default Comments (if applicable) Screen views dialog window (Press the Menu function key >... -
Page 53: Co 2 Profile Settings
Operating concept Setting Patient default User default Comments (if applicable) Alarm settings dialog window (Press the Menu function key > System setup > Alarm setup > enter password > Volume/ Tones Minimum alarm vol. Transport volume Transport pulse tone Alarm pattern Reminder: all alarms off Reminder: audio off sensor off dialog window (Masimo) - Page 54 Operating concept Setting Patient default User default Comments (if applicable) Size [mV/cm] Touch the CO waveform to set the (Size of the waveform) scale of the waveform (see page 46). Instructions for use Infinity Acute Care System – Infinity M540 SW VG4.n...
-
Page 55: Heart Rate And Arrhythmia Profile Settings
Operating concept Setting Patient default User default Comments (if applicable) Heart rate and arrhythmia profile settings The heart rate and arrhythmia profile settings are configured in the following dialog windows HR limits dialog window (Touch the heart rate parameter box > HR limits) Alarm These settings can be configured (On/off setting) -
Page 56: St Profile Settings
Operating concept Setting Patient default User default Comments (if applicable) ST profile settings The ST profile settings are configured in the following dialog windows ST limits dialog window (Touch the ST parameter box) Alarm These settings can be changed for (On/off setting) all ST parameters (STI, STII, STIII, STaVR, STaVL, STaVF,STV,STV+,... -
Page 57: Spo 2 (Masimo) Profile Settings
Operating concept Setting Patient default User default Comments (if applicable) Coincidence Size [mV/cm] Touch the RRi waveform to set the (Size of the waveform) scale of the waveform (see page 46). (Masimo) profile settings The SpO profile settings are configured in the following dialog windows limits dialog window (Touch the SpO parameter box) -
Page 58: Pulse Co-Ox (Masimo) Profile Settings
Operating concept Setting Patient default User default Comments (if applicable) Pulse CO-Ox (Masimo) profile settings The Pulse CO-Ox profile settings are configured in the following dialog windows Two separate Pulse CO-Ox limits dialog window (Touch the Pulse CO-Ox parameter box) Alarm These settings can be configured for (On/off setting) -
Page 59: Non-Invasive Blood Pressure Profile Settings
Operating concept Setting Patient default User default Comments (if applicable) Desat alarm This setting is only available in neo- natal mode, see page 91. Color (Color of the waveform and parameter) Size [mV/cm] Touch the SpO waveform to set the (Size of the waveform) scale of the waveform (see page 46). -
Page 60: Invasive Blood Pressure Profile Settings
Operating concept Setting Patient default User default Comments (if applicable) Invasive blood pressure profile settings The invasive blood pressure profile settings are configured in the following dialog windows Invasive blood pressure limits dialog window (example: CVP limits) (Touch the invasive blood pressure parameter box) Alarm These settings can be configured (On/off setting) -
Page 61: Monitor Settings
Operating concept Monitor settings The following list contains the monitor settings – Tone volume (ECG and SpO which are a subset of the profile settings. When the – Size [mV/cm] (ECG and SpO waveform) Profile settings is set to Monitor, only these set- tings are adopted when the M540 is docked. -
Page 62: Settings Not Included In A Profile
Operating concept Settings not included in a profile The following settings are not included in a profile Dialog window Setting and must be configured separately. These settings Units Temp remain unchanged until they are manually changed again by the user. etCO Pressures Dialog window... -
Page 63: Saving A Profile
Operating concept Saving a profile You can save the current profile settings as a de- NOTE fault device profile (see page 249). In a standalone To save a stored profile during a software up- configuration, the profile is saved on the M540 and grade, you can copy the profile onto a USB stick on the M500. -
Page 64: Profile Behavior In A Standalone Configuration
Operating concept Profile behavior in a standalone configuration The ability to store the profile settings on the M500 The Profile settings feature determines if the en- in a standalone configuration allows the M540 to tire profile is adopted (patient and user settings) or accompany the patient to different care areas of the only a subset (monitor settings only). -
Page 65: Different Profile Configurations
Operating concept Different profile configurations The following happens when an M540 with a newer The following happens when an M540 with an older software version and newer profile settings docks software version that does not support new settings on an M500 with an outdated profile: docks on an M500 with an updated profile: –... -
Page 66: Standby Mode
Operating concept Standby mode You can temporarily interrupt patient monitoring by To place the M540 in standby mode placing the M540 in standby mode. Press the Standby function key (if available for Standby mode has the following effect: display, see page 43). –... -
Page 67: Recordings/Reports
Operating concept To place the M540 into privacy mode Press the Privacy function key (if available for The message Privacy, Touch screen to resume display, see page 43). monitoring appears in the center of the M540 screen. 1 Press the Menu function key. To take the M540 out of privacy mode 2 Touch the Main tab, if not already selected. -
Page 68: Rest Ecg Reports
Operating concept Rest ECG reports A diagnostic 12-lead Rest ECG report can only be To generate a Rest ECG report requested from the M540 when the patient is also Press the Rest ECG report function key (if admitted at the ICS and the 12-lead locked option available for display, see page 43). -
Page 69: Assembly And Preparation
Assembly and preparation Assembly and preparation Overview ......70 Commercially available M500 mounting solutions . -
Page 70: Overview
Assembly and preparation Overview Commercially available M500 mounting This section describes the following basic assem- bly tasks: solutions – Docking/undocking the M540 from the M500 Various mounting solutions are available. It is the – Locking/unlocking the M540 into the M500 responsibility of the hospital to install, test, and en- sure the proper and safe operation of any mounting –... -
Page 71: Docking/Undocking The M540
Assembly and preparation Docking/undocking the M540 The following diagram shows the side and front To dock the M540 panel of the M500 which holds the M540 in place. 1 Align the curved portion of the M540 with the curved portion of the M500. M500 front view with M540 docked 2 Press the M540 (B) into the M500 (C) until it ‘clicks’... -
Page 72: Locking/Unlocking The M540
Assembly and preparation Locking/unlocking the M540 You can lock the M540 permanently in the M500 to To unlock the M540 prevent anyone from undocking it. 1 Insert the 2 mm Allen key (A) into the middle hole (B) on the locking tab and turn it counter- To lock the M540 clockwise to the unlocked position 1 Push the locking tab (D) of the M500 toward the... -
Page 73: Connecting The System Cables In An Iacs Configuration
Assembly and preparation Connecting the system cables in an IACS configuration For details on connecting the IACS system cables, refer to the instructions for use Infinity Acute Care System – Monitoring Applications. Connecting the system cable in an M540 stand-alone configuration 1 Connect one end of the M540 Y-cable/Y-adapt- er to the M500 system connector (A). -
Page 74: Mounting The Infinity Mcable - Masimo Set And Masimo Rainbow Set/Nellcor Oximax
Assembly and preparation Mounting the Infinity MCable – Masimo SET and Masimo rainbow SET/Nellcor OxiMax The following diagram shows how a Masimo MCa- ble and a Nellcor OxiMax can be mounted to the M540. Side view (connectors) Bottom view A M540 E Blue SpO connector B Tabs of the MCable mount adapter that lock into... - Page 75 Assembly and preparation To attach the MCable mount adapter To remove the MCable mount adapter Follow these steps to attach the MCable to the 1 Insert a flat head screwdriver (or equivalent M540: tool) between the indentations for locking the MCable mount adapter (F).
- Page 76 This page has been left blank intentionally. Instructions for use Infinity Acute Care System – Infinity M540 SW VG4.n...
-
Page 77: Getting Started
Getting started Getting started Overview of monitoring a patient ..78 Turning the M540 on/off ....78 Admitting a patient . -
Page 78: Overview Of Monitoring A Patient
Getting started Overview of monitoring a patient This chapter describes the necessary steps to start Specifically, this section describes how to: monitoring a patient on the M540. – Turn the M540 on/off – Admit/discharge a patient on the M540 – Change the patient category Turning the M540 on/off To turn the M540 on To turn the M540 off... -
Page 79: Admitting A Patient
Getting started Admitting a patient You can admit a patient at the M540 manually by 9 Touch ID and use the onscreen keyboard to en- entering the demographic data in the Patient setup ter the ID number (up to 12 characters) and tab. -
Page 80: Discharging A Patient
Getting started Admitting a patient using ’Get HIS’ You can populate the Patient setup page automat- face to the hospital Admit, Discharge, Transfer ically, by pulling the demographic data of a patient (ADT) system. The Hospital Information System from the network. The prerequisite for this network (HIS) searches the database for the demographic data transfer is the Infinity gateway with an inter- data of the patient by using the patient ID. -
Page 81: Patient Categories
Getting started Patient categories Each patient category has a specific profile associ- ated with it. Profiles are a set of patient and user settings that have been pre-configured by the fac- tory or the hospital. The M540 supports the follow- ing patient categories: Patient category Typical age range Weight... - Page 82 This page has been left blank intentionally. Instructions for use Infinity Acute Care System – Infinity M540 SW VG4.n...
-
Page 83: Alarms
Alarms Alarms Overview of alarms..... 84 Pausing alarm monitoring temporarily ..97 Alarm priorities ......84 Activating or deactivating alarm monitoring . -
Page 84: Overview Of Alarms
Alarms Overview of alarms The M540 produces acoustic and visual alarm sig- The color of an alarm message corresponds to the nals to alert you to alarm conditions ranging from priority of the associated alarm condition (see alarm limits violations, arrhythmia calls, and battery "Alarm priorities"... -
Page 85: Alarm Processing
Alarms Medium-priority alarm conditions Low-priority alarm conditions Most medium-priority alarms report physiological or All low-priority alarms alert you to technical issues technical alarm conditions that require prompt at- that may compromise the ability of the system to tention but may not be life-threatening. monitor the patient. -
Page 86: Activating Or Deactivating Alarm Validation
Alarms Multiple alarm conditions To acknowledge a latched alarm condition – Press the key on the M540. During multiple alarm conditions, the M540 reports the most recently detected highest-priority alarm condition. When several alarm conditions occur si- 1 Select All alarms off /All alarms pause (the multaneously, the parameter boxes flash for all name and function of the button depends on the alarming parameters. -
Page 87: Visual Alarm Signals
Alarms Visual alarm signals Each alarm priority has its own distinct visual alarm signals. The alarm message in the header bar is the only vi- sual alarm signal if an alarming parameter is not in- cluded in the current screen view and the alarm bar is deactivated. -
Page 88: Acoustic Alarm Signals
Alarms Alarm bar Visual alarm indicators on the M540 The alarm bar on the M540 visually announces high- and medium-priority alarm conditions (see page 84). However, the alarm bar is inactive when: – Only low-priority alarm conditions exist – The alarm bar is deactivated (see page 242) –... - Page 89 Alarms Alarm priority IEC fast IEC slow Infinity High The following tone se- The following tone sequence Continuous two-tone se- quence is repeated every is repeated every 8 s: quence 4.5 s: Three beeps > one beep > Three beeps > one beep > one beep with higher pitch >...
-
Page 90: Testing Visual And Acoustic Alarm Signals
Alarms Attention tones The M540 also provides an attention tone to alert When the M540 is docked to the Cockpit, the Cock- you to special information such as: pit assumes primary alarm annunciation and the M540 speaker is deactivated. – Start of venous stasis When the M540 is docked to an M500, the profile –... -
Page 91: Special Alarm Behavior
Alarms Special alarm behavior Activating any of the following features alters the HR, ASY, VF off banner appears when ar- normal alarm annunciation behavior: rhythmia monitoring is deactivated, the ASY/VF alarms selection is set to Follow HR, and heart – ASY/VF alarms rate alarms are deactivated. -
Page 92: Privacy Mode
Alarms Privacy mode Zeroing an individual invasive blood pressure from the M540 (see page 215) has the following effects: Privacy mode is available when the M540 is docked – The invasive blood pressure limit alarm and in an IACS configuration, on wireless transport, or static alarm for that parameter are suppressed in standalone mode provided the patient is admitted from the time the button is pressed until... -
Page 93: Or Mode
Alarms mode OR mode is only available on the M540 when it is docked in an IACS configuration. When OR mode is activated at the Cockpit, alarm messages for me- dium- and high-priority alarms clear when the alarm condition no longer exists. Cardiac bypass mode Cardiac bypass mode is only available when the M540 is docked in an IACS configuration, and the... -
Page 94: Pre-Silencing Alarms
Alarms Pre-silencing alarms This function allows you to pre-silence (audio To initiate a pre-silence period remotely is only pos- pause in advance) potential alarm conditions be- sible when the remote control setting of the remote fore they occur. Pre-silencing allows you to concen- device is also activated. -
Page 95: Pausing Acoustic Alarm Signals (Audio Pause)
Alarms Pausing acoustic alarm signals (audio pause) Quiet mode Active alarms can be paused, or silenced, at the M540 for two minutes. In addition to pausing alarms, the setting of the quiet mode feature deter- This feature gives you the flexibility to decide if you mines how subsequent alarm conditions are an- want restricted or full annunciation of future alarm nounced. -
Page 96: Pausing Alarms At The M540
Alarms Pausing alarms at the M540 The following happens at the M540 when you The behavior of new alarm condition while the sys- pause active alarms: tems is in an audio pause state is determined by the Quiet mode setting. –... -
Page 97: Pausing Alarm Monitoring Temporarily
Alarms Pausing alarm monitoring temporarily If the password-protected alarm pause feature is To pause alarm monitoring temporarily activated (see page 241), you can pause alarm 1 Press the Alarms function key. monitoring temporarily. The alarm pause duration is adjustable from 1 minute to 5 minutes. 2 Touch All alarms pause. -
Page 98: Activating Or Deactivating Alarm Monitoring
Alarms Activating or deactivating alarm monitoring – The alarming parameter box and alarm bar re- WARNING turn to the pre-alarm state If No timeout is assigned to the alarm off peri- – Alarm messages are removed from the alarm od, no counter appears and alarms remain de- message field of the header bar activated until you enable them again. -
Page 99: Setting The Upper And Lower Alarm Limits
Alarms Setting the upper and lower alarm limits You can configure the upper and lower alarm limits To set an individual parameter’s alarm settings of a parameter manually to trigger acoustic and vi- 1 Touch the parameter box (for example, HR) to sual alarm signals if a parameter goes above or be- access that parameter’s dialog window. -
Page 100: Using The Auto Set Function
Alarms Using the Auto set function The Auto set function allows you to adjust alarm limits quickly based on preset percentages listed in the following table. Auto Set All The Auto set all button adjusts alarm limits for ALL parameters based on a pre-defined percentage (see table). -
Page 101: Activating/Deactivating Alarms
Alarms Activating/deactivating alarms Archive function Except for the following parameters, you can acti- The archive function setting determines what hap- vate or deactivate the alarm function for individual pens in response to an alarm limit violation. The parameters: available settings are: –... -
Page 102: Event Recall
Alarms Event recall The Event recall dialog window is an electronic – When you press the Record function key (see record of the patient’s alarm history. It records page 43) on the M540 when the M540 is either alarm messages and stores the waveforms of the in standalone mode or on transport. -
Page 103: Viewing Stored Events
Alarms Viewing stored events The following diagram shows the Event recall dia- To access stored events log window. When you select any field on the table, Select the Review function key. The following dia- a frame highlights the selected row. For information gram shows the Event recall dialog window. -
Page 104: Viewing A Snapshot Of A Single Event
Alarms Viewing a snapshot of a single event 20 seconds of waveform and parameter data are Events with stored waveform and parameter data stored automatically in the Event recall dialog win- are identified in the Event recall dialog window by dow under the following circumstances: the label BED TIMED for manually stored events or the alarm string (for example, HR >... -
Page 105: Configuring The Spo
Alarms Configuring the SpO alarm priority The following two SpO alarm messages can be The following SpO parameters can generate this configured for the alarm priority that is most appro- alarm message according to the selected alarm pri- priate for your care environment. When the M540 is ority: docked in an IACS configuration, the Cockpit con- Masimo rainbow SET... -
Page 106: Alarm Management Setup
Alarms Alarm management setup (password-protected) The password-protected alarm setup is only acces- sible to authorized personnel. For details on avail- able setup functions, see page 255. The Code function key If the M540 is connected to the IACS you can acti- key on the M540. -
Page 107: Alarm Ranges And Defaults
Alarms Alarm ranges and defaults Parameter Alarm limit range Upper limit de- Lower limit de- Archive default faults faults HR adult Upper: 25 to 300 bpm – 120 (adult) – 45 (adult) – Str/Rec (adult, pediat- Increment: 5 bpm Lower: 20 to 295 bpm –... - Page 108 Alarms Parameter Alarm limit range Upper limit de- Lower limit de- Archive default faults faults SpHb / SpHbv Upper: 1.2 to 25.0 g/dL 17.0 g/dL 7.0 g/dL (0.7 to 15.5 mmol/L) (10.6 mmol/L) (4.3 mmol/L) Increment 0.2 g/dL (0.1 mmol/L) Lower: 1.0 to 24.8 g/dL (0.6 to 15.4 mmol/L) SpCO...
- Page 109 Alarms Parameter Alarm limit range Upper limit de- Lower limit de- Archive default faults faults NIBP M adult Upper: 11 to 250 mmHg 125 mmHg 60 mmHg (16.7 kPa) (8.0 kPa) Increment: 1 1.4 to 33.3 kPa mmHg or 0.1 kPa Lower: 10 to 249 mmHg 1.3 to 33.2 kPa NIBP M pediatric...
- Page 110 Alarms Parameter Alarm limit range Upper limit de- Lower limit de- Archive default faults faults IBP S pediatric/ne- Upper: –24 to +300 mmHg – 120 mmHg – 50 mmHg GP1 S to GP4 S, onate (16.0 kPa) (6.7 kPa) for LV S, RV S: Off –3.2 to +40.0 kPa for GP1 S to...
- Page 111 Alarms Parameter Alarm limit range Upper limit de- Lower limit de- Archive default faults faults IBP D neonate Upper: –24 to +300 mmHg – 80 mmHg – 35 mmHg GP1 D to GP4 D, (10.7 kPa) (4.7 kPa) for LV D, RV: Off Increment: 1 –3.2 to +40.0 kPa for GP1 D to...
- Page 112 Alarms Parameter Alarm limit range Upper limit de- Lower limit de- Archive default faults faults IBP M pediatric Upper: –24 to +300 mmHg – 80 mmHg – 50 mmHg (10.7 kPa) (6.7 kPa) for Increment: 1 –3.2 to +40.0 kPa for GP1 M to GP1 M to mmHg or 0.1 kPa...
- Page 113 Alarms Parameter Alarm limit range Upper limit de- Lower limit de- Archive default faults faults Upper: 6 to 150 bpm – 30 bpm – 5 bpm (adult) (adult) Increment of 1 bpm Lower: 5 to 149 bpm – 20 bpm (pe- –...
-
Page 114: Arrhythmia Ranges And Defaults
Alarms Arrhythmia ranges and defaults Parameter Alarm grade de- Rate (default) Count (default) Alarm archive fault factory default High Not adjustable Not adjustable Str/Rec High Not adjustable Not adjustable Str/Rec ≥100 to 200 (≥120) ≥5 to 15 (≥ 0) VTACH High Str/Rec Increments of 10... -
Page 115: Impedance Respiration (Rri)
Impedance respiration (RRi) Impedance respiration (RRi) Overview of respiration monitoring ..116 Supported parameters ....116 RRi precautions . -
Page 116: Overview Of Respiration Monitoring
Impedance respiration (RRi) Overview of respiration monitoring The M540 measures impedance respiration by The respiration monitoring functions are config- passing a harmless high-frequency current be- urable in the parameter-specific dialog window (see tween two ECG electrodes on the patient's chest. page 123). -
Page 117: Connecting The 3-, 5-, 6-Lead Wire Sets For Respiration Monitoring
Impedance respiration (RRi) Connecting the 3-, 5-, 6-lead wire sets for respiration monitoring The ECG lead wire sets connect directly to the To connect the ECG lead wire sets M540: 1 Insert the 3-,5-, or 6-lead wire set (B) into the re- cessed ECG connector (A) on the side of the M540. -
Page 118: Connecting The Lead Wire Sets For 12-Lead Respiration Monitoring
Impedance respiration (RRi) Connecting the lead wire sets for 12-lead respiration monitoring The ECG lead wire sets connect directly to the To connect the ECG lead wire sets M540: 1 Insert the 6-lead wire set (B) and the 4-lead wire set (C) into the recessed ECG connector (A) on the side of the M540. -
Page 119: Connecting The Lead Wires For Neonatal Respiration Monitoring
Impedance respiration (RRi) Connecting the lead wires for neonatal respiration monitoring The ECG lead wire sets connect directly to the To connect the ECG lead wire set M540: 1 Insert the Neonatal ECG adapter cable into the recessed ECG connector (A) on the side of the M540. -
Page 120: Patient Preparation For Respiration Monitoring
Impedance respiration (RRi) Patient preparation for respiration monitoring The following tips regarding skin preparation and Follow the same precautions for respiratory moni- proper electrode placement provide strong signals toring as for ECG monitoring (see page 130) and with minimal artifact but must never replace hospi- observe the following general recommendations: tal-approved practices or manufacturer’s recom- –... - Page 121 Impedance respiration (RRi) – For adult and pediatric patients, position the – For neonates, place the RA and LA electrodes electrodes to span the maximum expansion and at the midaxillary line. Position the LL electrode contraction of the lungs. This is especially im- below the diaphragm and umbilicus.
-
Page 122: Respiration Display
Impedance respiration (RRi) Respiration display Respiration markers On the M540, the respiration display consists of: – Respiration parameter box The following diagram shows how white vertical – Respiration waveform markers on the respiration waveform can identify each detected breath. Respiration parameter box The respiration parameter box contains the follow- ing elements: If an M540 is in an IACS configuration, respiration... -
Page 123: Respiration Measuring Modes
Impedance respiration (RRi) Respiration measuring modes The following respiration measuring modes are To select the desired respiration mode, see available: page 124. – Auto (default) – appropriate for patients with WARNING regular breathing patterns. It uses the optimal If the respiration waveform size is set too low breath-detection threshold calculated at the be- in manual mode, shallow breaths may not be ginning of respiration monitoring. -
Page 124: Respiration Parameter Setup Functions
Impedance respiration (RRi) Respiration parameter setup functions All respiration parameter setup functions take place The limits dialog window contains the Auto set and in the respiration dialog window (see "Accessing Alarm buttons for configuring the alarm functions. the respiration dialog window" on page 123). For detailed alarm setup information, see "Config- uring a patient’s alarm settings"... - Page 125 Impedance respiration (RRi) Selection Available settings Description Color Red, White, Yellow, Green, Light blue (de- Determines the color of the fault), Blue, Purple, Orange waveforms, and the parameter labels and values. Change parameter A list of currently available parameters. Changes the parameter box to a different parameter.
- Page 126 This page has been left blank intentionally. Instructions for use Infinity Acute Care System – Infinity M540 SW VG4.n...
-
Page 127: Ecg, Arrhythmia, And St Segment
ECG, arrhythmia, and ST segment ECG, arrhythmia, and ST segment Overview of ECG and heart rate 12-lead monitoring ....140 monitoring......129 Accessing the ECG dialog window . - Page 128 ECG, arrhythmia, and ST segment ST measuring points ....157 Adjusting ST measuring points... . . 157 ST reference .
-
Page 129: Overview Of Ecg And Heart Rate Monitoring
ECG, arrhythmia, and ST segment Overview of ECG and heart rate monitoring ECG signal processing and display The M540 calculates and displays the heart rate, identifies paced beats, reports arrhythmia condi- tions, and measures ST deviations. ECG and heart The M540 identifies QRS complexes of certain am- rate monitoring is for adult, pediatric, and neonatal plitudes and QRS widths for adult, pediatric, and patients. -
Page 130: Ecg Precautions
ECG, arrhythmia, and ST segment Supported parameters – ECG: HR ST: STI, STII, STIII, STaVR, STaVL, NOTE STaVF, STV, STV+, STV1 to STV6, STVM, Except for asystole and ventricular fibrillation STCVM, STdV1, STdV3, STdV4, STdV6 events, no other arrhythmia events appear in the trends of any ICS equipped with software version –... -
Page 131: Connecting The 3-, 5-, 6-Lead Wire Sets For Ecg Monitoring
ECG, arrhythmia, and ST segment Connecting the 3-, 5-, 6-lead wire sets for ECG monitoring The ECG lead wire sets connect directly to the To connect the ECG lead wire sets M540: 1 Insert the 3-,5-, or 6-lead wire set (B) into the re- cessed ECG connector (A) on the side of the M540. -
Page 132: Connecting The Lead Wire Sets For 12-Lead Ecg Monitoring
ECG, arrhythmia, and ST segment Connecting the lead wire sets for 12-lead ECG monitoring The ECG lead wire sets connect directly to the To connect the ECG lead wire sets M540: 1 Insert the 6-lead wire set (B) and the 4-lead wire set (C) into the recessed ECG connector (A) on the side of the M540. -
Page 133: Connecting The Lead Wires For Neonatal Ecg Monitoring
ECG, arrhythmia, and ST segment Connecting the lead wires for neonatal ECG monitoring The ECG lead wire sets connect directly to the To connect the ECG lead wire set M540: 1 Insert the neonatal ECG adapter cable (B) into the recessed ECG connector (A) on the side of the M540. -
Page 134: Patient Preparation For Ecg Monitoring
ECG, arrhythmia, and ST segment Patient preparation for ECG monitoring Electrosurgery The following tips provide optimal ECG monitoring results but must never replace hospital-approved practices or manufacturer’s recommendations. Integrated ESU suppression improves the perfor- mance of the monitor during electrosurgery, reduc- Follow hospital procedures for proper skin prepara- es noise on ECG waveforms, and protects the pa- tion. -
Page 135: Ecg Display
ECG, arrhythmia, and ST segment ECG display ECG waveforms On the M540, the ECG display consists of: – ECG parameter box The ECG waveform contains the following ele- – ECG waveforms ments: – Show all leads dialog window containing up to 12 leads The ECG parameter box appears differently when you activate arrhythmia monitoring. -
Page 136: Ecg Electrode Colors
ECG, arrhythmia, and ST segment To select the number of leads and the lead wire set, NOTE see page 141. ECGV and ECGV+ are chest leads The letter ’d’ indicates a derived lead Using a 6-lead and a 4-lead wire set provides 12 monitored ECG leads ECG electrode colors Electrodes are labeled and color-coded according... -
Page 137: Electrode Placement
ECG, arrhythmia, and ST segment Electrode placement Standard configuration, three electrodes (IEC/AHA) Standard configuration, five electrodes (IEC/AHA) Instructions for use Infinity Acute Care System – Infinity M540 SW VG4.n... -
Page 138: Pacer Configuration, Five Electrodes
ECG, arrhythmia, and ST segment Pacer configuration, five electrodes (IEC/AHA) Instructions for use Infinity Acute Care System – Infinity M540 SW VG4.n... -
Page 139: Standard Configuration, Six Electrodes
ECG, arrhythmia, and ST segment Standard configuration, six electrodes (IEC/AHA) 12-Lead configuration, ten electrodes for 12-lead Rest ECG monitoring (AHA) Instructions for use Infinity Acute Care System – Infinity M540 SW VG4.n... -
Page 140: 12-Lead Monitoring
ECG, arrhythmia, and ST segment 12-Lead configuration, ten electrodes for 12-Lead Rest ECG monitoring (IEC) 12-lead monitoring Standard 12-lead monitoring is only available when You can view all ECG waveforms, including TruST, you use a 6-lead and a 4-lead wire set. 12-lead on the Show all leads page (see page 142). -
Page 141: Accessing The Ecg Dialog Window
ECG, arrhythmia, and ST segment Accessing the ECG dialog window 1 Touch the heart rate parameter box. 3 Touch the desired parameter label to display it on the main screen. 2 Touch the Settings tab, or if the parameter is not displayed touch any parameter box >... - Page 142 ECG, arrhythmia, and ST segment Selection Available settings Description ECG filter – Off – provides the greatest sensitivity to noise Controls the sensitivity to vari- or artifact (the message Filter off appears in ous artifact sources. the waveform channel) When the M540 is in OR mode –...
- Page 143 ECG, arrhythmia, and ST segment Selection Available settings Description Change parameter A list of currently available parameters. Changes the parameter box to a different parameter. Settings – ECG 2 page Pacer detection – On (default) Determines whether pacer im- pulses are detected. See "Pac- (Not available in –...
-
Page 144: Monitoring Paced Patients
ECG, arrhythmia, and ST segment Selection Available settings Description QRS threshold – Normal (default) This function is only available for adult and pediatric patients. – Low Normal – detects QRS com- plexes of normal amplitudes (above 0.35 mV). Low – detects QRS complexes of low amplitude (above 0.17 mV). -
Page 145: Pacemaker Precautions
ECG, arrhythmia, and ST segment When pacer detection is deactivated, the message To turn pacer detection on/off Pacer off appears in the top ECG channel. 1 Touch the heart rate parameter box to select the To optimize pacer monitoring, follow the guidelines ECG dialog window directly. -
Page 146: Pacer Fusion Mode
ECG, arrhythmia, and ST segment NOTE WARNING The displayed heart rate may be incorrect if the Impedance respiration and pacemaker detec- pacemaker pulse wanders through the ECG tion are inoperative when the ESU filter is se- waveform (ineffective pacing). During the wander- lected. -
Page 147: Optimizing Pacer Processing
ECG, arrhythmia, and ST segment Line isolation devices Transcutaneous Electrical Nerve Stimulators (TENS) To minimize the effect of line isolation devices, which can cause temporary disturbances in the Signals from transcutaneous electrical nerve stimu- ECG signal, follow these precautions: lators (TENS) often resemble pacer signals and can be labeled as such. -
Page 148: Selecting Arrhythmia Leads
ECG, arrhythmia, and ST segment The arrhythmia monitoring functions have config- NOTE urable parameter-specific setup pages (see If French NFC mode is activated (see page 249), page 152). you cannot deactivate heart rate alarms. NOTE Before performing any monitoring functions, refer The banner HR Alarms Off appears in the to the section "For your safety and that of your... -
Page 149: Arrhythmia Processing
ECG, arrhythmia, and ST segment Arrhythmia processing Arrhythmias are identified using an internal detec- 3 VTACH (ventricular tachycardia) tion process. This process does the following: 4 RUN (ventricular run) – Filters out ECG signal irregularities 5 AIVR (accelerated idioventricular rhythm) –... - Page 150 ECG, arrhythmia, and ST segment VTACH Ventricular Tachycar- N or more PVCs are detected in a time interval T = (60 * (N - 1)) / 2), 4) R, where N is the VTACH count and R is the VTACH rate Premature Ventricular PVC alarm limit exceeded.
-
Page 151: Arrhythmia Display
ECG, arrhythmia, and ST segment Arrhythmia display Arrhythmia basic parameter box When arrhythmia monitoring is activated, arrhyth- mia events appear in the heart rate parameter box. If the heart rate parameter box is displayed and ar- When arrhythmia monitoring is turned off (see rhythmia monitoring is activated, all arrhythmia val- page 150) and at least one ECG waveform is dis- ues and labels appear in the heart rate parameter... -
Page 152: Accessing The Arrhythmia Dialog Window
ECG, arrhythmia, and ST segment Accessing the arrhythmia dialog window 1 Touch the heart rate parameter box. 4 Touch the desired parameter label to display on the main screen. 2 Touch the Settings tab. 5 Touch the parameter box > Settings tab > ARR 3 Touch the ARR tab, or if the parameter is not tab. -
Page 153: Monitoring St Overview
ECG, arrhythmia, and ST segment Monitoring ST overview ST analysis examines normal QRS complexes A Fiducial point from up to 12 ECG leads. The M540 learns each B ST level ST lead, combines the measurements into an aver- age QRS complex, and derives the ST segment de- C ST measurement point viation. -
Page 154: Trust 12-Lead Monitoring
ECG, arrhythmia, and ST segment TruST 12-lead monitoring This feature offers real-time assessment of 12 ST TruST monitoring is activated, the ECGV lead de- segment deviations, with only six electrodes, which faults to ECGV2 and the ECGV+ lead defaults to provide eight measured ECG leads and four de- ECGV5. -
Page 155: Connecting Lead Wire Sets For St Monitoring
ECG, arrhythmia, and ST segment Connecting lead wire sets for ST monitoring ST monitoring uses the following lead configura- – 12-lead ST monitoring – uses the standard 12- tions for each available ST monitoring mode: lead ECG configuration with ten electrodes (see page 131). -
Page 156: St Complex Dialog Windows
ECG, arrhythmia, and ST segment ST complex dialog windows Zooming in on a single ST complex The number of displayed ST complexes depends on the connected lead wire set. You can view all ST complexes or zoom in on a single ST complex to The following diagram shows a single ST complex view it in greater detail. -
Page 157: St Measuring Points
ECG, arrhythmia, and ST segment ST measuring points You can change the ST measuring points and iso- To change ST measuring points electric point from the single ST complex dialog 1 Touch the ST parameter box to access the ST window. -
Page 158: Accessing The St Dialog Window
ECG, arrhythmia, and ST segment Accessing the ST dialog window 1 Touch the ST parameter box. 1 Touch any parameter box > Settings tab > Change parameter. 2 Touch the Settings tab. 2 Touch the desired parameter label to display it Or, if the parameter is not displayed on the main screen. - Page 159 ECG, arrhythmia, and ST segment Selection Available settings Description ST lead 1 – Three electrodes: STI, STII, STIII Selects an ST lead for analysis and display. ST lead 2 – Five electrodes: STI, STII, STIII, STaVR, STaVL, STaVF, STV – Six electrodes: STI, STII, STIII, STaVR, STaVL, STaVF, STV, STV+ –...
-
Page 160: Learning/Relearning Qrs Pattern
ECG, arrhythmia, and ST segment Learning/relearning QRS pattern Manual relearning The M540 creates a reference template by learning the dominant QRS pattern of a patient. The refer- ence template is stored for reference and all subse- Relearn the QRS pattern of a patient when: quent beats and rhythms are compared against it –... -
Page 161: Spo
and Pulse CO-Ox monitoring with Masimo SET MCable and Pulse CO-Ox monitoring with Masimo SET MCable Overview of SpO monitoring ... . 162 Supported parameters ....163 and Pulse CO-Ox precautions. -
Page 162: Overview Of Spo 2 Monitoring
and Pulse CO-Ox monitoring with Masimo SET MCable Overview of SpO monitoring and Pulse CO-Ox monitoring is only possible NOTE with the corresponding SpO MCable. The follow- The Masimo rainbow SET parameters SpHb and ing hardware is available for monitoring SpO SpOC are not approved for neonatal monitoring. -
Page 163: Supported Parameters
and Pulse CO-Ox monitoring with Masimo SET MCable Supported parameters – Pleth variability index (PVI) measures peripher- al perfusion changes secondary to respiration or the PI amplitude over a respiration. PVI may The parameters SpO , PLS, and PI are available be closely related to intrathoracic pressure and displayed regardless of which Masimo sensor changes, circulating blood volume and vascular... -
Page 164: Spo 2 And Pulse Co-Ox Precautions
and Pulse CO-Ox monitoring with Masimo SET MCable Various sensors are available for the Masimo rain- NOTE bow SET MCable. The availability of the parame- A color band on the Masimo rainbow SET MCable ters depends on the selected sensor type. indicates which parameters are activated on the MCable. - Page 165 and Pulse CO-Ox monitoring with Masimo SET MCable WARNING CAUTION Elevated levels of methemoglobin (MetHb) When using the maximum sensitivity setting, the may lead to inaccurate SpO and SpCO mea- performance of the sensor off detection may be surements. compromised. If the device is in this setting and the sensor becomes dislodged from the patient, Elevated levels of total bilirubin may lead to in- false readings may occur due to environmental...
- Page 166 and Pulse CO-Ox monitoring with Masimo SET MCable NOTE Purchase of this device confers no express or im- plied license under any Masimo patent to use this instrument with any oximetry sensor that is not manufactured or licensed by Masimo. For a list of approved sensors, see the instructions for use In- finity Acute Care System –...
-
Page 167: Connecting The Masimo Set Mcable
and Pulse CO-Ox monitoring with Masimo SET MCable Connecting the Masimo SET MCable The Masimo SET MCable connects directly to the To connect the Masimo SET MCable M540. The logo on the MCable identifies if you are 1 Attach the Masimo SET MCable connector (B) using a Masimo rainbow SET or a Masimo SET to the blue SpO connector (A) of the M540. -
Page 168: Mcable
and Pulse CO-Ox monitoring with Masimo SET MCable Connecting the Masimo rainbow SET MCable The Masimo rainbow SET MCable connects direct- ly to the M540. The logo on the MCable identifies if you are using a Masimo rainbow SET or a Masimo SET MCable. -
Page 169: Patient Preparation
and Pulse CO-Ox monitoring with Masimo SET MCable Patient preparation The following tips provide optimal SpO monitoring The message SpO low perfusion appears when results but must never replace hospital-approved the monitor detects low amplitude arterial pulsa- practices or manufacturer’s recommendations. tions. -
Page 170: Spo 2 And Pulse Co-Ox Display
and Pulse CO-Ox monitoring with Masimo SET MCable To apply the sensor 3 Connect the sensor to the Masimo SET MCable or the Masimo rainbow SET MCable. 1 Select the size and type of sensor that is best suited for your patient. Follow the recommenda- NOTE tions of the manufacturer. - Page 171 and Pulse CO-Ox monitoring with Masimo SET MCable parameter box (Masimo SET MCable) The display of PLS CO-Ox parameters (SpHb/SpHbv, SpOC, SpMet, PVI, SpCO) is af- The SpO parameter box contains the following el- fected by the following conditions: ements: –...
-
Page 172: Accessing The Spo 2 Dialog Window
and Pulse CO-Ox monitoring with Masimo SET MCable – You can select up to three parameters to be dis- A Parameter 1 played in the parameter box (see page 175). B Unit of measure for parameter 1 Units of measure appear next to the parameter label if applicable and can be activated/deacti- C Upper/lower alarm limits or crossed triangle vated (see page 250). -
Page 173: Spo 2 Parameter Setup Functions
and Pulse CO-Ox monitoring with Masimo SET MCable parameter setup functions All SpO parameter setup functions take place in The limits dialog window contains the Auto set and the SpO dialog window (see "Accessing the SpO Alarm buttons for configuring the alarm functions. dialog window"... - Page 174 and Pulse CO-Ox monitoring with Masimo SET MCable Selection Available settings Description Sensitivity – Normal (default) – standard mode Determines the level of detection sen- mode sitivity. – APOD (adaptive probe off detection) – the least sensitive mode for detecting a reading on patients with low perfusion.
-
Page 175: Pulse Co-Ox Parameter Setup Functions
and Pulse CO-Ox monitoring with Masimo SET MCable Accessing the Pulse CO-Ox dialog window General Masimo rainbow SET setup functions take Or, if the parameter is not displayed place in the SpO and Pulse CO-Ox limits dialog 1 Touch any parameter box > Settings tab > windows. - Page 176 and Pulse CO-Ox monitoring with Masimo SET MCable Selection Available settings Description Pulse CO-Ox 2 SpHb , SpOC (default), SpMet, SpCO, Selects the parameter for the param- eter 2 location in the Pulse CO-Ox pa- rameter box. With an Hb sensor, the default param- eter is SpOC.
-
Page 177: Password-Protected Masimo Rainbow Set Setup Functions
and Pulse CO-Ox monitoring with Masimo SET MCable Selection Available settings Description Change parame- A list of currently available parameters. Changes the parameter box to a dif- ferent parameter. This setting is a patient default which may be unique for each patient category; it is part of the profile. If the venous blood source was selected for SpHb Cal, the parameter label changes from SpHb (arterial blood source) to SpHbv. - Page 178 This page has been left blank intentionally. Instructions for use Infinity Acute Care System – Infinity M540 SW VG4.n...
-
Page 179: Spo And Pulse Rate Monitoring With Nellcor Oximax Mcable
and pulse rate monitoring with Nellcor OxiMax MCable and pulse rate monitoring with Nellcor OxiMax MCable Overview of SpO monitoring ... . 180 Supported parameters ....180 precautions . -
Page 180: Overview Of Spo 2 Monitoring
and pulse rate monitoring with Nellcor OxiMax MCable Overview of SpO monitoring monitoring is only possible with an SpO The SpO monitoring functions are configurable in MCable. The M540 uses the Infinity MCable – Nell- the parameter-specific dialog window (see cor OxiMax (Nellcor OxiMax MCable) to measure page 185). - Page 181 and pulse rate monitoring with Nellcor OxiMax MCable WARNING To reduce the hazard of burns during surgery, NOTE keep the sensor or transducer and their asso- A functional tester can be used to measure the to- ciated cables away from the surgical site, the tal error of a pulse oximeter monitor-probe system electro-surgical unit return electrode, and if a particular calibration curve has been indepen-...
-
Page 182: Connecting The Nellcor Oximax Mcable
and pulse rate monitoring with Nellcor OxiMax MCable Connecting the Nellcor OxiMax MCable The Nellcor OxiMax MCable connects directly to To connect the Nellcor OxiMax MCable the M540. Attach the Nellcor OxiMax MCable (B) to the blue connector (A) of the M540. 1 Attach the sensor cable (D) to the Nellcor Oxi- Max MCable connector (C). -
Page 183: Monitoring
and pulse rate monitoring with Nellcor OxiMax MCable Patient preparation for SpO monitoring The following tips provide optimal SpO monitoring NOTE results but must never replace hospital-approved Read the instructions provided with the sensor for practices or manufacturer’s recommendations. optimal application techniques and for safety in- formation. -
Page 184: Spo 2 Display
and pulse rate monitoring with Nellcor OxiMax MCable display On the M540, the SpO display consists of: A SpO label – SpO parameter box B Units of measure – SpO pulse plethysmogram waveform C Crossed triangle symbol when the SpO alarm is turned off. -
Page 185: Spo 2 Parameter Setup Functions
and pulse rate monitoring with Nellcor OxiMax MCable parameter setup functions All SpO parameter setup functions take place in The limits dialog window contains the Auto set and the SpO dialog window (see "Accessing the SpO Alarm buttons for configuring the alarm functions. dialog window"... - Page 186 and pulse rate monitoring with Nellcor OxiMax MCable Selection Available settings Description SatSeconds Off (default), 10, 25, 50, 100 This selection does the following: – Analyzes desaturation events by multiplying their duration (seconds) by the number of per- centage points the patient exceeds the alarm limit.
-
Page 187: Temperature
Temperature Temperature Overview of temperature monitoring ..188 Supported parameters ....188 Precautions ......188 Connecting the temperature sensors. -
Page 188: Overview Of Temperature Monitoring
Temperature Overview of temperature monitoring The M540 measures and displays the following The temperature monitoring functions are config- temperature values: urable in the parameter-specific dialog window (see page 192). – Surface body temperature Before performing any monitoring functions, refer – Core temperature to the section "For your safety and that of your pa- Temperature monitoring is intended for adult, pedi- tients"... -
Page 189: M540
Temperature To connect two temperature sensors 1 Connect the temperature sensors (D) to the sensor connectors (C) of the dual temperature adapter cable. 2 Connect the connector (B) of the dual tempera- ture adapter cable to the M540 Temp/Aux con- nector (A). -
Page 190: Connecting The Temperature Sensors To The Hemodynamic Pods
Temperature Connecting the temperature sensors to the hemodynamic pods You can connect a single temperature sensor to the To connect temperature cables to the Hemo2 following devices: pod and the Hemo4 pod – Hemo4 pod 1 Connect the temperature sensor connectors (E) to the Temp A connector (H) and/or the Temp B –... -
Page 191: Temperature Display
Temperature Temperature display Temperature parameter box On the M540, the temperature display consists of a parameter box. You can select which temperature values are displayed in the parameter box (see The following diagram shows a temperature pa- page 192). rameter box. When the dual temperature cable is connected, the parameter box displays either the corresponding temperature values (for example, Ta and Tb) or one... -
Page 192: Accessing The Temperature Dialog Window
Temperature Accessing the temperature dialog window 1 Touch the temperature parameter box. 2 Touch the Settings tab. Or, if the parameter is not displayed 1 Touch any parameter box > Settings tab > Change parameter. 2 Touch the desired parameter label to display it on the main screen. -
Page 193: Non-Invasive Blood Pressure (Nibp)
Non-invasive blood pressure (NIBP) Non-invasive blood pressure (NIBP) Overview ......194 Supported parameters ....194 Non-invasive blood pressure precautions. -
Page 194: Overview
Non-invasive blood pressure (NIBP) Overview The M540 uses the oscillometric method to acquire The non-invasive blood pressure monitoring func- and process non-invasive blood pressure (NIBP) tions are configurable in the parameter-specific set- signals. Blood pressure measurements use the os- up page (see page 203). cillometric method and are equivalent to those ob- Before performing any monitoring functions, refer tained by intra-arterial methods, within the limits... -
Page 195: Non-Invasive Blood Pressure Precautions
Non-invasive blood pressure (NIBP) Non-invasive blood pressure precautions WARNING WARNING Rapid, prolonged cycling of non-invasive Accurate non-invasive blood pressure mea- pressure measurements have on occasion surements depend on the correct size and been associated with petechiae, ischemia, type of the blood pressure cuff in relation to purpura, or neuropathy. -
Page 196: Hose And Cuff
Non-invasive blood pressure (NIBP) NOTE NOTE The accuracy of the oscillometric blood pressure A systolic blood pressure higher than the current signal can decrease (up to loss of measurement) high inflation limit may trigger a message that the under the following conditions: non-invasive blood pressure inflation limit is low. -
Page 197: Patient Preparation For Non-Invasive Blood Pressure Monitoring
Non-invasive blood pressure (NIBP) Patient preparation for non-invasive blood pressure monitoring The following tips provide optimal non-invasive The following diagram depicts a typical Dräger cuff. blood pressure monitoring results but must never replace hospital-approved practices or manufactur- er’s recommendations. Accurate non-invasive blood pressure measure- ments depend on the correct size and type of the blood pressure cuff in relation to the arm circumfer- ence of the patient. -
Page 198: Non-Invasive Blood Pressure Display
Non-invasive blood pressure (NIBP) To apply the cuff NOTE The accuracy of the blood pressure measurement 1 Place the cuff 2 to 5 cm (1 to 2 inches) above can be affected by the following conditions: the elbow (or around the middle of the thigh). –... -
Page 199: Non-Invasive Blood Pressure Measurement
Non-invasive blood pressure (NIBP) Non-invasive blood pressure parameter A Non-invasive blood pressure parameter label B Unit of measure C Systolic and diastolic pressure value The non-invasive blood pressure parameter box contains the following elements: D Crossed triangle symbol when the NIBP D (di- astolic) alarm is turned off. -
Page 200: Single Measurement Mode
Non-invasive blood pressure (NIBP) Single measurement mode – Cardiac bypass mode – press the NIBP key to resume interval measurement after exiting car- diac bypass mode. Single measurement mode allows you to start mea- surements when needed. You can start and stop a –... -
Page 201: Venous Stasis
Non-invasive blood pressure (NIBP) To start interval measurements A 10 second (±1 second) minimum interval be- tween the end of one measurement and the start of Press the NIBP key on the M540. another provides minimal perfusion of the limb. To stop interval measurements To activate or deactivate continuous mode Press the NIBP key on the M540. -
Page 202: Dialog Window
Non-invasive blood pressure (NIBP) During venous stasis the monitor determines the To activate or deactivate venous stasis initial and maximum cuff inflation pressure and in- 1 Touch the non-invasive blood pressure param- flation time based on the patient category. eter box. Inflation Adult Pediatric Neonatal... -
Page 203: Functions
Non-invasive blood pressure (NIBP) Non-invasive blood pressure parameter setup functions All non-invasive blood pressure parameter setup The limits dialog window contains the Auto set and functions take place in the non-invasive blood pres- Alarm buttons for configuring the alarm functions. sure dialog window (see "Accessing the non-inva- For detailed alarm setup information, see "Config- sive blood pressure dialog window"... - Page 204 This page has been left blank intentionally. Instructions for use Infinity Acute Care System – Infinity M540 SW VG4.n...
-
Page 205: Accessing The Non-Invasive Blood Pressure
Invasive blood pressure (IBP) Invasive blood pressure (IBP) Overview of invasive blood pressure monitoring......206 Supported parameters . -
Page 206: Monitoring
Invasive blood pressure (IBP) Overview of invasive blood pressure monitoring The M540 acquires, processes, and displays inva- – Infinity MPod – Quad Hemo (MPod – Quad- sive blood pressure signals. Several pods are avail- Hemo) able for monitoring invasive pressure. Monitoring –... - Page 207 Invasive blood pressure (IBP) Hemo2 pod MPod – QuadHemo This pod measures up to two pressures, cardiac This pod measures up to four pressures, cardiac output, and temperature. output, and temperature. A Key for zeroing all pressures simulta- F Key for zeroing all pressures simulta- neously (see page 215) neously (see page 215)
-
Page 208: Invasive Blood Pressure Precautions
Invasive blood pressure (IBP) Dual Hemo MCable This Dual Hemo MCable measures up to two pres- sures. A Dual Hemo MCable connector that connects to the M540. B Intermediate cables for attaching the transduc- ers. Invasive blood pressure precautions WARNING To prevent patient injury, never reuse a single- use transducer. -
Page 209: Connecting The Hemo4 And Hemo2 Pods
Invasive blood pressure (IBP) Connecting the Hemo4 and Hemo2 pods The Hemo4 and Hemo2 pods connect directly to To connect the Hemo4 and Hemo2 Pod the M540. The following diagram shows where the 1 Attach the invasive blood pressure adapter (G) gray hemo connector (A) is located on the side of to the bottom of the Hemo4/Hemo2 pod. -
Page 210: Connecting The Mpod - Quadhemo
Invasive blood pressure (IBP) Connecting the MPod – QuadHemo The MPod – QuadHemo connects directly to the To connect the MPod – QuadHemo M540. 1 Connect one end of connection cable (C) to the connector located on the right side of the MPod –... -
Page 211: Connecting The Dual Hemo Mcable
Invasive blood pressure (IBP) Connecting the Dual Hemo MCable The Dual Hemo MCable connects directly to the To connect the Dual Hemo MCable M540. 1 Attach the transducers (D) to the transducer adapter cables (C). The transducer adapter ca- bles are permanently fastened to the Dual Hemo MCable. -
Page 212: Patient Preparation For Invasive Blood Pressure Monitoring
Invasive blood pressure (IBP) Patient preparation for invasive blood pressure monitoring – When preparing the patient, make sure there NOTE are no air bubbles in the sensor or the stopcock. If air bubbles appear in the tubing system, flush the system with the infusion solution again. Air –... -
Page 213: Labeling Invasive Blood Pressure Channels
Invasive blood pressure (IBP) Labeling Invasive blood pressure channels The invasive blood pressure label determines how To assign a pressure label manually a signal is analyzed and reported. The M540 takes 1 Touch the invasive blood pressure parameter the pressure labels from the connected pod or box. -
Page 214: Standard Pressure Labels
Invasive blood pressure (IBP) Standard pressure labels The M540 detects the labels automatically from the hemodynamic pod, provided a transducer is con- nected. You can also label pressure channels man- ually. The following table lists the available invasive blood pressure labels. Invasive blood pressure labels Label Pressure type... -
Page 215: Pressure Label Conflicts
Invasive blood pressure (IBP) Pressure label conflicts Pod-M540 label conflicts Each pressure label is assigned to one location. If you try to reuse a label, you must confirm it. The M540 assigns the label to the currently selected pa- The hemodynamic pods store pressure labels like rameter box and places an automatic pressure label the M540. -
Page 216: Zeroing All Pressure Transducers
Invasive blood pressure (IBP) Zeroing all pressure transducers This procedure zeroes all pressure transducers si- Hemo4 pod multaneously. Zeroing all pressures simultaneously from the Hemo4 pod, the Hemo2 pod, and the MPod – QuadHemo automatically zeroes all transducers open to air simultaneously. To zero all pressure transducers from the hemodynamic pods 1 Align the transducer to the level of the heart... -
Page 217: Pulmonary Wedge Pressure
Invasive blood pressure (IBP) Pulmonary wedge pressure You cannot request pulmonary wedge pressures di- M540 is part of IACS, refer to the instructions for rectly from the M540. For more information on re- use Infinity Acute Care System – Monitoring Appli- questing pulmonary wedge pressures when the cations. -
Page 218: Invasive Blood Pressure Parameter Setup
Invasive blood pressure (IBP) Invasive blood pressure parameter setup functions All invasive blood pressure setup functions take The limits dialog window contains the Auto set and place in the invasive blood pressure dialog window Alarm buttons for configuring the alarm functions. (see "Accessing the invasive blood pressure dialog For detailed alarm setup information, see "Config- window"... -
Page 219: Cardiac Output
Cardiac output Cardiac output Overview of cardiac output monitoring ..220 Cardiac output measurement method ..220 Supported parameters ....220 Cardiac output precautions. -
Page 220: Overview Of Cardiac Output Monitoring
Cardiac output Overview of cardiac output monitoring The M540 uses the thermodilution method to com- When computing cardiac output, the M540 takes pute cardiac output for adult and pediatric patients. the following factors into account: Cardiac output monitoring is not intended for neo- –... -
Page 221: Connecting The Cardiac Output Hardware
Cardiac output Connecting the cardiac output hardware You can connect the hemodynamic cable to one of A M540 hemodynamic connector the following devices: B Grey intermediate cable connector – MPod – QuadHemo C Red intermediate cable connector – Hemo4 pod D MPod –... - Page 222 Cardiac output To connect the cardiac output hardware to the Hemo4 and the Hemo2 pods 1 Connect the hemodynamic intermediate cable connector (B) to the grey hemo connector (A) of the M540. 2 Connect the red connector of the hemodynamic intermediate cable (C) to the Hemo4/Hemo2 connector (D).
-
Page 223: Patient Preparation For Cardiac Output
Cardiac output Patient preparation for cardiac output monitoring The following tips provide optimal cardiac output – Use an in-line injectate system. Systems that monitoring results but must never replace hospital- measure the injectate temperature in the ice approved practices or manufacturer’s recommen- bath can introduce errors. - Page 224 This page has been left blank intentionally. Instructions for use Infinity Acute Care System – Infinity M540 SW VG4.n...
-
Page 225: Carbon Dioxide Concentrations
Carbon dioxide concentrations Carbon dioxide concentrations Overview of CO monitoring ... . . 226 Supported parameters ....226 precautions . -
Page 226: Overview Of Co 2 Monitoring
Carbon dioxide concentrations Overview of CO monitoring The M540 provides fast and continuous main- As respiration gases flow through the airway adapt- stream measurements of carbon dioxide concen- er, the sensor analyzes the expired and inspired air trations (CO ) in the airway of intubated patients. of the patient by sending a beam of infrared light The M540 acquires signals from a CO sensor (In-... - Page 227 Carbon dioxide concentrations WARNING CAUTION The surface temperature of the sensor may To prevent leakage, make sure the airway adapter rise to 43 °C (109 °F). Prolonged exposure to is firmly connected to the breathing circuit. the patient's skin may result in a burn. CAUTION CAUTION Check the CO...
-
Page 228: Connecting The Co 2 Sensor
Carbon dioxide concentrations Connecting the CO sensor Before connecting any CO hardware, make sure the airway adapter that is used, matches the airway adapter setting of the M540 (see page 249). For ex- ample, you should not use a disposable airway adapter if the M540 is configured for a reusable air- way adapter (and vice versa). -
Page 229: Patient Preparation For Co 2 Monitoring
Carbon dioxide concentrations Patient preparation for CO monitoring The following tips provide optimal CO monitoring – When you switch adapter types (from reusable results but must never replace hospital-approved to disposable or adult to pediatric, or vice versa) practices or manufacturer’s recommendations. you do not have to rezero a Dräger sensor. -
Page 230: Co 2 Display
Carbon dioxide concentrations display waveform (capnogram) On the M540, the CO display consists of: – CO parameter box The M540 also displays an instantaneous CO – CO waveform (capnogram) waveform or capnogram. parameter box The CO parameter box contains the following ele- ments: A Expiratory or alveolar plateau (level of CO lungs ceases to increase significantly) - Page 231 Carbon dioxide concentrations Description Cause Capnogram Alveolar plateau showing a – Inadequate seal around the downward slope that merg- endotracheal tube es with a descending limb. – Leaky or deflated endotracheal or tracheostomy cuff – Artificial airway that is too small for the patient Elevated waveform base- Rebreathing due to one of the fol-...
-
Page 232: Accessing The Co 2 Dialog Window
Carbon dioxide concentrations Accessing the CO dialog window 1 Touch the CO parameter box. 2 Touch the Settings tab. Or, if the parameter is not displayed 1 Touch any parameter box > Settings tab > Change parameter. 2 Touch the desired parameter label to display it on the main screen. - Page 233 Carbon dioxide concentrations Selection Available settings Description RRc apnea time Off (default), 10, 15, 20, 25, Specifies the time the M540 waits before re- 30 s porting a cessation of breathing as an apnea event. Apnea archive Off, Store (default), Str/Rec, Determines what happens in response to an Record apnea.
- Page 234 This page has been left blank intentionally. Instructions for use Infinity Acute Care System – Infinity M540 SW VG4.n...
-
Page 235: System Configuration
System configuration System configuration Overview ......236 Service tab ......236 Configuring general settings. -
Page 236: Overview
System configuration Overview This chapter describes the Menu and Alarm set- The Menu dialog window consists of the following tings dialog windows. The Menu dialog window dialog windows: consists of several dialog windows for configuring – Main (see page 237) the M540. -
Page 237: Configuring General Settings
System configuration Configuring general settings This section describes the setup functions of the Main dialog window. To access the Main dialog window 1 Press the Menu function key. 2 Touch the Main tab. Main dialog window Selection Available settings Description All alarms pause None When the All alarms pause button is select-... - Page 238 System configuration Main dialog window Selection Available settings Description Rest ECG report None Prints a 12-lead ECG report for an adult or pe- diatric patient during 12-lead monitoring when the M540 is in wireless mode. When the M540 is docked, the feature is deac- tivated.
-
Page 239: Configuring The Patient Settings
System configuration Configuring the patient settings This section describes the setup functions of the Patient setup dialog window. The dialog window configures the M540 for the patient. To access the Patient setup dialog window 1 Press the Menu function key. 2 Touch the Patient setup tab. -
Page 240: Configuring The System Settings
System configuration Configuring the system settings This section describes the setup functions of the To access the system information System setup dialog window from where you can 1 Press the Menu function key. access biomed and service settings and system in- formation. -
Page 241: Accessing The Alarm Setup Dialog Window
System configuration Accessing the Alarm setup dialog window The Alarm setup dialog window provides access 3 Touch the Alarm setup or the Volume/ Tones to password-protected alarm settings. tab. 4 Enter the required password and touch OK. To access the Alarm setup dialog window Refer to the following table for available selections: 1 Press the Menu function key. - Page 242 System configuration alarm On (default) An SpO lower alarm limit violation must per- delay sist for 10 seconds before triggering acoustic and visual alarm signals. This function is not possible if the Nellcor SatSeconds feature is set to any value other than Off (see page 186).
- Page 243 System configuration Volume/Tones tab (clinical password required) Minimum alarm – Off (not available if con- Determines which alarm volume settings are vol. nection to the ICS is un- available under the Alarm volume button. available) This setting does not affect the volume of the attention or the pulse tone.
- Page 244 System configuration Reminder: audio – On (default) Sounds an alert tone every 30 seconds at the at the M540 to remind you that the alarm tone – Off is deactivated during an active alarm condi- tion. This alert tone is suppressed if you initiate an audio pause.
-
Page 245: Features
System configuration Accessing the configurable SpO alarm features The Alarm setup dialog window provides access To access the Alarm setup dialog window to password-protected SpO alarm settings. De- 1 Press the Menu function key. pending on the configuration of the M540, one of the following two tabs appears. -
Page 246: Viewing The System Information
System configuration Viewing the system information This section describes how to review the various To view the system information system information which is located in different 1 Press the Menu function key. menus under the System information dialog win- dow. 2 Touch the System setup tab. - Page 247 System configuration Dialog window Available information Wireless WLAN MAC address Multicast address Signal strength BSSID SSID Encryption Channel number Regulatory domain Instructions for use Infinity Acute Care System – Infinity M540 SW VG4.n...
-
Page 248: Configuring The Biomed Settings
System configuration Configuring the biomed settings This section describes the setup functions of the Biomed dialog windows. To access the Biomed dialog window 1 Press the Menu function key. 2 Touch the System setup tab. 3 Touch the Biomed button. 4 Enter the password and touch OK. - Page 249 System configuration Biomed dialog windows Biomed > Settings 1 dialog window Selection Available settings Description Restore Profile – Cancel Restores the saved profile settings and up to five available views on the M540. – OK In standalone mode, if docked on an M500 that has a saved profile, selecting this button will restore the M500 default profile.
-
Page 250: Configuring Units Of Measure
System configuration Configuring units of measure To access the Biomed dialog window Changing the units of measure dischargs the pa- tient. 1 Press the Menu function key. 2 Touch the System setup tab. 3 Touch the Biomed button. 4 Enter the password and touch OK. 5 Touch the Units tab. -
Page 251: Configuring The M500 Setup
System configuration Configuring the M500 setup The following setup features are intended for a To access the Biomed dialog window wired M500. These settings are stored on the M500 1 Press the Menu function key. and are adopted by an M540 when it is docked. 2 Touch the System setup tab. -
Page 252: Configuring The Wireless Network Setup
System configuration Selection Available settings Description Other dialog window Load profile Off (default) After docking, the M540 does not adopt the profile of the M500 but uses its own settings in- NOTE: The Load stead. profile button ap- Automatic After docking, the M540 adopts the profile of pears greyed out the M500. - Page 253 System configuration Keep bed label Yes (default) – In an IACS configuration: The M540 retains the bed label of the Cockpit when it un- docks. Any changes to the M540 bed label do not have any effect. If the patient is also monitored by the ICS, the data continue to display in the same viewport when the M540 is undocked.
-
Page 254: Configuring The Screen Setup
System configuration Configuring the screen setup This section describes the setup functions of the Screen setup dialog window. To access the Screen setup dialog window 1 Press the Menu function key. 2 Touch the Screen setup tab. Screen setup dialog window Selection Available settings Description... -
Page 255: Configuring Alarm Settings
System configuration Configuring alarm settings This section describes the setup functions of the Alarms dialog window. To access the Alarm settings dialog window 1 Press the Alarms function key. 2 Touch the Alarm settings tab. Alarms dialog window Selection Available settings Description Alarm settings Alarm volume... - Page 256 System configuration Alarms dialog window Selection Available settings Description Config. alarms window sensor off – High Assigns an alarm priority to the sensor alarm or deactivates the sensor alarm. – Medium – High: The event is treated as a high-priori- –...
-
Page 257: Configuring The Battery Alarm
System configuration Alarms dialog window Selection Available settings Description RRi lead off – High Assigns an alarm grade to the RRi lead-off alarm or deactivates it. The selected alarm – Medium grade affects how the alarm event is reported – Low (default) visually and acoustically (see page 87 and page 88). -
Page 258: Options
System configuration 5 Select one of the following settings: – High - a tone of high priority sounds when the battery has approximately 5 minutes of – Medium (default) - a persistent tone of me- the remaining charge left. Also, the mes- dium priority sounds when the battery has sage Recharge battery appears in the approximately 5-10 minutes of the remain-... -
Page 259: Temporary Options
System configuration To lock the wireless option 1 Press the Menu function key. 2 Touch the System setup tab. 3 Touch the Service button. 4 Enter the password > OK. 5 Touch the Locked options tab. 6 Touch the Wireless button. A dialog box with the following message appears: Disabling this option disables wireless func- tionality. - Page 260 This page has been left blank intentionally. Instructions for use Infinity Acute Care System – Infinity M540 SW VG4.n...
-
Page 261: Troubleshooting
Troubleshooting Troubleshooting Overview ......262 Device communication messages / general device messages ....262 M540 battery messages . -
Page 262: Overview
Troubleshooting Overview Multiple alarm messages cycle in the alarm mes- If no priority level is assigned, the message is infor- sage field of the header bar. mational and no action is required. For example, if two faults are detected simulta- In the following table, messages are listed in alpha- neously, the more urgent of the two is displayed. - Page 263 Troubleshooting Priority Message Cause Remedy None Offline A wireless M540 is un- – Check the network connec- docked and does not have tions. a bed label assignment. – Assign a bed label to the Disconnected network ca- M540. ble. None Recording stored A recording was requested Dock the M540 to an the M500 in...
-
Page 264: M540 Battery Messages
Troubleshooting M540 battery messages Priority Message Cause Remedy Low battery The M540 is undocked and Return the M540 to the M500 to the battery charge has recharge the battery. reached 10% of the remain- ing charge. An advisory tone sounds every 20 seconds. - Page 265 Troubleshooting Priority Message Cause Remedy ? Audio off This banner appears in Activate the alarm volume. the alarm message field when the alarm volume is deactivated on a standal- one M540 and the patient is also admitted at the ICS. When the M540 is in an IACS configuration, this banner appears when the...
-
Page 266: Ecg
Troubleshooting Priority Message Cause Remedy The reported arrhythmia was detect- Check the patient and treat if necessary. Brady (neonatal patient catego- ASY, VF OFF This banner appears in the alarm The banner disappears message field under the following under the following cir- circumstances: cumstances: –... - Page 267 Troubleshooting Priority Message Cause Remedy HR Alarms Off This banner appears in the alarm message field under the following circumstances. – When the alarm limits for heart rate are deactivated and the ASY/VF alarms function is set to Always on (see page 242). –...
- Page 268 Troubleshooting Priority Message Cause Remedy HR > (alarm limit) The parameter value is above/below – Check the patient and the set treat if necessary. HR < (alarm limit) upper /lower alarm limits. – Change the alarm lim- its. In the parameter box the parameter value is replaced by *** HR out of range high The parameter value is above the Check the patient and...
-
Page 269: Arrhythmia
Troubleshooting Priority Message Cause Remedy ST<label> > (alarm limit) The parameter value is – Check the patient and treat above/below the set if necessary. ST<label> < (alarm limit) upper /lower alarm lim- – Change the alarm limits. its. ST<label> out of range The parameter value is –... -
Page 270: Respiration (Rri)
Troubleshooting Priority Message Cause Remedy None ARR cannot learn (arrhythmia After 100 beats, the – Check the electrode prep- lead) M540 cannot determine aration. the dominant normal – Reapply electrodes if nec- complex on any lead essary. selected for QRS pro- cessing. - Page 271 Troubleshooting Priority Message Cause Remedy RRi artifact Persistent artifact was – Check the patient and treat if detected. necessary. RRi high impedance A high respiration imped- – Make sure the patient’s skin is ance was detected. prepared properly. RRi lead off The respiration lead has –...
-
Page 272: Spo
Troubleshooting The following messages originate from three differ- ent hardware devices (Masimo SET, Masimo rain- bow SET, and Nellcor OxiMax). Priority Message Cause Remedy None Learning Pulse CO-Ox The Masimo rainbow SET- Wait until the Masimo specific parameters are be- rainbow SET parame- Masimo ing calculated (only the pa-... - Page 273 Troubleshooting Priority Message Cause Remedy SpHb > (alarm limit) The parameter value is – Check the patient above/below the set upper / and treat if neces- SpHbv < (alarm limit) lower alarm limits. sary. PVI > (alarm limit) – Change the alarm PVI <...
- Page 274 Troubleshooting Priority Message Cause Remedy H/W failure Masimo SET MCable or – Check for defective Nellcor OxiMax MCable MCable Any SpO hardware failure. MCable – Power cycle the M540 to clear the message. – Contact Dräger Technical support. interference detected Interference such as artifact –...
- Page 275 Troubleshooting Priority Message Cause Remedy SpO2 only mode The device cannot calibrate Remove and reapply Masimo rainbow the Masimo rainbow SET pa- the sensor. If the prob- SET only Parameter values are displayed rameters and is attempting lem persists, contact for SpO , PLS, and PI;...
-
Page 276: Non-Invasive Blood Pressure
Troubleshooting Priority Message Cause Remedy unrecognized sensor – The MCable does not – Connect the right recognize the connected type of sensor. Any SpO sensor. MCable – Contact your techni- – A reusable SpHb sensor cal personnel. is connected to a Masimo rainbow SET MCable that does not support this parameter. - Page 277 Troubleshooting Priority Message Cause Remedy NIBP cannot measure The pulse profile is too – Check the patient and poor to establish a reli- treat if necessary. able measurement – Move the cuff to a limb (usually due to persis- with less movement. tent motion artifact) –...
-
Page 278: Cardiac Output
Troubleshooting Priority Message Cause Remedy NIBP open line There was no signifi- Make sure that the hose cant increase in cuff and cuff are properly pressure during the in- connected to the moni- flation cycle. tor. NIBP out of range high The parameter value is Check the non-invasive above/below the mea-... -
Page 279: Temperature
Troubleshooting Temperature Priority Message Cause Remedy 3) 4) Δ Cannot derive One of the cables is either – Check the equipment and unplugged or defective, or replace it if necessary. Δ Cannot derive the value is out of range. – Connect the second tem- Δ... -
Page 280: Invasive Blood Pressure
Troubleshooting Invasive blood pressure Priority Message Cause Remedy ART cath. disconnected? The arterial catheter could be – Assess the catheter in- dislodged, or there could be sertion site. a leak in the tubing. – Inspect the tubing for leaks or the presence of blood. - Page 281 Troubleshooting Priority Message Cause Remedy None <IBP> did not zero Transducer zeroing failed – Keep all tubing motion- because of: less, then rezero. – excessive signal – Change the transducer. noise – Check stopcock, then – a non-static wave- rezero. form IBP H/W failure Invasive blood pressure...
- Page 282 Troubleshooting Priority Message Cause Remedy etCO > (alarm limit) The parameter value is – Check the patient and treat above/below the set up- if necessary. etCO < (alarm limit) per/lower alarm limits. (except inCO – Change the alarm limits. check airway –...
- Page 283 Troubleshooting Priority Message Cause Remedy out of range The parameter signal is out- – Check the patient and treat side the measuring range of if necessary. the monitor. – Check the equipment and replace if necessary. None please zero Instructional message for Zero the mainstream sensor.
- Page 284 Troubleshooting Priority Message Cause Remedy None warming up The mainstream sensor is – Wait for the mainstream going through the warm-up sensor to warm up. During cycle. warm-up, the accuracy is reduced. – If the message persists longer than 15 min after the sensor has warmed up, and the ambient temperature is above 10 °C (50 °F), con-...
-
Page 285: Maintenance
Maintenance Maintenance Overview ......286 Definition of maintenance concepts ..287 Inspection . -
Page 286: Overview
Maintenance Overview This chapter describes the maintenance measures CAUTION required to maintain the proper functioning of the This device must be inspected and serviced at medical device. Maintenance measures must be regular intervals. A record must be kept on this performed by the responsible personnel. -
Page 287: Inspection
Maintenance Definition of maintenance concepts Concept Definition Maintenance All measures (inspection, preventive maintenance, repair) intended to main- tain and restore the functional condition of a medical device. Inspection Measures intended to determine and assess the actual state of a medical de- vice. -
Page 288: Inspection / Safety Checks
Maintenance Inspection / safety checks Inspection and safety checks of devices must be performed according to the suggested intervals specified in the table on page 287. Scope of inspection/safety checks for the M540 Safety checks are no substitute for preventive 5 Check the following safety features: maintenance measures (including preventive re- –... -
Page 289: Preventive Maintenance
Maintenance Preventive maintenance WARNING WARNING Risk of faulty components Risk of electric shock Device failure is possible due to wear or mate- Before performing any maintenance work, dis- rial fatigue of the components. connect all electrical connectors from the power supply. To maintain proper operation of all compo- nents, this device must undergo inspection The following table shows the preventive mainte-... - Page 290 This page has been left blank intentionally. Instructions for use Infinity Acute Care System – Infinity M540 SW VG4.n...
-
Page 291: Cleaning And Disinfection
Cleaning and disinfection Cleaning and disinfection Overview of cleaning and disinfecting the M540 and its accessories ....292 Cleaning and disinfecting precautions ..292 Approved cleaning agents. -
Page 292: Overview Of Cleaning And Disinfecting The M540 And Its Accessories
Cleaning and disinfection Overview of cleaning and disinfecting the M540 and its accessories Cleaning and disinfecting precautions Clean and disinfect the device or device parts be- fore each maintenance step – and also when re- turning for repair. WARNING Continuous exposure to moisture can damage the Because of the danger of electric shock, never M540 and its peripheral devices. -
Page 293: Approved Cleaning Agents
Cleaning and disinfection Approved cleaning agents Clean and disinfect the device or device parts per NOTE hospital approved protocol. Dräger makes no claims regarding the efficacy of the listed chemicals, their methods as a means for Agents tested by Dräger and shown to have no disinfecting, the ability of the agents to control in- harmful effect at the time of testing include: fection, their environmental impact, safe handling,... -
Page 294: Cleaning And Disinfecting The M540 And M500
Cleaning and disinfection Cleaning and disinfecting the M540 and M500 Use only the approved cleaning agents listed on To disinfect the M540 and M500 page 293, unless otherwise specified. 1 Disinfect the M540/M500 with a gauze pad us- ing an approved cleaning agent. M540, M500, and power supply 2 Dry thoroughly with a lint-free cloth. -
Page 295: Mpod
Cleaning and disinfection Cleaning and disinfecting an MCable and MPod Use only the approved cleaning agents listed on To disinfect an MCable and MPod page 293, unless otherwise specified. 1 Disconnect the MCable from the M540. 2 Disinfect the MCable with a gauze pad using an MCable precautions approved cleaning agent 3 Dry thoroughly with a lint-free cloth. -
Page 296: Cleaning And Disinfecting Patient Cables
Cleaning and disinfection Cleaning and disinfecting patient cables Use only the approved cleaning agents listed on To clean patient cables page 293, unless otherwise specified. The follow- 1 Disconnect the patient cable from the M540. ing procedures apply to all patient cables. 2 Clean the patient cables with a gauze pad moistened with soapy water or with an ap- Patient cable precautions... -
Page 297: Cleaning And Disinfecting Temperature Sensors And Cables
Cleaning and disinfection Cleaning and disinfecting temperature sensors and cables Use only the approved cleaning agents listed on To clean temperature cables page 293, unless otherwise specified. 1 Disconnect the temperature cable from the M540. Temperature probe and cable 2 Clean the temperature cables with a gauze pad moistened with soapy water or with an ap- precautions proved cleaning agent. -
Page 298: Cleaning Non-Invasive Blood Pressure Cuffs
Cleaning and disinfection Cleaning non-invasive blood pressure cuffs Non-invasive blood pressure precaution To clean non-invasive blood pressure cuffs 1 Disconnect the non-invasive blood pressure CAUTION hose from the M540. The non-invasive blood pressure cuff can be im- 2 Wipe the non-invasive blood pressure cuff with mersed in cleaning solution, but do not allow the a cloth moistened with soapy water or using an solution to enter the non-invasive blood pressure... -
Page 299: Cleaning And Disinfecting Mainstream Co 2 Sensors And Airway Adapters
Cleaning and disinfection Cleaning and disinfecting mainstream CO sensors and airway adapters Mainstream sensors and airway adapters precaution WARNING To reduce the risk of infection, remember that the disposable airway adapters are for single patient use only and cannot be sterilized. To clean and disinfect the mainstream sensor and reusable airway adapters Refer to the Dräger Infinity MCable Mainstream... - Page 300 This page has been left blank intentionally. Instructions for use Infinity Acute Care System – Infinity M540 SW VG4.n...
-
Page 301: Disposal
Disposal Disposal EU Directive 2002/96/EC (WEEE) ..302 M540 and M500 ......302 Disposal of Accessories . - Page 302 Disposal EU Directive 2002/96/EC (WEEE) This device is subject to EU Directive 2002/96/EC (WEEE). It is not registered for use in private households, and may not be disposed of at munic- ipal collection points for waste of electrical and electronic equipment. Dräger has authorized a firm to dispose of this device in the proper manner.
-
Page 303: Technical Data
Technical data Technical data Overview ......304 Carbon dioxide concentrations (CO ) ..333 Temperature . -
Page 304: Overview
Technical data Overview This chapter contains the technical data for the fol- – MPod and MCable lowing devices of the Infinity Acute Care System: – Parameter specifications – M540 For technical data regarding the C500/C700 refer – Infinity M500 MDock to the instructions for use entitled ’Infinity Acute Care System –... -
Page 305: Infinity M540
Technical data Infinity M540 Physical specifications Dimensions (W x H x D) 259 x 89 x 43 mm (10.2 x 3.5 x 1.7 in) Weight 916 g (2.0 lbs) Cooling Conduction (docked), Convection (undocked) Materials Enclosure: PC-ABS/TPU Lenses: polyamide Internal plastic: polyamide (PA) Printed circuits: glass/epoxy, lead/tin solder, copper etch Battery: lithium ion Heatsink: magnesium... - Page 306 Technical data Connectors Input/output ports – ECG – NIBP – Temperature/Auxillary – SpO – Hemo CO – CO Display attributes Display type Color Liquid Crystal Display (LCD), Advanced Touch Screen Display size 158.2 mm (6.2 in) diagonal Viewing size 148.8 x 53.8 mm (5.9 x 2.1 in) Resolution (pixels) 640 x 240 (1/2 VGA) Luminance...
- Page 307 Technical data Battery recharging time 100 % capacity: approximately 6.5 hours for a completely dis- charged battery 90% capacity: approximately 5.5 hours for a completely dis- charged battery 70 % capacity: approximately 4 hours for completely dis- charged battery Mode of operation Continuous (with power coupling through the M500) Environment Humidity (non condensing)
-
Page 308: Infinity M500
Technical data Sound pressure Sound pressure levels for IEC alarm tones Measurements per ISO 3744, 5 to 100% volume setting Device Low grade Medium grade High grade M540 46 dB(A) to 66 dB(A) 46 dB(A) to 67 dB(a) 48 dB(A) to 68 dB(a) Infinity M500 Physical specifications Dimensions (W x H x D) -
Page 309: Power Supply (Ps50)
Technical data Communications Internal network (M540) 802.3 100BaseT Ethernet (optically isolated) Power supply (PS50) Physical specifications Dimensions (W x H x D) 76 x 146 x 43 mm (2.99 x 5.75 x 1.69 in) Weight 400 to 550 g (0.88 to 1.2 lbs) Cable length 1.82 m (71.7 in) (from power supply to DC output connec-... -
Page 310: Watt Desktop Power Supply (Ps120)
Technical data 120 Watt desktop power supply (PS120) The following power supply is for use with the M540 CAUTION patient mnonitor. Always use a power cable with a hospital-grade plug and connect it to a hospital-grade or ground- ed receptacle as required by local regulation. Physical specifications Connections ODU Medi-Snap (3 pins) -
Page 311: Infinity Mcable - Mainstream Co2
Technical data Infinity MCable – Mainstream CO Physical specifications Size (W x H x D) 30 x 50 x 20 mm (1.18 x 1.97 x 0.79 in) Weight (without cable) 30 g or less (0.066 lb or less) Cable length 2.5 m (98.4 in) Connections Single cable connecting to the M540... -
Page 312: Infinity Mcable - Masimo Set And Infinity Mcable - Masimo Rainbow Set
Technical data Infinity MCable – Masimo SET and Infinity MCable – Masimo rainbow SET Physical specifications Size (W x H x D) 61 x 20 x 130 mm (2.4 x 0.8 x 5.1 in) Weight 0.12 kg (0.26 lb) Cable length 300 mm (11.8 in) Connections Single cable connecting to the M540... -
Page 313: Infinity Mcable - Nellcor Oximax
Technical data Infinity MCable – Nellcor OxiMax Physical specifications Size (W x H x D) 61 x 21 x 130 mm (2.4 x 0.8 x 5.1 in) Weight 0.12 kg (0.26 lbs) Cable length 300 mm (11.8 in) Connections Single cable connecting to the M540 Nellcor cable connector for sensor cable Environment Humidity (non-condensing) -
Page 314: Infinity Hemo2 And Hemo4 Pods
Technical data Infinity Hemo2 and Hemo4 pods Physical specifications Size (W x H x D) 205 x 140 x 60 mm (8.1 x 5.5 x 2.3 in) Weight Hemo2: 0.7 kg (1.6 lbs) Hemo4: 0.9 kg (1.9 lbs) NOTE: Weight includes one (Hemo2) or two (Hemo4) trans- ducer adapter block(s) and excludes mounting clamp. -
Page 315: Infinity Mpod - Quad Hemo
Technical data Infinity MPod – Quad Hemo Physical specifications Size (W x H x D) 205 x 110 x 80 mm (8.1 x 4.3 x 3.2 in) Weight 0.48 kg (1.1 lbs) NOTE: Weight includes four transducer cables but excludes the mounting clamp and rod. -
Page 316: Infinity Mcable - Dual Hemo
Technical data Infinity MCable – Dual Hemo Physical specifications Size (W x H x D) 61 x 25 x 125 mm (2.4 x 1.0 x 5.0 in) Weight 0.20 kg (0.44 lb) Cable length 2500 mm (98.4 in) Connections Two invasive pressure channels Single cable connecting to the M540 Environment Humidity (non-condensing) -
Page 317: Infinity Mcable - Analog/Sync
Technical data Infinity MCable – Analog/Sync Physical specifications Size (W x H x D) 66 x 31 x 110 mm (2.6 x 1.3 x 4.4 in) Weight 0.19 kg (0.42 lb) Cable length 500 mm (19.7 in) Connections Two connectors; one for analog output and one for QRS sync pulse cable Single cable connecting to the M540 Environment... - Page 318 Technical data QRS sync pulse output ≤35 ms Delay Output high (QRS detected): Amplitude: 10 V ±5 % Duration: 50 ms Output impedance: 5000 Ω <0.8 V Output low (no QRS) Pacemaker pulses Not included Electrical specifications Power source Powered directly from the M540 Input voltage 5 V nominal ≤325 mW under fault condition...
-
Page 319: Infinity Mcable - Nurse Call
Technical data Infinity MCable – Nurse call Physical specifications Size (W x H x D) 65 x 32 x 161 mm (2.6 x 1.36 x 6.3 in) Cable length 4500 mm (177.2 in) Connections Single cable connection to the M500 Cable signals during non-alarm state Cable 1 (NO normally open): white Cable 2 (COM common): brown... -
Page 320: Parameter Monitoring Specifications
Technical data Parameter monitoring specifications NOTE The following parameters are not monitored in neonatal mode: Arrhythmia, Cardiac Output, and ST seg- ment analysis. Display Up to 12 leads Available leads 3-lead wire set: ECGI, ECGII, ECGIII (user-selectable) 5-lead wire set: ECGI, ECGII, ECGIII, ECGaVR, ECGaVL, ECGaVF, VECGV 6-lead wire set: ECGI, ECGII, ECGIII, ECGaVR, ECGaVL, ECGaVF, ECGV, ECGV+... -
Page 321: Information
Technical data Degree of protection against electric Type CF shock Defibrillation protection Unit will detect pacers with the following characteristics: ): ±2 to ±700 mV Pacer detection Amplitude (a (adult/pediatric only) Width (d ): 0.2 to 2.0 ms Rise/fall times (min) 0.1 d , ≤100 μs Overshoot (min) -
Page 322: Arrhythmia (Arr)
Technical data Heart rate averaging method Heart rate is normally based on the average R-R interval cal- culated over the last 10 seconds, however it updates more quickly to reflect changes to the patient’s underlying rate. Response time of heart rate meter to Heart rate change from 80 to 120 bpm change in heart rate Range: 3.4 to 7.1 s average: 5.3 s... -
Page 323: St Segment Analysis
Technical data ST segment analysis Sensing leads 3-lead wire set: ECGI, ECGII, ECGIII (user-selectable) 5-lead wire set: (choice of 2 leads for display) ECGI, ECGII, ECGIII, ECGaVR, ECGaVL, ECGaVF, ECGV 6-lead wire set: (choice of 2 leads for display) ECGI, ECGII, ECGIII, ECGaVR, ECGaVL, ECGaVF, ECGV, ECGV+ Optional 12-lead monitoring with 6-lead wire set and 4-lead wire set: (choice of 2 leads for display) ECGI, ECGII, ECGIII,... -
Page 324: Invasive Blood Pressure (Ibp)
Technical data Manual mode: 0.15 to 2.0 Ω Detection threshold Auto mode: 0.2 to 1.5 Ω Measurement range 0 to 155 bpm Resolution 1 bpm ±1 or 2 % of rate (whichever is greater) Measuring accuracy Apnea detection intervals Off, 10, 15, 20, 25, and 30 s Invasive blood pressure (IBP) Measuring method Resistive strain gauge transducer... - Page 325 Technical data Accuracy validation Reference method: intra-arterial. Adult: the femoral artery Pediatric: the umbilical, brachial, radial or femoral arteries Neonate: the umbilical, brachial, radial or femoral arteries The associated NBP readings were taken on the same limb. Parameter display Systolic, diastolic, mean values Measuring method Oscillometric through step-deflation.
- Page 326 Technical data Adult: last systolic value plus 25 mmHg, ±5 mmHg Inflation pressure after a valid measure- ment (3.3 kPa, ±0.66 kPa) Pediatric: last systolic value plus 25 mmHg, ±5 mmHg (3.3 kPa, ±0.66 kPa) Neonate: last systolic value plus 30 mmHg, ±5 mmHg (4 kPa, ±0.66 kPa) Inflation pressure Adult: 160 mmHg, ±5 mmHg (21.3 kPa, ±0.66 kPa)
-
Page 327: Cardiac Output (C.o.)
Technical data Cardiac Output Parameter display Cardiac output, blood temperature, injectate temperature Measuring method Thermodilution Measurement range Cardiac output:0.5 to 20 L/min Blood temperature: 25 to 43 °C (77 to 109 °F) Injectate temperature: –5 to +35 °C (23 to +95 °F) Cardiac output: ±5 % Accuracy Blood temperature: ±0.15 °C (±0.3 °F) not including probe er-... -
Page 328: Rainbow Set
Technical data Pulse Oximetry (SpO ) Infinity MCable – Masimo SET and Infinity MCable – Masimo rainbow SET Adult and pediatric sensors LNCS DCI, LNCS DCIP, LNCS TC-I, LNCS TF-I, LNCS YI, LNCS Adtx, LNCS Pdtx, LNCS Adtx-3, LNCS Pdtx-3 Neonatal sensors LNCS Inf, LNCS Inf-3, LNCS Neo, LNCS Neo-3, LNCS NeoPt-3, LNCS NeoPt, LNCS YI, LNCS SofTouch, Neo-Pt-... - Page 329 Technical data accuracy with no motion 0 to 69 % not specified 1) 2) adult, pediatric 70 to 100% ±2 % for: LNCS DCI, LNCS DCIP LNCS TF-I, LNCS YI, LNCS Adtx, LNCS Pdtx, LNCS Neo (finger) ±3.5 % for: LNCS TC-I accuracy with no motion 0 to 69 % not specified 1) 2) 3)
- Page 330 Technical data NOTE Since pulse oximeter measurements are statistically distributed, only about two-thirds of those measurements can be expected to fall within ±1 A of the value measured by a co-oximeter. The Infinity MCable – Masimo SET pulse oximeter with adult sensors has been validated in human blood studies on healthy adult volunteers in induced hypoxia studies in the range of 70 % to100 % against a laboratory co-oximeter and ECG monitor.
-
Page 331: Nellcor Oximax
Technical data Pulse oximetry (SpO ) Infinity MCable – Nellcor OxiMax Adult and pediatric sensors OxiMax MaxA, OxiMax MaxAL, OxiMax MaxA, OxiMax MaxP, OxiMax MaxN, OxiMax MaxI, OxiMax MaxR, OxiMax MaxFast, SoftCare SC-A, OxiCliq A, OxiCliq P, OxiBandOXI- A/N, OxiBandOXI-P/I, Durasensor DS-100A, Dura-Y D-YS Neonatal sensors OxiMax MaxN, OxiMax MaxI, SoftCare SC-NEO, SoftCare SC-PR, OxiCliq I, OxiCliq N, Oxi-A/N, Oxi-P/I... - Page 332 Technical data measuring accuracy 0 to 60 % not specified 1) 2) 3) neonatal 60 to 80 % not specified: SoftCare SC-PR, SoftCare SC- NEO, OxiCliq N, D-YS, Oxi-A/N 60 to 80 %, ±3 % for: OxiMax MaxN 70 to 100 % ±2 % for: OxiMax MaxN, SoftCare SC-PR, SoftCare SC-NEO ±3.5 % for: OxiCliq N...
-
Page 333: Carbon Dioxide Concentrations (Co 2 )
Technical data Carbon dioxide concentrations (CO Measurement range etCO and inCO : 0 to 100 mmHg (0 to 13.3 kPa or 0 to 13.2 vol % at sea level) RRc: 3 to 150 bpm Measurement accuracy Disposable cuvette and reusable cuvette: –... - Page 334 Technical data Compensation Atm. pressure: user-selectable; 540 to 800 mmHg (72-106.7 kPa) Gas: user-selectable; Air, N >60%, HeliOx NOTE: Selection for Gas Compensation must be made for the automatic correction of the influence of a balance gas. The effect of barometric pressure on performance The user has to manually set the total gas pressure With user selection of atmospheric pressure, the (ambient or barometric pressure) in the monitor,...
- Page 335 Technical data The effect of interfering gases and vapors on performance The additional errors from interfering gases and va- pors are not corrected automatically by the Gas Compensation selection. Gas or Vapor, Concentration reading in Vol% at 0 Vol% Halothane, 5 Vol% 0.02 Enflurane, 5 Vol% 0.03...
-
Page 336: Temperature
Technical data Temperature Temperatures: Ta, Tb, ΔT, T1a, T1b, ΔT1 Parameter display Measurement range Ta, Tb, T1a, T1b: 0 to 50 °C (32 to 122 °F) ΔT, ΔT1: 0 to 50 °C (0 to 90 °F) Resolution 0.1 °C (0.1 °F) Ta, Tb, T1a, T1b: ±0.1 °C (±0.2 °F) Accuracy (exclusive of probe) ΔT, ΔT1: ±0.2 °C (±0.4 °F) -
Page 337: Electromagnetic Compatibility
Technical data Electromagnetic compatibility The separation distances are written with regard to Cables and accessories not specified within the in- the M540. The numbers provided will not guarantee structions for use are not recommended. Using oth- faultless operation but should provide reasonable er cables and/or accessories may adversely impact assurance of such. - Page 338 Technical data Electromagnetic emissions Emissions Compliance according to... Electromagnetic environment CISPR emissions classification Class B The equipment is suitable for use in all establishments including domes- Harmonic emissions Class A tic establishments and those directly (IEC 61000-3-2) connected to the public low-voltage Voltage fluctuations / flicker Complies power network that supplies build-...
- Page 339 Technical data Electromagnetic immunity Immunity against... IEC 60601-1-2 test Compliance level Electromagnetic environment level Conducted RF 150 kHz to 80 MHz: 3 Vrms Portable and mobile RF communica- rf coupled into lines tions equipment should be used no 80 MHz to 2.5 GHz 3 V/m (IEC 61000-4-6) closer to any part of the device, in-...
-
Page 340: Recommended Separation Distances
Technical data NOTE Field strengths from fixed transmitters, such as base stations for radio (cellular/cordless) telephones and land mobile radios, amateur radio, AM and FM radio broadcast and TV broadcast cannot be pre- dicted theoretically with accuracy. To assess the electromagnetic environment due to fixed RF trans- mitters, an electromagnetic site survey should be considered. -
Page 341: Index
Index Numerics Alarm messages ..... . . 262 ARR ......269 12-lead monitoring . - Page 342 apnea archive, selecting ....233 Back panel M540 ......24 apnea time, selecting .
- Page 343 Defaults Events marking ......102 patient default list ..... 52 profiles stored on M500 .
- Page 344 Marking events ......102 assigning label ..... . 237 Masimo SET MCable changing parameter .
- Page 345 NIBP Patient name, entering ....239 Patient preparation changing parameter ....203 chime on/off .
- Page 346 Profiles Respiration about ......51 apnea archive selection ....124 adopting on docking (yes/no) .
- Page 347 Specifications SpO2 (Nellcor) ......272 applying sensor ..... 184 Analog Sync MCable .
- Page 348 Tone volume selecting (ECG) ..... 141 selecting (SpO2 Masimo) ... . . 173 selecting (SpO2, Nellcor) .
- Page 349 This page has been left blank intentionally. Instructions for use Infinity Acute Care System – Infinity M540 SW VG4.n...
- Page 350 These instructions for use only apply to Infinity Acute Care System SW VG4.n with the Serial No.: If no Serial No. has been filled in by Dräger, these instructions for use are provided for gener- al information only and are not intended for use with any specific machine or unit.
Need help?
Do you have a question about the Infinity Acute Care System M540 and is the answer not in the manual?
Questions and answers