SMART Room System Setup And Maintenance Manual
For microsoft lync
Hide thumbs
Also See for SMART Room System:
- Installation best practices (80 pages) ,
- Quick start manual (2 pages)

Related Manuals for SMART SMART Room System


Summary of Contents for SMART SMART Room System
- Page 1 SMART Room System™ for Microsoft® Lync® Setup and maintenance guide For models SRS-LYNC-S, SRS-LYNC-M and SRS-LYNC-L...
-
Page 2: Product Registration
© 2013 SMART Technologies ULC. All rights reserved. No part of this publication may be reproduced, transmitted, transcribed, stored in a retrieval system or translated into any language in any form by any means without the prior written consent of SMART Technologies ULC. Information in this manual is subject to change without notice and does not represent a commitment on the part of SMART. -
Page 3: Important Information
Do not open or disassemble the SMART product. You risk electrical shock from the high voltage inside the casing. Opening the casing also voids your warranty. Do not stand (or allow children to stand) on a chair to touch the surface of your SMART product. Rather, mount the product at the appropriate height. - Page 4 Because the interactive flat panel is heavy, rope, wire or handle failure could lead to personal injury. Use SMART supplied mounting hardware or hardware that is designed to properly support the weight of your product. Disconnect all power cables for your interactive flat panel from the wall outlet and seek...
-
Page 5: Table Of Contents
Turning on your room system for the first time Logging on and configuring the displays Configuring Lync Room System software Checking the status of the Lync Room System software product key Configuring SMART Settings Making a test call Chapter 4: Using your room system Scheduling meetings... - Page 6 C O N T E N T S Resolving software issues Testing your room system Accessing SMART Settings Appendix A: Using the interactive flat panel on-screen display menu Accessing the on-screen display menu Changing settings in the on-screen display menu Small and large room on-screen display menu...
-
Page 7: Chapter 1: Welcome
Comparing small, medium and large rooms About this guide Other documentation and resources Specifications Installation instructions Deployment and remote management instructions User documentation and training Knowledge base This chapter introduces you to your SMART Room System™ for Microsoft® Lync and this guide. smarttech.com/kb/170450... -
Page 8: About Your Room System
C H A P T E R 1 Welcome About your room system Your SMART Room System features one or two SMART Board® interactive flat panels, a Lync appliance, a tabletop console, a high-definition camera, microphones, speakers and a video connection harness for use with an optional guest laptop. -
Page 9: Presence Detection
N O T E Other, minor components are documented elsewhere in this guide. SMART Board interactive flat panels SMART Board interactive flat panels feature SMART’s proprietary DViT® (Digital Vision Touch) technology on a 16:9 LCD screen with e-LED backlight. DViT technology enables users to do the... -
Page 10: Lync Appliance
Comparing small, medium and large rooms on page 6. Lync appliance The Lync appliance includes Lync Room System software as well as SMART Product Drivers. Lync Room System software enables users to start, join and facilitate meetings and connect with others through your organization’s Lync infrastructure. -
Page 11: Speakers
Accessories Accessories for the SMART Room System include the wall stand kit and table microphones. N O T E For accessory part numbers and ordering information, refer to the specifications (see Specifications on page 7). -
Page 12: Wall Stand Kit
Medium and large rooms come with two table microphones. You can purchase and connect up to three additional table microphones if needed for a total of up to five table microphones. Comparing small, medium and large rooms The SMART Room System comes in three sizes: Small Medium Large... -
Page 13: About This Guide
Document Link SMART Room System for Lync for small rooms specifications smarttech.com/kb/170449 SMART Room System for Lync for medium rooms specifications smarttech.com/kb/170448 SMART Room System for Lync for large rooms specifications smarttech.com/kb/170447... -
Page 14: Installation Instructions
Lync Meeting Room software includes a tutorial that explains how to use the software. To open the tutorial, press the Open Tutorial button on the interactive flat panels. The SMART training website (smarttech.com/training) includes an extensive library of training resources you can refer to when learning how to use your room system. -
Page 15: Chapter 2: Installing Your Room System's Hardware
Save all product packaging so that it’s available if you need to transport the room system at a later date. N O T E If the original packaging isn’t available, you can purchase new product packaging from your authorized SMART reseller (smarttech.com/where). smarttech.com/kb/170450... - Page 16 C H A P T E R 2 Installing your room system’s hardware Ensure the wall can support the weight of the room system. Room Weight (lb.) Weight (kg) Small Medium 141.6 Large N O T E S Refer to local building codes to confirm that the wall can support the above weights. Refer to the hardware selection guide for the recommended hardware for your wall type (see Installation instructions on page 8).
-
Page 17: Chapter 3: Configuring Your Room System's Software
Logging on and configuring the displays Configuring Lync Room System software Checking the status of the Lync Room System software product key Configuring SMART Settings Making a test call After completing the hardware installation, you must turn on the room system for the first time and then configure its software. -
Page 18: Turning On Your Room System For The First Time
C H A P T E R 3 Configuring your room system’s software You have the necessary information to connect the room system to the Lync Server, including the following: IP addresses for DNS servers (if not configured automatically from the network via DHCP) Administrator user name and password to be applied to the room system Lync appliance computer name for network presence Lync account name and password for the room system... - Page 19 C H A P T E R 3 Configuring your room system’s software 2. Press the Input Select button on the interactive flat panel’s front control panel until the input source is HDMI3/PC. N O T E In large room installations, set the input source to HDMI3/PC for both interactive flat panels. The Lync appliance starts and completes the first-run installation process.
- Page 20 N O T E Completing the above steps configures the interactive flat panels’ USB-video mapping, audio settings, presence detection settings and other settings for use with SMART Room Systems. In addition, completing the above steps disables the volume and input select controls on the interactive flat panels’...
- Page 21 C H A P T E R 3 Configuring your room system’s software To configure Lync Room System software first-run installation settings 1. Select your language, and then click Next. 2. Select your country or region, time and currency preference, and keyboard layout, and then click Next.
-
Page 22: Logging On And Configuring The Displays
1. Type the administrator account’s user name and password that you created in the previous procedure, and then press ENTER. The Lync appliance’s desktop and the SMART end user license agreement appear. 2. Read the SMART end user license agreement, and then click Accept. -
Page 23: Configuring Lync Room System Software
Configuring Lync Room System software N O T E The following procedure documents SMART’s recommended configuration of Lync Room System software for a typical Lync infrastructure setup. Refer to the Microsoft Lync Room System Deployment Guide (microsoft.com/en-us/download/confirmation.aspx?id=39274) for detailed deployment information. - Page 24 C H A P T E R 3 Configuring your room system’s software To configure Lync Room System software 1. Read the end user license agreement, and then click Accept. The Lync Admin Console appears. 2. Click Lync Settings, and then set the following controls: Control Procedure User Name...
-
Page 25: Checking The Status Of The Lync Room System Software Product Key
1. Click OEM Settings, and then click SMART Board Settings. SMART Settings appears. 2. Click Connection Wizard. The SMART Connection wizard appears. The wizard detects your room system’s SMART interactive products. N O T E SMART interactive products include the interactive flat panels and the console. - Page 26 C H A P T E R 3 Configuring your room system’s software 3. For each interactive flat panel, do the following: a. Select the interactive flat panel from the list, and then click Next. b. Select Product is being set up for the first time, and then click Next. The calibration screen appears on the selected interactive flat panel.
-
Page 27: Making A Test Call
You don’t need to calibrate or orient the console. 4. Continue to the next procedure. To optimize the camera and complete the software configuration 1. If SMART Settings isn’t open from the previous procedure, click OEM Settings, and then click SMART Board Settings. SMART Settings appears. - Page 28 C H A P T E R 3 Configuring your room system’s software 3. If adjusting the audio settings in the previous step didn’t resolve your audio issues, do the following: a. Click System Settings, and then click Network Connections. Control Panel appears. b.
-
Page 29: Chapter 4: Using Your Room System
Using the whiteboard feature Ending meetings This chapter provides an overview of how users can schedule and conduct a meeting using your SMART Room System and Lync Room System software. Scheduling meetings Using Microsoft Outlook® on their personal computers, users can schedule Lync meetings and book the SMART Room System as a resource. -
Page 30: Turning On Your Room System
C H A P T E R 4 Using your room system 4. If appropriate, make the meeting private so that participants must enter a password to join: a. Click Meeting Options. The Lync Meeting Options dialog box appears. b. Click Permissions, and then select A new meeting space (I control permissions). c. -
Page 31: Starting Meetings And Whiteboard Sessions
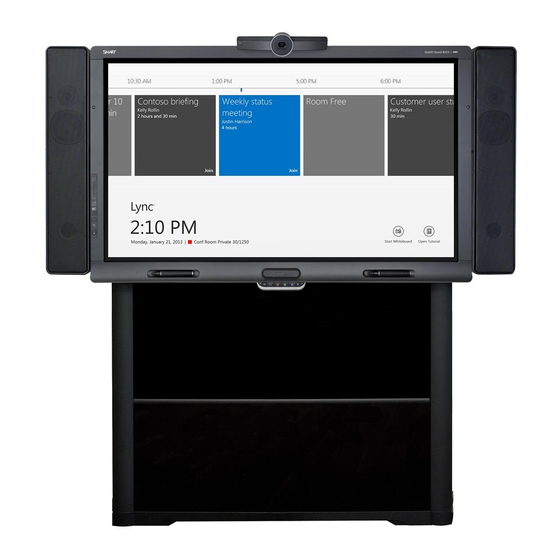
C H A P T E R 4 Using your room system Starting meetings and whiteboard sessions After the room system turns on, the interactive flat panels and the console show the room system’s schedule as a set of squares: When the room system is booked for a meeting, the meeting’s details and Join appear in the square. -
Page 32: Managing Meetings Using The Console
C H A P T E R 4 Using your room system 3. Press Start Meeting. The console shows a set of tabs for managing the meeting (see Managing meetings using the console below). The interactive flat panels show all connected participants’ videos in a gallery. T I P Alternatively, if the Lync infrastructure supports connecting through POTS, press Dial Pad and use the dial pad to call a person using the room system. - Page 33 C H A P T E R 4 Using your room system Contents Actions Participants A list of all participants in the Press a participant’s name and then select meeting the appropriate option from the menu: Mute and unmute the participant’s audio Pin the participant’s video to the gallery so that it’s always visible...
-
Page 34: Presenting Content During Meetings
A digital whiteboard N O T E Remote participants connecting to the meeting through some smart phones and other mobile devices are unable to view shared computer screens or whiteboard sessions due to limitations of the Lync client software for those devices. -
Page 35: Presenting Computer Screens
C H A P T E R 4 Using your room system Presenting computer screens Users with laptops can connect the laptop harness’s HDMI cable or VGA cable to their laptops to present their laptops’ video outputs. If the console prompts the user to share the screen, the user should press Yes. -
Page 36: Ending Meetings
C H A P T E R 4 Using your room system Using the whiteboard feature To start a digital whiteboard during a meeting, users can press New Whiteboard on the interactive flat panels or the console. A new whiteboard session appears on one of the interactive flat panels. Users can use the interactive flat panel’s pens and eraser to write, draw and erase digital ink. Alternatively, they can use their fingers to write or draw digital ink and their fists or palms to erase In addition to writing, drawing and erasing digital ink, users can move digital ink and other objects in... -
Page 37: Chapter 5: Maintaining Your Room System
Chapter 5 Maintaining your room system Recommended tools Turning off your room system Updating software and firmware Maintaining the interactive flat panels Calibrating the interactive flat panels Orienting the interactive flat panels Cleaning the screens Cleaning the presence detection sensors Cleaning the camera windows and reflective tape Maintaining ventilation Preventing condensation... -
Page 38: Recommended Tools
Functional spare speaker kit, including cables IT access IT administrator with knowledge of your organization’s Lync infrastructure SMART Board interactive flat panel remote control USB keyboard and mouse Laptop that has Outlook and Lync client software and that is connected to your organization’s Lync infrastructure Internet access for documentation and other resources (see Other documentation and resources on page 7) -
Page 39: Turning Off Your Room System
1. On the console, press Options, and then press Restart. 2. When the screens are blank or when the SMART logo appears, use the power switches on the bottoms of the interactive flat panels to turn off the room system. -
Page 40: Maintaining The Interactive Flat Panels
Typically, you need to calibrate the interactive flat panels during initial configuration only (see Configuring SMART Settings on page 19). However, you might need to calibrate the interactive flat panels after initial configuration in the following situations: Digital ink disappears as users write or draw. - Page 41 3. Type the room system administrator account’s user name and password, and then press ENTER. The Settings screen appears. 4. Press OEM Settings, and then press SMART Board Settings. SMART Settings appears. 5. Press SMART Hardware Settings. 6. Select the interactive flat panel you want to calibrate.
-
Page 42: Orienting The Interactive Flat Panels
Typically, you need to orient the interactive flat panels during initial configuration only (see Configuring SMART Settings on page 19). However, you might need to orient the interactive flat panels again if the location of users’ touch is misinterpreted (a pointer appears a distance from the actual contact or on a different display than the one being touched). -
Page 43: Cleaning The Screens
C H A P T E R 5 Maintaining your room system 4. Type the room system administrator account’s user name and password in the text boxes, and then press Authenticate. The room system restarts, and the Settings screen appears. 5. -
Page 44: Cleaning The Presence Detection Sensors
C H A P T E R 5 Maintaining your room system Do not rub the screens with a dense or rough material. Do not apply pressure to the screens. Do not use cleaning solution or glass cleaner on the screens, because they can deteriorate or discolor the screens. -
Page 45: Maintaining Ventilation
C H A P T E R 5 Maintaining your room system Applying too much pressure when cleaning the tape or cameras can damage the tape and cameras and cause performance issues or errors. To clean the camera windows and reflective tape 1. -
Page 46: Replacing A Pen Nib
To prevent damage to your interactive flat panels’ anti-glare coating, replace a pen nib if it becomes worn. Replacement pen nibs are included with your room system, and you can purchase additional replacements from your authorized SMART reseller (smarttech.com/where) or the SMART Parts Store (parts.smarttech.com). -
Page 47: Maintaining The Console
C H A P T E R 5 Maintaining your room system 2. Pull the bottom of the interactive flat panel away from the wall. 3. Deploy the kickstands by pushing them up and toward the wall. N O T E When you’ve completed your maintenance or troubleshooting and no longer need access to the connectors, push the kickstands down, push the locks up and then place the interactive flat panel back in its original position. -
Page 48: Maintaining The Camera
C H A P T E R 5 Maintaining your room system 2. Wipe the screen with a lint-free, non-abrasive cloth to remove finger prints and minor buildup. Apply a laptop screen cleaning solution to a lint-free, non-abrasive cloth, and then wipe the screen with the cloth to remove more significant buildup. -
Page 49: Checking Your Room System Installation
This packaging was designed with optimal shock and vibration protection. If your original packaging isn’t available, you can purchase the same packaging directly from your authorized SMART reseller (smarttech.com/where). Transporting your room system without correct packaging voids your warranty and could lead to product damage. -
Page 51: Chapter 6: Troubleshooting Your Room System
This chapter provides you with the information necessary to solve simple issues that can occur with your room system’s hardware and software. Resolving hardware issues This section explains how to resolve common issues with your room system’s hardware. If issues persist or aren’t covered, contact SMART Support (smarttech.com/contactsupport). smarttech.com/kb/170450... -
Page 52: Locating Serial Numbers
Interactive flat panel Back of the interactive flat panel in the top-right corner N O T E S When requesting technical support, provide SMART Support with the left interactive flat panel’s serial number. You can also access the interactive flat panel’s serial number from the on-screen display menu (see page 60 for small and large rooms or page 69 for medium rooms). -
Page 53: Locating Power And Status Lights
C H A P T E R 6 Troubleshooting your room system Locating power and status lights Your room system’s components have power and status lights, which you can use when resolving common issues with the room system. No. Component Light Interactive flat panel Power Interactive flat panel... -
Page 54: Resolving Issues With The Interactive Flat Panels
C H A P T E R 6 Troubleshooting your room system Resolving issues with the interactive flat panels Use the following table to resolve issues with your room system’s interactive flat panels. Power Touch Interactive flat Issues Solutions light system panel status status light... - Page 55 On with no touch There’s no touch control. Use SMART Board Diagnostics, green green control which is available from SMART Settings (see page 54), to troubleshoot the issue. Solid Ensure that the USB cable is green connected as shown in the installation instructions (see page 8).
-
Page 56: Resolving Issues With The Console
There’s no touch control. Use SMART Board Diagnostics, which is available from SMART Settings (see page 54), to troubleshoot the issue. Ensure that the USB cable is connected as shown in the installation instructions (see page 8). -
Page 57: Resolving Issues With The Camera
C H A P T E R 6 Troubleshooting your room system Resolving issues with the camera Use the following table to resolve issues with your room system’s camera. Video Service Camera status Issues Solutions capture light light Not receiving power The camera should be Ensure that the camera is receiving power but isn’t. -
Page 58: Resolving Issues With The Speakers
C H A P T E R 6 Troubleshooting your room system Resolving issues with the speakers Use the following table to resolve issues with your room system’s speakers. Power light Speaker status Issues Solutions Not receiving power The speakers should be Ensure that the speakers are receiving power but aren’t. -
Page 59: Resolving Software Issues
C H A P T E R 6 Troubleshooting your room system Ensure the laptop’s external display connector is enabled. N O T E Depending on the laptop, the external display connector might be enabled automatically or you might need to press a key on the keyboard. See the laptop’s documentation for instructions. If the console prompts you to share your screen with everyone in the meeting, press Yes. -
Page 60: Accessing Smart Settings
Accessing SMART Settings You might need to access SMART Settings for some troubleshooting procedures. N O T E To access SMART Settings, you need the room system administrator account’s user name and password. To access SMART Settings 1. On the console, press Options, and then press Settings. -
Page 61: Appendix A: Using The Interactive Flat Panel On-Screen Display Menu
Appendix A Using the interactive flat panel on-screen display menu Accessing the on-screen display menu Changing settings in the on-screen display menu Small and large room on-screen display menu Medium room on-screen display menu You can access the on-screen display menu using either the remote control or the menu control panel. -
Page 62: Changing Settings In The On-Screen Display Menu
A P P E N D I X A Using the interactive flat panel on-screen display menu dispose of exhausted batteries and product components in accordance with applicable regulations To replace batteries in the remote control 1. Press the tab on the underside of the remote control, and then open the cover. 2. -
Page 63: Small And Large Room On-Screen Display Menu
A P P E N D I X A Using the interactive flat panel on-screen display menu Small and large room on-screen display menu Option Values Function Notes (if any) PICTURE PICTURE MODE STANDARD Sets the picture mode Select USER to customize brightness, contrast, sharpness CINEMA/sRGB and other PICTURE options. - Page 64 PICTURE RESET [N/A] Resets all options in the PICTURE menu to their default values ADJUST The options in this menu aren’t applicable to the SMART Room System. AUDIO BALANCE L50–R50 Balances the left and right volume This option isn’t applicable to the SMART Room System.
- Page 65 Function Notes (if any) TREBLE L50–R50 Sets the high frequency sound This option isn’t applicable to the SMART Room System. Don’t change it from its default value. BASS L50–R50 Sets the low frequency sound This option isn’t applicable to the SMART Room System. Don’t change it from its default value.
- Page 66 STANDBY DDC CI ENABLE Enables or disables two-way This option isn’t applicable to the communication and control of the SMART Room System. Don’t DISABLE interactive flat panel change it from its default value. SCAN MODE UNDER SCAN Sets the scanning mode This option isn’t applicable to the...
- Page 67 Values Function Notes (if any) ENABLE Enables or disables Consumer This option isn’t applicable to the Electronics Control (CEC) support SMART Room System. Don’t DISABLE on HDMI inputs change it from its default value. HEAT STATUS FAN1 [N/A] Shows the status of the first fan This option only provides information.
-
Page 68: Medium Room On-Screen Display Menu
Values Function Notes (if any) USB2 VGA1 Sets the video input for the USB2 This option isn’t applicable to the receptacle, or disables the SMART Room System. Don’t VGA2 receptacle change it from its default value. HDMI1 HDMI2 HDMI3/PC DISABLE SETUP RESET... - Page 69 A P P E N D I X A Using the interactive flat panel on-screen display menu Option Values Function Notes (if any) Light Threshold [Number] Sets the light threshold You can modify this option only if you select Ambient in Picture Mode.
- Page 70 Function Notes (if any) Picture Option Noise Reduction Sets image noise reduction This option isn’t applicable to the SMART Room System. Don’t Medium change it from its default value. High MPEG Noise Sets MPEG image noise reduction This option isn’t applicable to the Reduction SMART Room System.
- Page 71 Notes (if any) Virtual Surround Enables or disables virtual This option isn’t applicable to the surround sound SMART Room System. Don’t change it from its default value. Clear Voice II Clear Voice II Enables or disables the Clear This option isn’t applicable to the Voice II feature SMART Room System.
- Page 72 DVI-D Component Composite Disable Audio In 3 HDMI3/PC Specifies a video input to map to This option isn’t applicable to the AUDIO3 or disables AUDIO3 SMART Room System. Don’t HDMI1 change it from its default value. HDMI2 DPORT DVI-D Component Composite Disable...
- Page 73 Notes (if any) On Time [N/A] Enables you to schedule times This option isn’t applicable to the when the interactive flat panel SMART Room System. Don’t turns on automatically change it from its default value. Sleep Timer 10–240 Specifies the amount of inactivity This option isn’t applicable to the...
- Page 74 Notes (if any) Welcome OSD Enabled Enables or disables the welcome This option isn’t applicable to the screen SMART Room System. Don’t Disable change it from its default value. Welcome Timeout 5–30 Sets how long the welcome screen This option isn’t applicable to the appears (in seconds) SMART Room System.
- Page 75 [N/A] Shows the interactive flat panel’s This option only provides serial number information. You’re unable to modify it. Customer Service Center [N/A] Provides information on how to This option only provides contact SMART Support information. You’re unable to modify it. smarttech.com/kb/170450...
-
Page 77: Appendix B: Resetting The Room System To Factory Defaults
Appendix B Resetting the room system to factory defaults This appendix explains how to reset the room system to factory defaults. In most situations, you should reset the room system from the Settings screen. However, if the room system is in an unrecoverable state or the Settings screen is otherwise not accessible, you can reset the room system from the BIOS. - Page 78 A P P E N D I X B Resetting the room system to factory defaults To reset the room system from the BIOS 1. Connect a USB keyboard to the Lync appliance. 2. Turn on the room system using the power switch located on the bottom of the interactive flat panel.
-
Page 79: Appendix C: Hardware Environmental Compliance
Appendix C Hardware environmental compliance SMART Technologies supports global efforts to ensure that electronic equipment is manufactured, sold and disposed of in a safe and environmentally friendly manner. Waste Electrical and Electronic Equipment and Battery regulations (WEEE and Battery Directives) Electrical and electronic equipment and batteries contain substances that can be harmful to the environment and to human health. -
Page 81: Index
Index cleaning cameras 42 interactive flat panel cameras and accessories 5 reflective tape channels 38 ad hoc meetings 25 interactive flat panel screens 37 administrator accounts 15 microphones 42 air conditioning 10, 39 presence detection sensors 38 ambient lighting 58 speakers 42 annotations 29 collaboration 2... - Page 82 I N D E X e-mail 30 keyboards Exchange See Microsoft Exchange on-screen 28 physical 11 keys See product keys kickstands 40 KMS servers 19 factory defaults 71 knowledge base 8 field of view 4 firmware updates 33 flashlights 32 ladders 32 languages 59 laptops 5, 29, 52 gallery of participants 27...
- Page 83 I N D E X starting 25 presence detection sensors microphones about 3 about 4 cleaning 38 cleaning 42 configuring 60 connecting additional 6 troubleshooting 48 muting 28 turning on the room system with 24 troubleshooting 51 privacy 4 Microsoft Exchange 11 product keys 19 Microsoft Lync appliances See Lync appliances...
- Page 84 I N D E X SMART Room Systems See room volume 21, 28, 52 systems SMART Settings 19 smoke 39 software configuration 11 wall stand kits 6 software updates 33 water 38 speakers WEEE and Battery Directives 73 about 5 whiteboard feature 2, 30...
- Page 86 SMART Technologies smarttech.com/support smarttech.com/contactsupport smarttech.com/kb/170450...
Need help?
Do you have a question about the SMART Room System and is the answer not in the manual?
Questions and answers