Table of Contents
Advertisement
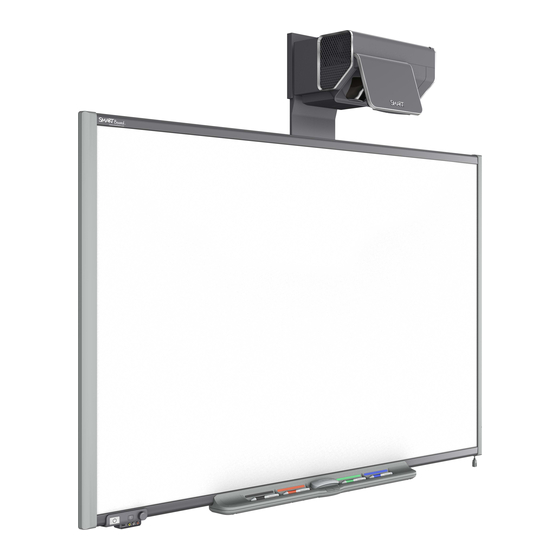
SMART Board
685ix Interactive
Whiteboard System
Condensed Configuration
and User's Guide
IMPORTANT
SMART Technologies frequently
updates this document to provide
accurate support. For the most
recent version of this document
(in English) visit the SMART
Support website at
http:\\smarttech.com\st\en-
us\support.
Advertisement
Table of Contents
Troubleshooting

Related Manuals for SMART Board 685ix


Summary of Contents for SMART Board 685ix
- Page 1 SMART Board 685ix Interactive Whiteboard System Condensed Configuration and User’s Guide IMPORTANT SMART Technologies frequently updates this document to provide accurate support. For the most recent version of this document (in English) visit the SMART Support website at http:\\smarttech.com\st\en- us\support.
-
Page 2: Product Registration
SMART Technologies ULC. Information in this manual is subject to change without notice and does not represent a commitment on the part of SMART. -
Page 3: Important Information
Important Information Read This Section First NOTE If you own a SMART product other than a SMART Board™ 685ix interactive whiteboard system, refer to the installation guide that came with your product for relevant warnings and maintenance instructions. In this document, “SMART Board 685ix interactive whiteboard system” refers to the SMART Board 685 interactive whiteboard and its UX60 projector, accessories and optional equipment. - Page 4 IN T RO D UC T IO N – IMP O RT AN T IN F O RMA TI O N • Failure to follow the installation instructions shipped with your SMART product could result in personal injury and damage to the product.
- Page 5 • Ensure that any cables extending across the floor to your SMART product are properly bundled and marked to prevent a trip hazard. •...
- Page 6 Wear protective eyewear while changing the lamp. Failure to do so can cause injury or loss of eyesight if the lamp shatters or bursts. – Use only replacement lamps approved by SMART Technologies. Contact your authorized SMART reseller for replacement parts.
- Page 7 IN T RO D UC T IO N – IMP O RT AN T IN F O RMA TI O N • Reduce the risk associated with a leaking battery in your projector’s remote control: – Use only the specified coin-cell type battery –...
- Page 8 • You must connect the USB cable that came with your SMART Board interactive whiteboard to a computer that has a USB compliant interface and that bears the USB logo. In addition, the USB source computer must be compliant with CSA/UL/EN 60950 and bear the CE mark and CSA and/or UL mark(s) for CAS/UL 60950.
-
Page 9: Transporting The Smart Board 685Ix Interactive
Transporting the SMART Board 685ix Interactive Whiteboard System If you need to ship any part of your SMART Board 685ix interactive whiteboard system, repack it with the original packaging. If the original packaging is no longer available, you can purchase replacement packaging from your authorized SMART reseller. - Page 10 vi ii | IN T RO D UC T IO N – IMP O RT AN T IN F O RMA TI O N Part No. 99-00984-20 REV A0...
-
Page 11: Table Of Contents
Transporting the SMART Board 685ix Interactive Whiteboard System ................. vii Contents........................ix About Your SMART Board 685ix Interactive Whiteboard System ......1 SMART Board 685ix Interactive Whiteboard System Features...... 2 SMART Board Interactive Whiteboard Features ........2 UX60 Projector System Features ............3 Standard Accessories.................. - Page 12 Using Your Remote Control ..............15 Understanding Your ECP Functions ............16 ECP Connection Diagram ..............17 Before Installing Your SMART Board 685ix Interactive Whiteboard System ..19 Environmental Requirements ............... 20 Humidity ....................20 Water and Fluid Resistance ..............20 Dust and Scratching ................
- Page 13 CON T EN TS Cleaning the UX60 Projector..............33 After Installing Your SMART Board 685ix Interactive Whiteboard System... 34 Adjusting Keystone Alignment ............... 34 Focusing the Image................35 Aligning the Image ................. 36 Securing the Pen Tray and the Interactive Whiteboard......40 Replacing the UX60 Projector’s Lamp Module........
- Page 14 xi i | CON T EN TS 99-00984-20 A0...
-
Page 15: Whiteboard System
UX60 wall-mounted, ultra-short-throw projector system with a SMART Board 685ix interactive whiteboard. Topics in this chapter describe the features and accessories that you can use with your SMART Board 685ix interactive whiteboard system, as well as other compatible products available from SMART. •... -
Page 16: Smart Board 685Ix Interactive Whiteboard System Features
The SMART Board 685 interactive whiteboard includes many features of other SMART Board interactive whiteboards, such as a resistive touch screen and a pen tray. The SMART Board 685 performs best with the UX60 projector because of its exceptional color performance, aspect ratio, input response and short-throw ... -
Page 17: Ux60 Projector System Features
UX60 Projector System Features The UX60 projector system includes an ultra-short-throw projector for use with SMART Board 685 interactive whiteboards, an extended control panel (ECP), an ECP harness cable and a sturdy support system for classroom environments. The features of the projector system include: •... - Page 18 CH A P T E R 1 – A BO U T Y O U R S M A R T B O A R D 6 8 5 I X I N T E R A C T I V E WH IT E BOARD SYS T E M •...
-
Page 19: Standard Accessories
CH A P T E R 1 – A BO U T Y O U R S M A R T B O A R D 6 8 5 I X I N T E R A C T I V E WH IT E BOARD SYS T E M Standard Accessories SMART provides the following accessories with your SMART Board 685ix interactive whiteboard system. Standard SMART Board Interactive Whiteboard Accessories Pen Tray Tools The pen tray tools include four pens and an eraser. - Page 20 A composite video input (RCA jack) and associated dual-channel audio input • (two RCA jacks) ECP Harness Cable A specialized harness cable provided by SMART allows input to be routed to the projector from the ECP. The harness cable includes: •...
-
Page 21: Optional Accessories
48' (15 m). Cat 5 to USB Cable Extender (CAT5-XT) Use the SMART Cat 5 to USB cable extender to extend your interactive whiteboard’s USB connection up to 87' (26.5 m) using RJ45 Cat 5 cable (not included). The extender includes two 6' (1.8 m) USB cables to connect your computer and your... - Page 22 CH A P T E R 1 – A BO U T Y O U R S M A R T B O A R D 6 8 5 I X I N T E R A C T I V E WH IT E BOARD SYS T E M Part No.
-
Page 23: Controlling Your Ux60 Projector
Chapter 2 Controlling Your UX60 Projector This chapter describes the components of your UX60 projector, and the connections on the projector and ECP. It also explains how to set up your remote control and adjust your projector options. • Components of the UX60 Projector (page 10) –... -
Page 24: Components Of The Ux60 Projector
10 | CH A P T E R 2 – C O NT R O LL IN G Y O U R UX6 0 P RO J E CT O R Components of the UX60 Projector Below is a list of all the components that can be found on the UX60 projector. 1. -
Page 25: Ux60 Projector Connection Diagram
11 | CH A P T E R 2 – C O NT R O LL IN G Y O U R UX6 0 P RO J E CT O R UX60 Projector Connection Diagram The following diagram and list describe the projector’s connection ports and the types of input you can connect to the projector. -
Page 26: Remote Control
12 | CH A P T E R 2 – C O NT R O LL IN G Y O U R UX6 0 P RO J E CT O R 12. 3.5 mm audio-input connector (for VGA 1 connector) 13. - Page 27 13 | CH A P T E R 2 – C O NT R O LL IN G Y O U R UX6 0 P RO J E CT O R Make sure the positive (+) and negative (-) signs on the battery terminals align with the correct signs on the battery holder.
-
Page 28: Using Your Projector Controls
14 | CH A P T E R 2 – C O NT R O LL IN G Y O U R UX6 0 P RO J E CT O R Using Your Projector Controls The UX60 projector remote control enables you to access on-screen projector menus and change projector settings. -
Page 29: Using Your Remote Control
4. Press the Hide button to hide or display the source image. 5. Press the Mode button to cycle through display modes: Bright Classroom, Dark Classroom, sRGB, User or SMART Presentation. 6. Press the Mute button to temporarily mute or un-mute the audio output from your speakers (not included). -
Page 30: Understanding Your Ecp Functions
16 | CH A P T E R 2 – C O NT R O LL IN G Y O U R UX6 0 P RO J E CT O R Understanding Your ECP Functions Your ECP gives you basic control options while you’re next to the interactive whiteboard system. -
Page 31: Ecp Connection Diagram
USB B receptacle (for secondary computers such as a laptop) RJ11 6-wire jack (for SC9 connector cable) USB A receptacle (SMART Board interactive whiteboard only) USB A receptacle (for any USB peripheral, up to 500mA) Part No. 99-00984-20 REV A0... - Page 32 18 | CH A P T E R 2 – C O NT R O LL IN G Y O U R UX6 0 P RO J E CT O R Part No. 99-00984-20 REV A0...
-
Page 33: Before Installing Your Smart Board 685Ix Interactive Whiteboard System
ECP. The instructions in your SMART Board 685 interactive whiteboard product box do not include instructions for installing the UX60 projector or ECP. This chapter includes requirements to consider before you install a SMART Board 685ix interactive whiteboard system. •... -
Page 34: Environmental Requirements
Water and Fluid Resistance SMART Board 685ix interactive whiteboard systems are for indoor use only and don’t meet any salt-spray or water ingress requirements. Don’t pour or spray any liquids directly onto the interactive whiteboard, the UX60 projector or any of its sub-components. -
Page 35: Dust And Scratching
Before Installing Your SMART Board 685ix Interactive Whiteboard System Choose a location for your SMART Board 685ix interactive whiteboard system that is far from bright light sources, such as windows or overhead lighting. Bright light sources can cause distracting shadows on the interactive whiteboard and can reduce the contrast of the projected image. - Page 36 I N T E R A C T I V E W H I T E B O A RD S Y S T E M Recommended Mounting Heights SMART includes a mounting template with each of its SMART Board 685ix interactive whiteboard systems. If you lose this template, contact your authorized SMART reseller.
-
Page 37: Integrating Other Devices To Your Interactive Whiteboard System
Integrating Other Devices to Your Interactive Whiteboard System Topics in this chapter include integrating your SMART Board 685ix interactive whiteboard system with peripheral devices, precautions to follow when connecting a new device to your interactive whiteboard system and basic software ... -
Page 38: Attaching Sources And Outputs To Your Ux60 Projector
Make sure each cable is long enough, has plenty of slack and can be placed safely in your room without presenting a tripping hazard. To access the UX60 1. Turn off your SMART Board 685ix interactive whiteboard system. projector’s connection 2. Remove the four screws on either side of the projector’s wall-mounting bracket panel cable covers. - Page 39 2. Place the cables across the wire management clip. Do not close the latch on the wire management clip at this time. 3. Pass the cables between the two wall-mounting brackets behind the interactive whiteboard. Cabling between the two wall-mounting brackets for the SMART Board 685 interactive whiteboard (not shown) Part No. 99-00984-20 REV A0...
-
Page 40: Attaching Temporary Sources And Outputs To Your Ecp
ECP harness, wire management bundle, and the interactive whiteboard’s SC-9 controller. • Don’t connect SMART Board Audio (SBA) USB speakers to the ECP. SMART recommends that you connect these speakers to the projector connection panel using dual-channel (left and right) RCA plugs to 3.5 mm cable (not included). -
Page 41: Connecting Computers To Your Interactive Whiteboard System
Whiteboard System Connecting Your Computer to the UX60 Projector If you want to permanently connect a computer to your SMART Board interactive whiteboard system, SMART recommends that you use your own cables to connect your computer directly to the UX60 projector (see page 24). -
Page 42: Installing Smart Notebook Software
SMART Support website for the latest software updates. If SMART Board software or SMART Notebook software is already installed on your computer, take this opportunity to upgrade your software to ensure compatibility. SMART Notebook software upgrades and online Help are available at www.smarttech.com/support/software/index.asp. -
Page 43: Maintaining And Troubleshooting Your Smart Board 685Ix Interactive Whiteboard System
System This chapter provides basic maintenance and troubleshooting information for your SMART Board 685ix interactive whiteboard system, including methods for properly cleaning and preventing damage to your interactive whiteboard system. For issues not covered in this chapter, please contact your... - Page 44 6 8 5 i x I NT E R A C T I V E W H I TE BO A R D S Y S T E M • Troubleshooting Your SMART Board 685ix Interactive Whiteboard System (page 45) –...
-
Page 45: Maintaining Your Smart Board 685Ix Interactive Whiteboard System
6 8 5 i x I NT E R A C T I V E W H I TE BO A R D S Y S T E M Maintaining Your SMART Board 685ix Interactive Whiteboard System With proper care, your SMART Board interactive whiteboard will provide years of trouble-free service. For additional maintenance instructions and recommendations see your 600 series interactive whiteboard Installation and User’s Guide (document 1414). -
Page 46: Cleaning The Pen Tray
32 | CH A P T E R 5 – MAIN T AIN IN G AND T ROU BLES H O O T I N G Y O U R S M A RT B O A R D 6 8 5 i x I NT E R A C T I V E W H I TE BO A R D S Y S T E M To remove dry-erase 1. -
Page 47: Cleaning The Ux60 Projector
33 | CH A P T E R 5 – MAIN T AIN IN G AND T ROU BLES H O O T I N G Y O U R S M A RT B O A R D 6 8 5 i x I NT E R A C T I V E W H I TE BO A R D S Y S T E M Cleaning the UX60 Projector WARNING Cleaning a wall-mounted projector can result in a fall or injury. -
Page 48: After Installing Your Smart Board 685Ix Interactive Whiteboard System
Keystone errors occur when the projected image isn’t perpendicular to the screen. Vertical keystone errors can occur when you mount the UX60 projector and the SMART Board 685 interactive whiteboard on an uneven surface or a wall that has obstructions. -
Page 49: Focusing The Image
35 | CH A P T E R 5 – MAIN T AIN IN G AND T ROU BLES H O O T I N G Y O U R S M A RT B O A R D 6 8 5 i x I NT E R A C T I V E W H I TE BO A R D S Y S T E M The image appears shorter across the right side when the distance from the projector to the right of the screen is shorter than the distance to the left of the screen. -
Page 50: Aligning The Image
• SMART doesn’t recommend adjusting the digital keystone adjustment within the projector. Instead, use the mechanical adjustment module described in this section. - Page 51 37 | CH A P T E R 5 – MAIN T AIN IN G AND T ROU BLES H O O T I N G Y O U R S M A RT B O A R D 6 8 5 i x I NT E R A C T I V E W H I TE BO A R D S Y S T E M 1.
- Page 52 38 | CH A P T E R 5 – MAIN T AIN IN G AND T ROU BLES H O O T I N G Y O U R S M A RT B O A R D 6 8 5 i x I NT E R A C T I V E W H I TE BO A R D S Y S T E M 3.
- Page 53 Pull the board from side to side, while holding the bottom bezel of the interactive whiteboard, to center the board to the projected image. c. Refer to your SMART Board 685ix Interactive Whiteboard System Textless Installation Guide document 137394), for instructions on drilling holes for attaching new anchors for the ...
-
Page 54: Securing The Pen Tray And The Interactive Whiteboard
Securing the Pen Tray and the Interactive Whiteboard Because the pen tray that comes with your SMART Board interactive whiteboard is detachable, you might want to safeguard it—and the interactive whiteboard at the same time—by anchoring it with a security cable. -
Page 55: Replacing The Ux60 Projector's Lamp Module
• If the lamp has shattered or burst: – Call an authorized SMART reseller for instructions. Do not attempt to replace the lamp. – Do not touch the glass fragments because they can cause injury. –... - Page 56 Wear protective eyewear while changing the lamp. Failure to do so can cause injury or loss of eyesight if the lamp shatters or bursts. – Use only replacement lamps approved by SMART Technologies. Contact your authorized SMART reseller for replacement parts.
- Page 57 43 | CH A P T E R 5 – MAIN T AIN IN G AND T ROU BLES H O O T I N G Y O U R S M A RT B O A R D 6 8 5 i x I NT E R A C T I V E W H I TE BO A R D S Y S T E M 4.
- Page 58 44 | CH A P T E R 5 – MAIN T AIN IN G AND T ROU BLES H O O T I N G Y O U R S M A RT B O A R D 6 8 5 i x I NT E R A C T I V E W H I TE BO A R D S Y S T E M To put the new lamp 1.
-
Page 59: Troubleshooting Your Smart Board 685Ix Interactive Whiteboard System
Integrated Interactive Whiteboard Ready Light Status The UX60 projector and the ECP integrate the interactive whiteboard’s ready light status. These status lights are different from what you normally see on a SMART Board 685 interactive whiteboard. Interactive Whiteboard... - Page 60 Flashing green The interactive whiteboard is on and communicating with your computer, but it’s in Mouse mode. Confirm that SMART software is installed on your computer. Flashing amber The interactive whiteboard system is turning on, is in service mode or it has detected a firmware error. On the projector’s input/output panel, check the ECP’s...
-
Page 61: Video Format Compatibility Modes
47 | CH A P T E R 5 – MAIN T AIN IN G AND T ROU BLES H O O T I N G Y O U R S M A RT B O A R D 6 8 5 i x I NT E R A C T I V E W H I TE BO A R D S Y S T E M Message Power LED (Green/Amber) Diagnostic LED (Red) -
Page 62: Video System Signal Compatibility
48 | CH A P T E R 5 – MAIN T AIN IN G AND T ROU BLES H O O T I N G Y O U R S M A RT B O A R D 6 8 5 i x I NT E R A C T I V E W H I TE BO A R D S Y S T E M Video System Signal Compatibility The following table lists video system signal compatibility, particularly those delivered over S-Video and Composite connectors. -
Page 63: Hardware Environmental Compliance
Appendix A Hardware Environmental Compliance SMART Technologies supports global efforts to ensure that electronic equipment is manufactured, sold and disposed of in a safe and environmentally friendly manner. Waste Electrical and Electronic Equipment Regulations (WEEE Directive) Waste Electrical and Electronic Equipment regulations apply to all electrical and electronic equipment sold within the European Union. -
Page 64: Packaging
China’s EIP regulations. U.S. Consumer Product Safety Improvement Act The United States has enacted the Consumer Product Safety Improvement Act which limits the lead (Pb) content in products. SMART Technologies is committed to complying with this initiative. 99-00984-20 A0... -
Page 65: Customer Support
Technical Support If you experience difficulty with your SMART product, please contact your local reseller before contacting SMART Technical Support. Your local reseller can resolve most issues without delay. NOTE To locate your local reseller, visit www2.smarttech.com/st/en-US/Where+to+Buy. -
Page 66: General Inquiries
E-mail info@smarttech.com Warranty Product warranty is governed by the terms and conditions of SMART’s “Limited Equipment Warranty” that shipped with the SMART product at the time of purchase. Registration To help us serve you, register online at www.smarttech.com/registration. 99-00984-20 A0... -
Page 67: Index
Damage Keystone alignment, 34 preventing, 31 Audio cable, 5 documentation, 51 dry-erase markers, 5 batteries, 49 Before installing your SMART Board 685ix ECP assembly, 5 interactive whiteboard system, 21 ECP cable, 5 Environmental requirements, 21 EIP regulations, 50 Bluetooth, 7... - Page 68 Security Cable, 40 Securing the pen tray to the Keystone interactive whiteboard, 40 Definition, 34 Serial conversion module, 7 SMART Board 600 series interactive whiteboard Optional accessories, 7, 28 Limited Equipment Warranty, 52 SMART Board 685 interactive whiteboard Features, 2...
- Page 69 IN DE X VGA cable, 5 Wall mounting assembly, 5 video format compatibility, 3 Warning lights, 45 video system compatibility, 3 warranty, 52 WEEE directive, 49 whiteboard pens, 5 Wire plate cover, 5 99-00984-20 A0...
- Page 70 xi i | IN DE X 99-00984-20 A0...
- Page 72 Contact SMART Technologies Toll Free 1.866.518.6791 (U.S./Canada) or +1.403.228.5940 99-00984-20 A0...
Need help?
Do you have a question about the Board 685ix and is the answer not in the manual?
Questions and answers