GRAPHTEC GL2000 User Manual
Midi logger hv
Hide thumbs
Also See for GL2000:
- Quick start manual (24 pages) ,
- Setup manual (16 pages) ,
- User manual (202 pages)
Table of Contents
Advertisement
Quick Links
Advertisement
Table of Contents

Related Manuals for GRAPHTEC GL2000


Summary of Contents for GRAPHTEC GL2000
- Page 1 GL2000 USER’S MANUAL MANUAL NO.GL2000-UM-151...
-
Page 2: To Ensure Safe And Correct Use
To Ensure Safe and Correct Use To Ensure Safe and Correct Use • To ensure safe and correct use of this device, read this manual thoroughly before use. • After having read this manual, keep it in a handy location for quick reference as needed. •... -
Page 3: Introduction
3. Notes for Safe Operation (1) Be sure to use the Graphtec-supplied AC adapter. In environments where there is a lot of noise or where the power supply is unstable, we recommend that you ground the GL2000. (2) When a high-voltage signal cable has been connected to the main unit’s analog signal input terminal, avoid touching the leads of the input terminal’s signal cable to prevent electrical shock due to high voltage. - Page 4 (5) Do not use GL2000 in the vicinity of other devices which are susceptible to electromagnetic interference. is subject to strong electromagnetic interference. (7) Insofar as possible, position GL2000 input signal cables away from any other cables which are likely to be affected by electromagnetic interference.
-
Page 5: Notes On The Use Of This Manual
(1) All rights reserved. No part of this publication may be reproduced, stored in a retrieval system, or transmitted, in any form or by any means, without the prior written permission of Graphtec Corporation. (2) The specifications and other information in this manual are subject to change without notice. -
Page 6: Table Of Contents
CONTENTS CONTENTS To Ensure Safe and Correct Use . . . . . . . . . . . . . . . . . . . . . . . . . . . . . . . . . . . . . . . . . . . . . . . Introduction . - Page 7 CONTENTS CHAPTER 3 Settings and Measurement 3 . 1 Window names and functions . . . . . . . . . . . . . . . . . . . . . . . . . . . . . . . . . . . . . . . . . . .3-2 3 .2 Key Operation .
-
Page 8: Chapter 1 General Description
CHAPTER 1 General Description CHAPTER 1 General Description This chapter provides a general description of this device and its features. PRODUCT SUMMARY 1 . 1 Overview 1 .2 Features 1 .3 Operating Environment 1 .4 Rubber Protector 1 .5 Notes on Temperature Measurement 1 .6 Notes on Using the Monitor 1 .7... -
Page 9: Overview
The application software lets you set conditions and monitor data on a PC in real time. • With the USB drive mode function, you can recognize the GL2000 internal memory and SD card as an external drive from a PC. -
Page 10: Operating Environment
CHAPTER 1 General Description 1.3 Operating Environment This section explains the operating environment for this device. Ambient Operating Conditions (1) Ambient temperature and humidity (Use within the following range.) • Temperature range: 0 to 40°C (When AC adapter or battery is operated) : 15 to 25°C (Battery being charged) •... - Page 11 CHAPTER 1 General Description When using the device, be sure to set the device vertically, or use the tilt foot and tilt stand to operate the device. Vertical state Tilt stand Tilt foot Tilt stand 90° Inclined state • Do not block the air vent on this device, as this will cause malfunctioning. •...
-
Page 12: Rubber Protector
CHAPTER 1 General Description 1.4 Rubber Protector This manual describes in the state without the rubber protector. Without rubber protector With rubber protector... -
Page 13: Notes On Temperature Measurement
1 .5 Notes on Temperature Measurement Please observe the following precautions when taking temperature measurement. • Do not block the air vents. Always provide a space of at least 30 cm on all sides of this device. • For stabilized temperature measurement, allow this device to warm up for at least 30 minutes after turning the power on. -
Page 14: Chapter 2 Checks And Preparation
CHAPTER 2 Checks and Preparation CHAPTER 2 Checks and Preparation This chapter provides how to check the device's external casing and accessories, and how to prepare the device for operation. PRODUCT SUMMARY 2 . 1 Checking the Outer Casing 2 .2 Checking for Accessories 2 .3 Nomenclature and Functions... -
Page 15: Checking The Outer Casing
2 .2 Checking for Accessories After unpacking, check that the following standard accessories are included. Standard Accessories Item Remarks Quantity Quick Start Guide GL2000-UM-85x CD-ROM User's Manual, Application software TO ENSURE SAFE AND SAFETY PAMPHLET CORRECT USE AC cable/AC adapter... -
Page 16: Nomenclature And Functions
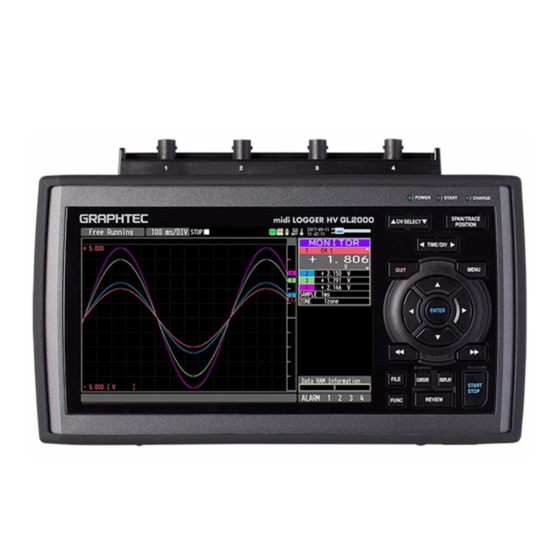
CHAPTER 2 Checks and Preparation 2 .3 Nomenclature and Functions This section describes the names and function of the device. PC interface terminals Operation status LED • POWER ON when the power is ON • USB • LAN Blinking while accessing to the memory External input/output terminals •... -
Page 17: How To Attach The Tilt Stand
CHAPTER 2 Checks and Preparation 2 .4 How to attach the tilt stand When tilt foot is used When tilt foot is not used (1) Please pay attention to the mounting position and install the tilt foot. • Without Rubber Protector M4 x5 Tilt stand Fasten with a screw from the... -
Page 18: How To Detach The Rubber Protector
CHAPTER 2 Checks and Preparation 2 .5 How to detach the rubber protector How to attach the rubber protector To remove the battery pack, first remove rubber protector. (1) Insert one side of this device about half into the Rubber Protector. (2) Pull the cover over the terminal block and insert the remaining half. -
Page 19: How To Remove The Rubber Protector
CHAPTER 2 Checks and Preparation How to remove the rubber protector (1) Open the upper and lower corner of the Rubber Protector on one side of this device as shown below. (2) Push out the body from the back side. (3) When both corners of this device are removed from the Rubber Protector, pull the protector over the terminal block. -
Page 20: Connecting The Power Cable And Turning The Power On
CHAPTER 2 Checks and Preparation 2 .6 Connecting the Power Cable and Turning the Power on This section describes how to connect the power cable and turn the power on. The connection method will vary depending on the type of power supply used. Connecting to an AC Power Supply Use the AC cable and AC adapter that are provided as accessories. - Page 21 CHAPTER 2 Checks and Preparation Connecting to a DC Power Supply Use the DC drive cable (B-514: option). • Use a power supply within 8 .5 to 26 .4 VDC range . • For DC drive cable, please be sure to use B-514 power cable . (1) Configure the tip of the DC drive cable (B-514: 2m) to connect to the DC power supply.
-
Page 22: Connecting The Input Signal Cables
. Screw terminal Do not input signals to the screw terminal and GL2000 BNC connector of the same CH at the same time . If a signal is input at the same time, the measurement target device may become damaged . - Page 23 CHAPTER 2 Checks and Preparation Connection diagram DC voltage input Thermocouple input Current input − − − Compensating lead wire DC voltage DC current Ex: The current is converted to the voltage using the shunt register . For 4 to 20mA current input, install 250 ohms (0 .
-
Page 24: Logic Alarm Cable Connection And Functions
CHAPTER 2 Checks and Preparation 2 .8 Logic Alarm Cable Connection and Functions This section describes how to connect the logic alarm cables and the functions of cable. When wiring, turn off the signal supply source to prevent electric shock . Also, position this input cables away from any power lines and ground cables . - Page 25 CHAPTER 2 Checks and Preparation Alarm Output Specifications Item Description Number of Output channels Output 1 is used for alarm output and trigger output by switching. Output format Open collector output +5 V, 10 kΩ pull-up resistance * For details of alarm output, refer to the next page. Trigger output time When a start trigger or a stop trigger is detected, a pulse of approx.500 μs width is output from the output 1 terminal.
- Page 26 CHAPTER 2 Checks and Preparation Internal equivalent circuit of I/O circuit • Alarm output Maximum ratings of the transistor for alarm output VCEO (Collector-emitter voltage) : 30 V IC (Collector current) : 0 .5A +5 V PC (Collector dissipation) : 0 .2W * The maximum ratings must not be exceeded .
- Page 27 CHAPTER 2 Checks and Preparation Wiring Cable tips are bare tips. Perform wiring for the necessary functions. Signal Name Channel Number Wire Color Logic/Pulse input Orange with red dotted line Orange with black dotted line Grey with red dotted line Grey with black dotted line Output1 : Alarm output1 / Trigger output * White with red dotted line...
-
Page 28: Mounting The Sd Card
CHAPTER 2 Checks and Preparation 2 .9 Mounting the SD Card • When a SD card is inserted, make sure that the card is not locked . If locked, data will not be recorded . • Please do not remove the SD card while accessing the SD card (Device Access display is displayed in "red"... - Page 29 CHAPTER 2 Checks and Preparation How to remove the SD card (SD CARD) (1) Remove SD card after the device access display (SD card) on the device's screen turns green. (2) Open the SD CARD cover. (3) The SD card is released by pushing gently on the card. Then, remove the SD card. While accessing the SD card, the device access indicator (SD card) turns red (and the POWER LED blinks) .
-
Page 30: Installing Usb Memory
CHAPTER 2 Checks and Preparation 2.10 Installing USB Memory • When handling USB memory, please pay attention to static electricity. • Do not remove the USB memory while it is being accessed (Device access indicator turns red and POWER LED blinks). The captured data may get damaged. •... -
Page 31: Connecting To A Pc
CHAPTER 2 Checks and Preparation 2 . 1 1 Connecting to a PC Use the USB or LAN Interface to connect this device to a PC. Connection Using a USB Cable (1) This device complies with the EMC Directive in the state when the supplied ferrite core is attached to the USB cable. - Page 32 Use the LAN Interface to connect this device to a PC. LAN cable Cable Types • Use a Cross cable to connect directly to a PC without using a hub. GL2000 • Use a straight cable when using a hub. GL2000 GL2000...
-
Page 33: Using The Battery Pack (B-569 : Option)
CHAPTER 2 Checks and Preparation 2 . 1 2 Using the Battery Pack (B-569 : Option) • The B-569 (optional) is the only battery that can be used with this device. • For the driving time with the battery, refer to "4.3 Accessories/Optional Accessories" •... - Page 34 CHAPTER 2 Checks and Preparation (3) Attach the battery cover. Charging the Battery Expected time required for charging: • Battery pack x 1: approx. 5 hours • Battery pack x 2: approx. 10 hours The battery pack is charged by inserting it in this device, attaching AC adapter to the device. (1) Insert the battery pack in the device (Refer to "Inserting the Battery Pack"...
- Page 35 CHAPTER 2 Checks and Preparation • During data capture, when the battery power is at low, the capturing stops automatically . • When using in conjunction with AC adapter, this device automatically shifts to battery-powered at the time of power outage . At such time, pay attention to the remaining battery power .
-
Page 36: Connecting The Humidity Sensor
CHAPTER 2 Checks and Preparation 2 . 1 3 Connecting the Humidity Sensor Connect the + and - lead wires of the humidity sensor (the B-530: Option) to the selected terminals, then insert the round connector into the 5V OUT connector on this device. Humidity sensor (B-530: Option) Connected to the 5V... -
Page 37: Precautions To Observe When Taking Measurement
CHAPTER 2 Checks and Preparation 2 . 1 4 Precautions to Observe When Taking Measurement To avoid break-downs or short-circuiting accidents, please make sure to follow warnings written below. • Use only the AC adapter provided as a standard accessory . The rated power supply range for the adapter is 100 to 240 VAC, and the rated frequency is 50/60 Hz . - Page 38 CHAPTER 2 Checks and Preparation When using Please be sure to read the following carefully in order to prevent electric shocks or short circuit. • Maximum input voltage If a voltage exceeding the specified value is input, the parts in the input area will be damaged. Never input a voltage exceeding the specified value even for a moment.
-
Page 39: Noise Countermeasures
• Connect the chassis GND of the measurement object . Ensure that a chassis GND wire of the measurement object is connected to a good ground. Measurement object GL2000 Thermocouple Input terminals • Connect the signal chassis GND to the measurement device chassis ground . - Page 40 CHAPTER 2 Checks and Preparation 2 . 1 6 When Fixing This Device When fixing this device to prevent the dropout, use the two nuts on the back panel. * Recommended tightening torque: 14kgf/cm When fixing this device, please use it in a vertically placed state. 58.5 2-M4 L5 Nut To prevent possible malfunction, do not block the air vents of this device .
- Page 41 CHAPTER 2 Checks and Preparation 2 . 1 7 Setting the Date and Time If you are using this device for the first time, first charge the internal rechargeable battery and then make the date and time settings. If this device is not used for a period of approximately six months or longer, the internal rechargeable battery may be discharged and the date and time may revert to the initial settings .
-
Page 42: Chapter 3 Settings And Measurement
CHAPTER 3 Settings and Measurement CHAPTER 3 Settings and Measurement This chapter describes the setting and measurement procedures for this device. PRODUCT SUMMARY 3 . 1 Window names and functions 3 .2 Key Operation 3 .3 Description of the display mode 3 .4 Operation Modes 3 .5... -
Page 43: Window Names And Functions
CHAPTER 3 Settings and Measurement 3 . 1 Window names and functions Y-T Screen 4 . Device access display (Internal memory) 5 . Device access display (SD card) 6 . Device access display (USB memory) 1 . Status message 7 . Remote lamp 2 . - Page 44 CHAPTER 3 Settings and Measurement Logging screen 20 . Logging display 13 . Internal RAM information 14 . Alarm indication 21 . Statistical calculation display...
- Page 45 CHAPTER 3 Settings and Measurement XY Screen 22 . Pen status display 27 . X-axis level bar 26 . /DIV display 23 . XY digital display 25 . XY waveform display 24 . Y-axis level bar 30 . Scale upper limit 29 .
- Page 46 CHAPTER 3 Settings and Measurement 1 . Status message Displays the operation status of this device. : Displayed when data is not being captured. : Displayed when data is not being captured while XY Screen is used. : Displayed when the pre-trigger capturing is in progress with the setting to wait for pre-trigger to complete.
- Page 47 CHAPTER 3 Settings and Measurement 3 . Status mark : Appears when neither capture nor replay is in progress. : Displayed when the captured data is being recorded. : Appears when waiting for a trigger during capturing and for the stop key after capturing. : Displayed when replaying the captured data.
- Page 48 CHAPTER 3 Settings and Measurement 6 . Device access display (USB memory) : USB memory is not attached. : USB memory is attached but not being accessed. : USB memory is accessed. Do not remove the USB memory. The POWER LED light also flashes while the USB memory is being accessed.
- Page 49 CHAPTER 3 Settings and Measurement 10 . AC/ battery status indicator : Running on AC or DC power supply. : Running on battery. The remaining battery power is 100 to 91%. : Running on battery. The remaining battery power is 90 to 61%. : Running on battery.
- Page 50 CHAPTER 3 Settings and Measurement 13 . Internal RAM information Displays the status of the internal RAM. The status of the block can be judged by the color of each block. For the number of blocks, set the division number by "memory block division". : Data was not captured.
- Page 51 CHAPTER 3 Settings and Measurement 16 . File name display (1) During data capture A file name is displayed during the recording. * If the ring capturing setting is ON, a file name displayed during capture ends with "_RINGx" (x represents a number) but the actual file name does not include "_RINGx".
- Page 52 CHAPTER 3 Settings and Measurement 19 . Capture bar (1) During recording Displays the elapsed time and the usage status on the internal memory, the SD card and the USB memory usage. Elapsed time Remaining time for data capture Used capacity of internal memory, SD Remaining capacity of internal memory, SD card and USB memory card and USB memory...
- Page 53 CHAPTER 3 Settings and Measurement 20 . Logging display Displays the digital value of the input signal in large character. The window can be divided into 2, 4 or 8 displays. Select from choices of analog CH, logic, or pulse CH. 2-divided 4-divided 8-divided...
- Page 54 CHAPTER 3 Settings and Measurement 22 . Pen status display Displays the UP/DOWN status of the pen in the XY screen. The current pen position is drawn with a yellow dot . When pen is UP status The trajectory of the pen is drawn with color used with XY-CH .
- Page 55 CHAPTER 3 Settings and Measurement 23 . XY screen digital display Displays the input value of CH set to XY-axis, /DIV display, Position, Vernier. To switch the screen use the [SPAN/TRACE/POSITION] key. L-R key mode: Select the XY-CH and the axis to be activated (enlarged display) with the keys or [CH SELECT] key.
- Page 56 CHAPTER 3 Settings and Measurement 24 . Y-axis level bar Displays the signal position of CH set on the Y-axis. In the Y-axis level bar, the trigger range and the alarm range are not visable. 25 . XY waveform display Displays XY waveform graph.
- Page 57 CHAPTER 3 Settings and Measurement 29 . XY position reference line Displays when the Position settings and the Vernier settings are visable in the XY digital screen or when "Origin" is selected by the Quick setting (It is a pink straight line). In the Range mode, the reference value is 0V (0Vrms).
-
Page 58: Key Operation
CHAPTER 3 Settings and Measurement 3 .2 Key Operation This section describes key operation. (1) CH SELECT (2) SPAN/TRACE/POSITION (3) TIME/DIV (4) MENU (5) QUIT (6) DIRECTION Keys (7) ENTER (8) FAST FORWARD (KEY LOCK) (9) START/STOP (USB DRIVE) (13) FILE (14) FUNC (12) CURSOR (ALARM CLEAR) (11) DISPLAY... - Page 59 CHAPTER 3 Settings and Measurement (2) SPAN/TRACE/POSITION Switch to change the information on the digital display. Use to change the settings related to waveform display during Free Running, data capture and data replay. Pressing the key will switch displays as follows: Y-T screen MONITOR SPAN...
- Page 60 CHAPTER 3 Settings and Measurement (3) TIME/DIV Press the [TIME/DIV] key to change the time axis display width. TIME/DIV display (4) MENU Open the settings window to capture data. For details on settings, refer to “3.5 Setting Menus”. * For details of remote lock release function, refer to GL-Connection User’s Manual. (5) QUIT (LOCAL) This key is primarily used for the following operations.
- Page 61 CHAPTER 3 Settings and Measurement (6) Direction Keys This key is primarily used for the following operations. • To move a menu or setting item during menu configuration. • To move the cursor during replay. • To move the active channel in the “Digital display” and “Logging screen” ( keys).
- Page 62 CHAPTER 3 Settings and Measurement (9) START/STOP (USB Drive Mode) This key performs the following two operations: <Starts/stops capture> • During Free Running, starts capture. • During capture, stops capture. USB Drive Mode In the “USB Drive Mode”, check the internal memory and SD card as external storage devices on the PC. They will be recognized as two external storage media.
- Page 63 CHAPTER 3 Settings and Measurement (10) REVIEW This key is used to replay captured data. • During Free Running, captured data is replayed. Display the "Data Replay Source" screen, and then set the internal RAM data or file you want to replay. •...
- Page 64 CHAPTER 3 Settings and Measurement 11) DISPLAY The key is used to switch the screen mode. When running Free Running (when the capturing is stopped) mode, the screen mode can be switched between data capturing and data replaying. Pressing this key switches the screen display as follows: <When Free Running and data capturing>...
- Page 65 CHAPTER 3 Settings and Measurement (12) CURSOR (ALARM CLEAR) • This key is used to switch between cursor A and B during replay. Pressing this key switches between cursor A and B. For details on cursor operation, refer to “3.5 Setting Menus” - “(8) Data replay menu”.
- Page 66 CHAPTER 3 Settings and Measurement (14) FUNC Execute the function operation. Take a shortcut with the key by selecting the frequently used function in advance. In addition, selection can be made anytime. For details of function operation, refer to "3.5 Setting Menus" - "(6) OTHER settings"...
- Page 67 CHAPTER 3 Settings and Measurement (15) Key lock release with password A password can be set to cancel the key lock. (No password is set at factory default.) <Operation flow> 1. Set the password. Press the , , and [ENTER] keys at the same time to display the password setting screen shown below. Specify a 4 digit password.
-
Page 68: Description Of The Display Mode
CHAPTER 3 Settings and Measurement 3 .3 Description of the display mode (1) Y-T waveform display The Y-T waveform is a graph in which the vertical axis is measured value (Y) and the horizontal axis is time (T). The horizontal axis (T) can be adjusted by Time/DIV setting. Adjust the display width of the horizontal axis (T) of the waveform by changing this value. - Page 69 CHAPTER 3 Settings and Measurement Zone division Zone division is a function to divide the Y-axis of the Y-T graph into multiple zones and display them so that the graphs do not overlap. Select from 1-zone (no zone division), 2-zone division, 4-zone division or 8-zone division. * For 4-zone division and 8-zone division, 4DIV above and below the center is used for display.
- Page 70 CHAPTER 3 Settings and Measurement For Logic CH, 10 zones are provided in advance, so you can select the zone to display the Logic CH waveform. 10-zone division • • • • • Zone 1 Zone 2 Zone 3 • • • • • Zone 10 3-29...
- Page 71 CHAPTER 3 Settings and Measurement Active CH (priority display CH) Active CH is a CH that displays over the other CHs. The CH selected in the digital display is the active CH. The active CH is displayed above the other CH, giving you easier view of the individual channel. CH1 is active CH .
- Page 72 CHAPTER 3 Settings and Measurement Span Span is a function to set measurement value of the upper and lower edges in the zone. By using the span setting, you can enlarge or shrink the vertical axis (Y) of the Y-T graph waveform. Upper edge Span value Lower edge...
- Page 73 CHAPTER 3 Settings and Measurement Digital display The digital display is seen on the right side in the "Waveform + Digital display". Digital display The digital display has the following functions. · See the measured value with a digital value. ·...
- Page 74 CHAPTER 3 Settings and Measurement Digital display of measured value <Analog CH/Pulse CH> During Free running/capturing CH number Calculation mark CH annotation Measured value Active CH CH number Measured value Inactive CH CH number : Measured CH number. Calculation mark : Displayed when calculation between channels is set.
- Page 75 CHAPTER 3 Settings and Measurement <Logic CH> • During Free running/capturing Logic selection cursor Logic annotation CH number Measured value Active CH CH number Measured value Inactive CH CH number : Logic CH number Logic annotation : Annotation of the logic CH selected by the logic selection cursor is displayed. Logic selection cursor : Select individual logic CH.
- Page 76 CHAPTER 3 Settings and Measurement Set active CH Switch between the active CH by operating the [CH SELECT] key or the keys. CH1 is active . CH2 is active . Simple setting of SPAN /POSITION/TRACE Choose each setting by pressing the [SPAN/TRACE/POSITION] key. Y-T screen MONITOR SPAN...
- Page 77 CHAPTER 3 Settings and Measurement Quick setting Quick setting is a function that you can perform the settings in the digital display without opening the setting menu. • Sampling interval (SAMPLE) You can change the sampling interval setting. Use the keys to change it.
- Page 78 CHAPTER 3 Settings and Measurement (2) Logging display/real time statistical calculation display The logging display is a function to digitally display the current measured value with large fonts on the display screen. Visibility is improved by use of large fonts. Real time statistical calculation display is a function to calculate and display maximum value, minimum value, P-P value, and average value.
- Page 79 CHAPTER 3 Settings and Measurement Logging display CH number Calculation mark CH annotation Level display Measured value CH number : Measured CH number. Calculation mark : Displayed when calculation between channels is set. CH annotation : Annotation set to CH is displayed. Measured value : Currently measured value is displayed.
- Page 80 CHAPTER 3 Settings and Measurement (3) XY waveform display XY waveform display is a function to show a graph with measured values for both the horizontal X-axis and the vertical Y-axis. Since the graph is drawn based on measured values of CH set on the horizontal axis and vertical axis, it allows to check the correlation between both data graphically.
- Page 81 CHAPTER 3 Settings and Measurement The differences in XY digital display operation are as follows. Mode RANGE/SPAN POSITION VERNIER RANGE Use the keys to change Position reference point is 0V 100 to 50% (40%) the V/DIV range. or 0Vrms. The V/DIV range cannot be changed during replay.
- Page 82 CHAPTER 3 Settings and Measurement XY position In the position function of XY graph display (hereinafter XY position), set the drawing position reference point to 0% for the lower left corner and 100% for the upper right corner of the XY graph. 100% 100% The measurement range displayed on the graph by the XY position setting is as follows.
- Page 83 CHAPTER 3 Settings and Measurement When setting the XY position, a position reference line (pink line) indicating the position reference value is displayed. XY position setting Position reference line VERNIER The VERNIER is a function to adjust the amplitude (gain). Adjust the display width range of the waveform displayed on the XY graph.
- Page 84 CHAPTER 3 Settings and Measurement XY digital display XY digital display The XY digital display has the following functions. · Displays the measured value as a digital value. · Active XY-CH setting. · RANGE/SPAN/POSITION/VERNIER setting. · Quick setting XY digital display Quick setting XY-CH which TRACE is set to Off is not displayed .
- Page 85 CHAPTER 3 Settings and Measurement Digital display of measured value • During Free running/Capturing XY-CH number X-axis CH number X-axis CH annotation RANGE/SPAN mode display X-axis measured value Y-axis measured value Y-axis CH number Y-axis CH annotation Active XY-CH XY-CH number X-axis measured value RANGE/SPAN mode Y-axis measured value...
- Page 86 CHAPTER 3 Settings and Measurement • During replays XY-CH number X-axis CH number X-axis CH annotation RANGE/SPAN mode display Y-axis CH number Y-axis CH annotation Active XY-CH XY-CH number Value indicated by selected cursor on X-axis RANGE/SPAN mode display Value indicated by selected cursor on Y-axis Inactive XY-CH XY-CH number...
- Page 87 CHAPTER 3 Settings and Measurement L-R key mode and Cross key mode XY digital display has 2 operation modes. 2 operation modes are L-R key mode with the same key operation as the Y-T waveform screen and Cross key mode optimized for operation of XY waveform screen. •...
- Page 88 CHAPTER 3 Settings and Measurement In the "MONITOR" display during replaying, the cursor moves on the selected axis. Move to decreases move /left (down) with the key, and to increases move /right (up) with the key. Select X-axis Select-Y axis •...
- Page 89 CHAPTER 3 Settings and Measurement In the "MONITOR" display during replaying, you can move the cursor of the selected XY-CH. Use the keys to move the X-axis cursor, and use the keys to move the Y-axis cursor. Simple setting of RANGE/SPAN/POSITION/VERNIER Press [SPAN/TRACE/POSITION] key to perform each setting.
- Page 90 CHAPTER 3 Settings and Measurement Quick setting Quick setting is a function that can be set in the Digital display without opening the setting menu. • Pen (PEN) Operates the pen UP/DOWN. Use the keys to change the state of UP/DOWN. When the pen is in DOWN state, the trajectory of the pen is drawn in the XY graph waveform.
- Page 91 CHAPTER 3 Settings and Measurement • Waveform Clear Erase the waveform (pen trajectory) in the XY graph. Press [ENTER] key to erase it. [ENTER] key • Operation mode (Operation) Switch the operation mode of the XY digital display. Press the keys to switch the operation mode.
- Page 92 CHAPTER 3 Settings and Measurement XY overwrite display When XY waveform display is used, you can display the saved ranges from the file menu as "Waveform screen" and the saved image file as the background image of the XY graph. (Waveform screen image file not saved by this device are not available to view.) Save the waveform screen...
-
Page 93: Operation Modes
CHAPTER 3 Settings and Measurement 3 .4 Operation Modes Check the system operation status in the “Status Message”. < Free Running > < Capturing > <Replaying while capturing data> < Replaying > Operation Description Simple message display Free Running Startup status, or data is not being captured. Free Running Free Running XY Capturing... - Page 94 CHAPTER 3 Settings and Measurement (1) Free Running In Free Running, first start the settings for data capture. The current input signal can be viewed in the waveform or digital value. Main operations available during Free Running Measurement condition setting change The [MENU] key is used to change various setting items in setting menus.
- Page 95 CHAPTER 3 Settings and Measurement (2) Capturing The remaining capacity of SD card (Remaining time more than 99999 hours is Elapsed time displayed as "++++:++:++" .) Capture destination and file name The captured data is saved in the Internal RAM, internal memory, SD card or USB memory during data capture.
- Page 96 CHAPTER 3 Settings and Measurement (4) Replaying Displays the voltage at a point indicated by Cursor A or B or the selected cursor . Displays the measurement time at a point indicated by Cursor A or B or the selected cursor . Displays the captured data.
-
Page 97: Setting Menus
CHAPTER 3 Settings and Measurement 3 .5 Setting Menus When you press the [MENU] key during Free Running, the following menu screens appear. DATA DISP TRIG OTHER (1) AMP settings This menu is used to specify input signal-related settings. < Analog settings > Setting Selections available Input... - Page 98 CHAPTER 3 Settings and Measurement Setting Selections available Misc. [DC, RH] Perform Auto Zero Press right key to execute. ADJ. Reset Auto Zero ADJ. Press right key to execute. [RMS] RMS value operation Set numeric value. cross value Reads the current Press right key to execute.
- Page 99 CHAPTER 3 Settings and Measurement Analog settings Settings the conditions for analog signals. When you use CH ALL to set input, range, filter and EU, all channels are set to the same values when input is the same . Range is set only for the same input channels . However, the range of a channel is not changed if EU (scaling) is set to On .
- Page 100 CHAPTER 3 Settings and Measurement Available SPAN Settings < Voltage Ranges > Range Maximum SPAN Minimum SPAN Minimum Resolution 20mV -22.000 to +22.000mV 0.200mV 0.001mV 50mV -55.00 to +55.00mV 0.50mV 0.01mV 100mV -110.00 to +110.00mV 1.00mV 0.01mV 200mV -220.00 to +220.00mV 2.00mV 0.01mV 500mV...
- Page 101 CHAPTER 3 Settings and Measurement < Temperature Ranges > : Fahrenheit Minimum SPAN Minimum Range Maximum SPAN Measurable Range (p-p) Resolution -459.0 to +3000.0ºF 10ºF -328 to +2498ºF 0.18ºF -459.0 to +3000.0ºF 10ºF -328 to +2012ºF -459.0 to +3000.0ºF 10ºF -328 to +752ºF -459.0 to +3000.0ºF 10ºF...
- Page 102 CHAPTER 3 Settings and Measurement (1)-4 EU (Scaling settings) This is used to convert the measured signals to other units. <When input is voltage and effective value (RMS)> <When input is temperature> (3) (4) (5) (6) Setting Description (1) EU Set the scaling function to ON or OFF.
- Page 103 CHAPTER 3 Settings and Measurement (1)-5 Other settings < Voltage/Humidity > < Effective value (RMS) > (10) (11) (12) < Temperature > (13) Setting Setting Description object (1) Annotation Settings Set the annotation (comment) displayed in the CH. (2) Inter-CH Op Settings Set rule for calculation between channels.
- Page 104 CHAPTER 3 Settings and Measurement Setting Description (3) Scaling Set the scaling factor for a calculation result. /1000000, /1000, ×1, ×1000, ×1000000 <Example> In the case of calculation result = In the case of calculation result = 0.001 1000 Calculation result ×1 = 0.001 Calculation result ×1 = 1000 Calculation result ×1000 = 1 Calculation result / 1000 = 1...
- Page 105 CHAPTER 3 Settings and Measurement Zero adjustment function Zero adjustment is a function to force cancel the offset of measured value with offset. Offset voltage For example, when the offset voltage is +1V, and if +1V is actually input, the device measures +1V as 0V. Setting Description (1) Perform Auto Zero...
- Page 106 CHAPTER 3 Settings and Measurement The area of this part is the effective value (RMS) . Cross value 1 cycle In the above example, the effective value (RMS) can be obtained by specifying this cross value. To obtain the cross value, specify the voltage crossing the waveform. If the waveform fluctuates up and down, check the waveform and set the cross value.
- Page 107 CHAPTER 3 Settings and Measurement Logic and Pulse settings For settings related to digital input. < Pulse setting > < Logic setting > (1)-6 Logic/Pulse To select the processing method for digital input. Selection item Description Digital input measurement is disabled. Logic Digital input is processed as logic signals.
- Page 108 CHAPTER 3 Settings and Measurement (1)-9 Slope To set the slope (direction) to count the number of pulses. This setting is available only if Pulse is selected in (1)-6. Selection item Description Counts the rising edges of pulses. Counts the falling edges of pulses. (1)-10 EU (scaling settings) The measured signal is converted with the engineering unit.
- Page 109 CHAPTER 3 Settings and Measurement (1)-11 Misc . < Pulse > < Logic > Setting Description (1) Annotation Settings Set the annotation (comment) displayed in the CH. (2) Span Settings Set the upper and lower limits of the span displayed in the Y-T waveform. (Pulse only) * When Pulse input is Integration, it is in the auto span state and can not be set.
- Page 110 CHAPTER 3 Settings and Measurement (2) DATA settings Set items related to data capturing. < When the capturing destination is internal RAM > < When the capturing destination is internal memory, SD card, USB memory > Setting Selections available Sampling Set the main sampling.
- Page 111 CHAPTER 3 Settings and Measurement Setting Selections available CSV decimal point Set the decimal point character of the CSV file. Period (.), Comma (,) CSV delimiter Set the delimiter of the CSV file. Comma (.), Tab, Semicolon (;) (2)-1 Sampling interval (main sampling interval) Set the interval for capturing data.
- Page 112 CHAPTER 3 Settings and Measurement (2)-2 Pulse sampling interval Set the interval for capturing pulse data. The pulse sampling interval can be set under the following conditions. Condition 1: Main sampling and interval are the same or larger. Condition 2: Sampling interval which is n times main sampling. When changing the main sampling interval, if it does not meet the above conditions, the sampling interval for pulse is also initialized in the same way as the main sampling interval.
- Page 113 CHAPTER 3 Settings and Measurement (2)-3 Capturing destination Set the capturing destination of the measured data. Setting Description Internal RAM The measured data is captured to the internal RAM. The data is lost when you turn off the power. When Overwrite is set to On, the data is overwritten if the next capturing is performed. - "7.
- Page 114 CHAPTER 3 Settings and Measurement (2)-4 Memory block division Internal RAM can be divided into blocks. Multiple data can be captured to divided blocks. This can be set only when the capturing destination is set to the Internal RAM. The number of divided blocks and the maximum number of data points when divided is as shown in the table below.
- Page 115 CHAPTER 3 Settings and Measurement <Overwrite mode is On> pattern 1 All eight blocks have not been recorded . All blocks are black . This is recorded from the first block (the block with yellow line scheduled to be captured next time). Recorded Recording Not recorded...
- Page 116 CHAPTER 3 Settings and Measurement (2)-6 Internal RAM clear Erase data saved in internal RAM. This can be set only when the recording destination is set to internal RAM. Please be aware that erased data cannot be restored. Back up the necessary data in the internal memory/SD card/USB memory before erasing. (2)-7 Capturing points Set the number of data points to be captured to the internal RAM.
- Page 117 CHAPTER 3 Settings and Measurement (2)-9 Auto save Set whether to automatically save the data captured to the internal RAM. This can be set only when the internal RAM is selected as the recording destination. Setting Description Auto save is not performed. Data captured to the internal RAM is lost if you turn off the power or start the next recording.
- Page 118 CHAPTER 3 Settings and Measurement (2)-11 Recording destination file name (file capture) Set the file name and folder name of the recording destination when capturing data. < When the automatic naming method is used > < When any file name and serial number is used for naming method > <...
- Page 119 CHAPTER 3 Settings and Measurement Changing the sampling interval, recording destination, number of measuring channels (number of channels for which the input is not Off), etc . will change the Capture Space and Capture Time on the screen display . If you find that the measurement time exceeds the Capture Time, take one of the following measures: •...
- Page 120 CHAPTER 3 Settings and Measurement (2)-12 Ring/Relay capture settings • Ring Capture Function < Ring capture > Setting Description (1) Ring/Relay capture Set the capturing function. off: Capturing function is not used. Ring: Ring capture is performed. (For details, refer to the figure below.) Relay: Data is recorded consecutively for each file of up to 4GB without skipping any data.
- Page 121 CHAPTER 3 Settings and Measurement • Relay Capture Function < Relay capture > Setting Description (1) Ring/Relay capture Set the capturing function. off: Capturing function is not used. Ring: Ring capture is performed. (For details, refer to the figure below.) Relay: Data is captured consecutively for each file of up to 4GB continuously.
- Page 122 This device has a function to periodically back up recorded data. (Refer to the figure below.) Automatic backup to an FTP server Ethernet FTP server GL2000 Auto backup to SD memory card or USB memory Measurement input Setting Description (1) Backup intervals Set the interval to back up the captured data.
- Page 123 CHAPTER 3 Settings and Measurement (3) DISP settings Set the screen display settings. (3)-1 Y-T/Y-T (All waveforms) display Setting Description Display mode Set the display mode of the screen. Y-T, Y-T (All waveforms), Logging, XY Time/DIV Set the Time/DIV. Range depends on the sampling interval. Zone division Set the number of zone divisions.
- Page 124 CHAPTER 3 Settings and Measurement Time/DIV This is a function to enlarge or shrink the horizontal axis (T) of the waveform of Y-T graph. When setting this, set the time for one grid of graph. The shorter the set time interval. the larger the horizontal axis (T). Set the time for one grid of graph The range of the Time/DIV value that can set depends on the sampling interval setting.
- Page 125 CHAPTER 3 Settings and Measurement Zone division This is a function to divide the Y-axis of the Y-T graph waveform into multiple zones and displays the graphs so that they do not overlap. Select from 1-zone (no zone division), 2-zone division, 4-zone division or 8-zone division.
- Page 126 CHAPTER 3 Settings and Measurement Logic zone Logic zone can be set in its own zone, which is different from analog CH and pulse CH. Logic CH1 to Logic CH4 are displayed together in one logic zone. 10-zone division • • • • • Zone 1 Zone 2 Zone 3...
- Page 127 CHAPTER 3 Settings and Measurement (3)-2 Logging display Setting Description Display mode Set the display mode of screen. Y-T, Y-T (full screen), Logging, XY Display format Set the display format of the logging screen. 2-division, 4-division, 8-division, Statistical operation * To select the real time statistics calculation screen, select the statistical operation. Display contents Select the display contents of the logging screen.
- Page 128 CHAPTER 3 Settings and Measurement Display contents Select the content displayed on each display frame on the logging screen. Choose from analog CH (CH1 to CH4/Pulse CH (P1 to P4)/Logic. Same as this selected part . The zone allocation when divided is as shown in the figure below. 2-division 4-division 8-division...
- Page 129 CHAPTER 3 Settings and Measurement (3)-3 XY display Setting Description Display mode Set the display mode of the screen. Y-T, Y-T (full screen), Logging, XY Set the X- axis and Y- axis of XY graph. CH1 to CH4 Trace Set the trace of XY graph. Off, On Waveforms are not displayed on the screen when trace is Off.
- Page 130 CHAPTER 3 Settings and Measurement Position (XY position) Set the XY position. This setting is used for XY display only. This differs from the position setting for Y-T waveform display (The position setting that can be operated at Y-T waveform + Digital display.).. For XY position setting, set the drawing reference position to 0% for the lower left and 100% for the upper right of the XY graph.
- Page 131 CHAPTER 3 Settings and Measurement • Span mode SPAN mode Lower limit span value Reference point Upper limit span value Center point of the upper and lower limit span = (upper limit span value + lower limit span value) / 2 The position reference point in Span mode is the center point between the upper limit span value and the lower limit span value.
- Page 132 CHAPTER 3 Settings and Measurement Vernier Set the XY Vernier. This setting is for XY display setting only. Vernier is a function to adjust the amplitude (gain). Adjust the display width range of the waveform displayed on the XY graph. -10DIV -5DIV Reference point...
- Page 133 CHAPTER 3 Settings and Measurement Span Span can be selected when Span mode CH is set on X-axis and Y-axis. This is a common setting with Span set in Y-T waveform display (AMP menu). Changing the Span setting affects the position reference point and the basic range of the vernier (the range displayed in the graph when the vernier is set to 100%) For details of the Range mode/Span mode, refer to "3.3 Operation Modes"-"(3) XY waveform display"-"...
- Page 134 CHAPTER 3 Settings and Measurement XY Overwrite Setting Description (1) Select File Select the image file to be overwritten and then perform the XY overwriting. The image file is a screen copy of the file menu in XY display, and the storage range is the image file saved on the waveform screen.
- Page 135 CHAPTER 3 Settings and Measurement (4) TRIG settings Set the trigger condition and the alarm. Setting Selections available Start Source Set the type of start trigger. Off, Level, Alarm, External input, Specified time, Specified day of the week, Constant time [Off] Set to Off when not using trigger.
- Page 136 CHAPTER 3 Settings and Measurement Setting Selections available Stop Source Set the type of start trigger. Off, Level, Alarm, External input, Specified time, Specified day of the week, Constant time [Off] Set to Off when not using trigger. [Level value] Combination Set the trigger signal detecting method and combination for each CH.
- Page 137 CHAPTER 3 Settings and Measurement (4)-1 Start side source setting This is used to specify trigger conditions to start data capture. Selection item Description Starts capturing data unconditionally when you press the [START/STOP] key. Level Starts capturing data when a specified level is reached. ->...
- Page 138 CHAPTER 3 Settings and Measurement (4)-3 Pre-trigger For pre-trigger, set the number of data points to record before trigger is set off. * Pre-trigger can be selected only when the capturing destination is set to the internal RAM. The data before the trigger point is called “pre-trigger data”, and the data after the trigger point is called “post-trigger data”.
- Page 139 CHAPTER 3 Settings and Measurement < Prioritize pre-trigger capturing > When a trigger sets off during pre-trigger capturing, the trigger is ignored. The trigger that initiates after the data capture corresponding to the pretrigger data points is completed is effective. Below is the case when a trigger sets off before the data capture of the pretrigger data points is completed.
- Page 140 CHAPTER 3 Settings and Measurement (4)-4 Repeated capturing This is used to enable or disable the repeat function to conduct repeated capturing. Selection item Description The repeat function is disabled. The repeat function is enabled. After one capture ends, the next capture starts (If the start side source setting is not Off, this device waits for a trigger).
- Page 141 CHAPTER 3 Settings and Measurement (4)-5 Alarm settings Alarm level settings This is used to set the alarm generation conditions and output destination, etc. When the conditions specified are met, the alarm output terminal (for which an output destination number must be specified for each channel) sets off an alarm.
- Page 142 CHAPTER 3 Settings and Measurement Trigger level settings/Alarm level settings Specifies detailed conditions for each channel when the start and stop side source settings are Level. The configuration of the level trigger is as shown in the figure below. CH n Mode Level CH n...
- Page 143 CHAPTER 3 Settings and Measurement Level and Edge operations In the Level operation, a trigger is assumed to be generated if the trigger conditions are met when the [START] key is pressed. In the Edge operation, a trigger is not assumed to be generated even if the trigger conditions are met when the [START] key is pressed.
- Page 144 CHAPTER 3 Settings and Measurement Dead zones (hysteresis) of trigger and alarm levels Trigger and alarm levels are provided with a dead zone (hysteresis) in order to prevent false detection due to noise. The following figure shows the dead zone (hysteresis). <...
- Page 145 CHAPTER 3 Settings and Measurement Logic trigger The trigger of logic CH is compared with the pattern against setting the logic 4CH set in the mode. Logic trigger A trigger initiates when the input signal matches the set pattern. Logic CH set to Off becomes “Don’t Care”, and it is regarded as a pattern match even if the input signal is H or L.
- Page 146 CHAPTER 3 Settings and Measurement (5) Interface settings This menu is used to specify conditions for PC connection. Setting Selection available End-of-line character Set the end-of-line character for sending and receiving the control commands. CR + LF, CR, LF USB ID Set the identification ID when connecting settings between PC and USB.
- Page 147 CHAPTER 3 Settings and Measurement Setting Selection available Notification Alarm Set the E-mail send when an alarm occurs. settings Off, On Low battery Set the E-mail send when the internal battery lowers. Off, On Drive free space Set the E-mail send when the drive free capacity during recording is low.
- Page 148 Starts a new line with CR+LF code (default value). Starts a new line with LF code. Starts a new line with CR code. * For details of I/F command, refer to GL980/GL2000-SDK. (5)-2 USB settings Set the USB ID number of this product.
- Page 149 CHAPTER 3 Settings and Measurement (5)-3 TCP/IP advanced settings Setting Description (1) IPAddr Auto Acq. Set the IP address automatic acquisition. On, Off (2) IP Address Set the IP address. 0 to 255 . 0 to 255 . 0 to 255 . 0 to 255 * When the IP address is set automatically, the automatic set IP address is displayed.
- Page 150 CHAPTER 3 Settings and Measurement (5)-4 FTP/WEB server settings Set the FTP server/WEB server as this device. Selection item Description FTP Client (1) FTP Server Enter the domain name or IP address of the FTP server. (Up to 127 characters) (2) User Name Enter the user name of the FTP account.
- Page 151 CHAPTER 3 Settings and Measurement (2) Mail send server settings Setting Description Outgoing mail Send (SMTP) Server Name Set the E-mail Send Server Name (server address). settings Enter the string of up to 63 characters. * Enter the domain name or IP address. * Enter the server name notified from the mail provider.
- Page 152 CHAPTER 3 Settings and Measurement (3) < Incoming mail server settings > Setting Description Incoming mail server Receive (POP3) Server Name Set the E-mail Receive Server Name (server address). settings Enter the string of up to 63 characters. * Enter the domain name or IP address. * Enter the server name notified from the mail provider.
- Page 153 CHAPTER 3 Settings and Measurement (6) OTHER settings Various other conditions can be set. Setting Description LCD brightness Set the brightness of the LCD backlight. Light, Medium, Dark Screen Saver Set the time the screen saver will start up. Off, 10, 30s; 1, 2, 5, 10, 30, 60min Power On Start Set whether to automatically start capturing when the power is turned on.
- Page 154 CHAPTER 3 Settings and Measurement Setting Description Information Various version information and MAC address are displayed. Demo waveform Set the demo waveform mode. Off, On NAVI functions Start up the NAVI functions. (6)-1 LCD brightness Set the brightness (three stages of bright, middle, and dark) of the LCD backlight. (6)-2 Screen Saver Select the time (eight stages of 10 s to 60 min.) you want to specify.
- Page 155 CHAPTER 3 Settings and Measurement (6)-5 Temperature settings Set the items related to temperature. Room temperature compensation Set whether thermocouple room temperature (terminal temperature) compensation of this device is used or not. Setting Description Internal Room temperature compensation of this device is enabled. (Normally you should select this.) External Set it when compensating for room temperature with external equipment.
- Page 156 CHAPTER 3 Settings and Measurement (6)-8 FUNC key settings Set the behavior when the function key is pressed. [FUNC] key can be set according to each screen mode (Y-T/logging/XY) and operating status (free running/ capturing/replaying) respectively. By pressing the [FUNC] key, the setting contents are executed immediately. The contents that can be set in each status are listed below.
- Page 157 CHAPTER 3 Settings and Measurement When "Always select" is set, items marked with " " are displayed according to the status when pressing the [FUNC] key. Use the the keys to select the item you want to perform. Press the [ENTER] key to perform the content you select. When pressing the [FUNC] key, the contents that can be executed at that point are displayed .
- Page 158 CHAPTER 3 Settings and Measurement (6)-10 Language Set the display language (9 languages of Japanese, English (US), English (UK), French, German, Chinese, Korean, Spanish and Russian). In addition, when this setting is changed, "CSV decimal point" and "CSV delimiter" of the CSV file are initialized.
- Page 159 CHAPTER 3 Settings and Measurement (7) FILE menu The operations for file can be performed by pressing the [FILE] key. The displayed items vary depending on Backup Off/On or Auto save or XY screen. < Normal > < Backup On > <...
- Page 160 CHAPTER 3 Settings and Measurement <Example of operation procedure> Example of file/folder delete procedure is described. (1) Select the file/folder you want to delete. Move the cursor to the file or folder you want to delete and then press the [ENTER] key. The "√" mark is displayed in the checkbox.
- Page 161 CHAPTER 3 Settings and Measurement (7)-2 Data Save Data in the internal RAM can be saved as well. During data replay, you can save the data that is being replayed. When saving in internal RAM Setting Description (1) Save block Select the internal RAM block to be saved.
- Page 162 Description (1) File Type Set the file format of data. GBD: The data file is created in our Graphtec's binary format. * Data cannot be changed. CSV: The data file is created in text format. * While GBD file is being replayed, you can duplicate it to a GBD file and convert it to a CSV file.
- Page 163 CHAPTER 3 Settings and Measurement (7)-4 Remove/replace SD card/USB memory The SD card/USB memory can be not swapped during data back up. Perform the card replacement according to the following procedure. (1) Press the [FILE] key to open the FILE menu. (2) Press [ENTER] key to perform “Remove/replace SD card/USB memory.
- Page 164 CHAPTER 3 Settings and Measurement (7)-5 Cancel auto save Auto save process can be cancelled when the recording destination is set to internal RAM and Auto save is performed. Select "Cancel auto save” and press [ENTER] key to cancel the auto save process. (7)-6 XY overwrite Perform XY overwrite settings.
- Page 165 CHAPTER 3 Settings and Measurement (7)-8 Save/Read the current setting Save and read the current setting. You can save the settings separately for the operation setting and the communication setting. Save Save the setting conditions for this device. Setting Description (1) Save details Set the details of saved data setting.
- Page 166 CHAPTER 3 Settings and Measurement (7)-9 File selection/Operation tool This tool is used for file selection and operation such as list display of file menu and data save destination on the DATA menu. The operation method is as follows. < File selection/Operation tool > Description Moves between folders.
- Page 167 CHAPTER 3 Settings and Measurement Thumbnail display If there is a waveform screen data saved automatically when data is captured by this device, the waveform screen data is displayed as a thumbnail when files are listed. Thumbnail display If there is a BMP file with the same file name as the data file, the thumbnail is displayed. (The image data for thumbnail saved by this device are only supported.) <...
- Page 168 CHAPTER 3 Settings and Measurement (7)-10 Character string enter tool The tool is used to enter the character string such as folder name, file name, annotation character string, and unit of EU (scaling), etc. Display Item Operation Description (1) Character string This is the cursor that indicates the position to edit the selection cursor character string you enter.
- Page 169 CHAPTER 3 Settings and Measurement < Enter character selection > (1) Select the character type to be entered in operation selection. (2) Use the key to move the enter selection cursor to the character selection field. (3) Use the keys to move the enter selection cursor to the character you want to enter. (4) Use [ENTER] key to enter a single character.
- Page 170 CHAPTER 3 Settings and Measurement < User character string change > (1) Select "User" in operation selection. (2) Use the keys to move to the user character string you want to change. (3) Select " " by pressing key. (3) Press [ENTER] key to display the character string enter tool for user character string editing. There is no user string in this tool.
- Page 171 CHAPTER 3 Settings and Measurement (8) Data replay menu Select the data you want to replay from the “Data replay source” by pressing the [REVIEW] key and replay the captured data. Press [MENU] key during replaying to display the data replaying menu. <...
- Page 172 CHAPTER 3 Settings and Measurement Setting Description Span Set the Span. You can set it when the analog CH in the Span mode is set to the axis. Run All Data XY Execute XY display for all data. * When the amount of data is large, it may take time to draw XY graph.
- Page 173 CHAPTER 3 Settings and Measurement (8)-3 Data search Set the conditions for data search. For details of the Combination and Mode and Level, refer to "3.5 Setting Menus" - "(4) TRIG settings" - "Trigger level settings/Alarm level settings". Alarm CH is searched when the specified alarm output turns On. After setting the search conditions, perform a search by selecting "Search for next"...
- Page 174 CHAPTER 3 Settings and Measurement (8)-5 XY display settings Perform XY display setting when starting XY execution. For details, refer to "3.5 Setting Menus" - "(3) DISP settings" - "3 XY display". This is a common setting. You can set it again during XY replaying. (8)-6 XY Execution Perform XY display according to the XY display settings.
-
Page 175: Web Server Function
CHAPTER 3 Settings and Measurement 3 .6 WEB Server Function This function allows operating and monitoring the device via a Web browser. • Supported Web browsers • Microsoft Internet Explorer 11 or later • Firefox 1.5 or later • Available functions using a Web browser •... - Page 176 Digital display....... Measured value is displayed digitally. Downloading files in this device... Data captured in this device can be downloaded to the PC using the FTP function. Graphtec's homepage ..Links to our homepage. Remote operation KEY LOCK ......Sets and cancels key lock.
- Page 177 CHAPTER 3 Settings and Measurement Screen display KEY LOCK ......Sets and cancels key lock. PASSWORD ....... Sets and cancels a password. Screen update rate ..... Sets an update rate of the screen. The screen update rate can be set either to 2, 3, 5, 10 seconds. This operation is the same as remote operation, but the screen is displayed in four times larger.
- Page 178 CHAPTER 3 Settings and Measurement Downloading files in this device This allows you to download the data saved in the internal memory/SD card/USB memory to the PC. To display the FTP site from the above figure with Explorer, press the [Alt] key, click [View], and click [Open FTP site in Explorer].
- Page 179 • Create file/folder • Change file name/folder name To write the the data to this device, the login account name must be changed. Please use the following table as a guide. Account name Password Restrictions GL2000 None None gl2000 None None Anonymous Read-only The account cannot be changed in Internet Explorer.
-
Page 180: List Of Error Codes
CHAPTER 3 Settings and Measurement 3 .7 List of Error Codes If an error code is displayed on this device, please handle errors in reference to the table below. Error code Description Unexpected error Please contact us. File not found. The operation target is not a folder. -
Page 181: Chapter 4 Specification
CHAPTER 4 Specification CHAPTER 4 Specification This chapter describes the basic specifications for this device. PRODUCT SUMMARY Standard Specifications Function Specifications 4 .3 Accessories/Optional Accessories 4 .4 External Dimensions... - Page 182 Item Description Number of analog CHs External output terminal Trigger input (1ch) or external sampling (1ch) Logic input (4ch) or pulse input (4ch) Alarm output (4ch) or trigger output (1ch) + alarm output (3ch) * Trigger input and external sampling input can be switched. * Alarm output and trigger output can be switched.
-
Page 183: Internal Ram
CHAPTER 4 Specification Internal RAM Item Description Memory capacity 4MW/CH volatile memory Memory contents Measured data Sampling interval 1, 2, 5, 10, 20, 50, 100, 200, 500 μs 1, 2, 5, 10, 20, 50, 100, 200, 500 ms 1, 2, 5, 10, 20, 30s, 1min, External Capturing settings Set the number of capturing points Setting range: 10 to 4000000 points... -
Page 184: Pc I/F
CHAPTER 4 Specification PC I/F Item Description Interface types Ethernet (10BASE-T/100BASE-TX) USB 2.0 Functions Data transfer to the PC (realtime, memory) PC control of this device Ethernet functions Web server functions: Displays the screen images (10BASE-T/100BASE-TX) FTP server function: Transfer/delete files in Internal memory and SD card FTP client function: Correct time of main unit’s clock DHCP client function: IP address automatic acquisition function Email sending function: Email sending (no receiving function) -
Page 185: Input Section
CHAPTER 4 Specification Input section Item Description Number of input channels 4CH fixed Input terminal type Voltage Insulated BNC connector or M3.5 screw terminal unit (However, it cannot input to the BNC connector of same CH and the screw terminal at the same time.) Temperature M3.5 screw type terminals (Rectangular flat washer) Input method... - Page 186 CHAPTER 4 Specification Item Description Withstand voltage Between each input (-) terminal and each input (-) terminal : AC/DC 5400V 1 minute Between each input (-) terminal and GND terminal : : AC/DC 5400V 1 minute Insulation resistance Between Input Ch and GND terminal: 50MΩ or more (At DC500V) Common mode rejection ratio 90 dB or more (50/60 Hz;...
-
Page 187: Function Specifications
CHAPTER 4 Specification 4 .2 Function Specifications Function Specificationsr Item Description Display screen Waveform + Digital screen All Waveform screen Logging + Calculation Display screen X-Y screen * It is possible to open the menu even during capturing (Setting is impossible, for confirmation) * Switching by dedicated key (Toggle operation) EU (scaling function) -
Page 188: Trigger Functions
CHAPTER 4 Specification Trigger Functions Item Description Repeat Trigger Off, On Repeat interval Start to start interval, stop to start interval 1 second - 9999 hours 59 minutes 59 seconds Trigger types Start: Data capture starts when a trigger is generated. Stop: Data capture stops when a trigger is generated. -
Page 189: External Input/Output Functions
CHAPTER 4 Specification External Input/Output Functions Item Description Input/output types Trigger input (1 ch) or External sampling input (1 ch) Logic input (4 ch) or Pulse input (4 ch) Alarm output (4ch), or Trigger output (1ch) + Alarm output (3ch) * Trigger input and external sampling input can be switched. -
Page 190: Accessories/Optional Accessories
Statistic/History Displays the maximum, minimum, average values, peak value Standard Accessories Item Remarks Quantity Quick Start Guide GL2000-UM-85x CD-ROM User's Manual, Application software TO ENSURE SAFE AND SAFETY PAMPHLET CORRECT USE AC cable/AC adapter 100 to 240 VAC, 50/60 Hz... -
Page 191: List Of Options
CHAPTER 4 Specification List of Options Item Model Description Battery pack B-569 7.2V/2900mAh DC drive cable B-514 2 m long (no clip on end of cable) Input/output cable for GL B-513 2 m long (no clip on end of cable) Protect cover B-579 DIN rail mounting screw... -
Page 192: External Dimensions
CHAPTER 4 Specification 4 .4 External Dimensions Unit: mm Dimension precision: Error ± 5 mm Terminals 40.0 Unit: mm Dimension precision: Error ± 0 .5 mm 4-12... -
Page 193: Index
INDEX INDEX DATA settings ....... 3-69 Date and Time ....... 2-28 AC . - Page 194 INDEX 3-111 Identification name ......Operating Environment ......Immediate backup .
- Page 195 INDEX 3-123 3-109 Screen copy ....... WEB server settings ......3-136 Screen display .
- Page 196 GL2000 User's Manual GL2000-UM-151 January 7, 2022 4th edition GRAPHTEC CORPORATION...
Need help?
Do you have a question about the GL2000 and is the answer not in the manual?
Questions and answers