Table of Contents
Advertisement
Quick Links
Advertisement
Table of Contents

Subscribe to Our Youtube Channel
Related Manuals for ITech IT6500C Series


Summary of Contents for ITech IT6500C Series
- Page 1 High power and Programmable Switching Power supply IT6500C Series User Manual Model: IT6512C/IT6513C/IT6514C/IT6515C/IT6516C/ IT6517C/ IT6522C/IT6523C/IT6524C/IT6525C/ IT6526C/IT6527C/ IT6532C/IT6533C/IT6534C/ IT6535C/IT6536C/IT6537C Version: V5.0/01,2022...
- Page 2 CAUTION sign until the in- pose. ITECH shall not be held liable Manual Part Number dicated conditions are for errors or for incidental or indirect fully understood and met.
-
Page 3: Warranty
Warranty ITECH warrants that the product will be free from defects in material and work- manship under normal use for a period of one (1) year from the date of delivery (except those described in the Limitation of Warranty below). -
Page 4: Safety Symbols
Failure to comply with these precautions or specific warn- ings elsewhere in this manual will constitute a default under safety standards of design, manufacture and intended use of the instrument. ITECH assumes no li- ability for the customer’s failure to comply with these precautions. - Page 5 This instrument is used for industrial purposes, do not apply this product to IT power supply system. • Never use the instrument with a life-support system or any other equipment subject to safety requirements. Copyright © Itech Electronic Co., Ltd.
-
Page 6: Environmental Conditions
Make sure the vent hole is always unblocked. Environmental Conditions The instrument is designed for indoor use and an area with low condensation. The table below shows the general environmental requirements for the instrument. Copyright © Itech Electronic Co., Ltd. -
Page 7: Regulation Tag
The service life of the product is 10 years. The product can be used safely within the environmental protection period; oth- erwise, the product should be put into the recycling system. Copyright © Itech Electronic Co., Ltd. -
Page 8: Waste Electrical And Electronic Equipment (Weee) Directive
According to the equipment classifi- cation in Annex I of the WEEE direc- tive, this instrument belongs to the “Monitoring” product. If you want to return the unnecessary instrument, please contact the near- est sales office of ITECH. Copyright © Itech Electronic Co., Ltd. -
Page 9: Compliance Information
2. Connection of the instrument to a test object may produce radiations beyond the specified limit. 3. Use high-performance shielded interface cable to ensure conformity with the EMC standards listed above. Safety Standard IEC 61010-1:2010+A1:2016 Copyright © Itech Electronic Co., Ltd. -
Page 10: Table Of Contents
3.14 Charge Protection ....................39 3.15 Static Protection Function of Battery ..............39 3.16 Internal Resistance Setting.................. 40 3.17 CC/CV Priority...................... 40 3.18 LIST Operation..................... 42 3.19 PV Simulation ...................... 47 3.20 Built-in Waveform....................49 Copyright © Itech Electronic Co., Ltd. VIII... - Page 11 5.2 Supplemental characteristics................142 A Appendix ........................143 A.1 Specifications of Red and Black Test Cables ..........143 A.2 How to avoid it couldn’t start when test battery..........144 A.3 Fuse Replacement ..................145 Copyright © Itech Electronic Co., Ltd.
-
Page 12: Inspection And Installation
Upon verification of the shipment, keep the package and relevant contents thereof in a safe place. When returning the instrument for warranty service or repair, the specified packing requirements shall be met. Copyright © Itech Electronic Co., Ltd. -
Page 13: Instrument Size Introduction
The instrument should be installed at well-ventilated and rational-sized space. Please select appropriate space for installation based on the instrument size. IT6500C series power supply different models are not the same size, the detail size of the power supply are shown as below. (Unit: mm, allowable deviation value: ±1mm) -
Page 14: Connecting The Power Cord
Inspection and Installation 4U Model 1.3 Connecting the Power Cord AC Power Input Level IT6500C series detailed AC input and maximum input apparent power refer to corresponding specification. Copyright © Itech Electronic Co., Ltd. - Page 15 Inspection and Installation IT6500C Series power supply can also work in 110V voltage circumstances. However, the output power is limited. For full-power output, please according to the specification and use 220V±10% voltage or 380V±10% voltage. Before Connecting the Power Cord •...
-
Page 16: Connecting The Device Under Test (Dut)
(N), and yellow-green to ground (PE) on the other end of the power cord to your AC distribution panel. 1.4 Connecting the Device Under Test (DUT) Precautions To prevent electric shock and damage to the instrument, observe the following precautions. Copyright © Itech Electronic Co., Ltd. - Page 17 When the test line end is connected with battery, short circuit may cause severe accident. • Always use test lines provided by ITECH to connect the equipment. If test lines from other factories are used, please check that the test line can withstand maximum current.
- Page 18 The sense terminal of rear panel diagram as follows: The connection diagram and steps of remote sensing are as follows: Copyright © Itech Electronic Co., Ltd.
- Page 19 6. Connect the other end of the remote sense cables and the red and black cables to the DUT. To ensure the stability of the system, use armored twisted-pair cables between the remote sense terminals and the equipment under test. Copyright © Itech Electronic Co., Ltd.
-
Page 20: Quick Reference
♦ Power-on Selftest 2.1 Brief Introduction IT6500C series power supply is single output high-powered and programmable DC power supply which support CC mode and CV mode. It also has a super wide range of voltage and current applications. The whole series include more than 100 models. - Page 21 Seamless switching. * IT6500C(G) is the model with built-in GPIB, the function is the same as standard model, please check with ITECH for availability. Model Rated value of...
-
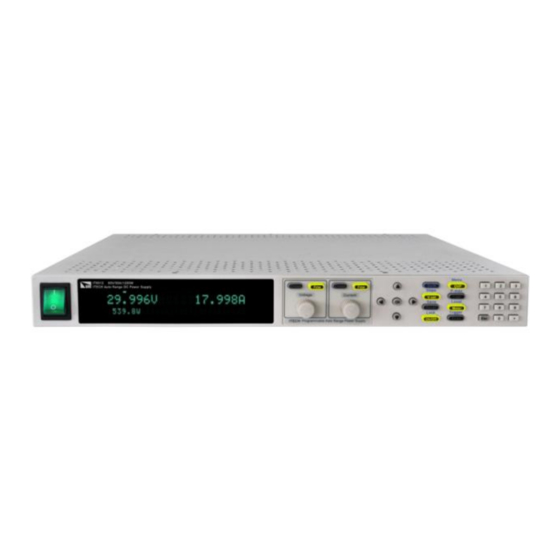
Page 22: Front Panel Introduction
8.4A/300W 2.2 Front Panel Introduction The 2U models of IT6500C Series power supply have the same front panels. Other models have the same panels as 2U Model. The front panel diagram and function key diagram of 2U Model are as follows. -
Page 23: Keyboard Introduction
Quick Reference 2.3 Keyboard Introduction IT6500C series power supply different models are same the key function in front board, schematic graph as follow. Table 2–1 Detailed description of keys Key Name Description Numeric button [Shift] Composite key [P-set] Power setting button, used to set the output power... -
Page 24: Rotary Knob And Coarse/Fine Button Introduction
[Shift]+[On/Off] (Lock) Turn the keyboard lock on or off. 2.4 Rotary Knob and Coarse/Fine Button Introduction IT6500C series power supply is supplied with the voltage adjustment knob and the current adjustment knob, as shown below. Copyright © Itech Electronic Co., Ltd. -
Page 25: Vfd Indicator Lamps Description
[Shift]+ [P-set](Menu) to enter the menu interface and then rotate the voltage adjustment knob to select the menu item from left to right. 2.5 VFD Indicator Lamps Description IT6500C series power supply VFD indicator lamps description as follows: Table 2–2 Function VFD indicator lamps description Flag... -
Page 26: Rear Panel Introduction
2.6 Rear Panel Introduction Different models of IT6500C Series power supply have different rear panels. 4U models have same rear panels as 2U Model except system bus and AC input terminal. The cabinets have same rear panels. The rear panels are shown as below. -
Page 27: Power-On Selftest
The status of Power switch is as follows. If the instrument is the cabinet type, the rear panel of the cabinet provides a master power switch. The relationships between the device status and switch status are listed in the following table. Copyright © Itech Electronic Co., Ltd. - Page 28 2. Check whether the power turn On. Power key is under “l ” “ON” status. 3. Check whether the power voltage matches with the supply voltage. Please refer to corresponding specification to select proper AC input. Copyright © Itech Electronic Co., Ltd.
- Page 29 Or, the user can attempt to clear the fault state by restarting the instrument. Do not restart the instrument until it is completely powered down. If not, contact ITECH engineer. Copyright © Itech Electronic Co., Ltd.
-
Page 30: Function And Features
• Using left and right direction key to set value. Press [V-set] button Press [Coarse] button (coarse adjustment, change the value in integer bit) or Copyright © Itech Electronic Co., Ltd. -
Page 31: Setting Current
And in on mode, the indicator lamp (CC/CV/CW) will be lit. Please ensure that the DC source and product under test have been connected well before you press[On/Off] button. Copyright © Itech Electronic Co., Ltd. -
Page 32: Switching Setting Value And Actual Value
100 sets, so that you can recall the parameters quickly. The following ways can help you achieve the save and recall operations: by pressing composite button [Shift] +[Recall] (Save) button or Copyright © Itech Electronic Co., Ltd. -
Page 33: Setting Group Number
• Group=2~Group=9 can be understood in the same manner. 3.8.2 Save Operation Save the parameters to nonvolatile memory. The procedures are as follows. 1. Using composite key [Shift]+ [Recall](Save) to save parameter. Copyright © Itech Electronic Co., Ltd. -
Page 34: Recall Operation
Bus trigger External trigger Work with Recall(Save) button to recall 100 sets saved Memory parameters 0: represents 0-9 sets; 1: Group = 0 represents 10-19 sets, by parity of reasoning Buzzer Set the buzzer function Copyright © Itech Electronic Co., Ltd. - Page 35 ( 1 -30) Select LAN communication interface Info:The information of LAN LAN Status IP Mode IP Addr SubNet Gateway DNS1 (Primary address) DNS2 (Secondary address) MAC:8C:C8:F4:40:01:E1 MDNS Status HostName HostDesc Domain TCPIP::INSTR Socket Port Copyright © Itech Electronic Co., Ltd.
- Page 36 ReturnMeter measured value (meter). Auto return Meter function Off(Def) disabled. Auto return Meter function enabled Power whether power supply was on P-Out After power on, the Off(Def) instrument will be in the off state. Copyright © Itech Electronic Co., Ltd.
- Page 37 Act as a master mode Master Mount: Master Mount: total number of instruments in parallel. Slave Act as a slave mode Loop-Mode Control loop setting CV-Loop CV loop control High(Def): High speed Low: Low speed Copyright © Itech Electronic Co., Ltd.
-
Page 38: Restored To Factory Setting(Reset)
2. Select SYSTEM, Press [Enter]. 3. Select Reset, Press [Enter]key, restore to factory setting values The default value for system menu as follows. Menu Parameter Default Value Power-On Rst(Def) Trigger Manual(Def) Memory Group = 0 Copyright © Itech Electronic Co., Ltd. -
Page 39: Power On Parameter(Power-On)
Trigger is used for trigger the output of voltage, current and power, and there’re three kinds of trigger options: Manual, Bus, and Ext. The default settings is Manual. 1. Press composite keys [Shift]+[P-set](Menu) enter to system menu. Copyright © Itech Electronic Co., Ltd. -
Page 40: Key Sound Set (Buzzer)
5. After set, press the [Esc] to return. 3.9.6 Return to Meter state (Return Meter) This option allows users to enable an internal fixed timer delay (5 seconds) for the power supply to automatically switch from setting display to measured Copyright © Itech Electronic Co., Ltd. -
Page 41: Power On Output State (P-Out)
2. Press the Right key to select CONFIG in the Menu to enter the Menu operation and select Load-Status. Press [OK]/[Enter] for confirmation and select the Load to set the load status. 3. The user can select On through Arrow key to turn on the load function. Copyright © Itech Electronic Co., Ltd. -
Page 42: Setting Filter
1. Press composite keys [Shift]+[P-set](Menu) enter to system menu. 2. Select CONFIG, press [Enter] to confirm. 3. Select Filter with Left/Right key and press [Enter] to confirm. 4. Select Low, Mid or Fast with Left/Right key and press [Enter] to confirm. Copyright © Itech Electronic Co., Ltd. -
Page 43: Setup Menu
Over current protection of source On(Def) Enable over current protection function I: OCP value Delay: delay time of protection Disable over current protection function Over power protection of source On(Def) Enable over power protection function P: OPP value Copyright © Itech Electronic Co., Ltd. - Page 44 Limit Set the maximum and minimum value of load I-Max: Maximum load current setting I-Min: Minimum load current setting P-Max: Maximum load power setting P-Min: Minimum load power setting Resistance Resistance Output resistance setting Copyright © Itech Electronic Co., Ltd.
-
Page 45: Setting Output Rise Time/Fall Time
IT6500CSeries provides OVP, OCP, OPP for power supply as well as OCP and OPP for the load. In addition, this power supply also provides OTP, Sense reverse protection, power-down protection and input under-voltage protection. Copyright © Itech Electronic Co., Ltd. - Page 46 “Prot” indicator lamp will be lit, and prompt “Over Current” or “LOAD Over Current” will be displayed on VFD screen. At same time, the beeper will be on. Copyright © Itech Electronic Co., Ltd.
- Page 47 5. Set OPP power value with numeric key and press [Enter] for confirmation. 6. Set OPP delay time with numeric key and press [Enter] for confirmation. The range of delay time is 0.001S to 10.00S. 7. Press [Esc] to exit menu setting. Copyright © Itech Electronic Co., Ltd.
- Page 48 The detailed value is shown in the next table. When the remote sense terminal is connected reversely, the maximum voltage will not exceed the sum of set voltage and the difference voltage. IT6512C~IT6592C IT6513C~IT6593C IT6514C~IT6594C Copyright © Itech Electronic Co., Ltd.
-
Page 49: Setting Maximum And Minimum Values
After the maximum/minimum voltage is set, the output voltage can only be set within this range. Vmax factory setting is the rated output voltage of corresponding model of the power supply. V-Min is 0V. Copyright © Itech Electronic Co., Ltd. -
Page 50: Charge Protection
Otherwise, the current of the battery will be consumed and flow backwards to the power supply. The value of the current flowing backwards of different models is not the same. It ranges from 0.1A to 0.5A approximately. Copyright © Itech Electronic Co., Ltd. -
Page 51: Internal Resistance Setting
3. Set internal resistance value with number key and press [Enter] for confirmation. 3.17 CC/CV Priority IT6500C Series is innovatively designed with CV/CC priority concept in the industry to solve various strict problems in long-term test applications and to make applications (e.g., speedy or no-overshoot operation of power supply) more flexible. - Page 52 In addition, this avoids surge current at startup, which may cause CC mode and startup failure. Waveform characteristics are as shown below. Yellow means output voltage and green means output current. • Battery charge-discharge, high speed, seamless, and no overshoot Copyright © Itech Electronic Co., Ltd.
-
Page 53: List Operation
5. Select Priority and set the current priority work mode, which defaults to CV mode. 3.18 LIST Operation LIST mode comprises 10 files (File1-File10) in total, and each has 10 waves. Each wave has 10 steps. You need to edit the voltage, current, load current, Copyright © Itech Electronic Co., Ltd. - Page 54 1st Wave Select: number of the first wave selected 1st Wave Repeat: count of repetitions of the first wave selected (0-65535) Yes/No: save to the file or not EditWave Wave file edit Recall Wave: Need to recall Wave file number. Copyright © Itech Electronic Co., Ltd.
- Page 55 5. Press the numeric key to set the voltage, current, load current,slope and width of the Wave step 1 in sequence. Step1 Voltage = 1V Step1 Current = 1A Step1 LoadCurr=1A Step1 Width = 1s Copyright © Itech Electronic Co., Ltd.
- Page 56 5. Press the numeric key to input the number and count of repetitions of the first Wave selected. 1st Wave Select = 02 1st Wave Repeat = 1 6. Press the numeric key to input the number and count of repetitions of the second Wave selected. Copyright © Itech Electronic Co., Ltd.
- Page 57 If On Recall EditFile EditWave is displayed under LIST MENU or the external analog control function is switched on, neither List nor Wave file editing is accessible. In this case, change On Recall EditFile EditWave to Off Recall EditFile EditWave before operation. Copyright © Itech Electronic Co., Ltd.
-
Page 58: Pv Simulation
Even if the output voltage is set in the PV curve, the output is still limited by the settings here. Static Static PV curve setting. Curve Open or edit a fixed format PV curve. Copyright © Itech Electronic Co., Ltd. - Page 59 To edit internal curve, follow the operation steps below: 1. Press [Shift]+ [I-set] (Function) to enter the Menu operation. 2. Select PV-SIM with Left/Right key and press [Enter] for confirmation. 3. Select Static with Left/Right key and press [Enter] for confirmation. Copyright © Itech Electronic Co., Ltd.
-
Page 60: Built-In Waveform
IT6500C models have built in DIN40839 waveform, ISO-16750-2 waveform, ISO21848 waveform, SAEJ1113-11 waveform and LV124 waveform. Provide for user to execute the test directly. Menu as below: Road- Vehicle waveform Vehicles Evaluation of automotive starting waveform DIN40839 Copyright © Itech Electronic Co., Ltd. - Page 61 This test verifies the behavior of a Starting- DUT during and after cranking. Profile Select 12V or 24V test system levels/ voltages/duration starting profile The levels of 12V: 1-4 The levels of 24V: 1-3 Enable/Disable this function Copyright © Itech Electronic Co., Ltd.
- Page 62 Momentary- Transit Voltage drop Drop Turn on / off transit Voltage drop wave Reset Reset test supply Voltage Ulow Set supply Voltage Turn on /off rest test function Start Startup pulse Copyright © Itech Electronic Co., Ltd.
- Page 63 Refer to the figure Test 5 Load dump waveform Test A select centralized load dump Unsuppression Test B select centralized load dump suppression Turn on/off load dump waveform Select 12V or 24V voltage system Copyright © Itech Electronic Co., Ltd.
- Page 64 Holding time at Ubmin Holding Time Turn on/off this function E-08 LV124 E-08 Slow decrease, quick increase of the supply voltage test waveform Ubmax Start voltage Ubmin Holding voltage Ubmin Holding time at Ubmin Holding Time Copyright © Itech Electronic Co., Ltd.
-
Page 65: Automotive Starting Waveform
For automotive startup voltage waveform, the startup voltage can also be set based on customers’ requirements. In this way, the user can create waveform between 8V to 32V. Copyright © Itech Electronic Co., Ltd. - Page 66 Please refer to 3.9.8 Load Function for the detailed operation. • DIN40839 for 12V system: Steps Voltage (V) Current(A) Width(mS) Slope(mS) 2000 • DIN40839 for 24V system: Steps Voltage (V) Current(A) Width(mS) Slope(mS) 2000 Copyright © Itech Electronic Co., Ltd.
- Page 67 8V-16V, the waveform is consistent with standard 12V; when the waveform program is divided into 16V-32V, the waveform is consistent with the standard 24V waveform. The waveform diagram is shown below. Copyright © Itech Electronic Co., Ltd.
-
Page 68: Simulate The Waveform To Verify The Anti-Interference Performance Of The Automotive Electronics' Products
IT6500C models have built-in ISO16750-2 waveforms. To verify the anti- interference performance of the automotive electronics’ products. Output pulse waveform completely meets the International Standard ISO-16750-2, convenient for quick recall by the user. Copyright © Itech Electronic Co., Ltd. - Page 69 2. Press right direction key to select ISO16750-2, press [Enter]. 3. Press Left/Right direction keys to select Short, press [Enter]. 4. Press right direction key to select On, press [Enter]. 5. Press Up/Down direction key to select 12V, press [Enter]. Copyright © Itech Electronic Co., Ltd.
- Page 70 4. VFD display Usmin…, press [Enter] to confirm. VFD will display Usmin=12.000V, user can select the Usmin level. 5. Press Right direction key to On, press [Enter] to confirm. 6. Press [On/Off], turn on the output. Copyright © Itech Electronic Co., Ltd.
- Page 71 4 shall be chosen in accordance with the application. af=2HZ • Standards for 12V system: Curve should be selected based on actual test requirements. To create waveform within 12V, follow the set standards as below: • Standards for 24V system: Copyright © Itech Electronic Co., Ltd.
- Page 72 • The pulse duration of load dump is mainly determined by the time constant and pulse amplitude of the excitation circuit. Copyright © Itech Electronic Co., Ltd.
- Page 73 LOAD DUMP, SINGLE PULSE - WITH CENTRALIZED LOAD DUMP SUPPRESSION Copyright © Itech Electronic Co., Ltd.
- Page 74 The following general considerations of the dynamic behavior of alternators during load dump apply: • The internal resistance of an alternator, in the case of load dump, is mainly a function of alternator rotational speed and excitation current. Copyright © Itech Electronic Co., Ltd.
-
Page 75: Road Vehicles - Electrical And Electronic Equipment For A Supply Voltage Of 42 V - Electrical Loads
Voltage of high-energy pulse raised from throw load in 42V electrical system, where the upper limit is the protection voltage of throw load. Apply 1 test pulse to the DUT, as shown below: Copyright © Itech Electronic Co., Ltd. - Page 76 As shown in the figure, apply test pulse and detect the reset performance of the DUT. The supply voltage drops from Ulow to 0.95U by 5% and keeps for 5s, and then rise to U and keep for at least 10s for function test. Then, drop Voltage to Copyright © Itech Electronic Co., Ltd.
- Page 77 DUT simultaneously. • t: time (in s) t1: 5ms • U: voltage (in V) t2:15ms • : 18V t3: 50ms • : 21V t4: 10000ms • UT: 42V t5: 100ms Copyright © Itech Electronic Co., Ltd.
-
Page 78: Saej1113-11 Waveform Protocol
Transient from DC motors acting as generators after ignition switch OFF Parameters 12V System 24V System ≤0.05Ω ≤0.05Ω 0.2 to 2s 0.2 to 2s 1ms±50% 1ms±50% 1ms±50% 1ms±50% 1ms±50% 1ms±50% Test 4 Starter motor engagement disturbance pulse. Copyright © Itech Electronic Co., Ltd. -
Page 79: Lv124
3.20.5 LV124 IT6500C series all come with built-in curves which meet general requirements, test conditions and tests of electrical and electronic components in motor vehicles up to 3.5 t. Copyright © Itech Electronic Co., Ltd. - Page 80 External starting of the vehicle is simulated. The maximum test voltage results from commercial vehicle systems and their increased power supply voltage. The test pulse of E-04 Jump start is shown in the next figure. Copyright © Itech Electronic Co., Ltd.
- Page 81 E-08 Slow Decrease, Quick Increase of the Supply Voltage This test simulates the slow decrease of the battery voltage to 0 V and the sudden reconnection of the battery voltage e.g. by means of applying a jump start source. Copyright © Itech Electronic Co., Ltd.
- Page 82 In order to cover both cases, two different test sequences are required. A component must always undergo both sequences. • Cold Start Test Pulse • Warm Start Test Pulse Copyright © Itech Electronic Co., Ltd.
-
Page 83: Dc Internal Resistance Measure
DUT capacity. During measure, the Meter interface will display the real-time DC internal resistance of the DUT. DC internal resistance measure Battery Capacity = Input battery capacity Off/On Turn off/on internal resistance measure function Copyright © Itech Electronic Co., Ltd. -
Page 84: Parallel Operation
After power on, it is not allowed to insert or pull out the bus and terminal matching resistance. • During wiring, check that the anode and cathode of the paral- lel output cables are properly and tightly connected; anode ON and cathode OFF are prohibited. Copyright © Itech Electronic Co., Ltd. - Page 85 Master: Master mode. If Master mode is selected, you need to set the number of Salves for the Master. Mount: total number of instruments in parallel. For example, Mount=3. 4. After setting of host and slave, switch off the power supply. Connect the networking. Copyright © Itech Electronic Co., Ltd.
-
Page 86: Analogue Interface (Enhanced Isolation)
10V(Def) 10V monitoring mode options 5V monitoring mode options Ext- Ctrl External control mode and related parameter setting Voltage(Def) Voltage setting mode selection 10V(Def)/5V 10V or 5V setting mode selection, select by Left/Right key. Copyright © Itech Electronic Co., Ltd. - Page 87 After selecting the Ext-Ctrl as On, exit the Menu. At this time, the Rear indicator on the VFD status bar will be lighted on and the right corner will display Analog. Figure 3–2 DB25 Analogue Interface Description Copyright © Itech Electronic Co., Ltd.
- Page 88 0-10V voltage, and the regulated output voltage should be from 0 to full range; In setting the Voltage and 5v, the input analog range should be 0-5V voltage, and the regulated output voltage should be from 0 to full range; Copyright © Itech Electronic Co., Ltd.
- Page 89 10V, power supply control current 0~120A and the power supply output current 12A, this pin will output 1V voltage. Similarly, when the analog voltage is 5V, control current 0~120A and the power supply output voltage 12A, this pin will output 0.5V voltage. Copyright © Itech Electronic Co., Ltd.
- Page 90 2. Press the Right Key to select Voltage ( or Resistance). 3. Press the Right/Left Key to select the voltage mode or resistor mode. • Voltage Mode Under voltage mode, the user can set the voltage output value of power supply through Pin 21. Copyright © Itech Electronic Co., Ltd.
- Page 91 3. Press the Right/Left Key to select the voltage mode or resistor mode. • Voltage Mode Under the voltage mode, the user can set the voltage output value of the power supply through Pin 23. Copyright © Itech Electronic Co., Ltd.
- Page 92 1. Select the MENU ( Menu)→CONFIG ( Configure)→Monitor (External monitor mode). 2. Press the Right Key to select the output voltage monitoring range (0~10V or 0~5V). The connection setting of digital voltmeter is shown below. Copyright © Itech Electronic Co., Ltd.
- Page 93 1. Select the MENU ( Menu)→CONFIG ( Configure)→Monitor (External monitor mode). 2. Press the Right Key to select the output current monitoring range (0~10V or 0~5V). The connection setting of digital voltmeter is shown below. Copyright © Itech Electronic Co., Ltd.
-
Page 94: Remote Control
RS-232 connection Please use a straight-through RS232 cable with DB9 interface and connect the RS232 serial port with the controller’s serial port(for example. PC). The table as below gives a detailed description for each pin. Copyright © Itech Electronic Co., Ltd. - Page 95 Data bit: 8 Stop bit: 1 Parity bit: (none, even, odd) • EVEN 8 data bits have even parity • ODD 8 data bits have odd parity Copyright © Itech Electronic Co., Ltd.
-
Page 96: Usb Interface
Then press [Shift] +[P-set] (Menu) to enter the system menu to set the address. The address range of power supply is 1-30. After you set the address, please press [Enter] button to confirm. GPIB address is saved in nonvolatile memory. Copyright © Itech Electronic Co., Ltd. -
Page 97: Lan Interface
IP address is on the same local subnet. The same numbering notation applies as for the IP Address. When a client IP address is on a different subnet, all packets must be sent to the Default Gateway. Copyright © Itech Electronic Co., Ltd. - Page 98 4. se left and right keys or rotate the voltage knob to select LAN and press [Enter]key to confirm. 5. se left and right keys or rotate the voltage knob to select Server-Config and press [Enter]key to confirm. Copyright © Itech Electronic Co., Ltd.
- Page 99 5. se left and right keys or rotate the voltage knob to select Reset,and press [Enter]key to confirm. • NO: indicates refuse to confirm the LAN setting. • YES: indicates confirm the LAN setting. Copyright © Itech Electronic Co., Ltd.
-
Page 100: Using The Web Interface
The following figure is just as an example and the Web interface of different models are different. The actual shown page shall be subject to the connected instrument. Copyright © Itech Electronic Co., Ltd. -
Page 101: Using Telnet
LAN Configuration: reconfigure the LAN parameters; • Security: change the password and control access to the Web interface; • Manual: go to the ITECH official website and view or download the relevant documents. • Logout: logout the Web interface. 4.4.2 Using Telnet The Telnet utility (as well as sockets), is another way to communicate with the instrument without using I/O libraries or drivers. -
Page 102: Can Communication Port
Before running communication, please match the power supply parameters with the PC parameters as shown below. Baud rate: 20K(20K|40K|50k|80k|100k|125k|150K|200k|250k|400K|500K| 1000K). You can enter the System menu through panel and set the communication Baud rate. Copyright © Itech Electronic Co., Ltd. - Page 103 Prescale (Pres): Not settable. Change with Baud rate setting. PTS (BS1): Not settable. Change with Baud rate setting. PBS (BS2): Not settable. Change with Baud rate setting. Baud rate (Prescale) 100K 125K 150K 200K 250K 400K 500K 1000K Copyright © Itech Electronic Co., Ltd.
-
Page 104: Technical Specification
Line regulation ±(%of Output+Offset) Current ≤0.01%+60mA Voltage ≤0.01%+30mV Load regulation ±(%of Output+Offset) Current ≤0.05%+120mA Voltage 10mV Setup Resolution Current 10mA Power 0.1W Voltage 10mV Read Back Resolution Current 10mA Power 0.1W Setup Accuracy Voltage ≤0.05%+30mV Copyright © Itech Electronic Co., Ltd. - Page 105 (%of Output +Offset) Current ≤0.1%+120mA Voltage ≤0.05%+30mV Readback stability-30min (%of Output +Offset) Current ≤0.1%+120mA Voltage ≤0.05%+30mV Readback stability-8h (%of Output +Offset) Current ≤0.1%+120mA Efficiency Remote Sense Compensation Voltage Command Response Time 20mS Power Factor 0.99 Copyright © Itech Electronic Co., Ltd.
- Page 106 7. When used in parallel, to balance power of each phase, distribute the instrument to three phases. But must ensure that single machine input voltage meets Specification requirements. 8. It means the maximum phase current value under minimum work input voltage. Copyright © Itech Electronic Co., Ltd.
-
Page 107: It6522C
1%+30W Voltage ≤80mVp-p Ripple (20Hz -20MHz) Current ≤0.05%+60mArms Setup Temperature Voltage ≤0.01%+30mV Coefficient (%of Output/℃+Offset) Current ≤0.02%+120mA Read Back Temperature Voltage ≤0.01%+30mV Coefficient (%of Output/℃+Offset) Current ≤0.02%+120mA Rise time( no load ) Voltage ≤10ms Copyright © Itech Electronic Co., Ltd. - Page 108 -10℃~70℃ Source OVP, OCP, OPP and Load OCP, OPP, OTP,Vsense Protective function standard Interface USB/RS232/CAN/LAN Isolation ( output to 500V ground) Parallel Number ≤8 Working temperature 0~40℃ Dimension ( mm) 483mmW×105.4mmH×640.8mmD Weight( net) 17Kg Copyright © Itech Electronic Co., Ltd.
-
Page 109: It6532C
0~240A Internal Sink 0~100A Output Rating ( 0 ℃-40 ℃) Current Output Power 0~6KW Internal Sink 0~300W Power Range 0~1.067Ω Output Resistance Accuracy 0.25%+30mΩ*A Resolution 0.1mΩ Voltage ≤0.01%+10mV Line regulation ±(%of Output+Offset) Current ≤0.01%+120mA Copyright © Itech Electronic Co., Ltd. - Page 110 -90%~90% ≤20ms Current seamless switching 90%~-90% ≤20ms Transient Response Time Voltage ≤3ms Voltage 220V±10% AC Input Frequency 47Hz~63Hz Voltage ≤0.05%+30mV Setup stability-30min (%of Output +Offset) Current ≤0.1%+240mA Setup stability-8h Voltage ≤0.05%+30mV (%of Output +Offset) Copyright © Itech Electronic Co., Ltd.
- Page 111 When external analog is used for programming, the programming accuracy is 2%FS. 4. Read-back value accuracy means the read-back accuracy realized through panel display or communication instructions; when external analog is used for monitoring, the monitoring accuracy is 1%FS. Copyright © Itech Electronic Co., Ltd.
-
Page 112: It6513C
Setup Resolution Current 10mA Power 0.1W Voltage 10mV Read Back Resolution Current 10mA Power 0.1W Voltage Setup Accuracy ≤0.05%+100mV (within 12 months,25℃ Current ≤0.2%+60mA ±5℃) ±(%of Output+Offset) Power ≤1%+30W Read Back Accuracy Voltage ≤0.05%+100mV Copyright © Itech Electronic Co., Ltd. - Page 113 Readback stability-30min Voltage ≤0.05%+100mV (%of Output +Offset) Current ≤0.2%+60mA Readback stability-8h Voltage ≤0.05%+100mV (%of Output +Offset) Current ≤0.2%+60mA Efficiency 89%(30V/60A)~90.5%(200V/9A) Remote Sense Compensation Voltage Command Response Time 20mS Power Factor 0.99 Maximum input current Copyright © Itech Electronic Co., Ltd.
- Page 114 7. When used in parallel, to balance power of each phase, distribute the instrument to three phases. But must ensure that single machine input voltage meets Specification requirements. 8. It means the maximum phase current value under minimum work input voltage. Copyright © Itech Electronic Co., Ltd.
-
Page 115: It6523C
Voltage ≤200mVp-p Ripple (20Hz -20MHz) Current ≤50mArms Setup Temperature Voltage ≤0.05 %+100mV Coefficient Current ≤0.2%+60mA (%of Output/℃+Offset) Read Back Temperature Voltage ≤0.05%+100mV Coefficient (%of Output/℃+Offset) Current ≤0.2%+60mA Rise time( no load ) Voltage ≤15ms Copyright © Itech Electronic Co., Ltd. - Page 116 -10℃~70℃ Source OVP, OCP, OPP and Load OCP, OPP, OTP,Vsense Protective function standard Interface USB/RS232/CAN/LAN Isolation ( output to ground) 500V Parallel Number ≤8 Working temperature 0~40℃ Dimension ( mm) 483mmW×105.4mmH×640.8mmD Weight( net) 17Kg Copyright © Itech Electronic Co., Ltd.
-
Page 117: It6533C
0~120A Internal Sink Output Rating ( 0 ℃-40 ℃) 0~50A Current Output Power 0~6KW Internal Sink Power 0~300W Range 0~6.666Ω Output Resistance Accuracy 0.25%+100mΩ Resolution 1mΩ Voltage ≤0.01%+20mV Line regulation ±(%of Output+Offset) Current ≤0.01%+60mA Copyright © Itech Electronic Co., Ltd. - Page 118 -90%~90% ≤20ms Current seamless switching 90%~-90% ≤20ms Transient Response Time Voltage ≤2ms Voltage 220V±10% AC Input Frequency 47Hz~63Hz Voltage ≤0.05%+100mV Setup stability-30min (%of Output +Offset) Current ≤0.2%+120mA Setup stability-8h Voltage ≤0.05%+100mV (%of Output +Offset) Copyright © Itech Electronic Co., Ltd.
- Page 119 When external analog is used for programming, the programming accuracy is 2%FS. 4. Read-back value accuracy means the read-back accuracy realized through panel display or communication instructions; when external analog is used for monitoring, the monitoring accuracy is 1%FS. Copyright © Itech Electronic Co., Ltd.
-
Page 120: It6514C
±(%of Output+Offset) Current ≤0.05%+30mA Voltage 10mV Setup Resolution Current 10mA Power 0.1W Voltage 10mV Read Back Resolution Current 10mA Power 0.1W Voltage ≤0.05%+135mV Setup Accuracy (within 12 months,25℃ Current ≤0.2%+30mA ±5℃) ±(%of Output+Offset) Power 1%+30W Copyright © Itech Electronic Co., Ltd. - Page 121 (%of Output +Offset) Current ≤0.1%+30mA Readback stability- Voltage ≤0.05%+135mV 30min (%of Output +Offset) Current ≤0.1%+30mA Voltage ≤0.05%+135mV Readback stability-8h (%of Output +Offset) Current ≤0.1%+30mA Efficiency Remote Sense Compensation Voltage Command Response 20mS Time Power Factor 0.99 Copyright © Itech Electronic Co., Ltd.
- Page 122 7. When used in parallel, to balance power of each phase, distribute the instrument to three phases. But must ensure that single machine input voltage meets Specification requirements. 8. It means the maximum phase current value under minimum work input voltage. Copyright © Itech Electronic Co., Ltd.
-
Page 123: It6524C
1%+30W Voltage ≤360mVp-p Ripple (20Hz -20MHz) Current ≤0.05%+30mArms Setup Temperature Voltage ≤0.01%+135mV Coefficient Current ≤0.02%+30mA (%of Output/℃+Offset) Read Back Temperature Voltage ≤0.01%+135mV Coefficient (%of Output/℃+Offset) Current ≤0.02%+30mA Rise time( no load ) Voltage ≤50ms Copyright © Itech Electronic Co., Ltd. - Page 124 Maximum input apparent 3800VA power Storage temperature -10℃~70℃ Source OVP, OCP, OPP and Load OCP, OPP, OTP,Vsense Protective function standard Interface USB/RS232/CAN/LAN Isolation ( output to 500V ground) Parallel Number ≤8 Working temperature 0~40℃ Copyright © Itech Electronic Co., Ltd.
-
Page 125: It6534C
8. It means the maximum phase current value under minimum work input voltage. 5.1.9 IT6534C Parameter IT6534C Ver:V1.6 Output Voltage 0~360V Output Current 0~60A Internal Sink Output Rating ( 0 ℃-40 0~25A Current ℃) Output Power 0~6KW Internal Sink 0~300W Power Copyright © Itech Electronic Co., Ltd. - Page 126 ≤50ms Rise time( full load ) Voltage ≤80ms Fall time( no load ) Voltage ≤250ms Fall time( full load ) Voltage ≤55ms -90%~90% ≤100ms Current seamless switching 90%~-90% ≤100ms Transient Response Voltage ≤3ms Time Copyright © Itech Electronic Co., Ltd.
- Page 127 The above specifications may be subject to change without prior notice. 1. Internal absorption current and internal absorption power mean the absorption current and power of the standard power dissipater inside the power supply. Copyright © Itech Electronic Co., Ltd.
-
Page 128: It6515C
Internal Sink Power 0~150W Range 0~138.88Ω Output Resistance Accuracy 0.25%+200mΩ Resolution 10mΩ Voltage ≤0.01%+50mV Line regulation ±(%of Output+Offset) Current ≤0.01%+10mA Voltage ≤0.01%+100mV Load regulation ±(%of Output+Offset) Current ≤0.05%+20mA Voltage 100mV Setup Resolution Current 10mA Copyright © Itech Electronic Co., Ltd. - Page 129 Voltage 220V±10% AC Input Frequency 47Hz~63Hz Voltage ≤0.03%+100mV Setup stability-30min (%of Output +Offset) Current ≤0.1%+30mA Voltage ≤0.03%+100mV Setup stability-8h (%of Output +Offset) Current ≤0.1%+30mA Readback stability- Voltage ≤0.03%+100mV 30min Current ≤0.1%+30mA (%of Output +Offset) Copyright © Itech Electronic Co., Ltd.
- Page 130 When external analog is used for programming, the programming accuracy is 2%FS. 4. Read-back value accuracy means the read-back accuracy realized through panel display or communication instructions; when external analog is used for monitoring, the monitoring accuracy is 1%FS. Copyright © Itech Electronic Co., Ltd.
-
Page 131: It6525C
±(%of Output+Offset) Current ≤0.05%+20mA Voltage 100mV Setup Resolution Current 10mA Power 0.1W Voltage 100mV Read Back Resolution Current 10mA Power 0.1W Voltage ≤0.05%+200mV Setup Accuracy (within 12 months,25℃ Current ≤0.2%+20mA ±5℃) ±(%of Output+Offset) Power ≤1%+30W Copyright © Itech Electronic Co., Ltd. - Page 132 Current ≤0.1%+30mA Readback stability- Voltage ≤0.03%+100mV 30min (%of Output +Offset) Current ≤0.1%+30mA Voltage ≤0.03%+100mV Readback stability-8h (%of Output +Offset) Current ≤0.1%+30mA Efficiency 90%(150V/20A)~93%(500V/6A) Remote Sense Compensation Voltage Command Response 20mS Time Power Factor 0.99 Copyright © Itech Electronic Co., Ltd.
- Page 133 7. When used in parallel, to balance power of each phase, distribute the instrument to three phases. But must ensure that single machine input voltage meets Specification requirements. 8. It means the maximum phase current value under minimum work input voltage. Copyright © Itech Electronic Co., Ltd.
-
Page 134: It6535C
Voltage ≤500mVp-p Ripple (20Hz -20MHz) Current ≤80mArms Setup Temperature Voltage ≤0.03 %+100mV Coefficient Current ≤0.1%+60mA (%of Output/℃+Offset) Read Back Temperature Voltage ≤0.03%+100mV Coefficient (%of Output/℃+Offset) Current ≤0.1%+60mA Rise time( no load ) Voltage ≤40ms Copyright © Itech Electronic Co., Ltd. - Page 135 -10℃~70℃ Source OVP, OCP, OPP and Load OCP, OPP, OTP,Vsense Protective function standard Interface USB/RS232/CAN/LAN Isolation ( output to ground) 500V Parallel Number ≤8 Working temperature 0~40℃ Dimension ( mm) 483mmW×194mmH×640.8mmD Weight( net) 35Kg Copyright © Itech Electronic Co., Ltd.
-
Page 136: It6516C
0~15A Internal Sink Output Rating ( 0 ℃-40 ℃) 0~1.5A Current Output Power 0~1800W Internal Sink Power 0~50W Range 0~312.5Ω Output Resistance Accuracy 0.25%+300mΩ Resolution 10mΩ Voltage ≤0.01%+75mV Line regulation ±(%of Output+Offset) Current ≤0.1%+7.5mA Copyright © Itech Electronic Co., Ltd. - Page 137 -90%~90% ≤35ms Current seamless switching 90%~-90% ≤35ms Transient Response Time Voltage ≤3.5ms Voltage 220V±10% AC Input Frequency 47Hz~63Hz Voltage ≤0.03%+100mV Setup stability-30min (%of Output +Offset) Current ≤0.1%+30mA Setup stability-8h Voltage ≤0.03%+100mV (%of Output +Offset) Copyright © Itech Electronic Co., Ltd.
- Page 138 = 40mΩ.1.0Ω, accuracy: (1.0Ω * 0.25%) +(375mΩ*A /10A) = 40mΩ. 3. Set value accuracy means the set accuracy realized through the panel button or communication instructions. When external analog is used for programming, the programming accuracy is 2%FS. Copyright © Itech Electronic Co., Ltd.
-
Page 139: It6526C
≤0.01%+75mV Line regulation ±(%of Output+Offset) Current ≤0.1%+7.5mA Voltage ≤0.01%+200mV Load regulation ±(%of Output+Offset) Current ≤0.05%+15mA Voltage 100mV Setup Resolution Current Power 0.1W Voltage 100mV Read Back Resolution Current Power 0.1W Setup Accuracy Voltage ≤0.05%+300mV Copyright © Itech Electronic Co., Ltd. - Page 140 Voltage ≤0.03%+100mV Setup stability-8h (%of Output +Offset) Current ≤0.1%+30mA Readback stability- Voltage ≤0.03%+100mV 30min (%of Output +Offset) Current ≤0.1%+30mA Voltage ≤0.03%+100mV Readback stability-8h (%of Output +Offset) Current ≤0.1%+30mA Efficiency 91.5%(200V/15A)~93.5%(750V/4A) Remote Sense Compensation Voltage Copyright © Itech Electronic Co., Ltd.
- Page 141 6. Use 12V/120AH battery for test. 7. When used in parallel, to balance power of each phase, distribute the instrument to three phases. But must ensure that single machine input voltage meets Specification requirements. Copyright © Itech Electronic Co., Ltd.
-
Page 142: It6536C
±(%of Output+Offset) Power ≤1%+60W Voltage Read Back Accuracy ≤0.05%+300mV (within 12 Current ≤0.2%+30mA months,25℃±5℃) ±(%of Output+Offset) Power ≤1%+60W Voltage ≤750mVp-p Ripple (20Hz -20MHz) Current ≤60mArms Setup Temperature Voltage ≤0.03 %+100mV Coefficient Current ≤0.1%+60mA (%of Output/℃+Offset) Copyright © Itech Electronic Co., Ltd. - Page 143 Power Factor 0.99 Maximum input current Maximum input 7600VA apparent power Storage temperature -10℃~70℃ Source OVP, OCP, OPP and Load OCP, OPP, OTP,Vsense Protective function standard Interface USB/RS232/CAN/LAN Isolation ( output to 750V ground) Copyright © Itech Electronic Co., Ltd.
-
Page 144: It6517C
8. It means the maximum phase current value under minimum work input voltage. 5.1.16 IT6517C Parameter IT6517C Ver:V1.6 Output Voltage 0~1000V Output Rating ( 0 ℃-40 Output Current 0~10A ℃) Internal Sink 0~1.5A Current Copyright © Itech Electronic Co., Ltd. - Page 145 ≤0.01%+375mV Coefficient Current ≤0.02%+10mA (%of Output/℃+Offset) Rise time( no load ) Voltage ≤70ms Rise time( full load ) Voltage ≤100ms Fall time( no load ) Voltage ≤350ms Fall time( full load ) Voltage ≤60ms Copyright © Itech Electronic Co., Ltd.
- Page 146 Protective function standard Interface USB/RS232/CAN/LAN Isolation ( output to 1000V ground) Parallel Number ≤8 Working temperature 0~40℃ Dimension ( mm) 483mmW×105.4mmH×640.8mmD Weight( net) 17Kg The above specifications may be subject to change without prior notice. Copyright © Itech Electronic Co., Ltd.
-
Page 147: It6527C
0~10A Internal Sink Output Rating ( 0 ℃-40 0~1.5A Current ℃) Output Power 0~3000W Internal Sink 0~50W Power Range 0~333.333Ω Output Resistance Accuracy 0.25%+375mΩ*A Resolution 10mΩ Voltage ≤0.01%+100mV Line regulation ±(%of Output+Offset) Current ≤0.01%+5mA Copyright © Itech Electronic Co., Ltd. - Page 148 Current seamless switching 90%~-90% ≤25ms Transient Response Voltage ≤3ms Time Voltage 220V±10% AC Input Frequency 47Hz~63Hz Voltage ≤0.05%+375mV Setup stability-30min (%of Output +Offset) Current ≤0.1%+10mA Voltage ≤0.05%+375mV Setup stability-8h (%of Output +Offset) Current ≤0.1%+10mA Copyright © Itech Electronic Co., Ltd.
- Page 149 When external analog is used for programming, the programming accuracy is 2%FS. 4. Read-back value accuracy means the read-back accuracy realized through panel display or communication instructions; when external analog is used for monitoring, the monitoring accuracy is 1%FS. Copyright © Itech Electronic Co., Ltd.
-
Page 150: It6537C
≤0.01%+10mA Load regulation Voltage ≤0.01%+375mV ±(%of Output+Offset) Current ≤0.05%+20mA Voltage 100mV Setup Resolution Current Power 0.1W Voltage 100mV Read Back Resolution Current Power 0.1W Setup Accuracy Voltage ≤0.05%+375mV (within 12 months,25℃ Current ≤0.2%+20mA ±5℃) Copyright © Itech Electronic Co., Ltd. - Page 151 Current ≤0.1%+20mA Voltage ≤0.05%+375mV Setup stability-8h (%of Output +Offset) Current ≤0.1%+20mA Voltage ≤0.05%+375mV Readback stability-30min (%of Output +Offset) Current ≤0.1%+20mA Voltage ≤0.05%+375mV Readback stability-8h (%of Output +Offset) Current ≤0.1%+20mA Efficiency Remote Sense Compensation Voltage Copyright © Itech Electronic Co., Ltd.
- Page 152 6. Use 12V/120AH battery for test. 7. When used in parallel, to balance power of each phase, distribute the instrument to three phases. But must ensure that single machine input voltage meets Specification requirements. Copyright © Itech Electronic Co., Ltd.
-
Page 153: Supplemental Characteristics
Technical Specification 8. It means the maximum phase current value under minimum work input voltage. 5.2 Supplemental characteristics State storage capacity: 100 sets Recommended calibration frequency: once a year Cooling style: fans Copyright © Itech Electronic Co., Ltd. -
Page 154: A Appendix
Appendix A.1 Specifications of Red and Black Test Cables ITECH provides you with optional red and black test cables, which are sold indi- vidually and you can select for test. For specifications of ITECH test cables and maximum current values, refer to the table below. -
Page 155: How To Avoid It Couldn't Start When Test Battery
Method to avoid no start: connect a switch which is parrallel with a current limiting discharging resistor. Close the switch after all the all leads connected well. The wiring diagram as follows: Copyright © Itech Electronic Co., Ltd. -
Page 156: Fuse Replacement
If there are no fuse assembly on the instrument rear panel, it means that you can’t replace the fuse by yourself. Please contact the ITECH engineer on the condition of the same malfunction. - Page 157 2. Have a visual inspection of the fuse to see whether it is burnt out; if yes, replace it with another fuse of the same specification. Re- fer to the corresponding technical specifi- cations for fuse rating. Copyright © Itech Electronic Co., Ltd.
- Page 158 3. Please replace with a fuse of the same specification. Refer to the technical specifi- cation of the corresponding instrument. 4. When install, put into the fuse box firstly. Then Push and turn the fuse box to 90 de- grees clockwise. Copyright © Itech Electronic Co., Ltd.
- Page 159 Facebook LinkedIn YouTube...
Need help?
Do you have a question about the IT6500C Series and is the answer not in the manual?
Questions and answers