SoftBank Whiz Operational Manual
Commercial robot vacuum
Hide thumbs
Also See for Whiz:
- Operational manual (138 pages) ,
- Operation manual (123 pages) ,
- Manual (15 pages)

Subscribe to Our Youtube Channel
Related Manuals for SoftBank Whiz


Summary of Contents for SoftBank Whiz
- Page 1 Original instructions CAUTION: Read the Operational Manual(this document)before using the product, and store in a safe location after reading it.
- Page 2 Whiz is a pioneer in cobotics, where humans and machines collaborate to build cleaner, more hygienic environments and better working experiences for all. In the spirit of cobotics, Whiz is a true team-player. By taking care of the vacuuming, Whiz shares the workload and frees up more time for the tasks you care about.
-
Page 3: Table Of Contents
Whiz Operational Manual TABLE OF CONTENTS 1 Introduction .......................5 2 Safety Warnings ....................6 2-1 About Safety Warnings ................... 6 2-2 Description of Symbols ................... 6 2-3 Description of Pictorial Indications ............... 6 2-4 Handling the Machine, Battery Charger, Battery and Notification Pager (Common) ........................ - Page 4 Whiz Operational Manual 7-3-2 Releasing the Machine from Emergency Stop ................ 43 7-4 Secondary Battery Power Button................. 44 7-4-1 Turning On/Off the Secondary Battery Power Button .............. 44 7-5 LED Lights ......................46 7-6 Touch Display ......................48 7-6-1 Indications on the Touch Display ..................... 48 7-7 Vacuum Power Button ...................
- Page 5 Whiz Operational Manual 11-2-1 Turning the Notification Pager On ..................99 11-2-2 Turning the Notification Pager Off ..................100 11-3 Pairing the Notification Pager................101 11-4 Recharging the Notification Pager ..............103 12 Machine Battery; Recharging the Machine’s Battery ......104 12-1 About Battery and Recharging .................
-
Page 6: Introduction
Whiz Operational Manual 1 Introduction Whiz is an industrial-purpose robot vacuum machine developed by SoftBank Robotics and which features onboard BrainOS. It is able to clean in two different modes (autonomous cleaning mode/manual cleaning mode). In autonomous cleaning mode, the machine cleans automatically, controlled by the BrainOS. The most current software version is always used by turning the main power switch ON/OFF on the machine. -
Page 7: Safety Warnings
Always adhere to warnings regarding machine installation, maintenance, and use and store this manual where it can always be referred to. Whiz operators are advised to take normal health and safety precautions suitable to their environment. -
Page 8: Handling The Machine, Battery Charger, Battery And Notification Pager (Common)
• Servicing, disassembly, modification, soldering, replacement or other repair work may not be undertaken by people other than by SoftBank Robotics or other authorized service staff. Use only the battery charger and battery that came with the machine when recharging the machine. - Page 9 Whiz Operational Manual Do not expose to warm air from a dryer or hot water. Doing so may cause fire, injury, electric shock, damage, malfunction, overheating, leakage, chemical explosion, or other damage to the machine, battery charger, battery or notification pager.
-
Page 10: Handling The Machine
Whiz Operational Manual 2-5 Handling the Machine WARNING Store in a dry environment with no dust in an ambient temperature range of 5 to 40°C. Failure to do so may result in fire, injury, electric shock, damage, malfunction, overheating, leakage, chemical explosion, or other damage to the machine, battery charger, battery or notification pager. - Page 11 Whiz Operational Manual Recharge the battery for the machine using only the battery charger that came with the machine. Recharge the notification pager using only the charging stand that came with the machine. Failure to do so may cause fire, injury, electric shock, damage, malfunction, overheating, leakage, chemical explosion, or other damage to the machine, battery charger, battery or notification pager.
-
Page 12: Handling The Battery Charger
Whiz Operational Manual Do not insert any objects in the machine. Doing so may cause fire, injury, electric shock, damage, malfunction, overheating, leakage, chemical explosion, or other damage to the machine, battery charger, battery or notification pager. If the machine is not operating normally (unusual sound, odor, smoke, etc.), immediately press the emergency stop button, to stop machine operation, turn off the main power switch, and contact customer support (cc@icerobo.com). - Page 13 Whiz Operational Manual Do not use in a location where vibration or impact is applied. Check that the supplied voltage is appropriate for the battery charger. Do not use any power source or voltage other than that specified (AC 100 to 240 V, 50 to 60 Hz).
-
Page 14: Handling The Notification
Whiz Operational Manual CAUTION Do not touch the surface of the battery charger for a long time. Prolonged skin contact may cause low-temperature burns. Do not drop, step on, or place objects on the battery charger, regardless of if it is connected or not. -
Page 15: Handling Near Electronic Medical Devices
Whiz Operational Manual Do not smoke in the vicinity of the battery or place objects near it that may be the cause of flames or sparks. Doing so may cause fire, injury, electric shock, damage, malfunction, overheating, leakage, chemical explosion, or other damage to the machine, battery charger, battery or notification pager. - Page 16 PRODUCT. ■ FCC Compliance Statement The Whiz Vacuum and the Notification Pager comply with part 15 of the FCC rules. Note with respect to the Whiz Vacuum: This equipment has been tested and found to comply with the limits for a Class A digital device, pursuant to part 15 of the FCC Rules.
- Page 17 FCC exposure requirements. SOFTBANK ROBOTICS CORP. (“COMPANY”) DISCLAIMS ANY AND ALL LIABILITY ARISING FROM THE USE OF THIS DOCUMENT AND DOES NOT GUARANTEE THAT ANY INFORMATION CONTAINED HEREIN IS ACCURATE OR COMPLETE.
- Page 18 Whiz Operational Manual This equipment complies with MPE ICNIRP radiation exposure limits. This equipment should be installed and operated with minimum distance 25 cm between the radiator and your body. This transmitter must not be co-located or operating in conjunction with any other antenna or transmitter.
-
Page 19: Positions Where The Warning Labels Are Affixed
Whiz Operational Manual 2-10 Positions where the Warning Labels are Affixed Refer to the labels on each product (the machine, battery charger, battery) (Fig. 2-1, Fig. 2-2, Fig. 2-3). Machine Fig. 2-1 18 / 145... - Page 20 Whiz Operational Manual Battery Fig. 2-2 19 / 145...
- Page 21 Whiz Operational Manual Charger Fig. 2-3 < Back of charger > 20 / 145...
- Page 22 Whiz Operational Manual Notification pager Fig. 2-4 Notification pager charger Fig. 2-5 21 / 145...
-
Page 23: Precautions Of Use
Whiz Operational Manual 3 Precautions of Use NOTE Handling the machine ■ The dustbag, brush, battery, HEPA filters, and notification pager are designed specially for the machine. Do not use other products. Using other products may cause the machine to malfunction or cause damage to the machine. -
Page 24: Supplied Accessories
Whiz Operational Manual 4 Supplied Accessories 4-1 Items in the Accessory Box Notification pager×1 Notification pager charger×1 micro USB cable ×1 [P00000401A01] [P00000501A01] [P00014201A01] Notifies the operator with a sound Recharges the notification pager. Connect the notification pager and vibration when an abnormality or and its charger. -
Page 25: Items In The Packaging Box
Whiz Operational Manual 4-2 Items in the Packaging Box Brush×1 [P00000801A01] This is attached to the machine to collect the dirt and dust into the hopper tray. 4-3 Items Delivered Separately Battery×1 Battery charger ×1 AC cord with country [P00000201A01] [P00000301A01] label ×3... -
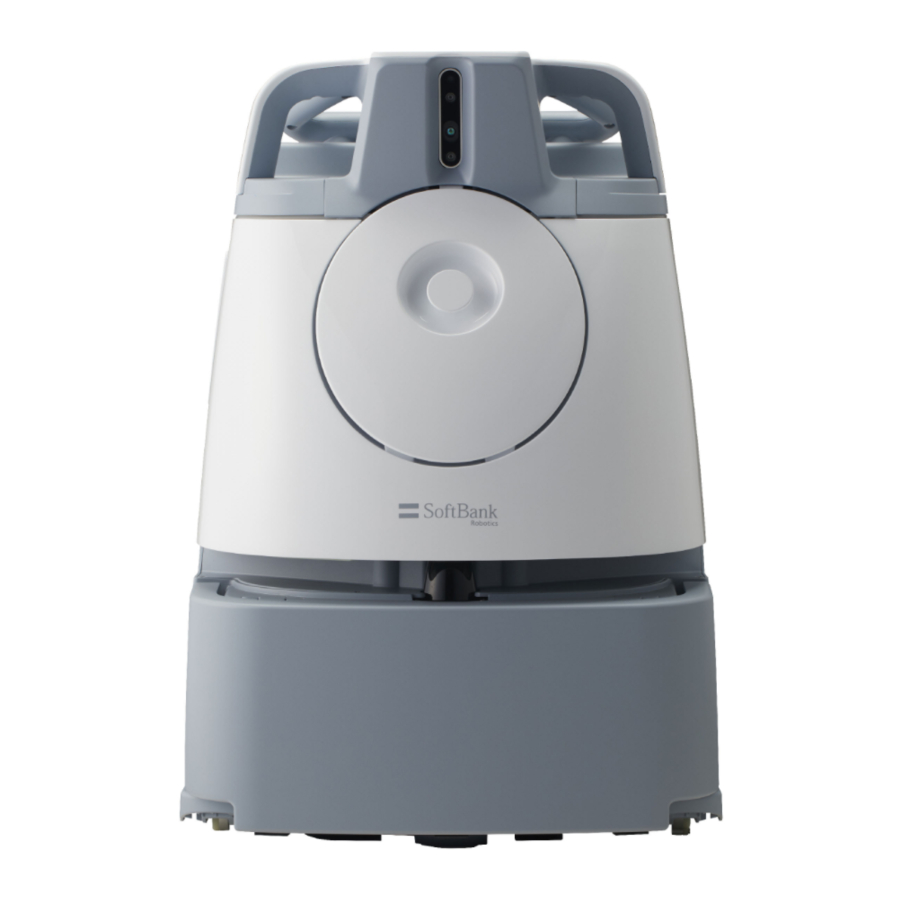
Page 26: Names Of Parts
Whiz Operational Manual 5 Names of Parts Machine Front/Side, Back Name ① Lift handles ② LED lights ⑤ ① ③ Pager holder ② ② ④ Wheel ③ ⑥ ⑤ 2D/3D camera (sensor) ⑥ Dustbin ⑦ LIDAR sensor ⑦ ⑧ Bumper ⑨... - Page 27 Whiz Operational Manual Machine Front/Side, Back Name ⑭ Emergency stop button ⑭ ⑮ Touch display ⑯ Max power mode button Autonomous clean start/stop ⑰ button ⑱ Vacuum power button ⑮ ⑱ ⑰ ⑯ ⑲ Front wheel ⑳ ㉕ ⑲ Brush compartment ㉕...
-
Page 28: Machine Setup And Parts Installation
Whiz Operational Manual 6 Machine Setup and Parts Installation 6-1 Removing the Machine from Its Packaging Unpack the machine. As a safety precaution, be sure to unpack with at least two people. ■ Check that the packaging is not damaged; if damaged, immediately contact customer support (cc@icerobo.com). - Page 29 Whiz Operational Manual Remove the outer box (Fig. 6-4). ■ Also remove the brush that is attached inside the outer box. Fig. 6-4 Remove the cushioning material (Fig. 6-5). Fig. 6-5 Take the machine out of the inner box (Fig. 6-6).
- Page 30 Whiz Operational Manual Remove the plastic bag (Fig. 6-7). Fig. 6-7 Remove the cushioning material (back of the bumper) (Fig. 6-8). Fig. 6-8 Either hold the lift handles (Fig. 6-9) or use the steering handles (Fig. 6-10) (see “P53 7-9 Steering Handle”) to bring the machine to the cleaning location.
-
Page 31: Preparing To Use The Machine
Whiz Operational Manual 6-2 Preparing to Use the Machine 6-2-1 Checking the Emergency Stop Button Check that the Emergency Stop Button is not pressed. If pressed, turn it to the right to release (Fig. 6-11). Fig. 6-11 ON / OFF 6-2-2 Checking the Dustbag Be sure to check that the dustbag is properly attached. - Page 32 Whiz Operational Manual Pull the cover towards you to remove (Fig. 6-13). Fig. 6-13 Check that the dustbin pin is afloat (Fig. 6-14). ■ If the dustbag is correctly set, the pin will float. Fig. 6-14 Insert the catches at the bottom of the cover in the bottom of the dustbin ( ① ) and close the cover while pushing down on the dustbin access handle ( ②...
-
Page 33: Checking The Hepa Filter
Whiz Operational Manual 6-2-3 Checking the HEPA Filter Check that the HEPA filter is properly installed. If the HEPA filter is not properly installed, follow the steps for installing the filter (see “P114 13-1-2 HEPA Filters”). Place your fingers in the holes of the filter cover and turn to the left to remove (Fig. 6-16). -
Page 34: Checking The Hopper Tray
Whiz Operational Manual 6-2-4 Checking the Hopper Tray Check that the Hopper Tray is correctly installed. If it is not installed correctly, reinstall the hopper tray (see “P119 13-1-4 Hopper Tray”). From the back of the machine, check if the Hopper tray is installed correctly (Fig. 6-18). - Page 35 Whiz Operational Manual Hold the lift handles with one hand, and hold the steering handle down with another hand (Fig. 6-20). ■ Please operate with two people. Fig. 6-20 Hold the lift handles with both of your hands, gently lay the machine on its side so that the side with the dustbin is up (Fig.
- Page 36 Whiz Operational Manual Check that the secondary battery power button on the bottom of the machine is off (see “P44 7-4 Secondary Battery Power Button”). At this time, remove the protective film of the cliff sensor as well (Fig. 6-22 ).
- Page 37 Whiz Operational Manual Push the brush in to the right, and attach the left end of the brush to the socket while aligning the same marks (Fig. 6-24). ■ Spin the brush, and check that both ends of the brush are securely attached in the sockets.
-
Page 38: Charging The Battery And Installing It To The Machine
Whiz Operational Manual 6-2-6 Charging the Battery and Installing It to the Machine Charge the battery ( see “P104 12-2 Recharging the Battery”). Pull the bottom left of the battery door towards you to open (Fig. 6-27). ■ Remove the accessory box from inside the battery compartment. -
Page 39: Removing The Protective Film
Whiz Operational Manual Check that the battery is locked (Fig. 6-29). Fig. 6-29 Close the battery door. 6-2-7 Removing the Protective Film Remove the protective film on 2D/3D Camera (sensor) (Fig. 6-30). ■ Please be careful not to damage the sensor when removing the film. -
Page 40: Turning The Notification Pager Power On
Whiz Operational Manual 6-2-8 Turning the Notification Pager Power On Before turning the power On, check that the notification pager is fully charged. If the notification pager battery is low, charge the battery fully before using the pager. (see “P103 11-4 Recharging the Notification Pager”). - Page 41 Whiz Operational Manual Confirm the ROC indicator (see “P48 7-6 Touch Display”) at the top right of the touch display (Fig. 6-33). Fig. 6-33 Robot Operations ROC indicator Center(ROC) display connection status It is connected to ROC It is not connected to ROC ■...
-
Page 42: Operation
Whiz Operational Manual 7 Operation 7-1 Main Power Switch 7-1-1 Turning the Power On Press “I” of the main power switch to turn on the power (Fig. 7-1 ). After turning the power on, a screen indicating the machine is loading appears on the touch display. -
Page 43: Stopping/Pausing The Machine
Whiz Operational Manual 7-2 Stopping/Pausing the Machine On the back of the machine, press the autonomous clean start/stop button (Fig. 7-3 ). The machine stops. Fig. 7-3 ON / OFF ■ To restart machine operation, press the autonomous clean start/stop button again. -
Page 44: Releasing The Machine From Emergency Stop
Whiz Operational Manual 7-3-2 Releasing the Machine from Emergency Stop ■ Check the safety of the machine and surrounding area before releasing the machine from emergency stop. Turn the emergency stop button to the right (Fig. 7-5). Fig. 7-5 ON / OFF ■... -
Page 45: Secondary Battery Power Button
Whiz Operational Manual 7-4 Secondary Battery Power Button This appliance contains Secondary Battery that are only replaceable by skilled persons. When using the machine, be sure to set the secondary battery power button off. When replacing the battery during autonomous cleaning, turn on the secondary battery power button before replacing the battery. - Page 46 Whiz Operational Manual Hold the lift handles with both of your hands, gently lay the machine on its side so that the side with the dustbin is up (Fig. 7-9). Rubber pad will support and stabilize the machine. ■ Please be cautious so the handle does not stick out of the machine.
-
Page 47: Led Lights
Whiz Operational Manual 7-5 LED Lights The LED lights notify you about the state of the machine, error information, etc. The LED lights on the front and back of the machine light in different colors and patterns (Fig. 7-12). Fig. 7-12... - Page 48 Whiz Operational Manual Color and pattern Appearance Description Flashing bright red rapidly Emergency stopped. Flashing red rapidly An alert has occurred on the machine. (For instance, this can occur if the machine has been lifted while the system is starting...
-
Page 49: Touch Display
Whiz Operational Manual 7-6 Touch Display You can check battery level, connection to the Robot Operations Center, error messages, and other information on the touch display. Teaching and selection of cleaning routes necessary for performing autonomous cleaning (see “P57 9 Autonomous Cleaning (Robot)”) are also done from the touch display. - Page 50 Whiz Operational Manual Item Description ④ Route sync icon Displays the status of synchronization with the Robot Operations Center (ROC) in such cases as saving or deleting cleaning routes. Route sync icon Status of synchronization with the display Robot Operations Center (ROC)
- Page 51 Whiz Operational Manual Fig. 7-14 SETTINGS screen Item Description ⑦ ROUTES Displays a list of Home Location Codes. ⑧ LANGUAGE Set the language displayed on the touch display. ⑨ ABOUT Check information such as the software version and the RIN (serial number) of the machine.
- Page 52 Whiz Operational Manual Fig. 7-15 Error message screen Item Description ⑪ Notification Appears at the upper left of the touch display. For alerts concerning machine components, follow the instructions on the touch display to remedy problems. ⑪ ⑫ Alert screen...
-
Page 53: Vacuum Power Button
Whiz Operational Manual 7-7 Vacuum Power Button Press the vacuum power button to start vacuuming. Press the button again to stop vacuuming. Pressing the vacuum power button stops vacuuming in either normal mode or max power mode (Fig. 7-16). Fig. 7-16... -
Page 54: Steering Handle
Whiz Operational Manual 7-9 Steering Handle Use the steering handle to move and change the direction of the machine during manual cleaning, to teach a cleaning route, and to transport the machine. Observe the following when using the steering handle. -
Page 55: Stow The Steering Handle
Whiz Operational Manual 7-9-2 Stow the Steering Handle ■ To stow the steering handle, hold with both hands and raise it forward at an angle, and push it in to its original position (Fig. 7-19). ■ Stow the steering handle when the machine is put away or is unused for a long time. -
Page 56: Notification
Whiz Operational Manual 7-10 Notification Pager If the machine stops operating during autonomous cleaning or the battery becomes low, the notification pager (see “P95 11 Notification Pager”) is alerted by the machine, and the notification pager emits an alert and vibrates to notify the operator (Fig. 7-20). -
Page 57: Inspection Before Operating The Machine
Whiz Operational Manual 8 Inspection before Operating the Machine 8-1 Inspection before Operating the Machine Before starting manual cleaning mode/autonomous cleaning mode, be sure to perform the following inspection. 8-1-1 Inspecting the Machine ■ Check that the emergency stop button is not pressed. -
Page 58: Autonomous Cleaning (Robot)
Whiz Operational Manual 9 Autonomous Cleaning (Robot) 9-1 Overview The machine is able to clean automatically with a saved cleaning route (autonomous cleaning mode). The autonomous cleaning mode requires first to teach a cleaning route to the machine either automatically (see “P72 9-4-3 Teaching a Cleaning Route Automatically”) or manually (see “P70 9-4-2 Teaching a Cleaning Route Manually”) and with the machine scan the Home Location Code you... -
Page 59: Home Location Codes
Whiz Operational Manual 9-2 Home Location Codes Home Location Codes are markers indicating where cleaning routes start and stop (Fig. 9-1). They are used for establishing the machine’s home location, and according to the size of the cleaning area, one or several Home Location Codes are used (6 cleaning routes can be saved for 1 Home Location Code). -
Page 60: Locations For Placing Home Location Codes
Whiz Operational Manual 9-2-1 Locations for Placing Home Location Codes Place Home Location Codes on walls, columns, etc. near areas that are frequently cleaned. ■ The back of Home Location Codes is sticky, allowing them to be placed directly on walls, etc. Replace with new Home Location Codes if they have lost their stickiness. -
Page 61: Cleaning Routes And Group Function
Home location code. * The Whiz Connect Portal is a portal site from where you can manage current machine activity and alerts, download activity reports, create a new group, assign a machine, and edit or delete created group names. - Page 62 Whiz Operational Manual ■ Planning the Space and Frequency It is also important to consider the environment of the cleaning area when planning a cleaning route. For example, teaching cleaning routes individually for an area that is cleaned every day (entrance or lobby to a building, corridor where people are always walking) and for a low-cleaning-frequency area only cleaned several times a month allows more effective cleaning.
-
Page 63: Precautions When Teaching A Cleaning Route
Whiz Operational Manual 9-3 Precautions when Teaching a Cleaning Route Be sure to check the following before teaching a cleaning route. 9-3-1 Machine ■ Always carry out an inspection before operating the machine (see “P56 8 Inspection before Operating the Machine”). - Page 64 Whiz Operational Manual ■ Do not include the following locations in the cleaning route. Also, clean the obstacles in advance. Prohibited locations for the cleaning route Specific examples Areas with steps higher than1.5 cm · Grooves between floors, drainage lids, gratings ·...
-
Page 65: Robot Operations Center (Roc)
Whiz Operational Manual 9-3-3 Robot Operations Center (ROC) Please check your mobile phone cellular connection in advance. Robot Operations Center (ROC) will not be connected to 4G (LTE) in an area where there is no signal. Do not include areas where the machine cannot be connected to the ROC in the cleaning area. -
Page 66: Teaching A New Cleaning Route
Whiz Operational Manual 9-4 Teaching a New Cleaning Route The procedure for teaching a new cleaning route is described below (Fig. 9-5). Fig. 9-5 ① Scan the Home Location Code P.65 “P66 9-4-1 Scanning a Home Location Code” Have the machine scan the start position of the cleaning route. -
Page 67: Scanning A Home Location Code
Whiz Operational Manual 9-4-1 Scanning a Home Location Code Home Location Codes are scanned with the camera on the front of the machine (see “P25 5 Names of Parts”). ■ Move the machine to where the distance between the camera and a Home Location Code is approximately 80 cm (2.6 ft), and stop the machine so that the Home Location Code and machine are... - Page 68 Whiz Operational Manual Press the main power switch (I/O) to turn it on (I) (Fig. 9-8). A warning screen about escalators or other moving platforms appears on the touch screen (see “P48 7-6 Touch Display”). Fig. 9-8 Check the warning message and tap “CONFIRM” (Fig. 9-9).
- Page 69 Whiz Operational Manual Place the machine so that the machine’s sensor and the Home Location Code are parallel, and scan the Home Location Code (Fig. 9-11). Fig. 9-11 ■ When the machine has scanned the Home Location Code correctly, a green frame appears.
- Page 70 Whiz Operational Manual Select for where to save cleaning route (Fig. 9-13). The selected spot is assigned to the new cleaning route. A screen appears for checking whether there are any escalators or other moving platforms in the cleaning area.
-
Page 71: Teaching A Cleaning Route Manually
Whiz Operational Manual 9-4-2 Teaching a Cleaning Route Manually Refer to “P62 9-3 Precautions when Teaching a Cleaning Route” before teaching a cleaning route. Tap “TEACH ROUTE” (Fig. 9-15). Fig. 9-15 Press the Vacuum power button (see “P52 7-7 Vacuum Power Button”) (Fig. 9-16). - Page 72 Whiz Operational Manual Use the steering handle to move the machine, and clean the entire cleaning route (teaching route) (Fig. 9-17). ■ Changing between normal mode and max power mode (see “P52 7-8 Max Power Mode Button”) is also learned in a cleaning route.
-
Page 73: Teaching A Cleaning Route Automatically
Whiz Operational Manual 9-4-3 Teaching a Cleaning Route Automatically You can create a cleaning route automatically by only training the perimeter of the cleaning area (within specified limitations). ■ Before teaching a cleaning route, check “P56 8 Inspection before Operating the Machine”. - Page 74 Whiz Operational Manual Use the steering handle to move the machine, and clean the entire cleaning route (teaching route) (Fig. 9-21). ■ Clean around the boundary once so that one side of the perimeter of the cleaning area is 10m or less and another side is 100m or less.
- Page 75 Whiz Operational Manual ■ Do not lift the machine up from the floor while teaching a cleaning route. ■ Do not abruptly stop other than for an emergency. Suddenly turning the machine or changing directions while teaching a cleaning route may affect teaching of the cleaning route. Make sure the machine travels in as straight a direction as possible.
-
Page 76: Saving The Cleaning Route
Whiz Operational Manual 9-4-4 Saving the Cleaning Route Tap “Save Route”. Return to the Home Location Code (Fig. 9-23). Fig. 9-23 Scan the Home Location Code (Fig. 9-24). The cleaning route is saved. ■ The saved route appears in the “CREAN” menu. -
Page 77: Carrying Out Autonomous Cleaning (One Route)
Whiz Operational Manual 9-5 Carrying Out Autonomous Cleaning (One Route) Select a previously taught cleaning route to start autonomous cleaning (see “P70 9-4-2 Teaching a Cleaning Route Manually” or “P72 9-4-3 Teaching a Cleaning Route Automatically”) and carry out autonomous cleaning. Before carrying out autonomous cleaning, always inspect the machine (see “P56 8 Inspection before Operating the Machine”). - Page 78 Whiz Operational Manual Move the machine to a Home Location Code (see “P59 9-2-1 Locations for Placing Home Location Codes”) (Fig. 9-25). Fig. 9-25 On the touch display (see “P48 7-6 Touch Display”), tap “CLEAN” (Fig. 9-26). Home Location Code scanning screen will be displayed.
- Page 79 Whiz Operational Manual On the touch display, select cleaning ROUTE/AREA (Fig. 9-28). A screen appears for checking whether there are any escalators or other moving platforms in the cleaning area. ■ The background color of dates is gray for teach route and is blue for teach boundary.
- Page 80 Whiz Operational Manual Stow the Steering Handle (Fig. 9-30). Fig. 9-30 Remove the notification pager from the machine (see “P95 11 Notification Pager”). Press the autonomous clean start/stop button (see “P55 7-11 Autonomous Clean Start/Stop Button”) (Fig. 9-31). Autonomous cleaning begins.
- Page 81 Whiz Operational Manual Check that all functions are operating properly. ■ Once autonomous cleaning completes, the machine returns to the Home Location Code, and notification arrives on the notification pager. The pager will notify you when cleaning is completed. Check “CLEANING COMPLETE”, and tap “HOME” (Fig. 9-32).
-
Page 82: Carrying Out Autonomous Cleaning (Multiples Routes)
Whiz Operational Manual 9-6 Carrying Out Autonomous Cleaning (Multiples Routes) Select a previously taught cleaning route to start autonomous cleaning (see P63 "9-4 Teaching a New Cleaning Route") and carry out autonomous cleaning. Before carrying out autonomous cleaning, always inspect the machine (see P54 “8-1 Inspection before Operating the Machine”). - Page 83 Whiz Operational Manual Scan the Home Location Code (Fig. 9-35). When the Home Location Code is recognized correctly, it will turn green, and a screen for selecting a route will appear on the touch display. Fig. 9-35 Tap “CHOOSE MULTIPLE” (Fig. 9-36).
- Page 84 Whiz Operational Manual Tap “NEXT” (Fig. 9-38). Fig. 9-38 Check for any escalators or other moving platforms in the cleaning area and tap “NO” (Fig. 9-39). Fig. 9-39 ■ Tap “YES” and a barrier warning screen appears. Check the warning message and tap “CONFIRM”.
- Page 85 Whiz Operational Manual Remove the notification pager from the machine. Press the autonomous clean start/stop button (Fig. 9-41). Autonomous cleaning begins. Fig. 9-41 ON / OFF ■ Remove the notification pager (see “P95 11 Notification Pager”) from the machine and carry it with you.
- Page 86 Whiz Operational Manual Check “CLEANING COMPLETE”, and tap “HOME” (Fig. 9-42). Fig. 9-42 ■ After autonomous cleaning is completed, the cleaning status for cleaning route/area is displayed. [Teach route] cleaning complete area: blue, incomplete area: white [Teach boundary] cleaning complete area: blue, incomplete area: “- - - ”...
-
Page 87: Carrying Out Autonomous Cleaning Using Delay Start
Whiz Operational Manual 9-7 Carrying Out Autonomous Cleaning Using Delay Start After setting the starting time of autonomous cleaning beforehand, autonomous cleaning will start automatically at the set time. ■ Make sure the machine is fully charged when carrying out autonomous cleaning using Delay Start. - Page 88 Whiz Operational Manual Scan the Home Location Code (Fig. 9-45). When the Home Location Code is recognized correctly, it will turn green, and a screen for selecting a route will appear on the touch display. Fig. 9-45 On the touch display, select cleaning ROUTE/AREA (Fig. 9-46).
- Page 89 Whiz Operational Manual Check for any escalators or other moving platforms in the cleaning area and tap “NO” (Fig. 9-47). Fig. 9-47 ■ Tap “YES” and a barrier warning screen appears. Check the warning message and tap “CONFIRM”. Tap “CANCEL” and a cautionary screen of autonomous cleaning appears.
- Page 90 Whiz Operational Manual Set the time and tap “NEXT” (Fig. 9-50). Scroll the digits up and down to set the desired time. The remaining time until autonomous cleaning starts is displayed after you tap “NEXT”. ■ The delayed time can be set up to 7 hours in advance.
- Page 91 Whiz Operational Manual Check that all functions are operating properly. ■ During autonomous cleaning, the LED light flashes orange twice in the direction the machine is turning. (example: when the machine is going to turn right, the LED light on the right side will flash).
-
Page 92: Deleting Cleaning Routes
Whiz Operational Manual 9-8 Deleting Cleaning Routes On the touch display, tap “SETTINGS” (Fig. 9-53). The SETTINGS menu appears. Fig. 9-53 Tap “ROUTES” (Fig. 9-54). A list of saved Home Location Codes appears. Fig. 9-54 Select the Home Location Code with ROUTE/AREA to delete (Fig. 9-55). - Page 93 Whiz Operational Manual Select cleaning routes/areas to delete (Fig. 9-56). The selected cleaning routes/areas are checked. Fig. 9-56 Tap "DELETE" (Fig. 9-57). The confirmation is displayed. Fig. 9-57 Tap "YES-DELETE" (Fig. 9-58). The selected cleaning routes/areas are deleted. Fig. 9-58...
-
Page 94: Manual Cleaning
Whiz Operational Manual 10 Manual Cleaning Clean by operating manually. In areas along a wall or the like, that cannot be cleaned autonomously, clean in manual mode. 10-1 Manual Cleaning Before carrying out manual cleaning, be sure to check “Inspection before Operating the Machine”... - Page 95 Whiz Operational Manual Pull the steering handle up as far as it will go, and lower it towards you (Fig. 10-3). Fig. 10-3 Use the vacuum power button (“P52 7-7 Vacuum Power Button”) and max power mode button (“P52 7-8 Max Power Mode Button“) to start cleaning (Fig. 10-4).
-
Page 96: Notification
Whiz Operational Manual 11 Notification Pager ■ FCC Compliance Statement Note: This equipment has been tested and found to comply with the limits for a Class B digital device, pursuant to part 15 of the FCC Rules. These limits are designed to provide reasonable protection against harmful interference in a residential installation. -
Page 97: Notification Pager Functions
Whiz Operational Manual 11-1 Notification Pager Functions Notification pager will notify the operator (Sound/Vibration) when irregular occur during autonomous cleaning or when the machine encounters obstacles (Fig. 11-1). When using the notification pager for the first time, please take the pager out of the battery box and charge the pager. (see “P103 11-4 Recharging the Notification Pager”). -
Page 98: Notification Pager Functions & Usage
Whiz Operational Manual 11-1-1 Notification Pager Functions & Usage ■ When the notification pager detects danger upon encountering an obstacle, an alert appears on the notification pager display (see “P98 11-1-2 Alert Display and its Notification Timing”), and it is notified with sound and vibration (Fig. -
Page 99: Alert Display And Its Notification Timing
Whiz Operational Manual 11-1-2 Alert Display and its Notification Timing Appearing on Appearing on Description Description display display Standby (within the Autonomous cleaning communication complete range/paired) Machine battery level low No machine battery remaining Dustbag full Connected for wireless communication... -
Page 100: Turning The Notification Pager On/Off
Whiz Operational Manual 11-2 Turning the Notification Pager On/Off When using the notification pager for the first time, use the supplied pin to turn the power On. 11-2-1 Turning the Notification Pager On Insert the supplied pin in the power button on the side of the notification pager (Fig. 11-3). -
Page 101: Turning The Notification Pager Off
Whiz Operational Manual 11-2-2 Turning the Notification Pager Off Insert the supplied pin in the power button on the side of the notification pager (Fig. 11-4). The display turns off. Fig. 11-4 Press the pager main button, and check that nothing appears on the display (Fig. 11-5). -
Page 102: Pairing The Notification
Whiz Operational Manual 11-3 Pairing the Notification Pager In order to receive the alerts on the notification pager, the pager must be paired with the machine itself. Turn On the notification pager and the machine (Fig. 11-6). Fig. 11-6 Check if the machine is connected to the Robot Operations Center (ROC) (Fig. 11-7). - Page 103 Whiz Operational Manual Press the button on the notification pager for at least 5 seconds (Fig. 11-8). The message “Wireless connection in process” will be shown on the pager's display. Fig. 11-8 Attach the pager onto the pager holder on the side of the machine (Fig. 11-9).
-
Page 104: Recharging The Notification
Whiz Operational Manual 11-4 Recharging the Notification Pager If notification pager battery is running low, charge the pager fully before using it. Insert the Micro USB plug to the cable in the terminal on the back of the notification pager charger. -
Page 105: Machine Battery; Recharging The Machine's Battery
Whiz Operational Manual 12 Machine Battery; Recharging the Machine’s Battery 12-1 About Battery and Recharging ■ The battery operates for about 3 hours when cleaning in normal mode. ■ About 4 hours are required for the battery to fully recharge. - Page 106 Whiz Operational Manual Pull the bottom left of the battery door towards you to open (Fig. 12-3). Fig. 12-3 Hold the grip on the battery in your right hand, and press the battery lock with your thumb (Fig. 12-4). Fig. 12-4 Pull the battery out towards you as you release your thumb from the lock (Fig.
- Page 107 Whiz Operational Manual Hold the handles, pull the battery out (Fig. 12-6). Be sure to hold the grips with both hands when pulling the battery out. Fig. 12-6 Insert the battery straight into the battery charger all the way (Fig. 12-7).
- Page 108 Whiz Operational Manual Insert the battery all the way in the battery compartment, and close the battery door (Fig. 12-9). ■ Insert the battery in the battery compartment by its terminal first. ■ Once the battery is properly inserted, the lock in the battery compartment will pop into place, making a “click”.
-
Page 109: Battery Charger Status Indicator
Whiz Operational Manual 12-2-1 Battery Charger Status Indicator Charging status is indicated by the light on the battery charger (Fig. 12-10). Fig. 12-10 Charge light Battery capacity light Status Charge light Battery capacity light Battery capacity: Lit orange One lit green... -
Page 110: Maintenance And Safety
■ Hopper tray (see “P119 13-1-4 Hopper Tray”) ■ Machine repair should only be carried out by technical staff approved by SoftBank Robotics. ■ Turn off the main power beforehand to disinfect the machine with alcohol. Use the amount of alcohol to some degree that a soft cloth is slightly wet. - Page 111 Whiz Operational Manual Hold the lift handles with one hand, and hold the steering handle down with another hand (Fig. 13-2). ■ Please operate with two people. Fig. 13-2 Hold the lift handles with both of your hands, gently lay the machine on its side so that the side with the dustbin is up (Fig.
- Page 112 Whiz Operational Manual Press the brush to the right, and pull the left end out towards you to remove (Fig. 13-4). Fig. 13-4 Remove the right end of the brush (Fig. 13-5). Fig. 13-5 111 / 145...
- Page 113 Whiz Operational Manual Mounting a new brush Check the marks on the left and right ends of the new brush. The mark on the left The mark on the right ■ When the machine is laid down with the front side facing upwards, you will see the sockets of the brush compartment.
- Page 114 Whiz Operational Manual Push the brush in to the right, and attach the left end of the brush to the socket while aligning the same marks (Fig. 13-7). Spin the brush, and check that both ends of the brush are securely attached in the sockets.
-
Page 115: Hepa Filters
Whiz Operational Manual 13-1-2 HEPA Filters Check that dirt has not accumulated in the HEPA filters and that they are not damaged. If dirt has collected or they are damaged, replace them with new filters following the steps below. ■ Do not wash the HEPA filters with water. -
Page 116: Dustbag
Whiz Operational Manual 13-1-3 Dustbag Replace with a new dustbag when it gets full. When replacing the dustbag, turn off the main power switch of the machine WARNING beforehand and remove the battery from the machine in order to reduce risk of shock. - Page 117 Whiz Operational Manual Pull out the attachment sheet for the dustbag inside the dustbin (Fig. 13-14). Fig. 13-14 Remove the used dustbag from the dustbin (Fig. 13-15). Fig. 13-15 116 / 145...
- Page 118 Whiz Operational Manual Attach the new dustbag Spread the new dustbag out and inflate. ■ Please be careful not to rip the dustbag. With a new dustbag, hook the left side of the attachment sheet to the catch on the left side of the suction duct (Fig.
- Page 119 Whiz Operational Manual Align the opening in the attachment sheet with the suction duct, and push the right of the attachment sheet in firmly (Fig. 13-18). ■ Be careful not to pinch your fingers. Fig. 13-18 Check that the dustbin pin is afloat (Fig. 13-19).
-
Page 120: Hopper Tray
Whiz Operational Manual 13-1-4 Hopper Tray Empty the hopper tray after every cleaning. Remove and replace the hopper tray following the steps below. The hopper tray is shaped as below (Fig. 13-21), and is located on the bottom of the machine (see “P25 5 Names of Parts”). - Page 121 Whiz Operational Manual Discard any dirt in the hopper tray. Wash the hopper tray with water if dirty. After washing, wipe away any water with a dry cloth and allow to dry. Slide the hopper tray into the bottom of the machine from the left (Fig. 13-24).
-
Page 122: Battery Charger
Whiz Operational Manual 13-1-5 Battery Charger Before recharging the battery, check that no dust or dirt is present in the air vents on the battery charger. If dust or dirt is present, clean with dry cloth. Remove any dust or dirt from the air vents (Fig. 13-26). -
Page 123: Sensors
Whiz Operational Manual 13-1-6 Sensors If dust or dirt is on the sensor, remove by using a micro-fiber cloth. Maintenance for the 2D/3D Camera (Sensor) and LIDAR Sensor Wipe the 2D/3D camera (sensor) and LIDAR sensor with the micro-fiber cloth (Fig. 13-27). - Page 124 Whiz Operational Manual Maintenance for the Cliff Sensor Stow the Steering Handle (“P53 7-9 Steering Handle”) (Fig. 13-28). Fig. 13-28 Hold the lift handles with one hand, and hold the steering handle down with another hand (Fig. 13-29). ■ Please operate with two people.
- Page 125 Whiz Operational Manual Hold the lift handles with both of your hands, gently lay the machine on its side so that the side with the dustbin is up (Fig. 13-30). Rubber pad will support and stabilize the machine. ■ Please be cautious so the handle does not stick out of the machine.
-
Page 126: List Of Consumables
Whiz Operational Manual 13-2 List of Consumables Name Model Note P00001101A01 (1-10) P00001201A01 (11-20) P00001301A01 (21-30) P00001401A01 (31-40) The number in parentheses is the P00001501A01 (41-50) Home Location Code P00001601A01 (51-60) Home Location Code number. P00001701A01 (61-70) P00001801A01 (71-80) P00001901A01 (81-90) -
Page 127: Storing The Machine
Whiz Operational Manual 13-3 Storing the Machine When transporting the machine, move the machine manually to its predetermined place of storage. ■ Turn off the power of the machine and remove the battery before storing it. ■ If not using the machine for a long time, turn off the Secondary Battery Power Button (see “P44 7-4 Secondary Battery Power Button”). - Page 128 Whiz Operational Manual Hold the lift handles and place the machine into the inner box (Fig. 13-34). ■ Align the direction of the cushioning material and the inner box. Fig. 13-34 Attach the cushioning material (Fig. 13-35). Fig. 13-35 127 / 145...
- Page 129 Whiz Operational Manual Cover the inner box with the outer box (Fig. 13-36). ■ Cover the outer box as the same direction as the cushioning material inside the inner box. Fig. 13-36 Attach the locking tab to the outer box (Fig. 13-37).
- Page 130 Whiz Operational Manual Press the locking tab lock until you hear a “click” (Fig. 13-38). ■ Locking tab will lock. Fig. 13-38 Make sure the locking tab will not come off from the outer box (Fig. 13-39). Fig. 13-39 129 / 145...
-
Page 131: Troubleshooting
Whiz Operational Manual 14 Troubleshooting 14-1 Checking Machine Alerts During an autonomous cleaning, if the machine encounters an obstacle and senses danger or if the battery is low, an alert will be notified on the touch display (see “P48 7-6 Touch Display”). If an alert is displayed, please follow the instructions on the touch display. -
Page 132: Error Message List
Whiz Operational Manual 14-2 Error Message List Alert message Cause Action ROBOT IS STUCK 1. Make sure the robot's path is clear or push past any obstacles. 2. Press blue button to start. PATH IS BLOCKED 1. Make sure the robot's path is clear or push past any obstacles. - Page 133 Whiz Operational Manual Alert message Cause Action 501 HOMING ERROR 1. IMU sensor error. Please reboot the machine and restart your route. 2. If the problem persists, contact customer service. HOMING CANCELLED 1. Please try homing again without moving the robot.
- Page 134 Whiz Operational Manual Alert message Cause Action BATTERY IS TOO LOW Inspect and change the battery. DUSTBAG FULL Inspect and replace the dustbag. SECONDARY Do NOT remove the main battery. BATTERY OFF Turn on the secondary battery, using the switch at the bottom of the machine.
- Page 135 Whiz Operational Manual Alert message Cause Action PAGER CONNECTION 1. Bring pager back to the machine. ERROR 2. Press and hold the main button on the pager for 6 seconds. 3. Dock the pager and reboot the machine. If connection fails, please contact customer service.
- Page 136 Whiz Operational Manual Alert message Cause Action 8700 SYSTEM ERROR DEPTH CAMERA connection error. 1. Please reboot the machine. 2. If the problem persists, contact customer service. IMPACT DETECTED 1. Make sure the robot's path is clear or push past any obstacles.
- Page 137 Whiz Operational Manual Alert message Cause Action SAVE ERROR Make sure to not pull the robot backwards more than 20 cm at a time while teaching a route. SAVE ERROR 1. Seonsor error. Clean the bottom sensor. 2. Reboot the machine. If the problem persists, contact customer service.
-
Page 138: Machine Specifications
Whiz Operational Manual 15 Machine Specifications 15-1 Machine Specifications Item Specifications Machine size (length × width × height) 474mm × 455mm × 653mm (18.6in × 17.9in × 25.7in) Machine weight Approx. 30kg (66lbs) Machine weight (battery installed) 35kg (77lbs) Cleaning width... -
Page 139: Notification
Whiz Operational Manual Item Specifications Commercial reference Whiz Type of device Automatic Cleaning Machine Model A00000101 15-2 Notification Pager Item Specifications Product code P00000401A01 Approx. 62mm (2.4in) × 100mm (3.9in) × 18mm (0.7in) Size (WLH) Wireless communication standard LoRa (Long Range) -
Page 140: Applicable Standards
Whiz Operational Manual 16 Applicable Standards This machine conforms to the following standards. This Automatic Cleaning Machine conforms to the following standards. 1. Low Voltage Directive (LVD), 2006/95/EC 2. Machinery Directive (MD), 2006/42/EC 3. Electromagnetic Compatibility (EMC) Directive, 2014/30/EU 4. Radio Equipment Directive (RED), 2014/53/UE 5. -
Page 141: Radio
Whiz Operational Manual 17 Radio The following bands are used for the radio of the machine and the notification pager. Machine WCDMA HSPA +: B1, B2, B3, B4, B5, B8 FCC: B2, B4, B5 RED: B1, B3, B8 LTE: B1, B2, B3, B4, B5, B7, B8, B12, B13, B20, B26, B28, B30, B41, B66... -
Page 142: Disposal
Whiz Operational Manual 18 Disposal This product is designed and manufactured with recyclable, high-quality materials and components. When disposing of the product, check that it is being disposed of properly as industrial waste differentiated from general and business waste according to regional and municipal regulations by request to an industrial waste disposal operator. -
Page 143: Glossary
Whiz Operational Manual 19 Glossary Terminology Description Accessory box The box includes notification pager, notification pager charger, pin and micro-fiber cloth. Upon arrival, accessory box will be stored inside the battery box. Autonomous The operator teaches a cleaning route on the machine beforehand cleaning (see “P70 9-4-2 Teaching a Cleaning Route Manually”... - Page 144 Group function Function that allows multiple machines to share the cleaning route (see “P60 9-2-2 Cleaning Routes and Group Function”). It is necessary to create a group with Whiz Connect Portal beforehand, and assign the machines to the group. HEPA filters High-performance exhaust filters located at the exhaust of the machine for removing dirt and particles.
- Page 145 Whiz Operational Manual Terminology Description Normal mode The usual mode for cleaning. (see “P52 7-8 Max Power Mode Button”) Notification A notification is issued when the battery level is low or when the error has occurred. Notifications appear at the upper left of the touch display of the machine (see “P48 7-6 Touch Display”).
- Page 146 Whiz Operational Manual Terminology Description Teach route Use Home Location Codes to teach cleaning routes in autonomous cleaning mode. A cleaning route can be taught either automatically (see “P72 9-4-3 Teaching a Cleaning Route Automatically”) or manually (see “P70 9-4-2 Teaching a Cleaning Route Manually”)
- Page 147 Revision history Issued June 1, 2020 : First revision...
Need help?
Do you have a question about the Whiz and is the answer not in the manual?
Questions and answers