
Related Manuals for Agilent Technologies G8610A


Summary of Contents for Agilent Technologies G8610A
- Page 1 Vacuum Products Division Agilent Technologies OPERATION MANUAL Helium Leak Detector MODELS: G8610A, G8610B, G8611A, G8611B, G8611C, G8612A, G8612B, G8612C, AND G8612D Manual No. G8610-90002 Revision A December 2017...
- Page 2 Agilent Technologies Helium Leak Detector Contra-Flow is a trademark or registered trademark of Agilent, Inc. Alconox is a registered trademark of Alconox, Inc. Apiezon is a registered trademark of M&I Materials Ltd. Copyright 2017 Agilent, Inc...
- Page 3 Agilent Technologies Helium Leak Detector Warranty Products manufactured by Seller are warranted against defects in materials and workmanship for twelve (12) months from date of shipment thereof to Customer, and Seller’s liability under valid war- ranty claims is limited, at the option of Seller, to repair, to replace, or refund of an equitable portion of the purchase price of the Product.
- Page 4 Agilent Technologies Helium Leak Detector This page intentionally left blank.
-
Page 5: Table Of Contents
Agilent Technologies Helium Leak Detector Table of Contents Preface ............................. 13 Documentation Standards ......................13 Hazard and Safety Information ....................14 Agilent Services ......................... 23 Contacting Agilent ........................23 Section 1. Introduction to the Leak Detector ..................25 1.1 The Leak Detector ....................... 25 1.2 Unpacking the Leak Detector.................... - Page 6 Agilent Technologies Helium Leak Detector 6.3 Wireless ..........................112 Section 7. Maintenance Screen ..................... 113 7.4 Maintenance Menu ......................113 7.4.2 Internal Calibrated Leak Setup .................. 115 7.4.3 Manual Tuning ......................118 7.4.4 Maintenance: Valve Control ..................121 7.4.5 Maintenance: Pump ....................124 7.4.6 Maintenance: Gauge Calibration ................
- Page 7 Figure Title Page Portable Leak Detector with Internal DS40M Wet Rotary Vane Pump, Model G8610A, and Portable Leak Detector with Internal IDP-3 (G8610B) Dimensions ........27 Mobile Leak Detector with External Wet Rotary Vane Pump or Dry Scroll Pump on a Cart, Model G8611A, G8611B and G8611C Dimensions.............
- Page 8 Agilent Technologies Helium Leak Detector 5-10 High Sensitivity ........................83 5-11 Auto Sequencer ........................86 5-12 Split Flow Application......................89 5-13 Split Flow Setup........................91 5-14 PPM Sniff Method........................ 92 5-15 Sniffing Setup ........................93 5-16 Metering Valve Overall Assembly ..................95 5-17 Metering Valve Assembly ....................
- Page 9 Agilent Technologies Helium Leak Detector Locating Leaks: Outside In ....................160 Measuring Leaks: Outside In ..................... 160 Measuring Leaks: Inside Out ..................... 161 Locating Leaks: Inside Out ....................161 Accumulation: Inside Out ....................162 Vacuum System......................... 163...
- Page 10 Agilent Technologies Helium Leak Detector This page intentionally left blank.
- Page 11 Agilent Technologies Helium Leak Detector List of Tables Table Title Page Series Leak Detector Configurations and Part Numbers ........... 26 Installation Requirements ....................34 Screens – General Description ................... 45 Features..........................51 On-Screen Icons ......................... 53 Leak Detector Operating States..................58 Leak Detector Condition States ..................
- Page 12 Agilent Technologies Helium Leak Detector This page intentionally left blank.
-
Page 13: Preface
Agilent Technologies Helium Leak Detector Preface Documentation Standards This manual uses the following documentation standards: Notes contain important information. NOTE Cautions appear before instructions, which if not followed, CAUTION could cause damage to the equipment or data loss. Warnings appear for a particular procedure or practice which, if WARNING not followed correctly, could lead to serious injury or death. -
Page 14: Hazard And Safety Information
Agilent Technologies Helium Leak Detector Hazard and Safety Information The common international symbols used in this manual and on the equipment are defined below. ° OFF Supply (Power) Earth (Ground) Terminal ON Supply (Power) Caution, Hot Surface AC – Alternating Current... - Page 15 Agilent Technologies Helium Leak Detector Solvents The mechanical components of leak detectors are typically WARNING cleaned with alcohol, methanol, or other solvents. When heated, sprayed, or exposed to high-temperature equipment, these solvents become flammable and explosive, causing serious injury or death. Do not use these solvents near a high-temperature source.
- Page 16 Agilent Technologies Helium Leak Detector O-ring Care When removing, checking or replacing O-rings, keep in mind the following: Agilent recommends replacing all O-rings during routine NOTE maintenance or during any maintenance procedure requiring that O-rings be removed. Due to the effective cleaning nature of VacuSolv solvent and NOTE its residue-free properties, Agilent’...
- Page 17 Agilent Technologies Helium Leak Detector Metal Seal Care Metal Seals must be replaced during routine maintenance or CAUTION during any maintenance procedure required. All fasteners must be installed and torqued per assembly procedure specifications. Remove Metal Seals carefully with your fingers. Do not use metal tools for this task, this prevents scratching of any sealing surfaces.
- Page 18 Agilent Technologies Helium Leak Detector Equipment tightness is guaranteed for normal operating WARNING conditions when the equipment leaves the factory. It is the user’s responsibility to maintain the level of tightness, particularly when pumping dangerous products. The performance and operating safety of this equipment can...
- Page 19 Detector Wireless Base Station, Nearson, Model S181FL-5-RMM- 2450S, www.nearson.com Power and Static Sensitivity Depending on the unit configuration ordered, the mains power WARNING supply requirements for Agilent Technologies Helium Mass Spectrometer leak detectors are: ❑ 100 VAC, 50 Hz, 5 A ❑...
- Page 20 Agilent Technologies Helium Leak Detector Use surge protection to improve the immunity of the leak CAUTION detector against unidirectional transients caused by the following phenomena: ❑ Switching phenomena in the power network (e.g., switching of capacitor banks, inductive loads, electrical motors, etc.)
- Page 21 Agilent Technologies Helium Leak Detector CAN/CSA-C22.2 No. 61010-1-12 - Safety Requirements for WARNING Electrical Equipment for Measurement, Control, and Laboratory Use - Part 1: General Requirements UL Std. No. 61010-1, 3rd Edition - Safety Requirements for Electrical Equipment for Measurement, Control, and Laboratory Use - Part 1: General Requirements EMC Emissions and Immunity - ETSI EN 301 489-1 v2.2.0...
- Page 22 Agilent Technologies Helium Leak Detector ❑ Allow an adequate distance (2 to 3’) from the back of the leak detector to the power source. This ensures easy access to the power cord for connecting or disconnecting purposes. Spectrometer Store the Ion Source/Preamplifier sub-assembly in a cool, dry WARNING area in a tightly sealed, ESD protected container.
-
Page 23: Agilent Services
Agilent Technologies Helium Leak Detector To avoid injury, wait until the turbo pump is completely WARNING stopped before disconnecting it from the vacuum system. Check the oil level often. Do not allow oil-based mechanical pumps to run when the oil level is below the LOW mark. - Page 24 Agilent Technologies Helium Leak Detector This page intentionally left blank.
-
Page 25: Section 1. Introduction To The Leak Detector
The leak detector is a wide-range Helium Mass Spectrometer Leak Detector, which is comprised of a turbo molecular high vacuum pump, internal mechanical rough pump (model G8610A), internal scroll pump (model G8610B), external mechanical rough pump (models G8611A, G8611B, G8611C, G8612A, G8612B, G8612C and G8612D),... - Page 26 Agilent Technologies Helium Leak Detector The usage of a longer cable for the parallel I/O output CAUTION connection with an external PLC is fully responsibility of the user. Some EMC prevention measure may be required by the user. ❑ USB type A connector and one located on the back of the leak detector.
-
Page 27: Portable Leak Detector With Internal Idp-3 (G8610B) Dimensions
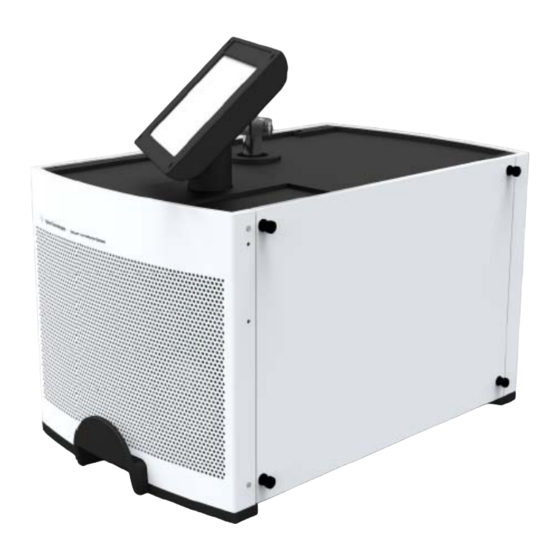
Figure 1-1 shows the outline drawing and physical dimensions of the portable leak detector with Internal DS40M Wet Rotary Vane Pump, Model G8610A and the G8610B, which utilizes a Agilent IDP-3 dry pump. Figure 1-1 Portable Leak Detector with Internal DS40M Wet Rotary Vane Pump, Model... -
Page 28: Unpacking The Leak Detector
The following items are included in the shipment: ❑ Agilent Technologies Helium Mass Spectrometer Leak Detectors Operations Manual ❑ Agilent Technologies leak detector configured and completely assembled as ordered ❑ All necessary power cords, as ordered ❑ Pump manuals (for the purchased configuration) ❑... -
Page 29: Leak Detectors Unboxed
Agilent Technologies Helium Leak Detector Figure 1-4 Leak Detectors Unboxed 3. Unpack a mobile unit with wheels by a. Removing the foam protective padding, propping up leak detector, placed between the two sets of wheels by gently tilting the leak detector a few degrees sideways and pulling the foam out. -
Page 30: Shipping Locks
Agilent Technologies Helium Leak Detector 2. Undo Shipping Locks A leak detector with either an IDP-15 pump or a TS620 pump is shipped with shipping lock bolts to secure the pump during transit. Remove these shipping locks before powering on the leak detector to prevent excessive rattle and noise during operation (Figure 1-6). -
Page 31: Idp-15 Shipping Locks Loosening
Agilent Technologies Helium Leak Detector Use the provided 4 mm T-handle Allen wrench to turn the locks clockwise to loosen; the IDP-15 ship locks only tighten/loosen, and are not removable (Figure 1-8). Figure 1-8 IDP-15 Shipping Locks Loosening ❑ For the TS620 pump, use a 10 mm driver to remove the shipping bolts (one on each side of the pump base) (Figure 1-9). -
Page 32: Oil-Based Pumps
Agilent Technologies Helium Leak Detector 3. Adding Oil Oil rotary vain pumps must be filled with oil before operation. These include the DS40-M, DS302, and DS602 pump model leak detectors (Figure 1-10). Figure 1-10 Oil-based Pumps 1. Use a funnel when adding oil, fill to the center of the sight glass marking. -
Page 33: Mobile Unit Oil Fill
Agilent Technologies Helium Leak Detector Figure 1-12 Mobile Unit Oil Fill Powering Up 1. Ensure that the roughing pump is switched on and if applicable (IDP-15), set to the correct voltage setting. 2. Switch the leak detector on, cover the leak detector inlet with a blank-off cap (provided... -
Page 34: Installation
Agilent Technologies Helium Leak Detector 1.3 Installation Installation requirements are described in Table 1-2. Table 1-2 Installation Requirements Item Requirement ❑ Close to its power source. Leak Detector Location ❑ Two to three feet clearance for proper ventilation. ❑ Sufficient room for the operator to safely maneuver to perform testing. -
Page 35: Bench System Installations
Figure 1-13 and Figure 1-17 represent the process for installation of the bench system version of the Agilent Technologies Helium Mass Spectrometer Leak Detector. Figure 1-13 is a drawing of a Bench Mount Leak Detector with External DS302 Wet Rotary Vane Pump, Model G8612A with individual components shown. -
Page 36: Recommended Additional Services
Agilent Technologies Helium Leak Detector Figure 1-15 is a drawing of a Bench Mount Leak Detector with External IDP-15 Dry Scroll Pump, Model G8612C with individual components shown. Figure 1-15 Bench Mount Leak Detector with External IDP-15 Dry Scroll Pump, Model G8612C 1.3.1 Helium... -
Page 37: Storage
Agilent Technologies Helium Leak Detector 1.3.3 Storage If the leak detector is not used immediately, it can be stored as received without special precautions. A dry, relatively dust-free area is preferred. The required environmental conditions for storage are: ❑ 0% to 95% relative humidity, non-condensing ❑... - Page 38 Agilent Technologies Helium Leak Detector If the system was recently calibrated before shut down, it can NOTES be used for qualitative testing. Read the standard leak to verify accuracy. For more accurate quantitative leak values, perform a calibration 20 minutes after start-up.
-
Page 39: Helium Background Timer
Agilent Technologies Helium Leak Detector background and shows the time until the calibration begins. Should you prefer not to wait, a Cancel button permits the calibration request to be canceled. The firmware initially starts at a large time interval, but NOTE recalculates the required time as the pumping continues. -
Page 40: Turn Off (Shutdown)
Agilent Technologies Helium Leak Detector 1.3.5 Turn Off (Shutdown) The system can be in any mode when shut down. When the system is shut down, all valves in the system close. If the system is not in Vent mode, the test port remains under vacuum and may be difficult to open. -
Page 41: Front Panel Display And Operations
Agilent Technologies Helium Leak Detector 1.4 Front Panel Display and Operations All operator control and monitoring are achieved via the resident software accessed using the Touch Panel Display. Table 1-3 on page 45. Figure 1-17 Front Panel Displays and Operations... -
Page 42: Home Screen
Agilent Technologies Helium Leak Detector Touch Panel Display Represents: ❑ Leak Rate - in a Bar Graph format with a numeric range indicator ❑ Leak Rate, System Status and Parameters - in alphanumeric format ❑ Series of with the soft key buttons for operator... -
Page 43: Home Screen
Agilent Technologies Helium Leak Detector 1.5 Home Screen VENT The VENT button advances the leak detector to the vented state. The red vent symbol in the middle of the switch remains red while the leak detector is in Vent. TEST... -
Page 44: Screen Flow
Agilent Technologies Helium Leak Detector The leak detector operator interface functions through a series of screens, which are navigated as in Figure 1-19. Figure 1-19 Screen Flow... -
Page 45: Front Panel Display - Home Screen Display
Agilent Technologies Helium Leak Detector 1.6 Front Panel Display - Home Screen Display Table 1-3 Screens – General Description Screen Purpose Home Accesses the Menu screens. Activates the Test, Vent and Zero functions. Activates the Gross Leak Test screen, when Gross Test is initiated via the Zero button. - Page 46 Agilent Technologies Helium Leak Detector Table 1-3 Screens – General Description (Continued) Screen Purpose Menus Accesses the following screens for tailoring leak detector operation: Calibration ❑ Internal or External selection ❑ Read Internal Leak ❑ Cal Leak information Test Configuration ❑...
- Page 47 Agilent Technologies Helium Leak Detector Table 1-3 Screens – General Description (Continued) Screen Purpose Maintenance ❑ General - Configures: ❑ Internal Calibrated Leak Setup & Expiration ❑ Software Update Utility ❑ Manual Tuning - Configures: ❑ Toggles between Filament 1 & 2 ❑...
-
Page 48: Rear Panel
Agilent Technologies Helium Leak Detector 1.7 Rear Panel The rear panel of the leak detector (models G8610A and G8612B) with the wireless remote control option is shown in Figure 1-20. Figure 1-20 Rear Panel ➀ Serial Connector A 9-pin male D-type connector to interface with an external PC via RS-232 type communications protocol for system diagnostic or control. -
Page 49: Rear Panel (With Discrete I/O Pcb)
Nitrogen Vent Port Nitrogen vent port. Wireless Label A wireless info label for leak detector with an optional Wireless Remote Control. The rear panel of the leak detector (Model G8610A and G8610B) is shown in Figure 1-21. Figure 1-21 Rear Panel (with Discrete I/O PCB) - Page 50 Connection nector. Analog Output The Agilent Technologies Helium Mass Spectrometer leak detector is equipped with a DB9F connector for the analog output. Pin #1 is signal (positive) and Pin #2 is return (negative). Signal range: From 0 to 10 VDC...
-
Page 51: Features
Agilent Technologies Helium Leak Detector ❑ 25 Pin I/O Inputs: Opto-isolated, 5 - 24 VDC 3300 Ohm resistive load. All inputs are opto-isolator LEDs with series resistors. ❑ Momentary Inputs: Opto-isolated, 5 - 24 VDC 3300 Ohm resistive load, requires 200 ms minimum pulse width. - Page 52 Agilent Technologies Helium Leak Detector Table 1-4 Features (Continued) Feature Description Wireless Remote Control This provides: ❑ RF communication between the leak detector (with base station or host) and the Wireless Remote unit from a distance up to 100 m (300 ft).
-
Page 53: Section 2. Operating The Leak Detector
Agilent Technologies Helium Leak Detector Section 2. Operating the Leak Detector 2.1 Screens The leak detector display is used for the initial set-up and configuration of the leak detector. Once the leak detector is set up and configured for a specific application, basic operation is controlled primarily using the TEST and VENT buttons on the leak detector and the Home screen Zero button (Section 3 “Home Screen”... - Page 54 Agilent Technologies Helium Leak Detector This page intentionally left blank.
-
Page 55: Section 3. Home Screen
Agilent Technologies Helium Leak Detector Section 3. Home Screen 3.1 Home Screen The Home screen displays a summary of the following status and configuration settings: ❑ ❑ ❑ Digital Leak Rate Display Test Port Pressure Gross Test button (not shown) Leak Detector Status ... - Page 56 Agilent Technologies Helium Leak Detector Hold Places the system in Hold (while in Test, press Test again to starts Hold); keeps the test port under vacuum and does not vent. Use Hold to keep the system under vacuum, while taking the leak detector out of test.
-
Page 57: Main Menu Select
Agilent Technologies Helium Leak Detector Pressing Zero while introducing helium tracer gas to the test NOTE object or while the helium background is varying significantly could result in the suppression of a real leak. Only use the Zero button after the helium tracer gas source has been removed. - Page 58 Agilent Technologies Helium Leak Detector Zero Enable Turns on or off the zeroed out background. This feature excludes the background leak from the leak rate signal. Helium background represents helium that is in the system but does not come from the part under test. If the background is zeroed out, a more accurate measurement of the leak rate of the part is determined.
- Page 59 Agilent Technologies Helium Leak Detector Table 3-2 Leak Detector Condition States (Continued) Display Description Cal OK Indicates that the calibration routine was executed successfully. Calibration Prep Indicates that the leak detector is preparing for a calibration routine. Filament 1 ...
- Page 60 Agilent Technologies Helium Leak Detector Table 3-2 Leak Detector Condition States (Continued) Display Description System Pressure Wait Indicates that the system (spectrometer) pressure is too high to light the ion source filament. System Ready Indicates that the system is ready for testing. This message appears only during the initial startup and is cleared after the first test cycle.
-
Page 61: Graphical Display
Agilent Technologies Helium Leak Detector 3.1.1 Graphical Display Screen The graphical display screen (Figure 3-4) represents the leak rate over time. The graphing line appears in blue and changes to red when a reject set point is triggered. Tapping the graph... - Page 62 Agilent Technologies Helium Leak Detector Pressing Zero while introducing helium tracer gas to the test NOTE object, or while the helium background is varying significantly, could result in the suppression of a real leak. Only use the Zero button after the helium tracer gas source has been removed.
-
Page 63: Menus Screen
Agilent Technologies Helium Leak Detector 3.1.2 Menus Screen ❑ Press Menus on the Home screen. The Menus screen appears (Figure 3-5). Use the arrow to navigate to the previous screen. The Menus screen consists of buttons to access the lower level screens used for application-specific configuration. - Page 64 Agilent Technologies Helium Leak Detector This page intentionally left blank.
-
Page 65: Section 4. Calibration Screen
Agilent Technologies Helium Leak Detector Section 4. Calibration Screen 4.1 Calibration Set-Up ❑ Press Calibration Menu screen. The Calibration screen appears (Figure 4-1). Use this screen to: ❑ View the value and expiration date of the Internal Calibrated Leak ❑... -
Page 66: Minute Warm-Up Dialog
Agilent Technologies Helium Leak Detector Calibrate Calibrates the system. Internal or External appears to indicate which leak the system is using to calibrate. Automated calibration is performed based on the parameters set on the Calibration screen. The sequence of events is: ❑... - Page 67 Agilent Technologies Helium Leak Detector Read Internal Leak Opens the Internal leak valve so the leak can be seen by the system. The Read Internal Leak button is only functional while the leak detector is in Test/Fine test and activates the internal calibrated leak, allowing verification of the system calibration.
-
Page 68: Helium Background Timer
Agilent Technologies Helium Leak Detector The data entry pad appears. 3. Enter the leak value and press OK. For calibration in the E-10 range, the vacuum system must be sufficiently pumped to reduce helium background below the E-10 range signal level. This is required to achieve an acceptable signal-to-noise level and ensure accurate calibration. -
Page 69: Section 5. Test Configuration Screen
Agilent Technologies Helium Leak Detector Section 5. Test Configuration Screen 5.1 Test Configuration 5.1.1 Test Configuration Menu The Test Configuration Menu allows you to: ❑ Program and activate process setpoints (leak rate pressure and audio) ❑ Enable or disable leak detector advanced features ❑... -
Page 70: Reject And Audio Setpoints
Agilent Technologies Helium Leak Detector Toggles these options on/off. Press the desired Activates the reject value to access its keypad set point if below the programmed value Activates the reject set point if above the programmed value Figure 5-1 Reject and Audio Setpoints... - Page 71 Agilent Technologies Helium Leak Detector For Plugged Probe Alarm - High Pressure Test (Sniffing Mode) NOTE see Section 5.1.3.5 “Sniff Method” on page 79. ❑ Off: The audio sounds for all leak rates above zero. Set points may be turned ON or OFF (enabled or disabled).
-
Page 72: Test Configuration Advanced Features
Agilent Technologies Helium Leak Detector 5.1.2 Test Configuration Advanced Features Use this screen to configure the High Pressure Test, Fine Test Only, AZ<0<0, Gross Test, Transfer to Test and Stabilization Wait Timer. Figure 5-2 Test Configuration Screen High Pressure Test Select the High Pressure Test mode. - Page 73 Agilent Technologies Helium Leak Detector Auto-Zero<0 Active Adjusts the zero reference point automatically and continually to the correct zero value when the helium background level drops below the previously set zero reference point. This feature ensures that the leak detector maintains a correct balance value after a pre- viously zeroed background signal naturally cleans up (background helium is pumped away).
-
Page 74: Gross Test Screen
Agilent Technologies Helium Leak Detector Figure 5-3 Gross Test Screen ❑ Gross Test is activated in the Test Configurations > Advanced Features menu. ❑ Once activated, the GROSS TEST button appears on the Home screen. Press GROSS TEST to enter the screen. -
Page 75: Transfer To Test
Agilent Technologies Helium Leak Detector 5.1.2.2 Transfer to Test The value input and hidden keypad is to the right of the Transfer to Test feature. Use it to set the pressure at which the system goes into Test. The Transfer to Test setting can be adjusted to lower values for specific applications. - Page 76 Agilent Technologies Helium Leak Detector 5.1.2.2.1 Stabilization Wait Timer Figure 5-4 shows the Transfer Points screen. Stabilization Wait This appears on the Home screen after a successful startup. This timer is necessary for the spectrometer stabilization and degassing. The factory default is 5 minutes. It is highly recommended for those...
-
Page 77: Home Screen - Activate Gross Test
Agilent Technologies Helium Leak Detector 5.1.2.4 Home Screen - Activate Gross Test Press to activate Gross Test. Figure 5-5 Home Screen - Activate Gross Test Gross Test Allows the operator to locate leaks while the system is in roughing mode. The test indicates the presence of a leak at high pressures only and does not display a leak rate value. -
Page 78: Application Setup
Agilent Technologies Helium Leak Detector Figure 5-6 Home Screen - Gross Test Active 5.1.3 Application Setup Figure 5-7 Application Setup... -
Page 79: Sniff Method
Agilent Technologies Helium Leak Detector 5.1.3.5 Sniff Method Utilizing the Agilent Power Probe connected to the test port of the Helium Leak Detector, the sniff method pinpoints the location and magnitude of leaks from volumes that have been filled with helium. Settings available in this mode include: ❑... - Page 80 Agilent Technologies Helium Leak Detector Audio Set Point: Desired Audio Alarmed Leak Rate Value (> <) - This value can be adjusted from 10 to 10 . The Audio Set Point triggers with its' own distinct tone if different from Set Point 1.
-
Page 81: Spray Method
Agilent Technologies Helium Leak Detector 5.1.3.6 Spray Method The spray method is for leak testing vacuum systems of all sizes. When properly connected to the vacuum system under test, the Helium Leak Detector will locate and indicate the relative size of leaks. Settings available in this mode include: ❑... - Page 82 Agilent Technologies Helium Leak Detector The Wireless Remote is a factory and field installed customer NOTE option. Files The operator can store up to three setup configurations: ❑ Spray 1-3 The information icon provides the necessary directions for a suc- cessful external calibration.
-
Page 83: High Sensitivity
Agilent Technologies Helium Leak Detector 5.1.3.7 High Sensitivity Often, calibration to a known, external helium leak standard is required for internal quality requirements or additional accuracy. High Sensitivity Test guides you through this procedure. Settings available and features in this mode include: ❑... - Page 84 Agilent Technologies Helium Leak Detector 5.1.3.8 Auto Sequencer The Agilent Auto Sequencer facilitates programming a repetitive test cycle for leak testing parts that have been sealed with helium inside. This can improve productivity and reduce testing errors. Settings available in this mode include: ❑...
- Page 85 Agilent Technologies Helium Leak Detector Rough Time Determines the amount of time that the leak detector is allowed to evacuate the test object to the Maximum Test Pressure (see Section 5.1.2.2 on page 75). In Auto Sequencer mode, the leak detector transfers into test as soon as the specified transfer pressure is met.
-
Page 86: Auto Sequencer
Agilent Technologies Helium Leak Detector ❑ Press TEST and let the system record the actual time spent in roughing. After the test is complete, use the recorded rough timer value to set an appropriate rough time. To access: 1. Select Test Configurations > Applications Setup. - Page 87 Agilent Technologies Helium Leak Detector Test Time This setting tells the system when to perform the test against the set point values. For example, you may set 20 seconds for the Test Time. At the end of 20 seconds, the system determines if the part...
- Page 88 Agilent Technologies Helium Leak Detector 5.1.3.8.2.2 Test Time Setup 1. Program the Test Time for some value that allows for correct characterization of the necessary test time to reach at least one decade less than that of Setpoint 1 (reject level).
-
Page 89: Split Flow Application
Agilent Technologies Helium Leak Detector 5.1.3.9 Split Flow Activating the split flow option properly characterizes the system to an external calibrated leak, which is influenced by additional vacuum pumping sources. These separate vacuum pumping sources reduce the amount of helium measured by the leak detector. - Page 90 Agilent Technologies Helium Leak Detector ❑ At the main screen, the system blinks the split flow symbol when split flow is ❑ When split flow is turned ON, it displays the corrected leak rate but it knows the real leak rate value.
-
Page 91: Split Flow Setup
Agilent Technologies Helium Leak Detector Figure 5-13 Split Flow Setup 7. Enter the value of the installed external calibrated leak. 8. Optional - Enter a Set Point 1 leak rate value. 9. Optional - Enter an Audio Set Point value. -
Page 92: Ppm Sniff Method
Agilent Technologies Helium Leak Detector 5.1.3.10 PPM (parts per million) Sniff Method Certain test protocols specify parts per million (PPM) units for measuring leak rates. This test method is only to be used with a suitable sniffer probe, it is not intended for vacuum leak testing. -
Page 93: Sniffing Setup
Agilent Technologies Helium Leak Detector Figure 5-15 Sniffing Setup 4. If the leak detector is vented - Press the Test button in the bottom right hand corner. Adjust the metering valve on the Sniffing Probe until a desired value between 5.0E-1 and 1 Torr is obtained. - Page 94 Agilent Technologies Helium Leak Detector 5.1.3.10.3 Calibrating to a Known Helium PPM Concentration ❑ Cheapest method ❑ Fastest response time ❑ Requires calibration using a known Helium PPM gas mixture This requires calibrating using a known PPM mixture, such as a NOTE 50 PPM helium mixture.
-
Page 95: Metering Valve Overall Assembly
Figure 5-16 Metering Valve Overall Assembly Figure 5-17 Metering Valve Assembly Item A. (2X) Description: NW25 to 1/4 NPT stainless steel male pipe adapter Make: Agilent Technologies Inc. - Agilent part number: KAMP250250S Item B. (2X) Description: 1/4 NPT to 1/4" tubing adapter... -
Page 96: External Sniff Calibration Setup
Agilent Technologies Helium Leak Detector 5. Place system into Test and ensure the test port pressure adjusted between 5E-1 Torr 1 Torr (750 mTorr preferred). 6. Perform an internal calibration. 7. Perform an external calibration using the sniffing probe (Figure 5-18) by: a. -
Page 97: Alicat Scientific Mass Flow Meter Supported Method Of Ppm Testing
Agilent Technologies Helium Leak Detector Figure 5-19 Alicat Scientific Mass Flow Meter Supported Method of PPM Testing The hose may be connected to the inlet side of the mass flow meter. One connection technique is described here, if you desire to purchase the Agilent sniffer power probe. 1/16"... -
Page 98: Re-Purposing A Power Probe For Thin Hose Without A Regulator
Agilent Technologies Helium Leak Detector Connecting from 3/16" tubing to 1/16" tubing may be accomplished using McMaster-Carr part number 2808K105. 1/16" tubing should be used as the long line sniffer in this application, not the thicker 3/16" ID tubing. The thinner tubing gives a faster response time for a helium signal. -
Page 99: External Sniff Calibration Setup
Agilent Technologies Helium Leak Detector The smallest mass flow meter that may be used while still NOTE functioning. It could be as small as 300 SCCM, though this flow rate may not be capable of reading mass flow when measuring flows of mobile unit leak detectors (units with larger roughing pumps). -
Page 100: Compression Port
Agilent Technologies Helium Leak Detector Figure 5-23 Compression Port Figure 5-24 Probe Configuration 2. Measure the flow rate. Write this number down for later. 3. Vent the system and remove the mass flow meter. If the test port pressure remains constant, the flow rate should not change. - Page 101 Agilent Technologies Helium Leak Detector 5.1.3.10.6.7 Parts per Million (PPM) Application Notes Theory Parts per million (PPM) of helium may be measured using a helium leak detector that is either used in conjunction with a mass flow meter, or is calibrated using a known concentration (PPM) of helium.
- Page 102 Agilent Technologies Helium Leak Detector This page intentionally left blank.
-
Page 103: Section 6. Settings Screen
Agilent Technologies Helium Leak Detector Section 6. Settings Screen 6.1 Settings Menu The Settings Menu configures the leak detector for a desired appearance and functionality. The Settings Menu consist of the following: ❑ Main Settings - Date and Time setup, Leak Rate and Pressure Units selection and Language selection. -
Page 104: Main Settings
Agilent Technologies Helium Leak Detector 6.2 Main Settings To open this screen select Menu tab > Setting > Main Settings. With the Settings Menu open, select the Main Settings Menu as shown below: Figure 6-1 Settings: Main Settings Buttons and Fields Date &... -
Page 105: Screen Settings
Agilent Technologies Helium Leak Detector Language Selections available include: ❑ English ❑ French ❑ Spanish ❑ German ❑ Mandarin ❑ Korean ❑ Japanese ❑ Russian 6.2.1 Configure Date and Time To configure the Date and Time screen: Figure 6-2 Date and Time 1. - Page 106 Agilent Technologies Helium Leak Detector Figure 6-3 Settings: Screen Settings Buttons and Fields Bar Graph Configures the bar graph: ❑ Linear Scale - The linear bar graph leak rate appears across the top of all screens when selected. In the Linear Bar Graph display mode, the bar graph display represents the mantissa of the leak rate, spanning from 0 to 10.
- Page 107 Agilent Technologies Helium Leak Detector Range Configures Minimum Range (Range Stop) and Only Show Range (Manual) Leak Rate options ❑ Only Show Range - Configures the leak detector so that it only displays the pre-selected decade entered in the manual range variable field.
-
Page 108: Analog Output
Agilent Technologies Helium Leak Detector Table 6-1 Range Stop/Sensitivity Requirements Range Stop Max Gain 5.00E-10 5.00E-09 6.2.3 Analog Output Analog Output Configures the analog outputs: ❑ Linear 10 V/DEC Linear output running from 0 to 10 V for each decade. -
Page 109: Leak Detector Linear Output Voltage
Agilent Technologies Helium Leak Detector Output Voltage = Leak Rate Mantissa Leak Rate Mantissa = Output Voltage *Standard and High Sensitivity Versions Output Voltage (Volts) Figure 6-4 Leak Detector Linear Output Voltage V = LOG (Leak Rate X 10 Leak Rate = 10... -
Page 110: Remote Control
Agilent Technologies Helium Leak Detector 6.2.4 Remote Control The remote control feature is a factory or field installed wireless option that establishes communication between the leak detector and Agilent's wireless hand-held remote control. Use this menu to activate the leak detector's wireless baseboard option and to assign the RF channel number that the remote hand-held device will link with. -
Page 111: Password And Restrictions
Agilent Technologies Helium Leak Detector 6.2.5 Password and Restrictions The Password and Restrictions Menu is an optional configuration that protects the setup of the leak detector. The factory and operational setups of the leak detector significantly affect the performance of the leak detector and must only be accessed by trained service personnel. -
Page 112: Wireless
Agilent Technologies Helium Leak Detector The password can also be read through the RS-232 port in the NOTE event of a lost password. See Section A “Communications Protocol” on page 139. Lock Vent Control Disables the VENT button. This option prevents accidental system venting during test while under remote or PLC control. -
Page 113: Section 7. Maintenance Screen
Agilent Technologies Helium Leak Detector Section 7. Maintenance Screen 7.4 Maintenance Menu The Maintenance Menu allows you to view or change the settings/parameters of the leak detector, including ❑ General ❑ Internal Calibrated Leak ❑ Manual Tuning ❑ Spectrometer tuning parameters ❑... -
Page 114: Usb Port
Agilent Technologies Helium Leak Detector 7.4.1 Software Update Contact Agilent Customer Service/Technical Support for the latest software upgrade. The software update utility is necessary when added features and software upgrades are needed. A USB jump drive is all that is needed. The USB port is located in the back of the leak detector Figure 7-2. -
Page 115: Internal Calibrated Leak Setup
Agilent Technologies Helium Leak Detector 7.4.2 Internal Calibrated Leak Setup Use this screen to set the Internal Leak Value, Temperature Coefficient or Expiration Date. The Internal Calibrated Leak screen appears (Figure 7-4). Figure 7-4 Internal Calibrated Leak To use this screen: 1. -
Page 116: Internal Calibrated Leak Keypads
Agilent Technologies Helium Leak Detector Figure 7-5 Internal Calibrated Leak Keypads 2. Enter the required values as shown on the calibrated leak label or calibration certification. 3. Repeat step 1 and 2 for each desired item. 4. Press OK to exit the screen. -
Page 117: Calibrated Leak
Agilent Technologies Helium Leak Detector Figure 7-6 Calibrated Leak The actual value and information of the internal calibrated can NOTE be found on the calibration certificate that shipped with the leak detector or shipped with the field installed calibrated leak. -
Page 118: Manual Tuning
Agilent Technologies Helium Leak Detector 7.4.3 Manual Tuning ❑ Press Manual Tuning and the Manual Spectrometer Tuning screen appears (Figure 7-7). Use this screen to view and manually adjust the parameters of the ion source in the spectrometer for a maximum helium signal. - Page 119 Agilent Technologies Helium Leak Detector Filament Switches between Filament 1 and 2. The filament selection can be performed manually, but occurs automatically if the current operat- ing filament burns out. A calibration routine is recommended every time the operating filament is changed.
- Page 120 Agilent Technologies Helium Leak Detector ❑ Adjust the ION value up or down to attain the maximum value. Ideally, the ION value should be between 205 and 240. ❑ Adjust the EMISSION to attain the maximum value. Ideally, the EMISSION value should be between 0.600 and 1.200.
-
Page 121: Maintenance: Valve Control
Agilent Technologies Helium Leak Detector 7.4.4 Maintenance: Valve Control Use this screen to monitor and control the valves in the leak detector vacuum system for troubleshooting purposes. See Figure 7-10 on page 123 for an illustration of the leak detector vacuum system. - Page 122 Agilent Technologies Helium Leak Detector These models all contain a diaphragm pump as shown above V8. Manipulation of the valves using the Manual Valve Control CAUTION screen must only be performed by persons who are extremely familiar with the leak detector as damage to critical components (e.g., spectrometer, turbo) can occur.
-
Page 123: Leak Detector Vacuum System Diagram
Agilent Technologies Helium Leak Detector Test Port Test Port thermocouple Calibrated Leak Spectrometer V1 Foreline V2 Contraflow1 V3 Contraflow2 V4 Midstage1 V5 Midstage2 V6 Cal Leak * V8 V7 Vent *V8 Exhaust Figure 7-10 Leak Detector Vacuum System Diagram * Normally open valve, powered closed during all operations. ** Model G8610B, G8611C,... -
Page 124: Maintenance: Pump
Agilent Technologies Helium Leak Detector 7.4.5 Maintenance: Pump The Pump Menu screen displays the Fore pump type (Dry or Oil) - Factory configured. Operating hours and Last Service are also displayed. This menu also displays the installation of a diaphragm exhaust pump and its' operating hours and Last Service Date. -
Page 125: Maintenance: Gauge Calibration
Agilent Technologies Helium Leak Detector 7.4.5.1 Fore Pump Type and Exhaust Pump Activation The fore pump type and exhaust pump are configured at the factory or can be configured by a service engineer. When the Last Service date is updated/changed the Operating NOTE Hours reset to Zero. -
Page 126: Maintenance: System Defaults
Agilent Technologies Helium Leak Detector Test Port ATM Sets the thermocouple atmospheric value. Perform this operation only when the test port is at atmosphere. Test Port Pressure and These values appear on this screen for reference. Spectrometer Pressure 7.4.6.2 Test Port Pressure Gauge Calibration Procedure Calibrates the test port pressure thermocouple gauge. -
Page 127: System Information
Agilent Technologies Helium Leak Detector 7.4.6.4 System Information ❑ Press System Information on the Menus screen. The System Information screen appears (Figure 7-14). This screen gives details of the installed software version, spectrometer parameters and the turbo frequency. Figure 7-14 System Information... -
Page 128: Current Setup Screen
Agilent Technologies Helium Leak Detector 7.4.1 Current Setup Menu Details of the current leak detector setup are displayed. Reject and audio set point status, auto sequencer status & split flow. The calibrated leak setting, leak rate range settings and vent lock out status. -
Page 129: Power Off
Agilent Technologies Helium Leak Detector Table 7-3 Current Setup Screen Conditions (Continued) Condition Display Description Range Stop Range Stop -[Exp] System is set to display the most [Exp] sensitive leak rate range, 10 See Section 4 “Calibration Screen” The range stop line shows only if on page 65. -
Page 130: Power Off
Agilent Technologies Helium Leak Detector 1. Select Power Off. 2. Wait for the Status Bar to fill to 100%. 3. Press OK and turn off the power switch located in the back of the leak detector. Figure 7-17 Power Off... -
Page 131: Section 8. Unit Maintenance
Agilent Technologies Helium Leak Detector Section 8. Unit Maintenance All service must be performed by trained personnel only. NOTE A mass spectrometer leak detector requires periodic maintenance to ensure continued reliable operation. After prolonged use, the leak detector accumulates contaminants from even the cleanest of products tested that eventually impair operation. - Page 132 Agilent Technologies Helium Leak Detector Cleanliness is vital when servicing the leak detector or any vacuum equipment. There are some techniques more important in leak detector servicing than in general vacuum work: Do not use silicone oil or silicone grease.
- Page 133 Replace tip seals on models: G8610B, G8611B, G8611C, G8611D,G8612B,G8611C Change Oil - Models G8610A, G8611A, G8611B, G8611D, G8612A Maintenance functions that may be required on a demand basis, such as changing a filament after filament failure, are listed in Table 8-2.
- Page 134 Agilent Technologies Helium Leak Detector Table 8-2 As-Required Maintenance Function Most Common Symptom Tuning adjustments If calibration is not successful or if the system is calibrated to an external leak, tuning can maximize the helium signal. Mechanical pump fluid change Persistent, high helium background signal.
-
Page 135: Daily Maintenance
Agilent Technologies Helium Leak Detector 8.1 Daily Maintenance 8.1.1 Sensitivity Check To perform a sensitivity check: 1. Turn on the Std Leak in the Control Panel screen. 2. Compare the value on the Home screen to the value of the known calibrated leak on the Internal Calibrated Leak screen. -
Page 136: Spare Parts List
Agilent Technologies Helium Leak Detector 8.3 Spare Parts List Table 8-4 Leak Detector Spare Parts Assembly Part Number Motherboard PCB R2101501 Ion Source PCB R2120502 Valve Driver PCB R2104502 Exchange Turbo Pump Controller PCB EX9699518M001 Touchscreen Display G8610-68003 Spectrometer Assembly, Exchange... - Page 137 Agilent Technologies Helium Leak Detector Table 8-5 Primary Pumps Replacement Parts Description Model Number Part Number DS302, Exchange Rotary Vane Pump G8611A, G8612A EX9699325 DS302 Minor Maintenance Kit G8611A, G8612A 9499370 TriScroll 620, Exchange Module G8611B, G8612B X3828-69510 TriScroll 620, Exchange Pump for cart...
-
Page 138: Leak Detector Accessory Item List
Agilent Technologies Helium Leak Detector 8.4 Leak Detector Accessory Item List Table 8-6 Leak Detector Accessory Item List* Assembly Part Number Flapper Box, NW25 Flange VSFLDFBNW25 Flapper Box, Cable (I/O option required) VSFLDFBCBL Power Probe, 10’ (NW25 Flange) K9565306 Power Probe, 25’ (NW25 Flange) -
Page 139: Appendix A. Communications Protocol
Agilent Technologies Helium Leak Detector Appendix A. Communications Protocol This appendix defines the technical specifications for the RS-232 protocol used with the leak detector and describes the customer-configured inputs/outputs. A.1 Protocol (RS-232) RS-232 ports operate at 9600 baud, 8 bits, no parity, and one stop bit. -
Page 140: Communicating With Rs-232
Agilent Technologies Helium Leak Detector A.2 Communicating with RS-232 The RS-232 Protocol is intended for diagnostic purposes and initial set-up inquires. The RS-232 connection is located on the rear D-sub 9-pin connector. The leak detector RS-232 port is not an interrupt-driven port. It is configured as DTE (Data Terminal Equipment), therefore the leak detector's RS-232 Protocol cannot be sent as strings. - Page 141 Agilent Technologies Helium Leak Detector 7. Configure the following settings: ❑ Bits per second (baud rate) – 9600 ❑ Data bits: – 8 ❑ Parity: – None ❑ Stop bits: – 1 ❑ Flow Control: – None 8. Click OK.
-
Page 142: Printing With Hyperterminal
Agilent Technologies Helium Leak Detector A.2.2 Printing with HyperTerminal The easiest way to print information captured in HyperTerminal is to choose Print from the File menu; however, this method only prints information currently displayed on the screen. Screen information can also be highlighted, copied and pasted into Microsoft Word or Excel. - Page 143 Agilent Technologies Helium Leak Detector Table A-1 lists inquiries that are used to determine internal operating parameters. All inquiries, except VER, begin with and end with <CR>. Table A-1 Internal Operating Parameters Inquiry Response ?ALL Responds with four lines. Each begins with a <cr><lf>. The first line reports the ion chamber value.
- Page 144 Agilent Technologies Helium Leak Detector Table A-1 Internal Operating Parameters (Continued) Inquiry Response ?LEAK Reports a six-character number consisting of a two-digit leak rate mantissa with decimal point after the first digit followed by E - then a two digit number, which is the leak rate range exponent (e.g., 1.3E-08).
- Page 145 Agilent Technologies Helium Leak Detector Table A-1 Internal Operating Parameters (Continued) Inquiry Response ?SETUP Reports seven lines, each begins with a <cr><lf>. The first line reports the turbo pump speed with the RPM value or OFF. The second line reports the selected manual leak rate range, and the ranging method as auto or manual.
- Page 146 Agilent Technologies Helium Leak Detector The commands listed in Table A-2 are used to set non-volatile operating parameters. The current value of the operating parameter is changed to the new value. If the leak detector is in back panel control, the response is cant.
- Page 147 Agilent Technologies Helium Leak Detector Table A-2 Non-Volatile Operating Parameters (Continued) Command Parameter INIT-ION Sets the ion voltage of the ion source. Preceded by a three-digit number (volts) in the range 220 to 280. INIT-LANGUAGE Selects the language to be shown on the display. Preceded by 0-6 where (0=English, 1=French, 2=German, 3=Korean, 4=Spanish, 5=Japanese, 6=Chinese).
- Page 148 Agilent Technologies Helium Leak Detector Table A-2 Non-Volatile Operating Parameters (Continued) Command Parameter INIT-4REJECT Sets the test port pressure value for Reject Set Point #4. Preceded by a two-digit leak rate mantissa with a decimal point after the first digit followed by E-, and then by a two-digit exponent: the test port TC pressure in millitorr.
- Page 149 Agilent Technologies Helium Leak Detector Table A-2 Non-Volatile Operating Parameters (Continued) Command Parameter UNLOCK-MS Disables the MS lock feature. ?MS-LOCK Queries the status of the MS lock feature; either on or off appears. The commands listed in Table A-3 are used to cause an immediate change in the spectrometer operating parameters.
- Page 150 Agilent Technologies Helium Leak Detector Table A-4 Leak Detection Actions (Continued) Command Action DISABLE-xREJECT Turns the Reject Set Point OFF. Where x is a number from 1 to 4 or the letter A. DISABLE-RANGESTOP Turns the Range Stop function OFF.
- Page 151 Agilent Technologies Helium Leak Detector Table A-4 Leak Detection Actions (Continued) Command Action TUNE Adjusts the ion source voltage to cause a maximum response to helium. VENT Causes the leak detector to isolate and vent the test port to the atmosphere.
-
Page 152: Customer Accessible Inputs And Outputs
Agilent Technologies Helium Leak Detector A.3 Customer Accessible Inputs and Outputs A.3.1 Serial Connector Use the SERIAL connector on the Rear Panel to interface the leak detector to a PC via an isolated RS-232 connection. Table A-5 and Figure A-1 provide details of the connection. A typical connection from a 9-pin PC serial connector requires a female-to-female, 9-pin, null modem cable, where pins 2 and 3 are crossed. - Page 153 Agilent Technologies Helium Leak Detector Table A-6 I/O Connector Pin Signals (Continued) Signal Name Signal Description Leak Detector Behavior ZERO_OUT Level Active HIGH when the leak Performs the Zeroing detector is in ZEROING routine. mode. HOLD_OUT O Level Active HIGH when the leak Performs a HOLD routine detector is in HOLD mode.
- Page 154 Agilent Technologies Helium Leak Detector Table A-6 I/O Connector Pin Signals (Continued) Signal Name Signal Description Leak Detector Behavior REJECT4_ Level Active HIGH when the test Indicates that the value of port pressure is over set the test port pressure point #4.
-
Page 155: A-2 Optically Isolated Output Circuit Sketch
Agilent Technologies Helium Leak Detector Table A-6 I/O Connector Pin Signals (Continued) Signal Name Signal Description Leak Detector Behavior RDSTDLK_ Level Active HIGH when standard Initiate the INTERNAL leak is ON. STANDARD LEAK reading routine. PARALLEL_ Level Active HIGH when ENABLE... -
Page 156: A-3 Optically Isolated Input Circuit Sketch
Agilent Technologies Helium Leak Detector Figure A-3 shows the input circuit sketch. All inputs are optically isolated 3300 Ohm resistive loads in series with the LEDs of the opto-isolators and voltage level from +5 VDC to +24 VDC. The required pulse inputs are 200 ms minimum pulse width. -
Page 157: Appendix B. Introduction To Leak Detection
Agilent Technologies Helium Leak Detector Appendix B. Introduction to Leak Detection B.1 Leak Testing—Why is it Needed? Helium is a superior choice of tracer gas used to find leaks for a multitude of reasons. Helium is: ❑ Non-toxic ❑ Inert and non-condensable ❑... -
Page 158: B-1 Magnetic Separation Principle
Agilent Technologies Helium Leak Detector ❑ Valves that enable the various stages of the leak detection cycle, from evacuation, to test, to venting ❑ Amplifier and readout instrumentation that monitors spectrometer output signal ❑ Electrical power supplies and controls that sequence valve’s, protective circuits, etc. -
Page 159: Methods Of Leak Testing
Agilent Technologies Helium Leak Detector Figure B-2 Selective Ion Pump Detector B.3 Methods of Leak Testing There are many different ways to leak test parts using helium as a tracer gas. In general, the leak detection method is selected based on the actual working conditions of the part being tested. -
Page 160: Vacuum Testing Method (Outside-In)
Agilent Technologies Helium Leak Detector B.3.1 Vacuum Testing Method (Outside-in) The part to be tested is evacuated with a separate pumping system for large volumes, or with just the leak detector itself. When the appropriate cross over pressure has been... -
Page 161: Pressure Testing Method (Inside-Out)
Agilent Technologies Helium Leak Detector B.3.2 Pressure Testing Method (Inside-out) In this technique, the part is pressurized with helium or a mixture of helium and air, and tested by one of the following methods. B.3.2.1 Measuring Leaks To determine the total quantity of leakage (but not the number or location of leaks), the part is pressurized with helium (or a mixture of helium and air or nitrogen). -
Page 162: System Leak Test Methods
Agilent Technologies Helium Leak Detector B.3.2.2.1 Accumulation Testing Method This method can both locate and quantify leaks. Some type of shroud or hood is placed in such a manner as to envelop a potential leak site. A certain amount of time is given to allow leaking helium to accumulate in the shrouded area, increasing the helium concentration. -
Page 163: B-8 Vacuum System
Agilent Technologies Helium Leak Detector Mount Test Part to Port Figure B-8 Vacuum System B.3.3.2 Pressurized Systems Many different types of pressurized systems also need to be leak-free. These systems can be charged with helium or some mixture of helium and another gas such as nitrogen. If a diluted helium mixture is used, the helium signal is diminished proportionally. -
Page 164: Typical Leak Detection Applications
Downtime in either case must be minimized. A rugged, dependable, fast starting leak detector is essential to maximize up time of production tools. Agilent Agilent Technologies Helium Mass Spectrometer portable leak detectors keep industry moving. Examples of some... -
Page 165: System Integrated Leak Detection
Agilent Technologies Helium Leak Detector ❑ Semiconductor process tools ❑ Laser process equipment Pressurized systems ❑ Power Plants ❑ Underground tanks, cables, and pipes ❑ High purity gas handling systems ❑ Bioreactors and fermenters ❑ Liquid gas manufacturing facilities ❑... - Page 166 Agilent Technologies Helium Leak Detector Portable Sniffing Applications Some applications require operators or technicians to look for leaks from a ladder, outdoors, above or below ground, or in a densely constructed industrial facility or power plant. In these cases, a mobile cart-mounted MSLD may not be practical. A truly portable unit such as the PHD-4 is required.
-
Page 167: Appendix C. Specifications
Agilent Technologies Helium Leak Detector Appendix C. Specifications C.1 Specifications The specifications for the leak detector are provided in Table C-1. Table C-1 Leak Detector Series Specifications Agilent Technologies Helium Mass Spectrometer Versions Specifications Pumps Rotary Vane Dry Scroll Fore Pump Type... - Page 168 See outline drawings (Figure 1-1 on page 27 to Figure 1-14 on page 35). Weight G8610A with built in DS40M pump: 77 lb./35 kg* G8611A w/DS-302 rotary vane pump on cart: 172 lb./78 kg* G8611C w/IDP-15 dry scroll pump on cart: 194 lb./88 kg* G8611B w/TS-620 dry scroll pump on cart: 192 lb./87 kg*...
- Page 169 Agilent Technologies Helium Leak Detector Table C-1 Leak Detector Series Specifications (Continued) Agilent Technologies Helium Mass Spectrometer Specifications Versions Contra cross over 10 Torr decreasing, 12 Torr increasing Sensitivity in High 1 x 10 atm.cc.sec Pressure Test mode...
- Page 170 Agilent Technologies Helium Leak Detector This page intentionally left blank.
- Page 171 Please follow these instructions whenever one of our products needs to be returned. 1) Complete the attached Request for Return form and send it to Agilent Technologies (see below), taking particular care to identify all products that have pumped or been exposed to any toxic or hazardous materials.
- Page 172 This page intentionally left blank. 4) HEALTH and SAFETY CERTIFICATION AGILENT TECHNOLOGIES CANNOT ACCEPT ANY PRODUCTS CONTAMINATED WITH BIOLOGICAL OR EXPLOSIVE HAZARDS, RADIOACTIVE MATERIAL, OR MERCURY AT ITS FACILITY. Call Agilent Technologies to discuss alternatives if this requirement presents a problem.
- Page 173 Shipping Regulations (IATA, DOT, etc.) and carrier requirements. Customers receiving an Advance Exchange product agree to return the defective, rebuildable part to Agilent Technologies within 15 business days. Failure to do so, or returning a non-rebuildable part (crashed), will result in an invoice for the non-returned/non-rebuildable part.
- Page 174 Agilent Technologies Helium Leak Detector This page intentionally left blank.
- Page 175 Agilent Technologies Helium Leak Detector This page intentionally left blank.
- Page 176 Service & Support North America India Southeast Asia Agilent Technologies Sales Sdn Bhd Agilent Technologies Agilent Technologies India Pvt. Ltd. Vacuum Products Division Vacuum Products Division Vacuum Products Division 121 Hartwell Avenue G01. Prime corporate Park, Unit 201, Level 2 uptown 2,...