Table of Contents
Advertisement
Available languages
Available languages
VENTIlogic LS/VENTIlogic plus
VENTIlogic LS with leakage ventilation / met lekkagesysteem
VENTIlogic LS - single patient circuit with patient valve / systeem
met een slang met patiëntenventiel
VENTIlogic LS - double patient circuit with patient valve /
systeem met dubbele slang met patiëntenventiel
VENTIlogic plus with leakage ventilation / met lekkagesysteem
VENTIlogic plus - single patient circuit with patient valve /
systeem met een slang met patiëntenventiel
Instructions for use for devices up to serial number 9.999 and from
firmware version 2.07 upwards
Gebruiksaanwijzing voor apparaten tot serienummer 9.999 en vanaf
firmwareversie 2.07
Advertisement
Table of Contents

Related Manuals for Weinmann VENTIlogic LS


Summary of Contents for Weinmann VENTIlogic LS
- Page 1 VENTIlogic LS/VENTIlogic plus VENTIlogic LS with leakage ventilation / met lekkagesysteem VENTIlogic LS - single patient circuit with patient valve / systeem met een slang met patiëntenventiel VENTIlogic LS - double patient circuit with patient valve / systeem met dubbele slang met patiëntenventiel VENTIlogic plus with leakage ventilation / met lekkagesysteem VENTIlogic plus - single patient circuit with patient valve / systeem met een slang met patiëntenventiel Instructions for use for devices up to serial number 9.999 and from...
- Page 3 English Nederlands...
- Page 4 Contents Overview ..... 5 Hygiene treatment ... . . 65 Description of device .
-
Page 5: Overview
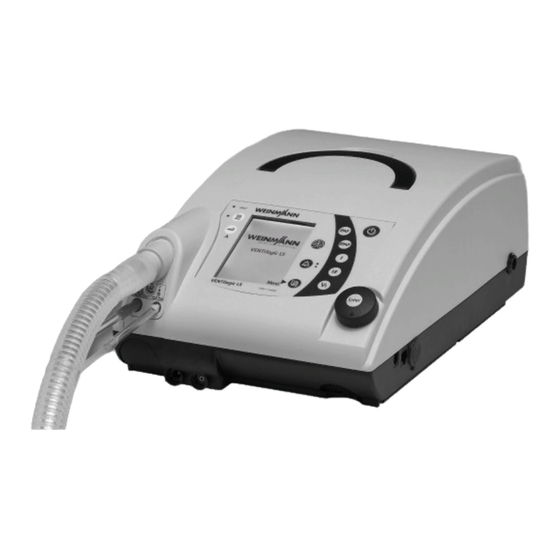
1. Overview English Therapy device, general 5 Power cord coupling 4 Handle 3 Control panel and displays 1 Device outlet port 6 VENTIpower connection 7 Card reader 15 Housing fan 8 Serial ports 13 Device ID plate (underneath) 12 Power connection 14 Oxygen connection 11 Cable-securing clip... -
Page 6: Power Cord
For connecting the oxygen supply if oxygen 7 Card reader supply has been prescribed. Slot for a Weinmann memory card. Therapy data 15 Housing fan are stored on the memory card which the doctor can call up. - Page 7 Therapy device with leakage ventilation 20 Sealing plug (2x) 16 Patient circuit 21 Drying adapter 18 Pressure 17 Adapter 19 Creased tube measuring tube 23 Connection for 22 Exhalation VENTIclick humidifier system 16 Patient circuit 22 Exhalation system The air flows to the patient/ventilator interface Carbon dioxide-enriched exhaled air escapes here through the patient circuit.
- Page 8 Therapy device, single patient circuit with patient valve 25 Connection for pressure 26 Test adapter 27 Connection for measuring tube (marked valve control tube blue) 24 Connection for O sensor 28 Single patient circuit 33 Connection for 29 Pressure- device outlet port measurement tube (marked blue)
- Page 9 29 Pressure-measurement tube (marked 32 Connection for patient blue) This is where the patient/ventilator interface is For measuring therapy pressure. connected. 30 Valve control tube 33 Connection for device outlet port For controlling (opening and closing) the patient This is where the patient circuit is connected to valve.
- Page 10 Therapy device, double patient circuit with patient valve (VENTIlogic LS only) 35 Connection for pressure- measurement tube 37 Connection for 36 Test adapter (marked blue) valve control tube 34 Connection for O 39 Opening for 38 Device connection for sensor...
- Page 11 40 Double patient circuit 44 Connection for device inlet port Delivers respiratory air to the patient and from the This is where the patient circuit is connected to patient back to the device. the device outlet port of the therapy device. 41 Connection for patient 45 Valve control tube This is where the patient/ventilator interface is...
- Page 12 Accessories 48 VENTIpower 49 VENTIclick (only leakage ventilation) 50 Carrying bag WM 27706 54 Protective bag WM 27106 51 Bacteria filter WM 24148 52 Bacteria filter 53 Set, O sensor (only leakage ventilation) WM 24476 (only valve ventilation) 48 VENTIpower 51 Bacteria filter WM 24148 (only leakage ventilation) and 52 Bacteria Available as an accessory, for mobile power...
- Page 13 Special markings on the device Left-hand side Oxygen connection: maximum supply rate: 15 l/min at < 1000 hPa VENTIlogic LS: Opening for exhaled air when operated with double patient circuit with patient valve; do not seal opening or block in any other way.
- Page 14 Front VENTIlogic LS: Connection for patient's exhaled air with double patient circuit with patient valve. VENTIlogic plus: Opening is not used with VENTIlogic plus. Jack: electrical connection for VENTIclick respiratory air humidifier (only leakage ventilation), max. current consumption at 40 V: 600 mA Jack: electrical connection for oxygen sensor;...
- Page 15 Servicing label: indicates when the next service is due Safety check label: (in Germany only) marks when the next safety check as per §6 of the German law relating to users of medical devices is required Device inlet port: inlet port for ambient air at room temperature Device ID plate (underneath) BF protection class Protection class II, protective insulation...
-
Page 16: Control Panel
Control panel 1 LED for power supply 2 LIAM (insufflation) 3 On/Off key 4 Alarm acknow- 9 Humidifier key ledgement key with LED with LEDs 8 Softstart key 5 Dial 7 Menu key 6 Operating keys 1 LED for power supply 6 Operating keys The green LED comes on when there is a power For quick-setting by a doctor;... - Page 17 Default display during therapy 2 Status line 3 Alarm display 4 Softstart display 5 Battery charge status 1 Active ventilation mode 6 Memory card symbol 12 Patient circuit 11 Ventilation parameters 7 Respiratory phase change display 10 Oxygen 8 Access to patient concentration menu 9 Bar chart for pressure display...
- Page 18 10 Oxygen concentration 12 Patient circuit Gives oxygen concentration in respiratory air in The relevant symbol appears depending on the percent. patient circuit set. 11 Ventilation parameters The relevant current ventilation parameters are displayed depending on the active mode. Overview...
- Page 19 Filter change required Servicing required At least one physiological alarm is activated Acoustic signal of alarms muted for 120 seconds All physiological alarms deactivated (exception for VENTIlogic LS: In VCV and aVCV modes, the Pressure and Pressure alarms cannot be...
- Page 20 TA mode active S mode active ST mode active T mode active CPAP CPAP mode active SX mode active (VENTIlogic LS only) SXX mode active (VENTIlogic LS only) PCV mode active PSV mode active aPCV aPCV mode active VCV mode active (VENTIlogic LS only)
- Page 21 Symbol Significance LIAM LIAM (Lung Insufflation Assist Maneuver) active Main window (Monitor): IPAP Inspiration pressure EPAP / PEEP Exhalation pressure Specifies the inspiration pressure level of the back-up ventilation (SIMV mode SIMV only) Pressure given in hectopascals; 1.01973 hPa corresponds to 1 cm H Respiratory frequency Respiratory phase switch triggered - spontaneous Respiratory phase switch triggered - mandatory...
- Page 22 Markings on the packaging Symbol Significance Therapy device: Serial number of device Permitted temperature for storage: -40 °C to +70 °C Permitted humidity for storage: max. 95 % relative humidity Protect pack from wet Do not tip over or drop pack Safety information in the instructions for use Safety information in these instructions for use is marked as follows:...
-
Page 23: Description Of Device
The device can be used in both static or mobile operation, both at home and in appropriate hospital departments. Note VENTIlogic LS is not a ventilator for intensive care purposes in accordance with DIN EN ISO 80601-2-12. The device can be used for weaning off invasive ventilation and converting to mask ventilation. -
Page 24: Qualification
Observe the legal requirements for operation and use (in Germany, the regulations governing owner/operators of medical devices apply in particular). Basic recommendation: get a person authorized by Weinmann to provide you with proper instruction about the handling, use and operation of this medical device. - Page 25 The doctor can activate volume compensation in pressure-controlled modes S, T, ST, SX (VENTIlogic LS only), SXX (VENTIlogic LS only), TA, PCV, PSV and aPCV. A minimum volume and maximum pressure rise are set to achieve this. If the minimum volume is undershot, the device automatically and continuously increases pressure up to the set maximum pressure (therapy pressure + max.
- Page 26 5 to 45 breaths per minute and inspiration time in the range from 15 % to 67 % of the respiratory period. In S, ST, SX (VENTIlogic LS only), SXX (VENTIlogic LS only), PSV, aPCV, aVCV (VENTIlogic LS only) and SIMV modes, the doctor can select one of 8 trigger stages for inspiration and one of 14 trigger stages for exhalation (not with aPCV, aVCV).
- Page 27 The device has a remote alarm connection to support the monitoring of patient and device, especially when VENTIlogic LS is used for life-support ventilation. All high and medium- priority alarms, together with the No power supply alarm are passed to this connection.
- Page 28 2.3.14 Recording therapy data Therapy data are stored in the device on a removable MMC or SD card. The WEINMANNsupport PC software can be used to enable a doctor to evaluate the therapy data. 2.3.15 Analog output of therapy data The device has an interface for connecting to analog box WM 27560.
-
Page 29: Safety Instructions
3. Safety instructions 3.1 Safety information Read these instructions for use carefully. They are a component of the device and must be available at all times. Use the device exclusively for the intended purpose described (see “2.1 Intended use” on page 23). For your own safety and the safety of your patients and in accordance with the requirements of Directive 93/42/EEC, please note the following. - Page 30 – It is essential to ensure that alarm V is activated for life-support ventilation T low (VENTIlogic LS only). Only if these conditions are met can a blockage (stenosis) be detected. – Set the V alarm appropriately.
- Page 31 • Masks of third-party manufacture may only be used following authorization by the manufacturer, Weinmann. The success of therapy is put in jeopardy by the use of unauthorized masks or other types of patient/ventilator interface.
- Page 32 • An exhalation system must always be used with leakage ventilation, otherwise the CO concentration in the breathing mask and tube would rise to critical values and thus obstruct breathing. • Always use a suitable water trap if the patient produces a great deal of secretion during ventilation, otherwise fluid may get into the device.
- Page 33 •When operated on a wheelchair, this system requires a certificate of conformity. To obtain this, consult a specialist dealer authorized by the manufacturer, Weinmann; this dealer will also perform the attachment. Caution! • The internal battery is not intended for mobile operation. Always use VENTIpower for a mobile power supply.
- Page 34 • Have servicing and maintenance work carried out only by the manufacturer, Weinmann, or by specialist staff expressly authorized by the manufacturer. • Have modifications to the device carried out only by the manufacturer, Weinmann, or by specialist staff expressly authorized by the manufacturer.
-
Page 35: Contraindications
Note: • If the therapy device is stored or not used for a prolonged period, the battery will discharge. This is a property of rechargeable batteries and is not a malfunction, so we recommend checking charge status regularly and recharging the battery with the aid of the therapy device if required. -
Page 36: Side Effects
3.3 Side effects When using the therapy device, the following undesired side effects may occur in short- term or long-term use: • pressure points on the face from the breathing mask and the forehead cushion • reddening of facial skin •... -
Page 37: Set Up Device
The volume displayed may deviate from that actually delivered by up to 105 ml. – Use patient circuit WM 27181 from Weinmann to avoid this deviation in the display. -
Page 38: Patient/Ventilator Interfaces
Caution! Do not cover the device with blankets etc. The air inlet would be blocked and the device could overheat. This may lead to inadequate therapy and to damage to the device. 1. Connect the power cord to the power connector of the device. - Page 39 It is essential to follow the instructions for use of the patient/ventilator interface and of the patient circuit. 4.3.2 Double patient circuit (VENTIlogic LS only) In addition to the ventilation tube which delivers air to the patient, the pressure- measurement tube and the valve control tube, the double patient circuit also has an exhalation tube which routes exhaled air back to the device and into the ambient air.
-
Page 40: Connect Leakage Ventilation
The pressure-measurement tube is the same length as the ventilation tube and leads to the Y-connecting piece where the ventilation tube and the exhalation tube are brought together. 4. Connect the valve control tube (5) to the connection of the device marked The valve control tube leads straight from the patient valve to the connection on the device and is therefore shorter than the pressure measuring tube. - Page 41 5. Note that maximum flow rate and the accuracy of dynamic pressure may deviate if you are not using Weinmann tubes. 4.4.2 Information relating to a separate exhalation system Caution! Always use an exhalation system. Used air containing carbon dioxide escapes from the patient/ventilator interface (e.g.
-
Page 42: Connect Humidifier
4.5 Connect humidifier 4.5.1 Leakage ventilation Warning! The VENTIclick humidifier is not suitable for invasive ventilation. The VENTIclick humidifier is connected between the therapy device and the patient circuit. The inlet connector stub and the electric connection of the heating element must point towards the therapy device. - Page 43 If the therapy device is intended for use by several patients (e.g. in a hospital), a bacteria filter must be used to prevent infections. 4.6.1 Leakage ventilation In combination with leakage ventilation, use bacteria filter WM 24148. If the bacteria filter is used alone, it is connected directly to the device outlet port and the ventilation tube is plugged onto the bacteria filter.
-
Page 44: Therapy With Oxygen Supply
Combination with an oxygen sensor and a humidifier 1. Connect the oxygen sensor directly to the therapy device. 2. Connect the bacteria filter to the outlet of the oxygen sensor. 3. Connect the humidifier to the outlet of the bacteria filter. 4. - Page 45 4. Switch off the device. The safety valve for the oxygen supply shuts off the oxygen supply. Oxygen can be supplied via an oxygen concentrator (e.g. Weinmann Oxymat 3), via the central gas supply system (only with corresponding pressure reducer) of a hospital, in the form of liquid oxygen with a continuous flow or of an oxygen cylinder with a corresponding pressure reducer.
-
Page 46: Connect Mobile Power Supply
2. Plug the oxygen sensor (1) and air management adapter into the T-adapter (3). 3. Plug the T-adapter (3) onto the device outlet port (5). 4. Connect the sensor (1) to the oxygen measuring jack (4) with the aid of the cable. 5. -
Page 47: Failure
VENTIpower now assumes the supply of power. The symbol appears in the status line of the therapy device. The power supply LED goes out. Using VENTIpower, you can operate the therapy device (independently of the power supply) in carrying bag WM 27706. -
Page 48: Operation
5. Operation 5.1 Controls 5.1.1 Function keys The following functions can be called up directly in ventilation mode by pressing the relevant key on the device. • Activate softstart and set softstart time (1) Note: Softstart can only be activated in CPAP mode. •... - Page 49 5.1.2 Navigating with the dial The dial (1) is the central control of the therapy device. You can use the dial to select menu items, navigate within the menu windows and set values for individual menu items. To familiarize yourself with navigation using the dial, we recommend switching to Menu first.
-
Page 50: Start Up The Device
5.2 Start up the device 5.2.1 Operating states Three operating states are possible on the therapy device: on, off and standby. If the device is switched on, therapy is in progress. In standby, the blower is switched off, but the device is immediately operational with a brief press of the On/Off key as long as the patient circuit is connected correctly. -
Page 51: 5.3 Activate/Deactivate Auto Switch-On
(see “5.3 Activate/deactivate Auto switch-on (only leakage ventilation)” on page 52). The operating hours and the Weinmann software version appear in the display for about 3 seconds. The device starts to pump air through the patient circuit. The display switches to the default display. - Page 52 See the section entitled “ Symbols used in the display” Softstart display on page 19 for an explanation of the other symbols in the display. Note: If a therapy in TA mode is intended, see also the section entitled “5.12 Therapy in TA mode (only leakage ventilation)”...
-
Page 53: Alarm List
3. Use the dial to select the menu item Auto switch-on and confirm the selection by pressing the dial. Now select on or off using the dial. Confirm the selection by pressing the dial. The selection bar switches back to Auto switch-on. -
Page 54: Adjust Brightness
5.5 Adjust brightness You can change the brightness of the display: 1. In the patient menu, select the Brightness menu item using the dial. 2. Select the desired brightness level using the dial. 3. Confirm your selection by pressing the dial. To switch off the display completely during therapy (at night for example), press the dial during therapy. -
Page 55: Overview
5.6.1 Activate/deactivate plateau signal In patient mode you can switch the plateau signal on or off under LIAM info: 1. In the LIAM info menu, use the dial to select the plateau signal. 2. Confirm your selection by pressing the dial. 3. - Page 56 The setting can be set in both standby and in ventilation mode. To do so, proceed as follows. 1. Keep the softstart key depressed until the Softstart window appears. 2. Change the softstart time using the dial (turn to the right = increase time, turn to the left = reduce time).
-
Page 57: Patient Valve
Also follow the instructions for use of the VENTIclick or, if using valve ventilation, the instructions for use of the corresponding humidifier. For valve ventilation we recommend humidifiers HC850 or HC550 from Fisher & Paykel with the corresponding patient circuit. Note: •... - Page 58 LIAM can only be enabled by the doctor and only triggered during ventilation. The maneuver includes at least one LIAM stroke consisting of insufflation and subsequent exhalation. Pressure Duration in min/h (e.g. 20 min) Interval in sec/min/h (e.g. every 5 min) Cycles (e.g.
- Page 59 Pressure Signal which can be 1 sec. plateau phase switched off IPAP ΔP LIAM Time LIAM LIAM Initially, the pressure curve within the individual LIAM stroke is comparable with a normal ventilation stroke. When the IPAP pressure level is reached, however, pressure continues to rise in linear form to maximum pressure IPAP (IPAP + ΔP ) and is maintained for...
- Page 60 5.11.3 Canceling LIAM LIAM can be interrupted at any time. Press the key to do this. Then LIAM is canceled and the device reverts to the preset ventilation mode. If LIAM is then to be carried out again, begin the process by pressing the key again.
-
Page 61: After Use
5.13 After use 1. Switch the device to standby by keeping the On/Off key depressed for approx. 2 seconds until the blower switches off. The duration of the previous therapy appears in the display. The device then switches to standby. 2. - Page 62 – ratio of spontaneous inspiration to total number of inspirations in % – ratio of spontaneous exhalation to total number of exhalations in % – number of effort episodes, related to number of breaths (TA mode only) – number of fighting episodes, related to number of breaths (TA mode only) –...
-
Page 63: Travel With The Therapy Device
Proceed as follows to put the memory card back in. 1. Pull on the rubber cover to get at the slot for the memory card. 2. Push the memory card into the slot with the cut-off corner pointing upwards. 3. Briefly press on the card so that the card can engage in the device with the aid of the spring mechanism. - Page 64 If you want to take the therapy device and accessories onto an aircraft as hand baggage, find out before departure whether any formalities are involved. You can obtain a certificate for transport in an aircraft from the manufacturer, Weinmann. Operation...
-
Page 65: Hygiene Treatment
6. Hygiene treatment This product may contain disposable items. Disposable items are intended to be used only once. So use these items only once and do not reprocess them. Reprocessing disposable items may impair the functionality and safety of the product and lead to unforeseeable reactions as a result of ageing, embrittlement, wear, thermal load, the effects of chemical processes, etc. -
Page 66: Clean Leakage Ventilation
The patient circuits for single and double patient circuits with patient valve (double patient circuit only on VENTIlogic LS) are disposables and cannot be subjected to a hygiene treatment. Follow the instructions for use for the patient circuit in question. - Page 67 4. Rinse the creased tube thoroughly inside and out using clean hot water. 5. Thoroughly shake out the patient circuit. 6. Hang up the patient circuit and leave to drip-dry well to stop moisture getting into the therapy device. 7. Remove the plugs from the pressure-measurement tube. 6.2.2 Dry the patient circuit using the therapy device If water ever gets into the pressure measuring tube by accident, the leakage circuit must be dried with the aid of the therapy device.
-
Page 68: Clean The Housing
6.3 Clean the housing Warning! • Risk of electric shock. Switch the device off completely before cleaning (see “Switch device off completely” on page 61). • Ensure that no liquids get into the device. Never immerse the device in disinfectants or other liquids, otherwise damage to the device and thus a hazard to users and patients may result. -
Page 69: Clean The Fan Filter
6.5 Clean the fan filter The fan filter protects the housing fan from dirt. To clean the fan filter, proceed as follows: 1. Remove the fan filter according to the instructions in section “Change fan filter” on page 93. 2. Clean the fan filter with fresh running water until it is free of residue. 3. -
Page 70: Change In Patients
If the device is to be used for another patient without a bacteria filter being used, it must be subjected to a hygiene treatment beforehand. This must be performed by the manufacturer, Weinmann, or by an authorized specialist dealer. The procedure for hygiene treatment is described in the service sheet and in the servicing and repair instructions for the therapy devices. -
Page 71: Function Check
7. Function check 7.1 Intervals Perform a function check of the device monthly. One exception to this is the oxygen sensor. The oxygen sensor needs calibrating daily. We recommend checking the battery capacity before each use. If you discover faults during the function check, you may not use the therapy device again until the faults have been rectified. - Page 72 If the trigger for exhalation does not work, it may have been switched off. Ask your doctor whether this is the case. An exhalation trigger is not available in aPCV and aVCV modes (VENTIlogic LS only). 7.2.2 Check flow measurement and flow sensors/pressure sensors...
- Page 73 6. If the function check is completed successfully, the message Function check ok! appears. If the function check is not successful, the message Device system implausible appears. In this case refer to section “8.1 Faults” on page 79. 7. Press the menu key to return to the standard display. 7.2.3 Check flow measurement and flow sensors/pressure sensors (leakage ventilation with leakage adapter for standard tapered connector)
- Page 74 Function check using a double patient circuit with patient valve (VENTIlogic LS only) 1. Connect the patient circuit to the device. 2. Plug the test adapter supplied onto the patient connection. 3. The subsequent steps are described in “Check flow measurement and flow sensors/pressure sensors (leakage ventilation)”...
-
Page 75: Calibrate Oxygen Sensor
4. At the oxygen source, set the oxygen flow to the value prescribed by the doctor. 5. Select one of the following procedures depending on whether or not you are using an oxygen sensor. With an oxygen sensor Ensure that the oxygen sensor is connected correctly and has been calibrated beforehand. - Page 76 7.3.2 Precautions Take the following precautions when calibrating. 1. Shut off the oxygen source. 2. Operate the device for approx. two minutes without an oxygen supply to flush out the remaining oxygen in the device. 7.3.3 Perform calibration Proceed as follows for calibration. 1.
-
Page 77: Energy Supply
If supply is not assumed by the battery without interruption, either this or the therapy device is defective. In this case have the device including its internal battery checked by an authorized specialist dealer or by Weinmann. 2. Check battery capacity (shown in the status line of the display). - Page 78 – VENTIpower empty: in this case, recharge the VENTIpower and repeat the function check. – VENTIpower not connected correctly: in this case, check the connecting cable and repeat the function check. – VENTIpower defective, therapy device defective: have the devices repaired by an authorized specialist dealer or by Weinmann. Function check...
-
Page 79: Troubleshooting
8.1 Faults Caution! If faults occur which cannot be eliminated at once, contact the manufacturer, Weinmann, or your specialist dealer immediately to have the device repaired. Do not continue operating the device in order to prevent even greater damage. Fault/fault message... -
Page 80: Alarms
Fault/fault message Cause of fault Remedy Initial contact with oxygen sensor Last calibration Calibrate O sensor performed over 24 Perform calibration of oxygen sensor hours ago Device was switched off completely beforehand Fan failure Fan no longer working Have device repaired Humidifier no longer Humidifier failure Have humidifier replaced or repaired... - Page 81 The alarms are classified into three priorities: • low-priority alarms, indicated by the symbol in the alarm window, a continuously illuminated yellow LED and an acoustic alarm issued (buzzer) • medium-priority alarms, indicated by the symbol in the alarm window, a flashing yellow LED and an acoustic alarm issued (buzzer) •...
- Page 82 8.2.3 Sequence of displays if alarms are triggered simultaneously If several alarms are triggered simultaneously, they are displayed in accordance with the hierarchy shown below. 1. High-priority alarms 2. Medium-priority alarms 3. Low-priority alarms If a new alarm with a higher priority occurs after one alarm is displayed, the alarm display switches to the higher priority.
- Page 83 Call a Low priority doctor Maximum pressure Pressure high exceeded. Low Various possible causes, (VENTIlogic LS only) Have settings checked by the priority, after 10 e.g. reduction in lung doctor supervising treatment breaths, rises to impedance medium priority...
- Page 84 8.2.5 Technical alarms Caution! If faults occur which cannot be eliminated at once, contact the manufacturer, Weinmann, or your specialist dealer immediately to have the device repaired. Do not continue operating the device in order to prevent even greater damage. Display...
- Page 85 Display Alarm Cause of fault Remedy Restore power supply and Battery capacity Battery discharged charge battery. In the event of highly critical High priority (under 10 % capacity a long power failure, connect remaining) the VENTIpower or use an alternative ventilation option Internal battery Device defective defective...
- Page 86 Display Alarm Cause of fault Remedy Check power cord is firmly connected. If necessary, check the function of the socket by No power supply and connecting a different device internal battery is (e.g. a lamp). discharged Connect device to a power Acoustic signal for at socket and charge internal least 120 seconds, no...
- Page 87 Display Alarm Cause of fault Remedy Check valve control tube for The valve control tube damage, replace patient between the device and circuit if necessary the patient valve is incorrectly connected Connect valve control tube Pressure Device defective Have device repaired permanently low High priority Implausible ventilation...
- Page 88 Display Alarm Cause of fault Remedy IPC failure Change device High priority Device defective Have device repaired Device switches off. Sensor system failure Change device High priority Sensor system defective Have device repaired Device switches off. System monitoring failure Voltage monitoring Low priority Have device repaired failure...
- Page 89 8.2.6 Storage of alarms Once the alarm threshold is reached, all the alarm types listed in tables “8.2.4Physiological alarms” and “8.2.5Technical alarms” are recorded in an alarm list with date, time and duration. Up to 200 alarms can be stored. After that, the oldest alarm in each case is overwritten.
-
Page 90: Maintenance And Safety Checks
9. Maintenance and safety checks 9.1 Intervals We recommend having servicing, safety checks and repair work carried out only by the manufacturer, Weinmann, or by a specialized dealer expressly authorized by the manufacturer. Check both filters regularly for dirt. • The coarse dust filter and the fan filer should be cleaned once a week and changed no later than every 6 months. -
Page 91: Battery
9.3 Change filter 9.3.1 Change coarse dust filter Use original filters from Weinmann only. Using third-party filters invalidates any claim under warranty and may result in restricted function and bioincompatibility. 1. If the VENTIclick humidifier is connected, first disconnect it from the device. This will avoid water running into the device when the filter is changed. - Page 92 3. Take the coarse dust filter out of the filter compartment lid and dispose of it in normal domestic waste. 4. Place the clean coarse dust filter in the filter compartment lid. 5. Put the filter compartment lid into the cutout in the housing bottom edge first.
- Page 93 1. To reset the filter change indicator, press the menu and use the the dial to select Filter change from the patient menu. Press the dial to call up the Filter change menu. 2. The question Reset filter change? appears. Select YES with the dial and confirm the selection by pressing the dial.
-
Page 94: Safety Check
9.3.5 Bacteria filter When using bacteria filter WM 24148, change the particulate filter in the bacteria filter in accordance with the associated instructions for use. When using bacteria filter WM 24476, change the bacteria filter in accordance with the associated instructions for use. 9.4 Change pressure-measurement tube (only leakage ventilation) 1. -
Page 95: Disposal
• after 2 years (see service label on the rear of the device) depending on which comes first. The safety check and servicing include: – check for completeness – visual inspection for mechanical damage – filter change – cleaning the device –... -
Page 96: Scope Of Supply
– patient passport WM 66810 – Hex socket wrench, size 3 WM 24708 Instructions for use, EN WM 66802 VENTIlogic LS, single patient circuit with patient valve WM 27700 Parts Order number VENTIlogic LS basic device with battery WM 27130... - Page 97 – Hex socket wrench, size 3 WM 24708 Adapter, leakage ventilation, packed WM 27199 Instructions for use, EN WM 66802 VENTIlogic LS, double patient circuit with patient valve WM 27710 Parts Order number VENTIlogic LS basic device with battery WM 27130 Power cord...
- Page 98 Bacteria filter (leakage ventilation) WM 24148 Bacteria filter (valve ventilation) WM 24476 Instructions for use of VENTIlogic LS, EN for patients and caregivers WM 66802 Instructions for use of VENTIlogic LS, EN for medical personnel WM 66791 Quick reference, EN...
- Page 99 10.1.2 VENTIlogic plus VENTIlogic plus, leakage ventilation WM 27930 Parts Order number VENTIlogic plus basic device with battery WM 27905 Power cord WM 24177 Protective bag for VENTIlogic plus WM 27106 Set, conversion to leakage ventilation, packed, consisting of: WM 15545 –...
-
Page 100: Accessories And Spare Parts
10.2 Accessories and spare parts You can order accessories and spare parts separately if required. A current list of accessories and spare parts can be ordered on the Internet at www.weinmann.de or via your dealer. Scope of supply... -
Page 101: Technical Data
11. Technical data Therapy device with Therapy device VENTIclick Product class to Directive 93/42/EEC Dimensions W x H x D in cm 23 x 14.5 x 34 23 x 14.5 x 45.5 Weight approx. 6.5 kg approx. 10.9 kg Temperature range –... - Page 102 Therapy device with Therapy device VENTIclick Electromagnetic compatibility (EMC) to EN 60601-1-2: – radio interference suppression EN 55011 – radio interference immunity EN 61000-3-2, EN 61000-3-3, EN 61000-4-2 to 6, EN 61000-4-8, EN 61000-4-11 Mean sound pressure level/ operation to EN ISO 17510 at a approx.
- Page 103 Flow at max. speed with bacteria Leakage ventilation: 270 l/min Leakage ventilation: 250 l/min filter at 0 hPa: Single patient circuit with patient valve: 250 l/min Double patient circuit with patient valve (VENTIlogic LS only): 230 l/min Tolerance ±15 l/min ±15 l/min Technical data...
- Page 104 Therapy device with Therapy device VENTIclick – Actual values: recalculated after each breath (no averaging) – Mean values: calculated across all breaths since the device started – Leakage: calculated continuously, updated after each breath – Volume compensation: In the "slow" stage, the device checks after 8 breaths whether the target volume has been reached and changes the pressure by 0.5 hPa.
-
Page 105: System Resistances
11.1 System resistances System resistance at an air flow rate of 60 l/min at the patient connection opening Therapy device with tube system Therapy device VENTIlogic LS with WM 24130 (leakage with single patient double patient Accessories system) and circuit with patient... -
Page 106: Oxygen Sensor
Bacteria filter WM 24148 for leakage ventilation Increase in sound pressure level at a distance of 1 m from the device Max. 0.5 dB(A) in patient position as per EN ISO 17510 1.5 l max. permitted flow (flowing off freely) 300 l/min Internal volume of bacteria filter 85 ml... -
Page 107: Analog Box With Therapy Device
11.4 Analog box with therapy device Channel Measured value Scaling VENTIlogic plus: 55 hPa, Channel 1 Mask pressure 0 hPa VENTIlogic LS: 55 hPa Channel 2 Flow -100 l/min +320 l/min Channel 3 Leakage flow 0 l/min +320 l/min Channel 4... -
Page 108: Pneumatic Diagrams
11.5 Pneumatic diagrams 11.5.1 Leakage ventilation Leckagesystem Pressure sensor Drucksensor for atmosphere Atmosphäre Pressure sensor Drucksensor for patient Patient Patient Patient Flushing out Ausspülung der Silentflow exhaled air via Silentflow Ausatemluft über das Pressure sensor Drucksensor leakage ventilation Leckagesystem device outlet port Geräteausgang Insp. - Page 109 11.5.2 Single patient circuit with patient valve Einschlauchsystem Pressure sensor for Drucksensor atmosphere mit Patientenventil Patient Atmosphäre Patient Pressure sensor Drucksensor for patient Patient Patient Patienten- Schaltventile Switching valves Exhaled air Ausatemluft valve ventil für for exhalation valve Ausatemventil Drucksensor Pressure sensor für valve control...
- Page 110 11.5.3 Double patient circuit with patient valve (VENTIlogic LS only) VENTIlogic LS VENTIlogic LS Pressure sensor for Drucksensor double patient circuit Doppelschlauchsystem atmosphere Atmosphäre with patient valve mit Patientenventil Pressure sensor Drucksensor for patient Patient Schaltventile Switching valves Patient Patient for exhalation valve für...
-
Page 111: Safety Distances
3.80 3.80 7.27 3.50 12.00 12.00 23.00 Further technical data are available from the manufacturer, Weinmann, on request or from the hospital manual and in the Servicing and Repair instructions. The right to make design modifications is reserved. Technical data... -
Page 112: Warranty
12. Warranty Weinmann gives the customer a limited manufacturer warranty on new original Weinmann products and any replacement part fitted by Weinmann in accordance with the warranty conditions applicable to the product in question and in accordance with the warranty periods from date of purchase as listed below. - Page 114 Inhoud Overzicht ....116 5.14 Reizen met het therapieapparaat . 177 Hygiënische voorbereiding ..179 Beschrijving van het apparaat . 134 Termijnen .
- Page 115 Garantie .....229 Conformiteitsverklaring ..229 Inhoud...
- Page 116 1. Overzicht Nederlands Therapieapparaat algemeen 5 Netaansluitleiding -Koppeling 4 Draaggreep 3 Bedieningsveld en weergaven 1 Uitgang apparaat 6 Aansluiting VENTIpower 7 Kaartenlezer 15 Huisventilator 8 Seriële interfaces 13 Typeplaatje (onderkant) 12 Netaansluiting 14 Zuurstof- aansluiting 11 Veiligheidsbeugel 9 Deksel van het filtervak, luchtinlaat 10 Aansluiting...
- Page 117 7 Kaartenlezer 15 Huisventilator Invoersleuf voor een Weinmann-geheugenkaart. Beschermt het apparaat tegen oververhitting. Op de geheugenkaart worden therapiegegevens opgeslagen, die de arts kan oproepen. 8 Seriële interfaces Worden gebruikt voor het aansluiten van apparaten voor de weergave en evaluatie van therapiegegevens.
- Page 118 Therapieapparaat met lekkagesysteem 20 Afsluitstop (2x) 16 Slangsysteem 21 Droogadapter 17 Adapter 18 Drukmeetslang 19 Vouwslang 23 Aansluiting 22 Uitademsysteem bevochtiger VENTIclick Legenda 16 Slangsysteem 21 Droogadapter Door het slangsysteem stroomt de lucht naar de Wordt gebruikt voor het drogen van het beademingsingang.
- Page 119 Therapieapparaat, Systeem met een slang met patiëntenventiel 25 Aansluiting drukmeetslang (blauw 26 Testadapter 27 Aansluiting ventiel- gekenmerkt) besturingsslang 24 Aansluiting O -sensor 28 Systeem met een slang 33 Aansluiting uitgang van 29 Drukmeetslang het apparaat (blauw gekenmerkt) 32 Aansluiting patiënt 30 Ventielbesturingsslang 31 Patiëntenventiel Legenda...
- Page 120 29 Drukmeetslang (blauw gekenmerkt) 32 Aansluiting patiënt Wordt gebruikt voor het meten van de actuele Hier wordt de beademingsingang aangesloten. therapiedruk. 33 Aansluiting uitgang van het apparaat 30 Ventielbesturingsslang Hier wordt het slangsysteem aan de uitgang voor Wordt gebruikt voor de besturing (openen en het apparaat van het therapieapparaat sluiten) van het patiëntenventiel.
- Page 121 Therapieapparaat, Systeem met dubbele slang met patiëntenventiel (alleen VENTIlogic LS) 37 Aansluiting ventiel- 36 Testadapter 35 Aansluiting drukmeetslang besturingsslang (blauw gekenmerkt) 34 Aansluiting O -sensor 39 Opening 38 Aansluiting op het uitademlucht apparaat voor patiëntenventiel 40 Systeem met dubbele slang...
- Page 122 39 Opening uitademlucht 44 Aansluiting ingang van het apparaat Hier wordt de uitademlucht van de patiënt uit het Hier wordt het slangsysteem aan de uitgang voor apparaat geleid. het apparaat van het therapieapparaat aangesloten. 40 Systeem met dubbele slang 45 Ventiel-besturingsslang Transporteert de ademlucht naar de patiënt en van de patiënt terug naar het apparaat.
- Page 123 Accessoires 48 VENTIpower 49 VENTIclick (alleen lekkagesysteem) 50 Transporttas WM 27706 54 Beschermtas WM 27106 52 Bacteriënfilter 51 Bacteriënfilter WM 24148 53 Set O -sensor WM 24476 (alleen (alleen lekkagesysteem) ventielsysteem) Legenda 48 VENTIpower 51 Bacteriënfilter WM 24148 (alleen lekkagesysteem) en 52 Bacteriënfilter Is verkrijgbaar als accessoire en wordt gebruikt WM 24476 (alleen ventielsysteem) voor de mobiele stroomvoorziening van het...
- Page 124 Speciale markeringen op het apparaat Linker kant Zuurstofaansluitingen: maximale invoer: 15 l/min bij < 1000 hPa VENTIlogic LS: Opening uitademlucht bij werking met systeem met dubbele slang met patiëntenventiel; opening niet sluiten of op andere wijze blokkeren. VENTIlogic plus: Opening wordt bij VENTIlogic plus niet gebruikt.
- Page 125 Voorkant VENTIlogic LS: Aansluiting uitademlucht patiënt bij systeem met dubbele slang met patiëntenventiel. VENTIlogic plus: Opening wordt bij VENTIlogic plus niet gebruikt. Bus: Elektrische aansluiting voor de ademluchtbevochtiger VENTIclick (alleen lekkagesysteem, max. stroomopname bij 40 V: 600 mA Bus: Elektrische aansluiting voor zuurstofsensor; max. 100 mV DC Aansluiting: Drukmeetslang (blauw gekenmerkt).
- Page 126 Onderhoudssticker: Geeft aan wanneer het volgende onderhoud vereist is STK-sticker: (alleen in de Bondsrepubliek Duitsland) Geeft aan wanneer de volgende veiligheidstechnische controle overeenkomstig §6 van de „Medizinprodukte-Betreiberverordnung“ (verordening voor de exploitant van medische hulpmiddelen) vereist is Ingang van het apparaat: Inlaat ruimtelucht met omgevingstemperatuur Typeplaatje (onderkant) Beschermklasse BF Beschermklasse II;...
- Page 127 Bedieningsfolie 1 LED stroomvoorziening 2 LIAM (insufflatie) 3 Aan-/uitschakeltoets 4 Alarmbevestigings- 9 Bevochtigertoets toets met lichtdiodes met lichtdiode 8 Softstarttoets 5 Draaiknop 7 Menutoets 6 Bedieningstoetsen Legenda 1 LED stroomvoorziening 6 Bedieningstoetsen De groene LED brandt wanneer er een Worden gebruikt voor de snelle instelling door de, stroomvoorziening aanwezig is.
- Page 128 Standaardweergave tijdens de therapie: 2 Statusregel 3 Alarmindicatie 4 Softstartindicatie 5 Laadstatus van de accu 1 Actieve beademingsmodus 12 Slangsysteem 6 Symbool 11 Beademings- geheugenkaart parameters 7 Weergave wissel ademfase 10 Zuurstofconcentratie 8 Toegang tot het patiëntenmenu 9 Staafdiagram voor de drukweergave Legenda 1 Actieve beademingsmodus 5 Laadstatus van de accu...
- Page 129 8 Toegang tot het patiëntenmenu 11 Beademingsparameters Met de toets die naast dit menupunt ligt, wisselt Naar gelang de actieve modus worden hier de u in het patiëntenmenu en terug in de overeenkomstige actuele beademingsparameters standaardweergave. weergegeven. 9 Staafdiagram voor de drukweergave 12 Slangsysteem Wordt gebruikt voor de grafische weergave van Naar gelang het ingestelde slangsysteem...
- Page 130 Er is minstens een fysiologisch alarm geactiveerd Akoestisch signaal van de alarmen werd gedurende 120 seconden stomgeschakeld Alle fysiologische alarmen werden gedeactiveerd (Uitzondering bij VENTIlogic LS: In de modi VCV en aVCV kunnen de alarmen Druk hoog Druk niet gedeactiveerd worden)
- Page 131 Betekenis Statusregel: TA-modus actief S-modus actief ST-modus actief T-modus actief CPAP CPAP-modus actief SX-modus actief (alleen VENTIlogic LS) SXX-modus actief (alleen VENTIlogic LS) PCV-modus actief PSV-modus actief aPCV aPCV-modus actief VCV-modus actief (alleen VENTIlogic LS) aVCV aVCV-modus actief (alleen VENTIlogic LS)
- Page 132 Pictogram Betekenis LIAM LIAM (Lung Insufflation Assist Maneuver) actief Hoofdvenster (monitor): IPAP Inspiratiedruk EPAP / PEEP Expiratiedruk legt het inspiratorische drukniveau van de back-up-beademing vast (alleen in de SIMV SIMV-modus) Drukweergave in hectopascal; 1,01973 hPa komen overeen met 1 cm H Ademfrequentie Spontaan geactiveerde wissel van de ademfase Mandatoir geactiveerde wissel van de ademfase...
- Page 133 Markering op de verpakking Pictogram Betekenis Therapieapparaat Serienummer van het apparaat Toegelaten temperatuur voor opslag: -40 °C tot +70 °C Toegelaten luchtvochtigheid voor opslag: max. 95 % relatieve luchtvochtigheid. Verpakking tegen vocht beschermen Verpakking niet storten of laten vallen Veiligheidsinstructies in de gebruiksaanwijzing In deze gebruiksaanwijzing worden de veiligheidsinstructies als volgt gekenmerkt: Waarschuwing!
- Page 134 Het apparaat kan in stationaire en mobiele werking zowel thuis als ook in het ziekenhuis worden toegepast. Aanwijzing: VENTIlogic LS is niet bestemd als beademingstoestel voor de intensieve verpleging conform DIN EN ISO 80601-2-12. Het apparaat kan voor de ontwenning (Weaning) van de invasieve beademing en de omstelling op maskerbeademing worden gebruikt.
- Page 135 Neem de wettelijke eisen voor exploitatie en gebruik in acht (in Duitsland met name de Medizinprodukte-Betreiberverordnung, d.i. "verordening voor de exploitant van medische hulpmiddelen"). Principieel advies: laat u door een door Weinmann geautoriseerde persoon deskundig instrueren in de hantering, het gebruik en de werking van dit medisch hulpmiddel.
- Page 136 Het apparaat bestuurt het patiëntenventiel via de ventiel-besturingsslang. Bij gebruik van het systeem met dubbele slang met patiëntenventiel (alleen VENTIlogic LS) voert bovendien een uitademslang de uitademlucht door het apparaat af in de omgevingslucht.
- Page 137 In de modi S, ST, SX (alleen VENTIlogic LS), SXX (alleen VENTIlogic LS), PSV, aPCV, aVCV (alleen VENTIlogic LS) en SIMV kan de arts voor de inspiratie een van telkens één van 8 triggerlevels en bij de expiratie één van 14 triggerlevels (niet bij aPCV, aVCV) kiezen.
- Page 138 2.3.7 SIMV-modus De SIMV-modus (gesynchroniseerde intermitterende mandatoire ventilatie) is een mengvorm van mandatoire en geassisteerde beademing. Wanneer er geen spontane ademhaling aanwezig is beademt het apparaat de patiënt na afloop van de tijdsduur T mandatoir met de ademfrequentie f , de verhouding apneu backup Ti/T...
- Page 139 2.3.13 Zusteroproep en afstandalarm Ter ondersteuning bij de bewaking van patiënt en apparaat vooral bij de VENTIlogic LS bij levensbehoudende beademing, beschikt het apparaat over een afstandalarmaansluiting. Aan deze aansluiting worden alle alarmen met hoge en gemiddelde prioriteit en het alarm Geen netspanning! doorgeleid.
- Page 140 3. Veiligheidsinstructies 3.1 Veiligheidsvoorschriften Lees deze gebruiksaanwijzing aandachtig door. Deze is bestanddeel van het apparaat en moet te allen tijde aanwezig zijn. Gebruik het apparaat uitsluitend voor het hier beschreven doel (zie „2.1 Toepassing“ op pagina 134). Voor uw eigen veiligheid en de veiligheid van uw patiënten en volgens de eisen van de richtlijn 93/42/EEG dient u op het volgende te letten: 3.1.1 Beademing om het leven in stand te houden Gevaar!
- Page 141 Wanneer de patiënt van het beademingstoestel afhankelijk is, wordt hij door het uitval van het alarm in gevaar gebracht. – Controleer bij de levensbehoudende beademing (alleen VENTIlogic LS) in elk geval of het alarm V geactiveerd is. Alleen zo kan een eventuele afsluiting T laag (stenose) worden herkend.
- Page 142 Anders kunnen deze in de ademstroom van de patiënt komen en hem daardoor in gevaar brengen. • Maskers van een vreemd fabrikaat mogen alleen na goedkeurig door de fabrikant Weinmann worden toegepast. Door het gebruik van niet goedgekeurde maskers of andere beademingsingangen wordt het succes van de behandeling in gevaar gebracht.
- Page 143 • Let voor het vermijden van een infectie of bacteriële contaminatie paragraaf „6. Hygiënische voorbereiding” op pagina 179. • Bij het ventielsysteem zijn geen maskers met geïntegreerd of apart lekkagesysteem toegestaan. • In het lekkagesysteem mogen alleen fullface maskers met geïntegreerd anti- asfyxieventiel gebruikt worden.
- Page 144 3.1.3 Mobiele werking Waarschuwing! •Bij de werking aan een rolstoel is voor dit systeem een conformiteitverklaring nodig. Neem hiervoor contact op met een door de fabrikant Weinmann geautoriseerde vakhandel die ook de bevestiging uitvoert. Voorzichtig! • De interne accu is niet bestemd voor de mobiele werking. Gebruik voor de mobiele stroomvoorziening steeds de VENTIpower.
- Page 145 3.1.4 Zuurstofinvoer Waarschuwing! •Bij de invoer van zuurstof in de ademstroom is roken en open vuur verboden. Er bestaat brandgevaar. De zuurstof kan zich in de kleding, het beddengoed of in de haren vastzetten. Het kan pas door grondig luchten worden verwijderd. •Let in elk geval op de veiligheidsinstructies in de gebruiksaanwijzing van uw zuurstofsysteem.
- Page 146 • Laat inspecties en reparatiewerkzaamheden alleen door de fabrikant Weinmann of door de fabrikant uitdrukkelijk geautoriseerd vakkundig personeel uitvoeren. • Laat modificaties aan het apparaat alleen door de fabrikant Weinmann of door de fabrikant uitdrukkelijk geautoriseerd vakkundig personeel uitvoeren. Aanwijzing: •...
- Page 147 • Ernstige epistaxis • Hoog risico van een barotrauma • Pneumothorax of pneumomediastinum • Pneumoencefalus • Schedeltrauma • Status na hersenoperatie en na chirurgische ingrepen aan de hypofyse of aan het middel- c.q. binnenoor • Acute bijholteontsteking (sinusitis) middeloorontsteking (otitis media) of trommelvelperforatie •...
- Page 148 Het aangegeven en het werkelijk toe- gediende volume kunnen tot 105 ml verschillen. – Gebruik het slangsysteem WM 27181 van Weinmann om de afwijking van de indicatie te vermijden. Het therapieapparaat kan zowel met een lekkagesysteem als ook met een ventielsysteem worden gebruikt.
- Page 149 worden aangehouden om de door het apparaat geproduceerde warmte te kunnen afvoeren. Voorzichtig! Dek het apparaat niet af met dekens enz. De luchtinlaat wordt anders geblokkeerd waardoor oververhitting van het apparaat kan ontstaan. Dit kan leiden tot onvoldoende therapie en beschadiging van het apparaat. 1.
- Page 150 Let in elk geval op de gebruiksaanwijzingen van de beademingsingang en van het slangsysteem. 4.3.2 Systeem met dubbele slang (alleen VENTIlogic LS) Het systeem met dubbele slang heeft naast de beademingsslang, die de patiënt lucht toevoert, de drukmeetslang en de ventiel-besturingsslang ook een uitademslang die uitademlucht terug naar het apparaat en in de omgevingslucht afvoert.
- Page 151 Om het systeem met dubbele slang aan te sluiten, gaat u als volgt te werk: 1. Steek de beademingsslang (1) op de uitgang van de VENTIlogic LS. 2. Steek de uitademslang (3), op het einde waarvan zich het patiëntenventiel (4) bevindt, op de ingang voor de uitademlucht onder de uitgang van het apparaat.
- Page 152 5. Let erop dat de maximumdoorstroming en de precisie van de dynamische druk kunnen afwijken wanneer u geen slangen van Weinmann gerbuikt. 4.4.2 Informatie over het aparte uitademsysteem Voorzichtig! Gebruik altijd een uitademsysteem. Via het uitademsysteem ontwijkt de verbruikte, kooldioxidehoudende lucht uit de beademingsingang bijv.
- Page 153 Ga bij het aansluiten van een apart uitademsysteem als Beademings- volgt te werk: ingang Uitademsysteem 1. Steek het uitademsysteem in de mof van het slangsysteem. 2. Sluit de beademingsingang aan op het uitademsysteem. Slangsysteem Neem de gebruiksaanwijzing van het uitademsysteem en de beademingsingang in acht. 4.5 Ademluchtbevochtiger aansluiten 4.5.1 Lekkagesysteem Waarschuwing!
- Page 154 4.6 Bacteriënfilter aansluiten Voorzichtig! Het bacteriënfilter vormt een extra weerstand in de luchtstroom. Dit kan een verandering van het reactievermogen van de trigger bewerkstelligen. Bij een achteraf aangesloten bacteriënfilter moet de arts daarom de apparaatparameters controleren en eventueel opnieuw instellen. Aanwijzing: Het bacteriënfilter mag niet langer dan 24 uur aan het apparaat worden gebruikt.
- Page 155 Wanneer bovendien een bevochtiger en/of een zuurstofsensor aangesloten moet worden, moet een andere volgorde worden aangehouden. Combinatie met een bevochtiger: 1. Sluit het bacteriënfilter direct aan op het therapieapparaat. 2. Sluit de bevochtiger aan op de uitgang van het bacteriënfilter. 3.
- Page 156 4. Schakel het apparaat uit. Het veiligheidsventiel voor de zuurstofinvoer sluit de zuurstofinvoer af. De zuurstofinvoer kan via een zuurstofconcentrator (bijv. Weinmann Oxymat 3), de centrale gasinstallatie (alleen met overeenkomstige drukreduceerklep) van een ziekenhuis, vloeibare zuurstof met een continue flow of een zuurstoffles met overeenkomstige drukreduceerklep plaatsvinden.
- Page 157 4.7.2 Zuurstofconcentratie meten (alleen ventielsysteem) De zuurstofsensor kan alleen in combinatie met het ventielsysteem gebruikt worden. Bij de meting wordt de zuurstofconcentratie over meerdere ademhalingen gemiddeld en weergegeven. De meetwaarden zijn afhankelijk van de therapiedruk en van de temperatuur van de omgeving en de ademlucht. Er is hier geen sprake van een FiO -meting maar van een gemiddelde waarde van de inspiratoire zuurstofconcentratie.
- Page 158 4.8 Mobiele stroomvoorziening aansluiten Voor de netonafhankelijke werking is de VENTIpower verkrijgbaar. De VENTIpower maakt een mobiele stroomvoorziening mogelijk. Waarschuwing! • VENTIpower moet voor het begin van de therapie door indrukken van de in-/ uitschakeltoets ingeschakeld worden zodat de VENTIpower bij netuitval of uitval van de interne accu de voorziening van het therapieapparaat kan overnemen.
- Page 159 4.9 Werking bij netuitval Wanneer de netvoeding eens uitvalt, neemt de interne accu van het therapieapparaat automatisch de voorziening van het apparaat over. De melding Geen netspanning verschijnt. De groene LED netvoeding gaat uit. De looptijd van de accu is afhankelijk van de betreffende belasting en het temperatuurbereik. Gedetailleerde gegevens over de verschillende belastinggevallen met de overeenkomstige acculooptijd staan vermeld in hoofdstuk 11.
- Page 160 5. Bediening 5.1 Bedieningselementen 5.1.1 Functietoetsen De volgende functies kunt u tijdens de beademingswerking direct oproepen door de overeenkomstige toets op het apparaat in te drukken: • Activeer de softstart en stel de softstartduur in (1) Aanwijzing: De softstart kan alleen in de CPAP-modus worden geactiveerd.
- Page 161 Alarmbevestiging Met de alarmbevestigingstoets kunt u een akoestisch alarm bevestigen en daarmee gedurende 120 seconden uitschakelen. 5.1.2 Met de draaiknop navigeren De draaiknop (1) is het centrale bedieningselement van het therapieapparaat. Met de draaiknop kunt u menupunten selecteren, in de menuvensters navigeren en waarden voor individuele menupunten instellen.
- Page 162 Menupunt verlaten Beweeg de draaiknop met de klok mee tot de selectiebalk in het display contextafhankelijk op terug, afbreken of sluiten staat. Druk vervolgens op de draaiknop. Het display springt terug in het bovengeschikte menu. Alternatief kunt u een menupunt verlaten door op de menutoets te drukken (contextafhankelijk verschijnt in het display links naast de menutoets terug, afbreken of sluiten).
- Page 163 (zie „5.3 Inschakelautomaat activeren/deactiveren (alleen lekkagesysteem)“ op pagina 165). De bedrijfsuren en de Weinmann-softwareversie verschijnen gedurende ca. 3 seconden op het display. De apparaat begint lucht door het slangsysteem te transporteren. Het display schakelt om op de standaardweergave.
- Page 164 5.2.3 Weergaven in het display Op het display worden de beademingsparameters zoals de ingestelde therapiemodus, de therapiedrukken (in de modus CPAP alleen CPAP- druk) in hPa, het geselecteerde slangsysteem en de actuele ademfrequentie in 1/min weergegeven. Aanwijzing: 1,01973 hPa komen overeen met 1 cm H Bij geactiveerde softstart verschijnt de softstart- indicatie...
- Page 165 5.3 Inschakelautomaat activeren/deactiveren (alleen lekkagesysteem) Wanneer de inschakelautomaat geactiveerd is, schakelt het therapieapparaat automatisch in, zodra u in het slangsysteem ademt. Het apparaat schakelt niet automatisch weer uit als de patiënt de beadmeingsingang afzet. Uitschakelen kunt u de het therapieapparaat uitsluitend via de in-/uitschakeltoets Aanwijzing: Het activeren of deactiveren van de inschakelautomaat is alleen mogelijk in de...
- Page 166 De alarmlijst blijft ook bij uitval van de gehele stroomvoorziening (uitval van net en interne accu) behouden. De gegevens kunnen in dit geval tot twee jaar lang worden opgeroepen. Na afloop van de twee jaar of na uitvoering van een onderhoud wordt de alarmlijst gewist. Bij netuitval blijven de alarmen in elk geval opgeslagen.
- Page 167 5.6 LIAM info Aanwijzing: Een gedetailleerde toelichting van de LIAM functie staat vermeld in hoofdstuk „5.11 LIAM (insufflatie)” op pagina 170. 1. Selecteer met behulp van de draaiknop in het patiëntmenu het menupunt LIAM info. 2. Bevestig de selectie door op de draaiknop te drukken. Onder LIAM info worden de volgende door de arts ingestelde waarden en de bijbehorende restlooptijden weergegeven:...
- Page 168 5.7 Overzicht Onder het menupunt Overzicht kunt u de actuele Instellingen, Huidige waarden en Alarm laten weergeven. 1. Selecteer met behulp van de draaiknop in het patiëntmenu het menupunt Overzicht. 2. Bevestig de selectie door op de draaiknop te drukken. 3.
- Page 169 het venster softstart sluit automatisch. Als er vier seconden lang geen toets wordt bediend, wordt de weergegeven softstartduur eveneens opgeslagen. De instellingen blijven na het uitschakelen van het apparaat behouden. Aanwijzing: • Het therapieapparaat start automatisch in de softstartmodus, als deze bij de laatste toepassing geactiveerd was.
- Page 170 kort indrukken van de bevochtigertoets uit c.q. ingeschakeld worden. Bij geactiveerde bevochtiger brandt de groene LED naast de bevochtigertoets. • Wanneer u de bevochtigertoets indrukt zonder dat er een ademluchtbevochtiger is aangesloten, schakelt het therapieapparaat deze functie niet in. 5.10 Bevochtiger voor slangsystemen met patiëntenventiel In combinatie met een ventielsysteem kan de VENTIclick niet toegepast worden.
- Page 171 LIAM kan alleen door de arts worden vrijgeschakeld en alleen tijdens de beademing worden geactiveerd. De manoeuvre bevat minstens een LIAM-slag bestaande uit insufflatie en hierna volgende uitademing. Druk Duur in min/h (bijv. 20 min) Interval in sec/min/h (bijv. iedere 5 min) Aantal (bijv.
- Page 172 Druk uitschakelbaar 1 sec plateaufase geluidssignaal IPAP ΔP LIAM Tijd LIAM LIAM Het betreffende drukverloop binnen de afzonderlijke LIAM-slag is aan het begin vergelijkbaar met een normale beademingsslag. Bij het bereiken van het IPAP-drukniveau stijgt de druk echter lineair verder tot op de maximale druk IPAP (IPAP + ΔP ) en LIAM...
- Page 173 5.11.2 Uitvoering U kunt LIAM handmatig tijdens de beademing activeren. Druk hiervoor op de toets ( ). Het apparaat schakelt in de LIAM-modus en de insufflatie wordt synchroon tot de volgende inademing gestart. U zelf kunt het gehele proces meerdere malen uitvoeren. Druk hiervoor opnieuw op de toets ( 5.11.3 LIAM afbreken LIAM kan op ieder moment afgebroken worden.
- Page 174 2. Schakel het therapieapparaat in en adem normaal verder. Het symbool A (automatische analyse) verschijnt in het display. Het apparaat stelt eerst een constante druk van 4 hPa beschikbaar en analyseert het ademritme van de patiënt. Zodra het apparaat het ademritme van de patiënt heeft herkend (na 10-20 ademhalingen), stelt het de voorgeschreven therapiedruk in precies dit ritme ter beschikking.
- Page 175 5.13.1 Apparaat geheel uitschakelen Als het apparaat op de netvoorziening is aangesloten, kan het niet compleet uitgeschakeld worden. Om het apparaat vanuit de netwerking compleet uit te schakelen, schakelt u het apparaat ind e stand-by-modus en koppelt u de netsaansluitleiding van de netvoorziening los.
- Page 176 Deze gegevens kunnen met behulp van WEINMANNsupport van de geheugenkaart uitgelezen en weergegeven worden. Of er een geheugenkaart in het apparaat aanwezig is en therapiegegevens geregistreerd worden, herkent u aan het symbool in de statusregel. Als het symbool niet verschijnt is de geheugenkaart defect, niet aanwezig of werd deze nog niet door het apparaat herkend.
- Page 177 Voorzichtig! Let er bij het afdekken van de geheugenkaart met de rubberen afdekking op dat u niet per ongeluk op de geheugenkaart drukt en deze weer uit het apparaat getransporteerd wordt. Anders kan er verlies van therapiegegevens worden veroorzaakt. 5.14 Reizen met het therapieapparaat 5.14.1 Tassen voor het therapieapparaat Het apparaat beschikt over twee tassen: een beschermtas (WM 27106) en een transporttas voor de mobiele toepassing (WM 27706).
- Page 178 Neem voor de werking in de tas de gebruiksaanwijzing van de VENTIpower in acht. Wanneer u het therapieapparaat als handbagage mee wilt nemen in een vliegtuig, dient u zich eventueel voor het vertrek te informeren over noodzakelijke formaliteiten. Een certificaat voor het transport in het vliegtuig is verkrijgbaar bij de fabrikant Weinmann. Bediening...
- Page 179 6. Hygiënische voorbereiding Dit product kan wegwerpartikelen bevatten. Wegwerpartikelen zijn bestemd voor eenmalig gebruik. Gebruik deze daarom slechts een maal en bereid deze niet meer voor. Een hernieuwde voorbereiding van het wegwerpartikel kan de functie en de veiligheid van het product in gevaar brengen en tot niet voorspelbare reacties door veroudering, broos worden, slijtage, thermische belasting, chemische inwerkprocessen enz.
- Page 180 – Ventilatiefilter vervangen De slangsystemen met enkele of dubbele slang met patiëntenventiel (systeem met dubbele slang alleen bij VENTIlogic LS) zijn wegwerpartikelen en kunnen niet hygiënisch gereinigd worden. Let in elk geval op de gebruiksaanwijzing van het betreffende slangsysteem. Let voor de hygiënische reiniging van de beademingsingang op de bijbehorende gebruiksaanwijzing.
- Page 181 4. Spoel vervolgens de binnen- en buitenkant van de vouwslang grondig met helder warm water af. 5. Schud het slangsysteem grondig uit. 6. Hang het slangsysteem op en laat het goed afdruipen om te voorkomen dat er vocht in het therapieapparaat binnendringt. 7.
- Page 182 6. Verwijder de droogadapter uit de uitgang van het apparaat. 6.3 Reiniging van het huis Waarschuwing! • Er bestaat gevaar voor elektrische schokken. Schakel het apparaat voor de reiniging in elk geval geheel uit (zie „Apparaat geheel uitschakelen“ op pagina 175). •...
- Page 183 4. Laat het grof stoffilter drogen. Voor de inbedrijfstelling moet het grof stoffilter volledig droog zijn. 5. Zet het grof stoffilter er weer in en sluit het deksel van het filtervak. Aanwijzing: Het fijne filter kan niet worden gereinigd. Dit wordt elke 1000 bedrijfsuren vervangen.
- Page 184 6.7.1 Apparaat Het huis en de netaansluitleiding van het therapieapparaat worden door eenvoudige ® wisdesinfectie gereinigd. Wij adviseren hiervoor terralin protect. 6.7.2 Slangsysteem (lekkagesysteem) ® ® Als desinfectiemiddel adviseren wij gigasept FF. Voer bij het gebruik van gigasept dezelfde stappen uit als beschreven onder „6.2 Reiniging/lekkagesysteem“. Spoel na de desinfectie alle onderdelen grondig af met gedestilleerd water.
- Page 185 Wanneer het apparaat zonder toepassing van een bacteriënfilter voor een andere patiënt moet worden gebruikt, moet dit van tevoren hygiënisch worden behandeld. Dit moet door de erkende vakhandel of door de fabrikant Weinmann worden uitgevoerd. De werkwijze van de hygiënische voorbereiding staat beschreven in het inspectieblad en in de service- en reparatiehandleiding van de therapieapparaten.
- Page 186 7. Functiecontrole 7.1 Termijnen Voer maandelijks een functiecontrole van het apparaat uit. Een uitzondering hierop vormt de zuurstofsensor. De zuurstofsensor moet dagelijks gekalibreerd worden. Wij adviseren voor elke hernieuwde inbedrijfstelling de accucapaciteit te controleren. Wanneer u fouten vaststelt bij de functiecontrole, mag u het therapieapparaat niet meer toepassen totdat de fouten zijn verholpen.
- Page 187 • invoer Wanneer de hierna aangegeven waarden c.q. functies niet vervuld worden, dient u het apparaat ter reparatie op te sturen aan de vakhandel of aan de fabrikant Weinmann. * Deze modi zijn alleen beschikbaar bij VENTIlogic LS. 7.2.1 Triggeren: 1.
- Page 188 4. Schuif met behulp van de draaiknop de zwarte selectiebalk op Functiecontrole en druk op ENTER. 5. Bevestig de functiecontrole in het volgende venster. Er gaat een meldingenvenster open Functiecontrole bezig !. De restduur van de functiecontrole wordt weergegeven. 6. Bij een succesvol beëindigde functiecontrole verschijnt de melding Functiecontrole o.k.!.
- Page 189 3. Voer de volgende stappen uit zoals beschreven onder „7.2.2Flowmeting c.q. flowsensors/druksensors controleren (lekkagesysteem)“ vanaf stap 2. Functiecontrole bij gebruikmaking van een systeem met dubbele slang met patiëntenventiel (alleen VENTIlogic LS): 1. Sluit het slangsysteem aan op het apparaat. 2. Steek de meegeleverde testadapter op de patiëntenaansluiting.
- Page 190 7.2.6 Zuurstofinvoer Voorzichtig! Wanneer in plaats van een zuurstofconcentrator een drukgasinstallatie wordt gebruikt, moet een overdrukventiel aanwezig zijn. Aanwijzing: Een functiecontrole van het zuurstofventiel kan alleen geactiveerd worden wanneer de zuurstofinvoer van tevoren door de arts werd geactiveerd. Om een functiecontrole van het zuurstofventiel uit te voeren, gaat u als volgt te werk: 1.
- Page 191 – wijzigingen van de therapiedruk. Voer de kalibratie steeds uit bij warmgelopen apparaat (ca. 20 minuten na het inschakelen). Voer de kalibratie van de zuurstofsensor eenmaal dagelijks uit om weersinvloeden op de meetresultaten te voorkomen. Het apparaat herinnert u dagelijks met een overeenkomstige melding eraan de kalibratie uit te voeren.
- Page 192 Bevestig de selectie door op de draaiknop te drukken. Het kalibratieproces wordt gestart en de resterende kalibratietijd wordt aangegeven. Daarna schakelt het apparaat automatisch terug in het patiëntenmenu. 4. Controleer de weergave op het display. De zuurstofsensor functioneert correct wanneer de gemiddelde zuurstofconcentratie bij 21 % ligt. 7.3.4 Houdbaarheid van de zuurstofsensor De houdbaarheid van de zuurstofsensor is afhankelijk van de ingevoerde zuurstofconcentratie, van de omgevingstemperatuur, van de toepassingsduur en van de...
- Page 193 Als er geen onderbrekingvrije overname van de voorziening door de accu plaatsvindt, is deze of het therapieapparaat defect. Laat in dit geval het apparaat met interne accu door een erkende vakhandel of door Weinmann controleren. 2. Controleer de accucapaciteit (wordt in de statusregel van het display weergegeven).
- Page 194 Voorzichtig! Als er storingen zijn opgetreden die niet direct kunnen worden verholpen, neem dan onmiddellijk contact op met de fabrikant Weinmann of met uw vakhandel om het apparaat te laten repareren. Gebruik het apparaat niet verder, om grotere schade te voorkomen.
- Page 195 Storing/ Oorzaak van de Remedie storingsmelding storing Onderhoud laten Het apparaat moet zo snel mogelijk door uitvoeren Onderhoudsinterval Weinmann of een vakhandel worden afgelopen Service-indicatie gecontroleerd of onderhouden verschijnt Eerste contact met zuurstofsensor Laatste kalibratie meer -Sensor kalibreren dan 24 h geleden...
- Page 196 8.2 Alarmen Er wordt onderscheiden tussen twee soorten van alarmen: • Fysiologische alarmen zijn alarmen die de beademing van de patiënt direct betreffen. • Technische alarmen zijn alarmen die de configuratie van het apparaat. De alarmen zijn ingedeeld in drie prioriteitniveaus: •...
- Page 197 Na de bevestiging van het akoestische alarm verschijnt weer de standaardweergave. De nog niet verholpen storing wordt verder in de statusregel weergegeven en de alarm-LED knippert (c.q. brandt) tot de storing werd verholpen. Als de storing na het bevestigen binnen 120 seconden niet wordt verholpen, klinkt het akoestische alarm (zoemer) opnieuw.
- Page 198 Oorzaak van de Indicatie Alarm Remedie storing Filter verontreinigd Filter reinigen c.q. vervangen Hoofdkap/hoofdbanden Beademingsingang zodanig instellen dat de ondicht beademingsingang dicht zit, Minimum evt. vervangen T laag ademvolume onderschreden. Beademingsingang Beademingsingang vervangen Hoge prioriteit defect Laat de instellingen door de Instellingen niet behandelende arts plausibel...
- Page 199 Consulteer een arts Lage prioriteit Druk Maximale druk hoog (alleen overschreden. Lage Verschillende oorzaken Laat de instellingen door de VENTIlogic LS) prioriteit, stijgt na 10 mogelijk, bijv. reductie behandelende arts ademhalingen op van de longimpedantie controleren gemiddelde prioriteit Filter verontreinigd Filter reinigen c.q.
- Page 200 Voorzichtig! Als er storingen zijn opgetreden die niet direct kunnen worden verholpen, neem dan onmiddellijk contact op met de fabrikant Weinmann of met uw vakhandel om het apparaat te laten repareren. Gebruik het apparaat niet verder, om grotere schade te voorkomen.
- Page 201 Oorzaak van de Indicatie Alarm Remedie storing Slangsysteem is niet correct of helmaal niet Slangensysteem controleren aan het apparaat Disconnectie aangesloten Hoge prioriteit Apparaat wordt met Beademingsingang open (niet aangebracht) aanbrengen of apparaat beademingsingang uitschakelen toegepast Apparaat laten afkoelen, Oververhitting van het beter geschikte Oververhitting Hoge prioriteit...
- Page 202 Oorzaak van de Indicatie Alarm Remedie storing Expiratieslang niet Slangverbinding controleren aangesloten en evt. slangsysteem Verkeerd slangsysteem vervangen aangesloten Fout slangsysteem Het in het menu Gemiddelde prioriteit geselecteerde Slangsysteem wisselen of slangsysteem komt niet instellingen door de overeen met het behandelende arts laten aangesloten corrigeren...
- Page 203 Oorzaak van de Indicatie Alarm Remedie storing Ventiel-besturingsslang op De ventiel- beschadigingen controleren, besturingsslang tussen evt. slangsysteem vervangen apparaat en patiëntenventiel is Ventiel-besturingsslang verkeerd aangesloten aansluiten Druk permanent Apparaat defect Apparaat laten repareren laag Hoge prioriteit Laat de instellingen door de Niet plausibele beade- behandelende arts mingsinstellingen...
- Page 204 Oorzaak van de Indicatie Alarm Remedie storing Parameters konden niet Hoge prioriteit geladen worden Apparaatstart foutief Apparaat laten repareren Hoge prioriteit Blaaswerk schakelt door Het apparaat schakelt netuitval niet meer in uit. Uitval IPC Hoge prioriteit apparaat vervangen Het apparaat schakelt Apparaat defect Apparaat laten repareren uit.
- Page 205 Oorzaak van de Indicatie Alarm Remedie storing VENTIpower Netverbinding herstellen. VENTIpower leeg uitgevallen VENTIpower laden Lage prioriteit VENTIpower defect VENTIpower laten repareren Attentie: apparaat Apparaat weer inschakelen werd uitgeschakeld! Apparaat werd Hoge prioriteit uitgeschakeld Alarm bevestigen Onbekend apparaat Hoge prioriteit Apparaat defect Apparaat laten repareren 8.2.6 Opslaan van alarmen...
- Page 206 9.1 Termijnen Wij adviseren u onderhoud, veiligheidstechnische controles en reparatiewerkzaamheden alleen door de fabrikant Weinmann c.q. door de fabrikant uitdrukkelijk geautoriseerde vakhandel te laten uitvoeren. De verontreiniging van de beide filters moet regelmatig gecontroleerd worden: • Het grof stoffilter en het ventilatiefilter moeten eenmaal per week gereinigd en uiterlijk elke 6 maanden worden vervangen.
- Page 207 Als de reikwijdte van de accu minder dan 45 minuten bij voordien volle capaciteit bedraagt, laat de accu dan door de fabrikant Weinmann of door een door de fabrikant geautoriseerde vakhandel vervangen.
- Page 208 3. Neem het grof stoffilter uit het deksel van het filtervak en verwijder het met het normale huisvuil. 4. Leg het schone grof stoffilter in het deksel van het filtervak. 5. Voer het deksel van het filtervak eerst met de onderste kant in de uitsparing van het huis in.
- Page 209 1. Om de filterwisselindicatie terug te zetten, drukt u op de menutoets en kiest u met de draaiknop in het patiëntenmenu het punt Filterwissel uit. Druk op de draaiknop om het menu Filterwissel op te roepen. 2. De vraag Filterwissel terugzetten ? verschijnt. Kies met de draaiknop JA en bevestig de keuze door op de draaiknop te drukken.
- Page 210 3. Neem een nieuw onvervuild filter en zet het in. Let erop dat het ventilatiefilter een rechte positie heeft en de hoeken niet in de opening kantelen. 4. Draai het apparaat om zodat de bovenkant naar boven wijst. 5. Verwijder het gebruikte filter met het huisvuil. 9.3.5 Bacteriënfilter Bij gebruik van het bacteriënfilter WM 24148 wisselt u het partikelfilter in het bacteriënfilter volgens de bijbehorende gebruiksaanwijzing.
- Page 211 9.5 Veiligheidstechnische controle De wettelijk voorgeschreven termijn voor de uitvoering van de veiligheidstechnische controle (STK) overeenkomstig 6 “Medizinprodukte-Betreiberverordnung” (verordening voor de exploitant van medische producten - alleen Bondsrepubliek Duitsland) bedraagt twee jaar. Bovendien moet als preventieve instandhoudingmaatregel een onderhoud in de volgende afstanden worden uitgevoerd: •...
- Page 212 9.6.2 Interne accu Verwijder de interne accu niet met het huisvuil. Wanneer de accu niet langer gebruikt wordt, kunt u deze inleveren bij een erkend gecertificeerd verwerkingsbedrijf voor elektronische apparaten. Het adres van een dergelijk bedrijf kunt u opvragen bij de betreffende milieu- instantie of uw gemeente.
- Page 213 -koppeling WM 27166 – Patiëntenpas WM 66810 – Inbussleutel, maat 3 WM 24708 Gebruiksaanwijzing, NL WM 66802 VENTIlogic LS, Systeem met een slang met patiëntenventiel WM 27700 Onderdelen Bestelnummer VENTIlogic LS Basisapparaat met accu WM 27130 Netaansluitleiding WM 24177 Beschermtas voor VENTIlogic LS...
- Page 214 – Patiëntenpas WM 66810 – Inbussleutel, maat 3 WM 24708 Adapter, lekkagesysteem, verpakt WM 27199 Gebruiksaanwijzing NL WM 66802 VENTIlogic LS, Systeem met dubbele slang met patiëntenventiel WM 27710 Onderdelen Bestelnummer VENTIlogic LS Basisapparaat met accu WM 27130 Netaansluitleiding WM 24177...
- Page 215 -sensor WM 27143 Bacteriënfilter (lekkagesysteem) WM 24148 Bacteriënfilter (ventielsysteem) WM 24476 Gebruiksaanwijzing voor patiënten en het verplegend personeel WM 66802 VENTIlogic LS NL Gebruiksaanwijzing voor ziekenhuispersoneel VENTIlogic LS, NL WM 66794 Beknopte gebruiksaanwijzing, NL WM 66784 Omvang van de levering...
- Page 216 10.1.2 VENTIlogic plus VENTIlogic plus, Lekkagesysteem WM 27930 Onderdelen Bestelnummer VENTIlogic plus Basisapparaat met accu WM 27905 Netaansluitleiding WM 24177 Beschermtas voor VENTIlogic plus WM 27106 Set, omschakeling op lekkagesysteem, verpakt, bestaande uit: WM 15545 – Adapter, lekkagesysteem WM 27122 –...
- Page 217 10.2 Accessoires en reserveonderdelen U kunt desgewenst accessoires en reserveonderdelen apart bestellen. Een actuele lijst met accessoires en reserveonderdelen is verkrijgbaar op het internet onder www.weinmann.de of via uw vakhandel. Omvang van de levering...
- Page 218 11. Technische gegevens Therapieapparaat met Therapieapparaat VENTIclick Productklasse volgens richtlijn 93/42/EEG Afmetingen B x H x D in cm 23 x 14,5 x 34 23 x 14,5 x 45,5 Gewicht ca. 6,5 kg ca. 10,9 kg Temperatuurbereik – Werking +5 °C tot +35 °C –...
- Page 219 Therapieapparaat met Therapieapparaat VENTIclick Elektromagnetische compatibiliteit (EMC) overeenkomstig EN 60601-1-2: – Radio-ontstoring EN 55011 – Radiostoringsbestendigheid EN 61000-3-2, EN 61000-3-3, EN 61000-4-2 tot 6, EN 61000-4-8, EN 61000-4-11 Gemiddeld geluiddrukniveau/ werking volgens EN ISO 17510 ca. 28 dB (A) bij 10 hPa op 1 m afstand van het apparaat in patiëntenpositie Geluiddrukniveau alarmmelding...
- Page 220 Flow bij max. toerental met Lekkagesysteem: 270 l/min Lekkagesysteem: 250 l/min bacteriënfilter bij 0 hPa: Systeem met een slang met patiëntenventiel: 250 l/min Dysteem emt dubbel slang met patientenventiel (alleen VENTIlogic LS): 230 l/min Tolerantie ±15 l/min ±15 l/min Technische gegevens...
- Page 221 Therapieapparaat met Therapieapparaat VENTIclick – Huidige waarden: Na elke ademhaling opnieuw berekend (geen gemiddelde berekenen) – Gemiddelde waarden: berekend over alle ademhalingen sinds de start van het apparaat. – Lekkage: continu berekend na elke ademhaling geactualiseerd – Volumecompensatie: Bij de trap „langzaam“ controleert het apparaat na elke 8 ademhalingen of het doelvolume werd bereikt en verandert de druk met 0,5hPa.
- Page 222 11.1 Systeemweerstanden Systeemweerstand bij een luchtstroom van 60 l/min aan de patiëntaansluitopening Therapieapparaat met slangsysteem Therapieapparaat VENTIlogic LS met WM 24130 met systeem met systeem met Accessoires (lekkagesysteem) een slang met dubbele slang met en Silentflow patiëntenventiel patiëntenventiel WM 23600 kPa ·...
- Page 223 Bacteriënfilter WM 24148 voor lekkagesysteem Verhoging geluiddrukniveau op 1 m afstand van apparaat in max. 0,5 dB(A) patiëntpositie overeenkomstig EN ISO 17510 1,5 l Max. toegelaten flow (vrij wegstromend) 300 l/min Inwendig volume bacteriënfilter 85 ml Therapiedrukbereik 3 tot 35 hPa Filtratiewerkzaamheid gecontroleerd overeenkomstig EN 13328-1 gebruiksduur partikelfilter 24 h...
- Page 224 11.4 Analoge box met therapieapparaat Kanaal Meetwaarde Schaal VENTIlogic plus: 55 hPa, Kanaal 1 Maskerdruk 0 hPa VENTIlogic LS: 55 hPa Kanaal 2 Flow -100 l/min +320 l/min Kanaal 3 Lekkage flow 0 l/min +320 l/min Kanaal 4 Tidal volume...
- Page 225 11.5 Pneumatische schema’s 11.5.1 Lekkagesysteem Leckagesystem Drucksensor Druksensor atmosfeer Atmosphäre Druksensor Drucksensor patiënt Patient Patiënt Patient Spoeling van de Ausspülung der Silentflow uitademlucht via het Silentflow Ausatemluft über das Druksensor Drucksensor lekkagesysteem Leckagesystem uitgang van het Geräteausgang Insp. flowmeet- Insp. Flow- VENTI- Bakterien- VENTI-...
- Page 226 11.5.2 Systeem met een slang met patiëntenventiel Einschlauchsystem Drucksensor Druksensor mit Patientenventil atmosfeer Patiënt Atmosphäre Patient Druksensor Drucksensor patiënt Patient Patiënten- Patienten- Schaltventile Schakelventielen Uitademlucht Ausatemluft ventiel voor ventil für uitademventiel Ausatemventil Drucksensor Druksensor voor für ventielbesturing Ventilsteuerung Bakterien- Bacteriënfil- Druksensor filter Drucksensor...
- Page 227 11.5.3 Systeem met dubbele slang met patiëntenventiel (alleen VENTIlogic LS) VENTIlogic LS VENTIlogic LS Druksensor Drucksensor Systeem met dubbele slang Doppelschlauchsystem atmosfeer Atmosphäre met patiëntenventiel mit Patientenventil Druksensor Drucksensor patiënt Patient Schaltventile Patiënt Schakelventielen Patient für voor Ausatemventil uitademventiel Drucksensor Druksensor für...
- Page 228 1,20 2,30 1,10 3,80 3,80 7,27 3,50 12,00 12,00 23,00 Verdere technische gegevens zijn op aanvraag verkrijgbaar bij de fabrikant Weinmann c.q. staan vermeld in het ziekenhuishandboek en in de serivce- en reparatiehandleiding. Wijzigingen van de constructie voorbehouden. Technische gegevens...
- Page 229 Producten voor eenmalig gebruik Geen 13. Conformiteitsverklaring Hierbij verklaart Weinmann Geräte für Medizin GmbH + Co. KG, dat het product voldoet aan de desbetreffende voorschriften van de richtlijn 93/42/EEG voor medische hulpmiddelen. De volledige tekst van de conformiteisverklaring vindt u op: www.weinmann.de...
- Page 232 Geräte für Medizin GmbH + Co. KG P.O. Box 540268 D-22502 Hamburg Kronsaalsweg 40 D-22525 Hamburg T: +49-(0)40-5 47 02-0 F: +49-(0)40-5 47 02-461 E: info@weinmann.de www.weinmann.de Center for Production, Logistics, Service Weinmann Geräte für Medizin GmbH + Co. KG Siebenstücken 14...
Need help?
Do you have a question about the VENTIlogic LS and is the answer not in the manual?
Questions and answers