
Related Manuals for Weinmann MEDUMAT Transport


Summary of Contents for Weinmann MEDUMAT Transport
- Page 1 MEDUMAT Transport Ventilator Instructions for Use for Devices from Software Version 6.7...
-
Page 2: Table Of Contents
Hygienic preparation ..109 Monitoring ventilation ..51 MEDUMAT Transport ..109 5.10 Performing inhalation ..53 Hose systems . - Page 3 Maintenance ....129 12.1 MEDUMAT Transport ..129 12.2 Sending in device ... . 130 12.3 Batteries .
-
Page 4: Overview
1. Overview Connections on MEDUMAT Transport 1 Alarm LED 2 USB interface 3 O2/AIR inlet 4 O2/AIR inlet/ outlet 5 Filter compartment cover, air inlet 6 Ventilation connection terminal 9 External power supply unit 8 DC connection 7 Rechargeable battery... - Page 5 Ventilation connection terminal 1 CO measuring hose connection 2 PEEP control hose connection 3 Pressure-measurement hose connection 5 BiCheck flow sensor connection line connection 4 Ventilation hose/inhalation adapter connection 1 CO measuring hose connection 4 Ventilation hose/inhalation adapter connection The CO measuring hose of the patient hose sys- The ventilation hose of the patient hose system or tem is attached to this connection via the connec-...
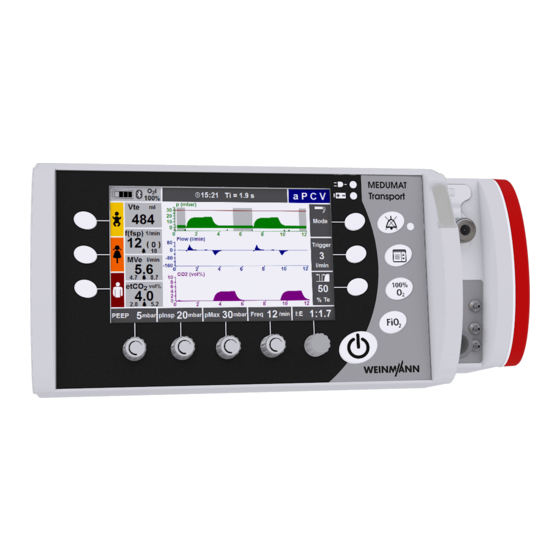
- Page 6 Controls of MEDUMAT Transport 1 Context-dependent 11Function buttons for function button emergency ventilation 2 Alarm mute button with 3 Context-dependent function button 4 Function button for main menu 5 Context-dependent function button 6 Function button for 100% O 7 Function button for...
- Page 7 Display of MEDUMAT Transport 1 Battery/Line operation indicators 10 Mode indicator 9 Info field 8 Numeric measurement display 7 Battery charge status 6 Numeric mea- surement display 2 Function indicator for 5 Function indica- context- tor for context- dependent dependent func-...
- Page 8 2 Water filter for CO measurement The blanking plug (Luer lock) is used to seal off the CO outlet if your MEDUMAT Transport is not The water filter protects the measuring chamber equipped with CO measurement or this is not of the MEDUMAT Transport against moisture and activated.
- Page 9 Hygiene input filter (optional) 1 Filter grommet 2 Filter mount 3 Hygiene input filter 1 Filter grommet 3 Hygiene input filter Protects the device from viral and bacterial Holds the suction filter in position. contamination. 2 Filter mount For installing a hygiene input filter in the device. Overview...
- Page 10 Inhalation adapter 1 Cover 2 Inhalation mask 3 Inhalation adapter 1 Cover 3 Inhalation adapter For connecting an inhalation mask to the device. Blocks the top two measuring ports on the device during inhalation. 2 Inhalation mask The patient inhales oxygen through the inhala- tion mask.
- Page 11 MEDUMAT Transport Main menu MEDUMAT Transport Main menu A A ctivate automatic alarm limits Automatic alarm limits MVe n MVe p Apnea Alarm limits etCO etCO P P ressure, flow Pressure, CO Pressure, flow, CO Pressure, flow, measurements Curves Pressure, CO...
- Page 12 Mode menu BiLevel + ASB aPCV CPAP + ASB PRVC + ASB IPPV S-IPPV SIMV + ASB Inhalation Pre-oxygenation Symbols used on the display Symbol Meaning Emergency mode – Infant (up to approx. 1 year) Emergency mode – Child (approx 1-12 years) Emergency mode –...
- Page 13 Symbol Meaning Tick box: option activated Radio button: function selected Navigate upwards Navigate downwards Increase value Decrease value Confirm your selection Navigation knob active Bluetooth connection: – Symbol is gray when connection has been activated – Symbol is blue during communication Acoustic alarm output activated Acoustic alarm output deactivated Alarm volume set to <...
- Page 14 Symbol Meaning Acoustic alarm output permanently muted (NVG mode only) Time Trigger time slot Overview...
- Page 15 Function of the controls during ventilation Depending on the ventilation mode selected, you can set the following ventilation parameters using the controls: Ventilation Control Control Control Control Navigation Function Function Function mode knob 1 knob 2 knob 3 knob 4 knob 5 button 6 button 7...
- Page 16 Ventilation Control Control Control Control Navigation Function Function Function mode knob 1 knob 2 knob 3 knob 4 knob 5 button 6 button 7 button 8 I:E and PEEP pMax Freq. Selection/ Δ pASB Trigger Mode SIMV + ASB Confirmation Flow Mode Inhalation...
- Page 17 Special markings MEDUMAT Transport 1 MEDUMAT Transport type plate 2 Voltage input 9 Cover of USB interface 8 Filter compartment cover 7 O2/AIR inlet 6 O2/AIR inlet/outlet 3 STK and service label Battery 5 Ventilation hose connection 4 Follow the instructions for use...
- Page 18 Symbol Meaning DC voltage Minimum and maximum current Do not dispose of the unit in the household waste. Type of protection against electric shock: protection class II device Protection against ingress of water IPX4 CE mark (confirms that the device complies with the applicable European Directives).
- Page 19 Symbol Meaning Volume flow rate / AIR 270 – 600 kPa 80 – 150 l/min Input 2.7 bar–6 bar O or sterile compressed air Consult instructions for use Rechargeable battery type plate Do not dispose of the unit in the household waste. Do not subject the unit to hard knocks or shocks.
- Page 20 Consult instructions for use Do not reuse Labeling on the packaging Symbol Meaning MEDUMAT Transport: Serial number of the unit Permissible storage temperature: -30°C to +70°C Permissible humidity for storage: up to 95% relative humidity RH % 0-95 Safety information in these instructions for use...
-
Page 21: Description
The MEDUMAT Transport is an automatic oxygen ventilator with additional preoxygen- ation and monitoring functions (pressure, flow and CO MEDUMAT Transport is used for the controlled and assisted, as well as invasive and non-inva- sive, ventilation of adults, children, and infants. In the case of volume-controlled ventilation, tidal volumes of 50 ml or more are possible. -
Page 22: Operator And User Qualification
2.3 Operator and user qualification MEDUMAT Transport must only be used by persons who can verify that they have the following qualifications: • A medical qualification and training in ventilation techniques • Training in the use of the MEDUMAT Transport by a person authorized by WEINMANN Emergency Improper use may lead to serious physical injury. - Page 23 Disposable hose system with reduced dead space without CO measuring hose for adults and children Hygiene input filter (optional) For ventilation in a contaminated atmosphere, MEDUMAT Transport can be used with a hygiene input filter. This protects the device from viral and bacterial contamination. Inhalation adapter The ventilation gas can alternatively be supplied to the patient via the inhalation adapter and the inhalation hose.
-
Page 24: Safety Information
Please observe the section "9. Hygienic preparation" on page 109 in order to avoid infection or bacterial contamination. Warning! • Risk of injury. Only use MEDUMAT Transport if you are a qualified medical professional and have received training in respiration techniques. Improper use may lead to serious physical injury. •... - Page 25 Always keep the air inlet openings on the filter compartment cover or the suction inlets on the hygiene input filter clear. • Only have modifications to the unit carried out by the manufacturer, WEINMANN Emergency, or by a technician expressly authorized by WEINMANN Emergency. Caution! •...
- Page 26 Safe handling of oxygen Warning! • Risk of explosion! In combination with combustible substances (grease, oil, alcohol etc.), highly compressed oxygen may give rise to spontaneous explosive reactions. • Risk of fire! If only the O2/AIR inlet/outlet is used, close the O2/AIR inlet on the side with a suitable cap.
- Page 27 Otherwise, there is a risk of insufficient ventilation. • Do not place the patient valve of the disposable hose system with reduced dead space near the O2/Air inlet of the MEDUMAT Transport, in order to prevent the device sucking in CO •...
- Page 28 Protect silicone/rubber parts against UV light and prolonged direct exposure to sunlight to prevent them becoming brittle. • We recommend that work such as inspections and repairs should be carried out by the manufacturer, WEINMANN Emergency, or by a technician expressly authorized by WEINMANN Emergency. Safety information...
- Page 29 • If third-party items are used, functional failures may occur and fitness for use may be restricted. Biocompatibility requirements may also not be met. Please note that in such cases, any claim under warranty and liability will be voided if neither the accessories nor genuine replacement parts recommended in the instructions for use are used.
-
Page 30: Installation
4. Installation As a rule, MEDUMAT Transport only has to be installed for stationary use in rescue vehicles, helicopters or aircraft. In this case, fastening sets can be supplied as accessories. If MEDUMAT Transport is supplied complete on a portable system, the unit is ready for operation and no further installation work is required. - Page 31 Connecting a new cylinder 1. Briefly open the valve of the new oxygen cylinder, then shut it again. This is to blow away any particles of dust. Caution! • Make sure that the patient is not connected up to the MEDUMAT Transport when you are establishing the gas supply.
-
Page 32: Connecting The Hose System
Otherwise, ventilation with a connected inhalation mask, tube, or inhalation cannula could injure the patient. A reusable hose system is supplied with the MEDUMAT Transport. Alternatively, a disposable hose system and a disposable hose system with reduced dead space are also available. - Page 33 Notice You can remove the elbow to reduce the dead space or to adapt the hose routing to suit the patient's position. Elbow Hose protection sleeve The tube protection sleeve is pulled over the ventilation hose with connected BiCheck flow sensor. It prevents the hose system from tangling on other items of equipment and being damaged.
-
Page 34: Connecting The Inhalation Adapter
4.3 Connecting the inhalation adapter An inhalation adapter for oxygen inhalation via the MEDUMAT Transport is supplied with the unit. The inhalation mode is used for administering a defined oxygen flow of 1-10 l/min via a suitable interface. On delivery, the inhalation adapter is secured to the connection for the ventilation hose by a retaining band. -
Page 35: Accessories From Other Manufacturers
*Not all types of humidifiers are suitable for use with MEDUMAT Transport. Always ensure that all products are compatible. **Not all types of nebulizers can be used effectively with MEDUMAT Transport. Always ensure that all products are compatible. Installation... - Page 36 You can use the O2/AIR inlet/outlet to connect units, modules or inhalation devices to the MEDUMAT Transport (quick connector to the front of the units). When doing so, bear in mind that the outlet gas flow reduces the efficiency of the gas supply (see "14.6 Possible O...
-
Page 37: Permanent Installation Of The Unit
If you wish to install the unit on a portable system or permanently install it in a vehicle or aircraft, you require the fastening set WM 15730. The following diagram shows the method of installation. Back panel of MEDUMAT Transport Portable system Installation... -
Page 38: Operation
5. Operation 5.1 Controls Display The display provides the following information while the unit is in use. • Progress of the current ventilation • Current measurements and alarm limits • Ventilation parameters set/to be set • Current assignment of the context-dependent function buttons and control knobs •... - Page 39 Context-dependent function buttons On both sides of the display there are context-dependent function buttons for calling up the following functions: Left side of the display: • Selecting emergency modes (available in every Function buttons ventilation mode): for emergency – Infant (up to approx. 1 year) ventilation –...
- Page 40 Navigation knob When a menu is open, you can use the navigation knob to navigate as follows: • Turn anticlockwise: moves the selection bar upwards in the menu • Turn clockwise: moves the selection bar downwards in the menu • Press the navigation knob: confirms selection Navigation knob When no menu is open, you can carry out the following functions:...
-
Page 41: Switching The Unit On/Self-Test
57). You should change the cylinder in good time, e.g., when the pressure falls below 50 bar, to ensure a sufficiently long operating time. 3. To switch on MEDUMAT Transport, press the On/ Standby/Off button. An automatic self-test runs which includes the following sequence of steps: •... - Page 42 The self-test is successful when all the steps have been completed. Check that all the steps are successfully completed. Do not operate the unit if: • one of the first three steps has not been successfully completed • the last part has not been successfully completed ("Fault"...
- Page 43 – Press the "New patient" button: Select the "Height" setting. The "Patient parameters" menu appears. Select the gender. Set the correct height with the context-dependent function keys or the navigation knob. Confirm the setting with "continue". Now select the appropriate ventilation mode and confirm your selection.
-
Page 44: Navigating In Menus
5.3 Navigating in menus The vast majority of functions of the MEDUMAT Transport are accessed via menus. MEDUMAT Transport offers two methods of navigating in these menus: • using the navigation knob • using the context-dependent function buttons on the right of the display You can close menus at any time by pressing the Menu button again. - Page 45 Navigating with the context-dependent function buttons 1. First use the function buttons to select a menu (here: Main menu). 2. Select a menu item by pressing the function button (the selection bar moves downwards) or the button (the selection bar moves upwards). 3.
-
Page 46: Selecting Emergency Mode
5.4 Selecting emergency mode Three modes with preset ventilation parameters are available for emergency ventilation. You can select these directly at any time during ventilation by pressing one of Emergency the function buttons twice or by pressing one of the ventilation function buttons once and then confirming with the function... -
Page 47: Selecting A Ventilation Mode
Factory settings of the unit: Emergency mode IPPV Parameter Adult Child Infant 0 mbar 0 mbar 0 mbar PEEP 30 mbar 25 mbar 20 mbar pMax 1:1.7 1:1.7 1:1.7 10/min 20/min 30/min Frequency 500 ml 200 ml 60 ml 5.5 Selecting a ventilation mode To select a different ventilation mode, proceed as follows: 1. -
Page 48: Changing The Ventilation Mode
5.6 Changing the ventilation mode To change the currently set ventilation mode, proceed as follows. 1. First, use the "Mode" function button to select the "Mode" menu. 2. Then use the navigation knob or the context-depen- dent function buttons on the right of the display to se- lect whether you wish to ventilate invasively or non- invasively. -
Page 49: Selecting Additional Ventilation Functions
The saved values become available again as soon as the previous ventilation mode is reactivated. • When changing from volume-controlled ventilation to pressure- controlled ventilation, the unit adopts the preset inspiratory pressure from the operator menu. • If you have selected a volume-controlled mode, and if the tidal volume or ventilation rate has changed, the device automatically adapts the corresponding alarm limits (±... -
Page 50: Performing Ventilation
Notice: When performing ventilation with a tidal volume Vt < 200 ml, a PEEP > 0 mbar and an inspiratory O concentration set to FiO < 70%, the inspiratory O concentration administered can deviate from the set value. Reduce the PEEP to decrease the administered inspiratory O concentration. -
Page 51: Monitoring Ventilation
Caution! Using the elbow increases the dead space of the hose system. Take this into account when setting the ventilation parameters. Otherwise the success of treatment may be compromised. 2. Attach the mask to the hose system. 3. If necessary, introduce a Guedel oropharyngeal tube to keep the patient's airways free. 4. - Page 52 Displayed measurements During ventilation, the following parameters are displayed as numbers: – O i: inspiratory O concentration measured by the unit – Vt : expiratory tidal volume/breath volume – f/(fsp): respiratory rate/number of spontaneous breaths per minute and the corresponding alarm limit –...
-
Page 53: Performing Inhalation
If you have a unit equipped with CO measurement, you can vary the display as follows: – Pressure, flow – Pressure, CO – Pressure, flow, CO – Pressure, flow, measurements – Pressure, CO , measurements – Gauge (only in volume-controlled modes) 5.10 Performing inhalation Caution! The device must not be operated in combination with a nebulizer during oxygen in-... -
Page 54: Alarm Signals
6. Select the "Inhalation" mode and confirm your selection. 7. Then select "Start ventilation" and confirm your selection. The device starts the inhalation. 5.11 Alarm signals Alarm priority MEDUMAT Transport classifies alarms into the following priority levels: • high priority • medium priority • low priority If two or more alarms occur simultaneously, alarms with the currently highest priority are displayed cyclically. - Page 55 Display of alarms MEDUMAT Transport displays alarms as follows: • High priority – LED flashes red – "High priority" alarm sounds every 8 seconds – Alarm text appears in info field; info field flashes Info field – Corresponding alarm limit in the measurement field flashes red •...
-
Page 56: Ventilation With Breathing System Filters (Not Supplied With The Unit)
Notice • Following the start of ventilation, all alarms are automatically muted for 120 seconds. This is with the exception of the technical alarms "Supply pressure < 2.7 bar", "Battery almost empty", and "Device malfunction", which cannot be muted. During this time, visual alarms are still displayed. •... -
Page 57: Calculating The Oxygen Level/Operating Time
149). This gives: 1000 l ------------------------- - × --------------- - Ventilation operating time (min) 88 min 1 h 28 min 11.3 l/min 100% If MEDUMAT Transport is operated with an O concentration less than 100%, the operating time will increase correspondingly. Operation... -
Page 58: Alternative Ventilation
2. Attach the ventilation bag, e.g., COMBIBAG WM 11000 from WEINMANN Emergency and perform manual ventilation. Oxygen failure If the oxygen supply fails or no medical oxygen is available, the MEDUMAT Transport can also be operated with sterile compressed air or concentrator oxygen (see "Options" on page 91). -
Page 59: Battery Management
WM 28937. MEDUMAT Transport can be operated from an external power supply when the battery is empty. The battery is charged while the unit is in operation but charging takes longer than when the unit is switched off. - Page 60 The charging status is only indicated when the external power supply is connected, since only then is it possible to actually charge the battery. When MEDUMAT Transport is off, the charging status is shown by the charging indicator. When MEDUMAT Transport is on, the charging status is shown by both the charging indicator and the capacity indicator.
- Page 61 Battery missing or (current charge level) faulty Charging batteries MEDUMAT Transport starts charging the battery automatically, as soon as the following conditions are met: • External power supply with at least 12 V DC is connected • The battery is not full (<95% charge) •...
- Page 62 Ending battery charging MEDUMAT Transport automatically determines the optimum point at which to end charging by measuring and evaluating the charging curve and battery temperature. As soon as charging has ended, the charging indicator glows green continuously. Interrupting battery charging Battery charging is continuously monitored by MEDUMAT Transport.
-
Page 63: Ventilation Modes
6. Ventilation modes You can select different ventilation modes in the "Mode" menu (see "5.5 Selecting a ventilation mode" on page 47). This section describes: • Classification of the ventilation modes (see "6.1 Classification of the ventilation modes" on page 63) •... - Page 64 The following ventilation modes are available in the unit: Spontaneous Control parameter Controlled ventilation Assisted ventilation respiration Pressure BiLevel + ASB, aPCV CPAP + ASB Pressure + Volume PRVC + ASB S-IPPV Volume IPPV SIMV + ASB Setting ventilation parameters can cause the classification of the ventilation modes to change.
-
Page 65: Important Ventilation Parameters
6.2 Important ventilation parameters Unit behaviour/ Ventilation parameter Explanation Special features In certain circumstances it may no longer be possible to achieve breath volume with volume-controlled ventilation. Tidal volume (breath volume) If airway pressure reaches the set limit pMax, it will be limited to the value pMax (pressure-limited ventilation). -
Page 66: Additional Functions And Safety Functions
6.3 Additional functions and safety functions NIV: Non-Invasive Ventilation (Mask ventilation) This additional function can also be activated in all pressure-controlled modes and in the CPAP + ASB mode.The leakage alarm is deactivated. The unit uses optimized trigger algorithms for non-invasive ventilation. If non-invasive ventilation is activated, only the ventilation modes BiLevel + ASB, aPCV, PCV, and CPAP + ASB available for this are shown in the "Mode"... - Page 67 Ventilation modes" on page 63). Caution! In the case of oxygen inhalation, check that the inhalation hose is connected and the measuring ports on the MEDUMAT Transport are blocked (see "4.3 Connecting the inhalation adapter" on page 34). Ventilation modes...
-
Page 68: Pressure-Controlled Ventilation Modes
6.4 Pressure-controlled ventilation modes Caution! Ventilation pressure is limited to pMax in the pressure-controlled modes (pressure limitation). A high-priority alarm is triggered when this pressure limit is reached. BiLevel + ASB BiLevel: ventilation at two pressure levels ASB: Assisted Spontaneous Breathing You can set the following ventilation values using the control knobs: Function Ventilation... - Page 69 Pressure pMax automated ventilation assisted respiration pInsp Pressure ramp Δ pASB PEEP Time TI=T 1/Freq. insp (spontaneous) 1/Freq. (set) The BiLevel + ASB mode is used for pressure-controlled ventilation combined with free spontaneous respiration at pressure levels pInsp and PEEP during the entire breathing cycle and for adjustable pressure support at PEEP level.
- Page 70 aPCV aPCV: assisted Pressure Controlled Ventilation Warning! • Risk of hyperventilation! Continuously monitor the patient's measured respiratory rate and measured minute volume in order to prevent ↑ hyperventilation. To this end, set a narrow alarm limit for the alarm, in order to recognize the risk of hyperventilation in good time.
- Page 71 You can find more setting options under the menu item "Advanced ventilation parame- ters" in the "Main menu" (see "7.4 Advanced ventilation parameters" on page 87). Pressure pMax Synchronized Automated Automated ventilation automated ventilation ventilation pInsp Pressure ramp PEEP Time ΔT 1/Freq.
- Page 72 PCV: Pressure Controlled Ventilation You can set the following ventilation values using the control knobs: Ventilation Control Control Control Control Navigation Function Function Function mode knob 1 knob 2 knob 3 knob 4 knob 5 button 6 button 7 button 8 I:E and PEEP pInsp...
- Page 73 Pressure pMax pInsp Pressure ramp PEEP Time 1/Freq. (set) 1/Freq. (set) PCV mode is used for mandatory pressure-controlled ventilation with fixed pressure levels. This mode is used on patients who have no spontaneous respiration. However, a spontaneously breathing patient can breathe deeply and freely during expiration. The set maximum pressure limitation (pMax) ensures the safety of the patient.
- Page 74 CPAP + ASB CPAP: Continuous Positive Airway Pressure ASB: Assisted Spontaneous Breathing You can set the following ventilation values using the control knobs: Ventilation Control Control Control Control Navigation Function Function Function mode knob 1 knob 2 knob 3 knob 4 knob 5 button 6 button 7...
- Page 75 The ASB mode is used for pressure support of insufficient or exhausted spontaneous respiration. The patient is able to breathe spontaneously without any restriction, but is supported in his breathing effort by MEDUMAT Transport. The CPAP + ASB mode is used exclusively on patients with adequate spontaneous respiration.
- Page 76 PRVC + ASB PRVC: Pressure Regulated Volume Controlled Ventilation ASB: Assisted Spontaneous Breathing You can set the following ventilation values using the control knobs: Ventilation Control Control Control Control Navigation Function Function Function mode knob 1 knob 2 knob 3 knob 4 knob 5 button 6...
- Page 77 Pressure pMax Safety pPlat pInsp (variable) margin 5 mbar Increments max. 3 mbar PEEP Time volume-controlled pressure-controlled pressure-controlled mechanical breath mechanical breath mechanical breath 1/Freq. (set) 1/Freq. (set) The controlled ventilation mode PRVC + ASB combines the advantages of both pressure- controlled ventilation and volume-controlled ventilation.
-
Page 78: Volume-Controlled Ventilation Modes
6.5 Volume-controlled ventilation modes Warning! Risk of inconsistent volume once pressure limitation pMax is reached! Monitor the patient continuously throughout volume-controlled ventilation modes and change the setting parameters if necessary. Once the pressure limitation is reached, a high- ↑ priority alarm (airway pressure ) guarantees the safety of the patient. - Page 79 Pressure pMax automated ventilation automated ventilation pPlat PEEP Time 1/Freq. (set) 1/Freq. (set) The IPPV mode is used for mandatory volume-controlled ventilation with a fixed tidal volume. This mode is used on patients who have no spontaneous respiration. However, a spontaneously breathing patient can breathe deeply and freely during expiration.
- Page 80 S-IPPV S-IPPV: Synchronized Intermittent Positive Pressure Ventilation Warning! • Risk of hyperventilation! Continuously monitor the patient's measured respiratory rate and measured minute volume in order to prevent ↑ hyperventilation. To this end, set a narrow alarm limit for the alarm, in order to recognize the risk of hyperventilation in good time.
- Page 81 You can find more setting options under the menu item "Advanced ventilation parameters" in the main menu (see "7.4 Advanced ventilation parameters" on page 87). Pressure synchronized automated automated ventilation ventilation pMax pPlat PEEP Time ΔT 1/Freq. (current) 1/Freq. (set) Synchronized time slot The S-IPPV mode is used for volume-controlled ventilation with a variable mandatory minute volume MV.
- Page 82 SIMV + ASB SIMV: Synchronized Intermittent Mandatory Ventilation ASB: Assisted Spontaneous Breathing You can set the following ventilation values using the control knobs: Ventilation Control Control Control Control Navigation Function Function Function mode knob 1 knob 2 knob 3 knob 4 knob 5 button 6 button 7...
- Page 83 Pressure pMax automated ventilation assisted synchronized automated spontaneous ventilation respiration spontaneous pPlat respiration ΔpASB PEEP Time ΔT 1/Freq. (current) 1/Freq. (set) Synchronized time slot The SIMV + ASB mode is used for volume-controlled ventilation with a fixed mandatory minute volume MV. The patient can breathe spontaneously between the mandatory mechanical breaths and thereby increase the minute volume.
-
Page 84: Main Menu
7. Main menu In the main menu, you can optimize the unit's settings to suit the particular operating conditions. The main menu can be called up at any time using the "Main menu" function button. To navigate in the menu, you can use either the navigation knob or the context-dependent function buttons on the right of the display (see "5.1 Controls"... -
Page 85: Alarm Limits
Automatic alarm calculation for the Apnea alarm Depending on the set percentage, the Apnea alarm is set to 4 (10%), 5 (20%) or 6 (30%) respiratory periods. The length of a respiratory period is 60/f in seconds, i.e., with a measured respiratory rate of, for example, 15/min, the increments for the Apnea alarm limit are 16 s, 20 s, and 24 s. -
Page 86: Curves
7.3 Curves In this menu, you can vary the display for monitoring ventilation. You can make the following settings: Parameters Setting range Pressure, flow Pressure, CO Pressure, flow, CO Curves Pressure, flow, measurements (Units equipped with measurement) Pressure, CO , measurements Pressure gauge (only available in volume- controlled modes) -
Page 87: Advanced Ventilation Parameters
7.4 Advanced ventilation parameters To achieve optimum results during transport ventilation, you can configure settings in the "Advanced ventilation parameters" menu, depending on the particular mode selected. The non-selectable functions in a particular ventilation mode are not shown. Pressure ramp With this function you can set how quickly the inspiratory ventilation pressure should be reached. - Page 88 Notice: How quickly the set flow is actually reached depends on the patient, any leakage (NIV) and on the set ventilation parameters. Flow progress With this function you can set the flow progress. You can make the following settings: Parameters Setting range decreasing Flow progress...
-
Page 89: Apnea Ventilation Parameters
ventilation. In contrast, at a setting of 100% Te, the patient has the possibility of triggering a mechanical breath at any point in the whole expiration time. Alternatively, you can also set the trigger time slot on the right in the display, using the trigger time slot function key. Alternatively, you can also set the trigger thresholds on the right in the display, using the trigger thresholds function button. -
Page 90: Audio/Video
7.6 Audio/Video This menu can be used to set the display brightness, alarm volume, and alarm LED: • Display brightness: Here you can set the display bright- ness for day colors, night colors, and in NVG mode sep- arately. • Alarm volume: Here you can set the volume of all the alarms. -
Page 91: Options
Parameters Setting range Brightness/NVG (only when NVG option is 10%-100% enabled) 50%-100% Volume 0%-100% (only when NVG option is enabled) Alarm LED (only when NVG option is 100% enabled) 7.7 Options configuration In this menu, you can activate CO suction. You can only access this menu if you have a unit equipped with CO measurement. - Page 92 In the menu, you can select which unit of measurement the CO concentration should be displayed in. You can make the following settings: Parameters Setting range mmHG Unit Vol% Date, time In this menu, you can set the current date and time. You can make the following settings: Parameters Setting range...
- Page 93 With the Bluetooth connection activat- ed, an application documentation system can connect to MEDUMAT Transport in order to retrieve application data. For this you need the bluetooth pin 6398 displayed in this menu. This menu only appears if the data communication option has been enabled.
-
Page 94: Night Colors
Hygiene input filter (optional) In this menu you can reset the hygiene input filter counter after a filter change. The remaining life of the hygiene in- put filter is shown in percent and is 100% when you have changed the hygiene input filter. Requirements for this function: •... - Page 95 You can activate the NVG mode here. When the NVG mode is activated, the device behaves as follows: • Alarm LED deactivated • Acoustic alarm output for all alarms permanently deac- tivated • Coloring of the display optimized for night vision devices •...
-
Page 96: Operator Menu
8. Operator menu In the operator menu, you can optimize the unit's settings to suit the particular operating conditions. The operator menu can be opened as follows when the device is started 1. Switch on the device 2. Then press the two lower context-dependent function keys simultaneously (see image on left). - Page 97 1. To call up a specific page of the operator menu, turn the navigation knob until the required page is dis- played. 2. Press the navigation knob. The first menu item of the selected page is highlighted in blue. 3. In order to call up a menu item on a page, turn the nav- igation knob until the selection bar is on the required menu item.
- Page 98 MEDUMAT Transport operator menu Enter operator menu Change operator password Password Page Enter service menu IPPV BiLevel + ASB Edit ventilation settings CPAP + ASB Ventilation Modes Edit alarm limits SIMV + ASB S-IPPV PRVC + ASB aPCV Pre-oxygenation Inhalation...
-
Page 99: Password Page
8.1 Password Page Before you enter the access code, the current software ver- sion of the unit is displayed on the start screen (Password Page) of the operator menu. The operator menu is protect- ed by a four-digit access code. On delivery, the access code for the operator menu is "0000". - Page 100 Notice: If a ventilation mode is already deactivated , you cannot call up its presets. If you have selected and confirmed the "edit presets" field, you enter the "Edit ventilation settings" submenu for the required ventilation mode. This submenu is divided into the patient groups Infant, Child, and Adult.
-
Page 101: File Export/Import
The following data records are available to export: • Service Files: Files are saved in the Service Files which can be of use to the WEINMANN Emergency Technical Service or WEINMANN Emergency authorized service agents on servicing. • Mission Logs: Mission Logs contains the session data of the last 60 applications. - Page 102 Export/import presets or screenshots To export presets or screenshots from MEDUMAT Trans- port, proceed as follows: 1. Select the "File Import/Export" page in the operator menu. 2. Insert a USB stick in the USB port of the device. Caution! Only USB sticks which conform to the USB standard 2.0 should be inserted in the USB port.
-
Page 103: Software Update
4. Select the "Software Update" page in the operator menu. Notice: It can take a moment for the MEDUMAT Transport to detect the USB stick. Leave the USB stick in the device's USB port throughout the software update. Do not remove it until the software update has completely finished. - Page 104 5. Press the button or the navigation knob to start the installation of the new software version on the device. 6. Follow the instructions on the display: Notice: It is not possible to install an earlier software version than is already installed on the device. If the device is not able to read the software update file, this can have the following causes: •...
-
Page 105: Options
Bluetooth communication option and NVG option. You require an option code to install the Bluetooth com- munication option and NVG option. You can obtain this from the WEINMANN Emergency customer service depart- ment. If you enable the NVG option, the following menu items are activated automatically (see "8.6 User Settings"... - Page 106 Language In this menu item, you can set the language in which the messages are displayed. You can choose the following settings: Parameter Options Brazilian Portuguese Português brasil. (PT-BR) Czech Český (CS-CS) Chinese 汉语 (ZH-ZH) Danish Dansk (DA-DK) German Deutsch (DE-DE) Greek Ελληνικά...
- Page 107 Emergency Mode In this menu item you can specify the IPPV or BiLevel + ASB mode as the emergency ventilation mode. Vt/kg body weight In this menu item you can set the tidal volume per kilo- gram of body weight. This value is a variable used to con- vert the body height to a tidal volume (see "14.8 Calculation of body weight on the basis of body height"...
- Page 108 Dust load on filter This menu item enables you to set the hygiene input filter wear according to the level of contamination in the ambi- ent air. You can choose between the settings "normal", "high", and "very high". Select "normal" for standard conditions, and "high"...
-
Page 109: Hygienic Preparation
Otherwise the unit may be damaged, causing a hazard to users and patients. Keep MEDUMAT Transport and the BiCheck flow sensor connecting lead clean by wiping with disinfectant. If using a hygiene input filter, do not remove it for wipe disinfection;... -
Page 110: Parts And Accessories
BiCheck flow sensor. Leave the BiCheck flow sensor to drip dry for a sufficient length of time. Alternatively, you can connect the patient hose system, without the test lung, to the MEDUMAT Transport and actuate several mechanical breaths. •... -
Page 111: Fittings
Cleaning agents containing alcohol or grease become flammable when combined with compressed oxygen and can cause explosions. Carry out hygienic preparation of the MEDUMAT Transport and the accessories used, as described in the following table. Refer to the instructions supplied with the hose system and with the disinfectant used. We ®... - Page 112 Reusable components Thermo- Sterili- Parts Cleaning Disinfection disinfector zation Wipe down with a MEDUMAT Transport Wipe disinfection Not permitted moist cloth permitted Wipe down with a BiCheck flow sensor lead Wipe disinfection Not permitted moist cloth permitted Clean at 95°C, as...
- Page 113 Thermo- Sterili- Parts Cleaning Disinfection disinfector zation – Rinse with water and mild soap 30°C washing cycle, – Wash at 30°C in Immersion with the addition of Velcro strap with clip the washing disinfection a suitable permitted machine (without disinfectant spinning) With a dry or moist Oxygen fittings...
- Page 114 Disposable components Thermo- Steriliza- Parts Cleaning Disinfection disinfector tion Disposable measuring tube system comprising: – PEEP control line – Pressure-measurement tube – CO measuring hose – Connector – Water filter – Y-piece (Luer lock) These are disposable parts and must not be reused. Use new parts instead. Luer lock connector Disposable Patient Hose System...
-
Page 115: Function Check
Warning! If this function check reveals any faults or deviations from the specified values, you must not use the MEDUMAT Transport. Have the unit repaired by WEINMANN Emergency or an authorized dealer. You should first try to rectify the fault with the aid of the information provided in section "11. -
Page 116: Intervals
10.1 Intervals Before each use: • Perform a function check. After each use or disassembly: • Clean, disinfect and sterilize the unit and the components (see "9. Hygienic preparation" on page 109). • Perform a function check. At least every 6 months: •... -
Page 117: Checking The System For Leaks
2. Wet all the screw and hose connections with the solution. If bubbles form, this indicates a leak. 3. Release the pressure in the system: Close the oxygen cylinder valve. Switch MEDUMAT Transport on briefly until the contents gauge on the O cylinder indicates "0". Then switch MEDUMAT Transport off again. -
Page 118: Checking The Patient Valve (Reusable Hose System Only)
10.3 Checking the patient valve (reusable hose system only) Caution! • Also observe the "Function check" section in the instructions for use of the "Patient Hose System" WM 66696. • Never use torn, wavy, distorted or sticky diaphragms for ventilation. Otherwise considerable malfunctions are to be expected. -
Page 119: Performing A Function Check
OK. Switch the device off and then on again. Re- peat the function check. If the fault reoccurs, have the device repaired by WEINMANN Emergency or an authorized dealer. 11.Press all the device controls apart from the On/Off button. - Page 120 13.Following a prompt during the function check: Change the suction filter (see "12.6 Changing the hygiene input filter" on page 132) or the hygiene input filter (see "12.6 Changing the hygiene input filter" on page 132). 14.Confirm the change of the suction filter or the hygiene input filter.
- Page 121 Testing the power-failure alarm 1. Once the automatic function check has finished, switch to ventilation mode. 2. Pull out the battery and disconnect the charger or remove the portable system from the wall mounting (for not more than 30 seconds). If the red alarm LED flashes and an acoustic signal sounds, the power failure alarm is functioning.
- Page 122 Suction filter Change suction filter. Hygiene input filter Change hygiene input filter If, despite all your measures to rectify the faults, a component still remains marked with a red cross, please contact an authorized dealer or WEINMANN Emergency. Function check...
-
Page 123: Troubleshooting
11. Troubleshooting If problems occur which cannot be rectified immediately, contact the manufacturer, WEINMANN Emergency, or your authorized dealer to have the unit repaired. Do not continue using the unit to avoid serious damage. 11.1 Troubleshooting Fault Cause Remedy MEDUMAT Transport defective Repair by manufacturer/dealer. - Page 124 Insert battery in device or connect screen is dark not connected to the line power. device to the line power. Switch the MEDUMAT Transport off Internal error and back on again. If the error persists: Have device repaired. No acoustic alarm output Deactivate NVG (see "NVG (Night...
-
Page 125: System Alarms
11.2 System alarms Message Alarm Cause Rectification Change suction filter on Suction filter or CO measurement hose system or occlusion medium priority measuring hose blocked replace complete measurement hose system module defective, Continue ventilation without CO module defective low priority no communication or measurement;... - Page 126 Message Alarm Cause Rectification No unit fault; message appears, e.g., on removing unit from wall mounting or portable system or if External power supply Battery operation low priority a power failure occurs during too weak or has failed operation via the power supply unit (alarm stops automatically after 10 seconds).
-
Page 127: Physiologic Alarms
11.3 Physiologic alarms Message Alarm Cause Rectification Check state of patient. high Upper limit value ↑ Check the limit value settings for high priority exceeded plausibility. Check state of patient. Lower limit value not ↓ Check the limit value settings for high priority reached plausibility. - Page 128 Message Alarm Cause Rectification Selected O concentration too high, Minimize leakage, select NIV e.g., during NIV add-in. ventilation with mask Activate "Compressed gas ↓ concentration High priority Sterile compressed air or supply" function (see "Allow gas gas other than medical type selection"...
-
Page 129: Maintenance
German regulations governing owners/operators of medical devices (MPBetreibV §11) which is valid under German law, we as the manufacturer recommend that all accessories for use of the MEDUMAT Transport that are connected with the same be subject to a safety check (STK) every two years. -
Page 130: Sending In Device
1. Uninstall components and accessories. 2. Clean the device, components, and accessories (see "9. Hygienic preparation" on page 109). 3. Send in the device and, if necessary, components and accessories to WEINMANN Emer- gency or a technician specifically authorized by WEINMANN Emergency. Notice... -
Page 131: Batteries
Notice: The batteries used for MEDUMAT Transport do not have a "memory effect". Therefore you can recharge them when they are only partially discharged without reducing their capacity or life. However, in terms of their functioning even these batteries have only a limited life of at least 300 charging cycles. -
Page 132: Filter
1. Undo the two screws in the filter compartment cover and remove the cover. Notice: Support the cover on one side with a slot-head screwdriver. This prevents the cover from jamming while you are lifting it off. 2. Remove the old suction filter with tweezers and dispose of it correctly. -
Page 133: Storage
"Options" menu item (see "7.7 Options" on page 91). 12.7 Storage If MEDUMAT Transport is not going be used for a considerable length of time, we recommend the following procedure: 1. Clean and disinfect the unit (see "9. Hygienic preparation" on page 109). -
Page 134: Disposal
The device packaging (cardboard box and inserts) can be disposed of as waste paper. Disposal of batteries Do not dispose of used batteries in the household waste. Contact WEINMANN Emergency or a public waste disposal authority. Maintenance... -
Page 135: Product, Accessories
Velcro strap with clip 28964 MEDUMAT Transport without CO module WM 28300 Parts Order number MEDUMAT Transport basic unit without CO 28315 module Patient hose system without CO measurement, 28295 reusable, complete Other items supplied as with MEDUMAT Transport WM 28400 Product, accessories... -
Page 136: Accessories
13.2 Accessories Parts Order number Oxygen cylinder, 2-liter 1822 Lightweight aluminium oxygen cylinder, 2-liter 1821 Pressure reducer OXYWAY Fix III 190 l/min; 4.5 bar WM 30301 Pressure reducer OXYWAY Fast II High Flow 31891 190 l/min; 4.5 bar Pressure hose, 10 bar, with connection nozzle Article number G 3/8;... - Page 137 Parts Order number Ventilation mask, one-piece, silicone – Size 5 5084 – Size 4 5085 – Size 2 5092 – Size 1 5091 – Size 0 5090 Rendell-Baker ventilation mask, silicone: – Children - Size 3 5063 – Children - Size 2 5062 –...
- Page 138 Parts Order number Patient hose system without CO measurement, 28255 disposable, with reduced dead space, complete Disposable hose system with CO measurement, with reduced dead space, without BiCheck 28193 flow sensor Disposable hose system without CO measurement, with reduced dead space, without BiCheck 28183 flow sensor Set of disposable hose systems, 3 m, with CO...
-
Page 139: Options
15871 without BiCheck flow sensor (10 pieces) Protective cap for BiCheck flow sensor 28218 Set, protective cap for BiCheck flow sensor (x30) 15923 Set, hygiene input filter for MEDUMAT Transport 15824 13.3 Options Parts Order number Bluetooth communication option 28269... -
Page 140: Replacement Parts
Protection sleeve for 3 m ventilation hose 28686 Set of suction filters (5 x WM 28331) 15473 BiCheck flow sensor (5 x WM 22430) 15685 EasyLung for WEINMANN Emergency 28625 CPAP/NIV disposable masks 20703 – Children - Size S, with retaining ring for headgear 20704 –... - Page 141 Parts Order number Set of 50 CPAP/NIV disposable masks for children, 15834 size S, with retaining ring for headgear Set of 50 CPAP/NIV disposable masks for adults, 15835 size M, with retaining ring for headgear Set of 50 CPAP/NIV disposable masks for large 15836 adults, size L, with retaining ring for headgear Headgear for CPAP/NIV disposable masks...
-
Page 142: Technical Data
14. Technical Data 14.1 Specifications MEDUMAT Transport Product class according to 93/42/EEC Dimensions WxHxD Dimensions with hygiene 345 mm x 163 mm x 149 mm input filter WxHxD 365 mm x 163 mm x 149 mm approx. 4.4 kg; (approx. 4.6 kg with etCO... - Page 143 MEDUMAT Transport Classification acc. to EN 60601-1 – Type of protection Protection class II against elec. shock – Degree of protection Type BF against elec. shock – Degree of protection IPX4 against water Electromagnetic compatibility (EMC) as per EN 60601-1-2 –...
- Page 144 MEDUMAT Transport min. 0.2 s (200 ms) Inspiration time: max. 59 s Tidal volume 50 ml - 2000 ml 3 mbar - 60 mbar (With pressure-controlled ventilation modes: pressure control via Ventilation pressure proportional valve) With volume-controlled ventilation modes: pressure limitation to pMax Pressure support (Δ...
- Page 145 MEDUMAT Transport Tolerances for CO ± 0.43 vol% + 8% of the CO concentration measurement as per ISO 80601-2-55 measurement Non-consuming O sensor concentration Adjustable in 10% steps between 40% and 100% In the range from 40 vol% to 60 vol%: ± 18 vol% In the range >...
- Page 146 MEDUMAT Transport Compliance* – Reusable hose system 0.79 ml/hPa (ml/cmH – Disposable hose system 0.90 ml/hPa (ml/cmH Internal volume of the complete respiratory system*: – Reusable hose system approx. 586 ml – Disposable hose system approx. 586 ml Hygiene input filter >...
-
Page 147: Battery Specifications
14.2 Battery specifications Battery Type Li-Ion, maintenance-free Dimensions (W x H x D) 100 mm x 118 mm x 45 mm Weight 604 g ≥ Rated capacity 6.6 Ah ( 71.3 Wh) Rated voltage 10.8 V Charging time (0% to 95%) Charging temperature +5°C to +45°C Operating time with battery... -
Page 148: Block Diagram
Recommended separation distances between portable and mobile RF telecommunication devices (e.g., cellular phone) and MEDUMAT Transport The MEDUMAT Transport is intended for use in an electromagnetic environment in which the RF interference is controlled. The customer or user of the MEDUMAT Transport can help to avoid... -
Page 149: O 2 Consumption Of The Unit
14.5 O consumption of the unit PEEP = 20 mbar PEEP = 15 mbar PEEP = 10 mbar PEEP = 5 mbar PEEP = 0 mbar pInsp [mbar] 14.6 Possible O concentration with counterpressure Notice: When performing ventilation with a hygiene input filter, the increased resistance in the suction area can produce a slightly higher O concentration (compared with the concentrations stated here). - Page 150 The following diagram applies when using medical oxygen. concentration * The counterpressure describes the resistance of the system as a whole and depends on the ventilation settings, the hose system used and the resistance and compliance of the patient. Technical Data...
-
Page 151: Counterpressure
Vt ml ---------------- - × Device outlet flow(l/min) 0.06 Ti s ( ) 14.7 Attainable tidal volume with counterpressure With volume-controlled ventilation, the volume released to the patient is influenced by the hose compliance. In relation to the respective airway pressure, the tidal volume falls by 0.79 ml/mbar (reusable hose system) or by 0.9 ml/mbar (disposable hose system). -
Page 152: Calculation Of Body Weight On The Basis Of Body Height
14.8 Calculation of body weight on the basis of body height In the start menu, you can set the height of the patient under the menu item New patient (see “5.2 Switching the unit on/Self-test” on page 41). The device calculates the appropri- ate ventilation parameters based on the set height and the corresponding ideal body weight (IBW). -
Page 153: Glossary
15. Glossary Pressure Peak pressure Pressure limitation pMax Resistance • Plateau pressure Increase Compliance • (V/C) Pressure Resistance Pressure • (R V) PEEP Time Flow phase Plateau phase • = const.) Insp Inspiration time Expiration time Term Explanation Measurement for the elastic properties (elasticity) of the lungs. Compliance (C) Unit: ml/mbar Flow is the quantity of gas applied to the patient in relation to time. - Page 154 Term Explanation Time during inspiration when the gas flow to the patient is zero. Plateau time The plateau time can be set in volume-controlled ventilation modes and is 0% - 50% of the inspiration time T Positive pressure (in relation to the atmosphere) in the lungs which Positive end-expiratory pressure is created artificially during ventilation and is present at the end of (PEEP)
- Page 155 Term Explanation Number of applied ventilation cycles per minute (total of Respiratory rate (Freq.) mandatory and spontaneous breaths) Respiratory time ratio (I:E) The ratio of inhalation time T to exhalation time T Tidal volume (Vt) Set volume to be applied per mechanical breath. A trigger (triggered by the patient) is a switch element enabling the Trigger patient and the ventilator to interact.
-
Page 156: Warranty
16. Warranty Starting from the date of purchase, WEINMANN Emergency gives the customer a lim- ited manufacturer’s warranty on a new original WEINMANN Emergency product and on replacement parts installed by WEINMANN Emergency in accordance with appli- cable warranty terms and conditions for the particular product and the warranty pe- riods listed below. - Page 160 Manufacturer Center for Production, Logistics, Service WEINMANN Emergency WEINMANN Emergency Medical Technology GmbH + Co. KG Medical Technology GmbH + Co. KG Frohbösestraße 12 Siebenstücken 14 22525 Hamburg 24558 Henstedt-Ulzburg GERMANY GERMANY T: +49 40 88 18 96-120 E: customerservice@weinmann-emt.de...
Need help?
Do you have a question about the MEDUMAT Transport and is the answer not in the manual?
Questions and answers