Advertisement
Quick Links
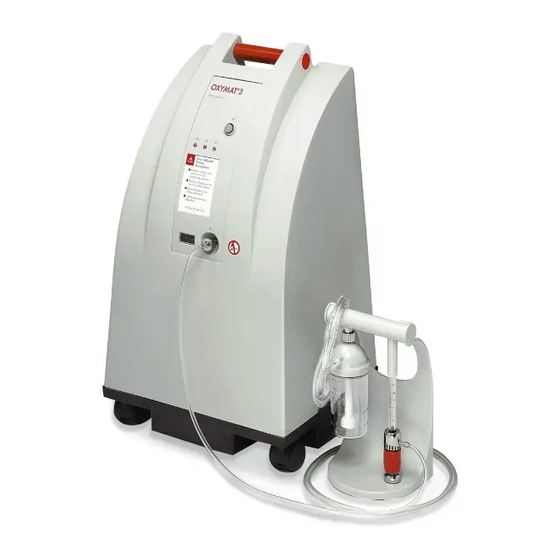
OXYMAT 3
Concentrateur d'oxygène à partir du SN 8000
Zuurstofconcentrator vanaf SN 8000
Concentratore di ossigeno a partire da SN 8000
Oxygen Concentrator from serial number 8000
Oxygenkoncentrator from SN 8000
Concentrador de oxígeno a partir de SN 8000
WM 13011/WM 13021/WM 13031/WM 13041/WM 13017/WM 13018
Description et mode d'emploi de l'appareil / Beschrijving van
het apparaat en gebruiksaanwijzing / Descrizione dell'
apparecchio e istruzioni per l'uso / Description and Operating
Instructions
/
Apparatbeskrivning
och
bruksanvisning/
Descripción del aparato e instrucciones
Advertisement
Chapters

Related Manuals for Weinmann OXYMAT 3


Summary of Contents for Weinmann OXYMAT 3
- Page 1 OXYMAT 3 Concentrateur d’oxygène à partir du SN 8000 Zuurstofconcentrator vanaf SN 8000 Concentratore di ossigeno a partire da SN 8000 Oxygen Concentrator from serial number 8000 Oxygenkoncentrator from SN 8000 Concentrador de oxígeno a partir de SN 8000 WM 13011/WM 13021/WM 13031/WM 13041/WM 13017/WM 13018 Description et mode d’emploi de l’appareil / Beschrijving van...
- Page 2 Français Nederlands Italiano English Svenska Español...
- Page 3 O / I...
-
Page 4: Légende
20. Appareil sous tension (vert) 21. Doseur (débitmètre) 22. Bille d’indication du débit 23. Raccord pour tuyau de l’OXYMAT 3 (20 m) 24. Bouton de réglage du débit 25. Bocal de l’humidificateur-barboteur 26. Raccord pour tuyau vers lunettes (3 m) 27. -
Page 5: Legenda
21. Doseereenheid (flowmeter) 20. Indicatore di funzionamento (verde) 22. Kogel, geeft de doorvoer aan 21. Unità di dosaggio (flussometro) 23. Aansluiting voor lange slang op OXYMAT 3 22. Sfera indicante la portata (20 m) 23. Attacco per tubo flessibile lungo su 24. -
Page 6: Table Of Contents
5.3 Voyants et indicateurs ..26 5.4 Mise hors service de l’OXYMAT 3 ... .28 5.5 Remise en service de l’OXYMAT 3 ... .30 5.6 Conseils . - Page 7 ... 29 5.4 Quando si mette da parte l'OXYMAT 3 ... . 29 5.5 OXYMAT 3 opnieuw in bedrijf stellen .
- Page 8 11. Gamme de produits ... 54 11.1 Equipement de série ..54 11.2 Pièces de rechange ..60 11.3 Accessoires ... . .60 12.
- Page 9 11. Geleverd pakket....55 11. Volume di fornitura... . 55 11.1 Standaardpakket ..55 11.1 Elementi in dotazione di serie 55 11.2 Reserveonderdelen .
-
Page 10: Description De L'appareil
2. Description de l’appareil 2.1 Domaine d’utilisation Votre médecin peut vous dire si vous avez Le concentrateur d’oxygène OXYMAT 3 sert à augmenter la teneur en oxygène (O ) de besoin d’une réserve d’oxygène de secours. l’air que vous inspirez. -
Page 11: Beschrijving Van Het Apparaat
2.1 Toepassing 2.1 Campo di impiego De taak van de OXYMAT 3-zuurstofconcen- Il concentratore di ossigeno OXYMAT 3 ha il trator is om het aandeel van de zuurstof (O compito di aumentare la percentuale di ossi- in de lucht die u inademt, te verhogen. - Page 12 à 82 % est détectée sur l’installation O , l’indicateur d’état s’enclenche. • Après le contrôle automatique, l’OXYMAT 3 commence à fonctionner normalement. Durant le fonctionnement, la commande séquentielle surveille en continu le cycle électrique, ainsi que le cycle pneumatique de l’installation à oxygène.
- Page 13 O , che • Na de zelftest begint de OXYMAT 3 met dà luogo ad una diminuzione della concen- de normale werking. Daarbij bewaakt trazione di O al di sotto dell’82%, l’indica-...
-
Page 14: Consignes De Sécurité
: • Veuillez lire avec attention le présent mode d’emploi. Il fait partie intégrante de l’OXYMAT 3 et doit toujours être dis- ponible. • Veuillez tenir compte également des mo- des d’emploi de tous les accessoires du concentrateur. -
Page 15: Aanwijzingen Voor De Veiligheid
Uw OXYMAT 3-zuurstofconcentrator tale. Nel corso dell'applicazione della tera- concentreert zuurstof uit de omgevings- pia con OXYMAT 3 anche i vostri indumenti lucht. Bij de behandeling met de possono entrare in contatto con aria arricchita OXYMAT 3 kan uw kleding in contact di ossigeno. - Page 16 3 devant un appareil de chauffage ni à l’exposer à la lumière solaire directe. • Ne mettez pas l’OXYMAT 3 dans une pièce humide (salle de bain p.ex.) ni sur un balcon. L’absorption permanente d’humidité abîme les tamis moléculaires et peut être à...
- Page 17 • Wanneer de rode storingsindicatie specializzato. brandt en gelijktijdig een alarmsignaal klinkt, dient u de OXYMAT 3 uit te scha- • Se l’indicatore giallo di stato si illumi- kelen en contact op te nemen met uw na insieme all’indicatore di funzionamen-...
- Page 18 • Après une durée d’inutilisation prolongée (plusieurs mois), faites vérifier la concen- tration d’oxygène de l’OXYMAT 3 par un revendeur spécialisé. • N’utilisez l’OXYMAT 3 qu’avec les pro- duits recommandés dans ce mode d’em- ploi. Le parfait fonctionnement de l’appareil ne peut être garanti en cas d’utilisation d’autres produits.
- Page 19 Nel caso di impiego • Gebruik de OXYMAT 3 alleen met de in di altri prodotti non può più venire garantito deze handleiding geadviseerde producten. un funzionamento ineccepibile dell'apparec- Wanneer andere producten worden ge- chio.
-
Page 20: Installation
20 m de long. • Si le bruit de l’OXYMAT 3 vous dérange, installez l’appareil dans une pièce voisi- • L’OXYMAT 3 doit être installé sur une sur- face plane à un endroit sec. Ne placez pas l’OXYMAT 3 dans une pièce humide... -
Page 21: Installatie
4.1 Installazione Breng de meegeleverde kaart met waarschuwin- Attaccate sull'OXYMAT 3 l'etichetta con le gen in uw eigen taal aan op de OXYMAT 3. note di avvertimento nella vostra lingua. Houd bij de keuze van een plaats van opstel- Nello scegliere il punto di installazione tenete... -
Page 22: Raccordement À L'ensemble De Dosage Et Aux Lunettes À Oxygène
Réglage et déblocage des roues de l’OXYMAT 3 Les deux roues avant de l’OXYMAT 3 possè- dent chacune un frein. • Pour bloquer les roues, appuyez sur le le- vier de blocage avec le pied. • Pour desserrer les freins, poussez le levier vers le haut. -
Page 23: Aansluiting Op Doseermonitor En Zuurstofbril
4. Nu kunt u de OXYMAT 3 met het net- gliatore-umidificatore. snoer aansluiten op een stopcontact. Let 4. Inserendo in una presa di corrente la spi- erop dat daarvoor een netspanning van na del cavo di collegamento a rete pote- 230 Volt vereist is. -
Page 24: Raccordement Au Débitmètre Et Aux Lunettes À Oxygène
2. Reliez le tuyau de raccordement 10 m aux lunettes à oxygène et au raccord du débitmètre. 3. Vous pouvez alors relier le cordon de l’OXYMAT 3 à une prise électrique. La ten- sion d’alimentation doit être de 230 V. Français... -
Page 25: Aansluiting Op Flowmeter En Zuurstofbril
3. Inserendo in una presa di corrente la spi- 3. Nu kunt u de OXYMAT 3 met het netsnoer na del cavo di collegamento a rete pote- aansluiten op een stopcontact. Let erop dat... -
Page 26: Utilisation
Si vous utilisez un système à eau stérile, montez celui-ci conformément aux instruc- tions de montage. 5.2 Mise en marche et arrêt 1. Connectez l’OXYMAT 3 à l’aide de l’in- O/ I terrupteur Marche/Arrêt 2. Un contrôle automatique démarre : –... -
Page 27: Bediening
5.2 In- en uitschakelen 5.2 Inserimento/disinserimento 1. Schakel de OXYMAT 3 in met de in-/ uit- 1. Accendete l’OXYMAT 3 con l’interruttore schakelaar 2. Daarna loopt er een zelf- ON/OFF 2. Verrà quindi svolto il test au-... -
Page 28: Voyants Et Indicateurs
; – l’indicateur de défaut rouge 18 indi- que une grave défaillance. L’OXYMAT 3 ne peut alors plus être uti- lisé. – Notez que le débit à pleine concen- tration n'est obtenu qu'au bout d'une dizaine de minutes de fonctionne- ment. -
Page 29: Weergaven
22. Il flusso viene in- geven in liters per minuut. dicato in litri al minuto. 3. De OXYMAT 3 is nu gereed voor gebruik. U kunt nu de zuurstofbril 12 opzetten. 3. Ora l'OXYMAT 3 è pronto per l'uso. Potete ora mettervi gli occhiali a ossigeno 12. -
Page 30: Mise Hors Service De L'oxymat 3
Indicateur d’appareil sous tension vert 20 : • – s’allume toujours lorsque l’OXYMAT 3 est connecté ; – clignote durant le contrôle automati- que consécutif à la mise en marche de l’appareil. • Indicateur d’état jaune 19 pour l’installa- tion O : s’allume uniquement lorsqu’une... -
Page 31: Oxymat 3 Buiten Bedrijf Stellen
• Groene aan-/ uitindicatie 20: • Indicatore verde di funzionamento 20: – brandt altijd wanneer de OXYMAT 3 – si accende sempre quando ingeschakeld is; l’OXYMAT 3 è inserito; – knippert tijdens de zelftest na het in- – lampeggia durante il test autodiagno- schakelen. -
Page 32: Remise En Service De L'oxymat 3
5.5 Remise en service de l’OXYMAT 3 Lorsque l’OXYMAT 3 n’a pas été utilisé pen- dant plus de 6 mois, il faut faire effectuer, avant la remise en service, un contrôle de fonctionnement (voir «7. Contrôle du fonctionnement» à la page 40), ainsi qu’une mesure de la concentration d’oxygène par vo-... -
Page 33: Oxymat 3 Opnieuw In Bedrijf Stellen
De doseermonitor kan • Il più lungo tubo flessibile di allacciamento 7 da 20 m, da inserire tra l'OXYMAT 3 ed direct op de OXYMAT 3 worden aange- il monitor di dosaggio 9, è stato conce- bracht, maar het is comfortabeler om hem direct bij u te hebben. -
Page 34: Précautions D'hygiène
6. Précautions d’hygiène Veillez à ce qu’il ne pénètre ni eau, ni Par mesure d’hygiène, l’OXYMAT 3 et ses ac- cessoires doivent être nettoyés et désinfectés désinfectant dans la fente d’aération et les à intervalles réguliers. A l’issue de ces opéra- tuyaux. -
Page 35: Hygiënische Bereiding
6. Hygiënische bereiding 6. Preparazione igienica De l’OXYMAT 3 en accessoires ervan moeten OXYMAT 3 e i relativi accessori devono esse- regelmatig hygiënisch voorbereid worden. re preparati igienicamente a intervalli regola- Voer na de hygiënische voorbereiding altijd ri. Dopo la preparazione igienica, eseguire een functiecontrole uit (zie “7. -
Page 36: Préparation
Démontage du filtre à poussières Détachez le filtre à poussières 13 del’abat- tant, au dos de l’OXYMAT 3. 6.3 Nettoyage et désinfection Nettoyez et désinfectez l’OXYMAT 3 et ses accessoires en procédant comme indiqué dans le tableau ci-dessous. Nous conseillons de netttoyer les composants avec un détergent ménager doux et de les dé-... -
Page 37: Voorbereiding
6.3 Reiniging en desinfectie 6.3 Pulizia e disinfezione Voer de hygiënische voorbereiding van de Eseguite la preparazione igienica di OXYMAT 3 en accessoires uit zoals in de vol- OXYMAT 3 e degli accessori, come descritto gende tabel is beschreven. nella tabella seguente. - Page 38 Filtre à Démonter et poussières secouer/aspirer Essuyer avec une Boîtier Essuyer avec un lingette imbibée de OXYMAT 3 chiffon humide désinfectant Essuyer avec une Cordon Essuyer avec un lingette imbibée de d’alimentation chiffon humide désinfectant Prudence ! Veillez à...
- Page 39 Smontare e Grofstoffilter afkloppen/ polvere grossa sbattere/aspirare. afzuigen. Alloggiamento Strofinare con un Disinfezione per OXYMAT 3 Met een vochtige di OXYMAT 3 panno umido strofinamento Wisdesinfectie huis doek afnemen Cavo di Strofinare con un Disinfezione per Met een vochtige collegamento...
-
Page 40: Stérilisation Du Bocal À Eau Stérile
Cette procé- dure doit être menée par le détaillant spécialisé ou le fabricant Weinmann. La procédure de préparation hygiénique est décrite dans le cahier d’inspection et les ins- tructions de maintenance et de réparation du... -
Page 41: Sterilisatie Van De Sproeier-Bevochtiger
De werkwijze van de hygiënische voorberei- ding staat in het inspectieblad en in de servi- La procedura di preparazione igienica è de- ce- en reparatiehandleiding OXYMAT 3 scritta nella scheda di controllo, nonché nelle beschreven. istruzioni di assistenza e riparazione di OXYMAT 3. -
Page 42: Contrôle Du Fonctionnement
7. Contrôle du fonctionnement 1. Connectez l’OXYMAT 3 à l’aide de l’in- terrupteur Marche/Arrêt 2. Un contrôle automatique démarre : – immédiatement, l’indicateur de défaut rouge 18, l’indicateur d’état jaune 19 et l’indicateur d’appareil sous tension vert 20 s’allument brièvement ;... -
Page 43: Controle Van De Werking
7. Controle van de 7. Controllo di werking funzionamento 1. Schakel de OXYMAT 3 aan de aan-/ uit- 1. Accendete l’OXYMAT 3 con l’interruttore schakelaar 2 in. Daarna loopt een zelf- ON/OFF 2. Verrà quindi svolto il test au- test af: todiagnostico: –... - Page 44 3 est en marche. Un signal sonore retentit et le voyant rouge 18 s’allume. 8. Remettez la prise. L’alarme doit cesser tandis que l’appareil se remet en marche. 9. Eteignez l’OXYMAT 3 si vous n’en avez plus besoin. Français...
- Page 45 Il segnale di allarme non si deve sentire più e l'apparecchio 9. Zet uw OXYMAT 3 uit wanneer u hem allora si rimette in funzione. niet meer nodig hebt. 9. Disinserite l'OXYMAT 3 dopo l'uso.
-
Page 46: Anomalies - Dépannage
8. Anomalies - Dépannage 8.1 Généralités Anomalie Cause Que faire ? Remplacer le fusible Pas de bruit de Fusible(s) (voir «8.2 Rempla- moteur, le voyant défectueux. cement d’un fusible » vert ne s’éclaire pas, à la page 48). tonalité d’alarme signalant une panne Pas de ten- Etablir l’alimentation... -
Page 47: Storingen En Het Verhelpen Ervan
8. Storingen en het 8. Disturbi e la loro verhelpen ervan eliminazione 8.1 Algemeen 8.1 Note generali Storing Oorzaak Oplossing Causa di Eliminazione di Disturbo errore errore Vervang de zekerin- Geen motorgeluid, gen (zie "8.2 Ver- Cambiate fusibile Nessun rumore di Zekeringen in bedrijf-indicator vangen van de... - Page 48 Si le délai de réparation est assez important, vous pourrez poursuivre la thérapie à l’aide d’un appareil de location (OXYMAT 3 ou ap- pareil à bouteille d’O Il ne faut pas utiliser l’OXYMAT 3 lorsque le voyant rouge (défaut) ou le voyant jaune est éclairé. Français...
- Page 49 Se non riuscite ad eliminare subito un distur- tijd vergt, kunt u uw therapie voortzetten met bo, rivolgetevi al vostro negoziante specializ- een leentoestel (OXYMAT 3 of toestel met O zato oppure al fabbricante. Inviate flessen). l'apparecchio difettoso al vostro negoziante...
-
Page 50: Remplacement D'un Fusible
8.2 Remplacement d’un fusible Au dos de l’OXYMAT 3 se trouvent deux fusibles de type T 2,5H / 250V. 1. Eteignez tout d’abord l’appareil et enle- vez la prise. 2. Pressez les deux languettes du porte-fusi- bles à la fois et retirez ce dernier. -
Page 51: Vervangen Van De Zekering
8.2 Vervangen van de zekering 8.2 Cambio di fusibile Aan de achterzijde van de OXYMAT 3 bevin- Sul retro dell'OXYMAT 3 sono inseriti due fu- sibili del tipo T 2,5H /250 V. den zich twee zekeringen van het type T 2,5H / 250V. -
Page 52: Révision De L'appareil
Dans le cadre de mesures de maintenances préventives, nous vous recommandons pour Gebruik voor transport naar de vakhandel l’OXYMAT 3 de faire effectuer un entretien of de fabriek uitsluitend de originele ver- par un revendeur spécialisé formé à cet effet pakking. -
Page 53: Onderhoud
Denk eraan; na de reparatie moet een ein- dopo ogni intervento di riparazione è ne- dcontrole worden uitgevoerd. cessario eseguire un controllo finale. Bij de OXYMAT 3 zuurstofconcentrator advi- Nel caso del concentratore di ossigeno seren wij als preventieve instandhoudingmaa- OXYMAT 3 consigliamo come provvedimen-... -
Page 54: Mise Hors D'usage
Remarque : Un filtre d’aspiration ayant noirci continue à fonctionner correctement tant qu’il n’a pas dépasse 5000 heures de fonctionnement, à moins que l’appareil ne fonctionne dans un environnement très poussiéreux. Par mesure d’hygiène, n’envoyez ni le systè- me de tuyaux, ni les lunettes à oxygène avec l’appareil. -
Page 55: Afvalverwerking
Opmerking: Osservazione: Een donker verkleurd aanzuigfilter heeft geen Un filtro di aspirazione che si è scurito legger- gereduceerd doorstromingsvermogen, voor mente continua ad esercitare un’adeguata zover het aantal bedrijfsuren ervan onder azione filtrante purché la sua vita di esercizio 5.000 h ligt behalve wanneer het apparaat non superi le 5.000 h. -
Page 56: Gamme De Produits
Les numéros de commande s´appliquant en Suisse sont les suivants: L’OXYMAT 3 existe en 6 variantes de série différentes. WM 13012: OXYMAT 3 à ensemble de do- sage indépendant pour adultes, comprenant N˚... -
Page 57: Geleverd Pakket
11. Geleverd pakket 11. Volume di fornitura 11.1 Standaardpakket 11.1 Elementi in dotazione di serie De OXYMAT 3 kan in zes verschillende stan- L’OXYMAT 3 si può ordinare in sei differenti daarduitvoeringen worden besteld. varianti di serie. Varianten Bestelnummer Varianti d'ordinazione –... - Page 58 WM 13021 : OXYMAT 3 à ensemble de dosage indépendant pour enfants, comprenant N˚ de Pièces commande – Concentrateur d’oxygène OXYMAT 3 WM 13005 – Ensemble de dosage pour enfants 0,2 - 2l/min WM 13770 – Tuyau de raccordement 3 m 5720 –...
- Page 59 WM 13021: OXYMAT 3 met aparte WM 13021: OXYMAT 3 con separato mo- doseermonitor voor kinderen, bestaande uit: nitor di dosaggio per bambini, comprendente i seguenti elementi Onderdelen Bestelnummer – OXYMAT 3 zuurstofconcentrator 13005 Elementi d'ordinazione – Doseermonitor voor kinderen...
- Page 60 WM 13017 : OXYMAT 3 avec ensemble de dosage pour systèmes à eau stérile pour adultes, comprenant N˚ de Pièces commande – Concentrateur d’oxygène OXYMAT 3 WM 13005 – Ensemble de dosage pour systèmes à eau stérile pour adultes 0,5 - 5 l/min WM 13715 –...
- Page 61 WM 13017: OXYMAT 3 met doseermonitor WM 13017: OXYMAT 3 con monitor di do- voor steriel watersystemen voor volwassenen, saggio per sistemi di acqua sterile per adulti, bestaande uit costituito da N˚ de Pièces Elementi commande d'ordinazione – OXYMAT 3 WM 13005 –...
-
Page 62: Pièces De Rechange
Bague d’étanchéité pour humidificateur- WM1145/93 barboteur WM 15360 Jeu de filtres à poussières 1470 Raccord avec écrou d’accouplement WM 16641 Mode d’emploi, OXYMAT 3 Mode d’emploi, humidificateur- WM 16199 barboteur WM 16198 Mode d’emploi, débitmètre 11.3 Accessoires N˚ de Pièce... -
Page 63: Reserveonderdelen
1470 Aansluittule met wartelmoer Beccuccio di allacciamento con dado 1470 per raccordi WM 16641 Gebruiksaanwijzing OXYMAT 3 WM 16641 Istruzioni per l'uso OXYMAT 3 Gebruiksaanwijzing sproeier- WM 16199 bevochtiger WM 16199 Istruzioni per l'uso per gorgogliatore- umidificatore WM 16198 Gebruiksaanwijzing flowmeter WM 16198 Istruzioni per l'uso per flussometro... -
Page 64: Fiche Technique
12. Fiche technique Classe du produit conformément á 93/42/CEE Dimensions LxHxP en mm 400 x 700 x 350 Poids env. 20 kg Température ambiante – Utilisation +10 à +40 °C – Stockage - 20 à +70 °C Alimentation électrique 230V, 50 Hz Puissance/Intensité... -
Page 65: Technische Gegevens
12. Technische gegevens 12. Dati tecnici Productklasse volgens 93/42/EEG IIa Classe di prodotto in base alla norma 93/42/CEE Afmetingen b x h x d in mm 400 x 700 x 350 Dimensioni L x H x P in mm 400 x 700 x 350 Gewicht env. -
Page 66: Garantie
13. Garantie • A compter de la date d’achat, Weinmann garantit pour une période de 5 ans et dans des conditions normales d’utilisation que le produit ne présente pas de défauts. Pour les produits ayant une durée de validité inférieure à 5 ans, la garantie prend fin à... -
Page 67: Garantie
Weinmann garandeert voor een periode • A partire dalla data di acquisto van 5 jaar vanaf de koopdatum, dat het Weinmann fornisce una garanzia di 5 product bij reglementaire toepassing vrij anni a copertura dei difetti del prodotto van gebreken is. Bij producten die... -
Page 68: Déclaration De Conformité
été causés intentionnellement ou par négligence grave ou en cas d’atteinte par imprudence au corps ou à la vie. • Weinmann se réserve le droit, soit d’éliminer le défaut, de livrer un produit sans défaut ou de réduire en con- séquence le prix d’achat. -
Page 69: Conformiteitsverklaring
• Weinmann si riserva il diritto di riparare o sostituire l’apparecchio difettoso con • Weinmann behoudt het recht voor, naar un prodotto privo di difetti, oppure di... -
Page 70: Legend
19. Oxygen concentration status indicator (yellow) 20. Power indicator (green) 21. Dosage unit (flowmeter) 22. Ball, indicates flow 23. Connection, long tube to OXYMAT 3 (20 m) 24. Flow control knob 25. Humidifier glass of bubble humidifier 26. Connection, 3 m hose to nasal cannula 27. -
Page 71: Översikt
21. Doseringsenhet (Flödesmätare) 21. Unidad dosificadora (flujómetro) 22. Kula för indikering av flödet 22. Bola, indica el flujo 23. Anslutning för lång slang till OXYMAT 3 (20 m) 23. Conexión del tubo flexible largo al OXYMAT 3 (20 m) 24. Inställningsratt för reglering av flödet 24. - Page 72 5.2 Switching on and off ..90 5.3 Indicators ....92 5.4 Storing OXYMAT 3 ..94 5.5 Bringing the OXYMAT 3 back into service .
- Page 73 5.4 Poner fuera de servicio el 5.5 Återupptagning av driften OXYMAT 3 ... . 95 med OXYMAT 3 ..97 5.5 Poner nuevamente en servicio 5.6 Tips .
- Page 74 11. Product and Spare Parts ..120 11.1 Standard products ..120 11.2 Spare parts ... .126 11.3 Accessories ... .126 12.
- Page 75 11. Leveransvolym ....121 11. Volumen de suministro ..121 11.1 I leverans ingår som 11.1 Volumen de suministro standard ... . .121 de serie .
-
Page 76: Description
2. Description 2.1 Purpose The OXYMAT 3 oxygen concentrator is de- signed to increase the oxygen content (O ) in the air that you breathe. Oxygen therapy is an important medical Your doctor can tell you whether you need measure. For many serious disorders of the... -
Page 77: Apparatbeskrivning
OXYMAT 3 Oxygenkoncentratorns uppgift är La función del concentrador de oxígeno att öka oxygenandelen (O ) i andningsluften. OXYMAT 3 es aumentar el porcentaje de oxí- geno (O ) del aire de respiración. Oxygenterapin är en viktig medicinsk åtgärd. Vid ett flertal allvarliga sjukdomar som berör La oxigenoterapia es una importante medida andningsorganen och hjärt-cirkulationssyste-... -
Page 78: Function
2.2 Function This section describes the main technical as- pects of how the OXYMAT 3 works. • An electrically powered compressor draws in ambient air through a dust filter and fine-mesh filter and forces the slightly compressed air into containers fitted with molecular filters. -
Page 79: Funktionsbeskrivning
Este en- sayo dura aprox. un minuto. Si durante • Efter självtesten startar OXYMAT 3 sin este autocontrol se detectaran fallos en la normala drift. Därvid övervakar styrning- instalación de oxígeno, cuyo resultado en fortlöpande syrgasanläggningens... -
Page 80: Safety Information
EU Directive 93/42/EEC, please observe the following points: • Read these operating instructions careful- ly. They are part of the OXYMAT 3 and must be kept available at all times. • Also be sure to observe the operating in- structions for all accessories. -
Page 81: Säkerhetsanvisningar
Tener también en cuenta las instruccio- nes de todos los accesorios. • Använd OXYMAT 3 endast för beskrivet ändamål. • Utilizar el OXYMAT 3 sólo para las apli- caciones descritas. • OXYMAT 3 Oxygenkoncentratorn anri- kar oxygen ur omgivningsluften. Vid tera- •... - Page 82 • The air drawn in by the concentrator is also used for cooling. Do not place the OXYMAT 3 in front of a heater or in direct sunlight. • Do not place the OXYMAT 3 in damp rooms (e.g. bathroom) or on the balcony.
- Page 83 När den röda felindikatorn lyser och samtidigt en larmsignal kan höras skall • Procure evitar una infección o contamina- man stänga av OXYMAT 3 och ta kon- ción bacteriana según las directrices del takt med auktoriserad teknikern. capítulo „Tratamiento higiénico“. •...
- Page 84 cannot be guaranteed if it is used with other products. • If third-party items are used, functional failures may occur and fitness for use may be restricted. Biocompatibility requirements may also not be met. Please note that in such cases, any claim under warranty and liability will be voided if neither the accessories nor genuine replacement parts recommended in the...
- Page 85 • Operar el OXYMAT 3 sólo con los pro- uppfyllas. Tänk på att tillverkarens garanti ductos recomendados en estas instrucci- och ansvar upphör att gälla om de ones. No se garantiza un tillbehör och originalreservdelar som...
-
Page 86: Installation
• The air drawn in by the concentrator is also used for cooling. Do not place the OXYMAT 3 in front of a heater or in di- rect sunlight. • You are recommended to put it on a smooth floor to ensure unimpeded air cir- culation. -
Page 87: Installation
• Se till att OXYMAT 3 står plant och torrt. largo de unión de 20 m. Placera inte OXYMAT 3 i fuktiga rum el- ler på balkong. -
Page 88: Connecting To Dosage Monitor And Nasal Cannula
Arresting and releasing the OXYMAT 3 castors OXYMAT 3 has a brake on each of the front castors. • Press the brake lever down with your foot to arrest the castors. The long hose is connected to the oxygen out- •... -
Page 89: Anslutning Till Doseringsmätare Och Oxygengrimma
Låsning och upplåsning av hjulen på Bloquear y desbloquear las ruedas OXYMAT 3 del OXYMAT 3 OXYMAT 3 tiene un freno en cada una de las OXYMAT 3 är försedd med broms på båda dos ruedas delanteras. framhjulen. • Pisar la palanca de bloqueo para inmo- •... -
Page 90: Connecting To Flowmeter And Nasal Cannula
2. Now attach the 10-meter connecting hose to nasal cannula and to connection on the flowmeter. 3. Now you can use the power cord to con- nect the OXYMAT 3 to a power outlet. Note that it needs a mains voltage of 230 V. English... -
Page 91: Anslutning Till Flödesmätare Och Oxygengrimma
3. Nu kan OXYMAT 3 med nätsladden an- 3. Conectar ahora el OXYMAT 3 con el ca- slutas till vägguttaget. Kontrollera att nät- ble de la red a una caja de enchufe. Te- spänninen är 230 V. -
Page 92: Operation
If the device has been stored in a cold en- vironment (below +10 °C) before being switched on, put it in a warm room and wait approximately 30 minutes before switching it on to allow the OXYMAT 3 to come to room temperature. • Unscrew humidifier glass... -
Page 93: Användning
5.2 In- och urkoppling 5.2 Encender y apagar 1. Conectar el OXYMAT 3 con el interrup- 1. Sätt på OXYMAT 3 med Till/Från knap- tor de encendido/apagado . A conti- . -
Page 94: Indicators
Read off flow at top of ball . The scale is marked in liters per minute. 3. The OXYMAT 3 is ready to use. You can now put on the nasal cannula 4. After treatment, switch off the OXYMAT 3 by pressing On/Off knob . -
Page 95: Indikeringar
3. OXYMAT 3 är nu klar för användning. médico. Regular el flujo del flujómetro Ni kan ta på er oxygengrimma mediante el botón giratorio . En la super-... -
Page 96: Storing Oxymat 3
. The flow rate is indicated in liters per minute. 5.4 Storing OXYMAT 3 If you will not be using the device for some time, be sure to clean and dry the humidifier, tube system and nasal cannula before storing them. - Page 97 . Flödet anges i liter litros por minuto. per minut. 5.4 Poner fuera de servicio el 5.4 Så här stängs OXYMAT 3 OXYMAT 3 Si se pone el aparato fuera de servicio por un Skall apparaten för en längre tid tas ur drift largo período, es imprescindible limpiar y secar...
-
Page 98: Bringing The Oxymat 3 Back
5.5 Bringing the OXYMAT 3 back into service If the OXYMAT 3 has been out of service for over 6 months, a functional check (see "7. Functional Check" page 106) and an oxygen concentration measurement must be per- formed by an authorized dealer before the device is brought back into service. -
Page 99: Så Här Stängs Oxymat 3 Av 95 5.5 Återupptagning Av Driften
5.5 Poner nuevamente en ser- med OXYMAT 3 vicio el OXYMAT 3 När OXYMAT 3 varit ur drift under längre än Si el OXYMAT 3 estuvo fuera de servicio du- 6 månader skall man utföra en funktionskon- rante más de 6 meses, antes de su nueva pues- troll före idrifttagningen (se „7. -
Page 100: Hygienic Preparation
No water or disinfectant must be allowed to enter the air slits or the tubes. Vatten eller desinfektionsmedel får ej The OXYMAT 3 and its accessories must al- tränga in i ventilationsöppningarna eller ways be subjected to hygienic preparation at slangarna. -
Page 101: Hygienisk Hantering
6. Hygienisk hantering 6. Tratamiento higiénico OXYMAT 3 och dess tillbehör måste rengöras Higienizar el OXYMAT 3 y sus accesorios pe- med jämna mellanrum. Gör en noggrann riódicamente. Después de la higienización, funktionskontroll efter rengöringen (se „7. como norma general, efectuar un control de Funktionskontroll“... -
Page 102: Preparation
2. Release the union nut of the flowmeter and disconnect the flowmeter from the oxygen outlet of the OXYMAT 3. Removal of coarse dust filter Please detach the coarse dust filter from the service flap at the rear of the OXYMAT 3. English... -
Page 103: Förberedelse
(10 m) de la conexión del flujómetro. ter och ta bort flödesmätaren från oxy- genutången på OXYMAT 3. 2. Soltar la tuerca de unión del flujóme- tro y retirar el flujómetro de la salida de oxígeno del OXYMAT 3. -
Page 104: Cleaning And Disinfection
6.3 Cleaning and disinfection Carry out hygienic preparation of the OXYMAT 3 and accessories as described in the table given below. For cleaning we recommend using a mild household detergent. For wipe disinfection we recommend TERRALIN. Please observe the directions for use of the disinfectant used. -
Page 105: Limpieza Y Desinfección
6.3 Rengöring och desinficering 6.3 Limpieza y desinfección Rengör OXYMAT 3 och dess tillbehör enligt Efectuar la higienización del OXYMAT 3 y de tabellen nedan. los accesorios conforme a lo descrito en la si- guiente tabla. Använd ett milt rengöringsmedel. Vi rekom- menderar TERRALIN för desinfektion. -
Page 106: Sterilisation Of Sterile Water Tank
This has to be carried out by the manu- facturer Weinmann or a dealer. The procedure used for the hygiene treatment is described in the inspection sheet and the service and repair instructions for OXYMAT 3. English... -
Page 107: Rengöring Och Desinficering 103 6.4 Sterilisering Av Luftfuktaren
Detta ska gö- ciente, previamente hay que prepararlo higié- ras av fackman eller tillverkaren! nicamente. Esto lo tendrá que realizar el fabricante Weinmann o una tienda especiali- Tillvägagångssättet vid rengöring beskrivs i in- zada. spektionsbladet och i service- och reparations- handboken för OXYMAT 3. -
Page 108: Functional Check
7. Functional Check 1. Switch on the OXYMAT 3 using On/Off knob . A self-test will then run. – Red fault indicator , yellow status in- dicator and green power indicator immediately come on briefly. – Green power indicator then flash- es for the duration of the self-test (ap- prox. -
Page 109: Funktionskontroll
7. Control de 7. Funktionskontroll funcionamiento 1. Sätt på OXYMAT 3 med Till/Från knap- 1. Conectar el OXYMAT 3 con el interrup- . Därefter utförs en självtest: tor de encendido/apagado . A conti- nuación realiza un autocontrol: – den röda felindikatorn... - Page 110 8. Insert the mains plug in the power socket again. The alarm signal should stop, and the device starts again. 9. Switch off your OXYMAT 3 when you no longer need it. English...
- Page 111 8. Volver a poner el enchufe en la caja de en- chufe. La alarma se tiene que apagar y el aparato se vuelve a poner en marcha. 9. Apagar el OXYMAT 3 si no lo necesita más. Svenska Español...
-
Page 112: Troubleshooting
8. Troubleshooting 8.1 General Fault Cause Remedy Change fuse (see No sound of motor, Faulty fuse "8.2 Changing power indicator fuses" page 114). does not light up, mains failure alarm Ensure power sup- No power sounds. ply. Device running, but Device intermittent a–cous- Clean air intake slits. -
Page 113: Störningar Och Åtgärder
8. Störningar och åtgärder 8. Averías y su subsanado 8.1 Allmänt 8.1 Generalidades Störning Orsak Åtgärd Causa del Avería Subsanado del fallo fallo Byt ut säkringen Inget motorljud, drift- Defekta (se „8.2 Byte av Cambiar el fusible indikeringens lampa El motor no hace säkringar. - Page 114 If the repairs are likely to take a long time, you will be given a new device to continue your therapy (OXYMAT 3 or O bottle unit). Never use OXYMAT 3 if the red fault indica- tor is on. English...
- Page 115 (Weinmann, Siebenstücken 14, D-24558 Henstedt-Ulzburg). Si se trata de una reparación larga puede continuar su terapia con un aparato prestado (OXYMAT 3 o aparato de botellas de O No hacer funcionar el OXYMAT 3 estando iluminado el indicador de averías rojo. Svenska...
-
Page 116: Changing Fuses
8.2 Changing fuses At the rear of the OXYMAT 3 are two fuses of type T 2.5H / 250V. 1. First switch off the device, then pull out the mains plug. 2. Squeeze together the tabs on each side of the fuse holder and pull the holder out. -
Page 117: Byte Av Säkring
8.2 Byte av säkring 8.2 Cambio del fusible På baksidan till OXYMAT 3 sitter två säk- En la parte posterior del OXYMAT 3 hay dos ringar av typ T 2,5H / 250V. fusibles del tipo T 2,5H / 250V. 1. Frånkoppla först apparaten och dra se- 1. -
Page 118: Maintenance
We recommend preventive servicing of the OXYMAT 3 oxygen concentrator by a trained Returnera apparaten endast i originalför- authorized dealer or by Weinmann, the packning; vi rekommenderar att förvara manufacturers: apparatens kartong för detta ändamål. -
Page 119: Underhåll
Como medida preventiva de mantenimiento, menderar vi service av auktoriserad tekniker recomendamos someter al concentrador de eller tillverkaren Weinmann som förebyggan- oxígeno OXYMAT 3 a un trabajo de mante- de åtgärd: nimiento por su comerciante especializado o el fabricante Weimann: •... -
Page 120: Disposal
Attention: The flow behaviour of the suction filter is not impaired whenever it has turned dark in co- lour as long as the number of operating hours is still below 5,000 h, unless the device is used in a very dusty environment. For hygiene reasons, do not send the tube sys- tems or nasal cannula with the device. -
Page 121: Avfallshantering
Obs: Observación: Filtrets genomströmningsförmåga påverkas Un filtro de aspiración que se haya vuelto de inte om ett insugningsfilter har blivit mörkt, så color oscuro no tiene mermada su capacidad länge drifttimmarna ligger under 5 000 t, så- de paso si su número de horas de servicio es vida inte apparaten används i mycket dammi- inferior a 5.000 horas, a no ser que el apa- ga omgivningar. -
Page 122: Product And Spare Parts
11. Product and Spare Parts 11.1 Standard products The OXYMAT 3 can be ordered in six diffe- rent variants as standard. Variants Order No. – OXYMAT 3 with separate dosage monitor, for adults WM 13011 – OXYMAT 3 with separate... - Page 123 11. Volumen de suministro 11.1 I leverans ingår som 11.1 Volumen de suministro de standard serie OXYMAT 3 kan seriemässigt beställas i tre oli- El OXYMAT 3 puede pedirse de serie en tres ka varianter. variantes diferentes. Varianter Artikelnummer Número de...
- Page 124 WM 13021: OXYMAT 3 with separate dosage monitor, for children, comprising Parts Order No. – OXYMAT 3 oxygen concentrator WM 13005 – Dosage monitor for children 0,2 - 2l/min WM 13770 – Connecting tube, 3 m 5720 – Connecting tube, 20 m WM 12330 –...
- Page 125 WM 13021: OXYMAT 3 med separatdose- WM 13021: OXYMAT 3 con dosificador ringsmätare för barn, bestående av por separado para niños, compuesto de Enheter Artikelnummer Número de Piezas pedido – OXYMAT 3 Oxygenkoncentrator WM 13005 – Concentrador de oxígeno – Doseringsmätare för barn...
- Page 126 WM 13017: OXYMAT 3 with dosage moni- tor for sterile water systems for adults, consis- ting of Parts Order No. – OXYMAT 3 oxygen concentrator WM 13005 – Dosage monitor for sterile water systems for adults, 0.5 - 5 l/min.
- Page 127 WM 13017: OXYMAT 3 med doseringsmo- WM 13017: OXYMAT 3 con dosificador nitor för sterila vattensystem för vuxna, bestå- por separado para sistemas de agua este- ende av: rilizada para adultos, compuesto de Enheter Artikelnummer Número de Piezas pedido – OXYMAT 3 syrgaskoncentrator WM 13005 –...
-
Page 128: Spare Parts
WM 1145/31 Sealing ring, bubble humidifier WM 1145/93 Coarse dust filter set WM 15360 Connecting nipple with union nut WM 1470 Operating instructions OXYMAT 3 WM 16641 Operating instruction, WM 16199 bubble humidifier Operating instructions Flowmeter WM 16198 11.3 Accessories Parts Order No. - Page 129 WM 15360 humidificador de burbujas WM1145/93 Anslutningshylsa med kapselmutter WM 1470 Juego de filtros contra polvo grueso WM 15360 Boquilla de empalme con tuerca Bruksanvisning OXYMAT 3 WM 16641 1470 de racor Bruksanvisning för luftfuktare WM 16199 OXYMAT 3 Instrucciones de WM 16641 Bruksanvisning för flödesmätare...
-
Page 130: Technical Data
12. Technical Data OXYMAT 3 Product category according to 93/42/EEC Dimensions WxHxD in mm 400 x 700 x 350 Weight approx. 20 kg Temperature range – Operation +10 to +40 °C – Storage - 20 to +70 °C Power supply 230V, 50 Hz Power output / current consumption 360 W / 1.6 A... - Page 131 12. Tekniska data 12. Datos técnicos OXYMAT 3 OXYMAT 3 Produktklass enligt 93/42/EEC Clase de producto 93/42/EEC Dimensioner BxHxD i mm 400 x 700 x 350 Dimensiones (l x a x a) en mm 400 x 700 x 350 Vikt ca.
-
Page 132: Warranty
13. Warranty • Weinmann offers a warranty that the pro- duct, when used in accordance with re- quirements, will remain free from defects for a period of five years from date of purchase. For products whose durability is clearly indicated as less than five ye-... - Page 133 13. Garanti 13. Garantía • Weinmann garanterar under en tids- • Weinmann garantiza, durante un perio- period på 5 år räknat från försäljningsda- do de 5 años a partir de la fecha de gen att produkten, om den används compra, que el producto está libre de enligt anvisningarna, är fri från brister.
-
Page 134: Declaration Of Conformity
• Weinmann is not liable for consequential harm caused by a defect if it is not based on intention or gross negligence. Weinmann is also not liable for minor physical injury to life or limb resulting from negligence. • Weinmann reserves the right to decide... - Page 135 • Weinmann se reserva el derecho, a su dis- bevilja en passande nedsättning av creción, de optar por reparar el defecto, försäljningspriset. suministrar un artículo libre de defectos o rebajar proporcionalmente el precio de •...
- Page 138 Weinmann Geräte für Medizin GmbH+Co.KG P.O.Box 540268 • D-22502 Hamburg Kronsaalsweg 40 • D-22525 Hamburg T: +49-(0)40-5 47 02-0 F: +49-(0)40-5 47 02-461 E: info@weinmann.de www.weinmann.de Center for Production, Logistics, Service Weinmann Geräte für Medizin GmbH+Co.KG Siebenstücken 14 D-24558 Henstedt-Ulzburg...
Need help?
Do you have a question about the OXYMAT 3 and is the answer not in the manual?
Questions and answers