
Subscribe to Our Youtube Channel
Related Manuals for Weinmann MEDUMAT Basic


Summary of Contents for Weinmann MEDUMAT Basic
- Page 1 MEDUMAT Basic Ventilator WM 22600 MEDUMAT Basic p Ventilator WM 22650 Servicing and repair instructions...
-
Page 2: Table Of Contents
© Copyright Weinmann GmbH & Co. KG. The content and presentation are copyright protected and may only be used by authorised Weinmann Service Partners in the course of their service operations. The content must not be reproduced or passed on to third parties. The complete documents... -
Page 3: Introduction
The new generation of equipment, which was Repairs and maintenance work must be carried out especially developed to meet the requirements of only by Weinmann or by knowledgeable experts. users, offers users and patients an enhanced level of safety. An intelligent alarm system monitors the... -
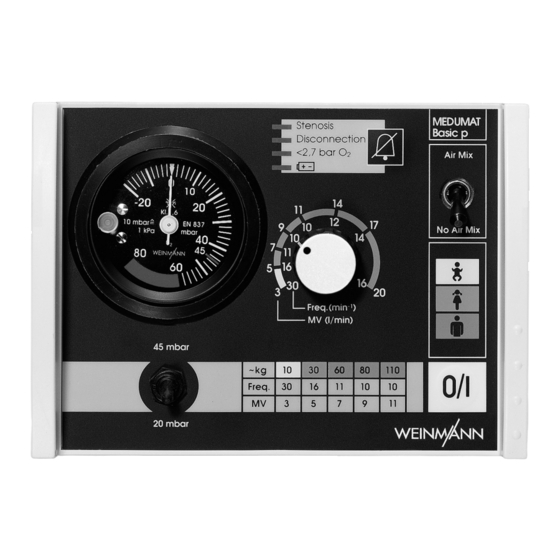
Page 4: Overview
1. Overview Control panel MEDUMAT Basic, Basic p 1 Ventilation pressure gauge 2 Alarm panel 3 Alarm mute button (Manometer) 4 Air Mix/No Air Mix switch 5 Minute volume regulator 6 Colour code 7 Recommendations for ventilation settings 8 ON/OFF switch 9 Tumbler switch for setting max. -
Page 5: Symbols Used On The Ventilator
1.1 Symbols used on the ventilator O / I O / I Inlet 2,7 - 6 bar O MEDUMAT Basic / Basic p device information plate Serial number of device Year of manufacture Do not dispose of device in domestic waste. -
Page 6: Description Of Ventilator
2. Description of ventilator 2.1 Uses MEDUMAT Basic / Basic p is an automatic (short-term) ventilator. You can use MEDUMAT Basic / Basic p: • to revive patients at the site of an emergency MEDUMAT Basic / Basic p: •... -
Page 7: Patient Valve
At the normal setting, atmospheric air is ad- Air Mix mixed to give an O -concentration of between 55% and 85% at 10 mbar ventilation pressure (see “9.2 O2 content when using Air Mix“ on page 55). In certain indications and in cases where the sur- O /I rounding atmosphere is contaminated, you can switch to... -
Page 8: Final Check
Units and measured values: – P high – P diff mbar – Rate 1/min or b/min – Vti – O If you have a comparable testing device, contact WEINMANN’s Technical Support department to have the setting parameters calibrated. Final Check... -
Page 9: Preparations For Final Check
1. Connect MEDUMAT Basic / Basic p to pressure supply 4.5 – 6 bar of cylinder system. 2. Connect respiration tube and pressure measurement tube to MEDUMAT Basic / Basic p. 3. Set MEDUMAT Basic / Basic p with switch in position No Air Mix to Freq. = 30 min , MV = 3 l/min and P = 45 mbar. -
Page 10: Device Self-Test After Switching On
Over-response of needle is normal. Note: MEDUMAT Basic / Basic p briefly switches to expiration if the maximum ventilation pressure is exceed- ed, but then tries to continue inspiration in the same inspiration phase. If the maximum ventilation pressure is exceeded for a second time during the same inspiration phase, the unit finally switches to expiration and vents the patient tube system completely. -
Page 11: Functional Check On Frequency Setting
O / I Orifice 10 mbar Volumetric flowmeter open 1. Run MEDUMAT Basic / Basic p in position No Air Mix, Freq. = 16 min and MV = 20 l/min. The measured frequency must be 16 ± 2 min Requirement: 2. -
Page 12: Checking Oxygen Concentration
3. Run MEDUMAT Basic / Basic p in position No Air Mix, Freq. = 30 min and MV = 3 l/min. Tidal volume must be 100 ± 20 ml. Requirement: Switch MEDUMAT Basic / Basic p to position Air Mix. -
Page 13: Functional Check On Pressure Limit
The pressure limit must respond at 20 ± 5 mbar and trigger the stenosis alarm. Requirement: 4. Applies to MEDUMAT Basic / Basic p Basic and MEDUMAT Basic / Basic p Basic p Set pressure limit to 45 mbar. The pressure limit must respond at 45 ± 5 mbar and trigger the stenosis alarm. -
Page 14: Checking External Condition
3.14 Checking external condition • Check external condition of device. No mechanical damage to housing. Requirement: Device labels with operating information are legible. Sealing sleeves are properly seated. Pressure gauge zero reading is correct. Connecting thread G3/8 is undamaged and functions smoothly. All rotary knobs are self-locking against inadvertent readjustment. -
Page 15: Servicing
Every 2 years, you must subject the device (including patient valve and tube system) to a technical safety check and maintenance. The servicing and inspection may also be carried out by the manufacturer Weinmann. The following points should be observed: •... -
Page 16: Batteries And Fuses
„6.7 Replacing the fuse“ on page 24. 4.3 Adjusting the pressure gauge In the idle state, with MEDUMAT Basic / Basic p deactivated and the oxygen cylinder closed, the needle of the pressure gauge must point precisely to “ ”. -
Page 17: Storage
4.4 Storage If you are not intending to use MEDUMAT Basic / Basic p for a long period, we recommend the following storage precautions: 1. Clean and disinfect the ventilator (see Important note! “5. Hygienic preparation” of the description Remember that the ventilator still requires servicing and operating instructions for MEDUMAT). -
Page 18: Troubleshooting
On/Off switch faulty (chap. 6.18, page 39) Pressure gauge hose on MEDUMAT Basic / Basic p Basic, MEDUMAT Basic / Basic p Basic p or on patient valve slipped Basic, Basic p is functioning Check pressure gauge hose... - Page 19 Two-way switch 45 mbar/ Replace switch (chap. 6.17, 20 mbar faulty (for page 38) MEDUMAT Basic / Basic p Basic p) Replace top of housing (chap. 6.18, LEDs do not light up page 39) Alarms (visual and acoustic) Check settings, check tube...
- Page 20 Adjustment knob out of adjustment page 25) Replace pneumatic block (chap. Frequencies incorrect Spindles (MV + frequency in 6.14, page 32) MEDUMAT Basic / Basic p Basic) or replace pneumatic block with out of adjustment angled outlet (chap. 6.15, page 34) Ventilation parameters wrongly...
-
Page 21: Repair Information And Repair Instructions
6. Repair information and repair instructions 6.1 General Repairs to MEDUMAT Basic / Basic p should be carried out only at an ESD workstation! • Please follow the safety instructions for • Please ensure that your hands and workplace MEDUMAT Basic / Basic p on page 6 of the are clean when carrying out repairs. -
Page 22: Changing The Foam Insert In The Pressure Relief Valve Outlet
6.3 Changing the foam insert in the pressure relief valve outlet Tools required: • Tweezers. 1. Use tweezers to remove foam insert 2. Place a new foam insert in the outlet. 6.4 Opening the device Tools required: • Crosstip screwdriver, size 2. 1. -
Page 23: Closing The Device
6.5 Closing the device Tools required: • Crosstip screwdriver, size 2. 1. Push the connecting hose into the angular bush as far as it will go. 2. Place the housing base section onto the up- per housing section. Take care to ensure that none of the lines are pinched and that the twistlock 11, the grommets 39 and the angled outlet or the pres- sure measurement connection 13 are correctly... -
Page 24: Replacing The Fuse
6.7 Replacing the fuse Tools required: • Crosstip screwdriver, size 2. 1. Open the device (see “6.4 Opening the device” on page 22). 2. Pull out the defective fuse upwards. 3. Carefully press a new fuse into the holder. 4. Close the device (see “6.5 Closing the device”... -
Page 25: Calibration After Removal Of Pcb
The ventilation control knob controls an EPROM on the printed circuit board of the MEDUMAT Basic / Basic p. To ensure correct setting of the minute ventilation, the EPROM must be calibrated after every removal of the PCB, the control knob or the pneumatic block. - Page 26 Once the Start/Stop LED stay on continuously and LEDs 5/16 and 17/14 have gone out, communication is established. The solenoid valve of the MEDUMAT Basic / Basic p does not switch any more. 9. Turn the ventilation control knob MEDUMAT to the setting MV=5, frequency=16.
-
Page 27: Replacing The Alarm Signalling Device
6.10 Replacing the alarm signalling device Tools required: • Crosstip screwdriver, size 2, • Crosstip screwdriver, size 1. 1. Open the device (see “6.4 Opening the device” on page 22). Up to appliance no.: Basic 1019; Basic p 1399 Pull the pressure measurement connection upwards out of the housing wall. -
Page 28: Replacing Two-Way Switch For Maximum Ventilation Pressure (Medumat Basic / Basic P Basic P Only)
Pull on the connector only, not on the lead! 3. Turn the MEDUMAT Basic / Basic p round. 4. Unscrew the cap from the two-way switch 5. Unscrew the nut with the special socket spanner. -
Page 29: Replacing The Circuit Board
6.12 Replacing the circuit board Tools required: • Crosstip screwdriver, size 2, • Side nippers, • Cable tie, • Calibration device WM 22836. 1. Open the device (see “6.4 Opening the device” on page 22). 2. Remove the battery by lifting it out of its holder and then pulling connector from the circuit board. - Page 30 10. Replace the alarm signalling device (see “6.10 Replacing the alarm signalling device” on page 27). 11. Place the new circuit board onto the spacer brackets. The points of the spacer brackets snap into the circuit board. Make sure that no leads are beneath the circuit board, where they may be pinched.
-
Page 31: Replacing The Pressure Gauge
6.13 Replacing the pressure gauge The pressure gauge is identical to the respiratory pressure meter described in the instructions for use. Note: Tools required: • Crosstip screwdriver, size 2, • Open-ended spanner SW 7, • If necessary, side nippers, • If necessary, cable tie. -
Page 32: Replacing The Pneumatic Block
6.14 Replacing the pneumatic block Tools required: • Crosstip screwdriver, size 2, • L-handled socket wrench 10 mm, • Special tool WM 22829 from special tool set WM 15349, • If necessary, side nippers, • If necessary, cable tie, • Calibration device WM 22836. - Page 33 43 45 13. Secure the circuit board (see „6.12 Replacing the circuit board“ on page 29, steps 14. Turn the MEDUMAT Basic / Basic p round. 15. Attach the control knob . To do so, proceed as follows: –...
-
Page 34: Replacing The Pneumatic Block With Angled Outlet
6.15 Replacing the pneumatic block with angled outlet The pneumatic block with angled outlet is fitted as standard to MEDUMAT Basic / Basic p Basic from ap- pliance No. 1020 and to MEDUMAT Basic / Basic p Basic p from appliance No. 1400 onward. Old appliances should be converted not later than the 6-year service. - Page 35 4. Pull the ventilation tube from the pneumatic block 5. Pull the suction connector from the pneuma- tic block (Basic p 6. Release the pressure tube by pushing back only) the sleeve of the inlet and pulling out the tube. Pressure For devices with an angled connector: measure-...
-
Page 36: Slide The Tube Onto The Sensor
20. Secure the circuit board (see „6.12 Replacing the circuit board“ on page 29, steps 43 45 21. Slide the tube onto the sensor 22. Turn the MEDUMAT Basic / Basic p round. Repair information and repair instructions... -
Page 37: Replace 3/2 Solenoid Valve
25) 26. Close the device (see “6.5 Closing the device” on page 23). 27. Turn the MEDUMAT Basic / Basic p round. 28. Place the lid on the knob 29. Perform a functional check (see “3. Final Check”... -
Page 38: Changing The Air Mix/No Air Mix Switch
3. Undo the two mounting screws and remove 3/2 solenoid valve 4. Replace the seal. Ensure that the seal is posi- tioned correctly. 5. Screw new 3/2 solenoid valve tight. 6. Refit the pneumatic block (see “6.15 Replac- ing the pneumatic block with angled outlet” on page 34). -
Page 39: Replace Upper Part Of Housing/Control Panel
Note: The rocker will tend to drop into the lower position. Up to appliance no. 1019 (Basic) or 1399 (Basic p): Re-install the pneumatic block (see „6.14 Re- placing the pneumatic block“ on page 32, steps From appliance no. 1020 (Basic) or 1400 (Basic p): Re-install the pneumatic block (see „6.15 Re- placing the pneumatic block with... - Page 40 3. Open the device (see “6.4 Opening the device” on page 22). 4. Remove the circuit board (see „6.12 Replac- ing the circuit board“ on page 29, steps The pressure measuring tube 47 may be left on the circuit board. 5.
- Page 41 For conversion up to appliance No. 1019 (Basic) or 1399 (Basic p): The pressure measuring tube is secured to the housing with a cable tie. Cut through the cable tie with side nippers and remove the tube or pull the tube off upwards the housing up to appliance no.: Basic 1019;...
- Page 42 O /I Fit upper part of housing 1. If your MEDUMAT Basic / Basic p is not to be updated (straight connection on pneumatic block), you will first have to file away a semi- circle for the pressure measurement connection 2.
- Page 43 from appliance no.: Basic 1020; Basic p 1400 10. Basic p only: from appliance no.: Basic 1020; Basic p 1400 – Insert the toggle switch so that the . This is wire points to the wall of the housing the only way to ensure the switch toggles correctly.
- Page 44 17. Secure the circuit board (see „6.12 Replacing the circuit board“ on page 29, steps 18. Turn the MEDUMAT Basic / Basic p round. 19. Secure the ventilation control knob . Please proceed as follows: –...
-
Page 45: Replacing The Housing Base Section
15. Open the vice. 16. Unscrew the special locknut tool from the com- pressed gas connection 17. If your MEDUMAT Basic / Basic p is not to be up to appliance no.: updated (straight connection on pneumatic Basic 1019; Basic p 1399... -
Page 46: Upgrading Ventilation Tube
6.20 Upgrading ventilation tube In order to reduce the ventilation resistance of the respiration tube, the ventilation tube on devices up to device number 1011 (Basic) or 1137 (Basic p) should be upgraded in the course of the two-yearly service. In addition a spring is installed to prevent kinks in the tube. -
Page 47: Spare Parts
7. Spare parts 7.1 List of spare parts Note: The item numbers in the following table match the numbers in the text of these service and repair instructions and the operating instructions. Item no. Designation Order No. Pressure gauge WM 22539 Pressurised gas connection (threaded connection), pre-assembled WM 22685 Twistlock for wall bracket WM 22642... - Page 48 Short button 4891 Set of rubber parts, consisting of: – Grommet for potentiometer – Rubber buffer for housing base section WM 15190 – Rubber buffer for upper housing section – Grommet for connections (up to appliance no. 1019 {Basic} or 1399 {Basic p}) and Set of screws, WM 15191 consisting of:...
-
Page 49: Maintenance Set
WM 15242 WM 15242 WM 15242 WM 15292 WM 15242 WM 15293 WM 15242 WM 15364 set Basic Maintenance WM 15242 WM 15242 WM 15242 WM 15244 WM 15242 WM 15289 WM 15242 WM 15474 set Basic p Maintenance set 2 years (for MEDUMAT Basic and Basic p) Set, WM 15242 consisting of: •... - Page 50 Rubber buffer receptacle • Sealing plug • Set of tubes • O–ring 5 x 1.2 • Pneumatic block, new Maintenance set (14) 16 years (for MEDUMAT Basic p) Set, WM 15474 consisting of: • Set WM 15242 • Rubber buffer receptacle •...
-
Page 51: Tools And Test Equipment
Below is a list of all tools and test equipment used in these service and repair instructions. The particular tools and test equipment required are outlined in the respective chapter. Special tools can be purchased from the manufacturer Weinmann. 8.1 General tools •... -
Page 52: Test Equipment
8.3 Test equipment • Oxygen concentration measuring device, Type Oxycontrol WM 13550 • Volumetric flowmeter Type Flow Analyser PF-300 obtainable from: SI-special instruments GmbH Strelgasse 2 D-86720 Nördlingen Tel.: +49 90 81 / 2 20 61 or 2 20 62 Fax: +49 90 81 / 2 20 63 www.specialinstruments.com Type RT 200 (Timeter) -
Page 53: Technical Data
9. Technical data MEDUMAT Basic / Basic p MEDUMAT Basic / Basic p High-pressure gas Product category External thread G 3/8 connection according to II b 93/42/EEC Connection to External diameter ventilation hose 13 mm Device dimensions 190 x 110 x 90 D x W x H inc. -
Page 54: Pneumatics
9.1 Pneumatics exp.-insp. amplifier valve input pressure 2.7 - 6 bar pressure regulator frequency regulator exhaust valve regulator valve manometer P/E converter injector unit patient valve non-return valve P/E converter relief valve A/D converter air mix valve evaluation electronics valve rocker air inlet The input pressure at is max. -
Page 55: O 2 Content When Using Air Mix
9.2 O content when using Air Mix The following diagram shows the oxygen concentration prevailing at various counter-pressures and minute volumes when is switched on. Air Mix 10 mbar counter-pressure 15 mbar counter-pressure 30 mbar counter-pressure Minute volume (l/min) In isolated cases the minute volume (MV) deviations may be higher at ventilation pressures in excess of 30 mbar. -
Page 56: Technical Changes
10. Technical Changes Technical change From Device No. Date 1011 20.07.00 Basic Lid, white 1040 28.01.99 Basic p 1011 20.07.00 Basic Ventilation tube rerouted and fitted with spring (see “6.20 Upgrading ventilation tube” on page 46) 1137 6.07.00 Basic p 1011 20.07.00 Basic... -
Page 57: Repair And Inspection Log
10.Functional check – pressure limit with No Air Mix • Pressure limit responds at 20 ± 5 mbar (only MEDUMAT Basic p) mbar • Pressure limit responds at 45 ± 5 mbar (MEDUMAT Basic and Basic p) mbar 11.Functional check – ventilation valve without patient valve •... - Page 60 Weinmann Geräte für Medizin GmbH+Co. KG P.O. Box 540268 • D-22502 Hamburg Kronsaalsweg 40 • D-22525 Hamburg T: +49-(0)40-5 47 02-0 +49-(0)40-5 47 02-461 E: info@weinmann.de www.weinmann.de Center for Production, Logistics, Service Weinmann Geräte für Medizin GmbH+Co. KG Siebenstücken 14...
Need help?
Do you have a question about the MEDUMAT Basic and is the answer not in the manual?
Questions and answers