Table of Contents
Advertisement
Quick Links
Function check
MEDUMAT Easy
CPR
I
Read the instructions for use before using this product. Failure to observe the
instructions for use can result in serious injury or death.
This document is not a substitute for the description of the function check in
the instructions for use. For comprehensive information, please refer to the
instructions for use of the device. The instructions for use are available on the
Internet at www.weinmann-emergency.com. Perform the function check prior
to every use.
Advertisement
Table of Contents

Related Manuals for Weinmann MEDUMAT EasyCPR


Summary of Contents for Weinmann MEDUMAT EasyCPR
- Page 1 This document is not a substitute for the description of the function check in the instructions for use. For comprehensive information, please refer to the instructions for use of the device. The instructions for use are available on the Internet at www.weinmann-emergency.com. Perform the function check prior to every use.
- Page 2 Warning Devices and accessories which are defective or not ready for use can disrupt the therapy or cause it to fail completely! Perform a function check prior to every use. Only use devices and accessories which have successfully passed the function check.
-
Page 3: Table Of Contents
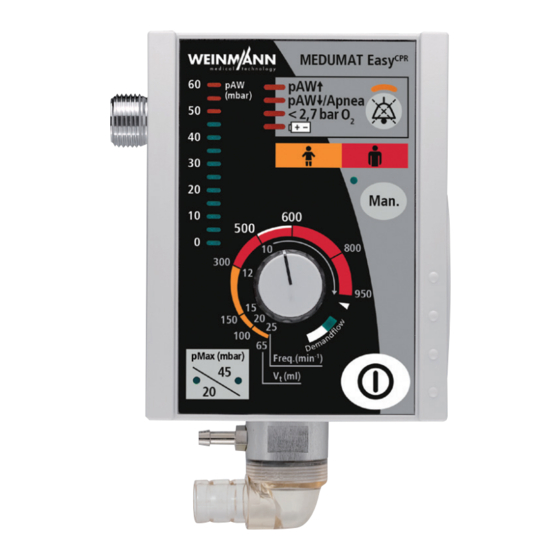
Contents Warning and overview of device 1. Preparing for the function check 2. Visually checking the device and components 3. Checking the system for leaks 4. Checking visual and audio alarm output 5. Checking the supply pressure alarm 6. Checking the ventilation rate 7. - Page 4 MEDUMAT Easy Overview of device Compressed gas connection Ventilation pressure display pMax button with LEDs for setting of max. ventilation pressure Connection for pressure measuring tube Connection for ventilation hose...
- Page 5 Alarm field Alarm mute button with LED Battery compartment Manual button with LED for activation of manual mode Adjusting knob for ventilation settings On/Off button Connection for MEDUtrigger...
-
Page 6: Preparing For The Function Check
1. Preparing for the function check The device is connected to the oxygen supply. The ventilation hose, pressure measuring tube and MEDUtrigger are connected to the device. The testing bag is connected to the patient valve. 2. Visually checking the device and components The device and accessories do not show any signs of damage, deformations or soiling. -
Page 7: Checking The System For Leaks
3. Checking the system for leaks OPEN CLOSE The needle on the gauge remains steady for one minute. 4. Checking visual and audio alarm output OPEN An audible signal is emitted when the device is switched on. Once the device is switched on, all the LEDs flash at least once and the lowest LED on the ventilation pressure display lights up green. -
Page 8: Checking The Supply Pressure Alarm
5. Checking the supply pressure alarm CLOSE After the oxygen cylinder has been closed, the visual and audible alarm for < 2.7 bar O is triggered once the device supply pressure falls below 2.7 bar O OPEN The < 2.7 bar O alarm stops when there is sufficient supply pressure. 6. -
Page 9: Checking The Tidal Volume And Paw Alarm
7. Checking the tidal volume and pAW alarm Select the following settings: Via the adjusting knob: Vt = 950 ml | Freq. = 10 bpm Via pMax button with control LEDs: pMax = 45 mbar Information: In combination with the testing bag, these settings can cause the pAW alarm to be triggered. -
Page 10: Checking The Paw /Apnea Alarm
8. Checking the pAW /apnea alarm The device triggers the pAW /apnea alarm after the second mechanical breath. 9. Checking MEDUtrigger Select the following settings: Via the adjusting knob: Vt = 950 ml | Freq. = 10 bpm Via pMax button with control LEDs: pMax = 45 mbar The Manual button and the LEDs on MEDUtrigger light up. -
Page 11: Checking The Demand Flow Mode
Pressing the button on MEDUtrigger triggers a mechanical breath. 10. Checking the demand flow mode The demand flow LED lights up. After the testing bag has been pressed and released, a clacking sound is heard. The function check is passed successfully when all of the steps have been completed. - Page 12 68314 FUNCTION CHECK MEDUMAT EASY CPR FROM SERIAL NUMBER 25000 EN 68314 06-2019 © Copyright reserved. Duplication of any kind can only be undertaken with the express permission of WEINMANN Emergency. Subject to any printing errors as well as changes in technology and design.
Need help?
Do you have a question about the MEDUMAT EasyCPR and is the answer not in the manual?
Questions and answers