
Related Manuals for Psion Teklogix Omnii XT10


Summary of Contents for Psion Teklogix Omnii XT10
- Page 1 Omnii™ XT10 Hand-Held Computer User Manual ® (Windows Embedded CE 6.0) September 16, 2010 P/N 8100190.A ISO 9001 Certified Quality Management System...
- Page 2 2100 Meadowvale Boulevard, Mississauga, Ontario, Canada L5N 7J9 http://www.psionteklogix.com This document and the information it contains is the property of Psion Teklogix Inc., is issued in strict confidence, and is not to be reproduced or copied, in whole or in part, except for the sole purpose of promoting the sale of Psion Teklogix manufactured goods and ser- vices.
- Page 3 Return-To-Factory Warranty Psion Teklogix Inc. provides a return to factory warranty on this product for a period of twelve (12) months in accordance with the Statement of Limited Warranty and Limitation of Liability provided at: www.psionteklogix.com/warranty The warranty on Psion Teklogix manufactured equipment does not extend to any product that has been tampered with, altered, or repaired by any person other than an employee of an authorized Psion Teklogix service organization.
-
Page 5: Table Of Contents
Features of Omnii XT10 ........ - Page 6 Using a Dialog Box..............57 Psion Teklogix Omnii XT10 Hand-Held Computer User Manual...
- Page 7 Trigger Mappings ...........105 Psion Teklogix Omnii XT10 Hand-Held Computer User Manual...
- Page 8 Profiles Tab ..............141 Psion Teklogix Omnii XT10 Hand-Held Computer User Manual...
- Page 9 Attaching the Shoulder Strap - Model No. ST6030 ......174 Psion Teklogix Omnii XT10 Hand-Held Computer User Manual...
- Page 10 Troubleshooting ............. . .190 Psion Teklogix Omnii XT10 Hand-Held Computer User Manual...
- Page 11 6.10 Bluetooth Peripherals ..............191 Chapter 7: Specifications The Omnii XT10 Hand-Held Computer (Model No. 7545XV) ......195 7.1.1 Hardware.
- Page 12 C.3.11 Codabar ..............C-33 viii Psion Teklogix Omnii XT10 Hand-Held Computer User Manual...
- Page 13 C.4.26 Postal: Kix ..............C-54 Psion Teklogix Omnii XT10 Hand-Held Computer User Manual...
- Page 14 Removing a Custom Preset ..........D-16 Psion Teklogix Omnii XT10 Hand-Held Computer User Manual...
- Page 15 D.5.28 2D Data Matrix............. . D-37 Psion Teklogix Omnii XT10 Hand-Held Computer User Manual...
- Page 16 ................I Psion Teklogix Omnii XT10 Hand-Held Computer User Manual...
- Page 17 1.4 Regulatory Labels ........7 Psion Teklogix Omnii XT10 Hand-Held Computer User Manual...
-
Page 19: Chapter 1: Introduction
Chapter 1: Introduction About the User Manual About the User Manual This User Manual describes how to configure, operate, and maintain the Psion Teklogix Omnii™ XT10 Hand-Held Computer. Chapter 1: Introduction provides a basic overview of the hand-held. Chapter 2: Basic Operation describes preparing Omnii for operation, including setting up your wireless network. -
Page 20: Text Conventions
Overview of Omnii™ XT10 Hand-Held Computer Omnii XT10 Hand-Held Computer is a modular, industrial hand-held computer, running the Microsoft Windows CE 6.0 operating system. A variety of options are available to suit ma- terial handling applications in warehouses, manufacturing facilities, ports, and yards, with a focus on real time wireless data transactions. - Page 21 Optional SIRF III GPS Receiver Note: 802.11b/g and Bluetooth are available simultaneously. The following figures illustrate the main features of Omnii XT10—for detailed views, please see “Features of Omnii XT10” on page 11. Psion Teklogix Omnii XT10 Hand-Held Computer User Manual...
- Page 22 Chapter 1: Introduction Overview of Omnii™ XT10 Hand-Held Computer Figure 1.1 Omnii XT10 Model with 59-Key Alpha ABC Keyboard Figure 1.2 Bottom View (Docking Connector) Psion Teklogix Omnii XT10 Hand-Held Computer User Manual...
-
Page 23: Regulatory Labels
Warning: Using controls or adjustments or performing procedures other than those specified herein may result in hazardous radiation exposure. Figure 1.5 LED Radiation Notice Label Thi l b l i ffi d b l th Psion Teklogix Omnii XT10 Hand-Held Computer User Manual... - Page 25 PERATION 2.1 Features of Omnii XT10 ....... . 11 2.2 Preparing Omnii for Operation ......14 2.2.1 The Battery .
-
Page 27: Chapter 2: Basic Operation
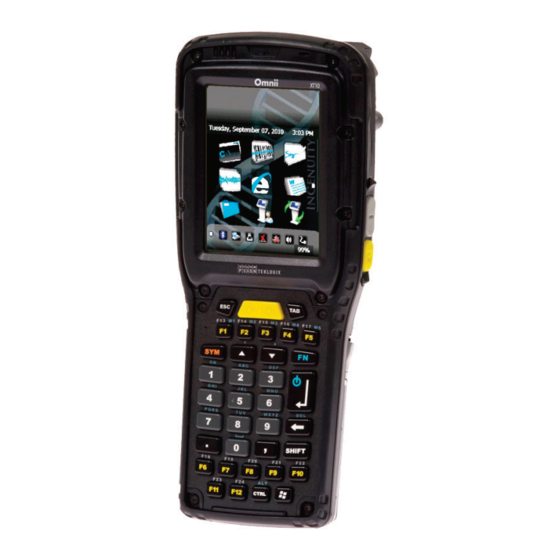
Chapter 2: Basic Operation Features of Omnii XT10 Features of Omnii XT10 Figure 2.1 Front View of Omnii XT10 Model with Alphanumeric Keyboard Speaker Beeper LEDs Display Scan Key Microphone FN Modifier Key Symbol Modifier Key ENTER/Power Key Psion Teklogix Omnii XT10 Hand-Held Computer User Manual... - Page 28 Slot for Snap Module Arm Figure 2.3 Bottom View 1 - Docking Connector 2 - Alignment Pin Holes 3 - M2.5 Locking Screws (for firmly attaching devices) 4 - Hand Strap Slot Psion Teklogix Omnii XT10 Hand-Held Computer User Manual...
- Page 29 Features of Omnii XT10 Figure 2.4 Top View Laser Aperture End-Cap Figure 2.5 Back View Camera Aperture Rear PTT Speaker (optional) Scanner Window Scanner Pod Expansion Back Pistol Grip Attachment Screws (4) Battery Pack Psion Teklogix Omnii XT10 Hand-Held Computer User Manual...
-
Page 30: Preparing Omnii For Operation
Battery Bottom 4 - Latch Tabs Note: If you are using a docking station or an external power supply, you can insert an uncharged battery and use the device while the battery charges. Psion Teklogix Omnii XT10 Hand-Held Computer User Manual... -
Page 31: Switching Omnii On And Off
Important: If your Omnii fails to power up, consider the following troubleshooting options: The battery may be overheated (>60C°), a non-Psion Teklogix battery may be installed, or the battery may have fallen below the configured Suspend Threshold. See “Suspend Threshold and Estimated Battery Backup” on page 110 for details. -
Page 32: Resetting Omnii
Note: If your Desktop is switched to the PsionVU Shell (refer to “The PsionVU Desktop Shell” on page 70), resetting the unit is done solely by use of the keyboard shortcuts. Psion Teklogix Omnii XT10 Hand-Held Computer User Manual... - Page 33 • Type ‘1’ to “Run Main OS” (continue loading the Windows Embedded CE operating system). Hard Reset Important: This procedure is recommended as a last resort, when all other methods fail. To execute a hard reset: • Remove the battery. Psion Teklogix Omnii XT10 Hand-Held Computer User Manual...
-
Page 34: Attaching Carrying Accessories
Replace the battery and power Omnii on. The terminal will boot as if from a cold reset. Attaching Carrying Accessories Psion Teklogix recommends that a carrying accessory—a hand strap or shoulder strap—be installed on Omnii before use. For detailed information, please see “Carrying and Protective Accessories”... -
Page 35: Wireless Networking
Wi-Fi Config: Status Tab The Status tab displays information about the wireless network to which Omnii is config- ured to connect. When there are no network profiles configured, this tab is not populated. Psion Teklogix Omnii XT10 Hand-Held Computer User Manual... -
Page 36: Wi-Fi Config: Configure Tab
Remove: Used to delete a wireless network configuration. Scan: Used to detect and list available wireless networks. You can highlight a network in the list, and tap on Add New to activate the network. Psion Teklogix Omnii XT10 Hand-Held Computer User Manual... -
Page 37: Authentication Mode
Enter the SSID (Service Set Identifier) for your network. 2.8.2.1 Authentication Mode Omnii supports several classes of authentication—Open, WEP, WPA/WPA2 (Personal PSK, Enterprise, CCKM-WPA, CCKM-WPA2), and 802.1x with EAP. Tapping on the Auth. Mode menu displays your authentication options. Psion Teklogix Omnii XT10 Hand-Held Computer User Manual... - Page 38 These authentication modes use 802.1X with EAP authentication. When 802.1X is selected, Omnii uses WEP encryption with automatic (as opposed to static) keying. For the others, the user may choose TKIP, AES or TKIP+AES encryption. Psion Teklogix Omnii XT10 Hand-Held Computer User Manual...
-
Page 39: Encryption
This menu allows you to choose the EAP (Extensible Authentication Protocol) type used for 802.1x authentication to an access point. The following EAP types are supported by Wi-Fi Config: • TLS: Provides strong security via the use of client certificates for user authentication. Psion Teklogix Omnii XT10 Hand-Held Computer User Manual... -
Page 40: Verify Server Certificate
Omnii for the verification. 2.8.2.5 Enable OPMK When used with compatible wireless infrastructure, Opportunistic Key Caching (OPMK) reduces the number of full authentications required when roaming. Only available with WPA2-Enterprise (EAP) authentication mode. Psion Teklogix Omnii XT10 Hand-Held Computer User Manual... -
Page 41: Connecting The Wireless Network
The Status tab is displayed. The Status field displays ASSOCIATING while the 802.11b/g radio attempts to connect to the network. Once the association is complete, the Status tab is populated with the appropriate information about your network. Psion Teklogix Omnii XT10 Hand-Held Computer User Manual... -
Page 42: Configuring Tcp/Ip
Tap on the radio icon in the taskbar, Tap on Start>Settings>Network and Dial-up Connections. Tap on the radio icon for which you want to assign an IP address—in the sample screen below, the icon is labelled SDIO86861. Psion Teklogix Omnii XT10 Hand-Held Computer User Manual... - Page 43 IP address. This is useful if, for example, you are out of communication range for a longer period of time and your hand-held is dropped from the network. To define a static IP address: • Tap on the Configure button. Psion Teklogix Omnii XT10 Hand-Held Computer User Manual...
-
Page 44: Name Server
Tap on the Name Servers tab. The DNS and WINS fields in the Name Servers tab allow you to specify additional WINS and DNS resolvers. The format for these fields is ###.###.###.###. Psion Teklogix Omnii XT10 Hand-Held Computer User Manual... -
Page 45: Wi-Fi Config: Advanced Tab
Values range from 5 to 30 dBm. Concluding the Wi-Fi Configuration If you’ve made changes in the Advanced menus, you will need to warm reset your Omnii. • Choose Start>Shutdown>Warm Reset. Psion Teklogix Omnii XT10 Hand-Held Computer User Manual... -
Page 46: Checking The Scanner
Drag and drop files between Omnii and the PC in the same way that you would between PC drives. • Back up Omnii files to the PC, restore them from the PC to the hand-held again, etc. Psion Teklogix Omnii XT10 Hand-Held Computer User Manual... -
Page 47: Using Microsoft Activesync
To transfer data between your PC and your hand-held: • Tap on Start>Computer to display the drives. Omnii will be visible here. • Open drives, files and folders as you would on your PC. Psion Teklogix Omnii XT10 Hand-Held Computer User Manual... - Page 49 3.7.2 Cleaning Omnii....... . 50 Psion Teklogix Omnii XT10 Hand-Held Computer User Manual...
-
Page 51: Chapter 3: Getting To Know Your Omnii
If you choose Maximum Backup Time, Omnii shuts off with more energy left in the battery so RAM can be backed up for a longer period of time. Psion Teklogix Omnii XT10 Hand-Held Computer User Manual... -
Page 52: Charging The Battery
Important: If your Omnii fails to power up, consider the following troubleshooting options: The battery may be overheated (>60C°), a non-Psion Teklogix battery may be installed, or the battery may have fallen below the configured Suspend Threshold. See “Suspend Threshold and Estimated Battery Backup” on page 110 for details. -
Page 53: Regular Keys
To access CAPS LOCK mode, press [FN] + [SHIFT]. In this state, if you press a numeric key, the number is displayed rather than the normal shifted function of that key. Press [FN] + [SHIFT] again to turn the CAPS LOCK mode off. Psion Teklogix Omnii XT10 Hand-Held Computer User Manual... - Page 54 Omnii is equipped with a single [SCAN] key on the keyboard and an extra [SCAN] button located on the left side of the unit. [SCAN] keys activate the scanner beam. For units that do not have internal scanners, these keys can be remapped to serve other functions. Psion Teklogix Omnii XT10 Hand-Held Computer User Manual...
-
Page 55: Modifier Keys
Note: Modifier keys are remapped in the Control Panel, and the Symbol SIP will automat- ically show and use the new mappings after the next reboot. The onscreen keyboard corresponds to the specific keyboard on your Omnii—either numeric or alphanumeric. Psion Teklogix Omnii XT10 Hand-Held Computer User Manual... -
Page 56: Activating Modifier Keys
If you disable the ‘One Shot’ function of the key, pressing it once will lock the key ‘on’. Pressing the same key a second time will unlock or turn it ‘off’. Refer to “Key- board One Shot Modes” on page 95 for details. Psion Teklogix Omnii XT10 Hand-Held Computer User Manual... -
Page 57: Function Keys And Macro Keys
Function keys F25 through F30 can only be accessed by remapping another key to that function. To access the white function keys, press the [SHIFT] key followed by the appropriate function key. Psion Teklogix Omnii XT10 Hand-Held Computer User Manual... -
Page 58: Macro Keys
‘One Shot’ screen (accessible through the Control Panel Keyboard icon). In ‘Lock’ mode, pressing the [FN] key once locks it ‘on’. Refer to “Keyboard One Shot Modes” on page 95 for details. Psion Teklogix Omnii XT10 Hand-Held Computer User Manual... -
Page 59: The Keypad Backlight
Panel. The behaviour of the keypad backlight is tailored in the Keyboard Properties dialog box. Refer to “Keyboard Backlight” on page 95 for details about this option. Note: Keep in mind that this option may be restricted to supervisory use only. Psion Teklogix Omnii XT10 Hand-Held Computer User Manual... -
Page 60: The Display
In the Control Panel, choose the Stylus icon to display the Stylus Properties window. • Select the Calibration tab, and then choose the Recalibrate button. • Follow the directions on the calibration screen to calibrate the screen. Psion Teklogix Omnii XT10 Hand-Held Computer User Manual... -
Page 61: Indicators
The far left LED is reserved for battery charge status. This indicator is active even when the hand-held is inserted in a docking station (and in suspend mode) so that the charge status of the battery can be detected easily. Psion Teklogix Omnii XT10 Hand-Held Computer User Manual... -
Page 62: Operating System Status Led
This LED is controlled by the Sounds and Notifications Control Panel applet. 3.4.1.3 Radio Status LED The third LED from the left indicates the status of the GPS radio in the Omnii XT10. Radio Traffic LED Behaviour Function The GPS radio is disabled. -
Page 63: Scanner Status Led
The taskbar changes dynamically, and only those icons that are applicable are displayed. For example, if a radio is not installed in your Omnii, the radio signal icon is not displayed in the taskbar. Psion Teklogix Omnii XT10 Hand-Held Computer User Manual... - Page 64 When a hand-held is inserted in a docking station, charger or cradle, an associated icon appears in the taskbar. Combo Charger & Quad Docking Station Powered Vehicle Cradle, Desktop Dock Combo Docking Station & Snap Module Psion Teklogix Omnii XT10 Hand-Held Computer User Manual...
-
Page 65: Audio Indicators
Press [ENTER] to display the Wireless Statistics dialog box. Note: Moving in and out of the radio coverage area can have varying effects on a network session. At times, you may need to renew your connection by logging in again. Psion Teklogix Omnii XT10 Hand-Held Computer User Manual... -
Page 66: Uploading Data In A Docking Station
To prevent damage to the touchscreen, use only your finger or the stylus (pen) supplied with your Omnii. • Use only mild detergent or soapy water to clean the hand-held unit. Psion Teklogix Omnii XT10 Hand-Held Computer User Manual... - Page 67 The plastic is partially soluble in oils, mineral spirits and gasoline. The plastic slowly decomposes in strong alkaline solutions. • To clean ink marks from the keypad and touchscreen, use isopropyl alcohol. Psion Teklogix Omnii XT10 Hand-Held Computer User Manual...
-
Page 69: Chapter 4: Windows Embedded Ce
4.5 The PsionVU Desktop Shell ......70 Psion Teklogix Omnii XT10 Hand-Held Computer User Manual... -
Page 71: Navigating In Windows Embedded Ce And Applications
Table 4.1 for a description of the navigation keys. Table 4.1 Keyboard Navigation Operation Key or Key Combination Switch between active applications [ALT] [TAB] Open task manager [ALT] [ESC] Move the cursor Arrow keys Psion Teklogix Omnii XT10 Hand-Held Computer User Manual... -
Page 72: Working With Files, Folders, And Programs
Working with Files, Folders, and Programs Figure 4.1 Working with Windows Icons Folder Program Icon File • Double-tap on the appropriate icon—either a folder icon, a program icon or a file icon—to open or launch your selection. Psion Teklogix Omnii XT10 Hand-Held Computer User Manual... -
Page 73: Using A Dialog Box
To display the information in the next tab from anywhere in the window, press [CTRL] [TAB]. Textbox: A textbox requires that you type information. Press the [TAB] key to highlight the textbox and then type the appropriate information. Psion Teklogix Omnii XT10 Hand-Held Computer User Manual... - Page 74 Saving Your Choices: Once you’ve made all your changes, press the [ENTER] key to save your changes and exit the window. Note: A dialog box item that is displayed in grey text indicates that it is not currently available. Psion Teklogix Omnii XT10 Hand-Held Computer User Manual...
-
Page 75: The Windows Classic Shell Startup Desktop
“in focus” and the arrow keys will highlight the icons. 4.4.1 The Desktop Icons The icons displayed in the startup desktop operate in much the same way as those displayed on any standard PC desktop that is running Windows. Psion Teklogix Omnii XT10 Hand-Held Computer User Manual... - Page 76 The appearance and actions of the desktop can be changed by tapping on the Shell Switch icon, which activates the PsionVU shell. After switching to PsionVU, the desktop appear- ance will be very different. For detailed information, please go to “The PsionVU Desktop Shell” on page 70. Psion Teklogix Omnii XT10 Hand-Held Computer User Manual...
-
Page 77: The Taskbar
Control Panel dialog box associated with the icon. For example, double-tap the battery icon to display a dialog box listing the current battery capacity information. On the keyboard: • Press [Windows] to display the Start Menu. Psion Teklogix Omnii XT10 Hand-Held Computer User Manual... -
Page 78: Customizing The Taskbar
The Start Menu lists the operations you can access and work with. It is available from the startup desktop or from within any application. • To display the menu, tap on the Start Menu. Psion Teklogix Omnii XT10 Hand-Held Computer User Manual... - Page 79 Use the arrow keys to highlight a menu item, and press [ENTER], or If the menu item has an underlined character: • Type the underlined alpha character. For example, to display the Run dialog box, type the letter ‘r’. Psion Teklogix Omnii XT10 Hand-Held Computer User Manual...
-
Page 80: The Desktop
Choosing the Desktop option from the Start Menu displays the Omnii desktop. 4.4.3.2 Programs • Choose Programs to display a sub-menu of options. The programs displayed will be those resident in the Windows\Programs folder of the computer. Figure 4.4 Program Sub-Menu Psion Teklogix Omnii XT10 Hand-Held Computer User Manual... -
Page 81: Command Prompt
Server so that you can run a “session” on the Server machine using the hand-held (Windows Embedded CE device). “Remote Desktop Connection” on page 81 provides a website with details about this option. Psion Teklogix Omnii XT10 Hand-Held Computer User Manual... -
Page 82: Shortcuts
Use the arrow keys to highlight an icon, for example, the Bluetooth icon. • Press [ENTER] to display the Bluetooth menus. Cycle Tasks When Cycle Tasks is selected (and the Task Manager is not open), you can cycle through active applications. Psion Teklogix Omnii XT10 Hand-Held Computer User Manual... - Page 83 The Task Manager allows you to switch to another task or to end an active task. To display the task manager window: • Tap on Shortcuts, Task Manager, or • Press [ALT] [ESC]. Psion Teklogix Omnii XT10 Hand-Held Computer User Manual...
-
Page 84: Settings
Control Panel The Control Panel contains applets used to configure hardware, the operating system and the shell. If your Omnii is running with the Psion Teklogix TekTerm application or another application, additional configuration applets may appear in the Control Panel. -
Page 85: Shutdown
The Suspend option suspends Omnii immediately. This is equivalent to turning the hand- held off. Warm Reset The Warm Reset option resets the hand-held, leaving all saved files and registry settings intact. Any unsaved data is lost. Psion Teklogix Omnii XT10 Hand-Held Computer User Manual... -
Page 86: The Psionvu Desktop Shell
Note: Although the Desktop appearance defaults to the “Ingenuity” theme, the theme is not changed using the PsionVU Shell icon. To change themes, open the Shell Set- tings>Advanced menu in PsionVU Access (see “Shell Settings” on page 115). Psion Teklogix Omnii XT10 Hand-Held Computer User Manual... - Page 87 The Favourites Bar replaces the Windows Classic Shell’s Desktop and Start Menu. These icons are the program shortcuts from your Windows>Start Menu. Tapping once will open the program. If you tap and hold on an icon, the application name is displayed. Psion Teklogix Omnii XT10 Hand-Held Computer User Manual...
-
Page 88: Restoring The Windows Classic Shell
Restoring the Windows Classic Shell The default Desktop appearance and actions can be restored by tapping on the PsionVU Shell icon in the Favourites Bar. Note: Omnii will be reset if you choose to switch shells. Psion Teklogix Omnii XT10 Hand-Held Computer User Manual... -
Page 89: Shutdown
‘on’. Note: If your Desktop is switched to the Windows Classic Shell, the unit will display a shutdown options screen before turning off (see “Switching Omnii On and Off” on page 15). Psion Teklogix Omnii XT10 Hand-Held Computer User Manual... - Page 90 • Press and hold down the [FN] key, the [ENTER/Power] key, and the [SCAN] key, simultaneously for a minimum of six seconds. After the cold reset, the BooSt menu appears. • Type ‘1’ to “Run Main OS” (continue loading the Windows Embedded CE operating system). Psion Teklogix Omnii XT10 Hand-Held Computer User Manual...
- Page 91 Using a coin, or other conductive item, connect pins 5 and 6 of the Omnii battery con- tacts for at least 6 seconds. Pin 5 Pin 6 • Replace the battery and power Omnii on. The terminal will boot as if from a cold reset. Psion Teklogix Omnii XT10 Hand-Held Computer User Manual...
- Page 93 5.5.9.2 Shell Settings ......115 Psion Teklogix Omnii XT10 Hand-Held Computer User Manual...
- Page 94 5.10.2 Creating Partitions ......145 5.10.3 Partition Management ......146 Psion Teklogix Omnii XT10 Hand-Held Computer User Manual...
- Page 95 5.14.3 Registry Editor .......168 Psion Teklogix Omnii XT10 Hand-Held Computer User Manual...
-
Page 97: Chapter 5: Configuration
TekTerm is a powerful emulation application ideally suited for real time data transaction ap- plications associated with mainframes and servers. Omnii includes unique features that support TekTerm—a Psion Teklogix application that has the ability to maintain multiple si- multaneous sessions with a variety of host computers. For detailed information, please refer to the TekTerm Software User Manual, P/N 8000073. -
Page 98: Control Panel Icons
“Control Panel Applications: Basic Setup” on page 86 describes the basic configuration for these applications. App Launch Keys By mapping keys to applications using this program, you can then launch those applications from a single key-press. Psion Teklogix Omnii XT10 Hand-Held Computer User Manual... - Page 99 Allows you to enable and configure GPS operation. Input Panel Provides the framework for a Microsoft Soft Input Panel (SIP) should you need to design your own SIP, or change some soft keyboard options. Psion Teklogix Omnii XT10 Hand-Held Computer User Manual...
-
Page 100: Internet Options
Allows you to assign a password to restrict access to elements of the unit. Once assigned, password access cannot be circumvented so it is important that you write down your pass- word and keep it in a safe place. Psion Teklogix Omnii XT10 Hand-Held Computer User Manual... - Page 101 Recalibrate button and following the directions on the screen. System You can display the system and memory properties, as well as create your device name. In the Memory tab, you can allocate memory between storage memory and program memory. Psion Teklogix Omnii XT10 Hand-Held Computer User Manual...
-
Page 102: Control Panel Applications: Basic Setup
The App Launch Keys icon allows you to map a key to an application so that you can then launch the application from a single key-press. • In the Control Panel, choose the App Launch Keys icon. Psion Teklogix Omnii XT10 Hand-Held Computer User Manual... - Page 103 If you need to, you can Browse through the information in your Omnii until you locate the application you want to launch. • Once you’ve selected the file you want to map, tap on OK. Psion Teklogix Omnii XT10 Hand-Held Computer User Manual...
-
Page 104: Certificates
Omnii explicitly trusts. This option is used in conjunction with 802.1x authentication to enhance Omnii security. • In the Control Panel, choose the Certificates icon. Psion Teklogix Omnii XT10 Hand-Held Computer User Manual... -
Page 105: Display Properties
(Omnii Hand-Held Computers), refer to the following website: http://www.microsoft.com/windowsserver2003/techinfo/overview/security.mspx 5.5.3 Display Properties • In the Control Panel, choose the Display icon. 5.5.3.1 Background • In the Display Properties dialog box, open the Background tab. Psion Teklogix Omnii XT10 Hand-Held Computer User Manual... -
Page 106: Appearance
(no key press, scanner trigger, etc.). Note: Keep in mind that this option may be restricted to supervisory use only. Psion Teklogix Omnii XT10 Hand-Held Computer User Manual... - Page 107 ON, the backlight remains ON at the configured intensity when Omnii is operating with ex- ternal power (not battery power). If Omnii is drawing power from its battery, this option is ignored and the other parameters defined in Display Properties dialog box take effect. Psion Teklogix Omnii XT10 Hand-Held Computer User Manual...
-
Page 108: Input Panel
Omnii screen. To customize the appearance and behaviour of the soft keyboard: Tap on the Input Panel icon in the Control Panel. Psion Teklogix Omnii XT10 Hand-Held Computer User Manual... -
Page 109: Keyboard Properties
[FN] and [SYM] modifier keys. This dialog box also allows you to define macro keys and Unicode characters. • In the Control Panel, choose the Keyboard icon. Psion Teklogix Omnii XT10 Hand-Held Computer User Manual... -
Page 110: Key Repeat
Note: Use the field at the bottom of this dialog box to test the repeat delay and rate set- tings you’ve chosen. Psion Teklogix Omnii XT10 Hand-Held Computer User Manual... -
Page 111: Keyboard Backlight
ON’ forces the keypad backlight to remain on when the unit is operating with external power. 5.5.5.3 Keyboard One Shot Modes • In the Keyboard Properties dialog box, open the One Shots tab. Psion Teklogix Omnii XT10 Hand-Held Computer User Manual... - Page 112 If you press the modifier key twice, it is locked ‘on’, remaining active until the modifier key is pressed a third time to turn it ‘off’. Psion Teklogix Omnii XT10 Hand-Held Computer User Manual...
-
Page 113: Keyboard Macro Keys
In the Macro menu highlight a macro key number, for example macro 1, to assign a macro to macro key [M1]. Choose the Record button. A message screen is displayed instructing you to Enter Key Strokes to Record. Psion Teklogix Omnii XT10 Hand-Held Computer User Manual... -
Page 114: Unicode Mapping
In the Macros tab, highlight the macro number you want to delete. • Choose the Delete button. 5.5.5.5 Unicode Mapping • In the Keyboard Properties dialog box, open the Unicode Mapping tab. Psion Teklogix Omnii XT10 Hand-Held Computer User Manual... - Page 115 Unicode mapping is mapped to the default Unicode value. Adding and Changing Unicode Values Important: Changes to Unicode mappings are not saved until you exit the Keyboard Properties dialog box. • Choose the Add/Change button. Psion Teklogix Omnii XT10 Hand-Held Computer User Manual...
-
Page 116: Scancode Remapping
[ENTER/Power] key, etc.), perform a function (e.g. turn the scanner on, change volume, etc.) or run a macro. There are three different tables of scancode mappings: the Normal table, the FN table and the SYM table. Psion Teklogix Omnii XT10 Hand-Held Computer User Manual... - Page 117 (e.g., Macro 2). Adding a Remap To add a new remapping: • Choose the Add button at the bottom of the dialog box. The Remap Scancode dialog box is displayed. Psion Teklogix Omnii XT10 Hand-Held Computer User Manual...
- Page 118 In the Scancode Remapping tab, tap on the remap you want to edit. • Tap on the Edit button, and make the appropriate changes. • Tap on OK to save your changes. Psion Teklogix Omnii XT10 Hand-Held Computer User Manual...
-
Page 119: Lock Sequence
A locked keyboard icon is displayed in the softkey bar when the keyboard is locked. Psion Teklogix Omnii XT10 Hand-Held Computer User Manual... -
Page 120: Manage Triggers
You can configure the trigger ID for each trigger button for both single- and double-click, and the double-click time. • In the Control Panel, choose the Manage Triggers icon. • In the Manage Triggers screen you’ll see a list of trigger mappings. Psion Teklogix Omnii XT10 Hand-Held Computer User Manual... -
Page 121: Trigger Mappings
By default, the trigger mapping list only shows active mappings. Mappings for drivers or applications that are not currently active are not normally displayed. By checking this checkbox, all mappings, both active and inactive, are displayed. Psion Teklogix Omnii XT10 Hand-Held Computer User Manual... -
Page 122: Add And Edit Trigger Mapping
These dialogs allow you to add and edit trigger mappings. Trigger Key This drop-down list allows you to specify the source of the trigger events, such as the Soft Scan, Left Scan, etc., for the trigger module selected. Psion Teklogix Omnii XT10 Hand-Held Computer User Manual... - Page 123 Up/Down has also been configured for the same source, it will only receive the first set of trigger events. Module Trigger This identifies the driver or application receiving the trigger presses. Psion Teklogix Omnii XT10 Hand-Held Computer User Manual...
-
Page 124: Microphone
Power Properties This icon displays a Power Properties dialog box that indicates the unit’s battery capacity and allows you to manage battery use. • In the Control Panel, choose the Power icon. Psion Teklogix Omnii XT10 Hand-Held Computer User Manual... -
Page 125: Battery Capacity
5.5.8.1 Battery Capacity • In the Power Properties dialog box, open the Battery tab to view battery details. 5.5.8.2 Power Saving Suspend • In the Power Properties dialog box, open the Suspend tab. Psion Teklogix Omnii XT10 Hand-Held Computer User Manual... -
Page 126: Suspend Threshold And Estimated Battery Backup
This drop-down menu allows you to specify whether the unit is using AC Power or Battery Power. Suspend Timeout Important: Psion Teklogix recommends setting the Suspend value to 3 minutes. To further reduce power consumption, carefully consider the duration of time that the display backlight is ‘on’ (see “Backlight” on page 90). - Page 127 Batch transaction environments, where data is not saved to a non-volatile memory (such as an SD FLASH card), may need to pay particular attention to this parameter. Psion Teklogix does not recommend the storage of any valuable data in system RAM.
-
Page 128: Advanced
PsionVU Shell either in the PsionVU Access settings (see “Other Shell Themes” on page 117) or by tapping on the Desktop icon PsionVU Shell (see “The PsionVU Desktop Shell” on page 70). • In the Control Panel, choose the PsionVU icon. Psion Teklogix Omnii XT10 Hand-Held Computer User Manual... -
Page 129: Administrator Password
Once a password has been set, the message will disappear. When an administrator password is set, the restricted options are accessed using a key com- bination. If a password has been set, the user would be prompted for the password. Psion Teklogix Omnii XT10 Hand-Held Computer User Manual... - Page 130 Access setting to the other (Administrator or User). The computer must be reset following a change, and a confirmation will appear to enable you to continue or dismiss the change. Psion Teklogix Omnii XT10 Hand-Held Computer User Manual...
-
Page 131: Shell Settings
(for .exe files only, not .lnk). For example, if the Command field is running “pword.exe” (Microsoft WordPad), the Parameters field could specify a doc- ument to open. • Display name: This is an editable field which is prefilled with the name of the application. Psion Teklogix Omnii XT10 Hand-Held Computer User Manual... - Page 132 • PsionVU Access in Start Menu: When this box is checked, the PsionVU Access program will be shown in the Start Menu>Programs list. The following item is not optional: • PsionVU Access Key Sequence: Sets the key sequence to open PsionVU Access. Psion Teklogix Omnii XT10 Hand-Held Computer User Manual...
-
Page 133: Restrictions
This section deals with items that are by default available to users but can be restricted by an administrator. Advanced The Advanced menu lists the system features you can restrict or block. Psion Teklogix Omnii XT10 Hand-Held Computer User Manual... -
Page 134: Control Panel Settings
Accessible as a shortcut icon from the Desktop. • You have the option of setting the entire applet or specific tabs within the applet as hidden or accessible. Any applet that can’t be set is greyed out. Psion Teklogix Omnii XT10 Hand-Held Computer User Manual... -
Page 135: Import/Export To File
Important: A copy of this file should also be saved in a central repository for all Psion Teklogix .xml files with a predefined name so that other Psion Teklogix utili- ties can locate it. -
Page 136: Stylus Properties
5.5.10 Stylus Properties Note: Touchscreen calibration may not be enabled on your unit. If your screen appears to require recalibration, contact your supervisor. • In the Control Panel, choose the Stylus icon. Psion Teklogix Omnii XT10 Hand-Held Computer User Manual... -
Page 137: Double-Tap
• Choose the Calibration tab, and then tap on the Recalibrate button. Psion Teklogix Omnii XT10 Hand-Held Computer User Manual... -
Page 138: Touch
In the Control Panel, choose the System Properties icon. • You can create a log (SystemProperties.xml) of your current components, which will be placed in the My Devices folder in Windows Explorer. Psion Teklogix Omnii XT10 Hand-Held Computer User Manual... -
Page 139: Volume & Sounds Properties
The optional rear speaker can be used for system (Windows) sounds and .wav files. When a rear speaker is absent, those sounds are routed to the front receiver. • In the Control Panel, choose the Volume & Sounds icon. Psion Teklogix Omnii XT10 Hand-Held Computer User Manual... -
Page 140: Volume Adjustments
This dialog box allows you to assign sounds to identify particular actions. For example, you can choose the sound your hand-held will emit when you close a program and choose another sound for a failed scan, etc. Psion Teklogix Omnii XT10 Hand-Held Computer User Manual... -
Page 141: Bluetooth ® Setup
This tab lists all paired devices and their corresponding services. The format of the name is <Device Name>:<Service Name>. Additional information may appear in this screen such as the Port Numbers for Serial Profiles service. Psion Teklogix Omnii XT10 Hand-Held Computer User Manual... - Page 142 Query Services and Remove Commands • Query Services displays a Services dialog box where a pairing service is chosen. • Remove unpairs the highlighted service and deletes the entry from the tab. Psion Teklogix Omnii XT10 Hand-Held Computer User Manual...
-
Page 143: Device Tab
In this tab, users can discover and display Bluetooth devices. 5.6.2.1 Discovering and Removing Devices Scan discovers Bluetooth devices in range of Omnii and lists them in this tab. Any existing devices previously discovered and listed will also be displayed. Psion Teklogix Omnii XT10 Hand-Held Computer User Manual... -
Page 144: Filtering By Class Of Device (Cod)
Choosing All lists all detected devices. 5.6.2.3 Device Pop-up Menu The Device pop-up menu allows you to pair a device, update a device name or delete a device from the list. Psion Teklogix Omnii XT10 Hand-Held Computer User Manual... -
Page 145: Pairing A Device
If the remote device has authentication enabled, type the PIN in this dialog box. • To proceed without authentication, tap on Next. After entering the device PIN, the Services dialog appears with a list of services available for that device. Psion Teklogix Omnii XT10 Hand-Held Computer User Manual... - Page 146 Scanner is used to create a connection to a bar code scanner. A serial connection is created, then the Scanner Services is notified of the connection so that the incoming bar code scan will be forwarded to Scanner Services directly. Psion Teklogix Omnii XT10 Hand-Held Computer User Manual...
-
Page 147: Servers Tab
Scanner server enables a Serial Port Profile server and then relays it to the Scanner Service (SCS). This is used for Bluetooth bar code scanners that operate in client mode. SCS opens the server port and handles the scanner input. Psion Teklogix Omnii XT10 Hand-Held Computer User Manual... -
Page 148: Mode Tab
Select the Bluetooth device to print to—you will need to key-in (or programmatically raise) the following key sequence [CTRL] [ALT] [F1] . • You can now select the Bluetooth device to which you wish to print. Psion Teklogix Omnii XT10 Hand-Held Computer User Manual... -
Page 149: About Tab
Local Address displays the MAC address (BD_Addr) of the Bluetooth chip. HCI Version & LMP Version display the version of the chip firmware. Component indicates the version of the Psion Teklogix Bluetooth Subsystem (the manager, drivers, etc). Profiles lists the supported profiles on this specific Omnii. - Page 150 5. Tap on Make New Connection. 6. In the Make New Connection dialog box, choose Dial-Up Connection. Enter a name for your GPRS network connection. 7. Choose the Next button to display the Modem dialog box. Psion Teklogix Omnii XT10 Hand-Held Computer User Manual...
- Page 151 Device Properties dialog box. Omnii then disconnects. 9. Under the Call Options tab, turn off Cancel the call if not connected within, and press [ENTER] to save your changes. Psion Teklogix Omnii XT10 Hand-Held Computer User Manual...
- Page 152 Finish button. 11. In the Control Panel, choose the Dialing icon. 12. The values in the Dialing Properties dialog box need to be edited according to your network carrier specifications. Psion Teklogix Omnii XT10 Hand-Held Computer User Manual...
- Page 153 New Connection is displayed. Tap on the new icon. When you tap on your new connection, an onscreen message indicates the status of your connection: connected, disconnected, error messages, and so on. Psion Teklogix Omnii XT10 Hand-Held Computer User Manual...
-
Page 154: Dr. Debug
This tab indicates the status (on/off) of the debug engines. Tapping on Browse logs displays error logs for your review. The logs should be used as reference when working with Psion Teklogix Technical Support personnel. Psion Teklogix Omnii XT10 Hand-Held Computer User Manual... -
Page 155: Settings
Utilities The Utilities tab is used to log network traffic. When you tap on the Start button, debug data is collected so that, if necessary, it can be forwarded to a Psion Teklogix technician for evaluation. Psion Teklogix Omnii XT10 Hand-Held Computer User Manual... -
Page 156: Error Reporting
This tab allows you to dictate how the GPS module behaves. The GPS Power drop-down menu is used to control when the GPS is powered on and off. • Off – the GPS module is left off, always. Psion Teklogix Omnii XT10 Hand-Held Computer User Manual... -
Page 157: Profiles Tab
When the GPS module is set to this profile and the operator moves into an area where satellite coverage is interrupted, the GPS module will not attempt to predict the opera- tor’s movement. Psion Teklogix Omnii XT10 Hand-Held Computer User Manual... -
Page 158: Agps (Assisted Global Positioning System) Tab
The Status field above the Update button displays the progress of the download, and once successfully downloaded, the Status field will read Idle. Settings • Click on the Settings button to define the AGPS server connection settings. Psion Teklogix Omnii XT10 Hand-Held Computer User Manual... -
Page 159: Info Tab
Internet and should only be altered with the assistance of qualified Psion Teklogix personnel. They will be able to help you configure your Psion Tek- logix device(s) and web server to retrieve the ephemeris data. -
Page 160: Storage Manager
To format an entire memory card: 1. Select Start> Settings>Control Panel. 2. In Control Panel, double-click on the Storage Manager icon. The Storage Manager menu opens: 3. Select the memory card from the drop-down list. Psion Teklogix Omnii XT10 Hand-Held Computer User Manual... -
Page 161: Creating Partitions
3. If more than one partition is desired, uncheck the Use All Available Diskspace checkbox, then specify the desired number of sectors to be used by the partition. 4. Press OK. The new partition appears in the Partitions list. Psion Teklogix Omnii XT10 Hand-Held Computer User Manual... -
Page 162: Partition Management
1. Choose the desired partition. 2. Tap the Properties button. The Partition Properties dialog appears. 3. Tap the Dismount button. The partition is dismounted. The asterisk disappears next to its name in the partitions list. Psion Teklogix Omnii XT10 Hand-Held Computer User Manual... - Page 163 There are also two checkboxes, which govern: • Whether to use the transaction-safe FAT file system (TFAT). This file system keeps multiple copies of the file-allocation table, changing one while maintaining another as a backup. Psion Teklogix Omnii XT10 Hand-Held Computer User Manual...
-
Page 164: Teklogix Imagers
If there is an imager installed but this icon is not present, additional software (ICS) may need to be installed. To enable a newly-installed imager, Press and hold down the [FN] key and the [ENTER/Power] key simultaneously for a minimum of three seconds. Psion Teklogix Omnii XT10 Hand-Held Computer User Manual... -
Page 165: Teklogix Scanners
Note: To enable a newly-installed scanner, press and hold down the [FN] key and the [ENTER/Power] key simultaneously for a minimum of three seconds. For a listing of available scanners and their specifications, please refer to Chapter 7: “Specifications”. Psion Teklogix Omnii XT10 Hand-Held Computer User Manual... -
Page 166: Bar Codes Tab
All internal scanners can be configured using these dialog boxes. 5.12.1.2 Restoring Default Settings If you want to restore the factory defaults after making changes, the defaults can be applied to a selected parameter, sub-tree of parameters or all scanner parameters. Psion Teklogix Omnii XT10 Hand-Held Computer User Manual... - Page 167 To reset a single parameter to its default setting: • Press and hold on the parameter you want to reset. • Choose Default parameter to reset the parameter to the default setting. Psion Teklogix Omnii XT10 Hand-Held Computer User Manual...
-
Page 168: Options Tab
A dialog box appears, asking that you press the key you want to insert. The ASCII/Unicode key value of the keypress is displayed. Pressing the [ESC] key in this dialog box resets the data to zero. Psion Teklogix Omnii XT10 Hand-Held Computer User Manual... -
Page 169: Display Parameters
These parameters determine whether or not Omnii emits an audible scanner ‘beep’ when a good (successful) scan or a bad (unsuccessful) scan is performed. Set these parameters to either on to enable the beeper or off to disable it. Psion Teklogix Omnii XT10 Hand-Held Computer User Manual... -
Page 170: Translations Tab
Only one case will be applied to a bar code and a case will only be applied if all rules specified in the case are successful—if a rule within a case fails, the entire case fails. Psion Teklogix Omnii XT10 Hand-Held Computer User Manual... - Page 171 Chapter 5: Configuration Translations Tab • In the Translation menu, tap on the Case # to create rules. • Tap on the No rule drop-down menu to display the rules. Psion Teklogix Omnii XT10 Hand-Held Computer User Manual...
-
Page 172: Case Rules
Match and replace at index—matches the match string at a specified index and replaces/changes it. • Replace at index—replaces/changes unspecified data in a given range. • Add barcode prefix/suffix—adds a global prefix or suffix. Psion Teklogix Omnii XT10 Hand-Held Computer User Manual... -
Page 173: Ports Tab
5.12.4.1 Port Replicator Port A (COM5) and Port B (COM6) Port Replicator Port A (COM5) and Port B (COM6) are standard RS-232 DE-9 DTE ports on the Omnii port replicator module, available on certain cradle types. Psion Teklogix Omnii XT10 Hand-Held Computer User Manual... - Page 174 Double-tapping on this option displays a pop-up window in which you can choose the appropriate parity. Stop Bits This parameter specifies the number of stop bits—1, 1.5 or 2—used for asynchronous communication. Psion Teklogix Omnii XT10 Hand-Held Computer User Manual...
-
Page 175: Total Recall
5.13 Total Recall Total Recall is a Psion Teklogix utility developed to maintain applications and settings during a cold boot, and clone settings to other devices. This utility is based on a backup and restore concept. -
Page 176: Creating A Backup Profile
In the Name field, type a new name. (You may need to move the onscreen keyboard down to make the Name field visible.) • Tap on OK to save the new profile name. Psion Teklogix Omnii XT10 Hand-Held Computer User Manual... - Page 177 Defining the Type of Backup Default Backup Default Backup is selected so that all installed or copied files, database entries, and the Reg- istry are saved. Choose Advanced Backup if you want to tailor your backup. Psion Teklogix Omnii XT10 Hand-Held Computer User Manual...
- Page 178 The options you chose to back up appear in your window as the backup progresses. When the backup is complete, the last item in the list indicates the location and name of the backup profile. Psion Teklogix Omnii XT10 Hand-Held Computer User Manual...
-
Page 179: Restoring A Profile
To view a profile: • In the Total Recall home screen, tap on View Profile. • Tap on the [...] button to the right of the Profile field, and locate your backup file. Psion Teklogix Omnii XT10 Hand-Held Computer User Manual... -
Page 180: Deleting A Profile
In the next screen, locate your backup file, and tap on OK. A warning pop-up screen appears asking if you’re certain that you want to delete this file. • Tap on Yes to delete the file. Psion Teklogix Omnii XT10 Hand-Held Computer User Manual... -
Page 181: Tweakit Settings
Temp folder—that is, data are always loaded from the FTP Server to the Temp folder and from the Temp folder to the FTP Server. If this option is disabled, a warm reset must be performed to accept the change. Psion Teklogix Omnii XT10 Hand-Held Computer User Manual... -
Page 182: Advanced Interface And Network Settings
When this option is enabled, Omnii logs AT commands (e.g., dial-out information, pass- word string, etc.) that the administrator can monitor for debugging purposes. Modem commands are stored in: \MdmLog.txt. 5.14.1.3 Advanced Services Settings Psion Teklogix Omnii XT10 Hand-Held Computer User Manual... -
Page 183: User
A warm reset must be performed once the server name as been entered. 5.14.2 User 5.14.2.1 User Display Settings User Font Size This option allows you to adjust the size of the font used in the Omnii display: Large, Normal, or Small. Psion Teklogix Omnii XT10 Hand-Held Computer User Manual... -
Page 184: Registry Editor
Registry Editor 5.14.3 Registry Editor This option is reserved for senior administrators who have a strong understanding of registry keys and values. Warning: Careless registry editing can cause irreversible damage to Omnii. Psion Teklogix Omnii XT10 Hand-Held Computer User Manual... - Page 185 6.7.5.3 Omnii charge indicator LED is red....184 6.7.5.4 Spare battery LED is red with a battery installed..185 Psion Teklogix Omnii XT10 Hand-Held Computer User Manual...
- Page 186 6.10 Bluetooth Peripherals ....... . 191 Psion Teklogix Omnii XT10 Hand-Held Computer User Manual...
-
Page 187: Chapter 6: Peripheral Devices & Accessories
There are a number of pistol grips available to you depending on the type of scanner/imager installed in your hand-held. Refer to Table 6.3 for a list of pistol grip model numbers and the types of scanners/imagers with which they are compatible. Psion Teklogix Omnii XT10 Hand-Held Computer User Manual... - Page 188 • Using a Phillips screwdriver, tighten the screws to a torque of 3 lbs-in (3kgf-cm) to secure the pistol grip in place. Figure 6.1 Attaching the Pistol Grip Psion Teklogix Omnii XT10 Hand-Held Computer User Manual...
-
Page 189: Carrying And Protective Accessories
Carrying and Protective Accessories Note: Omnii Hand-Held Computer is a body worn device, and to maintain compliance with the FCC RF exposure guidelines, use a Psion Teklogix approved carrying case. Use of non-approved accessories may violate FCC RF exposure guidelines. -
Page 190: Attaching The Shoulder Strap - Model No. St6030
6.4.2 Attaching the Shoulder Strap - Model No. ST6030 • Attach the shoulder strap clip to the slot at the base of the hand-held (Figure 6.3). Figure 6.3 Attaching the Shoulder Strap Psion Teklogix Omnii XT10 Hand-Held Computer User Manual... -
Page 191: Protective Carrying Case - Model No. St6090
Charging the Battery Omnii Hand-Held Computer operates with a lithium-ion battery pack, Model No. ST3000. Preparing the unit for operation requires that the battery pack be charged and installed in the hand-held. Psion Teklogix Omnii XT10 Hand-Held Computer User Manual... -
Page 192: Installation-Chargers And Docking Stations
Chargers will not charge batteries outside an ambient temperature range of 0°C to 40°C (32°F to 104°F). It is recommended that the charger or docking station be operated at room temperature—between 18°C and 25°C (64°F to 77°F) for maximum performance. Psion Teklogix Omnii XT10 Hand-Held Computer User Manual... -
Page 193: Operator Controls
PC, connection to an AC wall adaptor (Model No. ST1050) or a Vehicle Power Outlet Adaptor (Model No. ST3113), and the use of a micro-USB to USB ‘A’ cable (Model No. PX3058). Psion Teklogix Omnii XT10 Hand-Held Computer User Manual... - Page 194 Note: If you are using a hand or shoulder strap, there is no need to remove it before installing the Snap Module, since the Omnii hand strap slot will still be accessible. Psion Teklogix Omnii XT10 Hand-Held Computer User Manual...
-
Page 195: Ac Wall Adaptor - Model No. St1050
The Vehicle Power Outlet Adaptor allows you to power your hand-held and recharge your battery using power drawn from your vehicle’s automotive power outlet when used in con- junction with a Snap Module. Psion Teklogix Omnii XT10 Hand-Held Computer User Manual... -
Page 196: Desktop Docking Stations - Models St4002 And St4003
Omnii can be inserted into two desktop docking stations which are designed to charge the battery installed in the hand-held along with a spare battery pack: Models ST4002 and ST4003. Important: These docking stations can only be used to charge Psion Teklogix approved lithium-ion batteries. The ST4002 and ST4003 desktop docking stations feature: •... - Page 197 Teklogix Smart Batteries and handles a range of voltages and charge algorithms. See “Bat- tery Details” on page 35 for more information regarding battery capacity, charge times and battery life. See “Charging the Spare Battery” on page 183 for spare battery charge information. Psion Teklogix Omnii XT10 Hand-Held Computer User Manual...
-
Page 198: Charging A Battery Installed In Omnii
The LED on Omnii lights up indicating that the unit has external power and battery charging will begin. It is safe to leave the unit in the desktop docking station while it is not in use—the battery will not be overcharged. Psion Teklogix Omnii XT10 Hand-Held Computer User Manual... -
Page 199: Indicators
Charge in progress. Flashing Yellow Battery is not charging due to out-of-temperature conditions. Solid Red Unable to read battery or non Psion Teklogix battery. 6.7.3 Operation 6.7.3.1 Charging the Omnii Battery The desktop docking station supplies DC power to enable the Omnii internal fast charger. -
Page 200: Cleaning The Desktop Docking Station
Remove Omnii and disconnect the adaptor DC power cable. • Wait at least 20 seconds, and then plug the cable in again. • If the Omnii indicator still shows a fault, the hand-held requires service. Psion Teklogix Omnii XT10 Hand-Held Computer User Manual... -
Page 201: Spare Battery Led Is Red With A Battery Installed
Your Psion Teklogix battery and desktop docking station are carefully designed for safety and capacity performance in accordance with IEEE 1725. If the battery or charger are not Psion Teklogix approved products, or the safety mechanism is faulty, the spare charge slot LED or the Omnii LED will display red. -
Page 202: Installation
• Install the IEC power cord and apply power. Important: Use IEC-320 C13 power cords approved by Psion Teklogix, with the ground pin connected to a proper earth-grounded receptacle. Check with a quali- fied electrician if you are uncertain of your receptacle grounding. -
Page 203: Charging Batteries
Charge in progress. Each LED represents 25% battery capacity. Flashing Yellow Battery is not charging due to out-of-temperature conditions. Solid Red Unable to read battery or non Psion Teklogix battery. 6.8.4 Charging Batteries • Install the battery with the battery contacts facing the charger. Slide the battery between the guide rails until it lightly latches in place. -
Page 204: Indicator Does Not Light When Battery Installed
(5 - 55mil) at medium distances (up to 1m). • Extended Range: reads regular 1D bar codes (5 - 55mil) at short to medium distances (1m), as well as large 1D bar codes (e.g. 55 mil) at long distances. Psion Teklogix Omnii XT10 Hand-Held Computer User Manual... -
Page 205: Basic Scanner Operations
A bar code icon appears on the screen during a scan. While the scanner beam is active, the onscreen message states: SCANNING. If you want to turn off the onscreen message, disable “Scan Indication” in the Options tab in the Control Panel>Scanner Settings menu. Psion Teklogix Omnii XT10 Hand-Held Computer User Manual... -
Page 206: Troubleshooting
An imager scanner takes a snap shot of a single bar code or multiple bar codes (at one time). It can find a bar code regardless of its orientation—that is, even a bar code printed at a 45 degree angle to the hand-held will be decoded successfully. Psion Teklogix Omnii XT10 Hand-Held Computer User Manual... -
Page 207: Bluetooth Peripherals
It is possible to communicate with a variety of Bluetooth peripherals, including GSM/GPRS handsets, scanners, printers, and so on. The range of the Bluetooth radio in Omnii is limited to approximately 10 meters (32 ft.). Psion Teklogix provides built-in support for: Psion Teklogix Omnii XT10 Hand-Held Computer User Manual... - Page 208 To minimize the impact on the backbone 802.11 net- work, Psion Teklogix recommends using Bluetooth peripherals that have low transaction rates (such as printers and scanners).
- Page 209 PECIFICATIONS 7.1 The Omnii XT10 Hand-Held Computer (Model No. 7545XV) ... .195 7.1.1 Hardware ........195 7.1.2 Software .
-
Page 211: Chapter 7: Specifications
Chapter 7: Specifications The Omnii XT10 Hand-Held Computer (Model No. 7545XV) The Omnii XT10 Hand-Held Computer (Model No. 7545XV) Note: Performance specifications are nominal and subject to change without notice. 7.1.1 Hardware Physical Dimensions • 100 mm width x 42 mm depth x 230 mm length (3.9 in x 1.6 in x 9 in). - Page 212 Humidity: 5% - 95% RH non-condensing Drop Durability: 1.7 m (5.6 ft.), 26 drops to polished concrete (while powered on and with accessories); multiple 2.0 m (6.5 ft.) drops to polished concrete. Psion Teklogix Omnii XT10 Hand-Held Computer User Manual...
-
Page 213: Software
EN 301 489 Laser: IEC 60825-1 Ed. 2.0, Class 1, Class 2 FDA 21 CFR 1040.10 1040.11 Class I, Class II Bluetooth: Bluetooth and 802.11b/g: EN300 328, Part 15.247 RoHS compliant: EU Directive 2002/95/EC Psion Teklogix Omnii XT10 Hand-Held Computer User Manual... -
Page 214: Lithium-Ion Smart Battery 5000 Mah (St3000)
25°C (77 ºF)—recommended storage temperature. Cycle Life 300 cycles minimum with no degradation below 80% of nominal capacity based on 1C charge / 1C discharge rates (to 3.0 V) @ 25°C (77 ºF). Psion Teklogix Omnii XT10 Hand-Held Computer User Manual... -
Page 215: Wireless Radios
802.11 radio and Enhanced Data Rate (EDR) (up to 3 Mbps). Antenna Type Ceramic chip PIFA Antenna Gain 1 dBi peak Transmit Power -3 dBm (0.5mW) minimum, +4 dBm (2.5 mW) max Frequency Range 2.400–2.4835 GHz Psion Teklogix Omnii XT10 Hand-Held Computer User Manual... -
Page 216: Internal Scanners And Imagers
SE1223LR - Long Range (decoded) Scanner (page 202) • SE1224HP - High Performance Scanner (page 203). • SE1524ER - Extended Range Scanner (page 205). • EV15 1D Standard Range Imager (page 207). • 5080 Imager/Decoder (page 208). Psion Teklogix Omnii XT10 Hand-Held Computer User Manual... -
Page 217: Se955 Scanner
10,000 ft. candles Laser Safety IEC 60825 Electrical Safety UL 60950, EN/IEC 60950 EMI/RFI FCC Part 15 Class B, EN 55024/CISPR 22, AS 3548, VCCI Environmental RoHS Compliant 7.4.1.1 SE955 Decode Zones Psion Teklogix Omnii XT10 Hand-Held Computer User Manual... -
Page 218: Se1223Lr - Long Range (Decoded) Scanner
Input Current: 115 mA typical µA Standby Current: 70 max. Laser Classification Intended for use in CDRH Class II and IEC Class 2 devices Electrical Safety UL, VDE, and CUL recognized component laser Environmental RoHS-compliant Psion Teklogix Omnii XT10 Hand-Held Computer User Manual... -
Page 219: Se1224Hp - High Performance Scanner
Laser On Time, Aim Duration, Power Mode, Trigger Mode, Bi- directional Redundancy, Symbology types/lengths, Data format- ting. Ambient Light Artificial: 450 ft. candles (4844 Lux). Sunlight: 8000 ft. candles (86112 Lux). Laser Output Power (peak) 1.35 mW Psion Teklogix Omnii XT10 Hand-Held Computer User Manual... -
Page 220: Se1224Hp Decode Zones
Chapter 7: Specifications SE1224HP - High Performance Scanner 7.4.3.1 SE1224HP Decode Zones Psion Teklogix Omnii XT10 Hand-Held Computer User Manual... -
Page 221: Se1524Er - Extended Range Scanner
Laser On Time, Aim Duration, Power Mode, Trigger Mode, Bi- directional Redundancy, Symbology types/lengths, Data format- ting. Ambient Light Artificial: 450 ft. candles (4,844 Lux) Sunlight: 4,000 ft. candles (86,112 Lux). Laser Output Power (peak) 1.26 mW Psion Teklogix Omnii XT10 Hand-Held Computer User Manual... -
Page 222: Se1524Er Decode Zones
Chapter 7: Specifications SE1524ER – Extended Range Scanner 7.4.4.1 SE1524ER Decode Zones SE1524ER Decode Zone A (Short Range, Small Codes) SE1524ER Decode Zone B (Long Range, Large Codes) Psion Teklogix Omnii XT10 Hand-Held Computer User Manual... -
Page 223: Ev15 Imager
Works in any lighting conditions, from 0 to 100,000 lux 7.4.5.1 EV15 Imager Decode Zone 0 Lux to 100,000 Lux Minimum Range Maximum Range Mil Size Inches Inches 14.5 35.5 High quality symbols in normal room light. Psion Teklogix Omnii XT10 Hand-Held Computer User Manual... -
Page 224: 5080 Imager/Decoder
Code 39, Code 128, Codabar, UPC, EAN, Interleaved 2 of 5, Reduced Space Symbology, Code 93, Codablock Postal Postnet (US), Planet Code, BPO 4 State, Canadian Post, Japanese Post, KIX (Netherlands) Post OCR Fonts OCR-A and OCR-B Psion Teklogix Omnii XT10 Hand-Held Computer User Manual... -
Page 225: 5080 Working Range
12.5 (.021cm) 3.4 in. (8.6cm) 5.7 in. (14.5cm) 8.3 (.021cm) 3.4 in. (8.6cm) 5.4 in. (13.7cm) Linear 10 Linear 2.2 in. (5.6cm) 7.6 in. (19.3cm) 13 (.033cm) 2.0 in. (5.1cm) 8.9 in. (22.6cm) Psion Teklogix Omnii XT10 Hand-Held Computer User Manual... -
Page 226: Accessories
The DE9M connector is capable of speeds up to 115,200 kbp. Camera (Optional) • Colour, 3 Megapixel autofocus, manual digital 4X zoom, 2xLED flash, video capable (optional with or without PTT speaker). Psion Teklogix Omnii XT10 Hand-Held Computer User Manual... -
Page 227: Appendix A: Port Pinouts
A.2 Battery Contacts ........A-4 Psion Teklogix Omnii XT10 Hand-Held Computer User Manual... - Page 229 The following are the pin assignments of the interface. Table A.1 Docking Connector Pinout Pin # Signal Pin # Signal GROUND USB_OTG_P DC_IN USB_OTG_M DOCK_LOW_PWR CHARGE_IN GROUND GROUND USB_OTG_VBUS DC_IN CHARGE_IN UART_RX GROUND GROUND DC_IN UART_TX USBH_P CHARGE_DATA USBH_M GROUND Psion Teklogix Omnii XT10 Hand-Held Computer User Manual...
-
Page 230: Battery Contacts
Plastic Rip - provides mechanical polarity. BATT-RAW Positive lead of battery. BATT-CLK SMBus data clock. BATT-ID 0 Ω to NEG. BATT-DATA SMBus bi-directional data line. Negative lead of battery. Negative lead of battery. Psion Teklogix Omnii XT10 Hand-Held Computer User Manual... -
Page 231: B.3.3 Changing Network Properties
B.3.2 Deleting A Preferred Network ......B-9 B.3.3 Changing Network Properties ......B-9 Psion Teklogix Omnii XT10 Hand-Held Computer User Manual... -
Page 233: Appendix B: Wireless Zero Config
Tap on Start>Settings>Network and Dial-up Connections. • Choose the radio icon representing the radio you want to set up—in the sample screen in Figure B.2, this is labelled as SDIO86861 Figure B.2 802.11 Wireless LAN Settings Window Psion Teklogix Omnii XT10 Hand-Held Computer User Manual... -
Page 234: Wireless Statistics Tab
Configure button to display the Wireless Properties dialog box. • Connect button: To force connection to a specific, existing network, highlight the network to which you want Omnii to connect, and tap on the Connect button. Psion Teklogix Omnii XT10 Hand-Held Computer User Manual... - Page 235 Type the appropriate SSID (Service Set Identifier) in the Network name (SSID): dialog box. The Network name field can contain a maximum of 32 characters. The name assigned here is listed as a preferred network. Psion Teklogix Omnii XT10 Hand-Held Computer User Manual...
- Page 236 10 or 26 Hexadecimal digit sequence that matches the active WEP key on the access point. To assign a Network key, highlight The key is provided automatically, and uncheck the checkbox to disable this option. Psion Teklogix Omnii XT10 Hand-Held Computer User Manual...
- Page 237 The radio will search for the SSID and compare the WEP and authentication information you specified. If there is a match between the hand-held settings and the access point settings, the hand-held will communicate on the network through the access point. Psion Teklogix Omnii XT10 Hand-Held Computer User Manual...
-
Page 238: Assigning An Ip Address
Tap in the Networks List, and highlight the network that you want to move up or down in the list. • To move the highlighted item in the list upward or downward, tap on the Up or Down button. Psion Teklogix Omnii XT10 Hand-Held Computer User Manual... -
Page 239: Deleting A Preferred Network
Highlight the network that you want to modify. • Tap on the Properties button. • Make any necessary changes in the Wireless Properties dialog box, and press [ENTER] to save the changes. Psion Teklogix Omnii XT10 Hand-Held Computer User Manual... - Page 241 C.3.4 Code 128 ........C-28 Psion Teklogix Omnii XT10 Hand-Held Computer User Manual...
- Page 242 C.4.16 2D Data Matrix....... C-50 Psion Teklogix Omnii XT10 Hand-Held Computer User Manual...
- Page 243 C.5.14 IATA 2 of 5 ....... . C-65 Psion Teklogix Omnii XT10 Hand-Held Computer User Manual...
-
Page 245: Appendix C: Bar Code Settings
The symbologies listed change to reflect the scanner you choose and the bar codes it sup- ports. Always defer to your bar code scanner’s programming manual when in doubt about the availability or settings for any parameter. Psion Teklogix Omnii XT10 Hand-Held Computer User Manual... -
Page 246: Restoring Default Settings
Default all settings to reset all scanner parameters to default settings. To reset a single parameter to its default setting: • Press and hold on the parameter you want to reset. Psion Teklogix Omnii XT10 Hand-Held Computer User Manual... -
Page 247: Decoded (Internal) Scanners
Dot Time (msec) The value selected for Dot Time (msec) determines (in milliseconds) how long the targeting dot remains on before the scanner switches to a normal scan sweep. When you double-tap Psion Teklogix Omnii XT10 Hand-Held Computer User Manual... -
Page 248: Decoded (Internal) Advanced Options
Keep in mind that while this option is more suitable for battery powered applications, there will be a slight delay while the scanner powers up to scan a bar code. Psion Teklogix Omnii XT10 Hand-Held Computer User Manual... -
Page 249: Parameter Scanning
D 5 of 5 8 or less I 2 of 5 8 or less Linear security level 2 specifies that all types of codes must be successfully read twice before being decoded. Psion Teklogix Omnii XT10 Hand-Held Computer User Manual... -
Page 250: Decoded (Internal) 2D Scanning Options
Always Raster is assigned to the “2D Scanning Mode” parameter. “2D Raster Height” and “2D Raster Expand Rate” are intended for very specific applications and are usually not required for normal scanning purposes. C-10 Psion Teklogix Omnii XT10 Hand-Held Computer User Manual... -
Page 251: Decoded (Internal) Data Options
ECIs. If this parameter is set to off and a symbol that was encoded using an ECI escape is scanned, the scanner transmits the ECI escape followed by the uninterpreted data. Psion Teklogix Omnii XT10 Hand-Held Computer User Manual C-11... -
Page 252: Code 128
Two discrete lengths. The length of a code refers to the number of characters (i.e., human readable characters), including check digit(s). Double-tapping on these parameters displays dialog boxes labelled Set Code Lengths where you can define the code length that will be decoded by your scanner. C-12 Psion Teklogix Omnii XT10 Hand-Held Computer User Manual... -
Page 253: Check Digit Verification
When you double-tap on this parameter, a dialog box is displayed in which you can enter a decode performance level of between 1 and 3. Psion Teklogix Omnii XT10 Hand-Held Computer User Manual C-13... - Page 254 This parameter determines the number of characters that will be removed from the begin- ning of the bar code before the prefix character is added. Note: For Code 39 bar codes, the “AIAG Strip” is performed before the “Strip Leading”. C-14 Psion Teklogix Omnii XT10 Hand-Held Computer User Manual...
-
Page 255: C.2.6 Code 128
When you double-tap on this parameter, a dialog box is displayed in which you can enter a decode performance level of between 1 and 3. Length Restriction Refer to “Length Restriction” on page C-14 for details. Add/Remove Data Refer to “Add/Remove Data” on page C-14 for details. Psion Teklogix Omnii XT10 Hand-Held Computer User Manual C-15... -
Page 256: Ean 8
Country Code and System Char—both the country code (“0” for USA) and system character are transmitted with the data, or None—no preamble is transmitted. The lead-in characters are considered part of the symbol. C-16 Psion Teklogix Omnii XT10 Hand-Held Computer User Manual... -
Page 257: Upc E
This parameter converts UPC-E1 (zero suppressed) decoded data to UPC-A format before transmission. After conversion, data follows UPC-A format and is affected by UPC-A pro- gramming selections (e.g., Preamble, Check Digit). Add/Remove Data Refer to “Add/Remove Data” on page C-14 for details. Psion Teklogix Omnii XT10 Hand-Held Computer User Manual C-17... -
Page 258: Upc/Ean Shared Settings
This option should be enabled when bar codes are in proximity to each other. 2D UPC Half Block Stitching Setting this parameter to on enables “UPC Half Block Stitching” for an omnidirectional engine only. C-18 Psion Teklogix Omnii XT10 Hand-Held Computer User Manual... -
Page 259: Codabar
Choosing Two discrete lengths allows you to specify two lengths of bar codes that may be decoded. Length within a range allows you to decode any bar code with a length Psion Teklogix Omnii XT10 Hand-Held Computer User Manual C-19... -
Page 260: Msi Plessey
Length within a range allows you to decode any bar code with a length that falls within a specified range (e.g. between 10 and 15 characters). The minimum and maximum values for the range are 6 and 55, respectively. C-20 Psion Teklogix Omnii XT10 Hand-Held Computer User Manual... -
Page 261: Interleaved 2
Choosing Two discrete lengths allows you to specify two lengths of bar codes that may be decoded. Length within a range allows you to decode any bar code with a length Psion Teklogix Omnii XT10 Hand-Held Computer User Manual C-21... -
Page 262: C.2.16 Discrete 2 Of 5
Length within a range allows you to decode any bar code with a length that falls within a specified range (e.g. between 10 and 15 characters). The minimum and maximum values for the range are 1 and 12, respectively. C-22 Psion Teklogix Omnii XT10 Hand-Held Computer User Manual... -
Page 263: Composite
Important: To successfully read this type of bar code, the two types of symbologies included in a composite bar code must be enabled. In addition, “Center Bar Code Only” must be disabled (see page C-42). Psion Teklogix Omnii XT10 Hand-Held Computer User Manual C-23... -
Page 264: Micro Pdf-417
]C1 if the first codeword is 903-907, 912, 914, 915 ]C2 if the first codeword is 908 or 909 ]C0 if the first codeword is 910 or 911 C-24 Psion Teklogix Omnii XT10 Hand-Held Computer User Manual... -
Page 265: Decoded (Intermec Iscp
The value assigned to this parameter determines how long the laser will remain on when the scan button or trigger is pressed. Double-tapping on this parameter displays a dialog box in which you can enter a value between 1 and 10 seconds. Psion Teklogix Omnii XT10 Hand-Held Computer User Manual C-25... -
Page 266: Decoded (Iscp) Advanced Options
Diff Read Timeout Prevents unwanted reading of other bar codes on the same label. The value assigned deter- mines after what time period the scanner will timeout, from 0 to 2550 msec. C-26 Psion Teklogix Omnii XT10 Hand-Held Computer User Manual... -
Page 267: C.3.3 Code 39
Note: French CIP (French pharmaceutical) is only used with bar codes containing 7 characters. Italian CIP (Italian pharmaceutical) is also known as Code 32. It is transmitted as a standard Code 39 if checksum is not validated. Psion Teklogix Omnii XT10 Hand-Held Computer User Manual C-27... -
Page 268: C.3.4 Code 128
“FNC1 Conversion” allows the FNC1 character to be converted to another character for ap- plications that cannot use the default <GS> Group Separator or hex (1d). Double-tapping on this option displays a dialog box listing the allowable range: 0 to 255. C-28 Psion Teklogix Omnii XT10 Hand-Held Computer User Manual... - Page 269 (i.e., human readable characters), including check digit(s). Length Restriction Refer to “Length Restriction” on page C-14 for details. Add/Remove Data Refer to “Add/Remove Data” on page C-14 for details. Psion Teklogix Omnii XT10 Hand-Held Computer User Manual C-29...
-
Page 270: Upc A
Set this parameter to on to enable “UPC A” bar code scanning recognition. Transmit Check Digit If the check digit is to be transmitted with the data, this parameter must be enabled. C-30 Psion Teklogix Omnii XT10 Hand-Held Computer User Manual... -
Page 271: Upc E Settings
Refer to “Add/Remove Data” on page C-14 for details. C.3.9 UPC/EAN Shared Settings The setting assigned to the “Addendum” parameter associated with this option is shared across all UPC and EAN bar codes. Psion Teklogix Omnii XT10 Hand-Held Computer User Manual C-31... -
Page 272: Code 93
This parameter determines the reading distance from which a bar code can be successfully scanned. The default setting, Extended, allows for increased reading distance. C.3.10 Code 93 Enabled Set this parameter to on to enable “Code 93”. C-32 Psion Teklogix Omnii XT10 Hand-Held Computer User Manual... -
Page 273: Codabar
USS (Uniform Symbology Specification) or OPCC (Optical Product Code Council). Transmit Check Digit If the check digit is to be transmitted with the data, this parameter must be enabled. Psion Teklogix Omnii XT10 Hand-Held Computer User Manual C-33... -
Page 274: Msi Plessey
Minimum lengths for the bar code can be set from 0 to 255. The length of a code refers to the number of characters (i.e., human readable characters), including check digit(s). C-34 Psion Teklogix Omnii XT10 Hand-Held Computer User Manual... -
Page 275: Code 11
Refer to “Length Restriction” on page C-14 for details. Add/Remove Data Refer to “Add/Remove Data” on page C-14 for details. C.3.14 Interleaved 2 of 5 Enabled Set this parameter to on to enable “Interleaved 2 of 5”. Psion Teklogix Omnii XT10 Hand-Held Computer User Manual C-35... -
Page 276: C.3.15 Matrix 2 Of 5
Refer to “Length Restriction” on page C-14 for details. Add/Remove Data Refer to “Add/Remove Data” on page C-14 for details. C.3.15 Matrix 2 of 5 Enabled Set this parameter to on to enable “Matrix 2 of 5”. C-36 Psion Teklogix Omnii XT10 Hand-Held Computer User Manual... -
Page 277: C.3.16 Discrete 2 Of 5
Double-tapping on these parameters displays dialog boxes where you can define the code length that will be recognized by your scanner. Length Mode You can chose to set L1 as Minimum Length or L1,L2,L3 as Fixed Length. Psion Teklogix Omnii XT10 Hand-Held Computer User Manual C-37... -
Page 278: Telepen
‘RSS-Limited” is restricted, in that it can only encode 14 digit GTINs (global trade item numbers) that begin with either 0 or 1. It is not stackable and is not designed to be read omni-directionally. C-38 Psion Teklogix Omnii XT10 Hand-Held Computer User Manual... -
Page 279: Composite
When Linear Transmission Only is enabled, only the linear code portion of the composite bar code is transmitted when scanned. UPC-EAN Composite Message This option allows you to choose how UPC-EAN shared bar codes are transmitted: Always Linked, Never Linked or Auto-discriminate. Psion Teklogix Omnii XT10 Hand-Held Computer User Manual C-39... -
Page 280: Micro Pdf-417
Refer to “Length Restriction” on page C-14 for details. Add/Remove Data Refer to “Add/Remove Data” on page C-14 for details. C.3.22 Micro PDF-417 Enabled Set this parameter to on to enable “2D Micro PDF-417”. C-40 Psion Teklogix Omnii XT10 Hand-Held Computer User Manual... -
Page 281: Codablock
Set this parameter to on to enable “Codablock type F”. Length Restriction Refer to “Length Restriction” on page C-14 for details. Add/Remove Data Refer to “Add/Remove Data” on page C-14 for details. Psion Teklogix Omnii XT10 Hand-Held Computer User Manual C-41... -
Page 282: Imager
Max Number Barcodes Specifies the maximum number of bar codes the imager attempts to decode in an image. A maximum of 6 bar codes can be decoded at one time. C-42 Psion Teklogix Omnii XT10 Hand-Held Computer User Manual... -
Page 283: Imager Advanced Options
A value of 0 disables the target dot. C.4.2 Imager Advanced Options Important: Do not adjust the advanced options without first consulting Psion Teklogix technical support. Factory Defaults On Reboot The value assigned to this parameter determines whether or not the driver will restore the factory defaults to the imager device on the next reboot. - Page 284 “Captures Per HW Trigger”. Auto Exposure Important: This parameter value should only be changed by qualified Psion Teklogix personnel. It should be left at the default value: on. Setting this parameter to on allows the imager to make automatic gain, integration and illu- mination adjustments based on ambient light before capturing the bar code.
- Page 285 (2-4 times per second), the illumination stays on from the time the trigger is pulled until a decode is successful. This feature is useful in low light environments, since it will also reduce the distraction that the illumination can have on nearby co-workers. Psion Teklogix Omnii XT10 Hand-Held Computer User Manual C-45...
-
Page 286: Code 128
Set this parameter to on to enable “Code 128. Length Restriction Refer to “Length Restriction” on page C-14 for details. Add/Remove Data Refer to “Add/Remove Data” on page C-14 for details. C-46 Psion Teklogix Omnii XT10 Hand-Held Computer User Manual... -
Page 287: Ean 13
Addendum Refer to “Addendum” on page C-47. Add/Remove Data Refer to “Add/Remove Data” on page C-14 for details. C.4.7 UPC A Enabled Set this parameter to on to enable “UPC A”. Psion Teklogix Omnii XT10 Hand-Held Computer User Manual C-47... -
Page 288: Upc E
Enabled Set this parameter to on to enable “Codabar”. Length Restriction Refer to “Length Restriction” on page C-14 for details. Add/Remove Data Refer to “Add/Remove Data” on page C-14 for details. C-48 Psion Teklogix Omnii XT10 Hand-Held Computer User Manual... -
Page 289: Rss Code (Reduced Space Symbology
A composite symbol includes multi-row 2D components making it compatible with linear and area CCD scanners along with linear and rastering laser scanners. Enabled Set this parameter to on to enable “Composite” bar code scanner. Psion Teklogix Omnii XT10 Hand-Held Computer User Manual C-49... -
Page 290: Micro Pdf-417
Set this parameter to on to enable “2D Data Matrix”. Inverse Video Mode Enabling this parameter allows the imager to read inverse bar codes—white symbols pre- sented on a black background. C-50 Psion Teklogix Omnii XT10 Hand-Held Computer User Manual... -
Page 291: Qr Code
Set this parameter to on to enable “2D Maxicode”. Length Restriction Refer to “Length Restriction” on page C-14 for details. Add/Remove Data Refer to “Add/Remove Data” on page C-14 for details. Psion Teklogix Omnii XT10 Hand-Held Computer User Manual C-51... -
Page 292: Aztec
Refer to “Length Restriction” on page C-14 for details. Add/Remove Data Refer to “Add/Remove Data” on page C-14 for details. C.4.22 Postal: Australian Enabled Set this parameter to on to enable “Postal: Australian”. C-52 Psion Teklogix Omnii XT10 Hand-Held Computer User Manual... -
Page 293: Postal: Japanese
Set this parameter to on to enable “Postal: Royal”. Length Restriction Refer to “Length Restriction” on page C-14 for details. Add/Remove Data Refer to “Add/Remove Data” on page C-14 for details. Psion Teklogix Omnii XT10 Hand-Held Computer User Manual C-53... -
Page 294: Postal: Kix
Refer to “Length Restriction” on page C-14 for details. Add/Remove Data Refer to “Add/Remove Data” on page C-14 for details. Non-Decoded Scanners Figure C.1 Non-Decoded Scanner Options • Tap on the Scanner drop-down menu, and choose Non-decoded. C-54 Psion Teklogix Omnii XT10 Hand-Held Computer User Manual... -
Page 295: Options
Higher values significantly increase the time it takes to decode a bar code but also improve the reliability of the decoded bar code. Psion Teklogix Omnii XT10 Hand-Held Computer User Manual C-55... -
Page 296: Code 39
This identifier defines the general category or specific use of the data contained in the rest of the bar code. Note: If your unit is operating with the Psion Teklogix TESS application, this parameter should not be used in conjunction with the TESS AIAG feature. This is because the hand-held performs the strip function before it processes the data through the AIAG feature;... -
Page 297: C.5.3 Code 128
Double-tap on Variations to display a dialog box listing your options. • Tap on a variation to highlight it, and then tap on OK. If you choose None, a check is not executed. Standard Enable Standard if “Code 128” is desired. Psion Teklogix Omnii XT10 Hand-Held Computer User Manual C-57... -
Page 298: Ean 8
If this parameter is enabled, the check digit is included with the decoded bar code data. Addendum Important: Before “Addendum” can take effect, the “Short Code” parameter (see page C-55) must be enabled. C-58 Psion Teklogix Omnii XT10 Hand-Held Computer User Manual... -
Page 299: C.5.5 Ean
If this parameter is enabled, the check digit is included with the decoded bar code data. Addendum Important: Before “Addendum” can take effect, the “Short Code” parameter (see page C-55) must be enabled. See “Addendum” on page C-58. Psion Teklogix Omnii XT10 Hand-Held Computer User Manual C-59... -
Page 300: Upc A
ID character is inserted between the prefix and the decoded symbol. Add/Remove Data Refer to “Add/Remove Data” on page C-14 for details. C.5.7 UPC E Enabled Set this parameter to on to enable “UPC E”. C-60 Psion Teklogix Omnii XT10 Hand-Held Computer User Manual... -
Page 301: C.5.8 Codabar
Codabar message must be A, B, C, or D, and the body of the message should not contain these characters. Setting this parameter to on strips the start and stop characters from this bar code. Psion Teklogix Omnii XT10 Hand-Held Computer User Manual C-61... -
Page 302: C.5.9 Code 93
If “Include Check” is enabled, the check digit is included with the decoded bar code data. Check Digits This parameter can be set to None, One Check Digit or Two Check Digits. • Double-tap on this parameter to display a dialog box listing your options. C-62 Psion Teklogix Omnii XT10 Hand-Held Computer User Manual... -
Page 303: C.5.11 Interleaved 2 Of 5
A code ID character identifies the scanned bar code type. In addition to any single character prefix already selected, the code ID character is inserted between the prefix and the decoded symbol. Length Restriction Refer to “Length Restriction” on page C-14 for details. Psion Teklogix Omnii XT10 Hand-Held Computer User Manual C-63... -
Page 304: Msi Plessey
If this parameter is enabled, the ITF-14/16 MOD 10 check digit is calculated. Include Check If this parameter is enabled, the check digit is included with the decoded bar code data. C-64 Psion Teklogix Omnii XT10 Hand-Held Computer User Manual... -
Page 305: C.5.14 Iata 2 Of
ID character is inserted between the prefix and the decoded symbol. Length Restriction Refer to “Length Restriction” on page C-14 for details. Add/Remove Data Refer to “Add/Remove Data” on page C-14 for details. Psion Teklogix Omnii XT10 Hand-Held Computer User Manual C-65... - Page 307 D.4.12 Removing a Custom Preset ......D-20 D.4.13 Bar Coding Tab – Configuring Symbologies ....D-20 Psion Teklogix Omnii XT10 Hand-Held Computer User Manual...
- Page 308 D.5.29 2D QR Code ....... .D-37 Psion Teklogix Omnii XT10 Hand-Held Computer User Manual...
- Page 309 ....... . . D-40 Psion Teklogix Omnii XT10 Hand-Held Computer User Manual...
-
Page 311: Appendix D: Teklogix Imagers Applet
Every preset belongs to a preset type. The following preset types are available: Psion Teklogix Omnii XT10 Hand-Held Computer User Manual... -
Page 312: Predefined Presets
Symbology Settings menu, refer to “Bar Coding Tab – Configuring Symbologies” on page D-20. This preset enables the decoding of all bar codes that the imager can decode. Linear This preset enables the decoding of all the 1D symbologies that the imager can decode. Psion Teklogix Omnii XT10 Hand-Held Computer User Manual... -
Page 313: Bar Code Decoding Camera Predefined Presets
D.2.4 Image Capture Predefined Presets The following presets enable successful image capture in almost all conditions. Note: It is recommended that the default preset be used whenever possible. Psion Teklogix Omnii XT10 Hand-Held Computer User Manual... -
Page 314: Using The Teklogix Imagers Applet
To configure the image capture presets, open the dialog box as follows: • Tap on Start>Settings>Control Panel. • Tap on the Teklogix Imagers icon, and if it’s not already selected, tap on the Imaging tab. The following screen is displayed. Psion Teklogix Omnii XT10 Hand-Held Computer User Manual... -
Page 315: Selecting A Camera
• Highlight the preset, and tap on the Activate button. D.3.4 Viewing a Preset To view the parameter settings in a preset: • Highlight a preset, and tap on the View button. Psion Teklogix Omnii XT10 Hand-Held Computer User Manual... -
Page 316: Creating A Custom Preset
• Tap on OK to save your changes. The preset list is displayed; the new custom preset appears at the end of the list. It is marked as read and write. D-10 Psion Teklogix Omnii XT10 Hand-Held Computer User Manual... -
Page 317: Modifying A Custom Preset
- An associated dialog box containing the valid range of values for the parameter and the current setting like the sample screen following is displayed. - Type a value in the field provided. Psion Teklogix Omnii XT10 Hand-Held Computer User Manual D-11... -
Page 318: Removing A Custom Preset
Configuring the Bar Code Decoding Camera Presets To configure the bar code decoding camera presets: • Tap on Start>Settings>Control Panel>Teklogix Imagers. • Tap on the Barcoding tab. Figure D.2 Bar Code Presets D-12 Psion Teklogix Omnii XT10 Hand-Held Computer User Manual... -
Page 319: Selecting A Camera
Highlight the preset, and tap on the Activate button. D.4.3 Viewing a Preset To view the parameter settings in a preset: • Highlight a preset, and tap on the View button. The associated preset window is displayed. Psion Teklogix Omnii XT10 Hand-Held Computer User Manual D-13... -
Page 320: Creating A Custom Preset
• Tap on OK to save your changes. The preset list is displayed; the new custom preset appears at the end of the list. It is marked as read and write. D-14 Psion Teklogix Omnii XT10 Hand-Held Computer User Manual... -
Page 321: Modifying A Custom Preset
- Type a value in the field provided. • For a parameter that toggles between two values such as on or off and enabled or disabled: Psion Teklogix Omnii XT10 Hand-Held Computer User Manual D-15... -
Page 322: Removing A Custom Preset
Configuring the Bar Code Decoding Symbologies To configure the bar code decoding camera presets: • Tap on Start>Settings>Control Panel>Teklogix Imagers. • Tap on the Barcoding tab. Figure D.3 Viewing Bar Code Decoding Symbologies D-16 Psion Teklogix Omnii XT10 Hand-Held Computer User Manual... -
Page 323: Setting The Active Preset
Highlight the preset, and tap on the Activate button. D.4.9 Viewing a Preset To view the parameter settings in a preset: • Highlight a preset, and tap on the View button. The associated preset window is displayed. Psion Teklogix Omnii XT10 Hand-Held Computer User Manual D-17... -
Page 324: Creating A Custom Preset
• Tap on OK to save your changes. The preset list is displayed; the new custom preset appears at the end of the list. It is marked as read and write. D-18 Psion Teklogix Omnii XT10 Hand-Held Computer User Manual... -
Page 325: Modifying A Custom Preset
- Type a value in the field provided. • For a parameter that toggles between two values such as on or off and enabled or disabled: Psion Teklogix Omnii XT10 Hand-Held Computer User Manual D-19... -
Page 326: Bar Coding Tab - Configuring Symbologies
D.4.14 Filter Tab – Manipulating Bar Code Data To configure rules for manipulating bar code data: • Tap on Start>Settings>Control Panel. • Tap on the Teklogix Imagers icon, and then tap on the Filter tab. D-20 Psion Teklogix Omnii XT10 Hand-Held Computer User Manual... -
Page 327: Modifying A Bar Code Setting
- An associated dialog box containing the valid range of values for the parameter and the current setting like the sample screen following is displayed. - Type a value in the field provided. • For a parameter that takes a single character: Psion Teklogix Omnii XT10 Hand-Held Computer User Manual D-21... -
Page 328: Translation Tab - Configuring Rules
Tap on Start>Settings>Control Panel. • Tap on the Teklogix Imagers icon, and then tap on the Translations tab. For instructions on adding, editing, and removing translation rules, refer to “Translations Tab” on page 154. D-22 Psion Teklogix Omnii XT10 Hand-Held Computer User Manual... -
Page 329: Advanced Tab
• Tap on the Teklogix Imagers icon, and then tap on the Advanced tab. To define the location where imager files will be stored: • Tap on the File Location button. Psion Teklogix Omnii XT10 Hand-Held Computer User Manual D-23... -
Page 330: Configuring Triggers
In the Advanced tab, tap on the Trigger Control button. • To view all the triggers and the hardware devices that are configured to use them, tap in the checkbox next to Show all modules. D-24 Psion Teklogix Omnii XT10 Hand-Held Computer User Manual... -
Page 331: Bar Code Symbologies - Descriptions
The number of retries is dependent on the value assigned in the next pa- rameter, Max Number of Auto Retry. If this parameter is set to off, the imager will only attempt the image capture once. Psion Teklogix Omnii XT10 Hand-Held Computer User Manual D-25... -
Page 332: D.5.2 Code 39
When this parameter is enabled, before data is output, the “Code 39” symbol integrity is ver- ified based on a parity character that must be present in the code. If the parity character is not D-26 Psion Teklogix Omnii XT10 Hand-Held Computer User Manual... -
Page 333: Trioptic Code
Enabled Set this parameter to on to enable “Code 128”. ISBT Concatenation These codes are not concatenated by default. You need to set this parameter to on to send concatenated code. Psion Teklogix Omnii XT10 Hand-Held Computer User Manual D-27... -
Page 334: Ean 8
EAN 8 Enabled Set this parameter to on to enable “EAN 8”. Check Digit Strip If you enable this parameter, a check digit is stripped from the decoded bar code data. D-28 Psion Teklogix Omnii XT10 Hand-Held Computer User Manual... -
Page 335: Upc-A
When this parameter is set to on, the imager does not accept the main bar code without a supplement. Supplements Separator Supplements Separator is a space that is added between the UPC-A bar code and the Sup- plement code/Addenda. Psion Teklogix Omnii XT10 Hand-Held Computer User Manual D-29... -
Page 336: Upc-E Settings
This parameter specifies whether or not the imager will read only UPC-A/EAN-13 bar codes that have addenda. Note: The 2 or 5 digit addenda must be turned on/off, depending on the desired behavior. D-30 Psion Teklogix Omnii XT10 Hand-Held Computer User Manual... -
Page 337: Codabar
“Codabar” supports symbol concatenation. When Concatenation is set to on, Codabar uses a ‘D’ stop character to indicate that data from that symbol should be concatenated with data from the adjacent symbol with a ‘D’ start character. Psion Teklogix Omnii XT10 Hand-Held Computer User Manual D-31... -
Page 338: Msi Plessey
If this parameter is set to One Check Digit, it is assumed that the last digit is a check digit. If it is set to Two Check Digits, it is assumed that the last two digits are check digits. D-32 Psion Teklogix Omnii XT10 Hand-Held Computer User Manual... -
Page 339: D.5.14 Interleaved 2 Of 5
Double-tapping on these parameters displays a screen in which you can set the minimum and maximum allowable code lengths – 1 to 80. D.5.16 IATA 2 of 5 Enabled Set this parameter to on to enable “IATA 2 of 5”. Psion Teklogix Omnii XT10 Hand-Held Computer User Manual D-33... -
Page 340: Telepen
– 1 to 60. D.5.19 GS1 DataBar GS1 DataBar Set this parameter to on to enable the imager to read “GS1 Databar” symbols. D-34 Psion Teklogix Omnii XT10 Hand-Held Computer User Manual... -
Page 341: Posi Code (Reduced Space Symbology
Important: To successfully read this type of bar code, the two types of symbologies included in a composite bar code must be enabled. D.5.22 TLC-39 This composite component integrates MicroPDF417 with the linear code. Enabled Setting this parameter to on enables this parameter. Psion Teklogix Omnii XT10 Hand-Held Computer User Manual D-35... -
Page 342: Pdf-417
The “Code 49” bar code is a multiple-row bar code that can encode the full ASCII character set below ASCII 128. Up to 49 alphanumeric characters or 81 numeric characters can be D-36 Psion Teklogix Omnii XT10 Hand-Held Computer User Manual... -
Page 343: Codablock
Double-tapping on these parameters displays a screen in which you can set the minimum and maximum allowable code lengths – 1 to 1500. D.5.29 2D QR Code Enabled Set this parameter to on to enable “2D QR Code”. Psion Teklogix Omnii XT10 Hand-Held Computer User Manual D-37... -
Page 344: Maxicode
D.5.32 Postal: PlaNET Enabled Set this parameter to on to enable “Postal: PlaNET”. Check Digit Strip If you enable this parameter, a check digit is stripped from the decoded bar code data. D-38 Psion Teklogix Omnii XT10 Hand-Held Computer User Manual... -
Page 345: Postal: Postnet
Set this parameter to on to enable “Postal: Japanese”. D.5.38 Postal: Kix Enabled Set this parameter to on to enable “Postal: Kix”. D.5.39 Postal: Korean Enabled Set this parameter to on to enable “Postal: Korean”. Psion Teklogix Omnii XT10 Hand-Held Computer User Manual D-39... -
Page 346: Postal: Royal
D.5.40 Postal: Royal Enabled Set this parameter to on to enable “Postal: Royal”. ® D.5.41 VeriCode Enabled VeriCode is a 2D omni-directional symbol. To read this symbol, set this parameter to on. D-40 Psion Teklogix Omnii XT10 Hand-Held Computer User Manual... -
Page 347: Index
Bad Scan Beep 153 Prefix C-14 Bad Scan Vibrates 154 Strip Leading C-14 bar code Suffix Char C-14 appending to 152 Administrator Password (PsionVU decodes required C-55 settings) 113 decoding edge-to-edge C-56 Psion Teklogix Omnii XT10 Hand-Held Computer User Manual... - Page 348 ST3006 6-slot battery charger 185–188 (scanner double-click) Click Time Suspend Threshold dialog box 110 CLSI Editing C-20 swap time 35 CLSI Library System C-33 taskbar icon 48 Codabar C-19, C-33, C-48, C-61, B-31 Psion Teklogix Omnii XT10 Hand-Held Computer User Manual...
- Page 349 Data Bits 158 Dot Time C-7, C-43, C-55 Data Matrix, 2D B-37 double-click decoded (internal) scanner parameters C-7 appending characters to a decoded decoded Intermec (ISCP) parameters C-25 bar code 152 decoded scanners C-54 Psion Teklogix Omnii XT10 Hand-Held Computer User Manual...
- Page 350 Function Keys Include Check (I 2 of 5) C-49 36-key keyboard 41 Include Check (Interleaved 2 of 5 59-key keyboard 41 symbology) C-63 Include Chk C-46, C-56, C-60, C-62 Include Country C-58 Psion Teklogix Omnii XT10 Hand-Held Computer User Manual...
- Page 351 Microsoft SIP 92 installing 15 keyboard backlight 43 removing 15 keyboard keys 36 Lock Sequence 103 ALT 38 Low light arrow keys 38 Predefined preset D-7 BACKSPACE 38 Low light near CTRL 38 Psion Teklogix Omnii XT10 Hand-Held Computer User Manual...
- Page 352 Min Scan Duration C-44 creating 145 Mobile Device Center (Windows), setting deleting 147 up 31 dismounting 146 Mod 10 Check C-56, C-65 formatting 147 Mod 10 Check (Discrete 2 of 5 management 146 symbology) C-64 Psion Teklogix Omnii XT10 Hand-Held Computer User Manual...
- Page 353 Power Properties 108 Raster Expand Rate C-10 Power Source 110 Raster Height C-10 Predefined preset D-5 Reading Range C-27, C-29, C-32, C-36 All D-6 recalibrating touchscreen 44, 121 Glossy surface D-7 Rectangular C-51 Psion Teklogix Omnii XT10 Hand-Held Computer User Manual...
- Page 354 Center Barcode Only (Imager) C-42 integrated 200 Check Digit C-62 Inverse Video Mode C-50, C-51 check digit C-58 ISBN Conversion C-30 Check Digits (MSI Plessey) C-21 Laser On Time C-8, C-25 Linear Decode C-18 VIII Psion Teklogix Omnii XT10 Hand-Held Computer User Manual...
- Page 355 Windows Embedded CE, navigating 55 TekImager Enabled C-42 SE 1223LR specifications 202 Transmit Check Digit C-13, C-22, C-30 SE 1224HP specifications 203 Transmit Check Digit (MSI Plessey) C-21 SE 1524 ER specifications 205 Psion Teklogix Omnii XT10 Hand-Held Computer User Manual...
- Page 356 66 using 61 desktop 64 task manager 67 programs 64 TCP/IP, configuring 26–28 Run 68 TekImager Enabled C-42 Settings 68 Teklogix Imagers applet D-1 Shutdown 69 Teklogix Imagers settings 148 Psion Teklogix Omnii XT10 Hand-Held Computer User Manual...
- Page 357 UPC-A Check Digit C-16 UPC-A Preamble C-16 UPC E C-17, C-31, C-48, C-60, B-30 UPC-E1 Check Digit C-17 UPC-E1 Preamble C-17 UPC-EAN C-18 UPC-EAN Shared Settings C-31, B-30 UPC-E Check Digit C-17 Psion Teklogix Omnii XT10 Hand-Held Computer User Manual...
Need help?
Do you have a question about the Omnii XT10 and is the answer not in the manual?
Questions and answers