
Related Manuals for Psion Teklogix WORKABOUT PRO 7527 C G2


Summary of Contents for Psion Teklogix WORKABOUT PRO 7527 C G2
- Page 1 WORKABOUT PRO (Model Numbers 7527 C G2 & 7527 S G2) Hand-Held Computer With Windows CE 5.0 User Manual June 15, 2007 Part No. 8100140.A ISO 9001 Certified Quality Management System...
- Page 2 © Copyright 2007 by Psion Teklogix Inc., Mississauga, Ontario This document and the information it contains is the property of Psion Teklogix Inc., is issued in strict confidence, and is not to be reproduced or copied, in whole or in part, except for the sole purpose of promoting the sale of Psion Teklogix manufac- tured goods and services.
-
Page 3: Table Of Contents
ABLE OF ONTENTS Chapter 1: Introduction About This Manual ......3 Text Conventions ......4 WORKABOUT PRO Features . - Page 4 Contents Resetting The Hand-Held ......26 2.8.1 Performing A Warm Reset ....26 2.8.2 Performing A Cold Reset.
- Page 5 Contents Monitoring The Battery And Maximizing Run Time... 47 3.7.1 Storing Batteries ......47 Bluetooth Radio .
- Page 6 Contents Basic Setup....... . 84 5.5.1 Display Properties ......84 5.5.1.1 Display Backlight .
- Page 7 Contents 5.7.2 Restoring A Profile ..... . . 128 The Storage Manager ......128 5.8.1 Formatting A Memory Card .
- Page 8 Contents 5.10.3.9 UPC E Settings ..... 159 5.10.3.10 UPC/EAN Shared Settings ....160 5.10.3.11 Code 93.
- Page 9 Contents 5.10.4.8 UPC E Settings ....181 5.10.4.9 UPC/EAN Shared Settings ....181 5.10.4.10 Code 93 .
- Page 10 Contents 5.10.6.1 Double Click Parameters ....200 5.10.6.2 Display Parameters ....201 5.10.7 Translations Tab .
- Page 11 Contents 6.9.2 Battery Charge Duration..... 223 6.9.3 Charge Indicators–The LEDs ....223 6.9.4 Troubleshooting .
- Page 12 Contents B.1.2 Establishing A Connection ....B-2 B.1.3 Advanced Information ..... B-4 B.1.4 Tools Menu .
- Page 14 NTRODUCTION 1.1 About This Manual ....... 3 1.2 Text Conventions ....... . 4 1.3 WORKABOUT PRO Features.
-
Page 16: Chapter 1: Introduction
Chapter 1: Introduction About This Manual 1.1 About This Manual This manual describes how to configure, operate and maintain the Psion Teklogix WORKABOUT PRO hand-held computer. Chapter 1: Introduction provides a basic overview of the WORKABOUT PRO hand-held. Chapter 2: Basic Checkout describes the steps required to get the WORKABOUT PRO ready for operation, including setting up your RA2041 802.11b/g radio. -
Page 17: Text Conventions
Chapter 1: Introduction Text Conventions 1.2 Text Conventions Note: Notes highlight additional helpful information. Important: These statements provide particularly important instructions or additional information that is critical to the operation of the equipment. Warning: These statements provide critical information that may prevent physical injury, equipment damage or data loss. - Page 18 Chapter 1: Introduction WORKABOUT PRO Features Multi-Media Chipset • NVIDIAGoForce 4000 Multi-Media Processor Real-Time Clock • CPU independent RTC capable of maintaining the system date and time for at least 3 months with a fully charged backup battery User Interface •...
-
Page 19: The Workabout Pro C Hand-Held
Chapter 1: Introduction The WORKABOUT PRO C Hand-Held WORKABOUT PRO Hand-Held Computer With Windows CE 5.0 User Manual Note: 802.11b/g, GSM, and Bluetooth are available simultaneously. -
Page 20: The Workabout Pro S Hand-Held
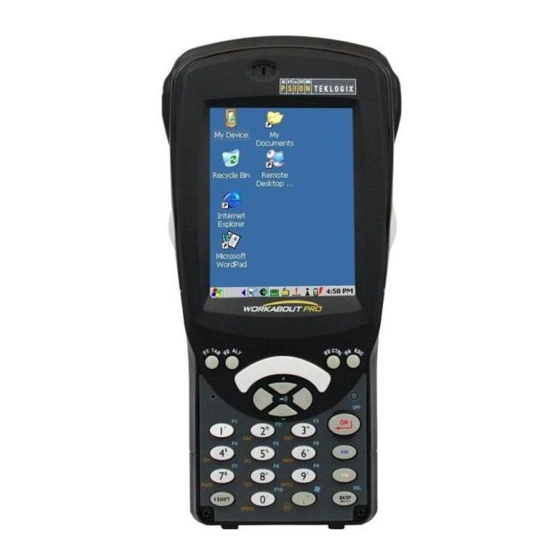
Chapter 1: Introduction The WORKABOUT PRO S Hand-Held 1.3.2 The WORKABOUT PRO S Hand-Held Figure 1.2 WORKABOUT PRO S With 25-Key Keyboard WORKABOUT PRO Hand-Held Computer With Windows CE 5.0 User Manual... - Page 22 ASIC HECKOUT 2.1 Preparing The WORKABOUT PRO For Operation ... . 11 2.1.1 The Main Battery ......11 2.1.1.1 Charging The Main Battery .
-
Page 24: Chapter 2: Basic Checkout
Chapter 2: Basic Checkout Preparing The WORKABOUT PRO For Operation 2.1 Preparing The WORKABOUT PRO For Operation 2.1.1 The Main Battery Warning: Before charging the battery, it is critical that you review the battery safety guidelines in the “WORKABOUT PRO Hand-Held Com- puter Warranty &... -
Page 25: The Backup Battery
– Lithium-Ion backup battery that can be ordered through Psion Teklogix. The backup battery will supply 5 minutes of continuous power while you install a charged, main battery. -
Page 26: Switching The Unit Off (Suspend)
Touchscreen” on page 41 for details. 2.4 Configuring The Summit RA2041 802.11b/g Psion Teklogix supports an 802.11b/g Compact Flash (CF) wireless LAN radio card, model number RA2041. It is a Direct Sequence Spread Spectrum radio. If you’re unit is equipped with an RA2041 CF radio, follow the steps under “Summit Client Utility (SCU) For Model RA2041”... -
Page 27: Summit Client Utility (Scu) For Model Ra2041
Chapter 2: Basic Checkout Summit Client Utility (SCU) For Model RA2041 2.4.1 Summit Client Utility (SCU) For Model RA2041 This section describes the Summit Client Utility (SCU). The SCU provides the utilities you will need to configure the Summit 802.11b/g Compact Flash radio module, model number RA2041 so that it can communicate through a wireless LAN effectively and securely. - Page 28 Chapter 2: Basic Checkout Assigning The IP Address The Summit WLAN Adapter Settings menu is displayed (In this screen shown as the SDCCF10G1 menu). 3. Tap on the IP Information tab. Figure 2.2 IP Information Tab Note: Choosing the Renew button forces the WORKABOUT PRO to renew or find a new IP address.
-
Page 29: Name Servers Tab
Chapter 2: Basic Checkout Name Servers Tab 2.4.3 Name Servers Tab Note: If DHCP is enabled, name server addresses are assigned automatically. • In the SDCCF10G1 window, display the IP Information tab. • In the Summit WLAN Adapter Settings>IP Information tab, tap on the Configure button. -
Page 30: Using The Scu To Connect To The Wlan
Chapter 2: Basic Checkout Using The SCU To Connect To The WLAN 2.4.4 Using The SCU To Connect To The WLAN This section provides a quick set of steps to create a profile (referred to as a “config”). Detailed information about each of the SCU tabs—Main, Config, Status, Diags and Global Settings—is provided in Appendix C: Summit Client Utility (SCU) For Model RA2041. -
Page 31: Ssid
Chapter 2: Basic Checkout SSID • Tap on the New button to define a new config. • Type a name for your configuration using any alpha-numeric combination to uniquely identify this config. • Tap on OK to return to the Config tab. •... -
Page 32: Checking The Scanner
Chapter 2: Basic Checkout Checking The Scanner • Configure any other settings that are supplied by the network administrator for the SSID to which you will associate. • Make certain that you tap on Commit following each change. Once you’ve completed the configuration: •... -
Page 33: Performing A Cold Reset
Chapter 2: Basic Checkout Performing A Cold Reset A warm reset closes open applications; any unsaved data are lost. Installed programs and saved data are preserved. Note: You do not need to reset your WORKABOUT PRO after configuring the radio. 2.8.2 Performing A Cold Reset 2.8.2.1 Cold Resetting To The BooSt Menu... - Page 35 WORKABOUT PRO ETTING 3.1 Features Of The WORKABOUT PRO ....31 3.2 The Battery ........33 3.2.1 Battery Safety .
- Page 36 3.10.1 Inserting The Card ......49 3.11 General Maintenance ......50 3.11.1 Caring For The Touchscreen .
-
Page 37: Chapter 3: Getting To Know Your Workabout Pro
Chapter 3: Getting To Know Your WORKABOUT PRO Features Of The WORKABOUT PRO 3.1 Features Of The WORKABOUT PRO Speaker (Light Emitting Diode) Microphone Port Figure 3.1 Front Of WORKABOUT PRO WORKABOUT PRO Hand-Held Computer With Windows CE 5.0 User Manual... - Page 38 Chapter 3: Getting To Know Your WORKABOUT PRO Features Of The WORKABOUT PRO Battery Cover Scanner Window Warning Label Back Cover Stylus (Pointing Tool) Battery Pack Stylus (pointing tool) Tether Port End-Cap Figure 3.2 Back Of WORKABOUT PRO DC IN Socket Low Insertion Tether Port Force Port (LIF)
-
Page 39: The Battery
Chapter 3: Getting To Know Your WORKABOUT PRO The Battery 3.2 The Battery The hand-held operates with a Lithium-Ion battery pack. Preparing the unit for operation requires that a battery pack be charged and installed in the WORKABOUT PRO. Three levels of battery packs are available for the WORKABOUT PRO: •... -
Page 40: Charging The Battery
Chapter 3: Getting To Know Your WORKABOUT PRO Charging The Battery The Suspend Threshold adjustment in the Power Properties tab allows you to determine the battery capacity at which the hand-held will be shut down. If left at the default value, Maximum Operating Time, the unit will run until the battery is completely empty;... -
Page 41: Switching The Hand-Held On And Off
Chapter 3: Getting To Know Your WORKABOUT PRO Switching The Hand-Held On And Off • Quad Docking Station — (Model # WA4204-G2 for WORKABOUT PRO C & Model # WA4304-G2 for WORKABOUT PRO S) can charge the battery of up to four WORKABOUT PROs inserted in the docking station. •... -
Page 42: The Keyboard
Chapter 3: Getting To Know Your WORKABOUT PRO The Keyboard Switching Off The WORKABOUT PRO (Suspend) Important: Keep in mind that turning off the WORKABOUT PRO does not result in a complete reboot; rather, the unit enters a power-saving, “suspend” state. When the unit is turned on from suspend state, operation resumes within a few seconds. -
Page 43: Activating Modifier Keys
Chapter 3: Getting To Know Your WORKABOUT PRO Activating Modifier Keys 3.4.1.1 Activating Modifier Keys When a modifier key is pressed once, it is displayed in lowercase letters in the taskbar at the bottom of the hand-held screen. For example, if the [CTRL] key is pressed, is displayed at the bottom of the unit screen. -
Page 44: Function Keys And Macro Keys
Chapter 3: Getting To Know Your WORKABOUT PRO Function Keys And Macro Keys The [BKSP/DEL] Key The [BKSP] key (sometimes referred to as destructive backspace) moves the cursor one character to the left, erasing the incorrectly entered key stroke. The [DEL] key ([FN/BLUE] [BKSP]) erases the character at the cursor position. The [CTRL] And [ALT] Key The [CTRL] and [ALT] keys modify the function of the next key pressed and are application dependent. -
Page 45: Macro Keys (Workabout Pro C Only)
Chapter 3: Getting To Know Your WORKABOUT PRO Macro Keys (WORKABOUT PRO C Only) • Press the [FN/BLUE] key followed by the [7] key – the numeric key to which function key [F7] is mapped. • To access function key [F8], press [FN/BLUE] [8], and so on. 3.4.3.2 Macro Keys (WORKABOUT PRO C Only) Important:... - Page 46 Chapter 3: Getting To Know Your WORKABOUT PRO 25-Key Keyboard – Accessing Alphanumeric Keys To choose the letter a: • Press the [FN/ORANGE] key, and press the numeric key [2]. Note: To choose the second, third or fourth alpha character assigned to a numeric key, you may want to lock the [FN/ORANGE] key ‘on’.
-
Page 47: The Keypad Backlight
Chapter 3: Getting To Know Your WORKABOUT PRO The Keypad Backlight Each time you press a numeric key from [2] through [9], an alpha character will be displayed on the screen. Remember that you can refer to the softkey bar for a visual indication of which alpha key will be displayed on the screen. - Page 48 Chapter 3: Getting To Know Your WORKABOUT PRO Calibrating The Touchscreen • In the Control Panel, choose the Stylus icon to display the Stylus Proper- ties window. Figure 3.4 Stylus Icon • Select the Calibration tab, and then choose the Recalibrate button. Figure 3.5 Calibration Screen •...
-
Page 49: Workabout Pro Indicators
Chapter 3: Getting To Know Your WORKABOUT PRO WORKABOUT PRO Indicators 3.6 WORKABOUT PRO Indicators The WORKABOUT PRO uses an LED (Light Emitting Diode), onscreen messages and audio tones to indicate the various conditions of the hand-held, the batteries, the scans and so on. -
Page 50: Onscreen Indicators
Chapter 3: Getting To Know Your WORKABOUT PRO Adjusting WORKABOUT PRO Speaker Volume 3.6.2.1 Adjusting WORKABOUT PRO Speaker Volume • Lock the [FN/BLUE] key ‘on’ and then, press [UP ARROW]—the increase volume key or [DOWN ARROW]—the decrease volume key until the volume meets your requirements. - Page 51 Chapter 3: Getting To Know Your WORKABOUT PRO Onscreen Indicators Modifier Key Indicators [SHIFT], [CTRL], [ALT], [FN/BLUE] and [FN/ORANGE] are modifier keys that when pressed, are displayed in the taskbar to indicate that they are active. If a modifier key is locked ‘on’, it is displayed in uppercase characters. For example, if the [FN/BLUE] key is locked on, it is displayed as in the taskbar.
-
Page 52: Monitoring The Battery And Maximizing Run Time
Chapter 3: Getting To Know Your WORKABOUT PRO Monitoring The Battery And Maximizing Run Time 3.7 Monitoring The Battery And Maximizing Run Time Note: When the main battery is at 50% capacity, a ‘low battery’ warning is dis- played. When the battery is at approximately 10% capacity, a ‘very low main battery’... -
Page 53: Bluetooth Radio
Chapter 3: Getting To Know Your WORKABOUT PRO Uploading Data In A Docking Station empty battery is stored for a long period of time such that the cell voltage drops below a lower limit. • To minimize storage degradation, recharge stored batteries to 40 to 60% every 4 or 6 months to prevent over-discharge damage. -
Page 54: Pairing A Bluetooth Headset Or Other Bluetooth Device
Chapter 3: Getting To Know Your WORKABOUT PRO Pairing A Bluetooth Headset Or Other Bluetooth Device 3.9.1 Pairing A Bluetooth Headset Or Other Bluetooth Device Note: If the Bluetooth radio is not already enabled, tap on the Power icon in the Control Panel, tap on the Devices tab and enable the Bluetooth radio. -
Page 55: General Maintenance
Chapter 3: Getting To Know Your WORKABOUT PRO General Maintenance • Orient the SD/MMC or SIM card according to the legend stamped into the battery well plastic. • For SD/MMC cards, slide the card into the lower slot, pushing it inward until it latches into place. - Page 56 Chapter 3: Getting To Know Your WORKABOUT PRO Cleaning The WORKABOUT PRO • Avoid abrasive cleaners, solvents or strong chemicals for cleaning. The plastic case is susceptible to harsh chemicals. The plastic is partially soluble in oils, mineral spirits and gasoline. The plastic slowly decomposes in strong alkaline solutions.
-
Page 58: Chapter 4: Working With Windows Ce
CE 5.0 ORKING INDOWS 4.1 Navigating In Windows CE 5.0 ......55 4.1.1 Navigating Using A Touchscreen And Stylus ... . 55 4.1.2 Navigating Using The Keyboard . -
Page 60: Navigating In Windows Ce 5.0
Chapter 4: Working With Windows CE 5.0 Navigating In Windows CE 5.0 4.1 Navigating In Windows CE 5.0 Note: In order to access many of the menus discussed in this chapter, the secu- rity level must be set to ‘Supervisor’ (see “Security Settings” on page 63). Graphic user interfaces like Windows CE 5.0 for portable devices and desktop Windows (2000, XP, etc.) utilize ‘point and click’... -
Page 61: Working With Files, Folders And Programs
Chapter 4: Working With Windows CE 5.0 Working With Files, Folders And Programs Operation Key or Key Combination Switch between active applications [ALT] [TAB] Open task manager [ALT] [ESC] Move the cursor Arrow keys Open file, folder or icon [ENTER] Exit &... -
Page 62: The Startup Desktop
Chapter 4: Working With Windows CE 5.0 The Startup Desktop • Double-tap on the appropriate icon—either a folder icon, a program icon or a file icon—to open or launch your selection. If you’re using the keyboard: • Use the arrow keys to highlight the icon you want to open or launch. •... -
Page 63: The Desktop Icons
Chapter 4: Working With Windows CE 5.0 The Desktop Icons select Desktop. Now the desktop will be “in focus” and the arrow keys will highlight the icons. 4.3.1 The Desktop Icons The icons displayed in the startup desktop operate in much the same way as those displayed on any standard PC desktop that is running Windows. -
Page 64: The Taskbar
Chapter 4: Working With Windows CE 5.0 The Taskbar 4.3.2 The Taskbar Figure 4.3 The Taskbar The WORKABOUT PRO is equipped with a taskbar at the bottom of the screen. It displays icons through which you can view the battery capacity and radio signal quality of your unit. -
Page 65: Customizing The Taskbar
Chapter 4: Working With Windows CE 5.0 The Taskbar On the keyboard: • Press [FN/BLUE] [.] (period) to display the Start Menu. • Choose Shortcuts from the Start Menu, and then press the [RIGHT] arrow key to display the sub-menu. •... - Page 66 Chapter 4: Working With Windows CE 5.0 The Taskbar Taskbar Advanced Tab • Tap on the Clear button to empty the Documents folder. • To display Control Panel applets in menu form rather than in a window, tap in the checkbox next to Expand Control Panel. Taskbar Security Tab If you check Disable hot keys, the Application from Start menu field becomes enabled.
-
Page 67: The Start Menu
Chapter 4: Working With Windows CE 5.0 The Start Menu 4.4 The Start Menu Note: Some of the Start Menu items may be disabled based on the current WORKABOUT PRO security settings. The Start Menu lists the operations you can access and work with. It is available from the startup desktop or from within any application. -
Page 68: The Desktop
Chapter 4: Working With Windows CE 5.0 The Desktop 4.4.1 The Desktop Choosing Desktop in the Start Menu displays the WORKABOUT PRO desktop. Figure 4.5 WORKABOUT PRO Desktop 4.4.2 Security Settings Choosing the Security option from the Start Menu displays a dialog box in which you can define the access level for the WORKABOUT PRO: Supervisor or User. - Page 69 Chapter 4: Working With Windows CE 5.0 Security Settings • In the Security Level dialog box, tap on the radio button next to Supervisor. • In the Password field, type the Supervisor level password. The default pass- word is 123456. •...
-
Page 70: Programs
Chapter 4: Working With Windows CE 5.0 Programs Note: It is recommended that you enable ‘Allow Teklogix Security Level’ so that authorized Psion Teklogix service personnel can access your unit should it require maintenance. 4.4.3 Programs • Choose Programs to display a sub-menu of options. - Page 71 Chapter 4: Working With Windows CE 5.0 Programs Summit This folder provides access to the Summit Client Utility (SCU), a utility that allows you to configure your Summit 802.11b/g radio, model number RA2041. Command Prompt Command Prompt is used to access the DOS command prompt. At the prompt, you can type DOS commands such as dir to display all the directories in the drive.
-
Page 72: Shortcuts
Chapter 4: Working With Windows CE 5.0 Shortcuts 4.4.4 Shortcuts Figure 4.9 Shortcuts Sub-Menu System Tray If your touchscreen is not enabled, you can use the System Tray option to access the icons in the taskbar at the bottom of the screen. The taskbar displays indicators such as a radio signal icon and the security level. - Page 73 Chapter 4: Working With Windows CE 5.0 Shortcuts Cycle Tasks When Cycle Tasks is selected (and the Task Manager is not open), you can cycle through active applications. To cycle through your active applications: • Choose Shortcuts>Cycle Tasks, or Press [ALT] [TAB]. Task Manager The Task Manager allows you to switch to another task or to end an active task.
-
Page 74: Settings
Chapter 4: Working With Windows CE 5.0 Settings 4.4.5 Settings The Settings sub-menu includes the following settings: Control Panel, Network and Dial-up Connections and Taskbar and Start Menu. Figure 4.11 Settings Sub-Menu Control Panel The Control Panel contains applets used to configure hardware, the operating system and the shell. -
Page 75: Run
Chapter 4: Working With Windows CE 5.0 4.4.6 Run Choosing the Run option from the Start Menu displays a dialog box in which you can enter the name of the program, folder or document you want to open or launch. Figure 4.12 Run Dialog Box 4.4.7 Shutdown The Shutdown menu includes these options: Suspend, Warm Reset and Cold Reset. -
Page 76: Using A Dialog Box
Chapter 4: Working With Windows CE 5.0 Using A Dialog Box Warm Reset The Warm Reset option resets the WORKABOUT PRO, leaving all saved files and (registry) settings intact. Any unsaved data is lost. Cold Reset The Cold Reset option resets the WORKABOUT PRO (see page 26). Any files not stored in permanent memory are lost;... - Page 77 Chapter 4: Working With Windows CE 5.0 Using A Dialog Box Textbox: A textbox requires that you type information. Press the [TAB] key to highlight the textbox and then type the appropriate information. Drop-down: This type of menu is identified by up and down arrows next to the drop-down menu to indicate that additional options are available.
-
Page 78: Remote Connect
ONFIGURATION 5.1 Remote Connect....... 79 5.2 The TekTerm Application ......79 5.3 The Control Panel . -
Page 79: Advanced
Chapter 5: Configuration 5.6 Bluetooth Setup ......109 5.6.1 The Devices Tab......110 5.6.1.1 Pairing A Device . -
Page 80: Scanner
Chapter 5: Configuration 5.10.2.18 Composite ......152 5.10.2.19 PDF-417......153 5.10.2.20 Micro PDF-417 .
Need help?
Do you have a question about the WORKABOUT PRO 7527 C G2 and is the answer not in the manual?
Questions and answers