
Related Manuals for Psion Teklogix 7530


Summary of Contents for Psion Teklogix 7530
- Page 1 7530 Hand-Held Computer User Manual December 10, 2003 Part No. 8000007.B ISO 9001 Certified Quality Management System...
- Page 3 © Copyright 2003 by Psion Teklogix Inc., Mississauga, Ontario This document and the information it contains is the property of Psion Teklogix Inc., is issued in strict confidence, and is not to be reproduced or copied, in whole or in part, except for the sole purpose of promoting the sale of Teklogix manufactured goods and services.
- Page 4 Return-To-Factory Warranty Psion Teklogix warrants a return-to-factory warranty for a period of one year from shipment. The warranty on Psion Teklogix manufactured equipment does not extend to any product that has been tampered with, altered, or repaired by any person other than an employee of an authorized Psion Teklogix service organization.
-
Page 5: Program License Agreements
ANT. PSION TEKLOGIX INC. HAS INDEPENDENTLY DETER- MINED HOW TO USE THE SOFTWARE IN THE DEVICE, AND MS HAS RELIED UPON PSION TEKLOGIX INC. TO CONDUCT SUFFI- CIENT TESTING TO DETERMINE THAT THE SOFTWARE IS SUIT- ABLE FOR SUCH USE. - Page 6 SOFTWARE, including the U.S. Export Administration Regulations, as well as end-user, end-use and destination restrictions issued by U.S. and other governments. For addi- tional information see http://www.microsoft.com/exporting/. Psion Teklogix 7530 Hand-Held Computer User Manual...
- Page 7 Software is distrib- uted within an exact copy of the original MDC self-extracting installation file. In other words, nothing may be left out of the Shareware as distributed on MDC's web site at http://www.mtghouse.com. Psion Teklogix 7530 Hand-Held Computer User Manual...
- Page 8 Software. You acknowledge such ownership and intellectual property rights and will not take any action to jeopardize, limit or inter- fere in any manner with MDC's or its suppliers' ownership of or rights with respect Psion Teklogix 7530 Hand-Held Computer User Manual...
- Page 9 Your exclusive remedy under this para- graph shall be, at MDC's option, a refund of the purchase price of the product con- taining the Software or replacement of the Software which is returned to MDC or a Psion Teklogix 7530 Hand-Held Computer User Manual...
- Page 10 SOFTWARE PROVE DEFECTIVE, YOU (AND NOT LICENSOR OR AN LICENSOR AUTHORIZED REPRESENTATIVE) ASSUME THE ENTIRE COST OF ALL NECESSARY SERVICING, REPAIR OR CORRECTION. SOME JURISDICTIONS DO NOT ALLOW THE EXCLUSION OF IMPLIED WAR- Psion Teklogix 7530 Hand-Held Computer User Manual...
- Page 11 Your use of any software produced by MDC is based only on your acknowledge- ment that you have read this License, understand it, and agree to be bound by its terms and conditions. Psion Teklogix 7530 Hand-Held Computer User Manual...
- Page 12 ARE IN ADDITION TO, THE MANDATORY STATUTORY RIGHTS APPLICA- BLE TO THE LICENSE OF THE SOFTWARE TO YOU. Meetinghouse Data Communications, Inc. 150 Greenleaf Avenue, Unit F Portsmouth, NH 03801 Revised 8/12/2002 VIII Psion Teklogix 7530 Hand-Held Computer User Manual...
-
Page 13: Table Of Contents
Chapter 2: Basic Checkout Preparing The 7530 For Operation ....13 2.1.1 Equipment You Need To Get Started ....13 2.1.2 Charging The Battery . - Page 14 Chapter 3: Getting To Know Your 7530 Features Of The 7530 ......31 The Battery....... . 32 3.2.1 Battery Safety .
- Page 15 Remote Desktop Connection ..... . .83 Pocket PC Compatibility ......83 Psion Teklogix 7530 Hand-Held Computer User Manual...
- Page 16 Code 93 ......128 5.7.2.10 Code 11 ......128 Psion Teklogix 7530 Hand-Held Computer User Manual...
- Page 17 Softkey Function Keys....148 6.2.2 Macro Keys......149 Psion Teklogix 7530 Hand-Held Computer User Manual...
- Page 18 6.6.2 Sending Data To The Host ....163 6.6.3 Psion Teklogix Keyboard And VT220 Equivalent Keys ..163 6.6.4 Block Mode (Local Editing) ....164 6.6.5 Working With Sessions .
- Page 19 6.17.1.2 Moving Between Split Screens ... . 190 6.17.1.3 Toggling Between Full & Split Screens ..190 Psion Teklogix 7530 Hand-Held Computer User Manual...
- Page 20 7.1.2 Entering Data With The Bar Code Reader ... .251 The 7530 Battery......251...
- Page 21 7.6.2 Operator Controls ......259 7.6.3 Using the Combo Charger With The 7530... . 259 7.6.4 Charging The Spare Battery .
- Page 22 Contents 7.11 The 7530 Picker Cradle ......268 7.11.1 Picker Cradle Mounting Recommendations ...269 7.11.1.1 Mounting Template.
- Page 23 C.1.2 Pre-Installation: Updating usbstor.inf And wceusbsh.inf ..C-2 C.1.3 Installation: Installing The 7530 As a Device On Your PC . . . C-4 C.1.4 Post Installation ......C-5...
-
Page 25: Declaration Of Conformity
PPROVALS AFETY UMMARY Declaration Of Conformity Product: 7530 Hand Held Micro-computer with Portable Docking Module Application of Council R&TTE Directive: 1999/5/EEC Directive(s): EMC Directive: 89/336/EEC Low Voltage Directive: 73/23/EEC Conformity Declared Article 3.1a (Health): EN 60950: 2000 to Standards: Article 3.1b (EMC): EN 301 489-17: v1.1.1; 09-2000 Article 3.2 (RF Spectrum): EN 300 328-2: v 1.1.1;... -
Page 26: Approvals And Safety Summary
2003 Year of Manufacture: Standard(s) to which Conformity is Declared: The 7530 Hand Held Micro-computer with Portable Docking Module, supplied by Psion Teklogix, has been tested and found to comply with FCC PART 15, SUBPART B - UNINTENTIONAL RADIATORS, CLASS B COMPUTING DEVICES FOR HOME &... - Page 27 2. This device must accept any interference received, including interfer- ence that may cause undesired operation. Changes or modifications not expressly approved by Psion Teklogix, the party responsible for compliance, may void the user's authority to operate the equipment. 1. FCC Information to Users...
- Page 28 The SE1200 ALR has an maximum radiated power less than 1.4 mW; according to EN 60825-1: 2001 it is classified as a Class 3B laser product. PERATE XPLOSIVE TMOSPHERE Operating Psion Teklogix equipment where explosive gas is present may result in an explosion. EMOVE OVERS NCLOSURES To avoid injury, the equipment covers and enclosures should only be removed by qualified service personnel.
- Page 29 252. Carefully review all battery safety issues. ORSICHT Explosiongefahr bei unsachgemäßem Austausch der Batterie Ersatz nur durch denselben oder einen vom Hersteller empfohlenen gleichwertigen Typ. Entsorgung gebrauchter Batterien nach Angaben des Herstellers. xvii Psion Teklogix 7530 Hand-Held Computer User Manual...
- Page 31 1.2 Text Conventions ....... 4 1.3 About The 7530 Hand-Held Computer ....5 1.3.1 Features .
-
Page 33: Chapter 1: Introduction
Chapter 5: Configuration provides a description of the Windows CE Control Panel and how to use it to configure the 7530, along with the scanners attached to the hand-held, and so on. Chapter 6: Tekterm Application describes TESS and ANSI operations. This chapter also provides descriptions of the Tekterm parameters. -
Page 34: Text Conventions
These statements provide particularly important instructions or additional information that is critical to the operation of the equipment. Warning: These statements provide critical information that may prevent physical injury, equipment damage or data loss. Psion Teklogix 7530 Hand-Held Computer User Manual... -
Page 35: About The 7530 Hand-Held Computer
36-key large button with 10 function keys. keypads feature EL backlight for visibility in low-light conditions. • Wireless communication: Compact FLASH slot normally equipped with an IEEE 802.11b 11 Mbps 2.4GHz Wi-Fi radio. Psion Teklogix 7530 Hand-Held Computer User Manual... - Page 36 SD I/O slot that supports extra FLASH memory (up to 512 MB) • Programming environment: HTML .net Compact framework Java, Visual C++ • Bar code applications: internal 1D and 2D scan engines. internal CMOS image capture scan engine. supports decoded and undecoded tethered scanners. Psion Teklogix 7530 Hand-Held Computer User Manual...
-
Page 37: The 7530 Hand-Held Computer
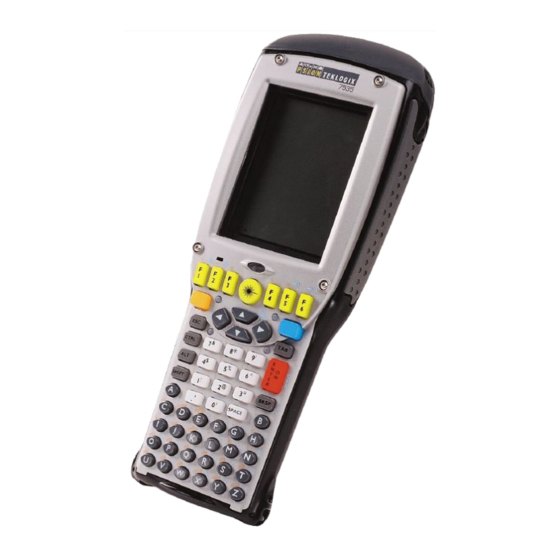
Chapter 1: Introduction The 7530 Hand-Held Computer 1.3.2 The 7530 Hand-Held Computer Figure 1.1 7530 With 58-Key Keyboard Psion Teklogix 7530 Hand-Held Computer User Manual... - Page 38 Chapter 1: Introduction The 7530 Hand-Held Computer Figure 1.2 7530 Docking Port Figure 1.3 Tether Port Figure 1.4 Scanner Window Psion Teklogix 7530 Hand-Held Computer User Manual...
-
Page 39: Regulatory Labels
Chapter 1: Introduction Regulatory Labels 1.3.3 Regulatory Labels Figure 1.5 Laser Warning Labels... - Page 40 Chapter 1: Introduction Regulatory Labels Figure 1.7 Manufacturer’s Label Warning: Using controls or adjustments or performing procedures other than those specified herein may result in hazardous radiation exposure. Psion Teklogix 7530 Hand-Held Computer User Manual...
- Page 41 2.5 Calibrating The Touchscreen ......28 2.6 Resetting The 7530 Hand-Held ..... . . 28...
-
Page 43: Chapter 2: Basic Checkout
Typically, 7530 hand-helds are configured at the factory and arrive ready for use. Although the 7530 is equipped with an internal Compact Flash and SD I/O slot, these slots are not intended for user modification. If a device needs to be changed or added in these slots, contact qualified Psion Teklogix personnel. -
Page 44: Attaching The Hand Strap
Two Phillips head screws are provided with the hand strap. • Attach the strap to the two threaded inserts located at the back of the 7535 near the top of the unit. Figure 2.1 Attaching The Hand Strap Psion Teklogix 7530 Hand-Held Computer User Manual... -
Page 45: Attaching The Pistol Grip
Attaching The Pistol Grip Note: A Phillips head screwdriver is required. The pistol grip is attached to the back of the 7530 using the four threaded inserts in the upper part of the 7530 casing. Four black #4-40 Phillips head screws are provided with this accessory. -
Page 46: Powering Up The 7530 And Configuring The Radio
• Position the pistol grip so that it fits snugly over the back of the unit and the inserts on the back of the 7530 align with the holes in the pistol grip. Figure 2.3 Attaching The Pistol Grip •... -
Page 47: Installing The Battery And Switching The 7530 On
Press and hold down the <ENTER/ON> key for at least one second. • When all four LEDs flash orange, release the <ENTER/ON> button. A splash screen displaying the Psion Teklogix logo and the Microsoft® Windows® CE. net logo appears. When Windows® CE has successfully loaded, the startup desktop is displayed. -
Page 48: Configuring An Ieee 802.11 Radio Installed In The 7530
Chapter 2: Basic Checkout Configuring An IEEE 802.11 Radio Installed In The 7530 2.2.2 Configuring An IEEE 802.11 Radio Installed In The 7530 The most common 802.11b settings are configured as defaults. However, there are some fields that must be completed, including the SSID of your access point and the security methods implemented in the network (including access keys). - Page 49 Chapter 2: Basic Checkout Configuring An IEEE 802.11 Radio Installed In The 7530 802.11b Wireless LAN Settings 2. Choose the radio icon to open the window – in $NETWLAN1 the sample screen this is labelled Figure 2.6 802.11b Wireless LAN Settings Window...
- Page 50 Connect button – To force connection to a specific, existing network, highlight Connect the network to which you want your 7530 to connect, and choose the button. Figure 2.8 Wireless Information Tab This tab lists available networks – any access points that are broadcasting an SSID, and it lists preferred networks –...
- Page 51 field can contain a maximum of 32 characters. The name assigned here is listed as a preferred network. Important: Keep in mind that the 7530 will only communicate with access points that are configured with the same SSID. Ad Hoc And Infrastructure If you are using an “Infrastructure”...
- Page 52 Chapter 2: Basic Checkout Configuring An IEEE 802.11 Radio Installed In The 7530 Authentication Open 802.11 supports two subtypes of network authentication services: Shared Open . Under authentication, any wireless station can request authentication. The station that needs to authenticate with another wireless station sends an authentication management frame that contains the identity of the sending station.
- Page 53 The radio will search for the SSID and will compare the WEP and authentication information you specified. If there is a match between your 7530 settings and the access point settings, the 7530 will communicate on the network through the access point.
-
Page 54: Assigning An Ip Address
7530 to renew or find a new IP address. This is useful if, for example, you are out of communication range for a longer period of time and your 7530 is dropped from the net- work. To define a static IP address: Configure... -
Page 55: Name Servers Tab
Name Servers tab. Figure 2.13 Name Servers Tab Name Servers The DNS and WINS fields in the tab allow you to specify additional WINS and DNS resolvers. The format for these fields is ###.###.###.###. Psion Teklogix 7530 Hand-Held Computer User Manual... -
Page 56: Advanced Features
Use the <UP> or <DOWN> arrow keys to highlight the network that you want to move up or down in the list. • To move the highlighted item in the list upward or downward, press <TAB> Down to highlight the button, and press <ENTER>. Psion Teklogix 7530 Hand-Held Computer User Manual... -
Page 57: Deleting A Preferred Network
• View 7535 files from Windows Explorer. • Drag and drop files between the 7530 and the PC in the same way that you would between PC drives. • Back up 7530 files to the PC, then restore them from the PC to the hand-held again, if needed, and so on. -
Page 58: Calibrating The Touchscreen
Refer to the following website for details: http://www.microsoft.com/windowsmobile/resources/downloads/pocketpc/activesync35.mspx 2.5 Calibrating The Touchscreen If your 7530 is equipped with a touchscreen, it will need to be calibrated. Refer to “Calibrating The Touchscreen” on page 41 for details. 2.6 Resetting The 7530 Hand-Held... - Page 59 ETTING 3.1 Features Of The 7530 ......31 3.2 The Battery ....... . . 32 3.2.1 Battery Safety .
-
Page 60: Chapter 3: Getting To Know Your 7530
3.12.1 Caring For The Touchscreen ..... 56 3.12.2 Cleaning The 7530......57... -
Page 61: Features Of The 7530
Chapter 3: Getting To Know Your 7530 Features Of The 7530 3.1 Features Of The 7530 7530 Screen Sound Port Ambient Light Sensor Tether Port Docking Port Figure 3.1 Front Of 7530 Scanner Window Stylus (Pointing Tool) Battery Pack Tether Port Figure 3.2 Back Of 7530... -
Page 62: The Battery
Removing The Battery Pack • If your 7530 is equipped with a hand strap, unhook it from the base of the battery. • Press down the release tab at the top of the battery, and slide the battery out. -
Page 63: Charging The Battery
249. For battery safety, refer to “Lith- ium-Ion Battery Safety Precautions” beginning on page 252. All batteries must be charged before use. The 7530 battery can be charged with a variety of chargers. These include: •... -
Page 64: Switching The 7530 Hand-Held On And Off
A splash screen displaying the Psion Teklogix logo and the Microsoft® Windows® CE. net logo appears followed by the startup desktop. Note: If the 7530 is in suspend state, pressing <ENTER/ON> key ‘wakes’ the unit from this state. The screen in which you were working before the computer entered suspend state is displayed. -
Page 65: The Keyboard
<BLUE> key is locked ‘on’. 3.4 The Keyboard The 7530 offers two types of keyboard layouts – a 58-key keyboard and a 36-key, large button keyboard. Most of the keys on these keyboards operate much like a desktop computer. -
Page 66: Activating Modifier Keys
Chapter 3: Getting To Know Your 7530 Activating Modifier Keys The <SHIFT>, <CTRL> and <ALT> keys operate much like a desktop keyboard except that they are not chorded (two keys held down simultaneously). The modifier key must be pressed first followed by the key whose function you want modified. -
Page 67: The 58-Key Keyboard
Chapter 3: Getting To Know Your 7530 The 58-Key Keyboard The <BKSP/DEL> Key The <BKSP> key (sometimes referred to as destructive backspace) moves the cursor one character to the left, erasing the incorrectly entered key stroke. The <DEL> key (<BLUE> <BKSP>) erases the character at the cursor position. -
Page 68: The 36-Key Keyboard
Chapter 3: Getting To Know Your 7530 The 36-Key Keyboard 3.4.4 The 36-Key Keyboard On 36-key 7530s, all alpha characters are printed on the unit plastic in orange typeface above the numeric keys. To access an alpha character, you must first press the <ORANGE>... - Page 69 Chapter 3: Getting To Know Your 7530 The 36-Key Keyboard Choosing More Than One Alpha Character From The Same Key If you need to choose more than one alpha character from a single key, you’ll need to press the ‘Accept’ key between alpha selections. The ‘Accept’ key is presented as an arrow ⇒...
-
Page 70: The Keypad Backlight
Chapter 3: Getting To Know Your 7530 The Keypad Backlight Suppose you want to type the letters ‘a’, ‘d’ and ‘g’. These alpha characters are accessed from the numeric keys <2>, <3> and <4>. • With the <ORANGE> key locked ‘on’ (press twice), press <2> to type the letter ‘a’. -
Page 71: Adjusting The Contrast
Chapter 3: Getting To Know Your 7530 Adjusting The Contrast 3.5.2 Adjusting The Contrast Note: In addition to the manual adjustments described in this section, the dis- play contrast can also be adjusted using the Windows CE Control Panel. Refer to “Display Contrast” on page 88 for details about this dialogue box. -
Page 72: 7535 Indicators
Chapter 3: Getting To Know Your 7530 7535 Indicators • Select the Calibration tab, and then choose the ‘Recalibrate’ button. Figure 3.5 Calibration Screen • Follow the directions on the calibration screen to calibrate the screen. 3.6 7530 Indicators 7535s use LEDs (Light Emitting Diode), onscreen messages and audio tones as indicators. -
Page 73: Charge Led
Chapter 3: Getting To Know Your 7530 Charge LED User Radio Traffic Application Scanner Charge Figure 3.6 Keyboard LEDs 3.6.1.1 Charge LED The lower-right LED is reserved for internal charger/power status. This indicator is active even when the 7535 is inserted in a docking station (and in suspend mode) so that the charge status of the battery can be detected easily. -
Page 74: Radio Traffic Led
3.6.1.4 User Application LED This indicator is available for user-loaded custom Windows CE applications. Refer to the 7535 SDK Manual for details about this LED. Neither Windows CE nor Tekterm use this LED. Psion Teklogix 7535 Hand-Held Computer User Manual... -
Page 75: Onscreen Indicators
For example, if a radio is not installed in your 7535, the radio signal icon is not displayed in the taskbar. Windows® Start Button If you have a touchscreen, you can display the Start Menu by tapping on the Windows® Start button in the taskbar. Psion Teklogix 7530 Hand-Held Computer User Manual... - Page 76 When the battery level is low – approximately 15 minutes from empty – a warning window pops up. When the battery power is completely depleted, a final warning window indicates that the 7530 will be powered down. If the 7535 is using external AC power, an AC icon is displayed in the taskbar.
-
Page 77: Audio Indicators
3.6.3 Audio Indicators The 7530 beeper provides a variety of sounds and can be configured to emit a sound when a key is pressed, a keyboard character is rejected, scan input is accepted or rejected, an operator’s entry does not match in a match field or the battery is low. -
Page 78: Adjusting The Beeper Volume
Chapter 3: Getting To Know Your 7530 Adjusting The Beeper Volume 3.6.3.1 Adjusting The Beeper Volume On 58-key keyboards, the volume function keys are accessed by pressing <BLUE> <F5> and <F6>. On 36-key keyboards, the volume function keys are accessed by pressing <BLUE>... -
Page 79: Scanning Techniques
Chapter 3: Getting To Know Your 7530 Scanning Techniques 3.7.1 Scanning Techniques Note: The scanning techniques described here apply to internal and external scanners. • Hold the scanner at an angle. Do not hold it perpendicular to the bar code. -
Page 80: Troubleshooting
If the scanner is not working, investigate the following: • Is the 7530 on? • Check that the bar code symbology being scanned is enabled for the 7530 you are using. Check any other parameters that affect the scanning proce- dure or the bar code. •... -
Page 81: Operating Internal Pdf Laser Scanners
It can find a bar code regardless of its orientation – that is, even a bar code printed at a 45 degree angle to the 7530 will be decoded successfully. Note: When scanning multiple bar codes, ensure that all of the desired bar codes are within the field of view of the scanner. -
Page 82: Connecting & Disconnecting Tethered Peripherals
An icon in the taskbar at the bottom of the screen provides a visual representation of the peripheral and indicates that it is ready for operation. To attach the peripheral to the round, tether port on the side of the 7530: •... -
Page 83: Monitoring The Battery And Maximizing Run Time
Lithium-Ion batteries age, their capacity decreases gradually, and they are generally considered depleted after approximately 2 years of use (less than 60% of original capacity remaining). Keep in mind however that heavy usage or operating the 7530 at temperature extremes will shorten the battery life. - Page 84 Chapter 3: Getting To Know Your 7530 Monitoring The Battery And Maximizing Run Time To maximize the run time of your batteries, consider the following: • The display backlight is the largest drain on the battery. Try to keep its brightness as low as possible.
-
Page 85: Storing Batteries
Chapter 3: Getting To Know Your 7530 Storing Batteries 3.9.1 Storing Batteries Long term battery storage is not recommended. If storage is necessary: • Always try to use a ‘first-in first-out’ approach to minimize storage time. • Lithium-Ion batteries age much faster at elevated temperatures. Store bat- teries at temperatures between 0˚... -
Page 86: Uploading Data In A Docking Station
Ethernet network. They are typically used to upload transaction data to a server computer when a radio link in not available. When a 7530 is properly inserted in a docking station, a dock icon is displayed in the taskbar at the bottom of the 7530 screen. -
Page 87: Cleaning The 7535
• Avoid abrasive cleaners, solvents or strong chemicals for cleaning. The 7530 has a plastic case that is susceptible to harsh chemicals. The plastic is partially soluble in oils, mineral spirits and gasoline. The plastic slowly decomposes in strong alkaline solutions. - Page 89 4.5 Using A Dialogue Box ......76 Psion Teklogix 7530 Hand-Held Computer User Manual...
-
Page 91: Chapter 4: Working With Windows Ce
A touchscreen is an optional feature. A 7530 equipped with a touchscreen has a stylus – a pointing tool that looks like a pen – stored in a slot at the top of the 7530. The stylus is used to select objects on the touchscreen. -
Page 92: Navigating Using The Keyboard
Navigating Using The Keyboard 4.1.2 Navigating Using The Keyboard If your 7530 has a standard screen (rather than a touchscreen), choosing icons and navigating dialogue boxes, displaying the desktop, and so on requires keyboard input. If your unit has already been fully configured and your application is launched at startup, you’ll have little need for keyboard navigation. -
Page 93: Working With Files, Folders And Programs
• Press <ENTER>. If you have a touchscreen: • Double-tap on the appropriate icon – either a folder icon, a program icon or a file icon – to open or launch your selection. Psion Teklogix 7530 Hand-Held Computer User Manual... -
Page 94: The Startup Desktop
Chapter 4: Working With Windows CE The Startup Desktop 4.3 The Startup Desktop When the 7530 boots up, the startup desktop (shell) is displayed. Any applications stored in the Startup folder start up immediately. Note: The startup folder is located in \Windows\StartUp and \Flash Disk\StartUp. -
Page 95: The Desktop Icons
PC desktop that is running Windows®. My Computer Choosing this icon displays the contents of your 7530 computer. If you’re not sure how to work with the files, folders and programs displayed, refer to “Working With Files, Folders And Programs”... -
Page 96: The Taskbar
4.3.2 The Taskbar Figure 4.3 The Taskbar The 7530 is equipped with a taskbar at the bottom of the screen. It displays icons through which you can view the battery capacity and radio signal quality of your unit. If the hand-held is attached to a charger, cradle, docking station or PDM, an associated icon is displayed. -
Page 97: Customizing The Taskbar
<SPACE> key to select them. A check mark indicates active items. If you have a touchscreen: • Tap the stylus on the items you want to activate or deactivate. The check mark indicates active items. Psion Teklogix 7530 Hand-Held Computer User Manual... -
Page 98: The Start Menu
Chapter 4: Working With Windows CE The Start Menu 4.4 The Start Menu Note: Some of the Start Menu items may be disabled based on the 7530’s current security settings. Start Menu lists the operations you can access and work with. It is available from the startup desktop or from within any application. -
Page 99: Security Settings
Security Teklogix Supervisor User which you can define the access level for the 7530 – Figure 4.6 Security Levels Security Level Start Menu These security levels define the options accessible to the operator in the and the taskbar. -
Page 100: The System Tray
Use the arrow keys to highlight an icon – for example – the security icon. • Press <ENTER> to display the security level dialogue box. If you have a touchscreen: • Tap on the icon with which you want to work. The associated dialogue box is displayed. Psion Teklogix 7530 Hand-Held Computer User Manual... -
Page 101: The Task Manager
Press <BLUE><0>, and type <C>, or • Press <ALT> <TAB>. 4.4.6 Power Info Start Menu Power Properties Selecting from the displays the dialogue box. Power Info This dialogue box indicates the remaining charge capacity of the battery. Psion Teklogix 7530 Hand-Held Computer User Manual... -
Page 102: Programs
Windows CE devices on the market. You can access the icon through Start Menu under or by double-tapping on the Settings>Control Panel My Computer Control Panel desktop icon labelled and then, double-tapping on the icon. Psion Teklogix 7530 Hand-Held Computer User Manual... -
Page 103: Settings
Remote Desktop Connection is a 7530 application used to connect to a Windows Terminal Server so that you can run a “session” on the Server machine using the 7530 (Windows CE device). “Remote Desktop Connection” on page 83 provides a website with details about this option. -
Page 104: Run
Network and Dial-up Connections window allows you to configure the 7530 radio or execute an existing configuration. Refer to “Configuring An IEEE 802.11 Radio Installed In The 7530” on page 18 for radio setup details. Taskbar And Start Menu Taskbar and Start Menu option displays a dialogue box in which you can customize the taskbar, choosing which options will be displayed. -
Page 105: Shutdown
. This option behaves like cold-reset, except that the 7530 starts Bootloader rather than Windows CE. Suspend Suspend option suspends the 7530 immediately – this is equivalent to turning the hand-held off. Warm Reset Warm Reset option resets the 7530, leaving all saved files and (registry) settings intact. -
Page 106: Using A Dialogue Box
Dropdown: This type of menu is identified by up and down arrows next to the dropdown menu to indicate that additional options are available. Press the <TAB> key to highlight the menu, and use the arrow keys on your keyboard to cycle through the options. Psion Teklogix 7530 Hand-Held Computer User Manual... - Page 107 Saving Your Choices: Once you’ve made all your changes, press the <ENTER> key to save your changes and exit the window. Note: A dialogue box item that is displayed in grey text indicates that it is not currently available. Psion Teklogix 7530 Hand-Held Computer User Manual...
- Page 109 5.7.2.1 Code 39 Settings ..... . 122 5.7.2.2 Code 128 Settings ..... 124 Psion Teklogix 7530 Hand-Held Computer User Manual...
-
Page 110: Chapter 5: Configuration
5.8.3.3 Changing A Destination ....140 5.8.3.4 Removing A Trap Destination ....140 Psion Teklogix 7530 Hand-Held Computer User Manual... - Page 111 5.8.4.1 Adding A Host ..... . . 141 5.8.4.2 Changing A Host..... . 142 Psion Teklogix 7530 Hand-Held Computer User Manual...
-
Page 113: Remote Desktop Connection
Remote Desktop Connection 5.1 Remote Desktop Connection Remote Desktop Connection is a 7530 application used to connect to a Windows Terminal Server so that you can run a “session” on the Server machine, using the 7535 (Windows CE device). Refer to the following website for step-by-step information about setting up this connection: http://www.microsoft.com/WindowsXP/pro/using/howto/gomobile/remotedesktop/default.asp... -
Page 114: Control Panel Icons
Start Menu Control Panel . Tap on Settings> Control Panel folder contains icons used in the setup of your 7530. Figure 5.1 Control Panel 5.4 Control Panel Icons Control Panel The Windows CE provides a group of icons that allow you to customize and adjust settings on your 7530. - Page 115 ‘Charger’ mine a suspend states, and the tab determines whether or not a battery that requires it, can be recalibrated. (Refer to “Power Saving Schemes” on page 101 for details.) Psion Teklogix 7530 Hand-Held Computer User Manual...
- Page 116 The client checks that the cer- tificate has been digitally signed by a certification authority that the client explicitly trusts. “Certificate Assignment” on page 105 directs you to the appropriate setup information. Psion Teklogix 7530 Hand-Held Computer User Manual...
- Page 117 7530 scanner will successfully read. Network And Dial-up Connections Displays a network window from which the 7530 radio can be configured and an existing configuration can be executed. Refer to “Configuring An IEEE 802.11 Radio Installed In The 7530” on page 18 for details.
-
Page 118: Basic Setup
, choose the icon. Figure 5.2 Choosing The Display Icon 5.5.1.1 Display Contrast Contrast tab allows you to adjust the 7530 display contrast to suit the environment in which you are using the hand-held. Psion Teklogix 7530 Hand-Held Computer User Manual... -
Page 119: Display Backlight
Note: Keep in mind that this option may be restricted to supervisory use only. Psion Teklogix 7530 Hand-Held Computer User Manual... - Page 120 Note: Backlight changes take affect immediately. You do not need to reset the 7530. ON Threshold The 7530 is equipped with an ambient light sensor. This sliding bar allows you to determine how dark the ambient light needs to be before the backlight turns on. Intensity This parameter is used to adjust the light intensity of the 7530 backlight.
-
Page 121: Display Appearance
‘When using external power keep the backlight When you select (√) the checkbox next to always ON. ’, the backlight remains ON at the configured intensity when the 7530 is operating with external power (not battery power). If the 7530 is drawing power Display from its battery, this option is ignored and the other parameters defined in... -
Page 122: Keyboard Properties
Keyboard • In the , choose the icon. Figure 5.6 Choosing The Keyboard Icon 5.5.2.1 Key Repeat • In the Keyboard Properties dialogue box, open the Repeat tab. Figure 5.7 Key Repeat Properties Psion Teklogix 7530 Hand-Held Computer User Manual... -
Page 123: Keyboard Backlight
Intensity This parameter is used to adjust the light intensity of the 7530 keyboard backlight. Sliding the bar to the left darkens the keyboard backlight intensity, and sliding it to the right lightens the intensity. -
Page 124: Keyboard One Shot Modes
– these keys are dis- Blue Key played in lowercase characters in the taskbar, you’ll know that the Orange Key and the are not locked. They will become inactive following a key press. Psion Teklogix 7530 Hand-Held Computer User Manual... -
Page 125: Keyboard Macro Keys
In the Macro: menu, highlight a macro key number – for example, macro 1 to assign a macro to macro key <M1>. Press the <TAB> key twice to highlight Record Macro button, and press <ENTER>. Psion Teklogix 7530 Hand-Held Computer User Manual... - Page 126 Executing A Macro To execute a macro: • Press the macro key to which you’ve assigned the macro. For example, if you created a macro for macro key ‘1’, press <M1> to execute the macro. Psion Teklogix 7535 Hand-Held Computer User Manual...
-
Page 127: Unicode Mapping
All user-defined Unicode mappings are listed in the tab in order of virtual key value, and then by order of the shift state. If a Unicode mapping is not listed, the Unicode mapping is mapped to the default Unicode value. Psion Teklogix 7530 Hand-Held Computer User Manual... - Page 128 Pressed’. Press <SPACE> to select ( √ ) the shift state you want to assign. Removing Unicode Values • In the ‘Unicode Mapping’ tab, highlight the item you want to delete, and Remove press <TAB> to highlight the button. • Press <ENTER> to delete the value. Psion Teklogix 7530 Hand-Held Computer User Manual...
-
Page 129: Volume And Sound Properties
Chapter 5: Configuration Volume And Sound Properties 5.5.3 Volume And Sound Properties Note: Sounds (wave files) cannot be reproduced on 7530 units. The conditions under which 7530s emit sounds are tailored from within the application installed on your unit. Control Panel Volume &... -
Page 130: Power Management Properties
Figure 5.16 Choosing The Power Icon 5.5.4.1 Battery Capacity • In the Power Properties dialogue box, open the Battery tab. Figure 5.17 Power Battery Properties Battery tab details information about the battery installed in your 7530. Psion Teklogix 7530 Hand-Held Computer User Manual... -
Page 131: Power Saving Schemes
Suspend state. In state, the 7530 CPU enters a sleep state, and the radio is shut off. The state of the device (RAM contents) is preserved. Pressing <ENTER> wakes the system from suspend state. When the 7530 is in suspend state, the network connection will not be broken immediately. -
Page 132: Suspend Threshold
10% level, when the battery capacity falls to 10%, the 7530 will enter suspend state. You will not be able to resume until the battery is charged, or you operate the 7530 using AC power. The allowable threshold ranges from 0 to 50%. -
Page 133: Charger Details
• In the Power Properties dialogue box, open the Charger tab. Allow Battery Calibration When the 7530 is in a Combo Dock, enabling (√) in this tab allows a battery requiring recalibration to be fully discharged and recharged. Recalibration occasionally extends the battery charge time. If you prefer that the battery always be charged in the shortest time possible, do not check this box. -
Page 134: Setting Double-Tap Sensitivity
• Choose the Calibration tab and then tap on the Recalibrate button. Figure 5.22 Calibrating The Touchscreen Calibration • Follow the directions in the tab to recalibrate the screen. Psion Teklogix 7530 Hand-Held Computer User Manual... -
Page 135: Certificate Assignment
Chapter 5: Configuration Certificate Assignment 5.5.6 Certificate Assignment • In the Control Panel, choose the Certificate icon. The dialogue box is used in conjunction with 802.1x authentication to enhance 7530 security. Figure 5.23 Certificates Dialogue Box Certificate For a detailed description about... -
Page 136: Scanner Properties Setup
5.7 Scanner Properties Setup Teklogix Scanners Control Panel icon in the provides dialogue boxes in which you can tailor bar code options and choose the bar codes your scanner will recognize. 5.7.1 Scanner Options Figure 5.45 Bar Code Options Options To display the sub-menus available in the tab: •... - Page 137 “Dot Time” parameter and initiates a normal scan sweep. If a value is assigned for the “Click Data” parameter, double-clicking the scanner trigger inserts the “Click Data” value rather than initiating a scan. Psion Teklogix 7535 Hand-Held Computer User Manual...
- Page 138 (Code 93, Code 128, UPC/EAN). Lower values have a lower tolerance for misreads, but they also increase the time it takes to decode the bar code. The default value of is generally a good compromise setting. Psion Teklogix 7530 Hand-Held Computer User Manual...
-
Page 139: Bar Codes
These scanners must be configured by scanning special configuration bar codes. These configuration bar codes affect the communication speed or data format between the scanner and the 7530 and must not be changed. The scanner manufacturer provides programming manuals for configuration purposes. -
Page 140: Code 39 Settings
The combination of an escape character and the next character is converted to an equivalent ASCII character. Include Check If this parameter is enabled (set to ‘ON’), the check digit is included with the decoded bar code data. Psion Teklogix 7530 Hand-Held Computer User Manual... - Page 141 Note: If your unit is operating with the Psion Teklogix TESS application, this parameter should not be used in conjunction with the TESS AIAG feature.
-
Page 142: Code 128 Settings
Note: The appended character is treated as any other keyboard character. For example, if <BKSP> is pressed, the usual action for that key is performed. If your unit is operating with the Psion Teklogix ANSI emulation application, the 7530 transmits the escape sequence associated with the function immediately after the bar code data. -
Page 143: Ean 13 Settings
An addendum is a separate bar code, supplementary to the main bar code. This parameter provides three options: Disabled, Optional Required Depending on the value chosen for this parameter, an addendum is recognized or ignored. Psion Teklogix 7530 Hand-Held Computer User Manual... -
Page 144: Ean 8
Note: The appended character is treated as any other keyboard character. For example, if <BKSP> is pressed, the usual action for that key is per- formed. If your 7530 is operating with the Psion Teklogix ANSI emulation application, the hand-held transmits the escape sequence associated with the function immediately after the bar code data. -
Page 145: Upc And Ean Settings
Refer to page 126 for details. 5.7.2.7 UPC E Settings Convert to UPC-A Setting this parameter to ‘ON’ results in a non-standard decoding that returns 12 digits from the 6 digit UPC E bar code. Psion Teklogix 7530 Hand-Held Computer User Manual... -
Page 146: Codabar
, it is assumed that the last digit is a One Check Digits check digit. If this parameter is set to , it is assumed that the last two digits Two Check Digits are check digits. Psion Teklogix 7530 Hand-Held Computer User Manual... -
Page 147: Interleaved 2 Of 5
5.7.2.13 Discrete 2 of 5 Mod 10 Check If this parameter is enabled (set to ‘ON’), the Mod 10 check digit is calculated. This calculation is the same as the Code 39 Mod 10 check digit. Psion Teklogix 7530 Hand-Held Computer User Manual... -
Page 148: Iata 2 Of 5
Refer to page 123 for details. 5.7.2.15 Postal: Australian Size/Chars Refer to page 123 for details. 5.7.2.16 Postal: Japanese Size/Chars Refer to page 123 for details. 5.7.2.17 Postal: Korean Size/Chars Refer to page 123 for details. Psion Teklogix 7530 Hand-Held Computer User Manual... -
Page 149: Postal: Planet
If enabled (set to ‘ON’), DataMatrix symbols of small physical size can be successfully decoded. Field Size/Chars Refer to page 123 for details. 5.7.2.22 2D Maxicode Field Size/Chars Refer to page 123 for details. 5.7.2.23 2D PDF-417 Field Size/Chars Refer to page 123 for details. Psion Teklogix 7530 Hand-Held Computer User Manual... -
Page 150: Micro Pdf-417
5.7.2.26 2D RSS Code Field Size/Chars Refer to page 123 for details. 5.7.2.27 Aztec Field Size/Chars Refer to page 123 for details. 5.7.3 Translations Figure 5.48 Translation Tab Translation • In the tab, choose the button. Psion Teklogix 7530 Hand-Held Computer User Manual... - Page 151 The value chosen from this dropdown menu determines what is compared with the decoded bar code reading – the beginning of decoded bar code, the end of decoded bar code, the entire decoded bar code or anywhere within the decoded bar code (default). Psion Teklogix 7530 Hand-Held Computer User Manual...
-
Page 152: Snmp (Simple Network Management Protocol) Setup
All Teklogix products support the TEKLOGIX-GENERIC-MIB – a MIB that defines some common features across Teklogix products. All devices also support MIB-II, a management information base that defines the common features of TCP/IP networks. The SNMP Agent software embedded in the 7530 product supports SNMPv1 (RFC 1157). Control Panel SNMP •... -
Page 153: Contact Tab
MIB-II’s object. sysContact Location This parameter is used to identify the physical location of this node (e.g., Warehouse A: Pillar 32B). The content of this parameter is accessible through MIB-II’s object. sysLocation Psion Teklogix 7530 Hand-Held Computer User Manual... -
Page 154: Communities Tab
’ allows the device to respond to SNMP queries and to send Traps. After enabling this option and rebooting the device, the SNMP Agent will automatically start up. To disable this feature, remove the check mark from the check box. Psion Teklogix 7530 Hand-Held Computer User Manual... -
Page 155: Adding A Community
The value assigned here is the name assigned by the network administrator to the set of devices to which this managed node belongs. Rights This menu allows you to specify access – that is, ‘Read-Only’ or Read-Write’ Psion Teklogix 7530 Hand-Held Computer User Manual... -
Page 156: Modifying A Community Setting
Highlight the community you want to remove in the tab and then Remove choose the button. Delete Confirmation screen is displayed. • To remove a community, choose the button. • If you decide not to remove the community, choose the button. Psion Teklogix 7530 Hand-Held Computer User Manual... -
Page 157: Trap Destination Tab
(e.g., an SNMP message received with a bad community name). 5.8.3.2 Adding A Destination To add a new destination: • Choose the button. Figure 5.56 Adding A Trap Destination • Type a destination in the text box provided, and press <ENTER>. Psion Teklogix 7530 Hand-Held Computer User Manual... -
Page 158: Changing A Destination
Remove • Choose the button. Delete Confirmation screen is displayed. • To remove a destination, choose the button. • If you decide not to remove the destination, choose the button. Psion Teklogix 7530 Hand-Held Computer User Manual... -
Page 159: Permitted Hosts Tab
Adding A Host To add a new host: • Highlight the button, and press <ENTER>. Figure 5.59 Adding A Host • Type a new host IP address in the text box provided, and press <ENTER>. Psion Teklogix 7530 Hand-Held Computer User Manual... -
Page 160: Changing A Host
Highlight the IP address you want to alter in the tab, and then Change choose the button. A dialogue box like the one displayed when you add a host is displayed. • Make the necessary changes, and press <ENTER>. Psion Teklogix 7530 Hand-Held Computer User Manual... - Page 161 6.6.2 Sending Data To The Host ..... . . 163 6.6.3 Psion Teklogix Keyboard And VT220 Equivalent Keys..163...
- Page 162 6.9.4 Retrieving Default Parameter Values ....175 6.10 Resetting The 7530 Hand-Held Computer ....175 6.11 The Parameters Menu .
-
Page 163: Chapter 6: Tekterm Application
6.20.2 802.IQ v2 ....... 245 Psion Teklogix 7530 Hand-Held Computer User Manual... -
Page 165: The Tekterm Application
Tekterm is a powerful emulation application ideally suited for real time data transaction applications associated with mainframes and servers. The 7535 includes unique features that support Tekterm – a Psion Teklogix application that has the ability to maintain multiple simultaneous sessions with a variety of host computers. -
Page 166: Softkey Function Keys
These softkeys can be reprogrammed to perform different functions within TESS and ANSI applications. Important: If your 7530 is equipped with a touchscreen, tapping the stylus on the appropriate softkey label executes the function of the softkey providing that the labels are visible at the bottom of the 7535 screen. -
Page 167: Macro Keys
Macro keys <M3> and <M4> are colour coded in orange print above macro keys <M1> and <M2>. • To access <M3>, press the <ORANGE> key followed by <M1> • To access <M4>, press <ORANGE> <M2>. Psion Teklogix 7530 Hand-Held Computer User Manual... -
Page 168: Keyboard Modes
To access <M6>, press <BLUE> <M2>. 6.3 Keyboard Modes 6.3.1 View Mode Placing the 7530 keyboard in View mode allows you to choose another screen font and to pan the contents of the screen. To place the computer keyboard in View mode: •... -
Page 169: Exiting View Mode
Note: You can press the <BLUE> key followed by the appropriate arrow key each time you want to pan the contents one increment at a time in the direction of the arrow key without placing the 7530 in View mode. Psion Teklogix 7530 Hand-Held Computer User Manual... -
Page 170: Using The Task Manager To Switch Between Applications
Highlight the application you want to work with, and press <ENTER>. To end or close an application: • Highlight the application you want to end, press <TAB> to highlight the <End Task> button, and press <ENTER>. Psion Teklogix 7530 Hand-Held Computer User Manual... - Page 171 Highlight the application you want to work with, and press <ENTER>. To end or close an application: • Highlight the application you want to end, press <TAB> to highlight the <End Task> button, and press <ENTER>. Psion Teklogix 7530 Hand-Held Computer User Manual...
-
Page 172: The Tekterm Status Area
One of the following is displayed – When <CTRL><ALT><V> is typed to place the 7535 in View mode, this View Mode information is displayed in the status area. Table 6.2 Status Area Psion Teklogix 7530 Hand-Held Computer User Manual... -
Page 173: Tess Emulation
Note: If the message “RESET: Press Enter” flashes at the bottom of the TESS screen when you turn on the 7530, press the <ENTER> key once. 6.5.1 Configuration Note: Each TESS session must have a unique name assigned to it. The title you assign will be displayed in the Display Menu. -
Page 174: Ibm 5250 Emulation Keys
field. 6.5.4 IBM 5250 Emulation Keys The following keys allow the Psion Teklogix computer to better emulate the functions of a true IBM 5250 terminal. Note: These keys are active at all times in TESS applications. -
Page 175: Tess Edit Modes And Cursor Movement
Chapter 6: Tekterm Application TESS Edit Modes And Cursor Movement There are several ways to configure the 7530 hand-held to complete a data field: • Pressing <ENTER> after entering data. • Pressing a function key after entering data. • Pressing an arrow key after entering data. -
Page 176: Del> Key Behaviour In Tess
• Refer to “Field Mode” at the beginning of this table. The <DEL> Fcursor mode key operates in the same manner in “Fcursor mode” as it does in “Field mode”. Psion Teklogix 7530 Hand-Held Computer User Manual... -
Page 177: Bksp> Key Behaviour In Tess
• If data is entered in a field and is then deleted before the field is com- pleted, the field remains unmodified when the cursor leaves the field or when the screen is transmitted. Psion Teklogix 7530 Hand-Held Computer User Manual... -
Page 178: Tess Status Message
Insert and replace mode are represented as “ins” and “rep” respectively. The number “0.6” indicates the response time of the last transmission in seconds. Press <CTRL> <T> to display the unit number instead of the TESS version number. Psion Teklogix 7530 Hand-Held Computer User Manual... -
Page 179: Lock Messages
Press and hold down the <CTRL> key, and press the <C> key three times within a two second period. • Press <ENTER>. This procedure restarts the TESS session without affecting the rest of the 7535. Psion Teklogix 7530 Hand-Held Computer User Manual... -
Page 180: The Local Menu
Chapter 6: Tekterm Application The Local Menu 6.5.10 The Local Menu The host can store local procedures in the 7530 for use when the unit is off-line. A menu of these procedures appears whenever <CTRL> <L> is pressed (see Figure 6.3). -
Page 181: Queuing Mode
This means software that supports ANSI terminals requires little or no changes. 6.6.1 Configuration To configure the 7530 for ANSI mode, the “Name” and “Type” of session – in this case, ANSI – must be specified in the Applications menu. This menu is described in the section titled, “Applications”... -
Page 182: Sending Data To The Host
The 7530 provides parameters that determine when the computer transmits characters to the host. The 7530 can be configured to transmit after a number of characters are typed in (the “Xmit Count” parameter) or after some time has elapsed (the “Xmit Wait”... -
Page 183: Block Mode (Local Editing)
Table 6.3 Psion Teklogix Keyboard And VT220 Equivalent Keys 6.6.4 Block Mode (Local Editing) The Psion Teklogix 7530s support “block mode” (or Local Editing). Application programs must be specifically written to support this mode. For software that supports this mode, the keys shown in Table 6.4 have special meaning. -
Page 184: Working With Sessions
Press <CTRL>, and type a lowercase a. • At the TCP> prompt, type cl in lowercase letters followed by the session number you want to close. e.g., Type cl 2 to close session 2. • Press <ENTER>. Psion Teklogix 7530 Hand-Held Computer User Manual... -
Page 185: Printing A Screen
In the ‘Display’ menu, type the letter corresponding to the radio statistics screen. For example, in the sample screen below, you’d type d to display the radio statistics screen. 01 Display Menu Parameters TESS ANSI Radio Psion Teklogix 7530 Hand-Held Computer User Manual... - Page 186 • number of transmitted acknowledgements. (Normally, this number should match the value in • beacon timeouts. Number of times the beacon has not been received as expected. Psion Teklogix 7530 Hand-Held Computer User Manual...
-
Page 187: The Tekterm Startup Display Menu
6.8 The Tekterm Startup Display Menu The values assigned to Tekterm parameters can be viewed and adjusted to optimize communication at the site in which a 7530 is operating. While some parameters are accessible through the “Parameter Manager”, others can be adjusted through the Windows CE Control Panel. -
Page 188: Working With Menus
Depending on the method you use when working with menus, review either “Using The Keyboard To Navigate Through Menus” on page 170 or “Using The Touchscreen To Navigate Through Menus” on page 173. Psion Teklogix 7530 Hand-Held Computer User Manual... -
Page 189: Using The Keyboard To Navigate Through Menus
1 through 10. If you attempt to enter a number which either exceeds 10 or falls below 1, the incorrect value will be rejected – the original value for this parameter, if any, will be displayed. Psion Teklogix 7530 Hand-Held Computer User Manual... -
Page 190: Y/N Parameters
• <ENTER> completes the entry field. • <BKSP> deletes the character to the left of the cursor. • <DEL> (key combination <BLUE> <BKSP>) clears the entire field. Psion Teklogix 7530 Hand-Held Computer User Manual... - Page 191 field. • Type the required text in the string entry field – including letters, numbers and symbols. • Press <ENTER> to save the text. Psion Teklogix 7530 Hand-Held Computer User Manual...
-
Page 192: Using The Touchscreen To Navigate Through Menus
If the softkey labels are visible at the bottom of the screen, tap the stylus on the “PREV” (previous) softkey label. • If the softkey labels are not visible, you’ll have to press <F2> – the “PREV” function key. Psion Teklogix 7530 Hand-Held Computer User Manual... -
Page 193: Numeric Parameters
Tap the stylus on the alpha field to cycle through the options. 6.9.2.5 String Entry Parameters You’ll need to use the keyboard to enter values in string entry fields. Refer to “String Entry Parameters” on page 171 for details. Psion Teklogix 7530 Hand-Held Computer User Manual... -
Page 194: Saving Changes To Parameters
A reset results in a complete reboot of the unit. All RAM memory contents are lost. The contents of the flash memory and memory card are preserved. When the 7530 is reset, the screen displays the Psion Teklogix and Microsoft® Windows® CE.net splash screen before displaying the startup desktop. -
Page 195: The Parameters Menu
Type the supervisory level password – it is set at the factory to 123456. • Press <ENTER>. Changing A Password Important: “Sup. Password” on page 186 describes how to change a supervi- sory level password and how to change “User” options. Psion Teklogix 7530 Hand-Held Computer User Manual... -
Page 196: Display Options
Contrast Ctrl Panel » see text The Display Properties dialogue box is displayed where you can adjust the appearance, backlight and contrast of your 7530 display. Important: ‘Display Properties’ dialogue box options are described in detail beginning on page 88. - Page 197 176 Display » see page 177 • To open the ‘More Parameters’ menu, press <F1>. Parameters Radio » System » Scanner Ctrl Panel » View Manager » Applications » Ports » Network » Psion Teklogix 7530 Hand-Held Computer User Manual...
-
Page 198: Radio Parameters
6.14 Radio Parameters Important: Radio parameters should not be changed from their factory settings without a clear understanding of your system. The 7530 is equipped with an Intel 802.11b radio. • Press <F1> to display the ‘Radio’ sub-menu. Radio 802.11 »... -
Page 199: System Parameters
Radio Address The value entered in the “Radio address” parameter is used to identify the 7530 over the radio link. A unique value from 1 to 3840 must be assigned for each 7530 hand-held computer. Initial RTT (Round Trip Time) Round trip time is the elapsed time between a hand-held computer transmission and an access point acknowledgement. -
Page 200: Keyboard
Figure 6.6 Macro Dialogue Box Important: Refer to “Keyboard Macro Keys” on page 95 for detailed instructions about creating macros. Important: For information about using the macro keys you’ve created, refer to “Macro Keys” on page 149. Psion Teklogix 7530 Hand-Held Computer User Manual... -
Page 201: Indicators
<BLUE> and <ORANGE> keys. Figure 6.7 Keyboard Properties Important: Refer to “Keyboard Properties” on page 92 for details about this dialogue box. Psion Teklogix 7530 Hand-Held Computer User Manual... -
Page 202: Audio
Scan Tone 3 And Scan Time 3 “Scan tone 3” and “Scan time 3” determine the frequency and duration of the third beep of a multiple beep. Tone is measured in hertz and time in milliseconds. Psion Teklogix 7530 Hand-Held Computer User Manual... -
Page 203: Power Mgmt Ctrl Panel
This option displays the Volume & Sounds Properties dialogue box. Figure 6.8 Adjusting The Volume This dialogue box is used adjust the beeper volume and to select the conditions under which the 7530 will emit a beep. Important: Refer to “Volume And Sound Properties” on page 99 for details about this dialogue box. -
Page 204: Security
6.15.4.1 Default Mode The value assigned to this parameter determines the operator’s level of access to 7530 parameters. The allowable values are User, Supervisor and Teklogix. “Default mode” is set to User. At User level, the operator is restricted to a small group of parameters. These are listed in the “User”... -
Page 205: Sup. Password
6.15.4.4 Allow Teklogix Setting this parameter to “Y” allows Psion Teklogix personnel to use their support level password to access 7530 parameters. If ‘Allow Teklogix’ is set to “N”, only your supervisory level password can be used to access the parameters. -
Page 206: Scanner Control Panel
Default Colours » see text Display Shift If this parameter is enabled (set to “Y”), the display in application screens shifts so that there are no blank columns on the left-most side of the display. Psion Teklogix 7530 Hand-Held Computer User Manual... -
Page 207: Split Screen
The “View IDs” parameter determines which application screens will be displayed in each pane of the split screen. “Moving Between Split Screens” on page 190 describes how to move the cursor from one split screen to the next. Psion Teklogix 7530 Hand-Held Computer User Manual... -
Page 208: Splitting And Displaying Screens
“Parameters” and B represents “TESS”. The “Type” and “View ID” values would be represented as follows: Split screen Type 2 Way ||| View IDs • Press <ENTER>. To display the split screen on the 7535: • Press <CTRL> <DOWN> arrow. Psion Teklogix 7530 Hand-Held Computer User Manual... -
Page 209: Moving Between Split Screens
<LEFT> arrow to move the cursor into the appropriate screen. • Press <CTRL> <ALT><0> to display the startup “Display Menu”. • Type the letter corresponding to the new application you want to display. Psion Teklogix 7530 Hand-Held Computer User Manual... -
Page 210: Custom Characters (Unicode™)
You can create up to 20 Unicode™ characters in the custom characters table. To create a Unicode™ value: • Replace the 0000 value with a hex value that represents the Unicode™ character you want to use. Psion Teklogix 7530 Hand-Held Computer User Manual... -
Page 211: Displaying The Unicode™ Pop-Up Window
Use the <LEFT> or <RIGHT> arrow key to position the cursor on the Unicode™ value you want to use, and press <ENTER>. To close the pop-up menu when you’re done: • Press the <ESC> key. Psion Teklogix 7530 Hand-Held Computer User Manual... - Page 212 Cyan White Black Note: The 7530 must be reset – press and hold down the <BLUE> and <ENTER> keys for a minimum of six seconds – in order for the new colour assignments to take affect. Psion Teklogix 7530 Hand-Held Computer User Manual...
-
Page 213: Applications
To display the “Settings” menu for your application, position the cursor on “Settings”, and press <F1> – the NEXT key. Note: Before you can access the “Settings” menu, you must first complete the “Name” and “Type” fields. Psion Teklogix 7530 Hand-Held Computer User Manual... -
Page 214: Ansi Settings
For every application session you create, the “Terminal #” assigned must be non- zero and unique. This parameter defines the number for the ANSI session and uniquely identifies all transmissions to and from the 7530. Psion Teklogix 7530 Hand-Held Computer User Manual... -
Page 215: Host Conn
Chapter 6: Tekterm Application Host Conn Other applications running in the 7530, such as a TESS session or another ANSI session must each have a different number. In addition, each Psion Teklogix 7530 using the radio link must have a unique number. - Page 216 6. Terminal ignores password echo if “Password Echo” is set to “Y”, otherwise skip to step 7. 7. Terminal looks for “Login Failed” in next transmission from host. 8. Login successful or Login failed and return to step 1. Psion Teklogix 7530 Hand-Held Computer User Manual...
- Page 217 The ‘Func Key Remap’ table allows these function key character sequences to be redefined. Func Key Remap 00 00 00 00 00 00 • • • 7E 00 7E 00 Psion Teklogix 7530 Hand-Held Computer User Manual...
-
Page 218: Screen
Display panning is used if the page is longer than the display. Note: The value in this parameter must be an even number. Psion Teklogix 7530 Hand-Held Computer User Manual... - Page 219 The possible attributes for these parameters are: “BLNK” (blink), “ULIN” (underline), “REV” (reverse), and “NONE” (normal). Bold This parameter specifies the actual video attributes to be assigned to fields created with the “Bold” ANSI attribute. Psion Teklogix 7530 Hand-Held Computer User Manual...
- Page 220 Label menu, and type a new name – preferably one that describes the corresponding key’s function. Note: Although you can enter up to 9 characters for each softkey label, the text will be shortened to better fit in the available space on your display. Psion Teklogix 7530 Hand-Held Computer User Manual...
-
Page 221: Xmit Modes
99. Note: If the 7535 is not in local edit mode, the <ENTER>, arrow, <CTRL>, and function keys cause an immediate radio transmission regardless of the “Xmit Count” parameter setting. Psion Teklogix 7530 Hand-Held Computer User Manual... - Page 222 Auto-Answer This string can be up to 30 characters long and is sent by the 7530 as a reply to an “ENQ” character from the host. The “Auto-Answer” string is programmable in the same manner as the keyboard macros.
- Page 223 Terminal Programmer’s Manual for more information. Kbd lock When this parameter is disabled (set to “N”), the 7530 does not lock the keyboard after a block mode transmission. When enabled (set to “Y”), the keyboard is locked after a transmission. The application program must unlock the keyboard by resetting the Keyboard Action Mode (KAM), using the Reset Mode (RM) or Enable Manual Input (EMI) controls.
- Page 224 If the parameter is not used, the rules specified in “Transmitted Data Stream” are used to determine end of line characters. EOB chars This string entry parameter specifies a string of up to 8 characters that are sent after each block transmission. Psion Teklogix 7530 Hand-Held Computer User Manual...
-
Page 225: Kbd Modes
field in the direction of the arrow. When set to “cursor”, pressing the <LEFT> and <RIGHT> arrow keys move the cursor within the current field. Echo Mode This parameter selects echo mode for the 7530. The available modes are “Local”, “Host”, and “Smart”. Local: In this mode, any character entered using the keyboard is displayed before being sent to the host. - Page 226 This parameter determines the “hot-key” for printing the screen contents via the 7535 serial port. The default is <CTRL> P (16). Note: The 7530’s port must be set to “printer” (see“Ports– Tether And Con- sole” on page 235). Psion Teklogix 7530 Hand-Held Computer User Manual...
- Page 227 The <ENTER> key normally enters data into a field and moves the cursor to the next field. However, some applications require that the <ENTER> key start a transmission from the 7530. When enabled (set to “Y”), this parameter causes the <ENTER> key to start a transmission.
-
Page 228: Edit Modes
ANSI mnemonics are displayed in reverse video. Other characters are displayed as normal characters. This mode can also be set with the Set Mode (SM) control but can only be reset from the Parameters menu. Psion Teklogix 7530 Hand-Held Computer User Manual... -
Page 229: Serial
Note: When an 8-bit set is selected from the ‘Lower’ character set, the ‘Upper’ character set will change to the same value. The ‘Upper’ character set cannot be altered until a non-8-bit value is assigned for the ‘Lower’ character set. Psion Teklogix 7530 Hand-Held Computer User Manual... -
Page 230: Anchor View
The “x origin” parameter is used to specify the column to which the upper left corner of the screen will be anchored. The “y origin” parameter is used to specify the row coordinate to which the screen will be anchored. Psion Teklogix 7530 Hand-Held Computer User Manual... -
Page 231: Tess Settings
Group Auto Term# Range Group When “Auto Term#” is set to “Y”, the ‘Group’ parameter is used to identify the group or pool of numbers from which an auto-address is chosen. Psion Teklogix 7530 Hand-Held Computer User Manual... -
Page 232: Host Conn
This parameter defines the terminal number for the TESS session and uniquely identifies all transmissions to and from the 7530. Other applications running in the 7530, such as an ANSI session or another TESS session must each have a different number. In addition, each Psion Teklogix 7530 using the radio link must have a unique number. -
Page 233: Screen
When enabled (set to “Y”), the display window moves to the origin (upper-left corner) after “LOCK-H” or “LOCK-B” messages. Field Scroll When enabled (set to “Y”), the display window moves to the left after entering a new entry field. Psion Teklogix 7530 Hand-Held Computer User Manual... - Page 234 This parameter determines the number of pages that can be stored and recalled at the 7530. Storing frequently used page data at the 7530 reduces the need for the host to retransmit complete page data over the radio link. Retransmitting data can reduce the system response time.
-
Page 235: Characters
Chapter 6: Tekterm Application Characters Colour Override Note: The menu is available only if your 7530 is equipped with a colour display. Range Colour Override Foreground Black see text Background White see text Foreground And Background When “Colour Override” is set to ‘Y’, the colours chosen in this menu are displayed in the TESS sessions. - Page 236 Enter the decimal value for the ASCII character that will be used by the host to identify hidden match field data. Enter 0 (zero) to disable this feature. Note: Another method of field matching is available directly through the TESS data stream. Psion Teklogix 7530 Hand-Held Computer User Manual...
-
Page 237: Tests
The value represents the number of the function key – not the ASCII decimal equivalent. After sending this key, the unit locks and waits for the host to unlock the 7530. To disable “AutoRep Fn”, set the “AutoRep T/O” parameter to zero. AutoRep T/O This parameter determines the time (in seconds) between the 7535 unlocking and the next transmission of the function key specified by the above parameter. -
Page 238: Features
The menu item “Local Process” has a sub-menu attached to it – “Save on Reset”. When this parameter is enabled (set to “Y”), data stored in the 7530 is saved if the unit is reset. Local procedures are defined on page 161. - Page 239 Chapter 6: Tekterm Application Features Send Mile This parameter controls the sending of a milestone from the 7530 after a “hey_you” command. Consult the Teklogix Screen Subsystem (TESS) User Manual for more information on milestones. Next X This parameter enables and disables the next messages used in queuing mode.
- Page 240 TESS print commands control the transfer of data to and from the serial and printer ports on the 7530. At the 7530 computer, the value assigned at the ‘Serial Port’ parameter ranks which port the TESS print command will identify and use as the first to fourth port.
- Page 241 SO suffix This parameter determines the end-of-message character on serial output. Enter an ASCII numeric equivalent from 0 to 255 to represent the end character. A value of “0” (zero) indicates no suffix. Psion Teklogix 7530 Hand-Held Computer User Manual...
-
Page 242: Scanner
Append F0 When enabled (set to “Y”), this parameter causes an <F0> code to be appended to the bar code. The <F0> code completes the entry of the bar code data in the field. Psion Teklogix 7530 Hand-Held Computer User Manual... -
Page 243: Fields
field can be defined by location on the screen or by the assignment of field numbers. When enabled (set to “Y”), the cursor moves according to field location. If disabled (set to “N”), the cursor moves according to the numeric order of the fields. Psion Teklogix 7530 Hand-Held Computer User Manual... - Page 244 Usually, the video attributes apply only to the text that is in an entry field. When this parameter is enabled (set to “Y”), the entire field (including blanks) takes on the video attributes. Some systems use this option to identify empty entry fields with reverse video. Psion Teklogix 7530 Hand-Held Computer User Manual...
- Page 245 fields. Enh Edit Mode This mode provides extended (enhanced) functions to users of Psion Teklogix’ IBM 5250 terminal emulation. When this parameter is enabled (set to “Y”), the arrow keys move the cursor anywhere on the screen, unrestricted by fixed or entry fields.
-
Page 246: Anchor View
Send CR with FKEY A function key press generates a string of text to be sent back to the host. If this parameter is enabled, a carriage return is appended to the function key. Psion Teklogix 7530 Hand-Held Computer User Manual... - Page 247 AIAG character. A value of 0 (zero) disables this feature. When a bar code data is scanned, the 7530 searches for AIAG fields on the current page that can accept the bar code data. The application program distinguishes an entry field as AIAG by preceding the field with this special mode character which...
- Page 248 The application program distinguishes this field as Serial I/O by preceding the field with a special character. If this character precedes a fixed field, the data will be sent to the 7530’s serial port. If it precedes an entry field, the field accepts data from the 7530’s serial port.
- Page 249 When the system request key is pressed, a Telnet “Interrupt Process” command is generated. The “Interrupt Process” command is sent to the host in place of the standard mechanism used to send the system request key press to a host using Telnet. Psion Teklogix 7530 Hand-Held Computer User Manual...
- Page 250 Telnet. LU Name Enabled If enabled (set to ‘Y’), this parameter allows the 7530 to negotiate a specific device name for itself. LU Name The value assigned in this field is used when the “LU Name Enabled”...
- Page 251 WEC command to the 7530. Otherwise, if set to “screen text”, the 7530 locks the keyboard and displays the error message contained in the WEC command on the screen at the line specified by the host.
- Page 252 AS/400 host treats the terminal. IBM-5251-11 is a standard 5250 terminal. IBM- 5555-001 is a Korean language terminal. Virtual Dev Enabled If enabled (set to ‘Y’), this parameter allows the 7530 to negotiate a specific device name for itself. Virtual Dev Prefix The prefix assigned in this field is used when the “Virtual Dev Enabled”...
- Page 253 "Features – 2392/Telnet" beginning on page 228. FKEY0-7, FKEY8-15, FKEY16-23, FKEY24-31 And FKEY32-39 FKEY0-7 FKEY0 ENTER FKEY1 FKEY2 FKEY3 FKEY4 FKEY5 FKEY6 FKEY7 The sub-menus attached to these parameters allow you to map the 7535 function keys. Psion Teklogix 7530 Hand-Held Computer User Manual...
-
Page 254: Ports- Tether And Console
Printer – all TESS print operations are directed to the port. All ANSI media copy operations to the “primary port” are directed to this port. • Scan-See – TESS and ANSI accepts input from the Scan-See through the Tether or Console port. Psion Teklogix 7530 Hand-Held Computer User Manual... -
Page 255: Tether And Console Port Parameter Settings
Misc. N » This menu contains all the character sets available with your Psion Teklogix computer. In this menu, the “Y” or “N” are used to visually guide you to the selected character set. For example, in the sample menu above, the “Y” next to IBM indicates that a character set has been chosen from this group. - Page 256 The 7535 can perform Software or Hardware handshaking, or you can choose to enable both of these options. Both The function of each mode is as follows: Enable: Used to input and output data. Psion Teklogix 7530 Hand-Held Computer User Manual...
- Page 257 If the count specified in this parameter is exceeded, the transmission fails. Input Tmo This parameter sets the time in tenths of a second that the 7530 waits before passing received data to the TESS or ANSI tasks. Output Tmo The value assigned at this parameter determines the maximum number of milliseconds that the application will wait for a ‘write’...
-
Page 258: Tether And Console Port Scan-See Parameters
6.19.3.1 Scan-See Sub-Menu – Mapping The Viewport Range Scan-See Anchor Line 0...1 Anchor Column 0...19 Follow Cursor Line Offset -25...25 Column Offset -80...80 Wraparound Panning Line Scrolling Brightness 0 to 5 Arrows Bright Bright Horz Vert Version 0...2 XON/XOFF Psion Teklogix 7530 Hand-Held Computer User Manual... -
Page 259: Scan-See Sub-Menu - Mapping The Viewport
(11–9,7–0) to (11–9+9,7–0+1) or (2,7) to (11,8). These computations assume that “Wraparound” (described on page 242) is disabled (set to “N”) and that “Follow Cursor” (described on page 242) is enabled (set to “Y”). Psion Teklogix 7535 Hand-Held Computer User Manual... -
Page 260: Scan-See Sub-Menu - Mapping The Viewport
Each time the <LEFT> arrow is pressed, the number is decremented by one. For example, to enter a value of “–5”, start from zero and press the left arrow key five times. Psion Teklogix 7535 Hand-Held Computer User Manual... - Page 261 Brightness The “Brightness” parameter controls the backlight brightness of the display. It only has an effect on Model 7000 Scan-Sees – scanners equipped with LED (light emitting diode) displays. Psion Teklogix 7530 Hand-Held Computer User Manual...
- Page 262 • Metrologic 7000M LCD units; these are encased in grey plastic. • Psion Teklogix 7000M LCD units; these are encased in black plastic. Table 6.7 Scan-See Versions Note: To interface the 7535 to the Scan-See units with older firmware (serial number lower than 1594120224), set “Parity = space”;...
-
Page 263: Scan-See Keyboard Mapping
The Scan-See is capable of displaying only a subset of the default PC-8 ASCII character set. Any characters that cannot be displayed are currently translated to ‘.’. 6.20 Network Network Ctrl Panel » 802.IQv2 » Psion Teklogix 7530 Hand-Held Computer User Manual... -
Page 264: Network Ctrl Panel Settings
7530 Figure 6.11 Network Settings Important: Follow the steps outlined in “Configuring An IEEE 802.11 Radio Installed In The 7530” on page 18 for details about configuring your radio. 6.20.2 802.IQ v2 Important: For setup information about 802.IQ v2, refer to the “9400 and 9450 Network Controllers User Manual”... - Page 265 Initial RTT 500...5000 Auto Radio Addr If this parameter is set to “Y”, the 7530 requests an automatically assigned radio address. Note: If ‘Auto Radio Addr’ is enabled (set to “Y”), any value assigned to the ‘Radio Address’ parameter is ignored.
-
Page 266: Iq V2
802.IQ v2 Initial RTT (Round Trip Time) Round trip time is the elapsed time between a 7530 hand-held computer transmis- sion and an access point acknowledgement. Each 7530 continuously adjusts the acceptable round trip time, calculating the average elapsed time over a number of transmissions. - Page 268 7.1.2 Entering Data With The Bar Code Reader....251 7.2 The 7530 Battery ....... 251 7.2.1 Lithium-Ion Battery Safety Precautions .
- Page 269 7.8.6.1 Network Link Unsuccessful ....264 7.8.6.2 7530 LED Does Not Light When Docked... 264 7.9 Portable Docking Module (PDM) .
-
Page 270: Chapter 7: Peripheral Devices & Accessories
To connect this scanner to the 7530, attach the device to the tether port at the upper- right side of the 7530. Before using the bar code reader, you may need to change some parameters. -
Page 271: Lithium-Ion Battery Safety Precautions
It is critical that this safety information be reviewed and that all warnings be strictly followed. Warning: BATTERIES ARE CONSIDERED HAZARDOUS WASTE and must be returned to Psion Teklogix for proper disposal. All used batteries must be forwarded to one of the following offices: Psion Teklogix Inc. Psion Teklogix Corp. -
Page 272: Important Charger Safety Instructions
fire or electric shock. If an extension cord must be used, make sure: • The plug pins on the extension cord are the same number, size, and shape as those on the charger. Psion Teklogix 7530 Hand-Held Computer User Manual... -
Page 273: Chargers
100% charge. No special conditioning is required. The full capacity of the battery will reach 100% after 5 cycles through the charger. It can take from 1.5 to 4 hours to charge a battery. The 7530’s intelligent charging system protects the battery from over-charging by terminating the charge process when the battery is at maximum capacity. -
Page 274: Installation
Be sure to locate the charger in an area where there is no risk of injury to persons walking in the vicinity. 7.5.2 Operator Controls The gang charger does not have operator controls or a power switch. Psion Teklogix 7530 Hand-Held Computer User Manual... -
Page 275: Charge Indicators
When the battery is fully charged, the charger stops applying power; the battery cannot be overcharged if left in the charger slot. The 75% charge indicator is handy if you need a quick recharge – it often occurs after less than an hour. Psion Teklogix 7530 Hand-Held Computer User Manual... -
Page 276: Troubleshooting
If the power LED still does not light up: • Unplug the mains cable, and check the fuse at the rear of the charger. If the fuse appears to be intact, the charger requires service. Psion Teklogix 7530 Hand-Held Computer User Manual... -
Page 277: Indicator Does Not Light When Battery Installed
The 7535 combo charger is a desktop charger designed to charge the 7535 internal battery along with a spare battery pack. The combo charger provides sufficient power to operate and fast charge the 7530 internal battery, while recharging the spare battery pack. -
Page 278: Operator Controls
The battery charge LED on the 7530 lights up indicating that the unit has external power and battery charging may begin. It is safe to leave the 7530 in the combo charger cradle while it is not in use – the battery will not be overcharged. -
Page 279: Charge Indicators
Charge status is displayed on the 7535 charge LED – the lower-right LED. Refer to “Charge LED” on page 43 for details. Normally, it takes from 1.5 to 4.0 hours to fully charge the 7530 internal battery. Note: Battery charging continues whether the 7530 is switched on or off. -
Page 280: Combo Dock
The 7530 detects combo dock and displays the appropriate icon – The battery charge LED (lower-right LED) on the 7530 lights up to show it has external power and may start charging the battery. Interaction with the 7530 while in the combo dock is a function of the user application software used to communicate with the host network. -
Page 281: Troubleshooting
A green LED is illuminated next to the RJ45 connector when a valid network link is established. A user application must be loaded onto each 7530 that utilizes the quad dock for communication. When the network is connected and this application is loaded, the quad dock is ready for use. -
Page 282: Indicators And Controls
TCP/IP protocol to name, locate and communicate with a specific 7530 on the network. If a link is established between a 7530 and a host, the application on the host and on the 7530 must have a recovery mechanism in the event that the 7530 is removed from the dock and the link is interrupted. -
Page 283: Troubleshooting
Chapter 7: Peripheral Devices & Accessories Troubleshooting 7.8.6 Troubleshooting The indicators, applications and drivers required to use and monitor the docking station are installed on the 7530 – no indicators or applications are present on the docking station itself. 7.8.6.1 Network Link Unsuccessful If a network link fails, the 7530 application alerts the operator that the link was unsuccessful. - Page 284 Chapter 7: Peripheral Devices & Accessories Portable Docking Module (PDM) • Align the pins on the PDM with the connectors on the base of the 7530. • Gently snap the PDM into place on the base of the unit. Figure 7.1 on page 266 provides a visual representation of how to secure the PDM.
- Page 285 Align the guide pins on the PDM with the slots on the base of the 7530, and gently snap the PDM onto the hand-held. Guide Pins Figure 7.1 Attaching The PDM To The Base Of The 7530 Psion Teklogix 7530 Hand-Held Computer User Manual...
- Page 286 DC power supply provided with your PDM. The DC power supplied by the PDM is sufficient to operate the 7530 and fast charge its internal battery at the same time. The 7530 can run from a PDM without a battery installed.
-
Page 287: Bluetooth Peripherals
Bluetooth Peripherals 7.10 Bluetooth Peripherals If the 7530 is equipped with a Bluetooth radio, it is possible to communicate with a variety of Bluetooth peripherals, including GSM/GPRS handsets, scanners, printers, and so on. The range of the Bluetooth radio in the 7530 is limited to approximately 2 meters. -
Page 288: Picker Cradle Mounting Recommendations
Psion Teklogix strongly recommends that you seek professional mounting advice from the vehicle manufacturer. -
Page 289: Wiring Guidelines
On a vehicle, it’s a good idea to pull up on the 7535 to be certain that it is secure. • To remove the 7530, press firmly on one of the knobs on either side of the cradle until it releases. You do not need to press both knobs. 7.11.4 Maintaining The Picker Cradle Two latches in the cradle hold the 7530 firmly in place. -
Page 290: Powered Cradle Installation In High Voltage Vehicles
7.11.5.1 Extreme Wet Environments For extreme wet environments, or environments where it is difficult to restrict vehicle operator access to the power connector, Psion Teklogix offers a waterproof heat shrink kit (PN 1030022). The kit contains 3 pieces of waterproof, high shrink ratio heat shrink tubing which can be used to encapsulate the entire connector assembly. -
Page 291: Powered Cradle Installation
Powered Cradle Installation 7.11.6 Powered Cradle Installation The powered cradle option is designed to allow the 7530 to be powered by a vehicle battery. The battery installed in the 7530 is also recharged by the vehicle battery. This option accepts DC power sources over the range 12V to 80V. -
Page 292: Wiring Vehicle Power To The Cradle
Keep in mind that the 7530 will continue to operate with or without vehicle power as long as its battery has sufficient charge. -
Page 293: The Port Replicator
This interface is typically used for fixed peripherals such as printers. Your serial device likely includes a suitable cable connector for this port. Note: The 7530 picker cradle can be ordered with the port replicator option installed, or it can be retrofitted later by an authorized Psion Teklogix service depot. - Page 294 PECIFICATIONS 8.1 7530 Hand-Held Computer Specifications ....277 8.2 Radio Specifications ......279 8.3 Bar Code Scanning .
-
Page 296: Chapter 8: Specifications
Quick swap battery packs. • Built-in fast charger (1.75 hour typical recharge). • Self-guiding & latching battery pack design. • System backup (10 minutes) during battery swap. • 1 week real-time clock backup. Psion Teklogix 7530 Hand-Held Computer User Manual... - Page 297 Cradle vibration: 1.5g RMS PSD (4Hz-500Hz). Approvals Safety UL 1950, CSA C22.2 No950, LVD EN60950 FCC Part 15 Class B, EMC Directive Class B Laser IEC 825-1 Class 2 (EN60825-1), 21CFR1040 Class II Psion Teklogix 7530 Hand-Held Computer User Manual...
-
Page 298: Radio Specifications
Automatic for all selected codes, Non- Decoded input. Decoded input is external scanner dependent. 8.3.1 Internal Scanners Base Options High performance, long range, advanced long range, wide angle, imager scanner and 2-D raster laser scanner. Psion Teklogix 7530 Hand-Held Computer User Manual... -
Page 299: Internal Scanner Port
SE1200LR 1D non-decoded, long range SE1200ALR 1D non-decoded, advanced long range SE1200 WA, non-decoded wide angle SE2223 PDF decoded raster 8.3.3 External Scanners Supported Types Decoded and Non-Decoded 5V only. Interface Via tether port. Psion Teklogix 7530 Hand-Held Computer User Manual... -
Page 300: Internal Scanner Specifications
675 nm. Ambient Light Sunlight: 8000 ft. candles Sunlight: 8000 ft. candles Immunity Artificial Light: 450 ft. candles Artificial Light: 450 ft. candles Table 8.1 SE1200HP And SE1200LR Scanner Specifications Psion Teklogix 7530 Hand-Held Computer User Manual... -
Page 301: Se1200 Advanced Long Range & Se2223 Pdf Specs
5.0 VDC ± 10% 5VDC ± 10% Input Current: 115 mA typical 230mA Standby Current: 70 µA max. 6.5mA Shock 2,000 G 2,000 G Table 8.2 SE1200 ALR And SE2223 PDF Scanner Specifications Psion Teklogix 7530 Hand-Held Computer User Manual... - Page 302 Top View Scan Pattern Specular Dead Zone < 2 º Scanner Scan Beam Side View Barcode Surface Roll Scanner Scan Beam Side View Barcode Surface Figure 8.1 Pitch, Skew And Specular Dead Zone Psion Teklogix 7530 Hand-Held Computer User Manual...
-
Page 303: Decode Zones
6.9 x 11.2 x 18.3 cm (2.7 x 4.4 x 7.2 in) Weight Scanner - 280 g (9.9 ozs) Cable (82.3 cm 32 in) - 176 g (6.2 ozs) Cable lengths Collapsed: 81 cm (32 in) Max working: 183 cm (72 in) Psion Teklogix 7530 Hand-Held Computer User Manual... - Page 304 Reflective Labels (decoded) 40 mil 40 to 180 in (102 to 457 cm) 70 mil 80 to 300 in (2032 to 762 cm) 100 mil 80 to 432 in (203 to 1097 cm) Psion Teklogix 7530 Hand-Held Computer User Manual...
- Page 305 2 of 5, Code 39 Full Ascii, Standard 2 of 5, Code 93, Codabar, Safety/Regulatory Electrical Complies to: Gost R; TUV; UL; cUL Emissions Complies to: FCC-A;EN55022-B BCIQCNS13438; AS/NZS3548; VCCI-B Laser Classification CDRH Class 2;IEC60825 Class 2 Psion Teklogix 7530 Hand-Held Computer User Manual...
-
Page 306: Powerscan™ Standard Range Scanner Specs
10 mil 0.2 to 5.5 in (0.5 to 14 cm) Print Contrast Ratio 25% minimum Pitch ± 65˚ Skew ± 55˚ Ambient Light Immunity Artificial light: 1200 ft. candles. Sunlight: 8000 ft. candles. Psion Teklogix 7530 Hand-Held Computer User Manual... -
Page 307: Lithium-Ion Battery Pack
Charge Temperature 0˚C to 39˚C (32˚F to 102˚F) Storage Temperature -30˚C to 60˚C (-22˚F to 140˚C) (Storage at elevated temperatures is not recommended.) Charge Cycles Minimum of 300 charge cycles with no deg- Psion Teklogix 7530 Hand-Held Computer User Manual... - Page 308 7.4 V nominal (6V min. to 8.4V max.) Cell Configuration 2 series connected cells Capacity 1800 mAh nominal at 300mA discharge 20˚C to 6.0V (minimum) Supported Chargers 6-Gang Charger Combo Charger Combo Docking Station Quad Docking Station Psion Teklogix 7530 Hand-Held Computer User Manual...
-
Page 310: Appendix A: Support Services And Worldwide Offices
A.1.1 Canada and USA: Technical Support and Repair Services In Canada and the U.S.A. these services can be accessed through the Psion Teklogix Helpdesk. The Helpdesk coordinates repairs, helps you troubleshoot problems over the phone, and arranges for technicians or engineers to come to your site. - Page 312 +56 2 334 9344 Fax: +46 31 13 57 80 Tel: +32 (0)3 250 22 00 Fax: +56 2 233 3868 Email: info@teklogix.se Fax: +32 (0)3 250 22 20 Email: ventas@psion.com Email: info@psionteklogix.be Psion Teklogix 7530 Hand-Held Computer User Manual...
- Page 313 08940 Cornellà de Llobregat (Barcelona) India España Tel: +91 11 621 9257 Tel: +34 9 3475 0220 Fax: +91 11 621 9076 Fax: +34 9 3475 0230 Email: tekind@psion.com Email: teklogix@apdo.com A.3 W ORLD www.psionteklogix.com Psion Teklogix 7530 Hand-Held Computer User Manual...
-
Page 314: Appendix B: Port Pinouts
Psion Teklogix and request document # 1010008 “Instruction Tether Port Termina- tion”. Attempting to interface to the tether connector without following this docu- ment may cause damage to the 7530 or the tethered device. B.2 Docking Station Connector 2 4 6 8 10 12 1 3 5 7 9 11 1. -
Page 315: Battery Contacts
10. USB Device Minus. When terminal operated as a USB device. 11. USB Device Plus. When terminal operated as a USB device. 12. Ground B.3 Battery Contacts These contacts represent right to left numbering with the 7530 docking port pointing toward you. 1. Battery Plus 2. SMBUS CLK 3. -
Page 316: Appendix C: Usb Setup Application
USB connection between the PC and the 7530, and • installs the 7530 as a device on your PC. This may require notifying the PC OS that the device should be reinstalled and then reconnecting the USB device. -
Page 317: Pre-Installation: Updating Usbstor.inf And Wceusbsh.inf
USB Setup application, and install a later version of ActiveSync. 2. Device Driver INF File Selection Dialogue Box: This dialogue box allows you to choose the paths of the appropriate inf files. Default file paths are provided in this dialogue box. Psion Teklogix 7530 Hand-Held Computer User Manual... - Page 318 You can choose to have the device drivers installed immediately by selecting the check box (√), or you can leave the check box blank and Windows will install the 7530 the next time it is connected. It is recom- mended that the device be installed immediately.
-
Page 319: Installation: Installing The 7530 As A Device On Your Pc
• An appropriate USB connection was never established between the PC and the 7530 running Windows CE. In this case, when an appropriate USB connection with this device exists, Windows will automatically attempt to install the device driver. -
Page 320: Post Installation
3. If you indicated that the usbstor driver should be installed, the same steps as described above are carried out for usbstor except that the 7530 must be running BooSt. (Press and hold down the <SCAN> <BLUE> <ENTER> keys for a minimum of 6 seconds to launch the BooSt program.) Keep in mind that a device running BooSt has a dif-... - Page 322 ALR (advanced long range) scanner 282 Media Copy 204 ALT Key 37 mnemonics 209 anchor (viewport) 239 multiple sessions 194 Anchor Column 240 Password (Telnet Settings) 198 Anchor Line 240 Password Echo (Telnet Settings) 198 Psion Teklogix 7535 Hand-Held Computer User Manual...
- Page 323 Code 11 128 Enh Mode, using 226 Code 128 124 moving the cursor 36 Code 39 122–123 Arrow mode Code 93 128 Arrows 243 Discrete 2 of 5 129 ASCII EAN 13 125 Psion Teklogix 7535 Hand-Held Computer User Manual...
- Page 324 Beep Tone and Beep Time 183 suffix 124, 126 bell (CTRL G) 207 Binary print Upper (ANSI) 210 character set (Tether & Console Port) 236 BKSP (DEL Key) 37 Character Sets BKSP/DEL Key Psion Teklogix 7530 Hand-Held Computer User Manual...
- Page 325 CTRL L (Form Feed) 207 ENTER Pmpt (ANSI Telnet CTRL p (reprint) 160 Settings) 197 CTRL r 156 Login (ANSI Telnet Settings) 198 CTRL s 159 Login Failed (ANSI Telnet Settings) CTRL s (status, displaying continuously) 160 Psion Teklogix 7530 Hand-Held Computer User Manual...
- Page 326 Display Menu DEL (BKSP) Key 37 selecting a TESS session 154 DEL/CLR key Display menu 168 BKSP key (ANSI) Display Properties 88 Local Echo mode (ANSI) 207 Display Shift desktop connection, remote 83 Psion Teklogix 7530 Hand-Held Computer User Manual...
- Page 327 LU Name Enabled 231 ESC Key 37 Null In Fields 230 ESC Prompt (ANSI Telnet Settings) 197 5250 Telnet 232 Estimated Battery Backup Time 102 Features 234 Estimated Operating Time 102 FKEY0-39 234 Intl EBCDIC 233 Psion Teklogix 7530 Hand-Held Computer User Manual...
- Page 328 217 GPRS (bluetooth) 111 Fields parameters (for TESS Settings) 224 Group (ANSI Auto Term#) 195, 212 Fill Chr Fixed Field Overhd 229 fixed fields 154 hand strap, installing on 7535 14 Psion Teklogix 7530 Hand-Held Computer User Manual...
- Page 329 (I 2 of 5 symbology) 129 modifier keys 46 I 2 of 5 onscreen 45 Short Code radio signal quality 46 scanner message 50, 51 security level 47 Kbd lock status area 153 VIII Psion Teklogix 7530 Hand-Held Computer User Manual...
- Page 330 field advance (tab) 155 Location 135 field backspace 155 “LOCK–B” message 160, 214 field exit 155 locked keyboard 204, 220 home 155 locked 7535 218 tab (field advance) 155 “LOCK–H” message 160, 214 Psion Teklogix 7530 Hand-Held Computer User Manual...
- Page 331 Null In Fields 230 messages, retransmitting (802.IQv1 xr) See Nulls In Fields 233 xr (retransmissions) 168 number messages received (rm) 167 of columns (ANSI) 200 messages transmitted (xm) 167 of columns (TESS) 214 Psion Teklogix 7530 Hand-Held Computer User Manual...
- Page 332 Tether and Console Port settings 235 saving changes to 175 port settings (tether & console) 235–238 string entry 171, 172, 174 position Y/N (boolean) 171, 174 of screen 214 Parity 237 power information 71 Psion Teklogix 7530 Hand-Held Computer User Manual...
- Page 333 802.IQ v1 180 ra (received acknowledgements) 167 radio address, automatic (802.IQ v1) 179 radio radio specifications 279 adding new network connection 20 radio statistics screen advanced settings of 26 802.IQ 166 rb (received beacons) 167 Psion Teklogix 7530 Hand-Held Computer User Manual...
- Page 334 Save on Reset 219 Click Data (appending data) 120 Scan Beep 119 Click Time 119 Scan Indicator 119 Cont Nxt Fld 223 SCAN Key 37 country code 125 Scan Log File 119 decode zones 284 XIII Psion Teklogix 7530 Hand-Held Computer User Manual...
- Page 335 219 # of Cols (TESS) I/O fields 221 # of Rows (ANSI) Serial In # of Rows (TESS) Serial Out Anchor View 211, 227 Serial Port Display Shift SI CRC Field Scroll Psion Teklogix 7530 Hand-Held Computer User Manual...
- Page 336 Start Menu 68 SNMP (Simple Network Management cycle tasks 71 Protocol) 134 desktop 68 Communities 136 power info 71 Contact 135 programs 72 Location 135 Run 74 Name 137 Security 69 Rights 137 Psion Teklogix 7530 Hand-Held Computer User Manual...
- Page 337 Fcursor mode 156 tab, vertical (CTRL K) 207 Field mode 156 TAB Key 37 Field Order 224 Tab stop mode Field parameters 224 target dot, duration of 120 Host (Connection Type) 213 taskbar Psion Teklogix 7530 Hand-Held Computer User Manual...
- Page 338 Flow Control 237 launching C-1 Input Tmo 238 updating usbstor & wceusbsh inf C-2 Output Tmo 238 usbstor.inf, installing C-4 Parity 237 usbstor.inf, updating C-2 Retries 238 Use Increment Stop Bits 237 XVII Psion Teklogix 7530 Hand-Held Computer User Manual...
- Page 339 files, folders, & programs, working 7530 with 63 approvals 278 Windows CE, navigating in 61 display 278 Windows Explorer 72 off-line 161 wireless connection setup 18 specifications 277 Wireless Information Tab 20 XVIII Psion Teklogix 7530 Hand-Held Computer User Manual...
- Page 340 Index Boldface indicates a parameter name. 7530 picker cradle See also Picker Cradle 80-col. font 802.IQ connection (ANSI) 196 802.IQ connection (TESS) 213 802.IQ v1(protocol) Auto Radio Addr 179 802.IQ v2 245 802.1X authentication, enabling 23 802.11b radio, configuring 18...
Need help?
Do you have a question about the 7530 and is the answer not in the manual?
Questions and answers