Table of Contents
Advertisement
Quick Links
Advertisement
Table of Contents

Related Manuals for FUTABA 32MZ-WC


Summary of Contents for FUTABA 32MZ-WC
- Page 1 FULL MANUAL 1M23Z10002...
-
Page 2: Table Of Contents
TABLE OF CONTENTS INTRODUCTION ・・・・・・・・・・・ 5 S.BUS2 ・・・・・・・・・・・・・・・ 25 PRECAUTIONS ・・・・・・・・・・・・ 7 Antenna instructions ・・・・・・・・・ 25 Flying Precautions ・・・・・・・・・・ 7 Channel Modes ・・・・・・・・・・・ 26 Battery and Charger Handling Precautions 8 Dual Rx Link System ・・・・・・・・・ 26 microSD Card Handling Precautions ・・ 9 How to change to Dual RX Link mode ・ ・ 27 Storage and Disposal Precautions ・・・ 9 FASSTest12CH(Telemetry OFF)mode ・ 27 Other Precautions ・・・・・・・・・・ 9 How to Dual Rx Link ... - Page 3 Compatibility of FASSTest26CH with Servo Reverse ・・・・・・・・・・・・ 91 receivers ・・・・・・・・・・・・・・ 41 Fail Safe ・・・・・・・・・・・・・・・ 92 About FASSTest26CH S.BUS2 connect and End Point (ATV) ・・・・・・・・・・・ 93 servos ・ ・・・・・・・・・・・・・・・ 41 Throttle Cut ・・・・・・・・・・・・・ 94 MODEL BASIC SETTING PROCEDURE ・・ 42 Idle Down ・・・・・・・・・・・・・・ 95 Airplane/glider basic setting procedure 42 Swash Ring ・・・・・・・・・・・・・ 96 Helicopter basic setting procedure ・・・ 44 Swash ・ ・・・・・・・・・・・・・・・ 97 Servos connection by model type ・・・ 48 Timer ...
- Page 4 MODEL MENU (COMMON FUNCTIONS) Gyro setting Basic menu ・・・・・・ 169 Condition Select ・・・・・・・・・・ 129 Gyro setting Config ・ ・・・・・・・・ 172 AFR (D/R) ・・・・・・・・・・・・・ 131 Gyro setting SBUS Basic menu ・・・・ 177 Prog. Mixes ・・・・・・・・・・・・ 133 MODEL MENU (HELICOPTER) ・ ・・・・ 178 Sequencer ・・・・・・・・・・・・・ 134 PIT Curve/Pitch Trim ・・・・・・・・ 179 Fuel Mixture ・・・・・・・・・・・・ 140 THR Curve/Throttle Hover trim ・・・ 182 MODEL MENU (AIRPLANE/GLIDER Acceleration Mixing ・・・・・・・・ 184 FUNCTIONS) ・・・・・・・・・・・・ 141 Throttle Hold ・・・・・・・・・・・ 185 AIL Differential ...
-
Page 5: Introduction
INTRODUCTION Thank you for purchasing a Futaba 32MZ-WC digital proportional R/C system. In order for you to https://www.futabausa.com instruction manual is limited to radio control models. 2. Exportation precautions: tions. Outside North America Compliance Information Statement (for U.S.A.) tions: mitter. - Page 6 CAUTION: To assure continued FCC compliance: Compliance Information Statement (for Canada) autre antenne ou émetteur. Declaration of Conformity (for EU) https://www.rc.futaba.co.jp/english/dl/declarations.html https://www.rc.futaba.co.jp/support/manual/ Where to Fly...
-
Page 7: Precautions
PRECAUTIONS ■ No part of this manual may be reproduced in any form without prior permission. ■ The contents of this manual are subject to change without prior notice. ■ The contents of this manual should be complete, but if there are any unclear or missing parts please contact a Futaba Service Center. ■ Futaba is not responsible for the use of this product by the customer. ■ Company and product names in this manual are trademarks or registered trademarks of the respective company. For safe use DANGER - WARNING - CAUTION - = Prohibited = Mandatory WARNING: Always keep electrical components away from small children. Flying Precautions WARNING Never grasp the transmitter antenna while flying. Do not fly when you are physically impaired as it could pose a safety hazard to yourself or others. ■ The transmitter output may drop drastically. Do not fly at the following places: Always make sure that all transmitter stick movements oper- ate all servos properly in the model prior to flight. Also, make ... -
Page 8: Battery And Charger Handling Precautions
Do not drop the battery into a fire or bring it near a fire or age. store them in a hot area. ■ Use the special charger by connecting it to a proper power outlet. Do not charge and store the battery in direct sunlight or oth- If the battery liquid should get in your eyes, do not rub your er hot places. eyes, but immediately wash them with tap water or other clean Do not charge the battery if it is covered with any object as it water and get treated by a doctor. may become very hot. ■ The liquid can cause blindness. Do not apply excessive mechanical stress to it. Keep the battery out of reach of children. Do not use chargers other than those recommended by Futaba. Always charge the battery before each flying session. ■ If the battery goes dead during flight, the aircraft will crash. Charge the battery with the dedicated charger supplied with the set. WARNING Do not touch the charger and battery for any length of time If the battery leaks liquid or generates an abnormal odor, im- during charging. mediately move it to a safe place for disposal. ■ Doing so may result in burns. ■ Not doing so may cause combustion. Do not use a charger or battery that has been damaged. If the battery liquid gets on your skin or clothing, immediate- ly flush the area with tap water or other clean water. -
Page 9: Microsd Card Handling Precautions
■ The data may be damaged or lost. noise. ■ Doing so may cause erroneous operation. Do not store the microSD card in the following places: ● Recorded data ・ Where the humidity is high ・ Where the temperature difference is severe The data recorded on the microSD card cannot be compensated ・ Where it is very dusty regardless of the contents or cause of the trouble or obstruction. ・ Where the card will be exposed to shock and vibration Futaba does not perform data restoration or recovery work. ・ Near speakers and other magnetic devices Storage and Disposal Precautions WARNING Keep wireless equipment, batteries, aircraft, etc. away from children. CAUTION When the device will not be used for a long time, remove the bat- Do not store wireless devices in the following places: teries from the transmitter and aircraft and store them in a dry place ・ Where it is extremely hot (40℃ [104 ℉ ] or higher) or cold (-10℃ [14 ℉ ] or ... -
Page 10: Features
• Multiprop channels can not use the mixing function. Replaceable switches S.BUS2 system Vibration function Windows Embedded Compact 7 R7208SB/R7308SB/R7214SB resources. Color LCD Main display featuring bi-directional communication. CONTENTS Your 32MZ-WC (packaged with an S.BUS receiver) includes the following components: • T32MZ-WC Transmitter • Transmitter case The set contents depend on the type of set. -
Page 11: Transmitter
TRANSMITTER Cautions on handling antenna WARNING Do not touch the antenna during operation. ■ There is the danger of erroneous operation causing a crash. Do not carry the transmitter by the antenna. ■ There is the danger that the antenna wire will break and operation will become impossible. Do not pull the antenna forcefully. ■ There is the danger that the antenna wire will break and operation will become impossible. -
Page 12: Rotating Antenna
Rotating antenna Angle adjustment of the antenna The antenna rotation and angle can be adjusted. The degrees. Forcing the antenna further than this can damage style. Low power High power High power *Rotate first *Stand up next Stand up:1 ⇒ 5 Storage: 5 ⇒ 1 LED monitor The status of the transmitter is displayed by changing the (LED Display) ◆... -
Page 13: Toggle Switch
Toggle switch • SA : 3 positions; Alternate; Short lever • SB : 3 positions; Alternate; Long lever • SC : 3 positions; Alternate; Long lever • SD : 3 positions; Alternate; Short lever • SE : 3 positions; Alternate; Short lever •... -
Page 14: Volume
Volume Volume LD and RD: linkage menu. Back side switch Switch SI, SJ: the setting screen of the each functions. Slide Lever LST (Left), RST (Right): LS (Left), RS (Right): and the other at the back of the transmitter. in the linkage menu. on the setting screen of mixing functions. -
Page 15: Digital Trim
Digital trim trim positions graphics on the screen. To change the trim the trim percentages. Note: Touch Panel are used for entering data. Touch softly the Touch Panel with the stylus pen or your fingertips. HOME/EXIT U.MENU/MON. Touch Panel is not failure. DANGER The T32MZ-WC touch screen is very sensitive. To avoid ac- cidentally activating it during a flight, it is suggested that it be ... -
Page 16: Home/Exit & U.menu/Mon. Button
HOME/EXIT & U.MENU/MON. Button HOME/EXIT U.MENU/MON. HOME/EXIT U.MENU/MON. Return to the previous Press To user menu display Press screen Press and hold To servo monitor display Return to the home Press and hold screen HOME/EXIT & U.MENU/MON. Panel lock/Lock release Simultaneous pressing... -
Page 17: Stick Adjustment
Stick Adjustment Adjustment of the lever length is recommended to adjust the length of the sticks in line [How to adjust the Stick length.] 1. Hold the lever head "B" and turn the lever head "A" 3. Securely lock the stick lever by holding lever head counter-clockwise, the lock will be released. A and turning lever head B counterclockwise. - Page 18 Adjustment of Stick Lever Tension For airplanes: For helicopters: Adjust the Adjust the screw screw on the on the right. [Adjustment of tension] left. Adjustment of Throttle Stick (Ratchet System) helicopter-touch. 1. Open the dust protection cap on the back of the transmitter that is covering the hole for throttle stick adjustment.
- Page 19 Release of spring tension The spring tension can be released by tightening e.g. Stick mode 2 → Stick mode 1 Loosen this screw and Tighten this screw to release add spring tension. the spring tension. Back side Loosen the screws for both of them. Next change the function For helicopters: Adjust the For airplanes: Adjust the screw screw on the left.
-
Page 20: Battery Exchange
Battery exchange Note: 2. Pull out the Battery removal clip and slide out the battery. 1. Open the battery cover by sliding as shown in the Battery removal clip Slide it to the position where the battery can be held by the internal battery holder. Battery holder The battery holder can not be removed from the transmitter. - Page 21 Attention to the direction 5. Slide and install the battery cover. Close the battery cover so that the wiring is not pinched. Be sure to attach a battery cover. WARNING Be careful to not drop the battery. Never take out the battery from the T32MZ-WC transmitter while the LED monitor is blinking. ■ Internal settings and memories can be destroyed. ■ Do not use the transmitter if a “Backup Error” warning occurs. Send it to the Futaba Service Center to be checked. Don't pull battery wiring. ■ When it short-circuits, there is danger of explosion ignition.
-
Page 22: Battery Charging
Battery Charging 1. Turn off the transmitter power. 2. Connect the power plug of the AC adapter to an AC outlet. *Don't connect AC plug to the T32MZ-WC without connecting with an AC outlet. 3. Open the back lid of the transmitter and insert the plug of the AC adapter into the CHG port. -
Page 23: Microsd Card (Sold Separately)
microSD Card (sold separately) to T32MZ-WC and use it. WARNING Be sure to turn off the power to the transmitter before insert- ing or removing the microSD card. As the microSD card is a precision device, do not use excessive force when inserting. If model data generated by a new software version transmit- ter is copied to an old software version transmitter, the transmit- ter may operate erroneously. Copy the model data after updating the copy destination transmitter to the new software version. Read data from a PC Stored data data such as picture data after a long period of use you failure to the data stored in the memory card for any reason. *No need for backup ... -
Page 24: Connector For Trainer Function (Trainer)
Do not connect any other chargers. The charger for the re- ceiver battery cannot be used for the transmitter. CRSF connector can only use up to ● CRSF CRSF Protocol for TBS not supported. WARNING Futaba is not responsible for damage sustained by combination with parts other than Futaba Genuine equipment. -
Page 25: Receiver
RECEIVER (Typical installation) R7208SB LED Indication Status LINK LED No signal reception Red Solid Receiving signals Green Solid Start → 2second S.BUS2 Waiting for link later → Red Blink(3 second) Red Green Unrecoverable error (EEPROM, etc.) Alternate blink port. In Dual RX Link Mode Status MODE LED External receiver is receiving error or Antenna instructions not connected. Red Solid 1. The two antennas must be kept as straight as S.BUS signal not received possible. -
Page 26: Channel Modes
Channel Modes Dual Rx Link System be operated. mode. R7208SB CH Mode table Channel Receiver : A Receiver : B Communicate with two receivers Even if there is a problem with the B receiver, communication will be performed with the A receiver. Default Even if there is a problem with Turn on the receiver. -
Page 27: How To Change To Dual Rx Link Mode
How to change to Dual RX Link mode FASSTest12CH(Telemetry OFF)mode This mode is forcibly turning off telemetry transmission Turn on the receiver. -
Page 28: How To Dual Rx Link
How to Dual Rx Link Receiver Switch ESW-1J 1 Install two receivers on the aircraft as shown in the turned on and off in an FET circuit. Compared to using a connection example. Link the two receivers using the dual receiver feature 2 less loss. of the transmitter. For systems without dual receiver capability, link each receiver in turn. -
Page 29: Toolbox
Toolbox Stylus pen adjustments that may be needed. Hexagonal wrench (1.5 mm and 2.5 mm) Tool for removing switch nuts. Safety precautions when you install receiver and servos Mounting the Servo WARNING Connecting connectors Be sure to insert the connector until it stops at the deepest Wood screw 2.3-2.6mm nut washer point. -
Page 30: Basic Operation
BASIC OPERATION How to stop the transmitter How to turn ON/OFF the power of the transmitter ® in operating system in the T32MZ-WC transmitter. on/off. Once you turn off the power, never operate the power switch until the power shutdown process is fully completed. If you turn on the power switch again while the transmitter is still in the process of power shutdown, the data could be damaged. How to reset software When turning on the power of the transmitter 1. Place the throttle stick below 1/3 closed. 2. -
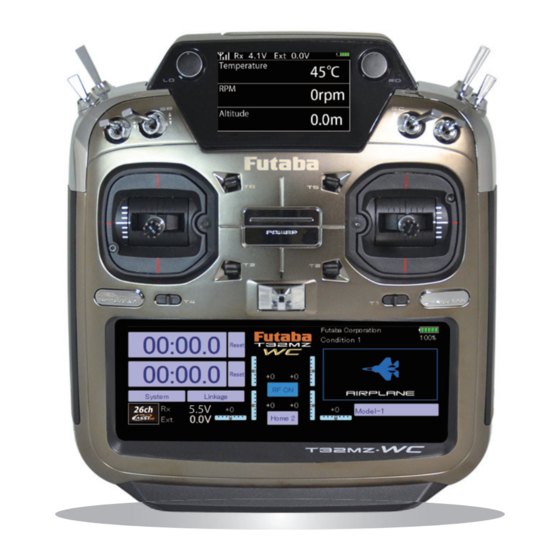
Page 31: Home Screen
Home screen screen. ① Timer ⑨ User's name If one of two timer displays is pushed, you will Push this area to enter the User's Name Setting screen. enter the Timer screen of a Linkage menu. In the button mode of a timer set, it can also ⑩... -
Page 32: Sub-Display
Sub-Display The sub-display can display timer or telemetry data. Telemetry receiving status Receiver Voltage Extra Voltage Transmitter Voltage Timer 1 Timer 2 How to display telemetry information Press [Home 2] from the home screen Main-display Press [Select] The telemetry data selected on the [Home 2] setting screen is displayed. Timer Telemetry Sub- display... -
Page 33: Link Procedue (T32Mz-Wc ↔ R7208Sb)
Link procedure (T32MZ-WC ↔ R7208SB) Linking method (T32MZ-WC ↔ R7208SB) 1. Bring the receiver to be linked to within 50 cm of Link mode the transmitter. Rx ON Within 50 cm 5. If linking is successful, the receiver LED changes from red to green, the link mode ends, and the receiver ID code is displayed. -
Page 34: Model Id
Model ID FASSTest, T-FHSS does not match the aircraft is used by mistake. Conventional system Model ID Rx 1 Rx 1 Operation Not Operation Operation Rx 2 Operation Rx 2 Model 1 Model 1 Model 2 Model 2 Model 3 Model 3 Operation Rx 3 Rx 3 Not Operation Select Model 2 Select Model 2 It works with different model data. Model 2 only works with Model 2 data. There is a risk of flying with different model data ! There is no risk of flying with different model data. Link is required when a new model is made from a model selection. Add new model data Model 1 Receiver Model 1... -
Page 35: How To Change The Number Of Value
How to change the number of value screen. Many increase Slightly increase Reset Press the value Slightly decrease Value setting button Many decrease appears How to activate the function Inhibit How to return to home screen or go back one step Push:Return to the previous screen Push and Hold:Return to the HOME screen Page of each setting screen Show pages (7 pages example) Bottom of screen of functions. To previous page To next page It is 1 page. -
Page 36: Switch Selection
Switch selection Press the switch Switch select screen appears Press the desired switch Press the ON Pos. Select the switch position Display of operation status A message is displayed when the function is turned ON/OFF. It is displayed for 5 seconds from the time of operation. -
Page 37: Home2 Screen
Home2 screen Timer If one of two timer displays is pushed, you will enter the If three either is pushed, it will move to a telemetry screen. Timer screen of a Three displays can be changed on a telemetry screen. Linkage menu. Panel lock →... -
Page 38: Registration Of The User's Name
Registration of the user's name T32MZ-WC transmitter can register user's name. How to register user's name 1. Turn on the power of the transmitter. 2. Push the area of the user's name shown on the home screen or the "user's name" in the system menu. Then the User's Name Set screen will pop up. 3. -
Page 39: Updating
UPDATING Updating procedure Note: If the battery fully discharges during program T32MZ SOFTWARE UPDATE updating, updating will fail. When the remaining battery capacity is 50% or less, always recharge the battery before updating. Note: The model data in the transmitter can be used unchanged after updating, but to be safe, back up the model data before updating. -
Page 40: Specifications
SPECIFICATIONS Your 32MZ -WC(packaged with an S.BUS receiver) includes the following components: • T32MZ-WC Transmitter • R7208SB, R7308SB, R7214SB Receiver, or Receiver-less • LT1F6600B Lithium-polymer battery & AC adapter • Switch harness • Tool Box (includes special jig for adjustment) •... -
Page 41: Compatibility Of Fasstest26Ch With Receivers
(Serial number less than 10361) Serial number Servos other than those listed here can be used as is. Updating requires a PC that can connect to the Internet and Futaba CIU-3. Refer to Futaba homepage for update software and update method. https://www.rc.futaba.co.jp https://futabausa.com The FASSTest 26CH mode is a new system that is ideal for those who need more channels, such as on large models. -
Page 42: Model Basic Setting Procedure
1. Model addition and call Default settings assign one model to the T32MZ-WC transmitter. To add new models or select previously setup models, use the Model Select function in the Linkage Menu. When a new model is added, relink with the receiver used in that model. - Page 43 4. Throttle cut setting ( In case of engine model ) 7. Airbrake Throttle cut can be performed with one touch by a switch This function is used when an air brake is necessary when without changing the throttle trim position. taking off or diving, etc.
-
Page 44: Helicopter Basic Setting Procedure
1. Model addition and call Default settings assign one model to the T32MZ-WC transmitter. To add new models or select previously setup models, use the Model Select function in the Linkage Menu. When a new model is added, relink with the receiver used in that model. - Page 45 4. Helicopter linkage Connect the throttle rudder, ailerons, elevators, pitch, and Operation of the swash plate near the hovering other rudder linkages in accordance with the kit instruction manual. For a description of the connection method, see "Receiver and servos connection". and elevator operation causes the swash plate to deviate from the normal direction.
- Page 46 This function sets the servo operation position at throttle hold. (Throttle cut and idle positions) When you want to link operation with stick [Speed]. condition select switch. *Pitch curve graph display can be switched to pitch angle direct reading display. Make the pitch at hovering approximately +5º~6º.
- Page 47 10. Gyro sensitivity and mode switching The gyro sensitivity and mode switching function is match take off and landing and vertical climb at dedicated to gyro mixing for each model used, and can be set for a constant speed. each condition. *For this curve, use the initial setting [Linear] curve [Separate] mode.
-
Page 48: Servos Connection By Model Type
The T32MZ-WC transmitter channels are automatically assigned for optimal combination according to the type selected with the Model Type function of the Linkage Menu. The channel assignment (initial setting) for each model type is shown below. Connect the receiver and servos to match the type used. - Page 49 ( Elevator 2 servo) 1Aileron 2Aileron 2Aileron+1FLAP 2Aileron+2FLAP The outp ut RxCH Glider Glider Glider Glider CH of each Airplane Airplane Airplane Airplane sy ste m Aileron Aileron Aileron Aileron Aileron Aileron Aileron Aileron Aileron Aileron Aileron Aileron Elevator Elevator Elevator Elevator Elevator Elevator Elevator Elevator...
- Page 50 2Aileron 2Aileron+1FLAP 2Aileron+2FLAP The output RxCH Glider Glider Glider CH of each Airplane Airplane Airplane syste m Aileron Aileron Aileron Aileron Aileron Aileron Aileron Aileron Aileron AUX4 AUX4 AUX4 AUX4 AUX4 AUX4 AUX4 AUX4 AUX4 Throttle Motor AUX7 Throttle Motor AUX7 Throttle Motor AUX7 Rudder Rudder...
- Page 51 2Aileron 2Aileron+1FLAP 2Aileron+2FLAP The output RxCH Glider Glider Glider CH of each Airplane Airplane Airplane system Aileron Aileron Aileron Aileron Aileron Aileron Aileron Aileron Aileron Rudder2 Rudder2 Rudder2 Rudder2 Rudder2 Rudder2 Rudder2 Rudder2 Rudder2 Throttle Motor AUX7 Throttle Motor AUX7 Throttle Motor AUX7 Rudder Rudder Rudder...
- Page 52 Helicopter ● FASSTest26CH / FASSTest18CH / FASST MULTI / FASST 7CH / S-FHSS / T-FHSS The outp ut CH of each All Other H-4/H-4X Swash sy ste m Aileron Aileron Elevator Elevator Throttle Throttle Rudder Rudder Gyro/RUD Gyro/RUD Pitch Pitch Governor Governor Governor 2 Elevator2 Gyro2/AIL Gyro2/AIL Gyro3/ELE Gyro3/ELE Needle Governor 2 AUX5 Needle AUX4 AUX4 AUX3 AUX3 AUX2 AUX2 AUX1 AUX1...
-
Page 53: System Menu
The System Menu sets up functions of the transmitter, this does not set up any model data. Starts and sets the trainer system. Display adjustment and auto power off setting. Sets the date and time (system clock setting) and resets the timer. User name registration and ID Pin number. -
Page 54: Trainer
T32MZ-WC trainer system makes it possible for the instructor to chose which channels and operation modes that can be used in the student's transmitter. The function and rate of each channel can be set, the training method can also be matched to the student's skill level. Two transmitters must be connected by an optional Trainer Cord, and the Instructors’... - Page 55 Note: In "teacher mode", the trainer function won’t show that is is activated unless the Instructors' transmitter receives signals from the student's this after connecting your trainer cable. "NORM" mode (Normal mode); "MIX" mode; "FUNC" mode (Function mode); < System Menu >...
- Page 56 The channel function can be selected and re-arranged Student side Instructor side Student CH for the student transmitter (when using either "FUNC" "MIX" "NORM") in the Trainer function of the Aileron Elevator transmitter. This makes trainer connection easy even Elevator Rudder when the instructor and student channel assignment are Throttle Throttle different.
-
Page 57: Display
The following LCD screen adjustments and auto power off setting are possible: [Start-up lock] ⇒ [Automatic lock] ⇒ [Cal.]calibration < System Menu >... -
Page 58: Date And Time
This function adjusts the system clock of the T32MZ- WC transmitter. Perform this setting when you purchase the set and when adjustment is necessary. The integrating timer can also be reset. *The integrating timer is displayed on the Home screen. <... -
Page 59: User Name
A PIN can also be set to protect the set data or user name. *Set the PIN carefully. When a system PIN is set, if you forget the PIN, none of the settings can be changed. In this case, the system must be reset by the Futaba Service Center. < System Menu >... -
Page 60: Switch
If you modify the location of the switches on the right and left (top) of the transmitter, you should be sure to re- assign functions to the switches for proper operation. A “Lock” is included to prevent settings from being unlock this by pressing “Lock”. -
Page 61: H/W Setting
This function is for adjusting the sticks, switches, and trim characteristics. It is not unless necessary. The power switch long press time when turning off the power can be selected from 1 second and 4 seconds. This function reverses the operation signal of the sticks, switches, trimmer levers, and knobs. - Page 62 [Normal] → Press and hold for 1 second to turn off the T32MZ-WC [Long] → Press and hold for 4 seconds to turn off the T32MZ-WC < System Menu >...
- Page 63 When this stick mode is changed, the model data is reset. of the stick matches the model operation. Change stick mode before entering model data. < System Menu >...
-
Page 64: Sound Volume
*If you have set the PIN try not to forget it. When a system PIN is set, if you forget the PIN, none of the settings can be changed or entered. In this case, the system must be reset by the Futaba Service Center. < System Menu >... -
Page 65: Player
The T32MZ-WC transmitter can play back ".wma" music Before downloading files from your PC into through the built-in speaker or through the headphone the microSD card, insert the microSD card into jack with your own headphones. the transmitter and turn on the power of the transmitter. -
Page 66: S.bus Servo
An S.BUS servo can memorize the channel and various settings itself. Servo setting can be performed on the T32MZ-WC screen by wiring the servo as shown in the Individual ID numbers are memorized for your S.BUS servos in your T32MZ-WC. When a servo is used (as shown at the right), the servo ID number is automatically read by the transmitter. - Page 67 on the right, the IDs of multiple servos installed on the aircraft can also be read and displayed in a list. Recall < System Menu >...
- Page 68 S.BUS Servo Description of function of each parameter *There are functions which can be used according to the kind of servo, and an impossible function. • ID Displays the ID of the servo whose parameters are to be read. It cannot be changed. • Channel Channel of the S.BUS system assigned to the servo. Always assign a channel before use. • Reverse The direction in which the servo rotates can be changed. • Servo type ■ Normal: Normal operation mode ■ Retract: Landing gear retract mode. When a load is applied to the servo for 30 seconds without any channel operation performed from the transmitter, the current consumption is suppressed by widening the dead band to 40° . When channel operation is performed from the transmitter, or the servo is moved outside the expanded dead band by an outside force, dead band expansion is reset and returns to the original operation. ■ O.L.P. : This is the Over Load Protection mode. When a servo horn has been locked for more than 5 seconds by a load, the servo output turns off to protect the servo. * The normal mode and retract mode are applicable only to the S3171SB, S9071SB, S9072SB, S9074SB, and S9075SB • Soft Start Restricts operation in the specified direction the instant the power is turned on. By using this setting, the first initial movement when the power is turned on slowly moves the servo to the specified position. •...
- Page 69 • Boost The minimum current applied to the internal motor when starting the servo can be set. Since a small travel does not start the motor, it essentially feels like the dead band was expanded. The motor can be immediately started by adjusting the minimum current which can start the motor. [Relationship between boost set value and servo operation] Small Motor reacts to a minute current and operation becomes smooth. Large Initial response improves and output torque increases. However, if the torque is too large, operation will become rough. • Boost ON/OFF OFF : It is the boost ON at the time of low-speed operation. (In the case of usual) ON : It is always the boost ON. (When quick operation is hope) • Damper The characteristic when the servo is stopped can be set. When smaller than the standard value, the characteristic becomes an overshoot characteristic. If the value is larger than the standard value, the brake is applied before the stop position. Especially, when a large load is applied, overshoot, etc. are suppressed by inertia and hunting may occur, depending on the conditions. If hunting (phenomena which cause the servo to oscillate) occurs even though the Dead Band, Stretcher, Boost and other parameters are suitable, adjust this parameter to a value larger than the initial value. [Relationship between damper set value and servo operation] Small When you want to overshoot. Set so that hunting does not occur. Large When you want to operate so that braking is not applied. However, it will feel like the servo response has worsened. (Note) If used in the hunting state, not only will the current consumption increase, but the life of the servo will also be shortened. • Stretcher The servo hold characteristic can be set. The torque which attempts to return the servo to the target position when the current servo position has deviated from the target position can be adjusted. This is used when stopping hunting, etc., but the holding characteristic changes as shown below. [Relationship between stretcher and servo operation] Small Servo holding force becomes weaker. Large ...
-
Page 70: Dlph-2
DLPH-2 mode setting can be performed on the T32MZ- S.I/F port RX1 port Recall Connect the battery to DLPH-2. Dual RX → Single RX → Airplane Gyro → Dual RX → . . . 1CH-16CH, DG1-2 → 17CH-24CH, DG1-2 → 1CH-16CH, DG1-2 →. . . [Airplane Gyro] [1CH-16CH, DG1-2] <... -
Page 71: Receiver
U.MENU/MON S.I/F port SB2/RX port No power supply required to receiver Recall Tap Recall within 10 seconds after connecting the receiver. If 10 seconds pass, an error will occur, so please try again. OFF ⇔ ON INH ⇔ ACT CH Mode Table Channel Mode Select CH mode <... -
Page 72: Information
The Information screen displays the T32MZ-WC system *When an microSD card are not inserted, their information is program version information, T32MZ-WC, microSD not displayed. card (memory size, vacant capacity, number of model < System Menu >... -
Page 73: Unit System
↔ → < System Menu >... -
Page 74: Range Check
The 'range check mode' reduces the transmission range of the radio waves to allow for a ground range check. *The range check mode, when activated, will continue for 90 seconds unless the user exits this mode early. When the *Since the range of the radio waves is short, if the progress bar reaches 90 second mark, the RF transmission model is too far from the transmitter, control will automatically returns to the normal operating power. -
Page 75: Linkage Menu
The Linkage Menu has all of the functions you will The functions which can be selected depend on which need to perform model addition, model type selection, model type you are using. A typical menu screen is frequency setting, end point setting, and other model shown below. -
Page 76: Servo Monitor
Servo Test & Graph Display/Displays servo positions. This is used for testing servo movement. Touch “Moving mode) depending on which one shows on the screen. To the neutral position of a servo horn. and you will move from “Moving Test” to “Neutral Test” Don't set a servo test mode when the drive position. -
Page 77: Model Select
This function is used to load the settings of the desired The Copy function is used to copy one set of model data model into the T32MZ-WC’s memory. into a second memory within the transmitter and the microSD card. It may be used for getting a head-start on The settings may be selected from either the transmitter’s setting up models with almost the same settings (only built-in memory or a microSD card. -
Page 78: Model Type
Note: Seven types of main wings and three types of tail wings are available for airplanes. Eight swash types are available for helicopters. Seven types of main wings and three types of tail wings are available for gliders. set in advance at the factory. Before After Data taking over... - Page 79 Select the model type from among airplane, helicopter, glider, and motor glider. Select from among : Selection from among: *For Tail-less wing, the rudder type can be selected from normal rudder and winglet. Select from normal, V-tail, and elevator. < Linkage Menu >...
-
Page 80: Picture
A photograph of the model taken with a digital camera When a picture is pasted, it is displayed as a screen image in the following screens: each model. This is convenient in identifying models with the same model name. cannot be used. Before reading data from the PC, insert the microSD card into the transmitter and turn on the power. -
Page 81: Sound
Sounds recorded with the microphone built into the transmitter or any audio files (.wav) can be set to the power switch or any preset switch that you choose. WC, microSD card) as the current model can be chosen. *The only audio file type which can be recorded is .wav. Before reading data from a PC, insert the Only the sounds recorded with the built-in microphone or microSD card into the transmitter and turn on the... - Page 82 This is used when calling the order of maneuvers, etc. selected by the above setting is turned on. < Linkage Menu >...
-
Page 83: System Type
A telemetry function cannot be used for the 2nd receiver. known with a transmitter. be changed from among 7 choices: FASSTest 26CH, FASSTest 18CH, FASSTest 12CH, FASST MULTI, FASST 7CH, S-FHSS, T-FHSS. Select the system matched to the type of receiver you are using.u Triple receivers can be linked with the T32MZ-WC. - Page 84 ↔ Do not perform the linking operation when the linking. drive motor is connected and the engine was started. ■ If the same receiver is sending in the vicinity, there is the ■ Inadvertent rotation of the motor or acceleration of the engine danger that the transmitter may be linked with that receiver.
- Page 85 System type FASSTest system receiver mode. Applicable with the telemetry sensor unit. Up to 26 ■ FASSTest 26CH --- channels (linear 24+ON/OFF2) can be used. ■ FASSTest 18CH --- FASSTest system receiver mode. Applicable with the telemetry sensor unit. Up to 18 channels (linear 16+ON/OFF2) can be used. ■ FASSTest 12CH --- FASSTest system receiver mode. Applicable with receiver voltage display. Up to 12 channels (linear10+ON/OFF2) can be used. Telemetry Sensor cannot be used, but the response speed is faster than that of the 18CH mode. Analog servos cannot be used with the FASSTest 12CH mode. • ■ FASST MULTI --- FASST-MULTI system receiver mode. Up to 18 channels (linear 16+ON/OFF2) can be used. ■ FASST 7CH --- FASST-7CH system receiver mode. Up to 7 channels can be used. ■ T-FHSS Air --- T-FHSS system receiver mode. Applicable with the telemetry sensor unit. Up to 18 channels (linear 16+ON/OFF2) can be used. ■ S-FHSS --- S-FHSS system receiver mode. Up to 8 channels can be used. ● In the FASSTest26CH system, the channels that can be used on the S.BUS/S.BUS2 port are different. ・ S.BUS port : 1 - 16 channel ...
-
Page 86: Function
When you select model and wing (swash) types, you channels. You can freely change combinations between channels and functions have been already preset. If servo output channels and input controllers you would like, on the function-setting screen of the linkage menu, you can freely change combinations of (sticks, switches, trim levers and trim switches). - Page 87 If [SWAP] is pushed, it will call up the following screen. You can easily change two separate functions, keeping the data that was set for each channel. < Linkage Menu >...
-
Page 88: Sub-Trim
The Sub-Trim function is used to set the servo neutral position, and may be used to make fine adjustments to the control surface after linkages and pushrods are hooked up. When you begin to set up a model, be sure that the digital trims are set to their center position. -
Page 89: Sub-Trim → Balance
In contrast to the neutral position correction for each channel using sub-trim, balance is an by multiple servos, it is used to absorb variations additional function that allows you to set an in operation between the multiple servos and arbitrary correction amount for the servo operating variations in the aileron linkage. - Page 90 Balance function setting example (aileron for large scale aircraft) Servo #12 Servo #11 Servo #1 This is a reference value so it cannot be changed. Adjust the rate of each point When zoomed, the vertical axis is displayed in detail Adjust the rate of each point When zoomed, the vertical axis is displayed in detail <...
-
Page 91: Servo Reverse
Servo Reverse changes the direction of an individual servo’s response to a control stick movement. For CCPM helicopters, be sure to read the section on Swash AFR before reversing any servos. With CCPM helicopters, always complete your servo reversing prior servo operation, the direction of control Glider functions that control multiple servos, it may be surfaces, and switch setup are correct. -
Page 92: Fail Safe
The Failsafe function is used to set up positions that the control suddenly moves to a position you did not servos will move to in the case of radio interference. command, land at once and check your receiver battery. Defines servo position when signals are lost and when receiver battery voltage becomes low. -
Page 93: End Point (Atv)
Note: The indicators on the screen display actual servo throw The End Point function adjusts the left and right servo throws, generates differential throws, and will correct of the each channel. The center position of the indicator is improper linkage settings. based on the Sub-Trim settings. -
Page 94: Throttle Cut
Throttle cut provides an easy way to stop the engine, by is not functional at high throttle to avoid accidental Idle dead sticks. The switch’s location and direction must be chosen, as it defaults to NULL. Note: When conditions are set, at Throttle cut setup can be performed for each condition. -
Page 95: Idle Down
The idle down function lowers the engines idle by is not functional at high throttle to avoid accidental dead sticks. The switch’s location and direction must be chosen, as it defaults to NULL. < Linkage Menu >... -
Page 96: Swash Ring
This function limits the travel of the swash plate to prevent linkage damage as the aileron and elevator operation is used. It is useful for 3D heli setting. < Linkage Menu >... -
Page 97: Swash
On your linkages, if the servo horn deviates from (Normally, the default value is used.) perpendicular at neutral, the linkage compensation functions may not work effectively. This neutral point swash plate so that it moves in the correct direction for setting reads the linkage compensation neutral position. - Page 98 separately. Note: → → → → → < Linkage Menu >...
-
Page 99: Timer
The Timer function may be set for any desired time, Each timer may be set for count-down or count up i.e. engine run time, specified times for competitions, operation with your choice of a target time. Also split etc. Two independent timers are provided for your use. time may be set up and counted. - Page 100 If a set period comes, you will be alerted by A setup of operation when the timer button in a vibration. home screen is pushed. → < Linkage Menu >...
-
Page 101: Dial Monitor
The Dial Monitor displays the current position and step The trim step of the T1-T6 can be set directly on the dial amount of each digital trim. The trim step can be set monitor menu. directly on the dial monitor. Displays the current position (black ) and last operating position (green ) of the VRs and slider levers. -
Page 102: Function Name
< Linkage Menu >... -
Page 103: Telemetry
This screen displays your choice of data from the Do not watch the transmitter screen during receiver. Also warnings can be activated regarding the data. For warned by an alarm (and vibration). the screen for you. A pilot should never take his eyes off his aircraft. -
Page 104: Audible Telemetry Information
In addition to the on-screen telemetry data information, the T32MZ-WC now has the ability to audibly indicate the aircraft status. → → → position. < Linkage Menu >... -
Page 105: A Setup Of Each Sensor Display
→ CA-RVIN-700 < Linkage Menu >... -
Page 106: Temperature Display
SBS-01T/TE operate. → SBS-01RM/RO/RB → Gear ratio < Linkage Menu >... -
Page 107: Altitude Display
SBS-01/02A Atmospheric pressure is measured by a sensor. The actual altitude is measured in regards to the difference between the ground and atmospheric pressure. Atmospheric pressure when the power supply of the altitude sensor is set to ON is displayed as a standard What altitude is it? [Reset] Push the button to re-set to a standard altitude. -
Page 108: Vario Melody Setting
Tap the [Melody] button Current variometer *These settings can be set each sensors. Range Deadband When the variometer is greater When the variometer is less than When the variometer is less than When the variometer is greater than this value, Vario melody is not this value, Vario melody is not this value, Vario melody is not than this value, Vario melody is not variable. -
Page 109: Gps Display
SBS-01/02G GPS, and displays the speed calculated from the distance, and distance from a preset position. acquire GPS satellite data. This process can take Additionally the sensor includes an accurate atmospheric several minutes. Please do not move the model pressure sensor that provides altitude and variometer (vertical during this process. - Page 110 ● GPS map display Equipped with GPS sensor The T32MZ-WC transmitter has a built-in GPS sensor. It is a function that displays the approximate position of the aircraft and pilot based on the data of the GPS sensor built into the transmitter and the GPS sensor installed in the aircraft. < Linkage Menu >...
-
Page 111: Voltage Display
SBS-01V from two different batteries at the same time. It will measure the voltage that its normal 3-pins connector is measure high voltages like drive batteries. < Two examples of wiring are shown > Two drive batteries are measured (SBS-01V use) Drive battery 1 (EXT Battery) Drive battery 2 (EXT Battery) *The same Receiver battery ... -
Page 112: Current/Voltage/Capacity Display
SBS-01C and capacity from drive battery at the same time. to reset. < Linkage Menu >... -
Page 113: Servo Sensor Display
*Servo sensor SBS-01S S.BUS2 servo only ◆ Current ◆ Operation ◆ Temperature → : Forgotten wiring alarm. < Linkage Menu >... -
Page 114: Airspeed Sensor Display
SBS-01TAS between airplane and air). And display it on the transmitter. The speed is measured from the pressure of the wind that the pitot tube receives. Unlike the ground speed measured by the GPS sensor, you can know the actual speed of the aircraft without headwind and tailwind effects. -
Page 115: Esc Display
*Futaba ESC(Telemetry compatible product) To CH3 Throttle ◆ MC-9130H/A telemetry connection example To free port To S.BUS2 SBM-2 To drive battery ◆ ESC telemetry display screen → The ESC status is displayed. Alarm setting is also possible. ◆ Current Voltage an alert. ◆ Capacity RPM * T h e c u r r e n t a n d c a p a c i t y ... -
Page 116: Sensor
1 , 2 , 8 , 9 , 1 0 , 1 6 , 1 7 , 1 8 , 6 slots 01S) 2 4 , 2 5 , 2 6 GPS (SBS-01/02G) 8 slots 8 , 1 6 , 2 4 Futaba ESC(MC-980H/A, MC- 8 slots 8 , 1 6 , 2 4 9130H/A, MC-9200H/A) TEMP125-F1713 1 slot 1 〜 31... - Page 117 Next explanation is required when using two or more the same kind of sensors. 【Example 1 Altitude sensor × 1, Temperature sensor × 1】 A setup is unnecessary. Two sensors are packed by HUB and it connects with S.BUS2 of a receiver. 【Example 2 Altitude sensor × 1, Temperature sensor × 2】 It is unnecessary to set up one altitude sensor and one temperature sensor. Sensor registration is required for two temperature sensors. The sensor unit of each transmitter slot is registered and the slot number of each sensor unit is changed automatically. "The registering succeeded." "There are not enough available slots" "The connected sensor is not ready"...
- Page 118 Next explanation is required when using two or more the same kind of sensors. This function rereads the slot number setting of the connected sensor units. This is a convenient way to allow another T32MZ-WC user to pilot your aircraft. ■ The procedure described below is in 2/2 of the sensor screens. < Linkage Menu >...
- Page 119 Next explanation is required when using two or more the same kind of sensors. It is necessary where a sensor is registered manually here. This item is unnecessary if "Sensor unit registration" is performed. △ ▽ △△ ▽▽ to the sensor. < Linkage Menu >...
- Page 120 Next explanation is required when using two or more the same kind of sensors. It is a case where a sensor is registered manually here. This item is unnecessary if "Sensor unit registration" is performed. ID of the sensor registered into each slot can be changed manually. Alternatively, registration of the sensor may be accomplished through the sensor unit registration function which follows. (ID is inputted automatically) < Linkage Menu >...
-
Page 121: Sensor Name
As the name suggests, this feature allows you to rename the sensors accordingly. This is very useful when a model has multiple sensors of the same variety (e.g., temperature). < Linkage Menu >... -
Page 122: Telemetry Setting
Telemetry data has been adapted to the log function which is recorded at the microSD card. the telemetry log converter available at the Futaba website. Notes ◇ ◇ Absolutely never remove the microSD card while log data is being recorded. - Page 123 The repeat time and duration time for the telemetry alarm (buzzer and vibration) can be set. Duration is not displayed when Repeat is INH. Duration Repeat It is an alarm output time. It is a repeat time of an alarm output. Setting range:1 s 〜 30 s Setting range:INH,1 s 〜 240 s Initial value:INH Initial value:INH Duration value has to be less than repeat value. Duration time is extended when the other alarm event occurs. e.g. Repeat time is 8 seconds and Duration time is 5 seconds. Repeat time 8 s Alarm ON ...
-
Page 124: Warning
A warning upon powering up your transmitter can be set * If a throttle stick turns on a power supply at full throttle up for the following functions. as in the case of the electric craft, it may begin to turn the prop at high rotation suddenly, and this is very Default setting is ON. -
Page 125: Data Reset
This function is designed to allow you to reset selected portions or all of the settings saved in the active model A function name is reset. memory. You may individually choose to reset the A user name is reset. Reset the digital trim setting. A telemetry settings is reset. -
Page 126: User Menu
T32MZ-WC has a menu for each of the following: System, Linkage, and Model. Also, you can create a personalized User Menu that can include all of the menus that you use most often. U.MENU/MON. Push Unregistered status Icon is not displayed *Any change made to data entered from the User Menu or from the normal method of use are the same. -
Page 127: Condition Hold
speed of the engine so that you may adjust flight conditions when the engine is running. An alarm indicates that the function is operating. It will prevent the engine from racing dangerously when adjusting the Idle-Up settings. While this function is active, the throttle servo when the function is activated. - Page 128 Before setting the model data, use the Model Type flight condition. When you want to use the system by function of the Linkage Menu to select the model type switching the settings for each condition by switch, stick matched to the fuselage. When another model type is position, etc., use the Condition Select function to add selected thereafter, the AFR, program mixing, and other setting data are reset.
- Page 129 The functions in the Model Menu can be used by conditions. Add conditions, as required. When you do not want to use the Condition Select function, this setting is unnecessary. In this case, initial setting. < Model Menu (Common Functions) >...
- Page 130 *For a description of the selection method, see [Switch Setting Method] at the back of this manual. < Model Menu (Common Functions) >...
- Page 131 AFR function is used to adjust the throw and operation another channel, both channels can be adjusted at the same time by adjusting the operation rate through the AFR function. When setting the D/R function, the screen display mode can be changed.
- Page 132 other conditions. < Model Menu (Common Functions) >...
- Page 133 Programmable mixing may be used to correct undesired tendencies of the aircraft, and it may also be used for programmed channel servo operation and may control up unusual control configurations. Mixing means that the to four circuits simultaneously. motion of a command channel, called the "master," is The Programmable mixing includes a powerful link added to the motion of the mixed channel, called "slave."...
- Page 134 < Model Menu (Common Functions) >...
- Page 135 < Model Menu (Common Functions) >...
- Page 136 Door opens Door closes Gear down Once set, this display will appear. Five sequencers can be set. The sequencer has three settings to choose from. ● Wheel/Basic Door 1.Gear down after a set time after the door opens. 2.The door closes after a set time after gearing up. ●...
- Page 137 Wheel/Basic Door 1.Select the switch to operate. SW direction Tap the desired SW 2.Select gear operation output function. Tap the function to operate the gear 3.Select door operation output function. Tap the function to operate the door Functions using the sequencer will be hidden.
- Page 138 Wheel/Cycle Door 1.Select the switch to operate. SW direction Tap the desired SW 2.Select gear operation output function. Tap the function to operate the gear 3.Select door operation output function. Tap the function to operate the door 4.Setting each rate and timing Gear down servo speed setting Gear down servo...
- Page 139 Wheel/Boost Door 1.Select the switch to operate. SW direction Tap the desired SW 2.Select gear operation output function. Tap the function to operate the gear 3.Select door operation output function. Tap the function to operate the door 4.Setting each rate and timing Gear down servo Door opening/closing servo speed setting...
- Page 140 This function is dedicated mixing used in needle adjustment of an engine that uses a fuel mixture control carburetor. Maximum change near center by center made small, trim is active only near the center. the adjustment range value is decreased, trim is active only near the center.
- Page 141 These are the menus usable when either airplane, condition, as required. When you want to use the system glider, or EP glider model type have been selected, and by switching the settings for each condition by switch or displayed in the Model Menu screen. First use the Model stick position, use the Condition Select function to add Type function of the Linkage Menu to select your model type, wing type, and tail type.
- Page 142 This function is used when powerful brake operation is necessary. [Glider, 2 ailerons or more] [Glider, 2 ailerons or more] [Airplane, general] This is dedicated mixing when a gyro is used. [Airplane/glider, general] This function adjusts the left and right rudders of winglet models. The operation speed when the motor of F5B and other EP gliders is started by switch can be set.
- Page 143 glider, 2 ailerons or more The left and right ailerons differential can be adjusted independently. The differential rate can also be adjusted according to the flying state by AIL1 AIL 2 (Main Aileron) (Main Aileron) AIL 3 AIL 4 (Chip Aileron) (Chip Aileron) operation.
- Page 144 each servo according to the wing type. offset FLP 3 FLP 4 FLP 1 (Brake Flap) FLP 2 (Brake Flap) (Camber Flap) (Camber Flap) (For more information, see the *The display screen is an example. The actual screen depends on the model type. manual.) independently.
- Page 145 in the aileron mode. When the aileron stick is manipulated, the ailerons and camber flaps move simultaneously and the roll axis is improved. FLP 1 FLP 2 (Camber Flap) AIL1 (Camber Flap) (Main Aileron) AIL 2 AIL 3 (Main Aileron) (Chip Aileron) AIL 4 (Chip Aileron)
- Page 146 aileron mode. When the aileron stick is manipulated, simultaneously and the performance of the roll axis is improved. FLP 3 FLP 4 (Brake Flap) (Brake Flap) AIL1 AIL 2 (Main Aileron) (Main Aileron) AIL 3 AIL 4 (Chip Aileron) (Chip Aileron) *The display screen is an example.
- Page 147 glider, general rudders with aileron operation. AIL1 AIL 2 (Main Aileron) (Main Aileron) AIL 4 AIL 3 (Chip Aileron) (Chip Aileron) RUDDER at Flying wing RUDDER 1 RUDDER 2 RUDDER AIL1 at V-TAIL AIL2 RUDDER 2 *The display screen is an example. The actual screen depends on the model.
- Page 148 general AIRBRAKE This mixing is used when you want to mix the elevators correct for drooping of the nose during airbrake operation. *This function does not operate when airbrake is not assigned. ELEVATOR ELEVATOR 2 V-TAIL ELEVATOR ELEVATOR 2 set. conditions.
- Page 149 general When the memory mode is exited, the memorized This function is used when you want to mix when rudder is applied during roll maneuvers, is automatically selected.) to scale models, large models, etc. like a full AIL1 When memory operation (switch operation) is performed in memory mode with the rudder correction, the switch operation position at RUDDER...
- Page 150 glider, 2 ailerons or more directions. The aileron, flap, and elevator rates can also be adjusted independently by curve, and attitude changes caused by camber operation can be corrected. Stick Stick *The display screen is an example. The actual screen depends on the model type.) adjustment <...
- Page 151 adjusted. the screen. setup screen. FLP 4 FLP 3 (Brake Flap) FLP 2 (Brake Flap) FLP 1 (Camber Flap) (Camber Flap) AIL 2 AIL1 (Main Aileron) (Main Aileron) AIL 3 AIL 4 (Chip Aileron) (Chip Aileron) ELEVATOR 2 ELEVATOR (at AILEVATOR) at V-TAIL ELEVATOR ELEVATOR 2...
- Page 152 glider, 2 ailerons or more This function is used when you want to mix the camber flaps with elevator operation. When mixing is used so that the flaps are lowered by up elevator, lift can be increased. adjustment rate. conditions (When conditions are set). <...
- Page 153 are used. FLP 1 (Camber Flap) FLP 2 (Camber Flap) ELEVATOR ELEVATOR 2 Model Menu to call the setup screen shown *The display screen is an example. The actual screen depends on the model type. adjustment setting) displayed on the screen. conditions (when conditions are set).
- Page 154 2 ailerons or more This function allows powerful brake operation by simultaneously raising the left and right ailerons landing configuration by accomplishing the following: adjust the rudder angle. tendency to tip stall. (The display screen is an example. The actual screen to set that point.
- Page 155 on the screen. AIL 3 (Chip Aileron) AIL1 (Main Aileron) FLP 1 (Camber Flap) FLP 3 (Brake Flap) ELEVATOR FLP 4 (Brake Flap) FLP 2 ELEVATOR 2 (Camber Flap) (at AILEVATOR) AIL 2 (Main Aileron) AIL 4 (Chip Aileron) at V-TAIL ELEVATOR ELEVATOR 2 <...
- Page 156 2 ailerons or more As an example can be set up for *When separating the settings for each condition, and a slight amount of up elevator. be used for high speed flying, with both ailerons elevator. setting a switch. To prevent sudden trim changes when switching flight conditions, a delay can be set to provide a smooth transition between the two.
- Page 157 adjust the rate with the adjustment FLP 3 FLP 4 (Brake Flap) (Brake Flap) FLP 2 FLP 1 (Camber Flap) (Camber Flap) AIL 2 AIL1 (Main Aileron) (Main Aileron) AIL 4 AIL 3 (Chip Aileron) (Chip Aileron) ELEVATOR 2 ELEVATOR (at AILEVATOR) at V-TAIL ELEVATOR...
- Page 158 This function is used when an air brake is necessary when landing or diving, etc. (When 2 ailerons model type selected) The offset amount of the aileron, elevator, and flap servos can be adjusted as needed. Also the speed of the aileron, elevator, and flap servos Note: The input numerics are examples.
- Page 159 adjust the rate with the adjustment FLP 3 (Brake Flap) FLP 4 FLP 1 (Brake Flap) (Camber Flap) FLP 2 AIL1 (Camber Flap) (Main Aileron) AIL 2 AIL 3 (Main Aileron) (Chip Aileron) AIL 4 (Chip Aileron) ELEVATOR ELEVATOR 2 (at AILEVATOR) <...
- Page 160 This function is used when a gyro is used to Function menu of the Linkage Menu to assign the sensitivity beforehand. switched with a switch. simultaneously controlled. (For more information, see the 5CH → GYRO 7CH → GYRO2 8CH → GYRO3 Control and Trim →...
- Page 161 This function let’s you adjust for left and right rudder angle changes at elevator and rudder ELEVATOR (RUDDER 2) RUDDER (ELEVATOR 2) to each rudder side moving up and down together, each side moves in opposite directions when V-TAIL as a Ruddervator, as they can serve the same purpose.
- Page 162 This function improves the operating performance of the roll axis by operating the elevators as ailerons. Ailevator is where each elevator, like ailerons on a down together, each side moves in opposite directions when moving as an Ailevator. Typically, both Ailevator performance, especially on larger wingspan planes.
- Page 163 This function adjusts the rudder left and right rudder rudders. The amount of movement of the two mounted rudder servos can be adjusted separately. Two servos are operated with one rudder stick. RUDDER 2 at Flying wing ( RUDDER 1 at Flying wing ( ...
- Page 164 This function lets you set the operation speed when the motor of a F5B or other EP glider is started by switch. The can also be operated as a safety function by setting two switches. Note: When using this function, always check initial operation with the propeller removed.
- Page 165 operation (switch operation) is performed with correction This function is used when you want to mix elevator undesirable tendencies when rudder is applied in roll maneuvers, knife edge, etc. of acrobatic planes. tuning) adjustment items are displayed. *When call switch were set (For a description of the switch setting method, memorized.
- Page 166 This function selects the switch and rate *The snap roll up side left and right and down side left and right direction switches are selected here. direction switch was switched to the direction mode is selected, snap roll in each direction The operation speed of each control surface when the switches.
- Page 167 This function lets you adjust the throttle when using Menu. a multi engine airplane with up to four engines. The center. *The throttle cut position set at this screen is THR1 THR2 THR3 THR4 screen is displayed. < Model Menu (Airplane/Glider) >...
- Page 168 Acceleration setting can be performed at elevator, ELE setting. The setting method is the same. < Model Menu (Airplane/Glider) >...
- Page 169 By installing the latest software on the GYA553, you can setting the airplane gyro GYA553 on the T32MZ-WC. Connection T32MZ-WC and GYA553 T32MZ-WC S.I/F Receiver Connection Cable (included with gyro) GYA553 CAUTION Be sure to connect and disconnect the GYA553 and T32MZ-WC connection cable with the power off. < Model Menu (Airplane/Glider) >...
- Page 170 SETTING 1. Select “Gyro setting” on the last page of Airplane Model Menu * At this time, if Gyro is not connected to T32MZ-WC by wire, this screen appears. When "GY Settings Transfer" is selected, the gyro setting data saved in T32MZ-WC is written to the gyro. 2. Select "Start" Tap "Yes" to display the GYA553 data saved in T32MZ- Select "Start" This will download the gyro data to the T32MZ-WC. To Basic menu 3. Home screen is displayed ◆ When copying data from Gyro A to Gyro B Connect the gyro A to the T32MZ-WC and press [Start]. (Enter the data of A into T32MZ-WC) If you press Start here, the B data will be download to the T32MZ-WC and the A data will be lost. Connect Gyro B to T32MZ-WC and press [GY Settings Transfer]. (Put data on A into gyro B) < Model Menu (Airplane/Glider) >...
- Page 171 Home screen Home screen sensitivity, battery voltage are displayed. Gyro operation mode / Gyro Battery voltage gain Displays the voltage of the Displays "AVCS" or "Normal" receiver battery connected to opera-tion mode and gyro GYA. gain of aileron (roll), elevator (pitch) and rudder (yaw) axis. GYA553 Software version The software version of the connected GYA553 is displayed.
- Page 172 Config Config Config 1/7 Gyro set mounting direction Set the mounting direction of GYA. Set mounting direction Config 1/7 WING/TAIL Set with the wing type/tail type of GYA553. The wing type/tail type of the transmitter is not used and is normal. ・ ・ ・ Select wing type Select tail type < Model Menu (Airplane/Glider) >...
- Page 173 Config Config Config 1/7 Servo type Select the servo type according to the servo to be used. Digital servo → DG : 285 Hz Analog servo → AN : 70 Hz action. Digital servo Analog servo Config 1/7 SB/R2 OUT Select the SB/R2 port. S.BUS(STD) If S3175HV, DLPH-1, etc. do not work with S.BUS(HS), use S.BUS(STD). S.BUS(HS) Rudder 2 Throttle Connect SV servo When using two rudder servos Program box S.BUS 2 MODE LED DATA LED MODE SW DATA SW Aileron S.BUS/Rudder 2 Rudder Aileron 2 Elevator 2...
- Page 174 Config Config Config 2/7 Gyro direction For dual aileron, dual elevator, and dual rudder aircraft, check the operating direction of each second aileron/elevator/rudder. Tilt the airplane to the left on the ground and check that the ailerons operate to the right. Tilt the airplane to the left on the ground and check that the 4-ailerons operate to the right. Turn the airplane to the right on the ground and check that the rudder operates to ...
- Page 175 Config Config Config 4/7 5/7 Servo limit This is the limit setting for each servo. The position of the maximum operation is read into the Aileron example Maximum angle button settings on the GYA553 main unit. Stick to full right Adjust the value (%) to reach the maximum operating position Maximum angle Stick to full left Adjust the value (%) to reach the < Model Menu (Airplane/Glider) >...
- Page 176 Config Config Config 6/7 Holding Power mode. The current rate numbers C1 to C5 are displayed by operating the channel of the transmitter. between them. You can set the holding power rate selector switch to the channel with the AFR function of Config 6/7 S.BUS Basic 2/3 C1-C5 switch ...
- Page 177 SBUS Basic menu SBUS Basic menu WARNING Always verify that the S.BUS function assignments match your transmitterʼ s function (in the FUNCTION menu) assignments. If any changes are made within the transmitter function assignments, then it will also be necessary to make the changes within the S.BUS function assignments. To change the channel, GYA553 and T32MZ-WC must be connected.
- Page 178 Pit to Needle: Pit to RUD: Fuel Mixture: Gyro: Used to switch Futaba GY series gyro sensitivity Governor: Used to switch RPM of the helicopter’s head Throttle Limiter: Limits the high range of the throttle movement by any slider or trimmer...
- Page 179 This function adjusts the pitch operation curve for each create a curve, a simple and smooth curve can be created by selecting the curve type and reducing the number of input points to movement of the throttle stick. points that you created. A curve, a simple and smooth curve can The pitch curve can be freely selected from linear operation curve to be created by selecting the curve type and reducing the number of smooth curve, and adjusted to match the curve you want by means...
- Page 180 Setting method by a bold line. the other conditions. When you want to set date into currently in use is also displayed. mode. ■ Curve setting examples The screens shown below are curves created by entering *For a description of the curve setting method, see the description at the pitch angle at low, center, and high side 3 points or 5 the back of this manual.
- Page 181 Hovering pitch trim High Pitch/Low Pitch Trim The Hovering Pitch function trims the pitch near the High Pitch/Low Pitch Trim is the pitch servo high side hovering point. Normally, it is used with the hovering and low side trim function. condition.
- Page 182 This function adjusts the throttle operation curve for each condition for optimizing the engine speed to throttle stick movement. A throttle curve from linear operation to smooth curve can be set. Adjustment to the curve you want to use is Function.
- Page 183 Curve setting examples The curves shown below were created by using the Line value). mode and inputting the data of the 5 points 0% (low side), 25%, 50% (center), 75%, 100% (high) side at each condition. They were created by reducing the number points of the line to 5.
- Page 184 An acceleration function can be set. This is used to adjust the pitch and throttle settings when the mixture is either too rich or too lean, which can be caused by sudden operation of the throttle stick. Setting method acceleration is performed. Note: When using the Acceleration function, since the pitch stroke is large, make your settings so there is no binding of your linkage.
- Page 185 This function sets the throttle cut position during an auto rotation dive. The throttle position can also be set to an idling position separate from the throttle cut position. This allows use for switching during training. Setting method Example of use Manual mode: switch operation only.
- Page 186 The swash mix function is used to correct the swash Example of use plate in the aileron (roll) direction and elevator (cyclic pitch) corresponding to each operation of undesirable tendencies in the roll direction each condition. Adjustment by independent curve for aileron, elevator, and pitch operations is possible.
- Page 187 This function corrects slowing of the engine speed Setting example caused by swash plate operation during aileron or elevator operation. The method of applying clockwise corrected. An acceleration function which temporarily increases the throttle side correction rate relative to rapid stick operation can also be set.
- Page 188 with needle control or other fuel-air mixture adjustment. A needle curve can be set. The acceleration function which can temporarily increase needle operation during throttle acceleration/deceleration operation can be set. The rise characteristic of the needle servo during acceleration and deceleration operation can be adjusted.
- Page 189 Use this mixing when you want to suppress the reaction mixing is not used. If this function is used when the gyro operation mode is the AVCS mode, the pitch operation. Adjust so that the nose does not move in neutral position will change.
- Page 190 This function is used when a gyro is used to stabilize the Note: fuselage attitude. The sensitivity and operation mode function. (Normal mode/GY mode) can be set up with three gyros Setting example for each condition respectively. mode) can be set up for three Gyros for each condition, respectively.
- Page 191 This is used to switch the RPM of the helicopters head. *When using the Fuel Mixture function, the mixture servo is controlled from the governor. When transmitting the mixture curve Up to three rates can be set for each condition. data from the transmitter to the governor, the governor AUX (m.trm) *The governor is used by connecting the governor speed setting connector must be connected to Governor2 function and governor...
- Page 192 This function limits the high range of the throttle movement by any slider or trimmer. The adjustment range of the high and low end can be set. button Setting method position. The limit value at the operation hardware neutral position can now be adjusted using the throttle limiter. <...
- Page 193 performed with the transmitter. Table of Contents Table of Contents ◆ T32MZ-WC-CGY755/CGY760R Connection ◆ Wireless Tunings Function List ◆ Wired Connection Setting ◆ Wireless Connection Setting ◆ Home Screen ◆ Basic Menu Map ◆ S.BUS Basic Menu ◆ Swash Basic Menu ◆ Flight Tune(Aileron/Elevator Basic Settings) ◆ RUD Basic(Rudder GYRO Basic Setting) ◆ GOV Basic(Governor Basic Setting) ◆ Expert Menu Map ◆ RUD Expert(Rudder Gyro Expert Setting) ◆ FLT. Expert(Aileron/Elevator Gyro Expert Setting) ◆...
- Page 194 A. Wired connection: Advanced settings (all functions same as GPB-1) T32MZ-WC Notes If the T32MZ-WC and gyro are not connected, CGY755/CGY760R the gyro setting value cannot be changed. ● Connect the receiver battery (3.5 to 8.4 V) to one of the "AIL" to "S.B2" connectors other P.BOX than "RPM" and "P.BOX". S.I/F (Do not connect to "RPM"...
- Page 195 SETTING A. Wired connection: Advanced settings CAUTION Be sure to connect and disconnect the CGY760R/CGY755 and T32MZ-WC connection cable with the power off. 1. Select "Gyro setting" on the last page of Helicopter Model Menu * At this time, if Gyro is not connected to T32MZ-WC by wire, the EQ ID screen appears. When "GY Settings Transfer" is selected, the gyro setting data saved in T32MZ-WC is written to the gyro. 2. Select "Start" Select "Start" This will download the gyro data to the T32MZ-WC. To basic menu To expert menu To receiver 3. Home screen is displayed ◆ When copying data from Gyro A to Gyro B Connect the gyro A to the T32MZ-WC and press [Start]. (Enter the data of A into T32MZ- If you press Start here, the B data will be written to the T32MZ-WC and the A data will be lost. Connect Gyro B to T32MZ-WC and press [GY Settings Transfer]. (Put data on A into gyro B) < Model Menu (Helicopter) >...
- Page 196 SETTING B. Wireless tunings Before making Wireless tunings, it is necessary to download the setting data from the gyro to the T32MZ-WC via a wired connection. T32MZ-WC First, wired connection ● Connect the receiver battery (3.5 to 8.4 V) to CGY755/CGY760R one of the "AIL" to "S.B2" connectors other than "RPM"...
- Page 197 Home Screen Home Screen Home Screen Display Condition number On the home screen, basic information such as swash type, With switch operation from the transmitter, several parameters can be switched by gyro operation mode, sensitivity and governor ON / OFF, setting up to 5 types of data. If you set the condition switch to the channel having the AFR function of the transmitter and set the point for each flight condition with engine operating time etc, are displayed. the AFR point curve, it can also be linked with the flight condition switch. • When either the DG1 or DG 2 switch is selected, the following options are available. Function Menu of your transmitter (DG1). Assigning DG1 to a switch or flight mode allows the use of two separate values for the condition selectable parameters. For functions that can set conditions in this manual, mark ...
- Page 198 Home Screen Home Screen Home Screen Basic menu screen ◆ Flight Tune(Aileron, Elevator) ◆ Swash Basic(Swash) ◆ Rud Basic(Rudder) ◆ Gov Basic(Governor) ◆ S.BUS Basic Expert menu screen ◆ Swash Detail(Swash) ◆ FLT Expert(Aileron) ◆ RUD Expert(Rudder) ◆ GOV Expert(Governor) Receiver screen ◆ Internal Rx ◆ RF type < Model Menu (Helicopter) >...
- Page 199 Basic Menu Basic Menu Make sure to set each " " . Basic menu screen ◆ Flight Tune(Aileron, Elevator) ◆ Swash Basic(Swash) ◆ Rud Basic(Rudder) ◆ Gov Basic(Governor) ◆ S.BUS Basic < Model Menu (Helicopter) >...
- Page 200 ELE2 channel Servo Type The channel of each function (If you want to use the ELE2 port for purposes other than swash.) can be changed. This selects the ELE2 servo types. There are three types of the servo driving frequency selection, AN:70 Hz, DG285 Hz, and 760 μ S. All Futaba digital servos can be operated with fastest DG:285 Hz mode but some of other brands of servos do not support DG:285 Hz mode. In this case, select the proper servo driving frequency per the manufacturerʼ s specifications. If you select H4-00 or H4-45 with 4 servo swashes, cannot set this ELE2 port servo type. In that case, select all swash servo types in SWH basic ...
- Page 201 RUD --------R RUD --------R (3) Servo Type This selects the swash servo types. There are four types or modes of the servo driving frequency selection, AN:70 Hz, DG:95 Hz, DG:140 Hz, DG285 Hz, and 760 μ S. All Futaba digital servos can be operated with fastest DG:285 Hz mode but some of other brands of servos do not support DG:285 Hz mode. In this case, select the proper servo driving fre- quency per the manufacturerʼ s specifications. Setting: AN:70 Hz / DG:95 Hz / DG:140 Hz / DG:760μS / DG:285 Hz ...
- Page 202 Swash Basic Swash Basic (4) SWASH Type: Swash change to plate type Select the swash plate type. When you change the setting, other data is initialized. Setting: H-1 / H3-120 / H3-140 / H3-90 / H4-00 / H4-45 Initial setting: H3-120 WARNING All of the swash plate parameters are reset when the swash plate type is changed. Doing so eliminates any possible errors or malfunc- tions within the system. After changing the swash plate type, Please proceed through the entire setup process once again before attempt- ing to fly the model.
- Page 203 Swash Basic Swash Basic (6)AIL, ELE, PIT. Ntr: Servo neutral adjustment Adjust the neutral position of the swash servo (aileron, elevator, pitch, second elevator). The second elevator (ELE2) is displayed only when the swash type is H4-xx. Setting ranges: +240 ~ -240 Initial value: 0 (7) SWS. Dir: Swash direction setting This selects the aileron, elevator and collective pitch direction. Reverse the direction when the stick movement and swash movement are op- posite. Each time you press the +/- button, the polarity switches.
- Page 204 Swash Basic Swash Basic (14) Pit. High: Pitch high memorizing This parameter saves the full positive collective pitch point into the CGY. [Setting method] Touch the "Pit. High" rate button to enter the setting mode. "Sure?" Is displayed. Operate the throttle stick fully to the high. If you touch the [Yes] button. The full positive pitch signal will be saved to the CGY. (15) Pit. Zero: Pitch zero memorizing This parameter saves the zero collective pitch point into the CGY. [Setting method] Touch the "Pit. Zero" rate button to enter the setting mode. "Sure?" Is displayed. Operate the throttle stick to 0 degree pitch. If you touch the [Yes] button. The zero pitch signal will be saved to the CGY. (16) Pit. Low: Pitch low memorizing This parameter saves the full negative collective pitch point into the CGY. ...
- Page 205 Flight Tune(Aileron / Elevator Basic settings) Flight Tune(Aileron / Elevator Basic settings) Flight tune sets control of helicopter roll (aileron) and pitch (elevator) axis. "FLT. (1) Base. Gain: Gyro base gain setting Cond This sets the Cyclic Gyro Base Gain. If the Rotor Head Gain (Rot HD Gn) Channels are set to "INH" within the CGY "SBUS.BASIC" menu, then the remote transmitter gain adjustment is not available. Thus the actual working ...
- Page 206 Flight Tune(Aileron / Elevator Basic settings) Flight Tune(Aileron / Elevator Basic settings) (3) Cnt. AuthAIL: Control Authority Aileron Cond Aileron Control Authority changes the rate at which the gyro will try to achieve the set "CYC. Rt". A higher value will create a quicker accelerated reaction to a stick input to reach and stabilize to the "CYC. Rt" value; a lower value will reach the desired "CYC. Rt" slower and accelerate slower ...
- Page 207 Flight Tune(Aileron / Elevator Basic settings) Flight Tune(Aileron / Elevator Basic settings) Note: To effectively operate the next "ELE Comp" (elevator correction), make sure to set "Pit High", "Pit Zero", "Pit Low" on the "SWITCH BASIC" menu. (7) ELE. Comp: Elevator pre compensation Cond A helicopter that has a head that rotates clockwise, will exhibit a tenden- cy whereby the nose will be pulled towards the disk with positive blade pitch. Conversely, the helicopter will push the nose away from the rotor disk during negative pitch inputs. In an instance of a slower servo set-up or larger (heavier) rotor blades, a small amount of elevator pre compen- sation may be needed to keep the nose of the helicopter flat at all times during collective pitch changes. In most cases with helicopter high- speed servos and standard 3D rotor blades, this function is not needed. ...
- Page 208 RUD Basic(Rudder GYRO Basic Setting) RUD Basic(Rudder GYRO Basic Setting) In the " " menu, you make the basic setting of the rudder gyro. WARNING " screen from the " " screen. " The servo type parameter within the CGY must match the type of servo you are using. Incorrect set- tings may damage the CGY or the servo. An incorrect setting may also result in a loss of control during flight.
- Page 209 GOV Basic(Governor Basic Setting) GOV Basic(Governor Basic Setting) Note: When using the governor function, be sure to make each setting of "GOV.BASIC". Note: After completing the linkage of the throt- " screen from the " " screen. " tle, be sure to set the "Servo limit point setting" first, and then set the other functions. (1) Governor: Governor active Set the governor operation mode of CGY. The initial setting is "ACT (ac- tive)" where, as the designation implies, the governor is active. If you do not want to use governor, select "INH (Inhibit)". Setting: ACT (Active) / INH (Inhibit) Initial setting: ACT (2) Gear Ratio: Input the main rotor gear ratio by pushing the "Gear Ratio" button to select the desired working mode.
- Page 210 GOV Basic(Governor Basic Setting) GOV Basic(Governor Basic Setting) (6) Stick sw.: Stick switch The governor can be activated by throttle stick position. [Setting method] Touch the "Stick SW" button to enter the setting mode. "Sure?" Is displayed. Operate the throttle stick to the position where you want to turn Governor ON. If you touch the [Yes] button, the ON position is memorized. This stick switch function is always enabled when the next "ON / OFF sw" is "INH" or the "Governor ON / OFF switch is not set by S.BUS setting. When governor is turned on and off by transmitter throttle stick The data is set so that the governor can be (Governor operating point) turned on and off with the transmitter throttle stick position. The following describes this operation. Set speed • Throttle stick over set point and more than 60% of set rotation speed.
- Page 211 GOV Basic(Governor Basic Setting) GOV Basic(Governor Basic Setting) (11) SenseTyp: Sensor type Select the type of governor sensor. Nitro (BPS-1 backplate; Magnet Type) 1:1 Magnet "1:1 Magn" (Magnet type applied to helicopter part that turns at the same RPM as the main rotor) HPoleEP: For Electric motors 8 poles and above LPoleEP: For electric motors 6 poles. (12) GOV Gain: Governor gain Cond Governor Gain. If the value of the Governor Gain is set too low, the heli- copter's RPM will fluctuate with collective and cyclic pitch changes. Con- versely, if the number is too high, the RPM itself will fluctuate and surge during flight. Setting ranges: 1 ~ 100% Initial value: Nitro = 40%, 1:1Magn = 60%, HPoleEP= 30%, LPoleEP = 10% (13) L Lmt. L rpm / H rpm: Low limit RPM Cond Low RPM Limit sets the minimum amount of throttle that the governor will command during an over-speed situation. Too low of value the en- gine could shut off or not recover power quickly enough during the next ...
- Page 212 Expert Menu Expert Menu Expert Menu ◆ Swash Detail(Swash) ◆ FLT Expert(Aileron・Elevator) ◆ RUD Expert(Rudder) ◆ GOV Expert(Governor) < Model Menu (Helicopter) >...
- Page 213 RUD Expert(Rudder Gyro Expert Setting) RUD Expert(Rudder Gyro Expert Setting) MENU 3D" screen. (1) RUD Ntr: Rudder servo neutral setting This parameter is used to set the neutral position of the rudder servo. Po- sition the rudder servo arm as perpendicular as possible to the tail rotor pushrod prior to making adjustments with this parameter. Setting ranges: -240 ~ 0 ~ +240 Initial value: +0 (2) EXP. AVCS / EXP. NORM: Rudder exponential This parameter sets the feel of the tail rotor control around center. When set to [0] the control curve is linear. Using a [+] value the tail rotor will be more sensitive around neutral conversely, using a [-] value will soften the feeling around neutral. The RUD EXP parameter in your transmitter can also be used to tune the tail rotor to a desired feeling. Setting ranges: -100 ~ 0 ~ +100% Initial value: AVCS = -20%, NORM = -20% Sports = AVCS -60% / NORMAL -40%, 3D = AVCS -20% / NORMAL -20%> < Model Menu (Helicopter) >...
- Page 214 RUD Expert(Rudder Gyro Expert Setting) RUD Expert(Rudder Gyro Expert Setting) (3) CNT. DlIn: Control delay in This parameter sets the delay as you move the stick from neutral toward left or right. Larger values result in a softer tail rotor feel off center. This parameter must be adjusted individually for LEFT and RIGHT tail rotor commands. Follow these same procedures to adjust the tail rotor feel in the opposite direction. [ Setting method ] Move the transmitter Rudder stick right or left in the direction you want to set. Touch the green button to enter the setting mode and set the de- lay amount. Do the same for the other side. Setting ranges: 0 ~ 20 n Initial value: 15 n (4) CNT. DlOut: Control delay out This parameter sets the delay when the stick is returned back to the neutral ...
- Page 215 RUD Expert(Rudder Gyro Expert Setting) RUD Expert(Rudder Gyro Expert Setting) (6) F/F.Rate U / F/F.Rate D: F/F mixing rate Feed Forward mix is used to counteract sudden increases in torque from the motor during fast collective pitch changes. If you notice a tail kick, using (right rudder on Clockwise rotor disk, left rudder on CCW) F/F mixing can be tuned to reduce the tail kick. The mixing amount can be individually set for high pitch side (U) and low pitch (D) side with zero pitch as the center. Setting ranges: -100 ~ 0 ~ +100% Initial value: +0% (7) ACC Gain: F/F mixing acceleration gain In low head speed situations where a lot of F/F Mixing might be needed, acc. gain boosts the input and removes it immediately after to help cure the sudden change in torque, but it does not allow the large tail rotor input to alter the axial behavior of the helicopter. ...
- Page 216 FLT. Expert(Aileron/Elevator Gyro Expert Setting) FLT. Expert(Aileron/Elevator Gyro Expert Setting) The " FLT.EXPERT " " FLT. EXPERT " screen from the " EXPERT MENU 3D " screen. (1) HeadHld A / HeadHld E: Head hold aileron / elevator Cond This features is used to adjust the heading hold aspect of the gyro con- trol. If the helicopter is not holding angle or cyclic control rates, increas- ing the heading hold gain will improve holding the helicopter at a certain angle and improve the cyclic rate consistency. If this is set too high you could see an oscillation on that axis. Lowering the heading hold below default would be used if the transmitter gain is reduced and a consistent oscillation is still not fixed during flight. Setting ranges: 0 ~ 200% Initial value: 80% (2) StopTune A : Stop tune aileron Cond Cyclic stop tuning on the aileron axis. If the helicopter continues to coast ...
- Page 217 SWH. Detail(Swash Detail Setting) SWH. Detail(Swash Detail Setting) The swash detail setting is used to keep the swash plate level at high and low collective pitch to cyclic interactions and cyclic pitch to collective pitch interactions. " " screen from the " EXPERT MENU 3D " screen. (1) PIT AIL: collective pitch aileron mixing rate...
- Page 218 SWH. Detail(Swash Detail Setting) SWH. Detail(Swash Detail Setting) (7) ELE PIT: elevator collective pitch mixing rate During back and forward elevator inputs at middle collective, check if the swash plate is raising or lowering during the input. [Setting method] Operate the transmitter stick in the direction you want to set. Touch the button lit in green to enter the setting mode and adjust the mixing rate. Do the same for the other side. Note: This setting can not be used when H4-00 swash mode is selected. Setting ranges: 30 ~ 150% Initial value: H3-120 = 50%, except H3-120 = 100% (8) ELE AIL: elevator aileron mixing rate While moving the elevator back and forth at middle collective, check to make sure the aileron axis is staying level. [Setting method] Operate the transmitter stick in the direction you want to set. Touch the button lit in green to enter the setting mode and adjust the mixing rate. Do the same for the other side. Note: This setting can not be used when H4-00 swash mode is selected. Setting ranges: 30 ~ 150% Initial value: H3-120 = 50%, except H3-120 = 100% (9) ELE ELE2: elevator 2nd elevator mixing rate This parameter adjusts the elevator to 2nd elevator mixing rate. The rate can be adjusted separately for up and down directions individually. ...
- Page 219 SWH. Detail(Swash Detail Setting) SWH. Detail(Swash Detail Setting) (12) ELE High / ELE Low: Linkage compensation elevator At both the HIGH pitch and LOW pitch check to make sure that the swash plate is staying level on the aileron and collective axis when using eleva- tor inputs. If the swash plate is rising or falling: [Setting method] Operate the transmitter stick in the direction you want to set. Touch the button lit in green to enter the setting mode and adjust the mixing rate. Do the same for the other side. Note: check all four directions: high/back; high/forward; low/back; low/ forward. Setting ranges: 0 ~ 100% Initial value: 0% (13) ELE Dir: Compensation direction of the elevator If the above Data (+/-) correction from 0-100 is NOT in the correct com- pensation direction, change the value from [+] or [-]. Setting: +/- Initial setting: + (14) Speed Comp: Speed compensation In 120 degrees CCPM all servos do not travel the same distance on eleva- tor ...
- Page 220 GOV. Expert(Governor Expert Setting) GOV. Expert(Governor Expert Setting) "GOV EXPERT" screen from the "EXPERT MENU 3D" screen. (1) Work Mode: Governor working mode Sets the governing type mode. - GOVERNOR (Governor Mode) ‒ RPM is entirely controlled by the GOV once it has engaged. The GOV will do whatever it takes to hold a con- stant RPM throughout flight. ...
- Page 221 GOV. Expert(Governor Expert Setting) GOV. Expert(Governor Expert Setting) (6) Revo. Up Dly: Revolution change up delay How quickly the RPM changes when increasing RPM between two differ- ent RPM conditions and flight modes. A higher number slows the RPM change rate; a lower value speeds up the RPM change rate. Setting ranges: 2 ~ 40 Frm Initial value: 8 Frm (7) Revo. Dn Dly: Revolution change down delay How quickly the RPM changes when reducing RPM between two differ- ent RPM conditions and flight modes. A higher number slows the RPM change rate; a lower value speeds up the RPM change rate.
- Page 222 This section describes the functions often used at the function setup screen. Refer to it when setting each function. Operations related to VR tuning Group/single mode switching (Gr./Sngl) Fine tuning VR setting setting contents with other conditions (Gr.) or setting independently (Sngl) can be selected.
- Page 223 Operations related to servo speed Master mode: The servo movement is Servo speed setting (1) traced by the setting curve. The trace 1. When setting the servo speed, touch the Speed button. The Servo Speed setup screen shown above is displayed. to the master channel.
- Page 224 This section describes the setting procedure of curves which are used with the AFR function and each mixing function. Curve type selection below is selected. screen of original function Curve type selection 1. Touch the button of the curve type you want to use. *The curve type changes and the display returns to the original screen.
- Page 225 Setting by curve type original screen. Adjust each curve as described below. Linear curve adjustment (Linear curve) RateA and RateB can be adjusted separately or simultaneously. *[Separate] mode: separately. *[Combined] mode: simultaneously. 1. Select the setting mode. *Initial value: +100.0% The curve can also be offset horizontally in the vertical direction and the rate reference point can be offset to the left or right.
- Page 226 EXP1 curve adjustment RateA and RateB can be adjusted separately or also be adjusted separately or simultaneously. *[Separate] mode: *[Combined] mode: simultaneously. 1. Select the setting mode. want to set. smoothening starting of the ailerons, elevators, rudder, etc. The curve can also be horizontally offset in the vertical direction.
- Page 227 Line and spline curve adjustment (Line curve) Line curves or spline curves of up to 17 points can be used. (Initial value: 7/9 points) The set points can which are symmetrical to the left and right of center can also be set. *[Separate] mode: Normal setting *[Combined] mode: Creates a left and right symmetrical curve.
- Page 228 Switch mode selection (Single switch/Logic switch) screen shown below is selected. Single mode or logic mode can be selected. Logic switch The Logic switch can activate functions by the use of other switch combinations. Up to 4 switch combinations can be set. The Logic switch can be assigned to the airplane mode).
- Page 229 Logic switch (Logic switch setting screen) 1.The logic selection dialogue appears when switches in the right are calculated as same way. you push the logic mode button. The 3 types selected. Caution: 1. The maximum number of the logic switch is 10 for off selection on each flight condition.
- Page 230 Switch selection screen below is shown. (Switch selection screen example) When switch is selected When stick, trim lever, or VR is selected. Switch ON/OFF setting is possible at each position. the following 4 modes can be selected. Alternate: depending on mixing function. Mode: Lin/Sym Type: Hysteresis (Hys.)/box (Box) switch was selected, the screen shown below...
- Page 231 Operation modes touching the Mode and Type buttons. Linear hysteresis mode When shifting the ON/OFF point This setting method selects function ON/OFF based The ON/OFF and hysteresis (dead band) boundary on the set point. Hysteresis (dead band) can be set between ON and OFF.
- Page 232 * A microSD card and an SD card adapter are required. R e m o v e t h e ADAPTER m i c r o S D c a r d ADAPTER T18MZ Insert the card into the Insert the microSD the SD card into necessary model data...
Need help?
Do you have a question about the 32MZ-WC and is the answer not in the manual?
Questions and answers