Table of Contents
Advertisement
Quick Links
Advertisement
Table of Contents

Related Manuals for AGFA DR 800


Summary of Contents for AGFA DR 800
- Page 1 DR 800 6010/200 User Manual 0392C EN 20210309 1049...
-
Page 2: Table Of Contents
Additional labeling of the radiographic table Additional labeling of the positioning console Additional labeling of the wireless console ...59 Additional labeling of the DR 800 sync cabinet Additional labeling of the positioner cabinet ..Additional labeling of the radiographic wall stand ................62... - Page 3 DR 800 | Contents | iii Additional labeling of the X-ray tube ceiling suspension ...........64 Additional labeling of the Full Leg Full Spine overlay ............65 Additional labeling of components with earthquake resistance ........66 Installation .............. 67 Mains supply ..........68 Radiation protection ........
- Page 4 | DR 800 | Contents Fine‐tuning the table position and centering of the examination area ........... 145 Gastrointestinal examinations: oesophagus and stomach ..................146 Gastrointestinal examinations: small intestine and colon ..................147 Skeleton ..............148 Cervical spine ............149 Abdominal and lumbar region .......
- Page 5 DR 800 | Contents | v Filter Status ..........197 Grid Status ..........198 Heat Units ..........199 Radiation status .........200 DAP Value ..........201 Fluo timer ..........202 Resetting the fluo timer ......203 Generator controls for static image, rapid sequence or ............... 204 Radiography imaging modes ......206...
- Page 6 | DR 800 | Contents Mounting the lower limbs support, ankle support or head contention device ..........250 Mounting the lateral arm rest on the radiographic table ..................251 Mounting the lateral arm rest on the radiographic wall stand ..............253 Mounting the lateral cassette/detector holder ..254...
- Page 7 DR 800 | Contents | vii Wireless console ........295 Collimator Technical Data ......296 Radiographic wall stand ......297 Ceiling suspension ........298 Workstation PC technical data ....300 DR 800 FLFS overlay ........301 Equivalent filtration ........302 Dosimetric and quantitative information (IEC 60601-2-54, IEC 60601-1-3) ......
-
Page 8: Legal Notice
Agfa and the Agfa rhombus are trademarks of Agfa-Gevaert N.V., Belgium or its affiliates. NX and DR 800 are trademarks of Agfa NV, Belgium or one of its affiliates. All other trademarks are held by their respective owners and are used in an editorial fashion with no intention of infringement. -
Page 9: Introduction To This Manual
DR 800 | Introduction to this Manual | 9 Introduction to this Manual Topics: • Scope of this Manual • About the safety notices in this document • Disclaimer 0392C EN 20210309 1049... -
Page 10: Scope Of This Manual
10 | DR 800 | Introduction to this Manual Scope of this Manual This manual contains information for safe and effective operation of the DR 800 system. 0392C EN 20210309 1049... -
Page 11: About The Safety Notices In This Document
DR 800 | Introduction to this Manual | 11 About the safety notices in this document The following samples show how warnings, cautions, instructions and notes appear in this document. The text explains their intended use. DANGER: A danger safety notice indicates a hazardous situation of direct, immediate danger for a potential serious injury to a user, engineer, patient or any other person. -
Page 12: Disclaimer
12 | DR 800 | Introduction to this Manual Disclaimer Agfa assumes no liability for use of this document if any unauthorized changes to the content or format have been made. Every care has been taken to ensure the accuracy of the information in this document. -
Page 13: Introduction
DR 800 | Introduction | 13 Introduction Topics: • Intended Use • Indications for Use • Intended User • DR 800 System Overview • Messages • Labels • Installation • Radiation Protection • Maintenance 0392C EN 20210309 1049... -
Page 14: Intended Use
14 | DR 800 | Introduction Intended Use The DR 800 is an X-ray modality. It is designed for general radiography and dynamic (fluoroscopy and/or rapid sequence) applications. The DR 800 will be used in a radiological environment by qualified staff to capture and route static and dynamic X-ray images. -
Page 15: Indications For Use
DR 800 | Introduction | 15 Indications for Use The DR 800 system is indicated for performing dynamic imaging examinations (fluoroscopy and/or rapid sequence) of the following anatomies/procedures: • Positioning fluoroscopy procedures • Gastro-intestinal examinations • Urogenital tract examinations • Angiography •... -
Page 16: Intended User
16 | DR 800 | Introduction Intended User This manual is written for trained users of Agfa products. Users are considered as the persons who actually handle the equipment as well as the persons having authority over the equipment. Before attempting to work with this equipment, the user must read, understand, note and strictly observe all warnings, cautions and safety markings on the equipment. -
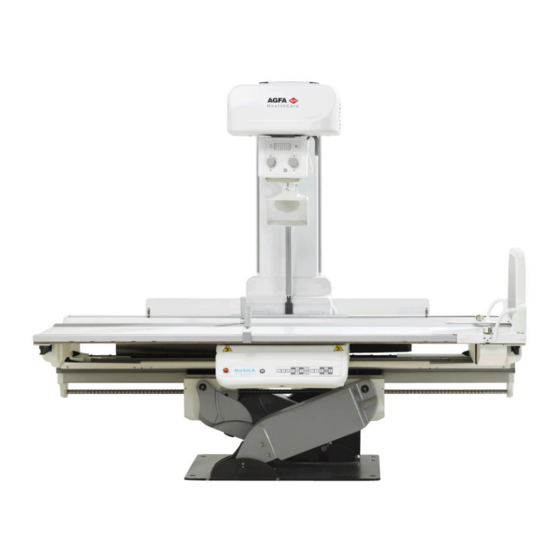
Page 17: Dr 800 System Overview
• Accessories for the radiographic table. X-ray parameters are controlled using the Software Console on the NX workstation. DR 800 can be used in combination with portable DR Detectors. DR 800 can be used in combination with a CR digitizer. 0392C EN 20210309 1049... - Page 18 18 | DR 800 | Introduction Radiographic table Position controls on the table Collimator X-ray tube Exposure controls Position controls NX workstation software Software console • Examination overview • Generator controls for static image or rapid sequence • Generator controls for fluoroscopy •...
-
Page 19: Radiographic Table
DR 800 | Introduction | 19 Radiographic Table The radiographic table is used for positioning of the patient lying, sitting or standing in front of the detector for exposure. The radiographic table has various degrees of freedom to allow different examinations. - Page 20 20 | DR 800 | Introduction Longitudinal and transversal displacement of the tabletop Longitudinal displacement of the X-ray tube and the DR detector Figure 2: Radiographic table movements 0392C EN 20210309 1049...
-
Page 21: Position Controls
DR 800 | Introduction | 21 Position Controls The position controls are available in the operator room. Optionally a wireless console with position controls is available in the examination room. Emergency stop button for motor driven movements of the radiographic... - Page 22 22 | DR 800 | Introduction Another set of position controls is available on the radiographic table. Emergency stop button for motor driven movements of the radiographic table Release position control. Keep the button pressed to allow movement. Source image distance (SID)
- Page 23 DR 800 | Introduction | 23 Positioning controls on page 229 Topics: • Position read-outs on the radiographic table • Wireless console with position controls Position read-outs on the radiographic table X-ray tube tilting angle Table tilting angle Figure 6: Digital read-out of tilting angles...
- Page 24 24 | DR 800 | Introduction On/off button with a multi-functional indicator light that indicates the on/off status of the console and the status of the battery charge. To turn on the wireless console, press and release the on/off button.
-
Page 25: Worklist Window
DR 800 | Introduction | 25 Worklist window Figure 9: Worklist Window In the Worklist window, you can view and manage the exams that are scheduled and that have been performed. 0392C EN 20210309 1049... -
Page 26: Software Console
26 | DR 800 | Introduction Software Console The software console is available to support X-ray exposure and position parameter control on the NX workstation. It is displayed on the NX workstation next to the NX application. The software console is used to control the X-ray exposure settings. - Page 27 DR 800 | Introduction | 27 Figure 11: Software console controls for generator, fluoroscopy, X-ray modality, positioner and system messages Related Links Software Console on page 187 0392C EN 20210309 1049...
-
Page 28: Exposure Controls
28 | DR 800 | Introduction Exposure Controls The exposure button is used to obtain a static image, to acquire a rapid sequence or to acquire a tomosynthesis sequence, depending on the mode that is selected in the software console. - Page 29 DR 800 | Introduction | 29 The sound signals that are heard when pressing the pedals are different for fluoroscopy and for radiography. Depending on the configuration, the exposure button on the wireless console and the footswitch in the examination room are disabled when an examination for the ceiling suspension is selected.
-
Page 30: Examination Window
30 | DR 800 | Introduction Examination window Figure 13: Examination window In the Examination window, you can view and manage the details of a specific examination. The drop-down list in the title bar of the window shows the name of the patient for which the examination is performed. You can select another name from the list to display the examination of the patient. -
Page 31: Acquisition Window
DR 800 | Introduction | 31 Acquisition window Figure 14: Acquisition window In the Acquisition window, you can manage the image acquisition for radiography and fluoroscopy examinations. A fluo group supports a DR workflow with fluoroscopy for positioning and contains a set of fluo sequences and a single static image. -
Page 32: Editing Window
32 | DR 800 | Introduction Editing window Figure 15: Editing window In the Editing window, you can prepare the image for printing. 0392C EN 20210309 1049... -
Page 33: Main Menu Window
DR 800 | Introduction | 33 Main Menu window Figure 16: Main Menu window In the Main Menu window, you can manage certain aspects of the NX Workflow which do not belong to the daily workflow. 0392C EN 20210309 1049... -
Page 34: Monitor For Reference Images
34 | DR 800 | Introduction Monitor for reference images An optional monitor can be installed in the operator room and/or in the examination room, on which images can be displayed during the examination, that have been acquired earlier on during the same examination. -
Page 35: Dr Detector Switch
DR 800 | Introduction | 35 DR detector switch The DR detector switch is available in the X-ray modality status frame of the software console. The DR detector switch shows which DR detector is active and shows its status. The DR detector switch can be used to activate another DR Detector. -
Page 36: Collimator
36 | DR 800 | Introduction Collimator The collimator controls consist of a button to switch on the collimator lamp and two knobs to open or close the internal blades of the collimator. When pressing the collimator lamp push-button, the collimator light turns on. - Page 37 DR 800 | Introduction | 37 Collimator rotation Depending on the configuration, the collimator can be rotated around the axis of the X-ray beam. Note: Black borders are not applied to dynamic images if the collimator is rotated. Put the collimator in the default position for performing dynamic imaging examinations.
-
Page 38: Portable Dr Detector
38 | DR 800 | Introduction Portable DR Detector When performing an exposure, keep in mind the following detector orientation aids: 1. Tube side 2. Patient orientation marker For an overview of the operation controls of the DR Detector, refer to the user manual of the DR Detector. -
Page 39: Compressor
DR 800 | Introduction | 39 Compressor The remote controlled compressor allows an effective though not traumatic palpation. The default compression force is 150 N. The compressor is designed for mechanical and electrical safety, as well as safety against wrong manoeuvres. -
Page 40: Flfs Overlay
40 | DR 800 | Introduction FLFS overlay The FLFS overlay consists of a stitching grid and a mounting unit. The stitching grid must be attached to the radiographic table using the mounting unit. The partial images of the FLFS examination are automatically stitched to create the DR Full Leg Full Spine image. -
Page 41: Emergency Stop Button
DR 800 | Introduction | 41 Emergency stop button If a system malfunction causes an emergency situation involving the patient, operating personnel or any system component, activate the emergency stop button. • On the position controls console • On the position controls Figure 23: Multiple emergency stop buttons are available on the system The emergency stop buttons are red with the word "STOP"... -
Page 42: Emergency Shutdown Power Switch
In this situation, the system must not be restarted and the Agfa service organization must be promptly contacted. An installation must be fitted with two emergency stop buttons. They must be effectively arranged so that the first button is close to the radiographic table and easily reached by the operator. -
Page 43: Cabinets And Power Switch
• Positioner cabinet • DR 800 sync cabinet The DR 800 sync cabinet is installed on top of the generator cabinet or nearby the NX workstation. These are the functions of the DR 800 sync cabinet: • connection between the NX workstation and the other cabinets •... -
Page 44: Radiographic Wall Stand
44 | DR 800 | Introduction Radiographic wall stand The radiographic wall stand is used for positioning of patients standing upright or sitting towards the bucky for exposure. The radiographic wall stand has two variants: • Wall stand with vertical bucky •... - Page 45 DR 800 | Introduction | 45 • Positioning the wall stand bucky • Inserting a DR detector in the wall stand bucky • Securing the detector in the bucky Positioning the wall stand bucky To adjust the height (mechanical brake): Figure 26: Mechanical brake 1.
- Page 46 46 | DR 800 | Introduction 1. Relesae the tilting brake, turning the knob of the tilting brake counterclockwise. 2. Adjust the tilting angle. 3. Lock the bucky into position, turning the knob clockwise. To rotate the bucky: Detector tray lock...
- Page 47 DR 800 | Introduction | 47 Inserting a DR detector in the wall stand bucky Bucky Bucky drawer DR Detector or CR cassette Lever to lock the clamps Bucky drawer handle Clamp Vertical center indicator Vertical stop Figure 29: Bucky...
- Page 48 48 | DR 800 | Introduction Push the lever to release the detector tray lock Figure 31: Detector tray lock for earthquake resistance To secure the lock for earthquake resistance, first turn the knob on the lever counterclockwise to allow the lock to be released.
-
Page 49: Ceiling Suspension
DR 800 | Introduction | 49 Ceiling Suspension Transversal rails Carriage Longitudinal rails Telescopic column X-ray tube head unit Collimator Figure 33: Ceiling Suspension Topics: • Positioning the X-ray tube of the ceiling suspension • Collimator of the ceiling suspension... - Page 50 50 | DR 800 | Introduction Display for X-ray tube rotation angle and SID value Positioning controls Collimator controls Figure 34: Control panel of the X-ray tube The operation controls of the X-ray tube head unit are located at the control panel.
- Page 51 DR 800 | Introduction | 51 Note: To avoid shock and damage, move the tube head unit with normal speed and slow down when reaching the mechanical end stops. CAUTION: Rotation may be limited by cables. Avoid strain on the cables during rotation.
-
Page 52: Messages
52 | DR 800 | Introduction Messages Under certain conditions the system shows a dialog box in the middle of the screen containing a message, or a message is displayed in a fixed message area in the user interface. This message informs the user that either a problem has occurred or that a requested action cannot be performed. -
Page 53: Labels
DR 800 | Introduction | 53 Labels Do not remove the labels applied to the equipment, they are an integral part of the instructions and documentation that accompany it. Symbol Explanation General warning, caution, risk of danger. Read and understand all instructions and warning labels in the product documentation before using the equipment. - Page 54 54 | DR 800 | Introduction Symbol Explanation On (power: connection to the mains) Off (power: disconnection from the mains) On - off (push-push) Protective earth (ground) Functional earth This mark indicates that this is a Type B Equipment Symbol of filtration.
- Page 55 Additional labeling of the radiographic table • Additional labeling of the positioning console • Additional labeling of the wireless console • Additional labeling of the DR 800 sync cabinet • Additional labeling of the positioner cabinet • Additional labeling of the radiographic wall stand •...
-
Page 56: Additional Labeling Of The Radiographic Table
56 | DR 800 | Introduction Additional labeling of the radiographic table Type label of the radiographic table is on the lower left side of the central table frame. Figure 36: Sample of type label Warning symbol that indicates that fingers may be crushed. - Page 57 DR 800 | Introduction | 57 Warning labels on the radiographic table Warning for crushing by the longitudinal and transversal displacement of the tabletop Warning for crushing by the transversal displacement of the tabletop Warning for maximum load on the table...
-
Page 58: Additional Labeling Of The Positioning Console
58 | DR 800 | Introduction Additional labeling of the positioning console Type label at the rear side of the positioning console. Figure 38: Sample of type label The 21 CFR Subchapter J label is positioned close to the type label. -
Page 59: Additional Labeling Of The Wireless Console
DR 800 | Introduction | 59 Additional labeling of the wireless console Following warning is printed on the rear side of the wireless console in English and Italian: WARNING: Figure 40: Sample of warning label Board powered in battery. A wrong replacement of the battery may involve a risk of explosion. -
Page 60: Additional Labeling Of The Dr 800 Sync Cabinet
60 | DR 800 | Introduction Additional labeling of the DR 800 sync cabinet Type label of the DR 800 sync cabinet is on the side of the cabinet. Figure 41: Sample of type label 0392C EN 20210309 1049... -
Page 61: Additional Labeling Of The Positioner Cabinet
DR 800 | Introduction | 61 Additional labeling of the positioner cabinet Type label on the foot of the positioner cabi- net. Figure 42: Sample of type label 0392C EN 20210309 1049... -
Page 62: Additional Labeling Of The Radiographic Wall Stand
62 | DR 800 | Introduction Additional labeling of the radiographic wall stand The type label of the radiographic wall stand is on top of the column. Figure 43: Sample of type label The maintenance label is on top of the column on the left side. -
Page 63: Additional Labeling Of The Collimator
DR 800 | Introduction | 63 Additional labeling of the collimator Type label of the collimator. Figure 45: Sample of type label Laser power. Laser source location. 0392C EN 20210309 1049... -
Page 64: Additional Labeling Of The X-Ray Tube Ceiling Suspension
64 | DR 800 | Introduction Additional labeling of the X-ray tube ceiling suspension The type label of the ceiling sus- pension is on the front side of the telescopic column. Figure 46: Sample of type label The maintenance label is on the front side of the telescopic column. -
Page 65: Additional Labeling Of The Full Leg Full Spine Overlay
DR 800 | Introduction | 65 Additional labeling of the Full Leg Full Spine overlay Table 2: FLFS Overlay Label Meaning This mark shows compliance of the equip- ment with Regulation 2017/745 (for Euro- pean Union). Type label on the reverse of the Ful Leg... -
Page 66: Additional Labeling Of Components With Earthquake Resistance
66 | DR 800 | Introduction Additional labeling of components with earthquake resistance The label indicates that the component is tested for earthquake resistance. Figure 51: Example of the label 0392C EN 20210309 1049... -
Page 67: Installation
DR 800 | Introduction | 67 Installation Installation and configuration is performed by an Agfa trained and authorized service engineer. Contact your local support organization for more information. The unit shall not be installed in wet enviroments like emergency operation rooms and operating theatre. -
Page 68: Mains Supply
68 | DR 800 | Introduction Mains supply All the components of the X-ray installation must be connected to the electrical mains by means of a socket or another multi-polar connector that must be installed by the customer. The room of the installation must be in compliance with the IEC/CEI or UL/CSA prescriptions in force (where requested). -
Page 69: Radiation Protection
DR 800 | Introduction | 69 Radiation protection The system is intended to be used in X-ray rooms with appropriate shielding. 0392C EN 20210309 1049... -
Page 70: Radiation Protection
70 | DR 800 | Introduction Radiation Protection X-ray radiation can cause serious damage to the health, therefore observe great care and ensure that protection against X-ray exposure is always applied. Some of the effects of X-ray radiation are cumulative and may extend over a period of time. -
Page 71: Fluoroscopy
DR 800 | Introduction | 71 Fluoroscopy Fluoroscopy is a radiological technique used to obtain real time images of a patient's internal anatomy, with the possibility of registering and reproducing the obtained images on monitor. The use of X-rays and subsequently fluoroscopy, requires that potential risks of exposure be carefully balanced by the benefits in terms of diagnosis, that the examination is able to offer. -
Page 72: Monitoring Of Personnel
72 | DR 800 | Introduction Monitoring of Personnel The monitoring checks the amount of X-ray radiation the personnel has been exposed to. It determines safety of the operators and it helps checking if safety measures of the X-ray environment are adequate. Inadequate or improper protection can lead to serious damage to the health. -
Page 73: Protected Area And Significant Zones Of Occupancy
DR 800 | Introduction | 73 Protected area and significant zones of occupancy If the operator or staff does not need to be close to the patient during the exposure, the operator and staff use the protected area to control the following functions: •... - Page 74 74 | DR 800 | Introduction to the patient), the significant zone of occupancy applies for operator and staff. Warning: The radiation protection has to be applied to the patient and to the operator. 200 cm 200 cm 0 cm...
- Page 75 DR 800 | Introduction | 75 Total radiation dose 6600 cGy·cm 200 cm 200 cm 0 cm 0 cm Vertical axis indicating operator position at the right side of the table (at 15 cm from the right side of the tabletop and at 50 cm distance from...
- Page 76 76 | DR 800 | Introduction Total exposure time 200 s Inherent filtration 2.9 mm Al equivalent Total radiation dose 3000 cGy·cm 0392C EN 20210309 1049...
-
Page 77: Maintenance
Safety is only guaranteed when changes, additions, maintenance or repairs are carried out by an Agfa certified field service engineer. A non certified engineer performing a modification or service intervention on a medical device, acts on his own responsibility and makes the warranty void. - Page 78 78 | DR 800 | Introduction CAUTION: In case of functional defects or other deviations from normal operation behavior the unit has to be switched off immediately and the service to be informed. The equipment must only be put back into operation when the fault has been repaired.
- Page 79 DR 800 | Introduction | 79 Check the cables. Ensure that cables are not damaged Every 6 months and cable jackets are not torn. Check the automatic collimation Every 6 months Replace the batteries in the wireless pedal Every 12 months The DR detector requires regular calibration.
-
Page 80: Maintenance Of The Ceiling Suspension And The Radiographic Wall Stand
80 | DR 800 | Introduction Maintenance of the ceiling suspension and the radiographic wall stand WARNING: The steel cable and winding drums must be checked every year. The steel cable must be replaced following the indication on the label that is placed on the equipment and in the latest every 5 years for the ceiling suspension and every 10 years for the wall stand. -
Page 81: Offset Calibration
Image artifacts after exposure of the system to foreign X-ray radiation. If another X-ray device (X-ray tubes not connected to the DR 800 generator) has been used nearby the system and you are not sure that automatic offset calibration has been performed (e.g. -
Page 82: Checking The Automatic Collimation
82 | DR 800 | Introduction Checking the automatic collimation 1. Move the focal distance to 115 cm. 2. Select the second sensor area and check that the collimator automatically sets to the selected value (30x30). 3. Vary the focal distance and check that the selected format keeps the right value. -
Page 83: Cleaning And Disinfecting
DR 800 | Cleaning and Disinfecting | 83 Cleaning and Disinfecting All appropriate policies and procedures should be followed to avoid contamination of the user/staff, patients and other equipment. All necessary precautions shall be taken to avoid patient contact or contact with potential sources of contamination. -
Page 84: Cleaning
84 | DR 800 | Cleaning and Disinfecting Cleaning To clean the exterior of the equipment: 1. Stop the system WARNING: When the equipment is going to be cleaned, be sure to turn off the main power of the system. Never use anhydrous or high solvency alcohols, benzine, thinner or any other flammable cleaning agent. -
Page 85: Use Of Protective Covers And Sheaths
DR 800 | Cleaning and Disinfecting | 85 Use of protective covers and sheaths If the system is used in an environment where disinfection is required or where it may get into contact with blood or other body fluids, use covers or sheaths to protect the system from direct patient contact. -
Page 86: Disinfecting
If you plan to use other disinfectants, approval of Agfa is needed before use, as most disinfectants can damage the device. UV disinfection is also not allowed. Perform the procedure following the instructions for use, the disposal instructions and the safety instructions of the selected disinfectants and tools and of the hospital. -
Page 87: Disinfecting Safety Directions
DR 800 | Cleaning and Disinfecting | 87 Disinfecting safety directions WARNING: Using a disinfectant that can form an explosive or flammable gas mixtures is hazard to life and health because of explosion risk. Switch the equipment off before disinfecting. Allow the gas mixture to evaporate before switching the x-ray system back on. -
Page 88: Approved Disinfectants
88 | DR 800 | Cleaning and Disinfecting Approved disinfectants Refer to the Agfa website for specifications on the disinfectants that have been found compatible with the cover material of the device and can be used on the outer surface of the device. -
Page 89: Flfs Overlay
DR 800 | Cleaning and Disinfecting | 89 FLFS Overlay All appropriate policies and procedures should be followed to avoid contamination of the user/staff, patients and other equipment. All existing universal precautions should be extended to avoid coming into contact with patient or close contact with patient or potential contaminations. -
Page 90: Safety Directions
90 | DR 800 | Safety Directions Safety Directions WARNING: Safety is only guaranteed when an Agfa certified field service engineer has installed the product. WARNING: The product must only be installed using released components and in released configurations. WARNING: To avoid risk of electric shock, this equipment must only be connected to a supply mains with protective earth. - Page 91 DR 800 | Safety Directions | 91 WARNING: The DR Detector is not intended to be used as a primary barrier to X-rays. The user is responsible for ensuring the safety of the operator, bystanders, and the subjects being radiographed.
- Page 92 CAUTION: Strictly observe all warnings, cautions, notes and safety markings within this document and on the product. CAUTION: All Agfa medical products must be used by trained and qualified personnel. Topics: • Dangerous areas •...
- Page 93 DR 800 | Safety Directions | 93 • Getting on and off the table • Preventing damage to the equipment • Attention to overhead loads • Full Leg Full Spine • Digital tomosynthesis • Ceiling suspension and radiographic wall stand...
-
Page 94: Dangerous Areas
94 | DR 800 | Safety Directions Dangerous areas During movement of the X-ray system, dangerous areas can be identified in the surrounding space. It is necessary to pay special attention to such areas, in order to prevent collisions or crushing. - Page 95 DR 800 | Safety Directions | 95 0392C EN 20210309 1049...
- Page 96 96 | DR 800 | Safety Directions Figure 56: The cross-hatched area indicates where there is a risk of collision or crushing depending on the position of the system 0392C EN 20210309 1049...
- Page 97 DR 800 | Safety Directions | 97 Figure 57: The black arrows indicate where there is a risk of collision and the white arrows indicate where there is a risk of crushing A pair of handgrips is a standard accessory of the system. Make sure that these handgrips are always installed.
-
Page 98: Patient Visibility
98 | DR 800 | Safety Directions Patient visibility Positioning console and exposure controls in the operator room Radiographic table DR 800 sync cabinet Generator cabinet Positioner cabinet Figure 58: Typical room layout (A is the maximum longintudinal dimension; safety area is indicated with cross-hatches) The room layout must allow the operator to keep complete visual contact with the moving tabletop and monitor the patient even from the operator room. - Page 99 DR 800 | Safety Directions | 99 In order to guarantee patient safety, a camera which displays the patient's image is built in the collimator, so the operator can monitor the patient position. This camera image is displayed on the software console.
-
Page 100: Wireless Console
100 | DR 800 | Safety Directions Wireless console WARNING: Bluetooth communication works up to a maximum distance of 10 metres. For proper operation of the system, use the wireless console exclusively within the operating room. WARNING: To conserve battery power, the wireless console automatically turns off 3 minutes after the equipment has been turned off. -
Page 101: Getting On And Off The Table
DR 800 | Safety Directions | 101 Getting on and off the table WARNING: If the tabletop is moved to the left or to the right, it is prohibited to let the patient get on or off the tabletop at the protruding end of the tabletop. -
Page 102: Preventing Damage To The Equipment
102 | DR 800 | Safety Directions Preventing damage to the equipment Before starting any movement, make sure there are no obstacles in the movement area. No object or material must be placed on the tabletop, the image receptor or the bars. -
Page 103: Attention To Overhead Loads
DR 800 | Safety Directions | 103 Attention to overhead loads The X-ray tube ceiling suspension is designed to support and move overhead devices. This system may be in use with other overhead or protruding devices, that can be either mobile or fixed, and can present hazards to both the patients and the operators that are located within the examination room. -
Page 104: Full Leg Full Spine
104 | DR 800 | Safety Directions Full Leg Full Spine WARNING: Do not use the FLFS overlay if it is damaged, to avoid injury. WARNING: Handle the FLFS overlay and the mounting unit with care to avoid damage. WARNING:... -
Page 105: Digital Tomosynthesis
DR 800 | Safety Directions | 105 Digital tomosynthesis WARNING: Metal structures in the image might affect the image quality of the tomosynthesis reconstruction. 0392C EN 20210309 1049... -
Page 106: Ceiling Suspension And Radiographic Wall Stand
106 | DR 800 | Safety Directions Ceiling suspension and radiographic wall stand WARNING: All movements of the ceiling suspension are blocked by permanent magnet brakes that require power to be turned ON to release them. This means that in the event of accidental interruption of power, the brake remains active, so one must avoid manually force the movement of the device. -
Page 107: Basic Workflow
DR 800 | Basic Workflow | 107 Basic Workflow Topics: • Starting the System • DR workflow with fluoroscopy for positioning • DR workflow for dynamic images • DR workflow for digital tomosynthesis • DR workflow for digital subtraction angiography (DSA) •... -
Page 108: Starting The System
Check that the emergency shutdown power switch for the system and the emergency stop button for the radiographic table is not activated. Check that the power switch of the DR 800 sync cabinet is on. 2. Start the NX workstation. -
Page 109: Warming-Up Of X-Ray Tube
DR 800 | Basic Workflow | 109 Warming-up of X-ray tube The X-ray tube needs to be warmed-up before making X-ray exposures at the start of each day and when the X-ray tube has not been in use for more than an hour. -
Page 110: Automated Workflow For Warming-Up Of X-Ray Tube
110 | DR 800 | Basic Workflow Automated workflow for warming-up of X-ray tube The software console provides an automated workflow for warming-up of the X-ray tube. 1. Close the collimator blades fully. 2. Make sure that no one will be exposed. -
Page 111: Dr Workflow With Fluoroscopy For Positioning
DR 800 | Basic Workflow | 111 DR workflow with fluoroscopy for positioning This workflow is available only on DR systems that support dynamic imaging. Fluoroscopy can be used as a guide for positioning the patient before performing the planned exposure. - Page 112 112 | DR 800 | Basic Workflow X-ray modality settings Generator settings for the static image Generator settings for fluoroscopy Automatic position Figure 64: Examination overview a) Check the X-ray modality settings. Figure 65: X-ray modality controls on the software console b) Check the exposure settings.
- Page 113 DR 800 | Basic Workflow | 113 Indicator light is blinking if an automatic position is selected, until the automatic movement has finished Operate the joystick to move to the selected automatic position, while the indicator light is blinking Figure 69: Position controls The actual and target position parameters are displayed on the software console.
- Page 114 114 | DR 800 | Basic Workflow Warning sign for delay on real-time imaging Figure 70: Dynamic image screen A warning sign can be displayed if the real-time imaging is not guaranteed. The fluo timer displays the total duration up till now of all fluoroscopy sequences in this examination.
- Page 115 DR 800 | Basic Workflow | 115 The image is acquired from the DR detector and displayed in a new thumbnail in the lower half of the Image Overview pane. After the exposure is made, the Acquisition window looks as follows:...
- Page 116 116 | DR 800 | Basic Workflow Resetting the fluo timer on page 203 0392C EN 20210309 1049...
-
Page 117: Dr Workflow For Dynamic Images
DR 800 | Basic Workflow | 117 DR workflow for dynamic images This workflow is available only on DR systems that support dynamic imaging. To acquire a set of fluo sequences, rapid sequences and static images for diagnosis: 1. Add a dynamic group to the Image Overview pane. - Page 118 118 | DR 800 | Basic Workflow X-ray modality settings Generator settings for the static exposure or the rapid sequence exposure, depending on the mode that is selected in the generator controls screen of the software console Generator settings for fluoroscopy...
- Page 119 DR 800 | Basic Workflow | 119 Figure 81: Positioning controls on the software console b) Move to the selected automatic position. Indicator light is blinking if an automatic position is selected, until the automatic movement has finished Operate the joystick to move to the selected automatic position,...
- Page 120 120 | DR 800 | Basic Workflow Image type Settings Step 1: activate Step 2: start ex- Result posure exposure button or radiography pedal Static im- exposure button or radiography pedal Information about the dynamic image is displayed next to the image.
- Page 121 DR 800 | Basic Workflow | 121 A fluo sequence thumbnail is indicated with a transparant Play icon in the center. Figure 84: Thumbnail of a fluo sequence 7. Acquire a rapid sequence. a) Select the rapid sequence mode in the software console.
- Page 122 122 | DR 800 | Basic Workflow Table 9: Buttons in the dynamic image screen after stopping the exposure Button Function Display the dynamic image in full screen mode for further edit- ing. Return to the Acquisition window. Depending on the configuration, this step is skipped and the screen returns to the Acquisition window right after stopping the dynamic exposure.
- Page 123 DR 800 | Basic Workflow | 123 0392C EN 20210309 1049...
-
Page 124: Dr Workflow For Digital Tomosynthesis
124 | DR 800 | Basic Workflow DR workflow for digital tomosynthesis This workflow is available only on DR systems that support digital tomosynthesis. The result of a digital tomosynthesis examination is an acquisition sequence and a reconstruction sequence. The acquisition sequence is a sequence of static images that is acquired during the tomographic movement of the X-ray tube around the center of the region of interest. - Page 125 DR 800 | Basic Workflow | 125 Figure 90: Thumbnail for a digital tomosynthesis group 2. Select the thumbnail for the digital tomosynthesis group in the Image Overview pane of the Acquisition window. The selected DR detector is activated. The default X-ray exposure parameters and X-ray system position for the selected examination are sent to the modality.
- Page 126 126 | DR 800 | Basic Workflow Figure 94: Digital tomosynthesis controls 3. Move the X-ray system to the right position. a) Check if a correct automatic position is selected. Figure 95: Positioning controls on the software console b) Move the X-ray system to the selected automatic position.
- Page 127 DR 800 | Basic Workflow | 127 Digital tomosynthesis screen of the software console Button to start the digital tomosynthesis workflow Figure 97: Button to start the digital tomosynthesis workflow If the X-ray system position is not suitable to perform the examination, the button is disabled.
- Page 128 128 | DR 800 | Basic Workflow The image processing to create the reconstruction sequence is started automatically and may take up to a minute. Figure 99: Progress indicator for the image processing to create the reconstruction sequence The reconstruction sequence is displayed as a reconstruction sequence thumbnail in the lower half of the Image Overview pane.
- Page 129 DR 800 | Basic Workflow | 129 After making the digital tomosynthesis exposure, no more static images or digital tomosynthesis sequences can be added to the digital tomosynthesis group. 11. Perform quality control. The reconstruction sequence can be viewed in the Acquisition window as a dynamic image.
-
Page 130: Dr Workflow For Digital Subtraction Angiography (Dsa)
130 | DR 800 | Basic Workflow DR workflow for digital subtraction angiography (DSA) This workflow is available only on DR systems that support digital subtraction angiography (DSA). The result of a DSA examination is a DSA sequence. Also roadmapping sequences, fluo sequences and static images can be acquired during a DSA examination. - Page 131 DR 800 | Basic Workflow | 131 Figure 103: Thumbnail for a DSA group 2. Select the thumbnail for the DSA group in the Image Overview pane of the Acquisition window. The selected DR detector is activated. The default X-ray exposure parameters and X-ray system position for the selected examination are sent to the modality.
- Page 132 132 | DR 800 | Basic Workflow Figure 107: Generator controls for fluoroscopy and for roadmapping WARNING: Higher frame rates (FPS) for DSA lead to shorter examination times until the heat limit is reached. Lower frame rates are recommended where applicable, especially in combination with thicker or more absorbing body parts 3.
- Page 133 DR 800 | Basic Workflow | 133 Image Settings Step 1: activate Step 2: start Result type exposure exposure button or ra- diography pedal Static image exposure button or ra- diography pedal Fluoro- not needed scopy fluoroscopy pedal The workflow for acquiring a DSA sequence is explained in the next steps.
- Page 134 134 | DR 800 | Basic Workflow Figure 110: Icon indicating that injection of the contrast medium can start 9. Start injecting the contrast medium when the syringe icon is shown. Blood vessels that contain the contrast medium, become clearly visible.
-
Page 135: Dr Workflow For Dsa Roadmapping
DR 800 | Basic Workflow | 135 DR workflow for DSA roadmapping This workflow is available only on DR systems that support digital subtraction angiography roadmapping. The roadmapping examination is performed as part of a DSA examination. The result of a roadmapping examination is a roadmapping sequence. Also DSA sequences, fluo sequences and static images can be acquired in the same session, before or after the roadmapping examination. - Page 136 136 | DR 800 | Basic Workflow Figure 112: Add Image b) Specify the exam group and exam type by clicking on the buttons. c) Select an exam type that is configured as a DSA group and click OK. The DSA group thumbnail is added to the Image Overview pane.
- Page 137 DR 800 | Basic Workflow | 137 Generator settings for DSA image acquisition (DSA is not part of this workflow) Generator settings for fluoroscopy or for roadmapping image acquistion Automatic position Figure 114: Examination overview a) Check the X-ray modality settings.
- Page 138 138 | DR 800 | Basic Workflow Any number of roadmapping examinations, DSA sequences, fluo sequences or static images can be acquired, in any order. Table 11: Supported workflows Image Settings Step 1: activate Step 2: start Result type exposure...
- Page 139 DR 800 | Basic Workflow | 139 Figure 119: Roadmapping workflow is started WARNING: The roadmapping image processing relies on absence of movement. Do not change the position of the table, X-ray tube or collimator during the roadmapping examination. 8. Press and hold down the fluoroscopy pedal to start the fluo sequence for generating the roadmapping mask.
- Page 140 140 | DR 800 | Basic Workflow 12. Release the fluoroscopy pedal to stop the exposure. The roadmapping sequence is stored and displayed as a roadmapping sequence thumbnail in the lower half of the Image Overview pane. The last image of the sequence is visible in the thumbnail.
-
Page 141: Stopping The System
To open the menu, go to the Windows taskbar and click the MUSICA Acquisition Workstation Control Center. Stopping the NX software also triggers the shutdown of the DR 800 sync cabinet. d) In Windows, perform a shutdown of the PC. -
Page 142: Application Examples
142 | DR 800 | Application Examples Application Examples Following sections provide examples of how to use the system, considering a patient lying or resting against the tabletop of the radiographic table, according to the main intended use. Topics: •... -
Page 143: Positioning The Patient On The Examination Table
DR 800 | Application Examples | 143 Positioning the patient on the examination table When positioning the patient, the examination table can be lowered to 50 cm from the floor, to provide easy access and positioning of persons with motor disorders, the elderly or children. - Page 144 144 | DR 800 | Application Examples A patient lying on a stretcher can be moved onto the examination table more easily by first moving the tabletop to the left or to the right. Related Links Getting on and off the table...
-
Page 145: Fine-Tuning The Table Position And Centering Of The Examination Area
DR 800 | Application Examples | 145 Fine‐tuning the table position and centering of the examination area If corrections are required to the focal distance, the tilting angle, the examination area centring and tube incidence, the operator can use the main control console or the control panel onboard the machine. -
Page 146: Gastrointestinal Examinations: Oesophagus And Stomach
146 | DR 800 | Application Examples Gastrointestinal examinations: oesophagus and stomach During the examination of the alimentary tract, the esophagus can be analysed, in radioscopy in continuous manner, following the course of the contrast mean after executing the centring on the hypopharynx. This procedure can be carried out by moving the X-ray tube and DR detector group downwards. -
Page 147: Gastrointestinal Examinations: Small Intestine And Colon
DR 800 | Application Examples | 147 Gastrointestinal examinations: small intestine and colon All projections on the duodenal and small intestine are easy to perform with the patient lying face down, face up or in an oblique position on the table top and with the table in a horizontal position. -
Page 148: Skeleton
148 | DR 800 | Application Examples Skeleton The ample examination field that can be obtained, thanks to the movement of the X-ray tube and DR detector group group, allows the operator to execute the most thorough analysis of the patient. Examinations of the skull under any incidence, of the back spine, and of the lower and upper limbs can be performed with the table in both a horizontal and vertical position. -
Page 149: Cervical Spine
DR 800 | Application Examples | 149 Cervical spine Radiography can be executed, with the adequate incidences, on the cervical spine of particularly tall patients too: it will be sufficient to move the X-ray tube and DR detector group towards the upper end of the examination table. -
Page 150: Abdominal And Lumbar Region
150 | DR 800 | Application Examples Abdominal and lumbar region By moving the X-ray tube and DR detector group downwards, it will be possible to execute examinations on the abdominal region as well as on the lumbar column even with oblique projections, with no need to raise the patient. -
Page 151: Upper Limbs And Lower Limbs (Also With Load)
DR 800 | Application Examples | 151 Upper limbs and lower limbs (also with load) The complete accessibility to the patient tabletop makes it possible to perform examinations on the upper and lower limbs even on patients suffering from restricted movement (e.g. those in a wheelchair). -
Page 152: Thorax And Lungs
152 | DR 800 | Application Examples Thorax and lungs The radiography of the thorax can be executed with a focus-detector distance of 180 cm. 0392C EN 20210309 1049... -
Page 153: Urography And Pyelography
DR 800 | Application Examples | 153 Urography and pyelography Examinations of loins and urinary ducts may require the Trendelenburg position. Using accessories such as the shoulder rest or the compression belt, guarantees the stability of the patient on the exam tabletop and optimising of image quality. -
Page 154: Hysterosalpingography
154 | DR 800 | Application Examples Hysterosalpingography The possibility of moving the X-ray tube and DR detector group towards the front end (or the back end) of the table, allows the operator to easily execute any radioscopic examinations and radiographs of the uterine cavity and fallopian tube. -
Page 155: Guidelines For Pediatric Applications
DR 800 | Application Examples | 155 Guidelines for Pediatric Applications CAUTION: Use special care when imaging patients outside the typical adult size range. Children are more radiosensitive than adults. Reducing dose for radiographic procedures while maintaining acceptable clinical image quality will benefit patients. The user documentation of this product contains a set of guidelines for pediatric applications, applicable in the U.S.A. - Page 156 156 | DR 800 | Application Examples • Image only when there is a clear medical benefit. • Image only the indicated area. • Use the lowest amount of radiation for adequate imaging based on size of the child (reducing tube output -- kVp and mAs, limiting the duration of dynamic imaging).
-
Page 157: Typical Examination Settings
DR 800 | Application Examples | 157 Typical examination settings Table 12: Static images Oesophagus 75-85 Stomach Small intestine 85-95 Colon Skull Femur Shoulder Shoulder ar- thrography Cervical spine Abdomen Lumbar spine Hand Wrist Wrist arthrogra- Chest Intravenous Pye- logram (IVP) - Page 158 158 | DR 800 | Application Examples Colon Shoulder ar- thrography Wrist ar- thrography Hysterosal- pingography Table 14: Fluoroscopy Oesophagus 75-85 5-10 Stomach 85-95 5-10 Small intestine 85-95 Colon 90-110 Shoulder ar- 65-70 thrography Wrist arthrogra- 50-55 Hysterosalpin- 75-90 gography...
-
Page 159: Full Leg Full Spine
DR 800 | Full Leg Full Spine | 159 Full Leg Full Spine Topics: • Retrieve the patient info • Select the exposure • Prepare the Full Leg Full Spine configuration • Prepare the examination • Prepare the X-Ray system for the examination •... -
Page 160: Retrieve The Patient Info
160 | DR 800 | Full Leg Full Spine Retrieve the patient info In the operator room at the NX workstation: 1. When a new patient comes in, define the patient info for the exam. 2. Start the exam. Select the exposure In the operator room at the NX workstation: 1. -
Page 161: Prepare The Full Leg Full Spine Configuration
DR 800 | Full Leg Full Spine | 161 Prepare the Full Leg Full Spine configuration Position the X-Ray system and the FLFS overlay: 1. Place the tabletop in the horizontal position. 2. Position the FLFS overlay on the radiographic table. - Page 162 162 | DR 800 | Full Leg Full Spine Patient orientation Mounting unit Tabeltop guides FLFS overlay Figure 126: FLFS overlay on radiographic table (head left, head right) 3. Use the positioning console to move the X-ray system to the automatic position.
-
Page 163: Prepare The Examination
DR 800 | Full Leg Full Spine | 163 Prepare the examination Position the patient and specify the region of interest for the examination: 1. Position the patient on the radiographic table relative to the FLFS overlay and make sure that the region of interest for the planned examination is within the range of the overlay. - Page 164 164 | DR 800 | Full Leg Full Spine Figure 127: X-ray tube moved to top most position Verify the position on the image from the collimator camera that is displayed in the software console. Figure 128: Setting the top most position for the examination 5.
- Page 165 DR 800 | Full Leg Full Spine | 165 Figure 130: Setting the bottom most position for the examination 7. Press the ROI 2 button to confirm the position. To adjust the positions, press the waste bin icon and repeat the positioning.
-
Page 166: Prepare The X-Ray System For The Examination
166 | DR 800 | Full Leg Full Spine Prepare the X-Ray system for the examination Prepare the X-Ray system for the examination: Use the positioning console to move the X-ray system to the automatic position. The X-Ray system moves to the starting position for the examination. -
Page 167: Check The Exposure Settings
DR 800 | Full Leg Full Spine | 167 Check the exposure settings The availability of following controls depends on the configuration. The Image Overview pane displays the empty thumbnails for the exposures that are required for the examination. 1. Check if the settings for patient size that are displayed on the console are suitable for the examination. - Page 168 168 | DR 800 | Full Leg Full Spine Partial images Confirmation button Figure 133: Edit exposure settings for partial images b) Select the partial image for which settings must be changed. c) Modify the settings. d) Confirm the settings.
-
Page 169: Execute The Exposure
DR 800 | Full Leg Full Spine | 169 Execute the exposure In the operator room: Press the exposure button to execute the examination. Hold the exposure button pressed until three beeps are heard from the NX Workstation to indicate that the examination has finished. -
Page 170: Perform A Quality Control
170 | DR 800 | Full Leg Full Spine Perform a quality control In the operator room at the NX workstation, the DR Full Leg Full Spine image is displayed in the Stitching pane. Figure 134: Stitching pane Stitching is applied based on grid markers in the stitching grid and a correction is applied based on the alignment of the anatomical information in the image. - Page 171 DR 800 | Full Leg Full Spine | 171 Button Parameter Indication that automatic stitching has been performed based on the alignment of the anatomical information in the image. Indication that patient movement is detected. Indication that automatic stitching has been performed based on the stitching grid.
- Page 172 172 | DR 800 | Full Leg Full Spine M Indication that manual corrections have been applied to the align- ment of the partial images. G Indication that automatic stitching has been performed based on the stitching grid. A Indication that automatic stitching has been performed based on the alignment of the anatomical information in the image.
-
Page 173: Finalize The Examination
DR 800 | Full Leg Full Spine | 173 Finalize the examination In the operator room: 1. Let the patient step down from the radiographic table. The patient may need help to step down from the radiographic table. 2. Remove the FLFS overlay from the radiographic table and store it. -
Page 174: Storing The Flfs Overlay
174 | DR 800 | Full Leg Full Spine Storing the FLFS overlay To safely store the FLFS overlay while it is not in use: Hang the FLFS overlay on the hook on the wall or on a flat surface. -
Page 175: Manually Adjusting A Dr Full Leg Full Spine Image
DR 800 | Full Leg Full Spine | 175 Manually adjusting a DR Full Leg Full Spine image Topics: • To rotate all partial images • To stitch a set of partial images • To align the partial images based on their projection on the stitching grid •... -
Page 176: To Rotate All Partial Images
176 | DR 800 | Full Leg Full Spine To rotate all partial images Rotate all partial images • Click the following button to rotate 90° clockwise: Figure 136: Rotate clockwise • Click the following button to rotate 90° counterclockwise:... -
Page 177: To Stitch A Set Of Partial Images
DR 800 | Full Leg Full Spine | 177 To stitch a set of partial images To stitch a set of partial images: 1. In NX, go to the Examination window. 2. In the Image Overview pane, select the thumbnail of one of the partial images. -
Page 178: To Align The Partial Images Based On Their Projection On The Stitching Grid
178 | DR 800 | Full Leg Full Spine To align the partial images based on their projection on the stitching grid To align the partial images based on their projection on the stitching grid: Click Grid. Figure 138: Stitch mode: grid The anatomical structure in the partial images may not be aligned, due to patient movement during the examination. -
Page 179: To Align The Partial Images Based On The Analysis
DR 800 | Full Leg Full Spine | 179 To align the partial images based on the analysis of the anatomical information in the image To align the partial images based on the analysis of the anatomical infor- mation in the image: Click Anatomic. -
Page 180: To Manually Align Two Partial Images
180 | DR 800 | Full Leg Full Spine To manually align two partial images To manually align two partial images: 1. Click the Alignment button. Figure 142: Alignment button A detail of the overlapping area is displayed. Figure 143: Detail overlapping area 2. - Page 181 DR 800 | Full Leg Full Spine | 181 Restoring the origi- Click the Revert button. nal alignment Figure 144: Revert button The relative position of the partial images, compared to their initial relative position, is illustrated by two crosshairs displayed in the image, each of which is locked to the position of one of the partial images.
-
Page 182: To Turn The Black Borders Or Cropping On Or Off
182 | DR 800 | Full Leg Full Spine To turn the black borders or cropping on or off To turn the black borders or cropping on or off: Click the following icon: Figure 146: Crop/uncrop button 0392C EN 20210309 1049... -
Page 183: To Save The Stitched Image
DR 800 | Full Leg Full Spine | 183 To save the stitched image To save the stitched image: Click Accept. The DR Full Leg Full Spine image is available in the examination. Depending on the configuration settings, the stitching parameters are added to the image as a text annotation. -
Page 184: Rejecting A Dr Full Leg Full Spine Image
184 | DR 800 | Full Leg Full Spine Rejecting a DR Full Leg Full Spine image By rejecting an image you indicate that the image is not suitable for diagnosis and that a retake is needed. Rejecting an image does not remove the image from the exam. -
Page 185: Making Measurements
DR 800 | Full Leg Full Spine | 185 Making measurements Distance measurements on DR Full Leg Full Spine images in NX are calibrated based on the Estimated Radiographic Magnification Factor. The calibration factor is calculated based on: 1. the distance between the patient and the stitching grid. This distance is entered during the acquisition workflow. - Page 186 186 | DR 800 | Full Leg Full Spine Source image distance (SID). This distance is received together with the X- Ray generator parameters. Figure 147: Making measurements on DR Full Leg Full Spine images The respective distances between the plane in which the measurement is...
-
Page 187: Software Console
DR 800 | Software Console | 187 Software Console Table 18: Navigation Navigation button Software console screen Examination overview Generator controls for static image, rapid sequence or Generator controls for fluoroscopy or roadmapping X-ray modality controls Positioning controls Digital tomosynthesis controls... -
Page 188: Examination Overview
188 | DR 800 | Software Console Examination overview In the examination overview the most important parameters are displayed. To display more detailed parameters or to modify the parameters, navigate to the screens with detailed controls by pushing the navigation buttons or the corresponding area on the examination overview screen. - Page 189 DR 800 | Software Console | 189 Messages Figure 148: Examination overview screen Related Links Generator controls for static image, rapid sequence or DSA on page 204 Generator controls for fluoroscopy or roadmapping on page 219 Positioning controls on page 229 Topics: •...
-
Page 190: X-Ray Modality Status Frame
190 | DR 800 | Software Console X-ray modality status frame 4 5 6 7 Ready for exposure status Modality position DR detector switch Filter status Grid status Heat units Radiation status Figure 149: X-ray modality status frame Related Links... -
Page 191: Ready For Exposure Status
DR 800 | Software Console | 191 Ready For Exposure Status Table 19: Exposure ready Color Description Green Exposure ready. Indicates that the selected technique is properly set and there are no interlock failures or system faults. Exposure not ready. -
Page 192: Modality Position
192 | DR 800 | Software Console Modality Position The modality position is automatically selected, based on the selected exposure. To modify the position on the modality where the exposure will be made, navigate to the X-ray modality controls screen and select the modality position. -
Page 193: Dr Detector Switch
DR 800 | Software Console | 193 DR detector switch The DR detector switch is available in the X-ray modality status frame of the software console. The DR detector switch shows which DR detector is active and shows its status. The DR detector switch can be used to activate another DR Detector. -
Page 194: Dr Detector Status
194 | DR 800 | Software Console DR Detector Status Battery status icon Meaning Full Medium Empty Connection status icon (wifi/ wired) Meaning Good Low Bad Wired DR Detector DR detec- tor status icon (blinking) Meaning Ready Initializing Error Sleep Offset cali-... -
Page 195: Performing Offset Calibration
DR 800 | Software Console | 195 Performing offset calibration Figure 151: Offset Calibration button The Offset Calibration button reminds the user to manually trigger the offset calibration in case the system cannot perform the offset calibration automatically. It is required to manually trigger the offset calibration, in order to prevent image artifacts caused by delayed offset calibration. -
Page 196: Unknown Status
196 | DR 800 | Software Console Unknown status If a status is unknown, a question mark icon is displayed: Figure 152: Unknown status Depending on the component for which the unknown status is displayed, an action is required on the component or on the software to provide the system with the missing information. -
Page 197: Filter Status
DR 800 | Software Console | 197 Filter Status On systems with automatic filtering, the filter is automatically set, based on the selected exposure. The filter setting can be modified on the software console. Table 21: Collimator with automatic filter (no icon) No filter is used. -
Page 198: Grid Status
198 | DR 800 | Software Console Grid Status Table 23: Grid status - removable grid (no icon) No grid is in use. The correct grid type is in use. The correct grid type is not inserted. A grid is inserted, but no grid is required. -
Page 199: Heat Units
DR 800 | Software Console | 199 Heat Units The status of the heat units is displayed below the X-ray icon. During exposures, the heat units are calculated and totalled. The heat units display shows the percentage of the thermal capacity of the X-ray tube that is used. -
Page 200: Radiation Status
200 | DR 800 | Software Console Radiation status Table 25: Radiation status Icon Description This icon indicates that there is no specific radiation status to be re- ported. By touching the icon, the exposure controls of the system are disabled, regardless of the ready for exposure status. -
Page 201: Dap Value
DR 800 | Software Console | 201 DAP Value The DAP value shows the radiation value of the last exposure. The radiation measure is read as DAP value (Dose Area Product) in cGy*cm (for example: DAP 12.22). A new exposure resets the DAP value. -
Page 202: Fluo Timer
202 | DR 800 | Software Console Fluo timer The fluo timer displays the total duration up till now of all fluoroscopy sequences in this examination. Figure 153: Fluo timer To prevent excessive fluoroscopy time, an alarm time and a maximum duration time can be configured. -
Page 203: Resetting The Fluo Timer
DR 800 | Software Console | 203 Resetting the fluo timer After the maximum duration time has been reached, fluoroscopy can be continued by resetting the fluo timer. To reset the fluo timer: Press and hold the fluo timer icon. -
Page 204: Generator Controls For Static Image, Rapid Sequence Or Dsa
204 | DR 800 | Software Console Generator controls for static image, rapid sequence or Imaging mode Patient age group Radiographic working mode Sensor area Radiographic parameters Automatic exposure control Maximum rapid sequence time Figure 154: Generator controls (example for rapid sequence) To change a value, use the + and - buttons. - Page 205 DR 800 | Software Console | 205 • Sensor area • Radiographic Parameters • Focal Spot Indicator • Automatic Exposure Control (AEC) • AEC field selection • Dose • Density • Patient Size • AEC dose failure 0392C EN 20210309 1049...
-
Page 206: Radiography Imaging Modes
206 | DR 800 | Software Console Radiography imaging modes The selection of the imaging mode determines the function of the exposure button. Table 26: Radiography imaging modes Static image mode Pressing the exposure button will trigger a single X-ray ex- posure. -
Page 207: Patient Age Group
DR 800 | Software Console | 207 Patient age group The pediatric patient age group can be configured with lower dose values when using AEC or ABS. Table 27: Patient age group Adult Pediatric Related Links Dose on page 214... -
Page 208: One Point, Two Point And Three Point Working Modes
208 | DR 800 | Software Console One point, two point and three point working modes You can select following radiographic working modes according to the parameters to be controlled and the degree of automation: Table 28: Radiographic working modes One point mode, by selecting kV. -
Page 209: Sensor Area
DR 800 | Software Console | 209 Sensor area When in rapid sequence mode or in fluoroscopy mode, a smaller active area on the DR detector can be selected to get better image resolution or more frames per second. Different sets of sensor area sizes are available for fluoroscopy and for rapid sequence mode. -
Page 210: Radiographic Parameters
210 | DR 800 | Software Console Radiographic Parameters You can set up following radiographic parameters: • kV: shows the radiographic kV value (X-ray tube voltage) selected for the exposure. • mAs: shows the radiographic mAs value selected for the exposure. -
Page 211: Focal Spot Indicator
DR 800 | Software Console | 211 Focal Spot Indicator A focal spot indicator shows the selected focal spot of the X-ray tube: “Small” or “Large”. Table 29: Focal Spot Indicator Small Large You can change the focal spot by touching this indicator. It keeps kV and constant mAs, whenever it is possible. -
Page 212: Automatic Exposure Control (Aec)
212 | DR 800 | Software Console Automatic Exposure Control (AEC) Automatic Exposure Control (AEC) produces consistent detector dose regardless of the radiographic technique selected and of the patient size. To activate AEC mode, push any of the three AEC field buttons. -
Page 213: Aec Field Selection
DR 800 | Software Console | 213 AEC field selection Each button indicates its related physical location of the selected field in the AEC exposure detector, and you may select or deselect it by touching it. Any combination of fields can be selected and the color of the buttons changes (highlighted) when active. -
Page 214: Dose
214 | DR 800 | Software Console Dose Each of these buttons allows adjustment of the AEC cut-off dose (low dose, middle dose and high dose), depending on configuration at installation time and on the selected patient age group. Each time a button is selected (highlighted), the others are automatically deselected. -
Page 215: Density
DR 800 | Software Console | 215 Density These buttons are used to adjust the AEC cut-off dose (and patient entrance dose accordingly). Density can be increased and decreased in a range of -4 to +4, representing a change of -50% to +100% in dose. When disabled, the density range number appears in black. -
Page 216: Patient Size
216 | DR 800 | Software Console Patient Size The size of the patient is classified in five categories: Extra Small, Small, Medium, Large and Extra Large. Touch the UP or DOWN arrows to select the desired patient size. Table 33: kV variation over patient size... - Page 217 DR 800 | Software Console | 217 Patient size Extra Large normal mAs * 4 0392C EN 20210309 1049...
-
Page 218: Aec Dose Failure
218 | DR 800 | Software Console AEC dose failure The AEC dose failure safety device terminates the X-ray exposure when no radiation is detected in the ionization chamber or when the selected parameters (short backup time/mAs) are not appropriate for an exposure with AEC. -
Page 219: Generator Controls For Fluoroscopy Or Roadmapping
DR 800 | Software Console | 219 Generator controls for fluoroscopy or roadmapping Pulsed fluoroscopy and continuous fluoroscopy Patient age group Sensor area Radiographic parameters Automatic brightness system Collimator camera Figure 158: Generator controls (example for pulsed fluoroscopy) To change a value, use the + and - buttons. The values increase or decrease step by step each time the corresponding button is pushed. -
Page 220: Fluoroscopy Imaging Modes
220 | DR 800 | Software Console Fluoroscopy imaging modes The active imaging mode determines the function of the fluoroscopy pedal. Table 35: Fluoroscopy imaging modes Pulsed fluoroscopy Pressing the fluoroscopy pedal will trigger a fluoroscopy ex- amination, lasting until the button is released. -
Page 221: Patient Age Group
DR 800 | Software Console | 221 Patient age group The pediatric patient age group can be configured with lower dose values when using AEC or ABS. Table 36: Patient age group Adult Pediatric Related Links Dose on page 214... -
Page 222: Sensor Area
222 | DR 800 | Software Console Sensor area When in rapid sequence mode or in fluoroscopy mode, a smaller active area on the DR detector can be selected to get better image resolution or more frames per second. Different sets of sensor area sizes are available for fluoroscopy and for rapid sequence mode. -
Page 223: Radiographic Parameters For Fluoroscopy
DR 800 | Software Console | 223 Radiographic Parameters for fluoroscopy You can set up following radiographic parameters: • kV: shows the radiographic kV value (X-ray tube voltage) for the exposure. • mA: shows the radiographic mA value for the exposure. -
Page 224: Automatic Brightness System (Abs)
224 | DR 800 | Software Console Automatic Brightness System (ABS) The Automatic Brightness system (ABS) continuously adjusts the exposure parameters to achieve an optimal dose for an optimal image quality, compensating for variation of patient thickness and density of body parts. - Page 225 DR 800 | Software Console | 225 Figure 162: Brightness curve Region of interest To optimize the image quality of the anatomatically relevant region in the image, the automatic brightness system can be applied to a smaller region in the center of the image. Only the brightness of the region of interest is taken into account to control the exposure parameters.
- Page 226 226 | DR 800 | Software Console Table 39: Fluoroscopy boost Normal dose level. Increased dose level. The button is blinking. 0392C EN 20210309 1049...
-
Page 227: Collimator Camera
DR 800 | Software Console | 227 Collimator camera The collimator has a built-in camera to visualize the anatomical region of interest on the software console while adjusting the patient position remotely. To hide the camera image on the software console, push the image. To display the camera image, push the camera icon. -
Page 228: X-Ray Modality Controls
228 | DR 800 | Software Console X-ray modality controls Select the modality position. All configured modality positions are displayed. Only the allowed modality positions can be selected. Select the DR detector or switch to CR. All configured detectors are displayed. Only the detectors that can be used with the selected modality position, can be selected. -
Page 229: Positioning Controls
DR 800 | Software Console | 229 Positioning controls Automatic position Actual and target position parameters Collimation controls Wireless console status Figure 166: Positioning controls Topics: • Automatic position • Actual and target position parameters • Collimation controls • Wireless console status... -
Page 230: Automatic Position
230 | DR 800 | Software Console Automatic position Table 40: Automatic position The name of the target automatic position is displayed. To select another automatic position from the list of configured positions, use the + and - buttons. A preview of the target automatic position is displayed. -
Page 231: Actual And Target Position Parameters
DR 800 | Software Console | 231 Actual and target position parameters The target position parameters correspond to the selected automatic position. Table 41: Position parameters Source image distance (SID) X-ray tube tilting angle Table tilting angle Table height 0392C EN 20210309 1049... -
Page 232: Collimation Controls
232 | DR 800 | Software Console Collimation controls Table 42: Collimation controls Single collimation. The collimation is automatically adjusted to match the selected sensor area. The same collimation is used for fluoroscopy as for static images and rapid sequences. - Page 233 DR 800 | Software Console | 233 repositioning the patient. Collimation borders that exceed the frame size of the dynamic image are drawn orange. Note: For oblique exposures, the previewed collimation area may be smaller than the actually collimation area.
-
Page 234: Wireless Console Status
234 | DR 800 | Software Console Wireless console status Table 43: Battery status Software console On/off but- Battery status ton light Yellow Battery charge level at least 85%. Yellow blink- Battery charge level between 20% and 85%. Red blinking Battery charge level between 10% and 20%. -
Page 235: Controls For Digital Tomosynthesis
DR 800 | Software Console | 235 Controls for digital tomosynthesis Radiographic parameters for acquisition Positioning controls for acquisition Recontruction parameters Button to start the digital tomosynthesis workflow Figure 167: Positioning controls Topics: • Radiographic Parameters for digital tomosynthesis •... -
Page 236: Radiographic Parameters For Digital Tomosynthesis
236 | DR 800 | Software Console Radiographic Parameters for digital tomosynthesis You can set up following radiographic parameters for the exposures in the digital tomosynthesis acquisition sequence: • kV: shows the radiographic kV value (X-ray tube voltage) for the exposure. -
Page 237: Position Parameters For Digital Tomosynthesis
DR 800 | Software Console | 237 Position parameters for digital tomosynthesis Table 44: Position parameters Source image distance (SID) The actual SID is displayed. A warning sign is displayed if the ac- quisition cannot be performed using the actual SID. -
Page 238: Reconstruction Parameters
238 | DR 800 | Software Console Reconstruction parameters Table 45: Reconstruction parameters Start Height - (cm) The height of the first slice of the reconstruction sequence, relative to the tabletop. End Height - (cm) The height of the last slice of the reconstruction sequence, relative to the tabletop. -
Page 239: System Messages
DR 800 | Software Console | 239 System messages System messages are displayed at the bottom of the software console. The color of the message indicates the importance: Blue Information Yellow Warning Orange Error Messages that require feedback from the user contain a button that can be pressed. - Page 240 240 | DR 800 | Software Console The system messages screen lists all messages since the last startup of the software. Figure 170: Messages history 0392C EN 20210309 1049...
-
Page 241: Options And Accessories
DR 800 | Options and accessories | 241 Options and accessories • Patient footrest • Hand grips • Shoulder rest • Compression belt • Lower limbs support • Ankle support • Head contention device • Lateral arm rest on the radiographic table •... -
Page 242: Mounting The Patient Footrest
242 | DR 800 | Options and accessories Mounting the patient footrest When examinations are to be executed with the table in the vertical position, the patient support footrest can be used as a base support to keep the patient in the standing position or seated. - Page 243 DR 800 | Options and accessories | 243 Footrest guides Footrest locking device Lock positions on the table 7. Make sure that the footrest is firmly secured to the guides by bearing down and pressing on the longitudinal direction onwards and backwards.
-
Page 244: Mounting The Patient Footrest As A Seat
244 | DR 800 | Options and accessories Mounting the patient footrest as a seat The footrest can also be fastened in a more advanced position compared with the center of the tabletop. Normally this position is used when the operator wishes to seat the patient on the footrest. -
Page 245: Removing The Patient Footrest
DR 800 | Options and accessories | 245 Removing the patient footrest 1. Turn and press the knobs on both sides to release the locks. 2. Pull the footrest to draw it out from the guides (in the opposite direction compared to the center of the table) by keeping the knobs pressed at least until they are beyond the external edge of the tabletop guides. -
Page 246: Mounting The Hand Grips
246 | DR 800 | Options and accessories Mounting the hand grips The hand grips ensure the patient a safe and firm holding position as well as an increased sensation of safety. The hand grips can be fixed in any position on the tabletop guides. -
Page 247: Mounting The Shoulder Rests
DR 800 | Options and accessories | 247 Mounting the shoulder rests The shoulder rests ensure complete safety to the patient when, during the examination, it is necessary to place him in the trendelenburg position (e.g. myelography). Since it is possible to use the shoulder rests together with the handgrips, before mounting the shoulder rests it will be necessary to fix the hadgrips (if they are not already mounted on the guides). -
Page 248: Mounting The Compression Belt
248 | DR 800 | Options and accessories Mounting the compression belt This accessory is normally used for compressing possible layers of tissue during the execution of abdominal examinations in order to reduce the volume of the irradiated masses and thus reducing the quantity of radiation scattering. - Page 249 DR 800 | Options and accessories | 249 Raising the pawl Free end of the belt Bar at the opposite end Cleft of the take-up roller Turning the knob of the take-up roller 0392C EN 20210309 1049...
-
Page 250: Mounting The Lower Limbs Support, Ankle Support Or Head Contention Device
250 | DR 800 | Options and accessories Mounting the lower limbs support, ankle support or head contention device The lower limbs support device consists of two separate elements. To mount the lower limbs support: 1. Place the tabletop in the horizontal position. -
Page 251: Mounting The Lateral Arm Rest On The Radiographic Table
DR 800 | Options and accessories | 251 Mounting the lateral arm rest on the radiographic table The lateral arm rest is used for examinations with the table in vertical position. WARNING: Do not mount the lateral arm rest when the table is in horizontal position. - Page 252 252 | DR 800 | Options and accessories 1. Place the table in the vertical position. 2. Loosen the knob of the clamp as much as it is necessary, by turning it counter clockwise. 3. Insert the clamp on the tabletop guide.
-
Page 253: Mounting The Lateral Arm Rest On The Radiographic Wall Stand
DR 800 | Options and accessories | 253 Mounting the lateral arm rest on the radiographic wall stand Take care that the lateral arm rest does not collide with the ceiling when moving the bucky upward. Take care when changing the bucky position (tilting, rotating) that the lateral arm rest does not collide with the column of the wall stand. -
Page 254: Mounting The Lateral Cassette/Detector Holder
254 | DR 800 | Options and accessories Mounting the lateral cassette/detector holder WARNING: Both the mounting and the use of the lateral cassette/detector holder are allowed only with the table in the horizontal position. In no case is the operator allowed to use this accessory with the table in vertical position. - Page 255 DR 800 | Options and accessories | 255 WARNING: The arm is not equipped with mechanical stops. If it no held manually, it may cause the detector holder to fall onto the tabletop. b) Position the detector holder at the desired height.
-
Page 256: Mounting The Joystick Console On The Radiographic Table
256 | DR 800 | Options and accessories Mounting the joystick console on the radiographic table To assemble the control joystick, as indicated by the arrow. 1. Insert the accessory on the edge of the patient tabletop. Figure 173: Joystick inserted on the edge of the tabletop 2. -
Page 257: Attaching The Cushion To The Tabletop
DR 800 | Options and accessories | 257 Attaching the cushion to the tabletop To provide extra comfort for patients, a cushion can be positioned on the examination tabletop (available only for tabletop length=2100mm). 1. Place the tabletop in the horizontal position. -
Page 258: Mounting The Paediatric Cradle
258 | DR 800 | Options and accessories Mounting the paediatric cradle The paediatric cradle is mounted to the tabletop by means of two special hand grips provided with the accessory. The accessory is composed of a support with fittings and a contention structure. -
Page 259: Using The Paediatric Cradle In Vertical Position
DR 800 | Options and accessories | 259 Support for the contention structure Contention structure 7. Wind the steel cable around the bottom of the groove on the octagon and insert the ring in the corresponding recess on the support. - Page 260 260 | DR 800 | Options and accessories Footrest Base of the cradle 5. Place the tabletop in vertical position. 0392C EN 20210309 1049...
-
Page 261: Exposure Control Pedals
DR 800 | Options and accessories | 261 Exposure control pedals The exposure control pedals are available as either a single pedal to control fluoroscopy or a double pedal to control fluoroscopy and radiography. WARNING: Whether a footswitch for the exam room is present on the system, it is possible that its use has been limited and that it is disabled for radiographic exams. - Page 262 262 | DR 800 | Options and accessories Symbol Status Description System error. Maintenance required. Footswitch in sleep mode Battery status Green Battery capacity > 50% (>3.75 … 4.5 V) Orange Battery capacity between 20% and 50% (≤ 3.75 … 3.3 V) Blinking orange Battery capacity <...
-
Page 263: Problem Solving
DR 800 | Problem solving | 263 Problem solving Topics: • Compressor cannot be released • DR Detector must be Recalibrated • DR 800 sync cabinet is down • Anatomical stitching is not optimal • Stitching fails • Only part of the full leg full spine image is displayed •... -
Page 264: Compressor Cannot Be Released
264 | DR 800 | Problem solving Compressor cannot be released A patient is lying on the table and the compressor is lowered, but tails cannot be released using the position controls. Cause Power failure. System failure that prevents the remote control of the compressor. -
Page 265: Dr Detector Must Be Recalibrated
DR 800 | Problem solving | 265 DR Detector must be Recalibrated Details A message is displayed on NX indicating that the DR De- tector must be recalibrated. Cause A DR Detector must be recalibrated at regular interval. Brief Solution... -
Page 266: Dr 800 Sync Cabinet Is Down
The DR 800 sync cabinet is down. Cause A shutdown of the NX workstation triggers the shutdown of the DR 800 sync cabinet. Brief Solution Turn the power switch on the DR 800 sync cabinet off and on again. 0392C EN 20210309 1049... -
Page 267: Anatomical Stitching Is Not Optimal
DR 800 | Problem solving | 267 Anatomical stitching is not optimal Table 48: Problem: Anatomical stitching is not optimal Details The anatomic information in the partial images cannot be automatically fully aligned. If the result of automatic stitching based on the alignment of the anatomical in-... -
Page 268: Stitching Fails
268 | DR 800 | Problem solving Stitching fails Table 49: Problem: Stitching fails Details The partial images cannot be stitched because the grid markers in the stitching grid are not visible in the parti- al images. Cause The stiching grid was not used for the examination. - Page 269 DR 800 | Problem solving | 269 Only part of the full leg full spine image is displayed Details Full leg full spine images are cropped to the collimation area that is automatically detected by NX. The cropping is intended to remove non relevant areas of the image.
- Page 270 270 | DR 800 | Problem solving To draw a polygonal collimation area: 1. Select an image in the Image Overview pane. 2. In the Editing window, from the first drop-down list in the Image Processing tool section, select the icon below.
-
Page 271: Full Leg Full Spine Examination Is Interrupted
DR 800 | Problem solving | 271 Full Leg Full Spine examination is interrupted Table 50: Problem: Examination is interrupted Details The DR Full Leg Full Spine examination is aborted before it has completely finished. Cause The exposure button is released by the user before the complete examination has finished. -
Page 272: Wireless Console With Position Controls Cannot Restore Connection
272 | DR 800 | Problem solving Wireless console with position controls cannot restore connection Details The wireless console is moved outside of the bluetooth communi- cation range of the radiographic table and the connection is lost. Afterwards, the wireless console is moved within the bluetooth commmunication range of the radiographic table again. -
Page 273: Problems With The Ceiling Suspension
DR 800 | Problem solving | 273 Problems with the ceiling suspension Operating er- Possible cause Possible solution There are no Referencing device or For system with automatic con- lateral SID indi- related hardware has trols, only manual functions are cations. -
Page 274: Error Messages On The Ceiling Suspension
274 | DR 800 | Problem solving Error messages on the ceiling suspension Table 51: Error messages are displayed on the display of the control panel of the X-ray tube of the ceiling suspension Error Possible cause Possible solution message... -
Page 275: Product Information
DR 800 | Product Information | 275 Product Information Topics: • Compatibility • Compliance • Equipment Classification • Patient data security • Product Complaints • Environmental protection • System Documentation • Training • Performance • Technical Data • Remarks for HF-emission and immunity (radiographic table) •... -
Page 276: Compatibility
Compatibility The system must only be used in combination with other equipment or components if these are expressly recognized by Agfa as compatible. A list of such equipment and components is available from Agfa service on request. Changes or additions to the equipment must only be carried out by persons authorized to do so by Agfa. -
Page 277: General
DR 800 | Product Information | 277 General • The product has been designed in accordance with the MEDDEV Guidelines relating to the application of Medical Devices and have been tested as part of the conformity assessment procedures required by 93/42/EEC Medical Device Directive (European Council Directive93/42/EEC on Medical Devices). -
Page 278: Equipment Classification
278 | DR 800 | Product Information Equipment Classification Per EN/IEC60601-1, Medical Electrical Equipment, General Requirements for Safety 3rd Edition, this device is classified as following: Table 52: Equipment classification Class I equip- Equipment in which protection against electric shock does... -
Page 279: Exposure Control Foot Pedals
DR 800 | Product Information | 279 Exposure control foot pedals Table 53: Equipment classification of the exposure control foot pedals Water ingress IP21 The device is protected against dripping water. Applied Parts Applied Parts refer to parts of the medical electrical equipment that in normal use necessarily comes into physical contact with the patient for the equipment to perform its function. -
Page 280: Patient Data Security
(ISP), set in compliance with point 17(4) and 18(8) of Annex I of the EU Medical Device Regulation 2017/745, must be implemented and used in connection with the use of the Agfa medical device by the Customer (User). These are minimum requirements and designed to protect against unauthorised access that could hamper the device from functioning as intended. - Page 281 DR 800 | Product Information | 281 • Medical devices shall be on an isolated network segment that restricts communication of the medical devices to the systems that are required for the device to function. • Internal firewalls shall be put in place to improve upon network segmentation and to further restrict communications of medical devices to the systems (internal and external) that they need to interact with.
-
Page 282: Product Complaints
Manufacturer address: Agfa Service Support - local support addresses and phone numbers are listed on www.agfa.com Agfa - Septestraat 27, 2640 Mortsel, Belgium Agfa - Fax +32 3 444 7094... -
Page 283: Environmental Protection
DR 800 | Product Information | 283 Environmental protection Figure 178: WEEE symbol Figure 179: Battery symbol WEEE end user notice The directive on Waste Electrical and Electronic Equipment (WEEE) aims to prevent the generation of electric and electronic waste and to promote the reuse, recycling and other forms of recovery. -
Page 284: System Documentation
284 | DR 800 | Product Information System Documentation The documentation shall be kept with the system for easy reference. The most extensive configuration is described within this manual, including the maximum number of options and accessories. Not every function, option or accessory described may have been purchased or licensed on a particular piece of equipment. -
Page 285: Training
DR 800 | Product Information | 285 Training The user must have received adequate training on the safe and effective use of the system before attempting to work with it. Training requirements may vary from country to country. The user must make sure that training is received in accordance with local laws or regulations that have the force of law. -
Page 286: Performance
286 | DR 800 | Product Information Performance Note: For specific information on performance with regard to particular digitizers, refer to the respective digitizer (system) User Manuals. The composite, stitched image which results from the image stitching process of the Full Leg Full Spine application is compressed. Furthermore, technical acquisition factors vary greatly with Full Leg Full Spine imaging;... -
Page 287: Technical Data
DR 800 | Product Information | 287 Technical Data Topics: • DR 800 Technical Data • Radiographic table • Fixed DR Detector Technical Data • Wireless console • Collimator Technical Data • Radiographic wall stand • Ceiling suspension • Workstation PC technical data •... -
Page 288: Dr 800 Technical Data
288 | DR 800 | Product Information DR 800 Technical Data Manufacturer Agfa NV Septestraat 27 2640 Mortsel, Belgium Type 6010/200 Electrical connection DR 800 system 400/480 V, 3~, 50/60 Hz, 155/130 A (type 6010/200) X-ray generator 400/480 V ± 10%, 3~, 50/60 Hz, 100/80 A Output power 50 kW 400/480 V ±... - Page 289 DR 800 | Product Information | 289 Environmental conditions Table 54: Environmental conditions for the X-ray system Environmental Conditions (during storage and transport) Temperature (ambient) between -10° and 50° Celsius Humidity (non condensing) between 20 and 80 % relative humidity Atmospheric pressure between 70 and 101.5 kPa...
-
Page 290: Radiographic Table
290 | DR 800 | Product Information Radiographic table Type 6010/050 Manufacturer Agfa NV Septestraat 27 2640 Mortsel, Belgium Dimensions Tabletop height between 50 cm and 100 cm Tabletop dimensions 240 cm x 80 cm (long tabletop) 210 cm x 80 cm (short tabletop) - Page 291 DR 800 | Product Information | 291 Longitudinal incidence an- between -40° and +40° X-ray tube rotation 270° Compressor force Maximum 200 N Compressor travel range 55 cm Maximum load on the ta- 265 kg up to 320 kg on condition that the radiograph- ic table is in the lowest position and not moved while it is under load.
-
Page 292: Fixed Dr Detector Technical Data
292 | DR 800 | Product Information Fixed DR Detector Technical Data Manufacturer Manufacturer DR Detector THALES AVS FRANCE SAS 460 Rue du Pommarin – BP122 38430 MOIRANS France Supported model Pixium RF4343 FL Warming-up time 270 minutes Reliability Estimated product life (if regularly serviced... - Page 293 DR 800 | Product Information | 293 Maximum altitude Vibration (10 Hz - 200 Hz) maximum 0.3 g minimum maximum Distance to calibration temperature -6 °C +6 °C Dynamic imaging modes Table 55: Pulsed fluoroscopy 43 cm x 43 cm sensor area...
- Page 294 294 | DR 800 | Product Information Binning Table 57: Rapid sequence 43 cm x 43 cm sensor area Frame rate Binning 30 cm x 30 cm sensor area Frame rate Binning 0392C EN 20210309 1049...
-
Page 295: Wireless Console
DR 800 | Product Information | 295 Wireless console Type 6010/050 Manufacturer Agfa NV Septestraat 27 2640 Mortsel, Belgium Electrical connection Wireless console 100-240 V~, 50/60 Hz, 240-100 mA Power 24 VA Battery life in standby mode 24 hours 0392C EN 20210309 1049... -
Page 296: Collimator Technical Data
296 | DR 800 | Product Information Collimator Technical Data Manufacturer Ralco Via dei Tigli 13/G 20853 Biassono (MB), Italy Supported type R 302 MLP/A Customization 006S Maximum radiation leak- 150 kVp – 4 mA Inherent filtration 2 mm Aluminum equivalent... -
Page 297: Radiographic Wall Stand
DR 800 | Product Information | 297 Radiographic wall stand Model Vertical bucky: TRN430 Tilting bucky: TRT430 Manufacturer GENERAL MEDICAL MERATE S.p.A. Via Partigiani, 25 - 24068 - Seriate (BG) - ITALY Dimensions Column height 230 cm Movement Minimum distance between... -
Page 298: Ceiling Suspension
298 | DR 800 | Product Information Ceiling suspension Model MSP150 Manufacturer GENERAL MEDICAL MERATE S.p.A. Via Partigiani, 25 - 24068 - Seriate (BG) - ITALY Dimensions Longitudinal rails 440 cm Transversal rails 300 cm Weight ~270 kg Movement Longitudinal range... - Page 299 DR 800 | Product Information | 299 Maximum radiation leak- 150 kVp – 4 mA Inherent filtration 2 mm Aluminum equivalent Added filtration 0mm Al 2mm Al 1mm Al + 0.1mm Cu (3.8 mm Aluminum equivalent) 1mm Al + 0.2mm Cu (6.5 mm Aluminum...
-
Page 300: Workstation Pc Technical Data
300 | DR 800 | Product Information Workstation PC technical data Table 58: Minimum hardware requirements for the workstation PC Windows 10 IoT LTSB build1607 64-bit English-US Processor must have a PassMark CPU mark (see http://www.cpubench- mark.net/) equal or higher than: Dual Intel Xeon E5-2637 v4 @ 3,50 GHz;... -
Page 301: Dr 800 Flfs Overlay
DR 800 | Product Information | 301 DR 800 FLFS overlay Table 59: DR 800 FLFS overlay technical data Dimensions Width: 615 mm (including mounting unit) Length: 1600 mm Thickness: 30 mm (4 mm overlay only) Weight of the FLFS overlay, without <... -
Page 302: Equivalent Filtration
302 | DR 800 | Product Information Equivalent filtration Equivalent filtration at 75 kV. IAE housing inherent filtration 1.2 mm Al Collimator inherent filtration 1 mm Al Additional filtration 0.3 mm Al 2.5 mm Al VARIAN housing inherent filtration 0.7 mm Al... -
Page 303: Dosimetric And Quantitative Information (Iec 60601-2-54, Iec 60601-1-3)
DR 800 | Product Information | 303 Dosimetric and quantitative information (IEC 60601-2-54, IEC 60601-1-3) The dosimetric information have been obtained by using the following test procedure (defined by standard IEC 60601-2-54). Table 60: System configuration used for testing SYSTEM NAME... - Page 304 304 | DR 800 | Product Information The variance between the values measured by the system and the values obtained with the test is included within the limit range defined by the standard. Upon customer request the company can provide further dosimetric ADDED FILTERS information referred to specific and peculiar work techniques.
- Page 305 DR 800 | Product Information | 305 RADIOGRAPHY FFD 180 cm (***) 1Al - 0,2 Cu Collimation Collimation 43x43 0,048 25x30 0,015 43x43 0,092 30x30 0,023 43x43 0,270 30x30 0,132 43x43 0,420 43x43 0,020 43x43 0,977 43x43 0,038 35x43 0,148...
- Page 306 306 | DR 800 | Product Information 3. Epidermal necrosis 4. Skin atrophy with 10-12 complications Whole Acute radiation sickness body (mild) 0392C EN 20210309 1049...
-
Page 307: Mains Supply
DR 800 | Product Information | 307 Mains supply Topics: • Radiographic table • Ceiling suspension • Radiographic wall stand Radiographic table All the equipments of any X-ray installation must be connected to the electrical mains by means of a contact or another multi-polar sectioning device that must be installed by the customer. - Page 308 308 | DR 800 | Product Information WARNING: To avoid risk of electric shock, this equipment must only be connected to a grounded electrical network. Ceiling suspension The system is not supplied with any type of ON/OFF switch control or related circuitry.
- Page 309 DR 800 | Product Information | 309 Radiographic wall stand WARNING: This equipment is categorized as a permanently installed device. It cannot be connected directly to a mains receptacle or mains power strip using common AC electrical plugs or extension cords.
- Page 310 310 | DR 800 | Product Information Verify that the connected auxiliary device power requirements are compatible with the output of this power supply unit. 0392C EN 20210309 1049...
-
Page 311: Technical Data Of Options And Accessories
DR 800 | Product Information | 311 Technical data of options and accessories Name Weight Maximum Dimensions (mm) (kg) load (kg) Patient footrest 845x443x360 Hand grips 75x40x170 each Shoulder rests 40 kg at 280x205x250 each -20° Compression belt 820x410x122 Lower limbs support... -
Page 312: Remarks For Hf-Emission And Immunity (Radiographic Table)
312 | DR 800 | Product Information Remarks for HF-emission and immunity (radiographic table) Annex A Guidance and manufacturer’s declaration – Electromagnetic emissions The system is intended for use in the electromagnetic environment specified below. The customer or the user of the system should assure that it is used in such an environment. - Page 313 DR 800 | Product Information | 313 30%, if the floor is made of synthetic material. Radiated electro- IEC 60601-1-2 Portable and mobile 3 V/m magnetic field Test level RF communications 80 MHz to 2.7 IEC 61000-4-3 equipment should be used no closer to...
-
Page 314: Immunity To Rf Wireless Communication Equipment
314 | DR 800 | Product Information IEC 60601-1-2 Voltage dips, 0% U for 0.5 cy- Mains power quality Test level short interrup- should be that of a tions and voltage typical commercial 0% U for 1 cycle variations on... -
Page 315: Remarks For Hf-Emission And Immunity (Radiographic Wall Stand)
DR 800 | Product Information | 315 Remarks for HF-emission and immunity (radiographic wall stand) Annex A Guidance and manufacturer’s declaration – Electromagnetic emissions The system is intended for use in the electromagnetic environment specified below. The customer or the user of the system should assure that it is used in such an environment. - Page 316 316 | DR 800 | Product Information at least 30%, if the floor is made of synthetic material. Fast transient elec- IEC 60601-1-2 The quality of the 2 kV for power trical disturbance Test level voltage supplied supply lines variables / bursts...
- Page 317 DR 800 | Product Information | 317 Tests of Re- Level of Electromagnetic Environ- sistance to 60601-1-2:2014 Agree- ment Disruption Test Level ment Conducted Portable and mobile RF com- munications equipment 150 kHz to 80 MHz should be used no closer to...
- Page 318 318 | DR 800 | Product Information Recommended separation distances between portable and mobile RF com- munication equipment and the device Rated output Separation distance in accordance with transmission fre- power of the quency transmitter 150 kHz to 80 80 MHz to 800 800 MHz to 2.5...
-
Page 319: Remarks For Hf-Emission And Immunity (Radiographic Wall Stand Bucky With Moving Grid)
DR 800 | Product Information | 319 Remarks for HF-emission and immunity (radiographic wall stand bucky with moving grid) Annex A Guidance and manufacturer’s declaration – Electromagnetic emissions The system is intended for use in the electromagnetic environment specified below. The customer or the user of the system should assure that it is used in such an environment. - Page 320 320 | DR 800 | Product Information at least 30%, if the floor is made of synthetic materi- Fast transient elec- IEC 60601-1-2 The quality of the 2 kV for power trical disturbance Test level voltage supplied supply lines variables / bursts...
- Page 321 DR 800 | Product Information | 321 Tests of Re- Level of Electromagnetic Environ- sistance to 60601-1-2:2014 Agree- ment Disruption Test Level ment Conducted Portable and mobile RF com- munications equipment 150 kHz to 80 MHz 150 kHz should be used no closer to...
- Page 322 322 | DR 800 | Product Information Recommended separation distances between portable and mobile RF com- munication equipment and the device Rated output Separation distance in accordance with transmission fre- power of the quency transmitter 150 kHz to 80 80 MHz to 800 800 MHz to 2.5...
Need help?
Do you have a question about the DR 800 and is the answer not in the manual?
Questions and answers