Siemens 1LA8 Operating & Installation Instructions Manual
Low-voltage motor
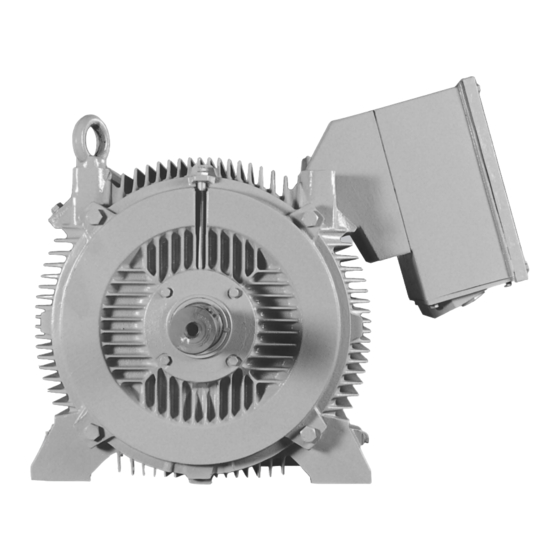
simotics tn series n-compact
Hide thumbs
Also See for 1LA8:
- Operating instructions manual (148 pages) ,
- Operating instructions manual (175 pages) ,
- Operating instructions manual (30 pages)

Related Manuals for Siemens 1LA8


Summary of Contents for Siemens 1LA8
- Page 1 For employment in zone 2 (IEC/EN 60079-10-1) II 3G Ex ec IIC T3 Gc Operating Instructions Installation Instructions Low-voltage motor SIMOTICS TN Series N-compact Type 1LA8 Edition 08/2017 www.siemens.com/drives...
- Page 2 18.08.2017 13:32 V16.00...
- Page 3 Introduction Safety information Description Low-voltage motor Preparations for use SIMOTICS TN Series N-compact Type 1LA8 Assembly Electrical connection Operating Instructions Installation Instructions Start-up Operation Maintenance Spare parts Disposal For employment in zone 2 (IEC/EN 60079-10-1) Service and Support II 3G Ex ec IIC T3 Gc...
-
Page 4: Assembly
Note the following: WARNING Siemens products may only be used for the applications described in the catalog and in the relevant technical documentation. If products and components from other manufacturers are used, these must be recommended or approved by Siemens. Proper transport, storage, installation, assembly, commissioning, operation and maintenance are required to ensure that the products operate safely and without any problems. -
Page 5: Table Of Contents
Phase synchronization during supply system switching............34 4.11 Space requirements.......................34 4.12 Voltage and frequency fluctuations during line operation............34 4.13 System-inherent frequencies....................35 4.14 Torsional loading of the drive train due to faults in the electrical supply........35 SIMOTICS TN Series N-compact 1LA8 Operating Instructions 08/2017... - Page 6 Aligning the machine to the driven machine and attaching it to it (IM V1, IM V10)....65 5.3.7 Axial and radial forces ......................65 Electrical connection...........................67 Basic rules..........................68 Terminal box..........................68 6.2.1 Terminal box 1XB1621......................69 6.2.2 Terminal box 1XB1631......................70 6.2.3 Terminal box 1XB1634......................71 Preparation..........................71 SIMOTICS TN Series N-compact 1LA8 Operating Instructions 08/2017...
- Page 7 Setpoint values for monitoring the bearing temperature............91 Set values for monitoring the winding temperature..............91 Test run..........................92 De-energizing.........................93 Operation..............................95 Safety guidelines in operation....................95 Operation in hazardous areas....................96 Switching off the anti-condensation heating................97 Switching on the machine......................98 Regreasing roller bearings.....................98 SIMOTICS TN Series N-compact 1LA8 Operating Instructions 08/2017...
- Page 8 Removing the labyrinth sealing ring..................123 9.2.8.4 Assembling the rolling-contact bearings................124 9.2.8.5 Install the V ring........................125 9.2.8.6 Installing the V ring ("Increased degree of protection" option)..........126 9.2.8.7 Installing the labyrinth sealing ring..................127 Spare parts...............................129 10.1 Ordering data........................129 SIMOTICS TN Series N-compact 1LA8 Operating Instructions 08/2017...
- Page 9 Stator winding insulation resistance at 40° C................52 Table 5-2 Permissible deviations for aligning the machine with flexible coupling........63 Table 6-1 Terminal designations using the 1U1-1 as an example..............72 Table 6-2 Determining the cross-section of the grounding conductor............72 SIMOTICS TN Series N-compact 1LA8 Operating Instructions 08/2017...
- Page 10 Schematic representation of a tandem drive................48 Figure 5-1 Balancing type on the drive-end side..................56 Figure 5-2 Schematic diagram of the water drain holes................59 Figure 5-3 Schematic diagram: Aligning the machine to the driven machine..........63 SIMOTICS TN Series N-compact 1LA8 Operating Instructions 08/2017...
- Page 11 Figure 10-8 Terminal box 1XB1621 with standard cable entry..............139 Figure 10-9 Two-part cable entry........................139 Figure 10-10 Terminal box 1XB1631......................140 Figure 10-11 Terminal box 1XB1634 with standard cable entry..............142 Figure 10-12 Two-pane cable entry........................142 SIMOTICS TN Series N-compact 1LA8 Operating Instructions 08/2017...
- Page 12 Table of contents SIMOTICS TN Series N-compact 1LA8 Operating Instructions 08/2017...
-
Page 13: Introduction
Using the "Documentation" function, from Product Support manuals, you can compile your own "Documentation". However, you can also include other Product Support content such as FAQs or characteristics in the documentation that you compile. SIMOTICS TN Series N-compact 1LA8 Operating Instructions 08/2017... - Page 14 Using the "Documentation" function, you can efficiently compile your own plant or system documentation. The "Documentation" compiled in a specific language can also be automatically exported in one of the other available languages. The full functionality is only available for registered users. SIMOTICS TN Series N-compact 1LA8 Operating Instructions 08/2017...
-
Page 15: Safety Information
An explosion can occur. This can result in death, serious injury or material damage. Do not commission the machine until it has been confirmed that the plant conforms with the explosion protection directive. SIMOTICS TN Series N-compact 1LA8 Operating Instructions 08/2017... -
Page 16: The Five Safety Rules
● General safety regulations applicable in the country where the machine is deployed. ● Manufacturer-specific and application-specific regulations ● Special agreements made with the operator ● Separate safety instructions supplied with the machine ● Safety symbols and instructions on the machine and its packaging SIMOTICS TN Series N-compact 1LA8 Operating Instructions 08/2017... - Page 17 Poisoning, skin damage, cauterization of the respiratory tract, and other health damage may result. ● Read the information in these operating instructions and the product information supplied by the manufacturer. ● Observe the relevant safety regulations and wear the personal protective equipment specified. SIMOTICS TN Series N-compact 1LA8 Operating Instructions 08/2017...
-
Page 18: For Use In Hazardous Zone 2 Or Zone 22
2014/34/EU (" Explosion protection directive") and 1999/92/EC - as well as in the IEC / EN 60079 series of standards. SIMOTICS TN Series N-compact 1LA8 Operating Instructions 08/2017... -
Page 19: Electrostatic Sensitive Devices
The necessary ESD protective measures for electrostatic sensitive devices are illustrated once again in the following drawings: a = conductive floor surfaceb = ESD table c = ESD shoes d = ESD overall e = ESD wristband f = cabinet ground connection SIMOTICS TN Series N-compact 1LA8 Operating Instructions 08/2017... -
Page 20: Processes That Generate High Levels Of Electrostatic Charge
Use the tested, original paint when repainting or touching up. It is possible to use a paint that has not been tested by Siemens, which is however suitable from an electrostatic perspective. The operating company is responsible for carrying out an electrostatic test of the complete system. -
Page 21: Interference Immunity
● Protect the personnel working in the plant by taking appropriate measures, such as erecting identifying markings, safety barriers and warning signs and giving safety talks. ● Observe the nationally applicable health and safety regulations. ● Do not carry any magnetic or electronic data media. SIMOTICS TN Series N-compact 1LA8 Operating Instructions 08/2017... - Page 22 Safety information 2.11 Electromagnetic fields when operating electrical power engineering installations SIMOTICS TN Series N-compact 1LA8 Operating Instructions 08/2017...
-
Page 23: Description
Declaration of Conformity for the versions of the harmonized standards referenced. Table 3-1 Machine design Feature Standard Rating and performance IEC/EN 60034‑1 Degree of protection IEC/EN 60034‑5 Cooling IEC/EN 60034‑6 Type of construction IEC/EN 60034‑7 SIMOTICS TN Series N-compact 1LA8 Operating Instructions 08/2017... -
Page 24: Table 3-2 Machine Design With Type Of Protection Ex Na Or Ex Ec
The IEC/EN standards correspond to the following GOST standards. IEC/EN GOST IEC/EN 60079-0 GOST R IEC 60079-0 IEC/EN 60079-2 GOST IEC 60079-2 IEC/EN 60079-7 GOST R IEC 60079-7 IEC/EN 60079-10 GOST IEC 60079-10 SIMOTICS TN Series N-compact 1LA8 Operating Instructions 08/2017... - Page 25 Ex marking for type of protection Ex nA IIB T3 Gc or Ex ec IIB T3 Gc ① ② ③ ④ ⑤ ⑥ ⑦ ⑧ ⑨ ⑩ AA87 ① ⑪ ② ⑫ ⑥ ⑦ ⑧ ⑨ ⑩ ⑬ SIMOTICS TN Series N-compact 1LA8 Operating Instructions 08/2017...
-
Page 26: Table 3-3 Data On The Rating Plate
Schematic diagram of rating plate Table 3-3 Data on the rating plate Item Description Item Description Type of motor (12) Rated speed [rpm] Motor type (13) Starting current ratio Serial number (14) (empty) SIMOTICS TN Series N-compact 1LA8 Operating Instructions 08/2017... - Page 27 The 1L.831.‑2 can optionally also be equipped with a unidirectional external fan. SIMOTICS TN Series N-compact 1LA8 Operating Instructions 08/2017...
-
Page 28: Table 3-4 Rolling-Contact Bearing Variants
The terminal box can be arranged either on the left or right of the machine. It is not possible to change the position to the other side of the machine at a later date. SIMOTICS TN Series N-compact 1LA8 Operating Instructions 08/2017... -
Page 29: Table 3-5 Assignment Of Shaft Heights To Terminal Boxes
Anti-condensation heating (option) The machine is fitted with anti-condensation heating. The connection data is listed on an additional plate on the machine. SIMOTICS TN Series N-compact 1LA8 Operating Instructions 08/2017... - Page 30 Description SIMOTICS TN Series N-compact 1LA8 Operating Instructions 08/2017...
-
Page 31: Preparations For Use
Thermal motor protection The machine is equipped with PTC thermistors for direct monitoring of the motor temperature to protect the machine against overheating during operation. Plan a corresponding circuit for monitoring. SIMOTICS TN Series N-compact 1LA8 Operating Instructions 08/2017... -
Page 32: Interlock Circuit For Anti-Condensation Heating (Option)
The weight of the machine is stated on the rating plate, data on geometry is shown in the dimension drawing. ● There is a threaded hole M36 at the bottom of the machine where you can attach the support foot. SIMOTICS TN Series N-compact 1LA8 Operating Instructions 08/2017... -
Page 33: Noise Emissions
Excessive rotational speed can lead to serious damage to the machine. This can result in death, serious injury, or material damage. ● Avoid operation above the permissible speed by using the appropriate control function. ● Observe the speeds stamped on the rating plate. SIMOTICS TN Series N-compact 1LA8 Operating Instructions 08/2017... -
Page 34: Complying With Speed-Torque Curve
Range A. Exceptions of this sort should be limited with regard to the values that arise, how often and for how long they occur. Where possible and SIMOTICS TN Series N-compact 1LA8 Operating Instructions 08/2017... -
Page 35: System-Inherent Frequencies
This can result in death, serious injury or material damage. When planning the system, consider the configuration data. Note More information about this may be found in the catalog. SIMOTICS TN Series N-compact 1LA8 Operating Instructions 08/2017... -
Page 36: Transport And Storage
● If the machine is packed, depending on the weight, size and on-site conditions, lift crates and transport frames using a fork-lift truck or a crane with slings. Use a crane or fork-lift truck suitable for the load. SIMOTICS TN Series N-compact 1LA8 Operating Instructions 08/2017... - Page 37 ● Always take account of the center of gravity when transporting or lifting the machine. If the center of gravity is not located centrally between the attachment points, then position the hoisting hook above the center of gravity. SIMOTICS TN Series N-compact 1LA8 Operating Instructions 08/2017...
-
Page 38: Securing The Rotor
– If a machine has to be transported in a horizontal position, the rotor must be fixed in position before the machine is turned onto its side. Vertical machines can be supplied in the horizontal position from the manufacturing plant. SIMOTICS TN Series N-compact 1LA8 Operating Instructions 08/2017... -
Page 39: Figure 4-1 Axial Fastening Of The Rotor
Axial preload force for other rotor shipping brace types Note Store the rotor locking device Be sure to store the rotor locking device. It must be remounted for possible disassembly and transport. SIMOTICS TN Series N-compact 1LA8 Operating Instructions 08/2017... -
Page 40: Transporting The Machine Set
● Only store goods in undamaged packaging. Unpack the goods if the packaging is damaged. Correctly store the goods corresponding to the type. ● Repair any damage to the packaging before putting the equipment into storage insofar as this is necessary to ensure proper storage conditions. SIMOTICS TN Series N-compact 1LA8 Operating Instructions 08/2017... - Page 41 ● Wrap the machine in plastic film: – Place a humidity meter inside the plastic film. – Place desiccant within the plastic film. – Pack the machine air-tight. ● Inspect the machine regularly. SIMOTICS TN Series N-compact 1LA8 Operating Instructions 08/2017...
- Page 42 (if available), and ensure that the air circulates in the storage room. Storage for longer than three months Lubricate the machine after every two years of storage. 1. Unpack the machine. 2. Remove the rotor shipping brace, if one is being used. SIMOTICS TN Series N-compact 1LA8 Operating Instructions 08/2017...
-
Page 43: Protection Against Corrosion
Note The order number shows whether the machine was ordered for operation with converter: the 9th digit of the order number features the letter "P" or "Q". SIMOTICS TN Series N-compact 1LA8 Operating Instructions 08/2017... -
Page 44: Converter Operation Of Explosion-Proof Machines
If a ground fault occurs when connected to an IT supply system, the insulation is excessively stressed. Winding damage can result. ● If possible, complete the process within two hours. ● Rectify the fault cause. ● Deploy a ground fault monitoring. SIMOTICS TN Series N-compact 1LA8 Operating Instructions 08/2017... -
Page 45: Converter Input Voltage
Equipotential bonding conductors: Use equipotential bonding conductors: ● Between motor and driven machine ● Between motor and converter ● Between the terminal box and the RF grounding point at the motor enclosure. SIMOTICS TN Series N-compact 1LA8 Operating Instructions 08/2017... - Page 46 ● In the overall system, set up a properly meshed grounding system with low impedance. ● Use the common-mode filter (damping cores) at the converter output. The Siemens sales representative is responsible for selection and dimensioning.
-
Page 47: Converter Operation On A Grounded Network
Comply with the plates on the machine relating to bearing insulation and possible bridges. ① ④ Driving machine Insulated bearings ② ⑤ Motor Insulated tachometer fitting ③ Coupling Figure 4-2 Schematic representation of a single drive SIMOTICS TN Series N-compact 1LA8 Operating Instructions 08/2017... - Page 48 If you connect two motors in series in "tandem operation", locate a coupling between the motors; this coupling should satisfy the Directive 2014/34/EU or the regulations that apply in the country where the equipment is installed. SIMOTICS TN Series N-compact 1LA8 Operating Instructions 08/2017...
-
Page 49: Assembly
Otherwise an explosion can occur in an explosive atmosphere. This can result in death, serious injury or material damage. Please contact the Service Center, if necessary. See also Service and Support (Page 149) SIMOTICS TN Series N-compact 1LA8 Operating Instructions 08/2017... -
Page 50: Preparations For Installation
As such, you can determine whether the machine needs commissioning or any necessary measures such as cleaning and/or drying the winding: ● Can the machine be put into operation? ● Must the windings be cleaned or dried? SIMOTICS TN Series N-compact 1LA8 Operating Instructions 08/2017... -
Page 51: Testing The Insulation Resistance And Polarization Index
Convert the measured insulation resistances in accordance with the formula to the reference temperature of 40° C. This thereby ensures that the minimum values specified can be compared. 4. Read out the insulation resistance one minute after applying the measuring voltage. SIMOTICS TN Series N-compact 1LA8 Operating Instructions 08/2017... -
Page 52: Table 5-1 Stator Winding Insulation Resistance At 40° C
Calculate the critical insulation resistance value depending on the rated voltage by multiplying the rated voltage (kV) by the specific critical resistance value. Convert the value for the current winding temperature at the time of measurement, see above table. SIMOTICS TN Series N-compact 1LA8 Operating Instructions 08/2017... -
Page 53: Preparing The Mating Faces
– Ensure that the wall faces are flat and free of contaminations. – Check the dimensions of the mounting-foot holes. – Support the machine from below, e.g. using a wall bracket or by bolting it. SIMOTICS TN Series N-compact 1LA8 Operating Instructions 08/2017... -
Page 54: Lift The Machine To Where It Will Be Installed, And Position It
Note Store the rotor locking device Be sure to store the rotor locking device. It must be remounted for possible disassembly and transport. SIMOTICS TN Series N-compact 1LA8 Operating Instructions 08/2017... -
Page 55: Removing The Rotor Shipping Brace From Machines With Vertical Type Of Construction
Using metal objects such as scrapers, spatulas, or plates to remove the anti-corrosion protection could result in damage to the surfaces of the machine parts. 2. Then lightly oil the bare surfaces again. SIMOTICS TN Series N-compact 1LA8 Operating Instructions 08/2017... -
Page 56: Mounting The Output Elements
The output element must be pulled on in one continuous operation using the front thread holes in the shaft or pulled on by hand. – Do not strike it with a hammer, as this would damage the bearings. SIMOTICS TN Series N-compact 1LA8 Operating Instructions 08/2017... -
Page 57: Lifting And Transporting The Machine
● If the machine is packed, depending on the weight, size and on-site conditions, lift crates and transport frames using a fork-lift truck or a crane with slings. Use a crane or fork-lift truck suitable for the load. SIMOTICS TN Series N-compact 1LA8 Operating Instructions 08/2017... - Page 58 If the lifting gear or load handling attachments were to fail, the machine could fall. This can result in death, serious injury or material damage. Never remain under or in the immediate vicinity of the machine when it is raised. SIMOTICS TN Series N-compact 1LA8 Operating Instructions 08/2017...
-
Page 59: Draining Condensation
2. Replace them when you have finished. NOTICE The degree of protection is reduced Nominally the degree of protection of the machine is reduced to IP44 when the screw plug is removed. SIMOTICS TN Series N-compact 1LA8 Operating Instructions 08/2017... -
Page 60: Putting The Machine Down
The transmission element such as a coupling half has already been pulled on. Roughly aligning the machine ● For horizontal positioning, push the motor sideways across the foundation. When doing so, ensure that the axial position is maintained. SIMOTICS TN Series N-compact 1LA8 Operating Instructions 08/2017... -
Page 61: Installing The Machine
● Take into account the maximum forces occurring in the case of a fault such as short circuit or system transfers in phase opposition. – When selecting the bolts – When designing the foundation SIMOTICS TN Series N-compact 1LA8 Operating Instructions 08/2017... -
Page 62: Preconditions For Smooth, Vibration-Free Operation
The balance state of the shaft (full-key or half-key balancing) and alignment errors primarily influence the service life of the bearing, especially for high motor speeds or when using rigid couplings. SIMOTICS TN Series N-compact 1LA8 Operating Instructions 08/2017... -
Page 63: Table 5-2 Permissible Deviations For Aligning The Machine With Flexible Coupling
≤ 3600 rpm = 0.05 mm = 0.05 mm / 100 mm ∅ D Note Machine expansion When performing alignment, make allowance for the thermal expansion of the machine due to rising temperature. SIMOTICS TN Series N-compact 1LA8 Operating Instructions 08/2017... -
Page 64: Aligning The Machine To The Driven Machine And Attaching It To It (Im B5)
This can result in death, serious injury or material damage. ● Mount the support base so that no additional mechanical tensions can occur in the housing. See also Tightening torques for screw and bolt connections (Page 151) SIMOTICS TN Series N-compact 1LA8 Operating Instructions 08/2017... -
Page 65: Aligning The Machine To The Driven Machine And Attaching It To It (Im V1, Im V10)
0.05 mm in diameter. 5.3.7 Axial and radial forces You can obtain the permissible values for axial and radial forces by contacting the Siemens Service Center (Page 149) or referring to the machine catalog. SIMOTICS TN Series N-compact 1LA8... - Page 66 This can result in damage to the bearings and shaft. Ensure that the permissible loads for the forces on the shaft extension are adhered to in accordance with the catalog data or configuration data. SIMOTICS TN Series N-compact 1LA8 Operating Instructions 08/2017...
-
Page 67: Electrical Connection
● Observe any specifications regarding the materials from which fixing elements must be made. ● When performing servicing, check the fastenings. See also Tightening torques for screw and bolt connections (Page 151) SIMOTICS TN Series N-compact 1LA8 Operating Instructions 08/2017... -
Page 68: Basic Rules
Depending on the terminal box, different cable entries and options for the cable connection are possible. You can identify the terminal box installed on the machine via the illustrations in the following chapters. Terminal box 1XB1621 (Page 69) SIMOTICS TN Series N-compact 1LA8 Operating Instructions 08/2017... -
Page 69: Terminal Box 1Xb1621
● Inserting the cable into the 1XB16... terminal box with cable gland (Page 75) ● Inserting the cable into the 1XB.. terminal box with ring seal (Page 77) ● Connecting cables with cable lugs (Page 78) SIMOTICS TN Series N-compact 1LA8 Operating Instructions 08/2017... -
Page 70: Terminal Box 1Xb1631
● Inserting the cable into the 1XB16... terminal box with cable gland (Page 75) ● Inserting the cable into the 1XB.. terminal box with ring seal (Page 77) ● Connecting cables with cable lugs (Page 78) SIMOTICS TN Series N-compact 1LA8 Operating Instructions 08/2017... -
Page 71: Terminal Box 1Xb1634
● Check that the connections (star or delta) comply with the specifications on the rating plate. ● Ensure that the connection values correspond to the information on the rating plate. SIMOTICS TN Series N-compact 1LA8 Operating Instructions 08/2017... -
Page 72: Terminal Designation
There is a hexagon bolt with a flat washer and a spring washer on the stator frame at the designated connecting point for the grounding conductor. The grounding conductor can be connected as follows: ● With stranded cables with cable lugs ● With flat cables with cable end designed accordingly SIMOTICS TN Series N-compact 1LA8 Operating Instructions 08/2017... -
Page 73: Connect Metal Shield In The Terminal Box
Establish the radio-frequency ground connection with flat cables. Alternatively you can establish the radio-frequency ground connection with cable lugs. SIMOTICS TN Series N-compact 1LA8 Operating Instructions 08/2017... -
Page 74: Connection Without Terminal Box
If the motor has been ordered with brought-out leads, in this case you must comply with the relevant conditions for Zone 2. It is assumed that the buyer, the installer and users of the installation are familiar with these conditions and will carefully observe them. SIMOTICS TN Series N-compact 1LA8 Operating Instructions 08/2017... -
Page 75: Connecting The Machine For A Specific Direction Of Rotation
The connection cables are inserted into the terminal box via an exchangeable cable entry plate or cable entry support . The cable entry plate is drilled by default. The cable glands are not included in the standard scope of supply. SIMOTICS TN Series N-compact 1LA8 Operating Instructions 08/2017... -
Page 76: Certified Cable Entries, Thread Adapters And Sealing Plugs
Certified cable entries, thread adapters and sealing plugs Use only sealing plugs, cable entries & conductor entries and thread adapters that are certified and marked for use in the respective hazardous zone. SIMOTICS TN Series N-compact 1LA8 Operating Instructions 08/2017... -
Page 77: Inserting The Cable Into The 1Xb
7. Insert the cable with the seal insert in position into the gland opening. Screw the strain relief device together once the cable is in a concentric position in the gland opening. SIMOTICS TN Series N-compact 1LA8 Operating Instructions 08/2017... -
Page 78: Laying Cables
2. Remove the insulation from the conductor ends so that the remaining insulation reaches ① almost up to the cable lug . Connect only one conductor per cable lug. SIMOTICS TN Series N-compact 1LA8 Operating Instructions 08/2017... -
Page 79: Connection Without Cable Lugs
Connection without cable lugs Lug terminal connections - which are suitable for connecting flexible and stranded conductors without the use of wire end ferrules - may be installed if ordered accordingly. If you wish to SIMOTICS TN Series N-compact 1LA8 Operating Instructions 08/2017... -
Page 80: Figure 6-8 Connection Using Terminal Clamps (Schematic Diagram)
For terminal box GT640, the fixing of the terminal element is done using a terminal nut M12 on the threaded stud of the terminal support with a torque of 20 Nm. Figure 6-8 Connection using terminal clamps (schematic diagram) SIMOTICS TN Series N-compact 1LA8 Operating Instructions 08/2017... -
Page 81: Use Of Aluminum Conductors
– or even in total failure, as well as material damage to the plant or system due to machine failure. ● Retighten the clamping nuts after approximately 24 hours and then again after approximately four weeks. Make sure that the terminals are de-energized before you tighten the nuts. SIMOTICS TN Series N-compact 1LA8 Operating Instructions 08/2017... -
Page 82: Using Single-Stranded Cables
Align the cable entry support and the cable entry plate to the terminal box enclosure so that the sealing surface between the terminal box and the terminal box cover form a flat face. There must be no steps in the sealing area. SIMOTICS TN Series N-compact 1LA8 Operating Instructions 08/2017... -
Page 83: Minimum Air Clearances
(Page 151). Connecting the auxiliary circuits 6.5.1 Selecting cables Take the following criteria into account when selecting the connecting cables for the auxiliary circuits: ● Rated current ● Rated voltage SIMOTICS TN Series N-compact 1LA8 Operating Instructions 08/2017... -
Page 84: Bringing Cables Into The Auxiliary Terminal Box And Routing Them
6. Make sure that the seal on the screwed sockets for the cable glands satisfies the degree of protection. See also Tightening torques for screw and bolt connections (Page 151) Spare parts (Page 129) SIMOTICS TN Series N-compact 1LA8 Operating Instructions 08/2017... -
Page 85: Connect Metal Shield In The Terminal Box
The cable shield is grounded just once; multiple grounding is not permitted. 6.5.5 Connecting temperature monitoring for the stator winding The stator winding is monitored for thermal loading by temperature sensors embedded in the stator winding. SIMOTICS TN Series N-compact 1LA8 Operating Instructions 08/2017... -
Page 86: Terminating The Connection Work (Auxiliary Circuit)
2. Close the auxiliary terminal box using the cover supplied for this purpose. See section "Tightening torques for screw and bolt connections (Page 151)" for the tightening torque of the fixing bolts for the cover. SIMOTICS TN Series N-compact 1LA8 Operating Instructions 08/2017... -
Page 87: Start-Up
● The feather key is secured to prevent it from being thrown out, and for balancing type "H" (standard type), its weight is reduced to 60 % of the original weight. ● The unused shaft extension is covered and protected against accidental contact. SIMOTICS TN Series N-compact 1LA8 Operating Instructions 08/2017... -
Page 88: Converter Operation
● The converter is correctly parameterized. The parameterization data is specified on the rating plate of the machine. Information about the parameters is available in the operating instructions for the converter. SIMOTICS TN Series N-compact 1LA8 Operating Instructions 08/2017... -
Page 89: Operation On A Converter With A Low Pulse Frequency
● Before starting up a machine for the first time ● After an extended period in storage or downtime ● Within the scope of maintenance work SIMOTICS TN Series N-compact 1LA8 Operating Instructions 08/2017... -
Page 90: Greasing The Roller Bearings Prior To Commissioning
1. Remove the bearing, regreasing pipes, grease nipples and the bearing cap. 2. Flush out the old grease. 3. Check the bearings before regreasing. If necessary, install new bearings. 4. Lubricate the bearings and reinstall the bearing components. SIMOTICS TN Series N-compact 1LA8 Operating Instructions 08/2017... -
Page 91: Setpoint Values For Monitoring The Bearing Temperature
Before running the machine for the first time, set the temperature value for shutdown on the monitoring device. Table 7-3 Set values for monitoring the winding temperatures during commissioning Set value Temperature Shutdown 145 °C SIMOTICS TN Series N-compact 1LA8 Operating Instructions 08/2017... -
Page 92: Test Run
As a consequence, when ramping up, observe the following: ● Monitor the ramp-up time and number of consecutive starts. ● Comply with the limit values and/or ramp-up conditions specified in the catalog or the order documentation. SIMOTICS TN Series N-compact 1LA8 Operating Instructions 08/2017... -
Page 93: De-Energizing
This will avoid the formation of condensation. ● Do not switch on the anti-condensation heating for at least two hours after the motor has been switched off. This prevents damage to the winding insulation. SIMOTICS TN Series N-compact 1LA8 Operating Instructions 08/2017... - Page 94 Start-up 7.8 De-energizing SIMOTICS TN Series N-compact 1LA8 Operating Instructions 08/2017...
-
Page 95: Operation
Certain parts of the machine become hot during operation. Severe burns can result from contact with these parts. ● Check the temperature of parts before touching them. If required, apply suitable protective measures. ● Allow the machine to cool before starting work on the machine. SIMOTICS TN Series N-compact 1LA8 Operating Instructions 08/2017... -
Page 96: Operation In Hazardous Areas
We recommend that these tests be carried out and documented in coordination with the responsible authorities. SIMOTICS TN Series N-compact 1LA8 Operating Instructions 08/2017... -
Page 97: Switching Off The Anti-Condensation Heating
● Make sure that the anti-condensation heating is switched off before the machine is switched on. ● Only operate anti-condensation heating when the machine is switched off. See also Interlock circuit for anti-condensation heating (option) (Page 32) De-energizing (Page 93) SIMOTICS TN Series N-compact 1LA8 Operating Instructions 08/2017... -
Page 98: Switching On The Machine
Damage may occur to the motor if it is not stored properly. If the machine is to be taken out of operation for more than 12 months, suitable anti-corrosion, preservation, packaging, and drying measures must be taken. SIMOTICS TN Series N-compact 1LA8 Operating Instructions 08/2017... -
Page 99: Avoidance Of Condensation Or Formation Of Condensation Within The Machine
Use the fitted key or the coupling halves as reference markers. ● During re-commissioning, refer to the information in the "Commissioning" section. See also Start-up (Page 87) Greasing the roller bearings prior to commissioning (Page 90) SIMOTICS TN Series N-compact 1LA8 Operating Instructions 08/2017... -
Page 100: Shaft Grounding Brushes (Option)
● Can the machine be put into operation? ● Must the windings be cleaned or dried? Detailed information on testing and the limit values can be found here: "Testing the insulation resistance and polarization index" (Page 51) SIMOTICS TN Series N-compact 1LA8 Operating Instructions 08/2017... -
Page 101: Decommissioning The Machine
Immediately perform an inspection after such faults. Correct the cause of the fault as described in the respective remedial measures section. Repair any damage to the machine. SIMOTICS TN Series N-compact 1LA8 Operating Instructions 08/2017... -
Page 102: Electrical Faults
Winding short circuit or phase short cir‐ Determine the winding resistances and insulation cuit in stator winding resistances. Carry out repair work after consulta‐ tion with the manufacturer. Incorrect direction of rotation Check the connection. SIMOTICS TN Series N-compact 1LA8 Operating Instructions 08/2017... -
Page 103: Mechanical Faults
Reinforce the foundation after consultation with the and foundation manufacturer. Changes in foundation Determine the cause and rectify it. Realign the ma‐ chine. Note any changes taking place during warm up ① SIMOTICS TN Series N-compact 1LA8 Operating Instructions 08/2017... -
Page 104: Roller Bearing Faults
Too much grease in bearing Remove surplus grease. Wrong grease in the bearing Use the correct grease. Friction marks on raceway Replace the bearing. Brinelling or scoring Replace the bearing. Avoid any vibration at standstill SIMOTICS TN Series N-compact 1LA8 Operating Instructions 08/2017... -
Page 105: Maintenance
● Perform maintenance work on the machine only when it is stopped. The only operation permissible while the machine is rotating is regreasing the roller bearings. ● When performing maintenance work, comply with the five safety rules (Page 16). SIMOTICS TN Series N-compact 1LA8 Operating Instructions 08/2017... - Page 106 Operating conditions and characteristics can vary widely. For this reason, only general intervals for inspection and maintenance measures can be specified here. Comply with the IEC / EN 60079‑17 standard during all service and maintenance work on the machine. SIMOTICS TN Series N-compact 1LA8 Operating Instructions 08/2017...
-
Page 107: Measurement Of The Insulation Resistance And Polarization Index In The Context Of Maintenance Work
Inspections in the event of faults Natural disasters or unusual operating conditions, such as overloading or short circuit, are faults that overload the machine electrically or mechanically. Immediately perform an inspection after such faults. SIMOTICS TN Series N-compact 1LA8 Operating Instructions 08/2017... -
Page 108: First Inspection After Installation Or Repair
The foundation has no cracks or indentations. (*) The machine is aligned within the permissible tolerance ranges. All the fixing bolts/screws for the mechanical and electrical connections have been securely tightened SIMOTICS TN Series N-compact 1LA8 Operating Instructions 08/2017... -
Page 109: Servicing The Roller Bearings
Grease selection criteria High quality ISO‑L‑X BDEA3 lubricating grease according to ISO 6743-9 and K3K‑20 lubricating grease according to DIN 51825 with lithium soap as a thickener and an upper SIMOTICS TN Series N-compact 1LA8 Operating Instructions 08/2017... -
Page 110: Table 9-3 Criteria For Selecting Roller Bearing Greases
Only use the grease type that is specified on the lubricant plate. ● If the operating conditions differ from those mentioned, other greases may only be used after prior consultation with the manufacturer. SIMOTICS TN Series N-compact 1LA8 Operating Instructions 08/2017... - Page 111 Alternative greases with NLGI class 2 for motors of horizontal construction Manufacturer Grease type Shell Gadus S2 V100 2 ExxonMobil Unirex N2 Esso Energrease LS2 Castrol Longtime PD2 Lubcon Turmogrease L 802 EP plus Shell Retinax LX2 Arcanol Multi 2 SIMOTICS TN Series N-compact 1LA8 Operating Instructions 08/2017...
- Page 112 ● Operation at speeds in accordance with rating plate ● Low-vibration operation ● Neutral ambient air ● High-quality roller bearing greases In the case of unfavorable operating conditions, reduce the relubrication intervals after prior consultation with the manufacturer. SIMOTICS TN Series N-compact 1LA8 Operating Instructions 08/2017...
-
Page 113: Sealing The Rolling-Contact Bearings ("Increased Degree Of Protection" Option)
The procedure is the same as that for lubricating grease. The sealing effect during operation is optimum as long as a small amount of relatively clean grease is forced out. SIMOTICS TN Series N-compact 1LA8 Operating Instructions 08/2017... -
Page 114: Keeping The Cooling Air Flow Clean
– IIC: Overall coating thickness ≤ 0.2 mm for motors of group II (gas) ● Limit the surface resistance of the paint used: – Surface resistance ≤ 1 GΩ for motors of groups II and III (gas and dust) SIMOTICS TN Series N-compact 1LA8 Operating Instructions 08/2017... -
Page 115: Maintaining Terminal Boxes
● Check the insulators, connectors and cable connections in the terminal box. ● Replace the damaged components if necessary. WARNING Short-circuit hazard Damaged components can cause short circuits, possibly resulting in death, serious injuries and property damage. Replace damaged components. SIMOTICS TN Series N-compact 1LA8 Operating Instructions 08/2017... -
Page 116: Corrective Maintenance
● The centerings in the shaft extensions have reset threads. Use lifting gear which is suitable for the rotor weight and direction of loading. SIMOTICS TN Series N-compact 1LA8 Operating Instructions 08/2017... -
Page 117: Seal The Motor
(Hylomar M). ● Surfaces whose mating faces are sealed using sealings that adhere to one side only can be resealed with the original sealing using the original adhesives (Loctite). SIMOTICS TN Series N-compact 1LA8 Operating Instructions 08/2017... -
Page 118: Screws With Precote Coating
Loctite. 9.2.4 Fan cowl To remove or replace the external fan, the fan cowl must be disassembled. The fan cowl is fixed on the machine enclosure with screws. SIMOTICS TN Series N-compact 1LA8 Operating Instructions 08/2017... -
Page 119: External Fan Made Of Metal
4. Secure the parallel key from falling out or remove it. Figure 9-1 Ventilation (schematic diagram with axial fan) Assembly 1. Remove the parallel key lock or insert it in the keyway. 2. Check the correct seating. SIMOTICS TN Series N-compact 1LA8 Operating Instructions 08/2017... -
Page 120: External Fan Made Of Plastic
External fan made of plastic External fans made of plastic feature a cast-on driver similar to a parallel key. The external fan is secured using a retaining ring to prevent axial movement. SIMOTICS TN Series N-compact 1LA8 Operating Instructions 08/2017... -
Page 121: Internal Fan
9.2.7 Internal fan The internal fan is located on the rotor inside the machine. If the internal fan is defective or must be replaced, please contact the Service Center (Page 149). SIMOTICS TN Series N-compact 1LA8 Operating Instructions 08/2017... -
Page 122: Roller-Contact Bearings
– Remove the end shield. Depending on the shaft height, roller bearing type and design, it is either a bearing head version or a bearing housing version. – Remove the locking ring from the shaft. 2. Pull off the roller bearing together with the grease slinger. SIMOTICS TN Series N-compact 1LA8 Operating Instructions 08/2017... -
Page 123: Remove V Ring
Before uninstalling the roller bearing, the labyrinth sealing ring must be removed. ③ The labyrinth sealing ring is fixed with three grub screws that are separably secured with adhesive such as Loctite 243. SIMOTICS TN Series N-compact 1LA8 Operating Instructions 08/2017... -
Page 124: Assembling The Rolling-Contact Bearings
Procedure 1. Remove the required components and replace damaged components. 2. Remove any dirt from the components. Remove any grease and the remains of sealant or liquid threadlocker. SIMOTICS TN Series N-compact 1LA8 Operating Instructions 08/2017... -
Page 125: Install The V Ring
If present: V ring (Page 125) Labyrinth sealing ring (special design) (Page 127) 9.2.8.5 Install the V ring Requirement The roller bearing is already fitted. The V ring can be installed for the bearing seal. SIMOTICS TN Series N-compact 1LA8 Operating Instructions 08/2017... -
Page 126: Installing The V Ring ("Increased Degree Of Protection" Option)
9.2.8.6 Installing the V ring ("Increased degree of protection" option) The grease chamber of the labyrinth sealing ring together with the V ring ensures compliance with degree of protection IP65. SIMOTICS TN Series N-compact 1LA8 Operating Instructions 08/2017... -
Page 127: Installing The Labyrinth Sealing Ring
1. Apply a soluble adhesive to the three set screws such as Loctite 243) and screw them partially into the labyrinth sealing ring. 2. Apply an corrosion protection paint to the shaft in the area of the labyrinth sealing ring. SIMOTICS TN Series N-compact 1LA8 Operating Instructions 08/2017... -
Page 128: Figure 9-7 Position The Set Screws For The Labyrinth Sealing Ring On The Outer Bearing Cover
4. Locate the labyrinth sealing ring in position by screwing the set screws in. Check that the tips of the set screws engage with the keyway with a short axial movement. The correct axial position is obtained when the locating setscrews screwed into the keyway engage. SIMOTICS TN Series N-compact 1LA8 Operating Instructions 08/2017... -
Page 129: Spare Parts
● Commercially available equivalent standard parts such as screws may be used. 10.2 Ordering spare parts via the Internet You can use "Spares on Web" to determine the order numbers for motor spare parts quickly and easily. Spares on Web (https://www.automation.siemens.com/sow). SIMOTICS TN Series N-compact 1LA8 Operating Instructions 08/2017... -
Page 130: Anti-Condensation Heating
Spare parts 10.3 Anti-condensation heating A short description of how to use "Spares on Web" is available on the Internet. Guide for Spares on Web (http://support.automation.siemens.com/WW/news/en/25248626). Rolling-contact bearings When ordering roller bearings, in addition to the bearing identification code, the supplementary specifying code is also necessary for the bearing version. -
Page 131: Stator And Rotor
10.00 Stator frame with laminated core and winding 8.00 Rotor, complete 10.50 Lifting lug 8.10 Shaft 10.84 Cover with seal 8.20 Rotor core with winding 20.00 Terminal box 8.30 Drive-end balancing ring SIMOTICS TN Series N-compact 1LA8 Operating Instructions 08/2017... -
Page 132: Ventilation
Air inlet nozzle 4.84 Grease supply extension tube 12.35 Protective grille 11.04 External fan, unidirectional 12.70 Protective cover, optional for design IM V1 11.05 External fan, bidirectional 12.85 Fixing elements 11.62 Locking ring SIMOTICS TN Series N-compact 1LA8 Operating Instructions 08/2017... -
Page 133: Drive End Rolling-Contact Bearings With Bearing Housing
3.81 3.20 Outer bearing cover 3.82 Grease tube 3.30 Locking ring 5.00 End shield, design B3 3.35 Grease slinger 5.10 Flanged end shield 3.40 Deep-groove ball bearing (locating bearing) 5.67 Sealing plug SIMOTICS TN Series N-compact 1LA8 Operating Instructions 08/2017... -
Page 134: Drive End Rolling-Contact Bearings Without Bearing Housing
Grease nipple 3.16 Labyrinth ring (optional) 3.81 3.20 Outer bearing cover 3.82 Grease tube 3.30 Locking ring 5.00 End shield 3.35 Grease slinger 5.67 Sealing plugs 3.40 Deep-groove ball bearing (locating bearing) SIMOTICS TN Series N-compact 1LA8 Operating Instructions 08/2017... -
Page 135: Roller Bearings, De - End Shield With Integrated Bearing Cover
3.13 Protective ring 3.80 Grease nipple 3.16 Labyrinth ring (optional) 3.81 3.30 Locking ring 3.82 Grease tube 3.35 Grease slinger 5.00 End shield 3.40 Deep-groove ball bearing (locating bearing) 5.67 Sealing plugs SIMOTICS TN Series N-compact 1LA8 Operating Instructions 08/2017... -
Page 136: Non-Drive End Rolling-Contact Bearings With Bearing Housing
V ring 4.60 Inner bearing cover 4.20 Outer bearing cover 4.81 4.30 Locking ring 4.82 Grease tube 4.35 Grease slinger 6.00 End shield 4.40 Deep-groove ball bearing 6.67 Sealing plugs 4.45 Compression spring SIMOTICS TN Series N-compact 1LA8 Operating Instructions 08/2017... -
Page 137: Non-Drive End Rolling-Contact Bearings Without Bearing Housing
Compression spring 4.10 V ring 4.60 Inner bearing cover 4.20 Outer bearing cover 4.81 4.30 Locking ring 4.82 Grease tube 4.35 Grease slinger 6.00 End shield 4.40 Deep-groove ball bearing 6.67 Sealing plugs SIMOTICS TN Series N-compact 1LA8 Operating Instructions 08/2017... -
Page 138: Roller Bearings, Nde - End Shield With Integrated Bearing Cover
Roller bearing cartridge (floating bearing) 4.60 Inner bearing cover 4.10 V ring 4.81 4.30 Locking ring 4.82 Grease tube 4.35 Grease slinger 6.00 End shield 4.40 Deep-groove ball bearing 6.67 Sealing plugs 4.45 Compression spring SIMOTICS TN Series N-compact 1LA8 Operating Instructions 08/2017... -
Page 139: Terminal Box 1Xb1621
Terminal box 1XB1621 spare parts Part Description Part Description 20.00 Terminal box without cable entry comprising the following components: 20.20 Terminal box housing 21.41 Terminal supports 20.27 Mounting rail 21.61 Terminal strip for auxiliary circuit SIMOTICS TN Series N-compact 1LA8 Operating Instructions 08/2017... -
Page 140: 1Xb1631 Terminal Box
Cover 22.43 Terminal link, stepped with two holes 20.38 Cover seal 22.70 Fixing lug for PE conductor 20.86 Entry for auxiliary cable You can order the terminal box just as one component. SIMOTICS TN Series N-compact 1LA8 Operating Instructions 08/2017... -
Page 141: Table 10-11 Additional Spare Parts For Terminal Box 1Xb1631 With Split Cable Entry
Part Description 20.61 Cable gland - upper part 20.66 Strain relief - lower part 20.62 Cable gland - lower part 20.70 Sealing insert for cable entry 20.65 Strain relief - upper part SIMOTICS TN Series N-compact 1LA8 Operating Instructions 08/2017... -
Page 142: Terminal Box 1Xb1634
Mounting rail 20.66 Strain relief (lower part) 20.28 Seal 20.68 Seal 20.30 Cover 20.70 Sealing insert for cable entry 20.38 Seal 21.41 Terminal supports 20.60 Cable gland 21.61 Terminal strip for auxiliary circuit SIMOTICS TN Series N-compact 1LA8 Operating Instructions 08/2017... - Page 143 Spare parts 10.14 Terminal box 1XB1634 Part Description Part Description 20.61 Cable gland (upper part) 22.70 Fixing lug for PE conductor 20.62 Cable gland (lower part) SIMOTICS TN Series N-compact 1LA8 Operating Instructions 08/2017...
- Page 144 Spare parts 10.14 Terminal box 1XB1634 SIMOTICS TN Series N-compact 1LA8 Operating Instructions 08/2017...
-
Page 145: Disposal
4. Remove all liquids such as oil and cooling liquids. Collect the liquids separately and dispose of them in a professional manner. 5. Detach the machine fixings. 6. Transport the machine to a suitable location for disassembly. SIMOTICS TN Series N-compact 1LA8 Operating Instructions 08/2017... -
Page 146: Dismantling The Machine
Dispose of the separated components according to local regulations or via a specialist disposal company. The same applies for cloths and cleaning substances which have been used while working on the machine. SIMOTICS TN Series N-compact 1LA8 Operating Instructions 08/2017... - Page 147 ● Wooden packaging for sea transport consists of impregnated wood. Observe the local regulations. ● The foil used for water-proof packaging is an aluminum composite foil. It can be recycled thermally. Dirty foil must be disposed of via waste incineration. SIMOTICS TN Series N-compact 1LA8 Operating Instructions 08/2017...
- Page 148 Disposal 11.4 Disposal of components SIMOTICS TN Series N-compact 1LA8 Operating Instructions 08/2017...
-
Page 149: Service And Support
Technical Support (https://support.industry.siemens.com/cs/sc?nId=2090&lc=en-WW) www.siemens.com/yourcontact (www.siemens.com/yourcontact) Siemens Support for on the move You can obtain optimum support anywhere you go using the "Siemens Industry Online Support” app. The app is available for Apple iOS, Android and Windows Phone. SIMOTICS TN Series N-compact 1LA8... - Page 150 Service and Support SIMOTICS TN Series N-compact 1LA8 Operating Instructions 08/2017...
-
Page 151: Technical Data
Table B-1 Tightening torques for bolted connections with a tolerance of ±10%. Case 1080 1700 2600 4200 1200 2000 3100 4700 7500 SIMOTICS TN Series N-compact 1LA8 Operating Instructions 08/2017... - Page 152 Different tightening torques for electrical connections and bolted connections for parts with flat seals or insulating parts are specified in the relevant sections and drawings. See also Securing the rotor (Page 38) SIMOTICS TN Series N-compact 1LA8 Operating Instructions 08/2017...
-
Page 153: Quality Documents
Quality documents You can find the quality documents here: https://support.industry.siemens.com/cs/ww/en/ps/13320/cert (https:// support.industry.siemens.com/cs/ww/en/ps/13320/cert) SIMOTICS TN Series N-compact 1LA8 Operating Instructions 08/2017... - Page 154 Quality documents SIMOTICS TN Series N-compact 1LA8 Operating Instructions 08/2017...
-
Page 155: Index
Components, 146 Brought-out cables, 74 Distance over surface, 80 Cable entries, 78 Electrical faults, 102 certified, 76, 84 Electromagnetic fields, 21 Cable entry and routing, 77 Emergency off, 98 Cable entry plate, 75 SIMOTICS TN Series N-compact 1LA8 Operating Instructions 08/2017... - Page 156 Metal shield, 73, 85 Hot surfaces, 17 Metal-armored cables, 73, 85 Minimum air clearances, 80, 83 More information, 149 Mounting parts, 50 Mounting-foot hole dimensions, 53 Ignition hazard, 18, 97 Increased degree of protection, 28 SIMOTICS TN Series N-compact 1LA8 Operating Instructions 08/2017...
- Page 157 RF grounding point, 45 Terminal box 1XB1621, 139 Risk of explosion, 42, 118, 130 Terminal box 1XB1631, 141 Cleaning with compressed air, 107 Terminal box 1XB1634, 142 Spare parts, 129 Ventilation, 132 SIMOTICS TN Series N-compact 1LA8 Operating Instructions 08/2017...
- Page 158 Bolted connection, 151 Cable lug, 73 Ground terminals, 73 Torsional loadings, 35 Transporting, 37, 58 Turning the machine on to its side, 55 Type of balancing, 56 Type of protection, 23, 129 SIMOTICS TN Series N-compact 1LA8 Operating Instructions 08/2017...
- Page 160 Further Information www.siemens.com/drives Siemens AG Process Industries and Drives Postfach 48 48 90026 NÜRNBERG GERMANY...