Citronix ci5200 Technical & Service Manual
Ci5000 series
Hide thumbs
Also See for ci5200:
- Operation manual (25 pages) ,
- Operation manual (133 pages) ,
- Operation manual (91 pages)
Table of Contents
Advertisement
Quick Links
Download this manual
See also:
Operating Manual
Advertisement
Chapters
Table of Contents

Related Manuals for Citronix ci5200


Summary of Contents for Citronix ci5200
- Page 1 Series Printer Technical Service Manual Citronix ci5000 Series Printer Technical Service Manual ci5200 ci5300 ci5500 ci5650 Revision 0.1 Part Number: 012-1002-007 Version 0.1...
- Page 2 ci5000 Series Printer Technical Service Manual THIS PAGE INTENTIONALLY LEFT BLANK. Version 0.1...
- Page 3 Series Printer Technical Service Manual Preface The Citronix team welcomes you to the ci5000 Series Continuous Inkjet Printer range. We are proud of this product range and the features it has to offer and are confident that this product will exceed the high expectations that you, our customers, have placed with us.
-
Page 4: Declaration Of Conformity
Each product marketed, is identical to the representative unit tested and found to meet the standards. Trade Name: Citronix Type of Product: Continuous Ink Jet Printer Model: ci5200, ci5300, ci5500, ci5650 Signed for and on behalf of Citronix Inc. 2241 S. Watson Road, Suite 111 Arlington, Texas 76010 *Original signed and available from local distributor*... - Page 5 ci5000 Series Printer Technical Service Manual This equipment has been tested and found to comply with the limits for a Class A digital device, pursuant to part 15 of the FCC Rules. These limits are designed to provide reasonable protection against harmful interference when the equipment is operated in a commercial environment.
- Page 6 ci5000 Series Printer Technical Service Manual CONTENT SECTION 1: GENERAL INFORMATION SECTION 2: GRAPHICAL USER INTERFACE SECTION 3: PRINTER OPERATION SECTION 4: INSTALLATION AND COMMISSIONING SECTION 5: STATUS BAR/TROUBLESHOOTING SECTION 6: CLEANING AND MAINTENANCE SECTION 7: COMMUNICATIONS SECTION 8: SPARES & ACCESSORIES SECTION 9: CALIBRATION SECTION 10:...
-
Page 7: Table Of Contents
ci5000 Series Printer Technical Service Manual SECTION 1: GENERAL INFORMATION CONTENTS Page Introduction ..........................1-3 Before You Begin ........................... 1-3 Safety Information ......................... 1-3 Specific Warnings .......................... 1-4 Health and Safety ........................1-4 Introduction ............................ 1-4 Basic Requirements ........................1-4 Storage ............................ - Page 8 ci5000 Series Printer Technical Service Manual Print Speed Chart - Drop Size: Macro/External Encoder .............. 1-16 Print Speed Chart - Drop Size: Micro/Internal Encoder ..............1-17 Print Speed Chart - Drop Size: Micro/External Encoder ............... 1-18 Print Speed Chart - Drop Size: HS50/Internal Encoder ..............1-19 Print Speed Chart - Drop Size: HS50/External Encoder ...............
-
Page 9: Introduction
This guide applies to all ci5000 Series Printers, namely ci5200, ci5300, ci5500 and ci5650 as well as specialty Printers (micro, HS50, Pigment and Heavy Pigment). Any differences between product variants are identified or highlighted. -
Page 10: Specific Warnings
Cleaning Solvent. Health and Safety Introduction Citronix supplies Safety Data Sheets (SDS) giving specific safety information with each of its ink, make- up and wash fluids. There are also warnings on each container. The following notes are for general guidance only. -
Page 11: Storage
ci5000 Series Printer Technical Service Manual available), taking care not to allow the water to run into an unaffected eye. Medical aid must be obtained immediately. After exposure to ink, all possible traces must be washed off as soon as possible at the nearest ... - Page 12 ci5000 Series Printer Technical Service Manual touch screen interface and all interfacing connectors, Low & High voltage power supplies, Pump Motor, and the power switch. The fluids compartment houses the ink system, filter module and the ink and make up tanks. These tanks are filled using their respective fill ports located on the top of the printer.
-
Page 13: Controller Cabinet
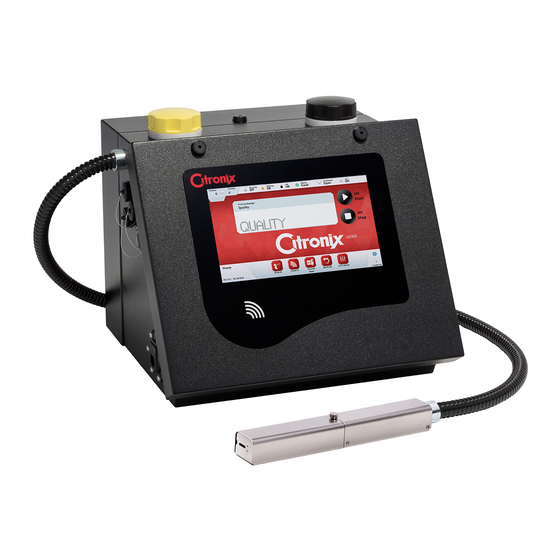
ci5000 Series Printer Technical Service Manual Controller Cabinet The front half of the controller cabinet consists of the electronics compartment. The cover, also known as the tablet has the touchscreen display, ciSafeFill Reader and controller PCB. The right hand side of the electronics cabinet houses the air filter. -
Page 14: Hardware Specification
Hardware Specification: Single Printhead Control 55-88 KHz Processor Cold Fire V4 Speed 250Mhz Memory 256Mb Flash and 256Mb RAM Interfaces: ci5200 Ci5300 Ci5500/ci5650 1 RS232 1 RS232 1 Ethernet 1 RS232 (1200 up to 115.2KB) SB Card SB Card SB Card... -
Page 15: Outputs
35° – 113° F (5° – 45° C) Temperature % Relative Humidity 10-90% (non-condensing) Electrical Requirements: Auto Ranging 90-260VAC (3 Amp) Frequency 50-60 Hz Controller and Printhead Physical Characteristics: ci5200 ci5300 Enclosure Black Powder Coated Steel 304 grade Stainless Steel Environmental IP55 IP55 Printer Weight 38.4 lbs.* 38.4 lbs.*... - Page 16 * The weight of the Printhead and conduit is included in the Printer weight. Ci5200/ci5300/ci5500 Side View ci5650 Side View Ci5200/ci5300/ci5500 Front View ci5650 Front View Cabinet Dimensions ci5200, ci5300 & ci5500 ci5650 Height 14.2 inches (361mm) 14.2 Inches (361mm) Width 16 inches (406mm) 17.7 inches (450mm)
-
Page 17: Printhead And Umbilical
Jets of water from all directions; limited ingress permitted. IP65 – Totally protected against dust. Protected against low-pressure Jets of water from all directions; limited ingress permitted. Printhead Dimension Drawings: Straight Printhead Umbilical Fitting (ci5200/ci5300/ci5500/ci5650) Access for Straight Printhead Umbilical Fitting (ci5200/ci5300/ci5500/ci5650) Version 0.1 1-11... - Page 18 ci5000 Series Printer Technical Service Manual 90 Degree Printhead Umbilical Fitting (ci5500/ci5650 option) Right Angle Printhead (ci5500/ci5650 option) Version 0.1 1-12...
-
Page 19: Print Speeds And Print Quality Charts
300 is the best quality; 0 is the fastest speed. The Speed Chart shows speeds at 0, 100, 200 and 300. NOTE: ci5200 is available only in Macro mode. Micro and HS50 models are available only with ci5500 and ci5650. -
Page 20: Print Speed Chart - Drop Size: Normal/Internal Encoder
ci5000 Series Printer Technical Service Manual Print Speed Chart - Drop Size: Normal/Internal Encoder Maximum Line Speed Print Speed / Quality Characters per Pixel Setting Feet per minute Meters per minute Selection second 3213 1928 1428 2142 1285 1224 1L12 1L12 1L12 1L12... -
Page 21: Print Speed Chart - Drop Size: Macro/Internal Encoder
ci5000 Series Printer Technical Service Manual Maximum Line Speed Print Speed / Quality Pixel Setting Characters per second Feet per minute Meters per minute Selection 3083 1850 1370 2055 1233 1174 1L12 1L12 1L12 1L12 1L16 1L16 1L16 1L16 1233 1L19 1L19 1L19... -
Page 22: Print Speed Chart - Drop Size: Macro/External Encoder
ci5000 Series Printer Technical Service Manual 1012 1518 1L12 1L12 1L12 1L12 1L16 1L16 1L16 1L16 1L19 1L19 1L19 1L19 1L25 1L25 1L25 1L25 1L31 1L31 1L31 1L31 Print Speed Chart - Drop Size: Macro/External Encoder Maximum Line Speed Print Speed / Quality Pixel Setting Characters per second Feet per minute... -
Page 23: Print Speed Chart - Drop Size: Micro/Internal Encoder
ci5000 Series Printer Technical Service Manual 1456 1L12 1L12 1L12 1L12 1L16 1L16 1L16 1L16 1L19 1L19 1L19 1L19 1L25 1L25 1L25 1L25 1L31 1L31 1L31 1L31 Print Speed Chart - Drop Size: Micro/Internal Encoder Maximum Line Speed Print Speed / Quality Pixel Setting Characters per second Feet per minute... -
Page 24: Print Speed Chart - Drop Size: Micro/External Encoder
ci5000 Series Printer Technical Service Manual 1037 1444 1011 1L12 1L12 1L12 1L12 1L16 1L16 1L16 1L16 1498 1L19 1L19 1L19 1L19 1L25 1L25 1L25 1L25 1L31 1L31 1L31 1L31 Print Speed Chart - Drop Size: Micro/External Encoder Maximum Line Speed Print Speed / Quality Characters per Pixel Setting... -
Page 25: Print Speed Chart - Drop Size: Hs50/Internal Encoder
ci5000 Series Printer Technical Service Manual 1386 1L12 1L12 1L12 1L12 1L16 1L16 1L16 1L16 1437 1L19 1L19 1L19 1L19 1L25 1L25 1L25 1L25 1L31 1L31 1L31 1L31 Print Speed Chart - Drop Size: HS50/Internal Encoder Maximum Line Speed Print Speed / Characters per Pixel Setting Feet per minute... -
Page 26: Print Speed Chart - Drop Size: Hs50/External Encoder
ci5000 Series Printer Technical Service Manual 1L12 1L12 1L12 1L12 1L16 1L16 1L16 1L16 1389 1L19 1L19 1L19 1L19 1L25 1L25 1L25 1L25 1L31 1L31 1L31 1L31 Print Speed Chart - Drop Size: HS50/External Encoder Maximum Line Speed Print Speed / Quality Pixel Setting Characters per second Feet per minute... -
Page 27: Consumables And Delivery
ci5000 Series Printer Technical Service Manual 1L12 1L12 1L12 1L12 1L16 1L16 1L16 1L16 1333 1L19 1L19 1L19 1L19 1L25 1L25 1L25 1L25 1L31 1L31 1L31 1L31 Consumables and Delivery Full range – MEK, Acetone, Ethanol Ink/Makeup Types Ink/Makeup Colors Black, Red, Blue, Yellow, Green, White, UV Readable Dry Time Quick dry to immediate... -
Page 28: Ink System
ci5000 Series Printer Technical Service Manual ● ● ● ● ● ● MEK Black Black ● ● ● ● ● ● Ethanol Black Black ● ● ● ● ● ● MEK Red ● ● ● ● ● ● MEK Blue Blue ●... - Page 29 ci5000 Series Printer Technical Service Manual Ink Pump Ink System Valves and Manifold Pressure Transducer Viscometer Filter Module Fluid Level Sense Make-up Fill Port Ink Fill Port Filter Module Ink Pump Module Base Viscometer Make-up Manifold (behind bracket)
-
Page 30: Ink Pump
ci5000 Series Printer Technical Service Manual Ink and Makeup Tanks The Ink tank holds 1.9 liters of Ink and the Makeup tank holds 2.25 liters of Makeup. Ink Pump The pump motor is on the electrical side of the enclosure, and the Ink pump is on the fluidic side of the enclosure isolated through a Teflon seal. - Page 31 ci5000 Series Printer Technical Service Manual Valves can be tested by pressing the [Menu] tab on the Main screen and then press [Service] . Press the [Test Valves] button in the Navigational Tool Bars. Pressing/selecting a valve while in this screen will activate the valve. Pressing/Selecting the “No Valve” or a different valve will deactivate the valve.
-
Page 32: Pressure Transducer
ci5000 Series Printer Technical Service Manual Pressure Transducer The Pressure Transducer monitors the operating Ink pressure and sends a signal to the CPU board for increasing/decreasing the pump revolutions per second (RPS) to maintain a set operating pressure. NOTE: Further troubleshooting/testing and adjustments are explained in SECTION 6 Cleaning and Maintenance/Service Routines Viscometer The Viscometer is an instrument used to measure viscosity of the Ink. - Page 33 ci5000 Series Printer Technical Service Manual Quick release buttons Alignment Version 0.1 1-27...
-
Page 34: Ink System Diagram
ci5000 Series Printer Technical Service Manual Ink System Diagram Version 0.1 1-28... -
Page 35: Print Head
ci5000 Series Printer Technical Service Manual Print Head The image below shows the printhead with the covers removed. High pressure ink is forced through a nozzle located on the end of the Drop Generator as a continuous stream. The Resonator Probe in the Drop Generator vibrates and causes the ink stream (or Jet) to break up into a steady stream of droplets. - Page 36 ci5000 Series Printer Technical Service Manual Drop Generator The Drop Generator contains the Resonator Probe and temperature sensor. The Resonator probe oscillates to break the stream into uniform drops. Each Printhead is calibrated with the modulation voltage, band, charge, and pressure at the time of manufacturing, which is noted on the Controller Settings Label.
-
Page 37: Printhead Temperature Sensor
ci5000 Series Printer Technical Service Manual Phase Circuit Board The Phase Circuit Board receives a low voltage signal from the Phase Detector, then amplifies and digitizes this signal for processing. Printhead Cover Sensor The Printhead Cover and Printhead Body contain an integrated intrinsically sealed switch to turn off the charge voltage (up to 300V), and deflector voltage (up to 8KV). - Page 38 ci5000 Series Printer Technical Service Manual SECTION 2: GRAPHICAL USER INTERFACE CONTENTS Page Introduction ..........................2-2 Home Screen ........................2-2 Printer Status and Controls: ....................2-3 Status Bar ........................2-3 Menus Tab ........................2-3 Navigation Tool Bar ...................... 2-4 Function Toolbar ......................2-4 Edit Button ........................
-
Page 39: Introduction
The touchscreen GUI provides a simple intuitive interface for controlling the printer. It follows the same familiar structure as previous generations of Citronix printers. The printer boots up to the home screen which provides quick access to the most commonly used printer features. -
Page 40: Printer Status And Controls
ci5000 Series Printer Technical Service Manual Printer Status and Controls: As you navigate through the GUI a number of different toolbars and control options become available. These consist of the status bar, menu tab, navigation toolbar, function toolbar, edit button, and help button which are described below and are used to view, change or edit depending on the task being undertaken. -
Page 41: Navigation Tool Bar
ci5000 Series Printer Technical Service Manual Message Status Service Properties Security Navigation Tool Bar Each icon on the Navigation Toolbar takes the operator to a new screen. Screens are grouped based on their common functionality and organized like a directory tree. Pressing an icon takes one further down the directory tree and pressing the back button brings one up the directory tree. -
Page 42: Edit Button
ci5000 Series Printer Technical Service Manual Edit Button [Edit] buttons provide easy access to change setting or enable options. When pressed, a keyboard will appear to allow the information to be entered or a list screen will appear to select from a list of options. Help Button [Help] button provides access to help information concerned with the current menu screen or... -
Page 43: Menu Screens
ci5000 Series Printer Technical Service Manual Menu Screens Home Screen The home screen provides quick and easy access to the most commonly used statuses and printer functions. Each of the status and function items are described below. Version 0.1... -
Page 44: Messages
ci5000 Series Printer Technical Service Manual Messages The message edit screen is used for creating and editing messages by adding fixed and variable fields and formatting to a WYSIWYG message window. There is also a well-defined “Search” function that will search up to 30-character message names. Status The status screens provide more detailed information on each of the printer’s subsystems. -
Page 45: Service
The system configuration screens. The following controls are used to calibrate, test, and set printer specific settings and configurations. These settings should only be changed by a Citronix trained service engineer. Service 5. Run Pump Flush Prime 6. -
Page 46: Security
ci5000 Series Printer Technical Service Manual Security The Security screen allows select features of the printer to be disabled until a user with the correct privileges logs in. By default, Security is disabled. To enable Security, you must have at least one user with security privileges. - Page 47 ci5000 Series Printer Technical Service Manual Version 0.1 2-10...
- Page 48 ci5000 Series Printer Technical Service Manual SECTION 3: PRINTER OPERATION CONTENTS Page Startup & Shutdown ......................3-3 Start up ............................3-3 Shutdown ............................3-4 Extended Shutdown ........................3-4 System Properties ......................... 3-5 Application Properties ........................3-5 Display Settings ..........................3-7 Setting them System Date &...
- Page 49 ci5000 Series Printer Technical Service Manual Message Store and Search ....................3-61 Selecting a Message to Print ....................3-62 Print Adjust Parameters....................... 3-62 Drop Size ............................. 3-63 Print Quality (ciPrecisionPlus) ...................... 3-64 Delay ............................3-64 Width ............................3-65 Gap .............................. 3-65 Orientation ...........................
-
Page 50: Startup & Shutdown
ci5000 Series Printer Technical Service Manual Startup & Shutdown Start up Press and hold the [Power] button located on the left-hand side of the printer for 2 seconds. After approximately 40 seconds, the printer will have fully booted up and is ready to start the jet. Press the [Jet Start] button and the Jet Status (located in the top right corner of the screen) will change... -
Page 51: Shutdown
ci5000 Series Printer Technical Service Manual In approximately 30 seconds the jet will be on, if the printhead cover is on, the Deflection Voltage will be turned on and the Jet Status will change to “Ready” (meaning ready to print). Pressing the [Pause] button while the printer is ready to print will stop/inhibit any print signal(s) and the Jet Status will change to “Paused”. -
Page 52: System Properties
ci5000 Series Printer Technical Service Manual If the printer is to be switched off for longer than 7 days, or transported, the ink and make up should be replaced with cleaning solvent to prevent valve and nozzle blocking. This can be done by using the following process. - Page 53 ci5000 Series Printer Technical Service Manual Settings Action Options Mode of Sets the operation of the system for the Normal, Measurement, Message Sequence, Message application – see details below. Code, One for One. Operation Encoder Sets whether a shaft encoder is used or not None, External, Internal PC1, or Internal PC2 Trigger Edge 1 Sets edge of print-go signal to begin printing...
-
Page 54: Display Settings
ci5000 Series Printer Technical Service Manual Photocell 2 has three options to set the orientation state of a message. These options are used when the Printhead is transported across a product, first in one direction and then in another. These options are: ... -
Page 55: Setting Them System Date & Time
ci5000 Series Printer Technical Service Manual Setting them System Date & Time From the Home screen, press the [Menu Bar] Tab to open the Menu bar then select the [Properties] button on the Menu Bar. Press the [Date/Time] button in the Navigation Tool Bar to set the printer’s: Date &... -
Page 56: Setting Host Interface Properties
If connecting a connection for Host Communication Interface using RS232 or Ethernet. The following will help setup the printer to send and receive commands. NOTE: a complete Section focusing on the Communications Interface for the Citronix Printer can be found in Section 7 “Communications”. -
Page 57: Changing System Language
ci5000 Series Printer Technical Service Manual Update firmware on the Printer. Backup and restore all Graphics, Messages and Properties of the Printer. Upload/Download Language files to the Printer. Upload Graphics to the Printer. Upload Font files to the Printer. ... -
Page 58: Setting Alarms
1. Alarms 1 Function 2. Alarms 2 Function 3. Alarms 3 Function 4. Relay Function (not available in the ci5200) For each Alarm/Relay, there are 3 state functions that need to be set. 1. What kind of alarm (None, Failure, Warning, Print Ready) 2. -
Page 59: Files
ci5000 Series Printer Technical Service Manual Files The Files screen allows a PC Free way to perform all upgrading and restore functions by using an on Board SD card or by plugging in a USB into the USB port on the CPU board. From the USB or SD Card you can: 1. - Page 60 ci5000 Series Printer Technical Service Manual 7. Install bitmaps/logos 8. Backup the Event Log When using a USB; First plug it into the printer. This allows the printer to download onto the USB a file structure. This is an automatic process. To do this; 1.
- Page 61 5. Now the USB device can be removed and plugged into a PC to download the file into the appropriate folder. On the USB there is a Citronix file with 2 sub-files (System & Customer). System is used for all system files 1.
- Page 62 The 5000 Series has now a large enough memory that ALL Fonts, Languages, and Keyboard IME’s will be installed on the printers before they leave Citronix, however if any are removed or otherwise need to be installed the following will give these instructions.
- Page 63 As mentioned in the previous section, all of the Fonts, Languages, and Keyboard IME’s will be installed onto every Citronix 5000 Series printer. In case one was deleted or corrupted the following procedure will describe the reinstallation process using a USB.
- Page 64 As mentioned in the previous sections, all of the Fonts, Languages, and Keyboard IME’s will be installed onto every Citronix 5000 Series printer. In case one was deleted or corrupted the following procedure will describe the reinstallation process using a USB.
- Page 65 ci5000 Series Printer Technical Service Manual NOTE: This process must be done for each Keyboard individually (CUSTOMER File) When using a USB, multiple printer files (Backup, Bitmaps, and Event Logs) can be stored onto one device (USB) Each Printer’s files will be save in its own “Customer” file with the printer’s serial number as the Customer File name.
- Page 66 ci5000 Series Printer Technical Service Manual Each Customer file can be transferred to a PC by: 1. copying the complete Customer Folder 2. Opening the individual file and copying the actual Backup or Event Log files Backup: On either the USB or SD Card (potentially both) the backup file will be automatically saved to the Printer’s Serial number file (if there are multiple).
- Page 67 ci5000 Series Printer Technical Service Manual 1. Highlight the device the Backup is stored. 2. Open the [Backups] folder by pressing the [Plus] button and highlight the Backup file to be used. 3. Press the [Restore File] button. 4. There will then be a screen displaying “Restoring” while the file is downloading. This will take a few seconds.
- Page 68 ci5000 Series Printer Technical Service Manual Event Logs: Event Logs are an important troubleshooting tool. Now an Event Log Backup file can be saved on board the printer using the SD Card AND taken with the technician by using the USB. Multiple Event Logs can be saved on each device (USB OR SD Card).
-
Page 69: Security
ci5000 Series Printer Technical Service Manual NOTE: Once these Event Logs are transferred to a PC, they can then be emailed just as they are saved on the USB (a .log file). Security The Security screen allows select features of the printer to be disabled until a user with the correct privileges logs in. - Page 70 ci5000 Series Printer Technical Service Manual Add/Change User and User Functions Once logged in as ADMIN, press the [User List] button found in the Navigation Tool Bar. A list of Users will then be displayed. Using the 4 selections on the Function Tool Bar located on the right side of the screen, add, delete, edit, or copy a user.
-
Page 71: Create Message
ci5000 Series Printer Technical Service Manual Note new OP (operator) User added to the User’s list (below). Users with Security rights are the only users able to Enable or Disable the Security feature. Create Message Select the [Messages] button in the Navigational Tool Bar at the bottom or the screen, OR you can also select the [Menu Bar] tab , then select the [Message] option to take the user to the... - Page 72 ci5000 Series Printer Technical Service Manual Set the default message settings from the lists. Please note there are 3 screens (shown below) to view/edit the different settings press the arrow button circled below. Definition of the Message Default Settings: 1. Drop Size (PixelPlus) – Drop size used in a particular message. This can be different for each message created.
- Page 73 Example: if printing 2 lines of 7 drop high characters, the selection should be either 2L or 16 not higher Example: Pixel Settings: The following pixel settings are available for selection: Pixel Description Ci5200 Ci5300 Ci5500/ci5650 5 Dot Matrix 1 or 2 Line 1 to 4 Line 1 to 5 Line...
- Page 74 ci5000 Series Printer Technical Service Manual 4. Height – Voltage controlling the overall height of the printed message. The maximum is 255, the minimum setting is 50 but can be different depending on the pixel size of the message and printhead alignment.
- Page 75 ci5000 Series Printer Technical Service Manual 7. Orientation - Sets direction and orientation of print. There are a possible 6 different orientations available. These are: Upside Up, Upside Down, Mirror Up, Mirror Down. When the Tower Print Option is Enabled: Tower CCW, Tower CW. Example: 8.
- Page 76 ci5000 Series Printer Technical Service Manual 9. Gap – This setting sets the inter-character spacing in raster’s/stroke’s. This setting can be set from 0 – 9 Example: NOTE: the higher the Gap setting will affect the overall print speed. 10. Default Font Setting – This setting sets the font size all new message fields will default to. These options are: 5 / 7 / 9 / 12 / 16 / 19 / 25 / 31.
- Page 77 ci5000 Series Printer Technical Service Manual 15. Encoder Print Length – Only used with Internal Encoder and used as a replacement for width setting. This setting can be set from 0 – 9999. 16. Alternate 0 – This setting turns on the European 0 with slash. 17.
- Page 78 ci5000 Series Printer Technical Service Manual Enter the content of that field using the keyboard and then press Save. The Field will be place in the Message. Version 0.1 3-31...
- Page 79 ci5000 Series Printer Technical Service Manual Next select the font size for this field by pressing the [Edit] button (as shown below). Select the Font size from the list and press [Save] button. NOTE: Only the available fonts will be displayed to fit the message pixel size. There could be more than 1 screen of fonts).
- Page 80 Series Printer Technical Service Manual Font Chart: The following fonts are available for selection: Ci5200 Font Description Ci5300 Ci5500/ci5650 5 Dot 5 Dot Matrix 1 or 2 Line 1 to 4 Line 1 to 5 Line 7 Dot 7 Dot Matrix...
- Page 81 ci5000 Series Printer Technical Service Manual To move the field, press the [Move Field] button and use the arrows to move the field. Each field can be moved by pixel (1, 10, or 100 pixel) or by checking the [Snap to Grid] option, the field will move (up or down) to the next grid (red lines shown below) depending on the arrow selected (up or down).
-
Page 82: Message Fields
ci5000 Series Printer Technical Service Manual To select any message to print, just touch and highlight the message and press [Start Print] button in the Function Tool Bar (as seen above). Message Fields Text Fields Text fields are non-updating characters. Primarily inputted using the on board keyboard. Version 0.1 3-35... -
Page 83: Autocode
ci5000 Series Printer Technical Service Manual Autocode Autocodes allow Date, Time, Shift, Counter, User and Printer ID data to be inserted into a message field. These fields automatically update depending upon the selection. Some of these Autocodes can be adjusted forward example: in the case of a date/time to display and print an expiration date. (See below for more details) AutoCode AutoCode Basis... - Page 84 ci5000 Series Printer Technical Service Manual Note: changing the Delimiter is done using the “Field Date Delimiter” property in screen 2. (See below) It is important that the date field is highlighted for the delimiter property to be available. Time: below are the different date options available for selection. Version 0.1 3-37...
- Page 85 ci5000 Series Printer Technical Service Manual Note: changing the Delimiter is done using the “Field Date Delimiter” property in screen 2. (See below) It is important that the date field is highlighted for the delimiter property to be available. Counter: below shows how to insert a counter field into a message. Version 0.1 3-38...
- Page 86 ci5000 Series Printer Technical Service Manual Note: to change the counter properties “Counter Base” use screen 2. (See below) It is important that the date field is highlighted for the delimiter property to be available. There are up to 5 total counters that can be used in each message. These are setup from the [Message Defaults] button found in the Navigational Tool Bar before creating a message, or by using the [Setting]...
- Page 87 ci5000 Series Printer Technical Service Manual Counter are now ready in a message User User fields allow the printed message to show the User currently logged in the “Security” section. When this field is entered, any user logged onto the printer will be displayed and printed. Then needing to insert or edit a “User”...
- Page 88 ci5000 Series Printer Technical Service Manual Then needing to insert or edit a “shift” code in a message, first set up the number of Shifts that are required. There are 24 available Shifts that can be programmed and used in each message. To set the Shifts, press the [Settings] button in the Navigational Tool Bar.
- Page 89 ci5000 Series Printer Technical Service Manual Printer ID: This Autocode allows a Printer identification name or number to be added to a message to be printed. The Printer ID can be alpha and/or numeric and up to 15 characters. First setting the Printer ID is entered by from the Home screen, pressing the [Menu Bar Tab] then press [Service] Menu button.
-
Page 90: Bar Code
ci5000 Series Printer Technical Service Manual Bar Code To add a Barcode to a message: Press the [Add Field] button, select Barcode from the list then press [Select] Next select from the list (shown below), the barcode needed then press [Select] Version 0.1 3-43... - Page 91 ci5000 Series Printer Technical Service Manual Using either the Number Keypad or the standard keyboard, enter the desired information (see chart below for available options), then press Save. Human Readable Description Input (enter data) Check Digit Text Available Up to 256 numeric Interleave 2 of 5 Automatic or Disabled characters or Counter...
-
Page 92: Graphic
ci5000 Series Printer Technical Service Manual Next Select the Barcode size. Please note the max selection will always be the maximum pixel size of the message. See below. Note: adding Human Readable text below the barcode requires using the “Alphanumeric Display” shown on screen 2 to be changed to “Yes”. - Page 93 ci5000 Series Printer Technical Service Manual The Graphic List will appear. Touch/select the desired Graphic from the list and press the [Select] button. Note: Ensure the Message Pixel size will accommodate the graphic of the graphic could be cut off. If this needs to be changed, Press the [Settings] button in the Navigation Tool bar to change. The graphic will be inserted to the message.
-
Page 94: How To Use Microsoft Paint To Create Printable Graphics
ci5000 Series Printer Technical Service Manual Continue to build or create the message. When done press the [Save] button. How to Use Microsoft Paint to Create Printable Graphics Microsoft Paint Utility can be used to create a monochrome bitmap image file that can be loaded on a CIJ Printer using the printer's built in “FileUpdate.htm”... - Page 95 ci5000 Series Printer Technical Service Manual Creating a Logo A pixel is the smallest unit in a picture that can be addressed or controlled. Printable bitmap images can vary in height up to 31 pixels and a width that is evenly divisible by 8 (i.e. widths of 8, 16, 24, 32, 40,...). The bitmap image size is expressed as pixel Height x Width.
- Page 96 ci5000 Series Printer Technical Service Manual Click the “OK” Button and the work area will shrink. Select the “View” tab and zoom in to increase the work area. After zooming in on the work area, return to the Home tab. Version 0.1 3-49...
- Page 97 ci5000 Series Printer Technical Service Manual Since the printer is a monochrome, use only black and white as the image colors. Drawing the Image Select the Rectangle Shape using a mouse click. (Optional) Select a “Size” for the lines and draw the Logo. Version 0.1 3-50...
- Page 98 ci5000 Series Printer Technical Service Manual Draw a border long with other rectangles. Save the Image. Click on save. Save file “Rectangles31x48” as “Monochrome Bitmap (*.bmp).” Version 0.1 3-51...
- Page 99 ci5000 Series Printer Technical Service Manual Do you want to continue? Yes! Click OK. Bitmap File Saved. For instructions on loading the graphic files onto the printer see section 6 Cleaning and Maintenance for “Uploading Graphics”. Version 0.1 3-52...
-
Page 100: Message Options
ci5000 Series Printer Technical Service Manual Message Options Graphic Utility This utility is a list of Graphics/Logos that are currently stored and available use in a message field a message. From this menu graphics, can be copied or deleted by using the buttons available in the Function Tool Bar located on the right-hand side of the screen. - Page 101 ci5000 Series Printer Technical Service Manual Example: All messages in a message sequence must use the same drop size and height settings. To set the drop size and height setting that will be used for the message sequence, press the [Settings] button in the Navigation Tool Bar circled above.
-
Page 102: Message Codes - External Message Select
ci5000 Series Printer Technical Service Manual Message Codes – External Message Select When operating in the Message Code mode (enabled in Mode of Operation in the Properties screen), the Printer selects the Message to be printed by reading eight input lines. The eight lines make up eight bits of a binary number that can range from 0 to 255. -
Page 103: Date Properties
ci5000 Series Printer Technical Service Manual • Pin 3 is bit 1 • Pin 4 is bit 2 • Pin 5 is bit 3 • Pin 6 is bit 4 • Pin 7 is bit 5 • Pin 8 is bit 6 •... - Page 104 ci5000 Series Printer Technical Service Manual Settings Action Options Week Start Specify the starting point for the week 1-Jan of year autocode. Sunday Monday Saturday ISO – see definition below. Hijri Date Adjust (days) Allows a day offset for the Hijri 0, 1, 2.
- Page 105 ci5000 Series Printer Technical Service Manual If a normal year starts on Thursday, or a leap year on Wednesday, then that year will have 53 weeks. Calendar Properties The Calendar Properties screens allow users to define names for Day of Week, Day of Month, Month, and Year.
-
Page 106: Message Defaults
ci5000 Series Printer Technical Service Manual Message Defaults See section above “Create Message” for details. Edit Message (Similar to create message) Press the [Messages] Button in the Functional Tool Bar, OR [Menu] Tab then press the [Messages] button to bring up the Message List (shown below). Version 0.1 3-59... - Page 107 ci5000 Series Printer Technical Service Manual Touch (highlight) the message to be edited, then press the [Edit Message] button. Touch to highlight the field to edited, then press the [Edit Field] button found in the Function Tool Bar. Use the Keyboard or Numbers keypad to edit the field and select [Save] when complete.
-
Page 108: Message Store And Search
ci5000 Series Printer Technical Service Manual Message Store and Search (Similar to create message) Press the [Messages] button in the Home screen Navigational Tool Bar OR [Menu] Tab then press [Messages] button to bring up the Message List (shown below). Search by pressing the [Search] button in the Function Tool Bar (shown below) and using the keyboard, type the message name, then press the [Save]... -
Page 109: Selecting A Message To Print
ci5000 Series Printer Technical Service Manual Selecting a Message to Print Navigate to the Message list by pressing the [Messages] button OR press the [Menu] and then selecting [Messages] Select/highlight the message in the Message List and press [Start Print] . -
Page 110: Drop Size
ci5000 Series Printer Technical Service Manual for each message. This allows different messages to be used for different products or production lines at different drop sized (depending on the printer type), delays, Print Quality, etc….. The Print Adjust Parameters are: Drop Size Print Quality Delay... - Page 111 Series Printer Technical Service Manual Printer Type Normal Macro Micro HS50 √ ci5200 √ √ ci5300 √ √ ci5500 ci5500 Pigment √ √ ci5650 Pigment ci5500 Heavy Pigment √ √ ci5650 Heavy Pigment √ √ ci5650 ci5500 Micro √...
-
Page 112: Width
ci5000 Series Printer Technical Service Manual Review the position on the package/product. If additional adjustments are needed, repeat the above edit process. Width Width defines the amount of time/space between each vertical raster/stroke. An increase in width will increase the length of a message. Press the [Edit] button to the right side of the Width number. -
Page 113: Bold
ci5000 Series Printer Technical Service Manual 4. Mirror Down Bold Bold defines the number of times that every printed raster (vertical stroke) is repeated. Each bold increment increases the overall length of the print. To select a bold value, press the [Edit] button to the right of the bold valve. -
Page 114: Add Ink And Makeup
Add Ink and Makeup To ensure the quality and proper fluid type, each authorized Citronix ink and Make-up bottle will have an ciSafeFill label attached to the back. This is to provide extra protection to ensure proper operation of your Citronix printer. - Page 115 ci5000 Series Printer Technical Service Manual Press the [OK] button. The next screen will ask you to scan a new bottle. Do this by holding a bottle up to the ciSafeFill icon on the touch screen so the two (2) ciSafeFill symbols match for approximately 2 seconds.
-
Page 116: Status
ci5000 Series Printer Technical Service Manual Makeup bottle rotated 90o clockwise Ink bottle rotated 90o clockwise Ensure that bottles are completely empty before removing to avoid spilling the fluid. Remove an empty bottle by rotating it counterclockwise by 90°, pulling the bottle out of the fill port then disposing of it according to local regulations. -
Page 117: Status (Main)
ci5000 Series Printer Technical Service Manual Status (Main) From this Main screen the details of the following can be monitored. Filters Indicates the status of the filters Nozzle Temperature Indicates the temperature at the Drop Generator Electronics Temperature ... - Page 118 ci5000 Series Printer Technical Service Manual The Event Log can be viewed in separate views of Error, Ink, Message, Misc., and All. Each event is Time and Date stamped. Saving Event Logs can be saved to the on-board SD Card or a USB drive by selecting the [Files] button, then select the device the file is to be saved and press the [Save Event Log] button.
-
Page 119: Active Alarms
ci5000 Series Printer Technical Service Manual Active Alarms This screen displays any alarm/condition that is currently active on the printer. Viscosity Status This screen displays all the viscosity status of the printer. Showing the expected, current viscosity in “Ball Fall Time” or Centipoise. Version 0.1 3-72... -
Page 120: Speed
ci5000 Series Printer Technical Service Manual Field Description Options High, Low or OK Ball Fall Time Shows status of viscosity Steady, Rising or Falling Last Time Ball drop time Time in seconds Calibration setting – calibration is obtained Calibration Constant Calibration number from the viscometer. -
Page 121: Filters
ci5000 Series Printer Technical Service Manual Field Description Options Encoder Freq Actual frequency of encoder Frequency in DPI Print Freq Actual printing frequency Encoder Freq divided by the product Width plus 1 Average Drops Average number of drops used per raster of Frequency in DPI current message Max Print Freq... -
Page 122: System Info
ci5000 Series Printer Technical Service Manual System Info There are 2 screens that contains some critical system information. The first screen has the Firmware Revision, CPU board information, Printer Serial Number, Power On & Run Time hours. The second page will display the local Distributor Information such as Distributor Name, Contact Name, Telephone Number, and Email Address. - Page 123 ci5000 Series Printer Technical Service Manual After entering the Advance Service password use the command SCONTACT. Each of the four fields can then be edited. Version 0.1 3-76...
- Page 124 ci5000 Series Printer Technical Service Manual SECTION 4: INSTALLATION AND COMMISSIONING CONTENTS Page Unboxing the Printer ......................4-2 Mounting the Controller & Printhead ..................4-3 Printer Installation .......................... 4-3 Connecting Peripherals ......................4-4 Cabinet Connections ........................4-4 Accessories ........................... 4-5 External Wiring Options .........................
-
Page 125: Unboxing The Printer
Series Printer Technical Service Manual Unboxing the Printer The Citronix printer come securely packed in the box. Below describes what you see. After opening, first remove the top 2 pieces of foam. These simply lift up and out. Remove the printhead as you remove the left piece of foam (as shown in the picture above). -
Page 126: Mounting The Controller & Printhead
ci5000 Series Printer Technical Service Manual Place the Controller on a sturdy/strong table or cart and place the printhead over the cabinet. Remove the Power Cord, QC sheet, and Printers Operations Guide from the bottom of the box. Mounting the Controller & Printhead Printer Installation The following is general information for installing the printer in a wide range of working areas. -
Page 127: Connecting Peripherals
+5°C and +45°C and the relative humidity will remain within 10% to 90% (non-condensing). The ci5200, ci5300, and ci5500 model printer draws in and expels air through the underside of the cabinet. Nothing must be allowed to interfere with this movement of air. -
Page 128: Accessories
ci5000 Series Printer Technical Service Manual This prevents mistakes while connecting peripheral accessories by having different pin-outs for each. Making easier and faster printer installations as well as making it fast and easy to swap a printer between multiple production lines. Accessories Photocells: Version 0.1... - Page 129 ci5000 Series Printer Technical Service Manual Encoder: Version 0.1...
- Page 130 ci5000 Series Printer Technical Service Manual Beacon Options: Version 0.1...
-
Page 131: External Wiring Options
Series Printer Technical Service Manual External Wiring Options External Connectors and pin-out drawings for Accessories not offered by Citronix: Version 0.1... - Page 132 ci5000 Series Printer Technical Service Manual Version 0.1...
-
Page 133: Connecting External Power
ci5000 Series Printer Technical Service Manual Connecting External Power Connect the power cord to a suitable power source as indicated below: Single Phase - 90VAC (3 amp) to 260VAC (1 amp) Frequency - 50/60 Hz The socket-outlet should be installed near the equipment and be easily accessible. The Power outlet should be on a dedicated line and not shared with other machines or motors. -
Page 134: Commissioning (Wizards)
Series Printer Technical Service Manual NOTE: To help protect and ensure reliable performance from your Printer, Citronix recommends the use of a surge suppressor or line conditioner for uninterruptible power supply and dedicated line from the main power source. - Page 135 ci5000 Series Printer Technical Service Manual The firmware will change back to the Wizard List screen showing this step has been completed. Wizard (System Settings) Next select the next wizard (System Settings) and press the [Open Wizard] button. Version 0.1 4-12...
- Page 136 ci5000 Series Printer Technical Service Manual The System Settings Wizard will take the user through a 8 step process to setup the date and time as well as all the formats to be used. Pressing the [Edit] button next to each option will allow the user to adjust/set each option. Using the numbers keypad, enter the desired date/time and press [Save] , then press the [Next Step] button to move to the next step.
- Page 137 ci5000 Series Printer Technical Service Manual Wizard (Theme Settings) This 2 step wizard enables a large visible banner on the Home Screen and selects the Theme Color of all the screen backgrounds (Red or Blue are the only options). NOTE: This will cause the printer to reboot to set. After the reboot, the Wizards will pick back up where it left off.
- Page 138 ci5000 Series Printer Technical Service Manual Pressing the [Edit] button next to each option will allow the user to set each option. Select from the list and press [Select] , then press the [Next Step] button to move to the next step. When the 2 steps are complete, press the [Next Step] button to save and exit to the Main Wizard menu.
- Page 139 ci5000 Series Printer Technical Service Manual This wizard will prep the printer with fluids (Ink & Make-up). 2 of the steps in this 6 step wizard, will ask to present the bottle tags to the reader BEFORE installing onto the printer. This validates the right fluids are being put in and at the right time. At this time it also resets the run hours for each fluid.
- Page 140 ci5000 Series Printer Technical Service Manual (Make-up Fill) After the 6 steps are complete the firmware will move back to the Wizard Main menu showing the step as completed. Version 0.1 4-17...
- Page 141 ci5000 Series Printer Technical Service Manual Wizard (Ink System Prime) Next press Ink System Prime and then press [Open Wizard] This 6 step process will correctly prime the ink system and affectively bleed out the air. Version 0.1 4-18...
- Page 142 ci5000 Series Printer Technical Service Manual Follow the instructions on the screen and proceed to the next step when directed. After the 6 steps are complete the firmware will move back to the Wizard Main menu showing the step as completed.
- Page 143 ci5000 Series Printer Technical Service Manual Wizard (Jet Start) Next press Jet Start and then press [Open Wizard] This wizard will move ink through the Printhead and jet ink out the Nozzle into the gutter. Remove the Printhead cover and have a beaker, paper towels, squirt bottle of Cleaning Solvent, protective clothing and eye wear to handle any initial Ink Jet missing the gutter.
- Page 144 ci5000 Series Printer Technical Service Manual This 3 step process will start the Ink Jet to allow the user to correctly identify the printhead alignment. For more details on jet alignment see Section 9 “Calibration”. Follow the instructions on the screen and proceed to the next step when directed. After the 3 steps are complete the firmware will move back to the Wizard Main menu showing the step as completed.
- Page 145 ci5000 Series Printer Technical Service Manual SECTION 5: STATUS BAR/TROUBLESHOOTING CONTENTS Page Introduction ..........................5-2 Red Alerts ............................5-2 Amber Alerts ..........................5-2 Fault Acknowledgement ......................... 5-2 Alert / Status Bar Messages ....................5-3 Printer States ......................... 5-3 Status: Jet Calibrating ........................5-4 Status: Jet Off ..........................
-
Page 146: Introduction
ci5000 Series Printer Technical Service Manual Introduction The Alert / Status Bar display’s a quick view of the printer status and information to the user. Red Alerts Red alerts are shown by a flashing red LED indicator on the alert switch and a corresponding message displaying in the status/alert bar. -
Page 147: Alert / Status Bar Messages
ci5000 Series Printer Technical Service Manual Alert / Status Bar Messages Printer States Shown below are some of the more common printer states, these will be shown in the status/alert bar at the top of the screen: Version 0.1... -
Page 148: Status: Jet Calibrating
ci5000 Series Printer Technical Service Manual Overall Printer Status Jet Status Printer Status Good Jet calibrating Printer Status Warning Jet Off Printer Status Error Jet Starting Jet Running Security Status (Print Enabled but HV not on) Jet Paused Security Enabled (Print Disabled but HV not on) Jet Ready Security Disabled... -
Page 149: Status: Start Jet
ci5000 Series Printer Technical Service Manual Status: Start Jet NOTE: when the jet is starting the Text to the right of the “Start” button will flash black and white, also a countdown will start on the bottom left of the screen while the system is starting. Status: Jet On NOTE: The above picture shows the jet status with the printhead cover off Version 0.1... -
Page 150: Status: Jet Ready
ci5000 Series Printer Technical Service Manual Status: Jet Ready In this Status, the Deflection Field is activated and the printer will print the message selected with each print signal. Version 0.1... -
Page 151: Printer Faults
ci5000 Series Printer Technical Service Manual Printer Faults The following problems can have the suggested causes and remedies. Fault / Issue Possible Cause / Fix 1. Check the power to the unit. No Power 2. Check the Power Switch. 3. Check the Mains Fuses. 1. - Page 152 ci5000 Series Printer Technical Service Manual Fault / Issue Possible Cause / Fix 1. Check the alignment of the Jet. Ensure the ink stream in going into the gutter. Gutter Error 2. Listen for a steady vacuum. 3. Check continuity of the gutter sensor to the CPU. 1.
-
Page 153: Print Quality Faults
ci5000 Series Printer Technical Service Manual Print Quality Faults A dirty printhead Please review Section 5.2 Printhead Cleaning Dirty nozzle See Section 5-4 Backflush Routine Poor or misadjusted printhead alignment Contact your local Service Technician Ink out of viscosity Ensure the proper ink and Make-up are used Contact your local Service Technician Needing recalibration Contact your local Service Technician... - Page 154 ci5000 Series Printer Technical Service Manual Replace/Clean Air Filter: ......................6-13 Service Module Replacement: ..................... 6-14 Error ............................6-15 Clear Error ........................... 6-16 Stop the jet ..........................6-16 Service Module Verification ......................6-17 Fault Finding & Repair: ......................6-20 Service Routines ......................... 6-53 Backup &...
- Page 155 ci5000 Series Printer Technical Service Manual Release the thumbscrew securing the printhead front cover and slide off the cover. Check inside the Printhead cover for a buildup of Ink deposits. If there are any deposits, clean the inside of the cover using the Cleaning Solvent compatible with the type of Ink being used. Check the Printhead for buildup of Ink deposits and when necessary, use the appropriate Cleaning Solvent compatible with the type of Ink being used.
- Page 156 ci5000 Series Printer Technical Service Manual Low-pressure dry, clean air Allow the Printhead to dry, ensuring that the slot in the charge electrode is clear of Cleaning Solvent. Refit the Printhead cover and tighten the thumbscrew. PERSONAL INJURY: Make sure the Printhead is completely dry before attempting to start the Jet.
-
Page 157: Replace/Clean Air Filter
ci5000 Series Printer Technical Service Manual Spray Cleaning Solvent into Nozzle After 10 seconds, press the Cancel button in the function Tool Bar to stop the process. In the unlikely event this does not resolve the problem, repeat the process up to 10 times. If the problem persists, contact a maintenance technician. -
Page 158: Service Module Replacement
ci5000 Series Printer Technical Service Manual Filter cover Gently tap the dirty side of the filter or use a vacuum to suck the dirt from the filter OR replace the filter. Reattach the filter element to the yellow cover by reverse the process. Snap the 4 slots on the filter element over the 4 hooks on the yellow cover. -
Page 159: Error
ci5000 Series Printer Technical Service Manual Error This error will appear in 3 stages to allow enough scheduling time to allow the printer to be shut down for replacement so that this does not interfere with normal production runs. They are as follows: 1. -
Page 160: Clear Error
ci5000 Series Printer Technical Service Manual Clear Error Press the [OK] button to clear the error as shown above. The following screen will display the hours remaining. When ready to replace the Service Module first ensure the jet and pump are off (see below). Stop the jet Press the [Stop] button. -
Page 161: Service Module Verification
ci5000 Series Printer Technical Service Manual Service Module Verification Press the [Menu Tab] , then [Status] button, and then press [Filters] button in the Navigation Tool Bar. Then press the [Replace ciEasyServ] in the Navigation Tool Bar to start an automated replacement wizard (ensure a new Service Module is readily available before pressing the Replacement button ). - Page 162 ci5000 Series Printer Technical Service Manual Remove the old and insert the new Service Module. Once the new Service Module has been fitted, Press the [Next] button in the Navigational Tool Bar at the bottom of the screen. This will start a 3 step automated prime sequence.
- Page 163 ci5000 Series Printer Technical Service Manual then press [Next Step] on the screen to restart the priming sequence. When this final priming sequence is finished press [Next] to continue. Following the screen instructions, refit the back cover. Once the last screen is complete and the user has pressed the [Next] button, the screen will change back to the Main filter screen showing the hours reset (seen below).
-
Page 164: Fault Finding & Repair
ci5000 Series Printer Technical Service Manual NOTE: The Replace ciEasyServ button is greyed out when the filter change has been properly completed. NOTE: The amount of filter hours will vary depending on the environmental conditions Fault Finding & Repair: Cooling Fan Error Definition: The cooling fan keeps circulation inside the printer cabinet. - Page 165 ci5000 Series Printer Technical Service Manual Yellow – tach output Air Pressure Error Definition: The ci5650 printer utilizes plant air to cool and pressurize the printer cabinet and to supply positive air to the printhead. A factory air supply with a minimum of 25 psi (1.7 bar) air should be supplied to the air system mounted to the right-hand side of the ci5650 Printer.
- Page 166 ci5000 Series Printer Technical Service Manual Phase Error Definition: Phasing synchronizes the printing system and ensures that each drop contains a full charge. Phase values change constantly with variations in viscosity, temperature or elevation of the Printhead. It also makes adjustments when the components such as Nozzle or Resonator Probe or fluids are changed. Phasing takes place between prints (characters, messages, etc.) or between printed strokes (in very slow printing).
- Page 167 ci5000 Series Printer Technical Service Manual Fig 1 Fig 2 Fig 3 Printhead Charge Error Definition: Charge Electrode charges the ink drops. When a Positive charge is applied to the Charge Electrode Electrons are attracted from the Drop generator (Earth). When the drop breaks off the excess electrons are trapped.
- Page 168 ci5000 Series Printer Technical Service Manual Corrective Action: If you receive a Printhead Charge Error, check the following: 1. Drop velocity. The error can be caused by: a. Pump pressure and RPS (high or low). b. Filter status (clogged/dirty). c. Ink viscosity (high or low). 2.
- Page 169 ci5000 Series Printer Technical Service Manual Fig 1 To realign loosen the 2 screws securing the Strobe Block assembly and move to center then tighten screws. See picture below. NOTE: do not overtighten the screws. This can cause damage to the Printhead chassis. Fig 2 Fig 3 Gutter Error...
- Page 170 ci5000 Series Printer Technical Service Manual Definition: Ink travels from the Nozzle Plate thru the Charge Electrode and then passes between the Defection Plates. Unprinted drops are collected in the gutter block and travels up the gutter tube back to the Ink Tank to be reused.
- Page 171 ci5000 Series Printer Technical Service Manual Fig 1 Corrective Action: 1. Inspect the ink level thru the tank and ensure the level is in fact high. a. If not high i. check the level rod wires for continuity back to the CPU board…if good ii.
- Page 172 ci5000 Series Printer Technical Service Manual Fig 1 Fig 2 High Voltage Trip Definition: Version 0.1 6-28...
- Page 173 ci5000 Series Printer Technical Service Manual A variable high voltage output of 0V to 8000 V at 120ì amps is provided to establish the electrostatic field between the Deflector Plates in the Printhead. If the Defection plates are shorted, this error/fault will occur.
- Page 174 ci5000 Series Printer Technical Service Manual Pressure Sensor Inaccurate Definition: As the Pressure Transducer controls the system ink pressure needed throughout the Ink system, the starting pressure needs to be within +/- 1.0psi with the pump off. If outside of this starting pressure, then this error/fault will be displayed.
- Page 175 ci5000 Series Printer Technical Service Manual 3. Plug the power cable back into the power outlet on the left side of the printer. Turn on the power. Once the printer has booted up, then press the [Menu] button and then press the [Service] button.
- Page 176 ci5000 Series Printer Technical Service Manual 3. Check Pressure Transducer (possibly an incorrect reading). See “Pressure Sensor Inaccurate” Pump Pressure Error – PRESSURE LOW Definition: This error/fault is caused when the pressure is continually falls below the set point (usually this is 40psi). Corrective Action: 1.
- Page 177 ci5000 Series Printer Technical Service Manual 4. Check the fittings on the inlet side of pump for leaks. Leaks on the inlet side of the pump will pull in and will usually not leak in because they are on the vacuum side of the pump. Pump Motor Error Definition: This would be displayed if the pump motor did not turn/start when the [Start]...
- Page 178 ci5000 Series Printer Technical Service Manual c. Set the motor on top of the printer cabinet. d. Press the [Menu] button and then press[Service] e. Press Run Pump to check Pump circuitry. Using the marker, mark a line on the magnetic cup of the motor (see picture below) as a location mark at the 6 o’clock position, then press the [Increase] button 1 time to start and rotate the motor at 5rps.
- Page 179 Definition: The Citronix printer constantly monitors the ink viscosity by filling the viscometer with flesh ink from the Ink Tank at each fill. This fill process pushes a ball in the viscometer to the top of the tube and then the firmware counts the time (in seconds) that it takes for the ball to each a sensor at the bottom of the tube.
- Page 180 Viscometer Not Calibrated Definition: Each viscometer is calibrated by Citronix. A label is produced with the Viscometer Calibration Constant value and is attached to the inside of the front electronic door of the printer. This number is then entered into the printer firmware. If the CPU board is replaced or the number is erased in the firmware, this error/fault will occur.
- Page 181 High Pump Speed Definition: The Citronix firmware controls/monitors the pump speed in RPS (Revolutions Per Second). If the Pressure Transducer does not read the pressure set in the software (example normal 40psi), the firmware will increase the pump speed until that pressure is met. When the pump speed exceeds 80 Version 0.1...
- Page 182 ci5000 Series Printer Technical Service Manual RPS, the error/fault will be displayed and the printer will automatically shutdown to attempt to prevent damage to the ink pump. Corrective Action: Check to ensure the ink pump is not blocked by; 1. Inspect the Ink Manifold to ensure the Pickup tube is fully inserted into the quick connect fitting on the underside of the Manifold and is not blocked.
- Page 183 ci5000 Series Printer Technical Service Manual 1. Check the pump motor is plugged in correctly on each end. 2. Replace the motor cable 3. Replace the motor Tach 1 Error Definition: As mentioned above, there are 3 motor drive signals inside the pump motor. If 1 drive is not working, this will display this error/fault.
- Page 184 ci5000 Series Printer Technical Service Manual printer will shut down automatically and this error/fault will be displayed. The sensor is part of the Drop Generator and is non-repairable. Corrective Action: 1. Ensure the ambient Temperature is not above 60°C. if so, remove the printer to a cooler area. 2.
- Page 185 Temperature Fault – CPU TEMP TOO HOT Definition: The Citronix ci5000 series printer cabinet has a temperature sensor that continually monitors the cabinet temperature to ensure the proper operating temperature is being maintained and removes solvent fumes from building up in the cabinet. This temperature will be (5-10°C) from the ambient temperature due to the heat from the electronics.
- Page 186 ci5000 Series Printer Technical Service Manual Corrective Action: 1. Ensure the fan is operating. 2. Ensure the Air filter is not clogged (replace if needed). For replacement procedure see Section 6 Sub-section “Replace/Clean Air Filter” 3. Ensure the Sensor is not laying on any board components. The sensor needs to be freestanding as shown in the picture above.
- Page 187 ci5000 Series Printer Technical Service Manual Definition: The ci5000 series printers constantly monitor fluid levels in the Ink & Make-up tanks. These levels are maintained to a volume that allows fast and easy viscosity control during normal operation. This is done using 3 level rods (low, high, and a ground) that are underneath the Ink Manifold.
- Page 188 ci5000 Series Printer Technical Service Manual Pic 2 Makeup Reservoir Empty Definition: The ci5000 series printers constantly monitor fluid levels in the Ink & Make-up tanks. The level in the Make-up tank is use to maintain a proper level to ensure enough Make-up to control the viscosity in the Ink tank during normal operation.
- Page 189 ci5000 Series Printer Technical Service Manual Pic 3 Pic 4 Ink Reservoir Low Version 0.1 6-45...
- Page 190 ci5000 Series Printer Technical Service Manual Definition: When the Ink level in the ink tank drops below the low level rod (500ml) this “Ink Reservoir Low Add Ink” warning will be displayed as shown below. Corrective Action: Add Ink (see Section 3 Sub-section “Add Ink and Make-up”) Ink Probe Shorted Definition: This error will occur when the CPU board senses a short on any of the Ink level sensing circuit.
- Page 191 ci5000 Series Printer Technical Service Manual Fig 1 Corrective Action: 1. Inspect the Make-up level thru the tank and ensure the level is in fact high. a. If not high i. check the level rod wires for continuity back to the CPU board…if good ii.
- Page 192 ci5000 Series Printer Technical Service Manual Makeup Reservoir Low Definition: This warning/fault will occur when the level of Make-up in the Make-up tank drops below 374ml and is no longer touching the “Low” Level rod. Corrective Action: Add Make-up (see Section 3 Sub-section “Add Ink and Make-up”) Makeup Probe Shorted Definition: This error will occur when the CPU board senses a short on any of the Make-Up level sensing circuit.
- Page 193 ci5000 Series Printer Technical Service Manual free from dirt and debris. This varies depending on the environment. When this time has expired, this error/fault will be displayed. Corrective Action: For a detailed procedure see Section 6 Subsection “Service Module Replacement”. Printing Too Fast Definition: The “Printing Too Fast”...
- Page 194 ci5000 Series Printer Technical Service Manual If the counter is not meant to start over once the upper limit has been reached, then there is no corrective action necessary. This is just an indicator to reset the counters in the message manually. If the counter is meant to start over once the upper limit has been reached, then the following are steps described in Section 3 of this manual under Message Fields, Autocodes, Counters to find the “Counter Wrap”...
- Page 195 This is not recommended as this can cause the CPU board to lock up and be non-functional. Consult the Technical Support Specialist at Citronix before attempting this. If the CPU board becomes locked up, it may need to be returned to Citronix for a complete memory wipe and reprogrammed.
- Page 196 ci5000 Series Printer Technical Service Manual This Error/Warning will be displayed when the temperature drops below the recommended operating temperature of 32°F (0°C). Corrective Action: Move the Printhead to an environment that is above this temperature. Flush Stop Not Completed Definition: This Error/Warning will be displayed anytime the jet shuts off without letting the stop flush complete, usually when the power was interrupted or turned off.
-
Page 197: Service Routines
ci5000 Series Printer Technical Service Manual Service Routines Backup & Restore Backup Copies of the entire printer configuration, messages, graphics, and system parameters are copied and stored to restore the original printer settings. This can be done using the On Board SD card or a USB (seen below). - Page 198 ci5000 Series Printer Technical Service Manual The backup file can be used to “CLONE” or “COPY” printers. This is useful when needing to use the same messages in multiple printers in a production environment without having to type/create the same messages multiple times.
- Page 199 ci5000 Series Printer Technical Service Manual 2. Due to the difference in the way browsers save, make sure to use: Ctrl+S Key or "Select all" then copy and paste into a file into “Notepad”. The file must be saved with Save as type: "Text File (*.txt)"...
- Page 200 ci5000 Series Printer Technical Service Manual Backup with USB or SD: Ensure the Power is off, then Insert the SD or USB into their respective ports, and then turn the power on. On the [Menu Tab] select the [Properties] button. Select the [Files] icon in the Navigation Tool Bar.
- Page 201 ci5000 Series Printer Technical Service Manual Press the [Save Backup] button on the Functional Toolbar: The backup file will be saved with a date and time. Version 0.1 6-57...
- Page 202 ci5000 Series Printer Technical Service Manual NOTE: Multiple Backup files can be saved to be used later. NOTE: DO NOT INSERT OR REMOVE THE SD CARD WHILE THE PRINTER IS ON. POWER MUST BE TURNED OFF!! Once the power is off, the SD card can be removed and the files can be restored on another printer OR the card (all of the files) can be saved onto a PC.
- Page 203 ci5000 Series Printer Technical Service Manual Press Send File. Restore from USB or SD Card: Ensure the Power is off, then Insert the SD or USB into their respective ports, and then turn the power on. On the [Menu Tab] select the [Properties] button, then select [Files] Version 0.1...
-
Page 204: Firmware Updating
ci5000 Series Printer Technical Service Manual Press and highlight the device to be used (if both are installed). Touch the + symbol left of Backups to reveal the list of backup files. Touch to highlight the file to be used and press the [Restore File] button. - Page 205 Now the USB can be removed and plugged into a computer to install the Firmware. Note: The new firmware must be loaded into the following file on the USB (Citronix/System/Firmware). Placing it in any other file or location will not be recognized by the printer.
- Page 206 ci5000 Series Printer Technical Service Manual The following screen will open to confirm the updating of the firmware. Pressing [OK] will begin the installation process. The following screen will be displayed while the firmware is being updated. Once this process is complete, the printer will reboot.
-
Page 207: Loading Fonts, Languages, And Keyboards
ci5000 Series Printer Technical Service Manual Loading Fonts, Languages, and Keyboards Using the same process as Updating Firmware mentioned above, install the fonts, Languages, and Keyboards onto the USB into their respective folders on the USB. Fonts Keyboards Version 0.1 6-63... - Page 208 ci5000 Series Printer Technical Service Manual Languages With each (fonts, Languages, and Keyboards) you will need to load each file separately. Simply press the + symbol to the left of the file you want to install and then touch/select the file and press the install button in the Function Tool Bar on the right side of the screen.
-
Page 209: Uploading Graphics
USB. Citronix/Customer/SN/Bitmaps. These files must be Monochrome Bitmaps to be used on the Citronix printer. Once the files have been loaded onto the USB and the drive plugged into the Printer’s CPU board, navigate to the USB and Press the + to the left of the Bitmaps folder. This will expand the folder showing all of the graphics. - Page 210 ci5000 Series Printer Technical Service Manual Once any/all the graphics have been loaded it will be displayed in the Graphic list, they will be ready to be inserted into any message. NOTE: If the graphic is not saved in the proper format, the [Install Bitmap] button will not be displayed.
-
Page 211: Changing/Replacing A Cpu Board
ci5000 Series Printer Technical Service Manual Changing/Replacing a CPU Board In the event that the CPU board has a catastrophic failure that cannot be resolved by rebooting the system or updating/changing the firmware the steps below will help the user to replace the CPU Board. NOTE: Always use a ground strap or wrist strap when working on or handling the CPU Board. - Page 212 ci5000 Series Printer Technical Service Manual 4. Disconnect the RFID Antenna (circled in red above) by turning the gold connector counterclockwise until the coax connector is free. 5. Carefully remove the Touch Screen’s flat ribbon cable (shown below) by moving the flat black tab from the up position to the down.
- Page 213 ci5000 Series Printer Technical Service Manual NOTE: ensure the board is place on or in an Anti-Static bag or mat to protect against ESD Damage! 7. Install the new CPU Board in the reverse order. NOTE: when installing the Touch screen flat ribbon cable, take care NOT to bend or pinch the ribbon cable.
-
Page 214: Changing Or Cleaning A Nozzle Plate
ci5000 Series Printer Technical Service Manual When all of the connections are fitting, reconnect the power cable into the socket. Changing or Cleaning a Nozzle Plate In the event a severe clog occurs that cannot be overcome through the Printhead cleaning routine or the Backflush service routine, the Nozzle Insert may be required to be more thoroughly cleaned or replaced. -
Page 215: Ultrasonically Clean A Nozzle Plate
4. Inspect the interior of the Nozzle using a microscope. If debris remains, continue to Stage 2. Stage 2: 1. Place the Nozzle in a small beaker of PHETCH (Citronix part number 016-1016-001). Place the beaker in the ultrasonic bath, lightly floating in water for a maximum of 5 minutes. -
Page 216: Changing Ink, Makeup Or Ink, Makeup Tank (Ink Refresh)
ci5000 Series Printer Technical Service Manual Start the Jet, ensuring the Overrides are still on. Observe the Jet’s position in the charge slot and adjust the block so that the Jet is in the center of the charge slot. This adjustment may be accomplished by first loosening the mounting screws and then gently levering the Charge Block using a screwdriver. -
Page 217: Changing The Ink System Pump
ci5000 Series Printer Technical Service Manual 11. Refill the tank with new Ink or Makeup, taking care to use the correct Ink type following the Add Ink/Makeup procedure mentioned in Section 3 of this manual. 12. Refit the Ink System housing cover. Changing the Ink System Pump 1. -
Page 218: Changing / Cleaning An Ink System Valve And Gasket
ci5000 Series Printer Technical Service Manual NOTE: If the pump is intended to be re-used, make sure the pump is cleaned using the appropriate Cleaning Solvent for the Ink type being used. Failure to do so will result in the Ink drying in the pump gears and causing damage. -
Page 219: Changing / Removing The Pressure Transducer
ci5000 Series Printer Technical Service Manual Changing / Removing the Pressure Transducer 1. Turn the power OFF using the appropriate shutdown routine. 2. Remove the Ink System housing cover. 3. Loosen the Ink tank hold down screw. 4. Remove the Ink fill tube by pressing the top of the quick disconnect fitting located on the top of the Ink Manifold (shown in Section 9.4 Pic 1) and pulling the tube up and out. - Page 220 ci5000 Series Printer Technical Service Manual 1. Loose the Ink tank hold down screw (described above in Changing Ink, Makeup or Ink, Makeup Tank). 2. Remove the ink fill tube by pressing the top of the quick disconnect fitting located on the top of the Ink Manifold (described above in Changing Ink, Makeup or Ink, Makeup Tank) and pulling the tube up and out.
-
Page 221: Changing / Cleaning The Venturi Restrictors
ci5000 Series Printer Technical Service Manual Changing / Cleaning the Venturi Restrictors The Venturi Restrictors may require cleaning or replacement due to the nature of the operation and size of the opening. 1. Remove the Manifold from the Ink tank as described in the previous step (Changing / Cleaning the Pressure Restrictor) 2. - Page 222 ci5000 Series Printer Technical Service Manual Version 0.1 6-78...
- Page 223 ci5000 Series Printer Technical Service Manual SECTION 7: COMMUNICATIONS Contents Page Overview ..........................7-2 Serial and Ethernet ........................ 7-2 RS232 Port ............................ 7-2 RS232 Settings ..........................7-3 RS232 Timings ..........................7-3 Ethernet ............................7-4 Ethernet Ports ..........................7-5 Ethernet Timings ..........................7-5 Printer Ethernet Settings ........................
-
Page 224: Overview
Series Printer Technical Service Manual Overview This section focuses on the Communications Interface for the Citronix Printer. There are two main protocols that can be used to remotely interface with the Printer: Serial and Ethernet. The Ethernet Web interface can be used to: o View and control the Printer via a Web interface. -
Page 225: Rs232 Settings
Series Printer Technical Service Manual The serial cable is a non-standard 10-pin ribbon connector to DB9 that is available from Citronix in lengths up to 25 feet. If frequent connecting and disconnecting to the RS232 serial port is to be done, Citronix recommends that a short serial cable be installed on the board and through the external housing with a strain relief fitting. -
Page 226: Ethernet
Series Printer Technical Service Manual The Citronix version and time header is only displayed if a serial connection is open before the Printer is powered on; otherwise, the terminal will be blank. Type in the “ST” command followed by a carriage return to get the Printer status. -
Page 227: Ethernet Ports
ci5000 Series Printer Technical Service Manual On the side of the electronics board, approximately 2 inches from the P1 connector are six LEDs used to monitor the Ethernet connection. If the other end of the Ethernet cable is connected to an active device whose interface is enabled, the DPX, LNK and SPD LEDs should light. - Page 228 ci5000 Series Printer Technical Service Manual This Internet address should be entered into the Printer before the Ethernet cable is plugged into the Printer. If the current Internet information in the Printer is not correct for the LAN, it may cause LAN problems with other Internet devices.
- Page 229 ci5000 Series Printer Technical Service Manual Type in the “ST” command followed by a carriage return to get the Printer status. Windows Settings The Windows networking information must be updated to work with the Printer. These are accessed through Control Panel -> Network Connections -> Local Area Connections -> Properties -> Internet Protocol (TCP/IP).
-
Page 230: Command Interface
ci5000 Series Printer Technical Service Manual No change should be necessary if the Printer and the computer are both properly connected to the LAN, the Internet address or Printer nickname. Command Interface The following table lists the commands processed by the remote communications interface. The commands are not case-sensitive. - Page 231 ci5000 Series Printer Technical Service Manual LNBOB,BOB Log On LNname, Logs on a user password See below Message See below Download data to existing fields in Data message. See below Message See below Allows creation, and editing of messages. ML<CR> Message List See below Sends a list of messages to host...
- Page 232 ci5000 Series Printer Technical Service Manual This command provides access to multiple fields: Current: 00000050 (interim start value) Upper: 99999999 (enter upper limit value) Lower: 00000000 (enter lower limit value Increment: 999 (enter increment value) Repeat: 001 (enter repeat value) Print Leading Zeros: Y (enter Yes or No) Number of Digits: 6 Example string: CO0,0,10000,000,001,Y,6<CR>...
-
Page 233: Videojet Emulation
ci5000 Series Printer Technical Service Manual Shift 2: HH MM SS (enter start time for beginning of shift 2) Code: XXX (enter up to three character code for shift 2) Shift 3: HH MM SS (enter start time for beginning for shift 3) Code: XXX (enter up to three character code for shift 3) Example string: SHn,bbbbbb,xxx,eeeeee,xxx,cccccc,xxx<CR>... -
Page 234: Acknowledgements
NOT be turned off. Doing so will return to the normal interface mode in which the Printer expects Citronix commands. Some VJ data could look like a Citronix command and cause unpredictable results such as starting or stopping the Printer. The interface cable should first be disconnected from the Printer before turning off the VJ emulation. -
Page 235: Web Browser Utility
ci5000 Series Printer Technical Service Manual o If any System Property is changed that may affect the message. o If the Print Adjust screen is used to change certain Properties. Acknowledgement Complete Acknowledgement Complete will transmit to an external computer that a print buffer has completed printing. -
Page 236: Firmware Upgrade
ci5000 Series Printer Technical Service Manual Firmware Upgrade To upgrade the firmware, simply click on the “Update Firmware in Printer” from the dropdown menu. The page below will open. Click the “Browse…” button and navigate to the location you have the firmware store on the computer. -
Page 237: Backup
ci5000 Series Printer Technical Service Manual Note: this process can take several minutes. Do not select the Back Button The Printer will reboot and the browser screen will display the following when the printer has been successfully reprogrammed. Backup Clicking on the Backup Printer from the dropdown menu will open a separate window displaying the Backup file data as shown below. - Page 238 ci5000 Series Printer Technical Service Manual Highlight and copy all: After highlighting the information, scroll down to the bottom of the highlighted file and verify that the highlighted area includes </Graphics> as the last tag of the last line. This ensures that all of the data has been captured before copy and paste.
-
Page 239: Restore
ci5000 Series Printer Technical Service Manual NOTE: When saving a backup file, it is IMPORTANT to note the encoding must be UTF-8 (see picture below). The restore file must be encoded UTF-8. If it is not saved this way, Unicode characters (example: Chinese, Japanese, etc.) will not restore correctly. - Page 240 ci5000 Series Printer Technical Service Manual Click the “Browse…” button and navigate to the location you have saved the Backup file you are using to restore. Select the file and press “Open.” During the Restore process the printer will indicate a Restore is in progress. When the restore is complete the Web Browser will display the following and the Printer screen will return to the Home screen.
- Page 241 ci5000 Series Printer Technical Service Manual SECTION 8: SPARES & ACCESSORIES Contents Page Cabinet ..........................8-2 Electronics ............................. 8-2 Hydraulics ............................8-4 Printhead ............................. 8-10 Spares & Tools ........................8-16 Consumables ..........................8-16 Level 1 (End Users) Spares ......................8-17 Level 2 (Service Engineers) Spares .....................
-
Page 242: Cabinet
ci5000 Series Printer Technical Service Manual Cabinet Electronics Image Part Number Description 110-0018-001 PCB, CPU Tested (Rev5) Specify machine type when ordering 004-1005-001 Power Switch Assembly 004-1108-001 IEC/EMI Power Plug 002-2018-001 Front Tablet with touchscreen, Stainless 004-2019-001 Front Tablet with touchscreen, Black Version 0.1... - Page 243 ci5000 Series Printer Technical Service Manual 022-2003-001 Cable Assy, Encoder (3 pin) 022-2004-001 Cable Assy, Photocell (4 pin) 022-2005-001 Cable Assy, Beaconl (7 pin) 022-1057-001 Power Cord, India 022-1058-001 Power Cord, USA 022-1059-001 Power Cord, China 022-1060-001 Power Cord, EURO 022-1061-001 Power Cord, UK 022-1022-001...
-
Page 244: Hydraulics
ci5000 Series Printer Technical Service Manual 004-1001-003 Fan, Cooling 004-1028-001 Guard, Fan 004-1047-004 Cover, Air Filter 004-1002-001 PSU, High Voltage 004-1029-001 Power Supply, DC Hydraulics Image Part Number Description Version 0.1... - Page 245 ci5000 Series Printer Technical Service Manual 003-2055-001 Viscometer Assembly, (specify ink type when ordering) 003-1235-001 Adapter, Viscometer, 6mm to 1/4inch 003-1228-001 Viscometer Bracket 003-1231-001 Strap, Viscometer 003-1229-001 Service Module Base Unit 003-1233-001 Service Module Bracket Version 0.1...
- Page 246 ci5000 Series Printer Technical Service Manual 003-1243-001 Fitting, Union Elbow, 0.25OD 003-1244-001 Ferrule, Flangeless 1/8in yellow 003-1245-001 Nut, Flangeless Polypropylene 1/8in 003-1246-001 Feed Damper 003-2060-001 Printer Service Kit, ci5000, 8,000 hours Includes: 1 x 003-1230-001 1 x 004-1015-003 Version 0.1...
- Page 247 ci5000 Series Printer Technical Service Manual 003-1230-001 Service Module ci5000 003-1005-001 Pump, Head 003-1155-001 Pump, Head Heavy Pigment (Only for Heavy Pigment Printer) 003-1006-001 Pump, Motor 003-2047-001 Restrictor, Kit Version 0.1...
- Page 248 ci5000 Series Printer Technical Service Manual 003-1202-001 Fitting, 90 degree push to connect 003-1190-001 Cap, Ink Fill (Black) 003-1191-001 Cap, Makeup Fill (Yellow) 003-1023-001 Valve, Ink Manifold 2 Way 003-1024-001 Valve, Ink Manifold 3 Way Version 0.1...
- Page 249 ci5000 Series Printer Technical Service Manual 003-1199-001 Fitting, 0.125 push to connect 003-1200-001 Fitting, .25, push to connect 003-1201-001 Fitting, .375, push to connect 003-1042-002 O-ring, Pressure Transducer 003-1020-002 Pressure Transducer Version 0.1...
-
Page 250: Printhead
ci5000 Series Printer Technical Service Manual 003-2051-001 Assembly, Ink Tank Manifold 003-2050-001 Assembly, Makeup Tank Manifold 003-1014-002 Tank, Ink 003-1014-003 Tank, Makeup 019-1088-001 Screw, hex head, SS 2.75in (holds down ink tank) Printhead Image Part Number Description Version 0.1 8-10... - Page 251 ci5000 Series Printer Technical Service Manual 002-1002-004 Bracket, Drop Generator 2003-2006 002-1002-005 Bracket, Drop Generator 2007 002-1002-006 Bracket, Drop Generator 2008 002-1008-006 Electrode, Charge 002-1073-002 PCB, Phase Amplifier/Sensor Assy 002-2012-002 Cover, Printhead Front 002-1011-004 Cover, Printhead Back Version 0.1 8-11...
- Page 252 ci5000 Series Printer Technical Service Manual 002-1012-003 Plate, Deflector GND 002-1091-001 Plate, Deflector GND (Micro Only) 002-2005-002 Assy, Deflector Plate Angled+ 002-2022-001 Assy, Deflector Plate (Micro Only) 019-1501-001 Screw, Thumb Printhead 2007 002-2025-002 Nozzle, Plate 65 2008 002-2026-002 Nozzle, Plate 40 2008 (Micro Only) 002-2027-002 Nozzle, Plate 50 2008 (HS50 Only) 002-2013-002...
- Page 253 ci5000 Series Printer Technical Service Manual 002-1017-001 Fitting, Gutter, Barb 002-1013-003 Block, Gutter 002-2007-001 Sensor, Gutter 002-1098-001 Connector, IDC Printhead Wires 002-1118-002 Cam, Jet Alignment 2008 Version 0.1 8-13...
- Page 254 ci5000 Series Printer Technical Service Manual 003-1025-001 Valve, Printhead 002-1003-003 Manifold, Printhead Valve 002-1029-001 Gasket, Printhead Valve 002-2008-002 Assy, Strobe Block 002-2008-003 Assy, Strobe Block (Micro Only) Version 0.1 8-14...
- Page 255 ci5000 Series Printer Technical Service Manual 002-2014-003 Drop Generator Block, Hybrid 002-2002-001 Assy, Drop Generator 2003-2007 Only for sale with ci580, ci700, ci1000, ci2000 (Printer sold between 2003 – 2007) 002-2002-003 Assy, Drop Generator 2008 (nozzle and calibration included) 002-1100-003 O-Ring, Resonator Probe 2008 002-2009-001 Assembly, Lid Switch...
-
Page 256: Spares & Tools
ci5000 Series Printer Technical Service Manual 002-1033-001 Contact, Solder Charge Cable 004-1012-001 Connector, Conduit Straight 004-1070-001 Connector, Conduit 90 Degree Spares & Tools Consumables Image Part Number Description 016-6009-001 Hand Cleaner, Reduran Version 0.1 8-16... -
Page 257: Level 1 (End Users) Spares
ci5000 Series Printer Technical Service Manual 016-6013-001 Wipes, Blue Shop Paper Roll 014-1041-001 Funnel, Filling Clean Solution 016-6014-001 Cleaner, Stainless Steel 016-1016-001 Solution, Nozzle Cleaning, 4 oz.(Phetch) Level 1 (End Users) Spares Spares recommended for end users are as follows: Part Number Description Quantity... -
Page 258: Level 2 (Service Engineers) Spares
ci5000 Series Printer Technical Service Manual Level 2 (Service Engineers) Spares Part Number Description Quantity PCB, CPU Tested (Rev 4) 100-0011-004a **Specify machine type at ordering 004-1002-001 PSU, High Voltage 004-1029-001 Power Supply, DC 004-1001-003 Fan, Cooling 004-2012-002 Display Assy, w/ LED Backlight, Qtr VGA 003-1005-001 Pump, Head 003-1006-001... -
Page 259: Options And Accessories
ci5000 Series Printer Technical Service Manual 014-2001-005 Kit, ciSeries, Specialized Tool Included specialty tools: 014-1032-001 Loupe, Eye Piece 014-1051-001 Wrench, Allen Key 1/16 inch 014-1078-001 Wrench, Allen Key 1/32 inch 014-1067-001 Wrench, Allen Key 3/16 inch 014-1066-001 Wrench, Allen Key 5/32 inch 014-1074-001 Screwdriver, Slotted 1/8 inch 014-1075-001 Screwdriver, Phillips # 0 014-1080-001 Cutter, Side Cutters... - Page 260 ci5000 Series Printer Technical Service Manual 015-2021-001 Photocell, Fiber Optic Through Beam Opposing (IP65 Connector) 015-2022-001 Photocell, Proximity Diffuse (IP65 Connector) Includes Banner N6/IP67 15ft (4.5M) Cable Bracket & screws NPN Open Collector Output 015-2023-001 Photocell, Retroreflective (IP65 Connector) Includes Banner N6/IP67 15ft (4.5M) Cable Bracket &...
-
Page 261: Alarm Beacons
ci5000 Series Printer Technical Service Manual Alarm Beacons Image Part Number Description 015-2026-001 Beacon, Alarm, Single Stage (IP65 Connector) Includes: Warning light(s) 9ft (3M) Cable Stand Mount Kit 015-2027-001 Beacon, Alarm Dual Stage (IP65 Connector) Includes: Warning light(s) 9ft (3M) Cable Stand Mount Kit 015-2011-003 Beacon, Alarm 3 Stage (IP65 Connector) - Page 262 ci5000 Series Printer Technical Service Manual 005-2008-003 Mounting Kit, Printhead Floor 005-2010-003 Mounting Kit, Conveyor Side 005-1044-001 Bracket, Cap 2” Post 005-1081-002 Bracket, Printhead Clamp 005-1082-001 Bracket, Photocell Mount Version 0.1 8-22...
- Page 263 ci5000 Series Printer Technical Service Manual 005-1080-001 Bracket, Crossblock 2” x .5” 005-1026-001 Bracket, Flange 2” 005-1083-001 Bracket, Rod Cross Arm, Printhead 005-1506-001 End Cap, Printhead Arm 005-1502-001 Bracket, Rod Handle, 1” shaft Version 0.1 8-23...
- Page 264 ci5000 Series Printer Technical Service Manual 005-1503-001 Bracket, Printhead Handle, 1 9/16” shaft 005-1075-001 Bracket, Alarm Beacon 005-1028-001 Bracket, Leveling Feet 005-1069-001 Bracket, Conveyor Mount 2” 005-1027-001 Bracket, Post 2” x 5 FT 005-1070-001 Bracket, Post 2” x 2 FT Version 0.1 8-24...
- Page 265 ci5000 Series Printer Technical Service Manual 015-1021-002 Bracket, Fiber Optic Image Part Number Description 022-1014-001 Cable, Shielded RS232 10 feet 022-1015-001 Cable, Shielded RS232 25 feet 022-1016-001 Cable, Shielded RS232 50 feet 022-1017-001 Cable, Cat 5 Ethernet Patch 10 feet 022-1018-001 Cable, Cat 5 Ethernet Patch 25 feet 022-1019-001...
- Page 266 ci5000 Series Printer Technical Service Manual SECTION 9: CALIBRATION CONTENTS Page Calibration ..........................9-2 Printhead Alignment ........................9-2 Band Adjustment (to be completed for each drop size) ..............9-7 Modulation Adjustment ........................9-9 Charge Adjustment ........................9-10 Version 0.1...
-
Page 267: Calibration
ci5000 Series Printer Technical Service Manual Calibration Calibration is needed to ensure the printer is printing at the most optimum level and print properly at any stage of operation. Calibration includes 4 main parts. They are; Printhead alignment ... - Page 268 ci5000 Series Printer Technical Service Manual o Release the thumbscrew securing the Printhead front cover and slide off the cover. (as shown below) o Press the [Menu Tab Bar] and press the [Service] button. Then press the [Override] button in the Navigation Tool Bar. Select the Charge, Phase, and Gutter Fault overrides and then press the [Back] button (as shown below).
- Page 269 ci5000 Series Printer Technical Service Manual Fig 1 o Using the Adjustment (shown in Fig 2) adjust the horizontal alignment to 80% to the left of the gutter hole (shown in Fig 3). When the adjustment is complete tighten the securing screw Fig 2 Fig 3...
- Page 270 ci5000 Series Printer Technical Service Manual 2. Next align the Ground Deflector Plate so that it is parallel to the ink stream (shown in Fig 6) 3. Adjust the Positive HV Plate so that the distance between the plates are (shown in Fig 6) o Top to 3.5 to 4mm o Bottom is approximately 6mm 4.
- Page 271 ci5000 Series Printer Technical Service Manual 5. Align the Charge Electrode so that the ink stream is centered in the slot. This adjustment may be accomplished by first loosening the mounting screws and then gently levering the Charge Block using a screwdriver. Version 0.1...
-
Page 272: Band Adjustment (To Be Completed For Each Drop Size)
ci5000 Series Printer Technical Service Manual Use an eyeglass to confirm that the Jet is centered. Carefully tighten the securing screws. Band Adjustment (to be completed for each drop size) Press the [Menu Tab Bar] and press the [Service] button. 1. - Page 273 ci5000 Series Printer Technical Service Manual 3. Set the Modulation to 170 by pressing the [Edit] button to the right of Modulation. Select 170 from the list and press the [Save] button. NOTE: there are multiple screens. Use the up and down arrows to scroll thru the screens to find the setting.
-
Page 274: Modulation Adjustment
ci5000 Series Printer Technical Service Manual Modulation Adjustment 1. Leave the Charge at 72 from the previous (Band) steps 2. Leave the Pressure at 40 from the previous (Band) steps 3. Using the [Edit] button set the Band to new setting (found in the Band Adjustment sets) 4. -
Page 275: Charge Adjustment
ci5000 Series Printer Technical Service Manual Charge Adjustment 1. Leave the Charge at 72 from the 2 previous steps 2. Leave the Pressure at 40 from the 2 previous steps 3. Leave the Modulation at the new set point found in the previous step. 4. - Page 276 ci5000 Series Printer Technical Service Manual NOTE: Pressure can also be adjusted slightly to allow for additional Print Quality. This should not be set outside 35-45psi for both normal and Macro drop sizes, 45-55 for HS50 and Micro drop sizes. Version 0.1 9-11...
- Page 277 ci5000 Series Printer Technical Service Manual SECTION 10: ci5650 AIR SYSTEM CONTENTS Page ci5650 Air Handling System Overview ..................10-2 Principle of Operation ........................10-2 Components ..........................10-3 Parts List ............................10-4 Version 0.1 10-1...
-
Page 278: Ci5650 Air Handling System Overview
Air Handling System Overview The Citronix ci5650 Continuous Ink Jet Printer is designed to IP65 rating for harsh (dusty) environments. This Printer utilizes plant air to cool and pressurize the Printer cabinet and to supply positive air to the Printhead. -
Page 279: Components
ci5000 Series Printer Technical Service Manual Components Regulator/Filter Bowl System Internal Components Version 0.1 10-3... -
Page 280: Parts List
ci5000 Series Printer Technical Service Manual Pressure Switch Connection Parts List 004-1088-001 Regulator/Filter Bowl Assembly 004-1079-001 Blanking Plate Version 0.1 10-4... - Page 281 ci5000 Series Printer Technical Service Manual 1/8” Tube fitting 004-1090-001 1/4” Tube fitting 004-1089-001 004-1084-001 Internal Air Filter 004-1085-001 Pressure Switch 004-1078-001 Air Adapter Version 0.1 10-5...
- Page 282 ci5000 Series Printer Technical Service Manual SECTION 11: REFERENCE CONTENTS Page Glossary Of Terms ......................11-2 Schematics .......................... 11-4 Display & Touch Connections ...................... 11-4 Electrical Connections ......................... 11-5 Fluids Connections ........................11-6 Menu Map ........................... 11-7 Version 0.1 11-1...
-
Page 283: Glossary Of Terms
ci5000 Series Printer Technical Service Manual Glossary Of Terms Alphanumeric Letter or number characters. Attribute A characteristic or distinctive feature. Backlash The ability to detect direction of line travel, enabling the print to be suspended when travelling in opposite direction and restart at the appropriate place. Break up point, below nozzle plate and within charge electrode, where jet breaks into drops. - Page 284 ci5000 Series Printer Technical Service Manual Select Information to be put into the printer - use the keyboard <> keys to choose the option required. Then use the Select key to insert or open. Safety Data Sheet Shaft Encoder A mechanical device that emits X amount of pulsed signals per revolution of the shaft.
- Page 285 ci5000 Series Printer Technical Service Manual Schematics Display & Touch Connections Version 0.1 11-4...
- Page 286 ci5000 Series Printer Technical Service Manual Electrical Connections Version 0.1 11-5...
- Page 287 ci5000 Series Printer Technical Service Manual Fluids Connections Version 0.1 11-6...
- Page 288 412 counter defaults status 307 System info set all messages 805 set all messages service properties 130 files security 222 flush prime citronix 206 override system 211 test valves customer 207 run pump 201 HV trip citronix 221 advanced service system...
Need help?
Do you have a question about the ci5200 and is the answer not in the manual?
Questions and answers