Canon IMAGEPRESS C7011VPS SERIES Operation Manual
Hide thumbs
Also See for IMAGEPRESS C7011VPS SERIES:
- Operation manual (391 pages) ,
- Service manual (121 pages)

Related Manuals for Canon IMAGEPRESS C7011VPS SERIES


Summary of Contents for Canon IMAGEPRESS C7011VPS SERIES
-
Page 1: Operation Guide
Operation guide i m a g e P R E S S C 7 0 1 1 V P S s e r i e s C 7 0 1 0 V P S s e r i e s... - Page 2 Copyright © 2011 - 2014 by Canon Inc. All Rights Reserved. No part of this publication may be reproduced or transmitted in any form or by any means, electronic or mechanical, including photocopying and recording, or by any information storage or retrieval system without the prior written permission of Canon Inc.
-
Page 3: Table Of Contents
Contents Contents Chapter 1 Preface..........................Trademarks..............................Copyright.................................11 Notes for the reader............................Abbreviations used in this manual....................... Available documentation..........................14 Chapter 2 Main parts..........................15 Overview of the machine configuration....................... The main unit..............................19 The paper modules............................The tab feeder (optional)..........................The special feeder (optional)......................... The automatic document feeder - ADF (optional).................. - Page 4 Contents Chapter 5 Operator panel views....................... dashboard..............................70 The Schedule view............................The Jobs view..............................73 The Trays view..............................75 The System view............................Chapter 6 Adapt printer settings to your needs................77 Introduction to the Setup section........................78 Work with the workflow profiles........................Change the warning time..........................Disable the warning time..........................85 Truncate the job name...........................
- Page 5 Contents Make a proof............................172 Stop the printer............................Delete print jobs............................. Schedule a waiting job for printing...................... Select more than one job for printing....................Bundle jobs in the list of Waiting jobs....................Print a file from a USB drive......................... Manage variable data printing (VDP jobs)................... Send a job to another printer........................182 PRISMAsync Remote Manger...
- Page 6 Contents Description of the copy job settings.....................228 Feed originals to the ADF (optional).....................240 Feed originals to the SADF (optional)....................Put originals on the glass plate......................244 Clean the glass plate..........................245 Copy your documents..........................246 Make a copy............................246 Create templates to use for recurring jobs..................Combining subsets into one document....................
- Page 7 Contents Account ID file...............................313 The account log file............................Save an account log file..........................320 Enter an account ID into the printer driver....................321 Chapter 13 Add toner and staples....................Toner................................Check the status of the toner reservoir and waste toner container...........324 Replacing the toner cartridge........................326 Replacing the waste toner container....................330...
- Page 8 Contents...
-
Page 9: Chapter 1 Preface
Chapter 1 Preface... -
Page 10: Trademarks
Trademarks Trademarks List of trademarks Océ, Océ PRISMA, Océ PRISMAsync, Océ PRISMAprepare and Océ PRISMAaccess are registered trademarks of Océ. Adobe, Acrobat, Reader and Distiller are registered trademarks of Adobe Systems Incorporated. PostScript 3® is a registered trademark of Adobe Systems Incorporated. Microsoft, Windows, Windows NT, Windows 98, Windows 2000, Windows XP, Windows Server 2003 are either registered trademarks or trademarks of Microsoft Corporation in the United States and/or other countries. -
Page 11: Copyright
Copyright Copyright This product includes software and/or software modules that are licensed by Canon Inc. or its licensors from third parties. Use and distribution of this software and/or software modules are subject to conditions (a) through (d) below. Copyright © 1999, 2000, 2002 Aladdin Enterprises. All rights reserved. -
Page 12: Notes For The Reader
Notes for the reader Notes for the reader Introduction This manual helps you to use the imagePRESS C7011VPS / C7010VPS series. The manual contains a description of the product and guidelines to use and operate the imagePRESS C7011VPS / C7010VPS series. Definition Attention-Getters Parts of this manual require your special attention. -
Page 13: Abbreviations Used In This Manual
Abbreviations used in this manual Abbreviations used in this manual Microsoft Windows 2000: Windows 2000 Microsoft Windows 2000 Professional: Windows 2000 Professional Microsoft Windows 2000 Server: Windows 2000 Server Microsoft Windows Server 2003: Windows Server 2003 Microsoft Windows XP: Windows XP Microsoft Windows XP Professional: Windows XP Professional Microsoft Windows Vista operating system:... -
Page 14: Available Documentation
Available documentation Available documentation For the imagePRESS C7011VPS / C7010VPS series the following information is available. • Operating information • Operating information for finishers • Operator's Maintenance Manual (English only) • Safety Instructions for the printer • Safety Information for the controller •... -
Page 15: Chapter 2 Main Parts
Chapter 2 Main parts... -
Page 16: Overview Of The Machine Configuration
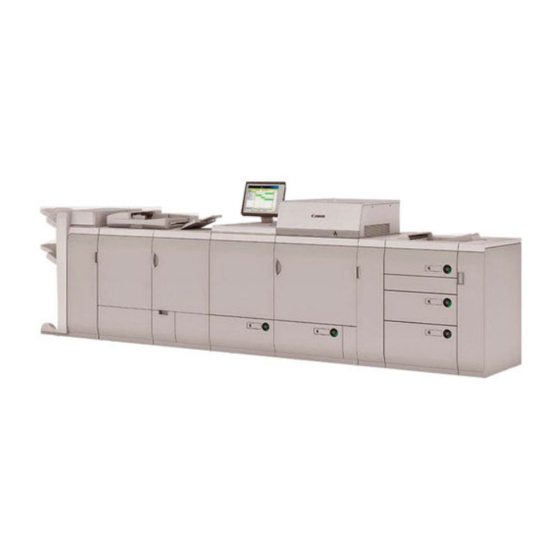
Overview of the machine configuration Overview of the machine configuration Introduction The following figures display two example configurations. [1] Mass production configuration [2] Space saving configuration The next section describes all available modules and options. The availability of modules and options differs per country. - Page 17 Overview of the machine configuration Component Function Main unit The main unit contains the components that print the media. Access to the main unit is only required when a paper jam occurs or when maintenance is required. The main unit consists of the following main parts.
- Page 18 Overview of the machine configuration Component Function Stacker/stapler, optional inserter and The stacker/stapler offers the following optional integrated punch unit functionality. (Finisher-AJ1 or • Stack prints Saddle Finisher-AJ2 with • Staple prints Document Insertion Unit-C1 and • Create stapled booklets Puncher Unit-BB1) •...
-
Page 19: The Main Unit
The main unit The main unit Introduction This section describes and shows the main parts of the main unit. External view [3] External view Component Function Operator panel The operator panel helps you with your daily work, for example the scheduling of the jobs. - Page 20 The main unit Internal view: the imaging unit (Marking Engine) [4] The location of the main parts of the unit (Marking Engine) The function of the main parts of the imaging unit (Marking Engine) Component Function Toner unit Gives access to the toner bottles. Intermediate transfer belt Transfers the toner to the paper.
- Page 21 The main unit Internal view: the fusing unit (Fixing Station) [5] The location of the main parts of the fusing unit (Fixing Station The function of the main parts of the fusing unit (Fixing Station) Component Function Primary fixing assembly Fixes toner that has transferred to paper.
-
Page 22: The Paper Modules
The paper modules The paper modules Introduction This section describes the parts of the available paper modules. Integrated paper trays The printer contains 2 integrated paper trays. External paper modules Optionally, you can extend the printer with up to 2 external paper modules. Parts of the paper module Component Function... - Page 23 The paper modules Parts of the bulk paper module Component Function Release button Detaches the bulk paper module from the main unit when pressed. Open button Opens the paper tray to load media or check for a paper jam. Paper tray Contains the media that will be printed Paper supply indicator Enables you to check the amount of paper...
-
Page 24: The Tab Feeder (Optional)
The tab feeder (optional) The tab feeder (optional) Introduction The tab feeder is needed to feed tabs via a paper tray. Tab feeder Parts of the tab feeder Component Function Paper holder The paper holder constrains the tab paper downwards. Handle Grip this handle to install the tab feeding attachment in the paper trays. -
Page 25: The Special Feeder (Optional)
The special feeder (optional) The special feeder (optional) Introduction You can use the special feeder to feed media to print on manually. The special feeder (optional) Parts of the special feeder Component Function Slide guides Enables you to match the size of the pa- per. -
Page 26: The Automatic Document Feeder - Adf (Optional)
The automatic document feeder - ADF (optional) The automatic document feeder - ADF (optional) Introduction This section describes the part of the Automatic Document Feeder (ADF). The automatic document feeder (ADF) Component Function Feeder cover Open this cover to clear a paper jam. Original set indicator Lights when originals are placed in the original supply tray. -
Page 27: The Color Scanner (Optional)
The color scanner (optional) The color scanner (optional) Introduction You can use the color scanner to scan bound originals (such as books and magazines), heavy or lightweight originals, and transparencies. If the color scanner is attached, the optional ADF or Platen Cover Type K is required. -
Page 28: The Operator Panel
The operator panel The operator panel Introduction The operator panel helps you to carry out print jobs, copy jobs and scan jobs. This section describes the main components of the operator panel. IMPORTANT You can clean the screen of the operator panel with a 50% mix of water and isopropyl alcohol (K2). - Page 29 The operator panel Component Function USB port Use the USB port to: • Connect the spectrophotometer and calibrate the printer and controller. • Print a file from an USB drive • Scan to a USB drive [Schedule] button Access the [Schedule] view to manage the jobs in the schedule.
- Page 30 The operator panel Component Function Status LED Displays the status of the system. • Red The machine has stopped, for example because a required media type is not available or an error has occurred. Operator attention is required now. • Orange The machine will stop soon, for example because more paper is required.
-
Page 31: The Operator Attention Light
The operator attention light The operator attention light Introduction The operator attention light on top of the printer helps you to monitor the status of the printer from a distance. The colors of the lights match the printer status that the dashboard displays. Illustration [7] The operator attention light Status colors... -
Page 32: Finishing Options
Finishing options Finishing options The following optional finishing options are described in separate manuals. • High Capacity Stacker-G1 • High Capacity Stacker-F1 • High Capacity Stacker-C1 • Booklet Trimmer-D1 • Two-Knife Booklet Trimmer-A1 • Perfect Binder-B1 The Finisher-AJ1/Saddle Finisher-AJ2/Puncher Unit-BB1/Document Insertion Unit-C1 is described in this manual. -
Page 33: The Stacker/Stapler, Optional Inserter And Optional Integrated Punch Unit
The stacker/stapler, optional inserter and optional integrated punch unit The stacker/stapler, optional inserter and optional integrated punch unit Introduction With the Finisher-AJ1 and Saddle Finisher-AJ2 you can stack and staple prints. With the Saddle Finisher-AJ2 you can also saddle stitch booklets. With the optional Puncher Unit-BB1 you can punch holes in your prints. -
Page 34: Internal View
The stacker/stapler, optional inserter and optional integrated punch unit Component Function Upper tray Receives finished documents Inserter The inserter is used to feed cover sheets for printed documents and booklets. The inserter is also an option for the Finisher- AJ1. Internal view [9] The finisher module Main parts... - Page 35 The stacker/stapler, optional inserter and optional integrated punch unit NOTE • If the finishing is used, the output trays move downward as the stack of paper that is output increases in quantity and thickness. Once an output tray has reached its stacking limit, subsequent prints are automatically delivered to the next available tray.
- Page 36 The stacker/stapler, optional inserter and optional integrated punch unit NOTE • If you want to staple more than 50 sheets (80 g/m² / 22 lb bond) of A3, B4, or A4R paper, or 100 sheets (80 g/m² / 22 lb bond) of A4 or B5 paper, the copies/prints are only offset but not stapled.
- Page 37 The stacker/stapler, optional inserter and optional integrated punch unit IMPORTANT • Punching is available only if the Puncher Unit-BB1 or Professional Puncher-B1 is attached. • Only the following paper size can be hole punched: A3, B4, A4, A4R, B5, or B5R / 11" x 17", LGL, LTR, LTRR, or EXEC •...
- Page 38 The stacker/stapler, optional inserter and optional integrated punch unit Paper size Upper tray Lower tray Booklet tray Custom size 139.7 mm x 182 mm 330.2 mm x 487.7 mm 1) Only the custom size (182 mm x 182 mm to 330.2 mm x 487.7 mm) can be output. 2) Only the custom size (210 mm x 279.4 mm to 330.2 mm x 487.7 mm) can be output.
-
Page 39: Optional Accessories
The stacker/stapler, optional inserter and optional integrated punch unit Optional accessories [13] Staple-N1: a case that holds staples for stapling [14] Staple-P1: a case that holds staples for saddle stitching Chapter 2 - Main parts... -
Page 40: The Puncher
The puncher The puncher Introduction The Professional Puncher Integration Unit-C1 reverses the paper punched by the Professional Puncher-B1. The following items are not applicable to the JP model. • Professional Puncher-B1 • Professional Puncher Integration Unit-C1 IMPORTANT Always keep the main power switch of the Professional Puncher-B1 inside the front cover turned to the "I"... -
Page 41: Chapter 3 Power Information
Chapter 3 Power information... -
Page 42: The Power Buttons And Power Modes
The power buttons and power modes The power buttons and power modes The power buttons The printer has the following switches and buttons to control the power supply. Button Name Description Power switch The power switch is located on top of the fusing unit of the printer. - Page 43 The power buttons and power modes Power mode Operator panel Description Sleep mode Once the printer has been idle for the time defined in the [Sleep mode timer] setting in the Settings Editor, the printer goes into sleep mode automatically. Compared to the low power mode, the printer uses less energy.
-
Page 44: Turn On The System
Turn on the system Turn on the system Introduction You are advised to turn on the system in the following order. 1. The optional equipment 2. The printer 3. The controller [17] The location of the on/off button (1) of the controller Turn on the system Procedure Turn on the optional equipment. -
Page 45: Turn Off The System
Turn off the system Turn off the system Introduction IMPORTANT Leave the main power switch on top of the main unit in the 'I' position. When you shut down, the power switch will automatically switch to the 'O' position. Procedure Touch [System] ->... -
Page 46: Restart The System
Restart the system Restart the system Introduction You can restart the system via the Settings Editor (under [Support] -> [Troubleshooting]) or via the printer operator panel. Procedure Touch [System] -> [Setup] -> [Shut down system]. The operator panel displays the message [Are you sure you want to shut down?]. Press [Restart]. -
Page 47: Chapter 4 Operating Concept
Chapter 4 Operating concept... -
Page 48: Operating Concept
Operating concept Operating concept Introduction To maximize efficient and productive printing, the operating concept of the system, is based on the following principles. • Document preparation / job submission and production printing are clearly separated steps in the workflow. • Media definition is done by choosing from a media catalog instead of selecting trays. •... - Page 49 Operating concept Components overview Component Main task Settings Editor Define initial and default system settings • Set default system, print, and workflow settings • Define default color management settings like color pre-sets • Maintain the media catalog • Set scan settings •...
- Page 50 Operating concept Component Main task Operator panel Manage production printing from the [Schedule] view • Monitor your print and copy jobs • Load and assign media to the media trays Manage jobs from the [Jobs] view • Schedule print and copy jobs •...
-
Page 51: Access The Settings Editor
Access the Settings Editor Access the Settings Editor Introduction The Settings Editor is a Web application and therefore accessible using an Internet browser. The Settings Editor allows you to manage settings or display information in the following areas. • [Media] •... - Page 52 Access the Settings Editor Result You can now use the Settings Editor to make changes in the above listed areas. For more information, read the short Help and tool tips in the Settings Editor. Chapter 4 - Operating concept...
-
Page 53: Maintain The Media Catalog
Maintain the [Media catalog] Maintain the [Media catalog] Introduction The [Media catalog] is a list of media with pre-defined characteristics including the [Media family]. Before you begin Make sure you have the following information. • Key operator or system administrator password Procedure From the navigation bar, select the [Media] tab. - Page 54 Maintain the [Media catalog] [20] The [Add new media] window Chapter 4 - Operating concept...
-
Page 55: Maintain The Media Families
Maintain the [Media families] Maintain the [Media families] Introduction A media family is a set of media with the same output profile (one per halftone) and calibration. By default, the controller provides the media families coated and uncoated. An expert can create a new media family for a specific group of media. -
Page 56: Maintain Colors Settings With The Settings Editor
Maintain colors settings with the Settings Editor Maintain colors settings with the Settings Editor Maintain the [Color presets] Introduction A color pre-set is a collection of color and quality settings that matches a specific document type, workflow or color application. The color pre-sets enable users to select the correct settings easily without in-depth knowledge about color management. - Page 57 Maintain the [Color presets] [24] The [Add color preset] window Chapter 4 - Operating concept...
-
Page 58: Maintain The Input Profiles
Maintain the [Input profiles] Maintain the [Input profiles] Introduction An input profile defines a reference color workspace for the color data of the objects in the document. An input profile is used to define colors in a device independent way. Procedure From the navigation bar, select the [Color] tab. -
Page 59: Maintain The Output Profiles
Maintain the [Output profiles] Maintain the [Output profiles] Introduction An output profile defines a reference color workspace for the color data of the objects in the document. An output profile is used to define colors in a device independent way. Procedure From the navigation bar, select the [Color] tab. -
Page 60: Exchange The Spot Color Libraries (Optional)
Exchange the [Spot color libraries] (optional) Exchange the [Spot color libraries] (optional) Introduction The Settings Editor allows you import and export spot color libraries. Procedure From the navigation bar, select the [Color] tab. From the [Color] tab, select [Spot color libraries]. The [Spot color libraries] window appears. -
Page 61: Maintain The Spot Colors
Maintain the [Spot colors] Maintain the [Spot colors] Introduction Spot colors are used to standardize colors to make sure that colors match regardless of the equipment used to produce the color. Procedure From the navigation bar, select the [Color] tab. From the [Color] tab, select [Spot colors]. -
Page 62: Maintain The Color Mappings (Optional)
Maintain the [Color mappings] (optional) Maintain the [Color mappings] (optional) Introduction Color mappings are used to map a color or a small range of colors in the input file to a fixed spot color in a spot color library. With color mapping you ensure for example that a company color or logo color is always exactly the same color. -
Page 63: Maintain The Color & Information Bars (Optional)
Maintain the [Color & information bars] (optional) Maintain the [Color & information bars] (optional) Introduction Color and information bars are used to control the print process. Use a color bar to check, for example, ink density, dot gain, and contrast. You can import and export color bars. With the information bar you can print the settings you use for a print job. -
Page 64: Prepare Print Jobs With Prismaprepare
Prepare print jobs with PRISMAprepare Prepare print jobs with PRISMAprepare Introduction Océ PRISMAprepare allows you to prepare the print job completely on page level. You can preview the result per page. PRISMAprepare is an optional application. This procedure describes the most important settings for daily use. Procedure Prepare the document. - Page 65 Prepare print jobs with PRISMAprepare [34] The media catalog in PRISMAprepare Select the required color pre-set or define customized color settings for optimal print quality. • Select [Office documents (default)] to print Microsoft ® ® Office documents. Microsoft Office documents use the RGB color space. •...
-
Page 66: Prepare Print Jobs With The Printer Driver
Prepare print jobs with the printer driver Prepare print jobs with the printer driver Introduction The printer driver enables you to prepare the print job completely. The printer driver appears in ® ® ® ® all applications for Microsoft Windows and Apple Macintosh operating systems. -
Page 67: Manage Production Printing
Manage production printing Manage production printing Introduction The operating panel of the printer enables you to manage production printing. You can manage all print jobs from the [Schedule] tab. The Remote Monitor enables you to monitor the system status from a distance via an internet browser. Procedure Press the [Schedule] button at the lower left of the operator panel to access the [Schedule] view. -
Page 68: Monitor Operator Intervention Remotely (Optional)
Monitor operator intervention remotely (optional) Monitor operator intervention remotely (optional) Procedure Open the Internet Browser. At the address bar, enter 'http://printername/remoteinfo' or 'https://printername/remoteinfo'. The Remote Monitor displays a fixed time line of 30 minutes. [36] The remote monitor Chapter 4 - Operating concept... -
Page 69: Operator Panel Views
Chapter 5 Operator panel views... -
Page 70: The Dashboard
The dashboard The dashboard Introduction The dashboard is the upper part of the operator panel. The dashboard is always visible, irrespective of the current view. The dashboard shows the following. • The status of the system. • The status of the supplies. •... - Page 71 The dashboard Number Function Display the file name of the current job (for document printing) or cur- rent stream (for stream printing). Furthermore, the progress of the cur- rent job is displayed. For document printing, the counter can display the following informa- tion.
-
Page 72: The Schedule View
The [Schedule] view The [Schedule] view Introduction The [Schedule] is your daily planning board for print jobs. The [Schedule] helps you to keep the machine running. This section shows and describes the main parts of the [Schedule]. NOTE The descriptions of the colors of the bars and the indication of the required amount of sheets are only valid for document printing. -
Page 73: The Jobs View
The [Jobs] view The [Jobs] view Introduction The [Jobs] view enables you to access all functions to print, copy and scan your documents. From the left side of the [Jobs] view, you can access the following sections. • The [Queues] section. The [Queues] section enables you to manage print jobs in the list of [Scheduled jobs] and [Waiting jobs]. - Page 74 The [Jobs] view Icon Description The printer is printing The job is ready for printing The printer converts and prints simultaneously (ripping and print- ing) The job contains an operator note Indicates a streaming job Indicates a proof print The job settings are overruled by the PRISMAsync controller set- tings because of conflicting settings.
-
Page 75: The Trays View
The [Trays] view The [Trays] view Introduction The [Trays] view has the following functions. • Display the current content and filling level of the paper trays • Change the media that is currently assigned to a paper tray • Assign media to a paper tray •... -
Page 76: The System View
The [System] view The [System] view Introduction The system view enables you to access all functions to maintain and set up the system. From the left side of the [System] view, you can access the following sections. • The [Printer] section. Enables you to check the toner levels and the status of the waste boxes and staples of finishing equipment. -
Page 77: Adapt Printer Settings To Your Needs
Chapter 6 Adapt printer settings to your needs... -
Page 78: Introduction To The Setup Section
Introduction to the [Setup] section Introduction to the [Setup] section Introduction The [System] view gives access to system information, the system setup and media information. This section gives an overview of the [Setup] section in the [System] view. Introduction to the [Setup] section The items of the [Setup] section The workflow section at the top of the operator panel displays the main settings of the current workflow profile... - Page 79 Introduction to the [Setup] section Shut down the printer and the controller in a controlled way. The advanced section displays the following buttons. • [Local key operator settings] Get direct access to a number of important key operator settings in the Settings Editor on the PRISMAsync controller.
-
Page 80: Work With The Workflow Profiles
Work with the workflow profiles Work with the workflow profiles Introduction The machine is used in different printing environments. Each environment requires other settings to optimize the workflow or to meet your personal workflow preferences. The machine contains a number of default workflow profiles to help you optimize your workflow. The default workflow profiles are combinations of frequently used settings for print jobs ([Receive], [Print] and [Output]). - Page 81 Work with the workflow profiles Workflow profile [Receive] settings [Destination of print job] [Destination of copy job] [Unattended] [Scheduled jobs] [Scheduled jobs] The default settings for [Print] The default [Print] settings Workflow profile [Print] settings [Confirm start of job] [Check first set] [Standard] [Off] [As in job]...
- Page 82 Work with the workflow profiles Setting Values Effect [Destination of [Scheduled jobs] The jobs are immediately sent to the list of [Scheduled copy job] jobs]. The machine will print the jobs in the ripped order. You can do the following to rearrange the order in which the jobs will be printed.
- Page 83 Work with the workflow profiles Setting Values Effect [Offset stacking] [Jobs] Each printed job that is delivered to an output location is stacked on top of the previous printed job with an offset. This helps you to identify the various jobs. [Sets (always)] Each printed set that is delivered to an output location is stacked on top of the previous set with an offset.
-
Page 84: Change The Warning Time
Change the warning time Change the warning time Introduction When operator interaction is required now or soon, the dashboard and the operator attention light can warn you. This is a trigger that action is required now or soon, for example load a required media type or empty an output location. -
Page 85: Disable The Warning Time
Disable the warning time Disable the warning time Introduction When operator interaction is required now or soon, the dashboard and the operator attention light warn you. However, you can disable this warning function. Procedure Touch [System] -> [Setup] -> [Warning time] (under [Operator panel]). When the box for [Warning in advance] has a check mark and states [On], the function is enabled. -
Page 86: Truncate The Job Name
Truncate the job name Truncate the job name Introduction In the [Jobs] view, the operator panel displays all jobs with their job names. If a job name is too long, the systems truncates the job name. To enable you to identify your jobs in the lists more easily, you can define how the system truncates the job names. -
Page 87: Adjust The Brightness And Contrast Of The Operator Panel
Adjust the brightness and contrast of the operator panel Adjust the brightness and contrast of the operator panel Introduction You can adjust the brightness and contrast of your monitor to improve the readability of the operator panel. The required brightness and contrast settings can depend on the lighting in your room, for example. -
Page 88: Access Settings Editor Settings Via The Operator Panel
Access Settings Editor settings via the operator panel Access Settings Editor settings via the operator panel Introduction NOTE The information contained in this section is primarily intended for key operators and system administrators. The Settings Editor application on the PRISMAsync controller is a web based application that allows key operators and system administrators to adapt the system completely to the situation in an organization and production environment. - Page 89 Access Settings Editor settings via the operator panel Group of settings Available settings Short description [Connectivity] • [MAC address] The [Connectivity] section contains the main (read-only) settings to integrate the printer into a network. • [Host name] After you have adapted the network settings, •...
- Page 90 Access Settings Editor settings via the operator panel Chapter 6 - Adapt printer settings to your needs...
-
Page 91: Chapter 7 Media Handling
Chapter 7 Media handling... -
Page 92: Introduction To The Schedule View
Introduction to the [Schedule] view Introduction to the [Schedule] view Introduction The [Schedule] is your daily planning board for print jobs. The [Schedule] helps you to keep the machine running. This section shows and describes the main parts of the [Schedule]. NOTE The descriptions of the colors of the bars and the indication of the required amount of sheets are only valid for document printing. - Page 93 Introduction to the [Schedule] view 2. The [Required media] pane The [Required media] pane displays the media that are required for each scheduled job. For each required media, the media properties are displayed (see list of references below). The bars show the availability of the media.
- Page 94 Introduction to the [Schedule] view Color of the bar Description The output location is required now, but not available. For example, be- cause the output location is full. Gray The output location is required, but availability is unknown. 5. The Zoom Control The zoom control enables you to adjust the time scale visible in the [Schedule].
-
Page 95: Load The Media Using The Schedule View
Load the media using the [Schedule] view Load the media using the [Schedule] view Introduction This section describes how to load the media into a paper tray. When you load the media via the [Load] button in the [Schedule], the media is automatically assigned to the correct tray. -
Page 96: Description Of The Trays View
Description of the [Trays] view Description of the [Trays] view Introduction The [Trays] view has the following functions. • Display the current content and filling level of the paper trays • Change the media that is currently assigned to a paper tray •... - Page 97 Description of the [Trays] view Num‐ Item Function [Unassign] button Unassign media from the paper tray. [Registration] button Perform a media registration to position the image at the exact position of the media. Arrow buttons When your configuration contains more paper modules or an inserter than the [Trays] view can display in 1 screen, you can press the arrow buttons to change the part of the machine displayed.
-
Page 98: Load The Media Using The Trays View
Load the media using the [Trays] view Load the media using the [Trays] view Introduction This section describes how to load the media into a paper tray. When you load the media via the [Load] button in the [Schedule], the paper tray is automatically assigned to the correct media. -
Page 99: Introduction To The Media Section
Introduction to the [Media] section Introduction to the [Media] section Introduction This section gives an overview of the [Media] section in the [System] view. Overview of the [Media] section [44] Overview of the [Media] section The items of the [Media] section Description of the [Media] section Num‐... - Page 100 Introduction to the [Media] section Num‐ Item Function [Curl correction] Correct curled media. The use of [Curl correction] is indicated at the icon in the list of available media in the [Media catalog]. [Registration] button Perform a media registration to position the image at the exact position of the media.
-
Page 101: Introduction To The Media Handling
Introduction to the media handling Introduction to the media handling Introduction The machine supports a wide range of media, including tabs and inserts. This section describes the following: • Media handling in general • The [Media catalog] • Temporary media. General introduction to the media handling All the print jobs require media that you can assign to the paper trays via the operator panel. -
Page 102: Add Temporary Media To The Media Catalog
Add temporary media to the [Media catalog] Add temporary media to the [Media catalog] Introduction When a job is submitted that requires media that are not included in the [Media catalog], these media become temporary media. The operator panel displays the temporary media in the following places. -
Page 103: Correct Skewed And Rotated Images
Correct skewed and rotated images Correct skewed and rotated images Introduction This procedure describes how to correct skewed or slightly rotated images. See the figure below. IMPORTANT The correction applies to all media. You are advised to use the largest possible media size. Required tools Ruler Illustration... -
Page 104: Perform A Curl Correction
Perform a curl correction Perform a curl correction Introduction Media can arrive curled in the output tray. This is caused by temperature differences during the print process. You can perform a correction procedure to prevent curled sheets in the output trays. -
Page 105: Perform A Media Registration
Perform a media registration Perform a media registration Introduction The different properties of media can influence the alignment of images on the media. To ensure a correct alignment, you can perform a media registration for each individual media in the [Media catalog]. - Page 106 Perform a media registration Illustration [46] Media registration chart for wizard media registration Procedure Start the registration procedure from one of the following locations: • The trays view: Touch [Trays]. Select the tray with the media you want to register. Touch [Optimize].
-
Page 107: Handle Media
Handle media Handle media Load the media into the paper tray Introduction This section describes how to load the media into a paper tray. When you load the media via the [Load] button in the [Schedule], the media is automatically assigned to the correct tray. - Page 108 Load the media into the paper tray IMPORTANT • Never place paper or any other items in the empty part of the deck next to the paper stack. Doing so may cause paper jams. • A paper blower is attached inside of the paper tray. Do not insert paper clips or other foreign objects into the blower port.
- Page 109 Load the media into the paper tray IMPORTANT If the printer is in the sleep mode, you may not be able to open the paper tray even if you press the open button. In this case, press the Sleep button at the operator panel to reactivate the machine, and then press the open button.
- Page 110 Load the media into the paper tray NOTE Before loading paper, always fan the sheets several times, and align the edges to facilitate feeding. Also, you should always fan paper that has just been removed from a newly opened paper package. Make sure that the inside lifter has lowered before loading paper, and lift the paper holder plate of the rear guide.
- Page 111 Load the media into the paper tray IMPORTANT • Do not load paper into the paper tray that has been previously printed onto, as this may result in a malfunction or damage to the copier. Always use the special feeder to feed paper when you want to print onto the back of a sheet of paper that already has something printed on its front side (2nd side of 2-Sided print).
- Page 112 Load the media into the paper tray NOTE If paper runs out during copying or printing, load a new paper stack, and follow the instructions on the touch panel display. The machine automatically restarts, and produces the remaining copies or prints. Chapter 7 - Media handling...
-
Page 113: Adjust The Paper Tray To Hold A Different Media Size
Adjust the paper tray to hold a different media size Adjust the paper tray to hold a different media size Introduction Before you can load media with a different media size, you must adjust the paper tray. NOTE If the printer is in the sleep mode, you may not be able to open the paper tray even if you press the open button. - Page 114 Adjust the paper tray to hold a different media size Load the desired paper to approximately 10 mm / 3/8" in height. Slide the outer size change plate and inner size change plate to align them with the desired paper size. IMPORTANT Do not subject the paper holder plate to shock when loading paper into the paper tray, as this may result in a malfunction or damage to the machine.
- Page 115 Adjust the paper tray to hold a different media size Load all remaining paper whose size you want to change into the paper tray. CAUTION When loading paper into the paper tray, take care not to cut your hands on the edges of the paper.
- Page 116 Adjust the paper tray to hold a different media size Gently push the paper tray back into the machine until it clicks into place in the closed position. The inside lifter automatically rises, and prepares the paper tray for printing. CAUTION When closing the paper tray, be careful not to get your fingers caught, as this may result in personal injury.
-
Page 117: Load The Media Into The Bulk Media Module (Optional)
Load the media into the bulk media module (optional) Load the media into the bulk media module (optional) Introduction This section describes how to load the media into the bulk media module. When you load the media via the [Load] button in the [Schedule], the media is automatically assigned to the correct tray. - Page 118 Load the media into the bulk media module (optional) NOTE • If a message prompting you to load paper appears during printing, the remaining prints are automatically made after you load the correct paper. If you select another paper source, the remaining prints are made after you press [OK].
- Page 119 Load the media into the bulk media module (optional) IMPORTANT Rewrap any remaining paper in its original package, and store it in a dry place, away from direct sunlight. NOTE Before loading paper, always fan the sheets several times, and align the edges to facilitate feeding.
- Page 120 Load the media into the bulk media module (optional) IMPORTANT • Do not load paper into the paper tray that has been previously printed onto, as this may result in a malfunction or damage to the copier. Always use the special feeder to feed paper when you want to print onto the back of a sheet of paper that already has something copied on its front side (2nd side of 2- Sided print).
- Page 121 Load the media into the bulk media module (optional) CAUTION When returning the paper tray to its original position, be careful not to get your fingers caught, as this may result in personal injury. Chapter 7 - Media handling...
-
Page 122: Adjust The Media Size For The Bulk Media Module (Optional)
Adjust the media size for the bulk media module (optional) Adjust the media size for the bulk media module (optional) Introduction This section explains how to change the paper size for the optional bulk media module. IMPORTANT Never place paper or any other items in the empty part of the paper tray next to the paper stack. Doing so may cause paper jams. - Page 123 Adjust the media size for the bulk media module (optional) Remove the two blue screws on the outer size change plate using a coin or something similar. IMPORTANT Do not loosen or remove any screw other than the two blue screws on the outer size change plate.
- Page 124 Adjust the media size for the bulk media module (optional) IMPORTANT • Make sure to align the size change plate properly with the marks for the desired paper size. There are two marks for paper size at the top of the paper tray. Align the size change plate with the desired marks.
- Page 125 Adjust the media size for the bulk media module (optional) IMPORTANT There are two screw holes for fastening the rear edge retainer. Make sure that the rear edge retainer is fastened properly, aligned with the marks for the desired paper size, to prevent it from being installed at an angle.
- Page 126 Adjust the media size for the bulk media module (optional) 11 17/LTR 12 18 13 19 (SRA3) IMPORTANT • Make sure to align the size change plate properly with the marks for the desired paper size. There are two marks for paper size at the top of the paper tray. Align the size change plate with the desired marks.
- Page 127 Adjust the media size for the bulk media module (optional) IMPORTANT • If you do not set the deck base plate (1), the edge of the paper may fall and paper jam may occur. Be sure to set the deck base plate. •...
- Page 128 Adjust the media size for the bulk media module (optional) CAUTION When loading paper into the paper tray, take care not to cut your hands on the edges of the paper. IMPORTANT • To load paper larger than B4, you have to first close the paper tray to raise the inside lifter, then open the paper tray, and load the paper.
-
Page 129: Adjust The Outer Size Change Plate Of The Bulk Paper Module (Optional)
Adjust the outer size change plate of the bulk paper module (optional) Adjust the outer size change plate of the bulk paper module (optional) Introduction When using special types of paper, such as coated paper, the paper size may be slightly different from standard paper sizes, and this may cause problems. - Page 130 Adjust the outer size change plate of the bulk paper module (optional) If you are using A4 paper, load a second stack of paper on the side of the first paper stack, so that the outer size change plate is not tilted. IMPORTANT If you have loaded a second stack of paper for fine adjustment, make sure to remove it after adjusting the outer size change plate.
- Page 131 Adjust the outer size change plate of the bulk paper module (optional) Remove the blue screw on the rear edge retainer (1) using a coin or something similar. IMPORTANT Do not loosen or remove the blue screw on the outer size change plate. Remove the rear edge retainer, then remove the spacer that is stored in the back of the rear edge retainer.
- Page 132 Adjust the outer size change plate of the bulk paper module (optional) Fasten the black adjustment screw on the left using a coin or something similar while slightly pressing the outer size change plate against the paper stack. Similarly, fasten the black adjustment screw on the right using a coin or something similar while slightly pressing the outer size change plate against the paper stack.
- Page 133 Adjust the outer size change plate of the bulk paper module (optional) IMPORTANT If you have loaded a second stack of paper for fine adjustment, make sure to remove it after adjusting the outer size change plate. Leaving the second stack of paper in the paper tray may lead to a paper tray malfunction.
- Page 134 Adjust the outer size change plate of the bulk paper module (optional) NOTE When loading paper, make sure that the height of the paper stack does not exceed 20 mm / 13/16". If the height of the paper stack exceeds 20 mm / 13/16", the edges of the paper stack may become curled or creased, and poor print quality may result.
-
Page 135: Load The Media Into The Special Feeder (Optional)
Load the media into the special feeder (optional) Load the media into the special feeder (optional) Introduction You can use the special feeder to feed media manually. IMPORTANT • Note the following points when using the special feeder: - Paper Quantity: one to approximately 100 sheets (80 g/m² / 22 lb bond, stack approximately 11 mm / 3/8"... - Page 136 Load the media into the special feeder (optional) Adjust the slide guides (1) to match the size of the paper. If you are feeding large size paper, pull out the auxiliary tray (2). Load the paper into the special feeder. Make sure that the height of the paper stack does not exceed the loading limit mark.
- Page 137 Load the media into the special feeder (optional) To copy/print on the back side of preprinted paper, load the preprinted paper face up into the special feeder, as shown in the illustration below. [48] The feeding direction (1) IMPORTANT When loading paper into the special feeder, align the paper stack neatly between the slide guides.
-
Page 138: Load Tabs Via The Tab Feeder (Optional)
Load tabs via the tab feeder (optional) Load tabs via the tab feeder (optional) Introduction Before you install the tab feeder, check the paper size of the tab feeder. IMPORTANT You cannot use A4 tab paper whose tab width is 13.5 mm / 35/64"or less, measured from the edge. - Page 139 Load tabs via the tab feeder (optional) Situation 1: you want to print on the tab paper Destination How to load tab paper Result [Stacker/stapler] Reverse order tab, face down, Reverse (1) and tabs to the left. [Stacker] Right order tab, face down, and tabs to the left.
- Page 140 Load tabs via the tab feeder (optional) Destination How to load tab paper Result [Stacker] Right order tab, face down, and tabs to the left. [Stacker] Right order tab, face up and upside down, and tabs to the left. IMPORTANT If the printer is in the sleep mode, you may not be able to open the paper tray even if you press the open button.
- Page 141 Load tabs via the tab feeder (optional) Unlock the lever of the size change plate. Slide the outer size change plate and the inner size change plate to the left as far as they will go. Embed the location fix frame, located on the back side of the tab feeder, to the hole of the lifter. IMPORTANT Embed the location fix frame in the hole of the lifter properly to prevent a paper jam or the paper tray from being damaged.
- Page 142 Load tabs via the tab feeder (optional) Adjust the outer size change plate and the inner size change plate to align completely with the tab feeder. Lock the lever of the size change plate and fix it. Load all remaining tab paper while lifting up the tab of the paper holder. IMPORTANT •...
- Page 143 Load tabs via the tab feeder (optional) IMPORTANT • Keep the rear guide on the left of the paper tray. Do not approach the rear guide to the tab feeder. • If the tab paper is curled, image blurring may occur. In this case, straighten out the curled paper, and reload it.
-
Page 144: Adjust The Media Size Of The Tab Feeder (Optional)
Adjust the media size of the tab feeder (optional) Adjust the media size of the tab feeder (optional) Procedure Place the tab feeder on the stable stand. IMPORTANT If the printer is in the sleep mode, you may not be able to open the paper tray even if you press the open button. - Page 145 Adjust the media size of the tab feeder (optional) IMPORTANT Do not touch the Paper Size Change Unit except for the case that you adjust the mark. If you hold the Paper Size Change Unit to lift the tab feeding attachment, the screws become loose, and a paper jam may occur.
-
Page 146: Load The Required Media Into The Selected Tray
Load the required media into the selected tray. Load the required media into the selected tray. Introduction The inserter is needed to load inserts and covers for booklets. The following table shows the effect of the cover position, original position and the staple settings on the output. Cover and original position Staple set‐... - Page 147 Load the required media into the selected tray. Cover and original position Staple set‐ Output tings Inserter Automatic Glass plate Document Feeder • [1 staple] - [Top left] A3, B4 • [1 staple] - [Bottom right] • [1 staple] - [Top left] A4, B5 •...
- Page 148 Load the required media into the selected tray. [49] Upper tray [50] Lower tray Open a package of paper, and remove the paper stack. CAUTION When loading paper, take care not to cut your hands on the edges of the paper. IMPORTANT Rewrap any remaining paper in its original package, and store it in a dry place, away from direct sunlight...
- Page 149 Load the required media into the selected tray. Load the paper stack face up into the inserter. [51] Face up in the upper tray IMPORTANT Make sure that the height of the paper stack does not exceed the loading limit mark at the back of the paper supply tray.
- Page 150 Load the required media into the selected tray. [52] Face up in the lower tray, face down for saddle stitching NOTE When loading paper into the lower tray, pulling up the upper tray makes it easier to access the lower tray. IMPORTANT •...
-
Page 151: Check The Status Of The Punch Waste Box
Check the status of the punch waste box Check the status of the punch waste box Introduction You can check the status of the punch waste box in the [System] view. Procedure On the operator panel, touch the button for the [System] view. Press [Printer]. -
Page 152: Removing The Punch Waste
Removing the punch waste Removing the punch waste Introduction This section describes how to remove the punch waste IMPORTANT Take care when handling the optional equipment that is attached to the machine. When an optional unit's cover is opened to replace a staple cartridge, discard punch waste, or clear paper or staple jams, prints may still be output if other optional units are operating normally, and are not involved in the paper or staple jam removal procedure NOTE... - Page 153 Removing the punch waste NOTE Make sure that the punch waste tray is completely emptied. Return the punch waste tray to its original position. Make sure to insert the punch waste tray as far as it can go. NOTE If the punch waste tray is not securely in place, you cannot make copies or prints in the Hole Punch mode.
-
Page 154: Handle Paper Jams
Handle paper jams Handle paper jams When a paper jam occurs, follow the instructions on the operator panel. IMPORTANT Make sure you follow the instructions precisely in the correct order to avoid unnecessary service calls. Chapter 7 - Media handling... -
Page 155: Chapter 8 Carry Out Print Jobs
Chapter 8 Carry out print jobs... -
Page 156: General Information
General information General information Introduction to the print function Introduction Print jobs can be sent from the following locations. • The printer driver. • PRISMAprepare. • From a USB drive. • From a hotfolder. • Via a printer protocol Depending on the workflow settings, the print job will appear in one of the following destinations. •... -
Page 157: Description Of The Print Job Settings
Description of the print job settings Description of the print job settings Introduction With the [Properties] button you view and partly change the job settings of the jobs in the following queues. • [Waiting jobs] • [Scheduled jobs] You cannot change the settings of an active job. •... - Page 158 Description of the print job settings Number Pane Description [Jobs] The [Jobs] pane shows the settings you can define for the job Preview The preview displays the settings you defined for the output. Action buttons The action buttons indicate the actions you can car- ry out.
- Page 159 Description of the print job settings Setting Values Description Here you can indicate that the print job requires a front cov- er. When the setting is enabled the corresponding setting [Media] becomes enabled. [Cover] [Front] [Media] When the setting [Front] is enabled, you can select a media from the media catalog.
- Page 160 Description of the print job settings Setting Values Description [Fit to page] You can select a media size for the output that differs from the media size of the original. When the [Fit to page] setting is enabled, the system scales the original in such a way that [Zoom] the image fits on the selected media size of the output.
- Page 161 Description of the print job settings Setting Values Description [Margin shift] Use this setting to increase or decrease the margin. By de- fault, the values of the front side and the back side are inter- locked. This means that the values for the front side and the [Shift] back side remain identical.
- Page 162 Description of the print job settings Setting Values Description [Output loca- Select the output location for the print job. Depending on the tion] settings for your print job, the machine automatically sug- gests the preferred output location for your job. However, [Print delivery] you can manually overrule this suggestion.
- Page 163 Description of the print job settings Setting Values Description [Advanced set- tings] -> [Sheet orientation] [Print delivery] [Header up LEF] Deliver the prints with the header on top side and in portrait position (vertical). [Header up SEF] Deliver the prints with the header on top side and in land- scape position (horizontal).
- Page 164 Description of the print job settings Setting Values Description [Color/Black & Here you can view if the job is printed in [Color] or in [Black white] and white]. [Black and If using color, the following options are available for jobs. white] •...
- Page 165 Description of the print job settings Setting Values Description [Binding] [None] Here you can define the required number of staples. Further- more you can define where you want the staples with the [Location] option. The available locations for the 1 staple option: [1 staple] •...
-
Page 166: Contradiction Handling
Contradiction handling Contradiction handling Be aware that if you change settings you might make contradicting settings. If you make contradicting settings, the preview pane informs you how to solve the contradictions. The contradicting settings are marked. The system indicates, with a green check mark, which setting you need to change to resolve the contradiction. -
Page 167: Manage Print Jobs
Manage print jobs Manage print jobs Print an urgent job immediately Introduction When a job must be printed urgently, you can give that print job priority over all other print jobs. The [Print now] button allows you to print a job immediately. When you use the [Print now] button, the active print job will be paused as soon as the current set is ready. -
Page 168: Give Priority To A Print Job
Give priority to a print job Give priority to a print job Introduction When you want to print a job as soon as possible, but not necessarily immediately, you must use the [To top] function. The [To top] function moves the selected job to the second position in the list of [Scheduled jobs], below the active print job . -
Page 169: Print A Scheduled Job Later
Print a scheduled job later Print a scheduled job later Introduction The machine prints the print jobs and copy jobs that are present in the list of [Scheduled jobs] jobs. However, you can decide to print a job later, for example because: •... -
Page 170: Reprint A Job
Reprint a job Reprint a job Introduction NOTE The following description is only applicable when the setting [Printed jobs] in the Settings Editor is enabled. Print jobs that have been completed are moved from the list of [Scheduled jobs] list to the list of [Printed jobs]. -
Page 171: Print A Job Ticket
Print a job ticket Print a job ticket Introduction Job tickets are used to transfer settings from an application to the printer. It can be convenient to print a job ticket before printing a job, to get an overview of the main job characteristics. Job tickets can contain the following information, for example. -
Page 172: Make A Proof
Make a proof Make a proof Introduction You can make a proof to check whether the quality and the layout of the output meet your expectations. When you use the [Proof] function, the machine prints 1 copy of the job. You can only make a proof for a job in the list of [Waiting jobs] or in the [DocBox] (optional). -
Page 173: Stop The Printer
Stop the printer Stop the printer Introduction The printer can be stopped in 2 ways. • Manually Use the Stop button or the [Stop after job] button to stop the printer. • Automatically Define a corresponding setting in the workflow profiles. Stop the printer manually Manual stop Stop after... - Page 174 Stop the printer Stop the printer automatically Automatic stop When Then • The [Check first set] setting in a [Workflow The printer stops each time the first set of a profile] is [On], and print job is completed. You can check the first •...
-
Page 175: Delete Print Jobs
Delete print jobs Delete print jobs Locations from which jobs can be deleted You can delete jobs from the following locations. • List of [Printed jobs] (if this function is enabled in the Settings Editor). • List of [Scheduled jobs]. •... -
Page 176: Schedule A Waiting Job For Printing
Schedule a waiting job for printing Schedule a waiting job for printing Introduction The destination of jobs is determined by the selected workflow profile. When jobs go to the list of [Waiting jobs], you must manually send the jobs to the print queue (list of [Scheduled jobs]). This enables you to keep full control of all jobs that must be printed. -
Page 177: Select More Than One Job For Printing
Select more than one job for printing Select more than one job for printing Introduction The table below describes the possibilities to select more than one job for printing. Select more jobs Options Description Select two or more jobs Touch the jobs you want to print one by one. manually [Select] button - [All] All jobs in the list of [Waiting jobs] are printed. -
Page 178: Bundle Jobs In The List Of Waiting Jobs
Bundle jobs in the list of [Waiting jobs] Bundle jobs in the list of [Waiting jobs] Introduction The bundle function allows you to combine two or more jobs into one new job. For example, this can be convenient when the participants of a meeting need several documents in a specific order. Often, the required documents are sent from several workplaces to the printer in advance. - Page 179 Bundle jobs in the list of [Waiting jobs] Touch the jobs you want to combine, or use an option from the [Select] menu to select multiple jobs at once. Press [Bundle]. A [Create bundle] window appears that allows you to make some changes. If necessary, use the [Up] and [Down] buttons to change the job order.
-
Page 180: Print A File From A Usb Drive
Print a file from a USB drive Print a file from a USB drive Introduction You can print documents (*.pdf, *.ps) on a USB drive. Procedure Insert the USB drive into the USB port at the left-hand side of the operator panel. Touch [Jobs] ->... -
Page 181: Manage Variable Data Printing (Vdp Jobs)
Manage variable data printing (VDP jobs) Manage variable data printing (VDP jobs) Introduction When a VDP job is sent to a queue, an additional [Records] column appears with the icon in the figure below. Change the job settings of a VDP job just like any other print job, except for optional page programming functions. -
Page 182: Send A Job To Another Printer
Send a job to another printer Send a job to another printer You can send jobs with their settings to another PRISMAsync printer from the following locations: • List of scheduled jobs • List of waiting jobs • A DocBox •... -
Page 183: Prismasync Remote Manger (Option)
PRISMAsync Remote Manger (Option) PRISMAsync Remote Manger (Option) With PRISMAsync Remote Manager you can monitor printers, operate printers remotely and send jobs and ready-to-print documents to the printer queues of all configured printers. You must enable and configure PRISMAsync Remote Manager in the Settings Editor. Refer to the user manual for the PRISMAsync Remote Manager for the options available when using this product. -
Page 184: Change The Job Settings Before Printing
Change the job settings before printing Change the job settings before printing Change the number of sets Introduction Follow the procedure below to change the number of sets for a job that is present in the list of [Waiting jobs] or [Scheduled jobs], or in a [DocBox]. Procedure Touch [Jobs] ->... -
Page 185: Check The First Set
Check the first set Check the first set Introduction If you have a large print job and you want to check whether the job is printed correctly, it is advised to check the first set before printing all other sets. When a job is sent to the printer, the submitter can indicate in the job submission application that the first set must be checked. -
Page 186: Change The Use Of Separator Sheets
Change the use of separator sheets Change the use of separator sheets Introduction Separator sheets are empty sheets that are automatically inserted before each new set or job to separate two sets or jobs. In the Settings Editor you can define the media that must be used as separator sheets. -
Page 187: Stack The Prints With An Offset
Stack the prints with an offset Stack the prints with an offset Introduction The [Offset stacking] function creates a visible distinction between sets or jobs in an output location. The active workflow profile or the active automated workflow determines the default type of offset stacking. -
Page 188: Combine Jobs
Combine jobs Combine jobs Introduction The bundle function allows you to combine two or more jobs into one new job. For example, this can be convenient when the participants of a meeting need several documents in a specific order. Often, the required documents are sent from several workplaces to the printer in advance. Normally, this means that you must print the documents first and sort or staple them later. - Page 189 Combine jobs NOTE If all jobs you want to combine have the same label, you can also touch [Select] -> [Jobs with label] to select all the required jobs at once. Press [Bundle]. The operator panel displays an overview of the bundled job. If necessary, use the Up and Down keys to change the job order.
-
Page 190: Change The Output Settings Before Printing
Change the output settings before printing Change the output settings before printing Change [2-sided] into [1-sided] and vice versa Introduction Jobs for which [1-sided] or [2-sided] printing was defined, will be printed on either 1 side or both sides of a sheet. If required, you can change this setting. Procedure Touch [Jobs] ->... -
Page 191: Change The Binding Edge
Change the binding edge Change the binding edge Introduction The binding edge determines whether the binding position is along the long edge or the short edge of the media. The binding edge is usually set via the printer driver, for example. However, you can view and change the binding edge via the operator panel. -
Page 192: Select A Different Media For A Job
Select a different media for a job Select a different media for a job Introduction If you want to print a job on other media than originally defined for that job, you can select a different media via the operator panel. You can select another media of the same size at the Preview pane. -
Page 193: Change The Settings For Covers
Change the settings for covers Change the settings for covers Introduction When front covers or back covers are required, the settings are usually set in the printer driver, for example. However, you can view and change the settings for the covers via the operator panel. -
Page 194: Shift The Image Roughly To Create Binding Space
Shift the image roughly to create binding space Shift the image roughly to create binding space Introduction If you want to create space for staples or punch holes, for example, you can use the [Align] function. The preview in the right-hand pane of the operator panel displays the consequences of your changes. -
Page 195: Shift The Image Precisely To Create Binding Space Or Correct The Layout
Shift the image precisely to create binding space or correct the layout Shift the image precisely to create binding space or correct the layout Introduction If you want to create space for staples or punch holes, for example, you can use the [Align] function. -
Page 196: Change The Print Delivery Settings
Change the print delivery settings Change the print delivery settings Introduction Usually the print delivery settings have been defined in the printer driver. Overview of the print delivery settings Setting Description [Output location] Change the output location for the job. The list shows all the out- put locations that are available for your system. -
Page 197: Change The Finishing Method
Change the finishing method Change the finishing method Introduction The required finishing method is usually set in the printer driver. However, you can change the finishing method on the operator panel. Depending on the configuration of your system you can change the following finishing methods, for example. -
Page 198: Automated Workflows (Access Through The Settings Editor)
Automated workflows (access through the Settings Editor) Automated workflows (access through the Settings Editor) Introduction to automated workflows Definition The Settings Editor enables you to set up separate automated workflows. Automated workflows are print queues that you can program to perform a range of operations. Automated workflows are mostly used for legacy applications where jobs are printed automatically and certain settings must be set automatically. -
Page 199: Add An Automated Workflow
Add an automated workflow Add an automated workflow Introduction The Settings Editor contains 1 factory default automated workflow. However, it can be beneficial for your productivity to add more automated workflows. NOTE It is not compulsory to define all the settings. When you put a check mark in front of a setting, that setting and its values become enabled. -
Page 200: Edit An Automated Workflow
Edit an automated workflow Edit an automated workflow Introduction You can change the attributes of an existing automated workflow. NOTE It is not compulsory to define all the settings. When you put a check mark in front of a setting, that setting and its values become enabled. -
Page 201: Delete An Automated Workflow
Delete an automated workflow Delete an automated workflow Introduction When you no longer need a certain automated workflow, you can delete that workflow. NOTE You cannot delete the factory default automated workflow. Procedure Go to [Workflow] -> [Automated workflows]. Put a check mark in front of the workflow you want to delete. Click the [Delete] button. -
Page 202: Restore The Factory Default Workflow
Restore the factory default workflow Restore the factory default workflow Introduction You can restore the factory default automated workflow. This has the following consequences. • All the automated workflows you added will be removed • All the changes in the default workflow will be lost. Procedure Go to [Workflow] ->... -
Page 203: Hotfolders
Hotfolders Hotfolders Introduction to hotfolders Introduction Technically, a hotfolder is a mapped network drive on a workstation that is linked to a shared folder on the PRISMAsync controller. For an operator, a hotfolder is a folder on a workstation where printable files can be dropped for printing. -
Page 204: Activate The Hotfolder Function
Activate the hotfolder function Activate the hotfolder function Introduction The information in this section is intended for system administrators. NOTE • By factory default, the hotfolder function is disabled. To use the hotfolder function, the system administrator must activate this function once. •... -
Page 205: Create A Hotfolder
Create a hotfolder Create a hotfolder Introduction The information in this section is intended for system administrators. Before you begin The hotfolder function must be activated once by the system administrator. Procedure Open your web browser and enter the host name or IP address of your PRISMAsync controller. Go to the [Workflow] ->... -
Page 206: Create A Shared Network Folder On A Workstation
Create a shared network folder on a workstation Create a shared network folder on a workstation Introduction The information in this section is intended for key operators. Before creating a shared network folder on a workstation, the following actions must be carried out first: •... -
Page 207: Create A Hotfolder Default Ticket ('Default_Ticket.jdf')
Create a hotfolder default ticket ('default_ticket.jdf') Create a hotfolder default ticket ('default_ticket.jdf') Introduction Hotfolders are primarily aimed at recurring PDF workflows. In these workflows identical PDFs, or other printable files, with identical settings are printed on a regular basis. A hotfolder default ticket (' default_ticket.jdf') in the hotfolder determines the settings for the print jobs. -
Page 208: Transaction Printing (Optional)
Transaction printing (optional) Transaction printing (optional) Introduction to the [Transaction] section Introduction NOTE Transaction printing requires a license. The [System] view on the operator panel displays the [Transaction] section only when transaction printing is licensed. Transaction printing enables you to print typical transactional documents like invoices, salary slips or other variable data streams. - Page 209 Introduction to the [Transaction] section The items of the [Transaction] section Description of the [Transaction] section Num‐ Item Function Dashboard The dashboard displays the following information for transaction printing. • The connection status • The IP address of the host that sends the jobs •...
- Page 210 Introduction to the [Transaction] section Step Actions on the print‐ Actions on the host Remarks Change the active Via the Settings Editor: [Transac- PDL when currently tion printing] -> [Setups] -> [Re- the wrong PDL is ac- quested active PDL]. tive.
-
Page 211: Activate Transaction Printing
Activate transaction printing Activate transaction printing Before you begin Make sure that the list of [Scheduled jobs] is empty. Procedure On the operator panel, touch [System] -> [Transaction] -> [Transaction printing mode]. The text on the button changes from [Off] to [On]. If required, touch [Active transaction setup] and select the desired setup. -
Page 212: Deactivate Transaction Printing
Deactivate transaction printing Deactivate transaction printing Before you begin Make sure that the list of [Scheduled jobs] is empty. Procedure On the operator panel, touch [System] -> [Transaction] -> [Transaction online] to put the printer offline. The text on the button changes from [On] to [Off]. Note that you can only switch the [Transaction online] function to offline when •... -
Page 213: Shift The Image In The Transaction Printing Mode
Shift the image in the transaction printing mode Shift the image in the transaction printing mode Introduction When a misalignment occurs you can shift the image to correct the problem. You can shift the image on the front side and back side horizontally and vertically. Examples of possible misalignments: •... -
Page 214: Transaction Setups
Transaction setups Transaction setups Create a new transaction setup Introduction For transaction printing, transaction setups are required. Transaction setups contain specific settings for specific transaction jobs. You can create setups in the Settings Editor. NOTE This section describes how to create a transaction setup from scratch. If you want to create a transaction setup that is very similar to an existing setup, you can also create a copy and make changes afterwards. -
Page 215: Edit A Transaction Setup
Edit a transaction setup Edit a transaction setup Procedure Go to [Transaction printing] -> [Setups]. Check the box next to the setup you want to change. If required, click the [Edit] button to change the name or description of the setup, then click [OK]. Click [Open] to allow changes to the setup. -
Page 216: Activate A Transaction Setup
Activate a transaction setup Activate a transaction setup Introduction After you create a new transaction setup or edited an existing transaction setup, you must activate the transaction setup in the Settings Editor. Otherwise, the changes are not applied. Procedure In the Settings Editor, click [Transaction printing] -> [Settings] -> [Switch the printer online or offline] to switch the printer offline. -
Page 217: Exchange All Setups Between Printers
Exchange all setups between printers Exchange all setups between printers Introduction If you have more than one printer, you can exchange the transaction setups between the printers, provided that the printer type and software version are identical. You can then use identical transaction setups on two or more printers. -
Page 218: Ipds
IPDS IPDS Media information Introduction The media catalog: • Contains a list of predefined media and their attributes. • Is an essential part of the system behavior of the imagePRESS C7011VPS / C7010VPS series. • Helps you to print your jobs more easily while using the correct media. Media information Make sure that the [Tray selection mechanism] setting in the Settings Editor is set to [Tray to media]. -
Page 219: Output Recovery In Case Of An Error
Output recovery in case of an error Output recovery in case of an error Introduction The imagePRESS C7011VPS / C7010VPS series is equipped with an efficient, reliable output recovery in case of an error. By factory default, the output recovery is set to [Normal]. After the error is solved, the job continues at the page where the error occurred automatically. - Page 220 Output recovery in case of an error Job progress states Normal output recov‐ End up in the output location after error re‐ covery The operator panel displays instructions on how to solve the paper jam. The opera- tor has to remove these the jammed sheets manually.
- Page 221 Output recovery in case of an error Job progress states Suppressed output re‐ End up in the output covery location after error re‐ covery Are deleted complete- Sheets copied to con- These sheets are not troller memory (in- delivered to the out- cluding error pages).
-
Page 222: Pcl
Media Messages (PCL) Introduction The media catalog: • Contains a list of predefined media and their attributes. • Is an essential part of the system behavior of the imagePRESS C7011VPS / C7010VPS series. • Helps you to print your jobs more easily while using the correct media. Response to Media Messages For transaction printing, the content of the paper trays (in terms of media from the media catalog) is translated into a format that the controller understands. -
Page 223: Handle The Media Messages In The Tray-To-Media Mode (Pcl)
Handle the Media Messages in the Tray-to-Media Mode (PCL) Handle the Media Messages in the Tray-to-Media Mode (PCL) Procedure A message on the control panel indicates that a media is missing. Select one of the following actions as a response to the message. •... -
Page 224: Handle The Media Messages In The Tray-To-Tray Mode (Pcl)
Handle the Media Messages in the Tray-to-Tray Mode (PCL) Handle the Media Messages in the Tray-to-Tray Mode (PCL) Procedure A message on the control panel indicates that a media is missing. Select one of the following actions as a response to the message. •... -
Page 225: Chapter 9 Carry Out Copy Jobs
Chapter 9 Carry out copy jobs... -
Page 226: General Information
General information General information Introduction to the copy function Introduction The copy function enables you to copy paper originals. You can define the settings of the copy jobs manually or by using templates. Templates contain predefined settings for recurring types of copy jobs. - Page 227 Introduction to the copy function The factory default templates Overview of the templates Template When to use [Copy job] Copy originals that have the same media size and only require simple settings, for example two-sided or a staple. [Combined copy job] Combine several sets of originals with the same or mixed media size, and create one single copy job.
-
Page 228: Description Of The Copy Job Settings
Description of the copy job settings Description of the copy job settings Introduction When you make a copy, you can define the following. • How the originals look. • How the output must look. • Generic settings for the whole job. To improve the productivity, the system defines a number of logical settings for the [Original] and the [Output] automatically. - Page 229 Description of the copy job settings Number Pane Description Action buttons The buttons in this section allow you to select ac- tions, for example, save settings to a template, can- cel a job, or start scanning. With the optional [Page programming] function, you can insert pages and define the media and fin- ishing settings for the page ranges in a job.
- Page 230 Description of the copy job settings Setting Icons and val‐ Description [Size] A4, A3, Letter, Ledger, etc. Original on the glass plate: • Select a predefined size from the list, or • Enter the media format of the original. When your original has a non-standard size, you can use the - and + but- tons to enter the exact measures.
- Page 231 Description of the copy job settings Setting Values Description The automatically set value from the original document. [Auto] [Binding edge] The output has a vertical format (height > width). The binding edge is at the left-hand side. When you turn a sheet over the binding edge the image is in [Portrait left] readable form.
- Page 232 Description of the copy job settings Setting Values Description Here you can indicate that the copy job requires a front cov- er. When the setting is enabled the corresponding setting [Media] becomes enabled. [Cover] [Front] [Print sides] Here you can select the sides of the front cover you want to print on.
- Page 233 Description of the copy job settings Setting Values Description [Fit to page] You can select a media size for the output that differs from the media size of the original. When the [Fit to page] setting is enabled, the system scales the original in such a way that [Zoom] the image fits on the selected media size of the output.
- Page 234 Description of the copy job settings Setting Values Description [Margin shift] Use this setting to increase or decrease the margin. By de- fault, the values of the front side and the back side are inter- locked. This means that the values for the front side and the [Shift] back side remain identical.
- Page 235 Description of the copy job settings Setting Values Description [Output loca- Select the output location for the copy job. Depending on tion] the settings for your copy job, the machine automatically suggests the preferred output location for your job. Howev- [Print delivery] er, you can manually overrule this suggestion.
- Page 236 Description of the copy job settings Setting Values Description [Advanced set- tings] -> [Sheet orientation] [Auto] [Print delivery] The automatically set value from the original document. [Header up LEF] Deliver the prints with the header on top side and in portrait position (vertical).
- Page 237 Description of the copy job settings Setting Values Description [Brightness] With the [Brightness] setting you can darken (-1 to -3) or lighten (1-3) your print. [Contrast] With the [Contrast] setting, you can change the differences [Adjust image] between dark and light areas on your print. A negative value reduces the difference, a positive value increases the differ- ence.
- Page 238 Description of the copy job settings Setting Values Description [Trimming] [None] Trims the long edge, top edge and bottom edge according to the specified values. The minimum trim size is 2 mm / 0.02". [Trim size] Trims the prints to a selected default size, for example A4, A5 etc.
- Page 239 Description of the copy job settings Setting Values Description [Destination] [Scheduled Add the copy job to the list of [Scheduled jobs] in the [Jobs] jobs] view. [Waiting jobs] Add the copy job to the list or [Waiting jobs] in the [Jobs] view.
-
Page 240: Feed Originals To The Adf (Optional)
Feed originals to the ADF (optional) Feed originals to the ADF (optional) Introduction You can use the ADF to feed a stack of originals at once, face up. Feeding originals in the portrait position is referred to as long-edge feed (LEF/vertical). Feeding originals in the landscape position is referred to as short-edge feed (SEF/horizontal). - Page 241 Feed originals to the ADF (optional) Place the originals face up into the original supply tray until the original set indicator (1) is lit. IMPORTANT • Do not add or remove originals while they are being scanned. • When scanning is complete, remove the originals from the original output tray to avoid paper jams.
-
Page 242: Feed Originals To The Sadf (Optional)
Feed originals to the SADF (optional) Feed originals to the SADF (optional) Introduction You can use the SADF to feed heavy or lightweight originals one by one, face down. Feeding originals in a portrait position is referred to as long edge feed (LEF). Feeding originals in a landscape position is referred to as short edge feed (SEF). - Page 243 Feed originals to the SADF (optional) When scanning is complete, close the SADF tray. CAUTION Close the SADF tray gently to avoid catching your hand, as this may result in personal injury. Chapter 9 - Carry out copy jobs...
-
Page 244: Put Originals On The Glass Plate
Put originals on the glass plate Put originals on the glass plate Introduction You can use the color scanner to copy bound originals (such as books and magazines), heavy or lightweight originals, and transparencies. You can place an original either vertically or horizontally. Always align the top edge of your original with the back edge of the glass plate (by the arrow in the top left corner). -
Page 245: Clean The Glass Plate
Clean the glass plate Clean the glass plate Introduction Clean the glass plate/original feeding belt/underside of the platen cover by following the procedure below. IMPORTANT If the glass plate/original feeding belt/underside of the platen cover is dirty, the original may not be scanned clearly, or the size of the original may be detected incorrectly. -
Page 246: Copy Your Documents
Copy your documents Copy your documents Make a copy Introduction A basic copy is a copy for which you only define a few settings before you touch Start , such as: • 1-sided or 2-sided • A staple • The number of copies required. Before you begin •... -
Page 247: Create Templates To Use For Recurring Jobs
Create templates to use for recurring jobs Create templates to use for recurring jobs Introduction When you regularly carry out identical copy or scan jobs, you can create custom templates for them. The custom templates contain the default settings for these jobs. Procedure Touch [Jobs] ->... -
Page 248: Combining Subsets Into One Document
Combining subsets into one document Combining subsets into one document Introduction You can copy or scan several sets of originals to one document or file with subsets. With the optional [Page programming] function, you can add pages, for example, tab sheets, and define the media and finishing settings for each page and subset. -
Page 249: Access Other Functions During A Copy Job Or Scan Job
Access other functions during a copy job or scan job Access other functions during a copy job or scan job Introduction When you access the copy function or scan function from the [Copy/Scan] view, the job window opens in full screen mode. Therefore, the buttons that give access to the other system functions are not visible. -
Page 250: The Zoom Behavior
The zoom behavior The zoom behavior Introduction When you carry out a copy job or scan job, you can use the Zoom function to reduce or enlarge an image, for example: • Copy an A4 / LTR original on an A3 / 11"x 17" sheet. The system enlarges the image •... - Page 251 The zoom behavior Illustration Description Result of a scan with a 200% zoom factor. NOTE The center of the image is fixed. Scan from the glass plate and use the zoom function The following table shows the zoom behavior of the machine when the originals are scanned from the glass plate.
-
Page 252: Rename A Copy Job
Rename a copy job Rename a copy job Introduction When you carry out a new copy job, the system creates an automatic name for the job. The default name 'Copy Job' followed by a sequence number is displayed in the [Job name] field. However, you can rename the copy job into a name of your choice. -
Page 253: Copy Non-Standard Size Originals
Copy non-standard size originals Copy non-standard size originals Introduction You can use the automatic document feeder to copy originals in a simple and quick way. The automatic document feeder supports the following standard media sizes. • A5, A5R, A4, A4R, A3, B5, B5R, and B4 •... -
Page 254: Scan Now And Print Later (Postponed Copying)
Scan now and print later (postponed copying) Scan now and print later (postponed copying) Introduction You can scan an original document now and print the document later. This is called postponed copying. To use this function, you must send a copy job to the list of [Waiting jobs] or to the [DocBox]. -
Page 255: Finish The Output
Finish the output Finish the output Procedure Place the originals face up into the ADF, or place 1 original face down on the glass plate. Touch [Jobs] -> [Copy/Scan] -> [Copy job]. At the [Binding] setting, select the required number of staples and the location of the staples. At the [Punching] setting, select the required number of holes. -
Page 256: Adjust The Image To Improve The Copy And Scan Quality
Adjust the image to improve the copy and scan quality Adjust the image to improve the copy and scan quality Introduction The [Adjust image] setting enables you to define the copy and scan quality manually. Depending on the situation, you can describe the original or the copy/scan. Procedure Place the originals face up into the ADF, or place 1 original face down on the glass plate. -
Page 257: Chapter 10 Carry Out Scan Jobs
Chapter 10 Carry out scan jobs... -
Page 258: Configure The Scan Function
Configure the scan function Configure the scan function Introduction to the scan function Definition The scan function enables you to create digital documents from paper originals. You can scan paper originals from the automatic document feeder (ADF) and from the glass plate of the scanner. - Page 259 Introduction to the scan function Illustration [62] The Copy/Scan view on the control panel Usage You can use the scan-to-email and scan-to-file templates that are defined in the sjt.csv file through the [Copy/Scan] section on the control panel ([Jobs] -> [Copy/Scan]. The names of the templates, which are defined in the sjt.csv file, are visible there (in the illustration above PDF Printing 600 dpi, for example).
-
Page 260: Configure The Settings For Scan To File
Configure the settings for scan to file Configure the settings for scan to file Introduction To use the scan-to-file function, the system administrator must configure the function in the Settings Editor on the PRISMAsync controller ([Configuration] -> [Connectivity]). A scan job will be sent to the FTP server configured. -
Page 261: Configure The Settings For Scan To Email
Configure the settings for scan to email Configure the settings for scan to email Introduction To use the scan-to-email function, the system administrator must configure the function in the Settings Editor on the PRISMAsync controller ([Configuration] -> [Connectivity]). A scan job will be sent as an attachment to the email address defined. -
Page 262: Configure The Settings For The Ldap Server
Configure the settings for the LDAP server Configure the settings for the LDAP server Introduction When the scan-to-email function is enabled, a list of user codes and matching email addresses is required. When a user enters his/her unique code on the printer operator panel, the scan job will be sent to the matching email address. -
Page 263: Use The Address List File (Ral.csv)
Use the address list file (ral.csv) Use the address list file (ral.csv) Introduction If an LDAP server is not available, you must use a remote address list file (ral.csv) for scan to email. This file must contain the unique user codes and matching email addresses. The PRISMAsync controller stores the address list file. -
Page 264: Use The Scan Profiles File (Sjt.csv)
Use the scan profiles file (sjt.csv) Use the scan profiles file (sjt.csv) Introduction When the scan function is licensed, the [Copy/Scan] section on the printer operator panel displays templates that give access to copy and scan functions. The scan templates are factory default Create templates that you can use to create custom templates from the operator panel. - Page 265 Use the scan profiles file (sjt.csv) Record item Description format The file format and compression used for the resulting (file format) scan file. • TIFF G31D_MH Multi-page TIFF CCITT Group 3 1D modified Huffman compressed images • TIFF G42D_Fax Multi-page TIFF CCITT.T6 Group 4 2D compressed im- ages •...
- Page 266 Use the scan profiles file (sjt.csv) Record item Description prefix The prefix can specify the application, for example ar- (file name prefix) chive or email. The prefix is a fixed part of the file name. When you create a scan-to-email profile, you must use the prefix email.
- Page 267 Use the scan profiles file (sjt.csv) Record item Description OrigOrientation The default orientation and binding of the originals on (orientation of the originals) the scanner. • portrait book • portrait calendar • landscape book • landscape calendar [63] portrait book [64] portrait calendar [65] landscape book [66] landscape calendar...
- Page 268 Use the scan profiles file (sjt.csv) Record item Description NOTE You can overrule this setting on the printer operator panel. OrigFormat The paper size and feed direction of the originals on the (paper size and feed direction of the scanner, for example A4 lef. originals) Paper sizes: •...
- Page 269 Use the scan profiles file (sjt.csv) NOTE Do not change the header information. Examples of Correct Profiles • PDF printing,PDF G31D_MH,2,scanjob,0,0,,n,,,,,,,,,, • Scan to email,PDF G31D_MH,1,email,5,5,Enter your employee number.,y,,,,,,,, • PRISMAaccess,PDF G31D_MH,1,Scanjob,0,0,,n,ScanLogic,,,,,,, Chapter 10 - Carry out scan jobs...
-
Page 270: Scan Your Documents
Scan your documents Scan your documents Description of the scan job settings Introduction When you make a scan, you can define the following. • How the original looks. • How the resulting file must look. • Generic settings for the whole job. To improve the productivity, the system defines a number of logical settings for the [Original] and the [Output] automatically. - Page 271 Description of the scan job settings Section Description [Job] The [Job] section enables you to define generic proper- ties for the whole job. Preview The preview section shows the result of the settings de- fined for the output. Action buttons The buttons in this section allow you to select actions, for example, save settings to a template, cancel a job, or start scanning.
- Page 272 Description of the scan job settings Name of the Values Description setting The automatically set value. [Auto] [Original type] The original has a vertical format (height > width). The binding edge is at the left-hand side. When you turn a sheet over the binding edge the image is in [Portrait left] readable form.
- Page 273 Description of the scan job settings [File] settings Name of the Values Description setting [Format] [Type] Select the [PDF] format when you require a format compati- ble with the Acrobat applications. A PDF file is a file with compressed graphics and text. This format matches all print systems and is common in the Internet environment.
- Page 274 Description of the scan job settings Name of the Values Description setting [Fit to page] You can select a media size for the file that differs from the media size of the original. When the [Fit to page] setting is enabled, the system scales the original in such a way that [Zoom] the image fits on the selected media size of the file.
- Page 275 Description of the scan job settings Name of the Values Description setting Margins of a document sometimes contain notes or punch holes, for example. The machine allows you to hide these el- ements on the copy. With the + and - buttons of the [Margin [Margin erase] erase] setting you can define how much margin of the origi- nal you want to erase.
- Page 276 Description of the scan job settings Name of the Values Description setting [Enter the user This setting applies only to scan-to-email jobs. To use the code.] scan-to-email function, an LDAP server must be configured. The LDAP server contains a mapping of unique user codes and email addresses.
-
Page 277: Scan To File
Scan to file Scan to file Procedure Place the originals face up into the ADF, or place 1 original face down on the glass plate. Touch [Jobs] -> [Copy/Scan]. Select a scan-to-file profile. The job window opens. Change the settings for the original and the file. Touch [Start] The scanner scans the originals. -
Page 278: Scan To Email
Scan to email Scan to email Procedure Place the originals face up into the ADF, or place 1 original face down on the glass plate. Touch [Jobs] -> [Copy/Scan]. Select a scan-to-email profile. The display names of scan-to-email profiles are defined in the scan profiles file. -
Page 279: Scan To Usb
Scan to USB Scan to USB Procedure Insert a USB drive into the USB port on the left side of the operator panel. Place the originals face up into the ADF, or place 1 original face down on the glass plate. Touch [Jobs] ->... -
Page 280: Scan To Docbox
Scan to DocBox Scan to DocBox Procedure Place the originals face up into the automatic document feeder (ADF), or place one original face down on the glass plate. On the control panel, touch [Jobs] -> [Copy/Scan] -> [To DocBox]. The job window opens. Change the settings for the original and the file. -
Page 281: Scan To Smb
Scan to SMB Scan to SMB Procedure Place the originals face up into the automatic document feeder (ADF), or place one original face down on the glass plate. On the control panel, touch [Jobs] -> [Copy/Scan] -> [Scan to SMB]. The job window opens. -
Page 282: Create Templates To Use For Recurring Jobs
Create templates to use for recurring jobs Create templates to use for recurring jobs Introduction When you regularly carry out identical copy or scan jobs, you can create custom templates for them. The custom templates contain the default settings for these jobs. Procedure Touch [Jobs] ->... -
Page 283: Combine Subsets Into One File
Combine subsets into one file Combine subsets into one file Introduction You can copy or scan several sets of originals to one document or file with subsets. With the optional [Page programming] function, you can add pages, for example, tab sheets, and define the media and finishing settings for each page and subset. -
Page 284: Optimize The Scan Quality
Optimize the scan quality Optimize the scan quality Introduction The printer can detect photos, rasters and fine lines on the original. This information is processed in such a way that the digital result has a high scan quality. This means that in most cases you do not need to adjust quality settings to get the best result. - Page 285 Optimize the scan quality [Dark]: When an area on the output is dark gray but must be black, then select a value of -1 to -3. When the area must be lighter, then select a value of 1 to 3. Press [OK].
- Page 286 Optimize the scan quality Chapter 10 - Carry out scan jobs...
-
Page 287: Use The Docbox (Optional)
Chapter 11 Use the DocBox (optional) -
Page 288: The Docbox Function
The DocBox function The DocBox function Introduction to the DocBox function Introduction DocBox is short for Document Box. The DocBox function, which is available through the operator panel, creates a buffer between the preparation of a job, for example page programming, and the printing of the job. - Page 289 Introduction to the DocBox function • To correct settings when the proof print is not correct, for example change the print quality or layout of a document. • To combine analogue documents with digital documents. • To store jobs that must be reprinted regularly, for examples reports or books. Chapter 11 - Use the DocBox (optional)
-
Page 290: Create A New Docbox
Create a new DocBox Create a new DocBox Illustration [69] Create a DocBox Procedure NOTE Only the System Administrator is allowed to create a new DocBox in the Settings Editor. Open your web browser and enter the host name or IP address of the PRISMAsync controller. Log on to the Settings Editor as System Administrator. -
Page 291: Handle The Jobs In A Docbox
Handle the jobs in a DocBox Handle the jobs in a DocBox Description of the DocBox job settings Introduction When you select a job in a DocBox and touch [Properties], the current settings of the selected job are displayed. Below, the available settings are described. NOTE Depending on the type of job you want to edit, either a print job or scan job, some settings cannot be changed. - Page 292 Description of the DocBox job settings Number Pane Description Preview The preview displays the settings you defined for the output. Action buttons The action buttons indicate the actions you can car- ry out. With the optional [Page programming] function, you can insert pages and define the media and fin- ishing settings for the page ranges in a job.
- Page 293 Description of the DocBox job settings Setting Values Description Here you can indicate that the print job requires a front cov- er. When the setting is enabled the corresponding setting [Media] becomes enabled. [Cover] [Front] [Media] When the setting [Front] is enabled, you can select a media from the media catalog.
- Page 294 Description of the DocBox job settings Setting Values Description [Fit to page] You can select a media size for the output that differs from the media size of the original. When the [Fit to page] setting is enabled, the system scales the original in such a way that [Zoom] the image fits on the selected media size of the output.
- Page 295 Description of the DocBox job settings Setting Values Description [Margin shift] Use this setting to increase or decrease the margin. By de- fault, the values of the front side and the back side are inter- locked. This means that the values for the front side and the [Shift] back side remain identical.
- Page 296 Description of the DocBox job settings Setting Values Description [Output loca- Select the output location for the print job. Depending on the tion] settings for your print job, the machine automatically sug- gests the preferred output location for your job. However, [Print delivery] you can manually overrule this suggestion.
- Page 297 Description of the DocBox job settings Setting Values Description [Advanced set- tings] -> [Sheet orientation] [Print delivery] [Header up LEF] Deliver the prints with the header on top side and in portrait position (vertical). [Header up SEF] Deliver the prints with the header on top side and in land- scape position (horizontal).
- Page 298 Description of the DocBox job settings Setting Values Description [Color/Black & Here you can view if the job is printed in [Color] or in [Black white] and white]. [Black and If using color, the following options are available for jobs. white] •...
- Page 299 Description of the DocBox job settings Setting Values Description [Binding] [None] Here you can define the required number of staples. Further- more you can define where you want the staples with the [Location] option. The available locations for the 1 staple option: [1 staple] •...
-
Page 300: Edit A Job In A Docbox
Edit a job in a DocBox Edit a job in a DocBox Introduction In addition to editing job settings, the optional page programming function allows you to add pages to a job. For example, you can add covers, inserts, and separator sheets. Furthermore, you can use the optional page programming function to set media and finishing settings for each page and subset. -
Page 301: Combine Jobs In A Docbox (Build Function)
Combine jobs in a DocBox (build function) Combine jobs in a DocBox (build function) Introduction You can combine a job in a DocBox with other jobs from the same DocBox. The system creates a new job from the selected jobs. The icon indicates a built job. -
Page 302: Split A Combined Job In The Docbox
Split a combined job in the DocBox Split a combined job in the DocBox Introduction You can split a combined job in the DocBox into the original separate jobs. Then the system restores the jobs with their original settings and status. You cannot split a combined job in the list of Waiting jobs. -
Page 303: Lock A Job In A Docbox
Lock a job in a DocBox Lock a job in a DocBox Introduction The DocBox allows you to lock the settings of your jobs. Advantages: • Settings cannot be changed accidentally. • The job is always printed exactly the same. Illustration [72] Select [Lock]. -
Page 304: Unlock A Job In A Docbox
Unlock a job in a DocBox Unlock a job in a DocBox Introduction Unlocking a job can be required if you want to split a locked, combined job into the original jobs, for example. Illustration [73] Select [Unlock]. Procedure On the control panel, touch [Jobs] -> [DocBox]. Touch the DocBox that contains the job you want to unlock. -
Page 305: Move A Job From One Docbox To Another
Move a job from one DocBox to another Move a job from one DocBox to another Illustration [74] Move a DocBox job Procedure On the control panel, touch [Jobs] -> [DocBox]. Touch the DocBox button that contains the job you want to move. Touch the job you want to move. -
Page 306: Print The Jobs In A Docbox
Print the jobs in a DocBox Print the jobs in a DocBox Print a non-urgent job from the DocBox Introduction You can print jobs from the DocBox in two ways: • Without urgency The system sends the print job to the bottom of the list of [Scheduled jobs]. •... -
Page 307: Print An Urgent Job From The Docbox Immediately
Print an urgent job from the DocBox immediately Print an urgent job from the DocBox immediately Introduction You can print jobs from the DocBox in two ways: • Without urgency The system sends the print job to the bottom of the list of [Scheduled jobs]. •... -
Page 308: Select And Print Multiple Jobs From The Docbox
Select and print multiple jobs from the DocBox Select and print multiple jobs from the DocBox Introduction When you want to print one job in a DocBox, select and print that job. However, you can also select multiple jobs at a time. The table below shows the available options. Select multiple jobs Jobs Description... - Page 309 Select and print multiple jobs from the DocBox Procedure On the control panel, touch [Jobs] -> [DocBox]. Touch the DocBox that contains the jobs you want to print. Touch the [Select] button. From the drop-down menu, select the required option. Press [Print].
- Page 310 Select and print multiple jobs from the DocBox Chapter 11 - Use the DocBox (optional)
-
Page 311: Chapter 12 Accounting
Chapter 12 Accounting... -
Page 312: The Accounting Related Settings In The Settings Editor
The accounting related settings in the Settings Editor The accounting related settings in the Settings Editor Description The table below describes the available accounting related settings in the Settings Editor (navigate to [Configuration] -> [Accounting]). The accounting related settings Setting Description [Save account log files] You can save the account log files to a location on your... -
Page 313: Account Id File
Account ID file Account ID file Introduction All account related information, such as account IDs and account names, is stored in an account ID file ('accid.csv'). You can download this file via the Settings Editor to add, edit or delete account information. -
Page 314: The Account Log File
The account log file The account log file The Name of an Account Log File An account log file has the following name format: <serialnumber><yyyy><mm><dd><extension>, for example 012345678920120115.CSV. Item Description <serialnumber> The serial number of the device. This number is a text string with a maximum length of 10 characters (A-Z, a-z, 0-9). - Page 315 The account log file Field name Specification Description <jobid> A number The PRISMAsync controller creates a unique job identification number when: • A new print job is received • A new copy or scan job is started • An existing job is started from the mailbox •...
- Page 316 The account log file Field name Specification Description <starttime> <hh>:<mm>:<ss> The time on which the printer started printing the job. Typically, this is the first moment that a job can NOTE be interrupted or stopped via the control panel. When you open the file in Microsoft®...
- Page 317 The account log file Field name Specification Description <accountid> A text string with a max- The account ID as defined in the [Account ID] field imum length of 40 char- of the [Account] tab of the printer driver, or on the acters control panel, or in the attribute 'accountid' in an OJT, for example.
- Page 318 The account log file Field name Specification Description <nofsim- A number The number of 1-sided sheets of a certain paper plex>(1-16)* type used in a job. <nofdu- A number The number of 2-sided sheets of a certain paper plex>(1-16)* type used in a job. <mediafor- A text string with a max- The media size used for the job.
- Page 319 The account log file Field name Specification Description <nofbooklets> A number The number of booklets in a job. <nofbinds> A number The number of bound sets in a job. NOTE * All fields that contain (1-16) will be included 16 times in an account log file. Each number refers to the type of media (1 up to 16) that is used.
-
Page 320: Save An Account Log File
Save an account log file Save an account log file Procedure In the Settings Editor, click [Configuration] -> [Accounting]. Click [Save account log files]. Click the link to the required file, then click [Save]. Browse to the location where you want to save the file, then click [Save]. Chapter 12 - Accounting... -
Page 321: Enter An Account Id Into The Printer Driver
Enter an account ID into the printer driver Enter an account ID into the printer driver Before you begin To use the accounting function in the printer driver the [Enable accounting] setting in the [Properties] of the printer driver must be enabled. ®... - Page 322 Enter an account ID into the printer driver Chapter 12 - Accounting...
-
Page 323: Chapter 13 Add Toner And Staples
Chapter 13 Add toner and staples... -
Page 324: Toner
Toner Toner Check the status of the toner reservoir and waste toner container Introduction You can check the status of the toner reservoirs in the dashboard and in the [System] view. The icons in the following table indicate the status of the toner reservoir. This section gives an overview of the possible toner statuses. - Page 325 Check the status of the toner reservoir and waste toner container Illustration [76] The location of the toner icons (left-side of the main window) Procedure On the operator panel, touch the button for the [System] view. Press [Printer]. The [Toner] section displays the toner and waste toner icons. The color of the toner icon indicates the current filling level of the toner reservoir.
-
Page 326: Replacing The Toner Cartridge
• Be careful of counterfeit toner cartridges. Please be aware that there are counterfeit Canon toner cartridges in the marketplace. Use of counterfeit toner cartridge may result in poor print quality or machine performance. Canon is not responsible for any malfunction, accident or damage caused by the use of counterfeit toner cartridge. - Page 327 Replacing the toner cartridge Genuine Supplies Canon has developed and manufactured Toner, Parts, and Supplies specifically for use in this machine. For optimal print quality and for optimal machine performance and productivity, we recommend that you use Genuine Canon Toner, Parts, and Supplies. Contact your Canon Authorized Dealer or Service Provider for Genuine Canon Supplies.
- Page 328 Replacing the toner cartridge WARNING Do not burn or throw used toner cartridges into open flames, as this may cause the toner remaining inside the cartridge to ignite, resulting in burns or a fire. IMPORTANT Do not touch the tip of the toner cartridge or subject it to shock by hitting it. Doing so may cause the toner cartridge to leak.
- Page 329 Replacing the toner cartridge IMPORTANT When replacing toner cartridges, make sure that the color of the toner cartridge matches the color of the toner supply port. If the color is different, the toner cartridge will not fit into the port. Close the inner toner replacement cover.
-
Page 330: Replacing The Waste Toner Container
Replacing the waste toner container Replacing the waste toner container Introduction This section describes how to replace the waste toner container when this container becomes full. You can print for a while even if you do not replace the waste toner container immediately. (The number of sheets may differ depending on the contents to print.) If you continue to print, an error occurs and you cannot continue printing. - Page 331 Replacing the waste toner container CAUTION When removing the waste toner container, be careful not to tilt it, as the toner may spill and get onto your hands or clothing. If toner gets onto your hands or clothing, wash them immediately with cold water.
-
Page 332: Staples
Staples Staples Check the status of the staple cartridges Introduction The following output locations contain staple cartridges to staple your jobs. • The stacker/stapler • The finisher. When all the staple cartridges are sufficiently filled, the staple icon in the dashboard is blue. When the staple icon in the dashboard is orange or red, one of the staple cartridges is empty or almost empty. - Page 333 Check the status of the staple cartridges Illustration [77] The location of the staple icons (right-side of the main window) Procedure Check the staple icon in the dashboard. When the staple icon is orange or red, go to the [Printer] section of the [System] view to check which staple cartridge must be refilled.
-
Page 334: Replacing The Staple Cartridge In The Stapler Unit
Replacing the staple cartridge in the stapler unit Replacing the staple cartridge in the stapler unit Introduction This section describes the procedure for replacing the staple cartridge in the optional Finisher- AJ1 or Saddle Finisher-AJ2. IMPORTANT Take care when handling the optional equipment that is attached to the machine. When an optional unit's cover is opened to replace a staple cartridge, discard punch waste, or clear paper or staple jams, prints may still be output if other optional units are operating normally, and are not involved in the paper or staple jam removal procedure. - Page 335 Replacing the staple cartridge in the stapler unit Insert the new staple cartridge. IMPORTANT Use only staple cartridges intended for use in this machine. NOTE Only one staple cartridge can be inserted at a time. Gently push the staple case into the stapler unit, until it is securely in place. Always make sure to insert the staple case as far as it can go.
- Page 336 Replacing the staple cartridge in the stapler unit CAUTION When discarding the staple waste, be careful not to touch the staple waste. Doing so may result in personal injury. Return the staple waste tray to its original position. Close the front cover of the finisher. CAUTION When closing the front cover of the finisher, be careful not to get your fingers caught, as this may result in personal injury.
-
Page 337: Replacing The Staple Cartridge In The Saddle Stitcher Unit
Replacing the staple cartridge in the saddle stitcher unit Replacing the staple cartridge in the saddle stitcher unit Introduction This section describes how to replace the staple cartridge of the saddle stitcher. IMPORTANT • Take care when handling the optional equipment that is attached to the machine. When an optional unit's cover is opened to replace a staple cartridge, discard punch waste, or clear paper or staple jams, prints may still be output if other optional units are operating normally, and are not involved in the paper or staple jam removal procedure. - Page 338 Replacing the staple cartridge in the saddle stitcher unit Open the staple case cover by pressing the area indicated in the illustration. Hold the staple case cover by its left and right sides, and then lift it and slide it off. Lift and pull out the empty staple cartridge.
- Page 339 Replacing the staple cartridge in the saddle stitcher unit Return the staple case to its original position. When returning the staple case, always make sure that the staple case is inserted until the arrows are aligned as shown in the diagram. IMPORTANT Follow steps 3 to 8 to replace the other staple cartridge in the saddle stitcher unit.
- Page 340 Replacing the staple cartridge in the saddle stitcher unit CAUTION When returning the saddle stitcher unit to its original position, be careful not to get your fingers caught, as this may result in personal injury. Close the front cover of the finisher. CAUTION When closing the front cover of the finisher, be careful not to get your fingers caught, as this may result in personal injury.
-
Page 341: Maintenance And Print Quality
Chapter 14 Maintenance and print quality... -
Page 342: Maintenance And Counters
Maintenance and counters Maintenance and counters Introduction to the [Maintenance] section Introduction The maintenance section consists of the following two subsections. • [Maintenance]. • [Counters] In the maintenance subsection, you can: • Access maintenance procedures • Enter the service mode •... -
Page 343: Auto Color Mismatch Correction
[Auto color mismatch correction] [Auto color mismatch correction] Introduction You can automatically correct color mismatching that occurs in the output. The [Auto color mismatch correction] aligns the position of the four different colors. NOTE Automatic color mismatch correction cannot be performed during printing. Procedure Touch [System] ->... -
Page 344: Clean The Roller (Main Unit)
Clean the roller (main unit) Clean the roller (main unit) Introduction If dirt or streaks appear on printed output, clean the roller inside of the main unit. NOTE • It takes approximately one minute to clean the roller. • Roller cleaning cannot be performed during printing. Procedure Touch [System] ->... -
Page 345: Clean The Wire
Clean the wire Clean the wire Introduction If streaks appear on printed output or parts of the printed image are missing, clean the corona assembly wires inside the main unit. NOTE • It takes approximately 35 seconds to clean the wires. •... -
Page 346: Clean The Automatic Document Feeder Rollers
Clean the automatic document feeder rollers Clean the automatic document feeder rollers Introduction If your originals have black streaks or appear dirty after scanning them through the feeder, clean the rollers of the feeder. NOTE • It takes approximately 20 seconds to clean the feeder. •... -
Page 347: Refresh The Fixing Roller
[Refresh the fixing roller] [Refresh the fixing roller] Introduction When paper with a longer width is used after copying or printing 100 or more sheets of paper with a shorter width (for example, when you use A3 paper after A4R paper), luster streak may appear on both edges in the feeding direction. -
Page 348: Engine Maintenance (Trained Operators)
Engine maintenance (trained operators) Engine maintenance (trained operators) Introduction Only operators that are specially trained in engine maintenance are allowed to perform engine maintenance. Before you can perform engine maintenance tasks you have to put the engine into the engine maintenance mode. IMPORTANT Make sure you are specially trained in engine maintenance for this product to prevent major damage. -
Page 349: Remote Service
Remote Service Remote Service Introduction NOTE Remote Service requires a license. Remote Service also requires permission to a printer dealer site outside the customer domain, either through a proxy server or IP white list. Contact your local IT specialist to give you the permission. Remote Service is an application that runs on a printer or a separate server in the customer's network. -
Page 350: Reset The Day Counters
Reset the day counters Reset the day counters Introduction The [Maintenance] section of the [System] view displays 2 types of counters • [Billing counters] • [Day counters] These counters provide information about the number of sheets that have been printed. This section first describes the 2 counters in the [Maintenance] section and how to reset the day counters. -
Page 351: Find The Meter Readings (Counters)
Find the meter readings (counters) Find the meter readings (counters) Introduction The [Printer] section of the [System] view displays 2 types of counters. • The billing counters provide information about the number of sheets that have been printed since the printer was installed. You cannot reset the billing counters. •... -
Page 352: Print The Billing Counters Report
Print the billing counters report Print the billing counters report Introduction You can print a report that contains all figures of the configured billing counters. The language of the billing counters report is the same as the selected language for the system. Procedure Touch [System] ->... -
Page 353: Ensure High Print Quality
Ensure high print quality Ensure high print quality About calibration Calibration is very important in keeping the print quality high for color reproduction. The environment of your print system influences the print quality. A constant temperature and humidity are essential for consistent color output. PRISMAsync automatically keeps the print quality as high as possible. - Page 354 To find the media for printer calibration in the Settings Editor: [Preferences] -> [Print job defaults] -> [Calibration media]. Media for the printer calibration • Canon CS-814 81.4 g/m² • Océ Top Colour FSC 100 g/m² • Mondi Neusiedler 100 g/m²...
-
Page 355: Calibrate The Printer
Calibrate the printer Calibrate the printer Calibrate the printer when you see the calibration indicator on the right-hand side of the About calibration on page dashboard. (See 353) IMPORTANT You are strongly advised to perform a daily printer calibration. Tools Eye-One spectrophotometer Before you begin Media for calibration... -
Page 356: Calibrate A Media Family
Calibrate a media family Calibrate a media family Calibrate a media family in the following situations: • After the installation of the print system, for the default coated and uncoated media families. • When a new media family is created. •... -
Page 357: Apply Manually Adjusted Cmyk Curves To All Jobs
Apply manually adjusted CMYK curves to all jobs Apply manually adjusted CMYK curves to all jobs Introduction Manual adjustment of CMYK curves for all jobs is system level. System-level CMYK curves are added to the CMYK curves for media family calibration. IMPORTANT This adjustment applies to all files that use the media family/halftone combination. -
Page 358: Apply Manually Adjusted Cmyk Curves To A Single Job
Apply manually adjusted CMYK curves to a single job Apply manually adjusted CMYK curves to a single job Introduction Manual adjustment of CMYK curves for a single job is on the job level. Job-level CMYK curves are added to the CMYK curves for media family calibration and system-level CMYK curves. Procedure Calibrate the printer. -
Page 359: Density Not Within Required Range Message
Density not within required range message Density not within required range message Introduction In exceptional cases, the [Shading correction] procedure fails with a 'Density not within required range' message. In that case, follow the next procedure. Procedure At [System] -> [Color adjustment] -> [Printer calibration details]: Select [Auto gradation adjustment]. -
Page 360: Problem Solving
Problem Solving Problem Solving Problems occur due to a print system or a job handling problem. Below you can find an overview of solutions for problems that can occur. Problem Solution Similar colors for text and color Perform a media calibration for all halftones. Calibrate a media family on page panes in the source document (See... -
Page 361: Chapter 15 Specifications
Chapter 15 Specifications... -
Page 362: Specifications
Specifications Specifications Technology Specification Value Imaging technology Electrophotography; no fusing oil Toner V-toner Resolution 1,200 x 1,200 dpi Color gradations 256 per color Color depth 8 bits per color Maximum imageable area 323 x 482.7 mm / 12.72" x 19" Features •... - Page 363 Specifications Specification Value imagePRESS C6010S 60 - 135 g/m² 61.7 ppm 16 lb bond - 36 lb bond 136 - 220 g/m² 53.6 ppm 37 lb bond - 81 lb cover 221 - 325 g/m² 41.2 ppm 82 lb cover - 120 lb cover 60 - 135 g/m²...
- Page 364 Specifications PRISMAsync Specification Value Description Integrated high-performance PRISMAsync color controller for im- agePRESS C7010VPS series Operating system Windows 7 Processor ® Intel Core™ Memory 16 GB Hard disk 3 x 3.5" SATA II, 250 GB, 7200 RPM Interface Ethernet (10/100/1000 Base-T), TCP/IP (LPR /LPD, 9100 Socket, SMB), Static IP / Auto-IP (DHCP) Page Description Language Adobe PostScript 3 (3020), PDF 1.7 Extension level 3, PDF/X, Opti- mized PostScript, Optimized PDF, Adobe PDF Print Engine 3.4...
- Page 365 Specifications General Specification Value Device memory (SDRAM) 1.5 GB Operation 15" full color touch screen operating panel Hard disk 2 x 80 GB (scanning) Warm-up time 7 minutes Front-to-back registration + / - 0.5 mm, Active registration, Automatic shrinkage compensa- tolerance tion See for details: Note...
- Page 366 Specifications Paper handling Specification Value Paper trays Two standard paper trays Options: Left-hand paper module, Right-hand paper module, Bulk paper module, Special feeder Maximum paper capacity 10,000 sheets from 2 standard paper trays and 6 paper trays of pa- per input modules (80 g/m² / 22 lb bond) Paper weight 60 - 325 g/m²...
- Page 367 Specifications Specification Value Dimensions (WxDxH) Left-hand paper module: 982 mm x 792 mm x 1095 mm / 38.66" x 31.18" x 43.11" Right-hand paper module: 811 mm x 792 mm x 1,095 mm / 32" x 31.18" x 43.11" Weight 250 kg / 551 lb 480 kg / 1,058 lb for tandem of first and second paper module Power requirement...
- Page 368 Specifications Specification Value Paper size A3R, A4R, A4, B4R, B5R, B5, A5R, SRA3, 11" x 17", LGLS, LTRL, LTRS, STMTS, 12" x 18", 13" x 19", Exec Custom sizes: 139.7 mm x 182 mm - 330.2 mm x 487.7 mm / 5.5" x 7.17"...
- Page 369 Specifications Specification Value Original size • A3, B4, A4, A4R, B5, B5R, A5 or Foolscap A5 originals cannot be placed horizontally (A5R). • 11" x 17", LGL, LTR, LTRR, STMT, or 8" x 13" STMT originals cannot be placed horizontally (STMTR). •...
- Page 370 Specifications Specification Value Dimensions (WxDxH) 800 mm x 792 mm x 1,180 mm / 31.5" x 31.18" x 46,46" 890 mm x 792 mm x 1,180 mm / 35.01" x 31.18" x 46,46" when Ex- pansion tray is attached Weight 130 kg / 287 lb Power consumption Maximum Power Consumption: 450 W...
- Page 371 Specifications Specification Value Media Uncoated paper (60 - 300 g/m² / 16 lb bond - 110 lb cover), Coated paper (80 - 300 g/m² / 22 lb bond - 110 lb cover), Recycled paper, Colored paper, Prepunched paper, Embossed paper, Vellum, Bond paper Paper weight 60 - 300 g/m²...
- Page 372 Specifications Specification Value Trim capacity Uncoated paper: 60 - 80 g/m² / 16 lb bond - 22 lb bond: 25 sheets (50 sheets by half-fold) * 80.1 - 105 g/m² / 23 lb bond - 28 lb bond: 15 sheets (30 sheets by half-fold) * 105.1 - 209 g/m²...
- Page 373 Specifications Specification Value Hole diameter 6.5 mm / 0.26" Option for Finisher-AJ1 or Saddle Finisher-AJ2 Puncher (Professional Puncher-B1; Professional Puncher Integration Unit-C1) Specifications Value Description Die punching with 12 interchangeable dies for plastic comb-, twin loop-, color coil-, pro click-, velo- and ring binding Paper weight Uncoated paper: 75 - 216 g/m²...
-
Page 374: Settings Editor Specifications
Settings Editor specifications Settings Editor specifications URL to access the Settings Editor http://<printername or IP address> https://<printername or IP address> Recommended resolution of your Minimum 640 x 480 pixels computer screen Supported web browsers • Microsoft ® ® Internet Explorer 8 and higher •... -
Page 375: Chapter 16 Third-Party Software
Chapter 16 Third-Party Software... -
Page 376: Third Party Software
DELIVERED WITH THE PRODUCT AND ALL UPDATED VERSIONS OF THE THIRD PARTY SOFTWARE PROVIDED UNDER MAINTENANCE AGREEMENTS OR OTHER SERVICE ARRANGEMENTS FOR THE PRODUCT WITH CANON USA OR CANON CANADA OR THEIR RESPECTIVE AUTHORIZED SERVICE ORGANIZATIONS. Chapter 16 - Third-Party Software... -
Page 377: The Software Subjected To The Other Conditions
The Software Subjected to the Other Conditions The Software Subjected to the Other Conditions Please refer to Table of Software and respective License terms below, for more detail and corresponding license conditions. Table of Software Names of Software License - Terms and Conditions of the License FPU Emulation code The BSD License FPU Emulation code on page 378... -
Page 378: Fpu Emulation Code
FPU Emulation code FPU Emulation code * Copyright © 1992, 1993 * The Regents of the University of California. All rights reserved. * This code is derived from software contributed to Berkeley by * Ralph Campbell. * Redistribution and use in source and binary forms, with or without * modification, are permitted provided that the following conditions * are met: * 1. -
Page 379: J2Me
J2ME J2ME a. Restriction. Software is confidential copyrighted information of Canon and title to all copies is retained by Canon and/or its licensors. Software shall not be modified, decompiled, disassembled, decrypted, extracted, or otherwise reverse engineered. Software may not be leased, assigned, or sublicensed, in whole or in part. -
Page 380: Library For Sde Compiler
Library for SDE Compiler Library for SDE Compiler * 1/4 University of California, Berkeley Copyright © 1990 The Regents of the University of California. All rights reserved. Redistribution and use in source and binary forms are permitted provided that the above copyright notice and this paragraph are duplicated in all such forms and that any documentation, advertising materials, and other materials related to such distribution and use acknowledge that the software was developed... - Page 381 Library for SDE Compiler copyright. Copyright © 1994, 1997 Cygnus Solutions. All rights reserved. Redistribution and use in source and binary forms are permitted provided that the above copyright notice and this paragraph are duplicated in all such forms and that any documentation, advertising materials, and other materials related to such distribution and use acknowledge that the software was developed at Cygnus Solutions.
- Page 382 Library for SDE Compiler Chapter 16 - Third-Party Software...
-
Page 383: Index
Index Index Delete.............. Edit..............1-Sided printing............ Restore default..........Automated workflows Attributes............Explanation.............198 2-Sided printing............ Automatic Document Feeder.......240 Location............Main parts............26 Access other functions during copy job or scan Available documentation........14 job................Account ID file Content............313 Basic copy............. Account log file Billing counters..........350, Description of the data records.....314... - Page 384 Index Margin shift............ Link speed and connection type..... Media.............. MAC address............ Number of sets..........184 Primary DNS suffix.......... Offset stacking..........196 Subnet mask.............88 Output location..........196 TCP/P..............Print order............196 Test TCP/IP connection........Rotation............196 Contradiction handling........Separator sheets..........Controller Settings for covers......... Concept............. Sheet order............. Turn on..............44 Sheet...
- Page 385 Index List of Scheduled jobs........Finishing options List of Waiting jobs........Overview............32 New jobs............Fixing roller............One by one............. Fixing Station Printed jobs.............175 Location............Delete Main parts............19 Automated workflow........Fusing unit Deskew..............Location............DHCP................88 Main parts............19 Disable Warning time............85 DNS suffix follows domain........88 Glass plate.............244...
- Page 386 Index other printer............182 feeder............138 Job name Trays view............98 Truncate............Lock settings in DocBox........303 Job settings Logging DocBox............291 Printing the Configuration Report....Hotfolder............Save the datadump file........88 status..............73 Save the zipped log file........Job status icons............73 Low power mode............42 Job ticket............... Job window File settings.............273...
- Page 387 Index Sleep mode............42 Power supply unit Océ PRISMAprepare Location............Concept............. Main parts............19 Offset stacking............Power switch............42 Changes in the Properties window....187 Primary DNS suffix..........88 Every N sets............196 Print a job from USB drive........180 Types...............187 Print a scheduled job later........Operator attention light Print an urgent job Description............31 DocBox............307...
- Page 388 Index Proof..............Minimize............Punch unit Zoom............... Location............18, Scan job Punch waste........... Automated settings........270 Punch waste tray............ File settings.............273 Punch waste............152 Optimize scan quality........Check...............151 Original settings..........Puncher Unit-BB1 Types of settings..........Location............Scan profiles file Puncher..............Download............264 Location............Edit..............Records............
- Page 389 Index Load media............. Tab Feeding Attachment-C1 Location............Location............Specifications paper trays........Main parts............24 Split print jobs..........178, TCP/P............... Spot color..............61 Templates Spot color library............60 Copy............247, Stack Bypass-A1............. Scan............247, Location............Temporary media......... 101, Stacker..............17 Test remote connection........Stacker/stapler Test TCP/IP connection.......... Location............
- Page 390 Index Unassign..............Unlock settings in DocBox........304 Urgent job............. Urgent jobs DocBox............307 USB drive Print job............180 Save a file to another location...... Version of printer software........88 View Maintenance view.......... Warning time Disable.............. Waste toner container..........324 Replace............330 Waste toner tray Location............Wire cleaning............Workflow profiles Check and print..........
- Page 391 6390 Dixie Road Mississauga, Ontario L5T 1P7, Canada CANON EUROPA N.V. Bovenkerkerweg 59, 1185 XB Amstelveen, The Netherlands (See http://www.canon-europe.com/ for details on your regional dealer) CANON LATIN AMERICA, INC. 703 Waterford Way Suite 400 Miami, Florida 33126 U.S.A. CANON AUSTRALIA PTY. LTD 1 Thomas Holt Drive, North Ryde, Sydney, N.S.W.
Need help?
Do you have a question about the IMAGEPRESS C7011VPS SERIES and is the answer not in the manual?
Questions and answers