
Related Manuals for Beckman Coulter CytoFLEX SRT


Summary of Contents for Beckman Coulter CytoFLEX SRT
- Page 1 Instructions for Use CytoFLEX SRT Cell Sorter For Research Use Only. Not for use in diagnostic procedures. C37808AC March 2022 Beckman Coulter, Inc. 250 S. Kraemer Blvd. Brea, CA 92821 U.S.A.
- Page 2 • In the UK, call us at +44 845 600 1345. • In Ireland, call us at +353 (01) 4073082. • In Italy, call us at +39 0295392 456. • In other locales, contact your local Beckman Coulter Representative. May be covered by one or more pat.-see www.beckman.com/patents...
-
Page 3: Revision History
This document applies to the latest software listed and higher versions. When a subsequent software version affects the information in this document, a new issue will be released to the Beckman Coulter Web site. For labeling updates, go to www.beckman.com and download the latest version of the manual or system help for your instrument. - Page 4 This document applies to the latest software listed and higher versions. When a subsequent software version affects the information in this document, a new issue will be released to the Beckman Coulter Web site. For labeling updates, go to www.beckman.com and download the latest version of the manual or system help for your instrument.
- Page 5 This document applies to the latest software listed and higher versions. When a subsequent software version affects the information in this document, a new issue will be released to the Beckman Coulter Web site. For labeling updates, go to www.beckman.com and download the latest version of the manual or system help for your instrument.
- Page 6 This document applies to the latest software listed and higher versions. When a subsequent software version affects the information in this document, a new issue will be released to the Beckman Coulter Web site. For labeling updates, go to www.beckman.com and download the latest version of the manual or system help for your instrument.
-
Page 7: Safety Notices
Beckman Coulter, Inc. urges its customers to comply with all national health and safety standards such as the use of barrier protection. This may include, but it is not limited to, protective eyewear, gloves, and suitable laboratory attire when operating or maintaining this or any other automated laboratory analyzer. -
Page 8: Safety Precautions
• This equipment is used in a manner other than specified. Operate the instrument as instructed in the Product Manuals. • You introduce software that is not authorized by Beckman Coulter into your computer. Only operate your system's computer with software authorized by Beckman Coulter. -
Page 9: Instrument Safety Precautions
Safety Notices Instrument Safety Precautions CAUTION If you purchased this product from anyone other than Beckman Coulter or an authorized Beckman Coulter distributor, and it is not presently under a Beckman Coulter service maintenance agreement, Beckman Coulter cannot guarantee that... - Page 10 BSL Level II or higher. This information will be kept confidential and will be used to inform Beckman Coulter Field Service Representatives of any hazards prior to visiting any instrument site. Failure to report this information may delay service on an instrument. Safety of the user as well as safety of Beckman Coulter employees is of overriding importance.
-
Page 11: Electrical Safety
Safety Notices Instrument Safety Precautions For additional information on laboratory biosafety, please review the U.S. Department of Health and Human Services, Centers for Disease Control document, Biosafety in Microbiological and Biomedical Laboratories. Contact the safety officer at your site and discuss proper waste disposal precautions and practices. -
Page 12: Deflection Plates
Safety Notices Instrument Safety Precautions Deflection Plates CAUTION Risk of personal injury. Do not touch the charged plates when power is applied. The range of voltage applied to these plates is ±3800 ~ ±4200 Vdc. This high voltage is present only when the plate voltage is turned on and the interlock is closed. - Page 13 In addition, other equipment can radiate RF energy to which this device is sensitive. If one suspects interference between this device and other equipment, Beckman Coulter recommends the following actions to correct the interference: 1. Evaluate the electromagnetic environment before installation/operation of this device.
- Page 14 European Union. For products under the requirement of WEEE directive, please contact your dealer or local Beckman Coulter office for the proper decontamination information and take-back program which will facilitate the proper collection, treatment, recovery, recycling, and safe disposal of device.
- Page 15 Safety Notices Symbol Explanations Symbol Warning Condition Action Laser Class I This label indicates that this product is a Class I Laser product. Take precautions to prevent CLASS 1 LASER PRODUC CLASS 1 LASER PRODUCT PRODUIT LASER CLASSE 1 exposure. Consider all materials Wear standard laboratory attire and follow safe (specimens, controls,...
-
Page 16: Table Of Contents
Contents Revision History, iii Safety Notices, vii Alerts for Warning, and Caution, vii Safety Precautions, viii Instrument Safety Precautions, ix General Safety, ix Biohazard Safety, x Electrical Safety, xi Safety Interlocks, xi Stream Charge, xi Drop Drive Voltage, xi Deflection Plates, xii Deflection Plate Arcing, xii... - Page 17 Contents Optical Components, 1-16 Laser Beam Shaping, 1-17 Cell Illumination, 1-17 Forward Scatter, 1-17 Side Scatter and Fluorescent Light, 1-17 Forward Scatter Collection, 1-18 Side Scatter and Fluorescent Light Collection, 1-18 Side Scatter, 1-18 Fluorescent Light, 1-18 Wavelength Division Multiplexer (WDM), 1-19 Optical Fiber, 1-22...
- Page 18 Contents Analysis Screen, 2-11 Compensation Experiment Screen, 2-12 QC Experiment Screen, 2-14 QC Report Screen, 2-14 QC Experiment Screen, 2-15 QC Screen Navigation, 2-15 Software Menu, 2-16 Acquisition and Analysis Screen Menu, 2-17 User Management, 2-21 Creating, Deleting, and Modifying Users in User Manager, 2-23 Unlocking a User Account, 2-25...
- Page 19 Contents System Startup Program, 3-8 Selecting Experiments from the Start Page, 3-18 CHAPTER 4: Instrument Quality Control and Standardization, 4-1 Overview, 4-1 Quality Control, 4-2 Preparing the QC Sample, 4-3 Required Materials, 4-3 CytoFLEX Daily QC Fluorospheres Preparation Process, 4-3 CytoFLEX Ready to Use Daily QC Fluorospheres Preparation Process, 4-4 Importing Lot-Specific Target...
- Page 20 Contents Setting Plot Display Conditions, 5-49 Setting Customized Parameters, 5-50 Setting Custom Statistics, 5-51 Load Sample and Record Data, 5-55 Before Running Samples, 5-55 Setting Up Violet Side Scatter (VSSC) Channel, 5-56 Verifying, Selecting, Editing, and Creating Detector Configuration, 5-60 Sampling and Collecting Data, 5-63 Sorting, 5-67...
- Page 21 Contents Adjusting Compensation, 6-13 Manually Adjusting Compensation, 6-13 Importing and Exporting Compensation, 6-13 Importing Compensation Settings from Compensation Matrix Files, 6-13 Importing Compensation Settings from the Compensation Library, 6-15 Exporting Compensation Settings, 6-16 Managing the Compensation Library, 6-18 Adding Channels for Compensation, 6-19 CHAPTER 7: Data...
- Page 22 Contents Troubleshooting Table, 9-9 Backup and Restore, 9-55 Backup, 9-55 Restore, 9-59 Cleanup, 9-62 CHAPTER 10: Cleaning Procedures, 10-1 Overview, 10-1 Routine Cleaning, 10-1 Daily Clean Program, 10-2 Flow Cell Clean Program, 10-7 Aseptic Clean Program, 10-22 Cleaning the Side Stream Illumination Source and the Deflection Plates, 10-35 Cleaning the Nozzle, 10-38...
- Page 23 Contents APPENDIX A: Approved Cleaners and Disinfectants, A-1 Overview, A-1 Cleaners, A-1 Disinfectants for Use in the Sample Line, A-1 Disinfectants for Use in the Sheath Line, A-2 Disinfectants for Use in the Waste Container, A-2 Sheath Tank, A-3 Deflection Plate Cleaning Materials, A-3 APPENDIX B: Consumables, B-1...
- Page 24 Viewing Windows Security Logs, E-106 Enabling Installation Restriction, E-107 Enabling Firewall Defender, E-110 Enabling Network Time Protocol, E-112 APPENDIX F: Table of Hazardous Substances, F-1 Table of Hazardous Substances, F-1 Abbreviations Beckman Coulter, Inc. SOFTWARE END-USER LICENSE AGREEMENT Related Documents...
- Page 25 Illustrations Illustrations Sort Overview Diagram, 1-3 Main Components, 1-4 Fluidic Flow, 1-5 Fluidics Cart, 1-6 Fluidics Cart (Back), 1-7 Fluidics Cart Connection Panel, 1-8 Connector Color Convention, 1-9 Sheath Tank, 1-10 Shutdown Fluid Container, 1-11 1.10 Waste Container, 1-12 1.11 Interconnections on the Right Side of Sorter, 1-13 1.12...
- Page 26 Illustrations 1.33 Aerosol Evacuation Vents, 1-35 1.34 Power and Signal Cable Connections, 1-37 1.35 Power and Signal Cable Connections [Waster Container inside Biosafety Cabinet], 1-38 1.36 Fluid Harness Connections, 1-39 1.37 Overview of Sorter Connections, 1-39 Drawing Controls Toolbar (Top of Screen), 2-11 QC Report Screen, 2-14...
- Page 27 Illustrations Laser Setting Window, 5-41 [Two 5 ml tubes and two 15 ml tubes], 5-67 [Four 5 ml tubes], 5-68 [Standard 96-well plate], 5-74 [96-well deep well plate], 5-74 [Slide], 5-74 [Standard 96-well plate], 5-76 [Slide], 5-76 [Standard 96-Well Plate], 5-82 [Slide], 5-83 [Standard 96-Well Plate], 5-83...
- Page 28 Illustrations 9.10 Pinch Hazard Label on the Sample Station, 9-8 9.11 Pinch Hazard Label on the Sort Chamber, 9-8 11.1 Sheath Fluid Filter and De-bubble Filter, 11-21 11.2 Aseptic Cleaning Solution Filter, 11-34 11.3 Sample Line, 11-70 [Straight Down Mode], 11-96 [Default Mode], 11-96 [Sheath Tank Type...
- Page 29 Tables Tables WDM Optical Filter Mount Color Codes, 1-21 Waste Catcher, 1-28 Temperature Control Setting, 1-34 Sheath Status, 3-7 Waste Status, 3-7 Shutdown Fluid Status, 3-7 Target Power Ranges in the Laser Setting Screen, 5-41 Sort Statistics, 5-102 Additional Information for Plate Sorting, 5-104 Troubleshooting-[Error Codes], 9-10...
-
Page 30: Introduction
The information in your Instructions for Use manual is organized as follows: CHAPTER 1, System Overview Provides information regarding the individual components of the CytoFLEX SRT Sorter and the corresponding functions of these components. CHAPTER 2, Using the CytExpert SRT Software Provides an overview of each aspect of the software’s functions. -
Page 31: Conventions Used
Introduction Conventions Used CHAPTER 5, Sorting Provides instructions for operating the CytoFLEX SRT instrument, including data acquisition, sorting, analyzing, and exporting results, and manually adjusting the compensation during the acquisition and analysis. CHAPTER 6, Compensation Describes how to create a compensation experiment and automatically calculate compensation values after acquiring the single color data. -
Page 32: Graphics
All graphics, including screens and printouts, are for illustration purposes only and must not be used for any other purpose. For example, software screens that show the CytoFLEX SRT system in the background may not depict the latest production version of the system. -
Page 33: System Overview
For Research Use Only. Not for use in diagnostics procedures. The use of data generated by this instrument depends upon the regulatory status of the reagents used. The CytoFLEX SRT Cell Sorter is a research instrument that analyzes and sorts cellular suspensions and other similarly sized particle suspensions. - Page 34 The CytoFLEX SRT Sorter can acquire and analyze up to 15 fluorescence, and two light-scatter parameters for each particle. Additional computed parameters can be created based on collected data.
-
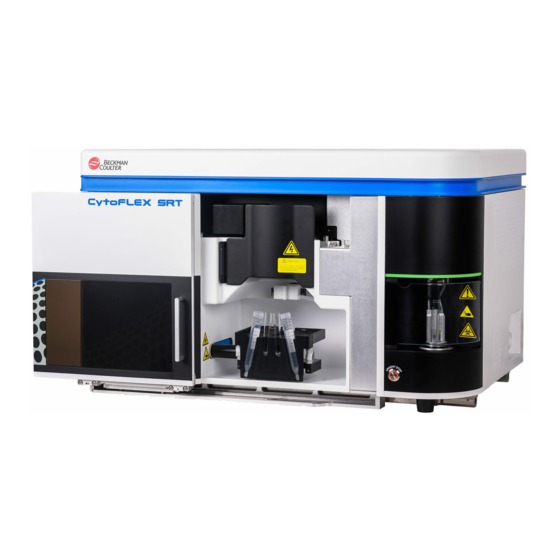
Page 35: Main Components
System Overview Main Components Figure 1.1 Sort Overview Diagram Main Components CAUTION Risk of instrument damage and/or instrument stability. Do not place any unnecessary objects on top of the instrument, as this could cause warping of the top cover or affect the stability of the optical path. However, airfoil is an exception if the instrument is used inside a Biosafety Cabinet. -
Page 36: Main Components
System Overview Main Components Figure 1.2 Main Components 1. Fluidics cart. Accommodates sheath fluid and shutdown fluid as required for operation of the instrument, and collects the waste fluid from the Sorter. 2. Sorter. Provides signal generation and sorting. 3. Workstation. Acquires and analyzes data using the CytExpert SRT software, and displays data generated by the Sorter. -
Page 37: Fluidics System
System Overview Fluidics System Fluidics System The fluidics system helps to transmit the sheath fluid at a stable rate into the flow cell, forming a laminar flow to ensure that the tested particles go through the detection area sequentially. The fluidics system consists of the Sample Station, the fluidics module, and the fluidics cart. -
Page 38: Fluidics Cart
The system accommodates both the rubber pads and the wheels for the fluidics cart. However, the stability of the fluidics cart is critical to the soring performance. Beckman Coulter recommends using the rubber pads for the fluidics cart on a solid and stable surface. - Page 39 System Overview Fluidics System Figure 1.5 Fluidics Cart (Back) 1. Signal cable of sheath tank scale 2. Shutdown fluid tubing 3. Waste fluid tubing 4. Sheath fluid tubing 5. Fluidics cart signal cable 6. Sheath pressure check point (for service) 7.
-
Page 40: Fluidics Cart
9. Sheath fluid filter. Filters particles larger than 0.2 μm. NOTE Beckman Coulter recommends replacing the sheath fluid filter every six months or sooner to ensure system performance. Using unfiltered sheath fluid can shorten the service life of the flow cell and/or nozzle, and increase noise and debris detection. -
Page 41: Sheath Tank
System Overview Fluidics System Figure 1.7 Connector Color Convention 1. Green: shutdown fluid 2. Orange or red: waste fluid 3. White: air tubing 4. Blue: sheath fluid Sheath Tank The sheath tank is an autoclavable, electroplated and stainless-steel tank, with 4-L capacity. Refer Figure 1.8. -
Page 42: Shutdown Fluid Container
System Overview Fluidics System Figure 1.8 Sheath Tank 1. Sheath outlet. Connects the sheath tubing to the sheath filter. 2. Air inlet. Provides pressure to convey the sheath to the flow cell or wash station. 3. Safety valve. Releases the pressure from the tank in case of emergency. 4. -
Page 43: Waste Container
For the shutdown fluid status information, refer to Table 3.3. NOTE Beckman Coulter recommends using CytoFLEX SRT Shutdown fluid to ensure system performance. For instructions on filling the Shutdown Fluid container, refer to Filling the Shutdown Fluid Container CHAPTER 11, Replacement/Adjustment Procedures. -
Page 44: Fluidics Module
System Overview Fluidics System Figure 1.10 Waste Container 1. Waste air filter. Filters the contaminated aerosol. 2. Waste level sensor. Monitors the volume of waste in the waste container. 3. Waste inlets. Carries the waste fluid from the Sorter to the waste container. Fluidics Module The Fluidics module is on the right side of the Sorter. -
Page 45: Sample Station
System Overview Fluidics System Figure 1.11 Interconnections on the Right Side of Sorter 1. Waste out. Connects the waste tubing from the Sorter to the fluidics cart. 2. Air outlet. Connects the sheath air tubing from the Sorter to the fluidics cart. 3. -
Page 46: Sample Station
System Overview Fluidics System WARNING Risk of personal injury. Keep your hands off the sample station when the sample chamber is moving to avoid pinching your hand. The Sample Station is where to load a tube and introduce a sample to the instrument. During acquisition, the sample chamber is enclosed and pressurized to force the sample toward the flow cell. - Page 47 After using the Urgent Stop button, follow the Daily Startup procedures to resume use. Refer to CHAPTER 3, Daily Startup. Beckman Coulter recommends running Shutdown Program prior to perform the acquisition or sorting. Provides fluid to clean the sample probe, and conveys the waste Backflush tubing.
-
Page 48: Optical Components
Risk of instrument damage. Do not place sample tubes in the optical filter holder. Liquid spills can damage instrument components. Use a tube rack to hold any sample tubes. 5. Optical filter holder. Securely holds additional CytoFLEX SRT optical filters. 1-16... -
Page 49: Laser Beam Shaping
System Overview Optical Components Laser Beam Shaping Before the laser beam reaches the sample stream, lenses focus the beam (refer to Figure 1.14). Focusing keeps the beam perpendicular to the sample stream flow while making the beam small enough to illuminate only one cell at a time. Figure 1.14 Laser Beam Shaping 1. -
Page 50: Forward Scatter Collection
System Overview Optical Components Forward Scatter Collection The Forward Angle Light Scatter (FALS) detector collects scattered light from a particle that intersects with a laser and delivers information roughly proportional to the size of the particle. The forward angle light is filtered with a 488 nm band pass before it reaches the FS sensor which generates voltage pulse signals. -
Page 51: Wavelength Division Multiplexer (Wdm)
System Overview Optical Components Figure 1.15 Light Path through the WDM with a Single Port 1. Fiber array photo detectors (FAPD) 2. Filter 3. 45-degree reflector 4. Doublet lens 5. Light path 6. Mirror Wavelength Division Multiplexer (WDM) Each WDM corresponds to a different laser, or in some cases two lasers. The color of the ring on each cap corresponds to the color of the respective laser. -
Page 52: Optical Filter Mount With Optical Filter
System Overview Optical Components Each optical filter mount has an optical filter glass piece. Refer to Figure 1.17. Figure 1.17 Optical Filter Mount with Optical Filter 1. Optical filter glass piece Each optical filter mount is labeled with the corresponding laser and band-pass information. Refer Figure 1.18. -
Page 53: Wdm Optical Filter Mount Color Codes
System Overview Optical Components Table 1.1 WDM Optical Filter Mount Color Codes CytoFLEX SRT Commonly used Laser Fluorescent Channel Channel Names Fluorescent Dyes V450 Pacific Blue™ dye, V450, 405 nm 450/45 BP eFluor™ 450, BV421 V525 Krome Orange, AmCyan, V500, BV510... -
Page 54: Optical Fiber
System Overview Optical Components Optical Fiber CAUTION Risk of data integrity damage. • During use, verify that the optical fibers are securely connected to the WDM. A loose connection can alter the optical path and affect fluorescence detection. • Do not disconnect the fiber as this could contaminate the tip and weaken the signal. -
Page 55: Cell Sorting
System Overview Cell Sorting Cell Sorting Sort Chamber The Sort Chamber is located in the center enclosure. The Sort Chamber is well lit, and designed for easy access and cleaning. The sort chamber sliding door, is part of a passive aerosol containment assembly that isolates the contents of a sort from the rest of the instrument, the operator, and the laboratory. -
Page 56: Overview Of Sort Chamber
System Overview Cell Sorting Figure 1.22 Overview of Sort Chamber 1. Sort protection door (open) 2. High voltage safety interlock 3. Waste catcher 4. CyClone movement system 5. Sort chamber illumination 6. Side stream illumination source 7. Nozzle module 1-24 C37808AC... -
Page 57: Stream Camera And Droplet Monitor
System Overview Cell Sorting Figure 1.23 Sort Chamber [with Side Stream Illumination Source Removed] 1. Deflection plates 2. Side stream detection window 3. Side stream illumination Stream Camera and Droplet Monitor The camera located opposite to the laser axis is not accessible by the operator. The camera is used to view the real-time break-off point, and the droplet status in the stream. -
Page 58: Deflection Plates
System Overview Cell Sorting Figure 1.24 Droplet Status NOTE For more details, refer to Starting and Monitoring a Sort CHAPTER 5, Sorting. Deflection Plates CAUTION Risk of personal injury. Do not touch the deflection plates when the high-voltage power is applied. High-voltage deflection plates deflect droplets from the mainstream and direct droplets to specific appropriate receptacles. -
Page 59: Nozzle Module
System Overview Cell Sorting instructions on removing and cleaning the Deflection Plate, refer to Cleaning the Side Stream Illumination Source and the Deflection Plates CHAPTER 10, Cleaning Procedures. Nozzle Module The nozzle module (hereinafter referred to as Nozzle) contains a detachable 100-μm nozzle (1), O-ring (2) and a nozzle holder (3). -
Page 60: Waste Catcher
System Overview Cell Sorting For instructions on cleaning the nozzle, refer to Cleaning the Nozzle CHAPTER 10, Cleaning Procedures. For instruction on removing/installing the nozzle module, refer to Removing/Installing the Nozzle Module CHAPTER 11, Replacement/Adjustment Procedures. Waste Catcher The waste catcher is located under the Side Stream Illumination Source. The waste catcher extends during the QC, and sort calibration. -
Page 61: Cyclone Movement System
System Overview Cell Sorting CyClone Movement System WARNING Risk of hand pinching. Keep your hands away from the sort chamber when the CyClone Movement System is moving. CAUTION Risk of damaging the CyClone Movement System. Do not place objects like tube holders, unused tubes, slides, gloves inside the Sort Chamber, which might interfere with the movement of CyClone System or damage the CyClone System. -
Page 62: Four 5 Ml Tubes
System Overview Cell Sorting Figure 1.27 Four 5 mL Tubes NOTE The tube adapters are required in the lateral tube slots for 5 mL tubes. Figure 1.28 Standard 96-Well Plate 1-30 C37808AC... -
Page 63: Sample Temperature Control
Water Bath through the body of the sort output holder and the sample tube holder. The Water Bath console is connected to the Sorter by two dedicated interconnection adapters (refer to Figure 1.30) which you can find in the CytoFLEX SRT system package. 1-31 C37808AC... -
Page 64: Interconnection Adapters
System Overview Cell Sorting Figure 1.30 Interconnection Adapters 1-32 C37808AC... -
Page 65: Connecting Water Bath To The Sorter
System Overview Cell Sorting Figure 1.31 Connecting Water Bath to the Sorter 1. Communication cable 2. Power cord 3. Power supply for Water Bath 4. Return flow tubing from Sorter to Water Bath 5. Circulating flow tubing from Water Bath to Sorter NOTE Ensure that the color of the quick connectors on the interconnection adapters match that of the quick connectors on the Sorter. -
Page 66: Aerosol Evacuation System
System Overview Cell Sorting CAUTION Risk of instrument damage and/or erroneous results. To ensure a long service life of the Sorter, the allowable range of the temperature setting for a Water Bath is 5°C - 49 °C if using DI water, and 0°C - 49 °C if using 25% propylene glycol-Water. For the recommended temperature control setting, refer to Table 1.3. -
Page 67: Aerosol Evacuation System
Cell Sorting Figure 1.32 Aerosol Evacuation System NOTE The sorting performance is sensitive to air disturbances. Beckman Coulter recommends using the 30% Suction Setting. The aerosol connector is located at the lower right corner of the Sorter. Refer to Figure 1.11. -
Page 68: Instrument Electronics
System Overview Instrument Electronics Instrument Electronics The instrument achieves an acquisition rate of 40,000 particles per second, and a sorting rate of 30,000 particles per second. Electronics and 64-bit software can store up to 34 million events in a single data file. System Connections CAUTION Risk of data loss and/or instrument damage. -
Page 69: Power And Signal Cable Connections
System Overview System Connections Figure 1.34 Power and Signal Cable Connections e fg h ij 1) 1! 1& 1. Sorter 10. Earthing protective cable 11. Fluidics cart signal cable 2. Back of fluidics cart 12. Camera cable (USB 3.0) 3. Workstation 13. -
Page 70: Power And Signal Cable Connections
System Overview System Connections Figure 1.35 Power and Signal Cable Connections [Waster Container inside Biosafety Cabinet] 1& 1#1$ efg h ij 1)1! 7809421AB 1. Sorter 12. Camera cable (USB 3.0) 13. USB 2.0 cable 2. Back of fluidics cart 14. Ethernet cable 3. -
Page 71: Fluid Harness Connections
System Overview System Connections Figure 1.36 Fluid Harness Connections 1. Shutdown fluid harness cable 2. Waste harness cable 3. Sheath harness cable NOTE For the fluidic connections on the fluidic cart, refer to Figure 1.6. Figure 1.37 Overview of Sorter Connections 1. -
Page 72: Instrument Specifications
System Overview Instrument Specifications Instrument Specifications Dimensions Dimensions Instrument dimensions Sorter 72.5 cm x 47.5 cm x 45 cm (Length x Width x Fluidics cart 34.5 cm x 60 cm x 48.5 cm Height) Sorter 62 kg Weight Fluidics cart (without fluid) 13.5 kg NOTE For the Biosafety Cabinet dimensions, refer to the manufacturer’s Product Specification. -
Page 73: Installation Category
If operating the instrument at an altitude greater than 2000 m, you could encounter startup failure, sort calibration failure, electric spark, fluid leakage, high carryover rate, or other unknown problems. Beckman Coulter assumes no responsibility for any problem resulting from operating instrument at an altitude greater than 2000 m (6561 ft). -
Page 74: Sorter
Optics Excitation Optics The CytoFLEX SRT system is configured with four spatially separated lasers. The optical system is alignment-free. The laser delays are automatically adjusted by the daily QC system, if required. No user intervention is required to ensure optimum system performance. -
Page 75: Performance Characteristics
Windows 10 (2019 LTSC) is the only operating system that has been validated to work with the CytoFLEX SRT workstation. b. If you need connect an external device or USB to the computer, Beckman Coulter recommends using the wireless keyboard and/or wireless mouse for the computer. -
Page 76: Material Safety Data Sheets (Sds/Msds)
Poisson’s statistics. Material Safety Data Sheets (SDS/MSDS) To obtain an SDS or MSDS for the CytoFLEX SRT reagents used on the CytoFLEX SRT systems: • On the Internet, go to www.beckman.com: 1. -
Page 77: Chapter 2: Using The Cytexpert Srt Software
CHAPTER 2 Using the CytExpert SRT Software Overview The CytExpert SRT software is a full-feature software package that controls the instrument's operation, which allows you to acquire, sort, and analyze flow cytometry data and then save the data in FCS format. This chapter will explain the software’s functions and features. This chapter contains information on: Launching the Software •... -
Page 78: Start Page
Using the CytExpert SRT Software Main Software Screen Start Page The start page automatically opens after logging into the software. The following operations can be selected from the start page: • . Creates a new experiment. The process creates a file with the .xits extension New Experiment and a folder with the same file name where the raw data (.fcs files) are kept. -
Page 79: Acquisition Screen
Using the CytExpert SRT Software Main Software Screen Opens a previously created compensation experiment. • Open Compensation. • . Exits the CytExpert SRT software. Exit The Experiment, Template, and Compensation tabs below give you the option of opening one of the 10 most recently opened experiments. -
Page 80: Acquisition Screen Navigation
Using the CytExpert SRT Software Main Software Screen Acquisition Screen Navigation The Acquisition screens have two navigation icons, the Acquisition screen, and the Analysis screen. 1. Acquisition screen icon. Accesses the Acquisition screen. 2. Analysis screen icon. Accesses the Analysis screen. C37808AC... -
Page 81: Collection
Using the CytExpert SRT Software Main Software Screen Collection Idle state Standby state Initialized state System: idle System: standby System: ready for use • Sample chamber: open • Sample chamber: open • Sample chamber: open • CyClone: home position • Cyclone: loading position •... - Page 82 Using the CytExpert SRT Software Main Software Screen 1. Acquisition control. Controls sample loading/unloading, sorting, and access acquisition setting. 2. Acquisition status. Displays information such as the acquisition rate (Events/Sec), Processed Events (%), Events, and Time. • Events/Sec: events acquired/acquisition time. NOTE The sorting pause during the data acquisition is excluded from the acquisition time.
-
Page 83: Acquisition/Sorting Control
Using the CytExpert SRT Software Main Software Screen Acquisition/Sorting Control Acquisition Sorting Ready for acquisition: Ready for sorting: Acquisition in process: Sorting in process: Sorting paused: C37808AC... -
Page 84: Tube Management
10. Standby. Turns off the sheath and puts the system in the Standby state. NOTE Beckman Coulter recommends re-running the sort calibration to ensure the auto drop delay is accurate if the system enters standby state during a sorting. For Sort... - Page 85 Using the CytExpert SRT Software Main Software Screen 1. Tube management controls. Used to add or delete a tube, open the tube property, open the experiment folder, open the compensation matrix, define the tube/plate sorting settings, and open the sort report. 2.
-
Page 86: Plot Area
Using the CytExpert SRT Software Main Software Screen Plot Area 1. Plot controls. Creates single or multiple plots, such as dot plots, histograms, density plots, pseudo color plots, and contour plots. 2. Index sorting. Enables index sorting. Refer to Index Sorting CHAPTER 5, Sorting. -
Page 87: Status Bar
Using the CytExpert SRT Software Main Software Screen Status Bar 1. Communication connection status. Displays whether the Sorter and the Workstation are connected. 2. Instrument state information. Displays the working state of the instrument. 3. System log information. Accesses the system log window. 4. -
Page 88: Compensation Experiment Screen
Using the CytExpert SRT Software Main Software Screen Plots Scale Index Gain sorting Statistics Compensation Hierarchy Threshold Gates Undo/Redo Zoom Compensation Experiment Screen The Compensation Experiment screen appears when you open or create a new compensation experiment. 1. Tube management. Displays sample tubes required for the compensation experiment. 2. - Page 89 Using the CytExpert SRT Software Main Software Screen Compensation Single Side Calculation Compensation Adjust Gain Matrix Compensation Undo/Redo Setup Add/Delete Alignment Negative Gate Zoom Rearrange Print 2-13 C37808AC...
-
Page 90: Qc Experiment Screen
Using the CytExpert SRT Software Main Software Screen QC Experiment Screen The Quality Control (QC) Experiment screen appears when select from the Start QC/Standardization QC/Standardization tab. QC Report Screen Before starting the QC routine, a Settings screen appears. Figure 2.2 QC Report Screen 1. -
Page 91: Qc Experiment Screen
Using the CytExpert SRT Software Main Software Screen QC Experiment Screen When acquiring QC samples, the software opens the QC screen. 1. QC experiment progress indicator. Displays the QC stage. 2. Plot area. Displays the QC plots. QC Screen Navigation The Analysis screens have two navigation icons, one for the QC screen and the other for the Levey-Jennings (LJ) charts. -
Page 92: Software Menu
Using the CytExpert SRT Software Main Software Screen Software Menu IMPORTANT All menu items apply to the CytExpert SRT Default software option unless otherwise specified. Depending on the Sorter state, certain functions may not be available. The CytExpert SRT software contains the following selectable menu items: Figure 2.3 Software Menu Tree *Only available in the CytExpert User Management software option. -
Page 93: Acquisition And Analysis Screen Menu
Using the CytExpert SRT Software Main Software Screen Acquisition and Analysis Screen Menu CytExpert Default Software Option CytExpert User Management Software Option File Menu For creating new experiments, opening existing experiments, saving new experiments and data, and importing/exporting FCS data files. 2-17 C37808AC... - Page 94 Using the CytExpert SRT Software Main Software Screen Cytometer Menu For configuring Cytometer settings and controlling Sorter functions. Depending on the Sorter state, certain functions may not be available. [CytExpert SRT Software Option-Standby State] QC/Standardization Menu Select from the QC/Standardization menu to start the QC routine. Start QC/Standardization 2-18 C37808AC...
- Page 95 Using the CytExpert SRT Software Main Software Screen Sorting Menu For controlling sorting options. Settings Menu Used to select and/or change software options and settings. [Acquisition Mode] [QC/Standardization Mode] Advanced Menu Used to access advanced settings for experienced users, including laser time delay settings, calibrations.
- Page 96 Using the CytExpert SRT Software Main Software Screen Account Menu Used for user account management settings. NOTE The Account menu is only available in the CytExpert User Management software option. Log Menu Used to access logs including the User Management Operation Log, System Operation Log, and the User Management Operation Log.
-
Page 97: User Management
Using the CytExpert SRT Software User Management User Management IMPORTANT Only an Administrator or authorized users can manage users. You must have the CytExpert User Management software option installed to use this feature. Refer to CytExpert Software Installation Options APPENDIX D, Instrument Installation. -
Page 98: User Manager (Grid View)
Using the CytExpert SRT Software User Management Figure 2.6 User Manager (Grid View) 1. Search text box: Filters users by user name and 6. Unlock: Used to unlock an existing account that full name. has been locked. 2. View drop-down: Toggles between Card View NOTE An account locks after 3 failed password (see... -
Page 99: Creating, Deleting, And Modifying Users In User Manager
Using the CytExpert SRT Software User Management Creating, Deleting, and Modifying Users in User Manager The initial System Administrator is a system default user and it cannot be deleted, modified, or disabled. Creating a New User in User Manager Select in the User Manager window. - Page 100 Using the CytExpert SRT Software User Management e. Optional: Select the portrait to import an image. Select . The new user displays in User Manager. Select Deleting Users in User Manager IMPORTANT If an account has been used and log information has been generated related to it, the account cannot be deleted, but it can be disabled.
-
Page 101: Unlocking A User Account
Using the CytExpert SRT Software User Management Modify the user information as necessary. NOTE Uncheck the enabled box to disable a user. Select Select Unlocking a User Account Select a Locked user in the User Manager window and select Unlock NOTE You cannot unlock an active user. -
Page 102: Resetting A User Password
Using the CytExpert SRT Software User Management Resetting a User Password IMPORTANT Only an administrator or authorized users can reset a password for the users who forget their passwords. However, a common administrator cannot reset a password for the initial System Administrator because the initial System Administrator is a super administrator. -
Page 103: Changing A User Password
The user is required to change the new random password immediately upon the initial login. Changing a User Password Beckman Coulter recommends changing your password on a regular basis. Select . The Change Password window appears. -
Page 104: Forgot Username Or Password
The System Administrator password cannot be reset without the system administrator credential file. Beckman Coulter is not responsible for and will not be able to recover your system administrator account if the system administrator password is forgotten and the credential file is lost. - Page 105 Using the CytExpert SRT Software User Management IMPORTANT Find the system administrator credential file from the backup folder when installing the CytExpert software. You can also export the credential file by selecting Export Credential File from the Account menu if you are logged in. Navigate to the system administrator credential file and select Open Select...
-
Page 106: Role Management
Using the CytExpert SRT Software Role Management Enter the new password, and confirm the new password. NOTE The new password must contain at least ten digits and all four of the following character types by default: • letter in upper case •... -
Page 107: Role Manager
Using the CytExpert SRT Software Role Management Select . The Role Manager window appears. Refer to Figure 2.7. Account Role Manager > Figure 2.7 Role Manager 1. New: Used to create a new role profile. 2. Modify: Used to modify an existing role profile. 3. -
Page 108: Creating, Deleting, And Modifying User Roles In Role Manager
Using the CytExpert SRT Software Role Management Creating, Deleting, and Modifying User Roles in Role Manager Creating New User Roles in Role Manager Select . The New window appears. Fill in the new role information. a. Enter the role name. NOTE Role Name has the following naming requirements: •... - Page 109 Using the CytExpert SRT Software Role Management b. Enter the role description. NOTE Role Description has the following naming requirements: • The maximum number of allowable characters is 100. • Special symbols are allowed. • The text box cannot be left blank. c.
- Page 110 Using the CytExpert SRT Software Role Management Modifying User Roles in the Role Window IMPORTANT The Administrator and Operator Roles are system defaults and may not be modified. Select the role to be modified and then select . The Modify window appears. Modify the role information as necessary.
-
Page 111: Account Policies
Using the CytExpert SRT Software Account Policies Account Policies IMPORTANT Only an Administrator can manage users. Account policies are used to define the default properties for the password policy, account lockout policy, and application inactivity policy. Select > . The Account Policies window appears. Account Account Policies Figure 2.8 Account Policies - Password Policy... -
Page 112: Account Policies - Account Lockout Policy
Using the CytExpert SRT Software Account Policies Figure 2.9 Account Policies - Account Lockout Policy NOTE The allowable range for each entry is as follows: • Invalid Login Attempts: 3-5 times • Lockout Time: 30-1,440 minutes 2-36 C37808AC... -
Page 113: Operation Log
Using the CytExpert SRT Software Operation Log Figure 2.10 Account Policies - Application Inactivity Policy NOTE The allowable range for each entry is as follows: • Inactivity Duration: 1-15 minutes Operation Log Use the Log feature to view, export, or manage the operation logs including the experiment operation log, the system operation log, and the user management operation log. -
Page 114: Viewing And Exporting Experiment Operation Logs
Using the CytExpert SRT Software Operation Log Viewing and Exporting Experiment Operation Logs Select . The Experiment Operation Log window appears. Log > Experiment Operation Log Select . The Select Experiment Profile window appears. 2-38 C37808AC... - Page 115 Using the CytExpert SRT Software Operation Log Select the experiment to be viewed. Enter the filter conditions: User and Time Range, and then select . The logs appear. To export the log, select NOTE Experiment Operation logs are exported as a .pdf or .csv file. 2-39 C37808AC...
-
Page 116: Viewing And Exporting System Operation Logs
Using the CytExpert SRT Software Operation Log Viewing and Exporting System Operation Logs Select . The System Operation Log window appears. Log > System Operation Log 2-40 C37808AC... - Page 117 Using the CytExpert SRT Software Operation Log Enter the filter conditions: User and Time Range, and then select . The logs appear. To export the log, select NOTE User logs are exported as a .pdf or .csv file. 2-41 C37808AC...
-
Page 118: Viewing And Exporting User Management Operation Logs
Using the CytExpert SRT Software Operation Log Viewing and Exporting User Management Operation Logs Select . The User Management Operation Log window Log > User Management Operation Log appears. Enter the filter conditions: User and Time Range, and then select . -
Page 119: Graphic And Gating Styles
Using the CytExpert SRT Software Graphic and Gating Styles To export the log, select NOTE User logs are exported as a .pdf file. Graphic and Gating Styles Plots The CytExpert SRT software offers a variety of plot formats including: • Single-parameter plots and histogram overlays •... -
Page 120: Gates
Using the CytExpert SRT Software Graphic and Gating Styles Pseudo color plot Contour plot Dot plot overlay Gates Various gating choices are available. The software includes the following gate types: • For dual-parameter plots: lasso, polygon, rectangle, four-quadrant, hinged gates, and auto polygon •... -
Page 121: Collection Device Library
Using the CytExpert SRT Software Collection Device Library Vertical gate a. This gate can be created using the autogate functionality. Refer to Creating and Adjusting Auto Gates CHAPTER 5, Sorting. Collection Device Library The Collection Device Library is used to manage and calibrate the position of plates or slides. To calibrate a plate or a slide, refer to Calibrating the Sort Collection Device CHAPTER 5,... -
Page 122: Default Collection Device Library
Using the CytExpert SRT Software Collection Device Library Figure 2.11 Default Collection Device Library 1. Add. Creates a new plate or slide. 2. Edit. Edits a plate or slide. 3. Duplicate. Duplicates a plate or slide. 4. Delete. Deletes an existing plate or slide. 5. -
Page 123: Sort Mode Library
Using the CytExpert SRT Software Sort Mode Library Sort Mode Library The Sort Mode Library is used to manage the sort modes, and set the default sort mode for sorting. To customize a sort mode, you have to add a sort mode first. Refer to Figure 2.12. -
Page 124: Sort Precision Level
• Purity1-2 Mode more inclusive than Purity Mode. for sorting NOTE Beckman Coulter recommends the Purity 1-2 Mode macro-particles • : Used when recovery is the most important aspect of the sort. With Enrich, all Enrich Mode positive events (an event that falls within the sort logic) are sorted. -
Page 125: Drop Envelope
Using the CytExpert SRT Software Sort Mode Library (red highlight) depending on the sort precision level chosen. The sort precision levels are showed from left to right: Single Purify Enrich Figure 2.13 Sort Precision Modes Applied to the Same Sort Stream Drop Envelope The sort drop envelope defines how many drops are sorted based on the position of the positive event in the drop. -
Page 126: Sort Guard Band
Using the CytExpert SRT Software Sort Mode Library volume/dilution must be minimized. When using this envelope and the drop delay is not perfect, recovery will be reduced by 1% for each 1% error in drop delay. • One drop is sorted if all positive events are in the center of the droplet. If a positive 1-2 Drop: event is outside the center, then the drop adjacent to the edge containing that event is also sorted. -
Page 127: Sort Stream Precedence
Using the CytExpert SRT Software Sort Mode Library The sort decision with the 25% Sort Guard Band applied are illustrated in Figure 2.16. The stream is represented by the gray dots flowing down the figure with either the target population (red) or the contaminant population (blue) located within the droplet. -
Page 128: Adding A Sort Mode
Using the CytExpert SRT Software Sort Mode Library population. The sort mode precedence is as follows: > > . The Stream Precedence Single Purify Enrich is from outside to inside streams (L2>R2>L1>R1). Adding a Sort Mode Select from the Advanced menu. The Sort Mode Library window appears. Sort Mode Library NOTE The Sort Mode Library is editable only when the experiment has been closed. - Page 129 Using the CytExpert SRT Software Sort Mode Library A new sort mode is added in the Sort Mode Library. NOTE Enter a name for this new sort mode. Select the desired Sort Precision Level from the dropdown menu. 2-53 C37808AC...
- Page 130 Using the CytExpert SRT Software Sort Mode Library Select the desired Drop Envelope from the dropdown menu. Select The SortMode1 is added in the Sort Mode Library. To apply this new sort mode, refer to Setting Up Tube Sorting Setting Up Plate/Slide Sorting CHAPTER 5, Sorting.
-
Page 131: Deleting A Sort Mode
Using the CytExpert SRT Software Sort Mode Library Deleting a Sort Mode IMPORTANT The system default sort modes that are in bold cannot be deleted. Select from the Advanced menu. The Sort Mode Library window appears. Sort Mode Library 2-55 C37808AC... - Page 132 Using the CytExpert SRT Software Sort Mode Library Select a sort mode to be deleted, and select Delete 2-56 C37808AC...
-
Page 133: Software Settings
Using the CytExpert SRT Software Software Settings Software Settings Select in the Settings menu to configure the software settings. Options In the experiment settings, you can set the experiment’s default save path. 2-57 C37808AC... - Page 134 Using the CytExpert SRT Software Software Settings In the tube settings, you can select the columns that display in the tube section of the screen. 2-58 C37808AC...
- Page 135 Using the CytExpert SRT Software Software Settings In the plot settings, you can define the background of the graphics display area, configure the histograms, and set the default signal parameters to either the channel’s area or the channel’s height. The default is area. You can also set the default axis display range. 2-59 C37808AC...
- Page 136 Using the CytExpert SRT Software Software Settings In the Gate settings, you can choose to display population percentage on all plots except overlay. NOTE Show as rare events is to increase the visibility of the gated population anywhere they appear on the plots.
- Page 137 Using the CytExpert SRT Software Software Settings In the Page Setup settings, you can change the page size, orientation, margin size, and display options. Select to display page boundaries within the Acquisition or Analysis Show page breaks views for simplifying plot arrangement for printing. 2-61 C37808AC...
- Page 138 Using the CytExpert SRT Software Software Settings In the Bubble Detect settings, you can enable/disable the Bubble Detector function. IMPORTANT Only use the Bypass Bubble Detector for the colored or turbid samples. The bubble detector is sensitive to light scattering and attenuation. When running colored or turbid samples, or sample with high concentration, the error 090025 is likely to occur.
-
Page 139: Language Settings
Using the CytExpert SRT Software Software Settings In the Record settings, you can set the default record count. Language Settings Select to open the Language Settings window. In the Language Settings > Language Settings Settings window, you can select which language to use for the software menus and graphical statistics. -
Page 140: Daily Startup
• Selecting Experiments from the Start Page Pre-Startup Inspection Before using the CytoFLEX SRT instrument, perform the following system checks. System Connections Inspection Verify that the power cable of the computer is securely connected to the power source. Check that the monitor, mouse, keyboard, and the Sorter USB cable are properly connected to the computer. -
Page 141: Checking Fluid Levels
Daily Startup Pre-Startup Inspection Verify that all sheath fluid tubing, waste fluid tubing, shutdown fluid tubing, and the sensor cable from the fluidics cart are properly connected to the Sorter. Refer to Figure 1.11. Verify that the power cable located below the power switch on the lower left side of the Sorter, and verify it is securely connected to both the Sorter and the power source. -
Page 142: Turning On The Instrument
If necessary, fill the sheath fluid tank while not exceeding the upper position ring. Refer to Filling the Sheath Tank CHAPTER 11, Replacement/Adjustment Procedures. If necessary, fill the shutdown fluid container with CytoFLEX SRT Shutdown fluid while not exceeding the bottom of the neck. Refer to Filling the Shutdown Fluid Container CHAPTER 11, Replacement/Adjustment Procedures. -
Page 143: Logging Into The Software
Daily Startup Logging Into the Software Wait for the Sorter to finish powering on, then turn on the Workstation. Logging Into the Software Log into the Windows operating system and double-click the CytExpert SRT desktop icon to open the software. If you are running the CytExpert Default software installation, login is not required. - Page 144 Daily Startup Logging Into the Software Confirm that the software and the Sorter are properly connected. a. Open the software. The Startup screen appears. C37808AC...
- Page 145 • Select the status information in the lower left to open the system log. Send a copy of the system log to your Beckman Coulter Representative for support if a service call is requested. c. Verify that the Sheath, Waste and Shutdown flow indicators in the lower right corner of the software screen are green indicating that the fluidics system is normal.
-
Page 146: Sheath Status
Daily Startup Logging Into the Software Table 3.1 Sheath Status Normal Insufficient Empty (with audible warning) Overfilling (with audible warning) The value in the symbol indicates the remaining time that the sheath can sustain. NOTE When the sheath flow indicator displays “empty”, refill the sheath tank as soon. Otherwise, the system stops the fluid and goes into standby automatically. -
Page 147: System Startup Program
Ensure that the sheath tank you used matches with the sheath tank type you selected. Otherwise, you could encounter startup failure, aseptic cleaning failure, long-term shutdown failure, or sheath flow indication error. Restarting after the Daily Shutdown (CytoFLEX SRT Shutdown Fluid in the Instrument) Select in the Cytometer menu. - Page 148 Daily Startup System Startup Program Open the sort chamber sliding door and the sort protection door. Clean the bottom of the flow cell, the sliding rails for the nozzle lift, and the V-plate surface. For instructions, refer to Daily Decontamination During Shutdown CHAPTER 10, Cleaning Procedures.
- Page 149 Daily Startup System Startup Program Insert the nozzle module carefully into Sorter with the UP symbol facing up. The nozzle module is locked into its position when you hear a click. Close the sort protection door, the sort chamber sliding door, and the sample station door. 3-10 C37808AC...
- Page 150 Daily Startup System Startup Program Select Next 3-11 C37808AC...
- Page 151 Daily Startup System Startup Program The system starts running Startup Program. NOTE Select Hide to hide the System Startup window. 3-12 C37808AC...
- Page 152 Daily Startup System Startup Program The Confirm window displays when the System Startup Program is finished, NOTE Select Yes to start QC now. For instructions on running QC, refer to CHAPTER 4, Instrument Quality Control and Standardization. Or select No to defer the QC. Select to quit the System Startup program.
- Page 153 Daily Startup System Startup Program Restarting after the Long-Term Shutdown (70% Ethanol in the Instrument) Select in the Cytometer menu. System Startup The following message appears. IMPORTANT Ensure the sheath is sterile. Empty the sheath tank and refill the sheath tank with at least 1.5 L sheath. Refer to Filling the Sheath Tank CHAPTER 11, Replacement/Adjustment...
- Page 154 Daily Startup System Startup Program Select . The system starts to rinse the sheath line with sheath. Next The following message appears when the system finishes the perfusion. Switch the aseptic cleaning filter with the sheath fluid filter. Refer to Replacing the Aseptic Cleaning Solution Filter CHAPTER 11, Replacement/Adjustment...
- Page 155 Daily Startup System Startup Program Select Next Open the sort chamber sliding door and the sort protection door. 3-16 C37808AC...
- Page 156 Daily Startup System Startup Program Insert the nozzle module carefully into Sorter with the UP symbol facing up. The nozzle module is locked into its position when you hear a click. Close the sort protection door, the sort chamber sliding door, and the sample station door. Select .
-
Page 157: Selecting Experiments From The Start Page
Daily Startup Selecting Experiments from the Start Page The Confirm window displays when the System Startup Program is finished, NOTE Select Yes to start QC now. For instructions on running QC, refer to CHAPTER 4, Instrument Quality Control and Standardization. Or select No to defer the QC. -
Page 158: Chapter 4: Instrument Quality Control And Standardization
Standardization Overview This chapter provides information on performing daily Quality Control (QC) on the CytoFLEX SRT Sorter and how to confirm that the instrument is working properly within the specified parameters. Quality Control allows you to determine whether your instrument can provide adequate signal strength and precision. -
Page 159: Quality Control
Instrument Quality Control and Standardization Quality Control Standardization Workflow: Obtain target Perform Apply standardization acquisition standardization Ô Ô Ô standardization settings settings sample This chapter contains information on: Quality Control • — Preparing the QC Sample Importing Lot-Specific Target Values —... -
Page 160: Preparing The Qc Sample
Instrument Quality Control and Standardization Quality Control Notifies you if laser delay is > 5 μs from the previous setting. Manual laser delay adjustments are required. Refer to Setting Laser Delay CHAPTER 11, Replacement/Adjustment Procedures. 6. Verifies and calibrates the gain settings. If any of these parameters are outside of the operating limits, the system automatically adjusts these parameters. -
Page 161: Cytoflex Ready To Use Daily Qc Fluorospheres Preparation Process
Instrument Quality Control and Standardization Quality Control Place the sample tube in a dark location at 2-8 C until ready to load the tube into the instrument for QC. NOTE Tubes containing diluted CytoFLEX Daily QC Fluorospheres should be sealed and stored in a dark location at 2-8 C for up to 5 days. - Page 162 Settings menu. The Target Library window appears. Target Library IMPORTANT The Beckman Coulter website may prompt you to select your Region and Country prior to the Beckman Coulter Technical Documents and Software page. Select . The Beckman Coulter Software Downloads page appears.
- Page 163 Instrument Quality Control and Standardization Quality Control In the Search By Product section of the screen, select the following: a. Select from the Market Segment drop-down menu. Research & Discovery b. Select from the Product Line drop-down menu. Flow Cytometry c.
- Page 164 Instrument Quality Control and Standardization Quality Control [CytoFLEX QC Fluorospheres Target] [CytoFLEX Ready to Use Daily QC Fluorospheres Target] C37808AC...
- Page 165 Instrument Quality Control and Standardization Quality Control Select under the Software Name column. The CytoFLEX QC Fluorospheres Target Values CytoFLEX QC Fluorospheres Target Values page appears. Select under the correct lot number from the CytoFLEX QC Fluorospheres Target Download Values page. If the File Download pop up window appears, select and browse to the desired file path.
- Page 166 Instrument Quality Control and Standardization Quality Control Select from the Target Library window in the CytExpert SRT software. Import Navigate to the file saved in step and select Open Select to exit the Target Library window. Close C37808AC...
-
Page 167: Collecting Qc Data
Ensure that the instrument configuration is properly configured for the QC experiment. The QC experiment may not be completed or may end in erroneous results if incorrect settings are chosen. Beckman Coulter recommends using the factory configuration and ensuring that the proper optical filters are in place. - Page 168 Instrument Quality Control and Standardization Quality Control Select in the QC/Standardization menu to access the QC experiment. Start QC/Standardization Ensure that the QC bead lot number is selectable in the Lot No. drop-down menu. If the lot number is not selectable, refer to Importing Lot-Specific Target Values, then select the proper lot number.
- Page 169 Instrument Quality Control and Standardization Quality Control During QC, the software automatically seeks the CytoFLEX QC Fluorospheres and computes the results. The software returns to the QC Report screen after the QC run is complete. If the sampling rate is too low, the Sorter stops the QC run and displays a prompt alerting you that the QC run failed to reach the required event flow rate.
-
Page 170: Confirming Results
Instrument Quality Control and Standardization Quality Control Select to start Sort Calibration now. Refer to Sort Calibration (Auto Drop Delay) CHAPTER 5, Sorting. Select to defer the Sort Calibration. NOTE Sort calibration is required prior to the sorting. For analysis experiments, skip the Sort Calibration. Confirming Results Select in the QC/Standardization menu to return to the QC Setting screen... - Page 171 Instrument Quality Control and Standardization Quality Control Select a QC run from the QC Process list on the left and a QC report appears on the right. NOTE The results column indicates a passing QC result with a and a failed QC result with QC results must meet the following criteria to pass: •...
- Page 172 Instrument Quality Control and Standardization Quality Control The report area on the right displays detailed experiment results, including laser power, delay, testing conditions, and signal results. The same symbols are used to indicate each result. For items that fail, values falling outside the prescribed range are displayed in red font. In the Comment area, an explanation appears for each failed item.
- Page 173 Instrument Quality Control and Standardization Quality Control e. Run Performing the Sheath Filter De-bubble CHAPTER 11, Replacement/Adjustment Procedures, and retest. f. Run Backflush. Select > , and retest. Cytometer Backflush g. Verify whether the Nozzle is clean and installed properly. Refer to Cleaning the Nozzle CHAPTER 10, Cleaning Procedures, and retest.
- Page 174 Instrument Quality Control and Standardization Quality Control IMPORTANT When there are multiple lots, select which lot to create the LJ charts from. Select LJ Chart Settings on the top of the LJ Chart screen. The LJ Chart Settings screen appears. 4-17 C37808AC...
- Page 175 Instrument Quality Control and Standardization Quality Control Select the tab, and select the power and/or delay checkboxes for each laser as needed. Laser 4-18 C37808AC...
- Page 176 Instrument Quality Control and Standardization Quality Control Select the tab, and select each channel checkbox as needed. Channel Select Apply Select 4-19 C37808AC...
-
Page 177: Qc Result Manager
Instrument Quality Control and Standardization Quality Control Select the Levey-Jennings plot and select the start and end date from the drop-down boxes at the top of the LJ Chart screen to specify the desired date range. NOTE Select the desired configuration and date range from the drop-down menus located at the top of the LJ Chart screen to sort by the configuration used during the specified date range. -
Page 178: Standardization
Preparing the Standardization Sample Use Beckman Coulter CytoFLEX Daily QC fluorospheres or CytoFLEX Ready to Use Daily QC Fluorospheres or any other reference material that is relevant for your application. 4-21... -
Page 179: Required Materials
Instrument Quality Control and Standardization Standardization Required Materials The following materials are required to complete the QC process: • CytoFLEX Daily QC Fluorospheres or CytoFLEX Ready to Use Daily QC Fluorospheres, or other material applicable for your application • IsoFlow or ISOTON II sheath •... - Page 180 Instrument Quality Control and Standardization Standardization Change the tube name. Refer to Changing the Tube Name CHAPTER 5, Sorting. Select from the File menu to save the experiment. Save As Select to delete all the remaining tubes. 4-23 C37808AC...
- Page 181 Instrument Quality Control and Standardization Standardization Select . The Compensation Matrix window appears. Select to clear the compensation matrix. The message Are you sure you want to clear the Clear compensation matrix? appears. Select Load the sample tube. NOTE The sample tube holder only accommodates 12 x 75 mm sample tubes. Select 4-24 C37808AC...
- Page 182 Instrument Quality Control and Standardization Standardization View the plots and establish the gates. Refer to Creating Plots and Gates CHAPTER 5, Sorting. NOTE Use the FSC channel as the trigger channel and select Automatic threshold. NOTE The threshold may need to be adjusted to visualize the QC beads populations. If so, record this value for future reference.
- Page 183 Instrument Quality Control and Standardization Standardization Right-click the table and select . The Statistics Setting window appears. Statistics Settings 4-26 C37808AC...
- Page 184 Instrument Quality Control and Standardization Standardization Select the Population tab and select the relevant population for the tube. 4-27 C37808AC...
- Page 185 Instrument Quality Control and Standardization Standardization Select the tab then select the Median Fluorescence value for all parameters used. Statistics NOTE The median values are the target settings that will be used for standardization. Select Stop Right-click the statistics table and select Export to CSV file 4-28 C37808AC...
-
Page 186: Adding A New Standardization Item
Instrument Quality Control and Standardization Standardization If Excel is not available, manually record all the median values or take a screen shot. Save the experiment. NOTE Rerun the experiment if: • You change the standardization fluorosphere used. • The Lot number for the standardization fluorosphere is changed. Adding a New Standardization Item Select in the QC/Standardization menu to access the Standardization... - Page 187 Instrument Quality Control and Standardization Standardization Select from the Settings menu. Standardization Target Library 4-30 C37808AC...
- Page 188 Instrument Quality Control and Standardization Standardization Select . The Add Standardization Target Value window appears. Enter the Item, Lot No., and Expire date from the dropdowns located at the top of the Add Standardization Target Value window. NOTE A single Lot No. can include several Items, but you cannot add duplicate Items under the same Lot No..
- Page 189 Instrument Quality Control and Standardization Standardization Set the channels to be standardized. NOTE The contents of the channel, laser, and filter column come from the current detector configuration setting. Refer to Verifying, Selecting, Editing, and Creating Detector Configuration CHAPTER 5, Sorting.
-
Page 190: Performing The Standardization
Instrument Quality Control and Standardization Standardization Select to save the target value. The saved results display in the Standardization Target Library window. This item is ready to be run through the Standardization experiment. Refer to Performing the Standardization CHAPTER 4, Instrument Quality Control and Standardization. - Page 191 Instrument Quality Control and Standardization Standardization Select the radio button. Standardization Select the correct Lot No. from the Lot No. dropdown. NOTE Ensure the Lot No. corresponds to the standardization sample that generated the target median values. Select the Items to be standardized. 4-34 C37808AC...
- Page 192 Instrument Quality Control and Standardization Standardization Select the proper detector configuration. Refer to Verifying, Selecting, Editing, and Creating Detector Configuration CHAPTER 5, Sorting. Select The Process section of the screen displays the process details. Once the process is complete, the Standardization Report displays. NOTE The updated Standardization item is added to the Acquisition Catalog automatically and overwrites the previously existing standardized settings for this item.
-
Page 193: Applying The Standardized Acquisition Settings
Instrument Quality Control and Standardization Standardization Select from the Cytometer menu to verify the gain settings. The Acq. Acq. Setting Catalog Setting Catalog window appears. NOTE designates test items from Standardization. Run Daily Clean. Refer to Daily Clean Program CHAPTER 10, Cleaning Procedures. - Page 194 Instrument Quality Control and Standardization Standardization Select from the Cytometer menu. The Acq. Setting window appears. Acq.Setting Select . The Acq. Setting Catalog window appears. Import from Catalog 4-37 C37808AC...
- Page 195 Instrument Quality Control and Standardization Standardization Browse for the item to import and select Import. The standardized settings are applied to the sample tube. The Information window appears to notify of the corresponding channels with the changed gain as a result of the Standardization. 4-38 C37808AC...
-
Page 196: Standardization Target Library
Instrument Quality Control and Standardization Standardization Select Standardization Target Library Select from the Settings menu. The standardization Target Library Standardization Target Library... window appears. NOTE The Item name displays in the Acquisition Setting Catalog window as the saved acquisition setting name. - Page 197 Instrument Quality Control and Standardization Standardization Select to exit the Standardization Target Library window. Exporting a Standardization Item Browse for the Item to export. The available items display on the left panel of the Standardization Target Library window. Select on the Standardization Target Library window. Navigate to the desired file path and select Save NOTE...
- Page 198 Instrument Quality Control and Standardization Standardization Edit Item, Lot No., Expire date and the parameters for that item and select NOTE Perform a new standardization if the Lot No. of standardization sample is changed. Ensure the item parameters are correct then select and save the file.
-
Page 199: Chapter 5: Sorting
CHAPTER 5 Sorting Overview This chapter contains information on how to use your CytoFLEX SRT instrument to perform an acquisition or sorting experiment. Workflow: Sort Create Load Acquisition Save Ô Ô Ô Ô calibration experiment sample and sorting experiment This chapter contains information on: Sort Calibration (Auto Drop Delay) •... -
Page 200: Sort Calibration (Auto Drop Delay)
Sort Calibration (Auto Drop Delay) Sort Calibration (Auto Drop Delay) IMPORTANT Beckman Coulter recommends performing the sort calibration immediately after passing QC for better sorting performance. For analysis experiments, skip the Sort Calibration. IMPORTANT Sort calibration is mandatory after reinstalling a nozzle or replacing a new nozzle. Beckman Coulter recommends re-running the sort calibration to ensure the auto drop delay is accurate if the system enters standby state during a sorting. - Page 201 Sorting Sort Calibration (Auto Drop Delay) IMPORTANT The system is sensitive to airflow interference. Ensure that the sort protection door and the sort chamber sliding door are always closed during the sort calibration. Select to begin the Sort Calibration procedure. Start C37808AC...
- Page 202 Sorting Sort Calibration (Auto Drop Delay) a. The system automatically scans the frequency and amplitude to form an optimal droplet. The dynamic stream appears on the right. Completed processes appear on the left. C37808AC...
- Page 203 Sorting Sort Calibration (Auto Drop Delay) Or perform Manual Droplet Calibration. IMPORTANT Manual Droplet Calibration should be activated before the Droplet Calibration starts. Refer to Step 2. Enter the frequency and amplitude values manually and select to begin the Continue manual droplet calibration.
- Page 204 Sorting Sort Calibration (Auto Drop Delay) b. After completing the droplet calibration, the system sequentially calibrates charge phase, charge voltage, and defanning automatically. These calibrated parameters appear in the middle. : The rate at which the crystal in the nozzle vibrates. •...
- Page 205 Sorting Sort Calibration (Auto Drop Delay) c. After completing the droplet calibration, the system determines the drop delay automatically. When the Sort Calibration procedures finish and pass, select Close C37808AC...
-
Page 206: Default Amplitude Setting (Optional)
Sorting Sort Calibration (Auto Drop Delay) Default Amplitude Setting (Optional) This function allows you to set the default amplitude as the datum point to scan the amplitude during the automatic Sort Calibration. Use this function only when the Droplet Calibration fails and prompts the error code 070015 or error code 070030. -
Page 207: Setting Drop Delay Manually (Optional)
Sorting Setting Drop Delay Manually (Optional) Setting Drop Delay Manually (Optional) IMPORTANT The Auto Drop Delay generated from the Sort Calibration may differ from Manual Drop Delay due to different measurement criteria. Manual Drop Delay is the most accurate, while the Auto Drop Delay is accurate to ±10%. - Page 208 Sorting Setting Drop Delay Manually (Optional) Place a clean slide on the sort output holder. Select from the Sorting menu. Manual Drop Delay 5-10 C37808AC...
- Page 209 Sorting Setting Drop Delay Manually (Optional) The Manual Drop Delay window displays. Select the desired gate for the Sort Logic. 5-11 C37808AC...
- Page 210 Sorting Setting Drop Delay Manually (Optional) Enter a desired Drop Delay for the puddle in the middle. The Drop Delay setting appears in the puddle. NOTE If you did not run the Manual Drop Delay test, the system starts with an Auto Drop Delay as the initial Drop Delay setting.
- Page 211 Sorting Setting Drop Delay Manually (Optional) Set a Delay Increment to specify a set of drop delays for the adjacent puddles. NOTE The range of Delay increment is 0.01-100. Set Beads Per Puddle to specify the target count of beads for each puddle. NOTE The range of Beads Per Puddle is 1-1,000,000.
- Page 212 Sorting Setting Drop Delay Manually (Optional) Set the Number of Puddles. NOTE The range for Number of Puddles is 3-20. The default setting is 10 puddles. Select to stop loading. Stop 5-14 C37808AC...
- Page 213 Sorting Setting Drop Delay Manually (Optional) IMPORTANT The slide calibration archived in the Collection Device Library cannot be used for the Manual Drop Test. Slide calibration is mandatory for the initial use of a slide during the Manual Drop Delay Test. Skip the slide calibration if you have calibrated a slide for a Manual Drop Delay Test.
- Page 214 Sorting Setting Drop Delay Manually (Optional) Select Test You will see the circles turn blue as the puddles are created. 5-16 C37808AC...
- Page 215 Sorting Setting Drop Delay Manually (Optional) Select when all puddles have been created. The following window displays. Calculate Remove the slide and inspect the puddles under a fluorescent microscope. Determine the puddle that contains the most beads. Puddle number one is located on the edge of the slide closest to the CyClone arm when the test was run.
- Page 216 Sorting Setting Drop Delay Manually (Optional) Enter the values in the Drop Delay Test window. The system automatically calculates the Drop Delay. NOTE The Test Result indicates a passing result with a and a failed result with NOTE The passing criteria: the difference between the number of beads in the puddles adjacent to the target puddle is less than 3%.
- Page 217 Sorting Setting Drop Delay Manually (Optional) If the test result passes, select to save the calibrated manual drop delay. If the test result fails, select and repeat Steps 18-21 until the test result passes. Retest Select Close 5-19 C37808AC...
-
Page 218: Creating An Experiment
Sorting Creating an Experiment Optional: Save this experiment as a template if needed. Creating an Experiment Creating an Experiment CAUTION Risk of file corruption. When modifying experiment (*.xit) file names in Windows Explorer, ensure you modify the corresponding experiment folder name to match the new file name. -
Page 219: Changing The Tube Name
Experiments are saved as an .xits file. Template are saved as an .xitm file. NOTE The CytoFLEX SRT software can read the experiments with the suffix xits. Selecting Convert CytExpert Experiment from the File menu to convert the .xit file to the .xits file if you want to use the CytoFLEX SRT software to analyze the experiments with the suffix xit. -
Page 220: Setting The Channel And Label
Sorting Creating an Experiment Setting the Channel and Label Select in the Settings menu. The Set Channel window appears. Set Channel 5-22 C37808AC... - Page 221 Sorting Creating an Experiment In the Set Channel window, modify which channels are used and how they are displayed. a. Select the channel signal check box, then you can add the reagent name in the Label column. The information you add appears in the corresponding axis of the relevant plot in the plot area.
- Page 222 Sorting Creating an Experiment b. Select . The Apply Channel Setting window appears. Apply to c. Select the tubes to apply the channel settings to and select d. If you only need to modify the label name, select in the Settings menu to make the Set Label required changes.
-
Page 223: Creating Plots And Gates
Sorting Creating an Experiment e. Select . The Apply Label Setting window appears. Apply to f. Select the tubes to apply the label settings to and select Creating Plots and Gates IMPORTANT The maximum number of elements allowed in an experiment is 200. Elements include plots, statistics tables, and gate hierarchy tables. - Page 224 Sorting Creating an Experiment b. Select an axis name to change which channel is displayed. An “A” after the channel name indicates signal pulse area, while an “H” indicates height. The default setting is "A". NOTE To modify the default settings, select Options in the Settings menu. The Options window appears.
- Page 225 Sorting Creating an Experiment c. Signal width can be used as a tool for doublet discrimination and to differentiate somatic cell adhesion. If necessary, select to open the Acq. Setting window. 5-27 C37808AC...
- Page 226 Sorting Creating an Experiment d. Select the tab, and select a channel with the required signal width. Width e. Plot properties can be configured to display axes in Log, Log-Linear, or Linear format. 5-28 C37808AC...
- Page 227 Sorting Creating an Experiment 1) Double-click the plot or right-click the plot and select from the drop-down Property menu. The Plot Property screen appears. 2) Select whether to display the axes in logarithmic or linear format for both the X-axis and Y-axis.
- Page 228 Sorting Creating an Experiment Dot plot with logarithmic X-axis Dot plot with log-linear X-axis f. You can adjust axis ranges using the pan axis display controls located at the top of the screen. • Select , to zoom-in and define which area of a plot to enlarge. The selected area can be magnified to fill the entire graph.
- Page 229 Sorting Creating an Experiment • In the Plot Property window, manually enter the minimum and maximum display values for the X- and Y-axes. You can also select to let the software Fit With Sample automatically adjust the lower limit according to the signal and perform the corresponding log-linear transformation.
- Page 230 Sorting Creating an Experiment To create gates, use the control buttons or right-click the plot and select the gate type required. Gates can be set according to different requirements to differentiate cell populations. NOTE To add a vertex to a polygon gate: Select the gate.
-
Page 231: All Gates - Example Experiment
Sorting Creating an Experiment Select the gates to display. a. Select the heading area of the plot, select the parent population/gate to display in the plot from the drop-down menu. The selected parent gate appears in the tab area of the plot. NOTE The auto gates cannot be used as the sort logic. - Page 232 Sorting Creating an Experiment b. If necessary, you can select the option from the drop-down menu to Combo Population create a combination gate, using the Boolean relationships “and”, “or”, and “not” to produce a new gate. You can also select the population color or change the gate name. •...
-
Page 233: Creating And Adjusting Auto Gates
Sorting Creating an Experiment Select to display the population hierarchy. The Population Hierarchy function allows you to view how gates rank in relation to one another. To change the display color, double-click the default color and select the desired color from the drop-down color palette. - Page 234 Sorting Creating an Experiment Select the population you want to gate in the histogram to automatically gate that population. To create an auto polygon gate, select from the tool bar or right-click on the 2D plot and select from the drop-down menu. Auto Polygon 5-36 C37808AC...
-
Page 235: Turning Auto Recalculate On/Off
Sorting Creating an Experiment Select the population you want to gate in the 2-D plot. The gate will automatically be drawn to fit the population. NOTE To add a vertex to an auto polygon gate: 1. Select the gate. 2. Hover your cursor over the perimeter of the gate until the cursor changes to the hand icon. 3. -
Page 236: Adjusting Autogate Movement And Extent
Sorting Creating an Experiment Adjusting Autogate Movement and Extent Movement — The distance an autogate can move to find the target population. To adjust movement, right-click an autogate and drag the Movement handle in the auto gate menu left and right. NOTE The default value setting for movement is 20 units. -
Page 237: Movement - Max Setting
Sorting Creating an Experiment Figure 5.5 Movement - Max Setting Extent — Shrinks or expands the gate around the population. To adjust extent, right-click an autogate and drag the Extent handle in the auto gate menu left and right. NOTE The default value setting for extent is 20 units. -
Page 238: Configuring Acquisition Settings
Sorting Configuring Acquisition Settings Figure 5.7 Extent - Maximum Setting Configuring Acquisition Settings Laser Settings To access the Laser Setting window, select > . The Laser Setting window Advanced Laser Setting appears. Refer to Figure 5.8. NOTE The instrument must be in Standby mode to access the Laser Setting window. 5-40 C37808AC... -
Page 239: Laser Setting Window
Sorting Configuring Acquisition Settings Figure 5.8 Laser Setting Window 1. Enable/Disable: Enables or disables the laser. IMPORTANT The laser target power setting is not available to users. 2. Target Power (mW): Used to change the laser target power. NOTE The power detector has ±1 mW tolerance. Refer to Table 5.1 Figure 2.2 (the target Power... -
Page 240: Adjusting The Gain
Sorting Configuring Acquisition Settings Select the radio button next to each laser on the Laser Setting window to enable Enable Disable or disable lasers. When a laser is disabled or abnormal, the laser status icon appears in the software status bar. Hover your mouse over to display details for each laser. - Page 241 Sorting Configuring Acquisition Settings Select the tab in the Acq. Setting window. Gain Select or edit the instrument’s default gain settings using one of the following methods: • Edit the gain settings and select to create a new default setting. Set as Default •...
-
Page 242: Adjusting The Threshold
Sorting Configuring Acquisition Settings Another option is to use the button on the tool bar in the graphic control Gain Control area to adjust the gain values for cell population data to their desired levels, directly on the plots where the data appears during data collection. NOTE Gain adjustments have a predefined range between 1 and 3,000. - Page 243 Sorting Configuring Acquisition Settings Select the tab in the Acq. Setting window. Threshold Set the desired threshold using one of the following methods: • Choose the channel that is used for setting the threshold. Manually enter the threshold value in the Threshold tab. NOTE For dual-parameter plots, you can right-click the plot and select both parameters if desired.
-
Page 244: Setting Collection Conditions
Sorting Configuring Acquisition Settings • Select from the plot control area. Move your mouse pointer to the desired threshold position in the desired plot and select once. Select Close Setting Collection Conditions Check mark the conditions required to set the necessary stop count events on the left side of the Acquisition screen. -
Page 245: Setting Sample Flow Rate
Sorting Configuring Acquisition Settings If you made changes to the data acquisition conditions and need to apply these changes to an established sample tube, right-click the sample tube and select , to apply Apply Acq. Settings To the conditions accordingly. Setting Sample Flow Rate Set the sample flow rate by specifying the sample pressure located in the lower left corner of the software screen. -
Page 246: Setting Mixing Speed
Sorting Configuring Acquisition Settings select from the Cytometer menu to offset the sample flow rate. Sample Flow Parameter Adjustment The allowable range is -5 to 10. 10: increase by approximately 10 μL/min -5: decrease by approximately 5 μL/min NOTE If the sample flow rate deviation is > 30%, or the QC problem persists after adjusting the sample flow rate offset, contact us to perform the sample flow rate calibration. -
Page 247: Setting Plot Display Conditions
Sorting Configuring Acquisition Settings Setting Plot Display Conditions Select in the Settings menu. The Events Display Setting window appears. Events Display Setting Three display options are available: Used to view all events on the plot. • Display all events. • Used to set the set number of events to display. -
Page 248: Setting Customized Parameters
Sorting Configuring Acquisition Settings Setting Customized Parameters Set custom parameter to create fluorescence calculations. Select from the Settings menu. Or, right-click a test tube from the Set Customized Parameter test tube menu and select . The Set Customized Parameter window Set Customized Parameter appears. -
Page 249: Setting Custom Statistics
Sorting Configuring Acquisition Settings Setting Custom Statistics Set custom statistics to create calculations based on populations of interest. Right-click the statistics table and select . The Statistics Setting window Statistics Setting appears. 5-51 C37808AC... - Page 250 Sorting Configuring Acquisition Settings Select Expression Select . The Expression window appears. Edit 5-52 C37808AC...
- Page 251 Sorting Configuring Acquisition Settings Enter the expression name in the Name section and enter the expression using the equation buttons. 5-53 C37808AC...
- Page 252 Sorting Configuring Acquisition Settings Select NOTE The equation populates in the Statistics Setting window under the Expression selection. 5-54 C37808AC...
-
Page 253: Load Sample And Record Data
Sorting Load Sample and Record Data Load Sample and Record Data Before Running Samples CAUTION Risk of erroneous results if the Sorter has been idle for an extended period of time. Perform a prime if the system has been idle for an extended period of time. Refer Performing the Flow Cell De-bubble CHAPTER 11, Replacement/Adjustment Procedures. -
Page 254: Setting Up Violet Side Scatter (Vssc) Channel
Setting Up Violet Side Scatter (VSSC) Channel For micro-particles, a VSSC option can be added to better separate side scatter signals from noise. Beckman Coulter recommends using this channel to detect particles smaller than 500 nm. NOTE Since the total available channel numbers remain the same when the VSSC channel is used, the number of fluorescent channels in the violet WDM is reduced by 1 channel. - Page 255 Place the sixth filter in position 1, the 405-nm filter in position 2, and the 450-nm filter in position 3. NOTE For the Violet WDM, Beckman Coulter recommends placing the filters in sequential order from the shortest wavelength to the longest wavelength in positions 2 to 6. Position 1 will always contain the unused filter.
- Page 256 Sorting Load Sample and Record Data Select the Default Configuration and select . The Configuration Save As window appears. Save As Name the new configuration VSSC and select Select the VSSC configuration and select . The Edit Detector Configuration window appears. Edit Change the filters and channel names according to the filter order in the violet WDM.
- Page 257 Sorting Load Sample and Record Data Right-click the VSSC channel, and select to set it as the Violet SSC channel. Set SSC Select to save the changes and close the Edit Detector Configuration window. Select Set as Current Select to save the changes and close the Detector Configuration window. Create a new experiment using the VSSC configuration.
-
Page 258: Verifying, Selecting, Editing, And Creating Detector Configuration
Sorting Load Sample and Record Data Verifying, Selecting, Editing, and Creating Detector Configuration CAUTION Risk of erroneous results. The system will read the selected Detector Configuration even if the optical filters do not match the selected Detector Configuration. You must verify the installed optical filters match the selected Detector Configuration. - Page 259 Sorting Load Sample and Record Data If a saved configuration requires changes, edit that configuration. NOTE The factory configuration is in bold and cannot be edited. a. Select the configuration, then select to access the Edit Detector Configuration screen. Edit b.
- Page 260 Sorting Load Sample and Record Data d. Ensure the new configuration is highlighted, then select . The Edit Detector Edit Configuration window appears. e. Customize the new configuration. Channels with a white background can be edited. Drag the names of the appropriate fluorescence channels and optical filters on the left to the correct channels.
-
Page 261: Sampling And Collecting Data
Sorting Load Sample and Record Data When finished, select Select the appropriate configuration. Verify that the correct optical filters are installed in the Sorter and match the newly created configuration. Select Set As Current Select To delete a configuration created in error, select . - Page 262 Sorting Load Sample and Record Data CAUTION Risk of clogging the sample line. Filter the biological sample using a 70-μm mesh aperture filter before sampling. NOTE Settings can be imported from the Acquisition Settings Catalog. Refer to Importing and Exporting Instrument Settings.
- Page 263 Sorting Load Sample and Record Data Select the desired acquisition parameters (Events/Time to Record, Sample Flow Rate, and Sample Mixing) on the left side of the screen. Select to load the sample. NOTE When you select a tube that only contains acquired data, as indicated by the blue tube in the test tube section of the screen, the following message appears: •...
- Page 264 Sorting Load Sample and Record Data Select to save the data. Record Wait for the saving process to finish. NOTE When you select a tube that contains recorded data, as indicated by the green tube in the test tube section of the screen, the following message appears: NOTE When you select a tube that only contains acquired data, as indicated by the blue tube in the...
-
Page 265: Sorting
Sorting Sorting Sorting Setting Up Tube Sorting Open the sort chamber sliding door. DO NOT OPEN THE PROTE CTION SORTE R A SORTI DOOR NG PROCE DURIN G Place the appropriate sorting tubes into the output holder and ensure they are secure. [Two 5 ml tubes and two 15 ml tubes] 5-67 C37808AC... - Page 266 Sorting Sorting CAUTION Risk of sample loss and biohazardous contamination. Ensure that the tube adapters are installed in the output holder when using the 12x75 mm tubes to collect the L2 and/or R2 side stream during the sorting. Otherwise, the sorted sample can spray outside the collection tube and contaminate the sort output holder.
- Page 267 Sorting Sorting Add a sample tube from the Tube Management screen. Select in the Tube Management Control screen to set the sorting settings. The Tube Sort window appears. 5-69 C37808AC...
- Page 268 Sorting Sorting Set the stop conditions for sorting. Explanation of restrictions: Events to Process: 1 ~ 864,000,000 Time to Sort: 1 second ~ 8 hour NOTE When multiple conditions are established, any one of these conditions stops the sorting process. Refer to Stop Criteria for Sorting.
- Page 269 Sorting Sorting IMPORTANT Place the most precious and/or rare events in the outer streams (L2/R2) for maximum purity. However, it is better to use the inner streams (L1/R1) for sorting macro-particles (≥15 μm). Set the side streams to be sorted. NOTE L1 refers to the left side stream closer to the core stream and L2 refers to the outer left side stream.
- Page 270 Sorting Sorting Set the Sort Logic. is the combinational Boolean logic of regions and gates to determine if an NOTE Sort Logic event is positive (desired for sorting). Events that fall outside the sort logic are considered negative events. NOTE The available logic displays in the dropdown list depends on the gates established in the plots.
-
Page 271: Setting Up Plate/Slide Sorting
Sorting Sorting Set the target count of cells to be sorted for each stream. NOTE The allowable range is 0~ 864,000,000. Target count “0” means unlimited. NOTE If the target volume setting exceeds the tube volume in theory, the system will display the corresponding sort stream. -
Page 272: 96-Well Deep Well Plate
Sorting Sorting Place the appropriate sorting plate/slide on the output holder and ensure it is secure. [Standard 96-well plate] [96-well deep well plate] [Slide] 5-74 C37808AC... - Page 273 Sorting Sorting IMPORTANT Ensure that the sort protection door is closed. Close the sort chamber sliding door. Select a sample tube from the Tube Management screen. Select in the Tube Management Control screen. The Plate Sort window appears. 5-75 C37808AC...
- Page 274 Sorting Sorting Select the desired plate type from the Plate Type drop-down menu. [Standard 96-well plate] [Slide] NOTE The screen varies according to the type of collection devices. 5-76 C37808AC...
- Page 275 Sorting Sorting Set the sorting sequence. Select the desired wells, and select to set the well settings for the desired wells. The Well Setting window appears. NOTE Ensure that the gates are created prior to this well settings. 5-77 C37808AC...
- Page 276 Sorting Sorting a. Enter a name for the group of desired wells. b. Select a color for the group of desired wells. c. Set the Sort logic. d. Set the Sort Mode for this group. NOTE For explanations about Sort Mode, refer to Sort Mode CHAPTER 2, Using the CytExpert SRT Software.
- Page 277 Sorting Sorting e. Set the Target Count for each well. NOTE The range of target count is 1- 1,000,000. The CyClone Movement system automatically moves to next well when the sorted events in a well reach the target. The sorting stops until all the desired wells reach the target. f.
-
Page 278: Stop Criteria For Sorting
Sorting Sorting Select to set the well settings for several groups of desired wells. Exit the Collection Plate window. Stop Criteria for Sorting Three stop sorting conditions are available for tube sorting. When multiple stop conditions are established, any one of these conditions stops the sorting process. . -
Page 279: Calibrating The Sort Collection Device
Sorting Sorting Calibrating the Sort Collection Device Calibrate the plate or slide position for the following cases: • Every time after running the sort calibration • When switching the sort collection device from tube to plate, or vice versa. • After using a new plate type •... - Page 280 Sorting Sorting Select in the Advanced menu. The Collection Device Library window Collection Device Library appears. Select the collection device type from the Collection Device Library window and place a plate or slide on the output holder. [Standard 96-Well Plate] NOTE Ensure plate well A1 aligns with position A1.
- Page 281 Sorting Sorting [Slide] Select on the Collection Device Library window. The Collection Device Calibration Calibrate window appears. [Standard 96-Well Plate] 5-83 C37808AC...
- Page 282 Sorting Sorting [Slide] Select the well to be calibrated. NOTE The selected well is highlighted in yellow. • UL: upper-left well A1. • UR: upper-right well A12. • LL: lower-left well H1. • LR: lower-right well H12. 5-84 C37808AC...
- Page 283 Sorting Sorting Select to adjust the well positions in the X-, and Y-axes. You can type a number as well. The X-axis arrows moves the well position left and right. The Y-axis arrows moves the well position forward and back. (0,0) Home position NOTE...
- Page 284 Sorting Sorting [Standard 96-Well Plate] 5-86 C37808AC...
- Page 285 Sorting Sorting Set the count of droplets for each well. [Standard 96-Well Plate] 5-87 C37808AC...
- Page 286 Sorting Sorting Select to deposit a small puddle over the wells. Test [Standard 96-Well Plate] Remove the plate lid or slide and verify that the drops are located in the center of each well at the corners. NOTE If the drops are not aligned with the center of the well, repeat steps until the stream R1 hits the center of each well.
-
Page 287: Manual Side Stream Calibration (Optional)
Sorting Sorting [Standard 96-Well Plate] NOTE Select Restore to Customer Settings to discard the current calibration and use the previous calibration setting. Select Restore to Factory Settings to set back to the factory default. Select to exit. Close Close the sort chamber sliding door. Manual Side Stream Calibration (Optional) This function is for advanced users to fine tune the charge voltage settings to ensure that the drops are deposited into the center of a tube. - Page 288 Sorting Sorting IMPORTANT The charge voltage and defanning setting can cause the side stream detection to be inaccurate. The system will deactivate the Side Stream Monitor function when the manual charge voltage or defanning setting takes effect. To restart the Side Stream Monitor, you need to perform the Sort Calibration again.
- Page 289 Sorting Sorting The Tube Sort window displays. Set up the tube sort settings. Refer to Setting Up Tube Sorting. Open the sort chamber sliding door and place a clean slide over the top of tubes. NOTE The slide is for viewing the position of drops into a tube. Select to exit the Tube Sort window.
- Page 290 Sorting Sorting Adjust the charge voltage to set the deflection angle for L2 stream. Explanation of restrictions: L2 Stream: 60 ~180 V L1 Stream: 10 ~ 100 V Core Stream: -40 ~ 40 V R1 Stream: -10 ~ 100 V R2 Stream: -60 ~ -180 V Adjust the defanning.
-
Page 291: Adjusting Tube Position (Optional)
Sorting Sorting Adjusting Tube Position (Optional) The Tube Position Setting allows you to slightly adjust the output holder position in the X-axis and Y-axis to align the sort tubes with the side streams when a sorting is in process. This function is helpful when all the side streams are slightly tilted to one side. -
Page 292: Starting And Monitoring A Sort
Sorting Sorting Starting and Monitoring a Sort During a Sort CAUTION Risk of contaminating the sorted sample. Do NOT open the sort protection door (refer to Figure 1.22) when a sorting is in process. Otherwise, the system disables the voltage to the deflection plates immediately, and a small amount of the waste stream (L1 stream) in the Straight Down mode will drop on a plate or slide due to the response delay of the waste catcher. -
Page 293: Viewing Sorter Status
Sorting Sorting Viewing Sorter Status Select in the lower right corner of the software screen, or select Sorter Status from the Sorting menu to access the Sorter Status window. NOTE The green line indicates the break-off position at the moment when the Sort Calibration finishes. The green line is created automatically, and can be used as a baseline. -
Page 294: Side Stream Monitor
Sorting Sorting Side Stream Monitor IMPORTANT The Side Stream Monitor is not available if the default voltage or defanning has ever been changed manually. You can re-start the Side Stream Monitor only after performing the Sort Calibration again. For instructions on Sort Calibration, refer to Sort Calibration (Auto Drop Delay). -
Page 295: Auto Maintain
Sorting Sorting Auto Maintain IMPORTANT Ensure that the Auto Maintain is enabled prior to starting a sort. Otherwise, the following warning message appears. When a sort is in process, the software with the IntelliSort technology monitors the droplet stream and maintains the Drop Delay automatically, which is called Auto Maintain. If the software detects an instability, Auto Maintain modifies the amplitude parameter (without affecting the determined DD) to ensure that the sort continues uninterrupted with no operator intervention. - Page 296 Sorting Sorting The status of Auto Maintain can be viewed by the icon below the droplet view on the Sorter Status window. Following the instructions below to enable the Auto Maintain. 5-98 C37808AC...
- Page 297 Sorting Sorting Select in the lower right corner of the software screen. The Sorter Status window appears. 5-99 C37808AC...
- Page 298 Sorting Sorting Select to unfold the Sorter Status window. More details 5-100 C37808AC...
- Page 299 Sorting Sorting Select to turn on the Auto Maintain. Turn On The Auto Maintain icon turns green. 5-101 C37808AC...
-
Page 300: Viewing Sorting Statistics
Sorting Sorting Viewing Sorting Statistics CAUTION Risk of sample loss and biohazardous contamination. Remove the sample collection tube when the tube is nearly full. The Tube Volume value on the software might not be accurate due to the various sample conditions. Use suitable laboratory attire when removing the sample. - Page 301 Sorting Sorting [Tube Sorting] [Plate Sorting] 5-103 C37808AC...
-
Page 302: Pause Sorting And Resume Sorting
Sorting Sorting Table 5.3 Additional Information for Plate Sorting The green dot at the upper right corner indicates that the sorting of this well has completed. The target count of this well is 100. The sorting sequence is the 75th. The red square indicates that the sorting of this well is in process. -
Page 303: Index Sorting
Sorting Sorting Select to reset the initial buffer volume. Select to resume sorting and acquiring data. Index Sorting You can use the index sorting to sort single cells onto a plate or slide, and index the well or slide location to the collected parameters for that cell. The index sorting helps to ensure that a sorted cell with a specific phenotype has been sorted. - Page 304 Sorting Sorting Select to start sorting. Sort Select from the drawing control tool bar to view the index sorting result. Select the wells you want to index on the index sorting plot. 5-106 C37808AC...
- Page 305 Sorting Sorting Right-click on the gate and select Show as rare events NOTE Show as rare events is to increase the visibility of the gated population anywhere they appear on the plots. You can see that the location of the populations is highlighted on the plot. 5-107 C37808AC...
-
Page 306: Sort Report
Sorting Sorting Sort Report Creating a Sort Report To create a sort report, select from the tube management area. A new sort report page appears. 5-108 C37808AC... -
Page 307: Designing A Report
Sorting Sorting Designing a Report Select on the sort report tool bar then select a property element to add to a report. NOTE The Sort Report Setting is different for tube experiment and plate experiment. Refer to Figure 5.10 Figure 5.11. -
Page 308: Report Output
Sorting Sorting Figure 5.11 Sort Report Setting-Plate Experiment Statistics-[With Index Sorting Disabled] Statistics-[With Index Sorting Enabled] Report Output Reports can be either be printed or exported as a PDF or CSV file via the output icons on the report tool-bar. Refer to Figure 5.12. -
Page 309: Additional Information For Aseptic Sorting
Sorting Exporting Data Additional Information for Aseptic Sorting Aseptic Sorting Workflow: Aseptic System Sort Create Sorting Ô Ô Ô Ô Ô Cleaning Startup calibration experiment For instructions on the Aseptic Cleaning, refer to Aseptic Clean Program CHAPTER 10, Cleaning Procedures. Exporting Data Select the sample tube to be analyzed. - Page 310 Sorting Exporting Data Right-click the plot and select to make the display color of the specified Bring population to front gate appear in front of all other colors, or select to hide the display Send population to back color of the specified gate behind all other colors. Select in the plot area to generate a statistical table.
- Page 311 Sorting Exporting Data Right-click the table and select to modify the settings of the statistics display Statistics Setting parameters. The Statistics Setting window appears. 5-113 C37808AC...
- Page 312 Sorting Exporting Data The Statistics Setting window allows you to change the display of the header, statistical elements and cell populations included. 5-114 C37808AC...
- Page 313 Sorting Exporting Data The final generated plots appear as shown below. Right-click a plot and select from the drop-down Export to Clipboard Export to Graphic File menu to select an image to export. • copies the plot to the clipboard, allowing you to paste it directly into Export to Clipboard documents in common file formats.
- Page 314 Ensure that any storage devices used with the instrument are free from viruses. To guard against data loss, Beckman Coulter recommends backing up data on a regular basis. Beckman Coulter is not liable for any loss of data resulting from computer viruses or damage to hardware.
-
Page 315: Exporting Fcs Files
Sorting Exporting Data Exporting FCS Files Exporting Single Tube Files Right-click the desired tube from the test tube section of the screen and select Export FCS File The Export FCS File window appears. 5-117 C37808AC... - Page 316 Sorting Exporting Data Select the population from the Population dropdown menu. Select either Area Height NOTE Select Index Sort to export the Index Sort data. The two parameters Sort Index-X and the Sort Index-Y will be added in the exported FCS file, which can be viewed by other analysis software. Select the FCS format next to File Version.
- Page 317 Sorting Exporting Data Exporting Multiple FCS Files Select from the File menu. The Export FCS File window appears. Export FCS File Select the tubes to export and select Next Repeat Steps from Exporting Single Tube Files. 5-119 C37808AC...
-
Page 318: Exporting Plots Or The Statistics Table Of Multiple Tubes As Picture Files
Sorting Exporting Data Exporting Plots or the Statistics Table of Multiple Tubes as Picture Files Right-click on the plot or statistics to export. Select . The Export Samples to Graphic Files window appears. Export Samples to Graphic File Select the desired tubes to export. Select NOTE The plots of the selected tubes save as .bmp file. -
Page 319: Importing And Exporting Instrument Settings
Sorting Exporting Data Importing and Exporting Instrument Settings The CytExpert SRT software supports importing and exporting instrument settings to facilitate the experiment process. Only instrument settings identical to the current configuration can be imported with current detector settings. Select to edit gain, threshold, and width. These can be imported from an experiment file or from a catalog of instrument settings. - Page 320 Sorting Exporting Data Select , locate the file with the required instrument settings, or select Import From File Import to import the instrument settings. From Catalog 5-122 C37808AC...
-
Page 321: Importing And Exporting Compensation Settings
Sorting Exporting Data Then the Information window displays. Select Exporting Instrument Settings Select the desired sample tube to export. Then select Select to export a current set of instrument settings, stored in a file ending in .acq. Export To File Select , give a name to the settings to be exported, and export the file to the Export To Catalog... -
Page 322: Printing Graphics
Sorting Exporting Data Printing Graphics CytExpert SRT offers printing functionality for the plots and tables that appear in the plot area. The software also allows you to save these images by converting them into .jpg or .pdf files. Select in the printer control area to print directly. Or, select the print drop-down arrow for the following options: Used to access the Preview screen. - Page 323 Sorting Exporting Data — Print preview also lets you choose between printing directly , modifying the printer configuration , or adjusting the page settings • Used to adjust the page settings. Page Setup. Used to print data for multiple tubes. •...
-
Page 324: Saving The Experiment
Sorting Saving the Experiment • Used to print a PDF of the data for multiple tubes. Batch Export to PDF File. 1. Select The Batch Export to PDF File window appears. Batch Export to PDF File. 2. Select the tube to print to PDF. 3. -
Page 325: Compensation
CHAPTER 6 Compensation Overview This chapter describes how to create a compensation experiment and automatically calculate compensation values after acquiring the data. It also explains how to use these calculations for other experiments. Compensation involves correction for fluorescence spillover emitted by the primary fluorochrome that is detected by the secondary fluorescent channels. -
Page 326: Creating A Compensation Experiment
Compensation Creating a Compensation Experiment Figure 6.2 After Compensation NOTE CytExpert SRT compensation allows full matrix compensation, manual, and automatic. CytExpert SRT compensation also includes a novel Compensation Library for storage of spillover values of dyes to easily determine the correct compensation matrix with new gain settings. Workflow: Apply Prepare... - Page 327 Compensation Creating a Compensation Experiment Navigate to the desired file path and select . The Compensation Setup window appears. Save CAUTION Risk of erroneous results. Select an unstained tube, according to which the fluorescence background will be set. If there is not an unstained tube available, then each single color tube must have a negative population.
- Page 328 Compensation Creating a Compensation Experiment If a negative population is not present in each single color tube, then an unstained control tube is recommended. NOTE The default selection is Area. The unstained negative control tube can be selected if needed. NOTE Label and lot number information can be retained in the Compensation Library to facilitate future compensation calculations.
-
Page 329: Preparing The Compensation Sample
Compensation Creating a Compensation Experiment Select After confirmation, the software automatically generates the following compensation experiment. NOTE Select Area to calculate compensation based on the Area measured. Alternatively, select Height to calculate compensation based on the Height measured. Preparing the Compensation Sample To perform a compensation experiment, prepare: •... -
Page 330: Using Control Samples To Generate The Compensation Matrix
Compensation Creating a Compensation Experiment Using Control Samples to Generate the Compensation Matrix Defining the Negative Population Using Unstained Samples Select to put the instrument in the Ready state. Initialize NOTE Skip this step if the instrument has already been initialized. CAUTION Risk of erroneous results. - Page 331 Compensation Creating a Compensation Experiment Select to load the sample. Set an appropriate number of cells to save in Events to Record located on the left side of the screen. Select to save the data. Record Running the Single Positive Control Samples Place the single positive tube in the sample station.
-
Page 332: Positive Population Selected From The Single-Stained Sample
Compensation Creating a Compensation Experiment CAUTION Risk of erroneous results. Calculations based on excessively small volumes of sampled data can be inaccurate. Ensure that more than 1,000 positive events and more than 1,000 negative events are sampled. If the number of positive cells is comparatively low, increase the number of acquisition events to a suitable amount. -
Page 333: Positive And Negative Populations Without An Unstained Sample
Compensation Creating a Compensation Experiment NOTE Figure 6.4 shows an example of selecting both the positive and negative populations without an unstained sample. Figure 6.4 Positive and Negative Populations Without an Unstained Sample 1. Negative population 2. Positive population Select Record Repeat steps to acquire data from subsequent single positive sample tubes. -
Page 334: Calculating Compensation Values
Compensation Creating a Compensation Experiment Calculating Compensation Values Check all acquired sample tubes and confirm that the gating is appropriate. Select or select in the Compensation menu to calculate the Compensation Calculation compensation values. The Compensation Matrix window appears, displaying the calculated compensation values. NOTE The primary fluorescence channels are listed in columns;... -
Page 335: Creating The Compensation Matrix From Previously Acquired Data
Compensation Creating the Compensation Matrix from Previously Acquired Data Select to save the single color compensation values in the Save To Compensation Library compensation library. Specify the key words and select NOTE The settings stored in the compensation library are specific to the detector configuration. The compensation library can only be applied when the detector configurations are the same. - Page 336 Compensation Creating the Compensation Matrix from Previously Acquired Data Select from the File menu or the start page. New Compensation To create a compensation experiment, select the required channels. Refer to Setting the Channel and Label CHAPTER 5, Sorting. Right-click on the appropriate test tube and select .
-
Page 337: Adjusting Compensation
Compensation Adjusting Compensation Calculate the compensation values and export them. Refer to Calculating Compensation Values. Adjusting Compensation Manually Adjusting Compensation The compensation can be manually adjusted in an experiment in two ways: • Select the populations where needs to be adjusted in the bivariate plot. Select from the graphic control area, then click and drag the mouse pointer up and down or left and right inside the plot to adjust compensation. - Page 338 Compensation Adjusting Compensation After opening the desired compensation file, the Import Compensation window appears. Select one of the following: • Import compensation matrix and convert it with current gains. • Import compensation matrix. • Import compensation matrix and gain. NOTE •...
-
Page 339: Importing Compensation Settings From The Compensation Library
Compensation Adjusting Compensation Importing Compensation Settings from the Compensation Library You can choose which single color data to include from the compensation library. Only single color data in the compensation library from the same detector configuration can be imported into the compensation matrix. -
Page 340: Exporting Compensation Settings
Compensation Adjusting Compensation In the Keywords column, the corresponding compensation values can be selected for each channel. The compensation values of the same keyword can also be selected using the drop-down menus in the Keywords column. Select to import the compensation values. Exporting Compensation Settings Select the desired sample tube to export. - Page 341 Compensation Adjusting Compensation Select to specify a path and file name for the compensation file you are saving. Export Select Save NOTE The generated file ends in .comp. 6-17 C37808AC...
-
Page 342: Managing The Compensation Library
Compensation Adjusting Compensation Managing the Compensation Library Compensation values can be managed in the Compensation Library. Select from the Settings menu. The Compensation Library window Compensation Library appears. NOTE The Compensation Library is arranged by fluorescence detection channels. Select the desired single color sample. The compensation information appears on the right side of the window. -
Page 343: Adding Channels For Compensation
Compensation Adjusting Compensation Adding Channels for Compensation Channels requiring compensation calculations that have not been previously acquired can be added to the compensation experiment by acquiring the necessary positive tubes. In the compensation experiment, select in the compensation controls, or select in the Settings menu. - Page 344 Compensation Adjusting Compensation 6-20 C37808AC...
-
Page 345: Chapter 7: Data Review
CHAPTER 7 Data Review Overview This chapter discusses how to use the Analysis screen to analyze data. Data can be analyzed using any computer equipped with the CytExpert SRT software. No online connection is required. Workflow: Import experiment or data Plot and configure statistics Export results Ô... - Page 346 Data Review Copying Experiments and Importing Data In the new or opened experiment, select in the File menu to import the data Import FCS File files. Imported data files appear in the Tube screen. symbol in front of each data tube indicates that the data tube is an imported data file. Imported data files are copied and saved in the folder where the current experiment data files are saved.
-
Page 347: Setting The Plots And Statistics
Data Review Setting the Plots and Statistics Setting the Plots and Statistics Opening the Analysis Screen Select on the left to enter the Analysis screen. Copy plots obtained during data acquisition. a. If you need original plots used during data acquisition, select to access the Acquisition screen. -
Page 348: Creating Histogram And Dot Plot Overlays
Data Review Setting the Plots and Statistics Use the sample selection controls in the graphics controls tool bar at the top of the page (see Figure 2.1) to change the data displayed in a plot. a. Select the plot requiring a change to the data displayed. By pressing and holding the Ctrl key while selecting plots, you can select several plots at one time. - Page 349 Data Review Setting the Plots and Statistics IMPORTANT A maximum of 10 samples can be overlaid. Select to select samples for overlay display. Or, drag and drop samples from the tube list on the left into the histogram or dot plot overlay. The software automatically assigns different colors to different data.
-
Page 350: Calculating Sample Concentration
Calculating Sample Concentration Calculating Sample Concentration The CytoFLEX SRT instrument supports the calculation of the sample concentration based on the known concentration of the reference beads. The system does not support the direct calculation of concentration based on the volume. -
Page 351: Adjusting Compensation Settings
Data Review Adjusting Compensation Settings Figure 7.1 Statistics Setting Adjusting Compensation Settings Data compensation can be carried out at any time. You can select the desired tube in the tube list on the left side of the screen and select in the compensation controls, or select Compensation in the Compensation menu. -
Page 352: Exporting Results
Data Review Exporting Results Exporting Results Refer to Exporting Data CHAPTER 5, Sorting. C37808AC... -
Page 353: Chapter 8: Shutting Down The System
Risk of corrupting the embedded controller's file system. Do not skip the System Shutdown program to shut down the system. Turning off the main power switch located on the Sorter directly may corrupt the system. This chapter provides procedures for shutting down the CytoFLEX SRT instrument. Shutdown Workflow: System... -
Page 354: Running Shutdown Program
The System Shutdown Program is to rinse the sample line and perfuse the flow cell with the CytoFLEX SRT Shutdown fluid to prevent saline accumulation. It is required to run the System Shutdown Program every time you shut down the instrument. Refer System Shutdown. - Page 355 Shutting Down the System Running Shutdown Program The System Shutdown window appears. C37808AC...
- Page 356 Shutting Down the System Running Shutdown Program CAUTION Risk of damage to the nozzle. When cleaning or replacing the nozzle, always handle with care to prevent the nozzle module from falling. Remove the nozzle module by pushing the metal release clamps inwards. Select The Confirm window displays.
- Page 357 Shutting Down the System Running Shutdown Program Select to start the System Shutdo n program. The System Shutdown program takes about five minutes. C37808AC...
- Page 358 Shutting Down the System Running Shutdown Program Then the following window displays. Perform the cleaning. Refer to Cleaning during Shutdown. C37808AC...
-
Page 359: Long Term Shutdown
Shutting Down the System Running Shutdown Program Select Next Select Close The system enters into the idle state. Long Term Shutdown is only available when the system is in the idle state. Long Term Shutdown C37808AC... - Page 360 Shutting Down the System Running Shutdown Program IMPORTANT Once you begin, ensure that you complete the entire Long Term Shutdown procedure before leaving the instrument. The entire process takes about 30 minutes. IMPORTANT If the Long Term Shutdown procedure was terminated by accident, perform the following: •...
- Page 361 Shutting Down the System Running Shutdown Program The Long Term Shutdown window appears. C37808AC...
- Page 362 Shutting Down the System Running Shutdown Program CAUTION Risk of damage to the nozzle. When cleaning or replacing the nozzle, always handle with care to prevent the nozzle module from falling. Remove the nozzle module by pushing the metal release clamps inwards. 8-10 C37808AC...
- Page 363 Shutting Down the System Running Shutdown Program Select . The following window appears. Next 8-11 C37808AC...
- Page 364 Shutting Down the System Running Shutdown Program WARNING Risk of fire hazard. Ethanol is a volatile liquid that cannot be used near a fire source. Empty the sheath tank and refill the sheath tank with at 1.5 L 70% ethanol. For instructions, refer to Filling the Sheath Tank CHAPTER 11, Replacement/Adjustment Procedures...
- Page 365 Shutting Down the System Running Shutdown Program Replace the waste air filter with a new one. For instructions, refer to Replacing the Waste Air Filter CHAPTER 11, Replacement/Adjustment Procedures. Empty the waste container. For instructions, refer to Emptying the Waste Container CHAPTER 11, Replacement/Adjustment Procedures.
- Page 366 Shutting Down the System Running Shutdown Program Select . The system starts cleaning the sheath line, flow cell, and sample probe with the 70% Next ethanol solution. This process takes about 15 minutes. 8-14 C37808AC...
- Page 367 Shutting Down the System Running Shutdown Program Wait for the process to finish. The following window appears. Perform the cleaning. Refer to Cleaning during Shutdown. 8-15 C37808AC...
- Page 368 Shutting Down the System Running Shutdown Program Select Next Select . The flow cell becomes empty. Close NOTE The Long Term Shutdown program might introduce air bubbles into the system. Refer to Removing Trapped Air Bubbles CHAPTER 11, Replacement/Adjustment Procedures. 8-16 C37808AC...
-
Page 369: Cleaning During Shutdown
Shutting Down the System Cleaning during Shutdown Cleaning during Shutdown Use universal precautions when working with pathogenic materials. Means must be available to decontaminate the instrument and to dispose of biohazardous waste. WARNING Use barrier protection, including protective eye wear, gloves, and suitable laboratory attire. -
Page 370: Turning Off The Power
Shutting Down the System Turning Off the Power Clean the deflection plates and side stream illumination source. For instructions, refer to Cleaning the Side Stream Illumination Source and the Deflection Plates CHAPTER 10, Cleaning Procedures. Clean the nozzle lift. Refer to Daily Decontamination During Shutdown CHAPTER 10, Cleaning... -
Page 371: The Sorter)
Shutting Down the System Turning Off the Power Turn the computer off. Optional: Turn the Biosafety Cabinet off. NOTE It is recommended to leave the Biosafety Cabinet on to save time for the thermal equilibrium if the Sorter will be used the next day. 8-19 C37808AC... -
Page 372: Chapter 9: Troubleshooting
IMPORTANT In addition to the information stated, never disassemble the instrument or have it repaired by unauthorized personnel. Beckman Coulter bears no responsibility for any problems arising from the unauthorized repair of the instrument. This chapter introduces solutions to common problems. If there is a problem, follow the information in this chapter to carry out self-inspection. -
Page 373: Laser Beam Hazards
Troubleshooting Laser Related Hazards Laser Beam Hazards The CytoFLEX SRT instrument contains 4 solid-state diode lasers that are capable of producing laser light at the following levels: • 405-nm, 90-mW solid-state diode laser • 488-nm, 50-mW solid-state diode laser • 561-nm, 30-mW solid-state diode laser •... -
Page 374: Laser Warning Labels
If necessary, a cover with a CDRH-approved or IEC compliant label must be removed by a qualified Beckman Coulter Representative only. Refer to the following figures for the locations of the CDRH-approved and IEC compliant labels: Refer to Figure 9.1... -
Page 375: Hazard Labels And Locations
Troubleshooting Hazard Labels and Locations Figure 9.2 Laser Warning Label within the Optical Bench (Located Inside the Sorter) Figure 9.3 Laser Warning Labels on the Sorter Back Cover CLASS 1 LASER PRODUCT PRODUIT LASER CLASSE 1 PRODU CT CLASS 1 LASER CLASSE 1 PRODU IT LASER R PROD UCT... -
Page 376: Biohazard Label And Location
Troubleshooting Hazard Labels and Locations Biohazard Label and Location Figure 9.4 Biohazard Label on the Fluidics Cart and Waste Container Figure 9.5 Biohazard Label on the Sample Station and Sort Chamber DO NOT OPE N THE PRO TEC SOR TER TIO N DO A SOR TIN OR DUR... -
Page 377: Electrical Shock Hazard Label And Location
Troubleshooting Hazard Labels and Locations Electrical Shock Hazard Label and Location Figure 9.6 Electrical Shock Hazard Label DO NOT OPEN THE PROT ECTI SORT ER ON DOO A SORT R DURI ING PROC ESS. Caution Labels and Location Figure 9.7 Caution Label on the Sorter Back Cover PRODU CT CLASS 1 LASER CLASS E 1... -
Page 378: Label On The Sort Protection Door
Troubleshooting Hazard Labels and Locations Figure 9.8 Label on the Sort Protection Door DO NOT OPEN THE SORTER DO NOT OPE N THE PRO TEC SOR TER TIO N DOO A SOR TING R DUR ING PRO CES PROTECTION DOOR DURING A SORTING PROCESS. -
Page 379: Pinch Hazard Labels And Location
Troubleshooting Hazard Labels and Locations Pinch Hazard Labels and Location Figure 9.10 Pinch Hazard Label on the Sample Station Figure 9.11 Pinch Hazard Label on the Sort Chamber DO NO T OP EN TH PR OT EC E SO RTE TIO N DO OR DU A SO RTI... -
Page 380: Disposal Precaution
Troubleshooting Disposal Precaution Disposal Precaution WARNING Risk of biohazardous contamination if you have skin contact with the waste container, its contents, and its associated tubing. The waste container and its associated tubing could contain residual biological material and must be handled with care. - Page 381 Troubleshooting Troubleshooting Table Table 9.1 Troubleshooting-[Error Codes] Problem Probable Cause Corrective Action [Error code 010037] Bubble • The silicone tubing is not 1. Verify that the joint between the silicone tubing and detector error. the PEEK tubing is completely in the slot of bubble completely seated in the slot of detector.
- Page 382 Troubleshooting Troubleshooting Table Table 9.1 Troubleshooting-[Error Codes] (Continued) Problem Probable Cause Corrective Action [Error code 060049] The charge • The fluid stream is unstable. 1. Select Standby to turn off the sheath. phase value is out of range. • The photodiodes are defective. 2.
- Page 383 Troubleshooting Troubleshooting Table Table 9.1 Troubleshooting-[Error Codes] (Continued) Problem Probable Cause Corrective Action [Error code 060050] Failed to • The fluid stream is unstable. 1. Select Standby to turn off the sheath. set the charge voltage of R1 • The photodiodes are defective. 2.
- Page 384 Troubleshooting Troubleshooting Table Table 9.1 Troubleshooting-[Error Codes] (Continued) Problem Probable Cause Corrective Action [Error code 060051] Charge • The fluid stream is unstable. 1. Select Standby to turn off the sheath. phase verification failed. • The photodiodes are defective. 2. Verify that the nozzle is clean and O-ring is present. •...
- Page 385 Troubleshooting Troubleshooting Table Table 9.1 Troubleshooting-[Error Codes] (Continued) Problem Probable Cause Corrective Action [Error code 060052] Charge • The fluid stream is unstable. 1. Select Standby to turn off the sheath. phase optimization failed. • The photodiodes are defective. 2. Verify that the nozzle is clean and O-ring is present. •...
- Page 386 Troubleshooting Troubleshooting Table Table 9.1 Troubleshooting-[Error Codes] (Continued) Problem Probable Cause Corrective Action [Error code 060053] The charge • The fluid stream is unstable. 1. Select Standby to turn off the sheath. voltage of L2 stream is out of • The photodiodes are defective. 2.
- Page 387 Troubleshooting Troubleshooting Table Table 9.1 Troubleshooting-[Error Codes] (Continued) Problem Probable Cause Corrective Action [Error code 060058] Failed to • The fluid stream is unstable. 1. Select Standby to turn off the sheath. optimize the charge voltage for • The photodiodes are defective. 2.
- Page 388 Troubleshooting Troubleshooting Table Table 9.1 Troubleshooting-[Error Codes] (Continued) Problem Probable Cause Corrective Action [Error code 060063] Failed to • The fluid stream is unstable. 1. Select Standby to turn off the sheath. determine the Detector Delay • The photodiodes are defective. 2.
- Page 389 Troubleshooting Troubleshooting Table Table 9.1 Troubleshooting-[Error Codes] (Continued) Problem Probable Cause Corrective Action [Error code 060069] Scan • The fluid stream is unstable. 1. Select Standby to turn off the sheath. defanning value error. • The photodiodes are defective. 2. Clean the side stream illumination and the deflection plates.
- Page 390 Troubleshooting Troubleshooting Table Table 9.1 Troubleshooting-[Error Codes] (Continued) Problem Probable Cause Corrective Action [Error code 060070] The Central • The fluid stream is unstable. 1. Select Standby to turn off the sheath. stream is not tight. • The photodiodes are defective. 2.
- Page 391 Troubleshooting Troubleshooting Table Table 9.1 Troubleshooting-[Error Codes] (Continued) Problem Probable Cause Corrective Action [Error code 060075] The • The fluid stream is unstable. 1. Select Standby to turn off the sheath. defanning value is out of range. • The photodiodes are defective. 2.
- Page 392 Troubleshooting Troubleshooting Table Table 9.1 Troubleshooting-[Error Codes] (Continued) Problem Probable Cause Corrective Action [Error code 060093] The central • The fluid stream is unstable. 1. Select Standby to turn off the sheath. stream is not aligned with the • The photodiodes are defective. 2.
- Page 393 Troubleshooting Troubleshooting Table Table 9.1 Troubleshooting-[Error Codes] (Continued) Problem Probable Cause Corrective Action [Error code 070004] No stream • The camera USB cable is not securely 1. Select Standby to turn off the sheath. is detected. connected. 2. Verify that the camera USB on the Sorter is securely •...
Need help?
Do you have a question about the CytoFLEX SRT and is the answer not in the manual?
Questions and answers