
Subscribe to Our Youtube Channel
Related Manuals for Tormach Automatic Tool Changer


Summary of Contents for Tormach Automatic Tool Changer
- Page 1 TECHNICAL DOCUMENT Version 1220A OWNER'S GUIDE M MACHINE AUTOMATIC TOOL CHANGER (ATC) RETROFIT FOR PCNC 770 SERIES 3 Page 1...
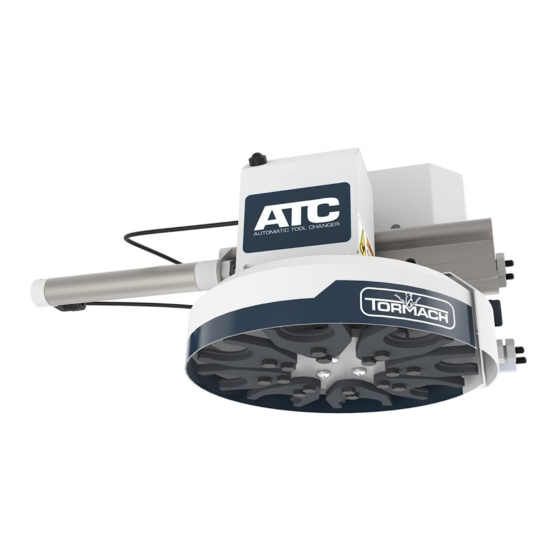
- Page 2 Automatic Tool Changer (ATC) for PCNC 1100 Series 3 (PN 39009) The Automatic Tool Changer (ATC) holds up to 10 tools in a single tray. If your program requires more tools, the ATC changes tools automatically for all tools assigned to the tray, and pauses for a manual tool change for all tools not assigned to the tray.
- Page 3 IMPORTANT! You must update your controller to the latest version of PathPilot before installing and operating the Automatic Tool Changer. If you don't, there's a risk that the ATC could become inoperable. 4. Update your controller: From the Status tab, select Update. Then, follow the on-screen instructions. Once the controller is updated to the latest version of PathPilot, go to Step 5.
- Page 4 Machinist's square, between 6 in. and 9 in. (152 mm and 229 mm) Straight rod (for Tormach Tooling System (TTS) tool holder), between 8 in. and 12 in. (203 mm and 305 mm) Tormach Tooling System (TTS) tool holder (for alignment rod) Air Requirements You must verify that the site conforms to the following air supply requirements.
-
Page 5: Table Of Contents
TECHNICAL DOCUMENT Install the Air Cylinder Mount the Automatic Tool Changer (ATC) Bracket Install the Main Assembly Level the Automatic Tool Changer (ATC) Prepare the Machine Examine Perpendicularity in the Y Direction Examine Perpendicularity in the X Direction Examine the Alignment of the Carousel Door Opening... -
Page 6: Mount The Automatic Tool Changer (Atc) Bracket
Connect the short air line to the front of the cylinder. Connect the long air line to the back of the cylinder. Mount the Automatic Tool Changer (ATC) Bracket 1. Identify the four provided standoffs that are used to mount the ATC to the Z-column:... - Page 7 Note: Verify that the tilt standoff's eccentric cam fits into the large slot on the ATC mounting bracket. Page 7 ©Tormach® 2020 tormach.com Specifications subject to change without notice. TD10560: Owner's Guide: M ATC Retrofit for PCNC 770 Series 3 (1220A)
-
Page 8: Install The Main Assembly
4. Secure the ATC main assembly to the mounting bracket with the four M8 × 1.25 - 16 mm socket head cap screws and washers that you set aside in Step 1. Level the Automatic Tool Changer (ATC) This section gives instructions to roughly level the ATC on the machine by using a long, straight rod. More adjustments are made later in the installation procedure. -
Page 9: Prepare The Machine
2. Verify that the linear bearing on the ATC is flush with the ATC main assembly. Figure 7: Linear bearing flush with the ATC main assembly. Page 9 ©Tormach® 2020 tormach.com Specifications subject to change without notice. TD10560: Owner's Guide: M ATC Retrofit for PCNC 770 Series 3 (1220A) -
Page 10: Examine Perpendicularity In The Y Direction
5. Put the tool holder into the fork so that the groove in the tool holder slides into the fork. Don't rest the tool holder on top of the fork. Figure 8: Groove on a Tormach Tooling System (TTS) aligned with the shoulder of an ATC fork. 6. Put a machinist's square on the machine table. -
Page 11: Examine Perpendicularity In The X Direction
Alignment of the Carousel Door Opening" (on the next page). If the rod must be adjusted, go to Step 2. Page 11 ©Tormach® 2020 tormach.com Specifications subject to change without notice. TD10560: Owner's Guide: M ATC Retrofit for PCNC 770 Series 3 (1220A) -
Page 12: Examine The Alignment Of The Carousel Door Opening
3. Verify that the ATC is all the way forward (toward the spindle), and then slowly move the Z-axis down (-Z) to examine the clearance of the carousel door opening. Page 12 ©Tormach® 2020 tormach.com Specifications subject to change without notice. - Page 13 Figure 12: Socket head cap screws securing the ATC main assembly to the mounting bracket. Page 13 ©Tormach® 2020 tormach.com Specifications subject to change without notice. TD10560: Owner's Guide: M ATC Retrofit for PCNC 770 Series 3 (1220A)
-
Page 14: Make Air Connections
WARNING! Crush Hazard: If the ATC isn't completely retracted, it could move once the air is reconnected. When you reconnect the air, you must keep your hands away from the ATC. Page 14 ©Tormach® 2020 tormach.com Specifications subject to change without notice. -
Page 15: Make Electrical Connections
If you don't, there's a risk of electrocution or shock. 1. Power off the machine and the PathPilot controller. Page 15 ©Tormach® 2020 tormach.com Specifications subject to change without notice. TD10560: Owner's Guide: M ATC Retrofit for PCNC 770 Series 3 (1220A) - Page 16 6. Connect red wire 105A to the slot opposite red wire 105 on the terminal block. Figure 15: New wire configuration on the terminal block. Page 16 ©Tormach® 2020 tormach.com Specifications subject to change without notice. TD10560: Owner's Guide: M ATC Retrofit for PCNC 770 Series 3 (1220A)
-
Page 17: Connect The Atc Legacy Adapter Cable
2. Route the loose wires from the ATC Legacy Adapter Cable out of the enclosure and toward the electrical cabinet on the back of the machine. Page 17 ©Tormach® 2020 tormach.com Specifications subject to change without notice. TD10560: Owner's Guide: M ATC Retrofit for PCNC 770 Series 3 (1220A) - Page 18 Figure 17: Access hole in the bottom of the electrical cabinet. 4. Remove the wire trough covers in the electrical cabinet. Page 18 ©Tormach® 2020 tormach.com Specifications subject to change without notice. TD10560: Owner's Guide: M ATC Retrofit for PCNC 770 Series 3 (1220A)
- Page 19 5. Identify wires T1 and B5 on the ATC Legacy Adapter Cable. Then, route them through the wire troughs toward the variable frequency drive (VFD). Figure 18: VFD in the electrical cabinet. Page 19 ©Tormach® 2020 tormach.com Specifications subject to change without notice. TD10560: Owner's Guide: M ATC Retrofit for PCNC 770 Series 3 (1220A)
- Page 20 VFD and remove it. Then, pull the loose cable out of the machine, and discard it. Figure 20: VFD interconnect cable connected to the VFD. Page 20 ©Tormach® 2020 tormach.com Specifications subject to change without notice. TD10560: Owner's Guide: M ATC Retrofit for PCNC 770 Series 3 (1220A)
- Page 21 Adapter Cable. 10. Completely push the lever down on the T1 lever nut to latch the wire. Verify that the lever is latched. Page 21 ©Tormach® 2020 tormach.com Specifications subject to change without notice. TD10560: Owner's Guide: M ATC Retrofit for PCNC 770 Series 3 (1220A)
- Page 22 Push the lever down on the B3/B5 lever nut to latch the wire. Then, connect the loose wire from the B3/B5 lever nut in to slot B5 on the VFD. 13. Replace the VFD faceplate. Page 22 ©Tormach® 2020 tormach.com Specifications subject to change without notice. TD10560: Owner's Guide: M ATC Retrofit for PCNC 770 Series 3 (1220A)
- Page 23 Figure 23: Terminal block in the electrical cabinet. 15. Connect the ground wire in to any open slot on the ground terminal block. Page 23 ©Tormach® 2020 tormach.com Specifications subject to change without notice. TD10560: Owner's Guide: M ATC Retrofit for PCNC 770 Series 3 (1220A)
- Page 24 17. Connect wire 503 to the TC+ terminal on the DC-BUS board. 18. Connect wire 504 to the TC- terminal on the DC-BUS board. Page 24 ©Tormach® 2020 tormach.com Specifications subject to change without notice. TD10560: Owner's Guide: M ATC Retrofit for PCNC 770 Series 3 (1220A)
-
Page 25: Rewire The Atc Board
Figure 26: Loose wires on the J10 connector from the ATC board. 4. Remove the plastic wire protectors from the ferrule ends. Page 25 ©Tormach® 2020 tormach.com Specifications subject to change without notice. TD10560: Owner's Guide: M ATC Retrofit for PCNC 770 Series 3 (1220A) -
Page 26: Verify The Installation
You must update your controller to the latest version of PathPilot before operating the Automatic Tool Changer. If you don't, there's a risk that the ATC could become inoperable. 2. If you have not yet done so, you must make sure that the PathPilot controller is updated to the latest version of PathPilot: From the Status tab, select Update. - Page 27 5. From the PathPilot interface, on the Main tab, in the RPM DRO field, type 1000. Then select the Enter key. 6. Select FWD. The spindle starts. Page 27 ©Tormach® 2020 tormach.com Specifications subject to change without notice. TD10560: Owner's Guide: M ATC Retrofit for PCNC 770 Series 3 (1220A)
-
Page 28: Adjust The Power Drawbar
If you don't, there's a risk of tool pull-out. To adjust the drawbar tension: 1. Put an empty Tormach Tooling System (TTS) tool holder into the collet. 2. While using one hand to support the tool holder, use the other to push the Release Tool button. -
Page 29: Adjust The Initial Setup
The tension force that is applied to the drawbar pulls the Tormach Tooling System (TTS) collet into the spindle taper, which then applies the clamping force to the Tormach Tooling System (TTS) tool. - Page 30 3. Disconnect the shop's air supply from the Power Drawbar button. 4. Pull out the quick-release pin. Page 30 ©Tormach® 2020 tormach.com Specifications subject to change without notice. TD10560: Owner's Guide: M ATC Retrofit for PCNC 770 Series 3 (1220A)
- Page 31 6. Remove the hex head screw on the Power Drawbar cylinder’s rod with an adjustable wrench, and set it aside. Figure 32: Hex head screw on the Power Drawbar cylinder's rod. Page 31 ©Tormach® 2020 tormach.com Specifications subject to change without notice. TD10560: Owner's Guide: M ATC Retrofit for PCNC 770 Series 3 (1220A)
- Page 32 14. Find the three provided M14 flat washers. 15. Put one M14 flat washer under each mounting post on the Power Drawbar cylinder. Make Final Alignments to the Automatic Tool Changer (ATC) Complete the following steps in the order listed:...
- Page 33 7. Make sure that the tool’s shank is aligned concentrically with the collet in the spindle. Page 33 ©Tormach® 2020 tormach.com Specifications subject to change without notice. TD10560: Owner's Guide: M ATC Retrofit for PCNC 770 Series 3 (1220A)
- Page 34 ATC tab, either select -- to step the tool tray counterclockwise or ++ to step the tool tray clockwise. Figure 36: Moving the tool tray clockwise or counterclockwise. Page 34 ©Tormach® 2020 tormach.com Specifications subject to change without notice. TD10560: Owner's Guide: M ATC Retrofit for PCNC 770 Series 3 (1220A)
- Page 35 1. From the PathPilot interface, slowly jog the Z-axis down (-Z) over the tool. Stop jogging when the spindle nose just makes contact with the shoulder of the tool holder. Page 35 ©Tormach® 2020 tormach.com Specifications subject to change without notice.
- Page 36 Adjust for Rotational Play There's a small amount of rotational play built into the Automatic Tool Changer (ATC) carousel. This play allows for some misalignment during tool changes, and you must adjust for it in both directions. The taper on the tool shank also helps align the tool during a tool change.
-
Page 37: Assign Tool Numbers
The tool is assigned to the nearest open slot. The ATC fetches the tool from the spindle and stores the tool in the tray. When stored, the tool number displays on the tray image in the center of the screen. Page 37 ©Tormach® 2020 tormach.com Specifications subject to change without notice. -
Page 38: Automatically Unload A Tool From The Tool Tray
2. Select Remove. The ATC fetches the tool from the tray. 3. Unload the tool from the spindle. Page 38 ©Tormach® 2020 tormach.com Specifications subject to change without notice. TD10560: Owner's Guide: M ATC Retrofit for PCNC 770 Series 3 (1220A) -
Page 39: Load A Tool Into The Spindle
Figure 5: open button on the side of the ATC. The opens. 2. Load a tool into the spindle. 3. Release the button. The closes. Page 39 ©Tormach® 2020 tormach.com Specifications subject to change without notice. TD10560: Owner's Guide: M ATC Retrofit for PCNC 770 Series 3 (1220A) -
Page 40: Manually Load A Tool Into The Tool Tray
2. Select Go To Tray Load Position. The spindle head moves up and the ATC moves into the door open position. Page 40 ©Tormach® 2020 tormach.com Specifications subject to change without notice. TD10560: Owner's Guide: M ATC Retrofit for PCNC 770 Series 3 (1220A) -
Page 41: Retrieve A Tool From The Tool Tray
1. From the PathPilot interface, slowly jog the Z-axis down (-Z) over the tool. Stop jogging when the spindle nose just makes contact with the shoulder of the tool holder. Page 41 ©Tormach® 2020 tormach.com Specifications subject to change without notice. -
Page 42: Switch To Manual Tool Changes
The tool change position is set. Switch to Manual Tool Changes From the PathPilot interface, on the Settings tab, select the Manual Tool Change radio button. The Automatic Tool Changer (ATC) is prevented from making tool changes. Page 42 ©Tormach® 2020 tormach.com... - Page 43 Turn Over the Tool Forks If the ATC is moounted too high on the machine column for the spindle nose to clear the Tormach Tooling System (TTS) shank after completing the alignment procedures in the owner's guide, you may need to make adjustments to lower the tool in the ATC carousel.
- Page 44 ATC carousel. To turn over the tool forks: Page 44 ©Tormach® 2020 tormach.com Specifications subject to change without notice. TD10560: Owner's Guide: M ATC Retrofit for PCNC 770 Series 3 (1220A)
- Page 45 Figure 2: Turning over a tool fork from the ATC carousel. 3. Replace the fork on the ATC carousel using the screws that you set aside in Step 1. Page 45 ©Tormach® 2020 tormach.com Specifications subject to change without notice.
Need help?
Do you have a question about the Automatic Tool Changer and is the answer not in the manual?
Questions and answers