Table of Contents
Advertisement
Quick Links
Advertisement
Table of Contents
Troubleshooting

Related Manuals for Tormach 1500MX


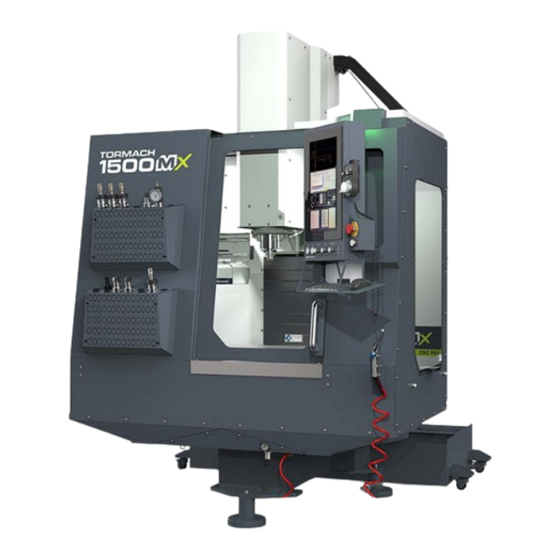
Summary of Contents for Tormach 1500MX
- Page 1 Original Instructions OPERATOR'S MANUAL Version 0424A...
- Page 2 Copyright Notice Information is subject to change without notice by Tormach, Inc. For the most recent version of this document, see tormach.com/support. You're welcome to make copies of this document for evaluating, learning about, and/or using the machine. You may not charge for any copies you make beyond the cost of printing.
- Page 3 All information provided is on an as is basis. The on the side of the electrical cabinet, next to the Main authors, publisher, and Tormach, Inc. ("we", "us", and so on) Disconnect switch. shall not have any liability for, or responsibility to, any person The version of PathPilot that you’re running.
-
Page 5: Table Of Contents
TABLE OF CONTENTS SAFETY 1.1 Intended Use 1.2 Machine Standards 1.2.1 American National Safety Institute (ANSI) 1.2.2 Occupational Safety and Health Administration (OSHA) 1.3 Safety Overview 1.3.1 Safety Messages Personal Injury Property Damage 1.3.2 Safety Decals On the Electrical Cabinet Door Next to the Main Disconnect On the Spindle Nose 1.3.3 Information Decals... - Page 6 4.7 Verify the Installation 4.7.1 Power on the Machine 4.7.2 Verify Axes Function 4.7.3 Verify Spindle Function ©Tormach® 2024 Page 6 UM10811: 1500MX Operator's Manual (Version 0424A) Specifications subject to change without notice. For the most recent version, see tormach.com/support...
- Page 7 Wireless Probe Installation and Setup Adjust Probe Tip Concentricity Set Probe Length and Diameter Probe Status Lights Reference ©Tormach® 2024 Page 7 UM10811: 1500MX Operator's Manual (Version 0424A) Specifications subject to change without notice. For the most recent version, see tormach.com/support...
- Page 8 Access Recent G-Code Files Close the Current Program 7.1.2 Edit G-Code Edit G-Code with a Text Editor ©Tormach® 2024 Page 8 UM10811: 1500MX Operator's Manual (Version 0424A) Specifications subject to change without notice. For the most recent version, see tormach.com/support...
- Page 9 Change the Layer or Shape Cut Order Adjust the Tree View Window Working in the Preview Window ©Tormach® 2024 Page 9 UM10811: 1500MX Operator's Manual (Version 0424A) Specifications subject to change without notice. For the most recent version, see tormach.com/support...
- Page 10 About Reset Mode 7.4.2 View the Active Axis to Jog 7.4.3 Jog the Machine Jog in Continuous Velocity Mode ©Tormach® 2024 Page 10 UM10811: 1500MX Operator's Manual (Version 0424A) Specifications subject to change without notice. For the most recent version, see tormach.com/support...
- Page 11 Use Additional Provided Information Enable Feeds and Speeds Suggestions in Conversational Routines Create Tool Descriptions Manually Enter Tool Descriptions ©Tormach® 2024 Page 11 UM10811: 1500MX Operator's Manual (Version 0424A) Specifications subject to change without notice. For the most recent version, see tormach.com/support...
- Page 12 Measure Tools Using a Known Reference Height 8.8 Set Work Offsets 8.8.1 About Work Offsets 8.9 Operate the Coolant Pump 8.9.1 About Coolant ©Tormach® 2024 Page 12 UM10811: 1500MX Operator's Manual (Version 0424A) Specifications subject to change without notice. For the most recent version, see tormach.com/support...
- Page 13 9.2.15 Apply Tool Length Offset (G43) 9.2.16 Engrave Sequential Serial Number (G47) 9.2.17 Cancel Tool Length Compensation (G49) 9.2.18 Absolute Coordinates (G53) ©Tormach® 2024 Page 13 UM10811: 1500MX Operator's Manual (Version 0424A) Specifications subject to change without notice. For the most recent version, see tormach.com/support...
- Page 14 9.6.1 Parameters Parameters Reference Parameter Syntax Parameter Scope Behavior of Uninitialized Parameters Parameter Mode Persistence and Volatility ©Tormach® 2024 Page 14 UM10811: 1500MX Operator's Manual (Version 0424A) Specifications subject to change without notice. For the most recent version, see tormach.com/support...
- Page 15 10.3.5 Examine the Spindle Belt 10.3.6 Prevent Rust Remove Rust TROUBLESHOOTING 11.1 Troubleshooting Safety 11.2 Getting Help 11.3 Required Tools ©Tormach® 2024 Page 15 UM10811: 1500MX Operator's Manual (Version 0424A) Specifications subject to change without notice. For the most recent version, see tormach.com/support...
- Page 16 12.14 Lubrication Assembly Parts List 12.15 X-Axis Lubrication Assembly Exploded View 12.16 X-Axis Lubrication Assembly Parts List ©Tormach® 2024 Page 16 UM10811: 1500MX Operator's Manual (Version 0424A) Specifications subject to change without notice. For the most recent version, see tormach.com/support...
- Page 17 13.9 -X1 AC Terminal Strip (Pages 11-13) 13.10 -X2 Control Terminal Strip (Page 14) 13.11 -X3 Grounds Terminal Strip (Page 15) ©Tormach® 2024 Page 17 UM10811: 1500MX Operator's Manual (Version 0424A) Specifications subject to change without notice. For the most recent version, see tormach.com/support...
-
Page 19: Safety
SAFETY IN THIS SECTION, YOU'LL LEARN: About the standards and safety precautions associated with this machine. Before operating the machine in any way, you must read and understand this section. Safe operation of the machine depends on its proper use and the precautions you take. Only trained personnel —... -
Page 20: Intended Use
ANSI B11.TR3-2000 Risk Assessment and Risk Reduction — A Guideline to Estimate, Evaluate, and Reduce Risks Associated with Machine Tools ©Tormach® 2024 Page 20 UM10811: 1500MX Operator's Manual (Version 0424A) Specifications subject to change without notice. For the most recent version, see tormach.com/support... -
Page 21: Property Damage
Do not remove any safety decals. If any safety decals become worn or damaged, contact Tormach Technical Support for guidance on receiving replacement decals. The following types of safety symbols are on the decals:... -
Page 22: Next To The Main Disconnect
Figure 1-3: Example of a safety decal on the spindle nose. must read all Safety Data Sheets (SDSs) for any ©Tormach® 2024 Page 22 UM10811: 1500MX Operator's Manual (Version 0424A) Specifications subject to change without notice. For the most recent version, see tormach.com/support... -
Page 23: Information Decals
Figure 1-4: Example of the serial number plate on the side atmosphere. Such explosive atmospheres include of the electrical cabinet. explosive gases, vapors, mists, powders, and dusts. ©Tormach® 2024 Page 23 UM10811: 1500MX Operator's Manual (Version 0424A) Specifications subject to change without notice. For the most recent version, see tormach.com/support... -
Page 24: Operational Safety
When machining an unproven program, use feed, speed, and maximum velocity overrides, Distance-to-Go (DTG) Never use tools at speeds above their operational limits. ©Tormach® 2024 Page 24 UM10811: 1500MX Operator's Manual (Version 0424A) Specifications subject to change without notice. For the most recent version, see tormach.com/support... -
Page 25: Workholding
For example, you can't jog the axis unauthorized personnel from accessing the electrical or control the spindle. cabinet. ©Tormach® 2024 Page 25 UM10811: 1500MX Operator's Manual (Version 0424A) Specifications subject to change without notice. For the most recent version, see tormach.com/support... -
Page 26: Setup Mode (Mode 2)
Note: This table assumes that the enclosure door is open and stays open during each activity. ©Tormach® 2024 Page 26 UM10811: 1500MX Operator's Manual (Version 0424A) Specifications subject to change without notice. For the most recent version, see tormach.com/support... -
Page 27: Automatic Tool Changer (Atc) Constraints
4. On the ATC tab, select Store Current Tool. 5. Repeat Steps 1 through 4 for each tool that you want to load. ©Tormach® 2024 Page 27 UM10811: 1500MX Operator's Manual (Version 0424A) Specifications subject to change without notice. For the most recent version, see tormach.com/support... -
Page 29: About Your Machine
ABOUT YOUR MACHINE IN THIS SECTION, YOU'LL LEARN: About this machine's specifications. CONTENTS 2.1 Machine Specifications... -
Page 30: Machine Specifications
Machine Size † 86" × 104" (2.2 m × 2.6 m) Overall System Height † 94" (2.4 m) ©Tormach® 2024 Page 30 UM10811: 1500MX Operator's Manual (Version 0424A) Specifications subject to change without notice. For the most recent version, see tormach.com/support... - Page 31 Installed size and weight depend on machine options and accessories. You may need additional space for service or maintenance access. Refer to "Site Requirements" (on page 1) for additional guidance. ©Tormach® 2024 Page 31 UM10811: 1500MX Operator's Manual (Version 0424A) Specifications subject to change without notice. For the most recent version, see tormach.com/support...
-
Page 33: Site Requirements
About the site requirements of this machine (including electrical and power requirements). Before operating the machine in any way, you must read and understand this section. CONTENTS 3.1 General Site and Space Requirements 3.2 Electrical and Power Requirements Space Planning Drawing - 1500MX Electrical Site Plan - 1500MX... -
Page 34: General Site And Space Requirements
50/60 Hz Recommended Circuit Amperage 30 A breaker Note: At minimum, you can operate the 1500MX on a 20 A circuit, but you'll need a second circuit to power accessories like the Figure 3-1: Example of the typical operator workstation. chip conveyor, if present. - Page 35 Correct Plug Pattern The machine is shipped with a NEMA L6-30P plug, designed for use with a NEMA L6- 30R receptacle. ©Tormach® 2024 Page 35 UM10811: 1500MX Operator's Manual (Version 0424A) Specifications subject to change without notice. For the most recent version, see tormach.com/support...
-
Page 39: Installation
INSTALLATION IN THIS SECTION, YOU'LL LEARN: About the installation process required for this machine. Before operating the machine in any way, you must read and understand this section. CONTENTS 4.1 Before You Begin 4.2 Installation Tools and Items 4.3 Move the Pallet 4.4 Unpack the Machine Crate 4.5 Self-Assembled Installation 4.6 Factory-Assembled Machine Setup... -
Page 40: Before You Begin
If there is any damage or shortages, you must contact Shipments arrive in crates loaded on pallets, which the freight Tormach within 30 days of receipt. Create a support carrier unloads onto the curb or loading dock. ticket with Tormach Technical Support at tormach.com/how-to-submit-a-support-ticket for... -
Page 41: Unpack The Machine Crate
With an assistant, lift the sides of the shipping crate off of the pallet. ©Tormach® 2024 Page 41 UM10811: 1500MX Operator's Manual (Version 0424A) Specifications subject to change without notice. For the most recent version, see tormach.com/support... -
Page 42: Self-Assembled Installation
Figure 4-6: Installing the machine's foot onto the Before You Begin threaded rod. Helpful Tips for Installation ©Tormach® 2024 Page 42 UM10811: 1500MX Operator's Manual (Version 0424A) Specifications subject to change without notice. For the most recent version, see tormach.com/support... -
Page 43: Before You Begin
Test for Leaks After the sealant is completely cured, test the enclosure for leaks and identify any areas requiring extra sealant. ©Tormach® 2024 Page 43 UM10811: 1500MX Operator's Manual (Version 0424A) Specifications subject to change without notice. For the most recent version, see tormach.com/support... - Page 44 Completely fill in the channel on the horizontal surface of the top edge, as shown in the following image. ©Tormach® 2024 Page 44 UM10811: 1500MX Operator's Manual (Version 0424A) Specifications subject to change without notice. For the most recent version, see tormach.com/support...
- Page 45 Fasten the chip tray support bracket to the machine stand using four M6 × 1.0 - 12 screws. ©Tormach® 2024 Page 45 UM10811: 1500MX Operator's Manual (Version 0424A) Specifications subject to change without notice. For the most recent version, see tormach.com/support...
-
Page 46: Install The Enclosure Panels
14. Repeat Steps 7 through 10 to install the coolant chute and the support bracket onto the left chip tray, and finish sealing the left chip tray. ©Tormach® 2024 Page 46 UM10811: 1500MX Operator's Manual (Version 0424A) Specifications subject to change without notice. For the most recent version, see tormach.com/support... - Page 47 Around each of the screw holes in the chip tray. ©Tormach® 2024 Page 47 UM10811: 1500MX Operator's Manual (Version 0424A) Specifications subject to change without notice. For the most recent version, see tormach.com/support...
- Page 48 12 screws. Figure 4-28: Example of sealant applied to the inside edge of the right chip pan. ©Tormach® 2024 Page 48 UM10811: 1500MX Operator's Manual (Version 0424A) Specifications subject to change without notice. For the most recent version, see tormach.com/support...
- Page 49 12 M6 × 1.0 - 12 screws. ©Tormach® 2024 Page 49 UM10811: 1500MX Operator's Manual (Version 0424A) Specifications subject to change without notice. For the most recent version, see tormach.com/support...
- Page 50 Figure 4-36: Front right panel. 19. Apply a bead of sealant to the bottom edge of the front right panel. ©Tormach® 2024 Page 50 UM10811: 1500MX Operator's Manual (Version 0424A) Specifications subject to change without notice. For the most recent version, see tormach.com/support...
- Page 51 23. Identify the right top panel (PN 51371). 21. Identify the front left panel (PN 51270). Figure 4-41: Right top panel. ©Tormach® 2024 Page 51 UM10811: 1500MX Operator's Manual (Version 0424A) Specifications subject to change without notice. For the most recent version, see tormach.com/support...
-
Page 52: Assemble The Door
Figure 4-44: Installing the left top panel to the left rear panel, the left side panel, and the left front panel. ©Tormach® 2024 Page 52 UM10811: 1500MX Operator's Manual (Version 0424A) Specifications subject to change without notice. For the most recent version, see tormach.com/support... - Page 53 Make sure that the screws are facing down and nearest to the front of the enclosure, as shown in the following image. ©Tormach® 2024 Page 53 UM10811: 1500MX Operator's Manual (Version 0424A) Specifications subject to change without notice. For the most recent version, see tormach.com/support...
- Page 54 16. Fasten enclosure door overlap extension panel to the left edge of the door panel using 4 M6 × 1.0 - 12 screws. ©Tormach® 2024 Page 54 UM10811: 1500MX Operator's Manual (Version 0424A) Specifications subject to change without notice. For the most recent version, see tormach.com/support...
-
Page 55: Secure Panel And Door Screws
2. Fasten the door switch to the top right panel using four M6 × 1.0 - 12 screws. ©Tormach® 2024 Page 55 UM10811: 1500MX Operator's Manual (Version 0424A) Specifications subject to change without notice. For the most recent version, see tormach.com/support... -
Page 56: Install The Door Latch Push Button
7. Connect the loose end of the wire harness into the Machine Door outlet inside of the electrical cabinet. Figure 4-58: Door switch push button. ©Tormach® 2024 Page 56 UM10811: 1500MX Operator's Manual (Version 0424A) Specifications subject to change without notice. For the most recent version, see tormach.com/support... -
Page 57: Install The Components
× 1.0 - 12 four screws. Orient the flood light so that the cable gland faces toward the mill's spindle. ©Tormach® 2024 Page 57 UM10811: 1500MX Operator's Manual (Version 0424A) Specifications subject to change without notice. For the most recent version, see tormach.com/support... -
Page 58: Install The Air Gun
Tighten flange nut using two 19 mm wrenches. ©Tormach® 2024 Page 58 UM10811: 1500MX Operator's Manual (Version 0424A) Specifications subject to change without notice. For the most recent version, see tormach.com/support... -
Page 59: Install The Windows
4. Repeat steps with remaining enclosure window assembly on the left side of the enclosure. ©Tormach® 2024 Page 59 UM10811: 1500MX Operator's Manual (Version 0424A) Specifications subject to change without notice. For the most recent version, see tormach.com/support... -
Page 60: Assemble The Console
7. Plug the power cord extension (PN 38893) into the power cord's brick. Put the brick into the opening behind the operator console. ©Tormach® 2024 Page 60 UM10811: 1500MX Operator's Manual (Version 0424A) Specifications subject to change without notice. For the most recent version, see tormach.com/support... -
Page 61: Set Up The Pathpilot Controller
12. Install the mouse pad panel to the side of the keyboard tray with the two screws preinstalled on the panel. ©Tormach® 2024 Page 61 UM10811: 1500MX Operator's Manual (Version 0424A) Specifications subject to change without notice. For the most recent version, see tormach.com/support... -
Page 62: Factory-Assembled Machine Setup
Complete the following steps in the order listed: 4.6.1 Set Up the PathPilot Controller 4.6.2 Set Up the Flood Coolant Kit ©Tormach® 2024 Page 62 UM10811: 1500MX Operator's Manual (Version 0424A) Specifications subject to change without notice. For the most recent version, see tormach.com/support... -
Page 63: Set Up The Flood Coolant Kit
Make Coolant Connections Required Tools Hammer Metric hex wrench set Phillips screwdriver Pliers Punch Thread seal tape ©Tormach® 2024 Page 63 UM10811: 1500MX Operator's Manual (Version 0424A) Specifications subject to change without notice. For the most recent version, see tormach.com/support... -
Page 64: Install The Flood Coolant Filter
M5 × 0.8 - 10 flanged button head cap screws (PN 38205) and a 3 mm hex wrench. ©Tormach® 2024 Page 64 UM10811: 1500MX Operator's Manual (Version 0424A) Specifications subject to change without notice. For the most recent version, see tormach.com/support... -
Page 65: Verify The Installation
Coolant Power outlet on the side of the electrical cabinet (on the side that's closest to the column). ©Tormach® 2024 Page 65 UM10811: 1500MX Operator's Manual (Version 0424A) Specifications subject to change without notice. For the most recent version, see tormach.com/support... - Page 66 4: INSTALLATION Recommended Circuit Amperage 30 A breaker Note: At minimum, you can operate the 1500MX on a 20 A circuit, but you'll need a second circuit to power accessories like the chip conveyor, if present. 2. Connect the machine's mains power cable to the verified electrical service.
-
Page 67: Verify Axes Function
Select Z on the MPG. Rotating the hand wheel moves the spindle head up (Z+) and down (Z-). ©Tormach® 2024 Page 67 UM10811: 1500MX Operator's Manual (Version 0424A) Specifications subject to change without notice. For the most recent version, see tormach.com/support... -
Page 68: Install Accessory Components
4.8.3 Install the Automatic Chip Tray Washdown Kit 4.8.4 Install the MQL Kit 4.8.5 Install the microARC 6 ©Tormach® 2024 Page 68 UM10811: 1500MX Operator's Manual (Version 0424A) Specifications subject to change without notice. For the most recent version, see tormach.com/support... - Page 69 3. Thread both 10 mm standoffs into he threaded holes until the flat on the standoffs are flush to the column. ©Tormach® 2024 Page 69 UM10811: 1500MX Operator's Manual (Version 0424A) Specifications subject to change without notice. For the most recent version, see tormach.com/support...
-
Page 70: Assemble The Atc
Make sure the pneumatic fittings point toward the back of the ATC. (screws in the accessory bag) ©Tormach® 2024 Page 70 UM10811: 1500MX Operator's Manual (Version 0424A) Specifications subject to change without notice. For the most recent version, see tormach.com/support... - Page 71 Figure 4-114: Motor box secured onto the piston shaft. 4. Tighten the lock nuts with a ratchet with an extension and a 13/16 socket. ©Tormach® 2024 Page 71 UM10811: 1500MX Operator's Manual (Version 0424A) Specifications subject to change without notice. For the most recent version, see tormach.com/support...
-
Page 72: Install The Atc Electrical Cabinet
8. Attach the ATC to the column mount with the bolts that you set aside in Step 5 and a 6 mm hex wrench. ©Tormach® 2024 Page 72 UM10811: 1500MX Operator's Manual (Version 0424A) Specifications subject to change without notice. For the most recent version, see tormach.com/support... - Page 73 Figure 4-124: Installing the ATC's electrical cabinet onto the standoffs. ©Tormach® 2024 Page 73 UM10811: 1500MX Operator's Manual (Version 0424A) Specifications subject to change without notice. For the most recent version, see tormach.com/support...
- Page 74 13. Connect the encoder motor cable to its 8-pin molex connector on the ATC electrical cabinet. ©Tormach® 2024 Page 74 UM10811: 1500MX Operator's Manual (Version 0424A) Specifications subject to change without notice. For the most recent version, see tormach.com/support...
-
Page 75: Level The Atc
(furthest away from the spindle) rod into the tool tray. to the right-hand outlet of the valve with regulators. ©Tormach® 2024 Page 75 UM10811: 1500MX Operator's Manual (Version 0424A) Specifications subject to change without notice. For the most recent version, see tormach.com/support... - Page 76 4. Adjust the jack screw to adjust the ATC level with a 13 mm wrench. 5. Once aligned, re-tighten the three screws that you loosened in Step 4. ©Tormach® 2024 Page 76 UM10811: 1500MX Operator's Manual (Version 0424A) Specifications subject to change without notice. For the most recent version, see tormach.com/support...
-
Page 77: Adjust The Tool Alignment And Set The Tool Tray Height And Encoder Position
8. Adjust the jack screw to adjust the ATC level with a 13 you must keep your hands away from the ATC. mm wrench. 8. Reconnect the air. ©Tormach® 2024 Page 77 UM10811: 1500MX Operator's Manual (Version 0424A) Specifications subject to change without notice. For the most recent version, see tormach.com/support... -
Page 78: Install The Flood Coolant Kit
Slide the coolant tank out from under the the BT30 taper. wooden clamps that are still installed on the crate. ©Tormach® 2024 Page 78 UM10811: 1500MX Operator's Manual (Version 0424A) Specifications subject to change without notice. For the most recent version, see tormach.com/support... -
Page 79: Install The Flood Coolant Pump
M10 × 1.5 - 20 socket head cap screws (PN 32625) and an 8 mm hex wrench. ©Tormach® 2024 Page 79 UM10811: 1500MX Operator's Manual (Version 0424A) Specifications subject to change without notice. For the most recent version, see tormach.com/support... -
Page 80: Install The Coolant Manifold
Figure 4-144: Y-axis washdown cover plate. ©Tormach® 2024 Page 80 UM10811: 1500MX Operator's Manual (Version 0424A) Specifications subject to change without notice. For the most recent version, see tormach.com/support... - Page 81 M6 screws that you set aside earlier. Figure 4-146: Washdown block installed on the front of the Y-axis cover. ©Tormach® 2024 Page 81 UM10811: 1500MX Operator's Manual (Version 0424A) Specifications subject to change without notice. For the most recent version, see tormach.com/support...
-
Page 82: Install The Flood Coolant Ring
Figure 4-153: Coolant ring mounted to t he bottom of the spindle head casting. ©Tormach® 2024 Page 82 UM10811: 1500MX Operator's Manual (Version 0424A) Specifications subject to change without notice. For the most recent version, see tormach.com/support... -
Page 83: Install The Manual Sprayer
Make sure the hose clamp is facing toward the front of the machine. If it's not, it may cause interference when ©Tormach® 2024 Page 83 UM10811: 1500MX Operator's Manual (Version 0424A) Specifications subject to change without notice. For the most recent version, see tormach.com/support... - Page 84 Then, re-install and tighten the locking nut onto the bulkhead fitting with a 30 mm wrench. ©Tormach® 2024 Page 84 UM10811: 1500MX Operator's Manual (Version 0424A) Specifications subject to change without notice. For the most recent version, see tormach.com/support...
- Page 85 Figure 4-167: Hose routing detail. Figure 4-164: Hose connected to the coolant manifold. ©Tormach® 2024 Page 85 UM10811: 1500MX Operator's Manual (Version 0424A) Specifications subject to change without notice. For the most recent version, see tormach.com/support...
-
Page 86: Make Coolant Connections
Install the Washdown Bars Make Connections Before You Begin Make sure that: Figure 4-170: Hose connected to the coolant filter. ©Tormach® 2024 Page 86 UM10811: 1500MX Operator's Manual (Version 0424A) Specifications subject to change without notice. For the most recent version, see tormach.com/support... -
Page 87: Required Tools
Figure 4-174: Washdown pump installed into the Figure 4-176: Hoses installed onto the tee fitting. coolant tank. ©Tormach® 2024 Page 87 UM10811: 1500MX Operator's Manual (Version 0424A) Specifications subject to change without notice. For the most recent version, see tormach.com/support... -
Page 88: Install The Washdown Bars
Install the loop clamps onto the washdown bar as shown clamp. in the following image. ©Tormach® 2024 Page 88 UM10811: 1500MX Operator's Manual (Version 0424A) Specifications subject to change without notice. For the most recent version, see tormach.com/support... -
Page 89: Install The Mql Kit
Figure 4-184: Push-to-connect fitting removed from the pump. Figure 4-183: Washdown coolant power outlet on the side of the electrical cabinet. ©Tormach® 2024 Page 89 UM10811: 1500MX Operator's Manual (Version 0424A) Specifications subject to change without notice. For the most recent version, see tormach.com/support... -
Page 90: Route The Tubing
Carefully insert a hex wrench into the 3/8 in. tube, and lightly push back the 1/8 in. capillary tube. Figure 4-188: Nozzle mounted behind the spindle. ©Tormach® 2024 Page 90 UM10811: 1500MX Operator's Manual (Version 0424A) Specifications subject to change without notice. For the most recent version, see tormach.com/support... -
Page 91: Mount The Pump
5. Route the tubing between the machine casting and the Figure 4-193: Reinstalling the push-to-connect fitting electrical cabinet. onto the tubing. ©Tormach® 2024 Page 91 UM10811: 1500MX Operator's Manual (Version 0424A) Specifications subject to change without notice. For the most recent version, see tormach.com/support... - Page 92 Figure 4-195: Pump mounted onto the access panel on the machine column. 7. Route the solenoid wire into the bottom of the electrical cabinet. ©Tormach® 2024 Page 92 UM10811: 1500MX Operator's Manual (Version 0424A) Specifications subject to change without notice. For the most recent version, see tormach.com/support...
-
Page 93: Install The Microarc
2.5 mm hex wrench. ©Tormach® 2024 Page 93 UM10811: 1500MX Operator's Manual (Version 0424A) Specifications subject to change without notice. For the most recent version, see tormach.com/support... - Page 94 Z-axis driver. Disconnect the cable from the Z-axis driver and connect it to the output port on the A- ©Tormach® 2024 Page 94 UM10811: 1500MX Operator's Manual (Version 0424A) Specifications subject to change without notice. For the most recent version, see tormach.com/support...
- Page 95 Figure 4-207: IDC ribbon cable connected to the A-axis driver. 13. Connect the loose end of the IDC ribbon cable to the IDC ©Tormach® 2024 Page 95 UM10811: 1500MX Operator's Manual (Version 0424A) Specifications subject to change without notice. For the most recent version, see tormach.com/support...
- Page 96 19. Connect the IEEE 1394 cable from the encoder to the A- axis driver. Figure 4-213: Ground wires connected to the A-axis driver. ©Tormach® 2024 Page 96 UM10811: 1500MX Operator's Manual (Version 0424A) Specifications subject to change without notice. For the most recent version, see tormach.com/support...
- Page 97 Figure 4-215: microARC on the machine table. 6. Secure the microARC to the machine table with the ©Tormach® 2024 Page 97 UM10811: 1500MX Operator's Manual (Version 0424A) Specifications subject to change without notice. For the most recent version, see tormach.com/support...
-
Page 98: Install The Probe And Tool Setter
Metric hex wrench set Dial test indicator (0.0005 in. indicator or better) with magnetic base Flat-blade screwdriver ©Tormach® 2024 Page 98 UM10811: 1500MX Operator's Manual (Version 0424A) Specifications subject to change without notice. For the most recent version, see tormach.com/support... -
Page 99: Wireless Probe Installation And Setup
Figure 4-225: Tightening the probe tip with the cabinet. Align the red dots on both the cable and the included pin. connector. ©Tormach® 2024 Page 99 UM10811: 1500MX Operator's Manual (Version 0424A) Specifications subject to change without notice. For the most recent version, see tormach.com/support... -
Page 100: Adjust Probe Tip Concentricity
©Tormach® 2024 Page 100 UM10811: 1500MX Operator's Manual (Version 0424A) Specifications subject to change without notice. For the most recent version, see tormach.com/support... - Page 101 6. Jog the table until the block is under the calibration tool. Slowly jog the Z-axis down until it's tip drags on the 1-2- 3 block. ©Tormach® 2024 Page 101 UM10811: 1500MX Operator's Manual (Version 0424A) Specifications subject to change without notice. For the most recent version, see tormach.com/support...
-
Page 102: Probe Status Lights Reference
1/4 in. below the ring gauge's surface. ©Tormach® 2024 Page 102 UM10811: 1500MX Operator's Manual (Version 0424A) Specifications subject to change without notice. For the most recent version, see tormach.com/support... -
Page 103: Align The Tool Setter's Stylus
©Tormach® 2024 Page 103 UM10811: 1500MX Operator's Manual (Version 0424A) Specifications subject to change without notice. For the most recent version, see tormach.com/support... -
Page 104: Reference The Tool Setter
Z-axis down until it's just above the tool setter. Figure 4-247: ETS Setup tab. ©Tormach® 2024 Page 104 UM10811: 1500MX Operator's Manual (Version 0424A) Specifications subject to change without notice. For the most recent version, see tormach.com/support... -
Page 105: System Basics
SYSTEM BASICS IN THIS SECTION, YOU'LL LEARN: About the main components of the machine and how it moves. Before operating the machine in any way, you must read and understand this section. CONTENTS 5.1 System Reference 5.2 Basic Controls Reference... -
Page 106: System Reference
5.1.3 Axes The machine has three linear axes of motion, and one optional rotary axis, used for machining: ©Tormach® 2024 Page 106 UM10811: 1500MX Operator's Manual (Version 0424A) Specifications subject to change without notice. For the most recent version, see tormach.com/support... -
Page 107: Pathpilot Interface
PathPilot control system consists of: Operator Console Console (with integrated touch screen) (Optional) Keyboard (Optional) Mouse Jog pendant ©Tormach® 2024 Page 107 UM10811: 1500MX Operator's Manual (Version 0424A) Specifications subject to change without notice. For the most recent version, see tormach.com/support... -
Page 109: Pathpilot Interface Overview
PATHPILOT INTERFACE OVERVIEW IN THIS SECTION, YOU'LL LEARN: How PathPilot is organized, and where you can access each tool or feature. CONTENTS 6.1 About PathPilot 6.2 Notebook Section 6.3 Persistent Controls 6.4 Keyboard Shortcuts 6.5 Manage PathPilot Versions... -
Page 110: About Pathpilot
Load .nc files into PathPilot to run a program. 6.2.7 Status Tab For information, see "Load G-Code" (page 164). ©Tormach® 2024 Page 110 UM10811: 1500MX Operator's Manual (Version 0424A) Specifications subject to change without notice. For the most recent version, see tormach.com/support... -
Page 111: Settings Tab
Figure 6-8: Probe tab. From the Probe tab, you can do the following activities: Figure 6-6: Offsets tab. ©Tormach® 2024 Page 111 UM10811: 1500MX Operator's Manual (Version 0424A) Specifications subject to change without notice. For the most recent version, see tormach.com/support... -
Page 112: Status Tab
For information, see "Reference the Machine" 6.3.1 Program Control Area 6.3.2 Position Status Area (page 162). 6.3.3 Manual Control Area ©Tormach® 2024 Page 112 UM10811: 1500MX Operator's Manual (Version 0424A) Specifications subject to change without notice. For the most recent version, see tormach.com/support... -
Page 113: Manual Control Area
Use the coolant function Alt+R Start a program Stop a program Figure 6-15: Software Update dialog box. ©Tormach® 2024 Page 113 UM10811: 1500MX Operator's Manual (Version 0424A) Specifications subject to change without notice. For the most recent version, see tormach.com/support... -
Page 114: Install An Update File From A Usb Drive
Figure 6-21: Software Update dialog box. Figure 6-18: Software Update dialog box. 7. From the Browse dialog box, select USB. ©Tormach® 2024 Page 114 UM10811: 1500MX Operator's Manual (Version 0424A) Specifications subject to change without notice. For the most recent version, see tormach.com/support... - Page 115 The update file is installed on the PathPilot controller. 6. Follow the on-screen instructions to restart the PathPilot controller. ©Tormach® 2024 Page 115 UM10811: 1500MX Operator's Manual (Version 0424A) Specifications subject to change without notice. For the most recent version, see tormach.com/support...
-
Page 117: Pathpilot Tools And Features
PATHPILOT TOOLS AND FEATURES IN THIS SECTION, YOU'LL LEARN: How to use PathPilot, depending on the activity that you want to do. CONTENTS 7.1 Create and Load G-Code Files 7.2 Machine Settings and Accessories 7.3 Set Up G-Code Programs 7.4 Run G-Code Programs 7.5 Control G-Code Programs 7.6 System File Management... -
Page 118: Create And Load G-Code Files
3. Select the location to which you want to copy the Figure 7-4: File tab. transferred file. ©Tormach® 2024 Page 118 UM10811: 1500MX Operator's Manual (Version 0424A) Specifications subject to change without notice. For the most recent version, see tormach.com/support... -
Page 119: Access Recent G-Code Files
"Transfer Files to and From the Controller" Figure 7-8: Job assignment editor. (on the previous page). To edit G-code with a text editor: ©Tormach® 2024 Page 119 UM10811: 1500MX Operator's Manual (Version 0424A) Specifications subject to change without notice. For the most recent version, see tormach.com/support... -
Page 120: Change The Step Order
Close. When prompted, select Close Without To search in the code: Saving. ©Tormach® 2024 Page 120 UM10811: 1500MX Operator's Manual (Version 0424A) Specifications subject to change without notice. For the most recent version, see tormach.com/support... -
Page 121: Set A New Start Line
4. (Optional) Select Enter. PathPilot finds the next instance of the searched text. 5. (Optional) Select Enter+Shift. ©Tormach® 2024 Page 121 UM10811: 1500MX Operator's Manual (Version 0424A) Specifications subject to change without notice. For the most recent version, see tormach.com/support... -
Page 122: Change The View Of The Tool Path Display
In the Tool Path display, there are four different line types: Dotted Blue Lines Indicate the boundary box (the ends of travel of the axes). ©Tormach® 2024 Page 122 UM10811: 1500MX Operator's Manual (Version 0424A) Specifications subject to change without notice. For the most recent version, see tormach.com/support... -
Page 123: Use Conversational Programming
Figure 7-15: Conversational DROs on the Face tab. Parameters common to most operations, like speeds and feeds. ©Tormach® 2024 Page 123 UM10811: 1500MX Operator's Manual (Version 0424A) Specifications subject to change without notice. For the most recent version, see tormach.com/support... -
Page 124: About Facing
X/Y plane over a Z range to form a boss. For information, see with microscopic height differences. "About Profiling" (on the next page). ©Tormach® 2024 Page 124 UM10811: 1500MX Operator's Manual (Version 0424A) Specifications subject to change without notice. For the most recent version, see tormach.com/support... -
Page 125: About Profiling
— in the Z DOC DRO field. g. In the Z DOC DRO field, type the desired amount of material to remove. ©Tormach® 2024 Page 125 UM10811: 1500MX Operator's Manual (Version 0424A) Specifications subject to change without notice. For the most recent version, see tormach.com/support... -
Page 126: Profiling Reference
2. From the Conversational DROs group, set the To create a rectangular pocket on a part: parameters for the pocket operation. ©Tormach® 2024 Page 126 UM10811: 1500MX Operator's Manual (Version 0424A) Specifications subject to change without notice. For the most recent version, see tormach.com/support... -
Page 127: About Pockets
4. Makes a cut around the perimeter of the pocket. About Rectangular Pockets PathPilot does one of the following, depending on the diameter of the tool: ©Tormach® 2024 Page 127 UM10811: 1500MX Operator's Manual (Version 0424A) Specifications subject to change without notice. For the most recent version, see tormach.com/support... -
Page 128: Create Hole Locations On A Part (Drill/Tap)
(greater than 0) required for the pattern. To rearrange the row order, select a row, and then select Raise or Lower. ©Tormach® 2024 Page 128 UM10811: 1500MX Operator's Manual (Version 0424A) Specifications subject to change without notice. For the most recent version, see tormach.com/support... -
Page 129: About Drilling And Tapping
In the Z End DRO field, type the location for the last Note: An auto-reversing tapping head typically uses a Z pass. drilling cycle. ©Tormach® 2024 Page 129 UM10811: 1500MX Operator's Manual (Version 0424A) Specifications subject to change without notice. For the most recent version, see tormach.com/support... -
Page 130: Create A Tapping Sequence
(horizontal) line from the center point going right (east) to the circumference. The angle from the base ©Tormach® 2024 Page 130 UM10811: 1500MX Operator's Manual (Version 0424A) Specifications subject to change without notice. For the most recent version, see tormach.com/support... -
Page 131: About Thread Milling
Z Clear The location the tool moves or retracts to when starting or ending a Z pass. ©Tormach® 2024 Page 131 UM10811: 1500MX Operator's Manual (Version 0424A) Specifications subject to change without notice. For the most recent version, see tormach.com/support... -
Page 132: Create Text To Engrave On A Part
©Tormach® 2024 Page 132 UM10811: 1500MX Operator's Manual (Version 0424A) Specifications subject to change without notice. For the most recent version, see tormach.com/support... -
Page 133: Working With Layers And Shapes
7.2.1 Change the Network Name 7.2.2 Select the Spindle Type ©Tormach® 2024 Page 133 UM10811: 1500MX Operator's Manual (Version 0424A) Specifications subject to change without notice. For the most recent version, see tormach.com/support... -
Page 134: Change The Network Name
Figure 7-27: Spindle Type field on the Settings tab. Wireless Probe and Tool Setter Kit (PN 51785) To specify a probe or a tool setter: ©Tormach® 2024 Page 134 UM10811: 1500MX Operator's Manual (Version 0424A) Specifications subject to change without notice. For the most recent version, see tormach.com/support... -
Page 135: Enable The Usb M-Code I/O Interface Kit
Dropbox account to easily synchronize your G-code files, which The Network Configuration dialog box displays. eliminates the need to transfer them with a USB drive. ©Tormach® 2024 Page 135 UM10811: 1500MX Operator's Manual (Version 0424A) Specifications subject to change without notice. For the most recent version, see tormach.com/support... - Page 136 The PathPilot controller is now connected to Dropbox. 5. From the web browser, sign in or create a Dropbox ©Tormach® 2024 Page 136 UM10811: 1500MX Operator's Manual (Version 0424A) Specifications subject to change without notice. For the most recent version, see tormach.com/support...
-
Page 137: Enable Automatic Updates
1. Verify that tool number 99 (the probe tool) is in the 1. From the PathPilot interface, on the Probe tab, select the spindle. X/Y/Z Probe tab. ©Tormach® 2024 Page 137 UM10811: 1500MX Operator's Manual (Version 0424A) Specifications subject to change without notice. For the most recent version, see tormach.com/support... -
Page 138: Set The Work Offset Zeroes On A Feature
2. Position the probe below the top surface of the boss and on the left-hand side. 2. Position the probe near the center of the pocket. ©Tormach® 2024 Page 138 UM10811: 1500MX Operator's Manual (Version 0424A) Specifications subject to change without notice. For the most recent version, see tormach.com/support... -
Page 139: Find The Center Of A Circular Boss
Tools" (page 167). Touch Off of a Known Reference Height For information, see Touch Off the Tool Length Offsets. ©Tormach® 2024 Page 139 UM10811: 1500MX Operator's Manual (Version 0424A) Specifications subject to change without notice. For the most recent version, see tormach.com/support... -
Page 140: About Tool Offsets
Z zero position; go to Set a Known Reference Height. To set a known reference height: To measure tools using a known reference height: ©Tormach® 2024 Page 140 UM10811: 1500MX Operator's Manual (Version 0424A) Specifications subject to change without notice. For the most recent version, see tormach.com/support... -
Page 141: Use An Electronic Tool Setter (Ets) To Measure Tools
Then select the Enter key. verify that the length of the tool is correct. 13. Jog the Z-axis up (+Z). ©Tormach® 2024 Page 141 UM10811: 1500MX Operator's Manual (Version 0424A) Specifications subject to change without notice. For the most recent version, see tormach.com/support... -
Page 142: Use A Tool Height Setter To Measure Tools
Tool Table window. Then, type a description for the tool you're measuring. 2. Put the tool holder into the spindle. ©Tormach® 2024 Page 142 UM10811: 1500MX Operator's Manual (Version 0424A) Specifications subject to change without notice. For the most recent version, see tormach.com/support... -
Page 143: Set Work Offsets
To set the current axis location to zero in the active work Offset Extended Name Name coordinate system: G54.1 P1 ©Tormach® 2024 Page 143 UM10811: 1500MX Operator's Manual (Version 0424A) Specifications subject to change without notice. For the most recent version, see tormach.com/support... -
Page 144: View Work Offsets
Resets all modal G-codes to their normal state To view available G-code modes: Rewinds the currently loaded G-code program ©Tormach® 2024 Page 144 UM10811: 1500MX Operator's Manual (Version 0424A) Specifications subject to change without notice. For the most recent version, see tormach.com/support... -
Page 145: View The Active Axis To Jog
In the Manual Control Area, select the step size. step size. The Step button's light comes on, indicating which step size is active. ©Tormach® 2024 Page 145 UM10811: 1500MX Operator's Manual (Version 0424A) Specifications subject to change without notice. For the most recent version, see tormach.com/support... -
Page 146: View The Current Machine Position
Cycle Start button flashes until it's selected again. Referencing" (page 162). Cycle Start Reference The Cycle Start button doesn't operate if you select it: ©Tormach® 2024 Page 146 UM10811: 1500MX Operator's Manual (Version 0424A) Specifications subject to change without notice. For the most recent version, see tormach.com/support... -
Page 147: Stop Machine Motion
While a program is running, the DTG read-only DRO fields show the remaining distance in each move. ©Tormach® 2024 Page 147 UM10811: 1500MX Operator's Manual (Version 0424A) Specifications subject to change without notice. For the most recent version, see tormach.com/support... -
Page 148: Use The Feed Rate Override Function
0% or above 100%. Figure 7-78: Maxvel Override slider. To remove the maxvel override function: Select Maxvel 100%. ©Tormach® 2024 Page 148 UM10811: 1500MX Operator's Manual (Version 0424A) Specifications subject to change without notice. For the most recent version, see tormach.com/support... -
Page 149: About Maxvel Override
For information, see "About Feed Rates" (on the next page). programmed spindle speed by a specific percentage. ©Tormach® 2024 Page 149 UM10811: 1500MX Operator's Manual (Version 0424A) Specifications subject to change without notice. For the most recent version, see tormach.com/support... -
Page 150: About Feed Rates
The FWD and REV buttons and the Spindle RPM DRO field To go to a set G30 position: don't operate if selected when: ©Tormach® 2024 Page 150 UM10811: 1500MX Operator's Manual (Version 0424A) Specifications subject to change without notice. For the most recent version, see tormach.com/support... -
Page 151: About G30
You can send G-code commands directly to the machine by using the MDI Line DRO field. For information, see "About the MDI Line DRO Field" (below). ©Tormach® 2024 Page 151 UM10811: 1500MX Operator's Manual (Version 0424A) Specifications subject to change without notice. For the most recent version, see tormach.com/support... -
Page 152: Copy Recently Entered Commands
You can limit G30 moves so that only the Z-axis moves. For information, see "About G30" (below). ©Tormach® 2024 Page 152 UM10811: 1500MX Operator's Manual (Version 0424A) Specifications subject to change without notice. For the most recent version, see tormach.com/support... -
Page 153: Refresh Dro Field Values
(those with a green background), and which DRO fields have values you've supplied (white background). ©Tormach® 2024 Page 153 UM10811: 1500MX Operator's Manual (Version 0424A) Specifications subject to change without notice. For the most recent version, see tormach.com/support... -
Page 154: Enable Feeds And Speeds Suggestions In Conversational Routines
1. From the PathPilot interface, on the Offsets tab, identify defaults to basic cutter features: the Tool Table window. ©Tormach® 2024 Page 154 UM10811: 1500MX Operator's Manual (Version 0424A) Specifications subject to change without notice. For the most recent version, see tormach.com/support... -
Page 155: Automatically Generate Tool Descriptions
2FLUTE Automatically Generate Tool Descriptions by “FL” or the same “FLUTE” as two If you're using a Tormach tool, you can enter the part number flutes. to automatically generate tool descriptions in the Tool Table window. length of “loc” LOC:0.875... -
Page 156: System File Management
You must first transfer files to the PathPilot controller. For information on transferring files, see "Transfer Files to and From the Controller" (page 118). ©Tormach® 2024 Page 156 UM10811: 1500MX Operator's Manual (Version 0424A) Specifications subject to change without notice. For the most recent version, see tormach.com/support... -
Page 157: About Backup Files
PathPilot controller. Store the file externally to use if you replace your controller or restore it to factory settings. ©Tormach® 2024 Page 157 UM10811: 1500MX Operator's Manual (Version 0424A) Specifications subject to change without notice. For the most recent version, see tormach.com/support... -
Page 158: Import And Export The Tool Table
The Import dialog box displays. 3. Select Save. The .csv file is saved in the File tab. ©Tormach® 2024 Page 158 UM10811: 1500MX Operator's Manual (Version 0424A) Specifications subject to change without notice. For the most recent version, see tormach.com/support... - Page 159 Copy to USB. 5. Select Eject. It's safe to remove the USB drive from the controller. ©Tormach® 2024 Page 159 UM10811: 1500MX Operator's Manual (Version 0424A) Specifications subject to change without notice. For the most recent version, see tormach.com/support...
-
Page 161: Basic Operations
BASIC OPERATIONS IN THIS SECTION, YOU'LL LEARN: About the basic operations required for most projects, organized as a suggested project workflow. CONTENTS 8.1 Start the Machine 8.2 Reference the Machine 8.3 Jog the Machine 8.4 Manually Control the Spindle 8.5 Load G-Code 8.6 Set Up Tooling 8.7 Set Tool Length Offsets 8.8 Set Work Offsets... -
Page 162: Start The Machine
After you push in the Emergency Stop button Figure 8-4: Step buttons (in G20 mode). Before running a G-code program Before using MDI commands ©Tormach® 2024 Page 162 UM10811: 1500MX Operator's Manual (Version 0424A) Specifications subject to change without notice. For the most recent version, see tormach.com/support... -
Page 163: About Jogging
The optional Jog Shuttle has the following functions: lengths. An inner wheel and outer ring that jog the currently selected axis. ©Tormach® 2024 Page 163 UM10811: 1500MX Operator's Manual (Version 0424A) Specifications subject to change without notice. For the most recent version, see tormach.com/support... -
Page 164: Manually Control The Spindle
"Install a Drill Chuck in a Jacobs Taper Arbor" (on the motor drives the spindle through a 5 mm pitch HTD timing next page) belt. ©Tormach® 2024 Page 164 UM10811: 1500MX Operator's Manual (Version 0424A) Specifications subject to change without notice. For the most recent version, see tormach.com/support... -
Page 165: Install A Tool In A Set Screw Tool Holder
3. Loosely thread the nut on the tool holder, insert the tool, and then tighten the collet. Figure 8-7: Tool Table window on the Offsets tab. ©Tormach® 2024 Page 165 UM10811: 1500MX Operator's Manual (Version 0424A) Specifications subject to change without notice. For the most recent version, see tormach.com/support... -
Page 166: About Tool Offsets
Use any surface that is parallel (within 0.02 mm) to the machine table. For example: A 1-2-3 Block Set (PN 31950) Box parallel ©Tormach® 2024 Page 166 UM10811: 1500MX Operator's Manual (Version 0424A) Specifications subject to change without notice. For the most recent version, see tormach.com/support... -
Page 167: Measure Tools Using A Known Reference Height
Tool Table, select the tool for which you previously wrote a description. Figure 8-11: Tool DRO field. ©Tormach® 2024 Page 167 UM10811: 1500MX Operator's Manual (Version 0424A) Specifications subject to change without notice. For the most recent version, see tormach.com/support... -
Page 168: Use A Tool Height Setter To Measure Tools
5. Slowly jog the Z-axis down (-Z) until it's 0.04 in. (1 mm) from the reference surface. ©Tormach® 2024 Page 168 UM10811: 1500MX Operator's Manual (Version 0424A) Specifications subject to change without notice. For the most recent version, see tormach.com/support... -
Page 169: Measure Tools Using A Known Reference Height
For more information on using work offsets, see "About Work Figure 8-16: Touch Z DRO field and button. Offsets" (on the next page). 7. Select Touch Z. ©Tormach® 2024 Page 169 UM10811: 1500MX Operator's Manual (Version 0424A) Specifications subject to change without notice. For the most recent version, see tormach.com/support... -
Page 170: About Work Offsets
Not used G54.1 P500 Not used 8.9 OPERATE THE COOLANT PUMP To turn coolant on or off: ©Tormach® 2024 Page 170 UM10811: 1500MX Operator's Manual (Version 0424A) Specifications subject to change without notice. For the most recent version, see tormach.com/support... -
Page 171: Programming
PROGRAMMING IN THIS SECTION, YOU'LL LEARN: About the languages that are understood and interpreted by PathPilot. CONTENTS 9.1 Programming Overview 9.2 Programming G-Code 9.3 Programming Canned Cycles 9.4 Programming M-Code 9.5 Programming Input Codes 9.6 Advanced Programming... -
Page 172: Programming Overview
1. (Optional) Block delete character (/) A word is indicated by the following, in the order listed: 2. (Optional) Line number ©Tormach® 2024 Page 172 UM10811: 1500MX Operator's Manual (Version 0424A) Specifications subject to change without notice. For the most recent version, see tormach.com/support... -
Page 173: Letters
(decimal point). Arc radius, or canned cycle retract level Spindle speed Tool selection Synonymous with A ©Tormach® 2024 Page 173 UM10811: 1500MX Operator's Manual (Version 0424A) Specifications subject to change without notice. For the most recent version, see tormach.com/support... -
Page 174: Order Of Execution
If each group 20. Set canned cycle return level mode (G98, G99) ©Tormach® 2024 Page 174 UM10811: 1500MX Operator's Manual (Version 0424A) Specifications subject to change without notice. For the most recent version, see tormach.com/support... -
Page 175: Modal Groups
Program stop and program end G85, G86, M02, M30, G88, G89} M60} Group {M03, M04, Spindle control M05} ©Tormach® 2024 Page 175 UM10811: 1500MX Operator's Manual (Version 0424A) Specifications subject to change without notice. For the most recent version, see tormach.com/support... -
Page 176: Comments
G61/G61.1 Set exact path control mode Set blended path control mode High-speed peck drill Multi-pass threading cycle ©Tormach® 2024 Page 176 UM10811: 1500MX Operator's Manual (Version 0424A) Specifications subject to change without notice. For the most recent version, see tormach.com/support... -
Page 177: Programming G-Code
9.2.14 Dynamic Cutter Compensation (G41.1 and G42.1) 185 direction, the X-axis should be moved first. 9.2.15 Apply Tool Length Offset (G43) ©Tormach® 2024 Page 177 UM10811: 1500MX Operator's Manual (Version 0424A) Specifications subject to change without notice. For the most recent version, see tormach.com/support... -
Page 178: Linear Motion At Feed Rate (G01)
(and the middle of the arc). The magnification effect is large enough that rounding error in a number can produce out-of- tolerance cuts. ©Tormach® 2024 Page 178 UM10811: 1500MX Operator's Manual (Version 0424A) Specifications subject to change without notice. For the most recent version, see tormach.com/support... -
Page 179: Center Format Arc
J and K are the offsets from the current location or coordinates – depending on depending on arc distance mode ©Tormach® 2024 Page 179 UM10811: 1500MX Operator's Manual (Version 0424A) Specifications subject to change without notice. For the most recent version, see tormach.com/support... -
Page 180: Dwell (G04)
N55 G00 Z0.1 The P number is not a valid tool number from the tool N60 X2 Y1.5 ©Tormach® 2024 Page 180 UM10811: 1500MX Operator's Manual (Version 0424A) Specifications subject to change without notice. For the most recent version, see tormach.com/support... -
Page 181: Set Coordinate System (G10 L2)
An axis other than X, Y, Z, or A is programmed Cutter Compensation is on The P number is unspecified ©Tormach® 2024 Page 181 UM10811: 1500MX Operator's Manual (Version 0424A) Specifications subject to change without notice. For the most recent version, see tormach.com/support... -
Page 182: Plane Selection (G17, G18, G19)
2. From the Probe tab, on the ETS Setup tab, select Set G37 ETS Position. The read-only DROs in the ETS G37 Position Setup group display the new position. ©Tormach® 2024 Page 182 UM10811: 1500MX Operator's Manual (Version 0424A) Specifications subject to change without notice. For the most recent version, see tormach.com/support... -
Page 183: Move And Measure Tool Length (G37)
G38.4 probes away from the workpiece, stops on loss of contact, and signals error if failure ©Tormach® 2024 Page 183 UM10811: 1500MX Operator's Manual (Version 0424A) Specifications subject to change without notice. For the most recent version, see tormach.com/support... -
Page 184: Use The Straight Probe Command
YZ or XZ-plane G00 Y #<y_center> (go to middle) ©Tormach® 2024 Page 184 UM10811: 1500MX Operator's Manual (Version 0424A) Specifications subject to change without notice. For the most recent version, see tormach.com/support... -
Page 185: Cutter Compensation (G40, G41, G42)
Troubleshooting It's an error if: ©Tormach® 2024 Page 185 UM10811: 1500MX Operator's Manual (Version 0424A) Specifications subject to change without notice. For the most recent version, see tormach.com/support... -
Page 186: Cancel Tool Length Compensation (G49)
If P is omitted then the speed is maintained however far from the programmed path the tool cuts. ©Tormach® 2024 Page 186 UM10811: 1500MX Operator's Manual (Version 0424A) Specifications subject to change without notice. For the most recent version, see tormach.com/support... -
Page 187: Distance Mode (G90 And G91)
If the F number is 2.0, the move should be completed in half a minute. ©Tormach® 2024 Page 187 UM10811: 1500MX Operator's Manual (Version 0424A) Specifications subject to change without notice. For the most recent version, see tormach.com/support... -
Page 188: Spindle Control Mode (G96 And G97)
The descriptions we use assume the XY-plane has been selected. The behavior is always analogous if the YZ- or XZ- plane is selected. ©Tormach® 2024 Page 188 UM10811: 1500MX Operator's Manual (Version 0424A) Specifications subject to change without notice. For the most recent version, see tormach.com/support... - Page 189 If the XZ- or YZ-plane is active, the preliminary and in-between the L word is equivalent to specifying L=1 motions are analogous. ©Tormach® 2024 Page 189 UM10811: 1500MX Operator's Manual (Version 0424A) Specifications subject to change without notice. For the most recent version, see tormach.com/support...
-
Page 190: High Speed Peck Drill (G73)
Step 2: Move the Z-axis only at the current feed rate to the Z position. Step 3: Retract the Z-axis at traverse rate to clear ©Tormach® 2024 Page 190 UM10811: 1500MX Operator's Manual (Version 0424A) Specifications subject to change without notice. For the most recent version, see tormach.com/support... -
Page 191: Simple Drilling Cycle (G82)
N40 X3 Program: G85 X~ Y~ Z~ A~ R~ L~ N45 Y2 The G85 cycle is as follows: ©Tormach® 2024 Page 191 UM10811: 1500MX Operator's Manual (Version 0424A) Specifications subject to change without notice. For the most recent version, see tormach.com/support... -
Page 192: Boring Cycle (G86)
P specifies the number of seconds to dwell. Activate output relays Program: G89 X~ Y~ Z~ A~ R~ L~ P~ ©Tormach® 2024 Page 192 UM10811: 1500MX Operator's Manual (Version 0424A) Specifications subject to change without notice. For the most recent version, see tormach.com/support... -
Page 193: Program Stop And Program End (M00, M01, M02, And M30)
The current motion mode is set to G01 (like G01) To turn all coolant off, program: M09 Coolant is turned off (like M09) ©Tormach® 2024 Page 193 UM10811: 1500MX Operator's Manual (Version 0424A) Specifications subject to change without notice. For the most recent version, see tormach.com/support... -
Page 194: Override Control (M48 And M49)
There are four contacts, numbered from 0 to 3. The contact is Q- is the timeout in seconds for waiting specified by the P word. ©Tormach® 2024 Page 194 UM10811: 1500MX Operator's Manual (Version 0424A) Specifications subject to change without notice. For the most recent version, see tormach.com/support... -
Page 195: Chip Conveyor Control (M231 And M233)
LE), and the MOD, ROUND, FUP and FIX operators support integer arithmetic. Troubleshooting It's an error if: ©Tormach® 2024 Page 195 UM10811: 1500MX Operator's Manual (Version 0424A) Specifications subject to change without notice. For the most recent version, see tormach.com/support... -
Page 196: Parameter Syntax
Programming with Subroutines later in this chapter 31-5000: G-code operator parameters. These parameters are global in G-code file ©Tormach® 2024 Page 196 UM10811: 1500MX Operator's Manual (Version 0424A) Specifications subject to change without notice. For the most recent version, see tormach.com/support... -
Page 197: Subroutine Parameters Reference
Read the following sections for reference: Binary Operators Reference Functions Reference ©Tormach® 2024 Page 197 UM10811: 1500MX Operator's Manual (Version 0424A) Specifications subject to change without notice. For the most recent version, see tormach.com/support... -
Page 198: Binary Operators Reference
Do/while/endwhile: Execute the subroutine while a ATAN[Y]/[X]: Four quadrant inverse tangent condition is true ABS[arg]: Absolute value ©Tormach® 2024 Page 198 UM10811: 1500MX Operator's Manual (Version 0424A) Specifications subject to change without notice. For the most recent version, see tormach.com/support... -
Page 199: Conditional Subroutines Reference
The file name only includes lowercase letters, numbers, theif keyword only when the if argument evaluates to true. dashes, and underscores. ©Tormach® 2024 Page 199 UM10811: 1500MX Operator's Manual (Version 0424A) Specifications subject to change without notice. For the most recent version, see tormach.com/support... -
Page 200: If/Elseif/Else/Endif
A label on else, elseif or endif not pointing to a matching Subroutines can be looped using the do/while or while/endwhile keyword constructs. ©Tormach® 2024 Page 200 UM10811: 1500MX Operator's Manual (Version 0424A) Specifications subject to change without notice. For the most recent version, see tormach.com/support... - Page 201 A label on endrepeat or endwhile no referring to a corresponding while or repeat ©Tormach® 2024 Page 201 UM10811: 1500MX Operator's Manual (Version 0424A) Specifications subject to change without notice. For the most recent version, see tormach.com/support...
-
Page 203: Machine Maintenance
MACHINE MAINTENANCE IN THIS SECTION, YOU'LL LEARN: About the required maintenance procedures that you must do so that this machine operates as designed. Before operating the machine in any way, you must read and understand this section. CONTENTS 10.1 Maintenance Safety 10.2 Maintenance Schedules 10.3 Regular Maintenance... -
Page 204: Maintenance Safety
For information, see "Diagrams and Parts Lists" Examine the spindle belt for wear. (page 229). For any additional support, we can help. Create a Examine the way covers for wear. support ticket with Tormach Technical Support at tormach.com/how-to-submit-a-support-ticket for guidance on 10.2.5 Annually how to proceed. -
Page 205: Clean The Way Covers
Remove the coolant tank covers and the chip strainer, and then clean the fine swarf from the coolant tank. ©Tormach® 2024 Page 205 UM10811: 1500MX Operator's Manual (Version 0424A) Specifications subject to change without notice. For the most recent version, see tormach.com/support... -
Page 206: Examine The Enclosure Windows
Citgo EP Compound 220 Oil (PN 52499) or the machine table: use light, even pressure, and move the equivalent. ©Tormach® 2024 Page 206 UM10811: 1500MX Operator's Manual (Version 0424A) Specifications subject to change without notice. For the most recent version, see tormach.com/support... - Page 207 If you find a lot of rust, or if there is rust on the machine's slideways or ball screws, take photos of all rust-covered areas. Create a support ticket with Tormach Technical Support at tormach.com/how-to-submit-a-support-ticket for guidance on how to proceed.
-
Page 209: Troubleshooting
TROUBLESHOOTING IN THIS SECTION, YOU'LL LEARN: About common causes of failure in this machine, and our recommendations for diagnosing and correcting them. WARNING! Electrocution Hazard - Electrical Cabinet: Do not make or disconnect connections under power. Before operating the machine in any way, you must read and understand this section. CONTENTS 11.1 Troubleshooting Safety 11.2 Getting Help... -
Page 210: Troubleshooting Safety
2. From the PathPilot controller, on the Status tab, select Log Data. PathPilot creates a file called logdata_[TODAY'S-DATE].zip, and saves it on your USB drive. 3. Remove the USB drive from the controller. Create a support ticket with Tormach Technical Support at tormach.com/how-to-submit- a-support-ticket for guidance on how to proceed. -
Page 211: Frequently Found Problems
Turn the Main Disconnect switch to OFF on the side of the electrical cabinet. 2. Unplug and firmly reseat connectors. ©Tormach® 2024 Page 211 UM10811: 1500MX Operator's Manual (Version 0424A) Specifications subject to change without notice. For the most recent version, see tormach.com/support... -
Page 212: Electrical Service
LEDs in PathPilot indicate output or functional status — including the LEDs on the Status tab, which are useful for indicating if any inputs or outputs are operational. There are various LED indicators in the electrical cabinet. Among these are: ©Tormach® 2024 Page 212 UM10811: 1500MX Operator's Manual (Version 0424A) Specifications subject to change without notice. For the most recent version, see tormach.com/support... - Page 213 S4 Power Drawbar Push Button The push button has an integrated status light that shows the machine is in an operating state where manually unclamping the power drawbar is allowed to facilitate tool changes. ©Tormach® 2024 Page 213 UM10811: 1500MX Operator's Manual (Version 0424A) Specifications subject to change without notice. For the most recent version, see tormach.com/support...
-
Page 214: Overview
11.5.2 Overview The 1500MX electrical system consists of several interrelated subsystems: 230 Vac Power Distribution Provides 230 Vac mains power to servo drives. Also provides pass-through power for accessory devices (such as flood and washdown coolant pumps, the PathPilot console, Automatic Tool Changer (ATC), and automatic oiler) and auxiliary devices (such as enclosure lights). -
Page 215: The Pathpilot Operator Console Won't Power On
CB2 circuit breaker. 11.7 CONTROL POWER SUBSYSTEM To troubleshoot the control power subsystem, read the following: ©Tormach® 2024 Page 215 UM10811: 1500MX Operator's Manual (Version 0424A) Specifications subject to change without notice. For the most recent version, see tormach.com/support... -
Page 216: The Machine Won't Power On
If it's on, K1 has a latching circuit issue. If it's not on, K1 may have a coil issue. ©Tormach® 2024 Page 216 UM10811: 1500MX Operator's Manual (Version 0424A) Specifications subject to change without notice. For the most recent version, see tormach.com/support... -
Page 217: Servo Drive Subsystem
Examine the coupling and make witness marks to determine if the motor's turning but the screw isn't. ©Tormach® 2024 Page 217 UM10811: 1500MX Operator's Manual (Version 0424A) Specifications subject to change without notice. For the most recent version, see tormach.com/support... -
Page 218: Axis Movement Is Noisy
Power off the machine (see Power Off the Machine). Then, tighten all for signs of overheating. screw connections. ©Tormach® 2024 Page 218 UM10811: 1500MX Operator's Manual (Version 0424A) Specifications subject to change without notice. For the most recent version, see tormach.com/support... -
Page 219: Lost Motion On Axis Travel
Examine the G-code programs. You must fully understand tool offsets, perceived loss of position is operator work offsets, and cutter compensation. error. ©Tormach® 2024 Page 219 UM10811: 1500MX Operator's Manual (Version 0424A) Specifications subject to change without notice. For the most recent version, see tormach.com/support... - Page 220 For information, see "Getting Help" Restart the controller and send the log file (from the logfiles directory) to (page 210). Tormach Technical Support. Create a support ticket with Tormach Technical Support at tormach.com/how-to-submit-a-support-ticket for guidance on how to proceed. Cause: There's an obstruction or excessive friction, or there's high load in the mechanical system.
-
Page 221: Spindle Drive Subsystem
That usually takes about five seconds. ©Tormach® 2024 Page 221 UM10811: 1500MX Operator's Manual (Version 0424A) Specifications subject to change without notice. For the most recent version, see tormach.com/support... - Page 222 Probability How-To Steps Power off the machine (see Power Off the Machine). Then, examine the mechanical system. ©Tormach® 2024 Page 222 UM10811: 1500MX Operator's Manual (Version 0424A) Specifications subject to change without notice. For the most recent version, see tormach.com/support...
-
Page 223: Machining Operations Are Loud ("Chattery")
2. Verify that the spindle and tool holder's contact surfaces are clean, dry, and free of grease or oil. ©Tormach® 2024 Page 223 UM10811: 1500MX Operator's Manual (Version 0424A) Specifications subject to change without notice. For the most recent version, see tormach.com/support... - Page 224 If you find incorrect pull studs used in the machine, inspect the clamping mechanism for damage. If you find any damage, replace it with Clamping Unit, BT30 (PN 39690). ©Tormach® 2024 Page 224 UM10811: 1500MX Operator's Manual (Version 0424A) Specifications subject to change without notice. For the most recent version, see tormach.com/support...
-
Page 225: Can't Load Or Unload A Tool, Or The Spindle's Drawbar Drags Against The Power Drawbar Cylinder's Piston Bolt
Reinstall the clamping unit: apply medium-strength (blue) thread-locking compound to the threads, and tighten the clamping unit onto the drawbar shaft with the installation tool. ©Tormach® 2024 Page 225 UM10811: 1500MX Operator's Manual (Version 0424A) Specifications subject to change without notice. For the most recent version, see tormach.com/support... -
Page 226: Spindle Rotates On Contact, Or Spindle Isn't Rigidly Clamped
Clean and reassemble the Low Pressure Regulator onto the ATC. Then, repeat Step 2. ©Tormach® 2024 Page 226 UM10811: 1500MX Operator's Manual (Version 0424A) Specifications subject to change without notice. For the most recent version, see tormach.com/support... -
Page 227: Spindle Doesn't Orient Correctly Or Consistently
TSC Input 2 Y-Axis IO-5 Probe Trigger Probe Activation Probe Pulse Toolsetter Activation Probe Battery MQL (Mist) Probe Error ©Tormach® 2024 Page 227 UM10811: 1500MX Operator's Manual (Version 0424A) Specifications subject to change without notice. For the most recent version, see tormach.com/support... - Page 228 Outputs Z-Axis IO-6 Enclosure Lock Enclosure Door Lock Power Drawbar Button TSC Power Z-Axis Brake A-Axis IO-9 ©Tormach® 2024 Page 228 UM10811: 1500MX Operator's Manual (Version 0424A) Specifications subject to change without notice. For the most recent version, see tormach.com/support...
-
Page 229: Diagrams And Parts Lists
DIAGRAMS AND PARTS LISTS IN THIS SECTION, YOU'LL LEARN: About this machine’s components. NOTICE! Only use Tormach-approved parts when making replacements. If you don't replace parts with those listed in this section, you may void your warranty. CONTENTS 12.1 Assembly Overview 12.2 Assembly Overview Parts List... - Page 230 12.34 Spindle Head Camera Assembly Parts List 12.35 Coolant Tank Assembly Exploded View 12.36 Coolant Tank Assembly Parts List ©Tormach® 2024 Page 230 UM10811: 1500MX Operator's Manual (Version 0424A) Specifications subject to change without notice. For the most recent version, see tormach.com/support...
-
Page 231: Assembly Overview
12: DIAGRAMS AND PARTS LISTS 12.1 ASSEMBLY OVERVIEW ©Tormach® 2024 Page 231 UM10811: 1500MX Operator's Manual (Version 0424A) Specifications subject to change without notice. For the most recent version, see tormach.com/support... -
Page 232: Assembly Overview Parts List
Z-Axis Way Cover Assembly, 1500MX (PN 51204) Y-Axis Rear Way Cover Assembly, 1500MX (PN 51205) Y-Axis Front Way Cover Assembly, 1500MX (PN 51206) X-Axis Sheet Metal Cover Assembly, 1500MX (PN 51231) Saddle Cover Right/Left Panel, 1500MX (PN 51448) Spindle Head Sheet Metal Cover Assembly, 1500MX (PN 51398) Base-Column Rear Access Panel, 1500MX (PN 51743) - Page 233 Screw, Socket Head Cap, M10 × 1.5 × 50 (PN 31597) Screw, Socket Head Cap, M10 × 1.5 - 35 (PN 31592) ©Tormach® 2024 Page 233 UM10811: 1500MX Operator's Manual (Version 0424A) Specifications subject to change without notice. For the most recent version, see tormach.com/support...
-
Page 234: Electrical Cabinet Exterior Exploded View
12: DIAGRAMS AND PARTS LISTS 12.3 ELECTRICAL CABINET EXTERIOR EXPLODED VIEW ©Tormach® 2024 Page 234 UM10811: 1500MX Operator's Manual (Version 0424A) Specifications subject to change without notice. For the most recent version, see tormach.com/support... -
Page 235: Electrical Cabinet Interior Exploded View
12: DIAGRAMS AND PARTS LISTS 12.4 ELECTRICAL CABINET INTERIOR EXPLODED VIEW ©Tormach® 2024 Page 235 UM10811: 1500MX Operator's Manual (Version 0424A) Specifications subject to change without notice. For the most recent version, see tormach.com/support... -
Page 236: Electrical Cabinet Parts List
Quantity Electrical Cabinet, 1500MX (PN 51284) – Electrical Cabinet Door, 1500MX (PN 51285) – Electrical Cabinet Door Gasket, 1500MX (PN 51669) – Cam Lock, Zinc Plated, Hex Drive, Quarter-Turn Counterclockwise McMaster-Carr: 2050N12 to Open (PN 51588) Hinge, Weld-On, Lift-Off Style, 1-7/16 in. Width (PN 51314) –... - Page 237 – Spindle Brake Resistor (S4) (PN 37906) – Screw, Button Head Cap, M4 × 0.7 - 8, Black Oxide Steel McMaster-Carr: 91239A140 (PN 51317) Bulkhead Label, Upper Bulkhead, 1500MX Electrical Cabinet – (PN 51471) Bulkhead Label, Upper Bulkhead, 1500MX Electrical Cabinet – (PN 51472) Standoff, 47 mm Hole Spacing, Clip-On Din Rail, Plastic (PN 51473)
- Page 238 Nut, Hex, M4, Zinc Plated (PN 38358) McMaster-Carr: 90591A255 Washer, Flat, M4 (PN 31087) McMaster-Carr: 91166A230 *Optional accessory not included with the base machine. ©Tormach® 2024 Page 238 UM10811: 1500MX Operator's Manual (Version 0424A) Specifications subject to change without notice. For the most recent version, see tormach.com/support...
-
Page 239: Enclosure Diagrams And Parts Lists
12: DIAGRAMS AND PARTS LISTS 12.6 ENCLOSURE DIAGRAMS AND PARTS LISTS 12.6.1 Enclosure Kit Exploded View ©Tormach® 2024 Page 239 UM10811: 1500MX Operator's Manual (Version 0424A) Specifications subject to change without notice. For the most recent version, see tormach.com/support... -
Page 240: Enclosure Kit Parts List
Air Gun Kit (PN 51443) – LED Flood Light (20 W) (PN 51591) – Flood Light and Window Retainer, 1500MX Enclosure (PN 51507) – Cable, IEC 320 Extension (IEC 320 C13 - IEC 320 C14), 2.0 m, 10 A – 250 V 18/3 AWG SJT (PN 38389) Decal, Enclosure, 1500MX, Front Left Panel (PN 51437) - Page 241 12: DIAGRAMS AND PARTS LISTS Description Alternative Part Number Quantity Decal, Enclosure, 1500MX, Rear Right Panel (Interior) (PN 51438) – Label Kit, 1500MX Enclosure (PN 52443) – Left Rear Enclsoure Panel, 1500MX (PN 51266) – Panel Plug, Push-In, 32 mm (PN 51383) McMaster-Carr: 9600K521 Panel Plug, Push-In, 6 mm (PN 51530)
-
Page 242: Enclosure Door Assembly Exploded View
12: DIAGRAMS AND PARTS LISTS 12.6.3 Enclosure Door Assembly Exploded View ©Tormach® 2024 Page 242 UM10811: 1500MX Operator's Manual (Version 0424A) Specifications subject to change without notice. For the most recent version, see tormach.com/support... -
Page 243: Enclosure Door Assembly Parts List
Short Window Clamp, Enclosure Door, 1500MX (PN 51691) – Linear Bearing Block, Round, 16 mm (PN 37610) – Linear Bearing Block, Supported Round, 16 mm (PN 51817) – Enclosure Door Linear Bearing Cover Panel, 1500MX (PN 51886) – Door Handle Bracket, 1500MX (PN 51360) – Door Handle, 1500MX (PN 51361) –... -
Page 244: X-Axis Assembly Exploded View
12: DIAGRAMS AND PARTS LISTS 12.7 X-AXIS ASSEMBLY EXPLODED VIEW ©Tormach® 2024 Page 244 UM10811: 1500MX Operator's Manual (Version 0424A) Specifications subject to change without notice. For the most recent version, see tormach.com/support... -
Page 245: X-Axis Assembly Parts List
McMaster-Carr: 91290A548 Screw, Socket Head Cap, M8 × 1.25 - 70 (PN 51751) McMaster-Carr: 91290A460 Y-Axis Lubrication Assembly, 1500MX (PN 51404) – X-Axis Sheet Metal Cover Assembly, 1500MX (PN 51231) – X-Axis Drag Chain, 1500MX (PN 51422) – X-Axis Drag Chain Guide, 1500MX (PN 51767) –... -
Page 246: Spindle Head Exploded View
12: DIAGRAMS AND PARTS LISTS 12.9 SPINDLE HEAD EXPLODED VIEW ©Tormach® 2024 Page 246 UM10811: 1500MX Operator's Manual (Version 0424A) Specifications subject to change without notice. For the most recent version, see tormach.com/support... -
Page 247: Spindle Head Parts List
12.10 SPINDLE HEAD PARTS LIST Description Alternative Part Number Quantity Spindle Head Casting, 1500MX (PN 51234) – 1500MX Spindle Cartridge Assembly, BT30, 10000 RPM, 5MHTD- – 36T PULLEY, Through Spindle Coolant (CTS) (PN 51347) Spindle Motor Pulley, 1500MX (PN 51235) – Spindle Motor Mount Plate, 1500MX (PN 51236) –... -
Page 248: Linear Actuator Assembly Exploded View
12: DIAGRAMS AND PARTS LISTS 12.11 LINEAR ACTUATOR ASSEMBLY EXPLODED VIEW ©Tormach® 2024 Page 248 UM10811: 1500MX Operator's Manual (Version 0424A) Specifications subject to change without notice. For the most recent version, see tormach.com/support... -
Page 249: Linear Actuator Assembly Parts List
Servo Motor, 750W (PN 51810 51810 51258) – Servo Power Cable (PN 51571 51572 51573) – Servo Encoder Cable (PN 51568 51569 51570) – ©Tormach® 2024 Page 249 UM10811: 1500MX Operator's Manual (Version 0424A) Specifications subject to change without notice. For the most recent version, see tormach.com/support... -
Page 250: Lubrication Assembly Exploded View
12: DIAGRAMS AND PARTS LISTS 12.13 LUBRICATION ASSEMBLY EXPLODED VIEW ©Tormach® 2024 Page 250 UM10811: 1500MX Operator's Manual (Version 0424A) Specifications subject to change without notice. For the most recent version, see tormach.com/support... -
Page 251: Lubrication Assembly Parts List
Screw, Button Head Cap, M6 × 1 - 20, Stainless Steel (PN 51700) McMaster-Carr: 92095A240 Fitting, Check Valve, M8 × P1.0 - 4 mm Tube (PN 52912) – ©Tormach® 2024 Page 251 UM10811: 1500MX Operator's Manual (Version 0424A) Specifications subject to change without notice. For the most recent version, see tormach.com/support... -
Page 252: X-Axis Lubrication Assembly Exploded View
12: DIAGRAMS AND PARTS LISTS 12.15 X-AXIS LUBRICATION ASSEMBLY EXPLODED VIEW ©Tormach® 2024 Page 252 UM10811: 1500MX Operator's Manual (Version 0424A) Specifications subject to change without notice. For the most recent version, see tormach.com/support... -
Page 253: X-Axis Lubrication Assembly Parts List
Screw, Button Head Cap, M6 × 1 - 20, Stainless Steel (PN 51700) McMaster-Carr: 92095A240 Tubing, Nylon, 4 mm OD (PN 31304) McMaster-Carr: 50405K33 Lubrication Line, Copper, 1500MX X-Axis Ball Nut (PN 52514) – Lubrication Line, Copper, 1500MX X-Axis Bearing 1 (PN 52515) –... -
Page 254: Y-Axis Lubrication Assembly Exploded View
12: DIAGRAMS AND PARTS LISTS 12.17 Y-AXIS LUBRICATION ASSEMBLY EXPLODED VIEW ©Tormach® 2024 Page 254 UM10811: 1500MX Operator's Manual (Version 0424A) Specifications subject to change without notice. For the most recent version, see tormach.com/support... -
Page 255: Y-Axis Lubrication Assembly Parts List
Alternative Part Number Quantity Y-Axis Lubrication Manifold Bracket, 1500MX (PN 51408) – 5-Port Manifold (PN 30442) – Lubrication Line, Copper, 1500MX Y-Axis Bearing 1 (PN 52233) – Lubrication Line, Copper, 1500MX Y-Axis Bearing 2 (PN 52234) – Lubrication Line, Copper, 1500MX Y-Axis Bearing 3 (PN 52235) –... -
Page 256: Z-Axis Lubrication Assembly Exploded View
12: DIAGRAMS AND PARTS LISTS 12.19 Z-AXIS LUBRICATION ASSEMBLY EXPLODED VIEW ©Tormach® 2024 Page 256 UM10811: 1500MX Operator's Manual (Version 0424A) Specifications subject to change without notice. For the most recent version, see tormach.com/support... -
Page 257: Z-Axis Lubrication Assembly Parts List
Bracket, Z-Axis Oil Distributor Mount, 1500MX (PN 51402) — 5-Port Manifold (PN 30442) — Lubrication Line, Copper, 1500MX Z-Axis Bearing 1 (PN 52238) — Lubrication Line, Copper, 1500MX Z-Axis Bearing 2 (PN 52239) — Lubrication Line, Copper, 1500MX Z-Axis Bearing 3 (PN 52240) —... -
Page 258: X-Axis Sheet Metal Cover Assembly Exploded View
12: DIAGRAMS AND PARTS LISTS 12.21 X-AXIS SHEET METAL COVER ASSEMBLY EXPLODED VIEW ©Tormach® 2024 Page 258 UM10811: 1500MX Operator's Manual (Version 0424A) Specifications subject to change without notice. For the most recent version, see tormach.com/support... -
Page 259: X-Axis Sheet Metal Cover Assembly Parts List
12: DIAGRAMS AND PARTS LISTS 12.22 X-AXIS SHEET METAL COVER ASSEMBLY PARTS LIST Description Alternative Part Number Quantity X-Axis Sheet Metal Cover Front/Rear Panel, 1500MX (PN 51446) – X-Axis Sheet Metal Cover Right Panel, 1500MX (PN 51447) – X-Axis Sheet Metal Cover Left Panel, 1500MX (PN 51811) –... -
Page 260: Spindle Head Sheet Metal Cover Assembly Exploded View
12: DIAGRAMS AND PARTS LISTS 12.23 SPINDLE HEAD SHEET METAL COVER ASSEMBLY EXPLODED VIEW 10** 11** 12** 14** 13** 15** 16** ©Tormach® 2024 Page 260 UM10811: 1500MX Operator's Manual (Version 0424A) Specifications subject to change without notice. For the most recent version, see tormach.com/support... -
Page 261: Spindle Head Sheet Metal Cover Assembly Parts List
12.24 SPINDLE HEAD SHEET METAL COVER ASSEMBLY PARTS LIST Description Alternative Part Number Quantity Spindle Head Front Panel, 1500MX (PN 51241) – Spindle Head Right Side Panel, 1500MX (PN 51243) – Spindle Head Left Side Panel, 1500MX (PN 51474) – Spindle Head Back Panel, 1500MX (PN 51242) –... -
Page 262: Z-Axis Way Cover Assembly Exploded View
12: DIAGRAMS AND PARTS LISTS 12.25 Z-AXIS WAY COVER ASSEMBLY EXPLODED VIEW ©Tormach® 2024 Page 262 UM10811: 1500MX Operator's Manual (Version 0424A) Specifications subject to change without notice. For the most recent version, see tormach.com/support... -
Page 263: Z-Axis Way Cover Assembly Parts List
12: DIAGRAMS AND PARTS LISTS 12.26 Z-AXIS WAY COVER ASSEMBLY PARTS LIST Description Alternative Part Number Quantity Top Segment, Z-Axis Way Cover, 1500MX (PN 51582) – Middle Segment, Z-Axis Way Cover, 1500MX (PN 51586) – Bottom Segment, Z-Axis Way Cover, 1500MX (PN 51589) –... -
Page 264: Y-Axis Rear Way Cover Assembly Exploded View
12: DIAGRAMS AND PARTS LISTS 12.27 Y-AXIS REAR WAY COVER ASSEMBLY EXPLODED VIEW ©Tormach® 2024 Page 264 UM10811: 1500MX Operator's Manual (Version 0424A) Specifications subject to change without notice. For the most recent version, see tormach.com/support... -
Page 265: Y-Axis Rear Way Cover Assembly Parts List
Base Segment, Y-Axis Rear Way Cover, 1500MX (PN 51636) – Moving Segment, Y-Axis Rear Way Cover, 1500MX (PN 51637) – Wide Slide Plate, Y-Axis Rear Way Cover, 1500MX (PN 51644) – Narrow Slide Plate, Y-Axis Rear Way Cover, 1500MX (PN 51645) – Screw, Socket Head Countersunk, M4 × 0.7 - 8, Stainless Steel McMaster-Carr: 92125A188 (PN 51672) -
Page 266: Y-Axis Front Way Cover Assembly Exploded View
12: DIAGRAMS AND PARTS LISTS 12.29 Y-AXIS FRONT WAY COVER ASSEMBLY EXPLODED VIEW ©Tormach® 2024 Page 266 UM10811: 1500MX Operator's Manual (Version 0424A) Specifications subject to change without notice. For the most recent version, see tormach.com/support... -
Page 267: Y-Axis Front Way Cover Assembly Parts List
Intermediate Segment 4, Y-Axis Front Way Cover, 1500MX – (PN 51653) Top Segment, Y-Axis Front Way Cover, 1500MX (PN 51646) – Linear Rail Slider Trim, Y-Axis Front Way Cover, 1500MX – (PN 51656) Screw, Button Head Cap (Flanged), M6 × 1 - 12, Stainless Steel McMaster-Carr: 97654A380 (PN 38206) ©Tormach®... -
Page 268: Bt30 Power Drawbar Cylinder Exploded View
12: DIAGRAMS AND PARTS LISTS 12.31 BT30 POWER DRAWBAR CYLINDER EXPLODED VIEW ©Tormach® 2024 Page 268 UM10811: 1500MX Operator's Manual (Version 0424A) Specifications subject to change without notice. For the most recent version, see tormach.com/support... -
Page 269: Bt30 Power Drawbar Cylinder Assembly Parts List
Power Drawbar Cylinder, 2.5T × 13 mm (PN 51601) – Screw, Socket Head Cap, M12 × 1.75 - 50 (PN 32476) McMaster-Carr: 91290A626 Power Drawbar CTS Extension Sleeve, 1500MX (PN 51605) – Screw, Hex Head Cap, M16 × 1.5 - 25 (PN 31322) McMaster-Carr: 91180A913 ©Tormach®... -
Page 270: Spindle Head Camera Assembly Exploded View
12: DIAGRAMS AND PARTS LISTS 12.33 SPINDLE HEAD CAMERA ASSEMBLY EXPLODED VIEW ©Tormach® 2024 Page 270 UM10811: 1500MX Operator's Manual (Version 0424A) Specifications subject to change without notice. For the most recent version, see tormach.com/support... -
Page 271: Spindle Head Camera Assembly Parts List
Screw, Pan Head Machine, M4 × 0.7 - 8, Zinc Plated (PN 20001) McMaster-Carr: 92005A218 Washer, Flat, M4 (PN 31087) McMaster-Carr: 91166A230 ©Tormach® 2024 Page 271 UM10811: 1500MX Operator's Manual (Version 0424A) Specifications subject to change without notice. For the most recent version, see tormach.com/support... -
Page 272: Coolant Tank Assembly Exploded View
12: DIAGRAMS AND PARTS LISTS 12.35 COOLANT TANK ASSEMBLY EXPLODED VIEW ©Tormach® 2024 Page 272 UM10811: 1500MX Operator's Manual (Version 0424A) Specifications subject to change without notice. For the most recent version, see tormach.com/support... -
Page 273: Coolant Tank Assembly Parts List
Oil Skimmer Cover Panel, 1500MX Coolant Tank (PN 52551) – Coolant Pump Cover Panel, 1500MX Coolant Tank (PN 52552) – Coolant Pump Mounting Plate, 1500MX Coolant Tank, 1/4 hp, Fits – ASP-4180 (PN 52553) Fitting, Plug, 1 in. NPT, External Square Drive (PN 52561) –... -
Page 275: Electrical Schematics
ELECTRICAL SCHEMATICS IN THIS SECTION, YOU'LL LEARN: About the electrical schematics for this machine’s electronics. CONTENTS 13.1 230 Vac Power (Sheet 2) 13.2 24 Vdc Controls (Sheet 3) 13.3 Safety Systems (Page 4) 13.4 Spindle Drive (Page 5) 13.5 X-, Y-, and Z-Axis Drives (Page 6) 13.6 A- and B-Axis Drives (Page 7) 13.7 EtherCAT IO Board (Page 8) 13.8 Accessory / Auxiliary (Page 9) -
Page 276: Vac Power (Sheet 2)
13: ELECTRICAL SCHEMATICS 13.1 230 VAC POWER (SHEET 2) ©Tormach® 2024 Page 276 UM10811: 1500MX Operator's Manual (Version 0424A) Specifications subject to change without notice. For the most recent version, see tormach.com/support... -
Page 277: Vdc Controls (Sheet 3)
13: ELECTRICAL SCHEMATICS 13.2 24 VDC CONTROLS (SHEET 3) ©Tormach® 2024 Page 277 UM10811: 1500MX Operator's Manual (Version 0424A) Specifications subject to change without notice. For the most recent version, see tormach.com/support... -
Page 278: Safety Systems
13: ELECTRICAL SCHEMATICS 13.3 SAFETY SYSTEMS (PAGE 4) ©Tormach® 2024 Page 278 UM10811: 1500MX Operator's Manual (Version 0424A) Specifications subject to change without notice. For the most recent version, see tormach.com/support... -
Page 279: Spindle Drive (Page 5)
13: ELECTRICAL SCHEMATICS 13.4 SPINDLE DRIVE (PAGE 5) ©Tormach® 2024 Page 279 UM10811: 1500MX Operator's Manual (Version 0424A) Specifications subject to change without notice. For the most recent version, see tormach.com/support... -
Page 280: Y-, And Z-Axis Drives (Page 6)
13: ELECTRICAL SCHEMATICS 13.5 X-, Y-, AND Z-AXIS DRIVES (PAGE 6) ©Tormach® 2024 Page 280 UM10811: 1500MX Operator's Manual (Version 0424A) Specifications subject to change without notice. For the most recent version, see tormach.com/support... -
Page 281: A- And B-Axis Drives (Page 7)
13: ELECTRICAL SCHEMATICS 13.6 A- AND B-AXIS DRIVES (PAGE 7) ©Tormach® 2024 Page 281 UM10811: 1500MX Operator's Manual (Version 0424A) Specifications subject to change without notice. For the most recent version, see tormach.com/support... -
Page 282: Ethercat Io Board
13: ELECTRICAL SCHEMATICS 13.7 ETHERCAT IO BOARD (PAGE 8) ©Tormach® 2024 Page 282 UM10811: 1500MX Operator's Manual (Version 0424A) Specifications subject to change without notice. For the most recent version, see tormach.com/support... -
Page 283: Accessory / Auxiliary (Page 9)
13: ELECTRICAL SCHEMATICS 13.8 ACCESSORY / AUXILIARY (PAGE 9) ©Tormach® 2024 Page 283 UM10811: 1500MX Operator's Manual (Version 0424A) Specifications subject to change without notice. For the most recent version, see tormach.com/support... -
Page 284: X1 Ac Terminal Strip (Pages 11-13)
13: ELECTRICAL SCHEMATICS 13.9 -X1 AC TERMINAL STRIP (PAGES 11-13) ©Tormach® 2024 Page 284 UM10811: 1500MX Operator's Manual (Version 0424A) Specifications subject to change without notice. For the most recent version, see tormach.com/support... - Page 285 13: ELECTRICAL SCHEMATICS ©Tormach® 2024 Page 285 UM10811: 1500MX Operator's Manual (Version 0424A) Specifications subject to change without notice. For the most recent version, see tormach.com/support...
- Page 286 13: ELECTRICAL SCHEMATICS ©Tormach® 2024 Page 286 UM10811: 1500MX Operator's Manual (Version 0424A) Specifications subject to change without notice. For the most recent version, see tormach.com/support...
-
Page 287: X2 Control Terminal Strip (Page 14)
13: ELECTRICAL SCHEMATICS 13.10 -X2 CONTROL TERMINAL STRIP (PAGE 14) ©Tormach® 2024 Page 287 UM10811: 1500MX Operator's Manual (Version 0424A) Specifications subject to change without notice. For the most recent version, see tormach.com/support... -
Page 288: X3 Grounds Terminal Strip (Page 15)
13: ELECTRICAL SCHEMATICS 13.11 -X3 GROUNDS TERMINAL STRIP (PAGE 15) ©Tormach® 2024 Page 288 UM10811: 1500MX Operator's Manual (Version 0424A) Specifications subject to change without notice. For the most recent version, see tormach.com/support...
Need help?
Do you have a question about the 1500MX and is the answer not in the manual?
Questions and answers