Table of Contents
Advertisement
Quick Links
Advertisement
Table of Contents
Troubleshooting

Related Manuals for Siemens DCA Vantage


Summary of Contents for Siemens DCA Vantage
- Page 1 DCA Vantage ® A n a l y z e r Operator's Guide REF 06489264 Rev. E, 2012-08...
- Page 2 No part of this manual or the products it describes may be reproduced by any means or in any form without prior consent in writing from Siemens Healthcare Diagnostics. DCA 2000, DCA, DCA Vantage, and RAPIDComm are trademarks of Siemens Healthcare Diagnostics. All other trademarks are the property of their respective owners.
-
Page 3: Table Of Contents
Setting up the Report Type ............31 Resetting Printer to Default............31 Loading Paper in the Onboard Printer ..........31 Software Setup ..................31 Start Up Tests ..................31 Loading Configuration Settings .............32 Verifying that the DCA Vantage System is Ready .........32 Optical Test...................32 Configuring Connectivity................32 DCA Vantage Operator’s Guide... - Page 4 Rules for Entering Patient Data Using the Barcode Reader....57 Entering Patient Data Using the Barcode Reader .........59 Cancelling a test ................59 Displaying, Printing, and Sending Results ........59 HbA1c Test Results ..............60 Removing the Reagent Cartridge ..........62 Microalbumin/Creatinine Test ..............63 DCA Vantage Operator’s Guide...
- Page 5 Running a Control Test ................90 Quality Control Errors ................91 Setting a Required QC Reminder or Displaying a QC Reminder for New Reagent Lots ..................92 Setting a QC Reminder..............92 New Lot Reminder ................92 Setting a Required QC Reminder ..........93 DCA Vantage Operator’s Guide...
- Page 6 Customized QC Reminders ............93 6 Maintenance Routine Cleaning .................95 Maintenance Schedule ................95 Turning Off the DCA Vantage System ...........95 Cleaning the Onboard Barcode Reader Window........96 Cleaning the External Barcode Reader Window ........97 Cleaning the Exterior ................97 Removing and Cleaning the Cartridge Spring and Cartridge Area ..98 Cleaning the Cartridge Compartment Optical Window ......102...
- Page 7 References ..................168 External Barcode Reader Beam Safety ...........168 Electromagnetic Emissions Safety..........168 Appendix B: Warranty and Support Information Legal Information ................169 Siemens Authorized Representative ...........169 Warranty Information ................169 Installation Details ................169 Manufacturer’s Warranty ..............169 Support Information ................169 DCA Vantage Operator’s Guide...
- Page 8 Barcode Symbols and Labels Specifications ........193 Barcode Symbologies................194 Installing the External Barcode Reader ........194 Disabling the External Barcode Reader..........195 Restoring the Barcode Reader default settings ........195 Testing the External Barcode Reader ..........195 Maintenance ..................197 Troubleshooting ................197 DCA Vantage Operator’s Guide...
- Page 9 Hardware Link................201 Character Format................201 Ethernet Connection .................202 Displaying and Printing the MAC address ...........202 Automatically Sending Data to an LIS..........202 Recovery from a Failed Ethernet Connection.........204 Appendix H: Glossary Hardware Terms ................205 Software Terms..................206 Acronyms ...................208 Index DCA Vantage Operator’s Guide...
- Page 10 DCA Vantage Operator’s Guide...
-
Page 11: Using This Guide
® The DCA Vantage Operator’s Guide provides information for physician’s office and laboratory professionals who use the DCA Vantage system. The following table describes how this manual is organized. If you want to . . . then refer to . . . -
Page 12: Conventions
Conventions The DCA Vantage Operator’s Guide uses the following text and symbol conventions: Convention Description Biohazard statements alert you to potentially biohazardous conditions. BIOHAZARD Warning statements alert you to conditions that may cause personal injury. WARNING Caution statements alert you to conditions... -
Page 13: Overview
(microalbuminuria), creatinine in urine, and the albumin/creatinine ratio in urine. The DCA Vantage system is intended for professional use in a physician’s office or hospital laboratory. Tests performed using the DCA Vantage system are intended for in vitro diagnostic use. -
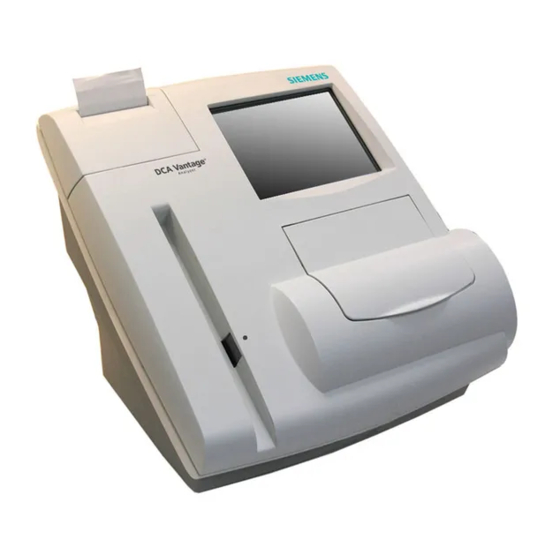
Page 14: Hardware Overview
Reagent Cartridge Compartment Onboard Barcode Reader Figure 1 DCA Vantage System Interaction with the DCA Vantage system is via an integrated touchscreen. Messages, options, and requests for information display, and responses are made by selecting the appropriate key symbol on the screen. -
Page 15: Memory
You can insert a Universal Serial Bus (USB) Flash memory drive into the system’s USB port to save data and system settings. You can then insert the USB memory drive into another DCA Vantage system and restore the data to the new system. - Page 16 External Interface Connections Power Plug Power Switch Figure 2 Power and External Connections DCA Vantage Operator’s Guide...
-
Page 17: Software Overview
Appendix F, External Barcode Reader. The DCA Vantage system does not support the connection of an NOTE: external computer keyboard or a mouse to enter data. -
Page 18: Menus And Screens
Menus and Screens Home Screen The Home screen displays after the DCA Vantage system completes its initialization. The Home screen displays the time and date and the state of the system. It is the starting point for Patient and Control Test Sequences. -
Page 19: Recall Menu
HbA results in graph format. After searching by patient ID, narrow the search Graph using a date range. The graph displays. You can print the graph to the external printer. DCA Vantage Operator’s Guide... -
Page 20: System Menu
System Tests optical tests, and calibrating the touchscreen. Additional Settings Select Additional Settings from the System Settings screen to customize the system and add external devices. DCA Vantage Operator’s Guide... - Page 21 Control Test Log and allows Reminders you to view and change the schedule for the Control Tests. set a reminder or require the user to run a New Lot control when a new reagent calibration card Reminder is scanned. DCA Vantage Operator’s Guide...
- Page 22 USB device to the Restore Data DCA Vantage system. This overwrites any current data on the system. DCA Vantage Operator’s Guide...
- Page 23 . . . to . . . copy saved settings from the USB device to Restore Settings the DCA Vantage system. Existing settings are overwritten. install new software from a USB device to the Install Software DCA Vantage system.
- Page 24 DCA Vantage Operator’s Guide...
-
Page 25: Installation
Avoid proximity to open windows, direct sunlight, ovens, hot plates, open burners, radiators, and dry ice baths. Do not place the DCA Vantage system on the same bench as a source of vibration. Provide bench space large enough to allow free air circulation around the system (8 cm/3 inches on all sides). - Page 26 Paper Roll • Self Adhesive Label Stock for onboard printer Figure 4 DCA Vantage System Parts 5. Retain the shipping carton and packing for several weeks. If you need to ship the system, the shipping carton provides the best protection against damage.
-
Page 27: Record The Warranty Information
3. Write the installation date and serial number in the spaces provided in the Pre-service Checklist, and on the Warranty Information‚ page 169. 4. Contact your Siemens representative for your warranty information if the pre-service checklist is not included in your manual. -
Page 28: Connect The System Power
1. Ensure that the system power switch is in the Off position. 2. Connect the power cord to the system and to an appropriate, grounded AC electrical outlet. External Connections Power Plug Power Switch Figure 6 External Connections and Power Connections DCA Vantage Operator’s Guide... -
Page 29: Installing The Hardware And External Devices
Installing the Hardware and External Devices If you are connecting an external printer, computer, or LIS system to the DCA Vantage system, you must configure the DCA Vantage system software before connecting the external hardware. Refer to Configuring Connectivity‚ page 32. -
Page 30: Setting Up The Onboard Printer
7. To save the external printer setting, select Save 8. Connect the printer cable to the USB port on the DCA Vantage system and to the external printer. 9. Power on the printer. DCA Vantage Operator’s Guide... -
Page 31: Setting Up The Report Header
The printer stops printing when it runs out of paper. If no paper is available at the start of printing, the printer does not attempt to print. Software Setup After the system is properly installed, start the DCA Vantage system by toggling the power button to the On position. The system displays the following information: •... -
Page 32: Loading Configuration Settings
Refer to Optical Test‚ page 105 for more information. Configuring Connectivity If you are connecting the DCA Vantage system to a computer or LIS, you must choose the serial or Ethernet port before connecting to these external devices. -
Page 33: Setting Up The Serial Port Connection
Back to go to the Connectivity screen, you must select Save to make the changes to the port settings take effect on the DCA Vantage system. Otherwise, the previous setting remain in effect. -
Page 34: Setting Stop Bits
Ethernet port. The default setting for the Ethernet port is disabled. NOTE: 1. At the Home screen, select System Settings 2. At the System Settings menu, select Additional Settings DCA Vantage Operator’s Guide... -
Page 35: Setting The Host Name
Configure Setting the Host Name Use the Host Name screen to enter the alphanumeric name used to identify the DCA Vantage system on the network. 1. At the Ethernet Port screen, select Host Name 2. Use the alphanumeric keypad to enter the host name. -
Page 36: Setting The Subnet Mask
4. To save the remote computer, select Save Setting the Port Number Use the Port Number screen to enter the port number for the system. 1. At the Ethernet Port menu, select Port Number DCA Vantage Operator’s Guide... -
Page 37: Setting Up Auto Send
5. Continue configuring the Ethernet or Serial connection parameters. 6. When finished, select Save The Auto Send setting is included in the backup and restore data so an administrator can copy the settings from one DCA system to another. DCA Vantage Operator’s Guide... -
Page 38: Installing Software
3. If you want to print the Full System Settings Report, be sure the printer is enabled and select Print. Otherwise, continue with step 4. 4. Select General 5. Select the down arrow 3 times. 6. Select Install Software DCA Vantage Operator’s Guide... - Page 39 To complete the installation, you must restart the DCA Vantage system and follow the next set of instructions. 1. After the DCA Vantage analyzer restarts, if prompted to calibrate the touch screen, follow the onscreen instructions. 2. At the prompt for using the analyzer in Japan, select 3.
- Page 40 DCA Vantage Operator’s Guide...
-
Page 41: Operating The System
Operating the System System Access You can set up the DCA Vantage system to have unrestricted or restricted system access. There are 4 types of system access: • Unrestricted (default) • Restricted • Restricted Plus • Fully Restricted If the system is unrestricted, most features are available to an operator without having to enter an access code. -
Page 42: Operator Ids And Access Codes
The term Operator ID replaces the term User ID used in earlier NOTE: versions of DCA Vantage software. You can add up to 1000 operators. Each Operator ID and access code must be unique. When system access is set to Fully Restricted or Restricted Plus, the operator enters his or her access code to continue. -
Page 43: Operator Levels
ID field. Edit Use the alphanumeric keypad or external barcode reader to enter an access code. 11. Select Enter 12. At the Add Operator screen, select Save The operator information is saved. DCA Vantage Operator’s Guide... -
Page 44: Editing An Operator
6. At the System Access menu, select Operators A list of operators displays. 7. Highlight the Operator ID you want to delete. 8. Select Delete A message displays verifying that you want to delete the Operator ID. DCA Vantage Operator’s Guide... -
Page 45: Performing Tests
Reagent Cartridge foil package. Opening the Reagent Foil Package 1. Remove one foil package (containing a reagent cartridge) from storage. For more information, see Recommended Procedures for Handling Reagent Cartridges in the DCA Systems Reagent Kit package insert. DCA Vantage Operator’s Guide... - Page 46 Do not use scissors to cut open the foil package. Scissors can damage the reagent cartridge, the flexible plastic pull-tab on the cartridge, or the desiccant bag. Figure 7 Opening Reagent Cartridge Package 3. Remove the contents of the package. DCA Vantage Operator’s Guide...
-
Page 47: Inspecting The Contents Of The Foil Package
The flexible pull-tab is loose or missing. • The desiccant bag is missing or open. • Loose desiccant particles are found inside the foil package. • If the foil package is open for more than 60 minutes. DCA Vantage Operator’s Guide... -
Page 48: Hemoglobin A1C Test
The following section explains the test sequence for an HbA test. Preparing Patient Samples and Controls for Hemoglobin A Test Materials Required: • DCA Systems Hemoglobin A Reagent Kit (for use with the DCA Vantage system) • Patient sample • Control Kit or other control •... - Page 49 Fill the capillary using blood from either a finger stick or venipuncture. Glass Capillary Absorbent Pad Latching Mechanism Figure 9 Capillary Holder DCA Vantage Operator’s Guide...
- Page 50 Do not attempt to fill the capillary by touching the glass capillary to NOTE: blood in a blood collection tube. Attempting to fill the capillary in this manner most often results in blood touching the capillary holder. If blood touches the capillary holder, discard the capillary holder. DCA Vantage Operator’s Guide...
- Page 51 Glass Capillary Tip Blood Sample Figure 11 Filling Capillary with Blood from Venipuncture DCA Vantage Operator’s Guide...
- Page 52 If sample loss is obvious, discard the capillary holder. Repeat the procedure using a new capillary holder. 6. Inspect the glass capillary for the presence of bubbles. If bubbles are obvious, discard the capillary holder and repeat the procedure using a new capillary holder. DCA Vantage Operator’s Guide...
- Page 53 After filling the capillary, carefully insert the capillary holder into the reagent cartridge until the holder gently snaps into place. Glass Capillary Reagent Cartridge Figure 13 Inserting Capillary Holder into a Reagent Cartridge DCA Vantage Operator’s Guide...
-
Page 54: Scanning The Reagent Cartridge
1. Locate the dot (on the system) next to the barcode track. 2. Locate the barcode on the reagent cartridge. 3. Hold the reagent cartridge so that the barcode faces to the right. 4. Insert the reagent cartridge (above dot) into the barcode track. DCA Vantage Operator’s Guide... - Page 55 A beep sounds to signal a successful scan. If no beep sounds, repeat procedure. If a beep repeatedly fails to NOTE: sound, refer to Troubleshooting‚ page 121. Barcode track dot Figure 14 Scanning the Reagent Cartridge DCA Vantage Operator’s Guide...
-
Page 56: Inserting The Reagent Cartridge Into The System
Five seconds after the door is closed, a beep sounds and the assay begins. If you accidentally close the door before you pull the flexible plastic tab, NOTE: you have 5 seconds to reopen the door and pull the tab. DCA Vantage Operator’s Guide... -
Page 57: Entering Patient Sample Data
The system accepts the following punctuation characters: ! " # $ & ' ( ) * + , - . / : ; < = > ? @ [ \ ] ^ _ ` { | } ~ DCA Vantage Operator’s Guide... - Page 58 1–24 data characters. (A maximum of 24 characters Number of Characters: can be displayed, stored, printed, and transmitted by the DCA Vantage system.) The Interleaved 2 of 5 (I2of5) symbology requires an even number of characters. If a scanned barcode has an odd number of characters, the symbology adds a leading zero, up to the maximum of 24 characters.
-
Page 59: Entering Patient Data Using The Barcode Reader
If you edit the data, you must manually select Print if you want a printed record of the change. To print manually, select . If the print button is not enabled, then the Print printer is disabled in Setup, or there is no paper. DCA Vantage Operator’s Guide... -
Page 60: Hba1C Test Results
You have to enable some of the data entries in System Settings. For more information, see Setting Patient Data Entry‚ page 151. Result Description The serial number of the DCA Vantage System Serial Number system. The type of test, either Microalbumin/... - Page 61 Result Details Using Single or Dual Reporting Units You can display and print the HbA results in single or dual reporting units. For example, the system can report test results in IFCC standard or NGSP units, or both. DCA Vantage Operator’s Guide...
-
Page 62: Removing The Reagent Cartridge
3. Push and hold it down with your right hand. 4. With your left hand, gently push the tab on the cartridge to the right. This action releases (unlocks) the cartridge. Reagent Cartridge Release Button Figure 16 Removing the Reagent Cartridge DCA Vantage Operator’s Guide... -
Page 63: Microalbumin/Creatinine Test
You can save unused capillary holders and use them with any lot of DCA Systems Microalbumin/Creatinine reagent cartridges. 1. Open and inspect the contents of the Reagent Cartridge foil package. Refer to Opening and Inspecting the Reagent Foil Package‚ page 45. DCA Vantage Operator’s Guide... - Page 64 Figure 17 Capillary Holder If the capillary holder is missing any of the above parts or parts are damaged, discard the capillary holder; also discard it if the starch plug is at the bottom of the capillary tube. DCA Vantage Operator’s Guide...
- Page 65 4. Using a lint-free tissue, carefully wipe the outside the capillary tube. Starch Plug Figure 18 Filling the Capillary with Urine DCA Vantage Operator’s Guide...
- Page 66 Contact with the open end of the capillary tube could result in loss of sample (by wicking into the tissue). If sample loss is obvious, discard the capillary holder; then repeat the procedure using a new capillary holder. DCA Vantage Operator’s Guide...
- Page 67 6. Inspect the glass capillary tube for the presence of bubbles. If bubbles are obvious, discard the capillary holder; then repeat the procedure using a new capillary holder. DCA Vantage Operator’s Guide...
- Page 68 CAUTION Avoid harsh insertion of the capillary holder. Do not dislodge the sample from the glass capillary or erroneous results may occur. Glass Capillary Reagent Cartridge Figure 20 Inserting the Capillary Holder into Reagent Cartridge DCA Vantage Operator’s Guide...
-
Page 69: Scanning The Reagent Cartridge
After a 1 second pause, a beep sounds to signal a successful scan. NOTE: If no beep sounds, repeat the procedure. If a beep repeatedly fails to sound, refer to Troubleshooting‚ page 121. Barcode Track Dot Figure 21 Scanning the Reagent Cartridge DCA Vantage Operator’s Guide... -
Page 70: Inserting The Reagent Cartridge Into System
3. Insert the reagent cartridge into the cartridge compartment until you hear a gentle snap. The cartridge is designed to fit only one way into the system. Do not NOTE: force the cartridge into the system. Figure 22 Inserting Reagent Cartridge into System DCA Vantage Operator’s Guide... -
Page 71: Cancelling A Test
You can cancel a test anytime. While a test is running, a display shows the time remaining and a Cancel button. If a test in progress is cancelled, you must discard the sample. To cancel a test, select Cancel. DCA Vantage Operator’s Guide... -
Page 72: Results Of A Microalbumin/Creatinine Test
You have to enable some of the features in System Settings for the NOTE: data to display. Result Description The serial number of the DCA Vantage System Serial Number system. The type of test, either Microalbumin/ Test Name Creatinine test or HbA test. - Page 73 An Albumin/Creatinine ratio preceded by a less than (<) sign or greater than (>) sign or (---) in the display, indicates that either the albumin and/or creatinine value is above or below the Reporting Range. In certain cases, no ratio is reported (---). DCA Vantage Operator’s Guide...
-
Page 74: Removing The Reagent Cartridge
This can cause physical injury to you and damage to the system. 1. Open the cartridge compartment door. 2. Locate the button on the right side of the cartridge compartment. 3. Push and hold it down with your right hand. DCA Vantage Operator’s Guide... -
Page 75: Recalling Patient Data, Control Tests, And Calibration Data
Recall Menu if system access is set to Fully Restricted in System Settings. If System Access is set to Unrestricted, Restricted, or Restricted Plus, this screen does not display. The default security setting is set to NOTE: Off so that an access code is not required DCA Vantage Operator’s Guide... -
Page 76: Recalling Patient Tests
Use the Patient ID/Name screen to search by either patient ID number or name. To use the search feature, this option is configured in System Settings, NOTE: Additional Settings. 1. From the Home screen, select Recall 2. From the Recall menu, select Patient Tests DCA Vantage Operator’s Guide... -
Page 77: Searching For A Specific Comment
To search for a specific comment for a microalbumin/creatinine patient test result, select Microalbumin/Creatinine 4. Select Comment 1 5. Enter the comment using the keypad or external barcode reader. 6. Select Next The search results display. DCA Vantage Operator’s Guide... -
Page 78: Searching Within A Specific Date Range
Use the Set Lower Limit screen to set the lower HbA value when you search by result range. 1. At the Home screen, select Recall 2. From the Recall menu, select Patient Tests 3. Select HbA1c The HbA Patient Test screen displays. DCA Vantage Operator’s Guide... -
Page 79: Viewing The Hba1C Results In Graph Format
To view patient results for an HbA patient test result, select HbA1c • To view patient results for an microalbumin/creatinine patient test result, select Microalbumin/Creatinine 4. Select View Last 10 NOTE: You can view patient results from any search finding. DCA Vantage Operator’s Guide... -
Page 80: Editing Patient Data
If both the onboard and external printer are enabled, use the Printer Selection screen to select the printer. NOTE: This screen displays only when both printers are configured and ready to print. 1. At the Patient Test Result screen, select Print The Printer Selection screen displays. DCA Vantage Operator’s Guide... -
Page 81: Configuring Gfr For A Patient
You can specify whether to print a long or a short report of the patient test results. For a summary of the contents of patient test printed reports, see Printed Reports‚ page 183. Regardless of the printed report type setting, the system transmits the long-form report. DCA Vantage Operator’s Guide... -
Page 82: Patient Trend Graph Report
The printed Patient Trend Graph Report prints from the Data Recall menu to an external printer. To print a graph, you must have an external printer connected to the DCA Vantage system. For a description of the contents of this report, see Patient Trend Graph Report Contents‚ page 185. -
Page 83: Calibration
Calibrating for Hemoglobin A You must scan the calibration card for a lot of reagent cartridges before you can use the lot on the DCA Vantage system. Scanning the calibration card enters the information on the DCA Vantage system. 1. Locate the dot on the system next to the barcode track. - Page 84 If no beep sounds, repeat the scanning procedure. If you NOTE: repeatedly fail to hear a beep, refer to Troubleshooting‚ page 121. Barcode track dot Figure 25 Scanning Hemoglobin A calibration card 6. To return to the Home screen, select DCA Vantage Operator’s Guide...
-
Page 85: Calibrating For Microalbumin/Creatinine
If no beep sounds, repeat the scanning procedure. If you repeatedly fail to hear a beep, refer to Troubleshooting‚ page 121. 6. Locate the barcode on the second side of the calibration card. 7. Repeat steps 3–5. 8. To return to the Home screen, select DCA Vantage Operator’s Guide... -
Page 86: Calibration Data
Microalbumin/Creatinine The Microalbumin/Creatinine calibration data displays. 4. Highlight the calibration data that you want to display, and select View 5. To print the calibration data, select Print 6. To return to the Recall menu, select Recall DCA Vantage Operator’s Guide... -
Page 87: Quality Control
5. Release the pressure on the bulb to aspirate a small amount of control solution. 6. Fill the glass capillary tube by touching it to the tip of the dropper and fill the tube. DCA Vantage Operator’s Guide... - Page 88 Do not touch the tissue to the open end of the tube. Contact with the open end could result in a loss of sample. 10. Inspect the capillary holder for the presence of any bubbles. If bubbles are obvious, discard the capillary and repeat the collecting NOTE: procedure. DCA Vantage Operator’s Guide...
-
Page 89: Inserting Capillary Holder Into The Reagent Cartridge
CAUTION Avoid harsh insertion of capillary holder. Do not dislodge the sample in the glass capillary because erroneous results may occur. Figure 27 Capillary holder Reagent cartridge Figure 28 Inserting Capillary Holder into Reagent Cartridge DCA Vantage Operator’s Guide... -
Page 90: Running A Control Test
Figure 29 Scanning the HbA Control Card A beep sounds to signal a successful scan. If no beep sounds, repeat the scanning procedure. If you NOTE: repeatedly fail to hear a beep, refer to Troubleshooting‚ page 121. DCA Vantage Operator’s Guide... -
Page 91: Quality Control Errors
If the new reagent cartridge fails to give results within the ambient moisture, expected values, proceed to the next possible cause. or heat. Deterioration of the Use a fresh control solution to repeat the quality control control solution. procedure. DCA Vantage Operator’s Guide... -
Page 92: Setting A Required Qc Reminder Or Displaying A Qc Reminder For New Reagent Lots
Setting a Required QC Reminder or Displaying a QC Reminder for New Reagent Lots The DCA Vantage system can display a reminder message when a QC test is due. You can set the QC test reminder message to display only or display and require a QC test for selected control tests each time a patient test is run. -
Page 93: Setting A Required Qc Reminder
You also can select daily, weekly, or monthly QC reminder cycles. To customize QC Reminders: 1. At the Home screen, select Menu 2. Select System Settings 3. Select Additional Settings 4. Select Control Tests 5. Select Control Test Reminder DCA Vantage Operator’s Guide... - Page 94 The Settings screen displays. Verify the settings you entered are correct. If a setting is incorrect, select , and update the settings, as needed. Change 16. Select Save The Control Test Reminders screen displays. 17. Repeat steps 6 to 16 to set additional QC reminders, as needed. DCA Vantage Operator’s Guide...
-
Page 95: Maintenance
WARNING Turn the power off and disconnect the power cord before cleaning the DCA Vantage system. Turning Off the DCA Vantage System Perform these steps to turn the system off: NOTE: You do not have to reconfigure system settings when turning the power on, the system stores the saved settings. -
Page 96: Cleaning The Onboard Barcode Reader Window
1. Clean the barcode window with a lint-free cloth dampened with water or ethanol. Onboard Barcode Reader Figure 31 Cleaning the Onboard Barcode Reader Window 2. Connect the power cord after the barcode window is clean and dry. DCA Vantage Operator’s Guide... -
Page 97: Cleaning The External Barcode Reader Window
NOTE: 0.5% sodium hypochlorite for 10 minutes. Remove any liquid blood on the system before disinfection. CAUTION Do not use any other type of solvent, oil, grease, or silicone spray on any part of the system. DCA Vantage Operator’s Guide... -
Page 98: Removing And Cleaning The Cartridge Spring And Cartridge Area
3. Wipe the inside surface of the compartment door and surfaces on both sides of the compartment using a lint-free cloth dampened with water or ethanol. 4. Dry the surface using a clean, dry, lint-free cloth. 5. Locate the cartridge return spring inside the cartridge holder. DCA Vantage Operator’s Guide... - Page 99 7. Gently pull the metal end towards the center of the cartridge compartment to release one side of the spring from the cartridge holder. 8. Repeat step 6 to release the other side of the spring from the cartridge holder. DCA Vantage Operator’s Guide...
- Page 100 Ensure the leaf springs are not bent or damaged while cleaning. Damaged leaf springs do not function properly. Spring Cut-out Leaf Springs Figure 33 Return Spring 11. Dry the cartridge return spring with a clean, lint-free cloth. DCA Vantage Operator’s Guide...
- Page 101 16. Locate the vertical grooves inside the cartridge compartment. 17. Locate the front and back slots near the top of the compartment. 18. Locate the leaf spring on one side of the cartridge return spring. DCA Vantage Operator’s Guide...
-
Page 102: Cleaning The Cartridge Compartment Optical Window
3. With the cartridge holder fully rotated, locate the two round holes on either side of the cartridge compartment. The optical window is the lower of the 2 openings, nearest the cover. Optical window Figure 35 Location of Optical Window Openings 4. Fully open the cartridge compartment cover. DCA Vantage Operator’s Guide... -
Page 103: Changing The Air Filter
6. Return the cartridge holder to its original position and close the compartment door. 7. Replace the air filter. 8. If the problem persists, contact the Siemens Technical Support Center or your local technical service provider. Changing the Air Filter Materials Required: •... - Page 104 Filter Cover Figure 36 Filter Location DCA Vantage Operator’s Guide...
-
Page 105: Performing Tests
You cannot use the external barcode reader to initiate tests. Optical Test The DCA Vantage system is designed to run a comprehensive series of self checks of the optical measurement system. These self checks are run automatically during every patient and Quality Control sample measurement. -
Page 106: Optical Test Values
Drift Max, the difference between the minimum and maximum transmittance of the 20 transmittance readings. When the optical test completes, the DCA Vantage system displays the Mean T, SD T, Drift Max, and Drift T readings. Table 5 provides the value ranges for the Optical Tests. - Page 107 4. Smoothly slide the cartridge down the barcode track. A beep sounds to signal a successful scan. Figure 38 Scanning the Optical Test Cartridge 5. Open the cartridge compartment door. 6. Hold the optical test cartridge so that the barcode faces to the right. DCA Vantage Operator’s Guide...
-
Page 108: System Tests
Pull the cartridge out of the compartment. System Tests You or your technical support provider can use the System Test menu screen to perform tests on the DCA Vantage system. The System Test menu screen includes the following types of System Tests: •... -
Page 109: Performing User System Tests
Operator ID and access code, refer to Operator IDs and Access Codes‚ page 42. Performing User System Tests The User System Tests screen enables you to test the DCA Vantage system. 1. At the System Menu screen, select System Tests 2. -
Page 110: Calibrating The Touchscreen
• adjust the contrast of the display • access additional settings for the system • view the current setting for the system You must restart the system if you restore system settings. NOTE: DCA Vantage Operator’s Guide... -
Page 111: Loading Paper On The Onboard Printer
7. Remove any paper remaining in the printer: a. Locate the printer paper release lever. This lever is colored dark gray and is located on the right of the printer when looking at the front of the system. DCA Vantage Operator’s Guide... - Page 112 Carefully pull paper through the printer in its normal direction of travel. Printer Cover Paper Feeder Figure 40 Removing the Printer Paper 8. Obtain a new paper roll. 9. Unroll sufficient paper to feed the printer. DCA Vantage Operator’s Guide...
- Page 113 10. Hold the roll just above the printer, with the paper unrolling from underneath. 11. Push the paper gently under the roller at the back of the printer. Figure 41 Inserting Paper into the Printer DCA Vantage Operator’s Guide...
- Page 114 Figure 42 Loading the Paper into the Feeder 13. Push the plastic tab to cover the paper. 14. Pull the paper feeder down. 15. Pinch and push down on the gray paper release lever to hold the paper in place. DCA Vantage Operator’s Guide...
-
Page 115: Replacing The Fuse
Ensure you place the screwdriver blade in the smaller groove. You can damage the fuse block by placing the blade in the larger groove. 2. Insert the blade of a small flat-head screwdriver into the smallest groove. DCA Vantage Operator’s Guide... - Page 116 3. Exert pressure to unsnap the top of the fuse holder. Small Groove Figure 44 Removing fuse holder 4. Repeat steps 2–3 for the bottom groove. 5. Remove the fuse holder from the system. DCA Vantage Operator’s Guide...
-
Page 117: Setting Maintenance Reminders
5. To set a maintenance reminder, select the check box. The maintenance reminder is set and Schedule becomes active. 6. To view the schedule, select Schedule 7. To change the schedule, select Change The Maintenance Reminder Frequency screen displays. DCA Vantage Operator’s Guide... -
Page 118: Viewing System Maintenance Status
1. At the Home screen, select Menu 2. At the Menu screen, select System Maintenance The System Maintenance Status screen displays with the status of each task. 3. To mark a task as complete select the scheduled task. 4. Select Complete DCA Vantage Operator’s Guide... -
Page 119: System Maintenance Log
4. At the Additional Settings menu, select Maintenance 5. Select 6. Use the up and down arrows to view all of the maintenance entries. 7. To delete all maintenance log entries, select Delete All 8. Select All log entries are deleted. DCA Vantage Operator’s Guide... - Page 120 DCA Vantage Operator’s Guide...
-
Page 121: Troubleshooting
Access Code is already in use. An optical test is required. A reminder message that it is time to run the Optical Test using the Optical Test Cartridge. The frequency of the reminder is determined by your location. DCA Vantage Operator’s Guide... - Page 122 HbA1c patient tests. HbA1c Normal control test requested by remote computer. HbA1c Normal control test requested by remote computer. Patient test locked until the control test is run. Instrument is Initializing, please wait. Invalid user action. DCA Vantage Operator’s Guide...
- Page 123 Close the door. The system is in diagnostics mode. The system is warming up. The system was powered on or power save mode was active. This field must have at least one alphanumeric character. DCA Vantage Operator’s Guide...
-
Page 124: Troubleshooting The System
Symptom Possible Cause Action Barcode cannot Is the barcode Verify the connections on the back be read using reader cable of the system. external barcode connected to the Refer to Hardware Installation‚ reader system? page 25. DCA Vantage Operator’s Guide... - Page 125 Screen. before scanning the cartridge. Onboard barcode reader Are you scanning Rescan the cartridge using a slower the cartridge too motion. If you are still having quickly? problems, try scanning upward instead of down. DCA Vantage Operator’s Guide...
- Page 126 DCA Vantage system may be set with an incorrect date. Cartridge is stuck If the cartridge tab has broken off, in the instrument do not try to remove the cartridge. Contact your local technical support provider. DCA Vantage Operator’s Guide...
- Page 127 Touchscreen Contact your local technical support electronics are provider. defective. Display is dim Contrast is set Adjust contrast. Refer to Setting the too low. System Display‚ page 163. DCA Vantage Operator’s Guide...
- Page 128 If an error code displays, correct the codes require error to continue. correction before running test. Calibration data No calibration data for the lot of does not exist for Reagent Cartridges. You must enter the reagent lot. the calibration data to continue. DCA Vantage Operator’s Guide...
-
Page 129: Troubleshooting Reagent Messages
In this case, the cartridges can be used. Errors Codes and Corrective Actions This section of the guide lists error codes and messages, along with a description and corrective actions. DCA Vantage Operator’s Guide... - Page 130 A Dark reading (mean of Contact your local technical 16) for a sample or support provider. Dark offset reference channel is measurement outside the acceptance is out of range range. This may indicate an electronic failure. DCA Vantage Operator’s Guide...
- Page 131 • low lamp intensity 4. Check/replace the air filter. • lamp alignment/ 5. Clean the cartridge holder with rotation compressed air while rotating. • lamp intensity 6. Restart the system. variation 7. Run an optical test. DCA Vantage Operator’s Guide...
- Page 132 Thermal control 2. Restart the system. cartridge holder system error - º thermistors is2 Possible causes: • defective heater plate • defective thermistor assembly • defective connector • defective electrical circuit DCA Vantage Operator’s Guide...
- Page 133 Possible causes: 2. Power off the system. • cold cartridge 3. Rerun the test. • defective heater plate • defective thermistor assembly • defective connector • defective electrical circuit DCA Vantage Operator’s Guide...
- Page 134 Thermal control 2. Rerun the test. cartridge holder system error - thermistors is 50 º high Possible causes: • defective heater plate • defective thermistor assembly • defective electrical circuit DCA Vantage Operator’s Guide...
- Page 135 • circuit failure The temperature 1. Restart the system. measured by the Internal 2. Rerun the test. ambient temperature instrument º thermistor is 50 temperature error–high Possible causes: • damaged ambient temperature thermistor • circuit failure DCA Vantage Operator’s Guide...
- Page 136 2. Verify serial port is enabled in successful, even after communication software. Refer to Setting up numerous attempts. error the Serial Port Connection‚ page 33. 3. Restart the system. 4. Contact your local technical support provider. DCA Vantage Operator’s Guide...
- Page 137 Error Code Description Corrective Action An attempt to 1. Verify the cables connecting communicate via the the DCA Vantage system and Ethernet port Ethernet serial port the computer interface are communication failed. failure securely connected. 2. Verify the DCA Vantage...
- Page 138 5. Repeat the test with a new • Cartridge is not cartridge. located in the proper 6. If the error still occurs, run the position optical test cartridge. • Buffer tab is not removed • Optical window has a defect DCA Vantage Operator’s Guide...
- Page 139 • Irregularity in patient red blood cells (rare) 5. If the error still occurs, contact Hemoglobin your local technical support. • > 24 g/dL = patient has abnormally high hemoglobin DCA Vantage Operator’s Guide...
- Page 140 Cartridge Error The system is ready. large. (Particulate - high variable contamination.) 3. Repeat the test with a new in hemoglobin sample. measurement 4. If the error still occurs, contact your local technical support. DCA Vantage Operator’s Guide...
- Page 141 3. Repeat the test with a new Possible cause: glycated sample. hemoglobin • cartridge exposed to NOTE: Verify that the reagent kit response excessive humidity was stored properly. or temperature 4. If the error still occurs, contact your local technical support. DCA Vantage Operator’s Guide...
- Page 142 Wait no more than 5 NOTE: greater than • blood left in the minutes after filling the capillary to the previous capillary too long start the test. check point 4. If the error still occurs, contact your local technical support. DCA Vantage Operator’s Guide...
- Page 143 Creatinine 3. Repeat the test. readings of the buffer Cartridge Error solution in the reagent 4. If the error still occurs, contact - variable buffer cartridge is too high. your local technical support. readings (Particulate contamination.) DCA Vantage Operator’s Guide...
- Page 144 The system is ready. is too low. Cartridge Error 3. Repeat the test. - Microalbumin Verify that the reagent NOTE: absorbance is too high was stored properly. 4. If the error still occurs, contact your local technical support. DCA Vantage Operator’s Guide...
- Page 145 Possible cause: package was opened just prior to readings • cartridge exposed to use. excessive 4. If the error still occurs, contact temperature or your local technical support. humidity DCA Vantage Operator’s Guide...
- Page 146 Possible causes: 3. Repeat the test. • normalization 4. If the error still occurs, contact cartridge is not in your local technical support. proper position • normalization cartridge is dirty or defective DCA Vantage Operator’s Guide...
-
Page 147: File Management
The system stores up to 4000 patient and control tests. When the DCA Vantage system reaches capacity, you must delete some test results to free up space. When the system is full, you cannot run any new tests. You can delete test results manually or set the system to automatically delete test results. -
Page 148: Saving Data And Settings
1. At the Home screen, select Menu 2. At the Menu screen, select System Settings 3. At the System Settings menu, select Additional Settings 4. At the Additional Settings menu, select General DCA Vantage Operator’s Guide... -
Page 149: Deleting Data
Delete Patient Information b. Select All the patient information is deleted. 6. To delete patient information and test results, select Delete All Data 7. Select All patient information and test data is deleted. DCA Vantage Operator’s Guide... - Page 150 DCA Vantage Operator’s Guide...
-
Page 151: Customizing The System
Customizing the System You can customize the analysis and reporting characteristics of your DCA Vantage system. You can specify the data, comments, and reminder schedules, for your lab. You can also schedule and change the configuration of control tests. Setting Patient Test Options... -
Page 152: Setting The Hba1C Reference Range
Save Testing and Results The DCA Vantage system is qualified for specific reportable ranges, as indicated in the following table. If the HbA value is less than the lower limit or greater than the upper limit, the instrument displays a warning message. -
Page 153: Display, Print, And Transmit Hba1C Reference Ranges
Reporting Units screen displays. 7. Select the Primary Reporting units. 8. Select the optional Secondary Reporting units. 9. Select Save Values for NGSP, mono-S, and JDS are expressed in %. The IFCC value is expressed as mmol/mol. DCA Vantage Operator’s Guide... - Page 154 IFCC When you select JDS, the display and printout show the units of the NOTE: results as HbA (JDS). If you select NGSP, the display and printout show the units of the results as HbA (NGSP). DCA Vantage Operator’s Guide...
-
Page 155: Setting User Corrections
To reset the settings to the default values: a. Select Reset Default Values This resets the slope to 1.000 and the offset to 0.0. 8. After completing the changes, select Back The Patient Tests screen displays. DCA Vantage Operator’s Guide... -
Page 156: Setting The Albumin User Correction
Setting the Albumin User Correction Use the Albumin User Correction screen to adjust the slope and the offset for Albumin values. Siemens recommends that you do not use a user defined correlation NOTE: when you perform external proficiency testing. This can impact the results. -
Page 157: Setting The Gfr Calculation
Setting the Patient Recall List Options Use the Patient Recall List Options screen to set the search criteria for patient results, and how the results are displayed. You can search by either patient ID or last name. DCA Vantage Operator’s Guide... -
Page 158: Setting Patient And Control Test Delete Options
Only the data you select as optional displays. If you select Required, you have to enter a value for that specific data before you can exit the screen. DCA Vantage Operator’s Guide... -
Page 159: Setting Control Test Reminders
7. To view the schedule, select Schedule The reminder schedule displays. 8. To change the schedule to optional or required, select Change The Mode screen displays. 9. Select Optional Required 10. Select Next The Frequency screen displays. DCA Vantage Operator’s Guide... -
Page 160: Control Test Limits
18. To return to the Control Test menu, select Back. Control Test Limits The DCA Vantage system is qualified for specific reportable ranges, as indicated in the following table. If the HbA value is less than the lower limit or greater than the upper limit, the instrument displays a warning message. -
Page 161: Setting General Options
1. At the Home screen, select Menu 2. Select , from the Menu screen. System Settings 3. At the System Settings menu, select Additional Settings 4. At the Additional Settings menu, select General 5. Select Time DCA Vantage Operator’s Guide... -
Page 162: Setting The Date Format And Current Date
1. At the Home screen, select Menu 2. Select , from the Menu screen. System Settings 3. At the System Settings menu, select Additional Settings 4. At the Additional Settings menu, select General DCA Vantage Operator’s Guide... -
Page 163: Volume And Display
• Medium • • 6. Select Save The sound volume is set. Setting the System Display Use the System Display screen to set the contrast of the color display. 1. At the Home screen, select Menu DCA Vantage Operator’s Guide... -
Page 164: Viewing The Current System Settings
Each line can be up to 24 characters long. 1. At the Home screen, select System Settings 2. At the System Settings menu, select Additional Settings 3. At the Additional Settings menu, select Printers 4. Select Report Headers 5. Select Line 1 DCA Vantage Operator’s Guide... -
Page 165: Setting The Printed Patient Test Report Type
3. At the Additional Settings menu, select Printers 4. Select Report Type 5. Select Full Report Short Report 6. Select to return to the Printers screen. Save Before attempting to print, make sure that at least one printer is NOTE: enabled. DCA Vantage Operator’s Guide... - Page 166 DCA Vantage Operator’s Guide...
-
Page 167: Appendix A: Safety Information
Keep your hands away from your face. • Cover all superficial cuts and wounds before starting any work. • Dispose of contaminated materials according to your laboratory’s biohazard control procedures. • Keep your work area disinfected. DCA Vantage Operator’s Guide... -
Page 168: References
• Do not look at the reflection of the beam from a shiny surface. Electromagnetic Emissions Safety When operating the DCA Vantage system, observe the following precautions: • Do not use this system in close proximity to sources of strong electromagnetic radiation (for example, unshielded intentional RF sources), as these may interfere with the proper operation. -
Page 169: Appendix B: Warranty And Support Information
Appendix B: Warranty and Support Information Legal Information To contact the legal representative for Siemens within the European community, contact the Siemens Authorized Representative. For service, contact your local technical support provider. Siemens Authorized Representative Warranty Information Installation Details Please record the following information and keep this sheet in your laboratory for future reference. -
Page 170: Contact Information
Our local technical support providers are available to help you. Before calling, please complete the Pre-service Checklist‚ page 171. Make a photocopy of the checklist first. This information helps your local technical support provider to identify the probable cause of the problem. Contact Information www.siemens.com/diagnostics DCA Vantage Operator’s Guide... -
Page 171: Pre-Service Checklist
Is the printer functioning properly? Are the appropriate messages and patient results being printed? If NO: • Is the internal or an external printer turned ON? • Is there paper in the printer? • Have you performed the printer test? DCA Vantage Operator’s Guide... - Page 172 Is the printer and/or host computer/ LIS connected and turned On? Have the correct parameters for transmission been selected through the Setup menus? Is the external printer properly printing the test results? Is the external barcode reader working properly? DCA Vantage Operator’s Guide...
-
Page 173: Appendix C: Orderable Supplies
Appendix C: Orderable Supplies Accessory Items The accessory items available for the DCA Vantage system are listed below. Siemens has introduced new SMN part numbers for certain orderable NOTE: supplies. The following tables show both the new SMN numbers and the earlier part numbers, where applicable. - Page 174 Printer Paper (pack of 5) 10324219 063 527 80 Printer Paper Self Adhesive Stock (pack of 5) Capillary holder (pack of 11) 10314620 860044 10286099 877244 Microalbumin/Creatinine Capillary holder 064 892 56 Multi-language Documentation CD 10282133 DCA Vantage Operator’s Guide...
-
Page 175: Appendix D: Symbols
System and Packaging This section describes the symbols that can display in the system documentation, the exterior of the DCA Vantage system, or on the system packaging. The symbols on the system provide you with the location of certain components and with warnings for proper operation. The symbols on the system packaging provide you with other important information. - Page 176 This symbol indicates that the product is fragile and you need to handle it with care. This symbol indicates that you should keep the product dry. This symbol indicates that you should not spray any liquids in this area. DCA Vantage Operator’s Guide...
- Page 177 This symbol indicates the revision letter of a part or product. This symbol indicates the name and location of the product manufacturer. This symbol indicates the date of manufacture of the product. This symbol indicates the manufacturer’s authorized representative within the European community. DCA Vantage Operator’s Guide...
-
Page 178: User Interface
Tests menu. Tests menu Data Recall Select this key to access the Data Recall menu. menu Select this key to display a Help screen with information about the screen. Help Help is not available on all screens. DCA Vantage Operator’s Guide... - Page 179 Select this key to add comments. Comments Shut down Select this key to shut down the system. System Blood This symbol indicates a HbA Blood test. Test Microalbumin/ This symbol indicates a Microalbumin/Creatinine Creatinine Urine test. Urine Test DCA Vantage Operator’s Guide...
- Page 180 Quality This symbol indicates a Quality Control Solution Control test. Solution Test DCA Vantage Operator’s Guide...
-
Page 181: Appendix E: Specifications
Appendix E: Specifications System Specifications This section summarizes the design specifications for the DCA Vantage system. System Dimensions Dimension Value Depth 27.7 cm (10.5 inches) Height 25.4 cm (9.0 inches) Width 28.7 cm (11.5 inches) Weight 3.88 kg (9 lb.) -
Page 182: Safety Certifications
This system generalities, uses and can radiate ratio frequency energy and, if not installed and used in accordance with the instructions in the DCA Vantage Operator’s Guide, may cause harmful interference to radio communications. There is no guarantee that interference will not occur in a particular installation. -
Page 183: Dual Reporting Calculations - Hba
The short-form printout contains less data but prints faster. The displayed patient test results are the same as for the long-form printed results. The following table summarizes the information that the system prints for patient tests. DCA Vantage Operator’s Guide... - Page 184 24 per line 1 & 2 Print Date Serial Number Test Date Sequence Number Cartridge Lot Primary Reporting Units Secondary Reporting Units User Slope User Offset Primary Result Secondary Result Ref. Range Albumin User Slope Albumin User Offset DCA Vantage Operator’s Guide...
-
Page 185: Patient Trend Graph Report Contents
When you issue a print request in a data recall function, you can generate a graph of patient results if you have an external printer attached to your system. The following table shows the contents of a patient trend graph report. DCA Vantage Operator’s Guide... -
Page 186: Control Test Report
The system displays these results on the screen. You can generate a printed report when the results or the analysis are complete and when you issue print request during a Data Recall operation. The following table summarizes the contents of a Siemens HbA Control Test Report. - Page 187 Value DCA Vantage Product Logo Report Title Custom Heading 1 & 2 Print Date Serial Number Test Date Sequence Number Cartridge Lot Control Lot Primary Reporting Units Secondary Reporting Units Level Primary HbA Result Secondary HbA Result Albumin Result Creatinine Result...
-
Page 188: System Settings Report
The following table summarizes the contents of a System Settings Report. This table uses the following symbols: Always reported Omitted if not specified Value Full Report Partial Report DCA Vantage Product Logo Report Title (Full or Partial) Custom Heading 1 & 2 Print Date Serial Number Software Version... - Page 189 Creatinine User Slope Creatinine User Offset GFR Calculation Patient Recall List Option Microalbumin Norm. Factor Operator ID Comments 1–3 Normal Abnormal A/C Low A/C High Control Test Reminders New Lot Reminder Other Controls Maintenance Reminders Change Air Filter DCA Vantage Operator’s Guide...
- Page 190 Test Lockout Settings Wizard Automatic Data Purging Sound Volume Onboard Printer Onboard Printer Autoprint External Printer External Printer Autoprint Patient Report Custom Header 1 & 2 External Barcode Reader Symbology Check Digit Port Protocol Serial Port DCA Vantage Operator’s Guide...
- Page 191 Value Full Report Partial Report Baud Rate Parity Data Bits Stop Bits Ethernet Port Host Name IP Setting IP Address Port Number Subnet Mask Default Gateway Remote Computer MAC Address End Date ---------------- (End of report) DCA Vantage Operator’s Guide...
- Page 192 DCA Vantage Operator’s Guide...
-
Page 193: Appendix F: External Barcode Reader
Tubes in the Clinical Laboratory (available from ASTM International, 100 Barr Harbor Drive, West Conshohocken, PA 19428-2959 USA www.astm.org). Barcode Symbols and Labels Specifications The DCA Vantage system supports the barcode entry for the following patient and control data: Field... -
Page 194: Barcode Symbologies
• Interleaved 2 of 5 with and without check digit Installing the External Barcode Reader Connect the barcode reader hardware to the DCA Vantage system NOTE: before activating the software to use the external barcode reader. 1. Turn the system power off. -
Page 195: Disabling The External Barcode Reader
6. To save the external barcode reader settings, select Save Restoring the Barcode Reader default settings 1. Leave the barcode scanner connected to the DCA Vantage system. 2. Turn the system off from the Home screen. 3. Turn the system power switch to the off position. - Page 196 Do not scan the barcodes in the barcode-reader manufacturer’s Quick NOTE: Start Guide. The DCA Vantage system does not require this installation step. 1. At the Home screen, select Menu 2. From the Menu screen, select System Tests 3. Select User System Tests 4.
-
Page 197: Maintenance
It is important that the labels be printed to the required specifications. Reading errors may occur if any of the following conditions exist: • the narrow bar width is too small • the barcode length too great • the height too small DCA Vantage Operator’s Guide... - Page 198 If the test label cannot be read, the reader itself is suspect. If you have problems that cannot be resolved, contact your local technical support provider. DCA Vantage Operator’s Guide...
-
Page 199: Appendix G: Computer Interface (Lis)
Appendix G: Computer Interface (LIS) General Information You can connect the DCA Vantage system to a host computer or laboratory Information System (LIS). The DCA Vantage system supports a serial connection or an Ethernet connection between instrument and host. The serial interface is compatible with the EIA-232-D Specification. -
Page 200: Ethernet Connections Using Astm
DCA Vantage Analyzer Host Computer Communications Link manual. Ethernet Connections Using ASTM The DCA Vantage system also supports the ASTM Specification E1381, Low- Level Protocol to Transfer Messages between Clinical Laboratory Instruments and Computer Systems. The system also supports the ASTM Specification E1394, Standard Specification for Transferring Information between Clinical Instruments and Computer Systems. -
Page 201: Architecture
Ring Indicator (not used) Pin 9 Control Character Format You can select the following character format options when you select the LIS communication parameters in setup at the DCA Vantage system. Option Selection data bits 7 bits, 8 bits parity odd, even, none The stop bits are set to 1. -
Page 202: Ethernet Connection
TCP/IP transmission between the system and the host is established through the system’s Ethernet network adapter using an RJ45 connector. The DCA Vantage system only supports the system connecting to the host. The host has to listen for connections on the TCP/IP port and needs to accept the connection when the system tries to connect. - Page 203 LIS on subsequent attempts to transmit. • Unknown: Only for test results created on Version 2.0 and upgraded directly to version 4.0 or greater. Not for live tests. DCA Vantage Operator’s Guide...
-
Page 204: Recovery From A Failed Ethernet Connection
If this is an ASTM connection, a transmission is considered to be failed if 72 hours have passed since the most recent transmission after a good connection went down, and the LIS did not receive the message on subsequent attempts to transmit it. DCA Vantage Operator’s Guide... -
Page 205: Appendix H: Glossary
The roll of printer paper the user inserts into the onboard Printer Paper Roll printer. A connector used to transferred data between the Serial Connector DCA Vantage system and an LIS or computer. Speaker The device that enables the system to emit audio alerts. System The DCA Vantage product. -
Page 206: Software Terms
A software UI screen that enables the operator to perform Diagnostic a system diagnostic test when troubleshooting the DCA Screen system. The state when a software UI control, such as a button, is Disabled not available to be “touched” or “pressed” by an operator. DCA Vantage Operator’s Guide... - Page 207 “pressed” brings the operator to a different software UI screen. Parity A serial communication setting. The DCA Vantage system state when the system is Ready available to perform tests. To access data such as test results stored on the Recall DCA Vantage system.
-
Page 208: Acronyms
Term Definition The act of copying data back onto a DCA Vantage system Restore to restore it. A sample data entry box that must have data entered into Required Entry it during a test sequence. The software “windows” that fill the entire display area... - Page 209 Mean Transmittance NGSP National Glycohemoglobin Standardization Program Precision Precision Drift Point of Care Testing 1A protocol for transferring POCT1A messages between clinical laboratory instruments and computer systems Quality Control Serial Number Standard Deviation Signal to Reference Ratio DCA Vantage Operator’s Guide...
- Page 210 DCA Vantage Operator’s Guide...
- Page 211 Exporting data 147 Capillary External Barcode Reader filling from finger stick 50 installing 29 filling from venipuncture 50 testing 195 inserting 53 External Printer 30 Cartridge Compartment cleaning 98 File Management 147 Changing the air filter 103 DCA Vantage Operator’s Guide...
- Page 212 IP address 35 viewing results 79 Percent HbA1c calculation 182 Japanese Mode 154 Port Number 36 Power Laboratory Information System (LIS) connections 15 connection 199 power save 17 Language, setting 161 Power Cord 28 Pre-service checklist 27 DCA Vantage Operator’s Guide...
- Page 213 System settings wizard 32 Screen Components 17 System settings, viewing 164 Secondary Reporting Units 61 System tests 108 Send test results automatically to LIS 37, 202 Test Lockout 160 Sequence Number, RAPIDComm Test results, Microalbumin/ requirement 163 Creatinine 72 DCA Vantage Operator’s Guide...
- Page 214 User system test 109, 110 contacting customer support 169 preservice checklist 171 Warranty quality control 91 information to record 27 Warranty and support information 169 Unpacking the system 25 Wizard, system settings 32 Urine Creatinine Units DCA Vantage Operator’s Guide...
Need help?
Do you have a question about the DCA Vantage and is the answer not in the manual?
Questions and answers
Is the microalbumin/creatinine ratio test considered a CLIA waived test?
How many days are good for patient testing if DCA VANTAGE cartriges are left at room temp.
NO LONGEER WORKING FAILED THE QC AND WILL NOT REBOOT
The provided context does not contain specific troubleshooting steps for a Siemens DCA Vantage that has failed quality control and will not reboot. However, general troubleshooting steps based on the available information include:
1. Restart the system.
2. Check for error codes displayed on the system and follow the corresponding corrective actions.
3. If the issue persists, contact the Siemens Technical Support Center or a local technical service provider.
If further details are needed, refer to the official manual or technical support.
This answer is automatically generated