VERITAS NetBackup 5230 Hardware Installation Manual
Hide thumbs
Also See for NetBackup 5230:
- Configuration manual (78 pages) ,
- Hardware service procedure (8 pages) ,
- Manual (84 pages)
Table of Contents
Advertisement
Quick Links
Advertisement
Table of Contents

Related Manuals for VERITAS NetBackup 5230


Summary of Contents for VERITAS NetBackup 5230
- Page 1 Veritas NetBackup™ 5230 Appliance Hardware Installation Guide...
-
Page 2: Legal Notice
Technologies LLC or its affiliates in the U.S. and other countries. Other names may be trademarks of their respective owners. This product may contain third party software for which Veritas is required to provide attribution to the third party (“Third Party Programs”). Some of the Third Party Programs are available under open source or free software licenses. -
Page 3: Technical Support
Include the document title, document version, chapter title, and section title of the text on which you are reporting. Send feedback to: APP.docs@veritas.com You can also see documentation information or ask a question on the Veritas community site: http://www.veritas.com/community/ Veritas Services and Operations Readiness Tools (SORT) Veritas Services and Operations Readiness Tools (SORT) is a website that provides information and tools to automate and simplify certain time-consuming administrative tasks. -
Page 4: Table Of Contents
Contents Chapter 1 Overview ................7 Product overview ................7 Appliance front panel ..............8 Appliance rear panel ............... 9 PCIe riser assemblies and slots ............9 3U16 storage shelf ............... 10 2U12 storage shelf ............... 10 Product documentation ..............11 Chapter 2 Preparing for hardware installation ...... - Page 5 Turning on the storage shelves ............36 Turning on the appliance ............... 40 Configuring the IPMI from the NetBackup Appliance Shell Menu .... 42 Accessing and using the Veritas Remote Management interface .... 44 Appendix A Adding 3U16 storage shelves to an operational NetBackup 5230 Appliance ........
- Page 6 Contents Appendix C Adding new disk space to the appliance configuration ..............135 Adding the disk space of additional storage shelves from the NetBackup Appliance Web Console ............135 Adding the disk space of additional storage shelves from the NetBackup Appliance Shell Menu ............
-
Page 7: Overview
Up to four external storage shelves can be used to increase the storage capacity of the appliance. The following storage shelves can be used with the NetBackup 5230 Appliance. 3U16 24TB storage shelves ■... -
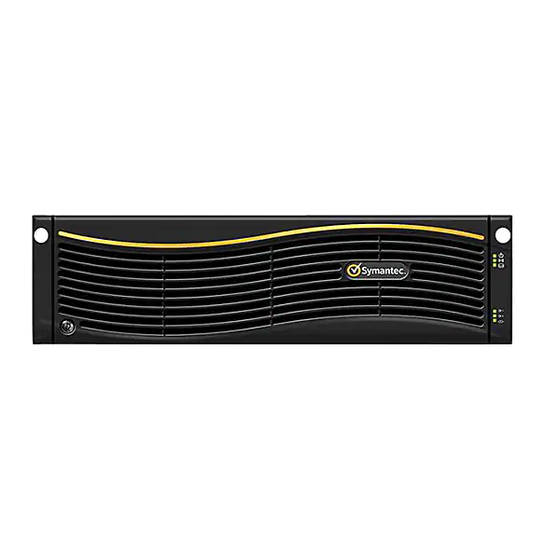
Page 8: Appliance Front Panel
■ Appliance front panel NetBackup 5230 appliances contain 12 disk slots. They are numbered from 0 to 11, starting at the lower left-hand corner. Each hard disk drive has two LEDs which give the drive status (1) and activity (2). -
Page 9: Appliance Rear Panel
The appliance rear panel provides access to the communication ports, PCIe add-in cards, and the hot-swappable power supplies. NetBackup 5230 appliances ship with grounding studs that are located on the rear panel of the appliance. You can use standard grounding practices to connect grounding wires to the studs. -
Page 10: 3U16 Storage Shelf
Overview 3U16 storage shelf 3U16 storage shelf The 3U16 storage shelf front panel contains 16 disk drives. The 16 disk drives in the 3U16 storage shelf are numbered from 1 to 16 starting at the top left corner. The storage shelf front panel includes two sets of three LEDs embedded in the handle on the right side of the shelf. -
Page 11: Product Documentation
Overview Product documentation The rear panel of the 2U12 storage shelf contains two power cooling modules and two I/O modules. The power modules are on the left and the right sides of the rear panel. The I/O modules are horizontally placed in the center of the rear panel. Product documentation The following table describes the hardware and the software documents that are available at the following website. -
Page 12: Preparing For Hardware Installation
Chapter Preparing for hardware installation This chapter includes the following topics: Tools ■ Hardware installation flow ■ 3U16 storage shelf weights and dimensions ■ Rack guidelines ■ Power supply overview ■ Electrical safety ■ Heat dissipation ■ Checking the shipping packages ■... -
Page 13: Hardware Installation Flow
Preparing for hardware installation Hardware installation flow Cable labels ■ Pen or pencil with which to write on labels ■ Cable ties and diagonal cutting pliers (optional) ■ Multimeter (optional) ■ Hardware installation flow Warning: NetBackup equipment and containers can weigh in excess of 70 lbs (31.75 kg). -
Page 14: 3U16 Storage Shelf Weights And Dimensions
Preparing for hardware installation 3U16 storage shelf weights and dimensions 3U16 storage shelf weights and dimensions Storage shelf weight and dimensions: Weight: 32.5 kg (71.7 lbs) ■ Height: 13.1 cm (5.15”) ■ Width: 44.7 cm (17.6”) ■ Depth: 56.1 cm (22.1”) ■... -
Page 15: Power Supply Overview
Preparing for hardware installation Power supply overview Front bezels and rack handles ■ Rear panel power supply latches ■ Rear panel cable connectors ■ Ensure that the rack is at least 100 cm (approximately 3 feet) away from the ■ walls. -
Page 16: Electrical Safety
Preparing for hardware installation Electrical safety Electrical safety Use the following best practices to ensure that your environment has the correct electrical setup. Verify proper grounding for the main AC power supply. ■ Overcurrent and overload protection must be available for the entire system. ■... -
Page 17: Removing The Protective Film From The 3U16 Storage Shelf
Preparing for hardware installation Removing the protective film from the 3U16 storage shelf Two AC-power cords for the appliance ■ A envelope containing license information and a USB stick that contains the ■ factory ISO image. If one or more storage shelves are included with the appliance, each storage shelf package should contain the following: A 3U16 storage shelf ■... -
Page 18: Locating Hardware Serial Numbers
You can locate the serial numbers on the hardware to record the units that you need to install. Serial number location for the NetBackup 5230 Appliance The serial number of the appliance is located on a vertical bar on the rear panel. -
Page 19: Prerequisites For Ipmi Configuration
Verify the following configuration prerequisites: Ensure that you have a dedicated network infrastructure. The remote ■ management port is 1 Gbps for NetBackup 5230 appliances. The remote management port can auto-negotiate its link speed of up to 1 Gbps. ■... -
Page 20: Installing Hardware Into Racks
Chapter Installing hardware into racks This chapter includes the following topics: Precautions - heavy equipment ■ Installing the 3U16 storage shelf guide rails ■ Installing the 3U16 Storage Shelf into a rack ■ Installing the appliance guide rails ■ Installing the appliance into a rack ■... -
Page 21: Installing The 3U16 Storage Shelf Guide Rails
Extenders that are built into the rails let you adjust the rails for the depth of the rack. Caution: Due to the weight of the units, Veritas recommends that storage shelves be installed at or near the bottom of the rack. - Page 22 Installing hardware into racks Installing the 3U16 storage shelf guide rails To install the 3U16 storage shelf guide rails Determine the installation positions of the guide rails in the rack. This list describes the components in the diagram. Number Description Location of a screw on the rear of the storage shelf handle.
-
Page 23: Installing The 3U16 Storage Shelf Into A Rack
Installing the 3U16 Storage Shelf into a rack Caution: Due to the weight of the units, Veritas recommends that storage shelves be installed at or near the bottom of the rack. Warning: A Storage Shelf weighs about 71.7 lbs (32.5 kg). Use appropriate practices, techniques, and tools when handling these components. - Page 24 Installing hardware into racks Installing the appliance guide rails This list describes the components of the drawing. Number Description Captive screw that connects the appliance to the rack. Blue peg that connects the rail bottom to the rack. Empty (no screws or pegs). Silver peg that connects the rail top to the rack.
-
Page 25: Installing The Appliance Into A Rack
Installing hardware into racks Installing the appliance into a rack Locate the left rail, with the L at the front end. The L faces the left side wall of the rack, not the center of the rack. Guide the rail into the two holes in the one RU that you selected. Hook the silver peg on the front of the rail into the top hole in the RU. - Page 26 Installing hardware into racks Installing the appliance into a rack To install the NetBackup appliance into a rack Verify that the guide rails are properly installed and securely fastened. Insert two snap-in screw locks into the rack immediately underneath the guide rails.
-
Page 27: Cables
Chapter Cables This chapter includes the following topics: About the cables ■ Connecting the VGA cable ■ Connecting the network cables ■ Connecting the appliance to one or more 3U16 storage shelves ■ Connecting the small form-factor pluggable (SFP+) transceivers ■... -
Page 28: Connecting The Vga Cable
Cables Connecting the VGA cable Fibre Channel cables for client and device connections ■ PS/2 to USB adapter cable ■ KVM cable ■ Connecting the VGA cable When the appliance is initialized, a monitor can be connected to the Video Graphics Array (VGA). -
Page 29: Connecting The Appliance To One Or More 3U16 Storage Shelves
Cables Connecting the appliance to one or more 3U16 storage shelves the initial configuration. Once the initial configuration has been completed you can connect NIC1 (eth0) to an administrative network. Ethernet ports NIC2/eth1, NIC3/eth2, NIC4/eth3, NIC5/eth4, and NIC6/eth5 can be connected to public networks. - Page 30 Cables Connecting the appliance to one or more 3U16 storage shelves For more than one 3U16 storage shelf, connect the SAS_OUT ports in the first 3U16 shelf to the SAS_IN ports in the second 3U16 shelf. Connect the SAS_OUT ports on the second 3U16 storage shelf to the SAS_IN ports on the next storage shelf.
- Page 31 Connecting the appliance to one or more 3U16 storage shelves Appliance and 3U16 storage shelf components (continued) Table 4-1 Numbers Feature SAS2 cables 3U16 storage shelves The following diagram shows a NetBackup 5230 appliance that is attached to the maximum number of four 3U16 storage shelves.
- Page 32 Cables Connecting the appliance to one or more 3U16 storage shelves “Connecting the power cables” on page 34.
-
Page 33: Connecting The Small Form-Factor Pluggable (Sfp+) Transceivers
Cables Connecting the small form-factor pluggable (SFP+) transceivers Connecting the small form-factor pluggable (SFP+) transceivers The NetBackup appliance requires an SFP Fibre Channel adapter to be plugged into the Fibre Channel ports if the appliance uses a Fibre Channel plug-in. The adapter allows usage of optical and copper Fibre Channel cables. -
Page 34: Connecting The Power Cables
Cables Connecting the power cables Remove an optical fiber from its packaging. Remove the caps of the optical connectors. Plug an optical connector into the interface of the card. Ensure that the optical connector is securely inserted into the optical transceiver. Connect the other optical connector of the optical fiber to a Fibre Channel switch. -
Page 35: Verifying Hardware Operation And Configuring Ipmi
Turning on the storage shelves ■ Turning on the appliance ■ Configuring the IPMI from the NetBackup Appliance Shell Menu ■ Accessing and using the Veritas Remote Management interface ■ Hardware verification Check the information in Table 5-1 after the hardware installation and cable connections are complete, but before the devices are turned on. -
Page 36: Turning On The Storage Shelves
Verifying hardware operation and configuring IPMI Turning on the storage shelves Installation confirmation Table 5-1 Component Correct installation Incorrect installation storage shelves The storage shelves are installed The storage shelves are securely in the lowest portion of the insecurely mounted or rack cabinet. - Page 37 Verifying hardware operation and configuring IPMI Turning on the storage shelves Turn on both power switches. On the front panel of the storage shelf check the system LEDs. System LEDs State Description Power (1) Not lit Solid green Global enclosure Not lit status (2) Solid green...
- Page 38 Normal operation Amber Abnormal or no operation Power/activity (2) Green Normal operation Amber Abnormal or no operation Make sure that the disk status and activity LEDs on each disk drive are green. If they are not green, contact Veritas Technical Support.
- Page 39 Verifying hardware operation and configuring IPMI Turning on the storage shelves Verify that the LEDs on the rear panel of the storage shelf show correct operation. Number Element Details SAS_IN port LED Not lit - no link available Solid green - link available Flashes green - activity Red - power supply failure SAS_IN port...
-
Page 40: Turning On The Appliance
Verifying hardware operation and configuring IPMI Turning on the appliance Note: When the 3U16 storage shelf starts, the primary I/O module (on the left side of the rear panel) starts first. Its LED turns green a few seconds after the start. - Page 41 Verifying hardware operation and configuring IPMI Turning on the appliance The Status LED (1) should not be lit. The following indications are possible: A solid, amber, LED indicates a disk fault. ■ A blinking, amber, LED indicates that a RAID rebuild is in progress. ■...
-
Page 42: Configuring The Ipmi From The Netbackup Appliance Shell Menu
Verifying hardware operation and configuring IPMI Configuring the IPMI from the NetBackup Appliance Shell Menu Number LED description Cold reset button (instantly restarts the appliance) NIC4/eth3 activity NIC3/eth2 activity NMI button (This button triggers a non-maskable interrupt. All server data is lost.) NIC1/eth0 activity NIC2/eth1 activity Status... - Page 43 Verifying hardware operation and configuring IPMI Configuring the IPMI from the NetBackup Appliance Shell Menu The defaults for the remote management port are: IP Address: 192.168.0.10 ■ Subnet Mask: 255.255.255.0 ■ Also review the following section on the IPMI prerequisites. “Prerequisites for IPMI configuration”...
-
Page 44: Accessing And Using The Veritas Remote Management Interface
(eth0) to an administrative network that does not provide any backup data transfer. Accessing and using the Veritas Remote Management interface The IPMI web interface is known as Veritas Remote Management interface. You can use Veritas Remote Management interface to log on to the NetBackup Appliance Shell Menu. - Page 45 Verifying hardware operation and configuring IPMI Accessing and using the Veritas Remote Management interface Note: Alert configuration is not supported using the Veritas Remote Management interface. Alert configuration is supported from either the Settings > Notification > Alert Configuration menu in the NetBackup Appliance Web Console or the Settings >...
- Page 46 Verifying hardware operation and configuring IPMI Accessing and using the Veritas Remote Management interface The Remote Control section lets you remotely monitor and control the server. Click Launch Console under the Console Redirection tab to launch the appliance NetBackup Appliance Shell Menu.
- Page 47 Verifying hardware operation and configuring IPMI Accessing and using the Veritas Remote Management interface A JViewer application opens that enables you to remotely monitor and control the appliance. This application requires Java Runtime Environment (JRE) version 6.0 or later. Install Java (as needed).
-
Page 48: Appendix A Adding 3U16 Storage Shelves To An Operational Netbackup 5230 Appliance
Appendix Adding 3U16 storage shelves to an operational NetBackup 5230 Appliance This appendix includes the following topics: About adding 3U16 storage shelves to an operational appliance ■ Shutting down the appliance ■ Preparing the appliance to install the additional hardware ■... -
Page 49: About Adding 3U16 Storage Shelves To An Operational Appliance
The NetBackup 5230 Appliance supports up to four storage shelves. The following scenarios define the supported and unsupported configurations. You can add up to four 3U16 shelves to a standalone NetBackup 5230 Appliance ■ that has no storage shelves attached. -
Page 50: Shutting Down The Appliance
These tasks must be performed in the order that is provided in this appendix. Shutting down the appliance This section describes how to perform a shutdown of the NetBackup 5230 Appliance. The process is designed to ensure an orderly system shutdown so that data is neither lost nor corrupted. -
Page 51: Preparing The Appliance To Install The Additional Hardware
50. Disconnect the AC power cords and peripheral cables as applicable. Slide the NetBackup 5230 appliance forward on the rails to the full extension. Caution: The unit weighs up to 65 lbs (29.5 kg). Make sure that sliding it forward does not destabilize the rack. -
Page 52: Installing The Additional Memory
■ Installing the additional memory Base NetBackup 5230 appliances are equipped with 64GB of memory in the form of Dual In-line Memory Modules (DIMMs). When a base unit is upgraded to use storage shelves, 64GB of additional memory must be installed. - Page 53 Adding 3U16 storage shelves to an operational NetBackup 5230 Appliance Installing the additional memory Locate the two, blue latches (A) that secure the back end of the air duct to ■ the chassis. Push the latches in to release the air duct.
- Page 54 Adding 3U16 storage shelves to an operational NetBackup 5230 Appliance Installing the additional memory Set the air duct aside in a safe location. ■ Obtain the DIMMs from the Expansion Storage Kit. Locate the DIMM sockets next to the CPUs on the mainboard.
-
Page 55: Installing The Additional Maintenance-Free Backup Unit (Mfbu)
Adding 3U16 storage shelves to an operational NetBackup 5230 Appliance Installing the additional Maintenance-Free Backup Unit (MFBU) Grasp a DIMM card by the edges and remove it from the anti-static package. ■ Do not touch the components or gold fingers on the card. - Page 56 Adding 3U16 storage shelves to an operational NetBackup 5230 Appliance Installing the additional Maintenance-Free Backup Unit (MFBU) MFBU case ■ MFBU cable ■ Insert the MFBU into the case. Do not damage or twist the wires that are attached to the MFBU.
- Page 57 Adding 3U16 storage shelves to an operational NetBackup 5230 Appliance Installing the additional Maintenance-Free Backup Unit (MFBU) Position the MFBU against the chassis side wall (1) and through the opening in the fan bulk-head (2). Align the tabs on the MFBU case with the mounting holes in the chassis.
-
Page 58: Installing The External Raid Controller Card
Adding 3U16 storage shelves to an operational NetBackup 5230 Appliance Installing the external RAID controller card Route the MFBU cable along the side of the chassis towards the rear of the appliance. Proceed to the next section to install the external RAID PCIe card and to connect it to the MFBU cable. - Page 59 Adding 3U16 storage shelves to an operational NetBackup 5230 Appliance Installing the external RAID controller card Remove the PCIe riser assembly as follows. Disengage the two hooks (1) from the chassis slots (2) that secure the riser ■ 2 assembly to the chassis.
- Page 60 Adding 3U16 storage shelves to an operational NetBackup 5230 Appliance Installing the external RAID controller card Align the edge connector on the card with the bottom PCIe-card socket (or slot 1). The edge connector is keyed to install one way only.
- Page 61 Adding 3U16 storage shelves to an operational NetBackup 5230 Appliance Installing the external RAID controller card Connect the MFBU cable to the rear of the RAID controller card. Reinstall the riser into the chassis. Insert the hooks on the riser (1) into the slots on the chassis (2).
- Page 62 Adding 3U16 storage shelves to an operational NetBackup 5230 Appliance Installing the external RAID controller card Align the two latches at the back of the air duct (A) behind the fans. Press ■ the latches in to secure them in the tabs.
-
Page 63: Removing The Protective Film From The Storage Shelf
Adding 3U16 storage shelves to an operational NetBackup 5230 Appliance Removing the protective film from the storage shelf Insert the four screws (2) and secure. ■ Reinstall the appliance into the rack as needed. Toward the rear of the chassis, locate the levers in the extensions on both ■... - Page 64 Extenders that are built into the rails let you adjust the rails for the depth of the rack. Caution: Due to the weight of the units, Veritas recommends that storage shelves be installed at or near the bottom of the rack.
- Page 65 Repeat these steps for the right rail. Be sure that rails are installed at the same height. Installing the 3U16 Storage Shelf into a rack Caution: Due to the weight of the units, Veritas recommends that storage shelves be installed at or near the bottom of the rack.
-
Page 66: Connecting The 3U16 Shelves To An Appliance Or To Other 3U16 Shelves
Adding 3U16 storage shelves to an operational NetBackup 5230 Appliance Connecting the 3U16 shelves to an appliance or to other 3U16 shelves Warning: A 3U16 storage shelf weighs about 71.7 lbs (32.5 kg). Use appropriate practices, techniques, and tools when handling these components to prevent harm to personnel and equipment. - Page 67 Adding 3U16 storage shelves to an operational NetBackup 5230 Appliance Connecting the 3U16 shelves to an appliance or to other 3U16 shelves If a RAID controller card is not installed it and other components of the Expansion Storage Kit must be installed. A Veritas-authorized field technician performs the installation.
-
Page 68: Connecting The 3U16 Shelves To An Appliance Or To Other 3U16 Shelves
Connecting additional 3U16 storage shelves This section describes how to connect additional 3U16 storage shelves. You can connect up to four storage shelves to one NetBackup 5230 Appliance. Refer to the following diagrams as needed. Detailed instructions are provided after... -
Page 69: Connecting The 3U16 Shelves To An Appliance Or To Other 3U16 Shelves
Adding 3U16 storage shelves to an operational NetBackup 5230 Appliance Connecting the 3U16 shelves to an appliance or to other 3U16 shelves SAS2 cable... -
Page 70: Connecting The 3U16 Shelves To An Appliance Or To Other 3U16 Shelves
Adding 3U16 storage shelves to an operational NetBackup 5230 Appliance Connecting the 3U16 shelves to an appliance or to other 3U16 shelves SAS2 cable... -
Page 71: Connecting The 3U16 Shelves To An Appliance Or To Other 3U16 Shelves
Adding 3U16 storage shelves to an operational NetBackup 5230 Appliance Connecting the 3U16 shelves to an appliance or to other 3U16 shelves SAS2 cable... -
Page 72: Connecting The 3U16 Storage Shelf And Appliance Power Cords
Adding 3U16 storage shelves to an operational NetBackup 5230 Appliance Connecting the 3U16 storage shelf and appliance power cords To connect additional 3U16 storage shelves Locate the two SAS2 cables that are shipped with the 3U16 storage shelf. Locate the SAS_IN and SAS_OUT ports on both I/O modules on the rear of the storage shelf. - Page 73 Adding 3U16 storage shelves to an operational NetBackup 5230 Appliance Connecting the 3U16 storage shelf and appliance power cords Caution: Do not turn on the power to any components while connecting the power cords. The components must be turned on in a specific sequence to ensure correct communication.
-
Page 74: Turning On The Hardware And Verifying Operation
Adding 3U16 storage shelves to an operational NetBackup 5230 Appliance Turning on the hardware and verifying operation Locate the power sockets in the appliance. Connect one cable between each socket and a socket on the Power Distribution Unit (PDU) for your rack. - Page 75 Adding 3U16 storage shelves to an operational NetBackup 5230 Appliance Turning on the hardware and verifying operation Verify that the power LED on each power module is green. Locate the LEDs on each I/O module. The following list describes the I/O module LED states.
- Page 76 Adding 3U16 storage shelves to an operational NetBackup 5230 Appliance Turning on the hardware and verifying operation Move to the front of the storage shelf to check the system LEDs. System LEDs State Description 1 - Power Not lit Solid green...
- Page 77 Adding 3U16 storage shelves to an operational NetBackup 5230 Appliance Turning on the hardware and verifying operation To turn on the appliance Connect both AC power connectors on the rear panel of the appliance to two main AC power supply outlets.
- Page 78 Adding 3U16 storage shelves to an operational NetBackup 5230 Appliance Turning on the hardware and verifying operation Review all LEDs on the front control panel. Number LED description AC power button with integrated LED Hard drive activity ID button with integrated LED...
- Page 79 Adding 3U16 storage shelves to an operational NetBackup 5230 Appliance Turning on the hardware and verifying operation Check the power supply module LEDs on the rear panel. Each module has one LED.
-
Page 80: Appendix B Adding 2U12 Storage Shelves To An Operational Netbackup 5230 Appliance
Appendix Adding 2U12 storage shelves to an operational NetBackup 5230 Appliance This appendix includes the following topics: About adding 2U12 storage shelves to an operational appliance ■ Shutting down the appliance ■ Preparing the appliance to install the additional hardware ■... -
Page 81: About Adding 2U12 Storage Shelves To An Operational Appliance
Configurations The following scenarios define the supported and unsupported configurations. You can add up to four 2U12 shelves to a standalone NetBackup 5230 Appliance ■ that has no storage shelves attached. You can add 2U12 shelves to an appliance that already has at least one 3U16 ■... -
Page 82: Hardware Requirements
SAS2 and SAS3 cables 2U12 rear panel SAS2 and SAS3 cables The appliance, the 2U12 shelves, and the 3U16 shelves have various SAS ports. The ports in the external RAID PCIe card in the NetBackup 5230 appliance ■ requires SAS2 compliant connectors. - Page 83 Adding 2U12 storage shelves to an operational NetBackup 5230 Appliance About adding 2U12 storage shelves to an operational appliance A 2U12 shelf requires SAS3 compliant connectors. ■ A 3U16 shelf requires SAS2 compliant connectors. ■ SAS2-to-SAS3 cables have a SAS2 connector on one end and a SAS3 connector on the other end.
- Page 84 Adding 2U12 storage shelves to an operational NetBackup 5230 Appliance About adding 2U12 storage shelves to an operational appliance The ports in the top canister are labeled A, B, and C from left to right. The ports in the bottom canister are labeled A, B, and C from right to left.
-
Page 85: Shutting Down The Appliance
Shutting down the appliance Shutting down the appliance This section describes how to perform a shutdown of the NetBackup 5230 Appliance. The process is designed to ensure an orderly system shutdown so that data is neither lost nor corrupted. Perform this procedure before you turn off the power switches on the unit. - Page 86 “Shutting down the appliance” on page 85. Slide the NetBackup 5230 appliance forward on the rails to the full extension. Caution: The unit weighs up to 65 lbs (29.5 kg). Make sure that sliding it forward does not destabilize the rack.
-
Page 87: Installing The Additional Memory
■ Installing the additional memory Base NetBackup 5230 appliances are equipped with 64GB of memory. When a base unit is upgraded to use storage shelves, 64GB of additional memory must be installed. Memory is included in the upgrade kit. Additional components are not required to install additional storage shelves. - Page 88 Adding 2U12 storage shelves to an operational NetBackup 5230 Appliance Installing the additional memory Lift the back edge of the air duct to disengage the two tabs from the fan ■ bulkhead (B). Set the air duct aside in a safe location.
- Page 89 Adding 2U12 storage shelves to an operational NetBackup 5230 Appliance Installing the additional memory Locate the DIMM sockets next to the CPUs on the mainboard inside the appliance chassis. A blank card is installed in each memory socket that is not currently used.
-
Page 90: Installing The Additional Maintenance Free Backup Unit (Mfbu)
Adding 2U12 storage shelves to an operational NetBackup 5230 Appliance Installing the additional Maintenance Free Backup Unit (MFBU) Grasp an expansion DIMM card by the edges and remove it from the ■ anti-static package. Do not touch the components or gold fingers on the card. - Page 91 Adding 2U12 storage shelves to an operational NetBackup 5230 Appliance Installing the additional Maintenance Free Backup Unit (MFBU) MFBU case ■ MFBU cable ■ Insert the MFBU into the case. Do not damage or twist the wires that are attached to the MFBU.
- Page 92 Adding 2U12 storage shelves to an operational NetBackup 5230 Appliance Installing the additional Maintenance Free Backup Unit (MFBU) Position the MFBU against the chassis side wall (1) and through the opening in the fan bulk-head (2). Align the tabs on the MFBU case with the mounting holes in the chassis.
-
Page 93: Installing The External Raid Controller Card
Adding 2U12 storage shelves to an operational NetBackup 5230 Appliance Installing the external RAID controller card Route the MFBU cable along the side of the chassis towards the rear of the appliance. Proceed to the next section to install the external RAID PCIe card and to connect it to the MFBU cable. - Page 94 Adding 2U12 storage shelves to an operational NetBackup 5230 Appliance Installing the external RAID controller card To install the RAID controller card Put on an ESD wrist strap or take other ESD precautions. Locate PCIe riser assembly R2 and slot 1. Riser 2 is located next to the power supply.
- Page 95 Adding 2U12 storage shelves to an operational NetBackup 5230 Appliance Installing the external RAID controller card Grasp the riser assembly with both hands. With firm even pressure lift it ■ out of the connector on the mainboard. Slot 1 is on the bottom of the riser. Remove the screw that secures slot 1 ■...
- Page 96 Adding 2U12 storage shelves to an operational NetBackup 5230 Appliance Installing the external RAID controller card Connect the cable on the MFBU to the separate cable from the kit. Connect the MFBU cable to the rear of the RAID controller card.
- Page 97 Adding 2U12 storage shelves to an operational NetBackup 5230 Appliance Installing the external RAID controller card Insert the hooks on the riser (1) into the slots on the chassis (2). ■ Firmly push down on edges of the assembly to engage the mainboard ■...
- Page 98 Adding 2U12 storage shelves to an operational NetBackup 5230 Appliance Installing the external RAID controller card Align the two latches at the back of the air duct (A) behind the fans. Press ■ the latches in to secure them in the tabs.
-
Page 99: Installing 2U12 Storage Shelves Into The Rack
Veritas recommends that two people install the rails; one person at the back of the rack and one at the front. Veritas also recommends that two people lift and place the storage shelf into the mounted rails. - Page 100 Adding 2U12 storage shelves to an operational NetBackup 5230 Appliance Installing 2U12 storage shelves into the rack To install storage shelf rails Identify the front and the rear of each rail. The following illustration shows the front of the left-hand and the right-hand rails. Red arrows show the pins that fit into the rack.
-
Page 101: Connecting The 2U12 Shelves To An Appliance Or Other Storage Shelves
Adding 2U12 storage shelves to an operational NetBackup 5230 Appliance Connecting the 2U12 shelves to an appliance or other storage shelves Install the storage shelf from the front of the rack. Use two people to lift the shelf. Slide the rear of the shelf into the front of the rails. Be sure that the shelf is straight and even inside the rack. -
Page 102: Connecting The 2U12 Shelves To An Appliance Or Other Storage Shelves
Connecting one 2U12 shelf to three existing 3U16 shelves Be sure to follow supported configurations. You can install up to four storage shelves with one NetBackup 5230 Appliance. ■ Any 3U16 storage shelves must be installed in front of any 2U12 shelves. -
Page 103: Connecting The 2U12 Shelves To An Appliance Or Other Storage Shelves
Adding 2U12 storage shelves to an operational NetBackup 5230 Appliance Connecting the 2U12 shelves to an appliance or other storage shelves Connect the SAS3 end of the same cable to port A in the top canister of the 2U12 storage shelf. Port A is the leftmost port on the top canister. - Page 104 Connecting 2U12 shelves to an existing 2U12 shelf To connect an existing 2U12 storage shelf to a new 2U12 storage shelf Verify that you have a NetBackup 5230 appliance and a 2U12 storage shelf with the correct cabling as shown.
-
Page 105: Connecting The 2U12 Shelves To An Appliance Or Other Storage Shelves
Adding 2U12 storage shelves to an operational NetBackup 5230 Appliance Connecting the 2U12 shelves to an appliance or other storage shelves In the existing shelf, connect port B in the top canister to port A in the top canister of the new shelf. -
Page 106: Connecting The 2U12 Shelves To An Appliance Or Other Storage Shelves
Adding 2U12 storage shelves to an operational NetBackup 5230 Appliance Connecting the 2U12 shelves to an appliance or other storage shelves Use the same scenario to connect up to four 2U12 storage shelves with SAS3 cables, as shown. SAS2-SAS3 cable... -
Page 107: Connecting The 2U12 Shelves To An Appliance Or Other Storage Shelves
Adding 2U12 storage shelves to an operational NetBackup 5230 Appliance Connecting the 2U12 shelves to an appliance or other storage shelves SAS2-SAS3 cable SAS3 cable... -
Page 108: Connecting The 2U12 Shelves To An Appliance Or Other Storage Shelves
Connecting 2U12 shelves to one existing 3U16 shelf To connect an existing 3U16 storage shelf to a new 2U12 storage shelf Verify that you have a NetBackup 5230 appliance and a 3U16 storage shelf with the correct cabling as shown. -
Page 109: Connecting The 2U12 Shelves To An Appliance Or Other Storage Shelves
Adding 2U12 storage shelves to an operational NetBackup 5230 Appliance Connecting the 2U12 shelves to an appliance or other storage shelves Connect the SAS2 connectors on the SAS2-SAS3 cables to the SAS_OUT ports on the 3U16 storage shelf. SAS2 cable SAS2-SAS3 cable Identify port A in the top and the bottom canister of the 2U12 storage shelf. -
Page 110: Connecting The 2U12 Shelves To An Appliance Or Other Storage Shelves
Adding 2U12 storage shelves to an operational NetBackup 5230 Appliance Connecting the 2U12 shelves to an appliance or other storage shelves Connect the SAS3 connectors of the SAS2-SAS3 cables to port A in the top and the bottom canister of the 2U12 storage shelf. -
Page 111: Connecting The 2U12 Shelves To An Appliance Or Other Storage Shelves
Adding 2U12 storage shelves to an operational NetBackup 5230 Appliance Connecting the 2U12 shelves to an appliance or other storage shelves From the first 2U12 shelf, connect port B in the top canister to port A in the top canister of the new shelf. -
Page 112: Connecting The 2U12 Shelves To An Appliance Or Other Storage Shelves
Adding 2U12 storage shelves to an operational NetBackup 5230 Appliance Connecting the 2U12 shelves to an appliance or other storage shelves Use the same cabling scenario to add a third 2U12 shelf. SAS2 cable SAS2-SAS3 cable SAS3 cable... -
Page 113: Connecting The 2U12 Shelves To An Appliance Or Other Storage Shelves
Connecting 2U12 shelves to two existing 3U16 shelves To connect two existing 3U16 storage shelves to new 2U12 storage shelves Verify that you have a NetBackup 5230 appliance and two 3U16 storage shelves with the correct cabling as shown. SAS2 cable SAS2 connectors connect the appliance and the 3U16 storage shelves. -
Page 114: Connecting The 2U12 Shelves To An Appliance Or Other Storage Shelves
Adding 2U12 storage shelves to an operational NetBackup 5230 Appliance Connecting the 2U12 shelves to an appliance or other storage shelves Identify the SAS_OUT ports on each I/O module in the 3U16 storage shelf. A diamond shape identifies the SAS_OUT ports. -
Page 115: Connecting The 2U12 Shelves To An Appliance Or Other Storage Shelves
Adding 2U12 storage shelves to an operational NetBackup 5230 Appliance Connecting the 2U12 shelves to an appliance or other storage shelves Connect the SAS2 connectors on the SAS2-SAS3 cables to the SAS_OUT ports on the 3U16 storage shelf. SAS2 cable... -
Page 116: Connecting The 2U12 Shelves To An Appliance Or Other Storage Shelves
Adding 2U12 storage shelves to an operational NetBackup 5230 Appliance Connecting the 2U12 shelves to an appliance or other storage shelves Identify port A in the top and the bottom canister of the 2U12 storage shelf. Note that the port labels A, B, and C are reversed in the two canisters. -
Page 117: Connecting The 2U12 Shelves To An Appliance Or Other Storage Shelves
Adding 2U12 storage shelves to an operational NetBackup 5230 Appliance Connecting the 2U12 shelves to an appliance or other storage shelves Connect the SAS3 connectors of the SAS2-SAS3 cables to port A in the top and the bottom canister of the 2U12 storage shelf. -
Page 118: Connecting The 2U12 Shelves To An Appliance Or Other Storage Shelves
Adding 2U12 storage shelves to an operational NetBackup 5230 Appliance Connecting the 2U12 shelves to an appliance or other storage shelves Ensure that the long blue tabs on the SAS3 connectors point toward the center of the 2U12 shelf. If you plan to connect a second 2U12 shelf, obtain two SAS3 cables. -
Page 119: Connecting The 2U12 Shelves To An Appliance Or Other Storage Shelves
Adding 2U12 storage shelves to an operational NetBackup 5230 Appliance Connecting the 2U12 shelves to an appliance or other storage shelves SAS2 cable SAS2-SAS3 cable SAS3 cable... -
Page 120: Connecting The 2U12 Shelves To An Appliance Or Other Storage Shelves
Connecting the 2U12 shelves to an appliance or other storage shelves Connecting one 2U12 shelf to three existing 3U16 shelves A NetBackup 5230 Appliance that already has three storage shelves only supports one additional storage shelf. The following diagram shows one 2U12 shelf and... -
Page 121: Connecting The 2U12 Storage Shelf And Appliance Power Cords
Adding 2U12 storage shelves to an operational NetBackup 5230 Appliance Connecting the 2U12 storage shelf and appliance power cords Connecting the 2U12 storage shelf and appliance power cords Each appliance and each storage shelf contain two AC power supplies. To ensure power redundancy, connect the power supplies on each component to separate AC power sources. -
Page 122: Turning On The Hardware And Verifying Operation
Adding 2U12 storage shelves to an operational NetBackup 5230 Appliance Turning on the hardware and verifying operation Locate the power sockets in the appliance. Connect one cable between each socket and a socket on the Power Distribution Unit (PDU) for your rack. - Page 123 Adding 2U12 storage shelves to an operational NetBackup 5230 Appliance Turning on the hardware and verifying operation Verify that the power LED on each power module is green. The LED icons are explained in the following table. Description Green = power cooling module ok...
- Page 124 Adding 2U12 storage shelves to an operational NetBackup 5230 Appliance Turning on the hardware and verifying operation Status PCM Ok Fan fault AC power DC power (Green) (Amber) fault fault (Amber) (Amber) No AC power in either No AC power in a...
- Page 125 Adding 2U12 storage shelves to an operational NetBackup 5230 Appliance Turning on the hardware and verifying operation Locate the LEDs on each I/O module canister. The LED in the red area with the white X-mark is amber when there is a fault in the I/O module canister.
- Page 126 Adding 2U12 storage shelves to an operational NetBackup 5230 Appliance Turning on the hardware and verifying operation Locate the SAS port LEDs. Note: The illustration shows the LEDs for port B in the top I/O module. The LEDs for all six ports are the same.
- Page 127 Adding 2U12 storage shelves to an operational NetBackup 5230 Appliance Turning on the hardware and verifying operation Identify the control panel LEDs and components. The following table describes the control panel functions. Number Item Description Input switch The Input switch enables you to set the Unit Identification display.
- Page 128 Adding 2U12 storage shelves to an operational NetBackup 5230 Appliance Turning on the hardware and verifying operation Number Item Description Unit Identification Display The Unit Identification Display is a dual digit display that provides information about the storage shelf. Its primary function is to assist in the configuration of multiple storage shelves.
- Page 129 Adding 2U12 storage shelves to an operational NetBackup 5230 Appliance Turning on the hardware and verifying operation Verify that the Power on/Standby LED is green. If the Power LED or the other two LEDs are amber, escalate the issue. The default Unit ID display is 88. You are not required to change this number.
- Page 130 Adding 2U12 storage shelves to an operational NetBackup 5230 Appliance Turning on the hardware and verifying operation System Module fault Logical fault Associated Status power (Amber) (Amber) LEDs and (Green or alarms Amber) On (Green) Flashing Array in a failed...
- Page 131 Adding 2U12 storage shelves to an operational NetBackup 5230 Appliance Turning on the hardware and verifying operation Check the LEDs on each disk drive carrier. The following table describes the disk drive carrier LEDs. Note that the combination of both LEDs provides the status.
- Page 132 Adding 2U12 storage shelves to an operational NetBackup 5230 Appliance Turning on the hardware and verifying operation To turn on the appliance Connect both AC power connectors on the rear panel of the appliance to two main AC power supply outlets.
- Page 133 Adding 2U12 storage shelves to an operational NetBackup 5230 Appliance Turning on the hardware and verifying operation Number LED description AC power button with integrated LED Hard drive activity ID button with integrated LED Cold reset button (instantly restarts the appliance)
- Page 134 Adding 2U12 storage shelves to an operational NetBackup 5230 Appliance Turning on the hardware and verifying operation Number LED description Status Check the power supply module LEDs on the rear panel. Each module has one LED.
-
Page 135: Appendix C Adding New Disk Space To The Appliance Configuration
Appendix Adding new disk space to the appliance configuration This appendix includes the following topics: Adding the disk space of additional storage shelves from the NetBackup ■ Appliance Web Console Adding the disk space of additional storage shelves from the NetBackup ■... -
Page 136: Adding The Disk Space Of Additional Storage Shelves From The Netbackup Appliance Shell Menu
Adding new disk space to the appliance configuration Adding the disk space of additional storage shelves from the NetBackup Appliance Shell Menu When the scan is complete, click OK to refresh the Disk tab. In the Disk column, a new ID should appear for the new storage shelf units. The new entries should have the following attributes: Type = Expansion. - Page 137 Adding new disk space to the appliance configuration Adding the disk space of additional storage shelves from the NetBackup Appliance Shell Menu Go to the Monitor view as follows: Type and press Monitor Enter Type Hardware ShowHealth and press Enter. Verify that the new storage devices appear.
-
Page 138: Index
18 connecting 2U12 storage shelves and 3U16 storage shelves 108 cables connecting a NetBackup 5230 Appliance and a add disk space of additional storage shelf 3U16 storage shelf 29 from NetBackup Appliance Shell Menu 136 connecting SAS2 29... - Page 139 Index cables (continued) fiber 33 MFBU network 28 case 91 power 34 installing 55, 90 SAS2 82 location 92 SAS2-SAS3 82 SAS3 82 SFP transceivers 33 ports VGA 28 2U12 storage shelf rear panel 84 configure appliance 28 IPMI 42 power supplies 15 protective film, removing from the 3U16 storage shelf 17...
- Page 140 Index validation (continued) appliance hardware checks 35 weight 2U12 storage shelf 99 3U16 storage shelf 64 appliance 51...
Need help?
Do you have a question about the NetBackup 5230 and is the answer not in the manual?
Questions and answers