VERITAS NetBackup 5230 Hardware Service Procedure
Storage disk drive replacement
Hide thumbs
Also See for NetBackup 5230:
- Hardware installation manual (140 pages) ,
- Configuration manual (78 pages) ,
- Hardware service procedure (6 pages)
Table of Contents
Advertisement
Veritas Appliance
Hardware Service Procedure
Storage Disk Drive Replacement: NetBackup 5230/5240 Appliance
Document Number: 108
Version: 4.0 (7/04/16)
Purpose
This document describes the process for replacing the storage disk drives in a NetBackup 5230
Appliance and a NetBackup 5240 Appliance.
Affected Models
NetBackup 5230 Appliance
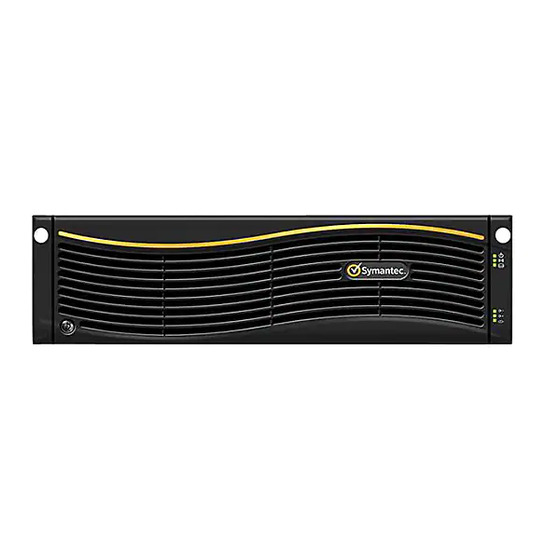
The NetBackup 5230 Appliance is a 2U system with 4 TB or 14 TB of internal storage. It consists of
either a stand-alone base server or a base server with one to four attached 3U Veritas Storage
Shelves. From the front panel of the NetBackup 5230, you can view 12 disk slots, arranged horizontally.
Two 1-TB SAS disks are installed in slots 0 and 1. Slots 2 and 3 hold blank carriers. The remaining
slots hold eight storage disks with a capacity of 1 TB or 3 TB each. All eight storage disks must have
the same capacity. Using 3-TB disks in slots 0 or 1 is not permitted. A small control panel is on the
right side of the front panel. It contains system LEDs and operations buttons, including the power
button.
Front view of the NetBackup 5230 Appliances
Figure 1
Rear view of the NetBackup 5230 Appliances
Figure 2
Slot 3
Slot 6
Slot 2
Slot 5
Slot 1
Slot 4
1
Advertisement
Table of Contents

Subscribe to Our Youtube Channel
Related Manuals for VERITAS NetBackup 5230


Summary of Contents for VERITAS NetBackup 5230
- Page 1 NetBackup 5230 Appliance The NetBackup 5230 Appliance is a 2U system with 4 TB or 14 TB of internal storage. It consists of either a stand-alone base server or a base server with one to four attached 3U Veritas Storage Shelves.
- Page 2 HSP 108 Storage Disk Drive Replacement: NetBackup 5230, 5240 Appliances The power sockets are on the left side of the rear panel. The rear panel contains six PCIe slots. Slot 1 is used for the external storage RAID controller if the appliance is connected to a storage shelf. The remaining slots may hold 10 Gb Ethernet NICs or Fibre Channel HBAs, depending on the configuration.
- Page 3 NetBackup 5230 Appliance and a NetBackup 5240 Appliance. In both a NetBackup 5230 Appliance and a NetBackup 5240 Appliance, the storage disk drives are located in slots 4 through 11. In both appliances, slot 11 contains the hot spare disk.
- Page 4 Note: Do not mix disk drive sizes. Replacement drives need to match the size of the drives they are replacing. For NetBackup 5230 Appliance, only replace 1TB drives with 1TB drives and 3TB drives with 3TB drives. If a drive does not have a label, it is 1TB in size. The picture below shows how the drives are labeled.
- Page 5 HSP 108 Storage Disk Drive Replacement: NetBackup 5230, 5240 Appliances • ESD wrist strap To locate and identify the appliance that has the faulty disk drive • Go to the unit with the failed component. To locate and then remove the faulty storage disk drive Put on a grounded ESD-compliant wrist strap or take other ESD-preventive measures.
- Page 6 HSP 108 Storage Disk Drive Replacement: NetBackup 5230, 5240 Appliances Caution: You must complete the hard disk drive swap within three minutes. Leaving the disk drive slot open for longer than three minutes can result in the appliance overheating and cause other components to fail.
- Page 7 HSP 108 Storage Disk Drive Replacement: NetBackup 5230, 5240 Appliances Check the status of the LEDs on the drive that you replaced. The drive activity LED turns green when the connection is good. After a short period, the drive status LED will start blinking amber to indicate that the rebuild is...
Need help?
Do you have a question about the NetBackup 5230 and is the answer not in the manual?
Questions and answers