
Subscribe to Our Youtube Channel
Related Manuals for JDS Uniphase CellAdvisor JD720C Series


Summary of Contents for JDS Uniphase CellAdvisor JD720C Series
- Page 1 CellAdvisor JD720C Series Cable and Antenna Analyzers JD723C JD724C JD725C JD726C User’s Manual...
- Page 2 CellAdvisor JD720C Series Cable and Antenna Analyzers JD723C JD724C JD725C JD726C User’s Manual Network and Service Enablement One Milestone Center Court Germantown, Maryland 20876-7100 USA Toll Free 1-855-ASK-JDSU • Tel +1-240-404-2999 • Fax +1-240-404-2195 www.jdsu.com...
- Page 3 Every effort was made to ensure that the information in this manual was accurate at the time of release. However, information is subject to change without notice, and JDS Uniphase reserves the right to provide an addendum to this manual with information not available at the time that this manual was created.
- Page 4 This product used free library for JPEG image compression written and distributed by Independent JPEG Group or IJG (http://www.ijg.org/). See “Appendix H – OSS licensing” on page 177 for more information. Ordering information This manual is a product of JDSU, issued as part of the JD720C Series analyzers. The catalog number for a published manual is JD720C362 - printed.
- Page 5 Instructions for returning waste equipment and batteries to JDSU can be found in the Environmental section of JDSU’s web site at www.jdsu.com. If you have questions concerning disposal of your equipment or batteries, contact JDSU’s WEEE Program Management team at WEEE.EMEA@jdsu.com. CellAdvisor JD720C Series User’s Manual...
-
Page 6: Table Of Contents
Table of Contents Chapter 1 About This Guide ..........................12 Purpose and scope ................................13 Assumptions..................................13 Safety and compliance information ............................. 13 Safety consideration ..............................13 Conventions ..................................14 Technical assistance ................................16 Chapter 2 JD720C Series Overview ........................17 About the JD720C series .............................. - Page 7 Display screen ................................72 Preparing for a measurement ............................. 73 Selecting measurement mode ............................. 73 Setting parameters ............................... 73 Performing calibration ..............................76 Making a measurement ............................... 76 Measurement examples ............................... 77 Analyzing measurement results ............................77 CellAdvisor JD720C Series User’s Manual...
- Page 8 Table of Contents Chapter 9 Smith Chart Testing ........................... 78 Introducing Smith chart measurements ..........................79 Display screen ................................79 Preparing for a measurement ............................. 80 Selecting measurement mode ............................. 80 Setting parameters ............................... 80 Performing calibration ..............................82 Making a measurement ............................... 82 Measurement examples ...............................
- Page 9 Example of alternate sweep ............................129 Using markers ................................... 129 Setting a marker ................................. 130 Moving, hiding, and clearing a marker ........................131 Searching for peak or valley .............................. 131 Finding a peak or valley ............................. 131 CellAdvisor JD720C Series User’s Manual...
- Page 10 Table of Contents Performing more searches ............................132 Finding a peak or valley in zoom zones ........................132 Displaying traces ................................132 Adding a trace ................................133 Performing trace math ............................... 134 Loading a saved trace ..............................134 Setting test limits ................................134 Setting a limit line ...............................
- Page 11 Connecting JD720C series from Android-based smartphone over Bluetooth ............183 Turning Bluetooth mode on/off manually ........................183 Appendix H – OSS licensing ............................. 184 Appendix I – RoHS information ............................185 JD723C and JD724C ..............................185 JD725C and JD726C ..............................186 CellAdvisor JD720C Series User’s Manual...
-
Page 12: Chapter 1 About This Guide
Chapter 1 About This Guide Topics discussed in this chapter include the following: Purpose and scope ......................13 Assumptions ......................... 13 Safety and compliance information ..................13 Conventions ......................... 14 Technical assistance ......................16 Sections “Safety and compliance information” and “Conventions” in this chapter contain information in French as well. -
Page 13: Purpose And Scope
(la sécurité) à la terre. WARNING Do not attempt to service this product yourself, as opening or removing covers may expose you to dangerous voltage and other hazards. Refer all servicing to qualified JDSU service personnel. CellAdvisor JD720C Series User’s Manual... -
Page 14: Conventions
Chapter 1 About This Guide AVERTISSEMENT Ne pas tenter de réparer ce produit vous-même, car l'ouverture ou le retrait des capots peut vous exposer à des tensions dangereuses et autres risques. Confiez toute réparation à un personnel qualifié de service JDSU. CAUTION This equipment contains parts and assemblies sensitive to electrostatic discharge (ESD). - Page 15 It may be associated with a general hazard, high voltage, or risk of explosion symbol. Indique une situation de danger potentiel qui, si elle n'est pas évitée, peut entraî ner la mort ou des dommages corporels graves. CellAdvisor JD720C Series User’s Manual...
-
Page 16: Technical Assistance
Chapter 1 About This Guide CAUTION Indicates a potentially hazardous situation that, if not avoided, could result in minor or moderate injury and/or damage to equipment. It may be associated with a general hazard, high voltage, or risk of explosion symbol. When applied to software actions, indicates a situation that, if not avoided, could result in loss of data or a disruption of software operation. -
Page 17: Chapter 2 Jd720C Series Overview
Chapter 2 JD720C Series Overview This chapter provides a general description of the JD720C series. Topics discussed in this chapter include the following: About the JD720C series ..................... 18 Features and capabilities ..................... 18 Options ..........................19 ... -
Page 18: About The Jd720C Series
Chapter 2 JD720C Series Overview About the JD720C series The majority of problems in mobile networks occur at the base station infrastructure that is consisted of the antenna system, cables, and connectors. It is essential to have the optimal instrument for properly servicing or installing cell sites. The JD720C series analyzers are the optimal test solution to characterize cell site’s infrastructure due to its light-weight handheld design, ease of use, and rich functionality. -
Page 19: Capabilities
“Appendix B – Ordering information” on page 168 for more information. Specifications AC power Input voltage is automatically selected within the instrument’s tolerable input line voltage from 100 to 240 VAC. This instrument does not have a separate line protection fuse. CellAdvisor JD720C Series User’s Manual... -
Page 20: Physical Specifications
Chapter 2 JD720C Series Overview Table 6 AC power requirements Item JD723C/724C JD725C/726C AC power 100 to 240 V AC, 50-60 Hz 100 to 240 V AC, 50-60 Hz Power consumption 12 W in operation; 34.5 W with battery 15 W in operation; 37.5 W with battery charging charging Physical specifications... -
Page 21: Chapter 3 Getting Started
Chapter 3 Getting Started This chapter describes how to get started with the JD720C series instrument. Topics discussed in this chapter are as follows: Unpacking the JD720C series ..................... 22 Exploring the JD720C series ....................22 Installing battery pack ......................30 ... -
Page 22: Unpacking The Jd720C Series
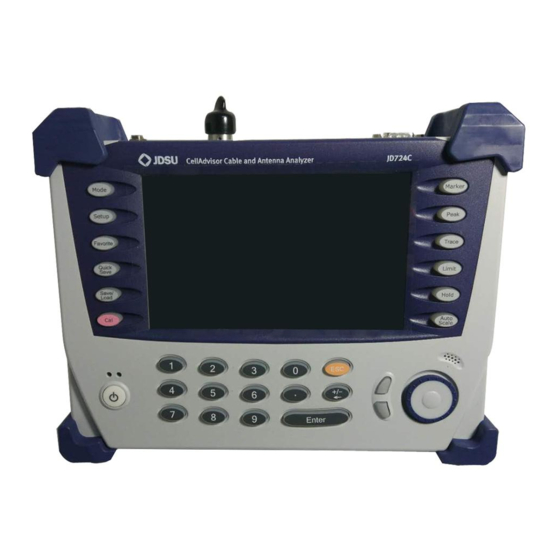
Chapter 3 Getting Started Unpacking the JD720C series Unpack and inspect the shipping package thoroughly to ensure that nothing was damaged during the shipment. Also, check that your delivered package includes all of your ordered items in the shipment. If contents in the package are damaged or defective or if there are missing items, keep the shipping list and materials for carrier’s inspection and contact your nearest JDSU's authorized sales and service office. - Page 23 Power On/Off: You can turn your instrument on or off. Two LEDs indicate power source and status. See "Starting up your JD720C series" on page 31. Measurement and operation keys You can use these hard keys to activate specified functions as labeled on each key. CellAdvisor JD720C Series User’s Manual...
- Page 24 Chapter 3 Getting Started Description Mode: You can bring up the measurement mode screen with all the measurement icons in three different layout options. Setup: You can bring up the measurement setup screen, where you can configure parameters and settings such as frequency, amplitude, distance, cable definition, data points, interference rejection, zoom, alternate sweep, etc.
-
Page 25: Top Panel
Top panel Figure 2and Figure 3 show the top panel of JD724C and JD725C respectively. Figure 2 JD724C top panel view Description 15 V DC port RF Out and Reflection port LAN port CellAdvisor JD720C Series User’s Manual... - Page 26 Chapter 3 Getting Started USB host ports – USB memory, RF power sensor, optical power meter, fiber microscope, GPS receiver, and Bluetooth adapter USB client port – JDViewer and JDRemote RS-232C serial port – RF power sensors Figure 3 JD725C Top panel view Description 15 V DC port RF Out 50 Ω...
-
Page 27: Display Screen
In dual display mode, the measurement display pane with outside borders indicates that it is selected and active for operation and analysis. You can simply touch the other measurement display pane on the screen to change the selection of active measurement. CellAdvisor JD720C Series User’s Manual... -
Page 28: Date And Time
Chapter 3 Getting Started Figure 4 JD720C display screen view Description Model number Shortcut – Date and time; GPS information if USB GPS receiver connected Calibration status indicators – CAL ON (E), CAL ON (I), CAL ON (Q), CAL OFF (T), CAL OFF Shortcuts –... - Page 29 PC: Indicates that your PC is connected for JDViewer or JDRemote successfully. StrataSync: Indicates the status of StrataSync connection. GPS Lock: Indicates the status of GPS antenna connection Bluetooth: Indicates the status of Bluetooth connection CellAdvisor JD720C Series User’s Manual...
-
Page 30: Installing Battery Pack
Chapter 3 Getting Started Power and battery indicators Indicator Description DC Supply: Indicates that external power is supplied to the instrument. The installed battery is charged when the external power supply is connected. Battery: Indicates that the instrument has a battery pack in it and shows the remaining battery level or charging status in percentage. -
Page 31: Starting Up Your Jd720C Series
Tap the drop-down list button for the Standard Time Zone and then select your time zone. Select the Date Format option from the choices: YYMMDD, MMDDYY, and DDMMYY. To set the date and time manually, complete the following steps: CellAdvisor JD720C Series User’s Manual... - Page 32 Chapter 3 Getting Started Select the Date input box for year, month, or day. Enter a number by using the numeric keys or the rotary knob. Select the Time input box for hour, minute, or second. Enter a number by using the numeric keys or the rotary knob. Tap the Apply button in the Date and Time pane to save the change(s).
-
Page 33: Chapter 4 Performing Calibration
Chapter 4 Performing Calibration This chapter provides instructions on how to perform calibration properly in order to obtain accurate measurement results. Topics discussed in this chapter are as follows: Understanding calibration ....................34 Performing 1-port calibration ....................35 ... -
Page 34: Understanding Calibration
Chapter 4 Performing Calibration Understanding calibration Calibration of your instrument to the Open, Short, and Load standards is important to get reliable and accurate measurement results. After setting frequencies and right before making a measurement, you need to perform an O-S-L calibration using a mechanical or electronic calibration kit. -
Page 35: Performing 1-Port Calibration
Press the CAL hard key. The on-screen instruction appears to guide you through the mechanical O-S-L calibration. Do the following depending on your instrument model and its installed option: CellAdvisor JD720C Series User’s Manual... - Page 36 Chapter 4 Performing Calibration – JD723C, JD724C, and JD726C without 2-por transmission option: Tap the Continue button. The calibration progress bar appears. – JD725C and JD726C with 2-port transmission option: Tap the O-S-L button. The calibration progress bar appears. Disconnect the calibration kit and then connect the SHORT standard of the calibration kit to the instrument's the RF Out / Reflection port or to the extension cable if used.
-
Page 37: O-S-L Calibration Using Electronic Ez-Cal Kit
O-S-L calibration easy and fast with only one connection of the kit to the instrument. The O-S-L calibration must be performed after setting the frequencies and connecting an extension cable. Figure 9 illustrates a connection setup with using the port extension cable. CellAdvisor JD720C Series User’s Manual... - Page 38 Chapter 4 Performing Calibration Figure 9 e-Calibration connection diagram with an extension cable JD725C/726C JD723C/724C Procedure Connect an extension cable, if necessary, to the RF Out / Reflection port of the instrument. Connect the EZ-Cal to the instrument's the RF Out / Reflection port or at the end of the extension cable if used.
-
Page 39: Quick Calibration
Quick calibration on JD724C NOTE CAL ON (Q) is valid only for a DTF measurement in the single layout. If you change the display mode to others, calibration status goes back to the previous one. CellAdvisor JD720C Series User’s Manual... -
Page 40: Performing 2-Port Calibration
Chapter 4 Performing Calibration Performing 2-port calibration Measurement modes that need the 2-port calibration are 2 Port Transmission and 2 Port Phase with JD725C and JD726C. You must perform the mechanical or electronic O-S-L calibration and then the Thru calibration after setting the frequency and the output power. Figure 13 illustrates a connection setup for Thru calibration. -
Page 41: O-S-L-Thru Calibration Using Electronic Ez-Cal Kit
RF Out / Reflection port to the instrument’s RF In port as illustrated in Figure 13. Tap the Continue button in the lower-left corner of the screen. The calibration progress bar appears. Check the screen to see if the calibration status is now changed to CAL ON (E). CellAdvisor JD720C Series User’s Manual... -
Page 42: Chapter 5 Reflection Testing
Chapter 5 Reflection Testing This chapter provides instructions on how to perform Reflection measurements in VSWR or Return Loss. Topics discussed in this chapter are as follows: Introducing reflection measurements ................... 43 Preparing for a measurement ....................45 ... -
Page 43: Introducing Reflection Measurements
It is a measure of the dissimilarity between impedances in metallic transmission lines and loads. For devices that are not perfect transmission lines or purely resistive loads, the return loss value varies with the frequency of the transmitted signal. CellAdvisor JD720C Series User’s Manual... -
Page 44: Display Screen
Chapter 5 Reflection Testing NOTE You can also view reflection measurements in Smith Chart to help you graphically identify problems with transmission lines. Display screen Figure 14 shows an example of Reflection measurement. Figure 14 Reflection measurement screen Description Measurement Mode Name Measurement Chart Trace(s) –... -
Page 45: Preparing For A Measurement
To set the start and stop frequencies, complete the following steps: Select the cell next to the Start Frequency. Enter a value by using the numeric keys or the rotary knob. Select the cell next to the Stop Frequency. CellAdvisor JD720C Series User’s Manual... - Page 46 Chapter 5 Reflection Testing Enter a value by using the numeric keys or the rotary knob. – To set the center frequency and the span, complete the following steps: Select the cell next to the Center Frequency. Enter a value by using the numeric keys or the rotary knob. Select the cell next to the Span.
- Page 47 Default setting is Off. It is recommended to use this feature only when you suspect interfering signals in the area as it slows down measurement. For JD725C and JD726C users with the option 001 Bias Tee installed. To use the Bias Tee, complete the following steps: CellAdvisor JD720C Series User’s Manual...
-
Page 48: Performing Calibration
Chapter 5 Reflection Testing Select On for the Bias Tee. Enter a value between 12 and 32 with 1 V step, as you desire. NOTE If you have set this Bias Tee to On, the instrument will supply a DC bias of set level (12 –... -
Page 49: Measurement Examples
Do not attempt to connect the instrument to the antenna when there is a risk of lightning. Electric shock may cause malfunction of or damage to the instrument. Measurement examples Figure 18 Reflection VSWR measurement screen (single layout) CellAdvisor JD720C Series User’s Manual... - Page 50 Chapter 5 Reflection Testing Figure 19 Reflection VSWR measurement screen (zoom zones) Figure 20 Reflection return loss measurement screen (single layout) Figure 21 Reflection return loss measurement screen (zoom zones) CellAdvisor JD720C User's Manual...
-
Page 51: Analyzing Measurement Results
You can use the Marker, Peak, Trace, Limit, Hold and Auto Scale hard keys and Zoom Zone function for your analysis of the results. You can also use Favorite, Quick Save and Save/Load functions. See "Analysis" on page 125 and “Operation” on page 138 for details. CellAdvisor JD720C Series User’s Manual... -
Page 52: Chapter 6 Dtf Testing
Chapter 6 DTF Testing This chapter provides instructions on how to perform DTF (Distance to Fault) measurements in VSWR or Return Loss. Topics discussed in this chapter are as follows: Introducing DTF measurements ..................53 Preparing for a measurement ....................54 ... -
Page 53: Introducing Dtf Measurements
Because of this sensitivity to impedance variations, the instrument may be used to verify cable impedance characteristics, splice and connector locations and associated losses, and estimate cable lengths or faulty location. Display screen Figure 24 shows an example of DTF measurement. Figure 24 DTF measurement screen CellAdvisor JD720C Series User’s Manual... -
Page 54: Preparing For A Measurement
Chapter 6 DTF Testing Description Measurement Mode Name Measurement Chart Trace(s) – Up to 4 traces Marker(s) – Up to 6 markers Readout for Active Marker Limit Line(s) – Traces out of the specified limits are displayed in red color Trace Legend –... - Page 55 Frequency changes after calibration affect the calibration status. If changed within the registered band, the status turns into CAL ON (I) and it does not require re-calibration. If changed off the registered band, the status turns into CAL OFF and it requires re-calibration. CellAdvisor JD720C Series User’s Manual...
- Page 56 Chapter 6 DTF Testing Figure 26 Band list window Distance You can also manually set a distance to be measured by entering start and stop distances. The maximum measurable distance is dependent on the frequency you set. You can set any values within the maximum measurable distance, but optimum resolution is achieved when you set the distance same as the maximum measurable distance, which is displayed in the measurement setting information bar at the bottom of the measurement screen.
- Page 57 To change the display unit for distance, select the Units option from the choices: Meter and Foot. NOTE Setting your city and time zone automatically changes not only the date and time but also the distance unit in the DTF settings accordingly to Meter or Foot. CellAdvisor JD720C Series User’s Manual...
-
Page 58: Defining Cable
Chapter 6 DTF Testing To enable the Interference Rejection feature, select On. NOTE Default setting is Off. It is recommended to use this feature only when you suspect interfering signals in the area as it slows down measurement. For JD725C and JD726C users with the option 001 Bias Tee installed. To use the Bias Tee, complete the following steps: Select On for the Bias Tee. -
Page 59: Performing Calibration
+25 dBm, the input power protection is triggered to protect the instrument and a measurement comes to stop automatically. Figure 27 Cable connection diagram for DTF measurements JD725C/726C JD723C/724C CellAdvisor JD720C Series User’s Manual... -
Page 60: Measurement Examples
Chapter 6 DTF Testing NOTE Do not change the connected port extension cable or frequency settings, or it may cause a measurement error. WARNING Do not attempt to connect the instrument to the antenna when there is a risk of lightning. Electric shock may cause malfunction of or damage to the instrument. - Page 61 Chapter 6 DTF Testing Figure 30 DTF return loss measurement screen (alternate sweep on) Figure 31 Reflection VSWR & DTF return loss measurement screen (horizontal layout) Figure 32 DTF VSWR & Smith chart measurement screen (vertical layout) CellAdvisor JD720C Series User’s Manual...
-
Page 62: Analyzing Measurement Results
Chapter 6 DTF Testing Analyzing measurement results You can use the Marker, Peak, Trace, Limit, Hold and Auto Scale hard keys and Alternate Sweep function for your analysis of the results. You can also use Favorite, Quick Save and Save/Load functions. See "Analysis" on page 125 and “Operation” on page 138 for details. CellAdvisor JD720C User's Manual... -
Page 63: Chapter 7 1-Port Cable Loss Testing
Chapter 7 1-Port Cable Loss Testing This chapter provides instructions on how to perform 1 Port Cable Loss measurements that are used to quantify signal loss in a cable or other device without connecting both ends of the cable or device to the instrument. Topics discussed in this chapter are as follows: ... -
Page 64: Introducing 1-Port Cable Loss Measurements
Chapter 7 1-Port Cable Loss Testing Introducing 1-port cable loss measurements The 1 Port Cable Loss measurement checks the signal attenuation level of the cable. The frequency band to measure the characteristics of a cable must be calibrated before performing the cable loss measurement. This measurement can be especially useful in measuring the loss of feed line connected to the antenna. -
Page 65: Preparing For A Measurement
It is desirable to set the frequency to a value that covers a normal range of the measurement with enough margins. Figure 34 Frequency setup window for cable loss measurements Procedure Press the SETUP hard key and touch the Frequency tab. Do one of the following: CellAdvisor JD720C Series User’s Manual... - Page 66 Chapter 7 1-Port Cable Loss Testing – To set the start and stop frequencies, complete the following steps: Select the cell next to the Start Frequency. Enter a value by using the numeric keys or the rotary knob. Select the cell next to the Stop Frequency. Enter a value by using the numeric keys or the rotary knob.
- Page 67 To enable the Interference Rejection feature, select On. NOTE Default setting is Off. It is recommended to use this feature only when you suspect interfering signals in the area as it slows down measurement. CellAdvisor JD720C Series User’s Manual...
-
Page 68: Performing Calibration
Chapter 7 1-Port Cable Loss Testing For JD725C and JD726C users with the option 001 Bias Tee installed. To use the Bias Tee, complete the following steps: Select On for the Bias Tee. Enter a value between 12 and 32 with 1 V step, as you desire. NOTE If you have set this Bias Tee to On, the instrument will supply a DC bias of set level (12 –... -
Page 69: Measurement Examples
Chapter 7 1-Port Cable Loss Testing JD725C/726C NOTE Do not change the connected port extension cable or frequency settings, or it may cause a measurement error. Measurement examples Figure 37 1 port cable loss measurement screen (single layout) CellAdvisor JD720C Series User’s Manual... -
Page 70: Analyzing Measurement Results
Chapter 7 1-Port Cable Loss Testing Figure 38 1 port cable loss measurement screen (zoom zones) Analyzing measurement results You can use the Marker, Peak, Trace, Limit, Hold and Auto Scale hard keys and Zoom Zone function for your analysis of the results. You can also use Favorite, Quick Save and Save/Load functions. -
Page 71: Chapter 8 1-Port Phase Testing
Chapter 8 1-Port Phase Testing This chapter provides instructions on how to perform 1 Port Phase measurements to tune DUT’s impedance matching and phase match cables. Topics discussed in this chapter are as follows: Introducing 1-port phase measurements ................72 ... -
Page 72: Introducing 1-Port Phase Measurements
Chapter 8 1-Port Phase Testing Introducing 1-port phase measurements You can use 1 Port Phase mode to measure S phase when you want to tune antennas and phase match cables. Display screen Figure 39 shows an example of 1 Port Phase measurements. Figure 39 1 port phase measurement screen Description... -
Page 73: Preparing For A Measurement
To set the start and stop frequencies, complete the following steps: Select the cell next to the Start Frequency. Enter a value by using the numeric keys or the rotary knob. Select the cell next to the Stop Frequency. CellAdvisor JD720C Series User’s Manual... - Page 74 Chapter 8 1-Port Phase Testing Enter a value by using the numeric keys or the rotary knob. – To set the center frequency and the span, complete the following steps: Select the cell next to the Center Frequency. Enter a value by using the numeric keys or the rotary knob. Select the cell next to the Span.
- Page 75 For JD725C and JD726C users with the option 001 Bias Tee installed. To use the Bias Tee, complete the following steps: Select On for the Bias Tee. CellAdvisor JD720C Series User’s Manual...
-
Page 76: Performing Calibration
Chapter 8 1-Port Phase Testing Enter a value between 12 and 32 with 1 V step, as you desire. NOTE If you have set this Bias Tee to On, the instrument will supply a DC bias of set level (12 – 32 V) from the RF In port to an active device, such as Tower Mounted Amplifier (TMA) or Low Noise Amplifier (LNA), through the transmission line, eliminating the need of an external power supply. -
Page 77: Measurement Examples
You can use the Marker, Peak, Trace, Hold and Auto Scale hard keys and Zoom Zone function for your analysis of the results. You can also use Favorite, Quick Save and Save/Load functions. See "Analysis" on page 125 and “Operation” on page 138 for details. CellAdvisor JD720C Series User’s Manual... -
Page 78: Chapter 9 Smith Chart Testing
Chapter 9 Smith Chart Testing This chapter provides instructions on how to perform reflection measurements in Smith Chart. Topics discussed in this chapter are as follows: Introducing Smith chart measurements ................79 Preparing for a measurement ....................80 ... -
Page 79: Introducing Smith Chart Measurements
Trace legend – For "Indoor" display mode Trace 1 Active Marker Captured Trace for each trace Trace 2 Current Trace (Clear Write) Trace 3 Loaded Trace Trace 4 Trace Off Measurement result table Screen menu and screen keys CellAdvisor JD720C Series User’s Manual... -
Page 80: Preparing For A Measurement
Chapter 9 Smith Chart Testing Preparing for a measurement Selecting measurement mode Procedure Press the MODE hard key and then select the Single Layout tab. Double-tap the Smith Chart icon. NOTE You can choose two measurement modes from the Vertical Layout tab if you want to view dual measurements displayed side by side. - Page 81 You can select options for Data Points and Interference Rejection. Procedure Press the SETUP hard key and touch the General tab. To set the measurement resolution, select the Data Points option from the choices: 126, 251, CellAdvisor JD720C Series User’s Manual...
-
Page 82: Performing Calibration
Chapter 9 Smith Chart Testing 501, 1001, and 2001. NOTE Default setting is 1001. It is recommended that you select high resolution data points only for an instance of measuring wide frequency bands or requiring precise measurement data. The larger number you choose, the higher resolution you get and the longer the instrument takes to sweep and display results. -
Page 83: Measurement Examples
Do not attempt to connect the instrument to the antenna when there is a risk of lightning. Electric shock may cause malfunction of or damage to the instrument. Measurement examples Figure 48 Smith chart measurement screen (single layout) CellAdvisor JD720C Series User’s Manual... -
Page 84: Analyzing Measurement Results
Chapter 9 Smith Chart Testing Figure 49 DTF VSWR & Smith chart measurement screen (vertical layout) Analyzing measurement results You can use the Marker, Trace, and Hold hard keys for your analysis of the results. You can also use Favorite, Quick Save, and Save/Load functions. See "Analysis" on page 125 and “Operation”... -
Page 85: Chapter 10 2-Port Transmission Testing
Chapter 10 2-Port Transmission Testing This chapter provides instructions on how to perform the 2-Port Transmission measurement that is a standard feature for JD725C and an option (002) for JD726C. It is used to quantify signal gain or loss in a cable or other devices with connecting both ends of the cable or device to the instrument. -
Page 86: Introducing 2-Port Transmission Measurements
Chapter 10 2-Port Transmission Testing Introducing 2-port transmission measurements The 2 Port Transmission measures the level of the signal attenuation of passive RF elements such as cables and filters, or the level of gains of active RF elements such as amplifiers. The frequency band to measure the characteristics of a cable must be calibrated before performing the insertion loss/gain measurement. -
Page 87: Preparing For A Measurement
Selecting measurement mode Procedure Press the MODE hard key and then select the Single Layout tab. Double-tap the 2 Port Transmission icon. NOTE You can choose two measurement modes from each window in the Horizontal Layout or CellAdvisor JD720C Series User’s Manual... -
Page 88: Setting Parameters
Chapter 10 2-Port Transmission Testing Vertical Layout tab if you want to view dual measurements displayed on one screen. Setting parameters Frequency You can manually set a frequency band to be measured by entering start and stop frequencies, or center frequency and span. You can also select a frequency band from the band list stored in the instrument. - Page 89 Enter a value by using the numeric keys or the rotary knob. The entered value becomes the maximum value for the Y-scale. Select the cell next to the Bottom. Enter a value by using the numeric keys or the rotary knob. CellAdvisor JD720C Series User’s Manual...
- Page 90 Chapter 10 2-Port Transmission Testing The entered value becomes the minimum value for the Y-scale. – To restore the instrument’s default range for the Y-scale, tap the Full Scale button. The amplitude range for this measurement mode is -100 to 100 dB. Tap the Apply button in the lower-right corner of the setup screen to save the change(s).
-
Page 91: Performing Calibration
Disconnect the calibrated extension cable from the RF In port of the instrument. Connect your DUT between the extension cable and the RF In port as illustrated in Figure 54. Your measurement result is displayed on the screen in real time. CellAdvisor JD720C Series User’s Manual... -
Page 92: Measurement Examples
Chapter 10 2-Port Transmission Testing Figure 54 Connection diagram for 2-port transmission measurements JD725C/726C NOTE Do not change the connected port extension cable or frequency settings, or it may cause a measurement error. Measurement examples Figure 55 2 port transmission measurement screen (single layout) Analyzing measurement results You can use the Marker, Peak, Trace, Limit, Hold and Auto Scale hard keys and Zoom Zone function for your analysis of the results. -
Page 93: Chapter 11 2-Port Phase Testing
Chapter 11 2-Port Phase Testing This chapter provides instructions on how to perform the 2 Port Phase measurement that is a standard feature for JD725C and an option (002) for JD726C. Topics discussed in this chapter are as follows: Introducing 2-port phase measurements ................ -
Page 94: Introducing 2-Port Phase Measurements
Chapter 11 2-Port Phase Testing Introducing 2-port phase measurements You can use 2 Port Phase mode to determine your DUT’s S phase characteristics. Display screen Figure 56 shows an example of 2 Port Phase measurements. Figure 56 2 port phase measurement screen Description Measurement Mode Name Measurement Chart... -
Page 95: Preparing For A Measurement
To set the start and stop frequencies, complete the following steps: Select the cell next to the Start Frequency. Enter a value by using the numeric keys or the rotary knob. Select the cell next to the Stop Frequency. CellAdvisor JD720C Series User’s Manual... - Page 96 Chapter 11 2-Port Phase Testing Enter a value by using the numeric keys or the rotary knob. – To set the center frequency and the span, complete the following steps: Select the cell next to the Center Frequency. Enter a value by using the numeric keys or the rotary knob. Select the cell next to the Span.
- Page 97 -30 dBm: To test your DUT’s gain if it is an active RF device such as amplifier. NOTE Default setting is 0 dBm. The output power -30 dBm may reduce measurement dynamic range. Changing the output power level after calibration affects the calibration status and it CellAdvisor JD720C Series User’s Manual...
-
Page 98: Performing Calibration
Chapter 11 2-Port Phase Testing requires you to perform a new calibration. To set the number of measurements to be averaged, complete the following steps: Select the input box next to the Average. Enter a value between one and five. To enable the Interference Rejection feature, select On. -
Page 99: Measurement Examples
You can use the Marker, Peak, Trace, Limit, Hold and Auto Scale hard keys and Zoom Zone function for your analysis of the results. You can also use Favorite, Quick Save and Save/Load functions. See "Analysis" on page 125 and “Operation” on page 138 for details. CellAdvisor JD720C Series User’s Manual... -
Page 100: Chapter 12 High Power Cw Signal Generating
Chapter 12 High Power CW Signal Generating This chapter provides instructions on how to use the CW Signal Generator function (option 005) with JD275C and JD726C. Topics discussed in this chapter are as follows: Introducing RF source ......................101 ... -
Page 101: Introducing Rf Source
Output power setting information Screen Menu and Screen Keys Using RF source Selecting measurement mode Procedure Press the MODE hard key and then select the Single Layout tab. Double-tap the RF Source icon. Turing on RF source Procedure CellAdvisor JD720C Series User’s Manual... - Page 102 Chapter 12 High Power CW Signal Generating To set the frequency of the signal, complete the following steps: Tap the Frequency screen key. Enter a value within the frequency range of your instrument by using the numeric keys, and then press the ENTER hard key. You can also use the rotary knob. To set the output level of the signal, complete following steps: Tap the Power Level screen key.
-
Page 103: Chapter 13 Rf Power Testing
Chapter 13 RF Power Testing This chapter provides instructions on how to use the RF Power Meter function. Topics discussed in this chapter are as follows: Introducing RF power measurements ................104 Preparing for a measurement .................... 105 ... -
Page 104: Introducing Rf Power Measurements
Chapter 13 RF Power Testing Introducing RF power measurements The RF Power Meter function of the JD720C series enables power measurements without carrying a separate power meter and additional tools. The JD720C series performs radio output power measurement with the use of external JD730 series power sensors and it serves as highly accurate RF power meter allowing wider range of power measurement. -
Page 105: Preparing For A Measurement
Press the SETUP hard key and then touch the Device Information tab. The Device Information window appears as shown in Figure 63. Tap the Cancel button to exit. Figure 63 Device information window for RF power measurements CellAdvisor JD720C Series User’s Manual... -
Page 106: Setting Parameters
Chapter 13 RF Power Testing Setting parameters You can set measurement parameters such as frequency, external offset, resolution, display mode, relative reference, and period. Procedure Press the SETUP hard key and then touch the Setting tab. The Setting setup window appears. To set the frequency to be measured, complete the following steps: Select the cell next to the Frequency. -
Page 107: Setting Display
Connect the power sensor plugged in to your instrument with the RF output port of BTS as shown in Figure 66 for a terminating power sensor or Figure 67 for a directional power sensor. Your measurement result is displayed on the screen in real time. CellAdvisor JD720C Series User’s Manual... -
Page 108: Measurement Example
Chapter 13 RF Power Testing Figure 66 Cable connection diagram for terminating power sensor CAUTION Do not connect the Terminating type of power sensor directly to the output of the HPA (High Power Amplifier). The power sensor will be damaged if the output power greater than +20 dBm is supplied directly. -
Page 109: Analyzing Measurement Results
The Sound option in the System setting must be On for the alarm sound. Tap the Apply button in the lower-right corner of the setup screen to save the change(s). Figure 69 Limit setup window for RF power measurements CellAdvisor JD720C Series User’s Manual... -
Page 110: Chapter 14 Optical Power Testing
Chapter 14 Optical Power Testing This chapter provides instructions on how to use the Optical Power Meter function. Topics discussed in this chapter are as follows: Introducing optical power measurements ................111 Preparing for a measurement .................... 112 ... -
Page 111: Introducing Optical Power Measurements
Optical power measurement screen Description Measurement Mode Name Measurement Result – Pass in green and Fail in red Pass/Fail Result Threshold Limit Reference Value Modulation Frequency – Auto or Detected Value Wavelength Screen Menu and Screen Keys CellAdvisor JD720C Series User’s Manual... -
Page 112: Preparing For A Measurement
Chapter 14 Optical Power Testing Preparing for a measurement Selecting measurement mode Procedure Press the MODE hard key and then select the Single Layout tab. Double-tap the Optical Power icon. Connecting a power meter Connecting an external optical power meter is mandatory for power measurements in the Optical Power Meter mode. -
Page 113: Setting Parameters
Measurement Value: To use the last measurement value as a reference. – Manual: To enter a reference value manually. Tap the Apply button in the lower-right corner of the setup screen to save the change(s). CellAdvisor JD720C Series User’s Manual... -
Page 114: Making A Measurement
Chapter 14 Optical Power Testing Figure 72 Setting window for optical power measurements Making a measurement Once the connected power meter is initialized and you have configured parameters, the instrument is now ready to make a measurement. Procedure Connect the power meter plugged in to your instrument with the optical output port of BTS as shown in Figure 73. -
Page 115: Measurement Example
To hold a measurement, press the HOLD hard key. Sweeping is paused and the text “Hold” appears. To resume the measurement, press the HOLD hard key again. Sweeping is continued and the text “Hold” disappears. CellAdvisor JD720C Series User’s Manual... -
Page 116: Viewing A Relative Power
Chapter 14 Optical Power Testing Viewing a relative power You can view a relative power in dB by setting a reference value. Procedure Press the SETUP hard key and touch the Setting tab. Select the reference option from the following choices: –... -
Page 117: Chapter 15 Fiber Testing
Chapter 15 Fiber Testing This chapter provides instructions on how to use the Fiber Inspection function. Topics discussed in this chapter are as follows: Introducing fiber inspection ....................118 Preparing for fiber inspection ..................... 119 Performing fiber inspection ....................120 CellAdvisor JD720C User's Manual... -
Page 118: Introducing Fiber Inspection
Chapter 15 Fiber Testing Introducing fiber inspection Inspection of fiber optic connections is essential for the optimal performance and longevity of fiber optic connectivity. Throughout their lives, fiber connectors must be inspected, analyzed, and cleaned to maintain an acceptable level of functionality. The JD720C series makes it fast and easy to troubleshoot and certify that every connection at a cell site is optimized for a lifetime of performance. -
Page 119: Preparing For Fiber Inspection
– Ribbon, MM (IEC-61300-3-35) – Ribbon, SM APC (IEC-61300-3-35) – SM APC (IEC-61300-3-35) – SM PC (IEC-61300-3-35) – SM UPC (IEC-61300-3-35) NOTE All of the profiles are factory set and cannot be edited or removed. CellAdvisor JD720C Series User’s Manual... -
Page 120: Performing Fiber Inspection
Chapter 15 Fiber Testing To select the pre-configured tip (optical settings) that you want to use, complete the following steps: Tap the drop-down list button for the Tip. Select one of the tips available to your selected profile, from the following choices: –... -
Page 121: Testing A Fiber
You can also press the Magnification Control button on the side of the P5000i. Touch the Test screen key to capture and analyze the image. Text “Analyzing…” appears as shown in Figure 79. CellAdvisor JD720C Series User’s Manual... - Page 122 Chapter 15 Fiber Testing NOTE If the image is not properly focused in step 3, you will encounter an analysis failure. Once the test is completed, check the result displayed on the screen with the following information: – Image overlay of the zone locations, defects, and scratches –...
- Page 123 Chapter 15 Fiber Testing Figure 80 Fiber testing result screen Figure 81 Fiber testing result in PDF CellAdvisor JD720C Series User’s Manual...
- Page 124 Chapter 15 Fiber Testing CellAdvisor JD720C User's Manual...
-
Page 125: Chapter 16 Analysis
Chapter 16 Analysis This chapter provides instructions to analyze measurement results. Topics discussed in this chapter are as follows: Using zoom zones......................126 Using alternate sweep ....................... 128 Using markers ........................129 Searching for peak or valley ....................131 ... -
Page 126: Using Zoom Zones
Chapter 16 Analysis Using zoom zones User-definable zones on frequency sub-bands enable visual identification of uplink and downlink frequencies for compliance verification with a single measurement window. You can use the Zoom function to have a closer look at the user-definable zoom zones in different windows up to three zones. -
Page 127: Example Of Zoom Zones
"active" chart with outside borders surrounded. When the top chart is selected, the MARKER and PEAK hard keys become inactive. When a zoom zone is selected, the MARKER and PEAK hard keys become active. CellAdvisor JD720C Series User’s Manual... -
Page 128: Using Alternate Sweep
Chapter 16 Analysis Using alternate sweep You can use the Alternate Sweep that is available only in DTF measurements after a calibration to scale down of a specific sub-band without a need of an additional calibration. Two independent sweeps can be performed, for example, one Reflection measurement and the other DTF measurement. -
Page 129: Example Of Alternate Sweep
The measurement display carries the active marker's position readouts at the top right corner on the display. CellAdvisor JD720C Series User’s Manual... -
Page 130: Setting A Marker
Chapter 16 Analysis Setting a marker Procedure Press the MARKER hard key to display the Marker screen menu bar. By default, the instrument shows the Marker screen bar. Tap one of the six marker screen keys (M1 to M6), which you like to position on the trace. The active marker’s readout is displayed on the screen as shown in Figure 86. -
Page 131: Moving, Hiding, And Clearing A Marker
Peak Search: Searches for the highest peak on the trace. – Next Peak: Searches for the second highest peak on the trace. – Next Peak Left: Searches for the highest peak to the left from the current position. CellAdvisor JD720C Series User’s Manual... -
Page 132: Performing More Searches
Chapter 16 Analysis – Next Peak Right: Searches for the highest peak to the right from the current position. – Valley Search: Searches for the lowest peak (valley) on the trace. Performing more searches Procedure Tap the More (1/2) screen key. Select the Search option by toggling between Peak and Valley. -
Page 133: Adding A Trace
To clear all the traces displayed on the chart, complete the following steps: Tap any trace screen key. Touch the Trace Clear All screen key. All the existing traces disappear and the default trace T1 is displayed with measurements. Figure 87 Trace overlay example CellAdvisor JD720C Series User’s Manual... -
Page 134: Performing Trace Math
Chapter 16 Analysis Performing trace math If you have the traces T1 and T2 on your measurement chart, you can perform trace arithmetic functions. Procedure Press the TRACE hard key to display the Trace screen menu bar. Tap either T1 or T2 trace screen key and then touch the More (1/2) screen key. Trace math screen keys appear in the screen menu bar. -
Page 135: Setting A Limit Line
To delete the selected point, tap the Delete Point screen key. Press the ESC hard key to return to the Limit Line screen menus. Optional. To save the limit settings, press the SAVE/LOAD hard key. See “Using save/load” on CellAdvisor JD720C Series User’s Manual... -
Page 136: Setting A Limit Window
Chapter 16 Analysis page 139 for more information. Figure 88 Upper and lower limit line with multiple segments Figure 89 Limit line with gaps Setting a limit window Procedure Press the LIMIT hard key to display the Limit screen menu bar. Select the Limit Alarm option by toggling the screen key between On and Off. -
Page 137: Holding A Measurement
To hold a measurement, press the HOLD hard key. Sweeping is paused and the text “Hold” appears. To resume the measurement, press the HOLD hard key again. Sweeping is continued and the text “Hold” disappears. CellAdvisor JD720C Series User’s Manual... -
Page 138: Chapter 17 Operation
Chapter 17 Operation This chapter provides instructions to perform operational tasks with the JD720C series. Topics discussed in this chapter are as follows: Performing save ......................... 139 Performing load ........................143 Managing files ........................145 Using on-screen keyboard ....................146 ... -
Page 139: Performing Save
For example, it saves like xxx_T.tra for the top pane, xxx_B.tra for the bottom one if in the horizontal display mode or xxx_M.tra, xxx_Z1.tra, and xxx_Z2.tra if in the single display with two enabled zoom zones. CellAdvisor JD720C Series User’s Manual... -
Page 140: Using Favorite Key
Chapter 17 Operation If the Screen is selected, the Colors Inversion appears and you can turn it on or off by selecting On or Off. If the Setup is selected, it saves a test configuration only, not including limit setting. You must select Limit to save limit settings for your measurement. -
Page 141: Using Quick Save Key
Trace generates multiple trace files for all the measurement display panes. For example, it saves like xxx_T.tra for the top pane, xxx_B.tra for the bottom one if in the horizontal display mode or xxx_M.tra, xxx_Z1.tra, and xxx_Z2.tra if in the single CellAdvisor JD720C Series User’s Manual... -
Page 142: Using Save On Event
Chapter 17 Operation display with two enabled zoom zones. Tap the Apply button to save the changes and exit. Figure 92 Quick save setup window Using save on event The Save On Even enables you to automatically save an active trace or screen according to your configuration set in Save On Event in advance if a measurement result falls outside defined limit setting. -
Page 143: Performing Load
Tap the Load button in the lower-right corner of the screen. NOTE You can also load the frequently used setup that you saved by using the FAVORITE hard key. See “Using favorite” on page 140 for more information. CellAdvisor JD720C Series User’s Manual... -
Page 144: Using Favorite Key
Chapter 17 Operation Figure 94 Load window Using favorite key You can load a frequently used measurement setup or test configuration added to the Favorites. Procedure Press the FAVORITE hard key. The Favorites window appears as shown in Figure 95. Select a favorite setup that you want to load. -
Page 145: Managing Files
Favorite. If you want to upload files to the StrataSync server, you must copy them into the default “StrataSync” folder. Select OK to confirm. Tap the Exit button or press the ESC hard key to close the file manager window. CellAdvisor JD720C Series User’s Manual... -
Page 146: Using On-Screen Keyboard
Chapter 17 Operation Figure 96 File manager window Using on-screen keyboard You can use the on-screen keyboard to type in text, file names, and folder names. Typing in and deleting letters Procedure Tap keys on the on-screen keyboard as shown in Figure 97. As you type, each letter is displayed in the name field. -
Page 147: Editing Keywords
The edit tag on-screen keyboard appears. Type in a name and then tap the Apply button. To delete the selected tag, tap the Delete button. To display the selected tag on the main screen, tap the Select button. CellAdvisor JD720C Series User’s Manual... - Page 148 Chapter 17 Operation Tap the Save button or the Close button to return to the main screen of the Keywords or Append Keywords. Figure 98 Keywords main screen Figure 99 Edit tags screen Editing a tag value A tag value is a keyword set for a keyword tag. You can store up to 15 tag values. Procedure Tap the Keywords or Append Keywords bar, as you want.
-
Page 149: Adding Keywords
Select the Separator option from the choices: hyphen [-], underscore [_], and None. A separator is automatically inserted at the end of each keyword when you select a keyword. To add keywords, complete the following steps: CellAdvisor JD720C Series User’s Manual... - Page 150 Chapter 17 Operation Select a keyword tag box under <Tags> to view available keywords for it. Select one keyword under <Tag Values>, from the following choices for each keyword tag: Keyword tag Keyword tag values Site-ID* SiteA, SiteB, SiteC Sector* Alpha, Beta, Gamma Technology* GSM900, WCDMA850, LTE180...
-
Page 151: Changing Display Layout
Figure 102 Single layout window Horizontal layout You can select the Horizontal Layout to display two measurement modes on the screen as shown in Figure 103. Smith Chart mode is not available in the horizontal layout view. CellAdvisor JD720C Series User’s Manual... -
Page 152: Vertical Layout
Chapter 17 Operation Figure 103 Horizontal layout window Vertical layout You can select the Vertical Layout to display two measurement modes on the screen as shown in Figure 104. Figure 104 Vertical layout window Connecting GPS receiver If you have installed the GPS Connectivity option, you can connect a USB GPS receiver to the instrument so that you can view and save GPS information tied to the captured data. -
Page 153: Gps Connection Status Indicators
The GPS indication icons provide you with the connection and activity status. Indicator Description Indicates that your GPS receiver is connected but not locked. Indicates that your GPS receiver is connected and locking in progress. Indicates that your GPS receiver is connected and locked successfully. CellAdvisor JD720C Series User’s Manual... -
Page 154: Chapter 18 System Setting And Maintaining
Chapter 18 System Setting and Maintaining This chapter describes how to set up your system preferences and properties and maintain your instrument. Topics discussed in this chapter are as follows: Checking system information ..................... 155 Setting preferences ......................155 ... -
Page 155: Checking System Information
The System window appears. Touch the Instrument Settings tab. The Instrument Settings window appears as shown in Figure 106. Do one of the following as needed: – Languague: To change the system language, complete the following steps: CellAdvisor JD720C Series User’s Manual... - Page 156 Chapter 18 System Setting and Maintaining Tap the drop-down list button for the Language. Default setting is English. Select a language option from the drop-down list. Available languages may vary depending on the country or region where the instrument is purchased. –...
-
Page 157: Installing Options
You can configure the Ethernet network to connect your JD720C series and your PC with JDViewer or JDRemote installed. Procedure Press the MODE hard key and then tap the System button. The System window appears. Touch the Instrument Settings tab. CellAdvisor JD720C Series User’s Manual... -
Page 158: Upgrading Firmware
Chapter 18 System Setting and Maintaining The Instrument Settings window appears as shown in Figure 106. Tap the bar for the LAN. The LAN window appears. Select the IP addressing option, from the following choices: – To enable automatic IP addressing, select DHCP for the Mode. –... -
Page 159: Performing Service Diagnostic
Use the following action buttons as needed: – Run Self Test – System Logging – Factory Reset – Touch Alignment See the sections below for details of each task. Tap the Apply button in the lower-right corner of the screen. CellAdvisor JD720C Series User’s Manual... -
Page 160: Running Self-Test
Chapter 18 System Setting and Maintaining Figure 107 Service diagnostic window Running self-test You can run a self-test on the Tx and Rx modules over the full frequency range. Procedure Tap the Run Self Test button. Disconnect any cable connected to the RF Out / Reflection port. The confirmation dialog box appears. -
Page 161: Reverting To Factory Setting
It also enables the centralized distribution of configuration settings to ensure all your engineers use the same instrument settings resulting in consistent measurements. CellAdvisor JD720C Series User’s Manual... -
Page 162: Setting Up Internet Connection
Chapter 18 System Setting and Maintaining Once testing is completed, the trace files can be uploaded onto StrataSync for secure storage and sharing. This sharing capability allows engineers who have a problem they cannot resolve to request help from an expert who can analyze the trace file via StrataSync using the JDViewer application from anywhere without having to be at the instrument, helping resolve problems even faster. -
Page 163: Establishing A Connection To Stratasync
StrataSync status icon changes. Tap the Apply button to exit. NOTE If you have encountered a failure to synchronize with the server, reboot your instrument and then start it from the setting up the Internet connection. CellAdvisor JD720C Series User’s Manual... -
Page 164: Stratasync Status Indicators
Chapter 18 System Setting and Maintaining Figure 108 StrataSync setting window StrataSync status indicators The StrataSync indication icons provide you with the connection and activity status. Indicator Description Indicates that your instrument is idle to be connected and synchronized with the StrataSync server. -
Page 165: Appendix
Appendix Topics discussed in this appendix are as follows: Appendix A – Product general information ................ 166 Appendix B – Ordering information ..................168 Appendix C – Cable listing ....................172 Appendix D – Band listing ....................173 ... -
Page 166: Appendix A - Product General Information
Appendix Appendix A – Product general information JD723C/JD724C JD725C/JD726C Supplemental Information RF In Connector: Type-N female Impedance: 50 Ω Nominal Damage Level: > +25 dBm, > ±50 V DC Nominal RF Out / Reflection Connector: Type-N female Type-N female Impedance: 50 Ω... - Page 167 260 x 190 x 60 (mm) Approximately (W x H x D) 10.2 x 7.5 x 2.4 (Inch) 10.2 x 7.5 x 2.4 (Inch) Warranty 2 years 2 years Calibration Cycle 2 years 2 years CellAdvisor JD720C Series User’s Manual...
-
Page 168: Appendix B - Ordering Information
Appendix Appendix B – Ordering information Basic Model Item Description Cable and Antenna Analyzer (100 to 2700 MHz) – Single Port JD723C Cable and Antenna Analyzer (5 to 4000 MHz) – Single Port JD724C Cable and Antenna Analyzer (5 to 4000 MHz) with 2-port transmission – Dual Ports JD725C Cable and Antenna Analyzer (5 to 6000 MHz) –... -
Page 169: Optional Accessories
Terminating power sensor (peak), 40 MHz to 4 GHz, -40 to 0 dBm RF adapters Item Description Adapter Type-N(m) to DIN(f), DC to 7.5 GHz, 50 Ω G700050571 Adapter DIN(m) to DIN(m), DC to 7.5 GHz, 50 Ω G700050572 CellAdvisor JD720C Series User’s Manual... - Page 170 Appendix Adapter Type-N(m) to SMA(f) DC to 18 GHz, 50 Ω G700050573 Adapter Type-N(m) to BNC(f), DC to 4 GHz, 50 Ω G700050574 Adapter Type-N(f) to Type-N(f), DC to 18 GHz 50 Ω G700050575 Adapter Type-N(m) to DIN(m), DC to 7.5 GHz, 50 Ω G700050576 Adapter Type-N(f) to DIN(f), DC to 7.5 GHz, 50 Ω...
- Page 171 JD723C/724C Calibration service for Asia and North America JD720C251 JD723C/724C Calibration service for Latin America and EMEA JD725C250 JD725C/726C Calibration service for Asia and North America JD725C251 JD725C/726C Calibration service for Latin America and EMEA CellAdvisor JD720C Series User’s Manual...
-
Page 172: Appendix C - Cable Listing
Appendix Appendix C – Cable listing Relative Propagation Nominal Attenuation dB/m Cable Type Velocity (V¦ ) @ 1000 MHz FSJ1-50A 0.84 0.197 FSJ250 0.83 0.134 FSJ4-50B 0.81 0.119 HCC 12-50J 0.915 0.092 HCC 158-50J 0.95 0.023 HCC 300-50J 0.96 0.014 HCC 312-50J 0.96 0.013... -
Page 173: Appendix D - Band Listing
1,780 PCS KOREA DOWN 1,840 1,870 PCS KOREA FULL 1,750 1,870 PDC 800 UP PDC 800 DOWN PDC 800 FULL PDC 1500 UP 1,525 1,549 PDC 1500 DOWN 1,477 1,501 PDC 1500 FULL 1,477 1,549 CellAdvisor JD720C Series User’s Manual... - Page 174 Appendix 1,895 1,918 SMR 800 UP SMR 800 DOWN SMR 800 FULL SMR 1500 UP 1,453 1,465 SMR 1500 DOWN 1,501 1,513 SMR 1500 FULL 1,453 1,513 TACS/ETACS UP TACS/ETACS DOWN TACS/ETACS FULL Tetra CellAdvisor JD720C User's Manual...
-
Page 175: Appendix E - Vswr-Return Loss Conversion Table
19.00 7.212 0.90 19.0 81.0 1.58 13.0 0.225 0.22 94.9 20.00 7.413 0.90 18.1 81.9 1.60 12.7 0.238 0.23 94.7 25.00 8.299 0.92 14.8 85.2 1.62 12.5 0.250 0.24 94.4 30.00 9.035 0.94 12.5 87.5 CellAdvisor JD720C Series User’s Manual... -
Page 176: Appendix F - Device Driver Installation
Appendix Appendix F – Device driver installation The JD720C series can be controlled from the application software JDViewer or JDRemote installed on your computer. You must install driver software for the instrument on to your computer if USB Client connection is used for communication. Following is an example of procedure done with Windows 7. -
Page 177: Appendix G - Bluetooth Connection
NOTE For more information on installation, refer to the Quick Start Guide or the User Guide provided with the adapter. Double-click the BlueSoleil Space shortcut icon on your computer desktop to launch the appli- cation. CellAdvisor JD720C Series User’s Manual... - Page 178 Appendix The BlueSoleil program window appears. Right-click the My Device icon (the orange ball) in the center of the window, and then click Properties > Services tab. The My Device Properties window appears. Select the Bluetooth Personal Area Network from the list, and then click the Properties button. The Bluetooth Personal Area Network Properties window appears.
- Page 179 If you see a disconnection via Bluetooth PAN Network Adapter, right-click your instrument icon on the BlueSoleil window, and then click the Disconnect Bluetooth Personal Area Network. Right-click your instrument icon on the BlueSoleil window, and then select the Connect Blue- tooth Personal Area Network again. CellAdvisor JD720C Series User’s Manual...
-
Page 180: Connecting Bluetooth Directly From Your Computer
Appendix Connecting Bluetooth directly from your computer In case that you want to use other Bluetooth devices connected to your computer and your instrument is within a few meters, you can make the Bluetooth connection directly from your computer without installing the BlueSoleil software. Procedure Go to Control Panel >... -
Page 181: Setting Up Communication In Jdsu Application
In the Connection Method pane, select the TCP/IP, and then enter 192.168.10.10. Click OK to finish the communication setup. Go to Load > Connect to make a connection between the instrument and JDViewer. JD720C series and JDViewer become ready for communication. CellAdvisor JD720C Series User’s Manual... - Page 182 Appendix JDRemote setup Procedure Launch the JDRemote application. The Select Model dialog box appears. Select the 720C Series, and then click the OK button. Right-click on the JDRemote window, and then click the Communication. The Communication dialog box appears. Select the TCP/IP, and then enter 192.168.10.10 without dots. Click OK to finish the communication setup.
-
Page 183: Connecting Jd720C Series From Android-Based Smartphone Over Bluetooth
Select the On radio button to turn it on in order to prepare your instrument for making the Bluetooth connection again. Connecting or disconnecting the adapter also turns the mode on or off automatically. Figure 111 Bluetooth information window CellAdvisor JD720C Series User’s Manual... -
Page 184: Appendix H - Oss Licensing
Appendix Appendix H – OSS licensing The JD720C series incorporates software that is covered by either the GNU General Public license or GNU Lesser General Public License. You can view the OSS license notification and distribution in details. Procedure Press the MODE hard key. The measurement mode window appears. -
Page 185: Appendix I - Rohs Information
China. The RoHS directive consists in the restriction on the use of certain hazardous substances in electrical or electronic equipment sold or used in the European Union, after July 1, 2006. These substances are: lead, mercury, cadmium, hexavalent chromium, polybrominated biphenyls, and polybrominated diphenyl ethers. JD723C and JD724C CellAdvisor JD720C Series User’s Manual... -
Page 186: Jd725C And Jd726C
Appendix JD725C and JD726C CellAdvisor JD720C User's Manual... - Page 187 Network and Service Enablement Regional Sales North America Latin America Asia Pacific EMEA www.jdsu.com Toll Free: 1 855 ASK JDSU Tel: +55 11 5503 3800 Tel: +852 2892 0990 Tel: +49 7121 86 2222 Doc Part No. 22080035 Rev. 4.0, September 2014...
Need help?
Do you have a question about the CellAdvisor JD720C Series and is the answer not in the manual?
Questions and answers