Tadiran Telecom Aeonix T200M Series Installation Manual
Hide thumbs
Also See for Aeonix T200M Series:
- User manual (316 pages) ,
- Installation, administration and user manual (108 pages)

Related Manuals for Tadiran Telecom Aeonix T200M Series


Summary of Contents for Tadiran Telecom Aeonix T200M Series
- Page 1 T200M Series Installation, Administration and Hardware Reference Manual Document Edition 2.0...
- Page 3 The information contained in this document is proprietary and is subject to all relevant copyright, patent and other laws protecting intellectual property, as well as any specific agreement protecting TADIRAN TELECOM (TTL) L.P.'s (herein referred to as the “Manufacturer”) rights in the aforesaid information. Neither this document nor the information contained herein may be published, reproduced or disclosed to third parties, in whole or in part, without the express, prior, written permission of the Manufacturer.
- Page 4 Record of Changes Edition Issue Date Brief Description • Aeonix 2.3 features Apr-30-2014 • Headset is supported with Zip tone • T208M/BL new style (fixed keys with icons, no more labels) 1st draft of Aeonix Release 1 May-23-2012...
-
Page 5: Table Of Contents
Table of Contents About this Manual ................... 1 Document Description ................1 Related Documentation ................3 Special Symbols Used in this Manual ............4 About these Products ..................5 General Information.................. 5 T207/T208 Phone Models ..............10 Installing the Phone..................11 Overview .................... - Page 6 Overview ....................33 Preparing for Installation ................ 34 Installing the TEM................... 35 Removing the TEM................. 36 Supplying Power to the Phone ..............37 Overview ....................37 Power over Ethernet “IEEE 802.3AF” - Type A & B ....... 37 Local Power Adapter Option - Type C............ 41 Tips - Defining which Type is Optimal ............
- Page 7 Configuring the MGCP Parameters............67 Customizing the Phone ................. 69 Overview ....................69 Printing DESI Labels ................69 Diagnostics and Troubleshooting ..............73 Overview ....................73 Diagnostics and Troubleshooting ............73 Problems During Installation ..............76 Failure Messages During Installation ............. 77 Upgrading the Phone Firmware ..............
- Page 8 T200M Series Installation Manual - Aeonix...
-
Page 9: About This Manual
About this Manual Document Description ........................ The T200M includes the T207M/NP, T208M/BL, T207M and T208M. The T200M Installation Manual is designed for field use by personnel who install these telephones in Aeonixsystems. This manual offers detailed information about these telephones, including specifications, internal hardware, interface circuit operation, and installation procedures. - Page 10 Chapter Topic Description Chapter 9 Configuring the To learn how to configure the T207M/NP, Phone via its Web T208M/BL, T207M and T208M via its web page Page Chapter 10 Customizing the To learn how to print the DESI labels and insert Phone them into the faceplate of the phone Chapter 11...
-
Page 11: Related Documentation
Related Documentation ........................ For further information not covered by this manual, refer to the following documentation. Item Subject Manual Aeonix Administration Aeonix - Administration Manual Configuration Aeonix - Configuration Guide for End Users How to use T207M/NP, T208M/BL, T207M T207M/NP, and T208M User Guide T208M/BL, T207M... -
Page 12: Special Symbols Used In This Manual
Special Symbols Used in this Manual ........................ There is a risk of danger to life or personal injury. There is a risk of damage to equipment. Indicates important information demanding special attention. Tip: Advice that makes it easier to follow the steps of a procedure. NOTES: A page that is intentionally left blank, and can be used for note-taking. -
Page 13: About These Products
About these Products General Information ........................ The T207M/NP, T208M/BL, T207M and T208M phones are IP telephones that support Media Gateway Control Protocol (MGCP). The T207M/NP, T208M/BL, T207M and T208M combine the ability to communicate with the IP world with the solid dependability and high level of functionality available from the Aeonix system. - Page 14 designated NP (“No Power” over Ethernet) support PoE (Power over the Ethernet). T207M/NP supports 115VAC 60Hz and 230VAC 50Hz without power over Ethernet as per IEEE 802.3 AF Supports multiple Audio Codecs: G.711 a-law/-law, G.729A, G.723.1T207 T208M, T208M/BL - includes a six-line display, 21 characters each line (128x64 pixels) ...
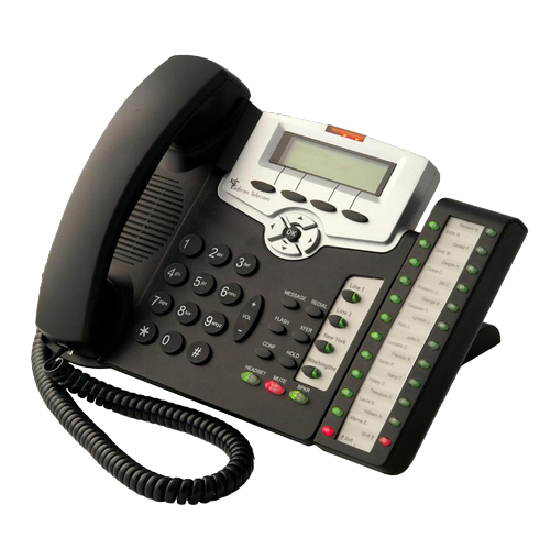
- Page 15 Figure 1 T207M and 4 Soft keys Flashing ring T207M/NP Phone with and message waiting indicator TEM and with Three-line Display Graphic display Speaker Navigator keys and OK button Handset 4 User programmed keys with removable faceplate Dial pad TEM expansion module (key pad) 2x 22 user programmable keys with removable faceplate...
- Page 16 Table 1 T207/T208 Component Description Phone Features Dial Pad (Key Pad) Buttons used to dial a phone number or activate a feature Volume Control Used to adjust the ring, speakerphone, headset, and handset volume During Idle or Ringing: Ring Volume is adjusted During Conversation: speaker, handset or headset volume is adjusted.
- Page 17 Component Description The Telephone Expansion Module (TEM) is an optional unit that increases the number programmable buttons available on your phone. These 2 x 22 programmable buttons can be configured from the phone or from the phone’s web page. Use the shift left/right buttons to program another 22 buttons.
-
Page 18: T207/T208 Phone Models
T207/T208 Phone Models ........................ Table 2 displays the differences between the various T207/T208 phone models as supplied by the manufacturer. Table 2 T207 and T208 Model Designations IP Set Protocol Display Spkr Headset Number of Power Back Model (pixels) tone detector over... -
Page 19: Installing The Phone
Installing the Phone Overview ........................ This chapter describes the process of installing and configuring T207M/NP, T208M/BL, T207M and T208M phones. It includes all of the procedures from unpacking up to the point that it is ready for use, including: Unpacking the Phone, page 12 ... -
Page 20: Unpacking The Phone
Unpacking the Phone ........................ Unpacking and Assembling the Phone, page Unpack the phone. See Verify that all components have been supplied. Verify that none of the components are damaged. If components are damaged and/or missing, contact your supplier. Otherwise proceed to the next procedure. -
Page 21: Powering The Phone
Powering the Phone ........................ An AC power adapter supplying 5VDC / 2A maximum is required for all NP phones. It is not supplied with the phone and must be ordered from the manufacturer, only. The use of any other power adapter will void the warranty. Do one of the following: Connecting the AC ... -
Page 22: Registering The Parameters In The Phone
Registering the Parameters in the Phone ........................ The phone parameters can be configured locally, from the phone or from its web page. To configure the T207M/NP, T208M/BL, T207M and T208M parameters Configuring the Phone via its Dial Pad, page from the phone, see ... - Page 23 Configure the Call Agent address For phones connected to the Aeonix server in the local network, configure the Call Agent address to the local IP address of theAeonix server. For phones connected to aAeonix server positioned behind the NAT, configure the Call Agent address to the global IP address of theAeonix server.
-
Page 24: Completing The Registration And Customizing Your Phone
Completing the Registration and Customizing your Phone ........................ Customizing the Phone, page Customize the phone user settings. See Record the phone’s details on the form provided in Table 4. These parameters might be necessary for future configuration. Installing the Phone T200M Series Installation Manual - Aeonix... - Page 25 Table 4 Station Number information form for T207/T208 Phones Dial # (Alias) Default User ID MAC # IP Address Emergency Line # (ELIN) Record the phone IP Enter the number that the 911 address when a Static emergency point associates with Address is used.
- Page 26 Installing the Phone T200M Series Installation Manual - Aeonix...
-
Page 27: Phone Hardware Description
Phone Hardware Description Overview ........................ This chapter describes in detail the hardware features of the phones and provides a detailed description of how to unpack and install the phones. Unpacking and Assembling the Phone ........................ Inspect for Damage Inspect the shipping carton for evidence of damage or mishandling prior to opening. - Page 28 The following items are not shipped with the phone: AC Wall Power adapter with 115/230VAC 60/50Hz input and 5VDC output at 2A. (It is not supplied with the phone and must be ordered from the manufacturer, only.) Figure 4 T20x Package wall-mounting template MESSAGE...
- Page 29 The FCC symbol indicates that the phone adheres to the standards of the FCC. This symbol also appears on the bottom panel of the phone. The wheelie-bin symbol indicates that the phone must be discarded according to local regulations. This symbol also appears on the bottom panel of the phone.
- Page 30 Installing the Handset The handset cord comes with the same connector type on both ends. Take one end of the cord and place it into the socket located at the bottom of the handset. The connector fits properly in one direction only. If the connector does not fit into the socket easily, turn it over and retry.
-
Page 31: Connecting To The Network (Lan / Pc)
Connecting to the Network (LAN / PC) ........................ Setting the Power over Ethernet (PoE) Switch ( T207M, T208M, T208M/BL Before connecting the cables, verify that the Power over Ethernet (PoE) switch is switched to the correct setting, if applicable (in some models). If there is a PoE/Adapter selection switch on the phone, do one of the following: ... - Page 32 Figure 9 T207/T208 Connection to LAN/PC power adapter 5VDC...2A DC-IN The ONLY AC power adapter that can be used with the phone is one purchased from the manufacturer. *The use of any other AC power adapter will void the warranty* Table 5 LAN Interface Pin #...
- Page 33 Table 6 PC Interface Pin # Connections Pin 1 Pin 2 Pin 3 Pin 4 not used Pin 5 not used Pin 6 Pin 7 not used Pin 8 not used Figure 10 LAN/PC Interface Connector PIN Assignment RJ-45 T200M Series Installation Manual - Aeonix Phone Hardware Description...
- Page 34 Daisy Chaining You can also ‘daisy chain’ additional T207 / T208 phones by connecting the LAN connector of the additional phones to the PC connector of the original phone. Using this technique, many phones may be operated from the same LAN socket. The daisy chain layout is ideally suited to situations in which all phones are installed on the same desk.
- Page 35 Connecting the Phone to the LAN/PC To connect the phone to the local LAN: Fabricate a cable for connection to the LAN as described in Table 5. Ensure that the length of the straight-through cable between the switch and the station does not exceed 100 meters, including all patch cables and cross connect wires.
- Page 36 Line Distances The T207/T208 is designed to operate over Ethernet LAN with a connection of up to 100 meters to the local switch when using Category 5 UTP (unshielded twisted pair). Figure 13 below for an illustration of the placement of IP stations in relation to their LAN hubs.
-
Page 37: Positioning And Mounting The Phone
Positioning and Mounting the Phone ........................ The phone can be mounted on a wall or on a desk. The desk mounting procedure is Mounting the Phone onto described below. The wall-mounting procedure is described on the Wall, page Positioning the Phone on your Desk The desk-mounting bracket is used to elevate the rear of the phone on a desktop in order to lower the viewing angle of the phone display. - Page 38 Mounting the Phone onto the Wall Using a flat blade screwdriver, pry latches A and B on both sides of the desk-mounting bracket. Remove latches from the desk-mounting bracket, and remove the bracket from the phone. Reinsert the latches into the desk-mounting bracket. Figure 15 Preparing the Phone for Mounting onto the Wall...
- Page 39 Figure 16 Wall-Mounting Template This way up This way up Make a mark on the wall in each of the template holes as indicated in Figure Use a small drill bit (#7, 13/64”, 5mm or smaller) to drill three holes into the wall for the mounting screws.
- Page 40 Figure 17 Mounting the Phone onto the Wall Fold the U-type frame onto the back of the phone. Connect cables to A and B Line up C, D and E with Reset Source Adapter screws on the wall and mount the phone Press down cradle latch...
-
Page 41: Tem Expansion Unit Description
TEM Expansion Unit Description Overview ........................ The TEM (Telephone Expansion Module) is a digital programmable expansion module that can be added onto the T200M Series telephone set. It increases the number of programmable buttons available on the phone. The TEM is powered by the telephone set. -
Page 42: Preparing For Installation
Preparing for Installation ........................ Inspect for Damage Inspect the shipping carton for evidence of physical damage or mishandling prior to opening. Inspect all parts for damage. Report any damage to the carrier immediately. If it is necessary to make a damage claim to the carrier, do not move the shipping carton until it has been examined by a representative of the carrier. -
Page 43: Installing The Tem
Installing the TEM ........................ Remove the power and the LAN cords from the phone, if connected. Remove the protective rubber cover from the two sleeves on the right side of the phone. Insert the shafts on the TEM into the sleeves affixed to the right side of the phone. -
Page 44: Removing The Tem
Removing the TEM ........................ Remove the power and the LAN cords from the phone, if connected. Unfasten the screws from the mating holes of the TEM unit-phone assembly. Figure Extract the TEM unit from the phone. See Figure TEM Expansion Unit Description T200M Series Installation Manual - Aeonix... -
Page 45: Supplying Power To The Phone
Supplying Power to the Phone Overview ........................ The phone requires external power at all times. There are three options to power the phone. Type A (for T207M, T208M, T208M/BL) provides Power over the Ethernet (PoE) according to the IEEE 802.3AF standard. See Figure ... - Page 46 For facilities that include 10MB LANs, ensure that all four pairs of cabling extend to all areas of their facility. Verify that there are no split cables within the facility. Additional cabling work might be required. See Figure Figure 21 Power over Ethernet LAN (Type A) for T207M, T208M and T208M/BL...
- Page 47 If the phone includes a PoE/Adapter switch on the rear of the phone base, it must be set to “PoE”, (see Figure 8 on page 23). T200M Series Installation Manual - Aeonix Supplying Power to the Phone...
- Page 48 PoE - Power over Ethernet LAN: Type B For organizations that are implementing 10/100MB LAN within their infrastructure, the only option available is to carry power via signal pairs (1, 2, 3 & 6), because all pairs are already used to carry data in 100MB LANs. Therefore, shortcomings in cabling should not be an issue.
-
Page 49: Local Power Adapter Option - Type C
Local Power Adapter Option - Type C ........................ All phone types can be powered directly from the AC power supply. Power is supplied from a local power adapter plugged into the AC (115V or 230V) power wall receptacle via the DC power jack on the rear panel. See Figure 23 Figure 8 on page Figure 23 AC Power... - Page 50 Single Unit Power Supply The manufacturer supplies an external, single unit, AC wall power adapter. With an input of 115VAC 60Hz or 230VAC 50Hz and an output of 5VDC 2A maximum output: 115VAC 60Hz input, 5VDC 2A max.output - CN.77440952800 (US pin) ...
-
Page 51: Tips - Defining Which Type Is Optimal
Tips - Defining which Type is Optimal ........................ The phone requires external power at all times. An AC wall power adapter (type C) for powering the phone is the most obvious and immediate means; it is both the easiest from an installation standpoint and currently the most cost-effective approach to providing power to the phone. -
Page 52: Connecting To Poe (Type A And B)
Connecting to PoE (Type A and B) ........................ If a PoE/Adapter switch is available on the bottom of the phone, turn it to “PoE”. See Figure 8 on page Connecting the AC Wall Power Adapter (Type C) ........................ The manufacturer supplies an external, single unit AC power supply adapter. -
Page 53: Checking The Phone Connectivity
Checking the Phone Connectivity ........................ At this point, the phone can be tested for connectivity with a ping test. It is not necessary to configure the Aeonix or the phone before testing connectivity. The factory-defined static IP address of the phone is 192.168.1.10. If your workstation is configured to an assigned static IP address, record the IP address on a piece of paper. - Page 54 Supplying Power to the Phone T200M Series Installation Manual - Aeonix...
-
Page 55: Aeonix Registration
Aeonix Registration About Registration ........................ This section provides general guidelines for registering T207/T208 phones in the Aeonix database. For detailed instructions, refer to the Aeonix Administration Manual, Related Documentation, page Chapter Defining a Phone. See Overview ........................ Each phone in the Aeonix system must be defined in the Aeonix database through the Aeonix Web Portal. - Page 56 Table 7 Aeonix Phone Parameter Description Parameters Phone type Select Tadiran MGCP. Phone ID In the first field (before the @ sign), enter the MAC address of the phone In the second field (after the @ sign), enter the domain to which the phone is connected.
-
Page 57: Configuring The Phone Via Its Dial Pad
Configuring the Phone via its Dial Pad Overview ........................ Before configuring the T207M/NP, T208M/BL, T207M and T208M, verify that all of Checking the Phone the necessary parameters have been configured via the Aeonix. See Connectivity, page Figure 25 T207M and Ring and Message T207M/NP Display Panel Waiting Indicator... - Page 58 This section describes the T207M/NP, T208M/BL, T207M and T208M configuration via the phone: Configuring the Phone Networking Parameters, page 51 Configuring the Operating Mode, page 52 Viewing the Diagnostics, page 52 Configuring the Phone via its Dial Pad T200M Series Installation Manual - Aeonix...
-
Page 59: Configuring The Phone Networking Parameters
Configuring the Phone Networking Parameters ........................ Click the OK fixed key for at least three seconds on the phone. [Sysdef] Select and enter the password (default = 159753) at the prompt. Select IP Parameters. [Edit] Click and modify the IP parameter to be configured. For a list of parameters, see Table [Esc]... -
Page 60: Configuring The Operating Mode
Configuring the Operating Mode ........................ Press the OK fixed key for at least three seconds on the phone. [SysDef] Select and enter the password (default = 159753) at the prompt. Select Operating Mode. Select the Operating Mode. See Table [Esc] Press several times until the following prompt is displayed:... - Page 61 Parameter Description Web Path Average Delay Displays average delay (in ms) over Information > Statistics > Average last connection Delay Jitter Displays the delay (in ms) between Information > Statistics > Jitter the second last packet and the last packet transmitted Speed Displays transmission speed of last connection...
- Page 62 Configuring the Phone via its Dial Pad T200M Series Installation Manual - Aeonix...
-
Page 63: Configuring The Phone Via Its Web Page
Configuring the Phone via its Web Page Overview ........................ This section describes how to configure and display the phone parameters through its web page. To configure a phone for the first time and define its network parameters, its web page must be accessed from a computer connected to the LAN port of the phone. -
Page 64: Browsing To The Phone Web Page
Browsing to the Phone Web Page ........................ To browse to the Phone Settings Web Page: The factory-defined static IP address of the phone is 192.168.1.10. To reach the Web page of the phone, do one of the following: Temporarily assign a static IP address to your workstation that is on the same IP network as the factory defined IP address of the phone. - Page 65 Users can enter the MGCP Phone Settings page as Administrators or as Regular Users. Administrators have access to the full range of configuration options. Users have access to all configuration option tabs except the MGCP tab where the Call Agent settings are defined. Click OK.
- Page 66 Table 11 Information Parameter Description Phone IP Type Displays the IP type: static or dynamic Current IP Displays the current IP address (dynamic or static, whichever is relevant as per IP Type above) Subnet Mask Displays the subnet mask (0.0.0.0) for dynamic Default Displays the default gateway...
-
Page 67: Configuring The Phone Network Parameters
Configuring the Phone Network Parameters ........................ Figure 29 Table 12 list all of the T207M/NP, T208M/BL, T207M and T208M phone Network parameters, their meanings, and the corresponding parameters in the phone. Figure 29 Network Parameters T200M Series Installation Manual - Aeonix Configuring the Phone via its Web Page... - Page 68 Table 12 Network Parameter Description Phone Parameters Private Key Server directory and filename of private key used to encrypt authentication request. The private key is uploaded along with either the personal, root, or trusted certificate. 1. Click Browse and select the directory and filename of the private key.
- Page 69 Parameter Description Phone IP Type Select Static or DHCP to define the SysDef > IP Parameters > mode of IP address definition for the Network Type > Static phone. IP/DHCP This field is automatically updated from the phone. IP Address Use this field to enter a Static IP SysDef >...
- Page 70 Parameter Description Phone 802.1x Type Defines the specific protocol used for 802.1x auscultation: Off - 802.1 authentication is not used. EAP-MD5 - Uses MD5 protocol EAP-TLS - Uses TLS protocol 802.1x Items 802.1x Defines the 802.1x authentication Identity username - provided by the system administrator 802.1x Defines the 802.1x authentication...
-
Page 71: Configuring The Phone Parameters
Configuring the Phone Parameters ........................ Figure 30 Table 13 list all of the T207M/NP, T208M/BL, T207M and T208M phone parameters, their meanings, and the corresponding parameters in the phone. Figure 30 Phone Settings T200M Series Installation Manual - Aeonix Configuring the Phone via its Web Page... - Page 72 Table 13 Phone Settings Parameter Description Phone Administrator Defines the Administrator Name name for login Administrator Defines the Administrator Password password for login Account Settings User Name Defines the user name for login User Defines the user password for Password login Handset Mic Sets the volume of the...
-
Page 73: Upgrading The Firmware Software
Upgrading the Firmware Software ........................ Figure 31 Table 14 list all of the SwUpgrade parameters, their meanings, and the corresponding parameters in the T207M/NP, T208M/BL, T207M and T208M phone. Figure 31 Software Upgrade T200M Series Installation Manual - Aeonix Configuring the Phone via its Web Page... - Page 74 Table 14 Software Parameter Description Phone Upgrade Select Enter the filename of the Firmware to software to be uploaded and Upgrade: click Upload. Upgrade by Select Profile Enter the filename of the HTTP to Upgrade: profile to be or saved or uploaded and click Upload or Download Settings.
-
Page 75: Configuring The Mgcp Parameters
Configuring the MGCP Parameters ........................ Figure 32 Table 15 list all of the MGCP parameters, their meanings, and the corresponding parameters in the T207M/NP, T208M/BL, T207M and T208M phone. Figure 32 MGCP Parameters Table 15 MGCP Parameters Parameter Description Phone Call Agent IP Call Agent 1-10 defines the... - Page 76 NOTES:...
-
Page 77: Customizing The Phone
Customizing the Phone Overview ........................ Customizing the phone is covered in detail in the T200M SeriesAeonix Configuration Guide for End Users. To personalize and program the buttons for the phone, refer to the following section in the Configuration Guide: ... - Page 78 Table 16 DESI Labels Label Sheet Catalog # Phone Model Details Letter (8 ½ x 11”) T207M, T207M/NP, T208M 7744-7300066 7744-7300067 4 buttons 7744-7300068 7744-7300069 22 buttons Printing the Multi-Designation Label Use the DESI software to select the layout of your multi-designation label (as described on the previous page).
- Page 79 Figure 34 Inserting DESI Label over the TEM Unit Lift up using a paper clip to remove flexible vinyl overlay T200M Series Installation Manual - Aeonix Customizing the Phone...
- Page 80 NOTES:...
-
Page 81: Diagnostics And Troubleshooting
Diagnostics and Troubleshooting Overview ........................ This section describes: Diagnostics and Troubleshooting, page 73 Problems During Installation, page 76 Failure Messages During Installation, page 77 Diagnostics and Troubleshooting ........................ Table 17 T207M/NP, Symptom Meaning Required Action T208M/BL, T207M and T208M Diagnostics and Your display panel is... - Page 82 Symptom Meaning Required Action The following message No subnet mask was entered. Do one of the following: appears: Verify that the subnet No net mask mask is correct. Configure the phone to DHCP. The following message The DNS server IP address Do one of the following: appears: was not provided by the DHCP...
- Page 83 Symptom Meaning Required Action Display panel is Handset is not properly Check handset connection. functional but there is connected. no dial tone Status message Connection to LAN is faulty. Check the connection to the appears on display LAN. panel too briefly Phone cannot complete Any of the following: Contact your administrator...
-
Page 84: Problems During Installation
Problems During Installation ........................ Problem Solution Phone does not work Check the following: Ethernet cable is connected Power Source switch, if present, is properly set (PoE/Adapter) AC power adapter is connected, if applicable No dial tone Check the following: ... -
Page 85: Failure Messages During Installation
Failure Messages During Installation ........................ Failure Message Problem Solution The call cannot be Request additional licenses from NO CALL LICENSE established because there the dealer. are not enough call licenses in Aeonix. The MAC address is not Make a note of the MAC address UNREGISTERED MAC registered. - Page 86 Failure Message Problem Solution The Self IP address Request a valid IP address from IP Address not defined in the T207M/NP, the system administrator and enter legal T208M/BL, T207M and it into the Self IP field on the T208M is invalid. T207M/NP, T208M/BL, T207M and T208M: [SysDef] >...
-
Page 87: Upgrading The Phone Firmware
Upgrading the Phone Firmware Overview ........................ The phone firmware is regularly enhanced to provide new features. You can upgrade the phone by downloading its latest version from the manufacturer’s website. This section describes the following: Upgrading the Phone Firmware, page 80 ... -
Page 88: Upgrading The Phone Firmware
Upgrading the Phone Firmware ........................ To upgrade the T207M/NP, T208M/BL, T207M and T208M firmware, do the following: Download the latest firmware version from the manufacturer’s web site. Access the manufacturer’s website at http://www.tadirantele.com Go to Partners login, type your username and password. Click Enter. - Page 89 On your workstation, open your browser and type the IP address into the address bar and browse to the web page of the MGCP keyset. The login window is displayed. Login to the web page portal. In the SwUpgrade tab of the web page, download the file from the TFTP Upgrading the Firmware Software, page 65).
- Page 90 After the software has been upgraded, the following message is displayed: WRITING COMPLETE After this message has been displayed, the phone initializes. If these messages are not displayed, a problem was encountered and it might be necessary to perform the Rescue Rescue Update Procedure, page Update procedure.
-
Page 91: Rescue Update Procedure
Rescue Update Procedure ........................ If the phone software has been corrupted, the phone can be updated with a manufacturer-supplied version using the following procedure: To perform the Rescue Update procedure: Disconnect the power from the phone and reconnect it while clicking the first softkey on the left;... - Page 92 Upgrading the Phone Firmware T200M Series Installation Manual - Aeonix...
-
Page 93: Specifications
Specifications T200M Series ........................ Dimensions: Figure 7 page 21 Weight: Figure 7 page 21 Material: ABS plastic Programmable Buttons: Alphanumeric Display: T207M, T207M/NP: 128 x 32 pixels (3 lines, 21 characters each) T208M, T208M/BL: 128 x 64 pixels (6 lines, 21 characters each) Back Light: T208M/BL Power over Ethernet “PoE”... - Page 94 LAN Interface: DTE side ..........Ethernet IEEE-802.3 standard Digital Cable Signal ......10/100 Base-T LAN cord, 4 Twisted Pair ....supplied with the phone Cord Cat#: 7244-0904110 can also be used LAN Cable requirements: UTP Category-5 Power Type-A ........4 Twisted Pair Power Type-B........
- Page 95 Optional Accessories: TEM Expansion Module Encoding standards: Supports all SIP codecs IP Protocol: MGCP Features: All Aeonixfeatures Phone Version: 9 or higher Voice Handling: Supports multiple Audio Codecs: G.711 a-law/ u-law, G.729A, G.723.1 (6.3K/5.3K). Supports VAD (Voice Auto Detection) and CNG (Comfort Noise Generation). Supports AGC (Automatic Gain Control).
- Page 96 NOTES:...
- Page 98 Israel +972-3-9262000 +1-516-632-7200 Russia +7-495-7750855 China +86-10-58696418 India +91-11-25850446 / 25854212 Visit us at: www.tadirantele.com...
Need help?
Do you have a question about the Aeonix T200M Series and is the answer not in the manual?
Questions and answers