Tadiran Telecom T207S User Manual
Ip telephone
Hide thumbs
Also See for T207S:
- User manual (20 pages) ,
- Installation, administration and user manual (108 pages)

Subscribe to Our Youtube Channel
Related Manuals for Tadiran Telecom T207S


Summary of Contents for Tadiran Telecom T207S
- Page 1 T207S/NP, T208S/BL T207S and T208S IP Telephone User Guide (Version 15.5) Creating a new world of IPportunities...
- Page 2 The information contained in this document is proprietary and is subject to all relevant copyright, patent and other laws protecting intellectual property, as well as any specific agreement protecting TADIRAN TELECOM LTD.’s (herein referred to as the “Manufacturer”) rights in the aforesaid information. Neither this document nor the information contained herein may be published, reproduced or disclosed to third parties, in whole or in part, without the express, prior, written permission of the Manufacturer.
-
Page 3: Table Of Contents
Phone Information Parameters ....39 T208S and T208S/BL with optional TEM — Front View ..........3 Network Settings........41 T207S and T207S/NP Front View ..... 4 Configuring Phone Items via the Web..43 T207S and T207S/NP with optional TEM — Information Page........44 Front View .......... - Page 4 Hot Line (Immediate)....... 139 Cancellation Code........102 Last Number Redial........140 Canned Messages........103 Malicious Call Trace........141 Class of Service (COS) Switchover ..... 106 Malicious Call Trace Printout ..... 143 Table of Contents TOC-ii T207S, T208S, T207S/NP and T208S/BL User Guide...
- Page 5 Programmable Buttons ......160 Receiving Calls / Answering Calls ....169 Appendix B - Tones ........B-1 Relay (Accessory) ........170 Reminder..........171 Ring Adjustment........173 Room Status ..........175 Table of Contents TOC-iii T207S, T208S, T207S/NP and T208S/BL User Guide...
-
Page 7: Introduction
Coral features that can be operated with these phones, in alphabetical order. The Table of Contents also doubles as an index to the various features that the Coral supports for T207S, T208S, T207S/NP and T208S/BL telephones. -
Page 8: Symbols And Conventions
• Options that can be selected from the graphic display screen are displayed in bold text. [Config] Text in a clear distinct box indicate a soft key option. Text in a bold Courier font indicates a graphic display message. Please Wait... Introduction T207S, T208S, T207S/NP and T208S/BL User Guide Symbols and Conventions... -
Page 9: Related Documentation
Related Documentation Refer to the following documentation, as required, for information regarding the operation of your T207S, T208S, T207S/NP and T208S/BL telephone. • T207S, T208S, T207S/NP and T208S/BL Installation, Administration and Hardware Reference Manual • T207S (and T207S/NP) Quick Reference •... -
Page 10: List Of Feature Codes
Directed............#180 or 77 Call Forward No Answer External....... #17708 Group ............. #181 or 76 Call Forward Timed..........#1984 Night (Bell/UNA)..........#192 or 78 Call Forward Timed External ......#17709 List of Feature Codes T207S, T208S, T207S/NP and T208S/BL User Guide... - Page 11 Call divert to Coral station......... Answering ........#175 or MSG fixed key Enabling Voice Mail (IVR) commands ...... Leaving ............#175 or #5 Call divert to desk phone .......... List of Feature Codes T207S, T208S, T207S/NP and T208S/BL User Guide...
- Page 12 Room Status ..........#7026 7041 Security Line............#17700 Speed Dialing: Programming Private Library....#193 [CONFIG] Time Zone............ >Time [CONFIG] Tone............. >Tone Transfer ............. XFER fixed key [CONFIG] Volume Adjustment......... >Volume List of Feature Codes T207S, T208S, T207S/NP and T208S/BL User Guide...
-
Page 13: Phone Overview
Phone Overview The following pages provide a general overview of the T207S/NP, T208S/BL, T207S and T208S IP phone’s hardware and software options. See the Station Features section, beginning on page 72 for a complete list of the phone’s station features. -
Page 14: T208S And T208S/Bl Front View
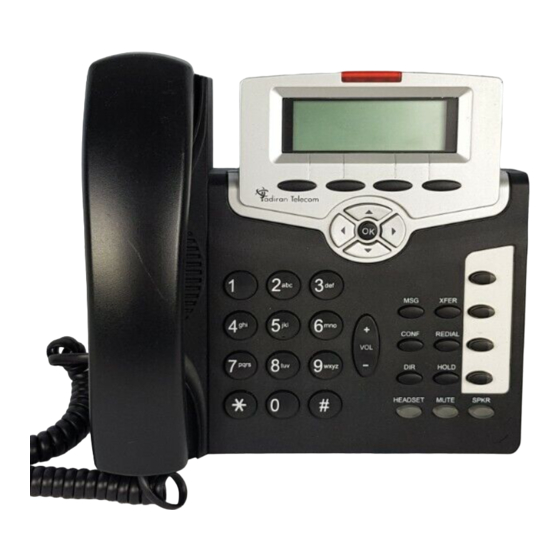
Graphic display Speaker Navigator keys Handset 4 User programmed keys with removable faceplate TEM connector Dial pad (key pad) Microphone Volume button 9 Fixed function keys Phone Overview T207S/NP, T208S/BL, T207S and T208S User Guide T208S and T208S/BL Front View... -
Page 15: T208S And T208S/Bl With Optional Tem - Front View
TEM expansion module Dial pad 2x 22 user programmable (key pad) keys with removable faceplate Microphone Volume button 9 Fixed function keys Phone Overview T207S/NP, T208S/BL, T207S and T208S User Guide T208S and T208S/BL with optional TEM — Front View... -
Page 16: T207S And T207S/Np Front View
Graphic display Speaker Navigator keys Handset 4 User programmed keys with removable faceplate TEM connector Dial pad (key pad) Microphone Volume 9 Fixed button function keys Phone Overview T207S/NP, T208S/BL, T207S and T208S User Guide T207S and T207S/NP Front View... -
Page 17: T207S And T207S/Np With Optional Tem - Front View
T207S and T207S/NP with optional TEM — Front View 4 Soft keys Flashing ring and message waiting indicator Graphic display Speaker Navigator keys Handset 4 User programmed keys with removable faceplate Dial pad TEM expansion module (key pad) 2x 22 user programmable... -
Page 18: Phone Component Descriptions
Phone Component Descriptions The following table describes the control buttons and keys found on the T207S/NP, T208S/BL, T207S and T208S. Component Description Dial Pad (Key Pad) Number buttons used for dialing and entering codes, passwords, names, etc. Fixed Function keys Nine fixed telephony function keys are available: Message, Conference, Directory, Headset, Transfer, Redial, Hold, Mute and Speaker. - Page 19 Used to adjust the volume of the Ringer, Speakerphone, handset and ringer. During Idle or Ringing: Ring Volume is adjusted During Conversation: Speaker, Handset or Headset Volume is adjusted. Phone Overview T207S/NP, T208S/BL, T207S and T208S User Guide Phone Component Descriptions...
-
Page 20: Phone Side And Bottom Views
Source Adapter Right view DC-IN Power Source Adapter connector Reset Power Power Link/ button adapter source Activity input selector green LED (available on some phones) indicators Phone Overview T207S/NP, T208S/BL, T207S and T208S User Guide Phone Side and Bottom Views... -
Page 21: Input/Output Ports And Switches
PoE: Power over Ethernet — Switch to this option to enable power for the phone over your LAN/WAN (available on some phones) connection. Handset Cord Socket Connect the Handset cord to this RJ-9 socket. Headset Wire Socket Connect the Headset to this RJ-9 socket. Phone Overview T207S/NP, T208S/BL, T207S and T208S User Guide Input/Output Ports and Switches... -
Page 22: Pc Connection
The phone is not shipped with an AC power adapter. The ONLY AC power adapter that may be used with the phone is one purchased from the manufacturer. *The use of any other AC power adapter will void the warranty* Phone Overview T207S/NP, T208S/BL, T207S and T208S User Guide PC Connection... -
Page 23: Desk Elevation Installation
T207S/NP, T208S/BL, T207S and T208S Note: For full instructions regarding desk elevation, refer to the Installation Manual Step A Step B Step C Step D Step E Step F Medium High Phone Overview T207S/NP, T208S/BL, T207S and T208S User Guide Desk Elevation Installation... -
Page 24: Wall Mounting
The phone can be wall mounted when required. T207S/NP, T208S/BL, T207S and T208S Note: For full instructions regarding wall mounting, refer to the Installation Manual Phone Wall (right view) Phone Overview T207S/NP, T208S/BL, T207S and T208S User Guide Wall Mounting... -
Page 25: Operating The Phone
Operating the Phone The T207S/NP, T208S/BL, T207S and T208S telephone is based on Session Initiation Protocol (SIP) allowing you extensive IP connectivity with your Coral based telephone. The phone includes a display screen of three lines for the T207 models, or six lines for the T208 models. The bottom line of the display is used to operate the dynamic soft keys which automatically change to offer features based on the phone’s current calling state (idle, busy, conf, hold, etc.). -
Page 26: Phone Display
The phone’s idle display shows the date and time, as well as the phone’s extension. The extension number is always accompanied by a call icon depicting the call state. The T207S/NP, T208S/BL, T207S and T208S phones are SIP based, requiring them to be registered by a proxy server in order for you to be able to dial. When the phone is properly registered, an Idle call icon is displayed next to the extension number and during calls, a Call-In-Progress icon is displayed. - Page 27 Configuration Menu options. The soft keys are also used when editing feature values or entering names or dial numbers. The phone’s maintenance and administration details can be viewed and configured via the phone’s Configuration Menu options, or via the phone Web page. Operating the Phone T207S/NP, T208S/BL, T207S and T208S User Guide Phone Display...
-
Page 28: Using The Fixed Function Keys
Used to create a phone book directory that enables Using the Phone Book dialing form the directory as well as creating names for Directory on page Directory incoming callers. Operating the Phone T207S/NP, T208S/BL, T207S and T208S User Guide Using the Fixed Function Keys... - Page 29 Note: The Speaker key can be used to save changes made to Configuration Menu items and return to idle automatically by pressing the key twice. Operating the Phone T207S/NP, T208S/BL, T207S and T208S User Guide Using the Fixed Function Keys...
-
Page 30: Configuration Options
IP addresses, MAC number, whether it is Parameters on page 44. connected using DHCP and DNS servers, as well as the page phone’s software version. Operating the Phone T207S/NP, T208S/BL, T207S and T208S User Guide Configuration Options... - Page 31 Book Directory on Page on page 65. page You may dial from the phone book, as well as add/edit or delete numbers from the phone book using this option. Operating the Phone T207S/NP, T208S/BL, T207S and T208S User Guide Configuration Options...
- Page 32 17. TEM Allows you to program dial numbers for the optional TEM TEM on page TEM Settings Page on module which offers an additional 44 programmable buttons. page 67. Operating the Phone T207S/NP, T208S/BL, T207S and T208S User Guide Configuration Options...
- Page 33 (System Settings page), password can gain access to all the other options of this and reboot (Information menu. Administrators can refer to the T207S/NP, T208S/BL, Page on page 44) T207S and T208S Installation, Administration and Hardware Reference Manual Manual for more details.
-
Page 34: Making Calls
Notes: 1) If required, add line access code when dialing external numbers. 2) Some systems might be programmed with a limit on duration of outgoing external calls. Once the pre-defined limit is reached, the call is automatically disconnected. Operating the Phone T207S/NP, T208S/BL, T207S and T208S User Guide Making Calls... - Page 35 [dial] 3. Press See Using the Phone Book Directory on page [dial] Call Log See Call Log on page Press to dial the selected dial number. Operating the Phone T207S/NP, T208S/BL, T207S and T208S User Guide Making Calls...
- Page 36 See Ending Calls on page for further details. When calling another station, before the station answers, the called station is preceded by an arrow, indicating that a call is being placed. Operating the Phone T207S/NP, T208S/BL, T207S and T208S User Guide Making Calls...
- Page 37 00: 01: 11 They have been L1: ( 8715) conversing for 1 minute 2023 01: 11 and 11 seconds. Hold EndCall Hold EndCall T207S and T207S/NP T208S and T208S/BL Operating the Phone T207S/NP, T208S/BL, T207S and T208S User Guide Making Calls...
- Page 38 • Continued to call 8892. 2023 00: 22 EndCall They have been conversing EndCall for 22 seconds, while 2023 is on hold. T208S and T208S/BL T207S and T207S/NP Operating the Phone T207S/NP, T208S/BL, T207S and T208S User Guide Making Calls...
- Page 39 You are prompted to redirect the call to another location or use an alternative service. • 300 Multiple choices • 301 Moved permanently • 302 Moved temporarily • 305 Use proxy • 380 Alternative service Operating the Phone T207S/NP, T208S/BL, T207S and T208S User Guide Making Calls...
- Page 40 • 416 Unsupported URI Scheme • 420 Bad Extension: Bad SIP Protocol Extension used, not understood by the server • 421 Extension Required • 423 Interval Too Brief Operating the Phone T207S/NP, T208S/BL, T207S and T208S User Guide Making Calls...
- Page 41 • 503 Service Unavailable • 504 Gateway/Server Time-out • 505 SIP Version Not Supported: The server does not support this version of the SIP protocol • 513 Message Too Large Operating the Phone T207S/NP, T208S/BL, T207S and T208S User Guide Making Calls...
- Page 42 The call cannot be processed under any circumstances. Try another number. • 600 Busy Everywhere • 603 Decline • 604 Does Not Exist Anywhere • 606 Not Acceptable Operating the Phone T207S/NP, T208S/BL, T207S and T208S User Guide Making Calls...
-
Page 43: Receiving Calls / Answering Calls
Press the Reject soft key to reject the call. The internal calling party’s display screen shows the “ DONT DIST station name/num ” Do not Disturb message and the call is immediately disconnected. Operating the Phone T207S/NP, T208S/BL, T207S and T208S User Guide Receiving Calls / Answering Calls... -
Page 44: Ending Calls
Press the lit key during a handsfree conversation (see figure below). SPKR • Press [EndCall] to end the call. Speaker XFER CONF REDIAL wxyz pqrs HOLD HEADSET MUTE SPKR Operating the Phone T207S/NP, T208S/BL, T207S and T208S User Guide Ending Calls... -
Page 45: Using The Phone Book Directory
Using the Phone Book Directory The T207S/NP, T208S/BL, T207S and T208S includes a Phone Book directory of up to 300 entry items. Each phone book entry item is numbered from 1 to 300 and may include a name, dial number and an associated ring type. The ring type defined for the entry is sounded whenever an incoming call is received from this entry. - Page 46 L1: ( 8715) Item: 1 Name: Number: Ring type: 0 Dial Edit Cancel Dial Edit Cancel T208S and T208S/BL T207S and T207S/NP Operating the Phone T207S/NP, T208S/BL, T207S and T208S User Guide Using the Phone Book Directory...
- Page 47 Used to define the type of characters that are used to enter the name. Pressing this soft key once, twice and then again causes it to change cyclically. Operating the Phone T207S/NP, T208S/BL, T207S and T208S User Guide Using the Phone Book Directory...
- Page 48 Whenever an incoming call from this number is received, the ring type defined in this field is sounded. 13. Press OK to save. To Exit: [Cancel] 14. Press or the left navigator key to exit. Operating the Phone T207S/NP, T208S/BL, T207S and T208S User Guide Using the Phone Book Directory...
-
Page 49: User Profiles
User Profiles The T207S/NP, T208S/BL, T207S and T208S supports up to four different User Profiles. If the phone is used by more than one user, each user profile holds its own unique telephone number and passwords, programmable via the phone Web page. - Page 50 • Use to delete number or letter [Cancel] • Use to delete the numbers or letters you entered and begin entering them again. 8. Press OK to log in. Operating the Phone T207S/NP, T208S/BL, T207S and T208S User Guide User Profiles...
-
Page 51: Phone Information Parameters
Phone Information Parameters The T207S/NP, T208S/BL, T207S and T208S phone can display its own information parameters via the configuration options. These items are read-only options and are available whether or not the phone is connected to a network. Therefore, if the phone is in an unregistered state (indicated by the Disconnect icon), you may access necessary information about the phone in order to troubleshoot and solve your problem. - Page 52 • Fail: The phone is not registered with its proxy server. No Coral calls can be made or received. Service Number Displays a local telephone number for phone service, when needed. Operating the Phone T207S/NP, T208S/BL, T207S and T208S User Guide Phone Information Parameters...
-
Page 53: Network Settings
Network Settings The T207S/NP, T208S/BL, T207S and T208S requires IP network settings in order to operate the phone. These settings may be defined in the options provided by this configuration menu item. Phone Address Defaults list below defines the phone’s default network settings. - Page 54 4. Press the left arrow key a few times to reach the “Quit Confirm:” screen. 5. Press OK to choose Yes and save your changes. If a change was made, the Saving changes..., Please wait message is displayed. Operating the Phone T207S/NP, T208S/BL, T207S and T208S User Guide Network Settings...
-
Page 55: Configuring Phone Items Via The Web
You may change your Login User Name and Login Password from the System web page, see User Login Name User Login Password on page 63. 3. Click OK. Configuring Phone Items via the Web T207S, T208S, T207S/NP and T208S/BL User Guide... -
Page 56: Information Page
You can also use this screen to re-initialize the phone whenever necessary, by clicking Reboot. Click Logout to log out of your phone’s web page and close the screen. Configuring Phone Items via the Web T207S, T208S, T207S/NP and T208S/BL User Guide Information Page... - Page 57 Displays the phone’s Product name MAC Address Displays the phone’s MAC Address Product Information Software Version Displays the phone’s loaded Software Version Hardware Version Displays the phone’s Hardware Version Configuring Phone Items via the Web T207S, T208S, T207S/NP and T208S/BL User Guide Information Page...
- Page 58 SIP Proxy Server Displays the SIP Proxy Server IP Address (the Coral UGW card serving this SIP phone) Configuring Phone Items via the Web T207S, T208S, T207S/NP and T208S/BL User Guide Information Page...
- Page 59 Page............48 Phone Settings Page............50 Phone Software Upgrade Page..........53 Personal Settings Page ............57 System Settings Page ............61 Phone Book Settings Page ..........65 TEM Settings Page ..............67 Configuring Phone Items via the Web T207S, T208S, T207S/NP and T208S/BL User Guide Information Page...
-
Page 60: Network Settings Page
CAUTION ! Network parameters have already been optimized for your phone. Please check with your IT network manager before changing any of the Network settings; otherwise, your phone might not operate correctly. Configuring Phone Items via the Web T207S, T208S, T207S/NP and T208S/BL User Guide Network Settings Page... - Page 61 CAUTION ! Changing any one of the IP addresses on this page might disable your phone. Check with your IT network manager before changing any of these items. Configuring Phone Items via the Web T207S, T208S, T207S/NP and T208S/BL User Guide Network Settings Page...
-
Page 62: Phone Settings Page
Save Settings to save and activate your changes or • Cancel to cancel changes and revert to old settings. Click Logout to close and leave the web page. Configuring Phone Items via the Web T207S, T208S, T207S/NP and T208S/BL User Guide Phone Settings Page... - Page 63 Defines the method or standard for relaying DTMF tones RFC2833 Payload When RCF2833 DTMF relay type is selected, this field defines the specific payload. Configuring Phone Items via the Web T207S, T208S, T207S/NP and T208S/BL User Guide Phone Settings Page...
-
Page 64: Phone Settings Page
• Does not allow the phone to transmit packets without voice, thereby saving bandwidth. • Generates moderate background noise during silence (similar to sidetone) Configuring Phone Items via the Web T207S, T208S, T207S/NP and T208S/BL User Guide Phone Settings Page... -
Page 65: Phone Software Upgrade Page
Save Settings to save your changes or • Cancel to cancel changes and revert to old settings. Click Logout to close and leave the web page. Configuring Phone Items via the Web T207S, T208S, T207S/NP and T208S/BL User Guide Phone Software Upgrade Page... - Page 66 Configuring Phone Items via the Web T207S, T208S, T207S/NP and T208S/BL User Guide Phone Software Upgrade Page...
- Page 67 Used to define the directory from which the files are to be uploaded (TFTP only) User Password Used to define the password necessary for downloading (TFTP only) Configuring Phone Items via the Web T207S, T208S, T207S/NP and T208S/BL User Guide Phone Software Upgrade Page...
- Page 68 To Enter a new Logo: 1. Enter a filename and click Save Settings to save the filename. 2. Click Update to save new logo. Configuring Phone Items via the Web T207S, T208S, T207S/NP and T208S/BL User Guide Phone Software Upgrade Page...
-
Page 69: Personal Settings Page
Save Settings to save your changes or • Cancel to cancel changes and revert to old settings. Click Logout to close and leave the web page. Configuring Phone Items via the Web T207S, T208S, T207S/NP and T208S/BL User Guide Personal Settings Page... - Page 70 Configuring Phone Items via the Web T207S, T208S, T207S/NP and T208S/BL User Guide Personal Settings Page...
- Page 71 Button 1 Speed Dial Enter the phone number for speed dialing if the Speed Dialing option was selected for this programmable button. Button 4 Speed Dial Configuring Phone Items via the Web T207S, T208S, T207S/NP and T208S/BL User Guide Personal Settings Page...
- Page 72 Speed Dial Entry Speed Dial Entry 21 More Speed Dial numbers may be programmed into a TEM module, see Settings Settings Page on page 67. Configuring Phone Items via the Web T207S, T208S, T207S/NP and T208S/BL User Guide Personal Settings Page...
-
Page 73: System Settings Page
CAUTION ! These system settings have been ideally defined for your phone. Please check with your System Administrator before changing any of the settings, otherwise, your phone may not operate correctly. Configuring Phone Items via the Web T207S, T208S, T207S/NP and T208S/BL User Guide System Settings Page... - Page 74 Configuring Phone Items via the Web T207S, T208S, T207S/NP and T208S/BL User Guide System Settings Page...
- Page 75 Used to define the type of log messages to be printed System Log Port Used to define the port for the message log System Language Used to define the language displayed on the phone Configuring Phone Items via the Web T207S, T208S, T207S/NP and T208S/BL User Guide System Settings Page...
- Page 76 Clock, Wake-up, Reminder, and Call Log features are used. In these cases the phone clock is automatically adjusted to follow the localized time definitions. Configuring Phone Items via the Web T207S, T208S, T207S/NP and T208S/BL User Guide System Settings Page...
-
Page 77: Phone Book Settings Page
Save Settings to save your changes or • Cancel to cancel changes and revert to old settings. Click Logout to close and leave the web page. Configuring Phone Items via the Web T207S, T208S, T207S/NP and T208S/BL User Guide Phone Book Settings Page... - Page 78 Enter a dial number for the Phone Book entry Per Access Dial Number Ring Type Choose a ring type for Phone Book entry Configuring Phone Items via the Web T207S, T208S, T207S/NP and T208S/BL User Guide Phone Book Settings Page...
-
Page 79: Tem Settings Page
Save Settings to save your changes or • Cancel to cancel changes and revert to old settings. Click Logout to close and leave the web page. Configuring Phone Items via the Web T207S, T208S, T207S/NP and T208S/BL User Guide TEM Settings Page... - Page 80 TEM Page Configuring Phone Items via the Web T207S, T208S, T207S/NP and T208S/BL User Guide TEM Settings Page...
- Page 81 TEM Page, Continued Configuring Phone Items via the Web T207S, T208S, T207S/NP and T208S/BL User Guide TEM Settings Page...
- Page 82 • Caller ID Blocking TEM 1...11 Speed If Speed Dial was selected for the TEM Right Column button, enter its dial number in this field. Dial Configuring Phone Items via the Web T207S, T208S, T207S/NP and T208S/BL User Guide TEM Settings Page...
- Page 83 • Caller ID Blocking TEM 1...11 Speed If Speed Dial was selected for the TEM Shift Right Column button, enter its dial number in this field. Dial Configuring Phone Items via the Web T207S, T208S, T207S/NP and T208S/BL User Guide TEM Settings Page...
-
Page 84: Station Features
Ask your system administrator for a list of the specific features installed. This section is organized alphabetically, on a feature-by-feature basis. Station Features T207S, T208S, T207S/NP and T208S/BL User Guide... -
Page 85: Account Code (As Required)
5. Press # or OK, depending on your phone settings, or wait for the phone to dial. Note: Depending upon your system definition, up to 16 digits are available for Account Numbers. Account Code (as required) T207S, T208S, T207S/NP and T208S/BL User Guide... -
Page 86: Account Code (Forced)
3. Press # or OK, depending on your phone settings, or wait for the phone to dial. Note: If you dial a wrong account number when VFAC is installed in your system, a reorder tone is heard followed by disconnect. Account Code (Forced) T207S, T208S, T207S/NP and T208S/BL User Guide... -
Page 87: Acd & Ucd Groups
PRIMARY LOG-IN - FOR ACD GROUP ....... 78 RELEASE/RESUME FROM ALL GROUPS ......79 RELEASE/RESUME FROM A UCD GROUP ....... 80 WRAP-UP CODE - FOR ACD GROUP ......... 81 WRAP-UP TIME ON/OFF ............82 ACD & UCD Groups T207S, T208S, T207S/NP and T208S/BL User Guide... -
Page 88: Load Id - For Acd Group
Note: Only one ID number is allowed per station. Any additional Load ID replaces the current one. The ID number can be changed as many times as needed. ACD & UCD Groups T207S, T208S, T207S/NP and T208S/BL User Guide Load ID - for ACD Group... -
Page 89: Log-In/Out - For A Single Acd Group
3) If you log-out from your primary group using this feature code, you must also log-out as primary, so the group is no longer marked as your primary (see page 78). ACD & UCD Groups T207S, T208S, T207S/NP and T208S/BL User Guide Log-In/Out - for a Single ACD Group... -
Page 90: Primary Log-In - For Acd Group
Note: After logging out so the group is no longer marked as primary, you must remain logged in as a member of the group (see page 77). ACD & UCD Groups T207S, T208S, T207S/NP and T208S/BL User Guide Primary Log-In - for ACD Group... -
Page 91: Release/Resume From All Groups
3. Press # or OK, depending on your phone settings, or wait for the phone to dial. 4. Listen for the confirmation tone. 5. Press SPKR to hang up. ACD & UCD Groups T207S, T208S, T207S/NP and T208S/BL User Guide Release/Resume from All Groups... -
Page 92: Release/Resume From A Ucd Group
4. Press # or OK, depending on your phone settings, or wait for the phone to dial. 5. Listen for the confirmation tone. 6. Press SPKR to hang up. ACD & UCD Groups T207S, T208S, T207S/NP and T208S/BL User Guide Release/Resume from a UCD Group... -
Page 93: Wrap-Up Code - For Acd Group
Use this table to create a list of Wrap Up Codes and their description (See your supervisor for a list of codes). Wrap-up Code Description ACD & UCD Groups T207S, T208S, T207S/NP and T208S/BL User Guide Wrap-Up Code - for ACD Group... -
Page 94: Wrap-Up Time On/Off
3. Press # or OK, depending on your phone settings, or wait for the phone to dial. 4. Listen for the confirmation tone. 5. Press SPKR to hang up. ACD & UCD Groups T207S, T208S, T207S/NP and T208S/BL User Guide Wrap-Up Time On/Off... -
Page 95: Activation Code
Use the Activation code as required when programming features. The following symbol in this manual indicates an activation code: See your system administrator, as to which activation code is used in your system. Activation Code T207S, T208S, T207S/NP and T208S/BL User Guide... -
Page 96: Auto Answer
CAUTION ! Leaving your phone while Auto Answer is activated will cause your station to answer an incoming call. All conversations in the room can be heard. A trunk call trapped in Auto Answer could lock up the trunk until released by the system. Auto Answer T207S, T208S, T207S/NP and T208S/BL User Guide... -
Page 97: Boss Group
DVMS pre-recorded message, UNA/central bell, group call, or network number (and the Boss Group itself for external calls). (See page 87 for forwarding procedure). The following Boss Group features are available: FEATURE ................PAGE CALL FORWARD ..............86 PRIVACY ................. 88 Boss Group T207S, T208S, T207S/NP and T208S/BL User Guide... -
Page 98: Call Forward
Table 1: Boss Group Call Forward Codes Call Forward Feature Codes Type Internal and External Calls External Calls Only #168 #17707 Busy #167 #17706 No Answer #169 #17708 Timed #1984 #17709 Boss Group T207S, T208S, T207S/NP and T208S/BL User Guide Call Forward... - Page 99 Note: If you hear the reorder tone, Call Forward is denied at your station (as defined by Class of Service). In order to use this feature, ask the attendant to activate Call Forward for your boss group. Boss Group T207S, T208S, T207S/NP and T208S/BL User Guide Call Forward...
-
Page 100: Privacy
2. Dial cancellation code . 3. Press # or OK, depending on your phone settings, or wait for the phone to dial. 4. Listen for the confirmation tone. 5. Press SPKR to hang up. Boss Group T207S, T208S, T207S/NP and T208S/BL User Guide Privacy... -
Page 101: Call Forward
1. The phone’s CF No Answer timer is defined in the online phone parameters— See “No Answer Timeout (sec)” on page 59. 2. CF_NO_ANS INT/EXT in the Station Timers branch (ST.T) of the Coral Program Interface, ask your system administrator. Call Forward T207S, T208S, T207S/NP and T208S/BL User Guide... - Page 102 See your system administrator for the time period definitions. For example, between 12:00pm and 12:30pm and between 6:00pm and 6:30pm, calls can be forwarded to the group secretary. Time Period From Call Forward T207S, T208S, T207S/NP and T208S/BL User Guide...
- Page 103 Coral’s Call Forward No Answer Timer (CF_NO_ANS INT/EXT) in the Station Timers branch (ST.T) when using this feature. See your system administrator for more details. Call Forward T207S, T208S, T207S/NP and T208S/BL User Guide...
- Page 104 Possible destinations for Y are the same as for X, plus your own station number, thus facilitating forwarding of internal calls to another destination, while retaining external calls at your own station, as shown in Case 5. Call Forward T207S, T208S, T207S/NP and T208S/BL User Guide...
- Page 105 4. Listen for the confirmation tone. 5. Press SPKR to hang up. Note: If you hear a Reorder Tone, Call Forward is denied at your station (as defined by Class of Service). Call Forward T207S, T208S, T207S/NP and T208S/BL User Guide...
- Page 106 To Activate/Cancel phone Call Forward: The phone Call Forward options can be turned on and off using the Toggle option, while the relevant Call Forward destination remains defined in the phone. Call Forward T207S, T208S, T207S/NP and T208S/BL User Guide...
- Page 107 6. Press the left arrow key a few times to reach the “Quit Confirm:” screen. 7. Press OK to choose Yes and save your changes. If a change was made, the Saving changes..., Please wait message is displayed. Call Forward T207S, T208S, T207S/NP and T208S/BL User Guide...
- Page 108 2. Use the navigator keys to select 7.Call Forward. 3. Select 3.No Answer Forward 4. Select 3.No Answer Time. - Change the default value as required. - Enter the required time-out period in seconds. [Backsp] - Use to delete. Call Forward T207S, T208S, T207S/NP and T208S/BL User Guide...
-
Page 109: Call Log
Call Log The T207S/NP, T208S/BL, T207S and T208S retains a call record list of all incoming and dialed calls that can be viewed by pressing the [CallLog] soft key on the idle display. You can dial any selected number directly from the Call lists. - Page 110 A message indicating the number of missed calls is displayed on the phone’s idle screen: <Missed Calls: xx> for the T208S and T208S/BL or <Missed: xx> for the T207S and T207S/NP, where xx indicates the number of missed calls. The count disappears from the display after the call log is viewed, and only reappears after another missed call is logged.
-
Page 111: Caller Blocking
>Blocking List The T207S/NP, T208S/BL, T207S and T208S allows you to block incoming calls from specified Caller IDs. A maximum of 10 Caller ID numbers indexed by access numbers 0 to 9, can be defined as Blocked. The blocked keyset caller does not hear any tone and the call is immediately disconnected. - Page 112 7. Press the left arrow key a few times to reach the “Quit Confirm:” screen. 8. Press OK to choose Yes and save your changes. If a change was made, the Saving changes..., Please wait message is displayed. Caller Blocking T207S, T208S, T207S/NP and T208S/BL User Guide...
-
Page 113: Camp-On
2) Camp-On is automatically cancelled after a system-wide defined period after activation. When your telephone rings (destination station now idle): Answer Call. Camp-On T207S, T208S, T207S/NP and T208S/BL User Guide Call Back... -
Page 114: Cancellation Code
#10, # 0, or Use the Cancellation code as required when programming features. The following symbol indicates a cancellation code: See your system administrator, as to which cancellation code is used in your system. Cancellation Code T207S, T208S, T207S/NP and T208S/BL User Guide... -
Page 115: Canned Messages
1. Dial Canned Message access code. 2. Dial activation code 3. Press # or OK, depending on your phone settings, or wait for the phone to dial. 4. Listen for the confirmation tone. 5. Hang up. Canned Messages T207S, T208S, T207S/NP and T208S/BL User Guide... - Page 116 2. Dial cancellation code . 3. Press # or OK, depending on your phone settings, or wait for the phone to dial. 4. Listen for the confirmation tone. 5. Hang up. Canned Messages T207S, T208S, T207S/NP and T208S/BL User Guide...
- Page 117 Table 3: Canned Message - Text and User Access Codes Canned Message Number Access Code Canned Message Text 7026 7027 7028 7029 7030 7031 7032 7033 7034 7035 7036 7037 7038 7039 7040 7041 Canned Messages T207S, T208S, T207S/NP and T208S/BL User Guide...
-
Page 118: Class Of Service (Cos) Switchover
4. Press # or OK, depending on your phone settings, or wait for the phone to dial. 5. Listen for the confirmation tone. 6. Press SPKR to hang up. Class of Service (COS) Switchover T207S, T208S, T207S/NP and T208S/BL User Guide... - Page 119 Notes: 1) To perform COS Switchover at your telephone, you must first have a defined passcode (see page 154). 2) The selection of secondary COS is denied when your telephone is in Check Out mode. Class of Service (COS) Switchover T207S, T208S, T207S/NP and T208S/BL User Guide...
-
Page 120: Conference
To Release Conference: 1. Return the handset to its cradle or press lit SPKR key to end the conference call. Conference XFER CONF REDIAL pqrs wxyz HOLD HEADSET MUTE SPKR Conference T207S, T208S, T207S/NP and T208S/BL User Guide 3-Way Calling... -
Page 121: Conference
2. Press # or OK, depending on your phone settings, or wait for the phone to dial. A warning tone is heard by all participants. To leave a conference: 1. Press the lit SPKR key to end the conference or see Ending Calls on page 32. Conference T207S, T208S, T207S/NP and T208S/BL User Guide... -
Page 122: Release
The first to be removed is always the first member who joined the conference, the second to be removed is the second member who joined the conference, and so on. When a member is removed, a warning tone is heard by all remaining participants. Conference T207S, T208S, T207S/NP and T208S/BL User Guide Release... -
Page 123: Do Not Disturb (Dnd)
5. Press SPKR to hang up. CAUTION ! When Coral DND is activated at your station, no indicators are displayed on your phone’s screen to remind you that you are in DND mode. Do Not Disturb (DND) T207S, T208S, T207S/NP and T208S/BL User Guide... - Page 124 “DONT DIST username/num” message on their display. SIP stations calling your DND station receive the “603 Decline” disconnect message, and the call is immediately disconnected. Do Not Disturb (DND) T207S, T208S, T207S/NP and T208S/BL User Guide...
-
Page 125: Executive Privilege
2) In order to use Executive Privilege your station must be defined with a passcode (see page 154). 3) Executive Privilege remains in effect for a single call only. Once the call is completed the telephone returns to its original Class of Service. Executive Privilege T207S, T208S, T207S/NP and T208S/BL User Guide... -
Page 126: Flexicall
• Boss Group call (only the first member of a Boss Group rings) • ELA Group call (only one member of an ELA Group rings) • Bell/UNA • Reminder, Wakeup • Voice Page FlexiCall T207S, T208S, T207S/NP and T208S/BL User Guide... - Page 127 External Calls ring at: Internal External Case (#17710) (#17711) (#17712) Coral station Remote phone Coral station Remote phone Irrelevant Irrelevant Table 4: FlexiCall Forward Codes FlexiCall Type Feature Codes #17710 Internal #17711 External #17712 FlexiCall T207S, T208S, T207S/NP and T208S/BL User Guide...
- Page 128 4. Listen for the confirmation tone. 5. Press SPKR to hang up. Note: If you hear a reorder tone, FlexiCall is denied at your station (as defined by Class of Service). FlexiCall T207S, T208S, T207S/NP and T208S/BL User Guide...
- Page 129 1. Answer the FlexiCall call as you would answer a regular call. (See your remote phone User Guide). 2. Once you have answered a FlexiCall call at your remote destination, you can activate any of the options described in Table 5, “FlexiCall Options from Remote Destination”. FlexiCall T207S, T208S, T207S/NP and T208S/BL User Guide...
- Page 130 If your station does not answer within the system defined time-out period, the call returns to your remote phone. Used to Start/Stop Recording incoming calls (requires a system-wide defined Navigator application). Call Recording / Help Requesting Or send Help request (requires a pre-selected system-wide defined keyset station). FlexiCall T207S, T208S, T207S/NP and T208S/BL User Guide...
- Page 131 Note: Contact your system administrator for the voice mail (IVR) dial number and voice mail remote access code. Use the table below to record the number and code: Voice Mail (IVR) Voice Mail Remote Dial Number Access Code FlexiCall T207S, T208S, T207S/NP and T208S/BL User Guide...
-
Page 132: Follow Me
3. Dial activation code 4. Press # or OK, depending on your phone settings, or wait for the phone to dial. 5. Listen for the confirmation tone. 6. Press SPKR to hang up. Follow Me T207S, T208S, T207S/NP and T208S/BL User Guide... - Page 133 2. Dial cancellation code . 3. Press # or OK, depending on your phone settings, or wait for the phone to dial. 4. Listen for the confirmation tone. 5. Press SPKR to hang up. Follow Me T207S, T208S, T207S/NP and T208S/BL User Guide...
-
Page 134: Freedom (Irss)
3. Press # or OK, depending on your phone settings, or wait for the phone to dial. 4. Listen for the confirmation tone. 5. Press SPKR to hang up. Freedom (IRSS) T207S, T208S, T207S/NP and T208S/BL User Guide... - Page 135 2. Dial cancellation code . 3. Press # or OK, depending on your phone settings, or wait for the phone to dial. 4. Listen for the confirmation tone. 5. Press SPKR to hang up. Freedom (IRSS) T207S, T208S, T207S/NP and T208S/BL User Guide...
- Page 136 4) To enable another Freedom phone, skip to page 130. 6. Listen for the ringback tone. 7. Wait for an answer. 8. You can activate any of the options described in the table on page 126. Freedom (IRSS) T207S, T208S, T207S/NP and T208S/BL User Guide...
- Page 137 • To enable another Freedom phone, skip to page 130. 7. Listen for the ringback tone. 8. Wait for an answer. 9. You can activate any of the options described in the table on page 126. Freedom (IRSS) T207S, T208S, T207S/NP and T208S/BL User Guide...
- Page 138 128. mail/IVR Used to Start/Stop Recording outgoming calls (requires a system-wide defined Navigator application). Call Recording / Help Requesting Or send Help request (requires a pre-selected system-wide defined keyset station). Freedom (IRSS) T207S, T208S, T207S/NP and T208S/BL User Guide...
- Page 139 2 for a 3-way call. To activate a combination of Consultation/Broker/3-way Conference calls: 1. Dial 2. Dial the third party number and wait for an answer. 3. Dial 2. The third party is put on. Freedom (IRSS) T207S, T208S, T207S/NP and T208S/BL User Guide...
- Page 140 Notes: 1) Contact your system administrator for the voice mail (IVR) dial number and voice mail remote access code. 2) Use the table below to record that number and code: Voice Mail (IVR) Voice Mail Remote Dial Number Access Code Freedom (IRSS) T207S, T208S, T207S/NP and T208S/BL User Guide...
- Page 141 5. Listen for the confirmation tone. To cancel the FlexiCall All feature from your Freedom phone: 1. Repeat steps 1-3 above. 2. Dial cancellation code . 3. Listen for the confirmation tone. Freedom (IRSS) T207S, T208S, T207S/NP and T208S/BL User Guide...
- Page 142 Dial the entire procedure in a single block sequence. 1. Repeat steps 1-4 above. 2. Dial cancellation code . 3. Listen for a short burst of confirmation tone. Freedom is cancelled at your station. Freedom (IRSS) T207S, T208S, T207S/NP and T208S/BL User Guide...
-
Page 143: Group Calls (Conference)
Group Call options are set in the Group Call definitions. A user can be authorized to force release a participant or terminate an entire conference. Group Calls (Conference) T207S, T208S, T207S/NP and T208S/BL User Guide... -
Page 144: Group Call Features
PRESET CONFERENCE ACTIVATION ....... 133 TEMPORARY CONFERENCE ACTIVATION ....... 134 JOINING .................. 135 FORCED RELEASE OF A PARTICIPANT ......136 FORCED RELEASE OF AN ENTIRE GROUP CALL ..137 Group Calls (Conference) T207S, T208S, T207S/NP and T208S/BL User Guide Group Call Features... -
Page 145: Preset Conference Activation
4. Wait for members to join, hear a warning tone (if defined system-wide) every time a member answers. 5. Start speaking. Use the following form to write in your group numbers and destination. Zone/Area/Members Access Code Group Calls (Conference) T207S, T208S, T207S/NP and T208S/BL User Guide Preset Conference Activation... -
Page 146: Temporary Conference Activation
7. Wait for members to join, hear a warning tone (if defined system-wide) every time a member answers. 8. Start speaking. Note: For Group Call access code, see the table on page 133. Group Calls (Conference) T207S, T208S, T207S/NP and T208S/BL User Guide Temporary Conference Activation... -
Page 147: Joining
Note: When the group is defined as blocked against joining an ongoing conference, a busy tone is heard. To leave a conference: Press SPKR to hang up. A warning tone is heard by all participants (if defined system-wide). Group Calls (Conference) T207S, T208S, T207S/NP and T208S/BL User Guide Joining... -
Page 148: Forced Release Of A Participant
4. Press # or OK, depending on your phone settings, or wait for the phone to dial. 5. There is no confirmation tone. 6. Press SPKR to hang up. Group Calls (Conference) T207S, T208S, T207S/NP and T208S/BL User Guide Forced Release of a Participant... -
Page 149: Forced Release Of An Entire Group Call
4. Press # or OK, depending on your phone settings, or wait for the phone to dial. 5. No confirmation tone is heard. 6. Press SPKR to hang up. Group Calls (Conference) T207S, T208S, T207S/NP and T208S/BL User Guide Forced Release of an Entire Group Call... -
Page 150: Hold
1. Press the Resume soft key. To end a call placed on Hold: [EndCall] • Press the soft key or hang up the receiver. Note: The held calls are returned in First In/First Out order. Hold T207S, T208S, T207S/NP and T208S/BL User Guide... -
Page 151: Hot Line (Immediate)
2. Dial any number. 3. Press # or OK, depending on your phone settings, or wait for the phone to dial. 4. The hot line destination phone rings immediately. 5. Wait for answer. Hot Line (Immediate) T207S, T208S, T207S/NP and T208S/BL User Guide... -
Page 152: Last Number Redial
The last number dialed over outgoing trunk or internal extension is automatically stored in memory. To activate Last Number Redial: 1. Dial feature code #143 or press 2. Press REDIAL. Redial XFER CONF REDIAL pqrs wxyz HOLD HEADSET MUTE SPKR Last Number Redial T207S, T208S, T207S/NP and T208S/BL User Guide... -
Page 153: Malicious Call Trace
Note: If you hear a reorder tone, Malicious Call Trace is denied at your station (as defined by the Class of Service). To use the feature, ask your Attendant to activate Malicious Call Trace at your station. Malicious Call Trace T207S, T208S, T207S/NP and T208S/BL User Guide... -
Page 154: Malicious Call Trace
2. Dial the cancellation code . 3. Press # or OK, depending on your phone settings, or wait for the phone to dial. 4. Listen for the confirmation tone. 5. Press SPKR to hang up. Malicious Call Trace T207S, T208S, T207S/NP and T208S/BL User Guide... -
Page 155: Malicious Call Trace Printout
2) The details recorded include the Originating number (for external calls: ANI if available, else trunk number), your station number and the time of the calls. 3) The listing is not deleted when printed out. It can be reprinted later, including subsequent updates. Malicious Call Trace Printout T207S, T208S, T207S/NP and T208S/BL User Guide... -
Page 156: Message
2) All your voicemail messages are stored in your voicemail box, however, you recieve only one text message asking you to call the voicemail box. Message T207S, T208S, T207S/NP and T208S/BL User Guide Answering... -
Page 157: Message
Note: When you try to leave a message at a station, and receive a reorder tone, the station is probably not equipped with a message waiting lamp, or not configured to accept messages. Message T207S, T208S, T207S/NP and T208S/BL User Guide Leaving... -
Page 158: Cancellation
2. Dial station or network number. 3. Press # or OK, depending on your phone settings, or wait for the phone to dial. 4. Listen for the confirmation tone. 5. Press SPKR to hang up. Message T207S, T208S, T207S/NP and T208S/BL User Guide Cancellation... -
Page 159: Mute Microphone
Party cannot hear your side of the conversation. The key lights red. To return to 2-way conversation: • Press the lit MUTE. Mute XFER REDIAL CONF pqrs wxyz HOLD HEADSET MUTE SPKR Mute Microphone T207S, T208S, T207S/NP and T208S/BL User Guide... -
Page 160: Night Answer (Central Bell/Una Pickup)
3. Press # or OK, depending on your phone settings, or wait for the phone to dial. 4. Answer the call. Note: UNA (Universal Night Answering) Pickup is also known as Bell Pickup. Night Answer (Central Bell/UNA Pickup) T207S, T208S, T207S/NP and T208S/BL User Guide... -
Page 161: Page Queue
Page_Q number. Note: If the call is not picked up within a predetermined time, it automatically returns to the originating station from which Page_Q was placed. Page Queue T207S, T208S, T207S/NP and T208S/BL User Guide... -
Page 162: Paging
2. Press # or OK, depending on your phone settings, or wait for the phone to dial. 3. Announce your message. 4. Press SPKR to hang up. Table 7: Voice Paging - Access Codes Location/Area Access Code 7074 7075 7076 7077 7078 7079 Paging T207S, T208S, T207S/NP and T208S/BL User Guide Public Address... -
Page 163: Voice (To Single Keyset)
4. Begin paging when tone stops. 5. Press SPKR to hang up. Note: Each Keyset has a unique Voice Page number, which is defined through the Coral system. Paging T207S, T208S, T207S/NP and T208S/BL User Guide Voice (To Single Keyset) -
Page 164: Zone (To Keyset Group)
4. Begin paging when tone stops. 5. Press SPKR to hang up. Location/Area Location/Area ACCESS ACCESS CODE C ODE 7300 7305 7301 7306 7302 7307 7303 7308 7304 7309 Paging T207S, T208S, T207S/NP and T208S/BL User Guide Zone (To Keyset Group) -
Page 165: Park
That is, the first parked call (first in) is the first call that is picked up (first out). 2) If the parked call is not picked up within a predetermined time, the call automatically returns to the originating station from which the park was made. Park T207S, T208S, T207S/NP and T208S/BL User Guide... -
Page 166: Passcode
If you forget the passcode you 6. Press SPKR to hang up. cannot utilize the features that require the code. Therefore, write your passcode number in a secure place for future reference. Passcode T207S, T208S, T207S/NP and T208S/BL User Guide... - Page 167 4. Redial your new passcode. 5. Press # or OK, depending on your phone settings, or wait for the phone to dial. 6. Listen for the confirmation tone. 7. Press SPKR to hang up. Passcode T207S, T208S, T207S/NP and T208S/BL User Guide...
-
Page 168: Phone Dial Lock
5. Listen for the confirmation tone. 6. Press SPKR to hang up. Note: You must first define a passcode (see page 154) in order to use this Coral feature. Phone Dial Lock T207S, T208S, T207S/NP and T208S/BL User Guide... - Page 169 July 23 MON 14:06 Phone locked . . . Pin: 1. Enter your PIN number and press to unlock the phone. [Backsp] • Use to edit and delete. Phone Dial Lock T207S, T208S, T207S/NP and T208S/BL User Guide...
-
Page 170: Phone Dial Lock
Note: Keep the new number in a safe place once you have changed it, as it also the password used to enter your online settings. See your system administrator for new password definitions. Phone Dial Lock T207S, T208S, T207S/NP and T208S/BL User Guide... -
Page 171: Pickup: Group, Directed
1. Dial Directed Call Pickup feature code #180. 2. Dial the number of the ringing phone. 3. Press # or OK, depending on your phone settings, or wait for the phone to dial. 4. Answer the call. Pickup: Group, Directed T207S, T208S, T207S/NP and T208S/BL User Guide... -
Page 172: Programmable Buttons
Coral feature with the cancellation code . Neither button lights, however, when the feature is in active mode, as in T207S, T208S, T207S/NP or T208S/BL phones (DSS). 2) The programmable buttons light for internal destination numbers when the destination is busy (BLF). -
Page 173: Programmable Buttons
Programmable Buttons Programmable Button Numbers XFER CONF REDIAL HOLD SPKR HEADSET MUTE SHIFT Programmable Keys Shift Right Shift Left Programmable Buttons T207S, T208S, T207S/NP and T208S/BL User Guide... - Page 174 Programmable Buttons TEM Programmable Keys Form SHIFT Shift Left keys Shift Right keys Programmable Buttons T207S, T208S, T207S/NP and T208S/BL User Guide...
- Page 175 [Backsp] 7. Enter numbers from the dial pad. Use to delete. 8. Press OK to end. 9. Press the left arrow key a few times to reach the “Quit Confirm:” screen. Programmable Buttons T207S, T208S, T207S/NP and T208S/BL User Guide...
- Page 176 7. Press the left arrow key a few times to reach the “Quit Confirm:” screen. 8. Press OK to choose Yes and save your changes. If a change was made, the Saving changes..., Please wait message is displayed. Programmable Buttons T207S, T208S, T207S/NP and T208S/BL User Guide...
- Page 177 Enter the dial number from the dial pad. The dial number can be any phone dial number or a Coral feature code string [Backsp] (use only Coral features that can be activated from idle). Use to delete. Programmable Buttons T207S, T208S, T207S/NP and T208S/BL User Guide...
-
Page 178: Button Labeling
The feature is either activated or cancelled, as defined. Button Labeling The T207S/NP, T208S/BL, T207S and T208S includes a removable faceplate for the programmable buttons on the phone as well as on the TEM, allowing you to label the buttons. - Page 179 Use the DESI software to select the layout of your multi-designation label • Enter the button content names per button location • Load the label sheet into the printer tray • From the DESI Plus/DESI Lite menu, choose File > Print Programmable Buttons T207S, T208S, T207S/NP and T208S/BL User Guide...
- Page 180 2. Remove the vinyl overlay with a paper clip (see adjacent figure). 3. Affix your new button label/s. 4. Replace the vinyl overlay. Lift up using a paperclip to remove flexible vinyl overlay Programmable Buttons T207S, T208S, T207S/NP and T208S/BL User Guide...
-
Page 181: Receiving Calls / Answering Calls
Receiving Calls / Answering Calls See Receiving Calls / Answering Calls on page 31. Receiving Calls / Answering Calls T207S, T208S, T207S/NP and T208S/BL User Guide... -
Page 182: Relay (Accessory)
3. Press # or OK, depending on your phone settings, or wait for the phone to dial. 7089 4. Listen for the confirmation tone. 7090 5. Press SPKR to hang up. 7091 Relay (Accessory) T207S, T208S, T207S/NP and T208S/BL User Guide... -
Page 183: Reminder
When the phone rings, the “REMIN” CALLING message appears indicating that this is a reminder call: 1. Answer the call; the message appears. “REMIN” 2. End the call (see Ending Calls on page 32). Reminder T207S, T208S, T207S/NP and T208S/BL User Guide... - Page 184 Note: Reminder times must be cancelled one at a time. If you have more than one reminder time programmed, then the closest reminder time to the present hour is cancelled. You must repeat this procedure to cancel each subsequent reminder time. Reminder T207S, T208S, T207S/NP and T208S/BL User Guide...
-
Page 185: Ring Adjustment
• Press the bottom of the Volume key (-) to decrease the ringing volume. CAUTION ! The ringer is disabled and the phone cannot receive calls when DND or Call Foward All has been activated. Ring Adjustment T207S, T208S, T207S/NP and T208S/BL User Guide... -
Page 186: Ring Adjustment
Phone Book entries via the phone Web page. Table 8: Ring Type Numbers Ring Type Name Corresponding Ring Type Number China Canada Japan France Korea Germany Singapore Hong Kong Taiwan Ring Adjustment T207S, T208S, T207S/NP and T208S/BL User Guide... -
Page 187: Room Status
2. Dial cancellation code . 3. Press # or OK, depending on your phone settings, or wait for the phone to dial. 4. Listen for the confirmation tone. 5. Press SPKR to hang up. Room Status T207S, T208S, T207S/NP and T208S/BL User Guide... - Page 188 Room Status Room Status Numbers and Access Codes Room Status # Access Code Name 7026 7027 7028 7029 7030 7031 7032 7033 7034 7035 7036 7037 7038 7039 7040 7041 Room Status T207S, T208S, T207S/NP and T208S/BL User Guide...
-
Page 189: Security Line
3. Press # or OK, depending on your phone settings, or wait for the phone to dial. 4. Listen for the confirmation tone. 5. Press SPKR to hang up. All break-in attempts are allowed. Security Line T207S, T208S, T207S/NP and T208S/BL User Guide... -
Page 190: Speed Dialing
8. Press the left arrow key a few times to reach the “Quit Confirm:” screen. 9. Press OK to choose Yes and save your changes. If a change was made, the Saving changes..., Please wait message is displayed. Speed Dialing T207S, T208S, T207S/NP and T208S/BL User Guide Using Phone’s SPD... - Page 191 To dial a Speed Dial SPD number from SPD list (when access code is unknown): [Config] 1. Press 2. Use the up/down navigator keys to select 13.SpeedDial and press OK. 3. The SpeedDial [0-21]: empty screen is displayed. Speed Dialing T207S, T208S, T207S/NP and T208S/BL User Guide Using Phone’s SPD...
- Page 192 Speed Dialing Using Phone’s SPD 4. Use the up/down navigator keys to scroll between the different entries. [Dial] 5. Press the soft key to dial the required entry. Speed Dialing T207S, T208S, T207S/NP and T208S/BL User Guide Using Phone’s SPD...
-
Page 193: Send
In response to your command the system sends your call immediately towards the destination. When you have finished dialing: • Press # or OK, depending on your phone settings, or wait for the phone to dial. Send T207S, T208S, T207S/NP and T208S/BL User Guide... -
Page 194: Speed Dialing
Private Library numbers). Coral Private Coral Private Library Contents (Destination) Library Number 7000 7001 7002 7003 7004 7005 7006 7007 7008 7009 Speed Dialing T207S, T208S, T207S/NP and T208S/BL User Guide Programming Coral Private Libraries... - Page 195 3. Dial cancellation code . 4. Press # or OK, depending on your phone settings, or wait for the phone to dial. 5. No confirmation tone is heard. Speed Dialing T207S, T208S, T207S/NP and T208S/BL User Guide Programming Coral Private Libraries...
- Page 196 Inhibits display (for Call Accounting System) Enables display (for Call Accounting System) Wait for second Dial Tone Display ‘-’ (for Call accounting System) Calibrated Opening on trunk (Flash) Dial Dial # out Speed Dialing T207S, T208S, T207S/NP and T208S/BL User Guide Programming Coral Private Libraries...
-
Page 197: Using Private And Public Libraries
Note: In some cases the Speed Dialing number must be followed by a Forced Account code. When Forced Account code is required the distinctive dial tone is heard after dialing the speed call library number. Speed Dialing T207S, T208S, T207S/NP and T208S/BL User Guide Using Private and Public Libraries... -
Page 198: Using Phone's Spd
8. Press the left arrow key a few times to reach the “Quit Confirm:” screen. 9. Press OK to choose Yes and save your changes. If a change was made, the Saving changes..., Please wait message is displayed. Speed Dialing T207S, T208S, T207S/NP and T208S/BL User Guide Using Phone’s SPD... - Page 199 To dial a Speed Dial SPD number from SPD list (when access code is unknown): [Config] 1. Press 2. Use the up/down navigator keys to select 13.SpeedDial and press OK. 3. The SpeedDial [0-21]: empty screen is displayed. Using Phone’s SPD T207S, T208S, T207S/NP and T208S/BL User Guide...
- Page 200 Using Phone’s SPD 4. Use the up/down navigator keys to scroll between the different entries. [Dial] 5. Press the soft key to dial the required entry. Using Phone’s SPD T207S, T208S, T207S/NP and T208S/BL User Guide...
-
Page 201: Time Zone
5. Press the left arrow key a few times until you reach the “Quit Confirm:” screen. 6. Press OK to choose Yes and save your changes. If a change was made, the Saving changes..., Please wait message is displayed. Time Zone T207S, T208S, T207S/NP and T208S/BL User Guide... -
Page 202: Tone
5. Press the left arrow key a few times until you reach the “Quit Confirm:” screen. 6. Press OK to choose Yes and save your changes. If a change was made, the Saving changes..., Please wait message is displayed. Tone T207S, T208S, T207S/NP and T208S/BL User Guide... -
Page 203: Transfer
[EndCall] and continue to dial another transfer destination. 5. Wait for answer. 6. Announce the call, then 7. Press XFER to complete the transfer. Your phone is immediately disconnected from the call. Transfer T207S, T208S, T207S/NP and T208S/BL User Guide... - Page 204 4. Wait to see the screen display change. • T208S and T208S/BL — both line name/numbers are displayed on the screen • T207S and T207S/NP — the display changes to show Line 1. Use the up/down navigator keys to switch between the lines.
-
Page 205: User Settings
6. Press the left arrow key a few times until you reach the “Quit Confirm:” screen. 7. Press OK to choose Yes and save your changes. If a change was made, the Saving changes..., Please wait message is displayed. User Settings T207S, T208S, T207S/NP and T208S/BL User Guide... - Page 206 3. Enter your user login password at the Admin Password prompt and press OK. 4. Select 3.Boot and press OK. The “Warm Reboot:” screen is displayed. 5. Press OK to choose Yes and reset the phone without saving changes. User Settings T207S, T208S, T207S/NP and T208S/BL User Guide...
-
Page 207: Volume Adjustment
• Ring Volume • Handset Speaker • Handset Microphone • Handsfree Speaker • Handsfree Microphone • Headset Speaker • Headset Microphone Volume XFER CONF REDIAL pqrs wxyz HOLD HEADSET MUTE SPKR Volume Adjustment T207S, T208S, T207S/NP and T208S/BL User Guide... - Page 208 To adjust volume level during a call: During a call (handsfree or handset) or during ringing, the phone’s volume items can be adjusted by using the Volume key (+ to increase, - to decrease). Volume Adjustment T207S, T208S, T207S/NP and T208S/BL User Guide...
-
Page 209: Waiting Calls - Receiving
Put the current call on hold (see Hold on page 138) and answer the waiting call Note: Some phones might not be configured for Waiting Calls and the calling party hears a Busy tone. Waiting Calls — Receiving T207S, T208S, T207S/NP and T208S/BL User Guide... -
Page 210: Wakeup
When the phone rings, the “WAKE” CALLING message appears indicating that this is a wakeup call: 1. Answer the call; the message appears. “WAKE” 2. End the call (see Ending Calls on page 32). Wakeup T207S, T208S, T207S/NP and T208S/BL User Guide... - Page 211 If you have more than one wakeup request time programmed, then the closest wakeup time to the present hour is cancelled. You must repeat this procedure to cancel each subsequent wakeup time. Wakeup T207S, T208S, T207S/NP and T208S/BL User Guide...
-
Page 213: Appendix A - Glossary
Coral An enterprise PBX that provides a VoIP service, allowing a user to connect to the Internet in order to make VoIP phone calls using Coral T207S, T208S, T207S/ NP, T208S/BL. Coral sets up a SIP account for the user. - Page 214 Key Set general name for the FlexSet, FlexSet-IP, DKT, DST, T207M, T208M, T207M/NP, T208M/BL, T207S, T208S, T207S/NP, T208S/BL, etc., or any telephone having several buttons, display unit, loudspeaker, microphone, etc. Message Waiting Indicator. An indicator that there is a message waiting or a voicemail message for the owner of an account.
- Page 215 ‘hold’, which has returned to you after a predetermined time-out period. Real-time Transport Protocol. A protocol for delivering the media portion of a data transmission over an IP network. “SRTP” (see below) is another media protocol. Appendix A - Glossary T207S, T208S, T207S/NP and T208S/BL User Guide...
- Page 216 Hunt group or Boss group. A station can be defined as a member of many Hunt groups and/or Boss groups. Transmission Control Protocol. A transport protocol for delivering data over an IP network. Other transport protocols are “TLS” (see below) and “UDP” (see below). Appendix A - Glossary T207S, T208S, T207S/NP and T208S/BL User Guide...
- Page 217 Other transport protocols are“TCP” and “TLS”. Uniform Resource Identifier. A name or address that identifies a location on the world wide web. A SIP address is a type of URI. Appendix A - Glossary T207S, T208S, T207S/NP and T208S/BL User Guide...
- Page 218 Each code can have specific dialing restrictions. VoIP Voice over Internet Protocol. A variation of IP used for sending voice data (that is, making phone calls) over the Internet. Appendix A - Glossary T207S, T208S, T207S/NP and T208S/BL User Guide...
-
Page 219: Appendix B - Tones
• The handset is not correctly on-hooked. Replace handset on the cradle, or: • The station you have called is in Do Not Disturb mode. A tone heard when the destination you have dialed is ringing. Ringback Tone Appendix B - Tones T207S, T208S, T207S/NP and T208S/BL User Guide... - Page 220 A tone heard while engaged in a conversation, indicating that a third party wants to break into the conversation with a whisper. The second conversing party does not hear the tone. Appendix B - Tones T207S, T208S, T207S/NP and T208S/BL User Guide...
- Page 222 International Headquarters Tadiran Telecom Ltd. 18 Hasivim Street P.O.Box 7607 Petach Tikva 49170 Israel Tel. +972-3-9262000, Fax. +972-3-9262310 USA Headquarters Tadiran Telecom, Inc. 4 Tri Harbor Court Port Washington, NY 11050 Tel. +1-516-632-7200, Fax. +1-516-632-7210 http://www.tadirantele.com C o r a l...
Need help?
Do you have a question about the T207S and is the answer not in the manual?
Questions and answers