Table of Contents
Advertisement
Advertisement
Table of Contents

Related Manuals for Tadiran Telecom T48G/S


Summary of Contents for Tadiran Telecom T48G/S
- Page 1 Tadiran T48G/S IP Phone User Guide Document Edition 3.1...
- Page 2 No parts of this publication may be subject to alteration, modification or commercial use. Tadiran Telecom (TTL), L.P . will not be liable for any damages arising from use of an illegally modified or altered publication.
- Page 3 Copyright Part 15 FCC Rules This device is compliant with Part 15 of the FCC Rules. Operation is subject to the following two conditions: 1. This device may not cause harmful interference. 2. This device must accept any interference received, including interference that may cause undesired operation.
-
Page 4: About This Guide
About This Guide ABOUT THIS GUIDE Thank you for choosing the T48G or T48S IP phone (designated T48G/S in this Guuide), an ultra-elegant IP phone which is exquisitely designed to provide business telephony features, such as Call Hold, Call Transfer, Busy Lamp Field, Call Recording, Multicast Paging and Conference over an IP network. -
Page 5: Table Of Contents
Table of Contents TABLE OF CONTENTS ABOUT THIS GUIDE ..............IV TABLE OF CONTENTS ............... V OVERVIEW ................. 1 Hardware Component Instructions ..................1 Icon Descriptions ........................3 LED Descriptions ........................4 User Interfaces ........................5 Phone User Interface ......................5 Web User Interface ...................... -
Page 6: Table Of Contents
Table of Contents Placing Calls ........................33 Answering Calls ......................... 35 Ending Calls ........................36 Redialing Numbers ......................37 Call Mute ..........................37 Call Hold/Resume ....................... 38 Do Not Disturb (DND) ......................38 Call Transfer ........................39 Conference ......................... 40 REGULATORY NOTICES ............ -
Page 7: Overview
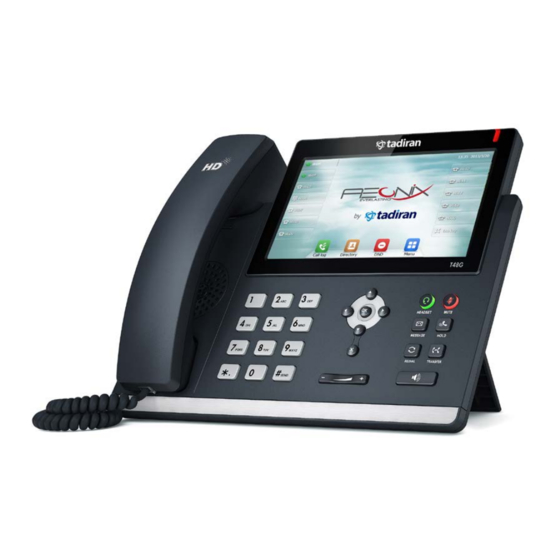
User Interfaces Documentation If you require additional information or assistance with your new phone, contact your system administrator. Hardware Component Instructions The main hardware components of the T48G/S IP phone are the touch screen and the keypad. - Page 8 Overview Hardware component instructions of the T48G/S IP phone are: Item Description ① Power Indicator LED Indicates phone power and some feature statuses. The screen is touch-sensitive. Tap to select and highlight screen items. Shows information about calls, messages, soft keys, time, date and other relevant data: ②...
-
Page 9: Icon Descriptions
Overview Icon Descriptions Icons appearing on the touch screen are described in the following table: Icons Description Network is unavailable Registered successfully Register failed Registering (Flashing) Hands-free speakerphone mode Handset mode Headset mode Multi-lingual lowercase letters input mode Multi-lingual uppercase letters input mode Alphanumeric input mode Numeric input mode Multi-lingual uppercase and lowercase letters... -
Page 10: Led Descriptions
Overview Icons Description Received Calls Placed Calls Missed Calls Forwarded Calls Recording box is full A call cannot be recorded Recording starts successfully Recording cannot be started Recording cannot be stopped Bluetooth mode is on Bluetooth headset is both paired and connected The default caller photo and contact icon LED Descriptions Power Indicator LED... -
Page 11: User Interfaces
Configuration Guide for End Users for details on available advanced features, and consult your Aeonix system administrator for best practices at your site. Documentation The following table shows documentations available for the T48G/S IP phone. Name Contents Where found Language... - Page 12 Overview Phone user T48G/S User interface settings for On the website English Guide basic call features Aeonix Phone web Configuration interface settings for On the website English Guide for End advanced features Users Note You can also download the latest documentations online: www.tadirantele.com.
-
Page 13: Getting Started
Getting Started GETTING STARTED This chapter provides the following basic installation instructions and information for obtaining the best performance with the T48G/S IP phone. Topics include: Packaging Contents Phone Installation Phone Initialization Registration Touch Screen Display ... -
Page 14: Optional Accessories
Quick Start Guide Check the list before installation. If you find anything missing, contact your system administrator. Optional Accessories The following items are optional accessories for your T48G/S IP phone. You need to purchase them separately if required. - Page 15 Getting Started Wall Mount Bracket Power Adapter Headset Wireless Headset Adapter EHS36 Bluetooth USB Dongle BT40 ...
-
Page 16: Phone Installation
Getting Started Phone Installation If your phone is already installed, proceed to Phone Initialization on page 12. This section introduces how to install the phone: Attach the stand or the optional wall mount bracket Connect the handset and optional headset Connect the network and power Attach the stand or the optional wall mount bracket Desk Mount Method... - Page 17 Getting Started Connect the handset and optional headset Note The headset, wireless headset adapter EHS36 and Bluetooth USB Dongle BT40 should be purchased separately. The EXT port can also be used to connect an expansion module EXP40. Connect the network and power You have two options for power and network connections.
-
Page 18: Phone Initialization
Getting Started Power over Ethernet With the included or a regular Ethernet cable, the T48G/S IP phone can be powered from a PoE-compliant switch or hub. To connect the PoE: Connect the Ethernet cable between the Internet port on the phone and an available port on the in-line power switch/hub. -
Page 19: Registration
The T48G/S IP phone supports up to 16 accounts. If your phone is not registered, you may have to register it. - Page 20 Getting Started Name Description keys 1-6 on the left can be used to activate up to six lines. Various features can be assigned to line keys. Each line key can display the label and indicate the status of the assigned feature. Provides a quick access to the line key screen.
-
Page 21: Navigating Menus And Fields
Getting Started Configuration Screen Display Name Description Screen Title Area Displays the title of the current menu screen. Displays various operation options for Operation Option Area different menu screens. Displays menu items. Menu Tree Area Tap the desired menu item to enter the corresponding feature configuration screen. -
Page 22: Entering Data And Editing Fields
Getting Started Note The menu system will automatically exit to the idle screen after 60 seconds of inactivity. To operate your phone, follow these tips: If you want to Action Enter the main menu. Return to the idle screen. Go back to the previous menu. or press Tap the item. -
Page 23: Phone Status
Getting Started If you want to Action For example, if the input mode is ABC: To enter “A”, press once. To enter “B”, press twice quickly. To enter “C”, press three times quickly. Press the keypad key key: If it is the uppercase (ABC soft key) or lowercase (abc soft key) input mode, it will provide the space character. - Page 24 Getting Started General information (IP address, MAC address and firmware version) Network status (e.g., IPv4 status, IPv6 status, IP address mode and MAC address) Phone status (e.g., device model, hardware version, product ID and device certificate status) Account status (e.g., register status of SIP accounts) ...
-
Page 25: Customizing Your Phone
If you require additional information or assistance with your new phone, contact your system administrator. General Settings Wallpaper You can customize the wallpaper of the T48G/S IP phone, and can change the wallpaper image via phone user interface. To change the wallpaper via phone user interface: ->Basic Settings->Display->Wallpaper. -
Page 26: Backlight
Customizing Your Phone , or press to select the desired wallpaper image. Tap the Save soft key to accept the change or to cancel. Backlight Backlight has three options: Backlight Active Level: The intensity of the LCD screen when the phone is active. You can change the intensity of the LCD screen. -
Page 27: Contrast
Tap the Save soft key to accept the change or to cancel. Contrast You can configure the contrast of the expansion module EXP40 connected to the T48G/S IP phone to a comfortable level on the phone. Ensure that the expansion module has been connected to the phone before configuration. -
Page 28: Audio Settings
Customizing Your Phone Audio Settings Volume You can press the volume key to adjust the ringer volume when the phone is idle. You can also press the volume key to adjust the receiver volume of currently engaged audio devices (handset, speakerphone or headset) when the phone is in use. To adjust the volume when the phone is idle: Press to adjust the ringer volume. -
Page 29: System Customizations
Bluetooth Headset The T48G/S IP phone supports Bluetooth. Bluetooth enables low-bandwidth wireless connections within a range of 10 meters (32 feet). The best performance is in the 1 to 2 meter (3 to 6 feet) range. - Page 30 Customizing Your Phone phone; however, only one headset can be connected at a time. You can also disconnect and delete your Bluetooth headset from the phone. Note Ensure that the Bluetooth USB dongle BT40 is properly connected to the USB port on the back of the phone.
- Page 31 Customizing Your Phone ->Basic->Bluetooth. Tap the found Bluetooth device to connect the Bluetooth headset to your phone. If there is no Bluetooth devices found on the touch screen, tap the Scan soft key to search for the Bluetooth device. Enter the PIN in the prompted Password field. The default PIN is “0000”.
- Page 32 Customizing Your Phone The Bluetooth icon appears on the touch screen. With the Bluetooth headset paired and connected, you can use the Bluetooth headset to place and answer calls. For more information, refer to the documentation from the Bluetooth headset manufacturer. Auto connection feature enables or disables the phone to connect with the Bluetooth headset automatically.
- Page 33 Customizing Your Phone after the desired Bluetooth headset. Tap the desired radio box of the Auto Connect field. To change the priority of paired Bluetooth devices: ->Basic->Bluetooth. after the desired Bluetooth headset. Tap Move Up or Move Down from the prompt list. The top device has the highest priority.
- Page 34 Customizing Your Phone The Bluetooth headset is disconnected. To connect it to your phone again, tap the Bluetooth headset again. You can delete your Bluetooth headset from your phone. When you delete the Bluetooth headset, it disappears from the Bluetooth Devices list. To connect it to your phone again, you need to scan it first, and then connect it again.
- Page 35 Customizing Your Phone The touch screen prompts the following warning “Delete the selected item?”. Tap the OK soft key to confirm the deletion or the Cancel soft key to cancel. You can also delete all headsets by tapping the Delete All soft key. Note If you cannot connect a Bluetooth headset to the phone successfully, we recommend that you delete the Bluetooth headset in the Bluetooth Devices list (if it exists) before pairing...
-
Page 36: Dss Keys
DSS Keys There are three types of DSS keys: Line Keys, Programmable Keys and Ext Keys. Details will be introduced in the following. The T48G/S IP phone supports 30 line keys. Line Keys You can assign predefined functionalities to line keys. You can also define a label for a line key feature which will appear on the touch screen. - Page 37 Customizing Your Phone Programmable Keys You can customize the soft keys, navigation keys and function keys. To customize programmable keys via the Aeonix Portal: Refer to Aeonix Configuration Guide for End Users for details on how to customize soft keys, navigation keys and function keys from the Aeonix Portal.
-
Page 38: Basic Call Features
Basic Call Features BASIC CALL FEATURES The T48G/S IP phone is designed to be easily used like a regular phone on a public switched telephone network (PSTN). You can place calls, answer calls, transfer a call to someone else, or conduct a conference call. -
Page 39: Placing Calls
Basic Call Features Placing Calls You can place a call in one of three ways using your T48G/S IP phone: Using the handset Using the speakerphone Using the headset You can also dial the number first, and then choose the way you want to speak to the other party. - Page 40 Basic Call Features You can enter the number using the keypad displayed on the touch screen. Press , or tap the Send soft key. The # key is configured as a send key by default. You can also set the * key as the send key, or set neither.
-
Page 41: Answering Calls
T48G/S IP phone can handle a maximum of 6 calls at one time. To place multiple calls: You can have more than one call on your T48G/S IP phone. To place a new call during an active call, do one of the following: Tap the line key. -
Page 42: Ending Calls
Basic Call Features Call duration and destination will always appear on the touch screen for the active call. To answer a call using the handset: Pick up the handset. To answer a call using the hands-free speakerphone mode: Do one of the following: Press With the handset on-hook and the headset mode deactivated, tap the Answer soft key. -
Page 43: Redialing Numbers
Basic Call Features Do one of the following: If you are using the handset, tap the End Call soft key or hang up the handset. If you are using the headset, tap the End Call soft key. If you are using the speakerphone, press or tap the End Call soft key. -
Page 44: Call Hold/Resume
Basic Call Features To un-mute a call: Press again to un-mute the call. Call Hold/Resume You can place an active call on hold. Only one active call can be in progress on the phone at any time. Other calls can be made and received while placing the original call on hold. -
Page 45: Call Transfer
Basic Call Features DND is enabled are logged to your missed calls list. Note Aeonix Configuration For additional details on DND and call routing, please refer to Guide for End Users Do not disturb is local to the phone, and may be overridden by the server settings. For more information, contact your system administrator. -
Page 46: Conference
If you are using a handset, the transfer can be completed by hanging up the handset. Conference You can use the T48G/S IP phone to create a conference with other two parties using the phone’s local conference or create a conference with multiple participants which is called network conference. - Page 47 Basic Call Features Conference soft key. When the second party answers the call, tap the Conference soft key again to join all parties in the conference. To join two calls in a conference: Place two calls using two different accounts on the phone (for example, place the first call using account 1, and then place the second call using account 2).
- Page 48 Basic Call Features to forbid the desired party from speaking. The muted party can hear everyone, but no one can hear the muted party. Tap the End Call soft key to drop the conference call.
-
Page 49: Regulatory Notices
Regulatory Notices REGULATORY NOTICES Service Agreements Contact your Tadiran Authorized Reseller for information about service agreements applicable to your product. Limitations of Liability TO THE FULL EXTENT ALLOWED BY LAW, TADIRAN EXCLUDES FOR ITSELFAND ITS SUPPLIERS ANY LIABILITY, WHETHER BASED IN CONTRACT OR TORT (INCLUDING NEGLIGENCE), FOR INCIDENTAL, CONSEQUENTIAL, INDIRECT, SPECIAL, OR PUNITIVE DAMAGES OF ANY KIND, OR FOR LOSS OF REVENUE OR PROFITS, LOSS OF BUSINESS, LOSS OF INFORMATION OR DATA, OR OTHER FINANCIAL LOSS ARISING OUT OF OR IN... - Page 50 Regulatory Notices Keep the device dry and free of dust. Place the device on a stable and level platform. Please do not place heavy objects on the device in case of damageand deformation caused by the heavy load. Keep at least 10 cm between the device and the closest object for heat ...
- Page 51 Regulatory Notices Keep the power plug clean and dry. Using a dirty or wet power plug may lead to electric shock or other perils.
-
Page 52: Index
Index Line Keys INDEX Network Connection About This Guide Answering Calls Attaching Stand Audio Settings Packaging Contents Auto Answer Phone Initialization Phone Installation Phone Status Phone User Interface Backlight Placing Calls Bluetooth Programmable Keys Call Mute Overview Call Hold/Resume Optional Accessories Call Transfer CE Mark Warning Conference... - Page 53 Index...
Need help?
Do you have a question about the T48G/S and is the answer not in the manual?
Questions and answers