Table of Contents
Advertisement
OPERATOR & SERVICE
CAIRE Inc.
2200 Airport Industrial Dr., Ste 500
Ball Ground, GA 30107
www.CAIREmedical.com
Copyright © 2019 CAIRE Inc.. CAIRE Inc. reserves the right to discontinue its products,
or change the prices, materials, equipment, quality, descriptions, specifications and/or
processes to its products at any time without prior notice and with no further obligation or
consequence. All rights not expressly stated herein are reserved by us, as applicable.
9735-SEQ H
Oxygen System
MANUAL
NSN: 6515-01-588-3083
PN 9400-SEQ
MODEL 3000
Advertisement
Table of Contents
Troubleshooting

Related Manuals for Saros 9400R-SEQ

Summary of Contents for Saros 9400R-SEQ
- Page 1 Oxygen System OPERATOR & SERVICE MANUAL NSN: 6515-01-588-3083 PN 9400-SEQ MODEL 3000 CAIRE Inc. 2200 Airport Industrial Dr., Ste 500 Ball Ground, GA 30107 www.CAIREmedical.com Copyright © 2019 CAIRE Inc.. CAIRE Inc. reserves the right to discontinue its products, or change the prices, materials, equipment, quality, descriptions, specifications and/or processes to its products at any time without prior notice and with no further obligation or consequence.
-
Page 2: Definition Of Symbols Page / Warning Page
NOTE: Indicates information considered important, but not hazard-related (e.g. messages relating to property damage). SYMBOLS USED IN THE OPERATION OF SAROS Symbols are frequently used on equipment in preference to words with the intention of reducing any possibility of misunderstand- ing caused by language differences. - Page 3 No. 60601-1-08 M90 for medical electrical equipment Alarm (Red) Indicator*: In Normal Mode, when illuminated, this indicates a *Alarms for the SAROS are considered information only Malfunction and the SAROS will stop signals. operating. An immediate response is necessary and contact a Service Technician.
-
Page 4: Table Of Contents
3.3 SAROS PERFORMANCE VERIFICATION TEST ....................20 4.0 THEORY OF OPERATION ............................. 21 5.0 OPERATING INSTRUCTIONS ..........................26 5.1 OPERATING THE SAROS FOR THE FIRST TIME ....................29 6.0 OPERATOR MAINTENANCE & SERVICE ......................32 6.1 CLEANING THE SAROS ..........................32 6.2 ROUTINE MAINTENANCE .......................... - Page 5 11.1 TOOLS AND TEST EQUIPMENT ........................41 11.2 MAINTENANCE AND SERVICE PARTS ......................41 11.3 REPROGRAMMING AFTER OVERHAUL AND REPAIR PROCEDURES ............42 11.4 SAROS MAIN COMPONENTS ........................42 11.5 ALARM INDICATIONS AND CODES ......................43 11.6 COMPREHENSIVE TROUBLESHOOTING GUIDE ................... 47 11.7 REMOVAL PROCEDURES ..........................
- Page 6 Figure 11-44. Down pipe Hose ........................60 Figure 11-45. Cap ............................61 Figure 11-46. Cable Ties ..........................61 Figure 11-47. Open SAROS ..........................61 Figure 11-48. Open SAROS ..........................62 Figure 11-49. Right Strut ..........................62 Figure 11-50. Route ATF wires ........................62 Figure 11-51.
- Page 7 Table 11-2. Alarm Indications and Codes ...................... 43 Table 11-3. Troubleshooting Guide ........................ 47 Table 12-1. Log the Results ..........................75 Table 12-2. Sample SAROS Maintenance Record ..................76 APPENDIX A A-1. SAROS Performance Verification Checklist .................... 77 9735-SEQ H | 7...
-
Page 8: Indications For Use
NOTE: Auditory alarms may not be heard in noisy environments and/or in tactical mode. Care providers must rely on visual indications to determine if there are any alarms or other system malfunctions. Care providers should monitor the SAROS for any alarm conditions. - Page 9 OCCUR. NOTE: ONLY USE THE CAIRE INC. SUPPLIED AC POWER ADAPTER AND 24 VDC CABLE WITH THE SAROS. USE OF ANY OTHER AC POWER ADAPTER OR DC CABLE MAY BE HAZARDOUS, CAUSE SERIOUS DAMAGE TO THE SAROS AND WILL VOID THE WARRANTY.
-
Page 10: Battery Safety
Operator & Service Manual BATTERY SAFETY WARNING: DO NOT DISASSEMBLE, PUNCTURE, OR CRUSH THE BATTERY. BATTERY ELECTROLYTES MAY BE TOXIC IF SWALLOWED AND CAN BE HARMFUL TO SKIN AND EYES. KEEP THE BATTERY AWAY FROM CHILDREN. WARNING: DO NOT SHORT-CIRCUIT THE BATTERY’S METAL CONTACTS WITH METALLIC OBJECTS, SUCH AS KEYS OR COINS. -
Page 11: Introduction
SAROS operates from external AC power, 24VDC or from a rechargeable Battery. The system includes a “Smart Battery” charger that recharges the Battery whenever the SAROS is connected to external power. The system monitors and controls both the power source and the Battery Charger. -
Page 12: Saros Oxygen System Specifications
Operator & Service Manual 1.2 SAROS OXYGEN SYSTEM SPECIFICATIONS Dimensions • With battery 26.80” long x 4.375” diameter (68.1 cm long x 11.1 cm diameter) • Without battery 23.25” long x 4.375” diameter (59.1 cm long x 11.1 cm diameter) Weight •... -
Page 13: Table 1-2. Pulse Mode Specifications
Operator & Service Manual Pulse Settings 16, 32, 48, 64, 80, 96 ml autoSAT Technology Servo-control to maintain consistent FiO2 Trigger Sensitivity Adjustable settings of 1 (most sensitive), 2 and 3 (least sensitive) Trigger Criteria Cannula pressure has dropped below the trigger point (typically between 0.15 – 0.45 Cm of H2O of negative pressure) Minimum time between breaths 1.25 seconds (max. -
Page 14: Table 1-6. Independent Safety Testing
Operator & Service Manual SAROS System and SAROS Concentrator, Model 3000 Safety IEC 60601-1 :1988 + A1 :1991 + A2 :1995 + Corrigendum (6/95) EN 60601-1(1990) + A1(1993) + A2(1995) + A12(1993) + A13(1996) + Corrigenda (7/94) Electromagnetic Compatibility FCC 15B (Sec. 107 & 109), EN55011, EN60601-1-2 :2001, EN6100-3-2, EN61000-3-3,... -
Page 15: Introduction To Your Saros Oxygen System
2.0 INTRODUCTION TO YOUR SAROS OXYGEN SYSTEM This operator & Service Manual will inform you about the use and care of the SAROS and its standard components. Please read thoroughly all of the information in this manual before operating the SAROS and receive proper training on the use and care of this device. -
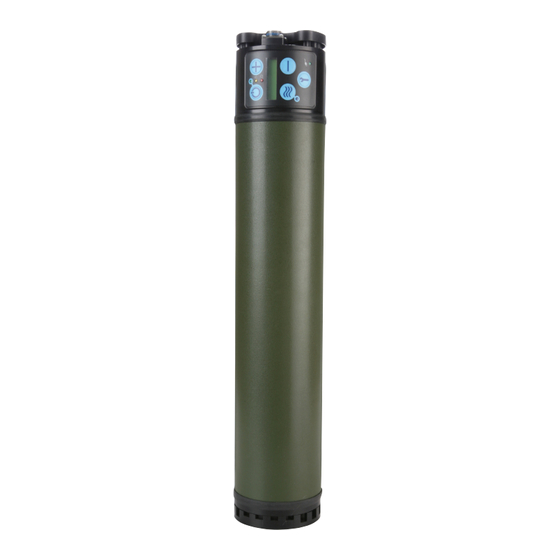
Page 16: Figure 2-2. Saros Components
/debris from entering the SAROS and should be cleaned regularly. External Power Connector: The SAROS AC Power Adapter or 24 VDC Cable connects to this receptacle. Exhaust Vent: Exhaust air from the SAROS leaves the device from this vent. -
Page 17: User Controls And System Status Indicators
Battery Status Gauge will not be illuminated and Time on Battery is not displayed. External Power is Present Indicator: When the SAROS is properly plugged in and is using the AC or 24 VDC Cable, this indicator will illuminate on the User Control Panel in Normal Mode. - Page 18 Operator & Service Manual Examples of LCD display at Power Up Example of LCD Display indicates the following information: Continuous Flow at 3 LPM, Tactical Mode, Battery between 81% and 100% of capacity, 29 minutes of battery operating time remains. Battery symbol is animated with a waterfall effect when charging.
-
Page 19: Recommended Operating Environments
While operating in temperatures between -13ºC – 0ºC and 43ºC – 49ºC, SAROS is capable of maintaining flow and purity in con- tinuous and pulse flow modes, while operating on all power sources with the exception of Battery charging. -
Page 20: Preparation For Use And Installation
NOTE: It is important to depress the latching pin release button prior to installation. 3. Insert the Battery onto the SAROS by aligning the Battery Connector of the Battery into the connector opening at the bottom of the unit. Battery is properly engaged when the latch pin is snapped into place. -
Page 21: Theory Of Operation
The BCMD drives the compressor motor based on the input power from either the battery, the AC Power Adapter or the 24 VDC Cable. COOLING FAN A cooling fan is installed in the SAROS to provide forced air cooling to the various components in the system that generate heat. 9735-SEQ H | 21... -
Page 22: Figure 4-1. System Board Diagram
The user may set the SAROS oxygen flow rate and mode. Continuous Flow Mode delivers a constant flow of oxygen to the Oxy- gen Outlet Port at settings of 1, 2, and 3 LPM. Within the SAROS, concentrated oxygen is stored in a product tank at pressures in the range of 5 –... - Page 23 The OxySafe is a thermal fuse to stop the flow of gas in the event that the downstream cannula or oxygen tubing is ignited and burns to the OxySafe. It is placed in-line with the nasal cannula or oxygen tubing between the patient and the oxygen outlet of the SAROS.
-
Page 24: Table 4-1. Battery Pack
Table 4-1. Battery Pack When the SAROS is operating on Battery power, the LCD displays an estimate of the amount of time the unit can operate at the current settings, within +/- 5 minutes. When the SAROS is operating on Battery and the time on battery falls below 15 minutes, the LCD time on battery characters will flash to indicate a low battery condition. - Page 25 40°C. The Battery charger is disabled when temperature is less than 5°C. All lithium ion batteries self-discharge at very low rates when not in use. SAROS Batteries are shipped from CAIRE Inc. in a partially charged state (nominally 40%). Do not store the SAROS with the battery installed in the unit. Remove the battery from the unit when storing to prevent damage to the battery and the unit.
-
Page 26: Operating Instructions
GENERAL CHARGING INFORMATION The SAROS charges the Battery when external power (AC or DC) is present and when the Battery temperature is below a safe charging temperature. When external power is disconnected, the device will automatically switch over to the Battery, if installed and charged. -
Page 27: Table 5-1. Typical New Battery Operating Time
INITIAL BATTERY CHARGING The new Battery supplied with the SAROS is not fully charged when it is shipped from the factory. Pushing the Test Button on the Battery will indicate the level of charge within. Before using the SAROS for the first time, fully charge the Battery. -
Page 28: Figure 5-1. Battery Installation
5 hours. CAUTION: Do not leave the SAROS, or battery, in the seating area of a motor vehicle or in the trunk of a motor vehicle during a hot day. -
Page 29: Operating The Saros For The First Time
When operating in the Continuous Flow Mode, a continuous supply of oxygen measured in liters per minute (LPM) will flow from the Oxygen Outlet Port. NOTE: When any Control Panel settings are changed, the SAROS re-enters a 5 minute stabilization mode during which no alarms are to be expected. -
Page 30: Table 5-3. Pulse Settings
Step 5: ADJUST THE FLOW SETTING TO THE PRESCRIBED LEVEL Using the Flow Setting Buttons, adjust the flow setting to the prescribed setting. NOTE: When any Control Panel settings are changed, the SAROS re-enters a 5 minute stabilization mode during which no alarms are to be expected. -
Page 31: Table 5-4. Utility Menu Screens
Operator & Service Manual NOTE: Pressing and holding the Utility button for at least 10 seconds will reset the SAROS. To restart, press and hold ON/OFF (Standby) button. The following sequence of screens shall be displayed on the LCD when the Utility Menu is displayed. -
Page 32: Operator Maintenance & Service
Cleaning the SAROS Battery The Battery in the SAROS requires special care to assure a longer life and the highest level of performance. The CAIRE Inc. Bat- tery is the only approved Battery recommended for use with the SAROS. -
Page 33: Cleaning Or Replacing Air Inlet Filter
Simplified User Instructions Label (behind) Battery Figure 6-1. SAROS Components 6.3 CLEANING OR REPLACING AIR INLET FILTER 6.3.1 Removing the air inlet cover. 6.3.2 Disconnect power supplies and remove the battery if connected. 6.3.3 Using a Phillips #1 screwdriver, loosen the four captive screws. -
Page 34: Replacing The Hepa Filter
6.3.10 Using a Phillips #1 screwdriver, re-attach the Cover with screws. 6.3.11 Initial and date the Service and Maintenance Record. Figure 6-3. Filter CAUTION: Operating the SAROS with a clogged air inlet filter may reduce performance and lead to system dam- age or premature failure. 6.4 REPLACING THE HEPA FILTER 6.4.1 Disconnect all power supplies including external Battery if connected. -
Page 35: Run Device And Fully Drain Saros Battery
2) Once the SAROS powers off, immediately connect to AC external power to begin re-charging the battery. You may either continue to run the SAROS or leave it powered off during re-charge. 3) Once the battery is fully charged, disconnect the battery, power off the unit if still running, and return the SAROS to proper storage conditions. - Page 36 1) Verify continuous flow settings C3 and C2 using the following procedure: a) Turn on the SAROS and set the flow to C3 (3.0 LPM). Allow the unit to run for a minimum of 5 minutes to stabilize before testing.
- Page 37 Adjust the SAROS to a setting of P48 (48mL). b) Trigger a simulated breath by folding and pinching the tubing* running from the SAROS to the testing device. Verify the breath is triggered by the light blinking adjacent to the pulse flow mode button.
-
Page 38: Replacing The 9V Battery
Operator & Service Manual 6.7 REPLACING THE 9V BATTERY 6.7.1 Disconnect power supplies and remove external battery if connected. 6.7.2 Using a Phillips #1 screwdriver, loosen the four captive screws shown in figure 6-2. 6.7.3 Remove cover. 6.7.4 Remove 9V battery from where shown in figure 6-5. 6.7.5 Disconnect and replace battery as shown in figure 6-5. -
Page 39: System Troubleshooting Guide
Clean air inlet filter or replace HEPA Filter. Place Air Inlet or HEPA Filter restricted your SAROS so there is adequate air flow. Place your SAROS so that there is adequate air Low Oxygen Concentration Inadequate Ventilation flow, i.e. not covered by a blanket or a poncho. -
Page 40: Reprogramming/Calibration
Ensure that all recommended maintenance procedures in section 6.0 are performed while the device is in storage. It is especially important that the 3-month requirement to run the device and fully drain the SAROS battery be performed while the unit is in storage to ensure proper operation. -
Page 41: Overhaul & Repair
• 3/8” open end wrench • Oxygen Anylizer that includes the capability to measure both flow rate (LPM and mL) and Oxygen concentration/purity %. • Tubing to connect the SAROS to the Oxygen Anylizer for testing. • ESD mat or approved ESD system. -
Page 42: Reprogramming After Overhaul And Repair Procedures
A flow calibration procedure is required after replacing any of the following components or assemblies: ATF Module, Compres- sor and Product Tank, PCB Circuit Board, Proportional Valve. If any of these components are replaced, the SAROS must be re- turned to CAIRE or a factory-authorized service center to have the flow calibration performed before returning to use. Equipment or procedures to perform a flow calibration are not contained in this manual. -
Page 43: Alarm Indications And Codes
This indication shall exist when no alarms are All OK None detected. Purity alarms shall be inhibited during the ini- tialization period. The SAROS will also enter the Initialization None stabilization period where no alarms are active if a control panel setting is changed. - Page 44 Operator & Service Manual Audio Ext. Power Battery Alarm Description Description Indicator Icon Code Power This alarm shall activate during production when the system determines that valid power has been lost. Loss of Power 4000 O2 Production and battery charging shall stop, and the electronics shall shut down after 10 seconds.
- Page 45 Operator & Service Manual Audio Battery Alarm Description Ext. Power LED Description Indicator Icon Code COMM O2 production and battery charging shall not start. The electronics shall shut down within Invalid Reset 8000 15 seconds when on battery power. The display shall be blanked within 15 seconds when on external power.
- Page 46 Operator & Service Manual Audio Ext. Power Battery Alarm Description Description Indicator Icon Code Temp ATF Temperature 8900 O2 production shall continue. Sensor Failure Compressor Too 9100 O2 production shall stop or cannot be started. Compressor Tem- perature Sensor 9110 O2 production shall continue.
-
Page 47: Comprehensive Troubleshooting Guide
A block to flow greater than 10% is 1) Find tubing blockage and remove; detected for more than 60 sec, unit Yellow LED will be 2) if blockage is within SAROS device - remove tub- beeps and yellow light is on. flashing ing and investigate filters. - Page 48 3) Adjust Pulse Sensitivity to a more sensitive setting. See menu options for adjustment; 4) Ensure the SAROS does not have a humidifier at- tached. Acts as a water block to neg inspiration; 5) Ensure tubing length does not exceed 7 ft.
-
Page 49: Removal Procedures
Operator & Service Manual 11.7 REMOVAL PROCEDURES 11.7.1 BATTERY INTERFACE PLATE, RAIN GUARD, AND SLEEVE Battery Interface 11.7.1.1 Remove the three screws (Part# 9914-6-SEQ) and re- Plate Part # 9939- move the Battery Interface Plate (Part# 9939-SEQ). Screws Part# 9914-6-SEQ Figure 11-2. -
Page 50: Inlet Cap Removal
Operator & Service Manual 11.7.1.5 Remove Fiberglass Sleeve (Part# 9280-SEQ) from the Sleeve: 9280-SEQ rails Figure 11-6. Fiberglass Sleeve 11.7.2 INLET CAP REMOVAL NOTE: Use ESD Controls when removing the Inlet Cap. 11.7.2.1 Loosen the four CAPTIVE screws (Part# 9291-SEQ) and remove the Air Inlet Cover (Part# 9758). -
Page 51: Figure 11-10. Oxygen Outlet Tube Disconnect
Operator & Service Manual 11.7.2.4 Cut green cable tie and disconnect the Oxygen Outlet Tube from the Flow Valve. oxygen outlet tube Figure 11-10. Oxygen Outlet Tube Disconnect. 11.7.2.5 Remove tape (Part# 2696-SEQ) from Front Panel Flex Cable and Top Mounting Struts (Part# 9778-SEQ). Lift up lock- ing connector and disconnect the Front Panel Flex cable. -
Page 52: Figure 11-14. Tube Disconnect
Operator & Service Manual 11.7.2.8 Disconnect the Breath Detect Tube. disconnect Figure 11-14. Tube Disconnect 11.7.2.9 Remove the Inlet Cap (Part# 9756-SEQ) and guide AC Power Cable under the frame of the PCB Assembly. Guide Wires Figure 11-15. Inlet Cap Removal 11.7.2.10 Remove the 3 screws (9912-1) to detach the Top Strut (9778-SEQ). -
Page 53: Remove Pcb Assembly
Operator & Service Manual 11.7.3 REMOVE PCB ASSEMBLY NOTE: Always use ESD Controls when handling the PCB Assembly. 11.7.3.1 Loosen the Battery Power Wire screws and remove wires. 11.7.3.2 Disconnect the Compressor Thermistor wires. 11.7.3.3 Disconnect the Halls Effect wire. 11.7.3.4 Loosen the Compressor Power screws and remove the wires. -
Page 54: Proportional Valve Removal (5293-Seq)
Operator & Service Manual 11.7.3.12 Slide the PCB Assembly away from the struts. (Place in ESD bag.) NOTE: Always use ESD Control when handling the PCB Assembly. igure 11-20. PCB Assembly 11.7.3.13 Place PCB Set in ESD Protective Bag. 11.7.4 PROPORTIONAL VALVE REMOVAL (5293-SEQ) 11.7.4.1 Remove Proportional Valve wire from PCB Assembly (if not done so already). -
Page 55: Compressor Fan Removal (9767-Seq)
Operator & Service Manual 11.7.5 COMPRESSOR FAN REMOVAL (9767-SEQ) Remove Compressor Fan wire from PCB Assembly (if not done so already). Figure 11-24. Remove Compressor Fan wire 11.7.5.1 Lift the Proportional Valve out of the way (See Propor- tional Valve Removal Step 3.4) Figure 11-25. -
Page 56: Battery Cable Removal (9201-Seq)
Operator & Service Manual 11.7.6 BATTERY CABLE REMOVAL (9201-SEQ) 11.7.6.1 Pull out the wires from the grommets on the bulkhead of the Compressor as shown in figure below. Hall Effect Sensor Hall Effect Sensor Figure 11-27. Hall Effect Sensor 11.7.6.2 Remove the two large wires (Battery Connector Cable) thru the middle Bulkhead as shown in figure below. -
Page 57: Rail Removal
Operator & Service Manual 11.7.6.5 Cut and remove all four Cable Ties between the STRUT (9779-SEQ) and the ATF Assembly. CAUTION: Do not cut wires or damage insulation. Figure 11-30. Cable Ties and Struts 11.7.7 RAIL REMOVAL 11.7.7.1 Remove five screws (part# 9912-1-SEQ) from left strut (9779-SEQ). Side Strut Figure 11-31. -
Page 58: Atf & Compressor / Tank Assembly Removal
Operator & Service Manual 11.7.8 ATF & COMPRESSOR / TANK ASSEMBLY REMOVAL 11.7.8.1 Remove Kapton Tape (2696) from the Muffler Assembly and left strut (9779-SEQ), as shown in figure. Muffler Assy 2x3” tape Cut cable tie here Figure 11-33. Kapton Tape 11.7.8.2 Remove exhaust tube and ATF to product tank tubing. -
Page 59: Installation Procedures
Operator & Service Manual 11.7.8.5 Cap both ATF ports (Feed and Vacuum ports). Cap 2X Figure 11-37. ATF ports 11.7.8.6 Remove the ATF Bulkhead FROM the bottom of the ATF Module Assembly as shown in figure below. ATF module assy (9729-SEQ) NOTE: Mark the position for installation. -
Page 60: Atf & Compressor/Product Tank Installation
NOTE: A flow calibration procedure is required after replacing the ATF or Compressor, the PCB Circuit Board, the Proportional Valve. If any of these components are replaced, the SAROS must be returned to CAIRE or a factory-authorized service center to have the flow calibration performed before returning to use. -
Page 61: Figure 11-45. Cap
ATF surface. NOTE: Pulling too hard on the Exhaust Tube may cause the tube to tear. exhaust filter tube 2x3” kapton tape muffler assy muffler tube (9221-SEQ) (9227-SEQ) (2696-SEQ) (9314-SEQ) (9390-SEQ) pull clearance Figure 11-47. Open SAROS 9735-SEQ H | 61... -
Page 62: Rail Installation
(SP6981-SEQ) x2 (6968-SEQ) pipe (9342-SEQ) (9369-SEQ) tube (9797-SEQ) Figure 11-48. Open SAROS 11.8.3 RAIL INSTALLATION 11.8.3.1 Attach RIGHT STRUT (9780-SEQ) with five screws (9912-1-SEQ) with and torque to 6.0 in-lbs. NOTE: Top bulkhead screw not shown. Figure 11-49. Right Strut 11.8.3.2 Rotate assembly, route the ATF wires (stepper motor... -
Page 63: Battery Cable Installation
Operator & Service Manual 11.8.4 BATTERY CABLE INSTALLATION 11.8.4.1 Secure two Cable Ties through the holes in LEFT STRUT (9779-SEQ) and round all wires. Secure two Cable Ties around all wires (battery cables & ATF Bundle). Apply one Cable Tie around all battery cables, close to the battery board, as in Figure below. NOTE: Leave the Cable Ties loose in case slack is needed at the PCBA assembly. -
Page 64: Figure 11-54. Secure Battery Wires
Operator & Service Manual 11.8.4.3 Secure the Battery Power wires on the LEFT STRUT (9779-SEQ) with Cable Tie. NOTE: Leave the Cable Ties loose in case slack is needed at the PCBA assembly. NOTE: Ensure slack to wires where indicated. cable ties v slack 6968-SEQ... -
Page 65: Compressor Fan Replacement
NOTE: A flow calibration procedure is required after replacing <the ATF or Compressor, the PCB Circuit Board, the Proportional Valve> If this components is replaced, the SAROS must be returned to CAIRE or a factory-authorized service center to have the flow calibra- tion performed before returning to use. -
Page 66: Installation Of Pcb Assembly
NOTE: A flow calibration procedure is required after replacing <the ATF or Compressor, the PCB Circuit Board, the Proportional Valve> If this components is replaced, the SAROS must be returned to CAIRE or a factory-authorized service center to have the flow calibra- tion performed before returning to use. -
Page 67: Figure 11-63. Secure
Operator & Service Manual 11.8.7.2 Insert and secure the Battery Power and Compres- compressor sor Power Wires where shown. Use a flat blade screwdriver to power wires tighten and torque the screws to 4.4 in-lbs. NOTE: Battery wire polarity indicated on the PCBA. Red is (+) and Black is (-). -
Page 68: Figure 11-66. Flow Tube
Operator & Service Manual 11.8.7.6 Attach the Flow Tube into the Product Tank. Secure the Flow Tube with Cable tie. Figure 11-66. Flow Tube 11.8.7.7 Tighten and secure all wires with Cable Ties. NOTE: Orient ALL Cable Tie knots towards the Compressor. SLACK cable ties (6968-SEQ) -
Page 69: Power Connector Replacement (9766-Seq)
Operator & Service Manual 11.8.7.9 Add Cable Tie to hold wires away from the coil. Hand- tighten loose as in Figure below. cable tie (6968-SEQ) Figure 11-69. Cable Ties 11.8.7.10 Attach Top STRUT (9778-SEQ) with 5 screws as shown on figure below. Torque the screws to 6.0 in-lbs. STRUT (9978-SEQ) screws... -
Page 70: Membrane Panel Replacement (9731-Seq)
Operator & Service Manual 11.8.9 MEMBRANE PANEL REPLACEMENT (9731-SEQ) 11.8.9.1 After performing steps 11.7.1.1 thru 11.7.1.8 from “INLET CAP REMOVAL”. 11.8.9.2 Peel off the User Panel (9731-SEQ) as shown in the figure below. Figure 11-73. Peel 11.8.9.3. Clean the surface shown in the figure below with Iso- clean propyl Alcohol before re-applying the new User Panel. -
Page 71: Inlet Cap Installation (Sp9756-Seq)
Operator & Service Manual 11.8.10 INLET CAP INSTALLATION (9756-SEQ) 11.8.10.1 Place O-Ring in the Ring Sleeve. O-Ring (9374-SEQ) Ring Sleeve (9928-SEQ) Figure 11-77. O-ring attached 11.8.10.2 Align & slide the 3 O-RINGS in the Ring SLEEVE over the 3 STRUTS. 11.8.10.3 Place the Inlet Cap (9756-SEQ) over the STRUTS 9928-SEQ so that the LCD Display is lined up with the Membrane Panel... -
Page 72: Figure 11-81. Flex Cable
Operator & Service Manual 11.8.10.6 Insert Front Panel Flex cable flush with locking con- nector. Apply 2” of Kapton Tape (2696-SEQ) on the Mounting STRUT. front panel flex cable securing tape (2696-SEQ) Figure 11-81. Flex cable 11.8.10.7 Connect the Ambient Air Thermistor and connect 9V 9v battery connector Battery Connector as shown. -
Page 73: Installation Of The Sleeve & Battery Interface Plate
Filter (9798-SEQ). filter Figure 11-85. 9V battery 11.8.10.11. Align the Air Inlet Cover (9758-SEQ) to the top of the SAROS and tighten the four screws (P9291-SEQ). tighten screws Figure 11-86. Align covers and tighten 11.8.11 INSTALLATION OF THE SLEEVE & BATTERY INTERFACE PLATE 11.8.11.1 Slide Sleeve (9280-SEQ) and Ring sleeve with O-... -
Page 74: Figure 11-89. Battery Interface Assembly
Operator & Service Manual 11.8.11.3 Attach the Battery Interface Assembly (9292-SEQ) to the Rain Guard by attaching the two screws (9960-4-SEQ). Figure 11-89. Battery Interface Assembly 11.8.11.4 Align and attach the Exhaust tube to the Exhaust port on the Rain Guard. Figure 11-90. -
Page 75: Service Records & Retention
12.0 SERVICE RECORDS & RETENTION 12.1 RECORD HOURS OF OPERATION AND SOFTWARE VERSION To help maintain the SAROS, you may obtain the Total Hours of Operation and software version numbers for the Control Board. To obtain system information, follow these steps: Press the “Utility”... -
Page 76: Service And Maintenance Record
12.2 SERVICE AND MAINTENANCE RECORD Whenever maintenance or service is performed on an SAROS unit, an entry should be made in the service log for that concentra- tor or recorded in accordance with your company’s standard procedure. Whenever the sleeve of the SAROS is removed, the flow rate, purity, and alarm status should be verified per the Test Procedures in this manual. -
Page 77: Appendix A A-1. Saros Performance Verification Checklist
Table A-1. SAROS Performance Verification Checklist Footnotes: (1) The SAROS is BTP compensated. If measuring concentration and/or flow with a device that is non-Argon compensated and non-BTP compensated, the acceptable range of the device readings will be reduced by 0.1 LPM. - Page 78 SAROS and autoSAT are trademarks of CAIRE Inc. Ball Ground, GA 30107. ® ® Salter Labs is a registered mark of Salter Labs, Arvin, CA 92303. ® Lysol is a registered trademark of Reckitt Benckiser, UK. ® Manufactured by: CAIRE Inc.
Need help?
Do you have a question about the 9400R-SEQ and is the answer not in the manual?
Questions and answers