Table of Contents
Advertisement
Advertisement
Table of Contents

Related Manuals for Native Instruments Maschine Jam


Summary of Contents for Native Instruments Maschine Jam
- Page 1 MANUAL...
- Page 2 The information in this document is subject to change without notice and does not represent a commitment on the part of Native Instruments GmbH. The software described by this docu- ment is subject to a License Agreement and may not be copied to other media. No part of this...
- Page 3 6725 Sunset Boulevard 5th Floor Los Angeles, CA 90028 www.native-instruments.com NATIVE INSTRUMENTS K.K. YO Building 3F Jingumae 6-7-15, Shibuya-ku, Tokyo 150-0001 Japan www.native-instruments.co.jp NATIVE INSTRUMENTS UK Limited 18 Phipp Street London EC2A 4NU www.native-instruments.co.uk © NATIVE INSTRUMENTS GmbH, 2016. All rights reserved.
-
Page 4: Table Of Contents
Connecting MASCHINE JAM ......................12 1.4.1 Connecting MASCHINE JAM to Your Computer ............12 1.4.2 Using MASCHINE JAM as a MIDI Device ..............13 MASCHINE Project Overview ..................15 Sound Content ..........................16 Arrangement ..........................17 MASCHINE Software Overview ..................... 19 2.3.1... - Page 5 Accessing Channels in MASCHINE ....................39 On-Screen Overlay ........................40 Controller Modes and Mode Pinning ................... 41 Undoing and Redoing Actions ..................... 43 Using MASCHINE JAM in Plug-in Mode ..................43 4.5.1 Differences between Stand-Alone and Plug-in Mode ..........44 4.5.2 Controlling your Host’s Transport Functions in Plug-in Mode ........
- Page 6 Adding Variation to Patterns ..................104 6.4.6 Clearing Groups and Sounds ..................108 6.4.7 Duplicating Groups and Sounds ................109 6.4.8 Clearing Patterns ...................... 111 6.4.9 Duplicating Patterns ....................111 Saving Your Project ........................112 MASCHINE JAM - Manual - 6...
- Page 7 Tuning a Sound ..................133 8.1.6.2 Tuning a Group ..................135 Using Performance Effects ......................136 8.2.1 Selecting a Performance Effect ................. 136 8.2.2 Using a Performance Effect ..................138 8.2.3 Automating a Performance Effect ................138 MASCHINE JAM - Manual - 7...
- Page 8 The MASCHINE Software Crashes ................149 9.1.4 Updates ........................149 Getting Help ..........................149 9.2.1 Knowledge Base ......................150 9.2.2 Technical Support ...................... 150 9.2.3 Registration Support ....................151 9.2.4 User Forum ........................ 151 10 Glossary ........................152 MASCHINE JAM - Manual - 8...
-
Page 9: Welcome To Maschine Jam
Using the MASCHINE JAM project view, with its 8x8 click-pad matrix, you can intuitively con- trol your project with unprecedented overview of your Scenes and Patterns, allowing you to cre- ate, and arrange new ideas on the fly. -
Page 10: Document Conventions
▪ References to keys on your computer’s keyboard you’ll find put in square brackets (e.g., “Press [Shift] + [Enter]”). Single instructions are introduced by this play button type arrow. ► Results of actions are introduced by this smaller arrow. → MASCHINE JAM - Manual - 10... -
Page 11: Where To Start
MASCHINE Software Manual and online video tutorials. MASCHINE JAM Manual (this document) About This Document What you are reading now is the MASCHINE JAM Manual. This document provides detailed in- formation about MASCHINE JAM. Please refer to the MASCHINE Software Manual for information about MASCHINE soft- ware. -
Page 12: Connecting Maschine Jam
This chapter contains a quick walk-through of the basic hardware setups. Make sure that you have installed the latest version of the MASCHINE software, includ- ing the MASCHINE JAM hardware driver, before you connect the controller to your com- puter! 1.4.1... -
Page 13: Using Maschine Jam As A Midi Device
Connecting MASCHINE JAM Connecting MASCHINE JAM to a computer. MASCHINE JAM will not work when it is connected to a USB 1.1 port. A USB 2.0 (or later) port is required! Windows users: In case you have installed the software including the hardware drivers, but the controller is not detected by your computer, connect the USB cable to another USB port before taking further measures. - Page 14 MASCHINE software installation procedure. For more information on this, please refer to the Controller Editor Manual available as a PDF file in the Documentation subfolder of the Controller Editor installation folder on your hard disk. MASCHINE JAM - Manual - 14...
-
Page 15: Maschine Project Overview
In the following diagram we can see the different aspects of a MASCHINE Project: Overview of a MASCHINE Project. ▪ The Project references all the sound content: the instruments, sounds and samples, and all the effects you apply to them. MASCHINE JAM - Manual - 15... -
Page 16: Sound Content
▪ A MASCHINE Project file (1) Groups (2) are available in Banks. Each Bank contains 8 Groups (A-H) and each Group contains 16 Sound slots (1–16) (3). Each Sound slot can be filled with samples or plug-ins. MASCHINE JAM - Manual - 16... -
Page 17: Arrangement
MA- SCHINE, i.e. the sound of all Groups. Arrangement The arrangement aspect of a MASCHINE Project is about building patterns, and further about putting those patterns into a loop or a song structure. MASCHINE JAM - Manual - 17... - Page 18 ▪ Together, the events add up to a Pattern (4) for this Group. ▪ All of this takes place in the Pattern Editor (5), where you can create several Patterns for each of your Groups. MASCHINE JAM - Manual - 18...
-
Page 19: Maschine Software Overview
Now that you have an overview of the core concepts, let’s have a quick look at the various areas and control elements on your hardware controller and in the MASCHINE software. MASCHINE Software Overview The MASCHINE software. MASCHINE JAM - Manual - 19... -
Page 20: Header
(1) MASCHINE menu: Click the MASCHINE menu to access the software menus. This menu is particularly useful in Full screen mode and when MASCHINE is used as a plug-in in a host ap- plication. MASCHINE JAM - Manual - 20... - Page 21 (8) Audio Engine button: Click the Audio Engine button to disable the entire sound processing of MASCHINE. (9) NI logo: The NI logo and MASCHINE logo open the About screen which displays the version number and edition of your MASCHINE software. MASCHINE JAM - Manual - 21...
-
Page 22: Browser
Browser The Browser. (1) LIBRARY tab: Use the LIBRARY tab to access your computer's hard drives via MASCHINE's selectors and filters. (2) FILES tab: Use the FILES tab to access your computer’s hard drives. MASCHINE JAM - Manual - 22... - Page 23 Results list in context with the rest of your Project while it is playing. Additionally, if you are browsing Samples, the Prehear button allows you to quickly hear each Sample you select in the Results list, at the volume set by the slider nearby. MASCHINE JAM - Manual - 23...
-
Page 24: Arranger
(4) Mix view button: Click the Mix view button to access the Mix view. Use the Mix view to mix your project using channel strips for your Sounds and Groups, and to edit Plug-ins. MASCHINE JAM - Manual - 24... -
Page 25: Control Area
Plug-in. The first Plug-in slot of the Sound level can also hold a plug-in instrument (Internal, Native Instruments, and External). The Plug-in list displays the Plug-in currently loaded. Click the desired Plug-in to display its parameters in the Parameter area (8). -
Page 26: Pattern Editor
(1) Group View button: Click this button to show the Group view. (2) Keyboard View button: Click this button to show the Keyboard view. (3) Sample Editor button: Click this button to open/close the Sample Editor. MASCHINE JAM - Manual - 26... - Page 27 (12) Dragger icons: The Dragger icons allow you to conveniently drag and drop audio or MIDI from your Patterns to your desktop or host software. For a detailed explanation of each section please refer to the MASCHINE Software Man- ual. MASCHINE JAM - Manual - 27...
-
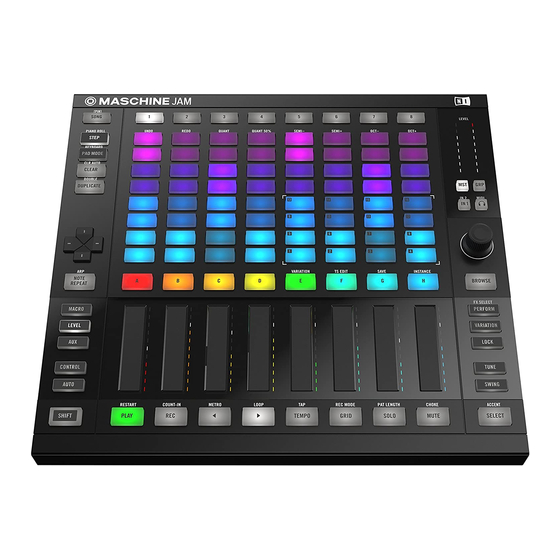
Page 28: Maschine Jam Overview
MASCHINE JAM Overview MASCHINE JAM Top View MASCHINE JAM Overview This chapter describes the areas and control elements on your MASCHINE JAM controller. MASCHINE JAM Top View This section quickly describes the areas and control elements on your hardware controller top view. - Page 29 MASCHINE JAM Overview MASCHINE JAM Top View Overview of the MASCHINE JAM hardware controller. (1) Project View section: By default the 8x8 click-pad matrix displays your Scenes and Patterns for the corresponding Group. Here you can access Groups (A-H), arrange patterns and build your Scenes (1-8).
- Page 30 Sound automatically at a given rate. While holding the NOTE REPEAT button, click-pad you want to play: notes will be repeatedly triggered at the rate selected in the right display. For more information Note Repeat, see ↑6.2.2.1, Using Note Repeat. MASCHINE JAM - Manual - 30...
-
Page 31: Project View Section
(1) SCENE buttons: Scenes allow you to store and select different variations (patterns) of a mu- sical idea in real time. Press a Scene button to select a Scene. (2) Click-pad Matrix: By default the 8x8 click-pad matrix shows your patterns for each corre- sponding Group (A-H). MASCHINE JAM - Manual - 31... -
Page 32: Note Input Section
(3) PAD MODE button: Enters Pad Mode. In this mode you can play the Sounds of Group or ac- cess Keyboard Mode and use the whole 8x8 click-pad matrix to play melodies or even chords. ▪ In the standard layout mapping, each click-pads (1-16) represent one Sound of a Group. MASCHINE JAM - Manual - 32... -
Page 33: Level Meter Section
(4) or output (2, 3, and 5) to display it in the Level meter. (2) GRP button (Group button). Press the button to display the volume level of the selected Group in the Level meter (1) and use the Encoder to adjust its volume level. MASCHINE JAM - Manual - 33... -
Page 34: Smart Strip Section
PERFORM to access the Performance effects. The performance effects were specifically designed for MASCHINE JAM and you can interact with them using the Smart Strips. Using the Smart Strips you can add the effect applied to the selected Group and change the effect parameters, for example, the Cutoff in the Filter. - Page 35 (9) AUX: Press to access AUX1 for Groups and Sounds. Press SHIFT to access AUX2. (10) LEVEL: Press LEVEL to access Group and Sound volume levels. Press SHIFT LEVEL access Group and Sound Pan settings. MASCHINE JAM - Manual - 35...
-
Page 36: Solo And Mute Section
For detailed information on all of these features, please refer to the MASCHINE JAM Manual. 3.1.5 Solo and Mute Section This subchapter provides an overview of the Solo and Mute section. -
Page 37: Maschine Jam Rear View
Metronome parameters (Level, Time signature and Auto-on) Count-In Length, automatic Quantize Mode, and set the Pattern Follow via the on-screen overlay. MASCHINE JAM Rear View Here is a description of the MASCHINE JAM rear view. MASCHINE JAM - Manual - 37... - Page 38 (1) USB socket: Connect your MASCHINE JAM controller to your computer using the supplied USB cable. (2) FOOTSWITCH: Your MASCHINE JAM controller provides a footswitch inputs in the form of a 1/4" socket on its rear panel. If you have a footswitch with two buttons: ▪...
-
Page 39: Working With Maschine Jam
Accessing Channels in MASCHINE MASCHINE JAM allows you to access the different channels such as the Master, Group and Sound directly while using the mode buttons (Macro, Level, Aux, Control, Tune, and Swing) ei- ther side of the Smart Strips. -
Page 40: On-Screen Overlay
MASCHINE Library. An example of the on-screen overlay. MASCHINE JAM and all its other features remain fully functional even when the on-screen overlay is in use—never stop jamming! The on-screen overlay can only be used with the Encoder and D-pad. It does not accept any interaction using the mouse. -
Page 41: Controller Modes And Mode Pinning
▪ Permanent modes stay active even if you release their button. To deactivate them, you must press their button a second time. This is for example the case with the BROWSE button. The following buttons are temporary; SELECT, SOLO, MUTE, DUPLICATE and CLEAR. MASCHINE JAM - Manual - 41... - Page 42 Working with MASCHINE JAM Controller Modes and Mode Pinning Pinning Buttons on MASCHINE JAM Controller Each of these buttons needs to be held pressed in order to use the corresponding mode. Pinning the Controller Modes You can also pin (i.e. lock) controller modes, so the controller doesn’t switch back when releas- ing a mode button, for example: Press and hold a controller mode button, e.g., MUTE.
-
Page 43: Undoing And Redoing Actions
SHIFT + REDO. Using MASCHINE JAM in Plug-in Mode You can run the MASCHINE software as a stand-alone application or integrate it into your fa- vorite Digital Audio Workstation (or DAW, in short) by loading it as a plug-in. The MASCHINE software is available in the VST, Audio Unit, and AAX plug-in formats. -
Page 44: Differences Between Stand-Alone And Plug-In Mode
MIDI interfaces is managed by the host — the MASCHINE plugin only communicates with the host. Native Instruments’ Online Knowledge Base provides how-to articles that will help you route the MASCHINE plug-in to multiple tracks/outputs in the major hosts: ▪... -
Page 45: Controlling Your Host's Transport Functions In Plug-In Mode
Working with MASCHINE JAM Using MASCHINE JAM in Plug-in Mode https://support.native-instruments.com/hc/articles/209556049 ▪ How to Route MASCHINE 2 Sounds to Separate Audio Tracks in Pro Tools: https://support.native-instruments.com/hc/articles/209556069 ▪ How to Route MASCHINE 2 Sounds to Separate Audio Tracks in Logic Pro X: https://support.native-instruments.com/hc/articles/209556089... -
Page 46: Using Two Or More Maschine Controllers
4.5.3 Using Two or More MASCHINE Controllers You can use two or more MASCHINE controllers of different types (MASCHINE JAM, MA- SCHINE STUDIO, MASCHINE MK2, MASCHINE MIKRO MK2, MASCHINE, and MASCHINE MIKRO) simultaneously with different instances of the MASCHINE software (possibly with one instance in stand-alone mode). - Page 47 Working with MASCHINE JAM Using MASCHINE JAM in Plug-in Mode If you have more than one instance of the MASCHINE software running on your comput- er, you can control each instance with a different controller. See the MASCHINE Soft- ware Manual for more information.
-
Page 48: Using The Browser
Native Instruments prod- ucts installed on your computer. Once both the MASCHINE software and MASCHINE JAM are up and running, your first stop is the Browser. You can access the vast library using the Browse button and navigate it using the on-screen overlay in combination with the Encoder and the D-pad. - Page 49 The selected file is loaded. → With the Browser still open, you can continue to load the next or previous file to see how it works in your track. To load the next or previous file: MASCHINE JAM - Manual - 49...
-
Page 50: Filtering Files In The Browser
To load a file type from the Browser using Filters: To open the Browser, press the BROWSE button. ► By default the factory content is selected. For detailed information on the user content, see section ↑5.4, Accessing User Content. MASCHINE JAM - Manual - 50... - Page 51 To set focus to the TYPES filter, press the D-pad down button until TYPES is selected. Turn the Encoder to scroll to the Type you want to use, then press the Encoder to select MASCHINE JAM - Manual - 51...
- Page 52 Filtering Files in the Browser ⇨ The result list on the right side is filtered accordingly and the Subtypes appear beneath the Types. You can select a Subtype to further filter the result list. MASCHINE JAM - Manual - 52...
- Page 53 To set focus to the MODES filter, press the D-pad down button until the MODES filter is selected. To scroll to a mode you want to use, turn the Encoder and then press it to select the mode. MASCHINE JAM - Manual - 53...
- Page 54 Filtering Files in the Browser ⇨ The result list on the right side is filtered accordingly. To set focus to the result list on the right side, press the right button of the D-pad. MASCHINE JAM - Manual - 54...
- Page 55 To scroll to an instrument preset you want to load, turn the Encoder. To load the instrument preset, press either the Encoder. 10. Press SHIFT + Up/Down button of the D-pad to load next or previous preset. MASCHINE JAM - Manual - 55...
- Page 56 The bowser will reset so you can create a new filter. → Restoring a Filter To restore a previous filter: Press SHIFT + Right button of the D-pad. ► The browser will return to the location where the previous filter was created. → MASCHINE JAM - Manual - 56...
-
Page 57: Using Favorites
For more information on the use of Favorites, please refer to the MASCHINE Software manual. 5.3.1 Activating and Deactivating the Favorites Filter To activate the Favorites filter: Press the BROWSE button to access the Browser. MASCHINE JAM - Manual - 57... - Page 58 Press the right arrow button on the D-pad to access the Results list. Press the up arrow on the D-pad to access the Favorite icon and press the Encoder to tog- gle Favorites on or off. MASCHINE JAM - Manual - 58...
-
Page 59: Adding An Item To The Favorites List
Items can be added to the Favorites list from the Browser search results. To add an item to the Favorites list: Select an entry in the search results list. Press SHIFT and press the Encoder to add the corresponding item to the Favorites list. MASCHINE JAM - Manual - 59... -
Page 60: Removing An Item From The Favorites List
↑5.3.1, Activating and Deactivating the Favorites Filter. 5.3.3 Removing an Item from the Favorites List Items can be removed from the Browser search results or from the Favorites list. To remove an item to the Favorites list: MASCHINE JAM - Manual - 60... - Page 61 The item is removed from the Favorites list, and the Favorites icon next to its name is de- → activated: To view all your Favorite items activate the Favorites Filter. For more information please read: MASCHINE JAM - Manual - 61...
-
Page 62: Accessing User Content
In the Category header of the Browser turn the Encoder to select the User icon. Press the Encoder to select User content. The User library is selected as indicated by the highlighted icon. Press the Encoder again → to return to the Factory library. MASCHINE JAM - Manual - 62... - Page 63 ► You can now use the Encoder to scroll through the results list. → Push the Encoder to load the selected file. ► The selected file type is loaded and ready to use. → MASCHINE JAM - Manual - 63...
-
Page 64: Recording And Editing Patterns
This chapter provides an overview of the necessary steps required to record and edit a pattern. It explains the generic process of creating both a beat and melodic content. It also describes the various ways this can be accomplished with MASCHINE JAM though real-time input or us- ing the sequencer. -
Page 65: Setting The Tempo
You can use Tap Tempo to set the tempo at any time. This is an intuitive way to match another beat or sync with other musicians. As you tap the tempo once every beat, the tempo of the MASCHINE will follow your tapping. MASCHINE JAM - Manual - 65... -
Page 66: Setting The Step Grid
As an example, you might want to reduce the step size from 1/16th note to 1/32nd note. This will allow you to place notes more precisely in the Pattern. To adjust the Step Grid: Press and hold the GRID button. ⇨ The on-screen overlay appears. MASCHINE JAM - Manual - 66... - Page 67 Changing the Grid Using the On-screen Overlay The on-screen overlay allows you access all available Step Grid resolutions. To change the Step Grid’s settings using the on-screen-overlay: Press the GRID button. Turn the Encoder to select STEP. Press the Encoder. MASCHINE JAM - Manual - 67...
-
Page 68: Setting The Pattern Length
Select a pattern by pressing a half-lit click-pad on the 8x8 matrix, or create a new pattern by pressing an unlit click-pad in the same column as the Group you want to work with. Press SHIFT SOLO (PAT LENGTH) to enter the Pattern Length Mode. MASCHINE JAM - Manual - 68... -
Page 69: Setting The Record Mode
The Record Mode options allow you to adjust Metronome parameters (Level, Time signature and Auto-on), Count-In Length, and automatic Quantize Mode via the on-screen overlay. On your controller do the following to access the Record Mode options: MASCHINE JAM - Manual - 69... - Page 70 / off state. COUNT-IN Length Adjusts the duration of the Count-in, i.e. how long the metronome will sound before the recording actually starts. The count-in length can be set to; Bar, Bars, and Bars. QUANTIZE MASCHINE JAM - Manual - 70...
- Page 71 Set the timeline to follow through the various parts of the Pattern in the Project View when step sequencing in Step Mode. The shortcut of SHIFT can also be used to set Follow Off. MASCHINE JAM - Manual - 71...
-
Page 72: Playing And Programming Beats
Playing and Programming Beats Playing and Programming Beats This chapter explains the process and features that can be used to create a beat based pattern using MASCHINE JAM. For information on creating melodic content see ↑6.3, Creating Melo- dies and Harmonies. -
Page 73: Recording Beats In Real-Time
1-16 of the Group you selected. To enter Pad Mode: Press the PAD MODE button. ⇨ The Group buttons and click-pads numbered 1-16 illuminate. Select a Group containing the Sounds you want to play. MASCHINE JAM - Manual - 73... -
Page 74: Using Note Repeat
▪ You can use Note Repeat even if the transport is not running: In this case the Note Repeat engine will use its own central clock. This clock will be reset as soon as you start the play- back. To use Note Repeat: MASCHINE JAM - Manual - 74... - Page 75 Playing and Programming Beats Press the NOTE REPEAT button. MASCHINE JAM will automatically switch to Pad Mode and the Sounds within the select- → ed Group are illuminated. Select the Group (A-H) containing the Sound you want to repeat. Press the Sound click-pads (1-16).
-
Page 76: Sequencing Beats With Step Mode
Off. 6.2.3 Sequencing Beats with Step Mode Step Mode turns your controller into a fully featured step sequencer. If you are familiar with classic drum machines, you should quickly feel at home. MASCHINE JAM - Manual - 76... - Page 77 To prepare Step Mode before you begin sequencing: Press the Group button (A-H) containing the Sounds you want to sequence (preferably a drum kit for this example). Select a click-pad on the 8x8 matrix to create a pattern. MASCHINE JAM - Manual - 77...
- Page 78 Activate each step by pressing a click-pad once. ⇨ The click-pads will illuminate to represent each entered step. If you press an illuminated click-pad the step is removed. This way it’s quick and easy to create a drum pattern. MASCHINE JAM - Manual - 78...
- Page 79 Sound you want to sequence. Progressively, you build up a new Pattern. → At any time, you can leave Step Mode: Press the STEP button to exit Step Mode. ► MASCHINE JAM - Manual - 79...
-
Page 80: Adding Swing
To add Swing to the Master channel: Press the SWING button. Touch the Encoder to show the on-screen overlay. Turn the Encoder to select MASTER. Push the Encoder and then turn it to select a Master swing value. MASCHINE JAM - Manual - 80... -
Page 81: Applying Choke
Project. This affects the audio coming from all Plug-ins. Choke All Notes is only available on your controller: Press SHIFT MUTE (CHOKE) to choke all playing notes. ► Choke All Notes can be useful in various situations: MASCHINE JAM - Manual - 81... -
Page 82: Creating Melodies And Harmonies
Voices triggered by subsequent notes will play normally. Creating Melodies and Harmonies This chapter explains the process and features that can be used to create melodic using MASCHINE JAM. For information on creating a beat see ↑6.2, Playing and Programming Beats. -
Page 83: Recording Melodies And Harmonies In Real-Time
The 8x8 click-pad matrix indicates the pitches played by each button (all are shown in the col- or of the focused Sound). If you press the click-pads you will hear that they all play the same Sound, but each with a different pitch. MASCHINE JAM - Manual - 83... - Page 84 C1 to C6, and the white click-pads represent the root note of the scale at each octave. Press the up or down arrows of the D-pad to access lower or higher notes in the scale. ► MASCHINE JAM - Manual - 84...
-
Page 85: Step Sequencing Melodies And Harmonies
Piano Roll Mode is set to allow one individual sound to be programmed using the 8x8 click- pad matrix. Select a Sound and scale and you’re ready to go! MASCHINE JAM - Manual - 85... - Page 86 Recording and Editing Patterns Creating Melodies and Harmonies Piano Roll Mode on MASCHINE JAM. Preparing Piano Roll Mode To prepare Piano Roll Mode before you begin sequencing: Press SONG to enter Project View. Press the Group button (A-H) containing the sound you want to sequence.
- Page 87 Touch the Encoder to display the Scale on-screen overlay, and use the D-pad and Encod- ► er to navigate and select the scale you would like to work with. For information on selecting a scale with MASCHINE JAM see ↑6.3.4, Selecting a Scale and Chords.
-
Page 88: Selecting A Scale And Chords
By default MASCHINE JAM is set to the chromatic scale of C and the 8x8 click-pad matrix represent each semitone. By simply touching the Encoder you can display the Scale on-screen overlay. - Page 89 Select the root note of the scale. Type Select the required scale type. CHORD Mode Choose between (no Chord) or Harm (Harmony). Type Choose the required Chord type. The following sections explain the Scale options in detail. MASCHINE JAM - Manual - 89...
-
Page 90: Setting The Root Note Of A Scale
Mode. Use it to generate chords from single notes, either from your MASCHINE JAM or from incoming MIDI notes from your host software. The 8x8 click-pad matrix indicates the keys of a chord being played via white illuminat- ed LEDs, while inactive click-pads are not fully illuminated. -
Page 91: Chord Type
If all of this seems complex, try setting a random value and use the click-pad matrix to see what notes are active, inactive, and played back. When CHORD Mode is set to Harm, the CHORD Type setting includes the following values: MASCHINE JAM - Manual - 91... - Page 92 CHORD Type. The following chords are available and can be generated: Chord Type Semitones Added above Played Note Octave Perf 4 (Perfect 4) Perf 5 (Perfect 5) MASCHINE JAM - Manual - 92...
-
Page 93: Creating Arpeggios
6.3.5 Creating Arpeggios MASCHINE JAM features a flexible and versatile arpeggiator that lets you play your instru- ments in note sequences according to the keys you press on the on the 8x8 click pad matrix. You can also use the arpeggiator in combination with the scales and chords created with the Scale engine (see section ↑6.3.4, Selecting a Scale and... - Page 94 ▪ To latch the playback of the Arp sequence, use the HOLD parameter. For more information, see section Hold. The following table describes each of the parameters in the Arpeggiator on-screen overlay. MASCHINE JAM - Manual - 94...
- Page 95 Sequence Allows you to add interesting rhythms to your arpeggiated notes. Select one of eight different sequences and apply it to the arpeggio you are playing. Select to use the default regular sequence. MASCHINE JAM - Manual - 95...
- Page 96 When set to On, the arpeggiator will continuously play a sequence according to the last notes that were pressed. To stop the arpeggiator playback, set the Hold parameter to Off. SCALE MASCHINE JAM - Manual - 96...
- Page 97 SCALE Type is set to Major. Mode The first CHORD parameter is Mode. Use it to generate chords from single notes, either from MASCHINE JAM or from incoming MIDI notes from your host software. MASCHINE JAM - Manual - 97...
-
Page 98: Playing Notes With Smart Strips
It is possible to customize the prede- fined chord sets or completely create your own using the controller’s click-pad matrix. Notes Mode on the MASCHINE JAM controller. Notes Mode has three different types of input:... - Page 99 Smart Strips to create variety. The white click-pads represent the root-note of the scale. Press the D-pad up/down buttons to show higher or lower notes within the scale. ► Notes Mode On-Screen Overlay MASCHINE JAM - Manual - 99...
-
Page 100: Editing A Pattern
Type Choose the required Chord type. Editing a Pattern This section explains some of the features available from the MASCHINE JAM hardware that can be used to edit your Patterns. The features included are as follows: ↑6.4.1, Quantizing Your Pattern ▪... -
Page 101: Quantizing Your Pattern
Hence, to avoid losing the Pattern’s groove, MASCHINE JAM allows you to half-quantize your events: Events are moved half way toward the closest beat/subdivision. Therefore, you get a tighter rhythm while keeping its human touch and groove. -
Page 102: Doubling A Pattern
To transpose the selected events down in semitones press SHIFT SEM- to transpose the selected events up press SHIFT + SEM+. ⇨ The notes are transposed by a semitone. If nothing is selected, all event/notes in the Pat- tern will be affected. MASCHINE JAM - Manual - 102... -
Page 103: Nudging Events In A Pattern
▪ You can also set the Nudge Grid resolution to a smaller fraction of the Step Grid resolution. This allows you to nudge events with even finer increments. To change the Nudge Grid’s settings: Press the GRID button. MASCHINE JAM - Manual - 103... -
Page 104: Adding Variation To Patterns
Depending on the selected mode, the on-screen overlay will adjust itself accordingly. To access Variation Mode: Select the Group (A-H) containing the Sound to which you want to apply the variation. Press SELECT + a Sound (1-16). MASCHINE JAM - Manual - 104... - Page 105 At 100% a note will be created at every step of pattern. Probability can be changed from 10-100% in 10% increments. Press SHIFT to change in finer increments of 1%. NOTE RANGE (Keyboard Mode) Note Lo Create notes no lower than the set value. MASCHINE JAM - Manual - 105...
- Page 106 Step can be changed from +/- 0-50% in 5% increments. Press SHIFT to change in finer increments of 1%. DISTRIBUTIONS MASCHINE JAM - Manual - 106...
- Page 107 Applies the current settings to the selected Sound. VELOCITY RANGE Velocity Lo Adjust notes with a velocity no lower than the set value. Velocity Hi Adjust notes with a velocity no higher than the set value. MASCHINE JAM - Manual - 107...
-
Page 108: Clearing Groups And Sounds
1%. 6.4.6 Clearing Groups and Sounds You can clear Groups and Sounds from your Project using MASCHINE JAM. Clearing Groups When a Group is cleared its Patterns are also removed from the Project. On your controller, do the following to clear a Group: Press and hold CLEAR. -
Page 109: Duplicating Groups And Sounds
6.4.7 Duplicating Groups and Sounds You can copy and paste Groups and Sounds in your Project using MASCHINE JAM. Duplicating Groups When a Group is duplicated its Pattern content is also included. On your controller in any mode, do the following to copy a Group from one to another: Press and hold DUPLICATE. - Page 110 Duplicating Sounds You can copy and paste Sounds across Sound slots (and thereby across click-pads (1-16)) within the same Group of your Project using MASCHINE JAM. When a Sound is duplicated its Pattern content is also included. On your controller in Pad Mode, do the following to copy a Sound from one slot to another:...
-
Page 111: Clearing Patterns
6.4.8 Clearing Patterns You can clear a Pattern from your Project using MASCHINE JAM. When a Pattern is cleared it is removed from the Scene. On your controller, do the following to clear a Pattern: Press the SONG button to return to the Project View. -
Page 112: Saving Your Project
Mode Pinning for more information. Saving Your Project You can save your Project at any time by initiating the Save command directly from MA- SCHINE JAM. To save your Project using the MASCHINE JAM: Press SHIFT (SAVE). ⇨ A message will appear on MASCHINE software. Since our current Project was not saved yet, MASCHINE asks you to name it before saving. -
Page 113: Arranging Your Project
One of the strengths of MASCHINE JAM lies in its ability to provide quick and easy access to Scenes and Patterns, which is a very flexible way to arrange your song and maintain an over- view of your project. - Page 114 Scene plays all the selected Patterns at once. Slowly you can begin to → build-up a song Scene by Scene. Add more Groups with Instruments to create more Pat- terns and Scenes. MASCHINE JAM - Manual - 114...
-
Page 115: Triggering Scenes And Patterns
→ loop. Switching between Patterns The 8x8 click-pad matrix of MASCHINE JAM provides a clear overview regarding the status of your Scenes and Patterns. The Project View represents the following: ▪ Each column from the top down contains one Scene (1-8), up to eight Patterns, and one Group (A-H). - Page 116 Press the Scene button containing the Patterns you want to change. Press the click-pads in each Group column to select the desired Patterns for this Scene. Press PLAY and the Scene plays all the selected Patterns. → MASCHINE JAM - Manual - 116...
-
Page 117: Looping Scenes
Press and hold a Scene button then turn the Encoder to set a loop range. Setting the Performance Grid Grid on-screen overlay is used to set quantize values for the following features: MASCHINE JAM - Manual - 117... -
Page 118: Duplicating Scenes
Turn the Encoder to select a new value. Press the Encoder to confirm your selection. A new Grid value is selected. → Duplicating Scenes You can copy and paste Scenes in your Project using MASCHINE JAM. MASCHINE JAM - Manual - 118... -
Page 119: Clearing Scenes
Clearing Scenes You can clear a Scene from your Project using MASCHINE JAM. When a Scene is cleared it is removed (deleted) from the Project, however, the Patterns still remain available. On your controller, do the following to clear a Scene:... - Page 120 Press the Scene button (1-8) you want to delete. The Scene is removed from the Project. If your Project contains more than eight Scenes, → press SHIFT + Scene button (1-8) to access the Scene bank. MASCHINE JAM - Manual - 120...
-
Page 121: Mixing Your Project
Smart Strip to adjust a Sound volume. The LEDs indicate the volume level. Adjusting the Volume of a Sound To adjust the volume of a Sound in Level Mode: MASCHINE JAM - Manual - 121... - Page 122 Hold the LEVEL button. ⇨ The Group buttons and Sound click-pads illuminate. The selected Group will blink and the on-screen overlay will appear. Select the Group button containing the Sound you want to reset. MASCHINE JAM - Manual - 122...
-
Page 123: Setting A Group Level
To achieve this, use the Input/Metering section on the right to adjust the volume level of a Group. MASCHINE JAM - Manual - 123... - Page 124 The Group buttons and Sound click-pads illuminate. The selected Group will blink and the on-screen overlay will appear. ⇨ The Smart Strips now represent Group A-H. Double tap on the Smart Strip of the Group you want to reset. MASCHINE JAM - Manual - 124...
-
Page 125: Setting The Master Level
For example, you can use it to prepare any Sound or Group in your headphones during a live session: first send the empty channel to the Cue bus, then load the desired Sound or Group MASCHINE JAM - Manual - 125... - Page 126 In any channel strip, click the little headphones button to send this channel to the Cue ► button. The headphones button lights up. The channel is not sent to its defined destination any- → more but instead to the Cue bus. MASCHINE JAM - Manual - 126...
-
Page 127: Mixing External Signals
MASCHINE allows you to route not only other internal signals to your Sounds, but also audio coming from the external sources. MASCHINE JAM allows you to select between two external input sources. You can meter an input level using the Level meter and adjust an input level using the Encoder. -
Page 128: Adjusting Pan
Activating Solo on a Group Press and hold SOLO to momentarily enter Solo Mode. Press a Group button (A-H) to solo it. Press the Group again to turn Solo off. MASCHINE JAM - Manual - 128... -
Page 129: Using Mute
Pinning allows a mode to remain selected without the need to hold the mode button, for example, press SOLO SONG to pin Solo Mode. You can now use both hands to manip- ulate the controls of MASCHINE JAM. Click SOLO again to exit the pinned Solo Mode. 8.1.4 Using Mute Mute Mode allows you to silence any number of Sounds or Groups. - Page 130 Selected Groups can be removed or added to the mix. → To Turn Mute on or off for a Sound Press the Group button (A-H) containing the Sound you want to mute. Press and hold MUTE to momentarily enter Mute Mode. MASCHINE JAM - Manual - 130...
-
Page 131: Adjusting Aux Send
This is notably used in send effects. The auxiliary out- puts of a Sound/Group are configured on the Aux page of the Output properties. MASCHINE JAM allows you to control the Aux levels for each Group and Sound. Adjusting the Aux Level of a Group... - Page 132 Smart Strip LEDs will reflect the aux level of the first eight sounds of the selected group. If you select any Pad numbered 9-16 the Smart Strips will represent the aux level of the second set of eight pads. MASCHINE JAM - Manual - 132...
-
Page 133: Tuning Sounds And Groups
Press the Group button (A-H) to select the Group that containing the Sound you want to adjust. If necessary, use the left and right arrows of the D-pad to access each bank of eight Groups. MASCHINE JAM - Manual - 133... - Page 134 Double tap on the Smart Strip of the Sound you want to reset. The Sound tuning will reset. You can reset other Sounds 9-16 by switching be- → tween the banks using the Page buttons and double-tapping on each of the Smart Strips. MASCHINE JAM - Manual - 134...
-
Page 135: Tuning A Group
Double tap on the Smart Strip of the Group you want to reset. The Group tuning will reset. You can reset other Groups by switching between banks using → the left and right buttons of the D-pad and double-tapping on each of the Smart Strips. MASCHINE JAM - Manual - 135... -
Page 136: Using Performance Effects
In addition, MASCHINE also has a set of Performance effects that are ideal for use in a live performance situation with MASCHINE JAM. They are designed specifically for their ease of use and can be applied to groups for maximum sonic impact. More importantly, they are fun to use! 8.2.1... - Page 137 The Performance FX on-screen overlay will appear. Turn the Encoder to scroll through the list of available effects. Press the Encoder to confirm your selection. The Performance FX will be loaded to the selected Group. → MASCHINE JAM - Manual - 137...
-
Page 138: Using A Performance Effect
Smart Strip, leaving your hands free to perform other tasks. To automate a Performance FX: Press PLAY to start playback of your song. Press the Group button (A-H) to select a Group containing the performance effect you want to automate. MASCHINE JAM - Manual - 138... -
Page 139: Controlling Plug-In Parameters
Press the left or right page buttons to select another page of parameters if they are availa- ble. The LED meters on the Smart Strips update to display the next page of parameters, and → the Smart Strips can be used to adjust the parameters. MASCHINE JAM - Manual - 139... - Page 140 To load another plug-in, such as an effect into a free plug-in slot: Press and hold the CONTROL button. Press the down or up button of the D-pad to select the symbol. Press the BROWSE button to load a plug-in. MASCHINE JAM - Manual - 140...
-
Page 141: Controlling Macros
To reset a Macros on the Master channel press the button, for a Group channel press the Group button (A-H), and for the Sound channel press a Sound button (1-16). Double tap on the Smart Strip of a Macro to reset it. MASCHINE JAM - Manual - 141... -
Page 142: Using Automation
Group button (A-H), and for the Sound channel press a Sound button (1-16). Press the required mode button LEVEL, CONTROL, MACRO, PERFORM, SWING, or ► TUNE. After you have a selected a parameter to automate: Press PLAY to start playback of your project. MASCHINE JAM - Manual - 142... -
Page 143: Creating Parameter Snapshots Using Lock
Snapshots can also be, overwritten or cleared allowing you to organize them ready for your live set. Creating a Snapshot To create a Lock snapshot: MASCHINE JAM - Manual - 143... - Page 144 Lock View presents an overview of all your snapshots. Here you can recall, update, or clear your snapshots. Using the on-screen overlay you can also set options for morphing between two snapshots. To enter Lock View: Press SHIFT + LOCK. ► MASCHINE JAM - Manual - 144...
- Page 145 Select the Snapshot you want to update from the 8x8 matrix. ⇨ The snapshot will illuminate to indicate it is in focus. Adjust the settings on your controller until you are ready to update the snapshot. MASCHINE JAM - Manual - 145...
- Page 146 Turn the morph setting on, and adjust the transition time accordingly. As you switch between your snapshots you will be able to hear a controlled transition from → one to another at the time selected time rate. The Lock on-screen overlay: MASCHINE JAM - Manual - 146...
- Page 147 You could for example group them according to changes of effects, pitch, or cutoff and resonance, or even Mute and Solo settings, etc. MASCHINE JAM - Manual - 147...
-
Page 148: Troubleshooting - Getting Help
Before getting help please make sure you have downloaded the latest MASCHINE soft- ware and documentation from the Native Instruments website. Troubleshooting A few common issues and possible solutions when working with MASCHINE are listed in this section. -
Page 149: The Maschine Software Crashes
The version number of your software is displayed in the About dialog for any Native Instruments ap- plication. This dialog can be opened by clicking on the NI logo in the upper right corner of the user interface. -
Page 150: Knowledge Base
You can reach the Online Support via: http://www.native-instruments.com/suppform When communicating with the Native Instruments support team, keep in mind that the more details you can provide about your hardware, your operating system, the version of the software you are running, and the problem you are experiencing, the better they will be able to help you. -
Page 151: Registration Support
9.2.4 User Forum In the Native Instruments User Forum, you can discuss product features directly with other users and with experts moderating the forum. Please be aware that the Technical Support team does not participate in the forum. If you’re encountering an issue that can’t be solved by other users, contact Native Instruments’... -
Page 152: Glossary
You then only have to set up the desired Sound(s) and Group(s) of your Project to send some of their audio to this bussing point. This basically is the way to set up send effects in MASCHINE! MASCHINE JAM - Manual - 152... - Page 153 Control Mode Control mode also allows you to easily adjust any parameter of your channels (Master, Group and Sound) and any plug-ins contained in them via the Control section of your controller. MASCHINE JAM - Manual - 153...
- Page 154 Sound slot. This mode is well suited for rhythmic instruments (e.g., a drum kit). Insert Effect An insert effect is an effect directly inserted in the signal path of the audio to be processed. MASCHINE JAM - Manual - 154...
- Page 155 Any modulated parameter is displayed both in the Control Lane (at the bottom of the Pattern Editor) and as a movement of the chosen parameter itself in the Control area. MASCHINE JAM - Manual - 155...
- Page 156 Pattern Editor Located at the bottom of the MASCHINE window, the Pattern Editor allows you to select Sound slots (on the left), display and edit your Patterns, change the Step Grid settings and create/edit automation. MASCHINE JAM - Manual - 156...
- Page 157 Plug-in A Plug-in is an instrument or effect unit, either Internal or External (by Native Instruments or a third-party manufacturer), that can be loaded into a Plug-in slot to produce or alter sound.
- Page 158 Song Mode is the default mode of your controller. In this mode, you can gain an overview of all your Scenes, Groups and Patterns. Song Mode also allows you to easily adjust any parameter of your Groups and Sounds via the Smart Strip section of your controller. MASCHINE JAM - Manual - 158...
- Page 159 Swing The Swing parameter allows you to shift some of the events in your Pattern to create a shuf- fling effect. MASCHINE JAM - Manual - 159...
Need help?
Do you have a question about the Maschine Jam and is the answer not in the manual?
Questions and answers