Native Instruments Maschine Reference Manual
Groove production studio
Hide thumbs
Also See for Maschine:
- Manual (962 pages) ,
- Getting started (200 pages) ,
- Getting started manual (104 pages)
Table of Contents
Advertisement
Quick Links
Advertisement
Table of Contents

Related Manuals for Native Instruments Maschine


Summary of Contents for Native Instruments Maschine
- Page 1 REFERENCE MANUAL...
- Page 2 The information in this document is subject to change without notice and does not represent a commitment on the part of Native Instruments GmbH. The software described by this document is subject to a License Agreement and may not be copied to other media. No part of this publication may be copied, reproduced or otherwise transmitted or recorded, for any purpose, without prior written permission by Native Instruments GmbH, hereinafter referred to as Native Instruments.
- Page 3 Germany Native Instruments GmbH Schlesische Str. 28 D-10997 Berlin Germany info@native-instruments.de www.native-instruments.de Native Instruments North America, Inc. 5631 Hollywood Boulevard Los Angeles, CA 90028 sales@native-instruments.com www.native-instruments.com © Native Instruments GmbH, 2010. All rights reserved.
-
Page 4: Table Of Contents
Disclaimer..................17 1.5 Installing MASCHINE ..................... 18 1.5.1 System Requirements ...............18 1.5.2 Installing MASCHINE on Windows® XP and Windows® Vista ....18 1.5.3 Installing the MASCHINE Software on Mac OS® X .......19 1.5.4 Activating MASCHINE ..............20 1.5.5 Connecting the MASCHINE Controller ..........21 1.6... - Page 5 3.1.1 Browser Mode Selector ..............52 3.1.2 File Type Selector ................52 3.1.3 Tag Filter ..................53 3.1.4 Text Search field ................54 3.1.5 Search Result List................54 3.1.6 Locating missing Samples ..............55 MASCHINE 1.5 Reference Manual – V...
- Page 6 4.5 Saving a Sound .....................77 4.6 Copying and Pasting Sounds ..................78 4.7 Resetting a Sound ....................79 4.8 Mute & Solo ......................80 4.9 Loading REX Files ....................83 4.10 Sound MIDI Options ....................84 4.10.1 Sound MIDI Batch Setup ..............85 4.10.2 Sound MIDI Settings ............... 86 4.10.3 MIDI Output from Sounds ..............88 MASCHINE 1.5 Reference Manual – VI...
- Page 7 6.1.8 Recording automation ..............112 6.1.9 Recording automation in the Step Sequencer ........113 6.1.10 Step Grid, Pattern Length Grid and Quantization ........ 113 6.2 Editing Patterns ....................115 6.2.1 Selecting notes and events .............. 115 MASCHINE 1.5 Reference Manual – VII...
- Page 8 Rendering MIDI from Patterns using Drag & Drop .......132 8 The MASCHINE Effects (FX) ...................134 8.1 Dynamics ......................135 8.1.1 Compressor ..................135 8.1.2 Gate .....................136 8.1.3 Limiter ..................137 8.1.4 Maximizer ..................137 8.2 Filtering ......................138 8.2.1 Filter ....................138 8.2.2 EQ ....................140 MASCHINE 1.5 Reference Manual – VIII...
- Page 9 9 Using FX ........................158 9.1 Adding FX to a Sound ..................158 9.2 Adding FX to a Group ................... 160 9.3 Adding FX to the Master ..................163 9.4 Applying FX to an external instrument ..............165 9.5 Recording FX automation ..................167 9.6 Saving FX Presets ....................167 9.7 Muting FX ......................169 9.8 Creating a Send Effect ..................170 9.9 Creating a Multi Effect ..................173 MASCHINE 1.5 Reference Manual – IX...
- Page 10 11.2.4 Mapping a Sample (Software) ............207 12 The Master Section ....................... 210 12.1 The Master Source Tab (SRC) ................210 12.1.1 Page 1: Master Mixer ..............210 12.1.2 Page 2: Group Panning ..............211 12.2 The Master Output Tab (OUT) ................211 13 Exporting Audio ......................213 13.1 Export Audio ....................... 213 13.2 Collate Audio ...................... 215 MASCHINE 1.5 Reference Manual – X...
- Page 11 16.1.3 Check your CPU power before playing ..........233 16.1.4 Name your Groups and Sounds ............234 16.1.5 Consider using a Limiter on your Master ........... 234 16.1.6 Hook up your other gear and sync it with MIDI clock ......234 MASCHINE 1.5 Reference Manual – XI...
- Page 12 16.3.1 Changing Pattern Length for variation ..........236 16.3.2 Using the Loop Mode to cycle through Samples ........ 236 16.3.3 Load long audio files and play with the start point ......236 17 Index ..........................237 MASCHINE 1.5 Reference Manual – XII...
-
Page 13: Introduction
You can sample your own material, slice loops and rearrange them easily. However, MASCHINE is a lot more than an ordinary groove box or sampler: it comes with an inspiring 5 Gigabyte library containing over 250 kits and 14,000 samples, and a sophisticated, yet easy to use tag-based Browser to give you instant access to the sounds you are looking for. -
Page 14: About This Manual
. Consequently you will notice that this formatting has been applied to all mall names of knobs, buttons and other elements that let you interact with the MASCHINE software, but not to the names that relate to the MASCHINE Controller’s Knobs, Pads, etc. MASCHINE 1.5 Reference Manual – 14... -
Page 15: Other Documentation
This is MASCHINE’s Reference Manual covering all the features and aspects of the MASCHINE Hardware and the MASCHINE Software in detail. If you would like to quickly get going with- out getting too deep into the specifics, we recommend you read the printed Getting Started Manual included in the box, which will give you a fast overview of MASCHINE’s main features... -
Page 16: Using The Unit Safely
MASCHINE Controller. Warning Do not open the MASCHINE Controller or attempt to disassemble or modify any internal parts! The MASCHINE Controller does not contain any user-serviceable parts. If it appears to be mal- functioning, discontinue use immediately and have it inspected by qualified service personnel. -
Page 17: Disposal Notice
The information contained in this manual is believed to be correct at the time of printing or digital release. However, Native Instruments reserves the right to make changes to the speci- fications at any time without notice or obligation to update existing units. -
Page 18: Installing Maschine
1.5 Installing MASCHINE This chapter will guide you through the MASCHINE installation procedure step by step. The installation includes all components of MASCHINE: the MASCHINE application, the sound library and the Controller Editor application. 1.5.1 System Requirements • Windows® 7 / Vista / XP, Pentium® / Athlon® 2 GHz, 2 GB RAM •... -
Page 19: Installing The Maschine Software On Mac Os® X
2. Connect the MASCHINE Controller using the USB cable. If you want to connect the MASCHINE Controller to a USB-hub instead, make sure the hub has its own power supply - the MASCHINE Controller will not work on a passive (bus-powered) USB hub. -
Page 20: Activating Maschine
10. If you want to install the MASCHINE Library contents to a custom location, e.g. to an external hard disk, click the folder icon in the Location column to open a dialog in which you can specify a destination for the installation. -
Page 21: Connecting The Maschine Controller
1.5.5 Connecting the MASCHINE Controller Plug the USB cable (included in the package) into the USB port on the back of the MASCHINE Controller, and connect the cable’s other end to one of the USB-ports of your computer. If you want to run the MASCHINE Controller on a USB-hub instead, make sure the hub has its own power supply - the MASCHINE Controller will not work on a passive (bus- powered) USB hub. -
Page 22: Maschine Controller: Overview
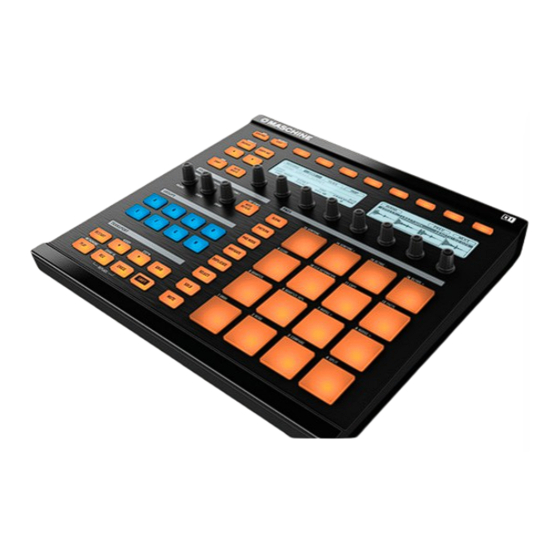
1.6 MASCHINE Controller: Overview This chapter will introduce you to the MASCHINE Controller’s hardware elements. Virtually all functions are available on both interfaces and you can access them through the software as well as through the hardware. If you need to look up a certain user interface element’s... - Page 23 19 Modifier Buttons If you own an older Hardware Controller, some of its Buttons might have a different name. In this document, we use the new names, followed by the older ones in brackets if necessary. MASCHINE 1.5 Reference Manual – 23...
-
Page 24: Maschine Software: Overview
MASCHINE Controller Overview chapter, you can access virtually all of MASCHINE’s functions via the MASCHINE Controller as well as in the software. If you need to look up a certain user interface element’s name, you can return to this chapter at... -
Page 25: The Header
1.7.1 The Header Menu Button Browser Button Display Area Transport Controls Connect Button Audio Engine Button CPU Meter Volume Control NI Logo 1.7.2 The Arranger Play Mode Controls Group Slots Arranger Timeline Clip Area MASCHINE 1.5 Reference Manual – 25... -
Page 26: The Browser
1.7.3 The Browser Browser Mode Selector File Type Selector Tag Filter Text Search Field Search Result List Tag Editor Audition Controls MASCHINE 1.5 Reference Manual – 26... -
Page 27: The Control Area
1.7.4 The Control Area Master Tab Group Tab Sound Tab Source Tab FX1 Tab FX2 Tab Output Tab Quick Browse Area Page Selector 10 Parameter Pages, depending on the selected Tab and Page MASCHINE 1.5 Reference Manual – 27... -
Page 28: The Pattern Editor
Step Editor View Switch Dragger Icon Step Editor Piano Roll / Keyboard View Switch Sampling View Switch Sound Slots Automation Lane Automation View Switch Edit Controls 10 Pattern Timeline 11 Pattern Slots 12 Pattern Length Controls MASCHINE 1.5 Reference Manual – 28... -
Page 29: The Sampling Area
1.7.6 The Sampling Area Record Tab Edit Tab Slice Tab Mapping Tab Trim Controls Sample Loop Controls Zone Envelope Controls Info Bar Sample Timeline 10 Sample View 11 Zoom Tool 12 Start Marker 13 End Marker MASCHINE 1.5 Reference Manual – 29... -
Page 30: Basic Concepts
Sound are available. Each Sound of the currently selected Group is mapped to one of the 16 Pads on the MASCHINE Controller, so you can play the Sounds by hitting the Pads. Refer to chapter 4, “Creating... - Page 31 This is where all audio signals from each of the Groups and Sounds come together and get mixed. The Master bus can also host two Insert FX of its own. More information on the Master can be found in chapter 10, “Creating a Song using Scenes.” MASCHINE 1.5 Reference Manual – 31...
-
Page 32: Common Operations
This is helpful if you have a small display connected to your computer, or want to concentrate on one element without being distracted by the other. This can be done on the MASCHINE Controller as well as in the soft- ware, but only affects your computer’s display. - Page 33 ► Press and hold NAVIGATE; now press Button 5 to hide the Browser. To bring it back, press Button 5 again. The Navigate screen on the Left and Right Display of the MASCHINE Controller Software ► Click on the Browser Button (with the magnifier symbol) in the Header to show and hide the Browser.
- Page 34 Software ► Click on the Minimize Button (showing an arrow) to the left of the Control Area to show and hide the Parameter Pages in the Control Area. The Control Area in full size MASCHINE 1.5 Reference Manual – 34...
-
Page 35: Navigating Parameter Pages In The Control Area
Hardware and Software. Hardware On the MASCHINE Controller you can use the Page Buttons to navigate through the Parameter Pages. Whenever there is more than one Page, it will be shown on the right of the Right Display like this: MASCHINE 1.5 Reference Manual –... -
Page 36: Undo And Redo
6.2.5, “Compare/Split” for the Hardware and 7.2.3, ”Compare/Split” for the Software. In MASCHINE you can undo everything you did after loading or creating your Project. Note: If you save your Project, you will no longer be able to Undo or Redo any actions... -
Page 37: Stand-Alone And Plug-In Mode
You can run MASCHINE as a stand-alone application or integrate it into your favorite Digital Audio Workstation (or DAW, in short) by loading it as a plug-in. MASCHINE is available in the VST, Audio Unit and RTAS plug-in formats. For further information on plug-in compatibility and for a detailed description of how to use plug-ins in your host, please refer to the docu- mentation included with your host software. -
Page 38: Preferences
2.4 Preferences You can find the Preferences dialog under MASCHINE in the Main Menu (Mac OS® X) or in the File menu (Windows®), as well as in the File submenu of the Plug-in menu: Preferences on the Main Menu (Mac OS® X depicted) Preferences in the Plug-in Menu MASCHINE 1.5 Reference Manual –... -
Page 39: Preferences - General Tab
2.4.1 Preferences – General Tab The Preferences – General Tab Startup If this option is checked, the last Project you worked on when quitting MASCHINE will be loaded as soon as you Eload laSt rojECt start MASCHINE again. Recording Audio... - Page 40 Use the Input Channel control to set the MIDI channel you want MASCHINE to receive MIDI messages on. Limiting npUt hannEl MIDI input to one channel can keep MASCHINE from play- ing unwanted MIDI notes sent by external devices. MASCHINE 1.5 Reference Manual – 40...
-
Page 41: Preferences - Default Tab
Template Project Here you can select a Project that will automatically be tandalonE loaded when you start MASCHINE in stand-alone mode. Here you can select a Project that will automatically be lUGIn loaded when you start MASCHINE in plug-in mode. -
Page 42: Preferences - User Paths Tab
If you have changed the content of the selected direc- tory (such as added or removed files), you should res- rESCan can it in order to let MASCHINE know which files have been removed and/or added so that they show up in the MASCHINE Library. -
Page 43: Preferences - Libraries Tab
2.4.4 Preferences – Libraries Tab The Preferences – Libraries Tab Click this button to rescan the MASCHINE Factory Library. rESCan This is useful if you have moved the Factory Library to anoth- er hard drive or to another location on the same hard drive. -
Page 44: Preferences - Hardware Tab
Pad hard to get a big velocity value). Display The Brightness Slider allows you to adjust the brightness of rIGhtnESS both Left and Right Displays of the MASCHINE Controller. With these sliders you can adjust the contrast of the Left & r ontraSt IGht and Right Displays separately. -
Page 45: Audio And Midi Settings
2.5 Audio and MIDI Settings ► To open the Audio and MIDI Settings dialog, select the Audio and MIDI Settings… entry from the File menu. 2.5.1 Audio Tab The Audio Tab of the Audio and MIDI Settings dialog MASCHINE 1.5 Reference Manual – 45... - Page 46 Windows®: When using an ASIO driver on the Audio and MIDI Settings dialog shows an ASIO Config button instead of the Latency slider. Click this button to open the settings dialog of the selected ASIO driver. MASCHINE 1.5 Reference Manual – 46...
-
Page 47: Routing Tab
The Routing Tab of the Audio and MIDI Settings dialog By clicking on this button, you can define which two inputs on your audio interface will be seen by MASCHINE. Select the Inputs of your audio interface on the right column by... -
Page 48: Midi Tab
FFSEt Adjust the Offset value to set an amount of latency to be compensated (in milliseconds). MASCHINE will then send MIDI clock events ahead of time as defined. MASCHINE 1.5 Reference Manual – 48... -
Page 49: Connecting External Midi Equipment
MIDI Clock entry from the File menu: External Sync activated If you use MASCHINE as a plug-in, it is automatically synced to the host application so you don’t have to activate External Sync! You have to define at least one Input in the Audio and Midi Settings’ MIDI Tab to enable External Sync. -
Page 50: Send Midi Clock
2.6.2 Send MIDI Clock MASCHINE can also send a MIDI Clock signal to any device that is capable of receiving MIDI Clock. This could be hardware such as a drum machine, another groovebox or sequencer, or even another software sequencer. To enable Send MIDI Clock, select it from the File menu: Send MIDI Clock activated MASCHINE 1.5 Reference Manual –... -
Page 51: Browser
Groups, Projects, FX Presets and Patterns. This is done by tagging them, which means cat- egorizing them by using keywords. Have a look at the tutorial videos “Browser & Library Part One” and “Browser & Library Part Two” available on the Native Instruments website (http:// www.native-instruments.com) for more information. -
Page 52: Browser Mode Selector
Mode Selector. On the File Type Selector you will find 6 icons representing the different file types of MASCHINE: Projects (1), Groups (2), Sounds (3), Patterns (4), FX Presets (5) and Samples (6). By clicking on one of them, it causes only the files of the selected type to be displayed in the Search Result List. -
Page 53: Tag Filter
The Type category is the first in the tag hierarchy of Type MASCHINE, and should be used to categorize your file in a general way. With the Subtype, you can narrow down the description of Subtype your file even further. -
Page 54: Text Search Field
Depending on what File type you have selected, the file will be loaded to different locations within MASCHINE: The Search Result List showing Kicks from the MASCHINE Factory Library • If it is a Project it will load all associated files replacing all files currently in memory. A dialog will appear asking you if you want to save changes to the currently loaded Project. -
Page 55: Locating Missing Samples
Browser and dropping them on the desired location. 3.1.6 Locating missing Samples If you are loading a MASCHINE Project and the referenced samples cannot be found for any reason, a dialog in which you can locate the missing samples will open. -
Page 56: Adding Your Own Samples
The Purge Missing Samples and the Find Missing Samples entries in the Maschine File Menu ► Select Purge Missing Samples to remove all sounds with missing samples from your MASCHINE Project. 3.2 Adding your own Samples Apart from the huge Library, you might still want to use your own Samples. The supported file types are Wav and Aiff. - Page 57 Browser. Click on the Audition Button; the slider to the right is the Volume Slider for the Audition Control. From left to right: S Utton UdItIon Utton olUmE lIdEr mport Utton MASCHINE 1.5 Reference Manual – 57...
-
Page 58: Importing A Sample Into The Library
Ctrl key (PC) or the Command key (Mac). After pressing Import, you will be presented with the Tag Editor to tag the Sample(s) you are about to import to the Library. MASCHINE 1.5 Reference Manual – 58... -
Page 59: Tagging Your Samples, Sounds, Groups, Fx Presets, Patterns And Projects
You can also add your own Tags. On the bottom of each of the three category columns in the Tag Editor, there is an add new… entry: Adding a new Tag in the Type Column MASCHINE 1.5 Reference Manual – 59... -
Page 60: Quick Browse
Tags you used to find it, or browse all Kick Sounds (given that the MASCHINE Library already has around 700 Kick Sounds, this may take a considerable amount of time). With Quick Browse you can restore the query with just one click. -
Page 61: Using Quick Browse
Search Result List if you click on the Magnifier Tool next to the file name in the respective Tab, but they will not be loaded automatically while browsing them. MASCHINE 1.5 Reference Manual – 61... -
Page 62: The Browser On The Hardware
Bank category from the Factory Library are Drums or Loops or Factory FX. The Type category is the first in the tag hierarchy of MASCHINE and Type categorizes the file in a general way. Examples for the Type category from the Factory Library are Brass, Analog FX or Kick. - Page 63 Search Result List in order to be able to compare them easily (just like In-Place Auditioning on the software). Quick Browse The Browser on the MASCHINE Controller always restores the search query you performed to get a given file. Read more about the Quick Browse function in section 3.3, “Quick Browse.”...
-
Page 64: Creating Sounds
(a Sound in MASCHINE terminology). A Sound can also be used as an effect source in MASCHINE; you could for example use a Sound to host a Send Effect for other Sounds, or even route external audio signals through a given Sound (read chapter 9, “Using FX,”... -
Page 65: The Sampler Parameters In The Sound's Source Tab (Src)
Page 2: Pitch/Gate and Amplitude Envelope • Page 3: FX and Filter Settings • Page 4: Modulation Envelope and Destination • Page 5: LFO and Destination • Page 6: Velocity Destination and Modwheel Destination MASCHINE 1.5 Reference Manual – 65... -
Page 66: Voice Settings And Engine
Hardware ► On your MASCHINE Controller, use the Page Buttons to step through the various Parameter Pages. On the MASCHINE Controller, step through the pages by pressing the Page Buttons. Software ► In the Software, use the Page Selector to step through the Parameter Pages. - Page 67 If you choose the S1200 model (see above), you can fur- ther shape the emulation model by activating a filter here. IltEr The available filters are: None (no filter), Low, Lo-Mid, Hi- Mid, and High. MASCHINE 1.5 Reference Manual – 67...
-
Page 68: Pitch/Gate And Amplitude Envelope
Oneshot: This is typical vintage drum machine behavior: the sample is played in its entirety from beginning to end with no envelope. Note: if Oneshot is activated, the following param- eters will not be available! MASCHINE 1.5 Reference Manual – 68... - Page 69 ADSR: Typically, the ADSR envelope is used for longer, sustained Samples that require complex dynamic control. Tip: unlike many other hardware devices, the Pads on MASCHINE are sensi- tive not only to being hit, but also to being held—so using the ADSR envelope, you can make the Pads behave like a MIDI keyboard and sustain a note only for as long as it is held down.
-
Page 70: Fx And Filter Settings
SR stands for sample rate: you can use it to lower the orig- inal sample rate in order to give a Sound a lo-fi touch. Allows you to lower the original bit rate of the Sound, re- sulting in a more rough, digital sounding lo-fi effect. MASCHINE 1.5 Reference Manual – 70... -
Page 71: Modulation Envelope And Destination
LFO or the MIDI Modulation Wheel. 4.3.1 Page 4: Modulation Envelope and Destination Page 4 of 6 from Sampler Source Tab on the hardware Page 4 of 6 from Sampler Source Tab on the software MASCHINE 1.5 Reference Manual – 71... -
Page 72: Lfo And Destination
, located on Sampler Parameter Page 3 rIvE • , located on Output Parameter Page 1 4.3.2 Page 5: LFO and Destination Page 5 of 6 from the Sampler Source Tab on the hardware MASCHINE 1.5 Reference Manual – 72... - Page 73 • Pitch, located on Sampler Parameter Page 2 • , located on Sampler Parameter Page 3 UtoFF • , located on Sampler Parameter Page 3 rIvE • , located on Output Parameter Page 1 MASCHINE 1.5 Reference Manual – 73...
-
Page 74: Velocity Destination And Modwheel Destination
This allows you to modulate the Cutoff parameter of the UtoFF Filters with filter types LP, HP, BP (on Page 3). This allows you to modulate Volume, which is what Velocity olUmE normally is used for. MASCHINE 1.5 Reference Manual – 74... -
Page 75: The Sampler Parameters In The Sound's Output Tab (Out)
Send Effect. 4.4.1 Page 1: Main, Aux 1 and Aux 2 Page 1 of 2 from the Sampler Output Tab on the hardware Page 1 of 2 from the Sampler Output Tab on the software MASCHINE 1.5 Reference Manual – 75... -
Page 76: Pre Mix Options
Defines the pan position of your Sound in the stereo field. If MASCHINE is running as a plug-in, the External Outputs will correspond to virtual outputs in your host. This allows you to send individual Sounds from MASCHINE to their own mixer channel within your DAW, for example. -
Page 77: Saving A Sound
Main Level and Pan of the Sound. 4.5 Saving a Sound To save a Sound, right-click (on Mac OS® X: Control-click) on the Sound Slot in the Arranger and select Save As… from the dropdown menu: Saving a Sound MASCHINE 1.5 Reference Manual – 77... -
Page 78: Copying And Pasting Sounds
The Sound will be added to the Library and is ready to be tagged. Saving a Sound is only available in the MASCHINE Software. 4.6 Copying and Pasting Sounds Hardware To copy a Sound from one pad to another, press and hold DUPLICATE, press the Pad of the Sound you want to copy, then select your target Sound Slot (this can also be in another Group, in this case first press one of the Group Buttons) by hitting its Pad. -
Page 79: Resetting A Sound
Hold SHIFT + ERASE and then touch the Pad corresponding to the Sound to be reset. Software ► To reset a Sound, right-click (on Mac OS® X: Control-click) the Sound Slot and choose Reset from the dropdown menu. MASCHINE 1.5 Reference Manual – 79... -
Page 80: Mute & Solo
Mode until you press SOLO again. There are two more functions in the Solo Mode: All On (press Button 3) to turn all Sounds on and None (press Button 4) to turn all Sounds of the Group currently in focus off. MASCHINE 1.5 Reference Manual – 80... - Page 81 Solo a given sound such as a kick drum, then build the track up again by bringing the muted sounds back in one at a time with the MUTE button. The Mute Screen on the hardware MASCHINE 1.5 Reference Manual – 81...
- Page 82 To unsolo a Group, right-click (on Mac: Control-click) on the Group icon again. Muting a Sound ► To mute a Sound, click on the Pad icon in the Pattern Editor. Muting a Sound ► To unmute the Sound, click on the Pad icon again. MASCHINE 1.5 Reference Manual – 82...
-
Page 83: Loading Rex Files
To unmute the Group, click on the Group icon again. 4.9 Loading REX Files MASCHINE supports REX (ReCycle) files to be loaded. REX files are loops that are already sliced and mapped to MIDI notes. Only REX2 files are currently supported. -
Page 84: Sound Midi Options
A REX file loaded on Sound 1 in the Piano Roll/Keyboard View 4.10 Sound MIDI Options MASCHINE’s Groups and Sounds can be triggered via MIDI, both globally and individually. To configure the appropriate MIDI settings, you have two functions at your disposal: Sound MIDI Batch Setup (for whole Groups) and Sound MIDI Settings (for individual Sounds). -
Page 85: Sound Midi Batch Setup
Sound MIDI Batch Setup from the pop-up menu. Selecting Sound MIDI Batch Setup for a Group Now you will be presented with the Sound MIDI Batch Setup dialog: The Sound MIDI Batch Setup dialog MASCHINE 1.5 Reference Manual – 85... -
Page 86: Sound Midi Settings
Right-click (on Mac OS® X: Ctrl-click) on the Sound Slot of a Sound and choose Sound MIDI Settings from the pop-up menu. Choosing Sound MIDI Settings for a Sound Now you will be presented with the Sound MIDI Settings dialog: MASCHINE 1.5 Reference Manual – 86... - Page 87 Define the lowest note on which the Sound will respond to MIDI here. Define the highest note on which the Sound will respond to MIDI here. Destination Options Define the Root Note of the selected Sound here. MASCHINE 1.5 Reference Manual – 87...
-
Page 88: Midi Output From Sounds
Groups have a higher priority than the Scene settings. 4.10.3 MIDI Output from Sounds You can output MIDI notes from individual Sounds allowing you to control your host applica- tion and/or external MIDI gear from MASCHINE’s sequencer. Hardware Select an empty Sound by pressing its Pad. - Page 89 2. Select the Source tab (SRC) and click on the arrow to open the dropdown menu. The dropdown menu in the Source tab 3. Choose MIDI Out, then select the MIDI Channel you want the Sound to send MIDI to. Choosing MIDI Channel 1 as output for Sound 2 MASCHINE 1.5 Reference Manual – 89...
-
Page 90: Creating Groups
The Group Source Tab Parameters on the software Voice Settings Here you can define a voice limit for the Group. The de- fault value is 16, the minimum 1 and the maximum 32 olyphony voices. MASCHINE 1.5 Reference Manual – 90... -
Page 91: Pitch & Swing
The default value is 1/8. This Button allows you to invert the Swing function so that instead of a long note followed by a short note, the oppo- nvErt site is true. MASCHINE 1.5 Reference Manual – 91... -
Page 92: Macro Controls
This is useful for playing live since you can choose a set of parameters to manipulate on one screen without having to switch screens, but also allows you to automate MASCHINE parameters using the host automation of your DAW. Please refer to the manual of your DAW software for more information on that. - Page 93 To remove a parameter from the assigned Macro Control, right-click (on Mac OS® X: Ctrl- click) on it and select the Remove Macro Control entry from the pop-up menu: Removing a parameter from a Macro Control MASCHINE 1.5 Reference Manual – 93...
- Page 94 Assigning MIDI CC 1 to Macro Control 1 Alternatively, you can also let MASCHINE learn the MIDI CC it is supposed to react to. Choose MIDI Learn from the pop-up menu and move the desired knob or fader on your connected...
-
Page 95: The Group Out Tab Parameters
5.2 The Group Out Tab Parameters 5.2.1 Page 1: Routing, Volume and Pan Page 1 of 2 from the Group Out Tab Parameters on the hardware Page 1 of 2 from the Group Out Tab Parameters on the software MASCHINE 1.5 Reference Manual – 95... -
Page 96: Aux Pre And Post
Here you adjust the amount of the signal that gets sent to the EvEl Aux 2 destination. 5.2.2 Page 2: Aux Pre and Post Page 2 of 2 from the Group Out Tab Parameters on the hardware MASCHINE 1.5 Reference Manual – 96... -
Page 97: Saving A Group
To save a Group, right-click (on Mac OS® X: Control-click) on the Group’s Slot in the Arranger and select Save As… from the dropdown menu: Saving a Group The Group will be added to the Library and is ready to be tagged. Saving Groups is only available on MASCHINE Software. MASCHINE 1.5 Reference Manual – 97... -
Page 98: Copy And Paste Groups
Resetting a Group means removing the associated Sounds and FX as well as putting all Group Parameters back to their default value. Hardware ► Hold SHIFT + ERASE, then press the Group Button for the Group to be reset. MASCHINE 1.5 Reference Manual – 98... -
Page 99: Naming Groups & Sounds
You can now edit the name of that Sound. Press the Return key to confirm. Some hosts will catch the Enter key, as it is mapped to some function of the host software. In this case, click anywhere else in the MASCHINE plug-in window to confirm the name you have entered. -
Page 100: Loading Groups Without Patterns
If you want to build a Group from scratch, you can load Groups without Patterns both on the MASCHINE Hardware and Software. Other than that, previously loaded Patterns will not be removed, enabling you to try out a Pattern using different Sounds. -
Page 101: Mpc Program Import To Groups
A selected Group in the Browser with the Pattern load option unchecked 5.8 MPC Program Import to Groups MASCHINE allows you to import Drum program files (.PGM and .AKP) from the Akai MPC series to Groups. Supported models include the MPC 4000, MPC 3000, MPC 2000, MPC 500, MPC 1000 and the MPC 2500. - Page 102 Filter1 Velocity to − − − Velocity Cutoff Frequency Mixer Level Track Level Mixer Pan − Track Pan Velocity to Level − − − Velocity to Volume Mute Group − − − Choke Group MASCHINE 1.5 Reference Manual – 102...
-
Page 103: Importing Mpc Program Files
5.8.2 Importing MPC Program files To import an MPC Program file, open the Browser on the MASCHINE software and enter DISK Mode. 2. Navigate to the MPC Program you want to import and double-click it. You will be prompted with the following dialog: The MPC Import dialog MASCHINE 1.5 Reference Manual –... - Page 104 If you only want to import a single Bank choose this option. Use the dropdown menu to the right to select which Bank mport InGlE you want to import. 4. Click OK to start the import procedure. MASCHINE 1.5 Reference Manual – 104...
-
Page 105: Working With Patterns (Hardware)
6 Working with Patterns (Hardware) Creating a Pattern is where the fun starts, because the Sequencer really is the core of MASCHINE. It comes with a complex, yet easy to use Pattern Editor and sophisticated au- tomation possibilities. Make sure to also check out the tutorial videos regarding the Sequencer: “Step Recording”... -
Page 106: Input Mode
Grid value. Input Mode also allows you to select a fixed velocity value for the Pads so that the selected Sounds (like drums) will play at the same volume no matter how hard you hit the Pads. MASCHINE 1.5 Reference Manual – 106... - Page 107 The Base Key can also be changed by using Buttons 5-8 in Keyboard mode: Buttons 5-6 will shift the Base key in Semitones, while Buttons 7-8 will shift it in octaves. This is useful for instantly transposing the pads “by ear.” MASCHINE 1.5 Reference Manual – 107...
-
Page 108: Recording The Pads
Now hit the Pads you want to record and listen to what happens. Take your time to set up the Pad Sensitivity and Velocity Scaling to your personal taste—you will have even more fun playing MASCHINE! 6.1.4 The Metronome The Metronome will help you to keep time when recording in realtime. To activate the Metronome, hold down SHIFT and press PLAY. - Page 109 16 steps by using Buttons 7 and 8. To switch to another Sound, use Buttons 5 and 6 located above the Right Display, or press and hold Select and the Pad of the Sound you want to switch to. A typical 4/4 kick line in Step Sequencer mode MASCHINE 1.5 Reference Manual – 109...
-
Page 110: Using Note Repeat
Note Repeat is a really funky way to play percussion and drums live creating build-ups and breaks. • Note Repeat is also interesting to use with tonal Sounds and you can access it from Piano Roll/Keyboard Mode to create synthesizer-like arpeggios. MASCHINE 1.5 Reference Manual – 110... -
Page 111: Using The Piano Roll/Keyboard
If you prefer to play your melodies with a MIDI keyboard, you can connect one to the MIDI In on the back of the MASCHINE Controller. You can also use any USB-MIDI keyboard selected in the Audio and MIDI Settings (see chapter 2.5, “Audio and MIDI... -
Page 112: Recording Automation
6.1.8 Recording automation One of the really cool features of MASCHINE is the ability to automate parameters from the FX Modules and the Sampler Modules both on the hardware and on the software in a very easy way. ► To automate a parameter with the hardware, first make sure the song is playing, then simply turn one of the 8 Knobs while holding down AUTO WRITE (F2). -
Page 113: Recording Automation In The Step Sequencer
To change the Step Grid’s quantization settings, press and hold GRID followed by Button 4; the Right Display will show you which Pad represents which Grid. The Right Display showing the available Grids Select a Step Grid resolution by hitting the corresponding Pad. MASCHINE 1.5 Reference Manual – 113... - Page 114 Step Grid. You can repeatedly apply Quantize 50% until you are happy; you could for example apply it until the notes are close enough to sound tight, but loose enough to maintain their basic “feel.” MASCHINE 1.5 Reference Manual – 114...
-
Page 115: Editing Patterns
Sound. While holding SELECT, use Buttons 5 (UP) and 6 (DOWN) to choose the Sound of which you want to select notes and events. Alternatively you can select Sounds using the Pads. MASCHINE 1.5 Reference Manual – 115... -
Page 116: Erase/Clear
This can be used to creatively add groove to Patterns—for example, shifting the snare drum so that it is ever so slightly late, or “in the pocket” (something a funk drummer does naturally!). MASCHINE 1.5 Reference Manual – 116... -
Page 117: Nudge
To transpose the selected notes down in octaves press SHIFT + Pad 15 (OCTAVE -); to trans- pose the selected notes up press SHIFT + Pad 16 (OCTAVE +). If no events are selected, all notes in the Pattern will be affected. MASCHINE 1.5 Reference Manual – 117... -
Page 118: Working With Patterns (Software)
Step Editor View Switch Dragger Icon Step Editor Piano Roll / Keyboard View Switch Sampling View Switch Sound Slots Automation Lane Automation View Switch Edit Controls 10 Pattern Timeline 11 Pattern Slots 12 Pattern Length Controls MASCHINE 1.5 Reference Manual – 118... -
Page 119: Selecting Patterns And Pattern Banks
A6) are the ones that have content but are not selected, the empty ones (all others starting with A7) being the darkest ones. To switch to another Pattern Bank, select it in the dropdown menu: The Pattern Bank submenu MASCHINE 1.5 Reference Manual – 119... -
Page 120: Copy And Paste Patterns
You can save a Pattern independently from its Group. This is useful if you want to try out a Pattern with different Sounds. To save a Pattern, right-click (on Mac OS® X: Control-click) on the Pattern icon and select Save As from the dropdown menu: MASCHINE 1.5 Reference Manual – 120... -
Page 121: Editing Patterns
Saving a Pattern As with most saving operations, saving a Pattern is only available on MASCHINE Software. 7.2 Editing Patterns You can enter notes by double-clicking in the Grid of the Pattern Editor. They will be applied according to the selected Step Grid. To delete them, you can either double-click or right-click (on Mac OS®... -
Page 122: Mouse Actions In The Pattern Editor
The other way round, left-clicking on a note and moving the mouse cursor with the button pressed will erase all notes under the Mouse cursor. MASCHINE 1.5 Reference Manual – 122... -
Page 123: The Zoom Tool
Using the Zoom Tool, you can zoom in and out in the Pattern Editor. Click on the Zoom Tool and drag upwards to zoom in and downwards to zoom out. The Zoom Tool selected MASCHINE 1.5 Reference Manual – 123... -
Page 124: Compare/Split
You can see that a Pattern has been edited by way of an asterisk symbol displayed in its icon. The new state will be confirmed as soon as you select another Pattern and the asterisk will vanish. MASCHINE 1.5 Reference Manual – 124... -
Page 125: The Piano Roll/Keyboard
You can record Automation by moving that ring with a left click on it and then dragging it up and down during playback. Almost all parameters are automatable, the exception being all Buttons. MASCHINE 1.5 Reference Manual – 125... - Page 126 You will see that they keep their relative distance although they change their absolute values. Double-clicking creates an Automation event and replaces the others on this Step. The Automation Lane with the Velocity parameter in focus MASCHINE 1.5 Reference Manual – 126...
-
Page 127: Adding A Modulator
The automation points will snap to the selected Step Grid. If you want to automate Group parameters, just click on the Group Tab in the Control Area to be presented with available parameters of the Group. MASCHINE 1.5 Reference Manual – 127... -
Page 128: Step Grid, Pattern Length Grid And Quantization
In addition to the Step Grid there is the Pattern Length Grid which determines the increments in which the Pattern Length can be resized (described below). Choose the Pattern Length Grid by clicking on the l label, located in the Pattern Length Control at the top left: MASCHINE 1.5 Reference Manual – 128... - Page 129 To adjust the Pattern Length, click on the number in the right part of the Pattern Length Control, then drag it upwards to extend the Pattern or drag it downwards to shorten it. Adjusting the Pattern Length MASCHINE 1.5 Reference Manual – 129...
- Page 130 Control-click) on the Pattern icon. If notes and events are selected, the quantization will only affect the selected ones; if no note or event is selected, the whole Pattern content will be quantized. Quantize function for the Pattern content MASCHINE 1.5 Reference Manual – 130...
-
Page 131: Rendering Audio From Patterns Using Drag & Drop
Step Grid) and Quantize 50% (only moves the notes half way towards the selected Step Grid). If you record notes from a MIDI keyboard or using the Pads, it often happens that you create double notes where you don’t want them; MASCHINE automatically detects and removes these double notes while quantizing. -
Page 132: Rendering Midi From Patterns Using Drag & Drop
Select the Group and Pattern you want to export MIDI from. 2. Click and hold the Arrow on the left in the Header of the Pattern Editor. A dropdown menu will open. Choose MIDI from the Pattern Drag Mode submenu: MASCHINE 1.5 Reference Manual – 132... - Page 133 You can now drag the exported MIDI file to your desktop or into a MIDI channel of your host application. Alternatively you can also use the Export MIDI… entry from the dropdown menu: Choosing Export MIDI… from the dropdown menu MASCHINE 1.5 Reference Manual – 133...
-
Page 134: The Maschine Effects (Fx)
Native Instruments website (www.native-instruments.com) covering FX: “FX & Automation Part 1” and “FX & Automation Part 2”. The titles say it all: MASCHINE FX are designed to be modulated and automated! That’s when the sounds really come to life - when you start recording the knob movements. -
Page 135: Dynamics
Output Simple Gain Control to adjust the volume of the resulting signal; sometimes called “make-up gain” as it can be used to compensate for any reduction in the signal induced by the settings above. MASCHINE 1.5 Reference Manual – 135... -
Page 136: Gate
The time the Gate will take to release the input signal after ElEaSE it rises above the threshold. Output Mix lets you adjust the amount of the effect in relation to the dry original audio signal. MASCHINE 1.5 Reference Manual – 136... -
Page 137: Limiter
Limiter, but it specifically designed for increasing the perceived volume. For an ex- ample, load the Project “Be Mine” from the Library: the Maximizer is used on the Master FX here. MASCHINE 1.5 Reference Manual – 137... -
Page 138: Filtering
Filter with selectable characteristics that can be modulated via LFO or envelope follower. There are many applications for a filter: it can be used to emulate a synthesizer more realistically or to filter out selected frequencies and create filter-sweeps. MASCHINE 1.5 Reference Manual – 138... - Page 139 Adjusts the start phase of the LFO. haSE Defines the speed of the modulation in Hz (Hertz) ranging pEEd from 0.03 Hz up to 16 Hz. Change the shape of the LFO waveform here. hapE MASCHINE 1.5 Reference Manual – 139...
- Page 140 Frequency selector for the Mid Band 2. Ranges from 40 Hz to 16 kHz. Gain Control for the Mid Band 2. High Band Frequency selector for the High Band. Ranges from 50 Hz to 20 kHz. Gain Control for the High Band. MASCHINE 1.5 Reference Manual – 140...
-
Page 141: Modulation
(thereby making it sound as if there were several voices). It works by splitting the audio signal up into two versions and slightly detuning one of them. MASCHINE 1.5 Reference Manual – 141... -
Page 142: Flanger
The amount of the Flanger effect. moUnt Here you can select the modulation source of the Flanger: available options are E and l nvElopE pEEd oUrCE Depending on your selection, the parameter to the right will change: MASCHINE 1.5 Reference Manual – 142... - Page 143 8.3.3 FM FM on the hardware FM modulates the frequency of the audio signal based on FM synthesis. High frequency set- tings are useful for adding a subtle “gritty” texture to the input signal. MASCHINE 1.5 Reference Manual – 143...
- Page 144 With high Split settings, the effect becomes more “gritty” and crackling. Depth Contour determines the extent to which the input volume ontoUr affects the intensity of the effect. Determines the amount of the FM Effect. moUnt MASCHINE 1.5 Reference Manual – 144...
-
Page 145: Freq Shifter
This parameter widens the stereo field of the effect. tErEo Output Invert the settings of the Frequency Shifter here. nvErt Mix lets you adjust the amount of the effect in relation to the dry original audio signal. MASCHINE 1.5 Reference Manual – 145... -
Page 146: Phaser
Activating this causes the Phaser to use the 8Pole Mode, resulting in a more intense Phaser effect. Mix lets you adjust the amount of the effect in relation to Output m the dry original audio signal. MASCHINE 1.5 Reference Manual – 146... -
Page 147: Spatial And Reverb
The “ICE”-factor: higher values sound more metallic. This is a parameter better experienced than described! Adjust the size of the virtual room here. Output Mix lets you adjust the amount of the effect in relation to the dry original audio signal. MASCHINE 1.5 Reference Manual – 147... -
Page 148: Metaverb
Low band EQ to cut or boost bass frequencies. High band EQ to cut or boost high frequencies. Position Panorama control of the Metaverb. Output Mix lets you adjust the amount of the effect in relation to the dry original audio signal. MASCHINE 1.5 Reference Manual – 148... -
Page 149: Reflex
With this parameter, you can soften the metallic character mooth of Reflex. Adjust the size of the virtual room here. Output Mix lets you adjust the amount of the effect in relation to the dry original audio signal. MASCHINE 1.5 Reference Manual – 149... -
Page 150: Reverb
Designed rEEzE to be adjusted in real time. Mix lets you adjust the amount of the effect in relation to the dry original audio signal. MASCHINE 1.5 Reference Manual – 150... -
Page 151: Delay
Output This parameter widens the stereo field of the effect. tErEo Mix lets you adjust the amount of the effect in relation to the dry original audio signal. MASCHINE 1.5 Reference Manual – 151... -
Page 152: Grain Delay
Creates a more “dense” cloud: higher values create feed- EnSIty back-like effects. The amount of modulation introduced to the grain cloud. Output lets you adjust the amount of the effect in relation to the dry original audio signal. MASCHINE 1.5 Reference Manual – 152... -
Page 153: Grain Stretch
Adjust the pitch of the grains ItCh When on, grain size is corrected by the pitch Adjust the size of the grains Mix lets you adjust the amount of the effect in relation to the dry original audio signal. MASCHINE 1.5 Reference Manual – 153... -
Page 154: Resochord
Adjust the amount of the Feedback here. EEdBaCk With Decay you adjust how fast the Resochord fades out. ECay Mix lets you adjust the amount of the effect in relation to the dry original audio signal. MASCHINE 1.5 Reference Manual – 154... -
Page 155: Distortion
Feedback settings. This parameter determines how fast the distorted Sound ElEaSE dies down when the Gate is enabled. Mix lets you adjust the amount of the effect in relation to the dry original audio signal. MASCHINE 1.5 Reference Manual – 155... -
Page 156: Lofi
This parameter widens the stereo field of the effect. tErEo Bitcrush Introduces a distortion based on bit reduction. Output Mix lets you adjust the amount of the effect in relation to the dry original audio signal. MASCHINE 1.5 Reference Manual – 156... -
Page 157: Saturator
This parameter lets you adjust the amount of compression moUnt performed on the audio signal. Drive The amount of the distortion introduced by the Saturator. moUnt The Contour control determines how closely it responds to ontoUr the input volume. MASCHINE 1.5 Reference Manual – 157... -
Page 158: Using Fx
Effect you want to apply, press Button 8 to load it into the FX Module. You can also use Buttons 5 and 6 to step through the list and immediately load the selected FX. MASCHINE 1.5 Reference Manual – 158... - Page 159 The Sound Tab with the Clap 909 Sound in focus 2. Select one of the two FX Modules and click the Arrow to the right to get a list of all avail- able FX: MASCHINE 1.5 Reference Manual – 159...
-
Page 160: Adding Fx To A Group
Group Button of the Group you want to apply the Effect to. On the Right Display, you can now see the Modules FX1 and FX2. Select FX1 by pressing Button 6 or FX2 by pressing Button 7. MASCHINE 1.5 Reference Manual – 160... - Page 161 In the same way that FX get applied to the Sound currently in focus, they get applied to the Group currently in focus, so make sure to have your Group in focus in the Arranger by clicking on it: MASCHINE 1.5 Reference Manual – 161...
- Page 162 3. Select one of the two FX Modules and click the Arrow to the right to get a list of all avail- able FX: The list of available Effects for the Group 4. After selecting the Effect with the mouse, you will find the parameters displayed in the FX Module: MASCHINE 1.5 Reference Manual – 162...
-
Page 163: Adding Fx To The Master
6 you can directly load them. The list of available Effects for the Master on the Right Display 3. When you’ve found an Effect you want to apply, press Button 8 to load it into the selected FX Module. MASCHINE 1.5 Reference Manual – 163... - Page 164 2. Click on the Arrow on the right of one of the FX Modules to select an Effect for the Master. The list of available Effects for the Master You can also load FX Presets from the Browser either by double-clicking them or by dragging them to the FX Slot you want to use. MASCHINE 1.5 Reference Manual – 164...
-
Page 165: Applying Fx To An External Instrument
OK: MASCHINE's Inputs configuration in the Audio and MIDI Settings dialog Audio signals coming from external sources will now be routed to MASCHINE’s FX section! Hardware Choose an empty Group by selecting it with one of the Group Buttons. - Page 166 4. You will now see two parameters: one knob for the Level of the external input and a read- out between two arrows that let you select a Source. Select Ext In 1 as the Source. MASCHINE 1.5 Reference Manual – 166...
-
Page 167: Recording Fx Automation
If you created a nice FX setting, you can put it to further use by saving it as an FX Preset. To save an FX Preset simply select the entry Save... in the dropdown menu of the FX Module containing the Effect you want to save. MASCHINE 1.5 Reference Manual – 167... - Page 168 The dropdown menu of the FX Module with the Save entry This function is only available in the MASCHINE Software. Your FX Presets are automatically included in the MASCHINE Library after saving them, so you can tag them right away!
-
Page 169: Muting Fx
2. Click on the label (orange if it is a Sound, blue if it is a Group, white if it is the Master) on the left side of the FX Modules to mute and unmute the desired Effect. Muting the Reverb MASCHINE 1.5 Reference Manual – 169... -
Page 170: Creating A Send Effect
12. Select the Output Tab (OUT, Button 8) and turn Knob 5 to select the Aux 1 destination: in our case, select B: INPUT 1 (which means the Sound “Input 1” from the Group B). MASCHINE 1.5 Reference Manual – 170... - Page 171 The Sound is automatically renamed to “Input 1” (if you chose the Sound 1). But you can rename the Sound further to be able to clearly identify it as an Effect later! This will help you choose the right Sound from the Aux destination list. MASCHINE 1.5 Reference Manual – 171...
- Page 172 → As you can hear, the Snare 909 Sound is already being sent to the Effect; by turning the Aux 1 Level, you can adjust the amount of signal that gets sent into it. MASCHINE 1.5 Reference Manual – 172...
-
Page 173: Creating A Multi Effect
Learn more on creating complex Effect Chains in chapter 9, “Using FX.” In the Library there are already a number of Multi Effect Groups tagged “Multi FX”: The Multi FX of the Library in the Browser MASCHINE 1.5 Reference Manual – 173... - Page 174 The Multi FX Dual LFO Filtered Delays consists of a combination of the Beat Delay with the Filter. Try out some other Multi FX from the Library to get some ideas on how to set up your own Multi FX! The Multi FX Dual LFO Filtered Delays on the software MASCHINE 1.5 Reference Manual – 174...
-
Page 175: Creating A Song Using Scenes
10 Creating a Song using Scenes Creating a Song on MASCHINE is easy and straightforward. The basic concept is this: a song is composed of Clips, each of which represents a Pattern from a given Group. A combination of several Clips stacked vertically is called a Scene, of which a Project can have up to 64. -
Page 176: Creating And Deleting A Clip In The Arranger
Pattern of this Scene. Hardware Enter Pattern Mode by pressing PATTERN and lock it by pressing Button 1 at the same time if you want. 2. Choose your Pattern by selecting it with the Pads. MASCHINE 1.5 Reference Manual – 176... - Page 177 → A Clip with the selected Pattern will be automatically inserted into the focused Scene Column in the Arranger. Creating a Clip ► To delete a Clip, right-click (on Mac OS® X: Control-click) it. MASCHINE 1.5 Reference Manual – 177...
-
Page 178: Scene Sync
Scene: i.e., leav- ing the first Scene on beat 3 will cause the new Scene to start playing on its beat 3. If you have set Scene Sync to , the Scene change will happen immediately. MASCHINE 1.5 Reference Manual – 178... - Page 179 The Scene Position Marker The Scene Position Marker helps you to keep track of where exactly you are in the current Scene. Software The Scene Position Marker underneath the Scene Label MASCHINE 1.5 Reference Manual – 179...
-
Page 180: Inserting And Deleting Scenes
Right-click (Ctrl-click on the Mac) on the Scene’s label and choose Duplicate. The copied Scene will immediately begin playback. To remove the Scene, right-click (Ctrl-click on the Mac) on the Scene’s label and choose Remove. Scene editing menu (Software) MASCHINE 1.5 Reference Manual – 180... -
Page 181: Copy And Paste Scenes
Loop. To disable the Loop again, just select another Scene by pressing a Pad in Scene Mode. To include all Scenes in the Loop, hit Button 2 (ALL). MASCHINE 1.5 Reference Manual – 181... - Page 182 To disable the Loop, click below the Arranger Timeline. Double-click in the same area to create a Loop that ranges over all available Scenes. A Loop containing Scenes 1, 2 and 3 in the Arranger MASCHINE 1.5 Reference Manual – 182...
-
Page 183: Triggering Scenes Via Midi
2. Choose Scene MIDI Settings from the dropdown menu to be presented with the Scene MIDI Settings dialog: The Scene MIDI Settings dialog This dialog allows you to define how you want your Scenes to be triggered via MIDI. MASCHINE 1.5 Reference Manual – 183... - Page 184 1 will trigger Scene 1, and the following Scenes will be trig- gered by the subsequent Program Change numbers. From this dropdown menu, select the MIDI Channel the Scenes should receive MIDI Program Change messages hannEl from. MASCHINE 1.5 Reference Manual – 184...
-
Page 185: Sampling & Sample Mapping
Samples in only one Sound. The files you record will be stored either in the Project folder or in the MASCHINE Library folder, depending on your settings in the Preferences (see chapter 2.4, “Preferences”). Make sure to also check out the tutorial videos regarding Sampling: “Sampling Part 1”... -
Page 186: Controlling Sampling From The Hardware
Using Knob 2 you can choose between the available Inputs. If Extern is selected, you can choose the external input of MASCHINE: In 1 L, In 1 R, or In 1 L + R. If Intern npUt is selected you can select from the available Groups and the Master as a source. - Page 187 (Button 5) will start the recording. If you have select- tart ed S , MASCHINE will wait for the next bar before start- ing to record; if you have selected Detect, the recording will start as soon as the Threshold value is met. Cancel (Button tart 6) cancels the recording;...
-
Page 188: Editing A Sample (Hardware)
Crossfade (Knob 4) allows you to blend a little of the ma- terial near the loop start and end points in order to get a roSSFadE smoother, less abrupt loop. This is particularly helpful if the loop is inducing any clicks. MASCHINE 1.5 Reference Manual – 188... - Page 189 Sample, make sure you set the start and end point on Page 1 accordingly. Use Knob 1 to define the start point of the Sample to be Start processed. Use Knob 2 to define the end point of the Sample to be processed. MASCHINE 1.5 Reference Manual – 189...
- Page 190 IlEnCE This causes the part of the Sample that is inside of the range to be deleted. This copies the selected Sample. This pastes the selected Sample. aStE This duplicates the selected Sample. UplICatE MASCHINE 1.5 Reference Manual – 190...
-
Page 191: Slicing A Sample (Hardware)
Manual is selected, you can dial in a BPM value using Knob 4; if Auto is selected, you can choose from multiples of the Tempo calculated by MASCHINE. In Grid Mode the Sample will be sliced according to musi- Grid Mode cal values. - Page 192 Manual is selected, you can dial in a BPM value using Knob 4; if Auto is selected, you can choose from multiples of the Tempo calculated by MASCHINE. In Detect Mode, the Sample will be sliced according to its Detect Mode transients.
- Page 193 Button 7 and creates notes that trigger the slices in the currently selected Sound. After you hit pply Apply, MASCHINE will automatically switch to Piano Roll / Keyboard Mode and the loop will play back in time with the Project tempo.
-
Page 194: Mapping A Sample (Hardware)
Adding Samples to the Map To add a new Sample to the map, activate the ADD option (Button 7) on the right Browser display. 2. Select the Sample in the MASCHINE Browser. → A new zone will be created for the added sample. - Page 195 Page 3: Tune, Gain and Pan Basic parameters of the selected Zone displayed on the hardware Tune control for the Zone (Knob 1). Volume level for the Zone (Knob 2). Panorama position for the Zone (Knob 3). MASCHINE 1.5 Reference Manual – 195...
-
Page 196: Controlling Sampling From The Software
If you choose a Sound Slot that is not empty, all Samples assigned and mapped to it will be removed. 2. Now click the S Button right underneath the p Button to open amplInG Iano EyBoard the Record Tab: The Record Tab MASCHINE 1.5 Reference Manual – 196... - Page 197 You can record Samples internally (check the I radio button) from another Group, Sound or the Master Output or from one of the External Inputs of MASCHINE: In 1 L, In 1 R, or In 1 L + R (check the radio button labeled Ext).
- Page 198 (on Mac OS® X: Control-click) on a Sample in the Recording History, there is a dropdown menu that holds the following entries: • Delete: This allows you to delete the selected recording. • Delete all unused Recordings: This deletes all unused recordings. The dropdown menu in the Recording History MASCHINE 1.5 Reference Manual – 198...
-
Page 199: Editing A Sample (Software)
Loop by dragging the handles of the Loop and move the entire Loop by dragging its title bar. Crossfade allows you to define a crossfade value between the end and the start of the Loop. MASCHINE 1.5 Reference Manual – 199... - Page 200 Detect Mode is selected). When you put the mouse cursor over the timeline, the cursor turns into a small magnifying glass: drag your mouse horizontally for scrolling through the waveform and vertically to zoom in/out. MASCHINE 1.5 Reference Manual – 200...
-
Page 201: Slicing A Sample (Software)
You can see that your Loop now has a couple of equally spread vertical lines in the waveform: this is where the Slices are going to be applied. You can select and listen to individual Slices by clicking on their waveform. MASCHINE 1.5 Reference Manual – 201... - Page 202 The Slice Tab on MASCHINE software Mode and Slices Settings Here you can select either Split, Grid or Detect. In Split mode, the Sample will be sliced into equally spread Slices. In Grid Mode the Sample will be sliced according to musi- cal values.
- Page 203 If this radio button is selected, you can enter the tempo in BPM manually. If you have selected Auto, you can choose between the tempo that MASCHINE detected, or half or double of that tempo. Add and Remove This allows you to add a Slice according to the current se- lection and the Mode and Slices Settings.
- Page 204 Keyboard Editor will open with notes for each Slice. File Name Displays the file name of the currently edited Sample and allows you to listen to the selected Slice by clicking on the loudspeaker icon. MASCHINE 1.5 Reference Manual – 204...
- Page 205 (useful when editing individual Slices). Waveform Display Here you can adjust individual Slices by dragging their borders: Dragging the border of a Slice adjusting its end point MASCHINE 1.5 Reference Manual – 205...
- Page 206 Dragging an individual Slice to another Sound Zoom Tool Use this to zoom in and out of the Sample by click-dragging up (zoom in) and down (zoom out). You can also use the timeline (see above). MASCHINE 1.5 Reference Manual – 206...
-
Page 207: Mapping A Sample (Software)
Zone in the Control Area: make sure the Zone is selected by clicking on it first though. To listen to the Sample of a selected Zone click on the speaker icon left to its name. MASCHINE 1.5 Reference Manual – 207... - Page 208 Set it by entering the value in the text field or by dragging the upper border of the Zone. Set the tuning of the Zone in the Tune field. Set the gain of the Zone here. MASCHINE 1.5 Reference Manual – 208...
- Page 209 Remove sample from map: Allows you to remove the Sample from the Sample Map. Dropdown Menu Open containing folder: Opens up the folder containing the Sample, allowing you quick access to the original file. MASCHINE 1.5 Reference Manual – 209...
-
Page 210: The Master Section
The Master Mixer on the software Level These knobs allow you to adjust the volume level of each Group. If you adjusted it already in the Group Out Tab, this EvEl knoBS will be represented here. MASCHINE 1.5 Reference Manual – 210... -
Page 211: Group Panning
This allows you to adjust the panorama position of each Group. If you adjusted it already in the Group Out Tab, this an knoBS will be represented here. 12.2 The Master Output Tab (OUT) The Master Output Tab on the hardware MASCHINE 1.5 Reference Manual – 211... - Page 212 Knob 1. This allows you to adjust the volume level of the Master EvEl output. This allows you to adjust the panorama position of the Master output. MASCHINE 1.5 Reference Manual – 212...
-
Page 213: Exporting Audio
CD. The format of the exported audio files is WAV. 13.1 Export Audio Choose Export Audio from the F and you will be presented with the following dialog: The Export Audio window MASCHINE 1.5 Reference Manual – 213... - Page 214 8 Bit (sounds kind of Lofi and was used in many vintage samplers and drummachines), 16 Bit (this is the bit Epth depth of CDs) and 24 Bit (the highest available bit depth in MASCHINE, best for Mastering). MASCHINE 1.5 Reference Manual – 214...
-
Page 215: Collate Audio
Sometimes it is useful to have the ability to save the Samples of a Project outside of the MASCHINE Library. If you want to take a Project to another studio or if you want to backup a production with all the related files, this comes in handy. -
Page 216: Appendix A: Maschine Controller Quick Reference Chart
14 Appendix A: MASCHINE Controller Quick Reference Chart This will give you a quick overview of the most used functions available on the MASCHINE Controller. You can print it so that you don’t have to open the Manual every time you are looking for the basic functions. -
Page 217: Loading And Saving
Press and hold ERASE together with SCENE and then the Delete Scenes Pad of the Scene you want to delete. In Scene Mode, press and hold the start Scene of your Setting a Scene Loop Loop followed by the end Scene. MASCHINE 1.5 Reference Manual – 217... -
Page 218: Pattern Operations
A) Press and hold GRID, then step through the values with < or > in the Transport Area. Setting the Length Grid Value B) Press and hold GRID, then select a value by pressing a Pad. MASCHINE 1.5 Reference Manual – 218... -
Page 219: Basic Editing
Group Button (A-H) of the Group you want to reset Select the MASTER Tab with Button 2. Group Mixer Select the SRC Tab with Button 5. Use Knobs 1-8 to adjust the volume for the Groups individually. MASCHINE 1.5 Reference Manual – 219... -
Page 220: Sound Operations
Loading an FX Select the FX using Knob 5. Load the FX by pressing Button 8. Press ERASE and Button 6 to reset FX1 Reset an FX Slot Press ERASE and Button 7 to reset FX2 MASCHINE 1.5 Reference Manual – 220... -
Page 221: Muting
Press ERASE and turn the Knob to remove all events for Delete Automation Events the associated Parameter. Press and hold a Pad to see the parameter for the Step on Step Automation the displays. MASCHINE 1.5 Reference Manual – 221... -
Page 222: Basic Sampling
Set the Source to „Intern“ using Knob 1. Sampling from an internal Source Choose your Input Source by dialing Knob 2. Dial Knob 4 until the Threshold reads 0 dB. Press Button 5 to start the recording. MASCHINE 1.5 Reference Manual – 222... -
Page 223: Secondary Pad Functions
Press SHIFT and the corresponding Pad. Clear (Pad 9) Clear Automation (Pad 10) Copy (Pad 11) Paste (Pad 12) Semitone – (Pad 13) Semitone + (Pad 14) Octave – (Pad 15) Octave + (Pad 16) MASCHINE 1.5 Reference Manual – 223... -
Page 224: Navigation Shortcuts On The Maschine Controller
14.14 Navigation Shortcuts on the MASCHINE Controller If you are really “lost in the flow” you might not want to take your hands off the MASCHINE Controller. The Navigation Shortcuts enable you to zoom and navigate in the Arranger, the Pattern Editor and the Sampling View on your computer screen by using the MASCHINE Hardware. - Page 225 Pad 1: Scroll Left in the Pattern Editor/Sampling View/Keyboard View Pad 3: Scroll Right in the Pattern Editor/Sampling View/Keyboard View Pad 8: Scroll up in the Pattern Editor/Sampling View/Keyboard View 10 Pad 4: Scroll down in the Pattern Editor/Sampling View/Keyboard View MASCHINE 1.5 Reference Manual – 225...
-
Page 226: Other Shortcuts On The Maschine Controller
VOLUME Master Encoder. Activating Count-In To activate a Count-In of one bar length, press SHIFT + RECORD on the MASCHINE Controller. Sound Volume Shortcut To adjust the volume of a selected Sound, press the corresponding Pad and dial the VOLUME Master Encoder. - Page 227 To adjust the Swing of a Group, hold the respective Group Button and dial the SWING Master Encoder. The Left Display will show a temporary meter displaying the Swing value of the Group. Temporary meter for the Group Swing MASCHINE 1.5 Reference Manual – 227...
- Page 228 To adjust the Timing of a Step in the Step Sequencer, hold the corresponding Pad and dial the SWING Master Encoder. The Left Display will show a temporary meter displaying the new position of the Step. Temporary meter for the Step position MASCHINE 1.5 Reference Manual – 228...
-
Page 229: Appendix B: Keyboard Shortcuts
15 Appendix B: Keyboard Shortcuts 15.1 Views Function Full Screen Mode Drum Grid View Piano Roll View Sampling View Browser Arranger Middle area Automation MASCHINE 1.5 Reference Manual – 229... -
Page 230: Navigation
15.2 Navigation The Navigation shortcuts only work outside of MASCHINE’s Browser. Function Page Up Prev Group Page Down Next Group Numeric - Prev Pattern Numeric + Next Pattern Numeric / Prev Pattern Bank Numeric * Next Pattern Bank Left / right... - Page 231 Duplicate Pattern Function (as on HW) Alt+Left Nudge Left Alt+Right Nudge Right Paint Mode on/off delete events Ctrl/Cmd + Z Undo Ctrl/Cmd + D Duplicate Pattern function (as on HW) Ctrl/Cmd + left/right Move Scene MASCHINE 1.5 Reference Manual – 231...
-
Page 232: Transport
15.4 Transport Function Space start/stop sequencer Ctrl/Alt+Space Start Sequencer from Scene Loop Start MASCHINE 1.5 Reference Manual – 232... -
Page 233: Appendix C: Tips For Playing Live
16 Appendix C: Tips for playing live Since MASCHINE is a very hands-on tool for producing music as well as for performing live, we figured we would gather some tips for you to get you started playing live. If you are used to playing live, you may not need them, but maybe you will find some new ideas to integrate in your set. -
Page 234: Name Your Groups And Sounds
If you have other gear such as a drum machine, a synthesizer or another sequencer that is able to send MIDI Clock, hook it up to the MASCHINE Controller’s MIDI In and activate Sync to External MIDI Clock from MASCHINE’s File menu so that they can play together in sync. -
Page 235: Basic Techniques
16.2 Basic Techniques 16.2.1 Use Mute & Solo Mute and Solo are a good way to build up a live set especially on MASCHINE as you can mute and solo Groups and Sounds at the same time. By locking the Mute and Solo function, you have both hands free to mute or solo Sounds and Groups. -
Page 236: Set Up Your Own Multi Fx Groups And Automate Them
As you know you can adjust the start of a Sound in the Sampler Parameter Pages. If you load a long audio file, you can create interesting variations by tweaking the start. Note: this technique requires that you choose either AHD or ADSR as the Amplitude Envelope. MASCHINE 1.5 Reference Manual – 236... -
Page 237: Index
Audio Engine Button loading files Audio inputs on the Hardware selecting showing and hiding Audio outputs Browser Button selecting Browser Mode Audio Source selecting Internal Audition Controls 26, Automation (Hardware) Clip recording Clip Area MASCHINE 1.5 Reference Manual – 237... - Page 238 Delay FX Frequency Shifter Distortion FX FX 27, Dynamics FX applying to a Group Filter FX applying to external instruments Modulation FX applying to Master Channel Modules Beat Delay Spatial and Reverb FX Chorus MASCHINE 1.5 Reference Manual – 238...
- Page 239 Parameters muting using MASCHINE Controller Groups Phaser Copying and pasting recording automation Introduction Resochord saving Saturator Voice Settings FX automation working with recording using MASCHINE Controller Group Slot Group Tab 27, 160, GRID Button MASCHINE 1.5 Reference Manual – 239...
- Page 240 Metronome LFO 138, 142, MIDI Library 18, compensating delay installing connecting external equipment Limiter keyboard lock synchronizing Loop Mode triggering Scenes via looping to combine scenes MIDI clock MIDI Sync Macro Controls Missing samples MASCHINE 1.5 Reference Manual – 240...
- Page 241 Parameter Pages MUTE (Controller) navigating Mute Mode Pattern locking using MASCHINE Controller loading using MASCHINE Controller Pattern Banks switching and selecting using MASCHINE Controller Naming 217, Groups and Sounds Pattern Editor 24, NI Logo Pattern Mode Note Repeat 110, locking 176,...
- Page 242 Groups Sampling Pitch scale Secondary Pad Functions Play Mode Controls Selecting 219, Preferences Soloing Defaults General Recording Hardware from internal sources Libraries Recording History User Paths Record Tab Pre-Listening Redo Projects REX files Introduction MASCHINE 1.5 Reference Manual – 242...
- Page 243 Scene Column in the Output Tab Scene Loop in the Source Tab setting using MASCHINE Controller 217, Sampling Scene MIDI Settings from external source using MASCHINE Controller Scene mode Scene Mode from internal source using MASCHINE Controller Scenes internal Introduction...
- Page 244 Step Sequencer (Hardware) Sounds Step Sequencer Mode Amplitude Envelope entering using MASCHINE Controller copying and pasting Swing Introduction Tag Editor 26, muting and soloing Tag Filter 26, Pitch/Gate using resetting Tagging saving Tags Velocity Destination adding MASCHINE 1.5 Reference Manual – 244...
- Page 245 Text Search Field 26, Threshold 136, 137, Transport Controls Transpose (Hardware) transposing transposing by octaves transposing by semitones Undo Update USB 19, User interface showing and hiding using Velocity fixed View switching Views switching by keyboard shortcut MASCHINE 1.5 Reference Manual – 245...
Need help?
Do you have a question about the Maschine and is the answer not in the manual?
Questions and answers