Table of Contents
Advertisement
Quick Links
Advertisement
Table of Contents

Subscribe to Our Youtube Channel
Related Manuals for Native Instruments MASCHINE JAM


Summary of Contents for Native Instruments MASCHINE JAM
- Page 2 The information in this document is subject to change without notice and does not represent a commitment on the part of Native Instruments GmbH. The software described by this docu- ment is subject to a License Agreement and may not be copied to other media. No part of this...
- Page 3 6725 Sunset Boulevard 5th Floor Los Angeles, CA 90028 www.native-instruments.com NATIVE INSTRUMENTS K.K. YO Building 3F Jingumae 6-7-15, Shibuya-ku, Tokyo 150-0001 Japan www.native-instruments.co.jp NATIVE INSTRUMENTS UK Limited 18 Phipp Street London EC2A 4NU www.native-instruments.co.uk © NATIVE INSTRUMENTS GmbH, 2017. All rights reserved.
-
Page 4: Table Of Contents
Connecting MASCHINE JAM ......................12 1.2.1 Connecting MASCHINE JAM to Your Computer ............12 1.2.2 Using MASCHINE JAM as a MIDI Device ..............13 MASCHINE Project Overview ..................15 Sound Content ..........................15 Arrangement ..........................17 MASCHINE Software Overview ..................21 Header ............................ - Page 5 Controller Modes and Mode Pinning ................... 45 Selecting Channels in MASCHINE ....................47 On-Screen Overlay ........................48 Undoing and Redoing Actions ..................... 49 Using MASCHINE JAM in Plug-in Mode ..................49 5.5.1 Differences between Stand-Alone and Plug-in Mode ..........49 5.5.2 Controlling your Host’s Transport Functions in Plug-in Mode ........
- Page 6 Nudging Events in a Pattern ..................111 7.4.6 Adding Variation to Patterns ..................113 7.4.7 Clearing Groups and Sounds ..................116 7.4.8 Duplicating Groups and Sounds ................117 7.4.9 Duplicating Patterns ....................119 7.4.10 Clearing Patterns ...................... 120 MASCHINE JAM - Manual - 6...
- Page 7 10.1.1.4 Setting the Cue Level .................140 10.1.1.5 Mixing External Signals ................142 10.1.2 Adjusting Pan ......................143 10.1.3 Using Solo ......................... 143 10.1.4 Using Mute ........................ 144 10.1.5 Adjusting Aux Send ....................146 10.1.6 Tuning Sounds and Groups ..................148 MASCHINE JAM - Manual - 7...
- Page 8 Triggering Lock Snapshots via MIDI ................163 11 Troubleshooting ......................166 11.1 Knowledge Base ......................... 166 11.2 Technical Support ........................166 11.3 Registration Support ........................167 11.4 User Forum ..........................167 12 Glossary ........................168 Index ........................176 MASCHINE JAM - Manual - 8...
-
Page 9: Welcome To Maschine Jam
Using the MASCHINE JAM Project view, with its 8x8 click-pad matrix, you can intuitively con- trol your project with unprecedented overview of your Scenes and Patterns, allowing you to cre- ate, and arrange new ideas on the fly. -
Page 10: Documentation Overview
Welcome to MASCHINE JAM Documentation Overview Documentation Overview Native Instruments provide many information sources regarding MASCHINE JAM. The main documents should be read in the following sequence: MASCHINE Software Manual and online video tutorials MASCHINE JAM Manual (this document) 1.1.1... -
Page 11: About This Document
Release SHIFT. 1.1.2 About This Document What you are reading now is the MASCHINE JAM Manual. This document provides detailed in- formation about MASCHINE JAM. Please refer to the MASCHINE Software Manual for information about MASCHINE soft- ware. This document is available from the Native Instruments website at https://www.native-instruments.com/maschinedownloads. -
Page 12: Connecting Maschine Jam
This chapter contains a quick walk-through of the basic hardware setups. Make sure that you have installed the latest version of the MASCHINE software, includ- ing the MASCHINE JAM hardware driver, before you connect the controller to your com- puter! 1.2.1... -
Page 13: Using Maschine Jam As A Midi Device
Connecting MASCHINE JAM Connecting MASCHINE JAM to a computer. MASCHINE JAM will not work when it is connected to a USB 1.1 port. A USB 2.0 (or later) port is required! Windows users: In case you have installed the software including the hardware drivers, but the controller is not detected by your computer, connect the USB cable to another USB port before taking further measures. - Page 14 Connecting MASCHINE JAM during the MASCHINE software installation procedure. For more information on this, please re- fer to the Controller Editor Manual available as a PDF file via the Help menu of Controller Edi- tor. MASCHINE JAM - Manual - 14...
-
Page 15: Maschine Project Overview
The following section will explain these two aspects in detail. Sound Content The sound content aspect of a MASCHINE Project includes all the instruments and effects contained in your Project file, and how these are structured. MASCHINE JAM - Manual - 15... - Page 16 ◦ The controls in the SOUND section affect the sound of the selected Sound (1–16). ◦ The controls in the GROUP section affect the sound of the selected Group (A–H), i.e. the sound of all its Sound slots. MASCHINE JAM - Manual - 16...
-
Page 17: Arrangement
The Ideas view allows you to experiment with your musical ideas without being tied to a time- line or any kind of arrangement. Here you can create Patterns for each Group and combine them into a Scene. MASCHINE JAM - Manual - 17... - Page 18 ▪ The events are recorded in a Pattern (1) for the selected Group. You can edit the Pattern in the Pattern Editor (5). ▪ You can create several Patterns for each of your Groups. MASCHINE JAM - Manual - 18...
- Page 19 ▪ Create Sections (1) on the Timeline (2) of the Arranger. ▪ Assign Scenes (3) to Sections in order to add Patterns to your arrangement. ▪ Change the position of a Section by dragging the Sections slot left or right. MASCHINE JAM - Manual - 19...
- Page 20 MASCHINE Project Overview Arrangement ▪ Change the length of a Section by dragging the end of the Section slot left or right. MASCHINE JAM - Manual - 20...
-
Page 21: Maschine Software Overview
(3) Arranger: This area has two views: Ideas view and Arranger view. Ideas view is for creating and experimenting with musical ideas free from the timeline. Arranger view is for organizing your musical ideas into a song on the Timeline. MASCHINE JAM - Manual - 21... -
Page 22: Header
Sounds, Groups, and the Master. In addition, it provides you with an intuitive interface for adjusting the parameters of all your Plug-ins. (4) Transport controls: The Transport controls contain buttons such as Play, Restart, Record and Loop. MASCHINE JAM - Manual - 22... - Page 23 (9) Audio Engine button: Click the Audio Engine button to disable the entire sound processing of MASCHINE. (10) NI logo: The NI logo and MASCHINE logo open the About screen which displays the ver- sion number and edition of your MASCHINE software. MASCHINE JAM - Manual - 23...
-
Page 24: Browser
10 11 The Browser. (1) LIBRARY tab: Use the LIBRARY tab to access your computer's hard drives via MASCHINE's selectors and filters. (2) FILES tab: Use the FILES tab to access your computer’s hard drives. MASCHINE JAM - Manual - 24... - Page 25 (potentially overwriting previous routings in the selected Group). When the +ROUT- button is off, any audio and MIDI routings saved in the Group will not be loaded, thus pre- serving any existing routings in the active Group. MASCHINE JAM - Manual - 25...
-
Page 26: Arranger
(11) Tag Editor: The Tag Editor allows you to edit Tags applied to files and add Tags to new files from the Bank, Types, and Modes and view Properties. Only Types and Modes Properties can be edited in the User content. The NI (Native Instruments) content is read only. You can show/hide it by clicking the EDIT button at the bottom right. - Page 27 Group. Using your mouse you can also right-click ([control] + right-click on Mac OS X) on the name of a Group to access the many options available to man- age them. MASCHINE JAM - Manual - 27...
- Page 28 Section along with the Scene's Patterns stacked vertically for each Group in the Project. The Patterns seen here are the same as those seen when viewing the same Scene in the Ideas view. MASCHINE JAM - Manual - 28...
-
Page 29: Control Area
In this case, click the name of the parameter page to display it. (7) Quick Browse Icon: Use the Quick Browse icon to recall the search query you performed to find the currently loaded file/preset. MASCHINE JAM - Manual - 29... -
Page 30: Pattern Editor
(2) Keyboard view button: Click this button to display the Keyboard view. (3) Group view button: Click this button to display the Group view. (4) Audition button: Click this button to audition a Sound when it is selected from the Sound slots (6). MASCHINE JAM - Manual - 30... - Page 31 (13) Edit controls: Use the Step menu to change the step size in which events can be moved/ resized and click the Arrow or Paint icons to toggle the Paint mode on/off. (14) Control Lane button: The Control Lane button allows you to show/hide the Control Lane (12). MASCHINE JAM - Manual - 31...
- Page 32 MASCHINE Software Overview Pattern Editor For a detailed explanation of each section please refer to the MASCHINE Software Man- ual. MASCHINE JAM - Manual - 32...
-
Page 33: Maschine Jam Overview
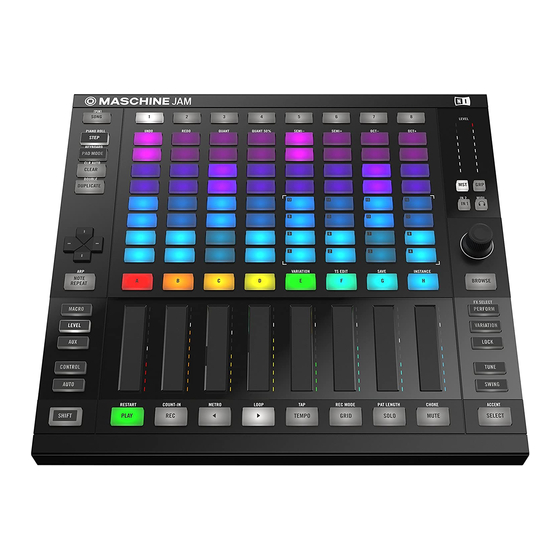
MASCHINE JAM Overview MASCHINE JAM Top View MASCHINE JAM Overview This chapter describes the areas and control elements on your MASCHINE JAM controller. MASCHINE JAM Top View This section describes the top view of your MASCHINE JAM controller. MASCHINE JAM - Manual - 33... - Page 34 MASCHINE JAM Overview MASCHINE JAM Top View Top view of the MASCHINE JAM hardware controller. (1) SONG button: Use the SONG button to switch between Ideas view and Arranger view. In Ideas view you can use the controller to manipulate Scenes, Patterns, Groups and Sounds. In Arranger view you can use controller to manipulate Sections, Patterns, Groups and Sounds.
- Page 35 Group when in Ideas view, or your Sections and Patterns when in Arranger view. Using the MASCHINE JAM Project view you can access Groups (A-H), arrange Patterns and build your Scenes or Sections (1-8). You can also access the Sounds pertaining to each Group...
-
Page 36: Project View Section
Pattern banks within the Project View, as well as the upper and lower parts of a scale when in Keyboard or Piano Roll mode. 4.1.1 Project View Section This subchapter provides an overview of the Project view section. MASCHINE JAM - Manual - 36... - Page 37 Sounds you want to work with. These buttons not only provide access to the Sounds within the Group but also allow you to access Group channel functions such as Level, Perform FX, Solo, and Mute, etc. MASCHINE JAM - Manual - 37...
-
Page 38: Note Input Section
Sound, Pattern, Group, Scene or Section. This can be useful for creating variations or trying out something new while preserving the cur- rent state of your work. MASCHINE JAM - Manual - 38... -
Page 39: Level Meter Section
Encoder. (5) MST (Master) button: Press the button to display the Master volume level (main vol- ume output level) in the Level meter (1) and use the Encoder to adjust its volume level. MASCHINE JAM - Manual - 39... -
Page 40: Smart Strip Section
This is a nice tool for extensive modulations, but also very useful to compare mixes, or to switch up snapshots during a live performance. MASCHINE JAM - Manual - 40... -
Page 41: Solo And Mute Section
Available in every channel (Sounds, Groups, and Master), Macro Controls are very useful for playing live since you can group parameters from various sources to make them easier to ma- nipulate. 4.1.5 Solo and Mute Section This subchapter provides an overview of the Solo and Mute section. MASCHINE JAM - Manual - 41... -
Page 42: Transport Section
(2) REC: During playback use to begin recording. Or use SHIFT to begin recording with a Count-in. Use a second time to stop recording. MASCHINE JAM - Manual - 42... -
Page 43: Maschine Jam Rear View
(1) USB socket: Connect your MASCHINE JAM controller to your computer using the supplied USB cable. (2) FOOTSWITCH: Your MASCHINE JAM controller provides a footswitch inputs in the form of a 1/4" socket on its rear panel. If you have a footswitch with two buttons:... - Page 44 Record button in the software’s Header. (3) Kensington Lock: Use the Kensington Lock slot to lock your MASCHINE JAM controller to something immobile and thus save it from being stolen. MASCHINE JAM - Manual - 44...
-
Page 45: Working With Maschine Jam
Working with MASCHINE JAM Controller Modes and Mode Pinning Working with MASCHINE JAM This chapter holds useful information for your every-day work with the MASCHINE JAM con- troller. Controller Modes and Mode Pinning Your controller has various other modes of operation, which you can enter by pressing their dedicated buttons. - Page 46 Working with MASCHINE JAM Controller Modes and Mode Pinning Pinning Buttons on MASCHINE JAM Controller. Each of these buttons needs to be held pressed in order to use the corresponding mode. Pinning the Controller Modes You can also pin (i.e. lock) controller modes, so the controller doesn’t switch back when releas- ing a mode button, for example: Press and hold a controller mode button, e.g., MUTE.
-
Page 47: Selecting Channels In Maschine
SONG ([PIN]) button again. Selecting Channels in MASCHINE MASCHINE JAM allows you to access the different channels of the MASCHINE software such as the Master, Groups and Sounds directly while using one of the mode buttons (MACRO, LEV- EL, AUX, CONTROL, TUNE, and SWING) either side of the Smart Strips. -
Page 48: On-Screen Overlay
MASCHINE Library. An example of the on-screen overlay. MASCHINE JAM and all its other features remain fully functional even when the on-screen overlay is in use—never stop jamming! The on-screen overlay can only be used with the Encoder and D-pad. It does not accept any interaction using the mouse. -
Page 49: Undoing And Redoing Actions
SHIFT + REDO. Using MASCHINE JAM in Plug-in Mode You can run the MASCHINE software as a stand-alone application or integrate it into your fa- vorite Digital Audio Workstation (or DAW, in short) by loading it as a plug-in. The MASCHINE software is available in the VST, Audio Unit, and AAX plug-in formats. - Page 50 MIDI interfaces is managed by the host—the MASCHINE plug-in only communicates with the host. Native Instruments’ Online Knowledge Base provides how-to articles that will help you route the MASCHINE plug-in to multiple tracks/outputs in the major hosts: ▪...
-
Page 51: Controlling Your Host's Transport Functions In Plug-In Mode
Working with MASCHINE JAM Using MASCHINE JAM in Plug-in Mode Multiple Plug-in Instances When you are using MASCHINE as a plug-in within a host application, you can open multiple MASCHINE instances. Actually, you can load as many instances of MASCHINE as your com- puter and your host application can handle CPU-wise. -
Page 52: Using Two Or More Maschine Controllers
5.5.3 Using Two or More MASCHINE Controllers You can use two or more MASCHINE controllers of different types (MASCHINE JAM, MA- SCHINE STUDIO, MASCHINE MK2, MASCHINE MIKRO MK2, MASCHINE, and MASCHINE MIKRO) simultaneously with different instances of the MASCHINE software (possibly with one instance in stand-alone mode). - Page 53 Working with MASCHINE JAM Using MASCHINE JAM in Plug-in Mode ▪ MASCHINE JAM controller: Press SHIFT (INSTANCE) and turn the Encoder to select an instance, and press the Encoder to load it. ▪ MASCHINE STUDIO controller: Press SHIFT + PLUG-IN, turn the jog wheel to select the desired instance, and press the jog wheel or Button 8 to load it.
-
Page 54: Using The Browser
Native Instruments products installed on your computer. Once both the MASCHINE software and MASCHINE JAM are up and running, your first stop is the Browser. You can access the vast Library using the... - Page 55 Press the Encoder to the load the selected file. The selected file is loaded. → With the Browser still open, you can continue to load the next or previous file. To load the next or previous file: MASCHINE JAM - Manual - 55...
-
Page 56: Filtering Files In The Browser
To open the Browser, press the BROWSE button. ► By default the factory content is selected. For information about accessing user content, see section ↑6.4, Accessing User Content. Press SHIFT + D-pad Left button to reset the Browser. MASCHINE JAM - Manual - 56... - Page 57 To set focus to the TYPES filter, press the D-pad Down button until TYPES is selected. Turn the Encoder to scroll to the Type you want to use, then press the Encoder to select MASCHINE JAM - Manual - 57...
- Page 58 Filtering Files in the Browser ⇨ The result list on the right side is filtered accordingly and the Subtypes appear beneath the Types. You can select a Subtype to further filter the result list. MASCHINE JAM - Manual - 58...
- Page 59 To set focus to the MODES filter, press the D-pad Down button until the MODES filter is selected. To scroll to a mode you want to use, turn the Encoder and then press it to select the mode. MASCHINE JAM - Manual - 59...
- Page 60 Using the Browser Filtering Files in the Browser ⇨ The result list on the right side is filtered accordingly. To set focus to the result list on the right side, press the D-pad Right button. MASCHINE JAM - Manual - 60...
- Page 61 To scroll to an instrument preset you want to load, turn the Encoder. To load the instrument preset, press the Encoder. 10. Press SHIFT + D-pad Up or Down button to load next or previous preset. MASCHINE JAM - Manual - 61...
- Page 62 To reset the Browser: Press SHIFT + D-pad Left button. ► The Browser will reset so you can create a new filter. → Restoring a Filter To restore a previous filter: MASCHINE JAM - Manual - 62...
-
Page 63: Using Favorites
For more information on the use of Favorites, please refer to the MASCHINE Software Manual. 6.3.1 Activating and Deactivating the Favorites Filter To activate the Favorites filter: Press the BROWSE button to access the Browser. MASCHINE JAM - Manual - 63... - Page 64 Using the Browser Using Favorites Press the D-pad Right button to access the Results list. Press the D-pad Up button to access the Favorite icon and press the Encoder to toggle Favorites on or off. MASCHINE JAM - Manual - 64...
-
Page 65: Adding An Item To The Favorites List
Items can be added to the Favorites list from the Browser search results. To add an item to the Favorites list: Select an entry in the search results list. Press SHIFT and press the Encoder to add the selected item to the Favorites list. MASCHINE JAM - Manual - 65... -
Page 66: Removing An Item From The Favorites List
↑6.3.1, Activating and Deactivating the Favorites Filter. 6.3.3 Removing an Item from the Favorites List Items can be removed from the Favorites list. To remove an item to the Favorites list: Select an entry in the results list. MASCHINE JAM - Manual - 66... -
Page 67: Accessing User Content
The Browser contains an icon on the top right-hand side which represents either the MA- SCHINE Factory library content or User created content. By default factory content is dis- played. To access the User content: Press SHIFT + D-pad Left button to reset the Browser. MASCHINE JAM - Manual - 67... - Page 68 Use the D-pad Right button to access the User content results list. ► You can now use the Encoder to scroll through the results list. → Push the Encoder to load the selected file. ► The selected file is loaded and ready to use. → MASCHINE JAM - Manual - 68...
-
Page 69: Recording And Editing Patterns
This chapter provides an overview of the necessary steps required to record and edit a Pattern. It explains the generic process of creating both a beat and melodic content. It also describes the various ways this can be accomplished with MASCHINE JAM though real-time input or us- ing the sequencer. -
Page 70: Setting The Tempo
You can use Tap Tempo to set the tempo at any time. This is an intuitive way to match another beat or sync with other musicians. As you tap the tempo once every beat, MASCHINE will fol- low you’re the tempo of your tapping. MASCHINE JAM - Manual - 70... -
Page 71: Setting The Step Grid
As an example, you might want to reduce the step size from 1/16th note to 1/32nd note. This will allow you to place notes more precisely in the Pattern. To adjust the Step Grid: Press and hold the GRID button. ⇨ The on-screen overlay appears. MASCHINE JAM - Manual - 71... - Page 72 Changing the Grid Using the On-Screen Overlay The on-screen overlay provides access to all available Step Grid resolutions. To change the Step Grid’s settings using the on-screen-overlay: Press the GRID button. Turn the Encoder to select STEP. Press the Encoder. MASCHINE JAM - Manual - 72...
-
Page 73: Setting The Pattern Length
Select a Pattern by pressing a half-lit click-pad on the 8x8 matrix, or create a new Pattern by pressing an unlit click-pad in the same column as the Group you want to work with. Press SHIFT SOLO (PAT LENGTH) to enter the Pattern Length mode. MASCHINE JAM - Manual - 73... -
Page 74: Setting The Record Mode
Setting the Record Mode The Record mode options allow you to configure the Metronome, Count-In Length, and Quan- tize mode via the on-screen overlay. On your controller do the following to access the Record mode options: MASCHINE JAM - Manual - 74... - Page 75 COUNT-IN Length Adjusts the duration of the Count-in, i.e. how long the metronome will sound before the recording actually starts. The count-in length can be set to; Bar, Bars, and Bars. QUANTIZE MASCHINE JAM - Manual - 75...
- Page 76 Set the timeline to follow through the various parts of the Pattern in the Project view when step sequencing in Step mode. The shortcut of SHIFT can also be used to set Follow Off. MASCHINE JAM - Manual - 76...
-
Page 77: Playing And Programming Beats
Playing and Programming Beats Playing and Programming Beats This chapter explains the process and features that can be used to create a beat based pattern using MASCHINE JAM. For information on creating melodic content see ↑7.3, Creating Melo- dies and Harmonies. -
Page 78: Recording Beats In Real-Time
In Pad mode the sixteen click-pads representing the Sounds of a Group can be used to jam or record beats in real-time as the Sounds are triggered. The kit you loaded using the Browser is now assigned to the click-pad 1–16. To enter Pad mode: Press the PAD MODE button. MASCHINE JAM - Manual - 78... - Page 79 (1–16) and load a new drum sample. For more information on loading files (includ- ing Samples) from the Browser see ↑6.1, Loading Files from the Browser. For information on changing Pattern Length or Step Grid settings see ↑7.1, Setting Recording Options. MASCHINE JAM - Manual - 79...
-
Page 80: Using Note Repeat
To use Note Repeat: Press the NOTE REPEAT button. MASCHINE JAM will automatically switch to Pad Mode and the Sounds within the select- → ed Group illuminate. Select the Group (A–H) containing the Sound you want to repeat. MASCHINE JAM - Manual - 80... - Page 81 200%: At low values the notes are very short. At notes and silences are equal. At 100% (midcourse) each note last exactly until the next note is triggered. At higher values notes overlap (provided that the selected Sound is polyphonic). MASCHINE JAM - Manual - 81...
-
Page 82: Sequencing Beats With Step Mode
▪ When eight Sounds are selected for sequencing, they are displayed on a single lane and each click-pad represents one step of the sequence. Preparing Step Mode To prepare Step mode before you begin sequencing: MASCHINE JAM - Manual - 82... - Page 83 Press and hold the STEP button at the top left of your controller and press button 1, to sequence one, four, or eight Sounds. Creating a Sequence To create a sequence in Step mode: MASCHINE JAM - Manual - 83...
- Page 84 The controller will remain in Accent mode until you press SHIFT SELECT (ACCENT) again. Please note, if an accent has been placed on a step that this will override any selected velocity setting. Press PLAY to start the sequencer. MASCHINE JAM - Manual - 84...
-
Page 85: Adding Swing
▪ On the Master channel, the Groove properties affect all Sounds of all Groups. The Master’s swing is added to the groove set for each individual Group and Sound via their own Groove properties. MASCHINE JAM - Manual - 85... - Page 86 Groups, use the D-pad Left and Right buttons to access other Group banks. Turn the Encoder to select GROUP. Push the Encoder and then turn it to select the Group Swing value. Hold SHIFT while you turn the Encoder to adjust the value in finer increments. MASCHINE JAM - Manual - 86...
-
Page 87: Applying Choke
▪ As a creative tool in a live performance, e.g. to create stutter beaks. ▪ As a workflow aid, to stop long one-shot Samples that still continue playing after you have stopped the sequencer. MASCHINE JAM - Manual - 87... -
Page 88: Creating Melodies And Harmonies
Voices triggered by subsequent notes will play normally. Creating Melodies and Harmonies This chapter explains how to create melodic content using MASCHINE JAM. For information on creating a beat see ↑7.2, Playing and Programming Beats. -
Page 89: Recording Melodies And Harmonies In Real-Time
The 8x8 click-pad matrix indicates the pitches played by each button (all are shown in the col- or of the focused Sound). If you press the click-pads you will hear that they all play the same Sound, but each with a different pitch. MASCHINE JAM - Manual - 89... - Page 90 From bottom left to top right of the 8x8 click-pad matrix the selected Sound can be played chromatically from C1 to C6, and the white click-pads represent the root note of the scale at each octave. Press D-pad Up/Down buttons to access higher or lower notes in the scale. ► MASCHINE JAM - Manual - 90...
-
Page 91: Step Sequencing Melodies And Harmonies
Piano Roll mode is set to allow one individual Sound to be programmed using the 8x8 click- pad matrix. Select a Sound and a Scale and you’re ready to go! MASCHINE JAM - Manual - 91... - Page 92 Recording and Editing Patterns Creating Melodies and Harmonies Piano Roll mode on MASCHINE JAM. Preparing Piano Roll Mode To prepare Piano Roll mode before you begin sequencing: Press SONG to enter Project view. Press the Group button (A–H) containing the Sound you want to sequence.
- Page 93 Touch the Encoder to display the Scale on-screen overlay, and use the D-pad and Encod- ► er to navigate and select the scale you would like to work with. For information on selecting a scale with MASCHINE JAM see ↑7.3.4, Selecting a Scale and Chords.
-
Page 94: Selecting A Scale And Chords
By default MASCHINE JAM is set to the chromatic scale of C and the 8x8 click-pad matrix represent each semitone. By simply touching the Encoder you can display the Scale on-screen overlay. - Page 95 Type Select the required scale type. CHORD Mode Choose between (no Chord) or Harm (Harmony). Type Choose the required Chord type. The last selected Scale is automatically assigned when a new Group is created. MASCHINE JAM - Manual - 95...
-
Page 96: Setting The Root Note Of A Scale
SCHINE JAM or from incoming MIDI notes from your host software. The 8x8 click-pad matrix indicates the keys of a chord being played via white illuminat- ed LEDs, while inactive click-pads are not fully illuminated. MASCHINE JAM - Manual - 96... -
Page 97: Chord Type
SCALE Type. This means that for all scales except the 12-tone Chrom scale, you can select the interval of notes that will make up your chord. MASCHINE JAM - Manual - 97... - Page 98 C as the chord’s root note. When CHORD Mode is set to Set, the CHORD Type setting includes the following values: Maj 1-8 ▪ Min 1-8 ▪ MASCHINE JAM - Manual - 98...
- Page 99 4, 7, 10 and 14 Min 7b5 (Minor 7 b5) 3, 6 and 10 Dim 7 (Diminished 7) 3, 6 and 9 (Augumented) 4 and 8 Quartal 5, 10 and 15 Trichd (Trichord) 5 and 11 MASCHINE JAM - Manual - 99...
-
Page 100: Creating Arpeggios
7.3.5 Creating Arpeggios MASCHINE JAM features a flexible and versatile arpeggiator that lets you play your instru- ments in note sequences according to the keys you press on the on the 8x8 click pad matrix. You can also use the arpeggiator in combination with the scales and chords created with the Scale engine (see section ↑7.3.4, Selecting a Scale and... - Page 101 Chord plays all notes of the chord together repeatedly. MASCHINE JAM - Manual - 101...
- Page 102 Dynamic Amplifies or reduces the velocity derived from the pressure you apply on each single click-pad you hold (Polyphonic Aftertouch). Available values range from to 200%. This setting applies globally to all rate presets. MASCHINE JAM - Manual - 102...
- Page 103 The following notes of the scale depend on which scale pattern you select with the Scale Type parameter. You can transpose any scale pattern up or down by selecting a different Root Note. MASCHINE JAM - Manual - 103...
-
Page 104: Playing Notes With Smart Strips
Mode The first CHORD parameter is Mode. Use it to generate chords from single notes, either from MASCHINE JAM or from incoming MIDI notes from your host software. 7.3.6 Playing Notes with Smart Strips Notes mode lets you play Sounds using the Smart Strips, for an inspiring playing experience. - Page 105 It is possible to customize the prede- fined chord sets or completely create your own using the controller’s click-pad matrix. Notes mode on the MASCHINE JAM controller. Notes mode has three different types of input: ▪...
- Page 106 The white click-pads represent the root-note of the scale. Press the D-pad Up or Down button to show higher or lower notes within the scale. ► Notes Mode On-Screen Overlay Notes mode on-screen overlay. MASCHINE JAM - Manual - 106...
-
Page 107: Editing A Pattern
Scale and Chords. Editing a Pattern This section explains some of the features available from the MASCHINE JAM hardware that can be used to edit your Patterns. These features include: ▪ Quantizing to force note events to stick to the selected Grid. For more information see ↑7.4.2, Quantizing Your... -
Page 108: Quick Edit In Step Mode
The tuning of the selected steps are adjusted and the current value is displayed on the → first Smart Strip and the 8x8 matrix. Adjusting the Position To finely adjust the position of the selected steps: Press STEP. Press SWING. MASCHINE JAM - Manual - 108... -
Page 109: Quantizing Your Pattern
To quantize a Pattern: Press SHIFT + QUANT. ► Your Pattern now plays perfectly tight. In the Pattern Editor, you can hear that all events → now are exactly on the beats or their subdivisions. MASCHINE JAM - Manual - 109... -
Page 110: Doubling A Pattern
Hence, to avoid losing the Pattern’s groove, MASCHINE JAM allows you to half-quantize your events: Events are moved half way toward the closest beat/subdivision. Therefore, you get a tighter rhythm while keeping its human touch and groove. -
Page 111: Transposing A Pattern
In addition to the Step Grid, a secondary grid specifically controls the timings at which existing events/notes can be nudged in the Pattern: the Nudge Grid. Nudging events means shifting them a small amount ahead or behind their current position. The Nudge Grid is based on the Step Grid: MASCHINE JAM - Manual - 111... - Page 112 To change the Nudge Grid’s settings: Press the GRID button. Turn the Encoder to select NUDGE. Press the Encoder to select the NUDGE parameter. Turn the Encoder to select a new value. A new Nudge value is selected. → MASCHINE JAM - Manual - 112...
-
Page 113: Adding Variation To Patterns
Humanize provides natural rhythmic fluctuations to your programmed sequences based on the values of the parameters of this mode. Apply Applies the current settings to the selected Sound. MASCHINE JAM - Manual - 113... - Page 114 The Note Count range is from to 6. NOTE LENGTH Steps Set the length of a note in steps. The value ranges from steps per note. Press SHIFT to change in finer increments. TIME SHIFT MASCHINE JAM - Manual - 114...
- Page 115 Gauss: Note lengths in the middle part of the pattern are more likely to be shorter. ½ Gauss: Note lengths in the middle to lower part of the pattern are more likely to be shorter. MASCHINE JAM - Manual - 115...
-
Page 116: Clearing Groups And Sounds
1%. 7.4.7 Clearing Groups and Sounds You can clear Groups and Sounds from your Project using MASCHINE JAM. Clearing Groups When a Group is cleared its Patterns are also removed from the Project. On your controller, do the following to clear a Group: Press and hold CLEAR. -
Page 117: Duplicating Groups And Sounds
7.4.8 Duplicating Groups and Sounds You can copy and paste Groups and Sounds in your Project using MASCHINE JAM. Duplicating Groups When a Group is duplicated its Pattern content is also included. MASCHINE JAM - Manual - 117... - Page 118 Duplicating Sounds You can copy and paste Sounds across Sound slots (and thereby across click-pads (1–16) within the same Group of your Project using MASCHINE JAM. When a Sound is duplicated its Pattern content is also included. On your controller in Pad mode, do the following to copy a Sound from one slot to another:...
-
Page 119: Duplicating Patterns
You will notice that once you have pasted the Pattern, the target slot starts to blink, indicating that it is ready to be pasted again to additional Pattern slots: Therefore, to duplicate a Pattern more than once you only need to press all the desired target click-pads in a row. MASCHINE JAM - Manual - 119... -
Page 120: Clearing Patterns
7.4.10 Clearing Patterns You can clear a Pattern from your Project using MASCHINE JAM. When a Pattern is cleared it is removed from the Scene. On your controller, do the following to clear a Pattern: Press the SONG button to return to the Project view. -
Page 121: Saving Your Project
Saving Your Project You can save your Project at any time by initiating the Save command directly from MA- SCHINE JAM. To save your Project using MASCHINE JAM: Press SHIFT (SAVE). MASCHINE JAM - Manual - 121... - Page 122 On your computer keyboard, type a name (e.g., “My Project”) in the field and press [En- ter] to confirm. Your Project is now saved on your hard disk. Should you close MASCHINE or open anoth- → er Project, you will still be able to open this Project later. MASCHINE JAM - Manual - 122...
-
Page 123: Creating Scenes
Scenes, clear a Scene and more importantly trigger your Scenes to so you can hear how they sound when played in a particular order. Pressing the Scene buttons along the top of MASCHINE JAM will trigger a Scene and in turn trigger all the assigned Patterns. In addition to creating ideas, Scene buttons are also fantastic for improvisation during a performance. - Page 124 To create a second Scene: Select the Scene (2) which is highlighted in white. ⇨ This creates a new Scene. Press the click-pads in each Group column to select or deselect Patterns for this Scene. MASCHINE JAM - Manual - 124...
-
Page 125: Triggering Scenes And Patterns
Ideas view is now active and you have an overview of your Scenes (1-8), Patterns, and Groups (A-H) Press the Scene buttons labelled situated at the top of MASCHINE JAM. If your Project contains more than eight Scenes, press SHIFT + Scene button (1-8) to access a Scene bank. - Page 126 As each Scene button is pressed, the selected Patterns for the Scene are played in a loop. → Switching between Patterns The MASCHINE JAM click-pad matrix provides a clear overview regarding the status of your Scenes and Patterns. The Ideas view represents the following: ▪...
- Page 127 Creating Scenes Triggering Scenes and Patterns MASCHINE JAM displaying the status of the available Scenes, Patterns and Groups. Selecting Patterns for a Scene To select different Patterns for a Scene: Press the SONG button so it is unlit. ⇨ Ideas view is now active and you have an overview of your Scenes (1-8), Patterns, and Groups (A-H).
-
Page 128: Setting The Performance Grid
Scene, and Off. If you choose Off, the Scene change will be performed immediately after you select the next Scene. To change the settings of a Grid: Press the GRID button. MASCHINE JAM - Manual - 128... -
Page 129: Duplicating Scenes
A new Grid value is selected. → Duplicating Scenes You can copy and paste Scenes in your Project using MASCHINE JAM. On your controller in the Project view, do the following to copy a Scene and all its contents from slot to another:... -
Page 130: Clearing Scenes
Clearing Scenes You can clear a Scene from your Project using MASCHINE JAM. When a Scene is cleared it is removed (deleted) from the Project, however, the Patterns still remain available. On your controller, do the following to clear a Scene:... -
Page 131: Arranging Your Song
Section and more importantly quickly and easily assign your Sections to the Timeline in the order you would like them to play. Pressing the Section buttons along the top of MASCHINE JAM will make the playhead jump to the Section and, in turn, cause that Section's Patterns to play. -
Page 132: Creating A Section And Assigning A Scene
Check the software for confirmation. You can change the length of a Section in the software by dragging the Section end marker to the left to shorten it, or to the right to lengthen it. MASCHINE JAM - Manual - 132... -
Page 133: Duplicating Sections
Section without assigning a Scene. Duplicating Sections You can copy and paste Sections in your Project using MASCHINE JAM. On your controller in the Project view, do the following to copy a Section and all its contents from slot to another:... -
Page 134: Clearing Sections
Arranging Your Song Clearing Sections Clearing Sections You can clear a Section from your Project using MASCHINE JAM. When a Section is cleared it is removed (deleted) from the Project, however, the Scene and its Patterns still remain availa- ble. - Page 135 Playback will continue until it is stopped. The loop range can be altered at any time by → repeating the procedure and adding new start and end points. You can also press and hold a Section button then press and turn the Encoder to set a loop range. MASCHINE JAM - Manual - 135...
-
Page 136: Mixing Your Song
Basic Functions Mixing Your Song MASCHINE JAM provides quick access to the level and routing settings of all your Sounds, Groups, and the Master channels. In addition, you can adjust the parameters of all your Plug- ins, record modulation, and play with the Perform FX. - Page 137 Hold the LEVEL button. ⇨ The Group buttons and Sound click-pads illuminate. The selected Group will blink and the on-screen overlay will appear. Select the Group button containing the Sound you want to reset. MASCHINE JAM - Manual - 137...
-
Page 138: 10.1.1.2 Setting A Group Level
To achieve this, use the Input/Metering section on the right to adjust the volume level of a Group. MASCHINE JAM - Manual - 138... - Page 139 The Group buttons and Sound click-pads illuminate. The selected Group will blink and the on-screen overlay will appear. ⇨ The Smart Strips now represent Group A–H. Double tap on the Smart Strip of the Group you want to reset. MASCHINE JAM - Manual - 139...
-
Page 140: 10.1.1.3 Setting The Master Level
For example, you can use it to prepare any Sound or Group in your headphones during a live session: first send the empty channel to the Cue bus, then load the desired Sound or Group MASCHINE JAM - Manual - 140... - Page 141 In any channel strip, click the little headphones button to send this channel to the Cue ► button. The headphones button lights up. The channel is no longer sent to its defined destination → but instead to the Cue bus. MASCHINE JAM - Manual - 141...
-
Page 142: 10.1.1.5 Mixing External Signals
Encoder. To adjust the level of external source one: Press the button to select input source one. Turn the encoder to set the volume level. To adjust the level of an external source two: MASCHINE JAM - Manual - 142... -
Page 143: Adjusting Pan
Soloing a Group Press and hold SOLO to momentarily enter Solo mode. Press a Group button (A–H) to solo it. Press the Group again to turn Solo off. MASCHINE JAM - Manual - 143... -
Page 144: Using Mute
Pinning allows a mode to remain selected without the need to hold the mode button, for example, press SOLO SONG to pin Solo mode. You can now use both hands to manip- ulate the controls of MASCHINE JAM. Click SOLO again to exit the pinned Solo mode. 10.1.4 Using Mute Mute allows you to silence any number of Sounds or Groups. - Page 145 Selected Groups can be removed or added to the mix. → Muting a Sound To mute a Sound: Press the Group button (A–H) containing the Sound you want to mute. Press and hold MUTE to momentarily enter Mute mode. MASCHINE JAM - Manual - 145...
-
Page 146: Adjusting Aux Send
Output properties in the software. MASCHINE JAM allows you to control the Aux levels for each Group and Sound. Adjusting the Aux Level of a Group To adjust the Aux level of a Group: Press and hold the button. - Page 147 If you select any click-pad numbered 1–8 the Smart Strip LEDs will reflect the aux level of Sounds 1–8. If you select any click-pad numbered 9–16 the Smart Strips will represent the aux level of Sounds 9–16. MASCHINE JAM - Manual - 147...
-
Page 148: Tuning Sounds And Groups
Press the Group button (A–H) to select the Group containing the Sound you want to ad- just. If necessary, use the D-pad Left or Right buttons to access each bank of eight Groups. MASCHINE JAM - Manual - 148... - Page 149 Double tap on the Smart Strip of the Sound you want to reset. The Sound tuning is reset. You can reset other Sounds 1–8 9–16 by switching between → the banks using the Page buttons and double-tapping on each Smart Strips. MASCHINE JAM - Manual - 149...
-
Page 150: 10.1.6.2 Tuning A Group
Double tap on the Smart Strip of the Group you want to reset. The Group tuning is reset. You can reset other Groups by switching between banks using → the left and right buttons of the D-pad and double-tapping on each Smart Strips. MASCHINE JAM - Manual - 150... -
Page 151: Using Performance Effects
In addition, MASCHINE also has a set of Performance effects that are ideal for use in a live performance situation with MASCHINE JAM. They are designed specifically for their ease of use with the Smart Strips and can be applied to Group channels for maximum sonic impact. - Page 152 The Performance FX on-screen overlay will appear. Turn the Encoder to scroll through the list of available effects. Press the Encoder to confirm your selection. The Performance FX will be loaded to the selected Group. → MASCHINE JAM - Manual - 152...
-
Page 153: Using A Performance Effect
Automation will replicate any movement you make with your finger on the Smart Strip, leaving your hands free to perform other tasks. To automate a Performance FX: Press PLAY to start playback of your song. MASCHINE JAM - Manual - 153... -
Page 154: Controlling Plug-In Parameters
The LED meters on the Smart Strips adjust to display the current value of the selected page of parameters. The Smart Strips can be used to adjust the parameter values. Press the Page buttons to select another page of parameters, as displayed in the Control area of the software. MASCHINE JAM - Manual - 154... - Page 155 Selecting a Free Slot to Load a Plug-in To load another plug-in, such as an effect into a free plug-in slot: Press and hold the CONTROL button. Use the D-pad to select the symbol. MASCHINE JAM - Manual - 155...
-
Page 156: Controlling Macros
Press and hold the MACRO button. To reset Macros on the Master channel press the button, for a Group channel press the Group button (A–H), and for the Sound channel press a Sound button (1–16). MASCHINE JAM - Manual - 156... -
Page 157: Using Automation
Group chan- ► nel press the Group button (A–H), and for the Sound channel press a Sound button (1– 16). Press the required mode button LEVEL, CONTROL, MACRO, PERFORM, SWING, or ► TUNE. MASCHINE JAM - Manual - 157... -
Page 158: Creating Parameter Snapshots Using Lock
10.6 Creating Parameter Snapshots using Lock The MASCHINE JAM Lock feature allows you to create up to sixty-four snapshots, each con- taining every modulatable parameter in your project, including your Solo and Mute assign- ments. Once created, you can switch between these instantly, or morph between them synchronized to the tempo of your Project. -
Page 159: Creating A Snapshot
Lock view presents an overview of all your snapshots. Here you can recall, update, or clear your snapshots. Using the on-screen overlay you can also set options for morphing between two snapshots. To enter Lock view: Press SHIFT + LOCK. ► MASCHINE JAM - Manual - 159... -
Page 160: Updating A Snapshot In Lock View
The snapshot will illuminate to indicate it is in focus. Adjust the settings on your controller until you are ready to update the snapshot. Press and hold the LOCK button to update your snapshot. MASCHINE JAM - Manual - 160... -
Page 161: Recalling A Snapshot In Lock View
The on-screen overlay is displayed. Turn the morph setting on, and adjust the transition time accordingly. As you switch between your snapshots a controlled transition from one to another at the → selected time rate can be heard. MASCHINE JAM - Manual - 161... -
Page 162: Clearing A Snapshot In Lock View
To clear a Lock snapshot: Press the SHIFT LOCK button to enter Lock view. Hold the CLEAR button. Press the click-pad on the 8x8 matrix containing the snapshot you want to clear. The snapshot is cleared. → MASCHINE JAM - Manual - 162... -
Page 163: Triggering Lock Snapshots Via Midi
Program Change numbers. Enabling the MIDI Lock Change To enable or disable the MIDI Lock Change feature, do the following: In the MASCHINE Header, click the cog wheel icon. MASCHINE JAM - Manual - 163... - Page 164 MIDI messages from (channel 1 by default). MIDI Scene change has priority over Lock change. Only Scenes will be triggered by the corresponding events coming from the MIDI source. Corresponding Lock snapshots will not be recalled. MASCHINE JAM - Manual - 164...
- Page 165 Mixing Your Song Creating Parameter Snapshots using Lock For more information on triggering Lock snapshots using your DAW (Digital Audio Workstation), please check the Knowledge Base on the Native Instruments website. MASCHINE JAM - Manual - 165...
-
Page 166: Troubleshooting
Knowledge Base Troubleshooting If you are experiencing problems related to your Native Instruments product that the supplied documentation does not cover, there are several ways of getting help. Before getting help please make sure you have downloaded the latest MASCHINE soft- ware from Native Access. -
Page 167: Registration Support
11.4 User Forum In the Native Instruments User Forum, you can discuss product features directly with other users and with experts moderating the forum. Please be aware that the Technical Support team does not participate in the forum. If you’re encountering an issue that can’t be solved by other users, contact Native Instruments’... -
Page 168: Glossary
(which you will hear by pressing the corresponding pad on your controller). If you load an effect plug-in in this first Plug-in slot, though, the Sound won’t generate audio itself but instead it becomes available for other Sounds and Groups to process MASCHINE JAM - Manual - 168... - Page 169 You may also use VST/AU plug-in effects. Effects can be loaded as Plug-ins in any Plug-in slot of the Sound, Group, and Master levels. MASCHINE’s flexible routing allows you not only to apply insert effects but also to create send effects and multi-effects. MASCHINE JAM - Manual - 169...
- Page 170 These Scenes can then be added to Sections in the Arranger view to create a larger musical structure. Insert Effect An insert effect is an effect directly inserted in the signal path of the audio to be processed. MASCHINE JAM - Manual - 170...
- Page 171 Any modulated parameter is displayed both in the Control Lane (at the bottom of the Pattern Editor) and as a movement of the chosen parameter itself in the Control area. MASCHINE JAM - Manual - 171...
- Page 172 Pattern Editor Located at the bottom of the MASCHINE window, the Pattern Editor allows you to select Sound slots (on the left), display and edit your Patterns, change the Step Grid settings and create/edit automation. MASCHINE JAM - Manual - 172...
- Page 173 Glossary Plug-in A Plug-in is an instrument or effect unit, either Internal or External (by Native Instruments or a third-party manufacturer), that can be loaded into a Plug-in slot to produce or alter sound. When a Plug-in is loaded into a Plug-in slot, the Plug-in appears in the Plug-in List in the left part of the Control area.
- Page 174 Groups that can hold up to 16 Sounds each. Sounds can be played directly from the pads on your controller. A Sound can be loaded with Plug-ins of various types (sound source or effect, Internal or External, etc.). MASCHINE JAM - Manual - 174...
- Page 175 By repeating the process Sound by Sound you build up the whole Pattern. Swing The Swing parameter allows you to shift some of the events in your Pattern to create a shuf- fling effect. MASCHINE JAM - Manual - 175...
-
Page 176: Index
Rate [141] send channel to Cue bus [103] setting root note for selected scale Audio Engine button [23] setting scale type [104] AUTO button [41] [102] setting velocity range Autoload Arpeggiator scale definition [168] MASCHINE JAM - Manual - 176... - Page 177 Browser search Auxiliary outputs [146] [66] removing items from Favorites list [62] resetting a filter restoring a filter [62] [56] TYPES filter [63] using Favorites [56] Using filters Bussing point [168] MASCHINE JAM - Manual - 177...
- Page 178 [97] Type parameter setting to follow Pattern in Step Sequencer Chord mode [94] choosing predefined chords [97] Controller Modes [97] enabling [46] locking [104] in Arpeggiator permanent [45] [97] setting Harmony (Harm) [46] pinning MASCHINE JAM - Manual - 178...
- Page 179 Cue level loading from MASCHINE factory library [77] Cue button [39] DUPLICATE button [38] Duplicate mode [120] pinning Duplicating [117] Group using your controller Scenes [129] [133] Sections [118] Sound using your controller MASCHINE JAM - Manual - 179...
- Page 180 Step Sequencer [139] resetting level to default value [150] resetting tuning [151] using [143] soloing [144] switching to Mute mode [143] switching to Solo mode [148] [150] tuning Group Channel accessing [47] MASCHINE JAM - Manual - 180...
- Page 181 [28] [22] Browser button GRP button [39] [23] CPU meter [171] definition [23] Display area [22] MASCHINE menu [23] Master Volume slider [23] NI logo [22] Transport controls Help [166] Humanizing [113] Pattern Variation MASCHINE JAM - Manual - 181...
- Page 182 Lock view [161] [89] using to record melodies [163] triggering via MIDI [89] using to record melodies in real-time [160] updating in Lock view Keyboard view [30] Lock view [171] definition [162] clearing snapshot MASCHINE JAM - Manual - 182...
- Page 183 MASCHINE Plug-in controlling the host application’s transport [51] functions [51] using multiple instances [50] using within host application Master [86] adding Swing to channel [171] definition setting level [140] Master Channel [48] accessing Master level MASCHINE JAM - Manual - 183...
- Page 184 Lock snapshots [163] using to trigger Lock snapshots Mode locking [45] Mode pinning [45] Modulation definition [171] [120] Piano Roll [120] Step mode Morphing [161] between Lock snapshots [162] parameters MST button [39] MASCHINE JAM - Manual - 184...
- Page 185 [40] [69] Recording Notes mode Overview [106] of Smart Strips [15] structure of a Project [106] on-screen overlay Nudge Grid [111] basics [112] changing settings [112] default resolution [112] resolution set to full step MASCHINE JAM - Manual - 185...
- Page 186 Pattern Length [73] Parameter page setting [73] definition [172] Pattern Variation Pattern [113] accessing mode accessing hidden parts in Step Sequencer applying settings to selected Sound [113] [93] [116] [113] adding variation [113] Humanize mode MASCHINE JAM - Manual - 186...
- Page 187 [153] Piano Roll mode [153] automating parameters using to play notes [88] [151] basics Pinning [151] Burst Echo [120] Duplicate mode [154] deleting automation Mute mode [146] [151] Filter [144] Solo mode [151] Flanger MASCHINE JAM - Manual - 187...
- Page 188 Step Length [173] definition [108] Step Position Product selector [25] Step Tuning [108] Project [108] Step Velocity [131] arranging [173] definition [15] overview and structure [121] saving using your controller Project view section [36] MASCHINE JAM - Manual - 188...
- Page 189 [129] [95] [123] selecting creating [174] [96] definition setting of scale [129] [133] Running the MASCHINE software duplicating [49] triggering [125] as a plug-in Scene buttons [37] as a stand-alone application [49] MASCHINE JAM - Manual - 189...
- Page 190 [174] clearing from Sound slot [117] definition Sequencing beats [118] copying and pasting [174] [82] definition in Step mode [118] Setting Pattern Length [73] duplicating using your controller Group [145] Smart Strip section [40] MASCHINE JAM - Manual - 190...
- Page 191 Master channel [175] definition [87] adding to Sound channel STEP button [38] [175] definition Step Grid [31] SWING button [41] [71] adjusting [72] changing settings in on-screen overlay [175] definition resolution [71] [71] setting MASCHINE JAM - Manual - 191...
- Page 192 Transposition [111] [114] Random mode parameters Troubleshooting [166] Volume [23] TUNE button [41] Volume level Tuning [136] setting [148] [150] Group VST/AU [150] resetting of Group definition [173] [149] resetting of Sound [148] Sound MASCHINE JAM - Manual - 192...
Need help?
Do you have a question about the MASCHINE JAM and is the answer not in the manual?
Questions and answers