Table of Contents
Advertisement
Advertisement
Table of Contents

Related Manuals for Native Instruments MASCHINE MK3


Summary of Contents for Native Instruments MASCHINE MK3
- Page 1 MASCHINE MK3 GETTING STARTED...
- Page 2 The information in this document is subject to change without notice and does not represent a commitment on the part of Native Instruments GmbH. The software described by this docu- ment is subject to a License Agreement and may not be copied to other media. No part of this...
- Page 3 NATIVE INSTRUMENTS FRANCE SARL SHENZHEN NATIVE INSTRUMENTS COMPANY Limited 113 Rue Saint-Maur 203B & 201B, Nanshan E-Commerce Base Of 75011 Paris Innovative Services France Shi Yun Road, Shekou, Nanshan, Shenzhen www.native-instruments.com China www.native-instruments.com © NATIVE INSTRUMENTS GmbH, 2017. All rights reserved.
-
Page 4: Table Of Contents
Table of Contents Table of Contents Welcome to MASCHINE ..................... 10 Documentation Overview ......................11 1.1.1 In This Document ....................... 12 1.1.2 Document Conventions ....................13 Setting Up MASCHINE ....................17 Connecting the Controller to the Computer ................. 17 Basic Audio Configuration ......................18 2.2.1 Using Your Controller as Audio Device in the MASCHINE Software ...... - Page 5 Table of Contents Recording Your First Pattern ....................... 41 Playing with Your Pattern ......................43 3.4.1 Using Solo and Mute ....................43 3.4.2 Using Note Repeat ..................... 46 Saving Your Project ........................47 To Sum Up… ..........................48 Building Your Own Drum Kit ..................49 Opening Your Project ........................
- Page 6 Table of Contents 5.2.4 Switching Patterns ....................82 Editing Patterns in the Software ....................82 Saving Your Project ........................83 To Sum Up… ..........................84 Adding a Bass Line ....................85 Selecting Another Group ......................86 Renaming and Coloring the Group ....................88 Using an Instrument Plug-in for the Bass ..................
- Page 7 Table of Contents 7.3.2 Editing Modulation ....................119 Saving Your Project ........................120 To Sum Up… ..........................120 Creating Beats with the Step Sequencer ..............121 Building Up a Beat in Step Mode ....................122 8.1.1 Using Step Mode ......................122 8.1.2 Adjusting the Pattern Length in Step Mode ...............
- Page 8 Table of Contents 10.2 Managing Sections ........................145 10.2.1 Adjusting the Length of a Section ................145 10.2.1.1 Adjusting the Length of a Section Using the Software .......146 10.2.1.2 Adjusting the Length of a Section Using the Controller ......147 10.2.2 Duplicating and Removing Sections ................
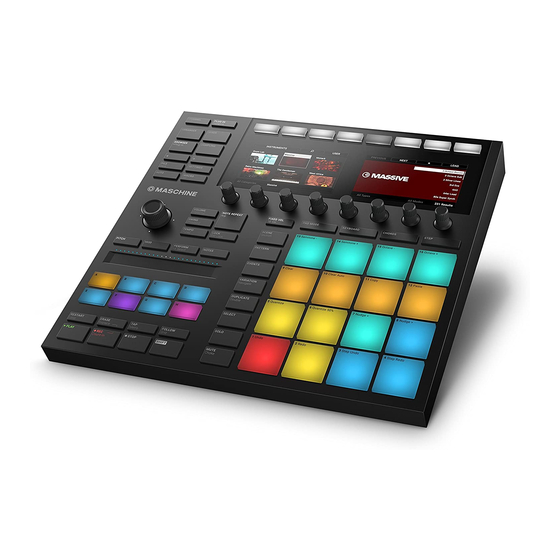
- Page 9 Table of Contents 12.2.1 Sound Content ......................183 12.2.2 Arrangement ......................184 12.3 MASCHINE Hardware Overview ....................187 12.3.1 MASCHINE Hardware Overview .................. 187 12.3.1.1 Control Section ..................189 12.3.1.2 Edit Section ....................192 12.3.1.3 Performance Section ..................193 12.3.1.4 Group Section ....................195 12.3.1.5 Transport Section ..................195 12.3.1.6 Pad Section ....................197 12.3.1.7 Rear Panel ....................202...
-
Page 10: Welcome To Maschine
Browser to give you instant access to the sounds you are looking for. But it doesn’t stop there! You can create your own sounds and samples or use MASCHINE EXPAN- SION packs, available for purchase from the Native Instruments website to further enhance your library of sounds. -
Page 11: Documentation Overview
We recommend that you follow along with these instructions while the respective appli- cation is running on your computer. Other Online Resources: If you are experiencing problems related to your Native Instruments product that the supplied documentation does not cover, there are several ways of getting help: ▪... -
Page 12: In This Document
Help menu or the following location: www.native-instruments.com. Please check the Native Instruments website regularly for up-to-date and localized ver- sions of these documents. 1.1.1 In This Document What you are reading now is the MASCHINE Getting Started. This document consists of a set of tutorials that will guide you through common workflows in MASCHINE. -
Page 13: Document Conventions
Welcome to MASCHINE Documentation Overview ◦ Chapter ↑6, Adding a Bass Line: Add a bass line to your song using a VST/AU instru- ment plug-in in MASCHINE. ◦ Chapter ↑7, Applying Effects: Add effects to the various instruments in your song and quickly automate the effect parameters. - Page 14 Welcome to MASCHINE Documentation Overview Whenever this exclamation mark icon appears, you should read the corresponding note carefully and follow the instructions and hints given there if applicable. This light bulb icon indicates that a note contains useful extra information. This infor- mation may often help you to solve a task more efficiently, but does not necessarily ap- ply to the setup or operating system you are using;...
- Page 15 Unlabeled Buttons and Knobs on the Controller The buttons and knobs above and below the displays on your MASCHINE MK3 controller do not have labels (all other elements on the controller do). MASCHINE - Getting Started - 15...
- Page 16 Welcome to MASCHINE Documentation Overview The unlabeled buttons and knobs on the MASCHINE MK3 controller. For better reference, we applied a special formatting here: throughout the document, the ele- ments are capitalized and numbered, so the buttons are written Button (1–8), while the knobs are written Knob (1–8).
-
Page 17: Setting Up Maschine
Setting Up MASCHINE Connecting the Controller to the Computer Setting Up MASCHINE This chapter provides basic setup information and guides you through the process of integrat- ing MASCHINE into your studio. The MASCHINE software is installed both as a stand-alons application as well as a VST, Audio Unit, and AAX plug-in. -
Page 18: Basic Audio Configuration
Setting Up MASCHINE Basic Audio Configuration Attach the “computer end” of the USB cable to an available USB 2.0 (or later) port on your computer. Press the power switch on the rear panel of the controller to switch it on. The controller is now detected by the operating system. -
Page 19: Using Your Controller As Audio Device In The Maschine Software
Setting Up MASCHINE Basic Audio Configuration 2.2.1 Using Your Controller as Audio Device in the MASCHINE Software By default, when you launch the MASCHINE software as a stand-alone application it already uses your MASCHINE controller as audio input/output device, so you shouldn’t have to set up anything particular to have it work. - Page 20 Setting Up MASCHINE Basic Audio Configuration Click Audio to display the Audio page: MASCHINE - Getting Started - 20...
-
Page 21: Selecting The Maschine Controller As Audio Device In Other Music Software
Setting Up MASCHINE Basic Audio Configuration Select the hardware driver supported by your controller (e.g., ASIO on Windows) from the Driver drop-down menu. Select Maschine MK3 from the Device drop-down menu. In the Routings section, click Input and select 1: Input Left and 2: Input Right in the... -
Page 22: Selecting The Maschine Controller As Default Audio Output Device In Your Operat
In the list of available output devices, click the entry corresponding to the pair of outputs on your MASCHINE controller that you want to set as default: In the list, your controller appears as Maschine MK3 WDM Audio, and the available entries Main... -
Page 23: Setup Examples
Setting Up MASCHINE Setup Examples Setup Examples In this section, you will learn how to connect the MASCHINE controller in various setup sce- narios. Although we cannot cover all imaginable setups here, the examples are general enough to apply the information to most situations. 2.3.1 Connecting Active Monitor Speakers This example shows an all-in-one production system setup in which your active monitor speak-... - Page 24 Setting Up MASCHINE Setup Examples Turn the LINE OUT VOLUME knob on the rear panel of the MASCHINE controller to the left-end stop to set the output volume to minimum. Connect the LINE OUT L/R sockets on the rear panel of the MASCHINE controller to your active speakers using balanced cables with 1/4"...
-
Page 25: Connecting Headphones
Setting Up MASCHINE Setup Examples 2.3.2 Connecting Headphones This example shows a setup for “on-the-road” beat making or performance including laptop, MASCHINE controller and a pair of headphones. MASCHINE setup with headphones. To use headphones with your MASCHINE controller: Turn the PHONES VOLUME knob on the rear panel of the MASCHINE controller to the left-end stop to set the headphones volume to minimum. -
Page 26: Maschine In A Recording Setup
Cue channel of MA- SCHINE. You cannot use it to monitor the main outputs in your headphones. For more details, please read the following Knowledge Base article on the Native Instruments website: https://support.native-instruments.com/hc/en-us/articles/115005070825-Important-... -
Page 27: Connecting A Dynamic Microphone
Setting Up MASCHINE Setup Examples You will find two examples using a recording setup with step-by-step instructions on how to route external audio to a particular Sound of your MASCHINE Project in section ↑11.3.2, Using an External Sound Source ↑11.4.1, How to Sample. -
Page 28: Connecting Line Level Equipment
Setting Up MASCHINE Setup Examples Make sure the MASCHINE controller’s LINE OUT VOLUME, PHONES VOLUME, and MIC IN GAIN knobs are turned down before connecting a microphone to the MASCHINE controller. Microphones nearby speakers can cause a loud squealing tone from the speakers (a phenomenon called the “Larsen effect”... - Page 29 Setting Up MASCHINE Setup Examples MASCHINE setup with a line level device (here a synthesizer) as input. To use the MASCHINE controller in a setup with typical line level equipment: Turn the LINE OUT VOLUME PHONES VOLUME knobs on the rear panel of the MA- SCHINE controller to the left-end stop to set the output and headphones volumes to mini- mum.
-
Page 30: Connecting A Pedal
LINE IN 1 sockets. 2.3.4 Connecting a Pedal Your MASCHINE MK3 Controller provides a pedal input in the form of 1/4" socket on its rear panel. PEDAL socket on the rear panel of your controller. PEDAL socket allows you to use a pedal footswitch to control the transport in MASCHINE. - Page 31 Setting Up MASCHINE Setup Examples The MIDI sockets on the rear panel of the MASCHINE controller. To connect your external MIDI equipment: Connect the device receiving MIDI signals to the MIDI OUT socket on the rear panel of the MASCHINE controller using a 5-pin DIN MIDI jack. Connect the device sending MIDI signals to the MIDI IN socket on the rear panel of MA-...
-
Page 32: First Steps
First Steps First Steps In this first tutorial, you will load a drum kit from the factory library, play it with the pads and record a simple rhythmic pattern. For a complete overview of MASCHINE and its controls, please see section ↑12, Quick Reference. -
Page 33: Loading A Drum Kit From The Factory Library
First Steps Loading a Drum Kit from the Factory Library Loading a Drum Kit from the Factory Library First you will choose a complete drum kit from the huge factory library included with MA- SCHINE, and load it using the MASCHINE Browser. The Browser is your tool for finding, tag- ging and categorizing all types of objects used in MASCHINE. - Page 34 Loading a Drum Kit from the Factory Library Click the Group icon to get a list of all available drum kits in the Library: In the Content selector to the right, click the world icon to select only Native Instruments factory content:...
- Page 35 First Steps Loading a Drum Kit from the Factory Library ⇨ The Browser will then display only kits in the Result list: Select the Urban Kit sub-type tag below to further refine your search. MASCHINE - Getting Started - 35...
- Page 36 First Steps Loading a Drum Kit from the Factory Library Scroll down the Result list and double-click EK-TL A Kit to load this drum kit into Group 3.1.2 Loading a Drum Kit from the Factory Library Using the Controller On your controller, do the following: Press button on the left of your controller to select the first Group slot.
- Page 37 Button 4 to disable it. ⇨ This will now allow you to select only Native Instruments factory content. Move the 4-D encoder to the left or to the right in order to put the focus (indicated by the brackets) on Types.
- Page 38 First Steps Loading a Drum Kit from the Factory Library Move the 4-D encoder one step to the right to put the focus (the brackets) on the All Sub- Types label that just appeared Press and hold the encoder. ⇨ The right display shows the various sub-types of drum kits available as long as the 4-D encoder is pressed: 10.
- Page 39 First Steps Loading a Drum Kit from the Factory Library 13. Now press SHIFT + Button 4 above the displays so that +PATTERNS is deselected (the Button must be off, this will be explained in more detail later): 14. Press the 4-D encoder to load the selected entry. The drum kit is loaded into the Group A.
-
Page 40: Playing With The Pads
First Steps Playing with the Pads Playing with the Pads As soon as a Group is loaded (here the EK-TL A Kit) and the corresponding Group slot selected (here Group slot A), this Group can be played from the pads on your controller. Each pad trig- gers one of the Sounds included in the Group. -
Page 41: Recording Your First Pattern
First Steps Recording Your First Pattern Select Group A again by pressing button and continue playing on the pads to get famil- ► iar with them. When you feel ready, move on to the next section, where you can record a little rhythmic pat- tern using this drum kit! Recording Your First Pattern Now that you feel comfortable with the pads, let’s use them to live record some rhythm into a... - Page 42 First Steps Recording Your First Pattern If you’d like to change the tempo to make your playing feel more comfortable, press the TEMPO button near the 4-D encoder in the middle left part of the controller (the button lights up), turn the 4-D encoder, and press TEMPO again to deactivate it (the button turns off).
-
Page 43: Playing With Your Pattern
First Steps Playing with Your Pattern Press again to stop recording. You just created your first Pattern! → You can now deactivate the metronome by pressing SHIFT again and listen to your new- ly created rhythm. To stop the sequencer, press STOP or press PLAY... - Page 44 First Steps Playing with Your Pattern 3.4.1.1 Using Solo and Mute in the MASCHINE Software Soloing a Sound To solo a Sound, right-click the number on the left side of the Sound slot in the Pattern ► Editor. Soloing the first kick Sound. To unsolo a Sound, right-click the number again.
- Page 45 First Steps Playing with Your Pattern By default, the Mute on Sounds is an event mute: events for muted Sounds are not trig- gered, but the audio coming from previous events might still be audible (reverb tail, etc.). You can also activate audio mute for Sounds to mute both events and audio. See the MASCHINE Manual for more information.
-
Page 46: Using Note Repeat
First Steps Playing with Your Pattern You can also solo and mute whole Groups by holding SOLO MUTE and pressing the desired Group button A–H; since you only have one Group loaded, it would not make much sense yet. 3.4.2 Using Note Repeat Note Repeat is a really handy way to play and program beats: it plays the selected Sound or note repeatedly at a given rate. -
Page 47: Saving Your Project
First Steps Saving Your Project Of course you can also use Note Repeat to program your Pattern (e.g., recording a con- tinuous hi-hat). Saving Your Project A drum groove is an ideal starting point for the creation of a song. All the instruments you re- cord afterwards will be based on the feeling of that rhythm. -
Page 48: To Sum Up
First Steps To Sum Up… Pressing the FILE button opens the File mode with additional options for managing your Project files directly from your controller: start a new Project, save a copy of the current Project, save the Project under a new name, or load a Project from the list of Projects opened recently. -
Page 49: Building Your Own Drum Kit
Building Your Own Drum Kit Opening Your Project Building Your Own Drum Kit In this tutorial, you will exchange some of the Sounds of your drum kit, and adjust a few set- tings for your Project and your Group. On the way, you will discover some features of the MA- SCHINE software user interface. - Page 50 Building Your Own Drum Kit Opening Your Project Available both on your controller and in the software, the Browser will be the preferred way to open a project when working on your controller. Here you will use a nice feature of MASCHINE: Each file you created and saved in MASCHINE is automatically put in “User”...
- Page 51 Building Your Own Drum Kit Opening Your Project In the Content selector to the right, click the User icon to select only the user-created Projects: In the result list below, you now have one unique Project left — your “My First Project”: Double-click this unique entry to load the Project in MASCHINE.
- Page 52 Building Your Own Drum Kit Opening Your Project ⇨ By selecting this, a list of Projects will become visible on the right display. Press Button 4 above the displays to enable it. ⇨ USER label underneath gets highlighted: This will select only User content. If you have already created more than one Project, turn the 4-D encoder or Knob 8 until My First Project is selected on the right display.
-
Page 53: Customizing Your Drum Kit
Building Your Own Drum Kit Customizing Your Drum Kit Press FILE to leave the File mode. You can continue to work on your Project. → The File mode provides additional options for managing your Project files directly from your controller: start a new Project, save a copy of the current Project, or save the Project under a new name. - Page 54 Building Your Own Drum Kit Customizing Your Drum Kit Click the Browser button in the top row to show the Browser within the MASCHINE win- dow (the button becomes highlighted): In the top row of the Browser, click the Sample icon on the far right to get a list of all the available samples in the Library: Since you want to find a side stick, type “side stick”...
- Page 55 Building Your Own Drum Kit Customizing Your Drum Kit Now activate Prehear by clicking the Prehear button (the loudspeaker symbol) at the bot- tom of the Browser: ⇨ Now you can listen to the available side sticks by clicking on their names in the list and choose one you like.
- Page 56 Button 4 to disable it. ⇨ This will select only Native Instruments factory content: Move the 4-D encoder to the left or to the right in order to put the focus (indicated by the...
- Page 57 Building Your Own Drum Kit Customizing Your Drum Kit Move the 4-D encoder one step to the right to put the focus (the brackets) on the All Sub- Types label that just appeared, and turn (or press and turn) the encoder to select the Snare sub-type.
-
Page 58: Loading A Drumsynth
Building Your Own Drum Kit Customizing Your Drum Kit As you can see, once you have selected the particular objects (Groups, Sounds, etc.) and content (factory or user) that you want to browse, you can perform the entire naviga- tion with one hand using the 4-D encoder! Feel free to use your preferred method: via the 4-D encoder, Knobs 1–8, or any combination of both. - Page 59 Building Your Own Drum Kit Customizing Your Drum Kit Select the Sound “Kick Ektl A 2.” Now have a look at the Control area: The Control area showing some Sampler Plug-in parameters for your kick drum Sound. In the left part of the Control area, you can load any number of Plug-ins into the Plug-in List. The processing order is from top to bottom (from the first Plug-in to the last).
- Page 60 Building Your Own Drum Kit Customizing Your Drum Kit ▪ Using the Plug-in menu: You can also choose the desired Plug-in directly from the Plug-in slot itself via the Plug-in menu. Note that these methods work in any channel (Sounds, Groups. or Master). However, since Drumsynth is an instrument, you can load it only into the first Plug-in slot of Sounds.
- Page 61 Building Your Own Drum Kit Customizing Your Drum Kit At the far left of the Control area, click the small Plug-in icon to display the Plug-ins. This displays the Plug-in List on the left of the Control area: The Plug-in List in this instance contains Sampler. Click the down-pointing arrow at the right to open the Plug-in menu.
-
Page 62: Loading A Drumsynth Into A Plug-In List On The Controller
Building Your Own Drum Kit Customizing Your Drum Kit Click the Kick entry to load it into the Plug-in List. The Kick Plug-in is now loaded and is ready to be tweaked. → 4.2.2.2 Loading a Drumsynth into a Plug-in List on the Controller Press the PLUG-IN button in the top left corner of your controller to enter Control mode... - Page 63 Building Your Own Drum Kit Customizing Your Drum Kit Press the 4-D encoder to open the Plug-in menu in the right display: Turn Knob 1 until the TYPE field is set to Instr. (for Instrument) and then Knob 2 until VENDOR field is set to Internal.
-
Page 64: Adjusting Volume, Swing And Tempo
Building Your Own Drum Kit Customizing Your Drum Kit The Plug-in menu is automatically closed and the Kick Plug-in is now loaded in place of → the Sampler, ready to be tweaked: As in the Browser (see section ↑4.2.1, Selecting Another Snare Sample), the 4-D encoder proves to be extremely handy for navigating the Plug-ins loaded in your Sounds and loading new ones. - Page 65 Building Your Own Drum Kit Customizing Your Drum Kit Use the Master Volume slider in the Header to adjust the overall volume of MASCHINE. You can also use Mix view to adjust your Sound and Group levels. Mix view gives you quick access to the level and routing settings of all your Sounds, Groups, and the Mas- ter.
- Page 66 Building Your Own Drum Kit Customizing Your Drum Kit 4.2.3.2 Adjusting Volume, Swing, Tempo and Tune on Your Controller Adjusting Volume Press the VOLUME button near the 4-D encoder. ► VOLUME button lights up. You can now adjust the volume for your overall Project, for →...
-
Page 67: Changing The Color Of Your Sounds
Building Your Own Drum Kit Customizing Your Drum Kit Adjusting Tempo/Tune Press the TEMPO button at the left of the 4-D encoder. ► TEMPO button lights up. You can now adjust the tempo of your Project as well as the →... - Page 68 Building Your Own Drum Kit Customizing Your Drum Kit Right-click on the desired Sound slots, select Color in the context menu, and select the ► desired color according to the type of percussion in that Sound slot. Here is an example of how you could color Sounds: Your drum kit full of colors.
-
Page 69: Moving Your Sounds And Groups
Building Your Own Drum Kit Customizing Your Drum Kit You can assign colors to your Sounds, Groups, Patterns, Scenes, and Sections. It’s up to you to decide which colors to use. You can use colors to distinguish different sound types, purposes, or anything else that best fits your needs and workflow. Changing the color of items can be done in the MASCHINE software only. -
Page 70: Saving Your Project
Building Your Own Drum Kit Saving Your Project Click and hold the Sound slot 3, which now contains the “Snare Ektl A 1.” While holding the mouse button, drag your mouse down. When the insertion line appears above the other snare, release the mouse button. Your first snare takes place above the second snare in the Sound slot 5. - Page 71 Building Your Own Drum Kit To Sum Up… ▪ Adjust the overall volume of MASCHINE along with the individual volume levels of your Groups and Sounds using your controller. ▪ Adjust the overall Swing of your song, both on your controller and in the software. ▪...
-
Page 72: Creating Beats
Creating Beats Fine-tuning your First Pattern Creating Beats In this tutorial, you will further enhance your tutorial Project and do the following: ▪ Double your Pattern and fine-tune it. ▪ Add a second Pattern for breaks. Even though you have only dealt with drum kits until now, MASCHINE is much more than a rhythm box. -
Page 73: Your Pattern In The Software
Creating Beats Fine-tuning your First Pattern 5.1.1 Your Pattern in the Software First of all, have a quick look at the Pattern Editor in the software: Your first Pattern displayed in the Pattern Editor. In the Pattern Editor, you will note the following: ▪... -
Page 74: Doubling The Pattern And Adding A Variation
Creating Beats Fine-tuning your First Pattern ▪ The biggest area of the Pattern Editor (3), in the lower right part, displays the events (the notes) of the selected Pattern. In other terms, you see here what you recorded in ↑3.3, Re- cording Your First Pattern. -
Page 75: Quantizing The Rhythm
Creating Beats Fine-tuning your First Pattern A doubled Pattern with some added side-sticks in bar for variation. When recording, you don’t necessarily need to be super-accurate in your playing: The next sec- tion will show you how the Quantize functions can correct the timing of your playing to a set of discrete values. - Page 76 Creating Beats Fine-tuning your First Pattern ▪ You can also quantize events directly when playing on the pads and/or recording! By de- fault, this option is disabled. You can enable it in Preferences > Defaults > Input > Quan- tize. Please refer to the Manual for more information. 5.1.3.1 Quantizing the Rhythm in the MASCHINE Software Zooming In Your Pattern...
- Page 77 Creating Beats Fine-tuning your First Pattern 5.1.3.2 Quantizing the Rhythm using the Controller Quantizing Your Pattern The process of quantization (sometimes called “note snap”) consists of forcing events to stick to the beats or to their subdivisions. This ensures that the rhythm is perfectly tight. On your controller, do the following: To quantize the events of your Pattern, press SHIFT...
-
Page 78: Adding A Second Pattern
Creating Beats Adding a Second Pattern Adding a Second Pattern Now you can create another Pattern that you can use as a break in your song. This will intro- duce a few more tasks and features of MASCHINE, namely the selection of Patterns, the Pat- tern Length, and the Count-in. -
Page 79: Adjusting The Pattern Length
Creating Beats Adding a Second Pattern ▪ All other Pattern slots are dark: They contain no Pattern. 5.2.1.2 Selecting a Pattern Slot on the Controller Press PATTERN and hold it. All pads light off except pad 1, which is fully lit. This indicates that all Pattern slots are empty except the first Pattern slot, which is additionally selected. - Page 80 Creating Beats Adding a Second Pattern In the timeline of the Pattern Editor, click the right limit of the Pattern (indicated by a ► little triangle pointing to the left) and drag your mouse horizontally in the timeline to change the Pattern Length. At the top right of the Pattern Editor, click the value and drag your mouse vertically to ►...
-
Page 81: Recording A New Pattern Using The Count-In
Creating Beats Adding a Second Pattern To change the resolution at which the Pattern Length can be resized, refer to the Man- ual for information on Arranger Grid. 5.2.3 Recording a New Pattern Using the Count-in Once your empty Pattern in Pattern slot 2 has the desired length, you are ready for recording. You have already learned how to record a Pattern by starting the sequencer then enabling the record mode, also using the metronome (see ↑3.3, Recording Your First... -
Page 82: Switching Patterns
Creating Beats Adding a Second Pattern 5.2.4 Switching Patterns Once you have recorded something in the second Pattern slot, you can check that both Pat- terns fit well together by instantly switching between both: 5.2.4.1 Switching Patterns in the MASCHINE Software Click the Play button in the Header at the very top of the MASCHINE window to start the sequencer (the Play button must be lit). -
Page 83: Saving Your Project
Creating Beats Saving Your Project Double-click into the Grid to create an event. Right-click it to delete it. To clear an event, right-click it. ► To move an event, drag it (i.e. click it, hold the mouse button, drag your mouse to the ►... -
Page 84: To Sum Up
Creating Beats To Sum Up… To save your Project on the controller: Press SHIFT FILE (Save) to save your Project. ► To Sum Up… In this tutorial, you have learned to: ▪ Double a Pattern. ▪ Quantize or half-quantize a Pattern. ▪... -
Page 85: Adding A Bass Line
Adding a Bass Line Adding a Bass Line MASCHINE is not only about rhythm. It is also a full-featured sequencing environment and, as such, lets you create melodic parts as well. As an example, you will add a bass line to your song. -
Page 86: Selecting Another Group
The Groups in Group bank 1 will be labeled and Group bank 2 to H2. For more information on creating and selecting additional Group banks, please refer to the MASCHINE MK3 Manual, available from the Help menu. 6.1.1 Selecting Another Group in the Software In the top part of the MASCHINE window, click the sign to add another Group. - Page 87 Adding a Bass Line Selecting Another Group Click the Group slot’s name to select that slot. Upon selection, the Pattern Editor below switches to display the content of the newly selected Group slot. For now, this is still empty (no Sounds, no Patterns). 6.1.2 Selecting Another Group on the Controller The eight buttons labeled...
-
Page 88: Renaming And Coloring The Group
Adding a Bass Line Renaming and Coloring the Group Renaming and Coloring the Group As you loaded the drum kit into the Group A1 (see ↑3.1, Loading a Drum Kit from the Factory Library), the slot automatically took the name of the loaded Group (“EK-TL A Kit”). Here you will manually rename the Group B1 to help keep your Project well organized. -
Page 89: Using An Instrument Plug-In For The Bass
Using an Instrument Plug-in for the Bass In addition to using the internal sounds of MASCHINE, you may also use 32-bit and 64-bit VST/AU plug-ins from Native Instruments and third-party manufacturers. This notably allows you to make use of your favorite synthesizer and effect plug-ins! -
Page 90: Browsing The Massive Presets
Using an Instrument Plug-in for the Bass MASCHINE already includes KOMPLETE 11 SELECT, a premium instrument and effect pack- age for all styles of music. This Native Instruments bundle notably includes MASSIVE (the leg- endary synthesizer), REAKTOR PRISM (a modal synthesizer), SCARBEE MARK 1 (an iconic electric piano) and SOLID BUS COMP (a superior compressor), just to mention a few. - Page 91 Adding a Bass Line Using an Instrument Plug-in for the Bass At the very top of the Browser, select the keyboard icon from the File Type selector: The Browser now shows the Instrument presets. Select the sphere icon from the Content selector: This selects the factory content for displaying.
- Page 92 Adding a Bass Line Using an Instrument Plug-in for the Bass …and select Massive: This will limit the list of presets displayed to the MASSIVE presets. Click All Banks to reveal a list of all MASSIVE banks installed on your computer: From this list, click Massive Factory.
- Page 93 Adding a Bass Line Using an Instrument Plug-in for the Bass 11. Click Bass Line in the Sub-Type section to further narrow your search. You can now load a bass preset by double-clicking its entry in the result list below. →...
- Page 94 Adding a Bass Line Using an Instrument Plug-in for the Bass Move the 4-D encoder to select banks, and turn the Knob to select Massive Factory bank: ⇨ The Browser will now show MASSIVE presets from the MASSIVE factory library only. Move the 4-D encoder to select All Types and press it to show the Type tag cloud with all...
-
Page 95: Switching To Keyboard Mode
Adding a Bass Line Using an Instrument Plug-in for the Bass 10. Move the 4-D to Sub-Type and turn the 4-D encoder to select Bass Line from the Sub- Type tag cloud: Once you release the 4-D encoder, the right display shows you the list of MASSIVE bass →... - Page 96 Adding a Bass Line Using an Instrument Plug-in for the Bass In the software, click the Autoload button at the bottom of the Browser to activate it: ► Each preset is now automatically loaded into the Sound slot 1 when selected in the →...
- Page 97 Adding a Bass Line Using an Instrument Plug-in for the Bass The Keyboard View button. The Pattern Editor shows a vertical keyboard at the right of the Sound slots. The rows in the grid now represent each note for the selected Sound slot, instead of representing each Sound slot.
-
Page 98: Adjusting The Root Note For The Pads
Adding a Bass Line Using an Instrument Plug-in for the Bass Keyboard mode and Group mode are so-called pad input modes: They define the behavior of the pads in reaction to your input (your hits). Other pad input modes are also availa- ble: Chords and Step. -
Page 99: Recording A Bass Line
Adding a Bass Line Recording a Bass Line Load various bass presets into Sound slot 1 and play them on the pads to choose the bass sound you would like to use. Now choose the Sound “Analovue,” because it has nice bass content and some high-fre- quency ornaments. -
Page 100: Recording Another Bass Pattern
Adding a Bass Line Recording a Bass Line 6.4.2 Recording Another Bass Pattern A single bass line is obviously not enough for your whole song. Now record a second one that you could use as variation. Switch to the second Pattern slot. As a reminder, you can do this on your controller by pressing PATTERN + pad 2, and in the software by double-clicking the Pattern slot... -
Page 101: Accessing The Plug-In Parameters
Adding a Bass Line Accessing the Plug-in Parameters Holding SELECT while pressing the pad selects the Sound slot regardless of which pad mode is active; on the contrary, pressing only the pad does not select the Sound slot if Keyboard mode is active. Moreover, when holding the SELECT button, you don’t hear the Sound when you press the pad. - Page 102 Adding a Bass Line Accessing the Plug-in Parameters The Control area allows you, among many other things, to adjust the parameters of your Plug- ins. Here, you want to display the Plug-in parameters for your first bass Sound “Analovue.” 6.5.1 Accessing the Plug-in Parameters in the Software At the left of the Pattern Editor, click the Sound slot’s name (Analovue) to select that Sound slot.
- Page 103 Adding a Bass Line Accessing the Plug-in Parameters The Control area indicating which parameters are displayed. The large part of the Control area to the right is called the Parameter area. This gives you ac- cess to the desired parameters: The parameters for the Sound “Analovue.”...
- Page 104 Adding a Bass Line Accessing the Plug-in Parameters Click the Osc2 label at the top of the Control area to select the Osc2 parameter page. The Control area now displays the parameters of that page. Click the fourth knob (Osc2Amp) and drag your mouse vertically to adjust the value. You can fine-adjust the parameter value by holding down [Shift] on your computer key- board while you drag the mouse.
-
Page 105: Saving Your Project
Adding a Bass Line Saving Your Project Saving Your Project Again, it is recommended to regularly save your work. You can then open another Project or close MASCHINE and take a break. Your tutorial Project will be recalled as it was the next time you open it. -
Page 106: Applying Effects
Applying Effects Applying Effects Now that you have created a few Patterns, you can spice them up with some effects. MASCHINE provides a healthy selection of effects (FX) that can be loaded in the form of Plug- ins. Each channel (Sounds, Groups and Master) can have an unlimited number of insert ef- fects loaded in their Plug-ins slots. -
Page 107: Loading Effects
Applying Effects Loading Effects Loading Effects In this section you will learn how to load effects in MASCHINE. In MASCHINE, effects are just a particular type of Plug-ins; the other type are the instrument Plug-ins, which you already met in the previous tutorials. Both effect and instrument Plug-ins are handled in the same way, with the notable difference that instrument Plug-ins can be load- ed only in the first Plug-in slot of Sounds, whereas effect Plug-ins can be loaded in any Plug-in slot of any channel (Sounds, Groups or Master). - Page 108 Applying Effects Loading Effects In the Control area below, click the SOUND tab to select the Sound level, since you want to apply the saturation to a Sound. The actual Sound that you assign the effect to is always the one in focus. Hence, at the left of the Pattern Editor, click the Sound slot’s name (Analovue) to select that Sound slot.
- Page 109 → If you have VST/AU effect plug-ins installed, you may also load them from the menu by selecting the Native Instruments submenu (for Native Instruments products) or the cor- responding vendor submenu (for third-party products). MASCHINE - Getting Started - 109...
- Page 110 Applying Effects Loading Effects If you wish to load a Plug-in at the Group level, just follow the same procedure except at the second step click the GROUP tab instead of the SOUND tab! Similarly, if you wish to load a Plug-in at the Master level (to process the audio of the whole Project), click the MASTER tab at this step.
- Page 111 Applying Effects Loading Effects Turn Knob 2 until the VENDOR field is set to Internal. This selects the MASCHINE internal effects, which are listed in the right display: Turn the 4-D encoder (or Knob 8) to select the Saturator, and press the encoder (or But- ton 8) to load it.
-
Page 112: Playing With Effects
Applying Effects Playing with Effects Playing with Effects Once the Saturator Plug-in is loaded into the Plug-in List, you will find its parameters dis- played in the Control area when the Saturator effect is selected: When Saturator is selected from the Plug-in List, the Control area displays its parameters. 7.2.1 Adjusting the Effect Parameters To adjust the effect parameters to your needs, the method is basically the same as when you... - Page 113 Applying Effects Playing with Effects Click in the display of the Mode selector at the left and select the Tube entry in the menu that opens. Upon your selection, the other parameters change in the Parameter area, giving you ac- cess to settings specific to this saturation mode.
-
Page 114: Practice Makes Perfect
Applying Effects Playing with Effects 7.2.2 Practice Makes Perfect! Don’t hesitate to practice with loading effects in different places of the tutorial Project and ad- justing their parameters. For example: ▪ You could load a Chorus on the Sound “Snare Ektl A 1” of the drum kit Group to slightly widen its sound (use a low value for the parameter of the effect). - Page 115 Applying Effects Playing with Effects Now click the icon (in Arrange view) at the left of the effect name in the Plug-in List. To bypass the effect. The effect unit does not affect the sound anymore. The effect is grayed out to indicate that it is now bypassed.
-
Page 116: Modulating Effect Parameters
Applying Effects Modulating Effect Parameters Effect on a Group: Press Button 2 (GROUP) to select the Group level, then press the de- sired Group button (A–H) to select the corresponding Group. Effect on a Sound: Press Button 3 (SOUND) to select the Sound level, press the desired Group button (A–H), then press the desired pad (or SELECT + the desired pad if the Key-... -
Page 117: Recording Modulation
Applying Effects Modulating Effect Parameters Modulation is not limited to effects: In MASCHINE, you can modulate just about any parameter at the Group or Sound level as soon as it has a continuous range of values — in other terms, almost any parameter controlled by a knob in the Parameter area! 7.3.1 Recording Modulation Now try to record some simple modulation for the effect parameter of your choice. - Page 118 Applying Effects Modulating Effect Parameters Press CHANNEL PLUG-IN depending on whether the parameter is located in Channel properties or in a Plug-in, respectively. Select the channel (Sound, Group or Master) containing the parameter: If the parameter is at the Master level, press Button 1 (MASTER). If the parameter is in a Group, press Button 2 (GROUP) and select that Group by pressing its Group button A–H.
-
Page 119: Editing Modulation
Applying Effects Modulating Effect Parameters Your modulation gets recorded now. On the next loop, the parameter changes will be re- → produced. There is also another way to record modulation from your controller: the step sequencer. More on this in ↑8, Creating Beats with the Step Sequencer! Delete the Recorded Modulation... -
Page 120: Saving Your Project
Applying Effects Saving Your Project Saving Your Project Again, it is recommended to regularly save your work. You can then open another Project or close MASCHINE and take a break. Your tutorial Project will be recalled as it was the next time you open it. -
Page 121: Creating Beats With The Step Sequencer
Creating Beats with the Step Sequencer Creating Beats with the Step Sequencer In this chapter you will learn a different way to create Patterns from your controller: the Step mode. The Step mode turns your controller into a fully featured step sequencer. If you are fa- miliar with classic drum machines, you should quickly feel at home. -
Page 122: Building Up A Beat In Step Mode
Creating Beats with the Step Sequencer Building Up a Beat in Step Mode Building Up a Beat in Step Mode Until now, you recorded all Patterns “live”: You hit the various pads at the desired moments while the sequencer was playing and the sequencer directly recorded your hits. This is the re- cording workflow when the controller is in Control mode. -
Page 123: Adjusting The Pattern Length In Step Mode
Creating Beats with the Step Sequencer Building Up a Beat in Step Mode Progressively, you build up a new Pattern. → If you decided to create a Pattern more than sixteen steps long, you can use Knob 6 un- der the right display to switch between each part — or alternatively press FOLLOW MASCHINE will automatically follow the Pattern and display the steps on the pads ac- cordingly. -
Page 124: Recording Modulation In Step Mode
Creating Beats with the Step Sequencer Building Up a Beat in Step Mode The 16 pads representing the full Pattern (the Pattern is one bar long). The 16 pads representing the second quarter of the Pattern (the Pattern is four bars long). 8.1.3 Recording Modulation in Step Mode It is also possible to record modulation in Step mode. -
Page 125: A Few Notes On Step Mode
Creating Beats with the Step Sequencer Building Up a Beat in Step Mode Hold the pad representing the step you want to modulate. While you are holding the pad, the displays turn back to a mode similar to Control mode: Press Button 1 (MASTER), Button 2 (GROUP) or Button 3 (SOUND) to select the level at which you want to modulate a parameter. -
Page 126: Adjusting The Step Grid
Creating Beats with the Step Sequencer Adjusting the Step Grid ▪ You are free to use both Control mode and Step mode on the same Pattern! For example, you could start building a tight, basic beat in Step mode, then switch to Control mode and record live-played ornaments to add a human touch to your Pattern. - Page 127 Creating Beats with the Step Sequencer Adjusting the Step Grid The Step Grid with the default resolution (1/16th note). To change the Step Grid resolution, do the following: Click the Step menu at the bottom left of the Pattern Editor. Select the desired step size in the list that opens.
-
Page 128: Saving Your Project
Creating Beats with the Step Sequencer Adjusting the Step Grid Similarly to changing the Pattern Length, changing the Step Grid resolution can result in a greater amount of steps in your Pattern than what your sixteen pads can represent. In that case, as described earlier, you can use the Page buttons to display the previous/next sixteen steps of your Pattern. -
Page 129: To Sum Up
Creating Beats with the Step Sequencer To Sum Up… Press [Ctrl] + [S] ([command] + [S] on macOS) to save your Project. ► To save your Project on the controller: Press SHIFT FILE (Save) to save your Project. ► To Sum Up… In this tutorial, you have learned to: ▪... -
Page 130: Creating Scenes
Creating Scenes Working with Scenes Creating Scenes In the previous tutorials you created a few Patterns for the drum kit Group and bass Group. Using these Patterns you can now start to create your own Scenes. A Scene is made of a varia- ble number of Patterns that each represent a certain part of the song, e.g., intro, verse, chorus, break, another verse…... -
Page 131: Assigning Patterns To Scenes
Creating Scenes Assigning Patterns to Scenes ▪ In each Scene, you can choose to play one particular Pattern from each Group. For exam- ple, in Scene 1 we play the Pattern 1 of the Group “EK-TL A Kit” (our drum kit) together with the Pattern 2 of the Group “Bass”... - Page 132 Creating Scenes Assigning Patterns to Scenes Press PLAY on your controller or the [Space] bar on your computer keyboard to start the ► sequencer. This way, you can directly hear if the various Patterns sound good together. In previous tutorials, when you pressed PLAY the first Scene played because it was selected by default.
- Page 133 Creating Scenes Assigning Patterns to Scenes Click the desired Patterns for Scene 2. The selected Patterns will play when Scene 2 is selected. By repeating these two steps for all Groups you want to use in this Scene, you progressive- →...
-
Page 134: Managing Scenes
Creating Scenes Managing Scenes While holding SCENE (Section), press pad to select Scene 2. lights up brightly to confirm its selection. turns half lit, indicating that Scene 1 is not currently selected. Release the SCENE (Section) button. Scene 2 is now selected. If the sequencer is playing, you won’t hear anything because →... -
Page 135: Renaming And Coloring Scene Slots
Creating Scenes Managing Scenes 9.3.1 Renaming and Coloring Scene Slots As with Sound slots and Groups, you can change the name and color of your Scene slots for a better visual organization, especially useful in a live situation, and for organizing parts of your song! Renaming and Coloring can only be done in the software. - Page 136 Creating Scenes Managing Scenes Right-click for example the Scene slot 2 and select Duplicate in the context menu. ► The content of Scene slot 2 is copied to the next Scene column and all other Scenes are → moved one Scene to the right. To delete a Scene in the Ideas view: Right-click for example the Scene slot 2 and select Delete in the context menu.
-
Page 137: Playing Live
Creating Scenes Playing Live Press and hold SCENE (Section) to enter Scene mode (or pin it by pressing SCENE (Sec- tion) + Button 1). The right display shows the names of your Scene slots. Additionally, the selected Scene slot is highlighted. Press for example pad to select Scene slot 2. - Page 138 Creating Scenes Playing Live ▪ The Perform Grid setting lets you choose the point at which the playhead has to leave the current Scene. It can be at the very moment at which you select another Scene, or at a set interval: on the next eight note, quarter note, etc., or even at the end of the Scene.
-
Page 139: To Sum Up
Creating Scenes To Sum Up… Press Button 2 to select PERFORM. On the right display you see the available Scene Sync values. The current value is high- lighted and the corresponding pad is lit. The default value Scene means that the next time you select a new Scene, the switch will happen once the current Scene has played to the end. -
Page 140: Saving Your Project
Creating Scenes Saving Your Project Saving Your Project Again, it is recommended to regularly save your work. You can then open another Project or close MASCHINE and take a break. Your tutorial Project will be recalled as it was the next time you open it. -
Page 141: Creating An Arrangement
Creating an Arrangement Accessing Arranger View Creating an Arrangement The chapter explains how to arrange your song using MASCHINE. If you followed the previous tutorials you will have created a few Patterns for the drum kit Group and bass Group and added them to Scenes using the Ideas view. - Page 142 Creating an Arrangement Accessing Arranger View the length of the Section (determining the playback length of the Scene) or re-order the Sec- tions as you see fit. You can also re-use the same Scene in multiple Sections in the timeline, or you can choose to assign no Scene to the Section at all.
-
Page 143: Creating Your First Section
Creating an Arrangement Accessing Arranger View This is how Sections work: ▪ The Arranger view is a timeline where playback of your Sections progresses from left to right. ▪ Only one Section is played at a time. ▪ Each Section contains one only Scene. 10.1.1 Creating your First Section To begin arranging you must start to populate the timeline with Scenes from the Ideas View. -
Page 144: Assigning A Scene To A Section
Creating an Arrangement Accessing Arranger View Press SCENE + pad 1. A new empty Scene is created. → 10.1.2 Assigning a Scene to a Section Now you have created an empty Section on the timeline of the Arranger, you can now add a Scene from the Ideas view to the Arranger view and start to arrange your song. -
Page 145: Managing Sections
Creating an Arrangement Managing Sections The selected Scene is assigned to the Section. → By repeating this for each new Section, you can quickly assign Scenes to the Timeline of the Arranger view. 10.2 Managing Sections Now that you have added your Scenes to a few Sections, you can start to organize them into a song. -
Page 146: 10.2.1.1 Adjusting The Length Of A Section Using The Software
Creating an Arrangement Managing Sections ranger, and a Truncated Pattern marker will appear on the right-hand side of the Section to indicate that a section of the Pattern is hidden: ▪ If a Section has been manually shortened, only the visible part of the Pattern within the set length will be audible. -
Page 147: 10.2.1.2 Adjusting The Length Of A Section Using The Controller
Creating an Arrangement Managing Sections Click and drag the end marker of the Section to the left. ► The Scene will be shortened, and if the adjustment is shorter than the referenced Pattern → a small Truncated Clip marker will appear on the right-hand side of the Section to indi- cate that a part of the Scene is hidden. -
Page 148: Duplicating And Removing Sections
Creating an Arrangement Managing Sections Press the SCENE (Section) button to enter the Section page. Press Button 1 to pin the page if required. Select the pad representing the Section you want to adjust. Turn Knob 4 to adjust the length of the Section as required. Turning the Knob left will shorten the Section, turning it right will lengthen the Section. - Page 149 Creating an Arrangement Managing Sections Right-click for example the Section slot 2 and click Remove in the context menu. ► The content of Section slot 2 is removed and all other Sections are moved one Section to → the left. Note that the Section has only been removed from the arrangement but has not been deleted.
-
Page 150: Selecting A Loop Range
Creating an Arrangement Selecting a Loop Range The Section slot is removed. Sections to the right of the removed Section are shifted one slot to the left to fill the gap. 10.3 Selecting a Loop Range We already learned how to select a Section by clicking its Section slot in the software’s Arrang- er or by pressing SCENE + the desired pad on your controller (see Adding other Sections). -
Page 151: Saving Your Project
Creating an Arrangement Selecting a Loop Range The loop range now contains three Sections. You will note that selecting a single Section amounts to selecting a one-Section-long loop range. 10.3.2 Selecting a Loop Range using the Controller On your controller: Press SHIFT SCENE... -
Page 152: To Sum Up
Creating an Arrangement To Sum Up… Press SHIFT FILE (Save) to save your Project. ► 10.5 To Sum Up… In this tutorial, we have learned to: ▪ Create Sections referencing our Scenes. ▪ Select a Section for playing. ▪ Pin the various controller modes. ▪... -
Page 153: Using Advanced Features
Using Advanced Features Changing the Sound, Group, and Master Channel Properties Using Advanced Features This chapter quickly presents a brief introduction to another four powerful features of MA- SCHINE: ▪ The Sound, Group, and Master Channel properties ▪ Advanced routing ▪... -
Page 154: Using Macro Controls
Using Advanced Features Using Macro Controls These buttons are called the Channel Property selector and allow you to select a particular set of Channel properties for displaying in the Parameter area on the right. As for the rest, accessing and changing parameters from the Channel properties works in the very same way as accessing and changing parameters of Plug-ins, both in the software and on your controller. -
Page 155: Macro Control Overview
Using Advanced Features Using Macro Controls The Macro properties (here for a Sound) in the software. You can access the Macro properties and adjust their Macro Controls via the usual pro- cedure common to all Channel properties and Plug-in parameters. For detailed instruc- tions, e.g., see ↑6.5, Accessing the Plug-in Parameters. -
Page 156: Assigning Macro Controls On The Controller
Using Advanced Features Using Macro Controls Linking the same parameter to more than one Macro Control can be useful in the follow- ing example: If a parameter of a Sound is particularly important, you can link it to the same knob in the Macro Controls of that Sound, of its parent Group, and of the Master. By doing this, you ensure that the parameter is always available on the same knob when you switch between the Master, Group, and Sound level (but not if you switch to another Sound or Group, of course). - Page 157 Using Advanced Features Using Macro Controls If parameters are spread over several pages, use the Page buttons (the two arrow buttons left of the displays) to show the page containing the desired parameter. Now the parameter appears along the bottom of the displays and you can adjust it via one →...
- Page 158 Using Advanced Features Using Macro Controls PITCH parameters are now assigned to Macros, as indicated by the little rotary knob icons. Once you are satisfied with your assignments, you can leave Set Macro mode by pressing MAC- RO. If you wish, you can then navigate to parameters located in other pages, Channel proper- ties or Plug-ins and assign them via the same method.
-
Page 159: Assigning Macro Controls In The Software
Using Advanced Features Using Macro Controls 11.2.3 Assigning Macro Controls in the Software Assigning Macro Controls is done in the Pages pane of the Assignment area when the Macro properties are selected. Opening the Pages Pane in the Assignment Area First of all, you need to open the Pages pane of the Assignment area for Macro properties:... - Page 160 Using Advanced Features Using Macro Controls Pages tab can be clicked only for Native Instruments or External Plug-ins and for Macro properties. For all other Plug-ins and properties, parameters and Parameter pages are not editable, and the Pages tab is grayed out and inactive.
- Page 161 Using Advanced Features Using Macro Controls (4) Focus frame: Indicates the Macro Control being assigned. Click any Macro Control to display and edit its assignment in the Target selector below (6). (5) Parameter Label fields: Double-click these fields to enter custom labels for your parameters (press [Enter] to confirm).
-
Page 162: Using Other Sound Sources
Using Advanced Features Using Other Sound Sources category listing the Channels included at the next level: if you’re editing the Macro prop- erties of the Master you will see the Groups subcategory listing all Groups of your Project, and if you are editing the Macros of a Group you will see the Sounds subcategory listing all Sounds in that Group. -
Page 163: Using Sounds And Groups As Sound Source
Using Advanced Features Using Other Sound Sources We will exclusively use the software, but most of these tasks can be done from your con- troller as well. Please refer to the Manual for more information. 11.3.1 Using Sounds and Groups as Sound Source The source of a Sound depends on the type of Plug-in loaded in its first Plug-in slot: By load- ing an effect Plug-in into the first slot, you make that Sound available for receiving the sig- nal(s) from any other Sound(s) or Group(s) in your Project. - Page 164 Using Advanced Features Using Other Sound Sources In this menu, select any effect, e.g., FM. The FM effect is loaded. Now click the Group Bass in the Arranger to select it. Click the GROUP tab in the Control area to select the Group level and display the parame- ters for the Group “Bass”...
- Page 165 Using Advanced Features Using Other Sound Sources 10. Click the parameter page. 11. In the Aux 1 section, click the label None of the Dest. (destination) selector. In the menu that opens, select C1: Sound 1-1. You hear your bass line processed by the FM effect on top of the original bass line! You →...
-
Page 166: Using An External Sound Source
Using Advanced Features Using Other Sound Sources ▪ Create new effects chains in other Sound slots of Group C and route other signals to them. Routing Tips ▪ For a better overview, rename the Sound you use as a send effect after the effects name. ▪... - Page 167 You then see the list of MASCHINE virtual input ports on the left. By clicking on the fields on the right, you can assign MASCHINE virtual input ports to the physical audio in- puts available on the rear panel of your MASCHINE MK3 controller. MASCHINE - Getting Started - 167...
- Page 168 Using Advanced Features Using Other Sound Sources Make sure that Maschine In 1 L Maschine In 1 R in the left column are assigned to the pair of inputs 1: Input Left 2: Input Right of your controller in the right column —...
- Page 169 In the steps above, we assumed that your MASCHINE software is configured for use with the integrated audio interface available on your MASCHINE MK3 controller (this is the case by default). Of course, you can follow the same procedure with any other audio in- terface —...
-
Page 170: Sampling
Using Advanced Features Sampling On the Audio page (selected by default), click the Source selector (currently reading None) and select In 1 L+R from the menu. You can hear the audio coming from your external device. Adjust its level via the Gain →... -
Page 171: How To Sample
Using Advanced Features Sampling In this tutorial we will sample some audio and add a chopped vocal to add to our track. Before we begin we must setup our external sound source to record the input from our microphone. This chapter is a short introduction to sampling. We will exclusively use the software, but most of these tasks can be done from your controller as well. - Page 172 Using Advanced Features Sampling In the Record tab, select your SOURCE at the bottom of the page. You can record Sam- ples from an internal signal (select Internal from the drop-down menu) or from one of the external inputs (select the Ext. Ster. or Ext. Mono from the drop-down menu). In this case we will record from the drum kit Group “EK-TL A Kit,”...
- Page 173 Using Advanced Features Sampling After selecting Sync, the LENGTH menu is displayed to the right. Click 1 Bar in the menu: Now click the Start button and, since the recording is going to be triggered by the se- quencer, start the sequencer (e.g., by pressing PLAY on your controller or the [Space] bar on your computer keyboard).
-
Page 174: Editing, Slicing And Mapping Your Sample
Using Advanced Features Sampling For external Samples coming from an instrument that is not synced to MASCHINE by way of MIDI Clock, it is more useful to record it manually or in Threshold mode. Please refer to the Manual for more information. 11.4.2 Editing, Slicing and Mapping Your Sample MASCHINE provides you with many features to make an efficient use of your recorded Sample. - Page 175 Using Advanced Features The Mix View The Mix view with Group B1 selected. Switching between Arrange View and Mix View You can switch the MASCHINE software at any time between the Arrange and Mix view: The Mix view button. To switch between Arrange view and Mix view in the MASCHINE software: MASCHINE - Getting Started - 175...
- Page 176 Press the MIXER button to switch your controller to Mixer mode. ► For all details on Mixer mode, please refer to the MASCHINE MK3 Manual available from the Help menu of the software. MASCHINE - Getting Started - 176...
-
Page 177: Quick Reference
Quick Reference Using Your Controller Quick Reference This chapter introduces you to the main areas and concepts of MASCHINE. In the following sections, you will find: ▪ Information that will help you in your every-day work with your controller (↑12.1, Using Your Controller). - Page 178 Quick Reference Using Your Controller For some of these modes, you need to hold the button to keep the mode active. For example, when you press the SOLO button, the displays will show Solo-specific control options; when you release it, the controller switches back to the previous mode. The buttons that are required to be held are in the middle column of your controller (left of the pads) along with the NOTE REPEAT...
-
Page 179: Controlling The Software Views From Your Controller
Quick Reference Using Your Controller On the left screen, the PATTERN label under Button 1 gets highlighted. You can release → PATTERN button: The controller will remain in Pattern mode until you press PAT- TERN again. Once a mode has been pinned your controller will automatically pin the mode next time it is pressed. - Page 180 Quick Reference Using Your Controller You can unpin the Navigate mode by pressing Button 1 (it is pinned by default). When Navigate mode is unpinned, the controller directly switches back to its previous mode when you release the VARIATION button. In some cases, this can be useful to quickly adjust software views without interrupting your workflow.
- Page 181 Quick Reference Using Your Controller Action Shortcut Zoom Arranger in/out (Arranger view only) Knob 1 (Timeline ZOOM) Scroll Arranger left/right (Arranger view only) Knob 2 (Timeline SCROLL) Zoom Pattern Editor in/out Knob 5 (Pattern ZOOM) Scroll Pattern Editor left/right Knob 6 (Pattern SCROLL) The pads also allow you to adjust scroll and zoom settings:...
-
Page 182: Maschine Project Overview
Quick Reference MASCHINE Project Overview Navigate mode: page navigation. Use Buttons 5–8 above the right display along with the pads to select the desired parameter page: Action Shortcut Select Plug-in (from the Plug-in list) / Button 5 and 6 Select Channel properties (Input, Output, Groove or Macro) Select Page Bank Button 7 and 8 Select parameter page... -
Page 183: Sound Content
Quick Reference MASCHINE Project Overview 12.2.1 Sound Content The sound content aspect of a MASCHINE Project includes all the instruments and effects contained in your Project file, and how these are structured. The sound content aspect of a MASCHINE Project with Arranger view selected. ▪... -
Page 184: Arrangement
Quick Reference MASCHINE Project Overview ▪ The Control area has three tabbed sections corresponding to each channel: MASTER, GROUP, and SOUND. ◦ The controls in the SOUND section affect the sound of the selected Sound (1–16). ◦ The controls in the GROUP section affect the sound of the selected Group (A–H), i.e. - Page 185 Quick Reference MASCHINE Project Overview The Ideas view of a MASCHINE Project optimized for creating Patterns and building Scenes. The workflow of creating ideas in MASCHINE is as follows: ▪ You load samples or plug-ins into the Sound slots (7) of the selected Group (2). ▪...
- Page 186 Quick Reference MASCHINE Project Overview ▪ In the upper half of the software, the Ideas view (4) allows you to combine your Patterns from each Group. ▪ Here you combine your Patterns (1) into Scenes (3). Arranger View In the Arranger view Scenes are assigned to Sections and placed on the Timeline of the Ar- ranger, where you can move them around to develop an arrangement.
-
Page 187: Maschine Hardware Overview
Quick Reference MASCHINE Hardware Overview ▪ Change the position of a Section by dragging the Sections slot. 12.3 MASCHINE Hardware Overview 12.3.1 MASCHINE Hardware Overview This section quickly describes the areas and control elements on your hardware controller. The top panel of your controller includes the following sections: MASCHINE - Getting Started - 187... - Page 188 Quick Reference MASCHINE Hardware Overview Overview of the MASCHINE controller’s top panel and its main sections. (1) Control section: Use this multi-purpose section to access to all parameters of the mode cur- rently selected on your controller. On the left, dedicated buttons provide access to the Browser, the Arranger, the Mixer and the Sample Editor.
-
Page 189: 12.3.1.1 Control Section
Quick Reference MASCHINE Hardware Overview (2) Edit section: This section holds the 4-D encoder, a multifunctional element to be used in various contexts. Used in combination with the 4-D encoder, the three Quick Edit buttons nearby allow you to easily adjust the volume, tempo and swing of your Sounds, Groups and Project. - Page 190 Quick Reference MASCHINE Hardware Overview The Control section on your controller. (1) CHANNEL button: Press CHANNEL to switch to Control mode (the default mode on your controller) and directly display the Channel properties of the selected Sound/Group or the Mas- ter.
- Page 191 Quick Reference MASCHINE Hardware Overview (3) ARRANGER button: Press ARRANGER at any time to access the Arrange view. This view al- lows you to edit your Sections, Scenes and Patterns to create the perfect arrangement. See the tutorials in ↑9, Creating Scenes ↑10, Creating an Arrangement.
-
Page 192: 12.3.1.2 Edit Section
Quick Reference MASCHINE Hardware Overview (11) MACRO button: The MACRO button provides instant access to your Macros (also called “Macro Controls”). It is a direct shortcut to the channel’s Macro properties. This shortcut can greatly facilitate both reactivity and improvisation when performing live! Press SHIFT MAC- (Set) to define new Macros in a quick and easy way, directly from your controller. -
Page 193: 12.3.1.3 Performance Section
Quick Reference MASCHINE Hardware Overview (2)–(4) Quick Edit buttons: Enable either VOLUME, SWING, or TEMPO to quickly adjust the vol- ume, swing, or tempo of your Project via the 4-D encoder (1). These buttons are mutually ex- clusive: Only one can be active at any time. When VOLUME, SWING TEMPO is active (lit),... - Page 194 Quick Reference MASCHINE Hardware Overview ing to both the pads you hold and the scale and chords you have configured. As a shortcut, when your pads are in Group mode press SHIFT NOTE REPEAT (Arp) to directly switch your pads in Keyboard mode and activate the Arp engine. The Note Repeat / Arp mode can be pin- ned: Press NOTE REPEAT + Button 1 to pin/unpin the mode.
-
Page 195: 12.3.1.4 Group Section
Quick Reference MASCHINE Hardware Overview If no Strip Mode button is active, the Smart Strip is disabled. 12.3.1.4 Group Section The eight dedicated Group buttons, labeled to H, provide instant access to the Groups. The Group buttons on your controller. Press any Group button to select the Group you want to work in. - Page 196 Quick Reference MASCHINE Hardware Overview The Transport section on your controller. (1) PLAY button: Press PLAY to activate playback. Press PLAY a second time to stop playback. (2) REC button: When playback is on, press to begin recording. Or when playback is off, press SHIFT to begin recording with the Count-in.
-
Page 197: 12.3.1.6 Pad Section
Quick Reference MASCHINE Hardware Overview various MASCHINE objects can be moved or resized: Perform grid (for transitions between Sec- tions), Arrange grid (for Pattern length and Section length), Step grid (for events), and Nudge grid (for events as well). (8) SHIFT button: While the most important features are accessible through dedicated buttons, many shortcuts are available by holding the SHIFT button and pressing pads... - Page 198 Quick Reference MASCHINE Hardware Overview The Pad section on your controller: the Mode buttons (1) to (8), the pads (9), and the Pad Input Mode buttons (10) to (14). Mode Buttons The Mode buttons (1) to (8) are located in the column left of the pads. They switch the pads and your controller to a series of modes dedicated to specific workflows: All the Mode buttons left of the pads can be pinned: Simply press the desired button + Button 1 (above the left display) to pin/unpin the corresponding mode.
- Page 199 Quick Reference MASCHINE Hardware Overview (2) SOLO button: Enters Solo mode. In this mode, you can instantly solo any Sound or Group (equals muting all other Sounds/Groups) by pressing its pad or Group button. This is useful to tweak the Sound or for performing live. The pad of the soloed Sound or Group is fully lit, while all other pads (representing the muted Sounds/Groups) are dimmed.
- Page 200 Quick Reference MASCHINE Hardware Overview ▪ Use Scene mode to create, select and manage Scenes to prepare them for assignment to Sections in the Arranger. During playback, you can switch Scenes for quick on-the-fly ar- rangement by pressing the pads; half-lit pads show existing Scenes, while fully lit pads show the selected Scene.
- Page 201 Quick Reference MASCHINE Hardware Overview ment. The right display shows you the pitch triggered by each pad. You can use Buttons 5–8 to adjust the Root Note (triggered by pad 1), and Knobs 1–4 to configure the Scale engine and limit the available pitches to a particular scale.
-
Page 202: 12.3.1.7 Rear Panel
Quick Reference MASCHINE Hardware Overview play or program complex drum fills. The right display indicates the velocity values for each pad. The pitch of the played note is defined by the Base Key. The 16 Velocities option is only available in Group mode, i.e. when PAD MODE (10) is enabled. - Page 203 Quick Reference MASCHINE Hardware Overview (6) MIC IN socket: Balanced input socket for plugging in dynamic microphones with a 1/4" TRS jack. When a microphone is plugged into the socket, the LINE IN 1 sockets (7) are disa- bled. (7) LINE IN 1 and 2 sockets: Pair of balanced 1/4" TRS input sockets accepting any line level signal (e.g., a synthesizer or mixer output).
-
Page 204: Maschine Software Overview
Quick Reference MASCHINE Software Overview 12.4 MASCHINE Software Overview The MASCHINE software. (1) Header: The Header contains the main controls for the MASCHINE software including the Display area, the Transport controls, and the Master Volume slider. You can also use this area to toggle the Browser, toggle the Mixer view, connect to your hardware controller and monitor the CPU usage of your computer. -
Page 205: Header
Quick Reference MASCHINE Software Overview (3) Arranger: This area has two views: Ideas view and Arranger view. Ideas view is for creating and experimenting with musical ideas free from the timeline. Arranger view is for organizing your musical ideas into a song on the Timeline. (4) Control area: The Control area allows you to control parameters and settings for each of the Plug-in slots at each Project level (Sound, Group and Master). - Page 206 Quick Reference MASCHINE Software Overview (4) Transport controls: The Transport controls contain buttons such as Play, Restart, Record and Loop. (5) Display area: The Display area provides control regarding Ableton Link, time signature, tem- po, global swing, Follow and Sync (Perform Grid and Retrigger in the Cog wheel icon.) (6) Controller icon: This area displays an icon each MASCHINE controllers connected to your computer.
-
Page 207: Browser
Quick Reference MASCHINE Software Overview 12.4.2 Browser 10 11 The Browser. (1) LIBRARY tab: Use the LIBRARY tab to access your computer's hard drives via MASCHINE's selectors and filters. (2) FILES tab: Use the FILES tab to access your computer’s hard drives. MASCHINE - Getting Started - 207... - Page 208 Quick Reference MASCHINE Software Overview (3) File Type selector: This contains six icons representing the different file types of MA- SCHINE. From left to right the file types are: Projects, Groups, Sounds, Instruments, Effects, and Samples. Clicking one of them causes only the files of the selected type to be displayed. (4) Content selector: The Content selector allows you to select between Factory content and User content.
-
Page 209: Arranger
(11) Tag Editor: The Tag Editor allows you to edit Tags applied to files and add Tags to new files from the Bank, Types, and Modes and view Properties. Only Types and Modes Properties can be edited in the User content. The NI (Native Instruments) content is read only. You can show/hide it by clicking the EDIT button at the bottom right. - Page 210 Quick Reference MASCHINE Software Overview The Ideas View The Ideas view for creating and experimenting with musical ideas free from the Timeline. (1) Scenes: This area displays all the current Scenes in your project. After creating a Scene by clicking the symbol, you can build the Scene by selecting a Pattern from each Group.
- Page 211 Quick Reference MASCHINE Software Overview The Arranger View The Arranger view for organizing your musical ideas into a song on the Timeline. (1) Groups: The Group slots can hold one Group each. Select the desired slot to load a Group into it and display the Group’s content (Sounds, Patterns…) in the Pattern Editor (see ↑12.4.5, Pattern Editor) and the Group’s Channel properties and Plug-in parameters in the...
-
Page 212: Control Area
Quick Reference MASCHINE Software Overview 12.4.4 Control Area The Control area. (1) Plug-in icon: Click the Plug-in icon to access Plug-ins and their parameters. (2) Channel icon: Click the Channel icon to access Channel properties where you can display and adjust various properties for the selected Sound/Group or Master channel in the Parameter area. -
Page 213: Pattern Editor
Quick Reference MASCHINE Software Overview 12.4.5 Pattern Editor The Pattern Editor. (1) Sample Editor button: Click this button to open/close the Sample Editor. (2) Keyboard view button: Click this button to display the Keyboard view. (3) Group view button: Click this button to display the Group view. (4) Audition button: Click this button to audition a Sound when it is selected from the Sound slots (6). - Page 214 Quick Reference MASCHINE Software Overview (6) Sound slots: Sounds slots 1–16 of the selected Group are listed here. Click a Sound slot to bring it into focus and display its Plug-ins and Channel properties in the Control area (see ↑12.4.4, Control Area).
-
Page 215: Troubleshooting
Knowledge Base Troubleshooting If you are experiencing problems related to your Native Instruments product that the supplied documentation does not cover, there are several ways of getting help. Before getting help please make sure you have downloaded the latest MASCHINE soft- ware from Native Access. -
Page 216: Registration Support
13.4 User Forum In the Native Instruments User Forum, you can discuss product features directly with other users and with experts moderating the forum. Please be aware that the Technical Support team does not participate in the forum. If you’re encountering an issue that can’t be solved by other users, contact Native Instruments’... -
Page 217: Glossary
Glossary Glossary In this glossary you will find short definitions for numerous terms used in the MASCHINE con- text. If you have any doubts about the meaning of a word, this is the place to check! Arranger The Arranger is the big area located in the upper part of the MASCHINE window, right under the Header. - Page 218 Glossary their audio. You then only have to set up the desired Sound(s) and Group(s) of your Project to send some of their audio to this bussing point. This basically is the way to set up send effects in MASCHINE! Channel Properties Channel properties are sets of parameters available at each Project level (i.e.
- Page 219 Glossary Event Events are the individual drum hits or notes that make up a Pattern. In the Pattern Editor, events are visually represented by rectangles in the Step Grid. Depending on the current view in the Pattern Editor, you can see events for all Sounds slots (Group view) or for the select Sound slots only (Keyboard view).
- Page 220 Glossary Header The Header is the topmost row of controls in the MASCHINE software window. It contains global settings, such as the Master Volume slider, the Transport controls, controls for global swing, tempo, time signature, etc. Keyboard View Keyboard view is the view of the Pattern Editor in which only events of the selected Sound are visible and editable.
- Page 221 Glossary Mute and Solo Muting allows you to bypass a Sound or a Group, whereas Soloing is pretty much the opposite: It mutes all other Sounds or Groups so that only the soloed Sound or Group is played. The combination of muting and soloing is a useful means both to play live and to test different se- quences together.
- Page 222 Glossary Plug-in A Plug-in is an instrument or effect unit, either Internal or External (by Native Instruments or a third-party manufacturer), that can be loaded into a Plug-in slot to produce or alter sound. When a Plug-in is loaded into a Plug-in slot, the Plug-in appears in the Plug-in List in the left part of the Control area.
- Page 223 Glossary Scene A Scene is a combination of Patterns for each Group. They can be used to combine Patterns in order to create musical ideas. Scenes are created in the Ideas view and then added to Sections in the Arranger view to create an arrangement. Section A Section is a reference to a specific Scene on the Timeline of the Arranger view and are used to arrange the Scenes into a larger musical structure.
- Page 224 Glossary Step Steps are elementary time blocks. They are notably used to apply quantization or to compose Patterns from your controller in Step mode. All steps together make up the Step Grid. In the software’s Pattern Editor, steps are visualized by vertical lines. You can adjust the step size, e.g., to apply different quantization to different events or to divide the Step Grid into finer blocks to edit your Pattern more precisely.
-
Page 225: Index
Index Index Numerics 4-D encoder [192] Active Speakers [23] Arranger adjusting the volume, swing, tempo and tune [66] [217] definition [36] [56] in the Browser [209] switching views [62] navigating and loading Plug-ins ARRANGER button [191] Arranger view [217] definition Groups [211] [211]... - Page 226 Index Audition [55] AUTO button [191] Channel Autoload Macro properties [154] definition [217] CHANNEL button [190] [53] replacing Sounds with Channel icon [153] [212] Channel Properties [153] creating send effects [163] definition [218] Channel Property selector [154] [212] CHORDS button [201] Basic audio configuration [18]...
- Page 227 Index Control Lane [218] definition Display area [206] editing modulation [119] Drumsynth [58] Control mode [58] load [218] definition DUPLICATE button [199] pads [40] Duplication Control section [189] Pattern Length [74] Controller [189] Control section [192] Edit section [195] Group buttons Group section [195] [187]...
- Page 228 Index Edit section [192] Factory library Editing presets [33] [82] FILE button [47] [52] [191] Patterns [174] File mode [48] Samples Effects [106] [52] load a recent Project [112] File Type selector [208] adjusting parameters [114] FILES tab [207] bypassing definition [218] FIXED VEL button...
- Page 229 Index Grid [126] Header [204] Groove properties Audio Engine button [206] [219] [205] definition Browser button Group [206] CPU meter [220] [88] definition changing the color [219] [206] definition Display area [33] MASCHINE menu [205] load a [206] Macro properties [154] Master Volume slider [43]...
- Page 230 Index KEYBOARD button [200] LIBRARY tab [207] Keyboard mode LINE IN 1 and 2 sockets [203] [96] Line level device [28] playing the pads [99] LINE OUT L and R sockets [202] recording Root Note [98] LINE OUT L/R sockets [24] [98] shifting octave...
- Page 231 Index Using as audio device in the MASCHINE [19] software MACRO button [192] Using as audio device in your operating Macro Control [22] system [220] definition Using as audio device with other music [21] software Macro Controls [154] [192] MASCHINE menu [205] [156] Assigning using the controller...
- Page 232 Index MIDI IN and OUT sockets [203] MIXER button [176] [191] Open Mixer mode [176] a Drumsynth [58] MOD button [194] [33] a Group Mode buttons [198] [89] a Plug-in Mode locking [177] [49] a Project Mode pinning [177] [53] a Sample Modulation a Sound...
- Page 233 Index [82] editing [41] recording Pad Input Mode buttons [200] PATTERN button [199] Pad input modes [200] Pattern Editor [205] [98] Keyboard mode [221] definition [123] Step mode editing events [82] PAD MODE button [200] Pattern Length Pad modes [79] adjusting [221] definition...
- Page 234 Index [89] load a [101] parameters Quantization [77] PLUG-IN button [190] definition [222] Plug-in icon [212] Query [54] Plug-in menu [63] Quick Edit buttons [193] Plug-in slots Quick Reference [177] load into [58] Power Supply socket [203] Power switch [203] Preferences Audio page [19]...
- Page 235 Index REAKTOR PRISM [90] Sample Rear panel [202] definition [222] REC button [196] [53] load a Record tab [172] Sample Editor [174] Recording definition [222] Sample Editor button [171] [41] a Pattern [99] Sampling [170] in Keyboard mode [117] [173] modulation Waveform SAMPLING button...
- Page 236 Index [223] [43] definition muting and soloing SELECT button [199] [162] routing [43] Send effect soloing [163] Sound slot creating [223] [44] definition number SOUND tab [212] Sequencer [223] Soundcard [18] definition Setting up MASCHINE [17] Source for sampling [172] SETTINGS button [81] [191] Speakers...
- Page 237 Index Tag Filter [208] VARIATION button [199] TAP button [196] Velocity Tempo [40] pads [67] Virtual inputs [21] quickly adjusting from the controller TEMPO button [67] [193] Virtual outputs [21] Text search [208] Volume [206] Touch Strip [194] quickly adjusting from the controller (Mas- ter/Group/Sound) [66] Transport controls...
Need help?
Do you have a question about the MASCHINE MK3 and is the answer not in the manual?
Questions and answers